

Page 1

P-974H/HW Series
Cable Router
Firmware v3.70
Edition 2, 09/2009
DEFAULT LOGIN DETAILS
IP Address: http://192.168.1.1:8080
Username: webadmin
Password: 1234
www.zyxel.com
Copyright 2009
ZyXEL Communications Corporation
Page 2

LEDs (P-974H and P-974HW)
POWER SYSTEM LAN
1~4
POWER SYSTEM LAN
1~4
USB CABLE
USB CABLE
DATA
DATA
WLAN
2
Page 3

ENGLISH
Introduction
The P-974H/HW allows you to connect to the Internet through your cable
TV service provider. The P-974H/HW is a DOCSIS2.0 and Cable Home
1.1 compliant Internet cable router with an integrated 4-port switch. The
P-974HW also comes with IEEE 802.11g wireless capability.
How It Works
Overview
• Make Your Hardware Connections, page 4
• Install the USB Driver, page 6
• Confirm Your Connection, page 9
• Troubleshooting, page 10
3
Page 4
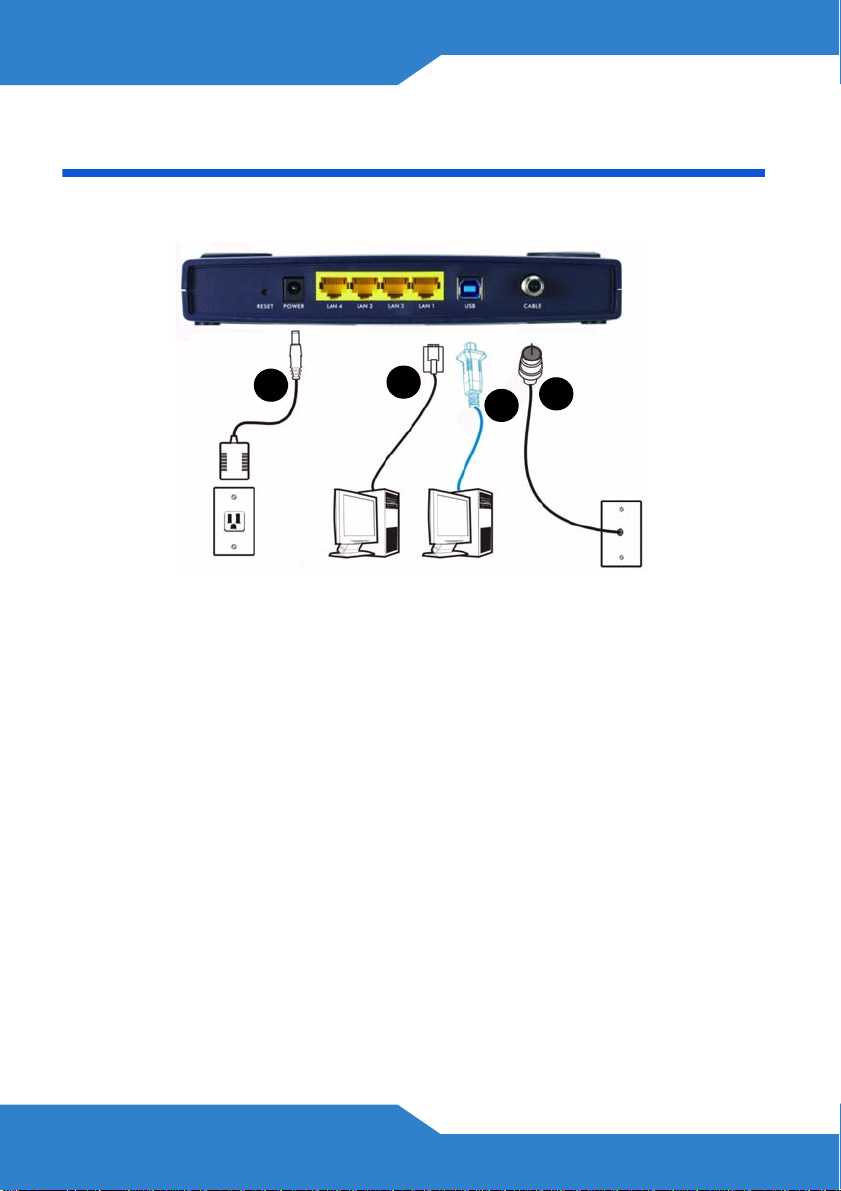
Hardware Connections
This section shows you how to set up your P-974H.
4
1. LAN: Use an Ethernet cable to connect a computer to a LAN port for
initial configuration and/or Internet access.
2. USB: Connect the provided USB cable to the cable modem USB port.
If you want to connect a Windows computer to the cable modem via
USB, you also have to install the USB driver (see page 6).
1
3
2
Do NOT connect the same computer to both the USB and
LAN ports on the ZyXEL Device.
3. CABLE: Tighten one end of the coaxial cable to this port and the
other end to a cable outlet.
Overly tightened coaxial cable may affect transmission
quality and/or break the connector pin.
4. POWER: Use only the included power adaptor to connect the ZyXEL
Device to an appropriate power source.
4
Page 5

This section shows you how to set up your P-974HW.
5
ENGLISH
4
1
3
2
1. LAN: Use an Ethernet cable to connect a computer to a LAN port for
initial configuration and/or Internet access.
2. USB: Connect the provided USB cable to the cable modem USB port.
If you want to connect a Windows computer to the cable modem via
USB, you also have to install the USB driver (see page 6).
Do NOT connect the same computer to both the USB and
LAN ports on the ZyXEL Device.
5
Page 6

3. CABLE: Tighten one end of the coaxial cable to this port and the
other end to a cable outlet.
Overly tightened coaxial cable may affect transmission
quality and/or break the connector pin.
4. POWER: Use only the included power adaptor to connect the ZyXEL
Device to an appropriate power source.
5. ANTENNA: Attach the included antenna.
USB Driver Installation
Only install the USB driver if you wish to access the Internet by
connecting your computer to the ZyXEL Device via the USB connection.
The USB driver supports Windows 2000 and Windows XP.
Follow the steps below to install the USB driver.
1. Save your work and close all applications.
2. Connect the ZyXEL Device to the USB port on your computer. A
Found New Hardware Wizard screen displays.
6
Page 7

ENGLISH
If the wizard screen does not display, do one of the following:
• Disconnect the USB cable and connect it again.
• Use the Windows Device Wizard to manually add the device.
• Restart your computer.
3. Insert the support disc into your computer’s disc drive, then select the
Install the software automatically (Recommended) option. Click
Next to continue.
4. Windows starts installing the USB driver.
Windows 2000/XP: If a warning screen displays, click Yes or
Continue Anyway.
5. Click Finish to complete the wizard.
Verifying the Connection to the ZyXEL Device
After you have finished the hardware connection and/or USB driver
installation, check that you can connect to the ZyXEL Device via the
USB connection.
1. Connect your computer to the USB port on the ZyXEL Device.
2. Click Start > Programs > Accessories > Command Prompt.
7
Page 8

3. Type "ping” followed by a space and the IP address of the ZyXEL
Device (192.168.1.1 is the default).
4. Press [ENTER]. The ZyXEL Device should send reply packets. This
indicates that you have a successful connection.
Connecting to the Web Configurator
The ZyXEL Device’s built-in Web Configurator allows you to change the
default settings. To connect to it:
1. Launch your web browser and then connect to “192.168.1.1:8080”.
2. Enter the user name (“user” is the default) password (“1234” is the
default) or enter the administrator user name (“webadmin” is the
default) and password (“1234” is the default) and click OK.
8
Page 9

ENGLISH
3. You should now see the Web Configurator’s Status screen.
Internet Access
Open your web browser and access any web site to test your Internet
connection.
9
Page 10

Troubleshooting
Use the following sections to correct problems with your ZyXEL Device.
None of the LEDs turn on when you turn the power on.
• Make sure that you use the included power adaptor to connect to
the ZyXEL Device and that it is plugged into an appropriate power
source.
• Check all cable connections. If the LEDs still do not turn on, you
may have a hardware problem. In this case, you should contact
your local vendor.
• Check the cable connection from your computer to the ZyXEL
Device.
Cannot access the Internet.
• Check the condition of the coaxial cable connected to the back of
the cable modem. If the cable is in poor condition, replace it.
• Check with your cable service provider to ensure that your Internet
account has been activated.
• Make sure your computer is configured for TCP/IP networking and
is able to receive a dynamic IP address (see Set Up Your
Computer’s IP Address).
• Make sure your computer can communicate with the ZyXEL Device
(either through the LAN or the USB port).
10
Page 11

ENGLISH
The USB LED is off.
• Check the USB cable connection. Unplug and plug in the USB
cable.
• Check that your computer operating system is supported by the
USB driver and that it has been properly installed. Try installing the
USB software again.
Set Up Your Computer’s IP Address
This section shows you how to set your Windows NT/2000/XP computer
to automatically get an IP address. This ensures that your computer can
communicate with your ZyXEL Device. Refer to your User’s Guide for
detailed IP address configuration for other Windows and Macintosh
computer operating systems.
1. Open the Windows Control Panel.
2. In Windows XP, click Network Connections. In Windows 2000/NT,
click Network and Dial-up Connections.
3. Right-click Local Area Connection and then click Properties.
11
Page 12

4. Select Internet Protocol (TCP/IP) (under the General tab in Win XP)
and click Properties.
5. The Internet Protocol TCP/IP Properties screen opens (the
General tab in Windows XP).
6. Select the Obtain an IP address automatically and Obtain DNS
server address automatically options.
7. Click OK to close the Internet Protocol (TCP/IP) Properties window.
8. Click Close (OK in Windows 2000/NT) to close the Local Area
Connection Properties window.
9. Close the Network Connections screen.
Product Certifications
1. Go to www.zyxel.com.
2. Select your product from the drop-down list box on the ZyXEL home
page to go to that product's page.
3. Select the certification you wish to view from this page.
12
Page 13

ENGLISH
Sample Configurations
The following are some sample configurations for your ZyXEL Device.
The values used in these samples are for example purposes only;
please use the values provided by your ISP where appropriate.
Connecting to the ZyXEL Device with Telnet
Before you can use these sample configurations, you must first connect
to the ZyXEL Device with Telnet.
1. Open your Command Line prompt or terminal application.
2. Telnet to 198.162.1.1.
3. Login as admin (default password “1234”).
After connecting to the ZyXEL Device, you can enter any of the
commands in the following samples. Be sure to customize them first.
13
Page 14

Set Static IP Only
To set only a static IP address, enter the following commands:
> defaults
> ip_sharing false
> dhcp_enable false
> dhcp_server 10.13.17.1 255.255.255.0
> static_ip 10.13.17.1 255.255.255.0
> dns_server 172.21.3.88 172.23.5.1 172.23.5.2
> rip_enable true
> rip2_md5 true
> rip2_keyid 1
> rip2_keystr david
> save
> reset
Change the settings according to the information provided by your ISP or
network administrator.
14
Page 15

ENGLISH
Set Static IP with Public DHCP
To set a static IP address with a public DHCP server, enter the following
commands:
> defaults
> ip_sharing false
> dhcp_enable true
> dhcp_server 10.13.17.1 255.255.255.0
> dhcp_pool 10.13.17.2 20
> static_ip 10.13.17.1 255.255.255.0
> dns_server 172.21.3.88 172.23.5.1 172.23.5.2
> rip_enable true
> rip2_md5 true
> rip2_keyid 1
> rip2_keystr david
> save
> reset
Change the settings according to the information provided by your ISP or
network administrator.
15
Page 16

Set Static IP with NAT
To set a static IP address with NAT, enter the following commands:
> defaults
> ip_sharing false
> dhcp_enable false
> dhcp_server 192.168.1.1 255.255.255.0
> static_ip 10.13.17.1 255.255.255.0
> dns_server 172.21.3.88 172.23.5.1 172.23.5.2
> rip_enable true
> rip2_md5 true
> rip2_keyid 1
> rip2_keystr david
> save
> reset
Change the settings according to the information provided by your ISP or
network administrator.
16
Page 17

ENGLISH
Set Static IP with NAT and Private DHCP
To set a static IP address with NAT and a private DHCP server, enter the
following commands:
> defaults
> ip_sharing false
> dhcp_enable true
> dhcp_server 192.168.1.1 255.255.255.0
> dhcp_pool 192.168.1.2 20
> static_ip 10.13.17.1 255.255.255.0
> dns_server 172.21.3.88 172.23.5.1 172.23.5.2
> rip_enable true
> rip2_md5 true
> rip2_keyid 1
> rip2_keystr david
> save
> reset
Change the settings according to the information provided by your ISP or
network administrator.
17
Page 18

Set Bridge Mode
T o set the ZyXEL Device to bridge mode, enter the following commands:
> defaults
> router_enable false
> save
> reset
Set Default IP Sharing / RG Mode
To set the ZyXEL Device to its default IP Sharing / RG mode, enter the
following commands:
> defaults
> save
> reset
Change the settings according to the information provided by your ISP or
network administrator.
18
 Loading...