

Page 1

ZyXEL G-162
802.11g Wireless CardBus Card
Quick Start Guide
Version 2.0
01/2005
Page 2

ZyXEL G-162 Quick Start Guide
Important Note
Federal Communications Commission (FCC) Interference Statement
The 802.11g Wireless LAN Adapter has been tested to the FCC exposure
requirements (Specific Absorption Rate).
The equipment complies with FCC RF radiation exposure limits set forth for an
uncontrolled environment, under 47 CFR 2.1093 paragraph (d) (2).
This Transmitter must not be co-located or operating in conjunction with any other
antenna or transmitter.
Refer to the User’s Guide for general FCC statements.
Procedure to View a Product’s Certification(s)
1. Go to www.zyxel.com
2. Select your product from the drop-down list box on the ZyXEL home page to
go to that product's page.
3. Select the certification you wish to view from this page.
.
About Your ZyXEL G-162
The ZyXEL G-162 is an IEEE 802.11g compliant wireless LAN PC card that fits
into any CardBus slot. With the ZyXEL G-162, you can enjoy the wireless mobility
within the coverage area. The IEEE 802.11g technology provides greater range and
offers transmission rate at up to 54 Mbps. Your ZyXEL G-162 can transmit at the
proprietary transmission rates of 22Mbps or up to 125 Mbps when connected to the
ZyXEL g+ AP or wireless router. Actual speeds attained also depend on the distance
from the AP, noise, etc.
1
Page 3
ZyXEL G-162 Quick Start Guide
1 Installation Requirements
Before installation, make sure you have a computer with the following:
• Pentium II 300MHz or above
• A minimum of 6 MB available hard disk space
• A minimum of 32 MB RAM
• A CD-ROM drive
• A CardBus slot
• Windows 98 Second Edition, Windows Me, Windows 2000 or Windows
XP
• Windows 98 SE users may need the Windows 98 SE CD
If you install the Funk Odyssey Client software on the
computer, uninstall (remove) it.
2 Driver Installation for Windows XP
If you want to use the Windows XP Wireless Zero Configuration (WZC) service to
manage the ZyXEL G-162, follow the steps below to install the driver only.
1. Locate an available CardBus slot on the computer.
2. With the pin connectors facing the slot and the LED side facing up, slide
the ZyXEL G-162 into the slot. The LEDs turn on if the ZyXEL G-162 is
properly inserted.
Never bend, force or twist the ZyXEL G-162 into the slot.
2
Page 4
ZyXEL G-162 Quick Start Guide
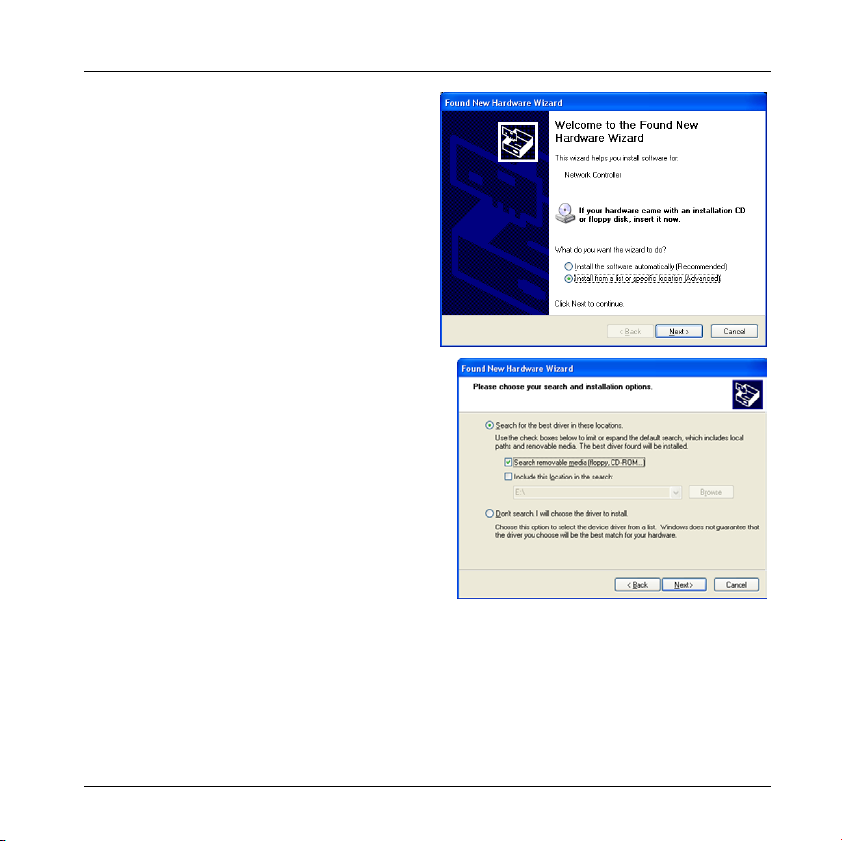
3. The Found New Hardware
Wizard window appears. Select
Install from a list of specific
location (Advanced) and click
Next.
4. Insert the included CD into
your CD-ROM drive, select
Search removable media
(floppy, CD-ROM…) and then
click Next.
3
Page 5

ZyXEL G-162 Quick Start Guide
5. After the driver has been
installed successfully, click
Finish to complete the
installation.
3 ZyXEL Utility and Hardware Installation
The installation procedures are similar for all supported Windows versions.
Windows 2000 screen shots are shown unless otherwise specified.
DO NOT insert the ZyXEL G-162 at this point.
1. Insert the support CD into the CD-ROM drive on your computer. The CD
automatically runs. Otherwise, locate and double-click setup.exe.
2. Select your language and click
OK.
4
Page 6

ZyXEL G-162 Quick Start Guide
3. Click Install Utility to start
installation.
4. A welcome screen displays. Click Next.
5. Click Next to accept the default
file location or click Browse to
select an alternate folder.
6. Click Finish to restart the computer.
5
Page 7

ZyXEL G-162 Quick Start Guide
KPWR
7. Locate an available CardBus slot on the
computer.
8. With the pin connectors facing the slot and
the LED side facing up, slide the ZyXEL
G-162 into the slot. The LEDs turn on if
the ZyXEL G-162 is properly inserted.
Never bend, force or twist the ZyXEL G-162 into the slot.
After you install the ZyXEL Utility and insert the ZyXEL G-162, an icon
appears in the system tray.
If the ZyXEL Utility icon displays, the ZyXEL G-162 is
installed properly. Refer to the User’s Guide to configure the
ZyXEL G-162.
4 LED Display
LIN
6
Page 8

ZyXEL G-162 Quick Start Guide
The following table describes the LEDs on the ZyXEL G-162.
LED COLOR STATUS DESCRIPTION
On The ZyXEL G-162 is receiving power. PWR Green
Off The ZyXEL G-162 is not receiving power.
Blinking The ZyXEL G-162 is receiving or sending data. LINK Green
Off The ZyXEL G-162 is not receiving or sending data.
5 One-Touch Intelligent Security Technology
(OTIST)
OTIST allows a ZyXEL g+ access point (AP) or wireless router to assign its SSID
and security settings (WEP or WPA-PSK) to the ZyXEL wireless adapters that
support OTIST and are within transmission range. The ZyXEL wireless adapters
must also support OTIST and have OTIST enabled.
This will replace the pre-configured wireless settings on
the wireless adapters.
This feature is not applicable when you use WZC.
7
Page 9

ZyXEL G-162 Quick Start Guide
5.1 How to configure your devices for OTIST
1. In the OTIST web configurator
screen of your ZyXEL g+ AP or
wireless router, enter an OTIST
setup key of exactly eight ASCII
characters. The default key is
01234567.
2. Click Start to encrypt the
wireless security data using the
setup key.
3. A dialog box displays the ZyXEL
g+ AP or wireless router security
settings. Click OK to proceed
with the OTIST setup.
4. Open the Adapter screen of the
ZyXEL G-162 utility, enter the
same setup key as the ZyXEL g+
AP or wireless router to which
you want to associate.
5. Select the OTIST(One-Touch
Intelligent Security
Technology) checkbox and click
Start.
8
Page 10

ZyXEL G-162 Quick Start Guide
6. An OTIST in progress screen
appears. The process takes three
minutes. During this time the
ZyXEL G-162 search for an
OTIST-enabled AP or wireless
router to associate.
7. If the ZyXEL G-162 cannot find
a ZyXEL OTIST-enabled AP or
wireless router after three
minutes, a warning screen
displays. Make sure that OTIST
has been enabled on the AP or
wireless router. Click OK to go
back to the ZyXEL utility main
screen.
8. When the following screen in the
ZyXEL g+ AP or wireless router
web configurator closes, your
current AP or wireless router
wireless settings are
automatically saved to the
wireless adapters.
9
Page 11

ZyXEL G-162 Quick Start Guide
9. If you activate OTIST on the
ZyXEL G-162, each time you
start the ZyXEL utility, the
following screen appears. Click
Yes to have an OTIST-enabled
AP or wireless router within
transmission range to assign the
wireless settings. You must also
activate and start OTIST on the
ZyXEL g+ AP or wireless router
at the same time. Otherwise, click
No.
10
Page 12

ZyXEL G-162 Quick Start Guide
or C ertifications. F or more information a bout your de vices De clara tion of C onformity (D OC ) ple as e refe r to www.z yxel. com
6 Troubleshooting
PROBLEM CORRECTIVE ACTION
Windows does not
auto-detect the
ZyXEL G-162.
Make sure the ZyXEL G-162 is inserted into the computer
CardBus slot properly and then restart your computer. Check
the LEDs on the ZyXEL G-162.
Perform a hardware scan by clicking Start, Settings, Control
Panel and double-clicking Add/Remove Hardware. (Steps
may vary depending on the version of Windows).
Follow the on-screen instructions to search for the ZyXEL G162 and install the driver.
Check for possible hardware conflicts. In Windows, click Start,
Settings, Control Panel, System, Hardware and then click
Device Manager. Verify the status of the ZyXEL G-162 under
Network Adapter. (Steps may vary depending on the version
of Windows).
Install the ZyXEL G-162 in another computer. If the error
persists, you may have a hardware problem. In this case, you
should contact your local vendor.
11
 Loading...