

ZyXEL AMG1001-T, AMG1011-T User Manual

AMG1001-T Series
ADSL2+ 1-port Gateway
AMG1011-T Series
ADSL2+ 1-port Ethernet/USB Gateway
Version 1.00
Edition 1, 07/2013
Quick Start Guide
User’s Guide
Default Login Details
IP Address http://192.168.1.1
User Name admin
Password 1234
www.zyxel.com
Copyright © 2013 ZyXEL Communications Corporation

IMPORTANT!
READ CAREFULLY BEFORE USE.
KEEP THIS GUIDE FOR FUTURE REFERENCE.
Note: This guide is a reference for a series of products. Therefore some features or
options in this guide may not be available in your product.
Screenshots and graphics in this book may differ slightly from your product due to differences in
your product firmware or your computer operating system. Every effort has been made to ensure
that the information in this manual is accurate.
Related Documentation
•Quick6WDUW*XLGH
The Quick Start Guide is designed to help you get up and running right away. It contains
information on setting up your network and configuring for Internet access.
AMG1001-T/AMG1011-T Series User’s Guide2

Contents Overview
Contents Overview
User’s Guide .......................................................................................................................................10
Introducing the AMG1001-T/AMG1011-T ...............................................................................................12
Introducing the Web Configurator ...........................................................................................................21
Technical Reference ..........................................................................................................................25
Device Information ..................................................................................................................................27
System Logs ...................... ... .... ...................................... .... ... ....................................... ..........................29
Traffic Statistics ................................................................... ... ... ... ...........................................................31
Quick Start Wizard.................................................................................................................................. 33
Internet Setup ..........................................................................................................................................39
LAN Setup ...............................................................................................................................................53
Static Route .............................................................................................................................................61
Network Address Translation (NAT) ............................................. ....................................... ....................64
Quality of Service (QoS) ........................ ... ... ... ... .... ... ....................................... ... ... .................................74
ADSL ..................................... ................................. ............................. ....................................................81
Firewall ...................................... ................................ ............................. .................................................82
Access Control ........................................................................................................................................84
Filters ......................................................................................................................................................87
SNMP .................................... ................................. ............................. ....................................................92
Universal Plug-and-Play (UPnP) .............................................................................................................94
Dynamic DNS Setup .............................................................................................................................105
CWMP ....................................... ................................... ................................ .........................................107
Administrator Settings ...........................................................................................................................110
Time Zone ............................................................................................................................................. 111
Firmware ...............................................................................................................................................113
System Restart .......................... ... ... ... .... ... ....................................... ... ..................................................120
Diagnostic .............................................................................................................................................121
Troubleshooting ....................................................................................................................................122
AMG1001-T/AMG1011-T Series User’s Guide
3

Table of Contents
Table of Contents
Contents Overview ..............................................................................................................................3
Table of Contents ................................................................................................................................. 4
Part I: User’s Guide .........................................................................................10
Chapter 1
Introducing the AMG1001-T/AMG1011-T ..........................................................................................12
1.1 Overview ............ .... ... ....................................... ... ... ....................................... ... ... ..............................12
1.2 Ways to Manage the AMG1001-T/AMG1011-T ......................................... ...... ... .... ... ... ... ... .... ... ... ... .12
1.3 Good Habits for Managing the AMG1001-T/AMG1011-T .................................................................12
1.4 Applications for the AMG1001-T/AMG1011-T ...................................................................................13
1.4.1 Internet Access ................ ... ....................................... ... .... ...................................... .................13
1.5 LEDs (Lights) ...................... ... ... ... ....................................... ... .... .......................................................13
1.6 The RESET Button ........................... ... ... ... ... .... ... ....................................... ... ... .................................15
1.6.1 Using the Reset Button ........... ... ....................................... ... ... .................................................15
1.7 USB Port (AMG1011-T Only) ............................................................................................................15
1.7.1 Installing the USB Driver in Windows ......................................................................................15
1.7.2 Verifying Your USB Installation ............................... ....................................... ... ... ....................19
Chapter 2
Introducing the Web Configurator ....................................................................................................21
2.1 Overview ............ .... ... ....................................... ... ... ....................................... ... ... ..............................21
2.1.1 Accessing the Web Configurator .............................................................................................21
2.2 Web Configurator Main Screen .........................................................................................................22
2.2.1 Navigation Panel .......... ... ... .... ... ... ... ........................................................................................22
2.2.2 Main Window .......................... ... ... ... ....................................... ... ... ...........................................24
Part II: Technical Reference............................................................................25
Chapter 3
Device Information .............................................................................................................................27
3.1 Overview ............ .... ... ....................................... ... ... ....................................... ... ... ..............................27
3.2 The Device Info Screen .....................................................................................................................27
Chapter 4
System Logs ....................................................................................................................................... 29
4
AMG1001-T/AMG1011-T Series User’s Guide

Table of Contents
4.1 Overview ............ .... ... ....................................... ... ... ....................................... ... ... ..............................29
4.2 The System Log Screen ...................................... ....................................... ... ... .................................29
Chapter 5
Traffic Statistics..................................................................................................................................31
5.1 Overview ............ .... ... ....................................... ... ... ....................................... ... ... ..............................31
5.2 The Statistics Screen ........................................................................................................................31
Chapter 6
Quick Start Wizard..............................................................................................................................33
6.1 Overview ............ .... ... ....................................... ... ... ....................................... ... ... ..............................33
6.2 Quick Start Wizard .............. ... ... ........................................................................................................33
Chapter 7
Internet Setup......................................................................................................................................39
7.1 Overview ............ .... ... ....................................... ... ... ....................................... ... ... ..............................39
7.1.1 What You Can Do in the Internet Screens ...............................................................................39
7.1.2 What You Need to Know About ADSL Internet Access .......... ... ... .... ... ... ... .... ... ... ... ... .... ... ...... .3 9
7.1.3 Before You Begin ... .... ... ... ... .... ... ... ....................................... ... ... ..............................................41
7.2 The Internet Screen ..........................................................................................................................41
7.2.1 Dynamic IP Address ..................... ... ....................................... ... ..............................................42
7.2.2 Static IP Address .....................................................................................................................44
7.2.3 PPPoA/PPPoE ........................................................................................................................46
7.2.4 Bridge Mode .................................... ... .... ... ... ... ....................................... ... ..............................48
7.2.5 The PVCs Summary Screen ...................................................................................................48
7.3 WAN Technical Reference ................................................................................................................49
7.3.1 Encapsulation .................. ... .... ... ....................................... ... ... .................................................49
7.3.2 Multiplexing ...... ... ... .... ... ... ....................................... ... ....................................... ... ....................50
7.3.3 VPI and VCI ..................... ... .... ...................................... .... ... ....................................................50
7.3.4 IP Address Assignment ................................... .... ... ... ... .... ... ...................................... .... ..........50
7.3.5 Always-On Connection (PPP) ............................. ....................................................................51
7.3.6 ATM QoS ............... ....................................... ... .... ...................................... .... ... .......................51
7.3.7 ATM Traffic Classes .................................................................................................................52
Chapter 8
LAN Setup ...........................................................................................................................................53
8.1 Overview ............ .... ... ....................................... ... ... ....................................... ... ... ..............................53
8.1.1 What Y ou Can Do in the LAN Screens ....................................................................................53
8.1.2 What You Need To Know About LAN ........... ... .... ...................................... .... ... .......................53
8.2 The LAN Screen ................................................................................................................................54
8.2.1 The DHCP IP Pool Summary Screen ......................................................................................56
8.3 LAN Technical Reference .......................................... .... ... ... ... .... ... ....................................................57
8.3.1 LANs, WANs and the ZyXEL Device ......................................................................... ..............57
AMG1001-T/AMG1011-T Series User’s Guide
5

Table of Contents
8.3.2 DHCP Setup ....................... .... ...................................... .... ... ....................................................57
8.3.3 DNS Server Addresses ....................................... ... ....................................... ... ... ....................57
8.3.4 LAN TCP/IP ......................................................... ... ... ....................................... ... ... .................58
8.3.5 RIP Setup ............................... ... ... ... ... .... ... ....................................... ... ... .................................59
8.3.6 Multicast .................................... ... ....................................... ... ... ..............................................59
Chapter 9
Static Route.........................................................................................................................................61
9.1 Overview ............... ... ... ....................................... ... ... ....................................... ... .... ..........................61
9.1.1 What Y ou Can Do in the Static Route Screens ........................................................................61
9.2 The Routing Table List Screen ..........................................................................................................62
9.2.1 The Static Route Screen ......................................... ... ... .... ... ... ... ..............................................62
Chapter 10
Network Address Translation (NAT)..................................................................................................64
10.1 Overview .........................................................................................................................................64
10.1.1 What You Can Do in the NAT Screens .............. ... ... ... .... ...................................... ... .... ..........64
10.1.2 What You Need To Know About NAT ....................................................................................64
10.2 The NAT Screen ......................... .... ... ... ... ... .... ...................................... .... ... ....................................65
10.3 The DMZ Screen ........ ....................................... ... ... ....................................... ... .... ..........................66
10.4 The Virtual Server Screen ...............................................................................................................67
10.4.1 Configuring Servers Behind Port Forwarding (Example) .......................................................67
10.4.2 Configuring the Virtual Server Screen ...................................................................................68
10.5 The IP Address Mapping Screen ....................................................................................................69
10.6 NAT Technical Reference ................................................................................................................71
10.6.1 NAT Definitions ......................................................................................................................71
10.6.2 What NAT Does .....................................................................................................................72
10.6.3 How NAT Works ....................................................................................................................72
Chapter 11
Quality of Service (QoS).....................................................................................................................74
11.1 Overview .........................................................................................................................................74
11.1.1 What You Can Do in the QoS Screens ..................................................................................74
11.1.2 What You Need to Know About QoS .................................... ... ... ....................................... ... .7 5
11.2 The QoS Screen .............................................................................................................................76
11.2.1 The QoS Settings Summary Screen ......................................................................................78
11.3 QoS Technical Reference ................................................................................................................79
11.3.1 IEEE 802.1p ...........................................................................................................................79
11.3.2 IP Precedence .......................................................................................................................79
11.3.3 Automatic Priority Queue Assignment ...................................................................................80
Chapter 12
ADSL....................................................................................................................................................81
6
AMG1001-T/AMG1011-T Series User’s Guide

Table of Contents
12.1 Overview .........................................................................................................................................81
12.2 The ADSL Screen ...........................................................................................................................81
Chapter 13
Firewall ................................................................................................................................................82
13.1 Overview .........................................................................................................................................82
13.1.1 What You Can Do in the Firewall Screens .............................................................................82
13.1.2 What You Need to Know About Firewall ................................................................................82
13.2 The Firewall Screen ................ ... .... ... ... ... ....................................... ... ... ...........................................83
Chapter 14
Access Control ...................................................................................................................................84
14.1 Access Control Overview ................................................................................................................84
14.1.1 The Access Control Setup Screen ........................................................................................84
14.1.2 Access Control Interfaces ......................................................................................................84
14.1.3 System Timeout ....................................................................................................................84
14.1.4 Configuring the Access Control Setup Screen ......................................................................85
Chapter 15
Filters...................................................................................................................................................87
15.1 Overview ........................................................................................................................................87
15.1.1 What You Can Do in the Filter Screens .................................................................................87
15.1.2 What You Need to Know About Filtering ...............................................................................87
15.2 The IP/MAC Filter Screen ...............................................................................................................88
15.3 The Application Filter Screen .................................. ........................................................................90
15.4 The URL Filter Screen ...................................................................................................................91
Chapter 16
SNMP ...................................................................................................................................................92
16.1 Overview .........................................................................................................................................92
16.1.1 Supported MIBs .....................................................................................................................93
16.2 The SNMP Screen ..........................................................................................................................93
Chapter 17
Universal Plug-and-Play (UPnP)........................................................................................................94
17.1 Overview .........................................................................................................................................94
17.1.1 What You Can Do in the UPnP Screen .................................................................................94
17.1.2 What You Need to Know About UPnP ...................................................................................94
17.2 The UPnP Screen ...........................................................................................................................95
17.3 Installing UPnP in Windows Example .............................................................................................96
17.4 Using UPnP in Windows XP Example ........................... ... ... .... ... ... ... ....... ... ... ... .... ... ... ... ... .... ... ... ....99
Chapter 18
Dynamic DNS Setup .........................................................................................................................105
AMG1001-T/AMG1011-T Series User’s Guide
7

Table of Contents
18.1 Overview .......................................................................................................................................105
18.1.1 What You Can Do in the DDNS Screen ...............................................................................105
18.1.2 What You Need To Know About DDNS ...............................................................................105
18.2 The Dynamic DNS Screen ............. ... ... ... ....................................... ... ... .........................................106
Chapter 19
CWMP ................................................................................................................................................107
19.1 Overview .......................................................................................................................................107
19.2 The CWMP Setup Screen .............................................................................................................108
Chapter 20
Administrator Settings.....................................................................................................................110
20.1 Overview .......................................................................................................................................110
20.2 The Administrator Screen .............................................................................................................110
Chapter 21
Time Zone..........................................................................................................................................111
21.1 Overview ....................................................................................................................................... 111
21.2 The Time Zone Screen ................................................................................................................ 111
Chapter 22
Firmware............................................................................................................................................113
22.1 Overview .......................................................................................................................................113
22.1.1 What You Need To Know About Firmware ..........................................................................113
22.1.2 Before You Begin .................................................................................................................114
22.1.3 Firmware and Configuration Files Examples .............. ....................................... ... ... ............114
22.2 The Firmware Screen ....................................................................................................................118
Chapter 23
System Restart..................................................................................................................................120
23.1 Overview .......................................................................................................................................120
23.2 The System Restart Screen ..........................................................................................................120
Chapter 24
Diagnostic .........................................................................................................................................121
24.1 Overview .......................................................................................................................................121
24.2 The Diagnostic Screen ...... ...................................... .... ... ....................................... ... ... ..................121
Chapter 25
Troubleshooting................................................................................................................................122
25.1 Power, Hardware Connections, and LEDs ........................ ... .... ... ... ... ... ....................................... ..122
25.2 AMG1001-T/AMG1011-T Access and Login .................................................................................123
25.3 Internet Access .............................................................................................................................124
8
AMG1001-T/AMG1011-T Series User’s Guide

Table of Contents
Appendix A Setting Up Your Computer’s IP Address......................................................................126
Appendix B IP Addresses and Subnetting.......................................................................................154
Appendix C Pop-up Windows, JavaScripts and Java Permissions.................................................164
Appendix D Common Services........................................................................................................173
Appendix E Legal Information..........................................................................................................176
Index ..................................................................................................................................................179
AMG1001-T/AMG1011-T Series User’s Guide
9

PART I
User’s Guide
10

11

Introducing the AMG1001-T/AMG1011-T
This chapter introduces the main applications and features of the AMG1001-T/AMG1011-T. It also
introduces the ways you can manage the AMG1001-T/AMG1011-T.
1.1 Overview
The AMG1001-T/AMG1011-T is an ADSL2+ router. By integrating DSL and NAT, you are provided
with ease of installation and high-speed, shared Internet access. The AMG1011-T is provided with
both USB and Ethernet ports, computers can share local resources (such as printers and files) and
access to the Internet - simultaneously.
Only use firmware for your AMG1001-T/AMG1011-T’ specific model.
Refer to the label on the bottom of your AMG1001-T/AMG101 1-T.
CHAPTER 1
See the datasheet for a full list of features available on the AMG1001-T/AMG1011-T.
1.2 Ways to Manage the AMG1001-T/AMG1011-T
Use any of the following methods to manage the AMG1001-T/AMG1011-T.
• Web Configurator. This is recommended for everyday management of the AMG1001-T/AMG1011T using a (supported) web browser.
• Command Line Interface. Line commands are mostly used for troubleshooting by service
engineers.
• FTP for firmware upgrades and configuration backup/restore.
• SNMP. The device can be monitored by an SNMP manager. See the SNMP chapter in this User’s
Guide.
• TR-069. This is an auto-configuration server used to remotely configure your device.
1.3 Good Habits for Managing the AMG1001-T/AMG1011-T
Do the following things regularly to make the AMG1001-T/AMG1011-T more secure and to manage
the AMG1001-T/AMG1011-T more effectively.
• Change the password. Use a password that’s not easy to guess and that consists of different
types of characters, such as numbers and letters.
• Write down the password and put it in a safe place.
AMG1001-T/AMG1011-T Series User’s Guide 12
Chapter 1 Introducing the AMG1001-T/AMG1011-T
DSL
LAN
USB
• Back up the configuration (and make sure you know how to restore it). Restoring an earlier
working configuration may be useful if the device becomes unstable or even crashes. If you
forget your password, you will have to reset the AMG1001-T/AMG1011-T to its factory default
settings. If you backed up an earlier configuration file, you would not have to totally re-configure
the AMG1001-T/AMG1011-T. You could simply restore your last configuration.
1.4 Applications for the AMG1001-T/AMG1011-T
Here are some example uses for which the AMG1001-T/AMG1011-T is well suited.
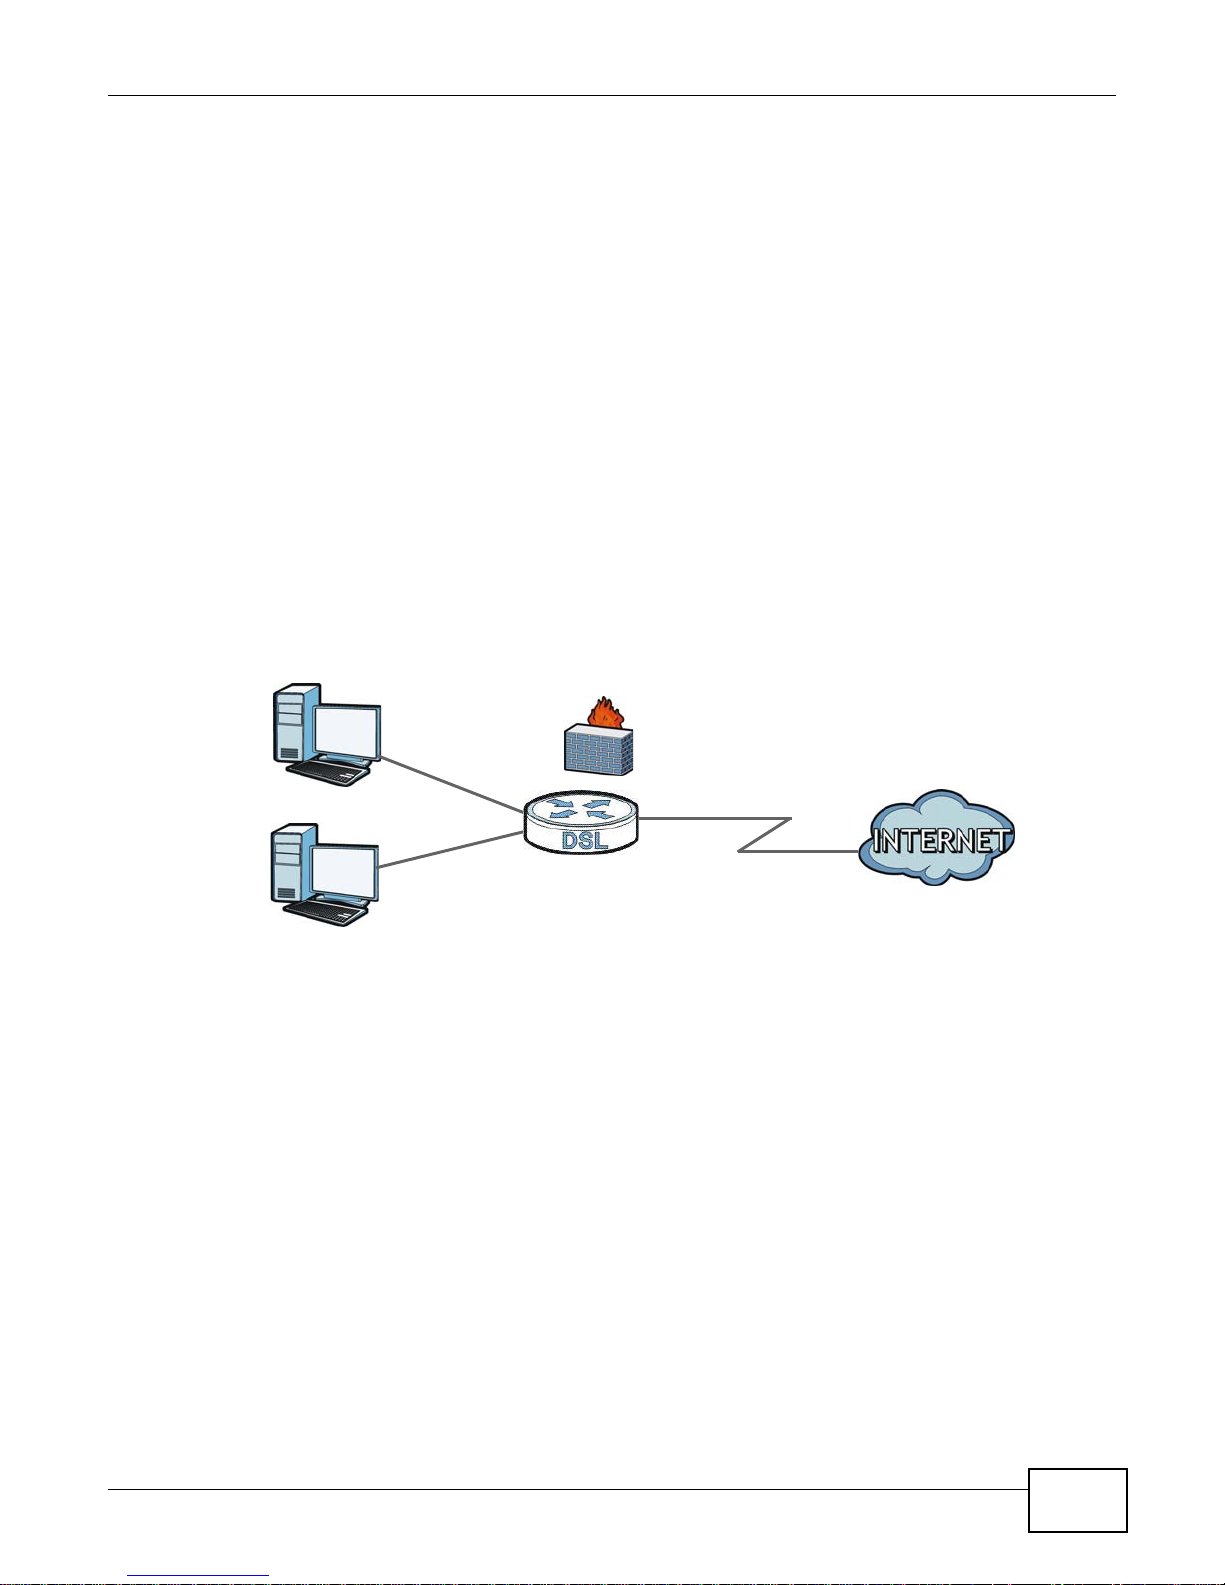
1.4.1 Internet Access
Your AMG1001-T/AMG1011-T provides shared Internet access by connecting the DSL port to the
DSL or MODEM jack on a splitter or your telephone jack. Computers can connect to the AMG1001T/AMG1011-T’s LAN ports.
Figure 1 AMG1001-T/AMG1011-T’s Router Features
You can also configure firewall and content filtering on the AMG1001-T/AMG1011-T for secure
Internet access. By default, the AMG1001-T/AMG1011-T prevents DDOS, LAND and Ping of Death
attacks whether the firewall is enabled or disabled. You can further block SYN Flood and Port
Scanner attacks by turning on the firewall.
Use content filtering to block access to specific web sites, with URL’s containing keywords that you
specify. For example, you could block access to certain web sites for the kids.
Use QoS to efficiently manage traffic on your network by giving priority to certain types of traffic
and/or to particular computers. For example, you could make sure that the AMG1001-T/AMG1011T gives voice over Internet calls high priority, and/or limit bandwidth devoted to the boss’s
excessive file downloading.
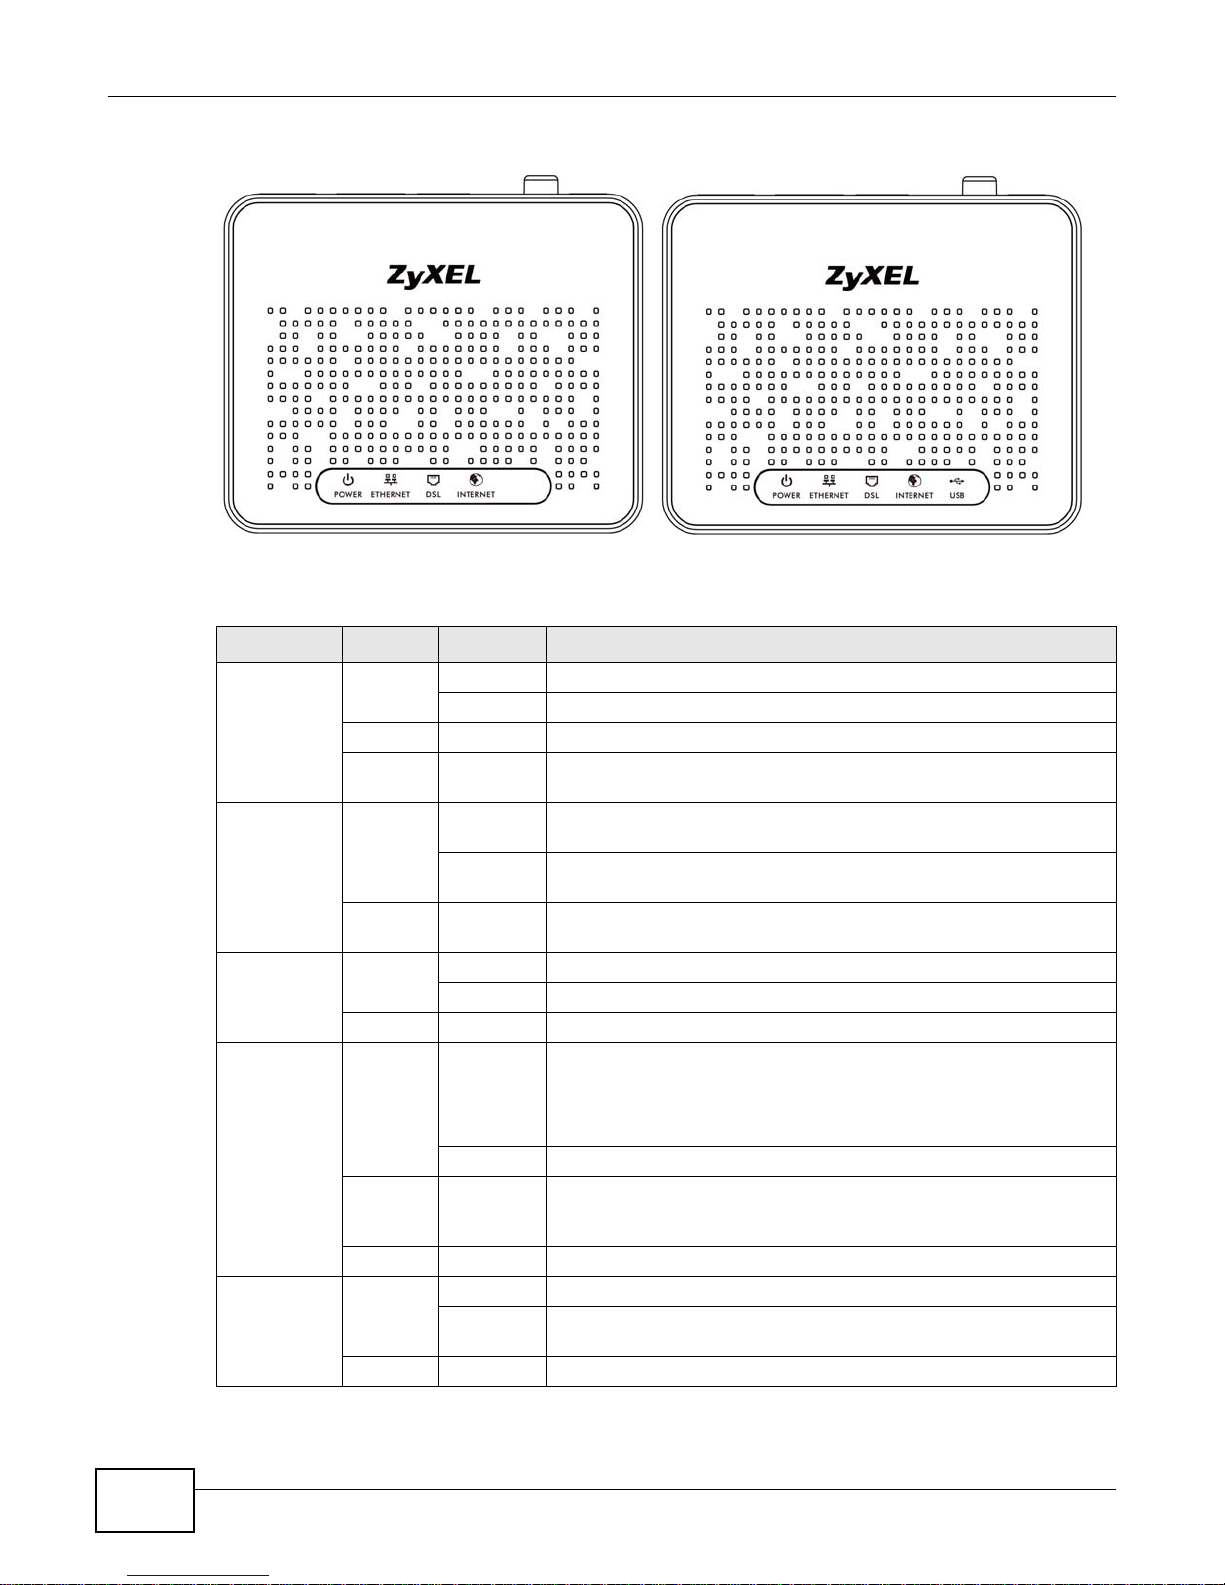
1.5 LEDs (Lights)
The following graphic displays the labels of the LEDs.
AMG1001-T/AMG1011-T Series User’s Guide
13
Chapter 1 Introducing the AMG1001-T/AMG1011-T
Figure 2 LEDs on the Top of the AMG1001-T/AMG1011-T
None of the LEDs are on if the AMG1001-T/AMG1011-T is not receiving power.
Table 1 LED Descriptions
LED COLOR STATUS DESCRIPTION
POWER Green On The AMG1001-T/AMG1011-T is receiving power and ready for use.
Blinking The AMG1001-T/AMG1011-T is self-testing.
Off The AMG1001-T/AMG1011-T is not receiving power.
Red On The AMG1001-T/AMG1011-T has failed from power self-testing or
ETHERNET Green On The AMG1001-T/AMG1011-T has an Ethernet connection with a
Blinking The AMG1001-T/AMG1011-T is sending/receiving data to /from the
Off The AMG1001-T/AMG1011-T does not have an Ethernet connection
DSL Green On The DSL line is up.
Blinking The AMG1001-T/AMG1011-T is initializing the DSL line.
Off The DSL line is down.
INTERNET Green On The AMG1001-T/AMG1011-T has an IP connection but no traffic.
there is malfunction.
device on the Local Area Network (LAN).
LAN.
with the LAN.
Red On The AMG1001-T/AMG1011-T attempted to make an IP connection
USB Green On There is a USB connection.
Refer to the Quick Start Guide for information on hardware connections.
14
Your device has a WAN IP address (either static or assigned by a
DHCP server), PPP negotiation was successfully completed (if used)
and the DSL connection is up.
Blinking The AMG1001-T/AMG1011-T is sending or receiving IP traffic.
but failed. Possible causes are no response from a DHCP server, no
PPPoE response, PPPoE authentication failed.
Off The AMG1001-T/AMG1011-T does not have an IP connection.
Blinking The AMG1001-T/AMG1011-T is sending or receiving data via the USB
port.
Off There is no USB connection.
AMG1001-T/AMG1011-T Series User’s Guide

1.6 The RESET Button
If you forget your password or cannot access the web configurator, you will need to use the RESET
button at the back of the device to reload the factory-default configuration file. This means that you
will lose all configurations that you had previously and the password will be reset to “1234”.
1.6.1 Using the Reset Button
1 Make sure the POWER LED is on (not blinking).
2 To set the device back to the factory default settings, press the RESET button for ten seconds or
until the POWER LED begins to blink and then release it. When the POWER LED begins to blink,
the defaults have been restored and the device restarts.
1.7 USB Port (AMG1011-T Only)
The USB port is useful if you have an USB-enabled computer that does not have a network interface
card for attaching to your Ethernet network. See the following sections for USB driver installation
procedures in your operating system.
Chapter 1 Introducing the AMG1001-T/AMG1011-T
System Requirements
• Windows XP, Windows Vista, Windows 7 or Windows 8
• An available USB port
Note: Install the USB driver before you connect the AMG1001-T/AMG1011-T to the USB
port.
1.7.1 Installing the USB Driver in Windows
1 Save your work and close all applications.
2 Insert the included CD. The CD automatically runs and the main screen displays.
3 Click the Setup icon on the main screen.
4 Select the Windows version of your operating system.
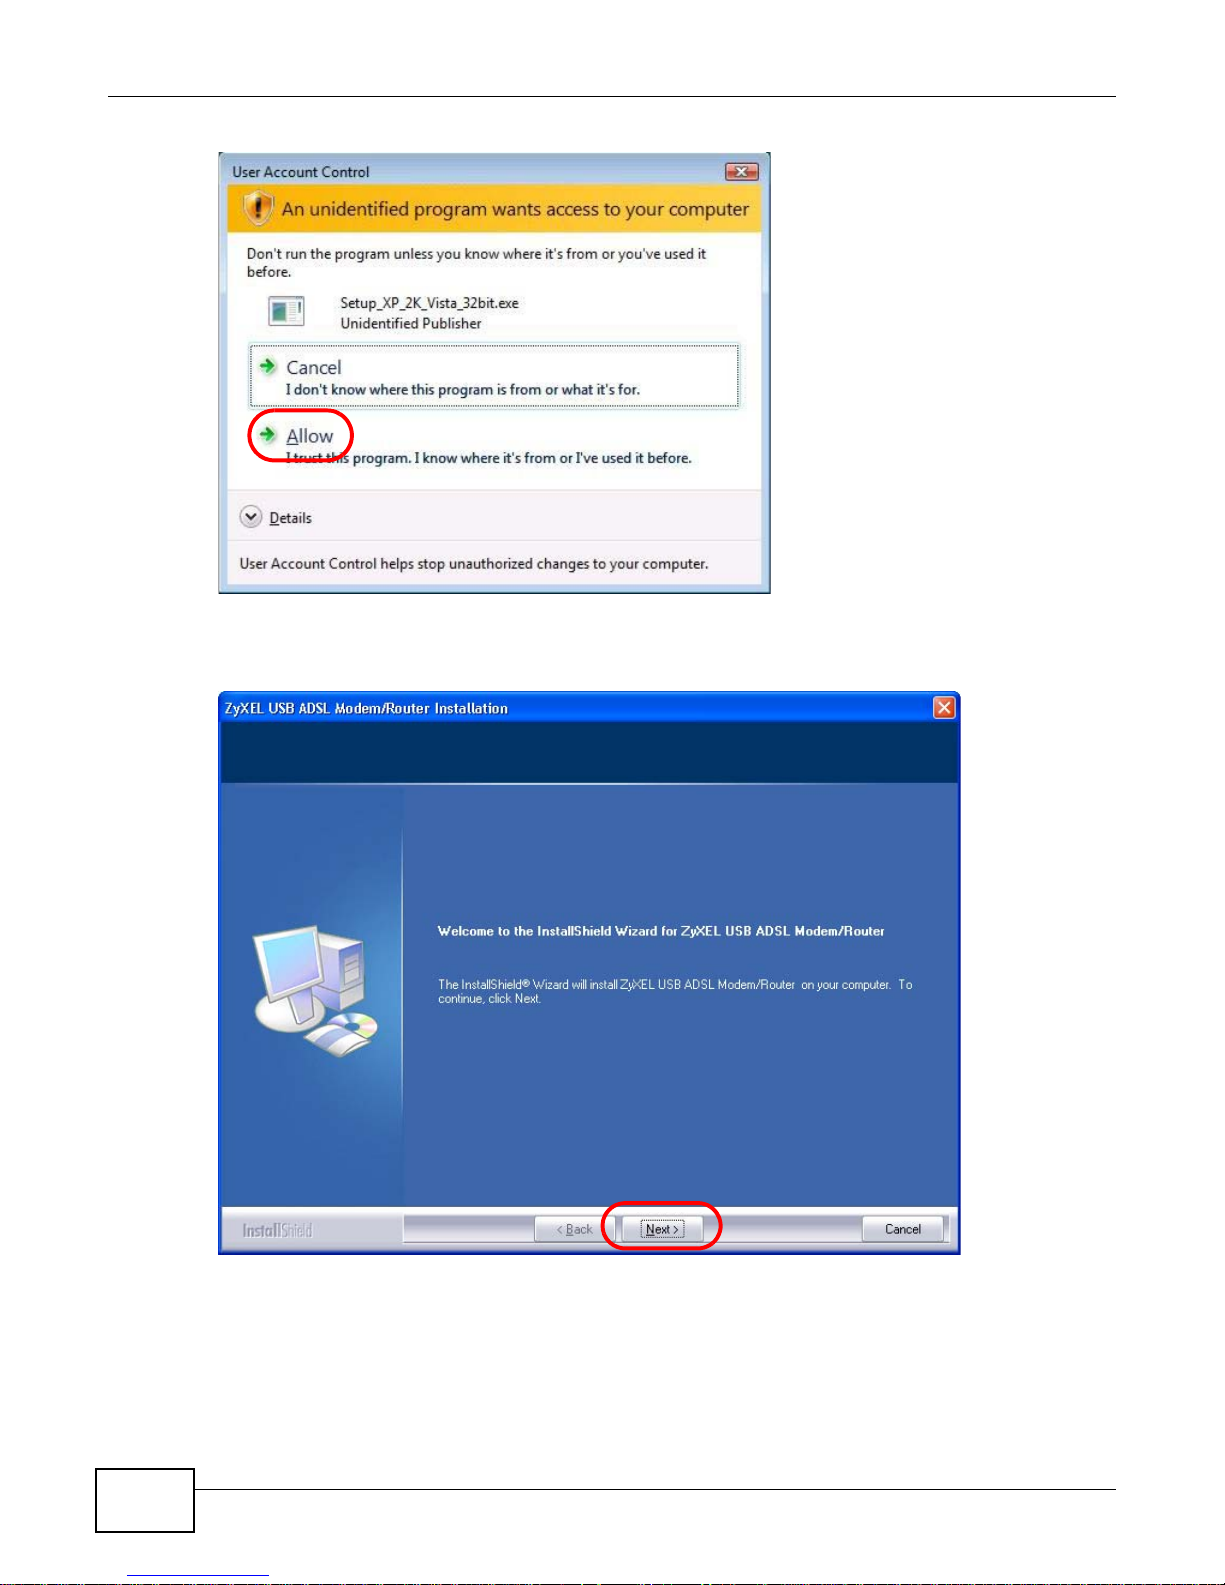
5 An install warning may appear in the Windows Vista OS. Click Allow to continue.
AMG1001-T/AMG1011-T Series User’s Guide
15
Chapter 1 Introducing the AMG1001-T/AMG1011-T
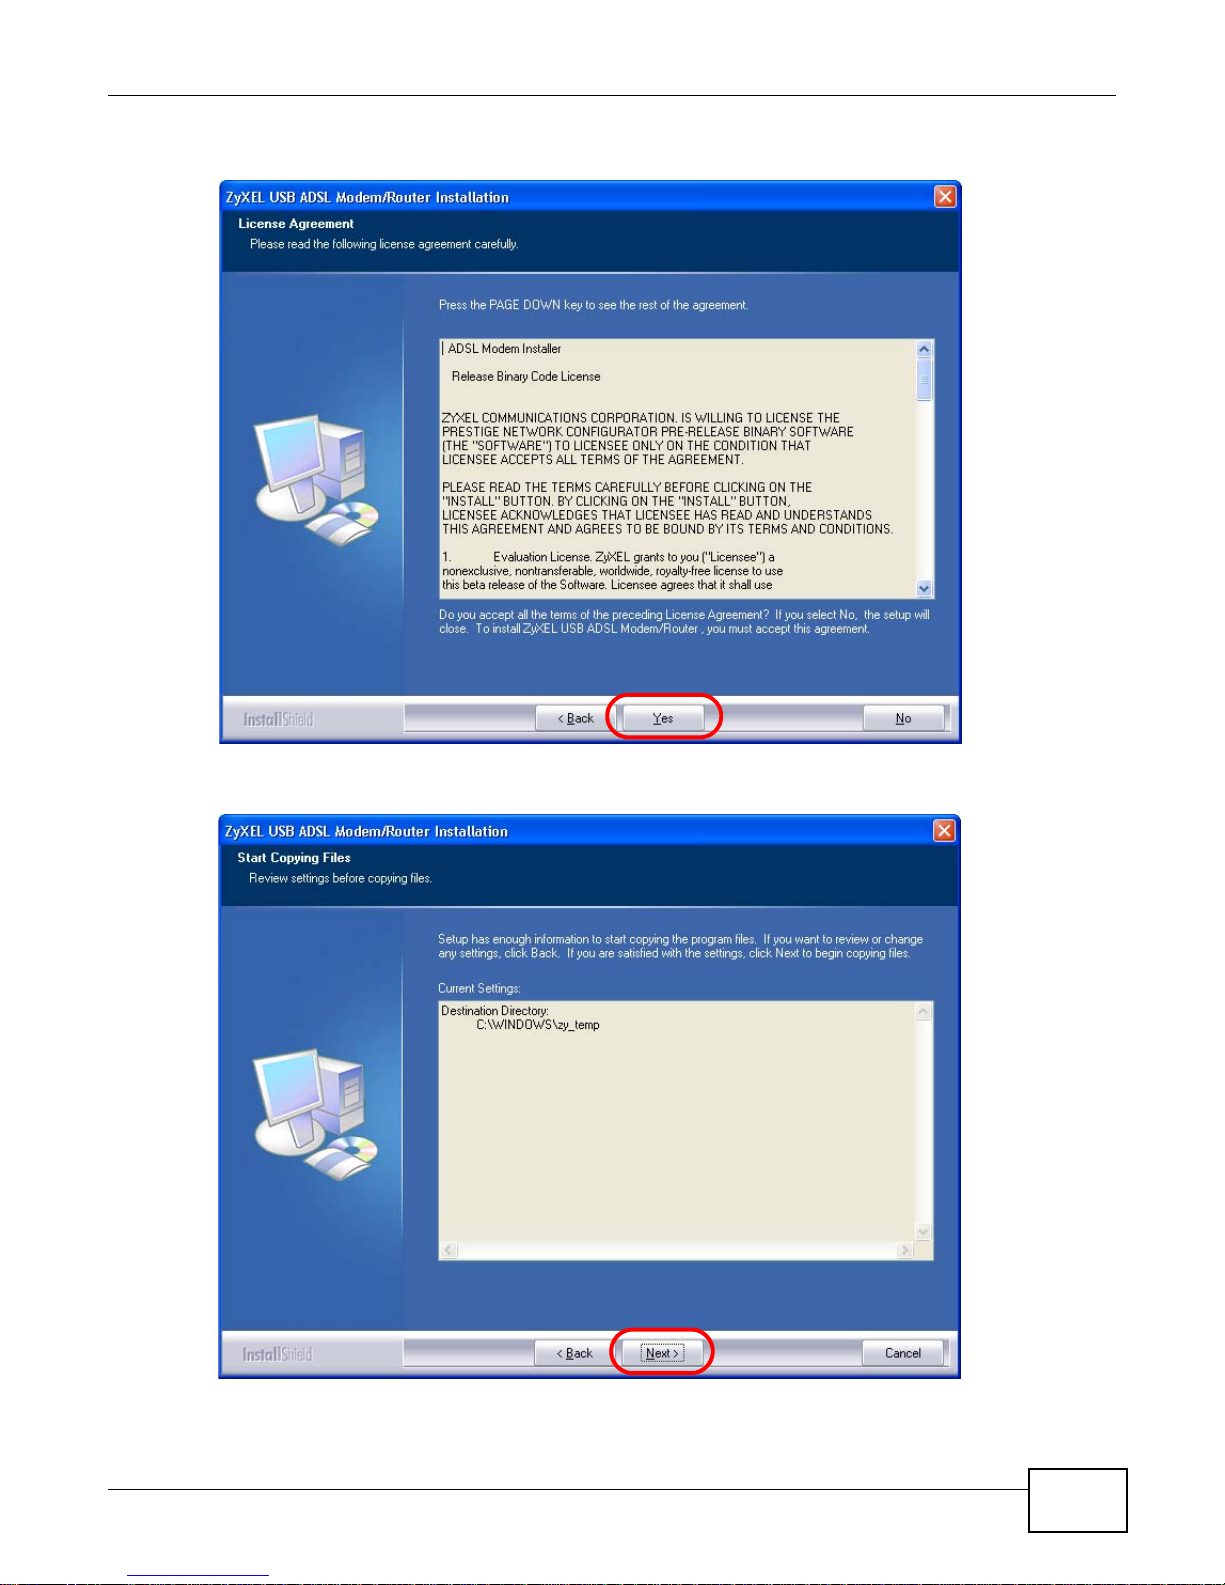
6 Click Next in the Welcome screen to begin the USB Installation Wizard. Follow the installation
prompts. You may need to restart your computer at the end of the installation.
16
AMG1001-T/AMG1011-T Series User’s Guide
7 Click Yes to agree to the license agreement.
Chapter 1 Introducing the AMG1001-T/AMG1011-T
8 A Start Copying Files screen displays. Click Next.
AMG1001-T/AMG1011-T Series User’s Guide
17
Chapter 1 Introducing the AMG1001-T/AMG1011-T
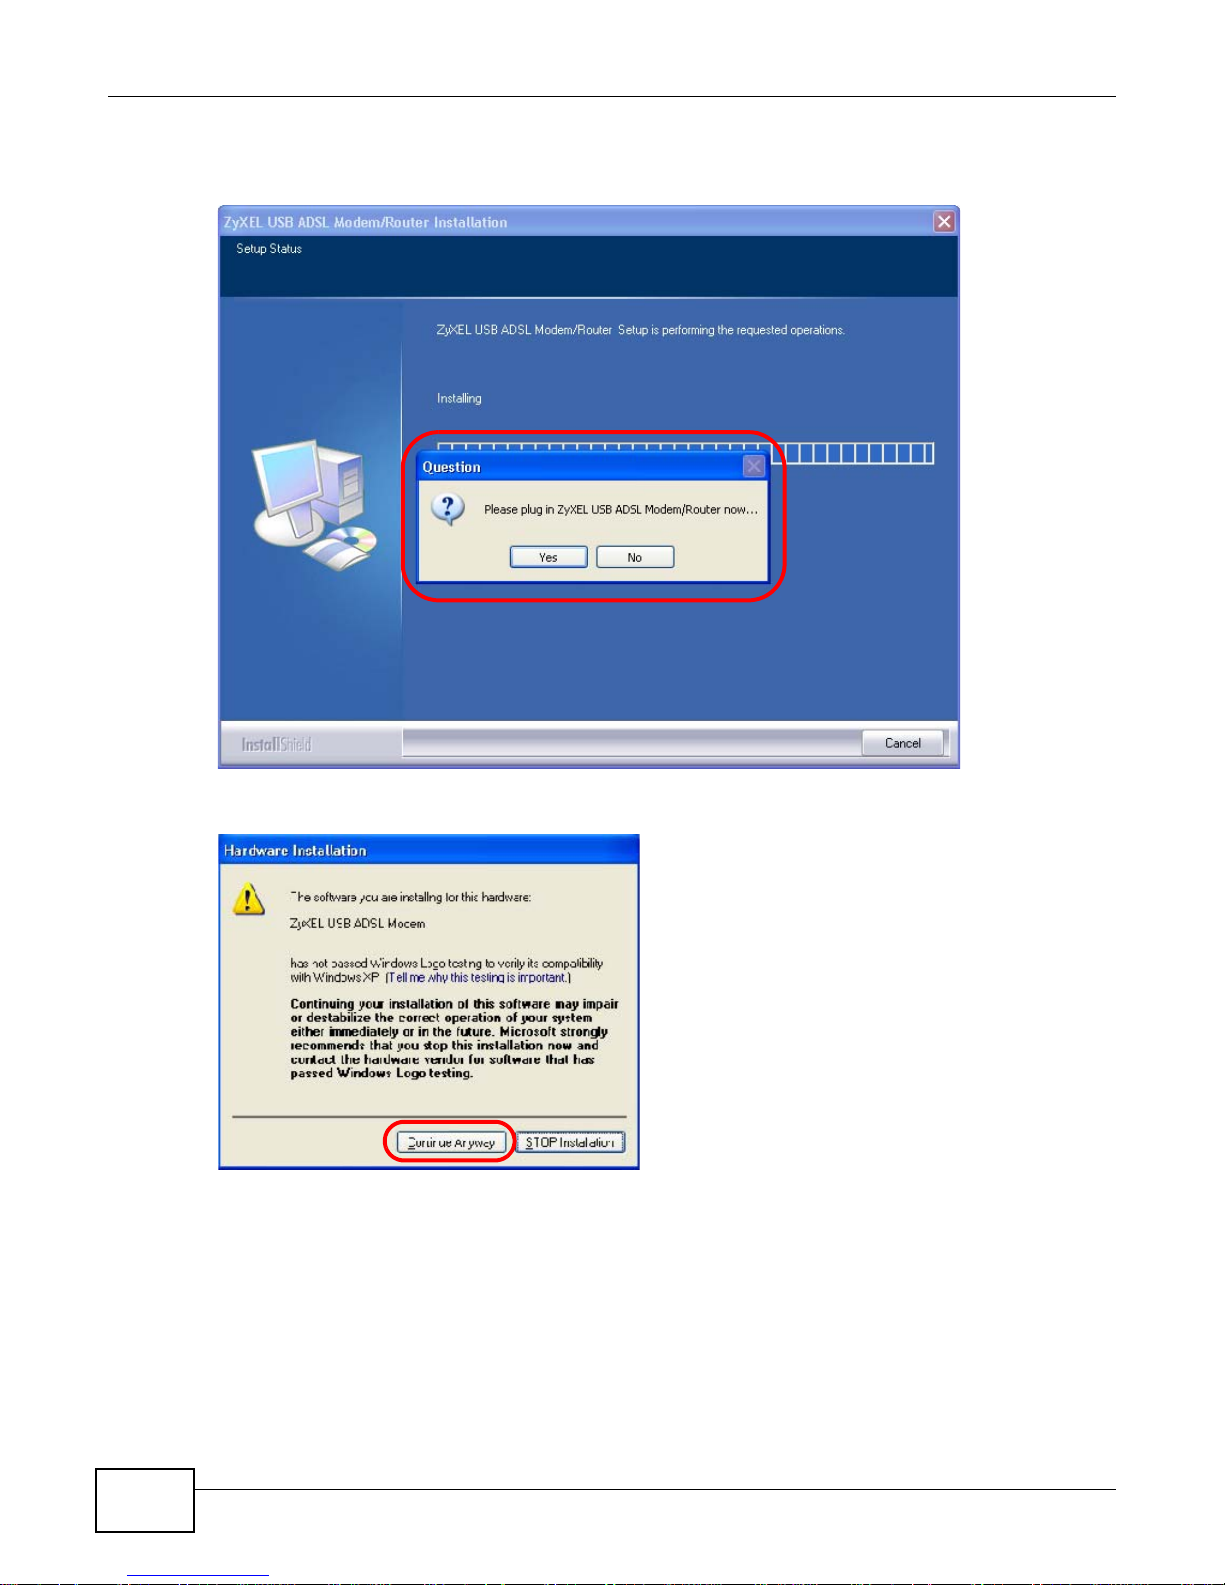
9 Windows XP: Connect the AMG1001-T/AMG1011-T to the computer’s USB port when prompted. A
windows displays indicating that the system has found new hardware.
10 Windows XP: If a warning window displays, click Continue Anyway.
18
AMG1001-T/AMG1011-T Series User’s Guide
Chapter 1 Introducing the AMG1001-T/AMG1011-T
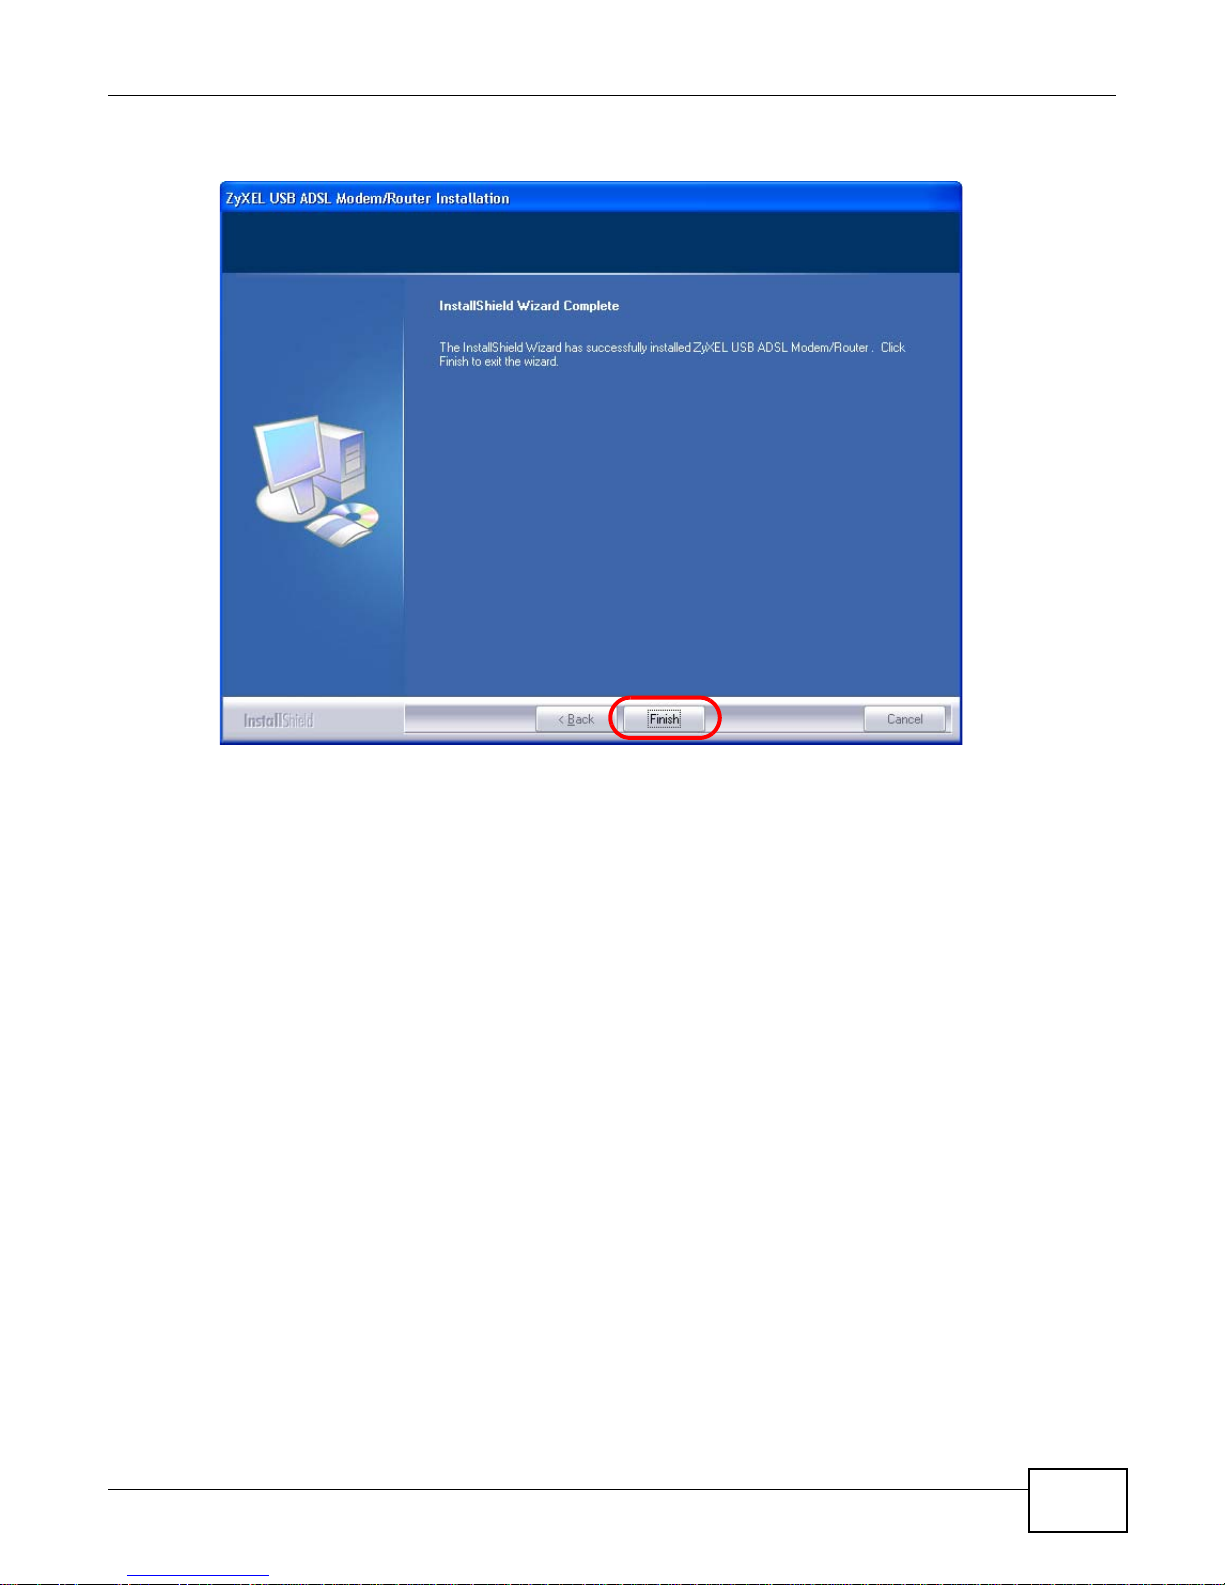
11 Click Finish to complete the installation. Restart the computer if prompted.
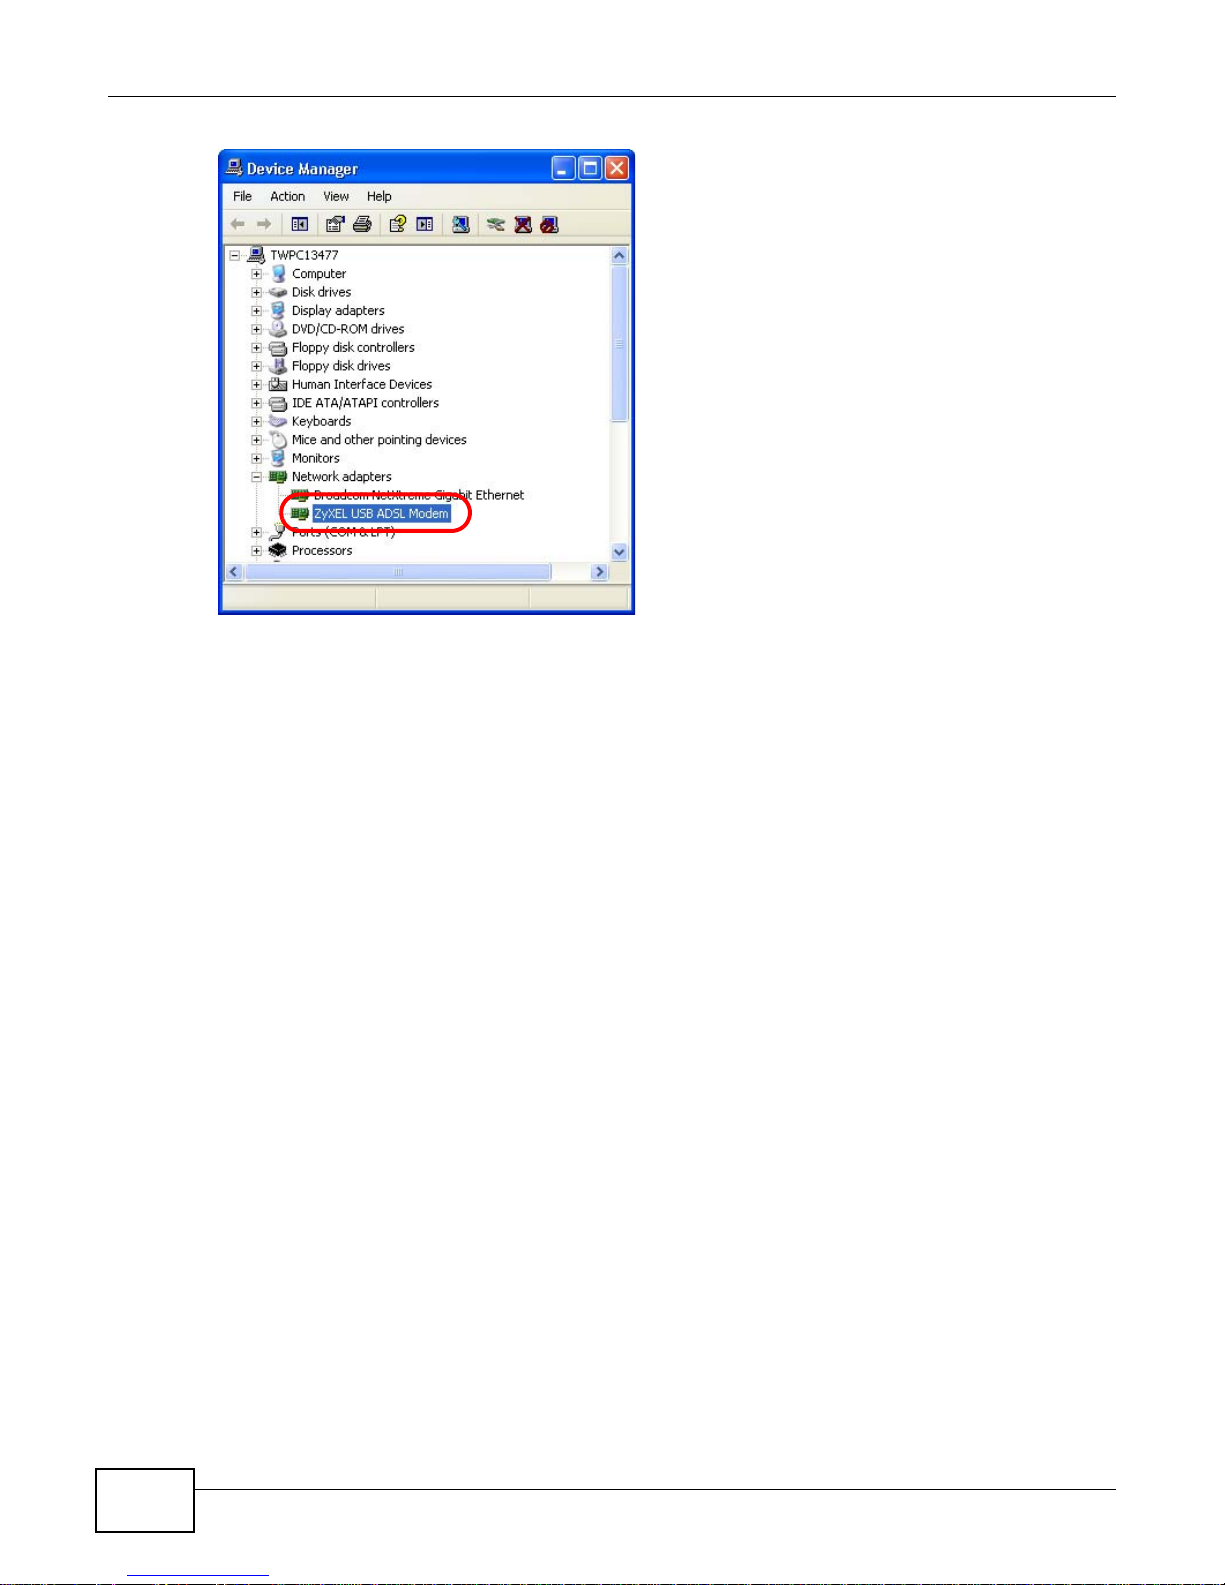
1.7.2 Verifying Your USB Installation
Check the status of the AMG1001-T/AMG1011-T in the Device Manager window. Click Start >
Settings > Control Panel > System > Hardware and then click Device Manager. (Steps may
vary depending on the version of Windows).
Verify the status of the AMG1001-T/AMG1011-T under Network adapters. Check that there is no
question mark on the device icon for the AMG1001-T/AMG1011-T.
The screen for Windows XP is shown here.
AMG1001-T/AMG1011-T Series User’s Guide
19
Chapter 1 Introducing the AMG1001-T/AMG1011-T
20
AMG1001-T/AMG1011-T Series User’s Guide
2.1 Overview
The web configurator is an HTML-based management interface that allows easy device setup and
management via Internet browser. Use Internet Explorer 6.0 and later or Netscape Navigator 7.0
and later versions. The recommended screen resolution is 1024 by 768 pixels.
In order to use the web configurator you need to allow:
• Web browser pop-up windows from your device. Web pop-up blocking is enabled by default in
Windows XP SP (Service Pack) 2.
• JavaScripts (enabled by default).
• Java permissions (enabled by default).
See Appendix C on page 164 if you need to make sure these functions are allowed in Internet
Explorer.
CHAPTER 2
Introducing the Web Configurator
2.1.1 Accessing the Web Configurator
1 Make sure your AMG1001-T/AMG1011-T hardware is properly connected (refer to the Quick Start
Guide).
2 Launch your web browser.
3 Type "192.168.1.1" as the URL.
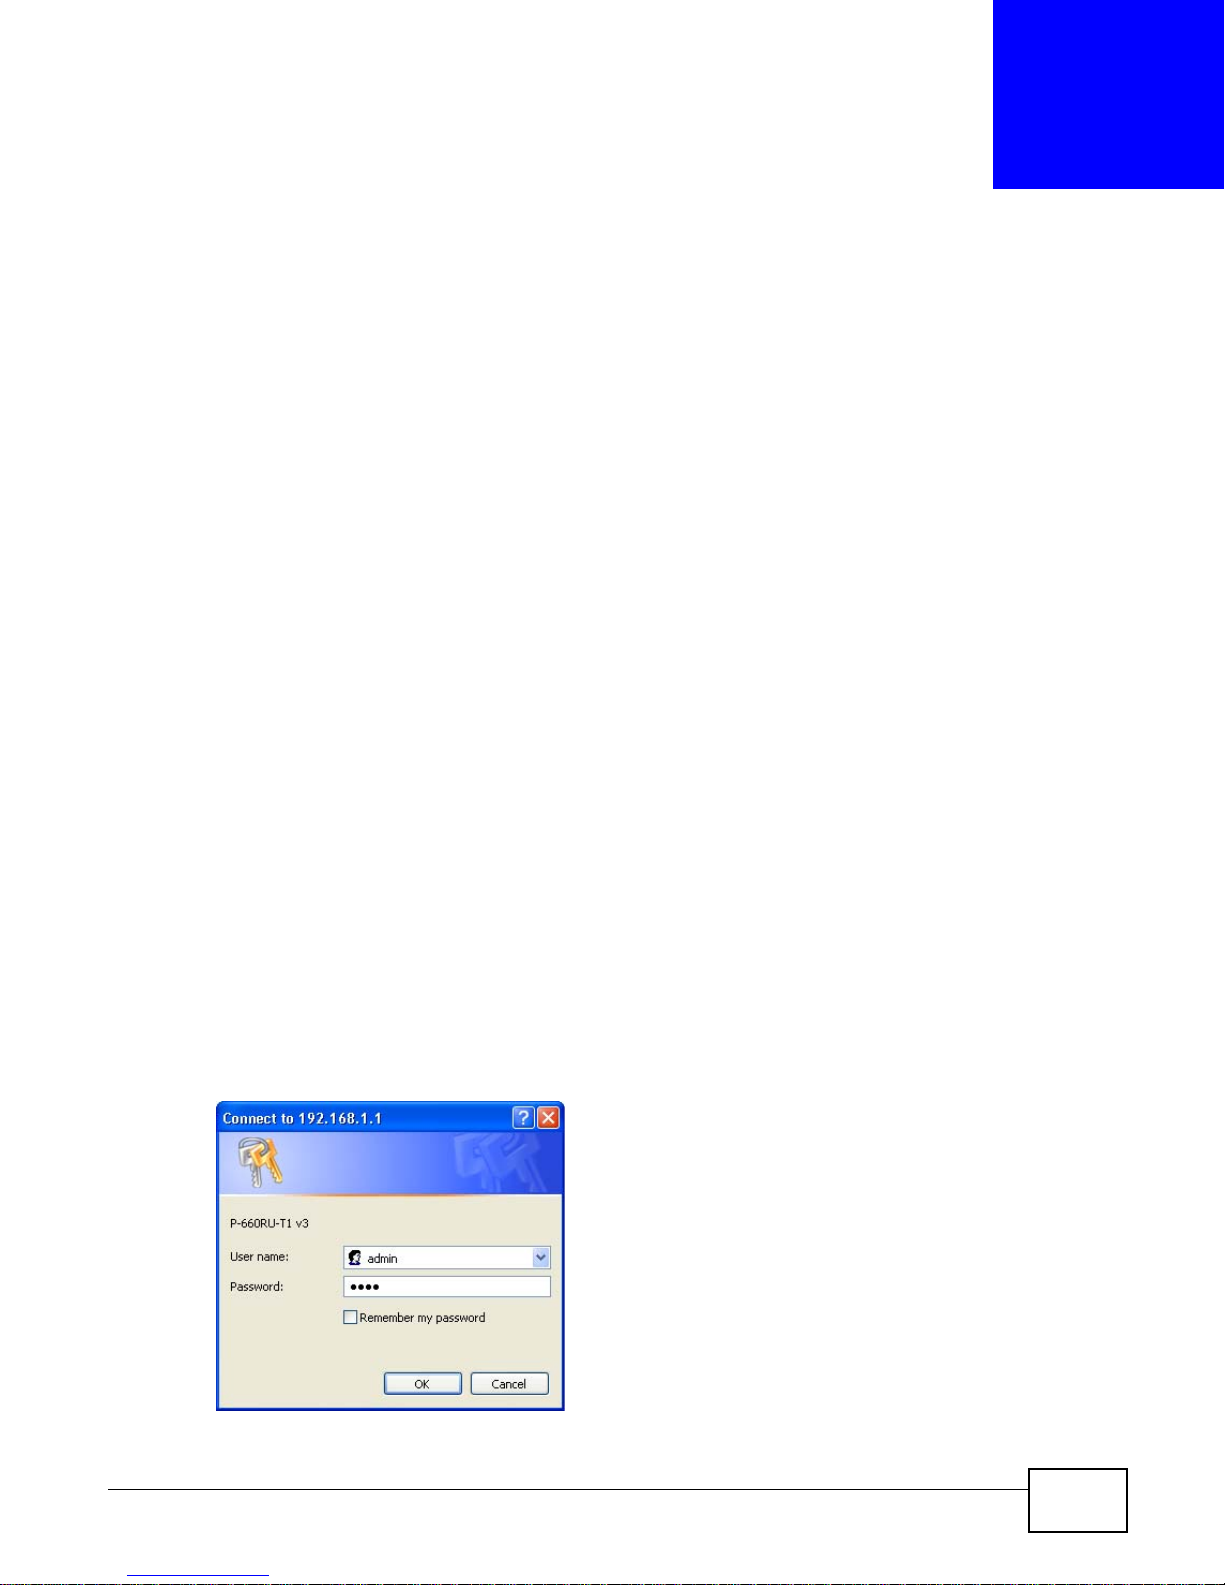
4 A login screen displays. To access the administrative web configurator and manage the AMG1001-T/
AMG1011-T, enter the username (admin by default) and password (1234 by default) in the login
screen and click OK. If you have changed the password, enter your password and click OK.
Figure 3 Login Screen
AMG1001-T/AMG1011-T Series User’s Guide 21
Chapter 2 Introducing the Web Configurator
B
A
Note: For security reasons, the AMG1001-T/AMG1011-T automatically logs you out if you
do not use the web configurator for five minutes (default). If this happens, log in
again.
2.2 Web Configurator Main Screen
Figure 4 Main Screen
As illustrated above, the main screen is divided into these parts:
• A - navigation panel
• B - main window
2.2.1 Navigation Panel
Use the menu items on the navigation panel to open screens to configure AMG1001-T/AMG1011-T
features. The following tables describe each menu item.
Table 2 Navigation Panel Summary
LINK TAB FUNCTION
Status
Device Info This screen shows the AMG1001-T/AMG1011-T’s general device and
System Log Use this screen to display your device’s logs.
Statistics Use this screen to display the statistics of the AMG1001-T/AMG1011-
22
network status information.
T.
AMG1001-T/AMG1011-T Series User’s Guide

Chapter 2 Introducing the Web Configurator
Table 2 Navigation Panel Summary
LINK TAB FUNCTION
Quick Start
Quick Start Use this wizard to set up your Internet connection.
Interface Setup
Internet Internet Use this screen to configure ISP parameters, WAN IP address
assignment and other advanced properties.
PVC Summary
Tab le
LAN LAN Use this screen to configure LAN TCP/IP and DHCP settings and
DHCP IP Pool
Summary
Advanced Setup
Routing Routing Table
List
Static Route Use this screen to configure IP static routes to tell your device about
NAT NAT Use this screen to configure the NAT settings.
DMZ
Virtual Server Use this screen to forward incoming service requests to the server(s)
IP Address
Mapping
QoS QoS Use this screen to enable QoS and traffic prioritizing and configure
QoS Settings
Summary
ADSL Use this screen to configure the ADSL settings on your AMG1001-T/
Firewall Use this screen to activate/deactivate the firewall and/or SPI on your
Access Management
ACL Use this screen to determine which application can access which
Filter IP/MAC Filter Use this screen to create IP/MAC filter rules.
Application Filter Use this screen to set the days and times for your device to perform
URL Filter Use this screen to allow or deny traffic from certain types of
SNMP Use this screen to configure your AMG1001-T/AMG1011-T’s settings
UPnP Use this screen to turn UPnP on or off.
DDNS This screen allows you to use a static hostname alias for a dynamic
CWMP Use this screen to have a management server manage the
Maintenance
Administration Use this screen to configure your device’s password.
Use this screen to display your PVC settings.
other advanced properties.
Use this screen to display the IP and MAC addresses of the
computers on your LAN.
Use this screen to display the static routes on your AMG1001-T/
AMG1011-T.
networks beyond the directly connected remote nodes.
Use this screen to configure the DMZ settings.
on your local network.
Use this screen to change your AMG1001-T/AMG1011-T’s address
mapping settings.
bandwidth management on the WAN.
Use this screen to check the QoS rules and actions you configured
for the AMG1001-T/AMG1011-T.
AMG1011-T.
AMG1001-T/AMG1011-T.
AMG1001-T/AMG1011-T interface from which computers.
content filtering.
applications.
for Simple Network Management Protocol management.
IP address.
AMG1001-T/AMG1011-T.
AMG1001-T/AMG1011-T Series User’s Guide
23
Chapter 2 Introducing the Web Configurator
Table 2 Navigation Panel Summary
LINK TAB FUNCTION
Time Zone Use this screen to change your AMG1001-T/AMG1011-T’s time and
Firmware Use this screen to manage configuration files and upload firmware to
SysRestart This screen allows you to reboot the AMG1001-T/AMG1011-T without
Diagnostics Use this screen to test the connections to other devices.
2.2.2 Main Window
The main window displays information and configuration fields. It is discussed in the rest of this
document.
Right after you log in, the Status screen is displayed. See Chapter 3 on page 27 for more
information about the Status screen.
date.
your device.
turning the power off.
24
AMG1001-T/AMG1011-T Series User’s Guide

PART II
Technical Reference
25

26

3.1 Overview
Use the Device Info screen to look at the current status of the device, system resources, and
interfaces (LAN and WAN).
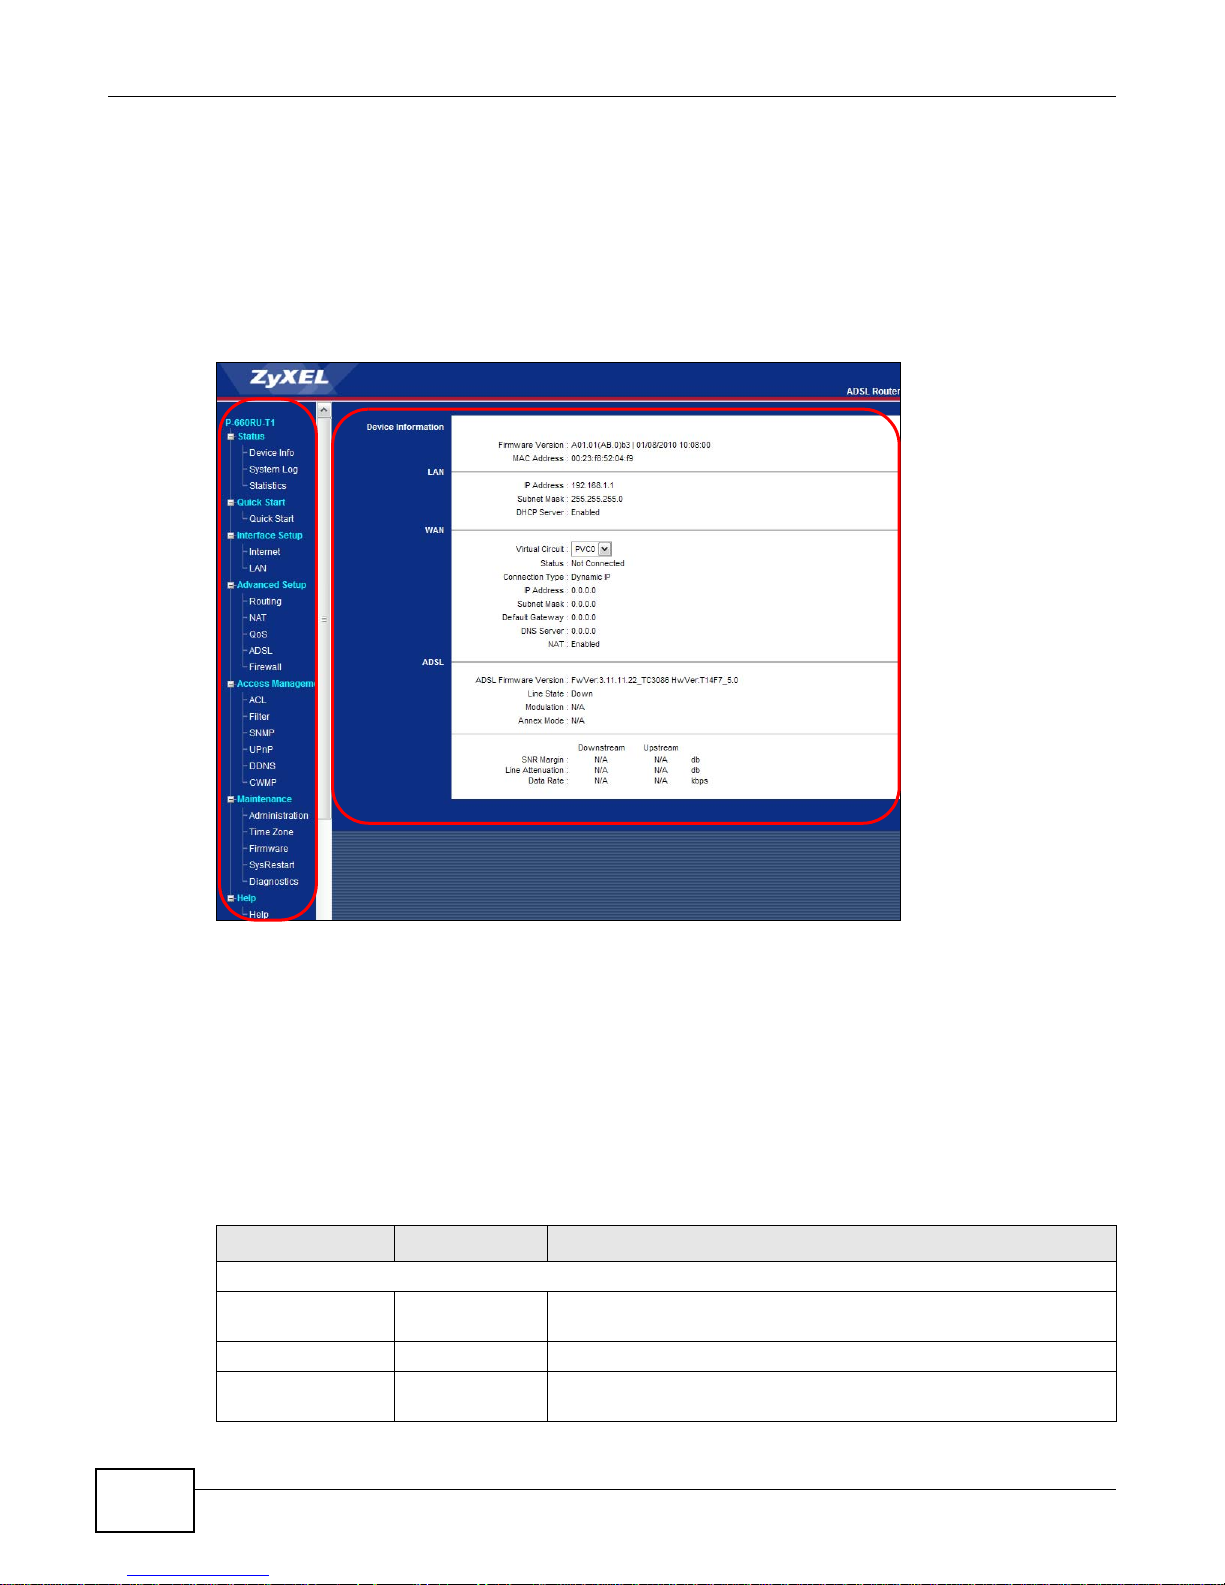
3.2 The Device Info Screen
Use this screen to view the status of the AMG1001-T/AMG1011-T. Click Status > Device Info to
open the following screen.
Figure 5 Status > Device Information
CHAPTER 3
Device Information
AMG1001-T/AMG1011-T Series User’s Guide 27

Chapter 3 Device Information
The following table describes the fields in this screen.
Table 3 Status > Device Information
LABEL DESCRIPTION
Device Information
Firmware
Version
MAC Address This is the MAC (Media Access Control) or Ethernet address unique to your AMG1001-T/
LAN
IP Address This is the current IP address of the AMG1001-T/AMG1011-T in the LAN.
Subnet Mask This is the current subnet mask in the LAN.
DHCP Server This field displays what DHCP services the AMG1001-T/AMG1011-T is providing to the
WAN
Virtual Circuit Use the drop-down list box to select a virtual circuit. The fields below display
Status This is the status of the WAN connection.
Connection
Type
IP Address This is the current IP address of the AMG1001-T/AMG1011-T in the WAN, if applicable.
Subnet Mask This is the current subnet mask in the WAN, if applicable.
Default
Gateway
DNS Server
NAT
ADSL
ADSL Firmware
Version
Line State This is the status of your ADSL connection.
Modulation This is the ADSL modulation of your AMG1001-T/AMG1011-T.
Annex Mode This is the annex mode of your AMG1001-T/AMG1011-T.
Downstream This is the downstream speed of your ZyXEL Device.
Upstream This is the upstream speed of your ZyXEL Device.
SNR Margin This is the Signal to Noise Ratio (SNR) margin. SNR represents the ratio of the signal
Line Attenuation This is the difference (in dB) between the power received at the near-end and that
Data Rate This is speed of data transfer on your AMG1001-T/AMG1011-T.
This is the current version of the firmware inside the device. It also shows the date the
firmware version was created.
AMG1011-T.
LAN. Choices are:
Enabled - The AMG1001-T/AMG1011-T is a DHCP server in the LAN. It can assign IP
addresses to other computers in the LAN.
Relay - The AMG1001-T/AMG1011-T acts as a surrogate DHCP server and relays DHCP
requests and responses between the remote server and the clients.
Disabled - The AMG1001-T/AMG1011-T is not providing any DHCP services to the LAN.
information about the virtual circuit you choose.
This is the connection type supported by your ISP.
This is the IP address of the default gateway, if applicable.
This is the current DNS server in the WAN, if applicable.
This field displays whether NAT is activated.
This is the current version of the device’s DSL modem code.
received to the system’s noise threshold. The higher the SNR number, the better the line
quality.
transmitted from the far-end.
28
AMG1001-T/AMG1011-T Series User’s Guide
4.1 Overview
This chapter contains information about viewing the AMG1001-T/AMG1011-T’s logs.
A log is a message about an event that occurred on your AMG1001-T/AMG1011-T. For example,
when someone logs in to the AMG1001-T/AMG1011-T.
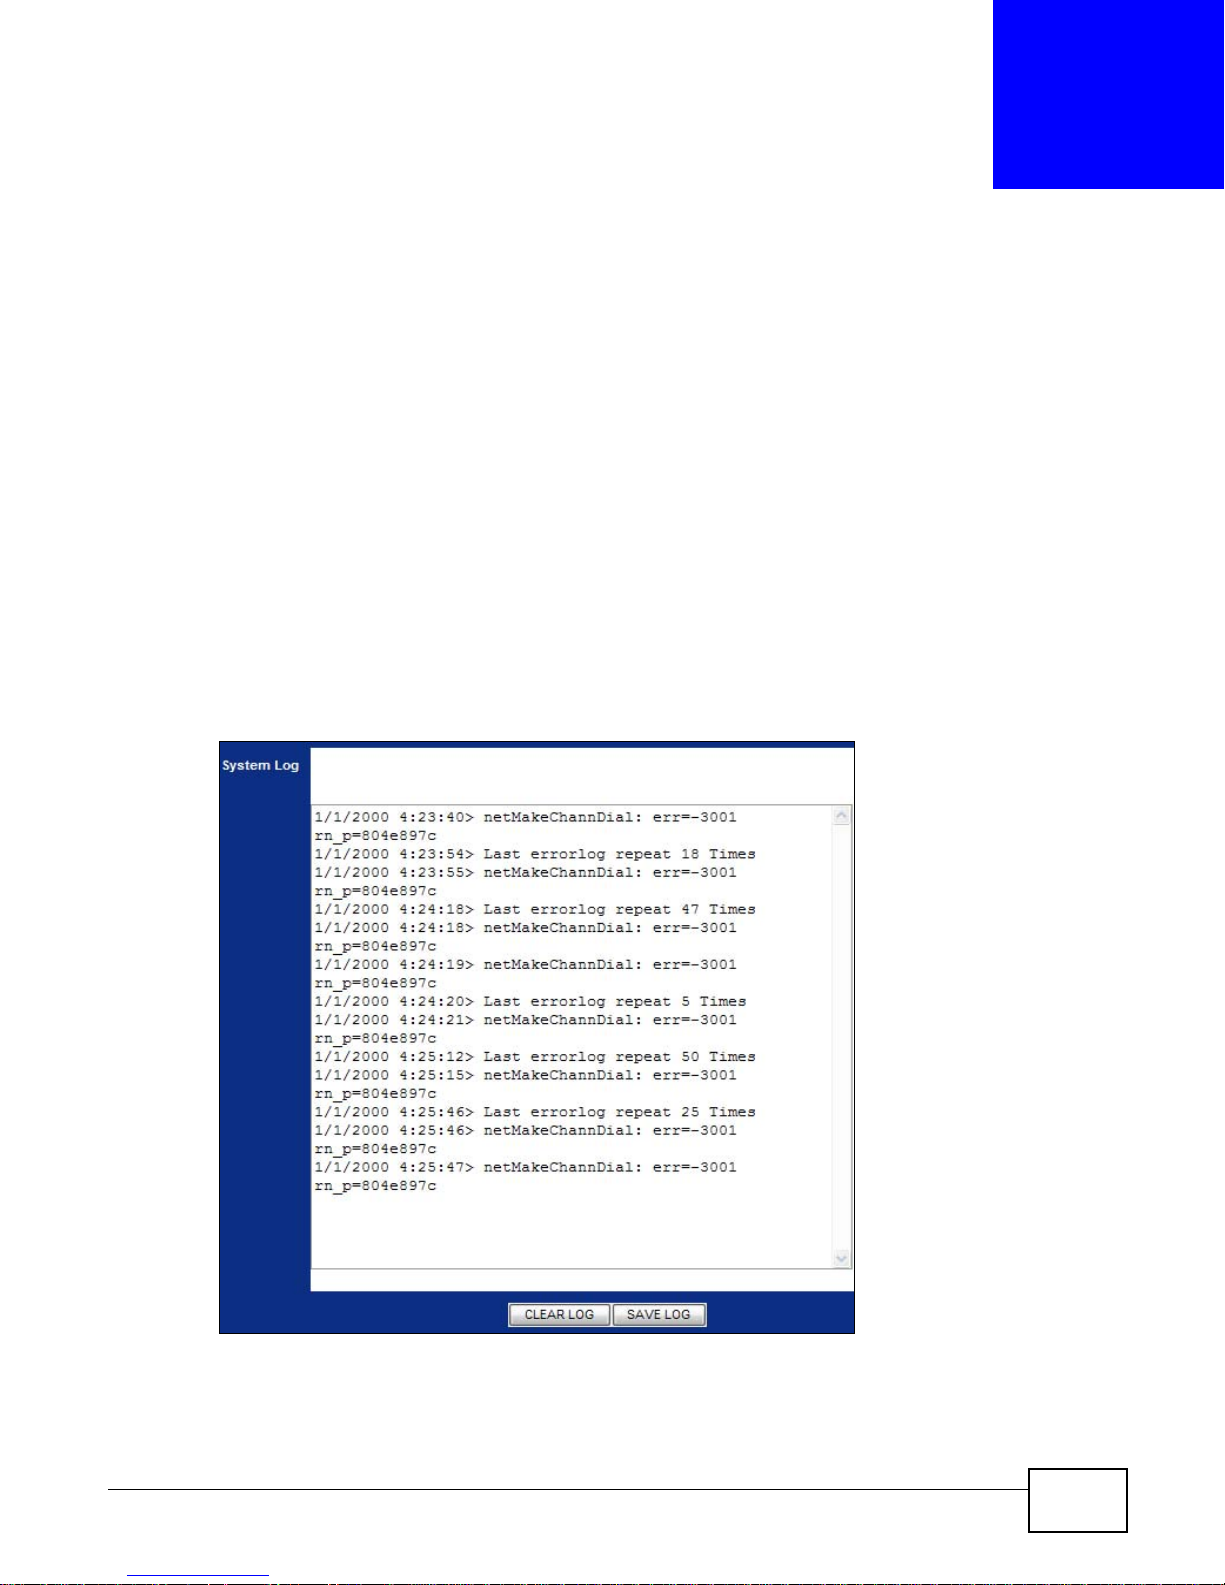
4.2 The System Log Screen
Use this screen to see the logs for your AMG1001-T/AMG1011-T. Click Status > System Log to
open the following screen.
CHAPTER 4
System Logs
Figure 6 Status > System Log
AMG1001-T/AMG1011-T Series User’s Guide 29

Chapter 4 System Logs
The following table describes the fields in this screen.
Table 4 Status > System Log
LABEL DESCRIPTION
System Log This field displays the log messages of your AMG1001-T/AMG1011-T.
CLEAR LOG Click this to delete all the logs.
SAVE LOG Click this to save the logs in a text file.
30
AMG1001-T/AMG1011-T Series User’s Guide
 Loading...