

Page 1

AG-320
802.11a/g Wireless PCI Adapter
Quick Start Guide
Version 1.00
Edition 1
8/2006
Table of Contents
ENGLISH 1
DEUTSCH 15
ESPAÑOL 29
FRANÇAIS 41
ITALIANO 53
РУССКИЙ 65
繁體中文 79
Page 2

ENGLISH
ENGLISH
Overview
The AG-320 is a wireless network adapter for your desktop
computer. See page 12 for a list of system requirements.
1 Install the Software
" Install the software from the CD before you
insert the AG-320. Do not insert the AG-320 yet.
If you have already installed Funk Odyssey
Client software on the computer, uninstall
(remove) it.
1 Remove the AG-320 if you already inserted it.
2 Insert the included CD into the CD-ROM drive on your
computer.
1
Page 3
ENGLISH
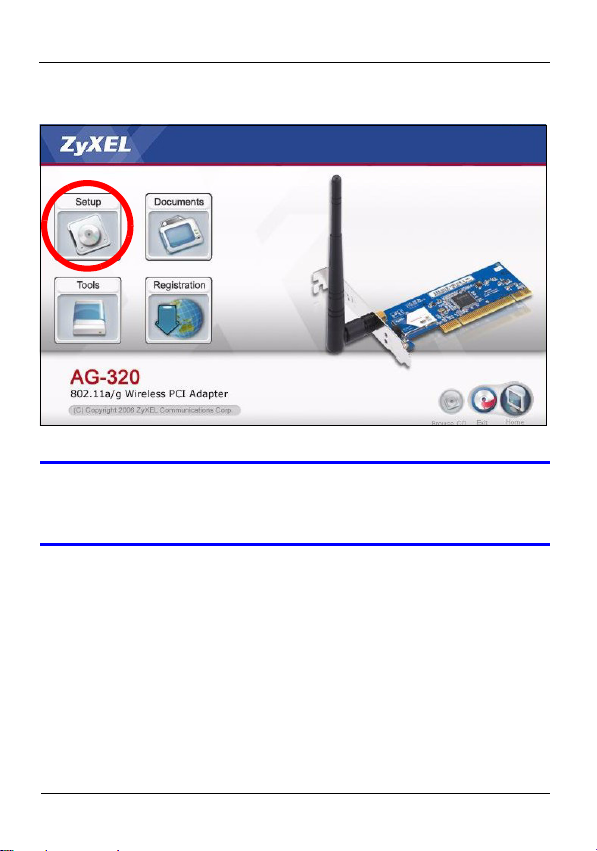
3 When the following screen displays, click Setup to install
the ZyXEL utility and driver.
V If the screen does not display, locate and
double-click autorun.exe on the CD.
2
Page 4
ENGLISH
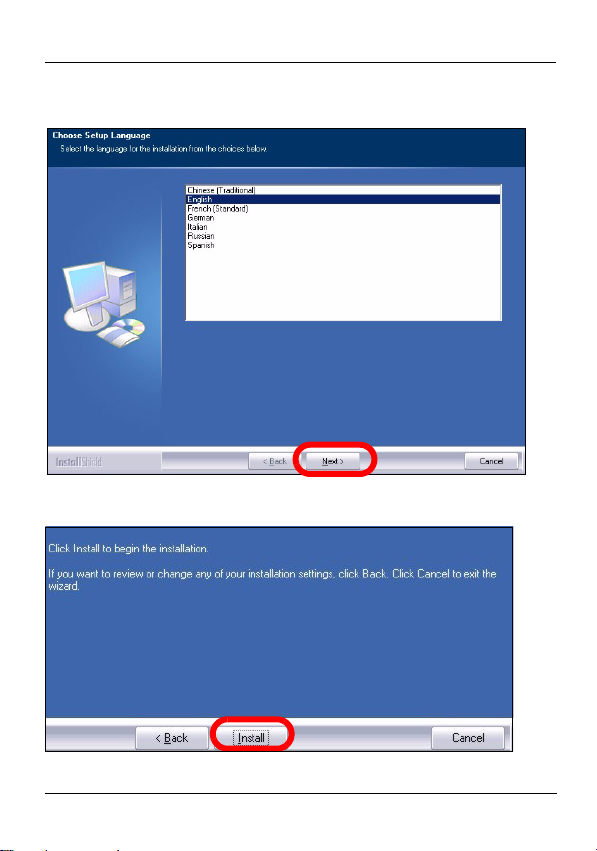
4 When the following screen displays, select your preferred
language and click Next.
5 Continue clicking Next until you reach the Ready to Install
screen. Then, click Install.
3
Page 5
ENGLISH
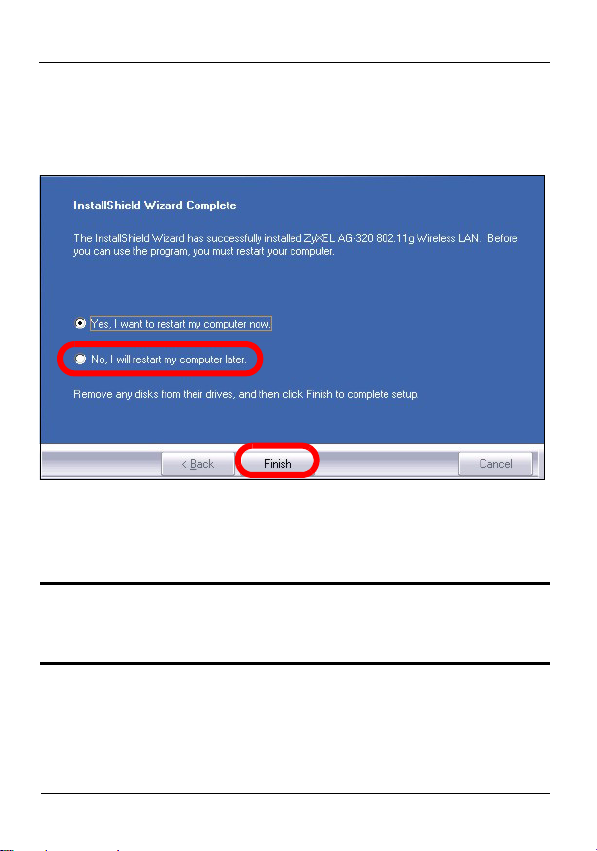
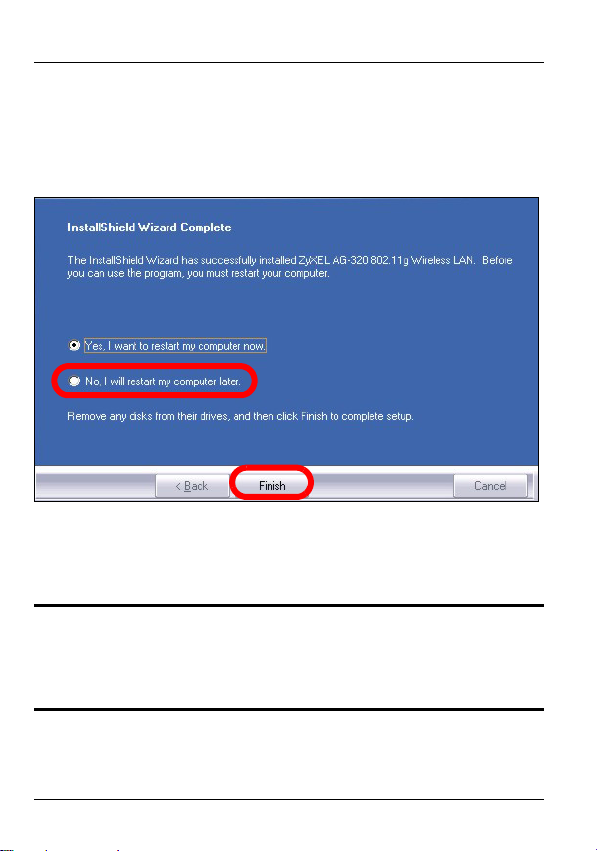
6 When the following screen displays, select No, I will
restart my computer later. You will turn your computer off in
order to install the hardware.
Click Finish to complete the software installation.
2 Install the Hardware
" Do not install the hardware until you have
installed the software from the CD.
4
Page 6

ENGLISH
1 Save your work and close all applications.
2 Turn off the computer and any peripheral device(s), such
as a printer.
3 Unplug the computer from the power source.
4 Ground yourself by wearing an anti-static wrist strap if you
have one or touching a grounded metal object. Remove
the computer cover, and then remove the AG-320 from its
packaging.
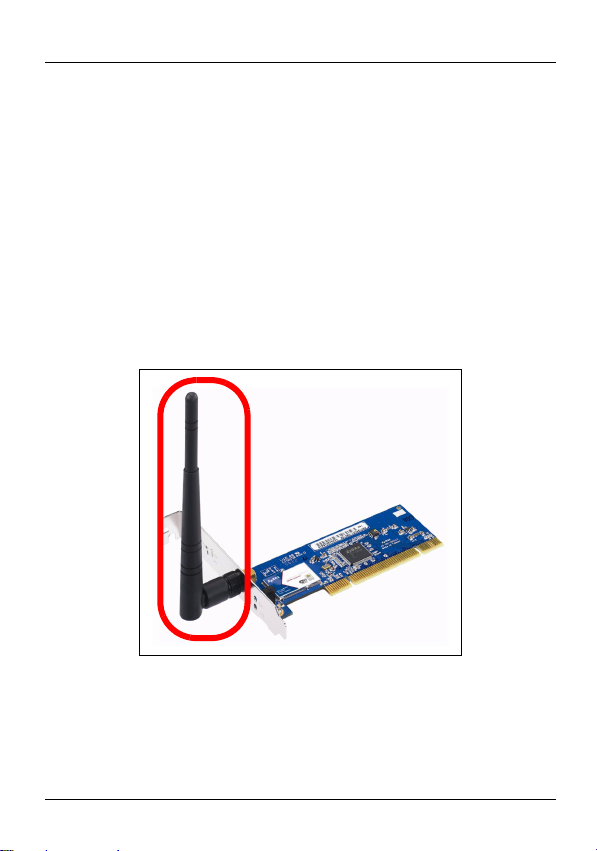
5 If the antenna is attached to the AG-320, remove
(unscrew) it.
5
Page 7
ENGLISH
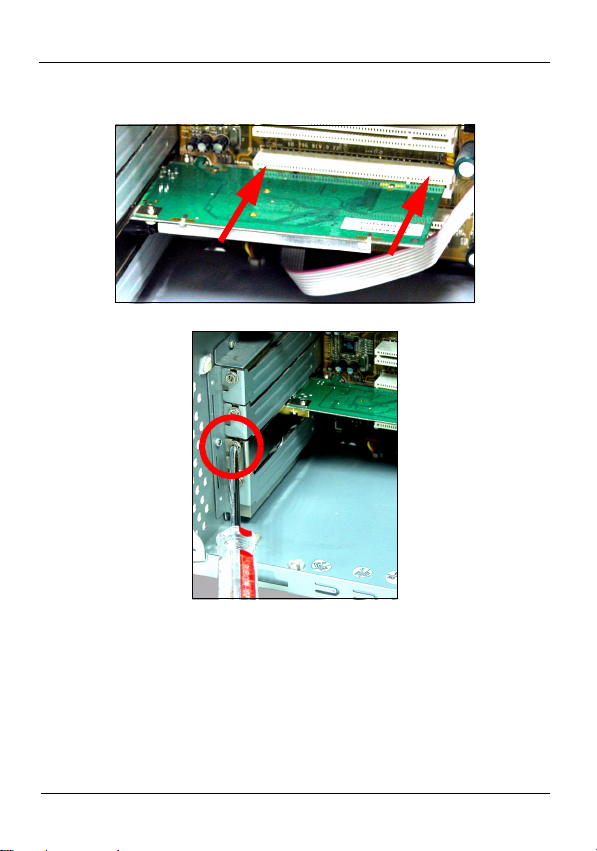
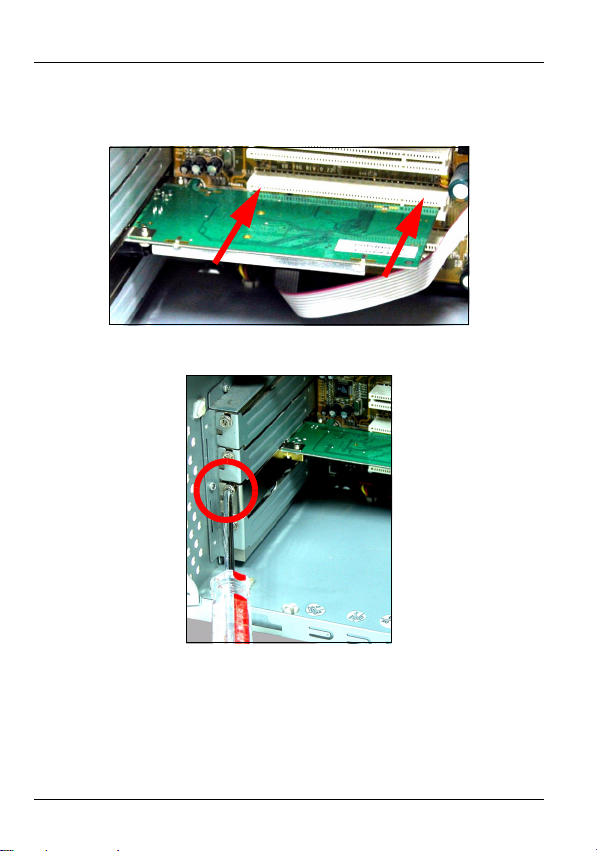
6 Insert the AG-320 into an available PCI slot. Make sure
the AG-320's contacts are fully seated in the PCI slot.
7 Secure the AG-320 to the computer with a bracket screw.
8 Attach (screw) the antenna onto the AG-320.
6
Page 8

ENGLISH
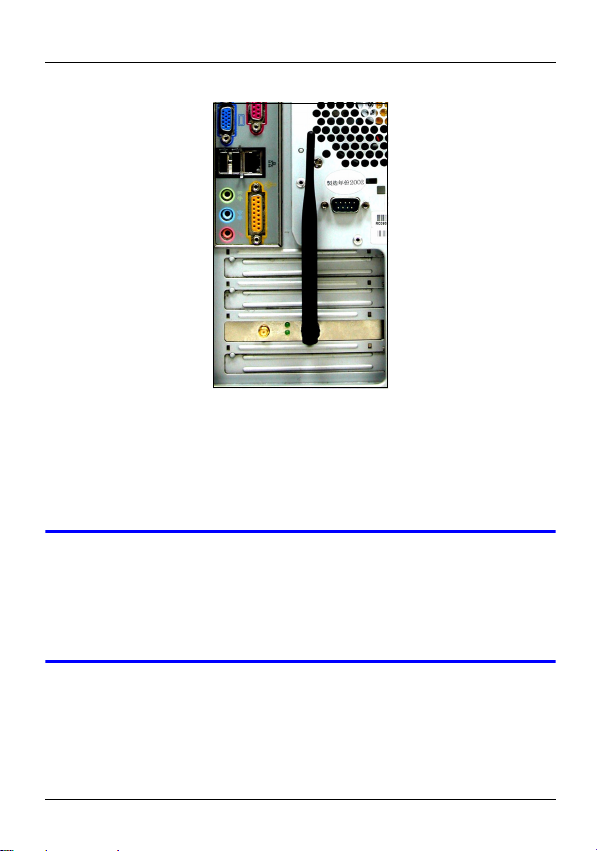
9 Point the antenna up.
10 Replace the computer cover.
11 Turn on your computer.
The AG-320’s LINK LED (light) turns on if it is properly
inserted.
V If the AG-320’s LINK LED is not on after you
have installed the software and the AG-320,
make sure the AG-320 is properly inserted.
7
Page 9

ENGLISH
3 Connect to a Wireless Network
After you install the ZyXEL utility and insert the AG-320, an
icon appears in the system tray.
V If the icon does not display, uninstall and re-
install the ZyXEL utility. See the User’s Guide
for how to uninstall the utility.
The AG-320 automatically searches for any available
network(s) and connects to a wireless network without
security enabled. However, this wireless network may not be
connected to the Internet.
If the icon color is red, you are not connected to a
wireless network.
8
Page 10
ENGLISH
If the icon color is green you are already connected to a
wireless network.
Use the following steps to select and connect to a wireless
network.
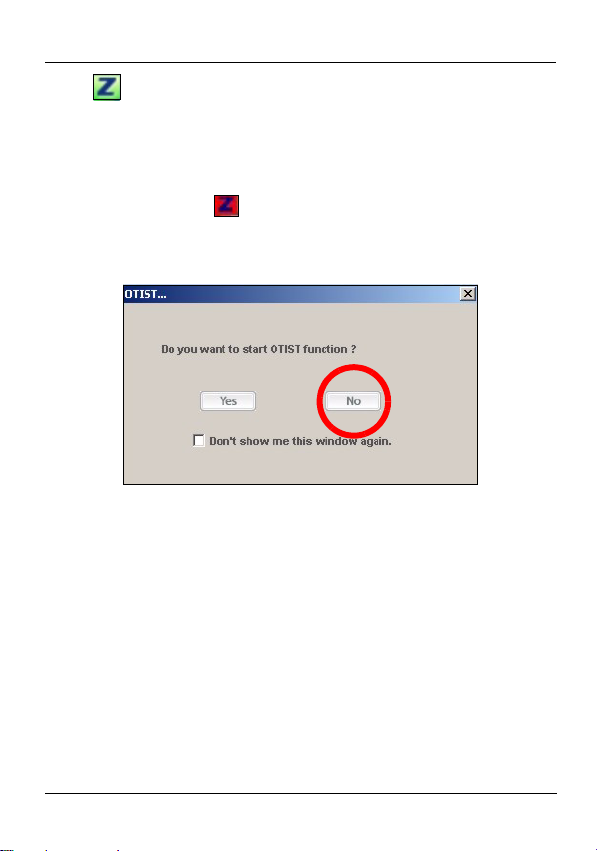
1 Double-click the icon. The OTIST window appears.
Click No unless you want to use an OTIST-enabled
access point (AP) to set up your network. See the User’s
Guide for more information on OTIST.
9
Page 11

ENGLISH
2 The ZyXEL utility Link Info screen displays. Click the Site
Survey tab.
3 The available wireless network(s) displays in the
Available Network List.
SSID means Service Set Identity and is the name of the
wireless network.
10
Page 12
ENGLISH
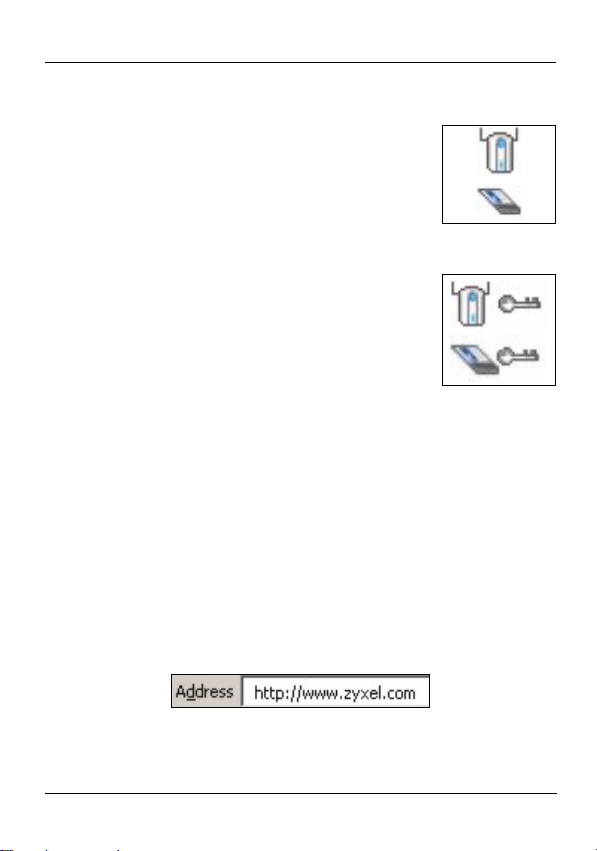
4 If a wireless network has no security, one of the following
icons appears next to its entry in the list.
If a wireless network has security, one of the following icons
appears next to its entry in the list.
Choose the network you want to connect to and double-click
its entry in the list.
5 If a network has no security, the Link Info screen displays.
Go to step 7.
6 If a network has security, the security settings screen
appears. You need to enter security information to connect
to the network. Get this information from the network
administrator. Be sure to enter the information exactly as it
was given to you.
7 To access the Internet, open your Internet browser and
enter the URL of a web site in the address bar. The
network should be connected to the Internet.
If the web site displays correctly, you are successfully
connected to the Internet.
11
Page 13

ENGLISH
System Requirements
Before installation, make sure you have a computer with the
following:
• Pentium II 500 MHz or above
• A 32-bit (v2.2) PCI slot
• A minimum of 20 Mb available hard disk space
• A minimum of 128 Mb RAM
• A CD-ROM drive
• Windows 98 Second Edition (SE), Windows ME, Windows
2000 or Windows XP
• Windows 98 SE users may need the Windows 98 SE CD.
Important Information
Federal Communications Commission
(FCC) Interference Statement
The 802.11g Wireless LAN Adapter has been tested to the
FCC exposure requirements (Specific Absorption Rate).
The equipment complies with FCC RF radiation exposure
limits set forth for an uncontrolled environment, under 47 CFR
2.1093 paragraph (d) (2).
This Transmitter must not be co-located or operating in
conjunction with any other antenna or transmitter.
12
Page 14

ENGLISH
Refer to the User's Guide for general FCC statements.
Procedure to View a Product's
Certification(s)
1 Go to www.zyxel.com
2 Select your product from the drop-down list box on the
ZyXEL home page to go to that product's page.
3 Select the certification you wish to view from this page.
13
Page 15

ENGLISH
14
Page 16

DEUTSCH
DEUTSCH
Übersicht
Die AG-320 ist ein Drahtlosnetzwerkadapter für Ihren
Computer. Eine Aufstellung der Systemvoraussetzungen
finden Sie auf Seite 26.
1 Installation der Software
" Installieren Sie die Software von der CD,
bevor Sie die AG-320 einstecken. Die AG-320
jetzt noch nicht einlegen.
Wenn auf Ihrem Computer das Programm
Funk Odyssey Client installiert ist, muss
dieses zunächst deinstalliert (entfernt)
werden.
1 Entfernen Sie die AG-320, falls Sie sie bereits eingesteckt
haben.
2 Legen Sie die mitgelieferte CD in das CD-ROM-Laufwerk
des Computers ein.
15
Page 17

DEUTSCH
3 Klicken Sie im folgenden Bildschirm auf Setup, um das
ZyXEL-Utility und den Treiber zu installieren.
V Falls dieses Fenster nicht erscheinen sollte,
navigieren Sie auf der CD zur Datei
autorun.exe und klicken Sie doppelt darauf.
16
Page 18

DEUTSCH
4 Wählen Sie in dem folgenden Bildschirm Ihre bevorzugte
Sprache und klicken Sie auf Weiter.
5 Klicken Sie so oft auf Weiter, bis Sie den Bildschirm Bereit
zur Installation erreichen. Klicken Sie dann auf
Installieren.
17
Page 19
DEUTSCH
6 Im folgenden Bildschirm wählen Sie Nein, Computer
später starten. Sie werden Ihren Computer zur Installation
der Hardware abschalten.
Klicken Sie auf Fertig stellen, um die Installation der
Software abzuschließen.
2 Installation der Hardware
" Installieren Sie die Hardware erst nachdem
Sie die Software von der CD installiert
haben.
18
Page 20
DEUTSCH
1 Speichern Sie Ihre Arbeit und schließen Sie alle
Programme.
2 Schalten Sie den Computer und die Peripheriegeräte (wie
z.B. Drucker) aus.
3 Trennen Sie Ihren Computer vom Netz.
4 Erden Sie sich, indem Sie ein antistatisches
Handgelenkband umbinden oder einen geerdeten
Metallgegenstand berühren. Entfernen Sie das Gehäuse
des Computers und nehmen Sie die AG-320 aus der
Verpackung heraus.
5 Falls eine Antenne an der AG-320 angeschlossen ist,
lösen Sie sie (abschrauben).
19
Page 21
DEUTSCH
6 Stecken Sie den AG-320 in einen freien PCI-Steckplatz.
Achten Sie dabei darauf, daß die Kontaktleiste des
Adapters richtig im Steckplatz sitzt.
7 Befestigen Sie den AG-320 an dem Gestell mit einer
Halterungsschraube.
8 Befestigen Sie die Antenne an der AG-320 (anschrauben).
20
Page 22
DEUTSCH
9 Richten Sie die Antenne nach oben.
10 Setzen Sie das Computergehäuse wieder auf.
11 Schalten Sie den Computer ein.
Wenn der AG-320 richtig angeschlossen wurde, beginnt
die LED-Anzeige LINK zu leuchten.
V Falls die AG-320 LINK-LED nach Installation
der Software und der AG-320 nicht aufleuchtet,
kontrollieren Sie, ob die AG-320 richtig
eingesteckt ist.
21
Page 23

DEUTSCH
3 Verbindung mit einem
Drahtlosnetzwerk
Wenn Sie das ZyXEL-Utility installiert und die AG-320
eingesteckt haben, erscheint in der Systemleiste ein neues
Symbol.
V Wenn das Symbol nicht angezeigt wird,
deinstallieren Sie das Utility-Programm und
installieren Sie es erneut. Im Benutzerhandbuch
finden Sie eine Beschreibung, wie das UtilityProgramm deinstalliert wird.
22
Page 24

DEUTSCH
Der AG-320 sucht automatisch nach verfügbaren Netzwerken
und stellt bei Netzwerken ohne Sicherheitsfunktion eine
Verbindung zu einem Drahtlosnetzwerk her. Allerdings ist
dieses Drahtlosnetzwerk nicht unbedingt mit dem Internet
verbunden.
Wenn das Symbol rot ist, besteht keine Verbindung zu
einem Drahtlosnetzwerk.
Wenn das Symbol grün ist, besteht eine Verbindung zu
einem Drahtlosnetzwerk.
Befolgen Sie die folgenden Schritte, um ein Drahtlosnetzwerk
auszuwählen und sich mit diesem Netzwerk zu verbinden.
1 Doppelklicken Sie auf das Symbol. Das OTIST-
Fenster öffnet sich. Klicken Sie auf Nein, sofern Sie Ihr
Netzwerk nicht mit einem OTIST-Access Point (AP)
einrichten möchten. Nähere Informationen zu OTIST
finden Sie in Ihrem Benutzerhandbuch.
23
Page 25

DEUTSCH
2 Der Bildschirm Link Info des ZyXEL-Utility öffnet sich.
Klicken Sie auf die Registerkarte Site Survey (SiteAbfrage).
3 In der Liste Available Network List (Liste verfügbarer
Netzwerke) werden alle verfügbaren Drahtlosnetzwerke
angezeigt.
24
Page 26

DEUTSCH
SSID steht für Service Set Identity und bezeichnet den
Namen des Drahtlosnetzwerks.
4 Wenn ein Drahtlosnetzwerk ohne Sicherheitsfunktion
verfügbar ist, erscheint neben den Einträgen der Liste
eines der folgenden Symbole.
Wenn ein Drahtlosnetzwerk mit Sicherheitsfunktion
verfügbar ist, erscheint neben den Einträgen der Liste eines
der folgenden Symbole.
25
Page 27

DEUTSCH
Wählen Sie das Netzwerk, mit dem Sie sich verbinden
möchten und doppelklicken Sie auf den betreffenden Eintrag
in der Liste.
5 Bei einem Netzwerk ohne Sicherheitsfunktionen erscheint
der Bildschirm Link Info. Gehen Sie zu Schritt 7.
6 Bei einem Netzwerk mit Sicherheitsfunktion erscheint der
Bildschirm mit den Sicherheitseinstellungen. Geben Sie
die Sicherheitsdaten ein, um sich mit dem Netzwerk zu
verbinden. Die notwendigen Informationen erhalten Sie
von Ihrem Netzwerkadministrator. Achten Sie darauf, die
Informationen genau so einzugeben, wie Sie sie erhalten
haben.
7 Um auf das Internet zuzugreifen, öffnen Sie Ihren Internet-
Browser und geben Sie in die Adressleiste die URL einer
Website ein. Das Netzwerk wird mit dem Internet
verbunden.
Sie sind mit dem Internet verbunden, wenn die Website
korrekt dargestellt wird.
Systemvoraussetzungen
Stellen Sie bitte vor der Installation sicher, dass Ihr Computer
die folgenden Anforderungen erfüllt:
• Pentium II 500 MHz oder höher
• Freier PCI-Steckplatz
• Mindestens 20 MB freier Festplattenspeicher
26
Page 28

DEUTSCH
• Mindestens 128 MB RAM
• CD-ROM-Laufwerk
• Windows 98 Second Edition, Windows ME, Windows 2000
oder Windows XP
• Benutzer von Windows 98 SE benötigen unter Umständen
die Windows 98 SE CD
Vorgehensweise zum Aufrufen einer
Produktzertifizierung
1 Gehen Sie auf www.zyxel.com.
2 Wählen Sie Ihr Produkt aus der Auswahlliste auf der
ZyXEL Homepage aus, um die Seite des entsprechenden
Produkts aufzurufen.
3 Wählen Sie die Zertifizierung, die Sie von dieser Seite aus
aufrufen möchten.
27
Page 29

DEUTSCH
28
Page 30

ESPAÑOL
ESPAÑOL
Vista previa
El AG-320 es un adaptador de red inalámbrico para su
ordenador de sobremesa. Consulte la página 40 para una
lista de requisitos del sistema.
1 Instalar el software
" Instale el software del CD antes de insertar el
AG-320. No inserte el AG-320 todavía.
Si ya ha instalado el software Funk Odyssey
Client en el ordenador, desinstálelo (quítelo)
1 Quite el AG-320 si ya lo ha insertado.
2 Inserte el CD incluido en la unidad de CD-ROM de su
ordenador.
29
Page 31

ESPAÑOL
3 Cuando aparezca la siguiente pantalla, haga clic en Setup
para instalar la utilidad ZyXEL y el controlador.
V Si la pantalla no aparece, busque y haga doble
clic en autorun.exe.
30
Page 32

ESPAÑOL
4 Cuando aparezca la siguiente pantalla, seleccione su
idioma preferido y haga clic en Next (Siguiente).
5 Continúe haciendo clic en Next (Siguiente) hasta que
aparezca la pantalla Ready to Install (Preparado para
instalar). Luego haga clic en Install (Instalar).
31
Page 33

ESPAÑOL
6 Cuando aparezca la siguiente pantalla, seleccione No, I
will restart my computer later (No, reiniciaré el sistema
más adelante). Apague el ordenador para instalar el
hardware.
Haga clic en Finish (Finalizar) para completar la instalación
del software.
2 Instalar el Hardware
" No instale el hardware hasta que haya instalado
el software del CD.
1 Guarde su trabajo y cierre todo los programas.
32
Page 34

ESPAÑOL
2 Apague el ordenador y los dispositivos periféricos, como
la impresora.
3 Desenchufar el ordenador de la fuente de alimentación.
4 Para su seguridad, asegure la toma de tierra usando una
muñequera antiestática, si dispone de ella, o en su
defecto tocando un objeto de metal conectado a tierra.
Quite la tapa del ordenador, luego extraiga el AG-320 de
su embalaje.
5 Si tiene la antena conectada al AG-320, quítela
(desenroscando).
33
Page 35

ESPAÑOL
6 Inserte el adaptador en una ranura PCI que esté
disponible. Asegúrese de que los contactos del adaptador
estén enteramente ubicados en la ranura.
7 Asegure el adaptador al chasis con un tornillo de soporte.
8 Coloque (enrosque) la antena en el AG-320.
34
Page 36

ESPAÑOL
9 Dirija la antena hacia arriba.
10 Vuelva a colocar la tapa del ordenador.
11 Encienda su ordenador.
La luz de conexión LINK del AG-320 se enciende cuando
está correctamente insertado.
V Si el LED AG-320 LINK no se enciende tras
haber instalado el software y el AG-320,
compruebe que el AG-320 esté bien insertado.
35
Page 37

ESPAÑOL
3 Conectar a una red inalámbrica
Tras instalar la utilidad ZyXEL e insertar el AG-320,
aparecerá un icono en la bandeja del sistema.
V Si el icono no aparece, desinstale y vuelva a
instalar la utilidad. Consulte la Guía del usuario
para comprobar cómo desinstalar la utilidad.
El AG-320 buscará automáticamente una red o redes
disponible(s) y se conectará a una red inalámbrica que no
tenga la seguridad habilitada. Sin embargo, esta red
inalámbrica puede no estar conectada a Internet.
Si el color del icono es rojo, no está conectado a una red
inalámbrica.
36
Page 38

ESPAÑOL
Si el color del icono es verde, ya está conectado a una
red inalámbrica.
Realice estos pasos para seleccionar y conectarse a una red
inalámbrica.
1 Haga doble clic en el icono . Aparecerá la ventana
OTIST. Haga clic en No a menos que desee usar un punto
de acceso (PA) con OTIST para configurar su red.
Consulte la Guía del usuario para más información sobre
OTIST.
37
Page 39

ESPAÑOL
2 Aparecerá la pantalla Link Info (Información de la
conexión) de la utilidad ZyXEL. Haga clic en la ficha Site
Survey (búsqueda de sitios).
3 Aparecerá(n) la(s) red(es) disponible(s) en la Available
Network List (Lista de redes disponibles).
SSID significa Service Set Identity y es el nombre de la red
inalámbrica.
38
Page 40

ESPAÑOL
4 Si una red inalámbrica no tiene seguridad, aparecerá uno
de los siguientes iconos junto a su entrada en la lista.
Si una red inalámbrica tiene seguridad, aparecerá uno de los
siguientes iconos junto a su entrada en la lista.
Elija la red a la que se desee conectar y haga doble clic en
su entrada en la lista.
5 Si una red no tiene seguridad, aparecerá la pantalla Link
Info (Información de la conexión). Vaya al paso 7.
6 Si una red tiene seguridad, aparecerá la pantalla de
configuración de seguridad. Necesitará introducir la
información de seguridad para conectarse a la red.
Obtenga esta información del administrador de red.
Asegúrese de introducir la información exactamente como
se le ha entregado.
7 Para acceder a Internet, abra su explorador de Internet y
escriba la URL de un sitio web en la barra de direcciones.
La red debería estar conectada a Internet.
39
Page 41

ESPAÑOL
Si el sitio Web aparece correctamente, se ha conectado a
Internet con éxito.
Requisitos del sistema
Antes de la instalación, asegúrese de que tiene un equipo en
el que se cumplen los siguientes requisitos:
• Pentium II a 500 MHz o superior
• Un mínimo de 20 MB disponibles de espacio en disco duro
• Un mínimo de 128 MB RAM
• Una unidad CD-ROM
• Una ranura PCI
• Windows 98 Second Edition, Windows ME, Windows 2000 o
Windows XP
• Los usuarios de Windows 98 SE podrían necesitar el CD de
Windows 98 SE
Procedimiento para ver las
certificaciones de un producto
1 Vaya a www.zyxel.com.
2 Seleccione el producto que desea en el cuadro de lista
desplegable que se encuentra en la página principal de
ZyXEL para obtener acceso a la página de dicho
producto.
3 Seleccione la certificación que desea ver en esta página.
40
Page 42

FRANÇAIS
FRANÇAIS
Présentation
La AG-320 est un adaptateur réseau sans fil pour votre
ordinateur de bureau. Voir la page 52 pour une liste des
configurations requises.
1 Installation du logiciel
" Installez le logiciel à partir du CD avant d'insérer
le AG-320. Ne pas encore insérer le AG-320.
Si vous avez déjà installé le logiciel Funk
Odyssey Client sur l'ordinateur, désinstallez-le
(retirez-le).
1 Retirez le AG-320 si vous l'avez déjà inséré.
2 Insérez le CD inclus dans le lecteur CD-ROM de votre
ordinateur.
41
Page 43

FRANÇAIS
3 Quand l'écran suivant s'affiche, cliquez sur Installer pour
installer l'utilitaire et le pilote de ZyXEL.
V Si l'écran n'apparaît pas, localisez et double
cliquez sur autorun.exe.
42
Page 44

FRANÇAIS
4 Quand l'écran suivant apparaît, sélectionnez la langue
désirée et cliquez sur Suivant.
5 Continuez à cliquer sur Suivant jusqu'à atteindre l'écran
Prêt à installer. Puis, cliquez sur Installer.
43
Page 45

FRANÇAIS
6 Quand l'écran suivant apparaît, sélectionnez Non, je
redémarrerai mon ordinateur plus tard. Vous éteindrez
votre ordinateur afin d'installer le matériel.
Cliquez sur Terminer pour terminer l'installation du logiciel.
2 Installer le matériel
" Ne pas installer le matériel avant d'avoir installé
le logiciel du CD.
44
Page 46

FRANÇAIS
1 Enregistrez votre travail et fermez toutes vos applications.
2 Eteignez votre ordinateur et vos appareils périphériques,
tels que l'imprimante.
3 Débranchez l'ordinateur de la source de courant.
4 Reliez votre corps à la masse en portant un bracelet
antistatique, si vous en avez un ou touchez un objet en
métal relié à la masse. Retirez le capot de l'ordinateur,
puis retirez le AG-320 de son emballage.
5 Si l'antenne est fixée au AG-320, retirez-la (dévissez-la).
45
Page 47

FRANÇAIS
6 Insérez le AG-320 dans un slot PCI disponible. Assurez
vous que les contacts de le AG-320 soient entièrement
posés dans le slot.
7 Fixez le AG-320 avec un tourne-vis..
8 Fixez (vissez) l'antenne au AG-320.
46
Page 48

FRANÇAIS
9 Dirigez l'antenne vers le haut.
10 Replacez le capot de l'ordinateur.
11 Allumez votre ordinateur.
La LED LINK de l'AG-320 s'allume si il est inséré
proprement.
V Si la LED LINK du AG-320 n'est pas allumée
après avoir installé le logiciel et le AG-320,
vérifiez que le AG-320 est correctement inséré.
47
Page 49

FRANÇAIS
3 Connectez à un réseau sans fil
Après avoir installé l'utilitaire ZyXEL et avoir inséré le AG320, une icône apparaît dans la barre d'état.
V Si l'icône ne s'affiche pas, désinstallez et
réinstallez l'utilitaire. Consultez le guide de
l'utilisateur pour la manière de désinstaller
l'utilitaire.
L'AG-320 recherche automatiquement le(s) réseau(x)
disponibles et se connecte à un réseau sans fil sans sécurité
activée. Cependant, ce réseau sans fil n'est peut-être pas
connecté à Internet.
48
Page 50

FRANÇAIS
Si la couleur de l'icône est rouge, vous n'êtes pas
connecté à un réseau sans fil.
Si la couleur de l'icône est verte vous êtes déjà connecté
à un réseau sans fil.
Utilisez les étapes suivantes pour sélectionner et connecter
un réseau sans fil.
1 Double cliquez sur l'icône . La fenêtre OTIST apparaît.
Cliquez sur Non à moins que vous ne vouliez utiliser un
point d'accès (AP) OTIST pour installer votre réseau. Voir
le guide de l'utilisateur pour plus d'informations sur OTIST.
49
Page 51

FRANÇAIS
2 L'écran Link Info (info liaison) de l'utilitaire ZyXEL
apparaît. Cliquez sur l'onglet Site Survey (etude du site).
3 Le(s) réseau(x) disponible(s) apparaîtront dans la
Available Network List (liste de réseau disponible).
SSID signifie Service Set Identity, c'est le nom du réseau
sans fil.
50
Page 52

FRANÇAIS
4 Si un réseau sans fil n'est pas sécurisé, l'une des icônes
suivantes apparaît à côté de son entrée dans la liste.
Si un réseau sans fil est sécurisé, l'une des icônes suivantes
apparaît à côté de son entrée dans la liste.
Choisissez le réseau auquel vous voulez vous connecter et
double cliquez sur son entrée dans la liste.
5 Si un réseau n'est pas sécurisé, l'écran Info liaison
apparaît. Allez à l'étape 7.
6 Si un réseau est sécurisé, l'écran des paramètres de
sécurité apparaît. Vous devez entrer les informations de
sécurité pour vous connecter au réseau. Obtenez ces
informations auprès de l'administrateur du réseau. Prenez
soin d'entrer les informations exactement comme elles
vous ont été données.
7 Pour accéder à Internet, ouvrez votre navigateur Internet
et entrez l'URL du site web dans la barre d'adresse. Le
réseau devrait être connecté à Internet.
51
Page 53

FRANÇAIS
Si le site web s'affiche correctement, vous êtes connecté à
Internet.
Configuration requise
Avant l'installation, assurez-vous que vous avez un ordinateur
avec la configuration suivante:
• Pentium II 500 MHz ou plus
• Au minimum 20 Mo d'espace disponible sur le disque dur
• An minimum 128 Mo de RAM
• Un lecteur de CD-ROM
• Un emplacement PCI
• Windows 98 Second Edition, Windows ME, Windows 2000
ou Windows XP
• Il se peut que les utilisateurs de Windows 98 SE aient besoin
du CD Windows 98 SE
Procédure permettant de consulter
une(les) Certification(s) du Produit
1 Connectez vous sur www.zyxel.com.
2 Sélectionnez votre produit dans la liste déroulante se
trouvant sur la page d'accueil ZyXEL pour accéder à la
page du produit concerné.
3 Sélectionnez sur cette page la certification que vous
voulez consulter.
52
Page 54

ITALIANO
ITALIANO
Cenni generali
AG-320 è una scheda di rete wireless per i computer desktop.
Vedere a pagina 64 per l'elenco dei requisiti di sistema.
1 Installare il Software
" Installare il software dal CD prima di inserire
AG-320. Non inserire ancora AG-320.
Se sul computer è già installato il software Funk
Odyssey Client, provvedere a disinstallarlo.
1 Rimuovere AG-320 se è già stato inserito.
2 Inserire il CD fornito a corredo nell'unità CD-ROM del
computer.
53
Page 55

ITALIANO
3 Quando viene visualizzata la seguente schermata, fare
clic su Setup per installare l'utility e il driver ZyXEL.
V Se la schermata non viene visualizzata,
individuare e fare doppio clic sul file
autorun.exe.
54
Page 56

ITALIANO
4 Quando viene visualizzata la seguente schermata,
selezionare la lingua desiderata e fare clic su Avanti.
5 Continuare facendo clic su Avanti finché non si raggiunge
la schermata Pronto per l'installazione. A questo punto,
fare clic su Installa.
55
Page 57

ITALIANO
6 Quando viene visualizzata la seguente schermata,
selezionare No, avvierò il computer in un secondo
momento. Il computer verrà spento per permettere
l'installazione dell'hardware.
Fare clic su Fine per completare l'installazione del software.
2 Installazione dell'hardware
" Non installare l'hardware prima di aver installato
il software contenuto nel CD.
56
Page 58

ITALIANO
1 Salvare il lavoro e chiudere tutti i programmi.
2 Spegnere il computer e le periferiche collegate, come la
stampante.
3 Scollegare il computer dalla presa di alimentazione.
4 Eliminare verso terra le scariche indossando un polsino
anti-statico se posseduto oppure toccare un oggetto di
metallo posto a massa. Rimuovere il coperchio del
computer, quindi rimuovere la AG-320 dalla sua
confezione.
5 Se l'antenna è collegata a AG-320, rimuoverla (svitarla).
57
Page 59

ITALIANO
6 Inserire l'adattatore in uno slot disponibile del PCI.
Assicurarsi che i contatti dell' adattatore siano
completamente inseriti nello slot.
7 Fissare l'adattatore allo chassis con una vite.
8 Collegare (avvitare) l'antenna al AG-320.
58
Page 60

ITALIANO
9 Puntare l'antenna verso l'alto.
10 Rimettere a posto il coperchio del computer.
11 Accendere il computer.
Il corretto inserimento dell'AG-320 viene segnalato
dall'accensione dell'indicatore LINK.
V Se il led AG-320 LINK non è acceso in seguito
all'installazione del software e del AG-320,
assicurarsi che AG-320 sia inserito
correttamente.
59
Page 61

ITALIANO
3 Connessione a una rete senza fili
In seguito all'installazione dell'utility ZyXEL e all'inserimento
di AG-320, nella barra di sistema viene visualizzata un'icona.
V Se l'icona non viene visualizzata,
disinstallare e reinstallare l'utility. Fare
riferimento alla Guida utente per le istruzioni su
come disinstallare l'utility.
L'AG-320 cerca automaticamente qualsiasi rete disponibile e
si collega a una rete senza fili se per questa non è attiva
l'opzione di protezione. Tuttavia, questa rete senza fili
potrebbe non essere collegata a Internet.
Se l'icona è di colore rosso, non è stato stabilito un
collegamento alla rete senza fili.
60
Page 62

ITALIANO
Se l'icona è di colore verde, il sistema è già collegato a
una rete senza fili.
Seguire i passaggi seguenti per selezionare ed effettuare il
collegamento a una rete senza fili.
1 Fare clic due volte sull'icona . Viene visualizzata la
finestra OTIST. Fare clic su No a meno che non si
desideri utilizzare un punto di accesso (AP) abilitato
OTIST per impostare la rete. Fare riferimento alla Guida
Utente per maggiori informazioni su OTIST.
61
Page 63

ITALIANO
2 Viene visualizzata la schermata Link Info dell'utility
ZyXEL. Fare clic sulla scheda Site Survey (analisi sito).
3 Viene visualizzato l'elenco delle reti wireless disponibili
nel campo d'azione.
SSID sta per Service Set Identity e rappresenta il nome della
rete senza fili.
62
Page 64

ITALIANO
4 Se la rete senza fili non è protetta, vicino alla voce
dell'elenco appare una delle icone seguenti.
Se la rete senza fili è protetta, vicino alla voce dell'elenco
appare una delle icone seguenti.
Scegliere la rete a cui si desidera collegarsi e fare clic due
volte sulla voce corrispondente nell'elenco.
5 Se una rete non è protetta, viene visualizzata la
schermata Link Info. Andare al passaggio 7.
6 Se una rete è protetta, viene visualizzata la schermata
delle impostazioni di sicurezza. E' necessario inserire
informazioni di sicurezza per collegarsi alla rete. Queste
informazioni possono essere reperite contattando
l'amministratore di rete. Assicurarsi di inserire le
informazioni esattamente nel modo in cui sono state
fornite.
7 Per accedere a Internet, aprire il browser e immettere
l'indirizzo URL di un sito Web nella barra degli indirizzi. La
rete dovrebbe essere collegata a Internet.
63
Page 65

ITALIANO
Se il sito Internet viene visualizzato correttamente, il
collegamento a Internet è avvenuto con successo.
Requisiti di sistema
Prima dell'installazione verificare che il computer sia dotato di
qaunto segue:
• Pentium II a 500 MHz o superiore
• Spazio libero disponibile nel disco rigido di almeno 20 MB
• Almeno 128 MB di RAM
• Unità CD-ROM
•Slot PCI
• Windows 98 Second Edition, Windows ME, Windows 2000
o Windows XP
Gli utenti di Windows 98 SE potrebbero aver bisogno del CD
di Windows 98 SE
Procedura per visualizzare le
certificazioni di un prodotto
1 Andare alla pagina www.zyxel.com
2 Nel sito ZyXEL, selezionare il proprio prodotto dall’elenco
a discesa per andare alla pagina di quel prodotto.
3 Da questa pagina selezionare la certificazione che si
vuole vedere.
64
Page 66

РУССКИЙ
РУССКИЙ
Обзор
AG-320 - это беспроводной сетевой адаптер для вашего
настольного компьютера. Перечень системных
требований смотрите на странице 77.
1 Установите программное
обеспечение
" Установите с CD-диска программное
обеспечение перед подключением AG-320.
Пока не подключайте AG-320.
Если у вас на компьютере уже есть
установленное приложение Funk Odyssey
Client, то его следует деинсталлировать
(удалить).
1 Отключите AG-320, если вы его уже подключили.
2 Вставьте CD-диск с ПО в привод CD-ROM вашего
компьютера.
65
Page 67

РУССКИЙ
3 Когда отобразится следующее окно, щелкните на
кнопке Setup (Установить) утилиту и драйвер ZyXEL.
V Если такое окно не появилось, то найдите и
запустите файл autorun.exe.
66
Page 68

РУССКИЙ
4 Когда отобразится следующее окно, выберите нужный
вам язык и щелкните на кнопке Next (Далее).
5 Продолжайте нажимать на кнопку Next (Далее) до тех
пор, пока не появится окно Ready to Install (Готово к
67
Page 69

РУССКИЙ
установке). Затем щелкните на кнопке Install
(Уста новить ).
6 Когда отобразится следующее окно, выберите No, I will
restart my computer later (Нет, перезагрузить
компьютер позже). Вы выключите компьютер для
установки оборудования.
68
Page 70

РУССКИЙ
Нажмите Finish (Завершить), чтобы завершить процесс
установки.
2 Подключение оборудования
" Не устанавливайте оборудование до
установки программного обеспечения с CDдиска.
1 Сохраните свои данные и закройте все приложения.
2 Выключите компьютер и периферийные устройства,
например, принтер.
69
Page 71

РУССКИЙ
3 Отключите компьютер от сети питания.
4 Заземлите себя, одев браслет для защиты от
статического электричества, или прикоснитесь к
заземленному металлическому объекту. Снимите
крышку процессорного блока компьютера, затем
распакуйте AG-320.
5 Если к AG-320 подключена антенна, то ее необходимо
снять (открутить).
70
Page 72

РУССКИЙ
6 Вставьте AG-320 в свободный PCI-слот. Убедитесь, что
контакты AG-320 вошли в слот полностью.
7 Закрепите AG-320 в компьютере при помощи винта
кронштейна.
8 Закрепите (прикрутите) антенну на AG-320.
71
Page 73

РУССКИЙ
9 Направьте антенну вверх.
10 Установите на место крышку процессорного блока.
11 Включите комьютер.
Если адаптер AG-320 установлен правильно, то на нем
загорится индикатор LINK (СВЯЗЬ).
V Если индикатор AG-320 LINK не включается
после установки программного обеспечения
и AG-320, то проверьте правильность
подключения AG-320.
72
Page 74

РУССКИЙ
3 Подключение к беспроводной
сети
После инсталляции утилиты ZyXEL и установки AG-320 в
системной линейке (обычно в нижней части рабочего
поля) появляется иконка.
V Если значок не отображается, то
деинсталлируйте, а затем заново установите
утилиту. Смотрите Руководство пользователя
где описана процедура деинсталляции
утилиты.
73
Page 75

РУССКИЙ
Адаптер AG-320 автоматически проводит поиск любой
доступной сети(ей) и подсоединяется к беспроводной сети
без включения системы защиты.Тем не менее, эта
беспроводная сеть может не иметь выхода в Internet.
Если цвет иконки красный, это означает, что вы не
подключены к беспроводной сети.
Если цвет иконки зеленый, это означает, что вы уже
подключены к беспроводной сети.
Для выбора и подключения к беспроводной сети
выполните следующие операции.
1 Дважды щелкните на иконке . Появится окно OTIST.
Щелкните на кнопке No (Нет), если вы не хотите
использовать в своей сети точку доступа (АР) с
функцией OTIST. Более подробная информация об
OTIST приведена в Руководстве пользователя.
74
Page 76

РУССКИЙ
2 Появится окно Link Info (Информация о связи) утилиты
ZyXEL. Щелкните на закладке Site Survey (Обзор
сайта).
3 Доступная беспроводная сеть(и) выводится в списке
доступных сетей (Available Network List).
75
Page 77

РУССКИЙ
SSID означает Service Set Identity (Идентификация
пакета услуг). Этот параметр является именем вашей
беспроводной сети.
4 Если доступна беспроводная сеть без включения
системы защиты, то рядом с элементом списка будет
находиться одна из следующих иконок.
Если доступна беспроводная сеть с включенной
системой защиты, то рядом с элементом списка будет
находиться одна из следующих иконок.
76
Page 78

РУССКИЙ
Выберите сети, к которой вы хотите подключиться и
дважды щелкните на ее обозначении в списке.
5 Если сеть не имеет системы безопасности, то появится
окно Link Info (Информация о связи). Переходите к
шагу 7.
6 Если сеть имеет систему безопасности, то появится
окно настройки параметров этой системы. Для
подключения к сети вы будете должны ввести
соответствующую информацию. Ее можно получить у
системного администратора. Вы должны будете ввести
эти данные предельно точно.
7 Для доступа к сети Интернет включите ваш Интернет-
браузер и введите адрес (URL) вебсайта в строке
адреса. Сеть должна подключена к Internet.
Если веб-сайт отображается правильно, то вы успешно
подключились к Internet.
Системные требования
Перед установкой убедитесь, что Ваш компьютер
соответствует следующим требованиям:
• Pentium II 500 МГц или выше
• Не менее 20 Мб доступного места на жестком диске
• Не менее 128 Мб ОЗУ
• Устройство CD-ROM
•32-битный (v2.2) PCI-слот
77
Page 79

РУССКИЙ
• Windows 98 Second Edition, Windows ME, Windows 2000
или Windows XP
• Пользователям Windows 98 SE может потребоваться
установочный компакт-диск 98 SE
Процедура просмотра
сертификатов изделий
1 Зайдите на сайт www.zyxel.ru.
2 Выберите нужное изделие из раскрывающегося списка
на домашней странице корпорации ZyXEL и перейдите
на страницу, посвященную этому изделию.
3 Выберите на этой странице нужный сертификат для
просмотра.
78
Page 80

繁體中文
繁體中文
概覽
AG-320 是桌上型電腦專用的無線網路配接器。 請參閱第 88
頁,取得系統需求清單。
1 安裝軟體
" 插入 AG-320 之前請先從 CD 安裝軟體。先不
要插入 AG-320。
如果您的電腦先前安裝過 Funk Odyssey Client
軟體,在安裝本驅動程式前,請先移除安裝。
1 如果已將 AG-320 插入,請移除之。
2 將隨附光碟片置入 CD-ROM 光碟機。
79
Page 81

繁體中文
3 以下畫面顯示時,按一下 Setup (設定) 安裝 ZyXEL 公用
程式和驅動程式。
V 如果沒有顯示該畫面,請找出 autorun.exe 再
按兩下。
80
Page 82

繁體中文
4 以下畫面顯示時,選取您偏好使用的語言再按一下 Next (
下一步 )。
5 持續按 Next ( 下一步) 直到抵達 Ready to Install (準備安
裝 ) 畫面。接著,按一下 Install (安裝)。
81
Page 83

繁體中文
6 以下畫面顯示時,選取 No, I will restart my computer later
( 不,我稍後再重新啟動電腦 )。為了安裝硬體您稍後須關
閉電腦。
按一下 Finish ( 完成 ) 完成軟體安裝。
2 安裝硬體
" 請先從 CD 安裝軟體再安裝硬體。
1 儲存你的工作文件以及關閉所有的程式。
2 關閉電腦及其週邊設備 ( 例如印表機 )。
3 拔掉插頭斷掉電腦的電源。
82
Page 84

繁體中文
4 如果您有防靜電手環請戴上,或可觸摸接地的金屬物件,以
做好接地準備。打開電腦外殼,然後從包裝中取出 AG-
320。
5 如果 AG-320 裝有天線,請將天線移除 ( 鬆開螺絲卸下 )。
6 將 AG-320 插入到一個可用的 PCI 插槽,確認 AG-320 與
PCI 插槽完全密合。
83
Page 85

繁體中文
7 使用檔板的螺絲將 AG-320 鎖緊在電腦的機殼上。
8 將天線裝到 AG-320 上 ( 用螺絲鎖上 )。
9 讓天線向上指。
10裝回電腦封蓋。
11開啟電腦。
84
Page 86

繁體中文
AG-320 的 LINK (連線)燈號會因為正確插入的動作而亮
起。
V 如果安裝軟體和 AG-320 之後 AG-320掇 LINK
LED 指示燈沒有亮起,請確認 AG-320 是否正
確插入。
3 連接無線網路。
安裝 ZyXEL 公用程式並插入 AG-320 之後,系統托盤
(system tray) 會出現一個新圖示。
85
Page 87

繁體中文
V 如果 圖示沒有顯示,請解除安裝公用程式,
再重新安裝一次。請參閱 《使用手冊》,了解如
何解除安裝公用程式。
AG-320 自動搜尋任何可用的網路,並連接其中一個未啟動保
全功能的無線網路。 但是,此無線網路可能未連接網際網路。
如果 圖示呈現紅色,代表您目前並未連接任何無線網路。
如果 圖示呈現綠色,代表您已經連接無線網路。
請利用下列步驟選取和連接無線網路。
1 按兩下 圖示。出現 OTIST 視窗。除非您要使用支援
OTIST 功能的基地台 (AP) 設定網路,否則請按一下 No
(否)。請參閱 《使用手冊》,取得更多關於 OTIST 的資
訊。
86
Page 88

繁體中文
2 顯示 ZyXEL 公用程式 Link Info ( 連結資訊 ) 畫面。 點擊
Site Survey (基地台搜尋)標籤。
3 在 Available Network List (可用網路清單)中會顯示可用
的無線網路。
SSID 意指服務組識別碼,這是無線網路的名稱。
87
Page 89

繁體中文
4 如果無線網路不具備保全功能,清單中的項目旁會出現以下
其中一種圖示。
如果無線網路具備保全功能,清單中的項目旁會出現以下其
中一種圖示。
選擇您要連接的網路,再按兩下清單中該網路所屬的項目。
5 如果網路不具備保全功能,螢幕會顯示 Link Info ( 連結資
訊) 畫面。請跳至步驟 89。
6 如果網路具備保全功能,則出現安全設定畫面。您必須輸入
安全資訊才能連接網路。請向網路管理員索取該資訊。如果
您已有該資訊,務必將其正確輸入。
7 若要連結網際網路,請開啟網路瀏覽器並在地址列輸入網站
的 URL。 網路應該已連接網際網路。
如果網站顯示正確,代表您成功連接網際網路。
系統需求
在安裝之前,請確認您的電腦或筆記型電腦符合下列的需求:
88
Page 90

繁體中文
• CPU Pentium II 500 MHz 或以上規格
• 至少 128 MB RAM
• 至少 20 MB 可用的硬碟空間
• CD-ROM 光碟機
• 一個 32-bit PCI 插槽
• Windows 98 Second Edition, Windows ME, Windows 2000
或 Windows XP 中任一作業系統
• Windows 98 SE 的使用者可能需要 Windows 98 SE 光碟
低功率電波輻射性電機管理辦法
經型式認證合格之低功率射頻電機,非經許可,公司、商號或
使用者均不得擅自變更頻率、加大功率或變更原設計之特性及
功能。
低功率射頻電機之使用不得影響飛航安全及干擾合法通信;經
發現有干擾現象時,應立即停用;並改善至無干擾時方得繼續
使用。
前項合法通信,指依電信法規定作業之無線電信。低功率射頻
電機須忍受合法通信或工業、科學及醫療用電波輻射信電機設
備之干擾。
如何查閱產品的認證
1 請到 ZyXEL 網站 www.zyxel.com。
2 請在 ZyXEL 首頁的產品頁面上,透過下拉式選單選取產品名
字。
3 從這個頁面上選擇你想查閱的產品認證。
89
 Loading...