

Zte Zfive 3 LTE User Manual

Z559DL
PHONE & FEATURE GUIDE
Z079584509773
1

Setting Up Your Phone
Installing a microSDXC™ Card (Not Included)
The microSDXC card can be installed and removed while the
phone is turned on. Unmount the microSDXC card before
removing it.
1. Place your finger in the slot at the lower left of the back cover
to lift and remove the cover.
2. Hold your microSDXC card with the metal contacts facing
down and slide it into the microSDXC card slot.
3. Insert the battery by aligning the metal contacts on the
battery with the metal contacts in the battery compartment.
Gently push down on the battery until it clicks into place.
4. Press the cover gently back into place until you hear a click.
Charging the Battery
Your phone’s battery should have enough power for the phone
to turn on, find a signal, and make a few calls. You should fully
charge the battery as soon as possible.
WARNING! Use only ZTE-approved chargers and USB cables.
The use of unapproved accessories could damage your phone
or cause the battery to explode.
1. Connect the adapter to the charging port. Ensure that the
adapter is inserted with the correct orientation. Do not
force the connector into the charging port.
2. Connect the charger to a standard AC wall outlet. If the
phone is on, you’ll see a charging icon, such as or ,
appear in the Status Bar.
3. Disconnect the charger when the battery is fully charged.
2

Speaker
3.5mm
Headset
Jack*
Back
Camera
Flash
Back
Cover
Earpiece
Proximity &
Light Sensor
Volume Key
Back Key**
Home Key
Touch
Screen
Front Camera
Charging/
micro-USB Port
Recent Apps
Key**
Power/Lock
Key
Microphone
Indicator
Light
Getting to Know Your Phone
* Supports CTIA headsets only.
**Customizable. See Touch Screen and Navi gation Keys panel.
3
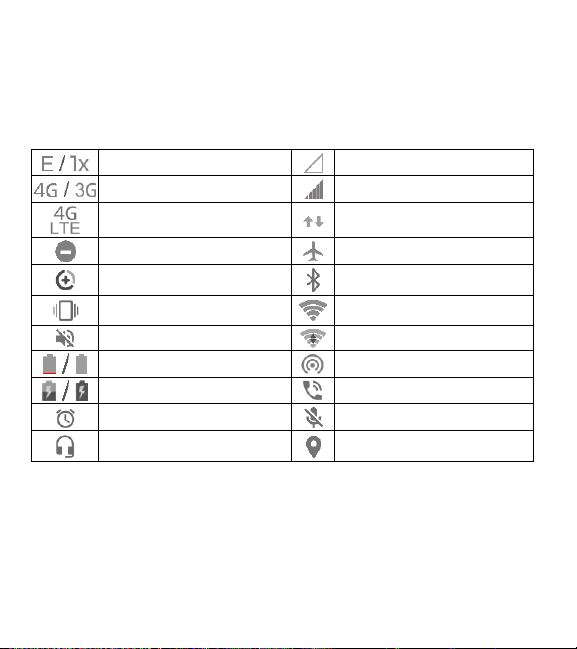
2G connected
No signal
3G connected
Signal strength
4G LTE™ connected
Mobile data in use
Do not disturb mode on
Airplane mode
Data saver on
Bluetooth on
Vibration on
Connected to a Wi-Fi® network
Ringer off
Wi-Fi in use
Battery low / Battery full
Portable Wi-Fi hotspot on
Battery charging
Speaker on
Alarm set
Phone microphone off
Wired headset connected
GPS on
Notifications
The Status Bar at the top of the home screen provides phone and service status icons,
and notification icons.
Phone and Service Status Icons
4

New SMS / MMS
Song playing
New email
message(s)
New Wi-Fi network
detected
New Gmail
message(s)
USB tethering on
Missed call
Downloading /
sending data
Call in progress /
Call on hold
microSDXC card
mounted
Notification Icons
QSG Z079584509773
5
Touch Screen and Navigation Keys
Power/Lock Key: Press and hold to power on,
restart the phone, turn on/off airplane mode, or
power off. Press to turn on/off the screen display.
Home Key: Press to return to the home
screen from any application or screen. Press and
hold to use Google Assistant.
Recent Apps Key: Press to view recently used
apps. Double-tap to switch to the most recent app.
Press and hold to activate split-screen mode.
Back Key: Press to go to the previous screen.
Volume Key: Press to turn the volume up or down
or to enable silent mode/vibration mode.
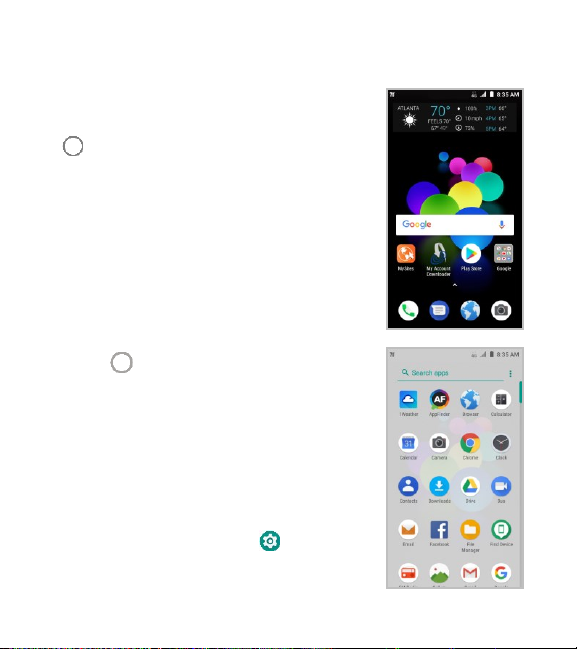
Opening Applications
1. Press if the current screen is not the home
screen.
2. Swipe up on the screen to view available apps.
3. Swipe up or down on the screen and tap an app
to open it.
Personalize
You can exchange the positions of the Back Key and
Recent Apps Key.
Swipe up on the home screen and tap >
Features > Navigation keys and select an option.
6
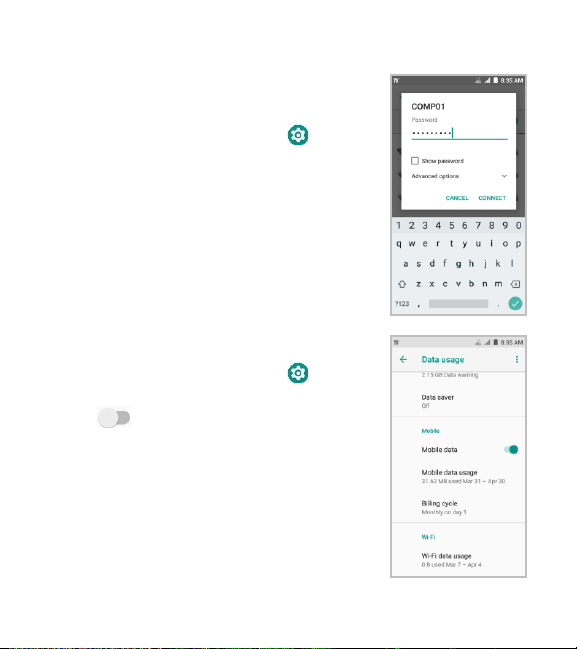
Internet
Connecting via Wi-Fi
1. Swipe up on the home screen and tap >
Network & Internet > Wi-Fi.
2. Slide the on/off switch if Wi-Fi is off. Your phone
automatically searches for Wi-Fi networks in range
and displays their names and security settings. Your
phone also connects to previously linked networks
when they are in range.
3. Tap a network name to connect to it.
4. If the network is secured, enter a password or other
credentials (ask your network administrator for
details) and tap CONNECT.
Connecting via Mobile Network
1. Swipe up on the home screen and tap >
Network & Internet > Data usage.
2. Slide next to Mobile data to enable mobile
data.
®
7

Calling and Voicemail
Making a Call
1. From the home screen, tap > .
2. Enter the phone number with the on-screen keypad.
Tap to delete incorrect digits.
3. Tap to place the call.
NOTE: To call a contact, swipe up on the home screen, tap
, and tap .
Checking Voicemail
1. From the home screen, tap > .
2. Press and hold the 1 Key. If prompted, enter your
voicemail password.
3. Follow the voice prompts to listen to and manage your
voicemail messages.
NOTE: To set your voicemail service, tap > >
Settings > Voicemail and tap the voicemail settings you
want to change. For detailed information, please contact
the service provider.
8
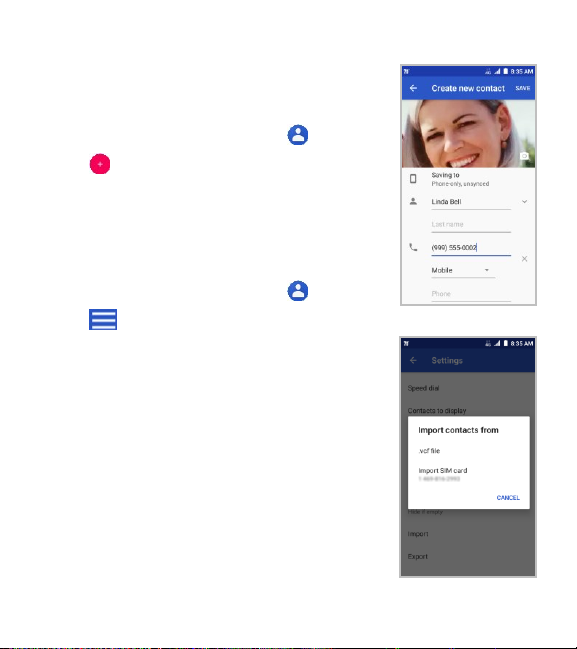
Address Book
Creating a New Contact
1. Swipe up on the home screen and tap .
2. Tap .
3. Enter the contact name, phone numbers, email
addresses, and other information, as shown.
4. Tap SAVE to save the contact.
Importing Contacts in Batches
1. Swipe up on the home screen and tap .
2. Tap > Settings > Import > .vcf file or Import
SIM card.
3. Tap the vCard file or SIM card contacts you want to
import. If prompted, select an account in which to
save the contacts.
9

Text Messaging
1. From the home screen, tap > .
2. Enter the recipient(s) and message text.
If you want to send an MMS, tap to add
attachments.
3. Tap to send the message.
Please don’t text and drive.
10
 Loading...