

ZTE Z787 User Manual

Z787
User Manual
1

Thank you for choose this ZTE mobile device. In order to keep
your device in its best condition, please read this manual and
keep it for future reference.
Copyright
Copyright © 2014 ZTE CORPORATION
All rights reserved.
No part of this publication may be quoted, reproduced,
translated or used in any form or by any means, electronic or
mechanical, including photocopying and microfilm, without the
prior written permission of ZTE Corporation.
Notice
ZTE Corporation reserves the right to make modifications on print
errors or update specifications in this guide without prior notice.
This manual has been designed with the utmost care to ensure
the accuracy of its content. However, all statements, information
and recommendations contained therein do not constitute a
warranty of any kind, either expressed or implied. Please refer to
chapter For Your Safety to be sure to use your phone properly
and safely.
We offer self-service for our smart terminal device users. Please
visit the ZTE official website (at www.ztedevice.com) for more
information on self-service and supported product models.
Information on the website takes precedence.
2

Disclaimer
ZTE Corporation expressly disclaims any liability for faults and
damages caused by unauthorized modifications of the software.
Images and screenshots used in this manual may differ from the
actual product. Content in this manual may differ from the actual
product or software.
Trademarks
ZTE and the ZTE logos are trademarks of the ZTE Corporation.
Google and Android are trademarks of Google, Inc.
The Bluetooth® trademark and logos are owned by the Bluetooth
SIG, Inc. and any use of such trademarks by ZTE Corporation is
under license.
microSDHC Logo is a trademark of SD-3C, LLC.
Other trademarks and trade names are the property of their
respective owners.
Version No.: R1.0
Edition Time: May 19, 2014
3

Table of Contents
Getting Started ....................................................... 13
Starting Up .................................................................. 13
Installing the micro-SIM Card ................................. 13
Installing the microSDHCTM Card (Not Included) .... 14
Charging the Battery .............................................. 16
Extending the Battery Life ............................................ 18
Switching Your Phone On/Off ...................................... 18
Setting Up Your Phone for the First Time ............... 19
Switching to Sleep Mode ........................................ 19
Waking Up Your Phone .......................................... 20
Touch Control .............................................................. 20
Getting to Know Your Phone ................................ ....... 22
Knowing the Keys .................................................. 25
Home Screen ......................................................... 25
Application List Screen ........................................... 29
Status and Notification Icons .................................. 31
Using the Notification Panel ................................... 33
Protecting Your Phone With a Screen Unlock Pattern
.............................................................................. 35
Protecting Your Phone With Encryption .................. 36
Phone Calls ............................................................ 39
Making Calls ................................................................ 39
Calling From the Dialer ........................................... 39
Calling From Your Contacts ................................... 39
4

Calling From Your Call History ................................ 40
Calling From a Text Message ................................. 40
Using Speed Dial .................................................... 40
Receiving Calls ............................................................ 41
Answering a Call ..................................................... 41
Rejecting a Call ...................................................... 41
Using Options During a Call .................................... 42
Managing Multi-party Calls ..................................... 43
Adjusting Your Call Settings ......................................... 44
Contacts ................................................................. 47
Importing and Exporting Contacts ................................ 47
Importing Contacts From the micro-SIM Card ......... 47
Importing Contacts From the microSDHC Card or
Phone Storage ........................................................ 48
Exporting Contacts to the micro-SIM Card .............. 48
Exporting Contacts to the microSDHC Card or Phone
Storage ................................................................... 48
Sharing Contacts Information ....................................... 49
Creating a Contact ....................................................... 49
Adding a Contact to Favorites ...................................... 50
Searching for a Contact................................................ 50
Joining Contacts .......................................................... 50
Separating Contact Information .................................... 51
Creating a New Group ................................................. 51
Entering Text .......................................................... 53
5

Changing Input Methods .............................................. 53
Google Keyboard......................................................... 53
TouchPal X Keyboard .................................................. 56
Google Voice Typing ................................................... 60
Input Method Settings .................................................. 61
Messaging .............................................................. 62
Opening the Messaging Screen ................................... 62
Sending a Message ..................................................... 62
Replying to a Message ................................................ 63
Forwarding a Message ................................................ 63
Changing Message Settings ........................................ 64
Email ....................................................................... 65
Setting Up the First Email Account .............................. 65
Checking Your Emails ................................ ................. 65
Responding to an Email ............................................... 66
Replying to or Forward an Email ............................ 66
Marking an Email as Unread .................................. 66
Deleting an Email ................................................... 67
Writing and Sending an Email ...................................... 67
Adding and Editing Email Accounts ............................. 68
Adding an Email Account ....................................... 68
Editing an Email Account ....................................... 68
Changing General Email Settings ................................ 69
Getting Connected to the Internet ........................ 70
Adding a New Mobile Data Connection ........................ 70
6

Turning On Wi-Fi .......................................................... 71
Connecting to a Wi-Fi Network ..................................... 71
Adding a Wi-Fi Network................................................ 71
Checking the Wi-Fi Network Status .............................. 72
Connecting to a WPS Network ..................................... 72
Browsing the Internet ............................................ 73
Opening the Browser ................................................... 74
Opening a Web Page or Searching the Web........... 74
Setting the Homepage ............................................ 74
Using Multiple Browser Tabs ........................................ 75
Downloading Files ........................................................ 76
Changing Browser Settings .......................................... 76
Using Wi-Fi Direct .................................................. 77
Connecting to Another Device via Wi-Fi Direct ............. 77
Sending Data via Wi-Fi Direct ...................................... 77
Receiving Data via Wi-Fi Direct .................................... 78
Bluetooth® .............................................................. 79
Turning Bluetooth On/Off ............................................. 79
Making Your Phone Visible .......................................... 79
Changing the Device Name ......................................... 80
Pairing With Another Bluetooth Device ......................... 80
Unpairing From a Bluetooth Device .............................. 81
Sending Data via Bluetooth .......................................... 81
Receiving Data via Bluetooth ....................................... 81
Making the Most of Multimedia ............................. 83
7

Capturing a Photo ........................................................ 83
Recording a Video ....................................................... 86
Adjusting Camera and Camcorder Settings ................. 87
Playing Your Music ...................................................... 88
Viewing Your Music Library .................................... 88
Setting a Song as the Default Ringtone .................. 89
Playing Music ......................................................... 89
Managing Playlists ................................................. 91
Using Your Gallery ...................................................... 91
Opening Your Gallery ............................................. 91
Working With Albums ............................................. 92
Working With Pictures ............................................ 92
Retouching Your Pictures ....................................... 94
Playing Videos ................................ ....................... 95
Making Memorable Memos.......................................... 95
Recording a Voice Memo ....................................... 96
Playing a Voice Memo ............................................ 96
Using Your Google™ Applications ...................... 97
Gmail ........................................................................... 97
Google Calendar ......................................................... 98
Google+™ ................................................................... 98
Getting Started With Google+................................. 99
Signing out of Google+ ......................................... 100
Google Maps ............................................................. 100
Activating Location Services ................................. 100
Getting Your Location........................................... 101
8

Searching for a Location ....................................... 101
Getting Directions to Your Destination .................. 102
Searching for Local Places ................................... 102
Google Search ........................................................... 103
Searching With Text ............................................. 103
Searching by Speaking ......................................... 103
Changing Search Settings .................................... 104
Google MusicTM .......................................................... 104
Playing Your Music ................................ ............... 105
Managing Playlists ................................................ 107
Google Play™ Store .................................................. 108
Browsing and Searching for Apps ......................... 108
Downloading and Installing Apps .......................... 109
Sorting out Your Phone Settings ....................... 110
General Settings ........................................................ 110
Airplane Mode ...................................................... 110
Wi-Fi ..................................................................... 110
Bluetooth .............................................................. 110
Mobile Networks ................................................... 110
Sound ................................................................... 111
Display ................................................................. 111
Date and Time ...................................................... 112
Language and Input .............................................. 112
Wireless and Networks .............................................. 113
Data Usage .......................................................... 113
VPN ...................................................................... 114
9

Default SMS App .................................................. 114
Device ....................................................................... 114
Storage ................................................................ 114
Battery ................................................................. 114
Apps .................................................................... 115
Connect to PC ...................................................... 115
Call Settings ......................................................... 116
Personal .................................................................... 116
Location ............................................................... 116
Security ................................................................ 116
Backup and Reset ................................................ 118
Accounts ................................................................... 118
System ...................................................................... 119
Accessibility ......................................................... 119
Developer Options ............................................... 119
About Phone ........................................................ 119
Other Applications ............................................... 120
Backup and Restore .................................................. 120
Calculator .................................................................. 120
Chrome™ .................................................................. 120
Clock ......................................................................... 121
Setting a New Alarm ............................................ 121
Using Bed Clock................................................... 121
Checking World Time ........................................... 122
Using the Stopwatch and Countdown ................... 122
Downloads ................................................................ 122
10

Drive ................................................................ .......... 122
File Manager .............................................................. 123
Note ........................................................................... 123
Mi-EasyAccess .......................................................... 124
Mi-POP ...................................................................... 124
Task Manager ............................................................ 125
YouTube .................................................................... 125
Upgrading the Phone Software .......................... 126
Troubleshooting .................................................. 127
For Your Safety .................................................... 133
General Safety ........................................................... 133
Radio Frequency (RF) Energy .................................... 134
FCC Compliance ........................................................ 136
Using Your Phone With a Hearing Aid Device ............ 137
Turning on the HAC Setting ....................................... 139
Distraction .................................................................. 140
Driving .................................................................. 140
Operating Machinery ............................................ 140
Product Handling ....................................................... 141
General Statement on Handling and Use .............. 141
Battery ................................ ................................ .. 142
Small Children ...................................................... 143
Demagnetization ................................................... 144
Electrostatic Discharge (ESD) ............................... 144
Antenna ................................................................ 144
11

Normal Use Position ............................................ 144
Air Bags ............................................................... 144
Seizures/Blackouts ............................................... 145
Repetitive Strain Injuries ...................................... 145
Emergency Calls ................................ .................. 145
Loud Noise ........................................................... 146
Phone Heating ..................................................... 146
Electrical Safety ......................................................... 146
Accessories .......................................................... 146
Connection to a Car ............................................. 146
Faulty and Damaged Products ............................. 147
Radio Frequency Interference ................................... 147
General Statement on Interference ...................... 147
Pacemakers ......................................................... 147
Hearing Aids ........................................................ 148
Medical Equipment ............................................... 148
Aircraft ................................................................. 148
Interference in Vehicles ........................................ 148
Explosive Environments ............................................ 149
Gas Stations and Explosive Atmospheres ............ 149
Blasting Caps and Areas ...................................... 149
12
Getting Started
Starting Up
Installing the micro-SIM Card
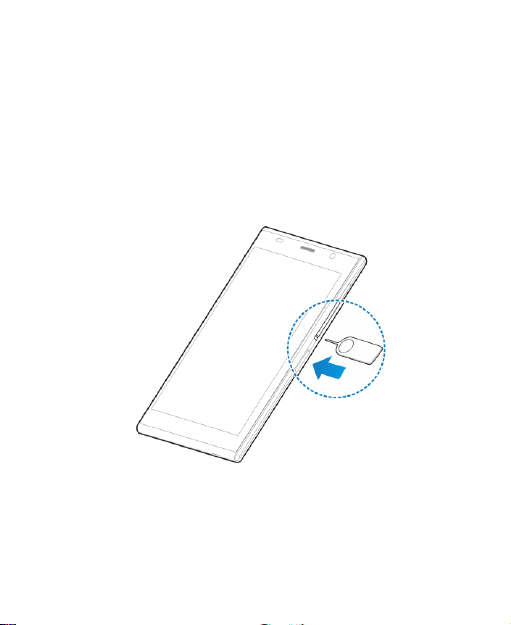
1. Insert the tray eject tool or the end of a small paper clip
into the hole beside the micro-SIM card tray (next to the
Power Key).
2. Pull out the micro-SIM card tray and place the micro-SIM
card (contacts facing down) on the tray as shown. Then
carefully install the tray back.
13
NOTE: Turn off your phone before installing or removing
the micro-SIM card.
WARNING! To avoid damage to the phone, do not use
any other kind of SIM card or any non-standard
micro-SIM card cut from a SIM card. You can get a
standard micro-SIM card from your service provider.
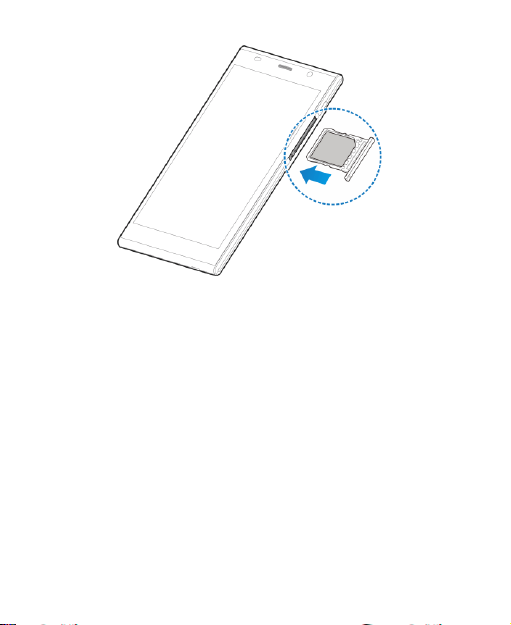
Installing the microSDHCTM Card (Not
Included)
The microSDHC card can be installed and removed while the
phone is turned on. Unmount the microSDHC card before
removing or replacing it.
14

1. Insert the tray eject tool or the end of a small paper clip
into the hole beside the microSDHC card tray (the upper
one).
2. Pull out the microSDHC card tray and place the
microSDHC card (contacts facing down) on the tray as
shown. Then carefully install the tray back.
15
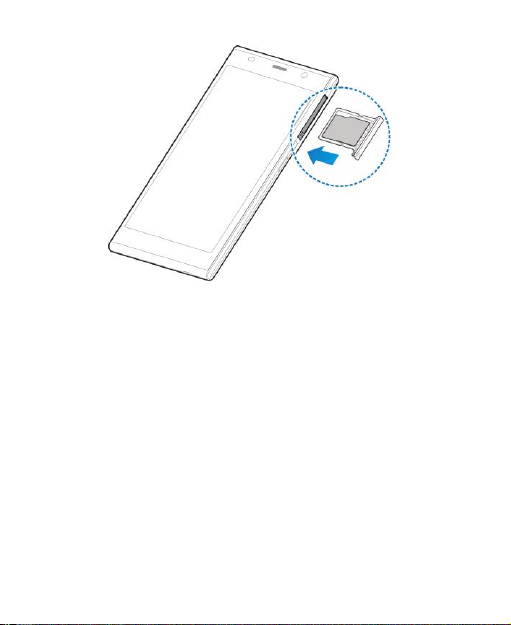
NOTE: Some applications may require a microSDHC card to
work normally or may store certain data on it. Therefore, it is
recommended that you keep a microSDHC card installed
and not remove or replace it randomly.
Charging the Battery
Your phone’s battery should have enough power for the
phone to turn on, find a signal, and make a few calls. You
should fully charge the battery as soon as possible.
If the battery is low, there will be a pop-up message on the
screen. As you charge your phone, the screen will tell you the
exact battery level each time you wake up your phone.
If the battery is extremely low, you may be unable to power
on the phone even when it is being charged. In this case, try
16

again after charging the phone for at least 10 minutes.
Contact customer service if you still cannot power on the
phone after prolonged charging.
1. Connect the adapter to the charging jack. Ensure that the
adapter is inserted with the correct orientation. Do not
force the connector into the charging jack.
2. Connect the charger to a standard AC wall outlet.
3. Disconnect the charger when the battery is fully charged.
WARNING! Use only ZTE-approved chargers and cables.
The use of unapproved accessories could damage your
phone or cause the battery to explode.
17

CAUTION: Do not change the built-in rechargeable battery in
your phone by yourself. The battery can only be changed by
ZTE or ZTE authorized service provider.
Extending the Battery Life
Active applications, screen brightness levels, Bluetooth and
Wi-Fi usage and GPS functionality can drain your battery.
You can follow the helpful tips below to conserve your battery
power:
Reduce the screen backlight time.
Lower the screen brightness.
Turn auto-sync, Wi-Fi, and Bluetooth off when not in use.
Disable the GPS function when not in use. Most
applications using this function will periodically query the
GPS satellites for your current location; each query drains
your battery.
Switching Your Phone On/Off
Press and hold the Power Key to switch on your phone.
To switch it off, press and hold the Power Key to get the
phone options. Touch Power off, and then touch OK
18

Setting Up Your Phone for the First Time
When you first power on your phone after you purchase it or
reset it to factory settings, you need to set up your phone
settings before using it.
1. Flick the language field to select the language you want to
use and then touch .
2. Select a Wi-Fi account to connect your phone to or touch
Skip.
3. If you have a Gmail account, touch Yes to sign in to
Google. Touch No if you do not have an account.
4. To create a Google account, touch Get an account. You
can also touch Not now to set up an account later.
5. Configure the Google location options and touch .
6. Enter your name which the phone uses to personalize
some apps and touch .
7. You will be prompted to accept the terms of Google
service. Touch to finish.
Switching to Sleep Mode
To save battery power, Sleep Mode suspends your phone to
a power-saving state while the display is off. Your phone also
goes into Sleep Mode by itself when the display is
automatically turned off after a certain period of time, which
you can set in Settings > Display > Sleep.
Press the Power Key to switch to Sleep Mode.
19

Waking Up Your Phone
1. Press the Power Key to activate your screen display.
2. Touch and hold any blank area of the screen to unlock the
screen and keys.
-orTouch and hold an application shortcut (Phone,
Messaging, Email or Contacts) at the bottom of the
screen to unlock the screen and open the application
quickly.
NOTE: If you have set an unlock pattern, a PIN or password
for your phone, you’ll need to draw the pattern, or enter the
PIN/password to unlock your screen.
TIP: You can change or delete the application shortcuts at
the bottom of the screen. See Mi-EasyAccess for details.
Touch Control
Your phone’s touch screen lets you control actions through a
variety of touch gestures.
Touch
When you want to type using the onscreen keyboard,
select items onscreen such as application and settings
icons, or press onscreen buttons, simply touch them with
your finger.
20

Touch and Hold
To open the available options for an item (for example, a
message or link in a Web page), touch and hold the item.
Swipe or Slide
To swipe or slide means to quickly drag your finger
vertically or horizontally across the screen.
Drag
To drag, press and hold your finger with some pressure
before you start to move your finger. While dragging, do
not release your finger until you have reached the target
position.
Pinch
In some apps (such as Maps, Browser, and Gallery), you
can zoom in and out by placing two fingers on the screen
at once and pinching them together (to zoom out) or
spreading them apart (to zoom in).
Rotate the screen
For most screens, you can automatically change the
screen orientation from portrait to landscape by turning
the phone sideways.
21
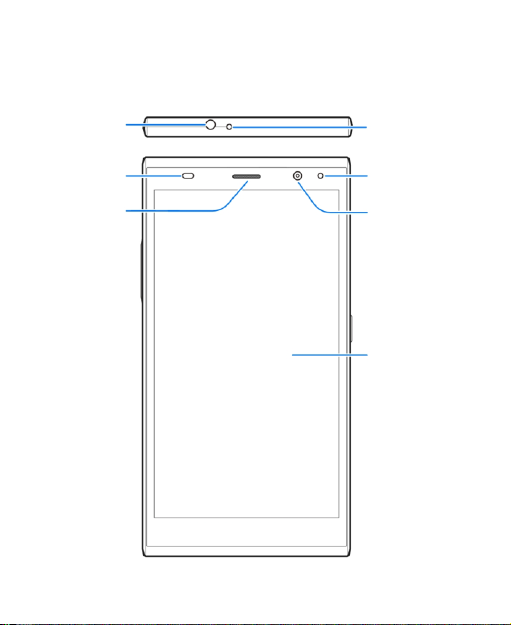
Getting to Know Your Phone
Indicator Light
Headset Jack
Earpiece
Touch screen
Front Camera
Infrared Sensor
Proximity &
Light Sensor
22
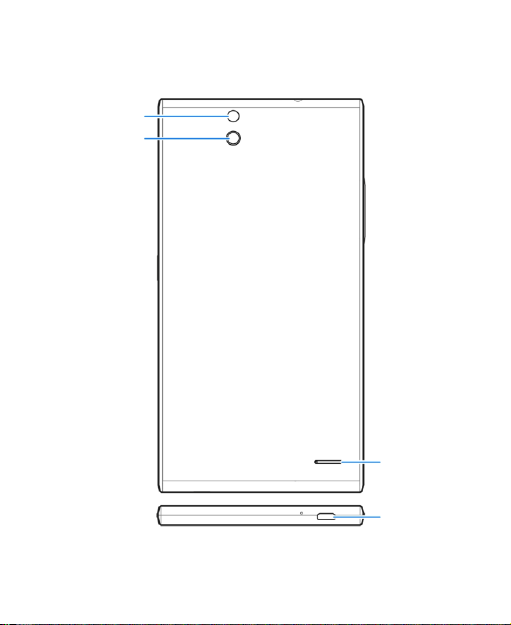
Back Camera
Flash
Speaker
Charging/microUSB Jack
23
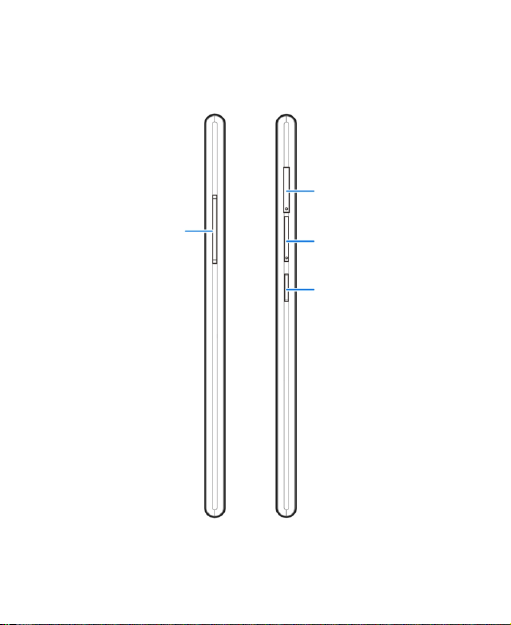
Power Key
Volume Key
microSDHC
Card Tray
micro-SIM
Card Tray
24

Knowing the Keys
Power Key
Press and hold to turn on or off Airplane mode, enable
silent mode or silent mode with vibration, disable silent
mode, power off or restart the phone.
Press to turn off or on the screen display.
Volume Key
Press or hold to turn the volume up or down.
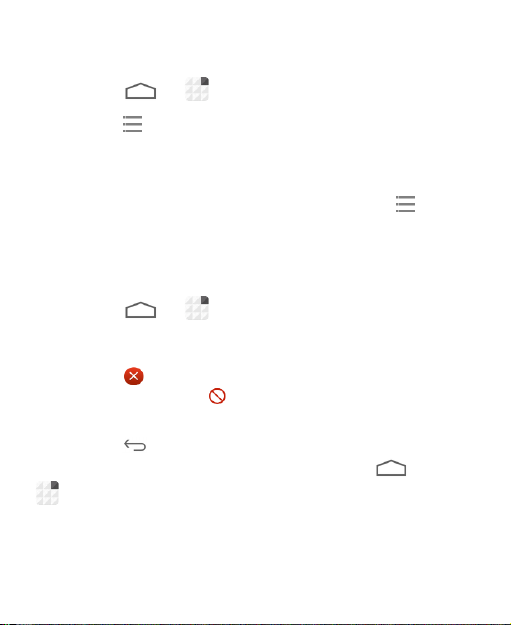
On-screen Keys
(Home)
Touch to return to the home screen from any application
or screen.
Drag to Google to open Google Search.
(Back)
Touch to go to the previous screen.
(Recent Apps)
Touch to see recently used applications.
Home Screen
You can customize your home screen. Set your own
wallpaper, add widgets or application shortcuts you need,
organize icons with folders, or remove them as you like.
25

Favorite shortcuts
Shortcut
Widget
Status and notification bar
Extended Home Screen
The home screen extends beyond the screen width, giving
you lot more space to add more stuff. Simply swipe your
finger to the left or right to see the extended home screen
panels.
To create, delete or set the home screens:
1. Pinch or spread two fingers on the home screen.
2. Touch + on the blank screen to create new home screens;
touch x on the corner of a screen to delete it; touch
26

on the bottom of a screen to set it as the main home
screen; touch and hold a screen and drag it to adjust its
place.
Choosing Your Wallpaper
1. Touch and hold an empty place on the home screen,
touch Wallpaper and then touch Wallpaper for home
screen or Wallpaper for lock screen.
2. Select a wallpaper source from Gallery, Live Wallpapers,
Photos, or Wallpapers and choose the image or
animation you want toy use as the wallpaper. Some
cropping may be needed for Gallery images.
3. Crop the Gallery or Photos images or touch Set
wallpaper.
NOTE: Live Wallpapers and Photos are not available for
the lock screen.
TIP: To change the home screen wallpaper blur effect, swipe
up on the home screen and drag the Wallpaper blurness
bar to adjust it.
Adding Items to Your Home Screen
1. Touch and hold an empty place on the home screen, and
then touch Widgets or Apps.
2. Touch and hold an item and drag it to a home screen
thumbnail at the bottom of the screen.
Adjusting Widget Size
1. Touch and hold a widget on the home screen and then
27

release it.
2. An outline appears around the widget. Drag the outline to
resize the widget.
NOTE: Not all widgets can be resized.
Organizing Icons With a Folder
1. Touch and hold the shortcut on the home screen you
want to add into a folder until (Folder) appears.
2. Drag the shortcut to (Folder) and release it. A new
folder will be created and the shortcut is added into the
folder.
3. To add more shortcuts into the folder, touch and hold
each shortcut and drag it over the folder before releasing
it.
- or -
Open the folder, touch and check the applications
you want to add into the folder, and then touch DONE.
TIP: Touch the folder and then touch the name field to
rename the folder.
Removing Items From Your Home Screen
1. Touch and hold a folder, a widget or a shortcut on the
home screen.
2. Drag it to (Delete) to remove it.
28

Setting the Home Screen Transition Effect
1. Touch and hold an empty place on the home screen and
touch Effect.
2. Check one effect you like.
Application List Screen
Touch > to access the application list screen and
find all your applications on the phone. You can uninstall or
disable the applications, hide the application icons or
organize them into folders.
Organizing Application Icons With a Folder
1. Touch > to open the application list screen.
2. Touch and hold an application icon and drag it into a
folder on the top of the screen.
3. To add more icons into the folder, touch and hold each
icon and drag it into the folder.
4. Touch to finish.
NOTE: You can also drag an application icon into New
Folder. A new application folder will be created in the
application list screen and the application icon is added in.
29
Hiding Application Icons
1. Touch > to open the application list screen.
2. Touch > Hide apps.
3. Touch the application icons you want to hide and then
touch DONE.
NOTE: To find the hidden application icons, touch >
Display hidden apps. You can then touch one icon and
touch DONE to display it again in the application list screen.
Uninstalling or Disabling an Application
1. Touch > to open the application list screen.
2. Touch and hold an application icon and then release it.
3. Touch on an application icon to uninstall the
application. Touch on an application icon to disable
the application.
4. Touch to finish.
NOTE: To find the disabled applications, touch >
> Settings > Apps > DISABLED. You can then touch
an application and touch Enable to enable it.
Not all applications can be uninstalled or disabled.
30
 Loading...