

Zte Vodafone 510 User Manual

1
Vodafone 510
User Manual
2
About this manual
Thank you for choosing this mobile device. In order to keep your
device in its best condition, please read this manual and keep it for
future reference.
Copyright
Copyright © 2017 ZTE CORPORATION
All rights reserved.
No part of this publication may be quoted, reproduced, translated
or used in any form or by any means, electronic or mechanical,
including photocopying and microfilm, without the prior written
permission of ZTE Corporation.
Notice
ZTE Corporation reserves the right to make modifications on print
errors or update specifications in this guide without prior notice.
This manual has been designed with the utmost care to ensure the
accuracy of its content. However, all statements, information and
recommendations contained therein do not constitute a warranty of
any kind, either expressed or implied. Please refer to For Your Safety
to be sure to use your phone properly and safely. We offer
self-service for our smart terminal device users.
Disclaimer
ZTE Corporation expressly disclaims any liability for faults and
damages caused by unauthorised modifications of the software.
Images and screenshots used in this manual may differ from the
actual product. Content in this manual may differ from the actual
product or software.
Trad emark s
ZTE and the ZTE logos are trademarks of ZTE Corporation.
Google and Android are trademarks of Google, Inc.
The Bluetooth
®
trademark and logos are owned by the Bluetooth
SIG, Inc. and any use of such trademarks by ZTE Corporation is
under license.
microSDXC Logo is a trademark of SD-3C, LLC.
3
Qualcomm
®
Snapdragon™ processors are products of Qualcomm
Technologies, Inc.
Qualcomm and Snapdragon are trademarks of Qualcomm
Incorporated, registered in the United States and other countries.
Used with permission.
Other trademarks and trade names are the property of their
respective owners.
Version No.: R1.0
Edition Time: March 21, 2017
4
Contents
Getting started .................................................... 7
Getting to know your phone ........................................... 7
Knowing the keys .......................................................... 8
Setting Up Your Phone .................................................. 8
Charging the battery ....................................................11
Extending the battery life ............................................ 12
Powering on/off ......................................................... 13
Setting up for the first time ......................................... 13
Locking/unlocking the screen and keys ....................... 13
Using the touch screen ............................................... 14
Getting to know the home screen .................................16
Knowing the basics ............................................ 18
Monitoring the phone status ....................................... 18
Managing notifications ............................................... 18
Entering text ............................................................... 19
Editing text ................................................................. 20
Opening and switching apps ....................................... 20
Use two apps in split-screen mode ...............................21
Uninstalling an app .....................................................21
Hiding apps ................................................................ 22
Connecting to networks and devices ................... 23
Connecting to mobile networks ................................... 23
Connecting to Wi-Fi .................................................... 24
Connect to another device via Wi-Fi Direct® ................. 26
Connecting to Bluetooth devices ................................. 26
Using tap & pay ............................ 错误!未定义书签。
Connecting to your computer via USB .......................... 28
Using the microSD card as portable or phone storage . 29
Sharing your mobile data connection ........................... 31
Connecting to virtual private networks ......................... 33
Phone calls ....................................................... 35
Placing and ending calls ............................................. 35
Answering or rejecting calls......................................... 35
5
Working with the call history ........................................ 36
Calling your contacts .................................................. 37
Contacts ................................ ........................... 38
Checking contact details ............................................. 38
Adding a new contact .................................................. 38
Setting up your own profile ........................................ .. 38
Importing, exporting, and sharing contacts .................. 39
Working with favourite contacts ................................... 40
Searching for a contact ............................................... 41
Editing contacts .......................................................... 41
Web accounts ................................................... 42
Adding or removing accounts ...................................... 42
Configuring account sync ............................................ 42
Email ................................ ................... ............. 44
Setting up the first email account ................................ 44
Checking your emails .................................................. 44
Responding to an email .............................................. 44
Writing and sending an email ...................................... 45
Adding and editing email accounts .............................. 46
Changing general email settings ................................. 46
Message+ ............................................ .............. 47
Opening the message+ screen .................................... 47
Sending a message ..................................................... 47
Replying to a message ................................................ 48
Forwarding a message ................................................ 48
Web browser ..................................................... 49
Opening the browser ................................................... 49
Using multiple browser tabs ........................................ 49
Downloading files ....................................................... 49
Changing Chrome settings .......................................... 50
Camera ............................................................. 51
Capturing a photo ....................................................... 51
Recording a video ....................................................... 52
6
Using manual camera mode ....................................... 53
Music ............................................................... 54
Playing your music ...................................................... 54
Managing playlists ..................................................... 56
Settings ............................................................ 58
Wireless and networks ................................................ 58
Device ........................................................................ 59
Personal .................................................................... 63
System .......................................................... ............. 66
Troubleshooting ................................................. 68
7
Getting started
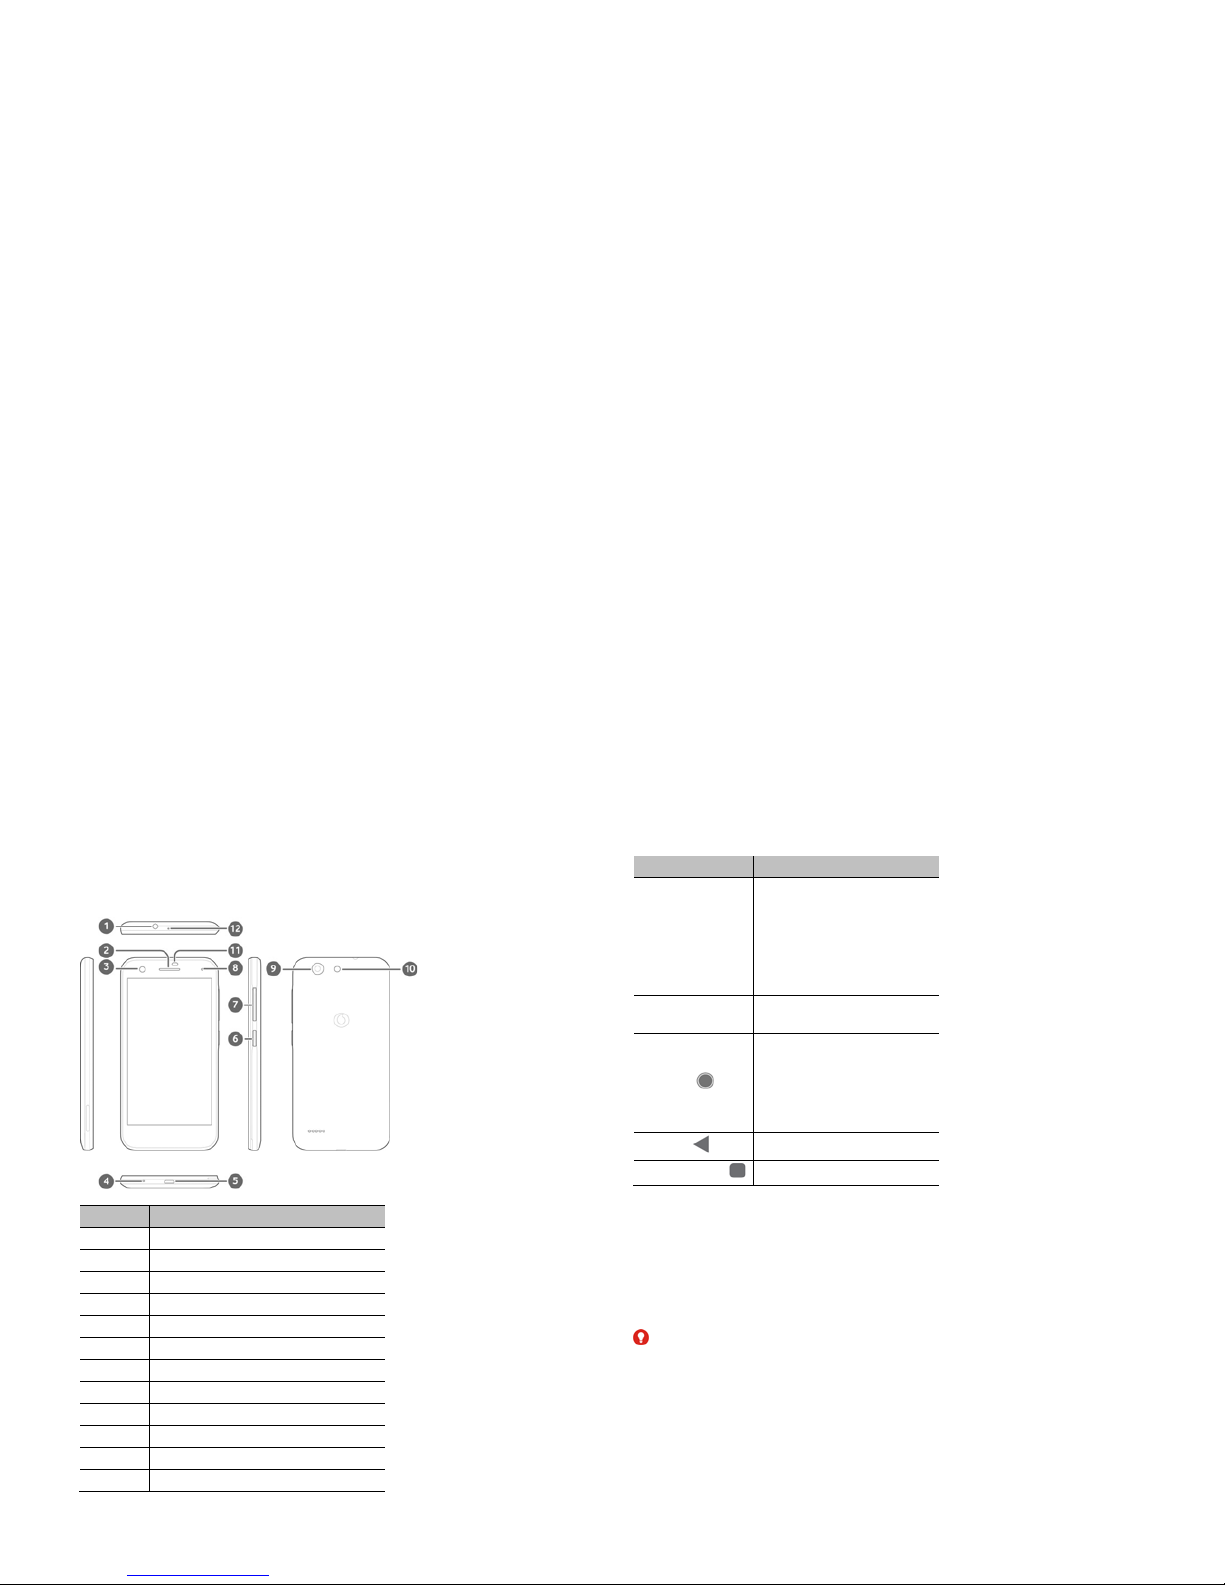
Getting to know your phone
Number Name
1 Headset jack
2 Earpiece
3 Front camera
4 Main microphone
5 Charging/micro-USB jack
6 Power key
7
V
olume key
8 Indicator light
9 Back camera
10 Back flash
11 Proximity & light sensor
12
A
uxiliary Microphone
8
Knowing the keys
Key
Function
Power key
Press and hold to turn on or off
flight mode, reboot, turn on or
off vibration or sound, power
off, or take a screen shot.
Press to turn off or on the
screen
display.
Volum e key
Press or hold either end of the key
to turn the volume up or down.
Home key
Touch to return to the home
screen from any application or
screen.
Touch and hold to use Google
Search or Now on Tap.
Back key
Touch to go to the previous screen.
Recent apps key
Touch to see recently used apps.
Setting Up Your Phone
Power off your phone before removing or replacing the battery.
Power off your phone before installing or removing the nano-SIM
card. The microSDXC card (optional) can be installed or removed
while the phone is turned on, but you need to unmount it before
removing it.
WARNING!
To avoid damage to the phone, do not use any other kind of SIM
cards, or any non-standard nano-SIM card cut from a SIM card. You
can get a standard nano-SIM card from your service provider.
1. Insert your fingernail into the slot at the bottom left of the back
cover and lift it up gently.

9
2. Install the nano-SIM card and the microSDXC card (optional).
Slide the nano-SIM card into the card holder.
10
Hold the microSDXC card with th e cut corner oriented as
shown and slip it into the card slot.
3. Insert the battery. Make sure the connectors on the battery go
into the battery compartment first and align with the
connectors in it. Gently push down on the battery until it clicks
into place.
11
4. Install the back cover in the order and direction as shown in the
figure.
Charging the battery
Your phone’s battery should have enough power for the phone to
turn on, find a signal, and make a few calls. You should fully charge
the battery as soon as possible.
If the battery is low, there will be a pop-up message on the screen.
NOTE:
Your phone supports QuickCharge 2.0. To use it, you need to buy the
compatible QuickCharge accessories which are sold separately.
WARNING!
Use only approved chargers and cables. The use of unapproved
accessories could damage your phone or cause the battery to
explode.
1. Connect the adapter to the charging jack. Ensure that the
adapter is inserted with the correct orientation. Do not force
the connector into the charging jack.
12
2. Connect the charger to a standard AC power outlet. If the
phone is on, you’ll see a charging icon, such as
or ,
appear on the status bar.
3. Disconnect the charger when the battery is fully charged.
NOTE:
If the battery is extremely low, you may be unable to power on the
phone even when it is being charged. In this case, try again after
charging the phone for at least 20 minutes. Contact the customer
service if you still cannot power on the phone after prolonged
charging.
Extending the battery life
Active applications, screen brightness levels, Bluetooth and Wi-Fi
usage and GPS functionali ty can drain your battery. You can follow
the helpful tips below to conserve your battery power:
Use the battery saver feature in Settings.
Reduce the screen backlight time.
Lower the screen brightness.

13
Turn Wi-Fi, Bluetooth and auto-sync off when not in use.
Disable the GPS function when not in use. Most applications
using this function will periodically query the GPS satellites for
your current location, and each query drains your battery.
Powering on/off
Press and hold the Power key to turn on your phone.
To power off, press and hold the Power key to open the options
menu and touch Power off.
NOTE:
If the phone freezes or takes too long to respond, you can press and
hold the Power key for about 16 seconds to restart the phone.
Setting up for the first time
When you first power on your phone after you purchase it or reset it
to factory settings (see Backup and reset), you need to do some
settings before using it.
Touch the language field to select the language. Then follow the
on-screen prompts to set up your phone.
Locking/unlocking the screen and keys
Your phone allows you to quickly lock the screen and keys (put the
phone to sleep mode) when not in use and to turn the screen back
on and unlock it when you need it.
To lock the screen and keys:
To quickly turn the screen off and lock the keys, press the Power key.
NOTE:
To save battery power, the phone automatically turns off the screen
after some time of inactivity. You will still be able to receive
messages and calls while the phone screen is off.
To unlock the screen and keys:
1. Press the Power key to turn the screen on.
- or -
Double-tap on the screen to turn it on.
14
NOTE:
To enable this feature, select
> Settings > Di splay >
Double tap to wake from the home screen.
2. Swipe up on the screen.
- or -
Swipe from a shortcut icon at the bottom to open the related
app or feature.
- or -
Touch a notification twice consecutively to open the related
app.
NOTE:
You can edit the shortcut icons on the lock screen. Select
>
Settings > Display > Edit Lockscreen shortcuts from the home
screen, touch a shortcut to change it, or touch Add shortcut to add
one.
Using the touch screen
Your phone’s touch screen enables you to control actions through a
variety of touch gestures.
Touch
When you want to type using the onscreen keyboard, select
items on the screen such as the application and settings icons,
or press the onscreen buttons, simply touch them with your
finger.
Touch and Hold
To open the available options f or an item (for example, a
message or link in a web page), touch and hold the item.
15
Swipe or Slide
To swipe or slide means to quickly drag your finger vertically or
horizontally across the screen.
Drag
To drag, press and hold your finger with some pressure before
you start to move your finger. While dragging, do not release
your finger until you have reached the target position.
Pinch
In some apps (such as Maps, web browser, and Gallery), you
can zoom in and out by placing two fingers on the screen at
once and pinching them together (to zoom out) or spreading
them apart (to zoom in).
Rotate the screen
16
For most screens, yo u can automatically change the screen
orientation from portrait to landscape by turning the phone
sideways.
NOTE:
The auto-rotate feature needs to be enabled for the screen
orientation to automatically change. Touch
> >
Settings > Display > When device is rotated and select Rotate
the contents of the screen.
You can also access the screen rotation control by sliding down
the status bar tw ice, slide left and touch Auto-rot ate/Portrait.
Getting to know the home screen
The home screen is the starting point for your phone’s applications,
functions, and menus. You can customise your home screen by
adding shortcuts, folders, widgets, and more.
Extended home screen panels
Your home screen is extendable, providing more space for shortcuts,
widgets, and more. Simply swipe left or right on the home screen to
see the extended panels. You can add or remove home screen
panels, or adjust t heir order.
To add a new home screen panel:
1. Touch and hold an empty area of the home screen to access
the home screen thumbnails.
Primary shor tcuts
Shortcut Folder
Widget
Status bar
17
2. Slide left until
appears.
3. Tou ch
to create a new home screen panel.
To adjust the order of a home screen panel:
1. Touch and hold an empty area of the home screen and slide left
or right to view the home screen thumbnails.
2. Touch and hold a thumbnail and drag it left or right to the place
you need.
To open your favourite home screen app:
You can slide right on the home screen to open your favourite app
quickly.
1. Slide right if necessary on the home screen to access the
leftmost home screen.
2. Sl ide right on the screen to open your favourite app.
NOTE:
Touch
> > Settings > Display > Favourite app panel to
turn on of off this feature, or touch Favourite home screen app to
select your favourite app.
To lock or unlock your home screen layout:
After the hom e screen layout is locked, you cannot add/remov e
/adjust the home screen panel, add/remove/move items on the
home screen, or change the wallpaper.
1. Touch and hold an empty area of the home screen to access
the home screen thumbnails.
2. Tou ch
/ to lock/unlock the home screen layout.
18
Knowing the basics
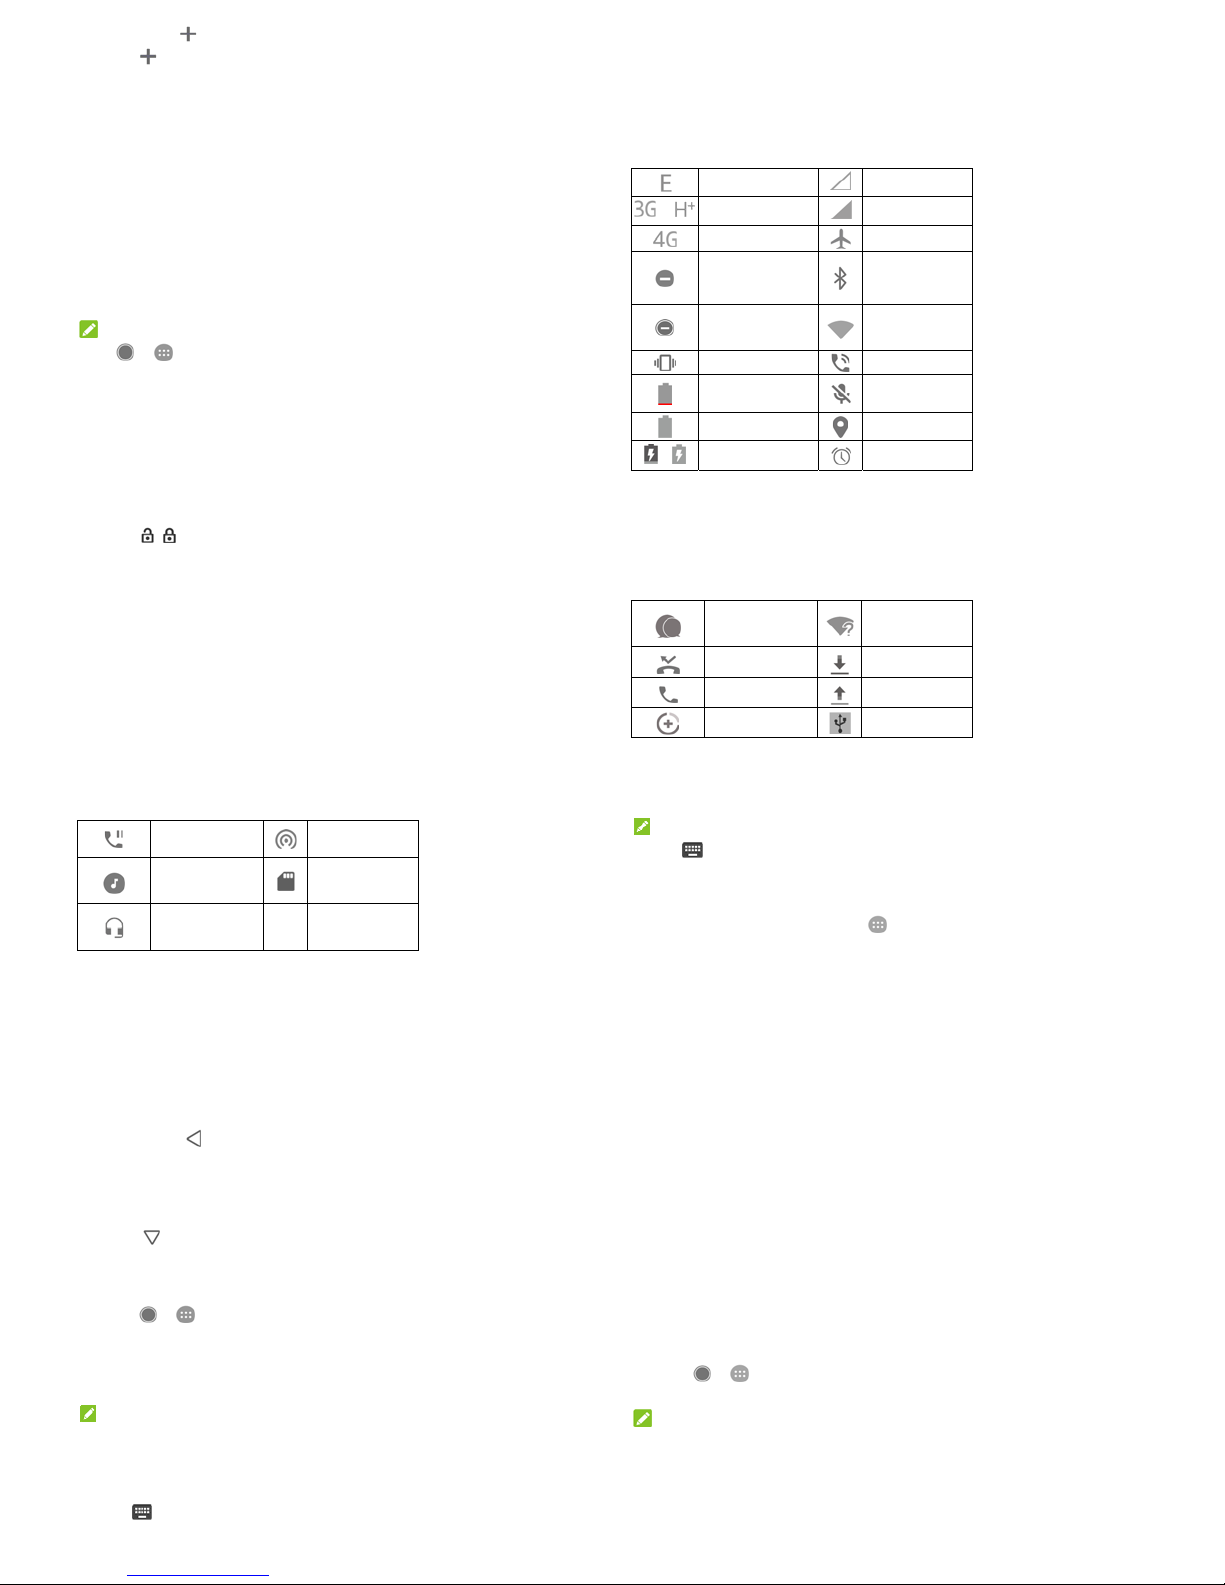
Monitoring the phone status
The status bar at the top of the home screen provides phone and
service status icons on the right side. Below are some of the icons
you may see.
EDGE connected
No signal
/
3G/HSPA+ connected
Signal strength
4G connected
Flight mode
Do not disturb mode
on (Alarms only or
Priority only)
Bluetooth
®
on
Do not disturb mode
on (Total silence)
Connected to a
Wi-Fi
®
network
V
ibration on
Speaker on
Battery low
Phone microphone
off
Battery full
GPS on
/
Battery charging
Alarm set
Managing notifications
Notification icons
The status bar at the top of the home screen provides notification
icons on the left. Below are some of the icons you may see.
New SMS/MMS
New Wi-Fi network
detected
Missed call
Downloading data
Call in progress
Sending data
Data saver on
USB tethering on
19
Call on hold
Portable Wi-Fi
hotspot on
Song playing
microSD card
mounted
Wired headset
connected
Open/close the notification panel
Notifications report the arrival of new messages, calendar events,
and alarms, as well as ongoing events, such as when you are playing
music. You can open the notification panel to view the details of
notifications.
To open the notification panel, swipe your finger down from the
top of the screen.
To close the notification panel, swipe your finger up on the
screen or touch
.
Entering text
You can enter text using the onscreen keyboard. Some apps open it
automatically. In others, you open it by touching where you want to
type. Touch
to hide the onscreen keyboard. You can also enter
text by speaking with the Google voice typing feature.
Enable or disable input methods
1. Tou ch > > Settings > Languages & input > Virtual
keyboard.
2. Tou ch Manage keyboards.
3. Slide the switches beside the input methods to enable or
disable them.
NOTE:
Some default input methods may not be disabled.
Change input methods
1. W hen you use the onscreen keyboard to enter text, touch the
icon
at the bottom right corner of the screen.
2. Select the input method you need.
20
NOTE:
The icon
appears only when mo re than one input method is
installed and enabled.
Input method settings
Choose the input method settings by touching > Settings >
Languages & inpu t > Virtual keyboard from the home screen. You
can set the current input method and choose the settings for input
methods.
Editing text
Move the insertion point: Touch where you want to type. Th e
cursor blinks in the new position, and a tab appears below it.
Drag the tab to move the cursor.
Select text: Touch and hold or double -tap within the text. The
nearest word highlights, with a tab at each end of the selection.
Drag the tabs to change the selection.
Cut or copy: Select the text you want to manipulate. Then touch
CUT or COPY to cut or copy the text to the clipboard.
Replace text with the clipboard text: Select the text you want to
replace. Then touch PASTE.
Insert clipboard text to the text field: Touch and hold the tab
below the cursor and then select PASTE.
Opening and switching apps
Open an app
1. Touch > to open the application list screen.
2. Slid e up or down on the screen and touch an app to open it.
NOTE:
Drag the slider on the right side of the screen to the initial letter of
the app you need, or touch the search box at the top to search for
apps.

21
Switch between recently opened apps
1. Tou ch . The apps you’ve used recently are displayed in a
series of tabs. Slide up and down to see all the tabs.
2. Touch a tab to open that app.
NOTE:
You can swipe a tab sideways or touch X on the tab to remove it from
the screen; touch
on the tab to lock it; touch CLEAR ALL to
remove all unlocked tabs.
NOTE:
Double-tap
to quickly switch between two most recently
opened apps.
Use two apps in split-screen mode
You can work with two apps at the same time in split-screen mode.
NOTE:
Some apps may not support split-screen mode.
1. Open the first app you want to use and then touch and hold
. The screen is divided into two.
2. You can do one of the following.
If the app you need is in the recent apps list, touch it to set
it as the second app.
Touch > to find the app you need and open it as
the second app.
To turn off split-screen mode, touch and hold
, or drag the
handle
on the screen to the edge of the screen.
Uninstalling an app
1. Tou ch > to open the application list screen.
2. Touch and hold an application icon and drag the icon to
(Uninstall) at the top of the screen.
3. Tou ch OK to uninstall the app.
NOTE:
The pre-installed apps may not be uninstalled.
22
Hiding apps
You can hide apps in the application list screen.
1. Touch
> to open the application list screen.
2. Touch
> Hide app.
3. Touch the apps you want to hide and touch
.
NOTE:
Touch
> > > Hide app to view all the hidden apps
at the top. You can touch the hidden apps and touch
to
display them again in the application list screen.
23
Connecting to networks and devices
Connecting to mobile networks
Control mobile data use
To enable or disable data access:
1. Tou ch
> > Settings > Data usage.
2. Tou ch the Mobile data switch to enable or disable mobile data
use.
To get data services when roaming:
1. Tou ch
> > Settings > More > Mobile networks.
2. Tou ch the Data roaming switch if it is turned off.
NOTE:
Data roaming may incu r significant roaming charges.
Select preferred network type
1. Tou ch > > Settings > More > Mobile networks.
2. Tou ch Preferred network type and touch the type of network you
prefer the phone to connect to.
Set access point names
To connect to the Internet you can use the default Access Point
Names (APN). And if you want to add a new APN, please contact the
service provider to get the necessary information.
1. Tou ch
> > Settings > More > Mobile networks.
2. Tou ch Access point names and then touch
.
3. Touch each item to enter the information you get from your
service provider.
4. Tou ch
> Save to complete.
NOTE:
To set the APN to default settings, touch
> Reset to default.
24
Select network operator
1. Touch > > Settings > More > Mobile networks.
2. Touch Network operators.
3. Touch Search networks to search for all available networks.
4. Touch a network in the network list to register manually.
You can also touch Choose automatically to select preferred
network automatically.
Connecting to Wi-Fi
Wi-Fi is a wireless networking technology that can provide Internet
access at distances of up to 100 meters, depending on the Wi-Fi
router and your surroundings.
Turn Wi-Fi on and connect to a Wi-Fi network
1. Touch > > Settings > Wi-Fi.
2. Slide the Wi-Fi switch to the On position to turn on Wi-Fi.
3. Touch a network name to connect to it.
4. If the network is secured, enter the password and touch
CONNECT.
NOTE:
Your phone automatically connects to previously used Wi-Fi
networks when they are in range.
Get notified of open networks
1. Touch > > Settings > Wi-Fi.
2. Slide the Wi-Fi switch to the On position.
3. Touch
.
4. Slid e the Network notification switch.
When Wi-Fi is on, you receive notifications in the status bar when
your phone detects an open Wi-Fi network. Switch off this option to
turn off notifications.
Add a Wi-Fi network
You can add a Wi-Fi network if the network does not broadcast its
name (SSID), or to add a Wi-Fi network when you are out of range.
 Loading...