

Page 1
ZTE Velox
Swipe right to clear individual noti cations or tap
™
Quick start guide
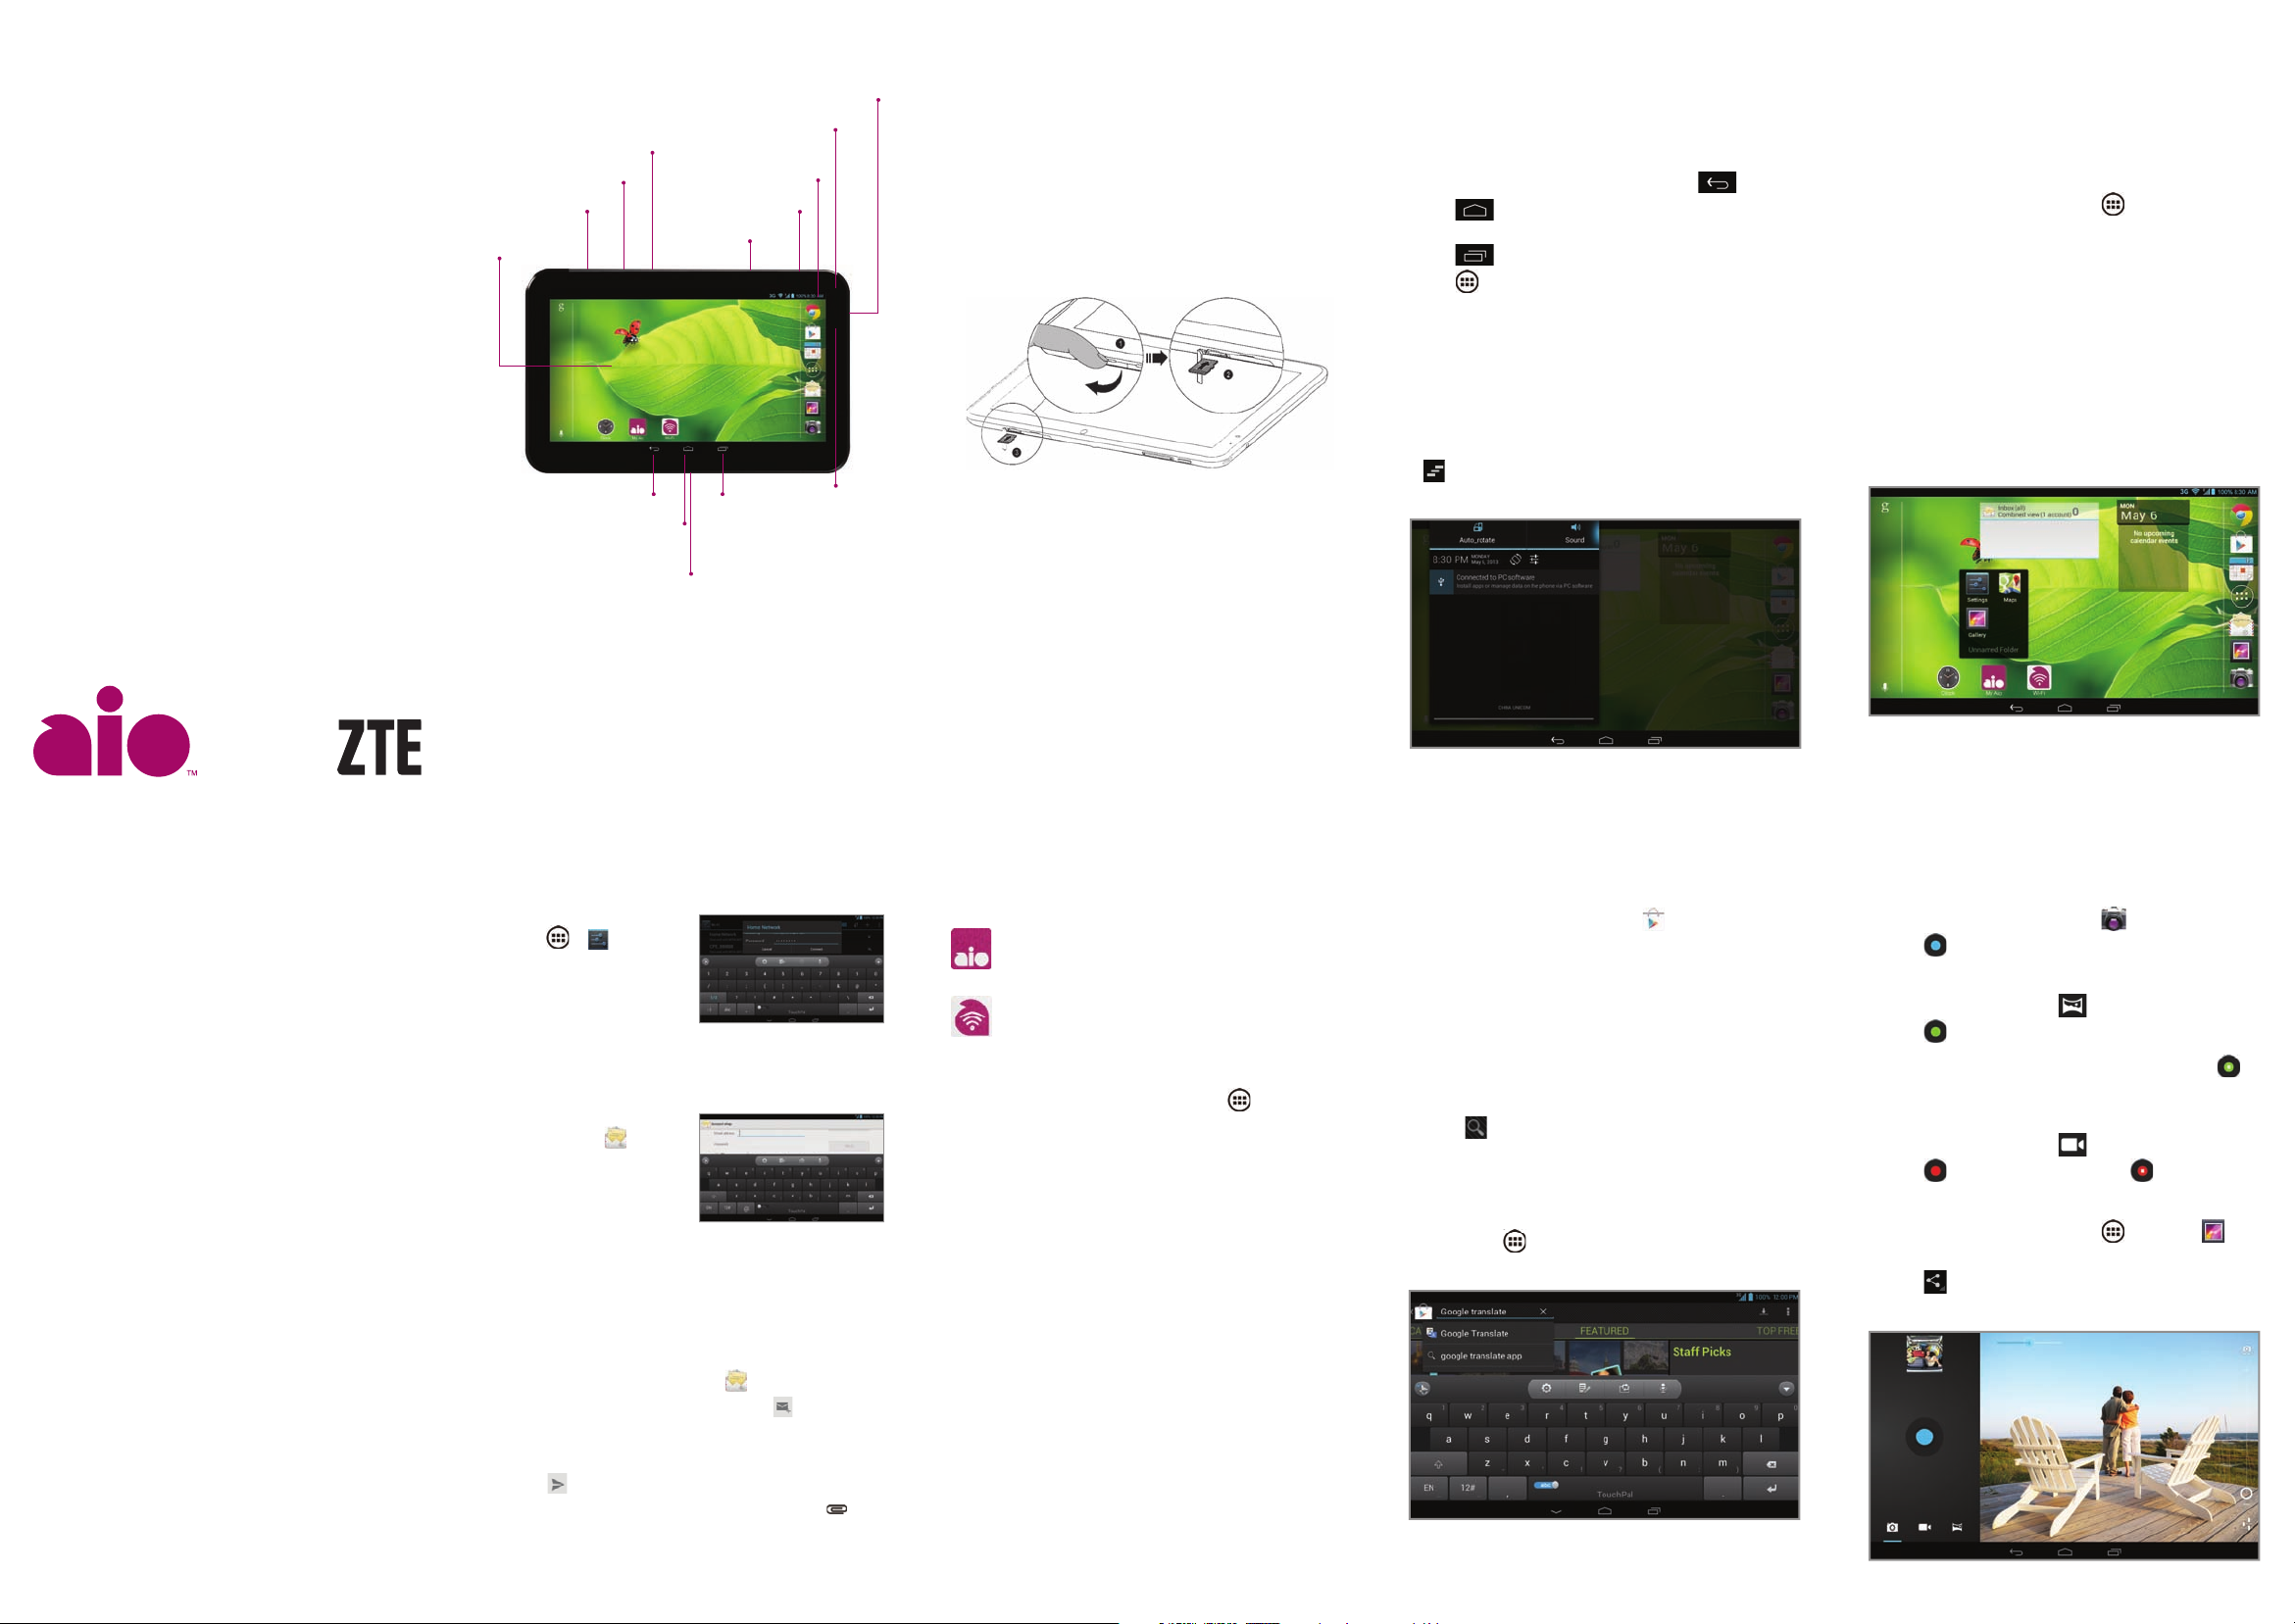
Get to know your tablet
Headset port
Camera lens
™
microSD
SIM card slot
Touch
screen
Microphone
card slot
Volume keys
Back key
Home key
Charging/data port
Status and
noti cation bar
Power/lock key
Recent
apps key
Status
LED
Tablet setup
Inserting your SIM card and microSD™ card
1. With the tablet off, open the cover of the
card slots.
2. Slide the SIM card into the slot, cut corner rst,
with the metal contacts facing down. When
properly seated, the SIM card will click into
place.
3. Insert the microSD card (not included) carefully
with the metal contacts facing down.
4. Replace the cover of the card slots.
Powering on/off
1. Press and hold the Power/lock key to turn on
your tablet.
2. To turn it off, press and hold the Power/lock key
to open the options menu.
3. Tap Power off > OK.
Touch screen
Navigating your tablet
Use your ngertip to lightly touch the screen.
•
• Use quick icks of your nger on the touch screen
to swipe up, down, left, and right.
• To return to the previous screen, tap .
• Tap at any time to return to the main home
screen.
• Tap to view your recent apps.
• Tap to access applications on your tablet.
Noti cations panel
The Noti cations panel provides quick access
to alerts including new messages, emails and
software updates.
• Pull down on the top black bar on the display to
reveal the Noti cations panel.
• Swipe right to clear individual noti cations or tap
to clear all.
Personalize
Set wallpaper
To change your home or lock screen wallpaper,
tap and hold a blank part of the home screen
and follow on-screen instructions.
Add apps or widgets
1. From the home screen, tap .
2. Tap and hold an app or widget to add it to a
home screen.
3. Drag the item to position it on a home screen.
To delete an app, drag it to X.
Create a folder
1. On a home screen, drag one app onto another
to create a folder.
2. To rename the folder, tap it and then tap the
folder name.
3. Enter a name and tap Done.
More information
On the web
Detailed support information, including device
speci cations, troubleshooting, and FAQs, is available
at www.aiowireless.com/support/devices.
On the phone
Call Aio Customer Care at 1-855-246-2461.
Accessories
Aio offers a full line of accessories. For more
information go to www.aiowireless.com/shop/
accessories or visit your local Aio retailer.
Product meets FCC Radio Frequency Exposure Guidelines—FCC ID
Q78-V72A. This device complies with Part 15 of the FCC Rules. Operation
is subject to the following two conditions: (1) this device may not cause
harmful interference, and (2) this device must accept any interference
received, including interference that may cause undesired operation.
© 2013 Aio Wireless LLC. All rights reserved. Aio, Aio Wireless and the Aio
logo are trademarks of Aio Wireless LLC. Other marks are the property of
their respective owners.
© 2013 ZTE CORPORATION. All rights reserved. No part of this publication
may be excerpted, reproduced, translated or utilized in any form or
by any means, electronic or mechanical, including photocopying
and micro lm, without the prior written permission of ZTE Corporation.
The manual is published by ZTE Corporation. We reserve the right to
make modi cations on print errors or update speci cations without
prior notice.
079584505342 Printed in China
Wi-Fi® and email
Connect to a Wi-Fi network
1. From the home screen,
tap
> .
2. If Wi-Fi is not enabled,
slide the Wi-Fi switch
to On.
3. Tap a network name
to connect to it. You may
need to enter a password.
Email setup (Gmail™, Yahoo!®, etc.)
1. From the home
screen, tap .
2. Enter email address
and password and
then tap Next.
3. Con rm email account
settings and tap Next.
4. Name the account, enter your name as it will
appear on outgoing messages and then tap
Next. Your email will begin to synchronize with
your tablet.
Create and send an email message
1. From the home screen, tap .
2. To compose a new message, tap .
3. Tap To eld and enter email address or name.
4. Enter a subject and email message.
5. Tap to send message.
6. To attach les to the email message, tap and
make your selection.
Note: To set up corporate email, contact your
IT administrator.
Aio services
These services make using Aio even better
and easier!
My Aio: Access billing, make quick payment,
view usage and access support from the
palm of your hand.
Aio Wi-Fi: Automatically connect to free and
open Wi-Fi hotspots, helping you to maximize
data usage and enhance coverage.
To update and use apps
1. From the main home screen, tap to open
the App tray.
2. Tap the applicable icon and then tap the
button at the bottom of the screen to go to
Google Play™.
3. In Google Play, tap Update.
4. Tap Accept & download.
5. Once installed, you will see a noti cation in
the Noti cations panel. Tap noti cation to
open app or locate it in the App tray or on
the home screen.
Apps on Google Play
™
Access Google Play
1. From the home screen, tap .
2. Use your existing Google™ account or create
one following the steps on the screen.
Navigate Google Play
From Play Store, you will have multiple ways to
search for apps, games and more.
1. Tap a category to browse popular apps, games,
movies and music organized by popularity or
category.
2. Tap to search the Play Store for a speci c
game or app.
3. To install, tap the app and follow instructions.
Once installed, you will see a noti cation in
the Noti cations panel. Open the app from
this noti cation or by locating the app in the
App tray
Note: A Google Checkout™ payment method is
required to purchase apps.
.
Camera and video
Take a picture
1. From the home screen, tap .
2. Tap .
Take a panorama picture
1. In camera mode, tap .
2. Tap and slowly pan the camera until the
blue progress bar at the bottom of the screen
reaches the green arrow. You can also tap
to end the shot.
Take a video
1. In camera mode, tap .
2. Tap to begin recording. Tap to stop.
Send a picture
1. From the home screen, tap , then tap .
2. Tap an album and then tap and hold a picture.
3. Tap and select a method from the list.
Page 2

Cambio de idioma
principal, toca
1. Desde la pantalla
principal, toca
> .
2. Toca Idioma y
entrada de texto.
3. Toca Idioma.
4. Toca el idioma que
deseas utilizar.
Conoce tu tablet
Lentes de la cámara
Micrófono
Ranura para tarjeta
Pantalla
táctil
microSD™
Ranura para
tarjeta SIM
encendido/bloqueo
Botones el
volumen
Puerto para
los audífonos
Barra de estado y
noti caciones
Botón de
Ajuste del tablet
Para insertar tu tarjeta SIM y la
tarjeta microSD
1. Con el tablet apagado, abre la cubierta de las
ranuras para tarjetas.
2. Desliza la tarjeta SIM en la ranura, insertando
primero la esquina cortada y con los contactos
de metal hacia abajo. La tarjeta SIM hará clic
cuando se coloque adecuadamente en
su lugar.
3. Inserta la tarjeta microSD (no incluida) con
cuidado con los contactos de metal hacia abajo.
4. Vuelve a colocar la cubierta en las ranuras
para tarjetas.
™
Pantalla táctil
Para navegar en tu tablet
•
Usa la punta de tu dedo para tocar ligeramente
la pantalla.
• Da golpecitos rápidos con tus dedos en la
pantalla táctil para deslizarte hacia arriba,
abajo, izquierda y derecha.
• Para regresar a la pantalla anterior, toca .
• Toca en cualquier momento para regresar
a la pantalla principal.
• Toca para ver tus aplicaciones recientes.
• Toca para obtener acceso a las aplicaciones
en tu tablet.
Panel de noti caciones
El panel de noti caciones te proporciona acceso
rápido a las alertas, que incluyen mensajes,
correos electrónicos y actualizaciones de software.
• Despliega la barra negra en la parte superior
para mostrar el panel de noti caciones.
• Desliza el dedo a la derecha para eliminar
noti caciones individuales o toca para
eliminarlas todas.
Personalización
Para establecer el fondo de pantalla
Para cambiar el fondo de pantalla de la pantalla
principal o de bloqueo, toca por unos segundos
la parte en blanco de la pantalla principal y sigue
las instrucciones de la pantalla.
Para agregar aplicaciones o widgets
1. Desde la pantalla principal, toca .
2. Toca por unos segundos una aplicación o
widget para agregarlo a la pantalla principal.
3. Arrastra el elemento para colocarlo en la
pantalla principal. Para borrar una aplicación,
arrástrala a X.
Para crear una carpeta
1. En la pantalla principal, arrastra una aplicación
a otra para crear una carpeta.
2. Para cambiar el nombre de la carpeta, tócala
y luego toca en el nombre de la carpeta.
3. Ingresa un nombre y toca en Listo.
Más información
En Internet
La información detallada de ayuda, incluyendo las
especi caciones del equipo, solución de problemas
y las preguntas frecuentes se encuentran disponibles
en www.aiowireless.com/support/devices.
En el teléfono
Llama al servicio al cliente de Aio al 1-855-246-2461.
Accesorios
Aio ofrece una línea completa de accesorios. Para
más información, dirígete a www.aiowireless.com/
shop/accessories o visita a tu vendedor local de Aio.
El producto cumple con los Lineamientos sobre la Exposición a
Radiofrecuencia de FCC ID Q78-V72A. Este equipo cumple con la Parte
15 de las Reglas de FCC. La operación está sujeta a las siguientes
dos condiciones: (1) este equipo no puede ocasionar interferencia
perjudicial, y (2) este equipo debe aceptar cualquier interferencia
recibida, incluyendo interferencia que pueda causar una operación no
deseada. © 2013 Aio Wireless LLC. Todos los derechos reservados. Aio,
Aio Wireless y el logo de Aio son marcas registradas de Aio Wireless LLC.
Las demás marcas son propiedad de sus respectivos propietarios.
© 2013 ZTE CORPORATION. Todos los derechos reservados. No se
puede extraer, reproducir, traducir ni utilizar ninguna parte de esta
publicación de ninguna forma ni por ningún medio, electrónico ni
mecánico, incluyendo las fotocopias y el micro lm, sin el permiso previo
de ZTE Corporation. El manual es publicado por ZTE Corporation. Nos
reservamos el derecho de hacer modi caciones en los errores impresos
o actualizar especi caciones sin aviso previo.
079584505342 Impreso en China
Botón de retroceso
Botón para pantalla principal
Botón para ver
aplicaciones
principales
Puerto de carga/datos
LED de
estado
Wi-Fi® y correo electrónico
Para conectarte a la red Wi-Fi
1. Desde la pantalla
principal, toca
2. Si Wi-Fi no está
habilitado, desliza el
interruptor de Wi-Fi
hacia Sí.
3. Toca el nombre de una red para conectarte
a ella. Es posible que debas ingresar una
contraseña.
Ajustes del correo electrónico (Gmail™,
Yahoo!
1. Desde la pantalla
2. Ingresa una dirección
3. Con rma la con guración de la cuenta de
4. Nombra la cuenta, escribe tu nombre como
®
, etc.)
principal, toca
de correo electrónico
y la contraseña y
luego toca Siguiente.
correo electrónico y toca Siguiente.
aparecerá en tus mensajes salida y luego toca
Siguiente. Tu correo electrónico empezará a
sincronizarse con tu tablet.
Crea y envía un mensaje de correo
electrónico
1. Desde la pantalla principal, toca .
2. Para escribir un mensaje nuevo, toca
3. Toca el campo de Para e ingresa una dirección
de correo electrónico o un nombre.
4. Ingresa un asunto y mensaje de correo
electrónico.
5. Toca
6. Para agregar archivos al mensaje de correo
electrónico, toca y selecciona.
Nota: para establecer un correo electrónico
corporativo, comunícate con tu administrador
de informática.
para enviar el mensaje.
> .
.
.
Encendido/apagado
1. Oprime por unos segundos el botón de
encendido/bloqueo para encender tu tablet.
2. Para apagarlo, oprime por unos segundos el
botón de encendido/bloqueo para abrir el
menú de opciones.
3. Toca Apagar > Aceptar.
Servicios de Aio
¡Estos servicios hacen que el uso de Aio sea mejor
y más sencillo!
My Aio: ten acceso a facturación, haz
pagos rápidos, ve el uso y ten acceso a la
ayuda desde la palma de tu mano.
Aio Wi-Fi: conéctate automáticamente
a sitios con cobertura gratuita de Wi-Fi
que te ayudan a maximizar el uso de la
información y mejorar la cobertura.
Para actualizar y usar las aplicaciones
1. Desde la pantalla principal, toca para abrir
la bandeja de aplicaciones.
2. Toca el icono correspondiente y luego toca el
botón de la parte inferior de la pantalla para ir
a Google Play™.
3. En Google Play, toca Actualizar.
4. Toca Aceptar y descargar.
5. Una vez instalada, verás una noti cación en
el panel de noti caciones. Toca la noti cación
para abrir la aplicación o para colocarla en
la bandeja de aplicaciones o en la pantalla
principal.
Aplicaciones en Google Play
Ten acceso a Google Play
1. Desde la pantalla principal, toca .
2. Usa tu cuenta Google™ actual, o crea una
siguiendo los pasos en la pantalla.
Navega en Google Play
Desde Play Store, tendrás muchas maneras de
buscar las aplicaciones, los juegos y más.
1. Toca una categoría para recorrer
aplicaciones populares, juegos, películas y
música organizados por su popularidad o
por categoría.
2. Toca para buscar en Play Store un juego o
aplicación especí ca.
3. Para instalar, toca la aplicación y sigue las
instrucciones. Una vez que instalada, verás
una noti cación en el panel de noti caciones.
Abre la aplicación desde esta noti cación o
ubicando la aplicación en
Nota: se requiere un método de pago Google
Checkout™ para comprar aplicaciones.
.
™
Cámara y video
Para tomar una fotografía
1. Desde la pantalla principal, toca .
2. Toca .
Para tomar una fotografía panorámica
1. En el modo de cámara, toca .
2. Toca y desplaza la cámara lateralmente
hasta que la barra de progreso azul de la parte
inferior de la pantalla alcance la echa verde.
También puedes
Para tomar un video
1. En el modo de cámara, toca .
2. Toca para empezar a grabar. Toca
para parar.
Para enviar una fotografía
1. Desde la pantalla principal, toca y después
toca .
2. Toca un álbum y luego toca una fotografía por
unos segundos.
3. Toca y selecciona un método de la lista.
tocar para terminar la toma.
 Loading...