


VF945
User Manual

LEGAL INFORMATION
Copyright © 2010 ZTE CORPORATION.
All rights reserved.
No part of this publication may be excerpted, reproduced,
translated or utilized in any form or by any means, electronic
or mechanical, including photocopying and microfilm, without
the prior written permission of ZTE Corporation.
The manual is published by ZTE Corporation. We reserve the
right to make modifications on print errors or update specifications
without prior notice.
Version No. : R1.0
Edition Time : 20100714
Manual No. :

Contents
For Your Safety ...................................................... 11
Product Safety Information ........................................... 11
RF Exposure
General Statement on RF Energy
Specific Absorption Rate (SAR) .. 错误!未定义书签。
Body-worn Operation .................. 错误!未定义书签。
Limiting Exposure to Radio Frequency (RF) Fields . 错
误!未定义书签。
Regulatory Information ............................................ 15
Distraction
Driving
Operating Machinery
Product Handling
General Statement on Handling and Use
Small Children
Demagnetization
Electrostatic Discharge (ESD)
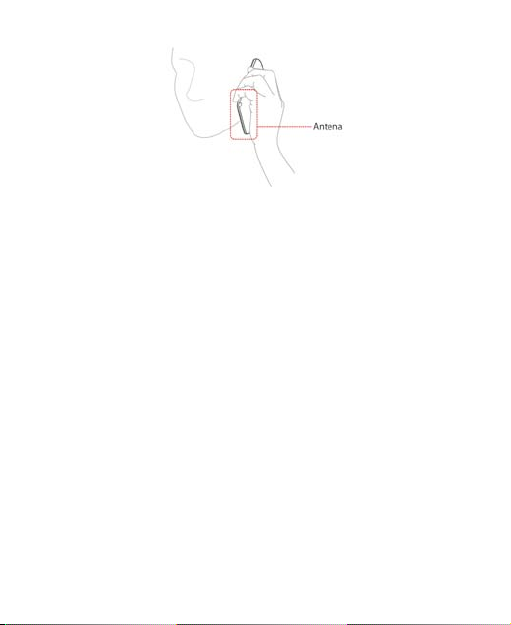
Antenna
Normal Use Position
Air Bags
Seizures/ Blackouts
Repetitive Motion Injuries
Emergency Calls
Loud Noise
Phone Heating
3
................................................................ 12
错误!未定义书签。
.................................................................... 16
.................................................................... 16
.............................................. 16
......................................................... 16
................ 16
........................................................ 17
..................................................... 18
................................. 18
.................................................................. 18
............................................... 18
.................................................................. 19
................................................ 19
........................................ 19
.................................................... 20
............................................................. 20
........................................................ 20

Electrical Safety
Accessories
Connection to a Car
Faulty and Damaged Products
Interference
General Statement on Interface
Pacemakers
Hearing Aids
Medical Devices
Hospitals
Aircraft
Interference in Cars
Explosive Environments
Petrol Stations and Explosive Atmospheres
Blasting Caps and Areas
Getting Started ....................................................... 24
Overview ...................................................................... 24
Key Definition
Starting Up
How to slot your SIM/memory card
How to pop in your battery
How to charge your mobile phone
Powering On/Off Your Phone
How to power on your phone
How to power off your phone
How to switch your phone to sleep mode
4
........................................................... 20
............................................................ 20
................................................ 21
................................ 21
.................................................................. 21
.............................. 21
........................................................... 21
........................................................... 22
..................................................... 22
................................................................. 22
.................................................................... 22
................................................ 23
............................................... 23
............ 23
........................................ 23
............................................................... 26
................................................................... 27
......................... 27
...................................... 28
........................... 29
....................................... 30
.................................. 30
.................................. 30
................ 30

How to wake up your phone from sleep mode
Getting Around Your Phone
Using Finger Gestures
Home Screen
Phone Status and Notifications
Applications and Settings Preview
Phone Calls ............................................................ 45
Making a Call ............................................................... 45
Making a Call from Dialer
Making a Call from Contacts
Making a Call from Call History
Making a Call from a Text Message
Making a Conference Call
Making an Emergency Call
Making an International Call
Receiving a Call
Answering an Incoming Call
Rejecting an Incoming Call
Muting a Call
Putting a Call on Hold
Turning the Speaker On/Off
Ending a Call
Call Settings
Contacts ................................................................. 51
Starting to use Contacts ............................................... 51
5
........ 31
......................................... 32
............................................ 32
.......................................................... 32
............................... 36
.......................... 38
........................................ 45
................................... 45
............................... 45
........................ 46
....................................... 46
..................................... 47
.................................... 47
........................................................... 48
.................................... 48
..................................... 48
........................................................... 48
............................................. 49
.................................... 49
.......................................................... 49
................................................................. 49

Contacts Screen
Managing Contacts
Importing/Exporting Contacts
Creating a Contact
Adding a Contact to Favorites
Searching for a Contact
Editing a Contact
Deleting a Contact
Entering Text .......................................................... 55
Using the On-screen Keyboard .................................... 55
Android Keyboard
TouchPal Keyboard
Entering Text through the On-screen Keyboard
Entering Numbers and Symbols
Touch Input Settings
Messages ............................................................... 61
Exchanging Messages ................................................. 61
How to compose an SMS
How to compose an MMS
Managing Messages and Messages Threads
Message Settings
Using Email
How to create an Email account
How to compose and send an Email
How to reply to or forward an Email
6
..................................................... 51
...................................................... 52
.................................. 52
.................................................. 53
................................. 53
.......................................... 54
.................................................... 54
.................................................. 54
................................................... 55
................................................ 56
.......... 58
............................. 58
.................................................... 58
....................................... 61
....................................... 62
......... 63
................................................... 64
.................................................................. 65
............................. 65
....................... 67
........................ 68

Email Settings
Getting Connected ................................................. 70
Connecting to the Internet ............................................ 70
Ways of Connecting to the Internet
GPRS/3G/EDGE
Wi-Fi
Using Browser
How to open Browser
How to open Web Pages
Browsing Options
Using Bookmarks
Browser Settings
Bluetooth
How to turn on/off Bluetooth
How to make your device visible
How to change your device name
How to pair with another Bluetooth device
Experiencing Multimedia ...................................... 82
Camera ........................................................................ 82
How to open Camera
How to take Pictures
Camera Settings
Camcorder
How to open Camcorder
How to shoot Videos
7
......................................................... 68
......................... 70
.................................................... 70
....................................................................... 71
.............................................................. 73
............................................. 73
........................................ 73
................................................... 74
.................................................... 77
.................................................... 78
...................................................................... 80
.................................... 80
............................. 80
........................... 81
.............. 81
.............................................. 82
............................................... 82
..................................................... 82
................................................................... 84
......................................... 84
............................................... 84

Video Settings
FM Radio
How to open FM Radio
How to listen to FM Radio
Music
How to open Music
How to play Music
How to create Playlists
Managing Your Playlists
How to set a Song as Ringtone
Videos
How to open Videos
How to play Videos
Gallery
Sound Recorder
How to open Sound Recorder
How to record your memos
Google Applications .............................................. 92
Signing In to Your Google Account ............................... 92
Using Google Calendar
Using Google Mail
How to open Google Mail
How to create and send an email
Using Google Talk
How to open Google Talk
How to add a new friend
8
........................................................ 84
..................................................................... 85
........................................... 85
....................................... 85
........................................................................... 86
................................................. 86
................................................... 87
............................................ 87
......................................... 88
............................... 88
.......................................................................... 89
................................................ 89
................................................. 89
......................................................................... 90
........................................................... 90
................................. 90
..................................... 91
................................................ 92
........................................................ 93
........................................ 93
............................ 93
........................................................ 93
....................................... 94
......................................... 94

How to view and accept an invitation
How to change your online status
How to start a chat
Phone Settings ....................................................... 95
Basic Settings .............................................................. 95
How to set the time and date
Display Settings
Sound Settings
Language Settings
Mobile Network Services
Security Settings
Protecting Your Phone with a Screen Lock
Protecting Your SIM Card with a PIN
Setting Up Credential Storage
Managing Memory
Managing Your Memory Card
Managing Internal Phone Storage
How to reset to factory settings
Application Settings
Managing Applications
Other Settings
Search Settings
Speech Synthesis Settings
Other Applications ............................................... 110
Alarm ......................................................................... 110
9
...................... 94
........................... 94
.................................................. 94
.................................. 95
...................................................... 95
....................................................... 96
................................................ 100
...................................... 100
........................................................ 102
........... 102
.................... 103
.............................. 104
..................................................... 105
............................... 105
......................... 106
............................. 106
.................................................... 106
.......................................... 106
............................................................ 108
.................................................... 108
................................... 109

How to set alarms
Docs To Go
Global Time
Note pad
Calculator
SIM Toolkit
Task Manager
Stopwatch
Specifications ...................................................... 112
Index
10
................................................. 110
................................................................ 110
............................................................... 110
.................................................................... 110
................................................................... 111
................................................................. 111
............................................................ 111
.................................................................. 111
..................................................................... 113
For Your Safety
Read the Safety
on this page
mm
Do not dispose of it
sound
Keep away from
medical devices
Product Safety Information
Information section
of this user guide
Do not use
hand-held while
driving
For body-worn
operation maintain
a separation of 15
Small parts may
cause a choking
hazard
This device may
produce a loud
pacemakers and
other personal
11
Do not use while
re-fuelling
This device may
produce a bright or
flashing light
in a fire
Avoid contact with
magnetic media
Avoid Extreme
Temperatures
Avoid any contact
with liquid, keep it
dry
Switch off when
medical facilities
Switch off when
Do not rely on this
Switch off in
environments
instructed in
hospitals and
Do not attempt to
disassemble
instructed in
aircrafts and
airports
explosive
device for
emergency
communications
Only use approved
accessories
RF Exposure
Health and safety information
Radio Frequency (RF) Energy
This model phone meets the government’s requirements for
exposure to radio waves.
This phone is designed and manufactured not to exceed the
emission limits for exposure to r adio frequen cy (RF) en ergy set by
the Federal Communications Commission of the U.S.
Government:
The exposure standard for wireless mobile phones employs a unit
unit of measurement known as the Specific Absorption Rate, or
SAR. The SAR limit set by the FCC is 1.6W/kg. *Tests for SAR
SAR are conducted using standard operating positions accepted
12

by the FCC with the phone transmitting at its highest certified
power level in all tested f r equency bands. Although the SAR is
determi ned at the hi ghest certified power level , t he actual SAR
level of the phone while operating ca n be well below the maximum
maximum value. This is because the phone is designed to
operate at multiple power levels so as to use only the poser
required to reach the network. In general, the closer you are to a
a wireless base station antenna, the lower the power output.
The highest SAR value for the model phone as reported to the
FCC when tested for use at the ear is 1.29 W/kg and when worn
on the body , as described in this user guide, is 1.11 W/kg
(Body-worn measurements differ among phone models,
depending upon available enhancements and FCC
requirements.)
While th ere may be differences between the SAR levels of
various phones and at various positions, they all meet the
governm ent requirement.
The FCC has granted an Equipment Authorization for this model
phone with all reported SAR levels evaluated as in c ompliance
with the FCC RF exposure guidelines. SAR information on this
model phone is on file with the FCC and can be found under the
Display Grant section of http://www.fcc.gov/oet/fccid after
searching on
FCC ID: Q78-VDF945
For body worn operation, this phone has been tested and meets
the FCC RF exposure guidelines for use with an accessory that
contains no metal and the positions the handset a minimum of
1.5 cm from the body. Use of other enhancements may not
ensure compliance with FCC RF exposure guidelines. If you do
13

no t use a body-worn accessory and are not holding the phone at
the ear, p osition the handset a m inimum of 1.5 cm from your
body when the phone is switched on.
FCC Compliance(FOR PART 15B/PART 15C)
This device complies with par t 15 of the FCC Ru les. Operation is
subject to the following two conditions: (1) This device may not
cause har m ful inte rference, and (2) thi s device mus t ac cept any
interference received, including interference that may cause
undesired operation.
Caution: Changes or m odi fi cation s not expressly approved by the
manufacturer could void the user’s authority to operate the
equipment.
NOTE: This equipment has been tested and found to comply with
the limits for a Class B digital device, pursuant to part 15 of the
FCC Rules. These limits are designed to provide reasonable
protection against harmful interferen ce i n a r es idential installation.
This equipment generates, us es and can radiate radio frequency
energy and, if not installed and used in accordance with the
instructions, may cause harmful interference to radio
communications. However, there is no guarantee that
interference will not occur in a particular installation. If this
equipment does cause harmful interference to radio o r t elevisi on
reception, which can be determined by turning the equipment off
and on, the user is encouraged to try to correct the interference
by one or more of the following measures:
14

—Reorient or relocate the rec e iving antenna.
—Increase the separation between the equipment and receiver.
—Connect t he equipment into an out let on a cir c uit diffe rent from
that to which the receiver is connected.
—Consult the dealer or an experienced radio/ TV technician for
help.
Regulatory Information
The following approvals and notices apply in specific regions
as noted.
Please find the section Declaration of RoHS Compliance and
CE DOC in the end of this manual.
15

Distraction
Driving
Full attention must be given to driving at all times in order to
reduce the risk of an accident. Using a phone while driving
(even with a hands free kit) can cause distraction and lead to
an accident. You must comply with local laws and regulations
restricting the use of wireless devices while driving.
Operating Machinery
Full attention must be given to operating t he machinery in
order to reduce the risk of an accident.
Product Handling
General Statement on Handling and Use
You alone are responsible for how you use your phone and
any consequences of its use.
You must always switch off your phone wherever the use of a
phone is prohibited. Use of your phone is subject to safety
measures designed to protect users and their environment.
• Always treat your phone and its accessories with care and
keep it in a clean and dust-free place.
• Do not expose your phone or its accessorie s to open flames
or lit tobacco products.
16

• Do not expose your phone or its accessories to liquid,
moisture or high humidity.
• Do not drop, thro w or try t o bend your pho ne or i ts
accessories.
• Do not use harsh chemicals, cleaning solvents, or aerosols
to clean the device or its accessories.
• Do not paint your phone or its accessories.
• Do not attempt to disassemble your phone or its accessories,
only authorized personnel must do so.
• Do not expose your phone or its accessories to extreme
temperatures, minimum - [5] and maximum + [50] degrees
Celsius.
• Please check local regulations for disposal of electronic
products.
• Do not carry your phone in your back pocket as it could
break when you sit down.
Small Children
Do not leave your phone and its accessories within the reach
of small children or allow them to play with it.
They could hurt themselves or others, or could accidentally
damage the phone.
Your phone contains small parts with sharp edges that may
cause an injury or may become detached and create a choking
hazard.
17

Demagnetization
To avoid the risk of demagnetization, do not allow electronic
devices or magnetic media close to your phone for a long time.
Electrostatic Discharge (ESD)
Do not touch the SIM card’s metal connectors.
Antenna
Do not touch the antenna unnecessarily.
Normal Use Position
When placing or receiving a phone call, hold your phone to
your ear, with the bottom towards your mouth.
18
Air Bags
Do not place a phone in the area over an air bag or in the air
bag deployment area.
Store the phone safely before driving your vehicle.
Seizures/ Blackouts
The phone can produce a bright or flashing light.
Repetitive Motion Injuries
To minimize the risk of RSI when texting or playing games
with your phone:
• Do not grip the phone too tightly.
• Press the buttons lightly.
• Use the special features which are designed to minimize
the times of pressing buttons, such as Message Templates
and Predictive Text.
• Take lots of breaks to stretch and relax.
19

Emergency Calls
This phone, like any wireless phone, operates using radio
signals, which cannot guarantee connection in all conditions.
Therefore, you must never rely solely on any wireless phone
for emergency communications.
Loud Noise
This phone is capable of producing loud noises, which may
damage your hearing. Turn down the volume before using
headphones, Bluetooth stereo headsets or other audio devices .
Phone Heating
Your phone may become warm during charging and during
normal use.
Electrical Safety
Accessories
Use only approved accessories.
Do not connect with incompatible products or accessories.
Take care not to touch or allow metal objects, such as coins
or key rings, to contact or short-circuit in the battery terminals.
20

Connection to a Car
Seek professional advice when connecting a phone interface
to the vehicle electrical system.
Faulty and Damaged Products
Do not attempt to disassemble the phone or its accessory.
Only qualified personnel can service or repair the phone or
its accessory.
If your phone or its accessory has been submerged in water,
punctured, or subjected to a severe fall, do not use it until you
have taken it to be checked at an authorized service centre.
Interference
General Statement on Interface
Care must be taken when using the phone in close proximity
to personal medical devices, such as pacemakers and hearing
aids.
Pacemakers
Pacemaker m anuf act urers recom men d that a m inimum
separation of 15 cm be maintained between a mobile phone
and a pacem aker t o avoi d pot ent ia l int erf ere nce wi th t he
pacemaker. To achieve this, use the phone on the opposite
ear to your pacemaker and do not carry it in a breast pocket.
21

Hearing Aids
People wit h hea r i ng ai ds or ot h er c oc hl e ar i m pl ant s m a y
experience interfering noises when using wireless devices or
when one is nearby.
The level of interference will depend on the type of hearing
device and the distance from the interference source, increasing
the separation between them may reduce the interference.
You may also consult your hearing aid manufacturer to discuss
alternatives.
Medical Devices
Please consult your doctor and the device manufacturer to
determine if operation of your phone m ay interfere with the
operation of your medical device.
Hospitals
Switch off your wireless device when requested to do so in
hospitals, clinics or health care facilities. These requests are
designed to prevent possible i nterference w ith sen sitive medica l
equipment.
Aircraft
Switch off your wireless device whenever you are instructed
to do so by airport or airline staff.
22

Consult the airline staff about the use of wireless devices on
board the aircraft, if your device offers a ‘flight mode’ this
must be enabled prior to boarding an aircraft.
Interference in Cars
Please note that because of possible interference to electronic
equipment, some vehicle manufacturers forbi d the use of
mobile phones in their vehicles unless a hands-free kit with
an external antenna is included in the installation.
Explosive Environments
Petrol Stations and Explosive Atmospheres
In locations with potentially explosive atmospheres, obey all
posted signs to turn off wireless devices such as your phone
or other radio equipment.
Areas with potentially explosive atmospheres include fuelling
areas, below decks on boats, fuel or chemical transfer or
storage facilities, areas where the air contains chemicals or
particles, such as grain, dust, or metal powders.
Blasting Caps and Areas
Power off your mobile phone or wireless device when in a
blasting area or in areas posted power off “two-way radios” or
“electronic devices” to avoid interfering with blasting operations.
23
Getting Started
Overview
24
25

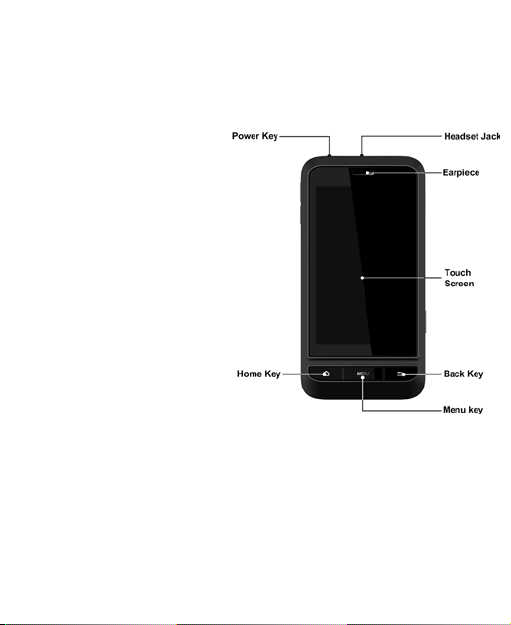
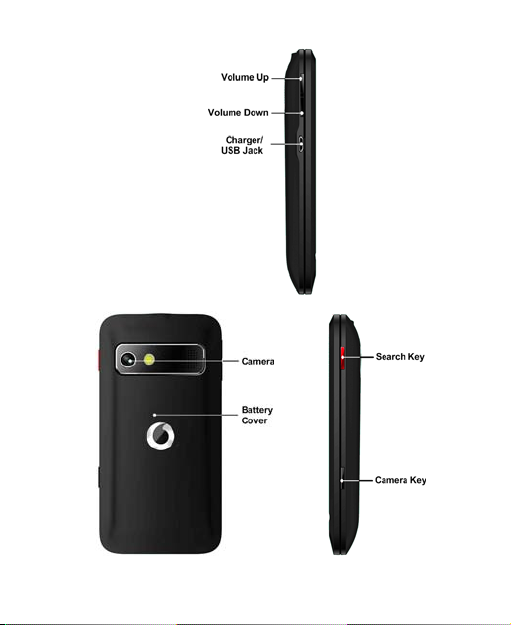
Key Definition
Key
Function
Press to wake up your phone.
Hold to see the recently- used applications.
screen.
Back Key
Press to go to the previous screen.
volume down.
Power Key • Hold to get the phone options. You can
select Silent mode, Vibration mode,
Airplane mode or to power off your
phone.
• Press to switch your phone to sleep
mode.
•
Home Key • Press to return to Home Screen from
any application or screen.
•
Menu Key Press to get the options on the current
Volume Keys • Press Volume Up Key to turn the
volume up.
• Press Volume Down Key to turn the
26
Starting Up
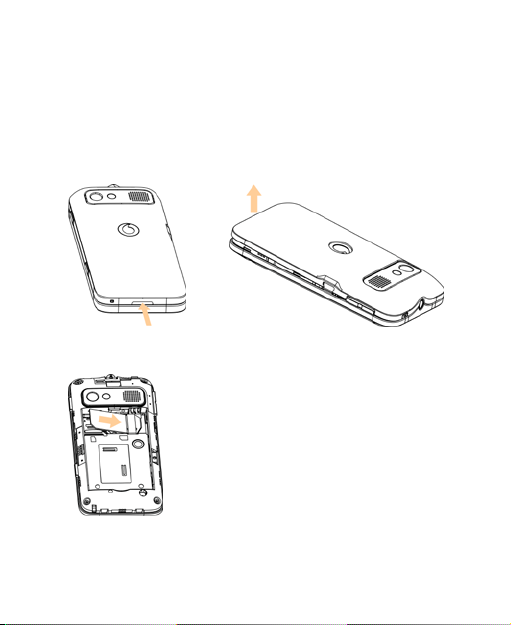
How to slot your SIM/memory card
Power off your phone before installing or replacing the battery,
SIM card, and memory card.
1. Remove the battery cover.
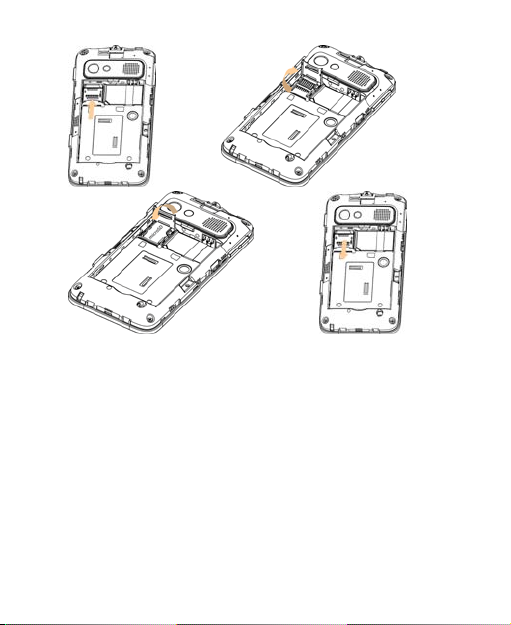
2. Hold your SIM card with the cut corner oriented as shown
below and then insert it into the card holder properly.
3. Open the memory card holder, hold your memory card with
the cut corner oriented as shown in the following picture
and then insert it into the card holder properly.
27
Notes:
microSD logo is a trade mark of SD Card Association.
How to pop in your battery
1. Insert th e bat ter y by ali gni ng t he gold c ont acts on the
battery with the gold contacts in the battery compartment
on the phone.
28
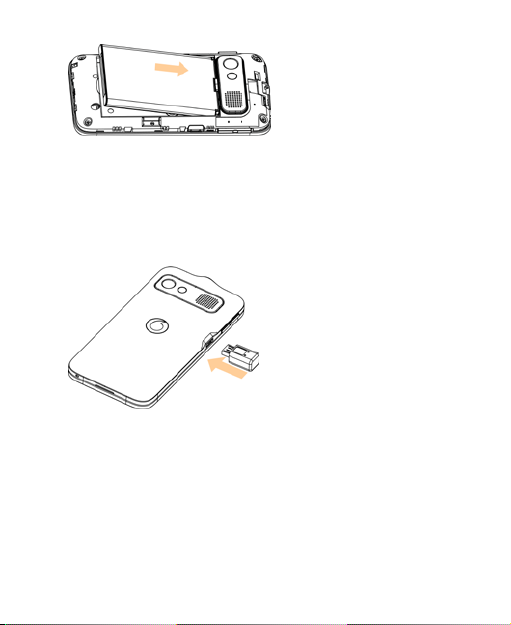
2. Push down the battery until it clicks into place.
How to charge your mobile phone
The new battery is not fully charged. To charge the battery,
you need to:
1. Connect the adapter to the charger jack.
2. Connect the charger to a standard AC wall outlet.
Notes:
29

If the battery is low, there will be a pop-up message on
the screen and the indicator light will be red.
If the phone is powered on, the icon
the notification bar. When charging is completed, the
battery indicator
3. Disconnect the charger when the battery is fully charged.
appears on the notification bar.
will appear on
Powering On/Off Your Phone
How to power on your phone
1. Make sure that your SIM card is in your device and the
battery is charged.
2. Press Power Key to power on your phone.
How to power off your phone
1. Hold Power Key to get the phone options.
2. Select Power off, and then tap OK.
How to switch your phone to sleep mode
Press Pow er Key.
Sleep Mode suspends your device to a low-power-consumption
state while the display is off to save battery power. Your device
also goes into Sleep Mode automatically when you leave it
idle after a certain period of time.
30

How to wake up your phone from sleep mode
If your phone is switched to sleep mode, you need to wake it
up:
1. Press Power Key to activate your screen display.
2. Drag
icon to the right.
Notes:
If you have set an unlock pattern for your phone (see Phone
Settings-Security Settings-Protecting Your Phone with a
Screen Lock-To set the screen unlock pattern), you need to
draw the pattern to unlock your screen.
31

Getting Around Your Phone
Using Finger Gestures
You can use finger gestures to control your phone. The controls
on your touch screen change dynamically depending on the
tasks you are performing.
1. Tap the buttons, icons, or applications to select items or
to open applications.
2. Hold a certain item to get available options.
3. Slide on the screen, you can scroll up/down. From H ome
Screen, you can also slide left/right to browse the extended
Home Screen.
4. Drag a cert ain it em to move it or to d o some ot he r
corresponding operations.
Tips:
Besides using finger gestures to control your phone, you can
also switch your phone screens (such as text input screen,
gallery screen, etc.) between portrait or landscape mode by
holding the phone upright or sideways.
Home Screen
You can add or remove home items in your Home Screen.
32

notifications panel
Display area
Shows the operation and
display areas of your phone.
get the results.
related applications.
Interface switching buttons
Include the Main Menu,
Dialer/360 People.
Notifications bar Displays the reminders and
Google search Text your search requests to
Shortcuts Tap these shortcuts to start
status icons of your phone.
Flick down to open the
Messages, Email, and
33

How to extend the Home Screen
Beyond the screen width, the Home Screen extends to provide
more space for adding items. Slide your finger to the left or
right to get the extended Home Screen.
Customize the Home Screen Wallpaper
To change the wallpaper
1. Press Home Key to return to Home Screen if needed.
2. Press Menu Key and select Wallpaper.
3. Select the wallpaper you want to use from Gallery, Live
wallpapers, or Wallpapers.
4. Tap Save or Set wallpaper.
To add a Home Screen item
1. Press Home Key to return to Home Screen.
2. Slide you r fi nger to the left or right to get the ext ended
Home Screen if needed.
34

3. Press Menu Key and select Add.
You can also tap and hold the bl ank area of the Home
Screen to get the Add to Home screen shortcut menu.
4. Select the category and the item you want.
To remove a Home Screen item
1. Press Home Key to return to Home Screen.
2. Slide your finger to the left or right to get the extended
Home Screen if needed.
3. Hold the item you want to delete until the
on the screen.
4. Drag the item to
.
icon appears
35

Phone Status and Notifications
mute
mute
installed
Connected to a
headset
Phone Status
GPRS connected
Signal strength
GPRS i n use
EDGE connected
EDGE i n use
3G connected
3G in use
Battery is very low
Battery is low
Battery is full
Battery is charging
Vibrate mode
36
Roaming
Phone speaker is
Phone
microphone is
No SIM card
GPS is on
GPS is connected
USB is connected
Wi-Fi network
Alarm is set
Wired microphone

Airplane mode
New instant
Content
downloaded
notifications
delivery
Bluetooth is on
Notifications
No signal
New Mail
New SMS/MMS
New voicemail
Missed call
Call in progress
Call on hold
Call forwarding on
Problem with
SMS/MMS
37
Speaker is on
message
Upcoming event
Song is playing
Downloading data
Uploading data
More (not
displayed)

How to open the notification panel
Applications
Description
network provider.
services.
From the Notifications Panel, you can get the information of
calendar events, new messages, and ongoing settings such
as call forwarding or the current call status. You can open the
message, reminder, event notification etc. from the Notification
Panel.
1. Hold the notification bar until
the Screen.
2. Drag
Tips:
You can also open the notification panel from the Launcher
Home Screen by pressing Menu Key > Notifications.
downwards.
appears on the top of
Applications and Settings Preview
Programs Preview
Your VF945 has lots of functions. Tap
programs that are pre-installed on your device.
to get the following
360 People Enables you to move mobile contacts from
360 Updates Enables you to check the updates of 360
one phone to another easily by backing up
and syncing all contacts regardless of
38

Applications
Description
Alarm
Enables you to set alarms.
Browser
Enables you to browse the internet.
Calculator
Enables you to perform the basic calculation,
division and so on.
including meetings and other events.
Camcorder
Enables you to enter camcorder and shoot
the video clips you like.
directly and use the camera features.
your friends and colleagues.
Dialer
Enables you to dial a number to call.
Docs To Go
Enables you to view your documents.
receive Emails.
files on your microSD card.
listen to them, and save them on your device.
such as addition, subtraction, multiplication,
Calendar Enables you to schedule appointments,
Camera Enables you to enter the camera screen
Contacts Enables you to manage the information of
Email Enables you to enter the Email screen,
File manager Enables you to organize and manage your
FMRadio Enables you to search for radio channels,
where you can setup Email, send or
39

Applications
Description
Gallery Enables you to organize and manage your
multimedia files.
Global Time
Enables you to view the global time.
Maps
Enables you to track your current location,
time traffic situations, and receive
detailed directions to your destination.
Market
Enables you to access to useful applications
and install on your phone.
Messages
Enables you to enter the Messages screen,
MMS messages.
Enables you to browse your audio files and
listen to them in the Music player.
Music Shop
Enables you to browse, sample and buy
them direct to your mobile phone.
world.
Note pad
Enables you to create text notes.
Google Mail Enables you to access your Google Mail
Music
My Web Enables you to personalise your online
account and check your email on your
mobile phone.
view real-
and fun games which you can download
where you can send and receive SMS and
individual tracks and albums, or downloaded
40

Applications
Description
RoadSync
Calendar
Enables you to sync your Exchange
the RoadSync Calendar Widget.
RoadSync Mail
Enables you to sync your mail to the new
RoadSync Mail application.
Settings
Enables you to adjust the device settings.
SIM Toolkit
Appears on the screen only if your SIM card
information.
Sound
Recorder
Enables you to record audio clips.
Stopwatch
Enables you to measure the exact time it
takes to do something.
Talk
Enables you to send and receive instant
Task Manager
Enables you to view and manage all the
running programs on your device.
Videos
Enables you to browse your video files and
You Tube
Enables you to view videos that have been
uploaded by YouTube members.
appointments to the new RoadSync Calendar
app and stay on top of your agenda with
provides this function. services. Please contact
with your service provider for detailed
messages and voice over internet protocol
(VOIP), offered by Google Inc.
watch them in the Videos player.
41

Enables you to configure and manage your
Call settings
Enables you to set up fixed dialing numbers,
caller ID etc.
Sound & display
Enables you to set sound settings, such as
such as screen brightness and so on.
locations from My Location.
Applications
Enables you to manage applications and
installation of new programs.
Settings Preview
You can adjust the device settings. Press Home Key >
>
Settings to view all the settings on your device.
Tips:
You can also press Menu Key > Settings from the Home Screen.
Wireles s &
networks
phone’s wireless connections, such as Wi-Fi,
Bluetooth, mobile networks, and Virtual
Private Networks. You can also enable the
Airplane mode.
voicemail, call forwarding, call waiting, and
ringtones, notifications, and display settings
Location &
security
Enables you to set the screen unlock pattern,
enable the SIM card lock, or manage the
phone’s credential storage. You can also
select the sources to use when determining
42

USB Settings
and USB Charging settings.
Account & sync
Enables you to manage your account and
Privacy
Enables you to configure privacy settings,
Personal data.
SD card, USB
phone storage
Enables you to check the available memory
storage.
Search
Enables you to set the search options.
system language and region) and text input
options.
Accessibility
Enables you to manage accessibility options.
Text-to-speech
Enables you to configure the text-to-speech
(voice data) application.
Date & time
Enables you to set the date, time, time
About phone
Enables you to view the phone status,
battery level, and legal information.
Enables you to configure the PC connection
configure general sync settings.
such as Location, back up Settings, and
Mass Storage &
Language &
keyboard
of the external card and the internal phone
Enables you to set the locale (operating
settings if you have installed a text-to-speech
zone, and date/time format. If the network
supports, you can also enable automatic
time update.
43

How to open recently used applications
1. Hold Home Key from any screen until the following recently
used applications interface appears.
2. Tap an application you want to open.
44

Phone Calls
Making a Call
Making a Call from Dialer
1. Tap > Dialer from Home Screen.
2. Enter the phone number or the contact name you want to call.
to erase the wrong entry, hold this key to clear
Tap
all digits. Your phone automatical ly lists the matching
contacts. You ca n tap
if there are more matching numbers or contacts.
3. Tap
.
Making a Call from Contacts
1. Press Home Key > > Contacts.
2. Slide y ou r f i nge r t o s c r ol l t h e c on t act s lis t a nd tap the
contact you want to call.
Tips:
You can search for a contact by pressing M enu Key >
Search.
3. Tap
.
Making a Call from Call History
1. Press Home Key > > Dialer to open the Dialer.
to hide the keypad and to see
45

2. Tap
3. Tap a recently dialed or received call from the list. You
4. Tap
to open Call History.
Tips:
You can also open Call History by tapping the Call log
tab from the Contacts Screen.
can scroll down the list to see more call history.
.
Making a Call from a Text Message
If a text message contains a phone number that you want to
call, you can make the call while viewing the text message.
1. Press Home Key >
that contains the phone number you want to call.
2. Tap the number.
3. Select the number and tap
> Messages and tap the message
Making a Conference Call
You can create a phone session between yourself and two or
more other parties.
Notes:
This func t i o n is s ubj ec t t o you r se r vi c e o pe r at or an d t h e
network status.
1. Call the first number.
2. While you are connected to the first number, tap Add call.
46

3. Call the second number.
4. While you are connected to the second number, tap Merge
calls.
5. To add the third party, tap Add call.
6. Dial the number, and when connected, tap Merge calls
Making an Emergency Call
1. Enter the emergency number for your location from Dialer.
2. Tap
Notes:
It is possible to dial emergency numbers when the SIM card
is not inserted.
Your SIM card may store other emergency numbers. Contact
your service operator if you need more information.
.
Making an International Call
Notes:
This func t i o n is s ubj ec t t o you r se r vi c e o pe r at or an d t h e
network status.
1. Hold
2. Enter the full phone number.
For example: +49-123-12345678 in the following format:
+ country code-area code-phone number.
3. Tap
from Dialer to enter “+”.
.
47

Receiving a Call
Answering an Incoming Call
When there is an incoming call, the phone will display the
information on the screen.
to the right to answer the call.
Drag
Rejecting an Incoming Call
Drag to the left to reject the call.
Muting a Call
During a call, you can mute your microphone so that the
person with whom you are speaking cannot hear you, but
you can still hear him or her.
Tap Mute.
48

When the microphone is turned off, the mute icon
on the screen.
appears
Putting a Call on Hold
During a call, you can use the following methods to put the
call on hold.
Tap Hold.
icon will be displayed if a call is on hold.
The
If you are already on a call and accepted the new call, the
first call will be put on hold automatically. You can choose to
switch between the two callers by tapping Swap.
Turning the Speaker On/Off
Tap Speaker during a call.
The speakerphone icon (
when the speakerphone is on
) appears in the notification bar
Ending a Call
During a call, you can tap End to end it.
Call Settings
You can adjust the call settings of your phone. To open the call
settings menu, press Menu Key > Settings > Call settings
from the Home Screen.
49

Fixed
Enables you to restrict outgoing calls to a fixed
service
provider.
settings
DTMF
Enables you to set the length of DTMF tones.
Enables you to forward incoming
or Forward when unreachable.
whether to display your
Dialing
Numbers
Voicemail
set of numbers. To enable this feature you
must know your SIM card’s PIN2 code.
Enables you to select a voicemail service
Voicemail
Enables you to specify a voicemail number.
Tones
calls to a different number. You
can select when to forward:
Call
forwarding
Always forward, Forward when
busy, Forward when unanswered,
GSM/WCD
MA call
settings
Caller ID
Additional
settings
waiting
Enables you to choose
number in outgoing calls.
Enables you to choose
whether to be notified
Call
of new incoming calls
while you are already
on a call.
50

Contacts
Starting to use Contacts
You can add new contacts along with their information. Setting
up communication information for the contact will allow you to
call the person quickly or browse the contact's information.
Contacts are saved in the phone memory or in the SIM card.
If you store the information in the SIM card, you can fill the
name and a number. If you store the information in the phone
memory, you can also fill out more inform at i o n i nc l udi ng
Email, Postal address, pictures, Nickname, website, etc.
Press Home K ey >
Screen.
Contacts Screen
There are three tabs in the Contacts Screen: Call log, Contacts,
and Favorites.
> C on t ac ts to enter the Co ntac ts
51

Managing Contacts
Importing/Exporting Contacts
You can import/export contacts from/to you SIM card or
microSD card.
To Import/export contacts from/to SIM card
1. Press Menu Ke y > Import/Expor t from th e Contacts
Screen.
2. Select to import or export contacts from/to SIM card.
Your VF945 will automatically read the contacts.
3. Select the contacts you want to import/export.
Tips:
If you want to import all contacts saved in your SIM
card, press Menu Ke y > Import all.
If you want to expo rt all c ontac ts to you r SI M card,
press Menu Ke y > Select all.
4. Tap Done if needed.
To Import/export contacts from/to memory card
1. Press Menu Ke y > Import/Expor t from th e Contacts
Screen.
2. Select to import or export contacts from/to memory card.
If you wa nt t o im po rt c o nt ac ts f rom memory c ard, you
should have vCard files saved in the memory card. If there is
more than one vCard file, you need to select the vCard file.
52

3. Tap OK.
Creating a Contact
1. Press Menu Key > New contact from the Contacts Screen.
2. Select the location to save your contact.
3. Enter the name and phone numbers. You can also set the
Email add ress es, Chat addr ess es, P ost al ad dres ses ,
Organizations, Notes etc. if you select to create a phone
contact.
4. Tap Done to save the contact.
Adding a Contact to Favorites
1. Select the contact you want to add to Favorites from your
Contacts Screen.
2. Hold the contact until a shortcut menu appears.
3. Tap Add to favorites.
53

Searching for a Contact
1. Press Menu Key > Search from the Contacts Screen.
2. Input the contact name you want to search for.
The contacts matched will be listed.
Editing a Contact
1. Select t he contact y ou wa nt to ed it f rom t he Co nt ac ts
Screen.
2. Press Menu Key > Edit contact.
Tips:
You can also edit a contact by holding it in the Contacts
Screen and select Edit contact from the pop-up shortcut
menu.
3. Edit the contact and tap Done.
Deleting a Contact
1. Select the contact you want to delete from the Contacts Screen.
2. Press Menu Key > Delete contact.
Tips:
You can also delete a contact by holding it in the Contacts
Screen and select Delete contact from the pop-up shortcut
menu.
3. Tap OK.
54

Entering Text
Using the On-screen Keyboard
When you enter a field that needs text or numbers, hold the
input box and select Input method f rom the pop-up menu to
change input method.
Android Keyboard
Android Keyboard is a keyboard layout similar to a desktop
computer keyboard. You can choose to use the landscape
orientation of the on-screen keyboard, by turning the phone
sideways.
55

Tips:
• If you want to use the landscape keyboard, you need to select
the Orientation check box in Settings > Sound & display.
• The landscape QWERTY keyboard is not supported in all
applications.
TouchPal Keyboard
You can select to use one of the there layouts of TouchPal
Keyboard.
• Full QWERTY
56

• 12–Key PhonePad
• CooTek T+
57

Entering Text through the On-screen Keyboard
1. Enter a field that needs text or numbers.
2. Tap or hold the letters on the keyboard to enter your text.
Entering Numbers and Symbols
1. Enter a field that needs text or numbers.
2. Tap
3. Select the numbers and symbols.
/ to open the symbol panel.
Touch Input Settings
You can configure the touch input settings by pressing Menu
Key > Settings > Language & keyboard from Home Screen.
TouchPal
• Basic settin gs
Word prediction: Enables the word prediction function.
Key press sound: Enables the sound feedback as
you touch on the keyboard.
Key press vibration: Enables the vibration feedback
as you touch on the keyboard.
Mixed language in put: E nabl es the l ang uage
auto-detection if no more than 3 languages are selected.
Select languages: Select the languages that you may
use.
58

Swipe to switch layout: Select to swipe horizontally
over the keyboard to switch layout.
Layout in portrait mode: Select Full QWERTY,
12-Key PhonePad, or CooTek T+ to change the key
pad layout in portrait mode.
Layout in landscape mode: Select Full QW ERTY,
12-Key Phon ePad , or CooTek T+ to change the
keypad layout in landscape mode.
• Prediction & Gestures
Predict next word: Enables your VF945 to predict the
next word.
Correct mistyping: Enables your VF945 to correct
your mistyping.
Slide-down symbols: Enables you to input symbols
by sliding down on keys.
Relevant words: Enables you to input relevant words
by sliding on candidates.
Help: View the online user manual for using TouchPal.
About: View the TouchPal information.
Android keyboard
Vibrate on keypress: Enables vibration feedback as you
touch on the keyboard.
Sound on keypress: Enables the sound feedback as you
touch on the keyboard.
59

Auto-capitalization: Select the check box to capitalize the
fist letter of each sentence automatically.
User dictionary
You can add words to your dictionary by pressing Menu
Key > Add.
60

Messages
Messages is where all of your SMS and MMS accounts are
located.
To access your message accounts, Press Home Key >
> Messages.
Exchanging Messages
From Messages, you can receive and send an SMS or MMS.
When you receive a new message, you can open it from the
Notification Panel, or from Messages Screen. Simply tap on
the new message to read it.
The device will alert you for the unread message(s) with the
in the notification bar.
icon
How to compose an SMS
1. Press Home Key > > Messages.
2. Tap New message.
3. Tap To field and enter the recipient’s number. You can also
enter t h e fi rs t l ett e rs of t he r ec i pi en t ’s nam e to display a
list of matching names stored in Contacts, and then select
a recipient from the list.
4. Tap Type to compose field and enter the content of your
SMS.
5. Tap Send to send your SMS.
61

How to compose an MMS
1. Press Home Key > > Messages.
2. Tap New message.
3. Tap To field and enter the recipient’s number. You can also
enter the first letters of the recipient’s name to display a
list of matching names stored in Contacts, and then select
a recipient from the list.
4. Press M e nu K e y > Add subject to enter the subject of
your MMS.
5. Tap Type to compose field and enter the contents of
your MMS.
6. Press Menu Key > Attach to add an attachment to your
MMS:
Pictures: Select a picture to add to your MMS.
Capture picture: Take a photo and add to your MMS.
Videos: Select a video clip to attach to your MMS.
Capture video: Shoot a video clip and add to your MMS.
Audio: Select an audio file to add to your MMS.
Record audio: Record an audio file and add to your MMS.
Slideshow: Edit a sildeshow and add to your MMS.
7. Tap Send to send your MMS.
62

Tips:
• If you add a subject or an attachment to your SMS, the
SMS will be converted to an MMS automatically.
• If you remove the subject and attachment of your MMS,
the MMS will be converted to an SMS automatically.
Managing Messages and Messages Threads
SMS and MMS messages which are sent to and received from
a contact (or a number) are grouped into message threads in
Messages Screen. Threaded messages show your exchanged
messages (similar to a chat program) with a specific contact
on the screen. Message threads are sorted by the time when
you received them, with the latest one on the top.
To reply to a message
1. Tap the message you want to reply to from Messages
Screen.
2. Tap Type to compose and enter the contents of your
message.
3. Tap Send.
To delete a message (thread)
1. Press Menu Key > Delete threads from the Messages
Screen.
2. Select the messages or threads you want to delete.
3. Tap OK.
63

Notes:
You can also delete a message or thread by opening it from
Messages Screen and pressing Menu Ke y > More > Delete
thread.
Message Settings
Press Menu Ke y > Settin g s from the Messages Screen.
You can configure your message settings.
Storage settings
• Delete old messages: Select to delete old messages as
limits are reached.
• Text message limit: Set the maximum num be r of te xt
messages allowed in a single thread.
• Multimedia message limit: Set the maximum number of
multimedia messages allowed in a single thread.
Text message (SMS) settings
• Delivery reports: Request a delivery report for each SMS
message you send.
• Manage SIM card messages: Manage the messages
saved in your SIM card.
• Service Center: Enables you to view and edit the service
center.
Multimedia message (MMS) setting s
• Delivery reports: Request a delivery report for each MMS
message you send.
64

• Read reports: Request a re ad report f or each MMS
message you send.
• Auto-retrieve: Sel ect to retr ieve MMS m essag es
automatically.
• Roaming auto-retrieve: Select to retrieve MMS messages
automatically when you are roaming.
Notifications settings
• Notifications: Select to display message notifications in
the notification bar.
• Select ringtone: Sel ect a ri ngton e for your inc om ing
messages.
• Vibrate: Select to make your phone vibrate when receiving a
new message.
Using Email
Press Home Key > > Email. You can enter the Email
Screen to setup your Email account and exchange Emails.
How to create an Email account
1. Enter your Email address and password, then tap Next
when you enter the Email Screen for the first time.
65

2. Select the type of your account, edit the incoming server
settings, and then tap Next.
Your phone will check the incoming server settings and
finish the setup automatically. If you are notified that setup
could not be finished, you might need to correct some
settings to finish it. If there is any problem, please contact
your mobile service provider and Email service provider.
3. Edit the outgoing server settings and tap Next.
66

Your phone will check the outgoing server settings and
finish the setup automatically.
4. Set the Email checking frequency, select whether to use
this account by default or be notified when Email arrives,
and then tap Next.
5. Give your account a name and set a name displayed on
outgoing message, and then tap Done.
How to compose and send an Email
After creating an Email account, you can compose and send
Email messages.
1. Press Menu Key > Compose from the Email Screen.
2. Tap To field and enter your recipient’s address.
When yo u ent e r t h e add r ess , t h e m atching a ddr es s es
saved in your Contacts will be displayed. You can tap the
recipient from the list.
67

Tips:
You can also press M enu Key > Add Cc/Bcc to ad d
recipients.
3. Enter the subject and the content of your Email.
4. Tap Send.
How to reply to or forward an Email
1. Open the Email you want to reply to or forward fro m Email
Screen.
2. Press M e nu K e y > R ep ly/ Forwar d t o reply to/forward
the Email.
You can also press Menu Key > Reply all to reply to all
recipients of the Email.
3. Enter the contents/recipients of your Email.
4. Tap Send.
Email Settings
Tap the account you want to set from the Email Screen and
press Menu Key > Account s et tings. You can get the Email
settings.
General settings
• Account name: Set your account name.
• Your name: Set the name displayed on outgoing message.
• Email address: Set the email address.
68

• Email check frequency : Set the email checking frequency.
• Power-saving mode: Enable the email synchronization
time intelligent adjustment.
• Default account: Select the check b ox t o send ema il
from this account by default.
Notification settings
• Email notifications: Select to be notified in notification
bar when Email arrives.
• Select ringtone: Select the ringtone for incoming Email
notification.
• Vibrate: Sel ect to be notif i ed by vibration with ringtones
when Email arrives.
Server settings
• Incoming settings: Set the incoming server settings.
• Outgoing settings: Set the outgoing server settings.
69

Getting Connected
Connecting to the Internet
Your phone’s networking capabilities allow you to access the
Internet or your corporate network.
Ways of Connecting to the Internet
You can use the default connection settings to connect to the
Internet through your mobile network (GPRS/3G/EDGE), or
Wi-Fi.
GPRS/3G/EDGE
Use GPRS/3G/EDGE to connect to the Internet and to send
and receive MMS/Email messages on your phone. You will
need a data plan t o use your wireless service provider’s
GPRS/3G/EDGE network. Check with your wireless service
provider for GPRS/3G/EDGE rates. If the GPRS/3G/EDGE
settings are not pre-configured on your phone, contact your
operator for the parameters. Do not change the settings as
this may cause services to stop working.
To add a new GPRS/3G/EDGE connection
Before you begin, get the following information from your
service provider:
• Acces s Point Name (APN)
• Your user name and password if needed.
70

• Server IP and the port number if the network uses a proxy
server.
1. Press Home Key >
networks > Mobile networks > Access Point Names.
2. Press Menu Key > New APN.
3. Tap Name to enter you APN name (You can name it as
you like).
4. Tap APN to enter the APN you want to add.
5. Tap Proxy and Port to enter the Server IP and port if the
network uses a proxy server.
6. Tap and enter Username and Password (If there is no
User name and Password, leave them blank).
7. Tap and enter AP N type if needed.
8. Press Menu Key > Save to complete.
Notes:
If you want to set the APN to default settings, press Menu
Key > Reset to default.
> Settings > Wireless &
Wi-Fi
Wi-Fi provides wireless Internet access over distances of up
to 300 feet (100 meters).
To turn on Wi-Fi
1. Press Home Key >
2. Select the Wi-Fi check box to turn Wi-Fi on.
> Settings > Wireless & networks.
71

To add a Wi-Fi network
1. Press Home Key >
networks > Wi-Fi settings.
The Wi -Fi netwo rk n am es a nd se c ur it y s et t i ngs ( o pen
network or secured network) of detected Wi-Fi networks
are displayed in the Wi-Fi networks section.
2. Tap a network to connect.
If you select an open network, you will be automatically
connected to the network.
If you select a secured network, you will need to input
the wireless password.
Check the Wi-Fi network status
You can check the Wi-Fi network status from the notification
bar and wireless controls.
1. Check the
2. Press Home Key >
networks > Wi-Fi settings, then tap the wireless network
that the phone is currently connected to.
You can check the network status from the pop-up window.
> Settings > Wireless &
icon in the notification bar.
> Settings > Wireless &
72

Using Browser
You can use your Browser to browse most of the websites.
Some web pages may not be displayed properly as some
specific web pa ge tec hnol ogi es, suc h as Flas h, a re not
supported by the phone. Your phone will automatically create
an EDGE or GPRS/3G connection for you while browsing
web pages.
How to open Browser
Press Home Key > > Browser to start this function.
How to open Web Pages
In Browser, you can open web pages through the following
ways:
1. Tap the address bar to enter the website you want to
browse, and tap Go.
73

2. Press Menu Key > Bookmarks and select an item to open.
3. Select an i tem f rom Most vi sited tab/History tab of
Bookmarks Screen.
Browsing Options
When browsing web pages, you can do some operations.
1. Press Menu Key > Refresh to refresh the page.
2. Press M e nu K e y > Mo re > Fi nd on p a ge to enter the
search item to view the search result.
3. Press Menu Key > More > Select text and slide your on
the page to select the text you want to copy.
Your phone automatically copies the selected text to the
clipboard.
4. Press Menu Key > More > Share page to send the page
by Email, Google Mail, Messages, or RoadSync Mail.
5. Press Menu Key > More > Page info/Downloads to
view the page or download information.
6. Rotate your phone sideways to view the landscape Browser
Screen if you select the Orientation check box in Home
Key >
To open a new browser window
1. Press Menu Key > New window to open a new browser
window.
2. Tap the address bar to enter the website you want to
browse.
> Settings > Sound & display.
74

To switch between different browser windows
If you have more than one browser window opened, you can
switch between these windows.
1. Press Menu Key > Windows to view all the windows you
opened.
2. Tap the page you want to browse.
Tips:
You can also tap
Open links in web pages
1. Open a web page that contains a link.
to close a window.
75

2. Tap a link to open the page.
You can also hold on the link to open the shortcut menu:
Open: Open the web page.
Open in new window: Open the web page in a new
window.
Bookmark link: Save the link to your Bookmarks.
Save link: Download the linked web page to your
phone.
Share l ink: Send t he li nk b y Emai l, Googl e Mail,
Messages, or RoadSync Mail.
Copy link URL: Copy the link to the clipboard.
To download applications from web pages
1. Open a web page that contains an application link.
2. Tap the link or hold on the link and select Save link to
download the application to your phone.
76

Notes:
Downloaded applications are saved in your memory card.
Using Bookmarks
You can save your frequently-us ed pages as bookmarks on
your phone.
To add a new bookmark
1. Open a web page.
2. Press Menu Key > Bookmarks.
3. Tap Add.
4. Enter a name of the bookmark and tap OK.
Bookmarks will be sorted by the time with the latest one on
the top.
To edit a bookmark
1. Open a Browser window.
2. Press Menu Key > Bookmarks.
3. Select an it em y ou wa n t t o edit and hold on it until the
shortcut menu pops up.
4. Select Edit bookmark.
5. Edit the name or location, and then tap OK to save it.
To delete a bookmark
1. Open a Browser window.
2. Press Menu Key > Bookmarks.
77

3. Select an item you want to delete and hold on it until the
shortcut menu pops up.
4. Select Delete bookmark and tap OK to confirm the deletion.
Browser Settings
You can set the Browser text size, home page etc. by pressing
Menu Key > More > Settings from a browser window.
Page content settings
• Text size: Adjust the browser text size.
• Default zoom: Set the browser default zoom.
• Open pages in overview: Select to show overview of
newly opened pages.
• Text encoding: Select a text encoding type.
• Block pop-up windows: Select to block pop-up windows.
• Load images: Select to show the images of web pages.
• Auto-fit pages: Select to form at the web pages to fit the
screen.
• Landscape-only display: Display the web pages only in
landscape screen orientation.
• Enable JavaScript: Select to enable JavaScript.
• Enable plug-ins: Select to enable plug-ins.
• Open in background: Select to open new windows behind
the current one.
• Set home page: Select to edit the home page web site.
78

Privacy settings
• Clear cache: Delete all the cached page contents.
• Clear history: Clear the browser navigation history.
• Accept cookies: Select to allow sites to save and read
cookies.
• Clear all cookie data: Clear the browser cookies.
• Remember form data: Select to remember the data you
type in forms for later use.
• Clear form data: Clear the saved form data.
• Enable location: Select to allow sites to request access
to your location.
• Clear location access: Select to clear access for all
websites.
Security settings
• Remember passwords: Select to save usernames and
passwords for web sites.
• Clear passwords: Clear the saved passwords.
• Show security warnings: Select to show warnings if
there is a problem with a site’s security.
Advanced settings
• Website settings: View advanced settings for individual
websites.
• Reset to default: Clear all brows er dat a an d reset all
settings to default.
79

Bluetooth
Bluetooth is a short-range wireless communication technology.
Phones with Bluetooth capabilities can exchange information
within a distance of about 10 meters without any physical
connection. The Bluetooth devices must be paired before the
communication is performed.
How to turn on/off Bluetooth
1. Press Home Key > > Settings > Wireless & networks.
2. Select the Bluetooth check box to turn Bluetooth on.
icon will be displayed in the notification bar. If you
The
want to turn Bluetooth off, clear the Bluetooth check box.
Notes:
By default, Bluetooth is turned off. If you turn it on, and then
turn off your device, Bluetooth is also turned off. When you
turn on your device again, Bluetooth turns on automatically.
How to make your device visible
Other devices with Bluetooth capabilities can detect your
phone, establish a partnership, or use a Bluetooth service.
1. Press Home Key >
networks > Bluetooth settings.
2. Select the Bluetooth check box if needed.
3. Select the Discoverable check box to make your device
visible.
> Settings > Wireless &
80

How to change your device name
1. Press Home Key > > Settings > Wireless &
networks > Bluetooth settings.
2. Select the Bluetooth check box if needed.
3. Tap Device name.
4. Enter the name and tap OK.
How to pair with another Bluetooth device
You can pair your device with another device that has Bluetooth
capabilities. Once you do this, the two devices must have
Bluetooth turned on but do not need to be visible for you to
exchange information between them.
1. Press Home Key >
networks > Bluetooth settings.
2. Tap Scan for devices.
Your VF945 will display all reachable Bluetooth devices in
the Bluetooth devices section.
3. Tap the device you want to pair with.
4. If necessary, type your PIN to pair and tap OK.
Tips:
The same PIN should be entered on the other device.
> Settings > Wireless &
81

Experiencing Multimedia
Camera
Your phone comes with a 3.2–megapixel camera that lets
you capture sharp pictures.
How to open Camera
Press Home Key > > Camera t o open the camera.
Notes:
You can switch from the camera to the camcorder quickly by
dragging the
How to take Pictures
Aim the camera at the subject and then tap to take the
shot.
Tap the picture in the right corner of your Camera Screen
to view the picture just captured.
Press Menu Key > Gallery to view all of your pictures.
Camera Settings
By pressing Menu Key > Settings from the Camera Screen,
you can adjust the camera settings.
Camera settings
switch up.
82

• White ba l an c e: Tap to adjust the white balance. White
balance en ables the c am era to ca pt ure co lors m ore
accurately by adjusting to the current lighting environment.
• Anti Banding: Select to adjust preview images automatically
or for specified AC frequencies, in order to avoid striate
previews caused by interference.
• Color effect: Tap to select the picture effect.
• Store location: Select to record location in picture data.
• Select ISO: Tap to set the ISO level to 100, 200, 400, or
800, or set it back to Auto. Higher ISO numbers are better
for taking pictures in low light conditions.
• Picture size: Tap to select the size of your captured
pictures.
• Picture quality: Tap to adjust the jpeg quality.
• Focus mode: Select to turn on/off autofocus.
• Sharpness: Tap to adjust the saturation.
• Contrast: Tap to adjust the contrast. Higher contrast ratio
enables you to easily see the sharp colors of blue, red or
green against any black color.
• Saturation: Tap to adjust the saturation.
Restore to default settings
Restore to default settings: Restore the camera settings to
default.
83

Camcorder
Camcorder enables you to shoot video clips.
How to open Camcorder
Tap > Camcorder to open the camcorder.
Notes:
You can switch from the camcorder to the camera quickly by
dragging the
How to shoot Videos
1. Tap to start shooting.
2. Tap
Notes:
Tap th e pict ur e in the r ight cor ner of you r Camc ord er
to stop shooting.
Screen to view the video clip just shot.
Video Settings
By pressing Menu Key > Settings from the C amcord er
Screen, you can adjust the video settings.
Camcorder settings
• Video quality: Select the video quality t ype.
• Video Encoder: Select the video encoder type.
• Audio Encoder: Select the audio encoder type.
• Video duration: Tap to set the video duration.
switch down.
84

Restore to default settings
Restore to default settings: Restore the camcorder settings
to default.
FM Radio
With the FM Radio, you can search for radio channels, listen
to them, and save them on your device. Note that the quality
of the radio broadcast depends on the coverage of the radio
station in that particular area. The wired headset works as an
antenna, so always connect the headset when using the radio.
When you receive an incoming call while listening to the radio,
the radio will be turned off.
How to open FM Radio
You need to insert a headset to your phone before opening
the FM radio.
> FMR adio to open the FM radio.
Tap
After opening the FM radio, you will see the
notification bar.
How to listen to FM Radio
1. Tap or to scan for channels automatically.
2. Press M e nu K e y > Adjust, and then tap
tune the frequency by +/–0.1 MHz manually.
85
icon in the
/ to f i n e

3. Hold on a frequency until a red box appears on the screen,
and then drag it to the box to save the frequency.
4. Press Volume Keys to adjust the volume.
5. Press Menu Key > Sleep to set the FM radio sleep timer.
6. Tap
to turn off the FM radio.
Music
You can play digital audio files from your phone’s memory
card in Music.
How to open Music
You need to copy the audio files you want to play to your
memory card first.
1. Tap
2. Select a file to open.
> Music to open Music Screen.
86

How to play Music
1. Tap Artists/Albums/Songs/Playlists to get the songs you
want to play.
2. Tap a song from the list to start playing.
Notes:
Press Volume Keys to adjust the volume.
How to create Playlists
You can create some playlists to organize your music files.
1. Select a music file you want to add to a new playlist.
2. Tap and hold on the file until a shortcut menu pops up.
3. Tap Add to playlist.
4. Tap New.
87

5. Enter the playlist name and tap Save.
The playlist is created and the file you selected is added to
the playlist.
Managing Your Playlists
1. Tap Playlist from the Music Screen to view all playlists.
2. Hold on the playlist you want to play or edit until a shortcut
menu pops up.
i Tap Play to play the playlist.
ii Tap Delete to delete the playlist.
iii Tap Rename to edit the playlist name.
To add songs to your playlist
1. Open the folder where the song you want to add to a
playlist is.
2. Hold on the song until a shortcut menu pops up.
3. Select Add to playlist.
4. Select a playlist from the list.
How to set a Song as Ringtone
1. Open the folder where the song you want to set as ringtone is.
2. Hold on the song until a shortcut menu pops up.
3. Select Use as phone ringtone.
Tips:
You can also set a song as ringtone when you are playing it
by pressing Menu Ke y > Use as ringtone.
88

Videos
You can use Videos to play your video files.
How to open Videos
Press Home Key > > Videos to open the video player.
Your phone will show you all video file s saved on your memory c ard.
How to play Videos
Copy the video file to your memory card before playing it.
1. Tap the video file you want to play from the Videos Screen.
2. Tap on the screen to show the control bar.
89

Gallery
Gallery helps you view pictures and play back videos. For
pictures, you can also do some basic editing tasks. For instance,
set them as your wallpaper or contact icon, and share with
your friends.
Sound Recorder
Sound Recorder enables you to record your voice memos
that you can set as ringtone.
How to open Sound Recorder
Press Home Key > > Sound Recorder to open the sound
recorder.
90

Notes:
You need to install a memory card to use Sound Recorder.
How to record your memos
1. Get the microphone near to your mouth.
2. Tap
3. Tap
4. Tap
5. Tap OK to save the voice recording, or tap Discard to
Notes:
You can find your recordings in Home Key >
Playlists > My recordings. If you want to set a recording as
ringtone, hold the recording and select Use as phone ringtone
from the pop-up shortcut menu.
to start recording.
to stop recording.
to play back the voice recording.
discard the recording.
> Music >
91

Google Applications
Signing In to Your Google Account
Signing in to your Google Account enables you to synchronize
Google Mail, Calendar, and contacts between your phone
and the web.
1. Tap a Google application, such as Talk.
2. Read the instructions and tap Next.
3. Tap Sign in if you have a Google account. Enter your user
name and password, and then tap Sign in.
Tap Create if you do not have a Google account.
Using Google Calendar
Tap H o me Ke y > > Calen d ar to us e Go o gl e Cal e nd ar,
Google’s t im e m a na gem e nt applic at i on . Y ou c a n us e the
calendar to schedule appointments, including meetings and
other events. Your appointments will be displayed on the
screen as are scheduled. All your appointments are synchronised
to your Google account, which enables you to share your
schedule, get your entire calendar on the go, and rec ei v e
Email reminder for your upcoming events.
92

Using Google Mail
Google Mail is Google’s web-based email service. Google
Mail is configured when you sign in to your Google account.
Depending on your synchronization settings, Google Mail on
your phone is automatically synchronized with your Google
Mail account on the web.
How to open Google Mail
Tap > Google Mail.
How to create and send an email
1. In the Inbox, press Menu Key and then tap Compose.
2. Enter the message recipient’s email address in the To
field. If you are sending the email to several recipients,
separate the email addresses with a comma. You can
add as many message recipients as you want.
3. Enter the email subject, and then compose your email.
4. After composing your email, tap Send.
Using Google Talk
Google Talk is Google’s instant Messages program, which
enables you to communicate with other people that also use
Google Talk.
93

How to open Google Talk
Tap > Talk.
How to add a new friend
You can only add people who have a Google Account.
1. In the Friends list, press Menu Key > Add friend.
2. Enter t he G o o gl e Ta lk i nstant Messages ID or Google
email address of the friend you want to add.
How to view and accept an invitation
1. In the Friends list, press Menu Key > Invites.
All chat invitations you have sent or received are listed on
the pending invitations screen.
2. Tap a pending invitation, and then tap Accept or Decline.
How to change your online status
1. Tap the online status icon beside your status message,
and then select the status you want on the menu.
2. Tap the status message box and then enter your status
message using the onscreen keyboard.
How to start a chat
1. Tap a friend in the Friends list.
2. Chat with your friend by entering text using the on-screen
keyboard.
3. After entering your message, tap Send.
94

Phone Settings
Basic Settings
How to set the time and date
1. Press Home Key > Menu Key > Settings > Date & time.
2. Clear the Automatic check box if you want to set time
and date by yourself.
3. Configure the time and date settings:
– Tap Set date. Adjust the date, and tap Set to save it.
– Tap Select time zone and tap the area where you are.
– Tap Set time. Adjust the time, and tap Set to save it.
– Tap the check box behind Use 24–hour format to
change the time format.
– Tap Select date format and select the type you like.
Display Settings
By pressing Home Key > Menu Key > Settings > Sound &
display, you can c onf i gu re t he dis p la y s et ti n gs , s uc h as
orientation, animation, brightness, and screen timeout.
To adjust the screen brightness
1. Select Brightness from the Display settings.
2. Adjust the brightness and tap OK.
95

To adjust the delay before the screen turns off
1. Tap Screen timeout from the Display settings.
2. Select the time from the list.
To switch the screen orientation automatically
You can select to switch your screen orientation to landscape
or portrait automatically when rotating your phone.
Select the Orientation check box from the Display settings.
If you wa nt t o di s a bl e t h is f unction, c l ea r t h e Orientation
check box.
To show animation when opening/closing windows
You can select to show an animation when opening or closing
windows.
1. Tap Animation in the Display settings.
2. Select the animation type you’d like to use.
If you want to disable this function, select No animations.
Sound Settings
By pressing Home Key > Menu Key > Settings > Sound &
display, you can configure the sound settings, such as ringtones
and notifications.
To set the ringtone
1. Tap Phone ringtone from Sound settings.
2. Select the ringtone you want to use from the pop-up list
and tap OK.
96

Tips:
You can also set an audio file as the ringtone while browsing
the music list.
1. Open the songs list by pressing Home Key > >
Music > Songs.
2. Hold the song you like until the shortcut menu pops up.
3. Select Use as phone ringtone.
To set the default notification ringtone
1. Select Notification ringtone from the Sound & display
settings.
2. Scroll the ringtone list and select one to set as the default
notification ringtone.
3. Tap OK to save.
To switch your phone to silent m ode
1. Select the Silent mode check box from the Sound & display
settings.
2. You can also switch to silent mode quickly from the locking
screen.
97

The silent icon will appear in t he notificat i on bar.
To switch your phone to vibration mode
Select the Phone vibrate check box from the Sound & display
settings.
If you switch your phone to silent mode with vibration, the
vibration icon
To enable the haptic feedback
You can get the vibration feedback while pressing the soft
keys and on certain UI interfaces if you have enabled haptic
feedback.
1. Press Home Key >
2. Select the Haptic feedback check box.
To adjust the ringer volume
If you want to set the ringer volume, make sure your phone is
not in silent mode.
1. Select Ringer volume from the Sound & display settings.
will appear in the notificati on bar.
> Settings > S ound & display.
98

2. Adjust the ringer volume and tap OK to save.
Tips:
You can adjust the ringer volume quickly by pressing Volume
Keys from any screen.
Notes:
If you want to adjust the notification volume together with ringer
volume, select the Use incoming call volume for notifications
check box.
To adjust the media volume
You can adjust the media volume for Music and Videos
players.
1. Select Media volume from the Sound & display settings.
2. Adjust the media volume and tap OK to save.
To enable the touch tones
You can set your phone to play tones when touching the keys
of Dialer.
Select the Audible touch tones check box from the Sound &
display settings.
To enable the screen selection tones
You can set your phone to play sound while making a selection
by touching the screen.
Select the Audible selection check box from the Sound &
display settings.
99

To enable the memory card notifications
You can set your phone to play sound for memory card
notifications.
Select the SD card notifications check box from the Sound
& display settings.
Language Settings
You can change the system language of your phone.
To change the language of your operating system
1. Tap
2. Select a language from the locale list to set it as the system
> Settings > Language & keyboard > Select
locale.
language.
Mobile Network Services
The GSM and WCDMA services are supported by your phone.
You can configure the network settings according to your
phone service.
To enable data roaming
1. Tap
2. Select the Data roaming check box to enable data roaming.
To switch the network mode
1. Tap
> Settings > Wireless & networks > Mobile
networks.
> Settings > Wireless & networks > Mobile
networks > Network Mode.
100
 Loading...