

Zte Nubia NX501 Quick Start Manual

nubia NX501
WCDMA Digital Mobile Handset
Quick St ar t G uide

1
Copyright Statement
Copyright © 2013 ZTE CORPORATION.
All rights reserved.
No pa rt of this publication may be quoted, reproduced,
translated or used in any form or by any means, electronic
or mechanical, including photocopying and microfilm,
without the prior written permission of ZTE Corporation.
ZTE Corporation reserves the right to make modifications
on print errors or update specifications in this manual
without prior notice.
Trademarks
Android is a trademark of Google, Inc.
The Bluetooth word mark and logos are registered
trademarks of Bluetooth SIG, Inc., and any use of such
marks by ZTE Corporation is under license.
The product is manufactured under the license of Dolby
Laboratory. Dolby and the double-D symbol are registered
trademarks of Dolby Laboratories.
The MicroSIM card is a tiny SIM card with the size of
12mmx15mm, which functions the same as the normal
SIM ca rds.
The word of MicroSIM is used to clarify the phone's
functions and give guidance to consumers.
All other trademarks remain the property of their respective
owners.
Statement of Third-party Applications
During the installation process of some third-party
applications, the issues of repeated restart or abnormal

2
use of software might be caused by incompatibility of the
third-party applications, rather than the phone itself.
Version 1.0, Mar. 2013

3
Before you get started
Thank you for choosing ZTE Corporation’s digital mobile
phone nubia NX501, which we’ll simply call ‘phone’ from
now on.
Based on the Android
TM
platform, th e p hone ad op ts a
quad-core processor with novel appearance and cool user
interface, which bring you brandnew experiences.
If you’d like your phone to live a long and fruitful life, please
read this guide carefully and keep it for future reference.
You never know when you might need it.
The Quick Start Guide only describes the phone’s basic
functions. For more information about these functions,
please read the built-in User Manual. Turn on your phone
and tap ‘User Bible’ to view the User Manual.
Don’t worry if the pictures we use to demonstrate your
phone’s functions look a little different from w hat you see
on the screen. It’s the functions that matter.
If there is any inconsistence caused by function update
between this guide and your phone, please subject to your
phone.
4
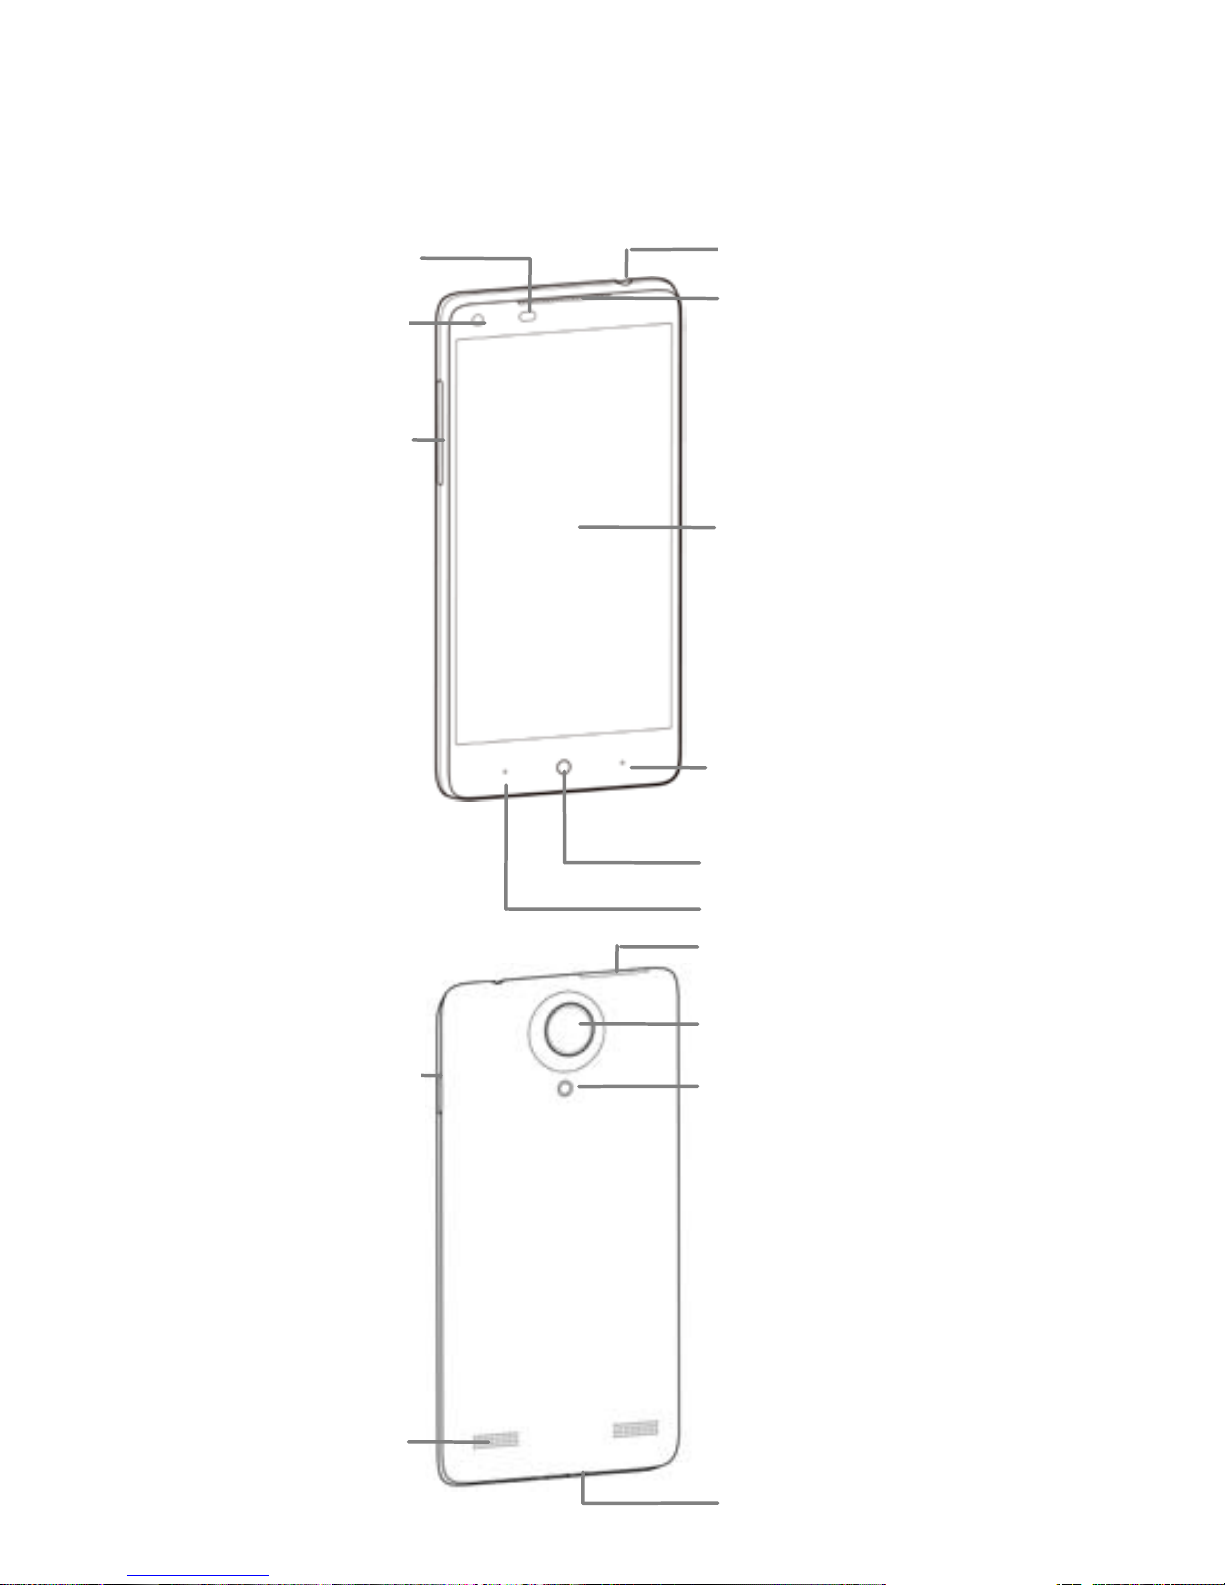
Earpiece
Flashlight
Fron t camer a
Touch screen
Menu key
Hom e key
Back key
Volume keys
Speaker
Power / Lock key
SIM card socket
Headset jack
USB port
Light sens or /
Proximity sens or
Back camera
Getting t o k now your phone

5
Descriptio ns of Keys
Keys Functions
Power/Lock
key
Press & hold: turn on your phone;
open the menu/options.
Press & hold for more than 10
seconds: restart your phone.
Press: turn off and lock the LCD; or
turn on the LCD.
Home key
Press it to open the home screen.
Press & hold the key to open the
most recently used applications
screen.
Menu key
Press it to open a menu with items
that affect the current screen or
application.
Back key
Press it to open the previous screen
you were working in.
Volume keys
Adjust the volume. Press & hold the
UP key to adjust to the maximum
volume, and press & hold the DOWN
key to adjust to the Vibration/Silence
mode.

6
Inserting and removing the SIM
You must insert a v alid SIM card into your phone before
use. All information about the es t ab lish m en t of network
connection, together with the relevant information saved in
the card’s Contacts, are stored in the SIM card.
1. Turn off your phone.
2. Use the accompanying card
ejector to insert into the hole
on the SIM card socket, and
slightly press inward to eject
the card socket.
3. Install the SIM card onto the
socket and push the socket
back to the original position.
Turn off your phone before taking out the UIM/SIM card.
Note: You can use MicroSIM card only.
Charging the battery
The battery is not fully charged for the first time. Please
exhaust the capacity of the battery before you recharge it
for the first time. To ensure the battery is always in its best
condition, please charge the battery 8 hours for the first
time and recharge it later at least 2 hours each time.
1. Connect the charger with the
phone through the USB port, and
plug the charger into a standard
power socket.
2. Please unplug the charger from the power socket and
take up your phone after the charging is completed.
Tips:

7
To charge the battery, you can also connect your
phone to the PC through the USB cable.
During the process of charging, your phone and
charger may normally become hot.
Powering on
Press & hold the Power key until the power-on animation
appears.
Powering off
Press & hold the Power key and select Power off.
Tips:
If your SIM card has enabled PIN verification, you need
input the correct PIN as you turn on your phone.
The PUK code is required to unlock if you have entered
incorrect PIN for three consecutive times. Please contact
your network operator to get your PUK code.
If your phone cannot be turned off normally upon an
exception, please press & hold the Power key more than
10 seconds to forcefully turn off your phone and restart it.
 Loading...