

Page 1

ZTE N910
User Manual
1
Page 2

LEGAL INFORMATION
Copyright © 2011 ZTE CORPORATION.
All rights reserved.
No part of this publication may be quoted, reproduced,
translated or used in any form or by any means, electronic
or mechanical, including photocopying and microfilm,
without the prior written permission of ZTE Corporation.
The manual is published by ZTE Corporation. We reserve the
right to make modifications on print errors or update
specifications without prior notice. Every effort has been
made in the preparation of this manual to ensure accuracy of
the contents, but all statements, information, and
recommendations in this manual do not constitute a warranty
of any kind, expressed or implied.
Version No.: R1.0
Edition Time: December 2011
2
Page 3

Contents
For Your Safety ........................................................ 9
General Safety ................................................................. 9
FCC Compliance............................................................ 10
Radio Frequency (RF) Energy ................................. 11
Distraction ...................................................................... 13
Driving ...................................................................... 13
Operating Machinery ................................................ 13
Product Handling ........................................................... 14
General Statement on Handling and Use ................. 14
Small Children .......................................................... 15
Demagnetization ...................................................... 15
Antenna .................................................................... 16
Normal Use Position ................................................. 16
Air Bags .................................................................... 17
Seizures/ Blackouts .................................................. 18
Repetitive Motion Injuries ......................................... 18
Emergency Calls ...................................................... 18
Loud Noise ............................................................... 18
Phone Heating .......................................................... 18
Electrical Safety ............................................................. 19
Accessories .............................................................. 19
Connection to a Car ................................................. 19
Faulty and Damaged Products ................................. 19
Interference .................................................................... 20
General Statement on Interface ............................... 20
3
Page 4

Pacemakers ............................................................. 20
Hearing Aids ............................................................ 20
Medical Devices ....................................................... 20
Hospitals .................................................................. 21
Aircraft ...................................................................... 21
Interference in Cars ................................................. 21
Explosive Environments ................................................ 21
Gas Stations and Explosive Atmospheres ............... 21
Blasting Caps and Areas ......................................... 22
Getting Started ....................................................... 23
Overview ....................................................................... 23
Keys Explained .............................................................. 23
Starting up ..................................................................... 24
Installing the microSD Card and Battery .................. 24
Removing the microSD Card ................................... 27
Charging the Battery ................................................ 27
Switching Your Phone On/Off ....................................... 28
Setting Up Your Phone for the First Time ................ 28
Switching to Sleep Mode ......................................... 29
Waking up Your Phone ............................................ 29
Getting Around .............................................................. 30
Touch Control .......................................................... 30
Home Screen ........................................................... 30
Status and Notification Icons ................................... 33
Applications and Settings Preview ........................... 36
Phone Calls ............................................................ 40
4
Page 5

How to Make Calls ......................................................... 40
Calling from the Dialer .............................................. 40
Calling from Your Contacts ...................................... 40
Calling from Your Call History .................................. 40
Calling from a Text Message .................................... 41
Using Speed Dial ...................................................... 41
How to Receive Calls ..................................................... 41
Answering a Call ...................................................... 41
Rejecting a Call ........................................................ 42
Ending a Call ............................................................ 42
Adjusting Your Call Settings .......................................... 42
Contacts ................................................................. 43
Importing and Exporting Contacts ................................. 43
Sharing Contacts Information ........................................ 43
Creating a Contact ......................................................... 44
Adding a Contact to Favorites ....................................... 44
Searching for a Contact ................................................. 44
Creating a New Group ................................................... 44
Entering Text .......................................................... 46
Android Keyboard .......................................................... 46
Swype Input ................................................................... 48
Choosing Touch Input Settings ...................................... 48
Messaging .............................................................. 49
The Message Box .......................................................... 49
Sending a Message ....................................................... 49
Changing Message Settings .......................................... 50
5
Page 6

Email ....................................................................... 53
Creating an Email account ............................................ 53
Receiving Emails ........................................................... 54
Composing and sending an Email ................................. 54
Replying to or Forwarding an Email .............................. 55
Deleting an Account ...................................................... 55
Email Settings ............................................................... 55
Getting Connected to the Internet ........................ 56
Turning on Wi-Fi ............................................................ 56
Connecting to a Wi-Fi Network ...................................... 56
Checking the Wi-Fi Network Status ............................... 57
Browsing the Internet ............................................ 58
Browsing Options .......................................................... 58
Using Bookmarks .......................................................... 59
Editing a Bookmark .................................................. 60
Deleting a Bookmark ................................................ 60
Changing Browser Settings ........................................... 60
Opening Links in Web Pages ........................................ 60
Bluetooth® .............................................................. 62
HAC ......................................................................... 63
Hearing Aid Compatibility (HAC) regulations for Mobile
phones ........................................................................... 63
Turn on HAC ................................................................. 65
Making the Most of Multimedia ............................. 66
Taking Pictures with Your Camera ................................ 66
Adjusting Camera Settings ...................................... 66
6
Page 7

Shooting Video with Your Camcorder ............................ 67
Adjusting Your Video Settings .................................. 67
Playing Your Music ........................................................ 67
Creating Playlists ...................................................... 68
Managing Playlists ................................................... 69
Setting a Song as Ringtone ...................................... 69
Playing Your Videos ...................................................... 69
Opening Your Gallery .................................................... 70
Making Memorable Memos ........................................... 71
Using Your Google™ Applications ...................... 73
Gmail .............................................................................. 73
Using Google Calendar ................................................. 74
Using Google Talk ......................................................... 74
Opening Google Talk ............................................... 74
Adding a New Friend ................................................ 74
Changing Your Online Status ................................... 75
Starting a Chat ......................................................... 75
Places ............................................................................ 75
Latitude .......................................................................... 76
Sorting out Your Phone Settings ......................... 77
Changing Display Settings ............................................. 77
Sound Settings............................................................... 77
Language Settings ......................................................... 79
Mobile Network Services ............................................... 79
Security Settings ............................................................ 80
7
Page 8

Protecting Your Phone with a Screen Unlock Pattern
................................................................................. 80
Protecting Your Phone with a PIN or Password ...... 81
Disabling Screen Unlock Security ............................ 81
Setting up Credential Storage .................................. 82
Managing Your Device Memory .................................... 82
Privacy: Reset to Factory Settings ................................ 83
Managing Applications .................................................. 83
How to Install an Application .................................... 83
Managing Other Settings ............................................... 85
Search Settings ........................................................ 85
Voice Interaction ...................................................... 85
Accessibility ............................................................. 85
About Phone ............................................................ 85
Other Applications ................................................. 86
4G mobile Hotspot ......................................................... 86
Alarms ........................................................................... 86
Note Pad ....................................................................... 86
Calculator ...................................................................... 86
Task Manager ............................................................... 87
MetroPCS Easy Wi-Fi ................................................... 87
@metro App Store ......................................................... 87
IM and Social ................................................................. 87
Specifications ......................................................... 88
8
Page 9
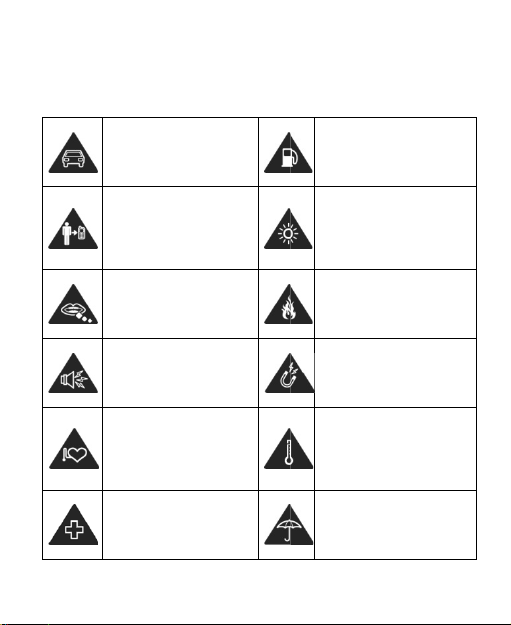
For Your Safety
General Safety
Don’t make or receive
handheld calls or text
while driving.
Keep your phone at
least 15mm away from
your ear or body while
making calls.
Don’t use at gas stations.
Your phone may produce
a bright or flashing light.
Small parts may cause
a choking.
Your phone can
produce a loud sound.
Keep away from
pacemakers and other
electronic medical
devices.
Switch off when asked
to in hospitals and
medical facilities.
Don’t dispose of your
phone in fire.
Avoid contact with
anything magnetic.
Avoid extreme
temperatures.
Avoid contact with
liquids. Keep your phone
dry.
9
Page 10
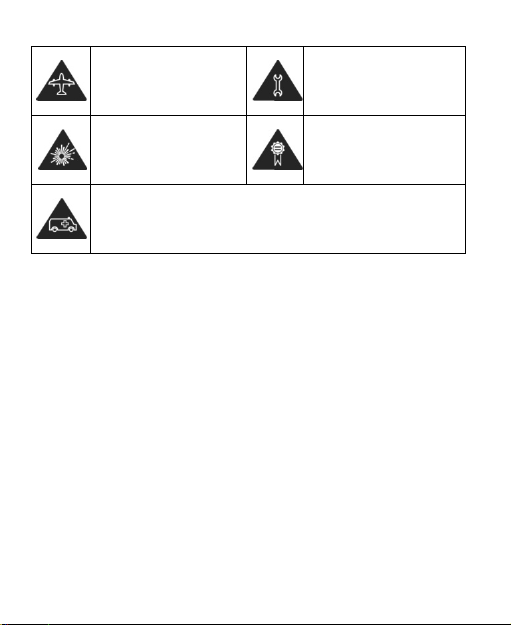
Switch off when told to
in aircrafts and airports.
Don’t take your phone
apart.
Switch off when near
explosive materials or
liquids.
Don’t rely on your phone as a primary device for emergency
communications.
Only use approved
accessories.
FCC Compliance
This device complies with part 15 of the FCC Rules.
Operation is subject to the following two conditions: (1) This
device may not cause harmful interference, and (2) this
device must accept any interference received, including
interference that may cause undesired operation.
Caution: Changes or modifications not expressly approved
by the manufacturer could void the user’s authority to
operate the equipment.
NOTE: This equipment has been tested and found to comply
with the limits for a Class B digital device, pursuant to part 15
of the FCC Rules. These limits are designed to provide
reasonable protection against harmful interference in a
10
Page 11

residential installation. This equipment can generate, use
and radiate radio frequency energy and, if not installed and
used in accordance with the instructions, may cause harmful
interference to radio communications. However, there is no
guarantee that interference will not occur in a particular
installation. If this equipment does cause harmful
interference to radio or television reception, which can be
determined by turning the equipment off and on, the user is
encouraged to try to correct the interference by one or more
of the following measures:
—Reorient or relocate the receiving antenna.
—Increase the separation between the equipment and
receiver.
—Connect the equipment into an outlet on a circuit different
from that to which the receiver is connected.
—Consult the dealer or an experienced radio/ TV technician
for help.
Radio Frequency (RF) Energy
This model phone meets the government’s requirements for
exposure to radio waves.
This phone is designed and manufactured not to exceed the
emission limits for exposure to radio frequency (RF) energy
set by the Federal Communications Commission of the U.S.
Government:
11
Page 12

The exposure standard for wireless mobile phones employs
a unit of measurement known as the Specific Absorption
Rate, or SAR. The SAR limit set by the FCC is 1.6W/kg.
*Tests for SAR are conducted using standard operating
positions accepted by the FCC with the phone transmitting at
its highest certified power level in all tested frequency bands.
Although the SAR is determined at the highest certified
power level, the actual SAR level of the phone while
operating can be well below the maximum value. This is
because the phone is designed to operate at multiple power
levels so as to use only the poser required to reach the
network. In general, the closer you are to a wireless base
station antenna, the lower the power output.
The highest SAR value for the model phone as reported to
the FCC when tested for use at the ear is 1.
when worn on the body, as described in this user guide, is 1.34
W/kg (Bodymodels, depending upon available enhancements
requirements.
While there may be differences between the SAR levels of
various phones and at various positions, they all meet the
government requirement.
The FCC has granted an Equipment Authorization for this
model phone with all reported SAR levels evaluated as in
compliance with the FCC RF exposure guidelines. SAR
information on this model phone is on file with the FCC and
can be found under the Display Grant section of
worn measurements differ among phone
)
12
39 W/kg and
and FC
C
Page 13

http://www.fcc.gov/oet/ea/fccid/ after searching on
FCC ID: Q78-ZTEN910.
For body worn operation, this phone has been tested and
meets the FCC RF exposure guidelines for use with an
accessory that contains no metal and the positions the
handset a minimum of 1 cm from the body. Use of other
enhancements may not ensure compliance with FCC RF
exposure guidelines. If you do no t use a body-worn
accessory and are not holding the phone at the ear, position
the handset a minimum of 1 cm from
phone is switched on.
your body when the
Distraction
Driving
Full attention must be given to driving at all times in order to
reduce the risk of an accident. Using a phone while driving
(even with a hands free kit) can cause distraction and lead to
an accident. You must comply with local laws and
regulations restricting the use of wireless devices while
driving.
Operating Machinery
Full attention must be given to operating the machinery in
order to reduce the risk of an accident.
13
Page 14

Product Handling
General Statement on Handling and Use
You alone are responsible for how you use your phone and
any consequences of its use.
You must always switch off your phone wherever the use of a
phone is prohibited. Use of your phone is subject to safety
measures designed to protect users and their environment.
• Always treat your phone and its accessories with care
and keep it in a clean and dust-free place
• Do not expose your phone or its accessories to open
flames or lit tobacco products.
• Do not expose your phone or its accessories to liquid,
moisture or high humidity.
• Do not drop, throw or try to bend your phone or its
accessories.
• Do not use harsh chemicals, cleaning solvents, or
aerosols to clean the device or its accessories.
• Do not paint your phone or its accessories.
• Do not attempt to disassemble your phone or its
accessories, only authorized personnel can do so.
• Do not expose your phone or its accessories to extreme
temperatures, minimum - [5] and maximum + [50]
degrees Celsius.
14
.
Page 15

• Please check local regulations for disposal of electronic
products.
• Do not carry your phone in your back pocket as it could
break when you sit down.
Small Children
Do not leave your phone and its accessories within the reach
of small children or allow them to play with it.
They could hurt themselves or others, or could accidentally
damage the phone.
Your phone contains small parts with sharp edges that may
cause an injury or may become detached and create a
choking hazard.
Demagnetization
To avoid the risk of demagnetization, do not allow electronic
devices or magnetic media close to your phone for a long
time.
15
Page 16
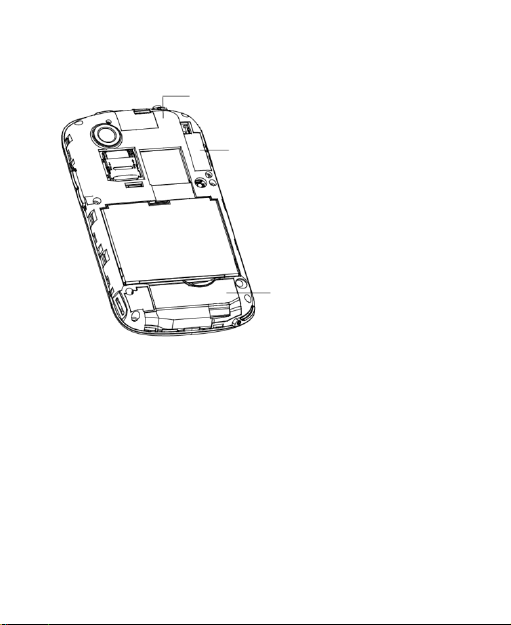
Antenna
GPS antenna
Bluetooth antenna
Antenna
Do not touch the antenna unnecessarily.
Normal Use Position
When placing or receiving a phone call, hold your phone to
your ear, with the bottom towards your mouth.
16
Page 17
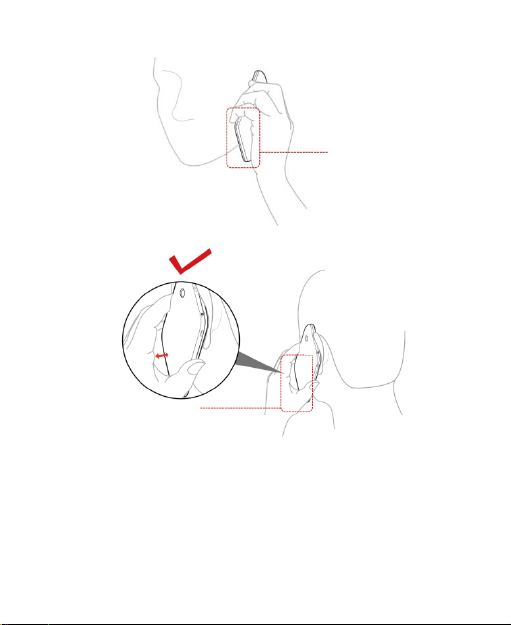
A
ntenna
A
ntenna
Air Bags
Do not place a phone in the area over an air bag or in the air
bag deployment area.
Store the phone safely before driving your vehicle.
17
Page 18

Seizures/ Blackouts
The phone can produce a bright or flashing light.
Repetitive Motion Injuries
To minimize the risk of RSI when texting or playing games
with your phone:
• Do not grip the phone too tightly.
• Press the buttons lightly.
• Use the special features which are designed to minimize
the times of pressing buttons, such as Message
Templates and Predictive Text.
• Take lots of breaks to stretch and relax.
Emergency Calls
This phone, like any wireless phone, operates using radio
signals, which cannot guarantee connection in all conditions.
Therefore, you must never rely solely on any wireless phone
for emergency communications.
Loud Noise
This phone is capable of producing loud noises, which may
damage your hearing. Turn down the volume before using
headphones, Bluetooth stereo headsets or other audio
devices.
Phone Heating
Your phone may become warm during charging and during
18
Page 19

normal use.
Electrical Safety
Accessories
Use only approved accessories.
Do not connect with incompatible products or accessories.
Take care not to touch or allow metal objects, such as
coins or key rings, to contact or short-circuit in the battery
terminals.
Connection to a Car
Seek professional advice when connecting a phone interface
to the vehicle electrical system.
Faulty and Damaged Products
Do not attempt to disassemble the phone or its accessories.
Only qualified personnel can service or repair the phone or
its accessories.
If your phone or its accessories have been submerged in
water, punctured, or subjected to a severe fall, do not use it
until you have taken them to be checked at an authorized
service centre.
19
Page 20

Interference
General Statement on Interface
Care must be taken when using the phone in close
proximity to personal medical devices, such as pacemakers
and hearing aids.
Pacemakers
Pacemaker manufacturers recommend that a minimum
separation of 15 cm be maintained between a mobile phone
and a pacemaker to avoid potential interference with the
pacemaker. To achieve this, use the phone on the opposite
ear to your pacemaker and do not carry it in a breast pocket.
Hearing Aids
People with hearing aids or other cochlear implants may
experience interfering noises when using wireless devices or
when one is nearby.
The level of interference will depend on the type of hearing
device and the distance from the interference source,
increasing the separation between them may reduce the
interference. You may also consult your hearing aid
manufacturer to discuss alternatives.
Medical Devices
Please consult your doctor and the device manufacturer
to determine if operation of your phone may interfere with
the operation of your medical device.
20
Page 21

Hospitals
Switch off your wireless device when requested to do so in
hospitals, clinics or health care facilities. These requests are
designed to prevent possible interference with sensitive
medical equipment.
Aircraft
Switch off your wireless device whenever you are instructed
to do so by airport or airline staff.
Consult the airline staff about the use of wireless devices on
board the aircraft. If your device offers a ‘flight mode’, this
must be enabled prior to boarding an aircraft.
Interference in Cars
Please note that because of possible interference to
electronic equipment, some vehicle manufacturers forbid
the use of mobile phones in their vehicles unless a
hands-free kit with an external antenna is included in the
installation.
Explosive Environments
Gas Stations and Explosive Atmospheres
In locations with potentially explosive atmospheres, obey all
posted signs to turn off wireless devices such as your phone
or other radio equipment.
Areas with potentially explosive atmospheres include fuelling
21
Page 22

areas, below decks on boats, fuel or chemical transfer or
storage facilities, areas where the air contains chemicals or
particles, such as grain, dust, or metal powders.
Blasting Caps and Areas
Power off your mobile phone or wireless device when in a
blasting area or in areas where you are told to power off
“two-way radios” or “electronic devices” to avoid interfering
with blasting operations.
22
Page 23
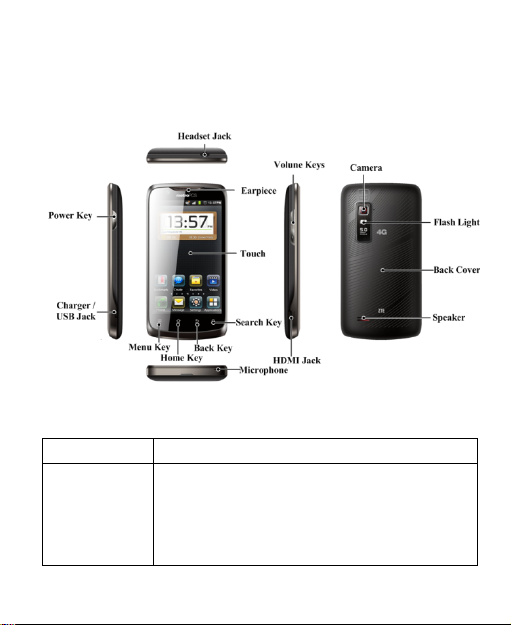
Getting Started
Overview
Keys Explained
Key Function
Power Key • Hold to select phone modes: Silent,
Airplane, Restart or Power off.
• Press to switch your phone to Sleep
mode.
• Press to wake up your phone.
23
Page 24
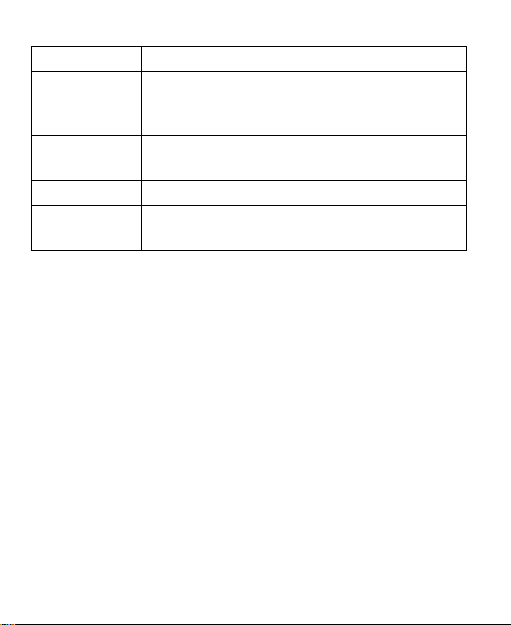
Key Function
•
•
•
Home Key
Press to return to the Home Screen from
any application or screen.
• Hold to see recently used applications.
Menu Key
Press to get the options for the current
screen.
Back Key
Press to go to the previous screen.
Volume Keys • Pr ess Volume + to turn the volume up.
• Pr ess Volume - to turn the volume down.
Starting up
Installing the microSD Card and Battery
Switch off your phone before installing or replacing the battery.
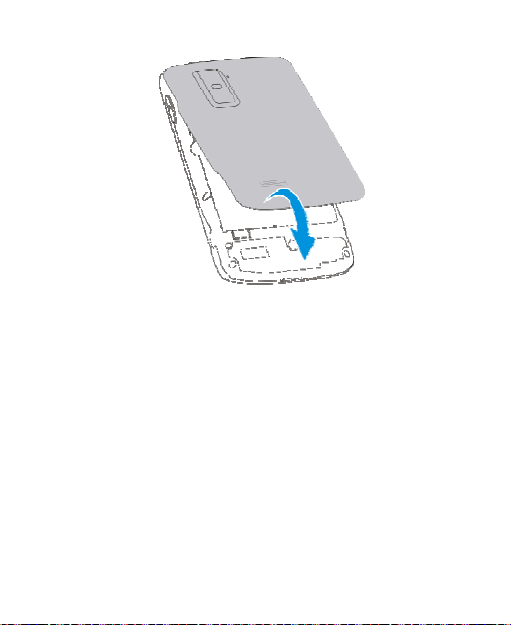
1. Remove the back cover.
24
Page 25
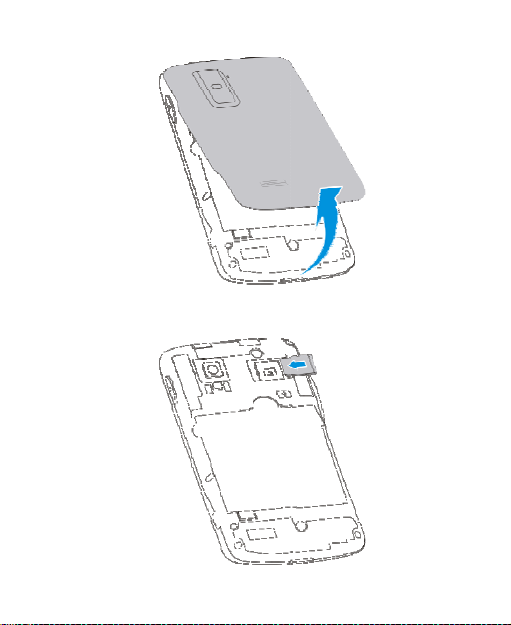
2. Insert the microSD Card.
25
Page 26
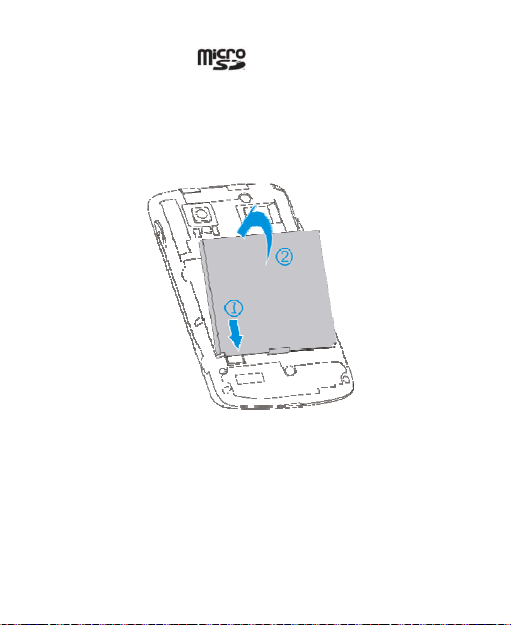
The microSD logo is a t
e
t
t
Card Association.
3. Insert the battery by aligning th
battery with the gold contacts in
Gently push down the battery un
4. Replace the battery cover.
rade mark of the SD
gold contacts on the
he battery compartment.
il it clicks into place.
26
Page 27
a
D
e
r
r
a
Removing the microSD C
Open the cover. Slide the microS
remove it.
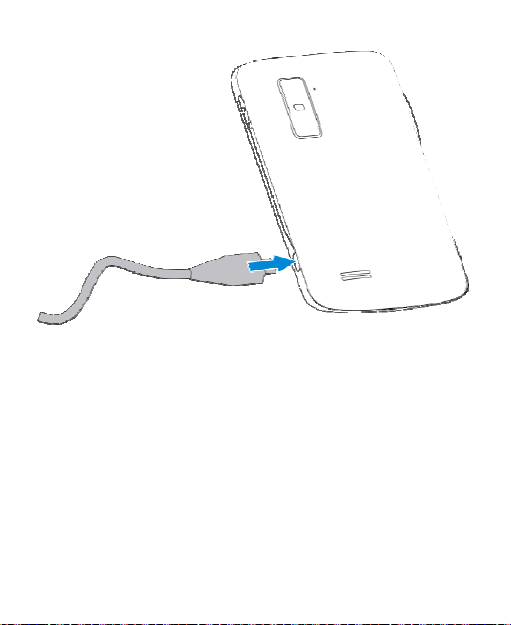
Charging the Battery
When you first get your new phon
battery.
1. Connect the adapter to the cha
adapter is inserted with the cor
force the connector into the ch
rd
card out gently and
you’ll need to charge the
ger jack. Ensure that the
ect orientation. Do not
rger jack.
27
Page 28
2. Connect the charger to a standa
r
e
O
u
t
O
t
t
3. Disconnect the charger when th
d AC wall outlet.
battery is fully charged.
Switching Your Phone
Make sure the battery is charged.
• Hold Power Key to switch on yo
• To switch it off, hold Power Key
Select Power off, and then tap
Setting Up Your Phone for
When you first power on your phone
n/Off
r phone.
o get the phone options.
K.
he First Time
after you purchase it or
28
Page 29

reset it to factory settings (see Sorting out Your Phone
Settings – Privacy: Reset to Factory Settings), you need to
adjust some settings before using it.
1. Tap Change language to change the language you want
to use, if needed.
2. Tap the Android robot on the screen.
3. Create a Google Account or Sign in your account.
You can also tap Skip to set up an account later.
4. Configure the Google location options and tap Next.
Switching to Sleep Mode
To save battery power, Sleep Mode suspends your device to
a low-power-consumption state while the display is off. Your
device also goes into Sleep Mode by itself when the display
is automatically turned off after a certain period of time, which
you can set in Settings > Display > Screen timeout.
Press Power Key to switch to Sleep Mode.
Waking up Your Phone
1. Press Power Key to activate your screen display.
2. Drag the icon to the right.
NOTE: If you have set an unlock pattern, PIN or password for
your phone (see Sorting out Your Phone Settings – Security
Settings) you’ll need to draw the pattern or enter the
PIN/password to unlock your screen.
29
Page 30

Getting Around
Touch Control
You can use finger gestures to control your phone. The
controls on your touch screen change dynamically
depending on the tasks you’re performing.
• Tap the buttons, icons, or applications to select items
or to open applications.
• Keep your finger on an item to see the available
options.
• Flick the screen to scroll up, down, left or right.
• Point, drag and drop to move particular items across
the screen.
• Pinch with two fingers or double-tap the screen, to
zoom in/out on a web page or an image.
NOTE: You can view the phone screen in portrait or
landscape orientation simply by holding it upright or turning it
on its side.
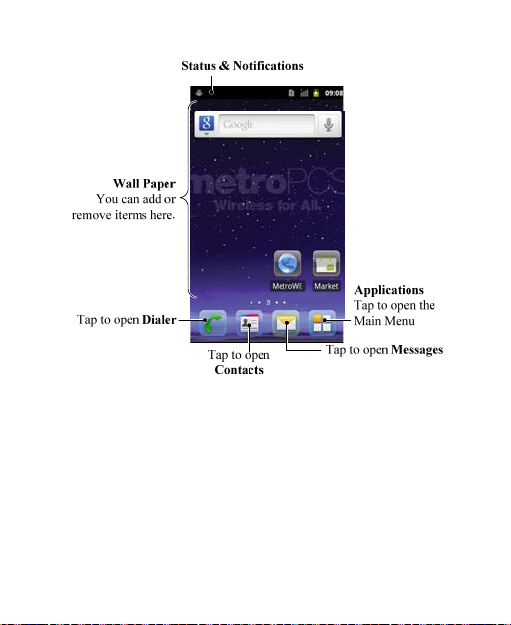
Home Screen
You choose what is shown on your Home Screen. Set your
own wallpaper, add the widgets or application shortcuts you
need, or remove them as you like.
30
Page 31
¾ Extended Home Screen
The Home Screen extends beyond the screen width, giving
you more space to add more stuff. Simply slide your finger to
the left or right to see the extended Home Screen.
¾ Choosing Your Wallpaper
1. Tap Home Key to return to the Home Screen.
2. Tap Menu Key and select Wallpaper.
3. Select the wallpaper you want to use from Gallery,
Live wallpapers, or Wallpapers.
31
Page 32

4. Tap Set wallpaper.
¾ Adding Things to Your Home Screen
1. Tap Home Key to return to the Home Screen.
2. Slide left or right to find a part of the Home Screen with
free space.
3. Tap Menu Key and select Personalization > Add to
home screen.
You can also tap and hold the blank area of the Home
Screen to get the Add to Home screen menu.
4. Select a category and the item you want to add to the
Home Screen.
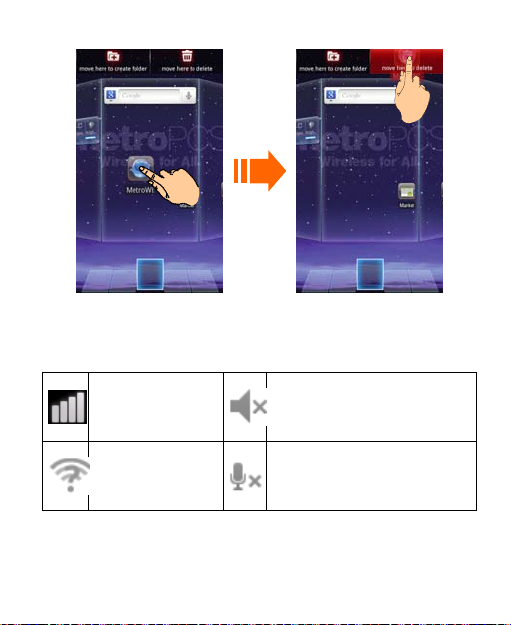
¾ Removing Things from Your Home Screen
1. Tap Home Key to return to the Home Screen.
2. Tap and hold the item you want to delete until the
icon appears on the screen.
3. Drag the item to and release your finger when the
item turns red.
32
Page 33
Status and Notification Ic
o
a
y
o
o
Your phone will tell you exactly wh
you simple icons. Here’s what the
Signal strength
Ph
ns
t’s going on by showing
mean.
ne speaker off
New W i-Fi n etwork
detected
Ph
33
ne microphone off
Page 34
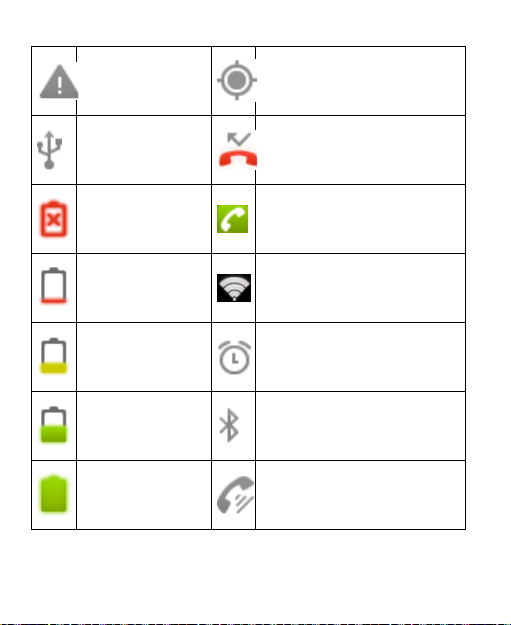
Error or warning GPS
e
n
n
m
on
USB connected Miss
Battery flat Call i
Battery very low Con
Battery low Alar
Battery partiall y
drained
Battery full Spea
d call
progress
ected to a Wi-Fi network
set
Bluet
ooth on
ker on
34
Page 35
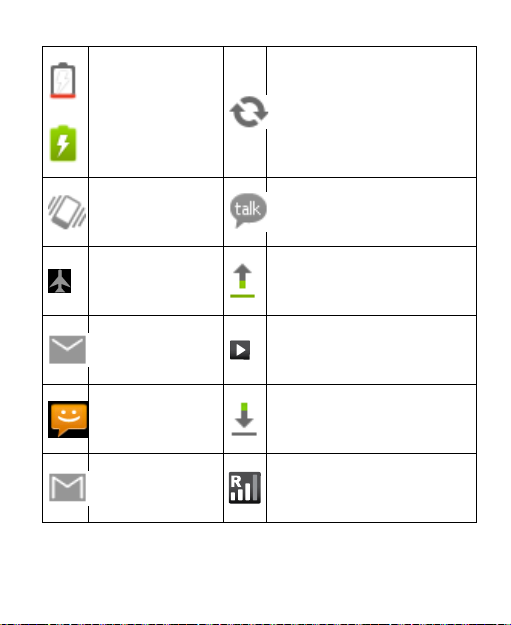
Battery charging Sy
n
w
n
n
w
a
cing
Vibrate mode Ne
Airplane mode Se
New mail So
New SMS/MMS/
voicemail
New Gmail message Ro
instant message
ding data
g is playing
Do
nloading data
ming
35
Page 36
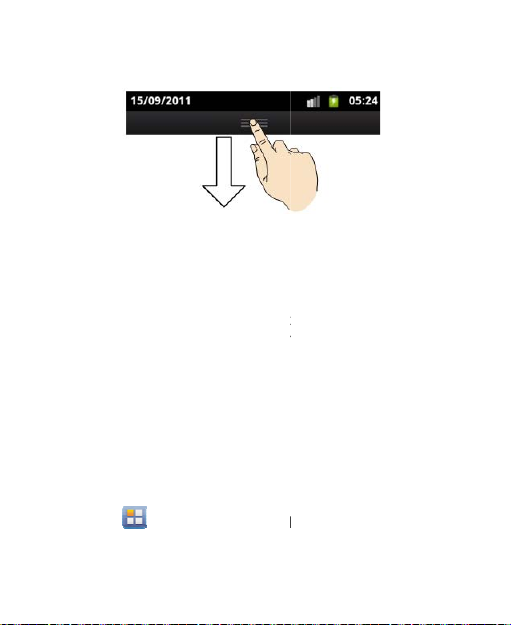
Using the Notification Pan
e
m
e
s
t
r
a
P
t
M
s
l
Flick the status bar downwards fro
screen to open the Notification Pan
your calendar events, new messag
– such as call forwarding, call statu
Wi-Fi, data connection and auto-ro
you can also open new messages,
TIPS: You can also open the Notific
Menu Key > Notifications from the
Applications and Settings
Checking Your Settings
To change or view your phone’s set
Screen tap > Settings. Or tap
across the top of the
el, where you can see
s, and current settings
, turn on/off sound,
ate screen. From here
eminders, etc.
tion Panel by tapping
Home Screen.
review
ings, from the Home
enu Key > Settings.
36
Page 37
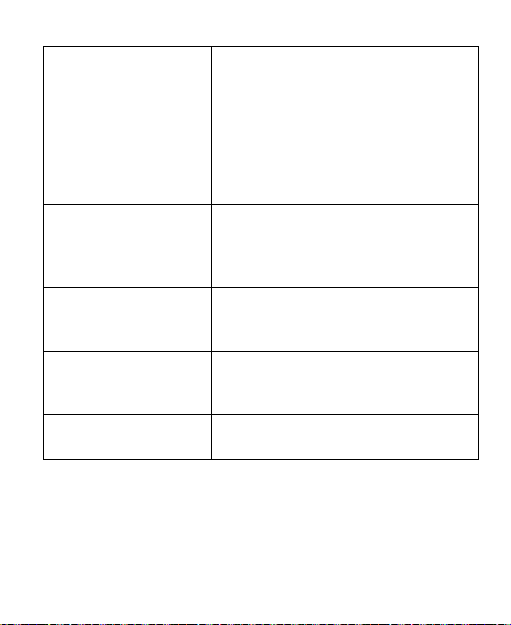
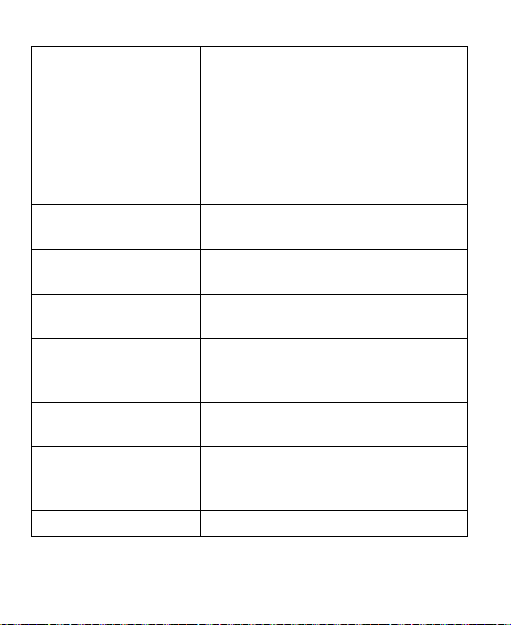
Wireless & networks
Call settings
Emergency Alerts
Sound
Display
Configure and manage wireless
connections, such as Wi-Fi,
Bluetooth
®
, 4G Mobile Hotspot,
mobile networks, Virtual Private
Networks (VPN) Settings and
Tethering &portable hotspot. You
can also select Airplane mode from
here.
Set up Voicemail, Speed dial, Call
Timers, Accounts, Use Internet
calling settings, TTY mode, Hearing
aids and DTMF Tones.
Set emergency alerts, such as
extreme alerts, server alerts, amber
alerts and emergency test message.
Set sound settings, such as General
ringtones, Incoming calls,
notifications and Feedback.
Display settings, such as screen
brightness.
37
Page 38
Enables you to set the Screen
unlock pattern, SIM/USIM card
Location & security
Settings
Applications
Accounts & sync
Privacy
Storage
Language & keyboard
Voice input & output
Accessibility Choose accessibility options.
lock, Passwords, Device
administration, or manage the
device’s Credential storage. You
can also select the sources to use
when determining locations from My
Location.
Manage your applications and
installation of new ones.
Manage your accounts and
configure synchronization settings.
Configure privacy settings, such as
back up settings, and personal data.
Check available memory on the
external card and the internal phone
storage.
Set operating system language and
region, plus text input options.
If you have installed a text-to-speech
(voice data) application, you can
choose the settings.
38
Page 39
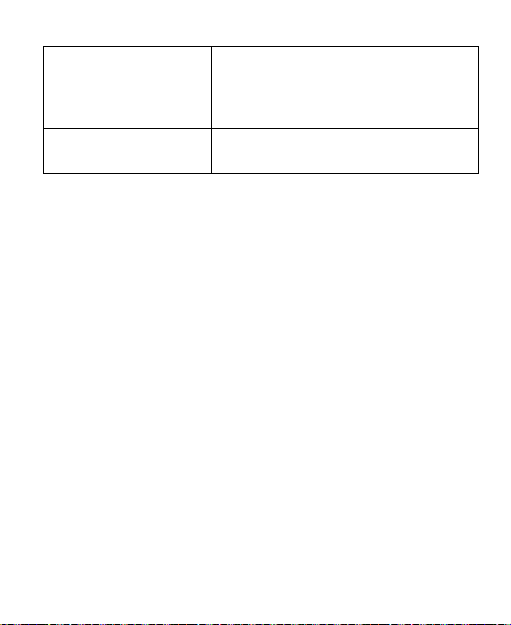
Enables you to set the date, time,
Date & time
About phone
time zone, and date/time format. If
the network supports, you can also
enable automatic time update.
View phone status, battery use, and
legal information, etc.
Open Recently Used Applications
1. Hold Home Key from any screen. The phone will display
the Task Manager icon and the icons of applications you
used recently.
2. Tap the application you want to open.
39
Page 40
Phone Calls
o
s
t
t
o
t
How to Make Calls
There are many ways to make a call
they’re all easy to do.
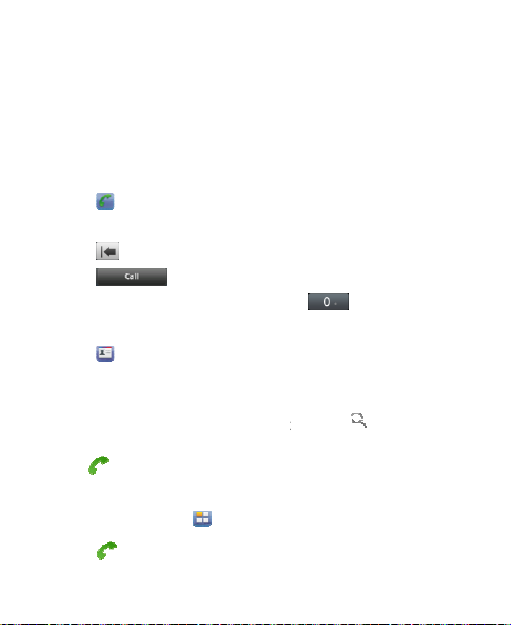
Calling from the Dialer
1. Tap on the Home Screen.
2. Enter the phone number with the
Tap to delete wrong digits.
3. Tap
TIPS: To make international calls, h
Calling from Your Contact
1. Tap on the home screen.
2. Slide your finger to scroll the con
contact you want to call.
You can search for a contact by
the contact name.
3. Tap .
Calling from Your Call Hist
1. Tap Home Key > > Call log
2. Tap
next to the number you
with your phone. And
on-screen keypad.
ld to enter the “+”.
acts list and tap the
apping and entering
ry
.
want to call.
40
Page 41
Calling from a Text Mess
a
e
t
d
p
l
e
t
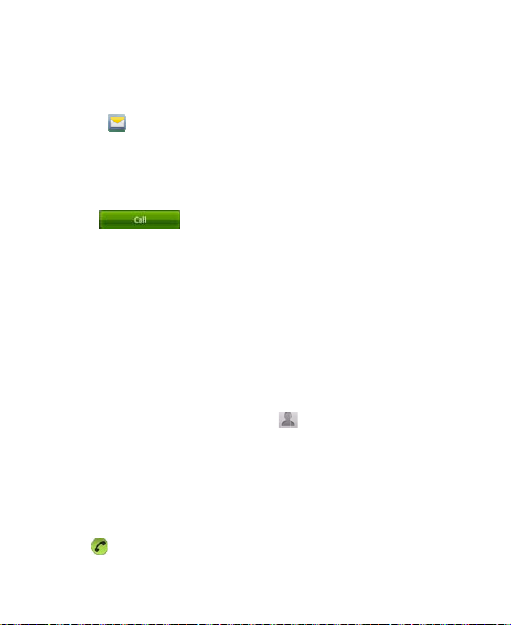
If a text message contains a phon
call, you can make the call while vi
1. Tap on the Home Screen.
2. Tap the conversation and then
the phone number you need.
3. Tap the number.
4. Tap
.
Using Speed Dial
Press and hold 1 - 9 key from the
corresponding speed dial number.
The number key 1 is reserved to s
Assigning a speed dial key:
1. Tap Menu Key > Settings> Cal
Speed dial from the Home Screen
2. Tap a speed dial key.
3. Enter a phone number or tap
contacts list.
4. Tap OK.
How to Receive Calls
Answering a Call
Drag to the right to answer th
ge
number that you want to
ewing the text message.
he message that contains
ialer to call the
eed dial your voicemail.
settings > Call Settings >
.
to select one from the
call.
41
Page 42
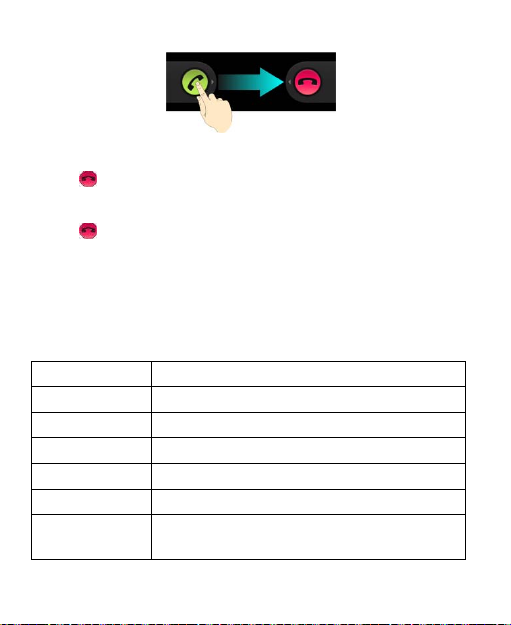
Rejecting a Call
Drag to the left to reject the call.
Ending a Call
Drag to the right to finish the call.
Adjusting Your Call Settings
From the Home Screen, you can open the call settings menu
by going from Menu Key > Settings > Call settings > Call
Settings.
Voicemail service Select a voicemail service provider.
Voicemail settings Specify a voicemail number.
Call Timers View and clear the call timers and data statistic
Speed dial Set speed dialing keys and numbers.
Voice privacy Enable enhanced privacy mode
Accounts Set up Internet calling (SIP) accounts.
Use Internet
calling
Choose when to use the Internet calling function.
42
Page 43

Contacts
e
m
t
r
n
m
r
t
h
r
r
r
n
t
n
You can add contacts on your phon
the contacts in your Google account
support contact synchronizing.
To see your contacts, tap fro
there, you can tap the tabs on the
dialer, call log, favorite contacts, o
and synchronize them with
or other accounts that
the Home Screen. From
op to quickly switch to
contact groups.
Importing and Exporti
You can import/export contacts fro
1. Tap Menu Key > Import/Expo
Screen.
2. Choose to import or export con
contacts from the microSD card
files saved in the microSD card.
vCard file, you need to select t
Sharing Contacts Info
1. Tap Menu Key > Import/Expo
contacts from the Contacts Sc
export all information of the co
Screen to a temporary vCard fil
2. Choose how you want to send
either send it via Bluetooth to a
g Contacts
/to your microSD card.
t from the Contacts
acts. If you want to import
, you should have vCard
If there’s more than one
e vCard file and tap OK.
mation
t > Share visible
een. Your phone will
tacts in the Contact
e.
he vCard file. You can
other device, or as an
43
Page 44

attachment in an Email, Gmail or
e
o
v
d
o
u
t
n
n
Creating a Contact
1. Tap from the Contacts Scr
2. Enter the contact name and ph
postal addresses, etc.
3. Tap to save the contact.
a message.
en.
ne numbers, emails,
Adding a Contact to Fa
1. In the Contact Screen, tap and hol
add to Favorites.
2. Tap Add to favorites from the p
TIPS: You can also tap a contact an
the contact’s name to add it to Favo
Searching for a Contac
1. Tap at the bottom of the Co
2. Input the contact name you want
The contacts matched will be listed.
Creating a New Group
1. Tap the Groups tab from the Co
2. Tap at the bottom of the sc
orites
the contact you want to
p-up menu.
d then tap next to
rites.
tacts Screen.
to search for.
tacts Screen.
reen.
44
Page 45

3. Enter the group name and tap .
4. Tap the new group and tap to add group members.
5. Tick the check boxes next to the contacts you want. Then
tap .
To send messages to the group members, you can tap
next to the group and select message recipients from the
listed group members.
45
Page 46
Entering Text
e
e
y
o
t
e
d
p
When you enter a field that needs t
keyboard automatically appears on th
box and select Input method from
change input method.
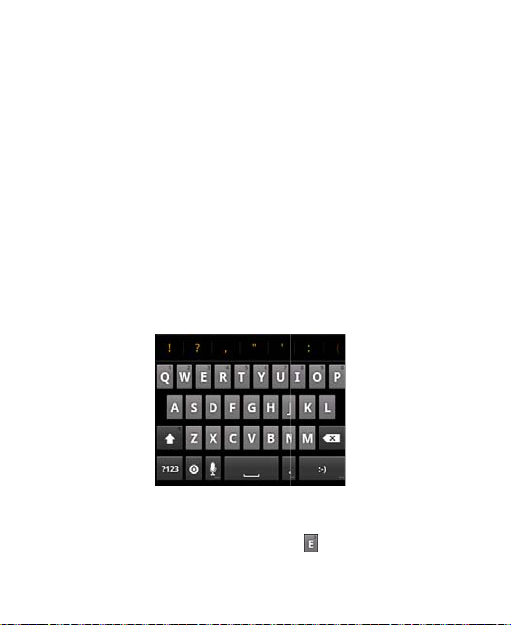
Android Keyboard
The Android Keyboard provides a la
computer keyboard. Turn the phone
keyboard will change from portrait t
To use the landscape keyboard, jus
screen check box in Settings > Dis
QWERTY keyboard is not support
• Tap the alphabetic keys to enter
keys to enter associated accente
example, to enter È, tap and hol
accented letters and number 3 a
xt or numbers, a
screen. Hold the input
the pop-up menu to
out similar to a desktop
sideways and the
landscape.
tick the Auto-rotate
play. (The landscape
d in all applications.)
letters. Tap and hold the
d letters or numbers. For
and the available
pear. Then slide to
46
Page 47
choose È.
o
d
e
r
c
d
r
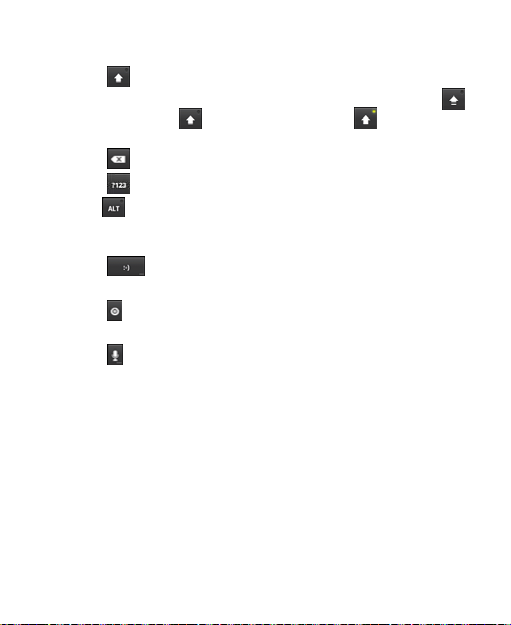
• Tap to use uppercase or l
changes to indicate the current
for lowercase, for upperca
in uppercase.
• Tap to delete any text you
• Tap to select numbers an
tap to find more. Also, oft
displayed on top of the keyboa
the one you need and tap to en
• Tap to enter a smiley fa
to choose more emoticons.
• Tap to change input metho
keyboard.
• Tap to use Google’s netwo
wercase. This key also
case you are using:
se, and when locked
have entered.
symbols. You can then
n used symbols are
d. Flick left or right to find
ter.
e; hold the key and swipe
or set up Android
ked voice input.
47
Page 48
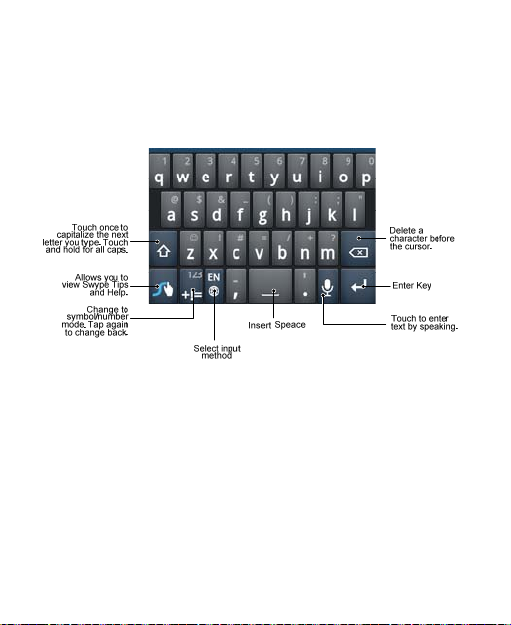
Swype Input
Swype is a text input method that allows you to enter a word
by sliding your finger or from letter to letter, lifting your finger
between words.
Choosing Touch Input Settings
Choose the touch input settings by tapping Menu Key >
Settings > Language & keyboard from Home Screen.
In the Keyboard settings section, you can choose the
settings for Android keyboard and Swype.
48
Page 49
Messaging
S
n
n
m
s
o
.
T
e
e
Your SMS (text message) and MM
service) are combined into one me
screen.
The Message Box
Instead of an inbox and outbox, yo
messages you sent and received i
messages exchanged with the sa
message thread in the Messaging
message thread to see the conver
someone.
Message threads are sorted in chr
latest one on top.
Sending a Message
1. Tap from the home screen
2. Tap .
3. Enter the recipient’s number or
matching contacts will appear.
to add as a recipient.
4. Tap Type to compose and typ
• Tap Menu Key to insert Qui
or contact.
(multimedia messaging
u in from the home
ur phone organizes all
to one box, where
e party are grouped into a
Screen. You can tap a
ation you have had with
nological order with the
name. As you type,
ap a suggested contact
your message.
ck Text, signature, smiley,
49
Page 50

• If you are sending an MMS, tap Menu Key > Attach to
attach pictures, videos, audio, or slideshows.
5. Tap Send to send your text.
NOTE: Add an attachment to text message and it will be
converted into an MMS automatically. Likewise if you remove
all attachments from an MMS, it’ll automatically become a
text message.
Changing Message Settings
The phone’s message settings are pre-configured for you to
use immediately. To change them, tap Menu Key > Settings
from the Messages Screen.
¾ Storage settings:
• Delete old messages: Select to delete old messages
when your storage limits are reached.
• Text message limit: Set the maximum number of text
messages allowed in a single thread.
• Multimedia message limit: Set the maximum number of
multimedia messages allowed in a single thread.
¾ Text message (SMS) settings:
• Delivery reports: Request a delivery report for every text
message you send.
• SMS validity: Set the validity time limit for outgoing text
messages.
50
Page 51

¾ Multimedia message (MMS) settings:
• Delivery reports: Request a delivery report for every
MMS message you send.
• Read reports: Request a read report for every MMS
message you send.
• Auto-retrieve: Automatically retrieve MMS messages.
• Roaming auto-retrieve: Automatically retrieve MMS
messages when you’re roaming.
• MMS validity: Set the validity time limit for outgoing
multimedia messages.
• MMS creation mode: Select MMS creation restrictions.
An MMS created under restricted mode is more likely to
be displayed properly on other devices than those
created under free mode.
¾ Display Settings:
• Font Size: Set the font size of messages.
• Dialog Patterns: Set the patterns of the dialog
messages.
¾ Notification settings:
• Notifications: Show message notifications in the status
bar.
• Select ringtone: Choose a ringtone for your incoming
messages.
51
Page 52

• Vibrate: Make your phone vibrate when a new message
arrives.
¾ Cell Broadcast
• Cdma Broadcast Messages: Set the CDMA Broadcast
Messages.
¾ Signature settings:
• Edit signature: Edit your signature, which can be added
automatically to outgoing messages.
• Add signature: Add the signature to all outgoing
messages.
NOTE: Tap Menu Key > Restore default settings to
change all the message settings back to the original.
52
Page 53

Email
o
t
o
a
e
]
p
e
m
h
c
E
g
t
e
Tap Home Key > > Email. Y
Screen to setup your Email accoun
u can enter the Email
and exchange Emails.
Creating an Email acc
1. When you open Email for the fi
address and password. Then t
2. Select the type of your account
3. Edit the settings for incoming s
Then tap Next or Next [Check
Press Next [Check], and your
Internet and verify the settings b
next step. Please contact your
Email service provider for more
NOTE: Your phone knows the
Email service providers. If the
providers, the phone will autom
incoming and outgoing settings
address and password.
4. Set the Email checking frequen
account name and other settin
finish.
Your phone will show the inbox of
start to download Email messages
unt
rst time, enter your Email
p Manual setup.
and tap Next.
rver and outgoing server.
.
hone will connect to the
fore proceeding to the
obile service provider and
elp.
lient settings for many
mail you use is from those
atically configure the
after you enter your Email
cy, download settings,
s. Tap Done when you
he Email account and
.
53
Page 54

TIPS: To add more Email accounts, open Email to get the
Inbox screen. Then tap Menu Key > More > Accounts >
Menu Key > Add account.
Receiving Emails
Press Menu Key > Refresh to download recent Emails. You
can select Load more messages at the bottom of the Email
list to download earlier messages.
Composing and sending an Email
After creating an Email account, you can compose and send
Email messages.
1. Tap Menu Key > Compose from the Inbox Screen.
2. Tap To field if needed, and enter the recipient’s address.
When you enter the address, matching contacts on the
phone will be displayed. Separate each recipient with a
comma.
TIPS: You can also tap Menu Key > Add Cc/Bcc to add
more recipients.
3. Enter the subject and the content of your Email. If
necessary, change the email priority.
Tap Menu Key > Add attachment to add files to the
Email.
4. Tap Send.
54
Page 55

Replying to or Forwarding an Email
1. Open the Email you want to reply to or forward from Inbox
Screen.
2. Tap Reply or Menu Key > Forward to reply to/forward
the Email.
You can also tap Reply all to reply to all recipients of the
Email.
3. Enter the contents/recipients of your Email.
4. Tap Send.
Deleting an Account
1. Open the Email application. If there is at least one account,
tap Menu Key > More > Accounts to get the Accounts
list.
2. Tap and hold the account you want to delete and select
Remove account from the pop-up menu.
3. Ta p OK to confirm. All Email messages in the account will
be deleted.
Email Settings
Tap the account you want to set from the Email Screen and
tap Menu Key > More > Account settin gs . You can get the
settings for the Email account. You can also tap Menu Key >
More > System settings to set up storage, exchange and
other settings.
55
Page 56

Getting Connected to the Internet
Your phone’s impressive networking capabilities allow you to
access the Internet or your corporate network with ease.
You can use default connection settings to connect to the
web via your mobile network (CDMA/EvDo), 4G LTE, or
Wi-Fi.
The CDMA/EvDo connection can be enabled/disabled
manually. Just select Menu Key > Settings > Wireless &
networks > Mobile networks from the Home Screen and
tick or clear the Data enabled check box.
Turning on Wi-Fi
Wi-Fi provides wireless Internet access over distances of up
to 300 feet (100 meters).
1. Tap Home Key >Menu Key > Settings > Wireless &
networks.
2. Tick the Wi-Fi box to turn it on.
Connecting to a Wi-Fi Network
1. Tap Home Key > Menu Key > Settings > Wireless &
networks > Wi-Fi settings.
The Wi-Fi access points, or “hotspots”, that your phone
has detected are displayed with their names and
security settings.
56
Page 57

2. Tap an access point to connect
e
t
b
o
o
If security features are implement
password.
to it.
d, you’ll need to enter a
Checking the Wi-Fi Ne
You can check the Wi-Fi network
in the status bar.
Or tap the access point that the ph
to in Wi-Fi settings. You can then
from the pop-up window.
work Status
y looking at the icon
ne is currently connected
check the network status
57
Page 58

Browsing the Intern
e
h
B
b
w
o
o
o
m
R
o
b
n
You can use your phone to get on t
EVDO, 4G LTE or Wi-Fi connection.
Tap Home Key > > MetroWE
There are different ways to open we
• Tap the address bar to enter the
browse. Then tap .
• Tap beside the address bar
Bookmarks. Select a bookmark t
• Tap beside the address bar
Bookmarks. Choose an item fro
History tab.
Browsing Options
• Refresh: Menu Key > Refresh.
• Forward/Back: Menu Key > Mo
the next/previous web page.
• Home/Go to URL: Menu Key >
the home web page or a new U
• Add bookmark: Menu Key > M
add the current web page to the
• Search: Menu Key > More > Fi
search item.
58
t
e Internet via a CDMA,
.
pages:
ebsite you want to
r tap Menu Key >
open.
r tap Menu Key >
the Most visited tab or
re > Forward to browse
More > Home to browse
L web page.
re > Add bookmark to
ookmarks.
d on page and enter the
Page 59

• Copy: Menu Key > More > Select text and slide your
finger on the page to select the text you want to copy.
Your phone automatically copies the selected text to the
clipboard.
• Share pages: Menu Key > More > Share page to send
a page by Bluetooth, Email, Gmail, Google+, mail@metro
or Messages.
• Downloads/Page info: Menu Key > More > Page
info/Downloads.
• Landscape browser: Home Key > Menu Key >
Settings > Di s play . Tick the Auto-rotate screen box and
rotate your phone sideways to view the landscape browser
screen.
• Open new browser window: M enu Key > New window.
Then tap the address bar to enter the website you want to
browse.
• Switch browser windows: If you have more than one
browser window open, you can switch between these
windows by tapping Menu Key > Windows. Then tap the
page you want to browse. You can also tap to close
a window.
Using Bookmarks
To bookmark a web page, open it and tap or Menu Key >
Bookmarks. Then tap Add. Give the bookmark a name and
tap OK.
59
Page 60

TIPS: You can press Menu Key > List view/Thumbnail
view to change how you view bookmarks on your phone
screen.
Editing a Bookmark
1. Open a Browser window.
2. Tap or Menu Key > Bookmarks.
3. Select an item you want to edit and hold on it until the
shortcut menu pops up.
4. Select Edit bookmark.
5. Edit the name or location, and then tap OK to save it.
Deleting a Bookmark
1. Open a Browser window.
2. Tap or Menu Key > Bookmarks.
3. Select an item you want to delete and hold on it until the
shortcut menu pops up.
4. Select Delete bookmark and tap OK to confirm.
Changing Browser Settings
Tap Menu Key > More > Settings from a browser window to
change browser settings.
Opening Links in Web Pages
When you’re on a web page with a link to another site, either
60
Page 61

tap the link to open the page, or hold on the link to open the
shortcut menu, giving you these options:
• Open
• Open in new window
• Bookmark link
• Save link
• Share link (by Bluetooth, Email, Gmail, Messages,
mail@metro or Google+.)
• Copy link URL
61
Page 62

Bluetooth®
c
w
n
e
e
S
o
n
t
w
N
c
o
h
w
Bluetooth® is a short-range wireless
technology. Phones or other devices
capabilities can exchange informatio
distance of about 10 meters. The Blu
paired before the communication is p
1. Tap Home Key > Menu Key >
networks and tap the check box
Bluetooth.
When Bluetooth is on, the ic
status bar.
2. T ap Bluet ooth setti ngs > Sca
phone will show all visible Blue
3. Tap the device you want to pair
your PIN and tap OK.
If a PIN is required, the same PI
the other device. Refer to the do
Bluetooth device for information
PIN.
Tick the Discoverable check box if t
pair with your phone.
ommunication
ith Bluetooth
wirelessly within a
tooth devices must be
rformed.
ettings > Wireless &
by Bluetooth to turn on
n will appear in the
for devices. Your
ooth devices in range.
ith and, if required, enter
should be entered on
ument for the other
n pairing mode and
e other device tries to
62
Page 63

HAC
Hearing Aid Compatibility (HAC)
regulations for Mobile phones
In 2003, the FCC adopted rules to make digital wireless
telephones compatible with hearing aids and cochlear
implants. Although analog wireless phones do not usually
cause interference with hearing aids or cochlear implants,
digital wireless phones sometimes do because of
electromagnetic energy emitted by the phone's antenna,
backlight, or other components.
Your phone is compliant with FCC HAC regulations (ANSI
C63.19).
While some wireless phones are used near some hearing
devices (hearing aids and cochlear implants), users may
detect a buzzing, humming, or whining noise.
Some hearing devices are more immune than others to this
interference noise and phones also vary in the amount of
interference they generate.
The wireless telephone industry has developed a rating
system for wireless phones to assist hearing device users in
finding phones that may be compatible with their hearing
devices. Not all phones have been rated. Phones that are
rated have the rating on their box or a label located on the
box. The ratings are not guarantees. Results will vary
63
Page 64

depending on the user's hearing device and hearing loss. If
your hearing device happens to be vulnerable to interference,
you may not be able to use a rated phone successfully.
Trying out the phone with your hearing device is the best way
to evaluate it for your personal needs.
M-Ratings: Phones rated M3 or M4 meet FCC requirements
and are likely to generate less interference to hearing
devices than phones that are not labeled. M4 is the
better/higher of the two ratings.
T-Ratings: Phones rated T3 or T4 meet FCC requirements
and are likely to be more usable with a hearing device’s
telecoil (“T Switch” or “Telephone Switch”) than unrated
phones. T4 is the better/ higher of the two ratings. (Note that
not all hearing devices have telecoils in them.)
Your phone meets the M4/T3 level rating.
Hearing devices may also be rated. Your hearing device
manufacturer or hearing health professional may help you
find this rating.
For more information about FCC Hearing Aid Compatibility,
please go to http://www.fcc.gov/cgb/dro
64
.
Page 65

Turn on HAC
When the HAC setting is on, your phone sends the audio
from your phone calls to the telecoil rather than to the
microphone of your hearing aid. You are likely to hear calls
much better because volume is increased and background
noise and feedback are diminished. The HAC setting
improves only the calls you listen to through the earpiece. It
does not affect calls heard on the speakerphone or a headset.
It’s better to turn off the Bluetooth function when the HAC
setting is on. HAC requires extra battery power, so watch
your battery consumption when it’s turned on.
Note:
Do not turn on the HAC setting unless you use a hearing aid
with a telecoil. Using this setting without a hearing aid or with
a hearing aid without a telecoil may be harmful to your
hearing.
65
Page 66
Making the Most of
M
C
e
M
e
fe
e
h
o
a
n
Using Camera
Taking Pictures with Your
Your phone has a 5-megapixel cam
Home Key > > Camera.
Tap to take a shot. To view it, ju
right corner of the screen. Or select
view all your pictures.
Adjusting Camera Settings
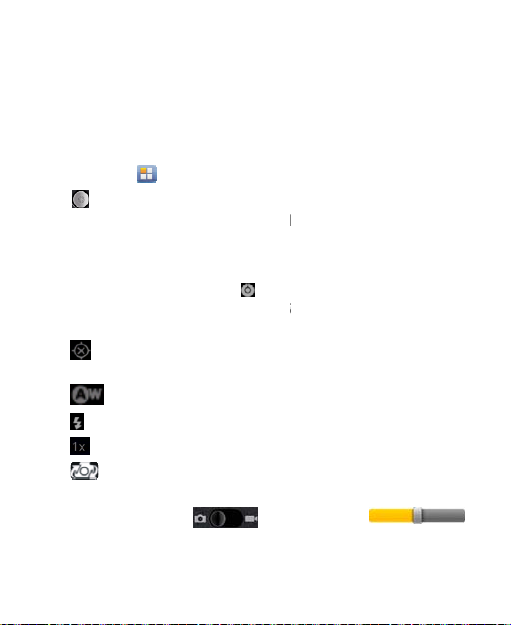
From the Camera Screen tap to s
exposure, picture size/quality, color ef
saturation, contrast, sharpness, or to r
Tap to choose whether to save p
location.
Tap to change white balance.
Tap to turn on/off the flash light.
Tap to zoom in or out.
Tap to switch the back camera t
TIP: To change quickly from camer
versa, use the switch ico
bar to adjust the brightness.
ultimedia
amera
ra. Open it by tapping
st tap the picture in the
enu Key > Gallery to
t up focus mode,
ct, ISO, anti-banding,
store defaults.
oto’s geographic
the front camera.
to camcorder or vice
. Use the
66
Page 67
Using Camcorder
o
a
t
s
d
t
a
m
c
t
s
t
Shooting Video with Your
Open the camcorder by tapping H
Camcorder. Then select to st
stop. Select the picture in the right
view the video you’ve just shot. Or
to see all your video clips.
Adjusting Your Video Set
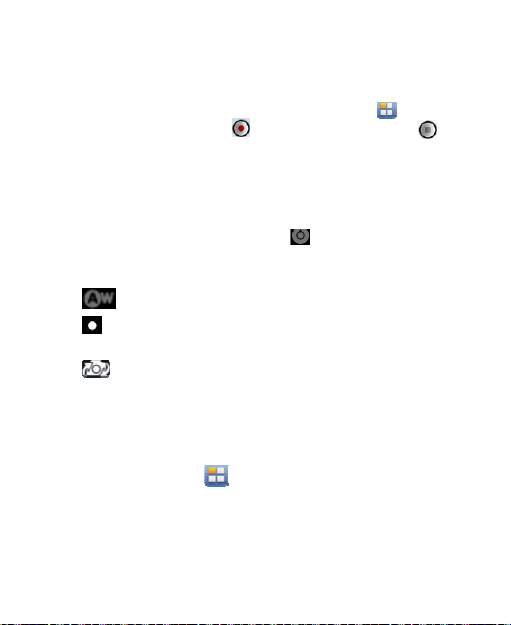
From the Camcorder Screen, tap
video quality, video/audio encoder, v
defaults.
Tap to change white balance
Tap to change video quality, an
High, Low, MMS, YouTube or cus
Tap to switch the back camer
Playing Your Music
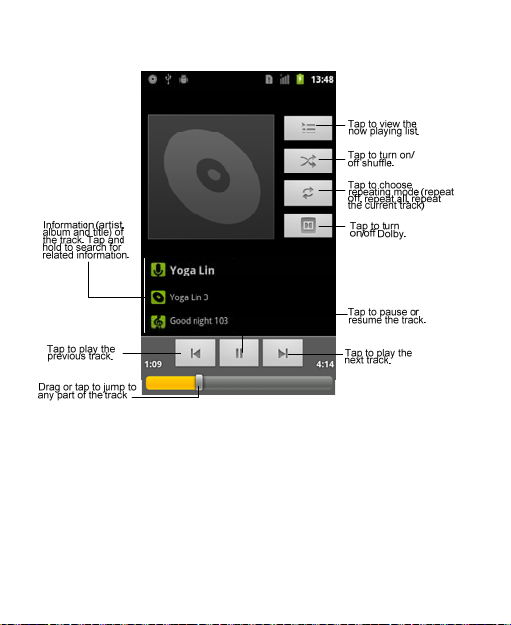
You can play digital audio files fro
card in Music.
1. Tap Home Key > > Musi
Screen.
2. Select Artists/Albums/Songs/
you want to play.
3. Tap an item from the list to star
Camcorder
me Key > >
rt shooting, and to
corner of the screen to
tap Menu Key > Gallery
ings
to adjust color effect,
ideo duration, or to restore
etting.
the icon will change to
om.
to the front camera.
your phone’s memory
to open the Music
Playlists to find the songs
playing.
67
Page 68
4. Adjust the volume with Volume Keys.
Creating Playlists
Playlists help you organize your music files:
1. Select a music file you want to add to a new playlist.
2. Tap and hold on the file until a shortcut menu pops up.
3. Tap Add to playlist.
4. Tap New.
68
Page 69

5. Type the playlist name and tap
y
y
u
n
s
u
y
o
y
y
s
Managing Playlists
1. From the Music Screen tap Pla
2. Hold on the playlist you want to
shortcut menu pops up.
3. Tap Play, Delete or Rename.
Adding a Song to a Playlist
1. Open Music and find the song
Albums, Songs, or Playlists.
2. Hold on the song until a shortc
3. Select Add to playlist.
4. Select a playlist.
Setting a Song as Ringto
1. Find the music file under Artist
Playlists.
2. Hold on the song until a shortc
3. Select Use as phone ringtone
Playing Your Videos
To play a video file, tap Home Ke
video file to start playing. Tap on
control bar will appear as below. S
Save.
lists to see them all.
play or edit until a
ou need under Artists,
t menu pops up.
e
, Albums, Songs, or
t menu pops up.
.
> > Videos. Tap a
the screen and the
now you can play, pause,
69
Page 70
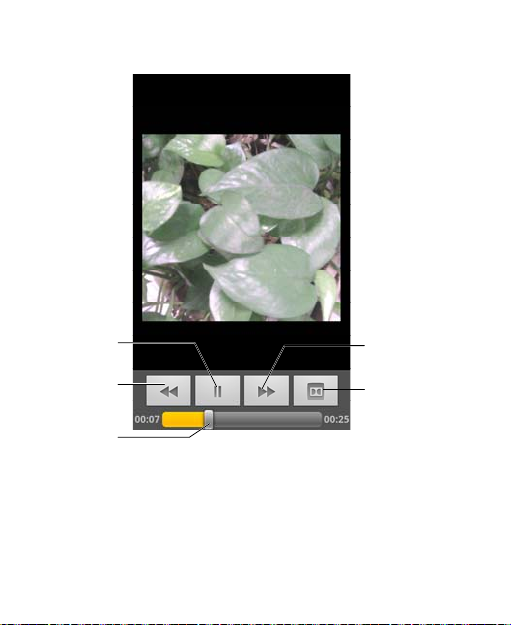
fast forward, etc.
Tap to pause/
resume video.
Tap to rewind.
Hold and drag to
jump to any part
of the video.
Tap to fast
forward.
Tap to turn on/off
the dolby.
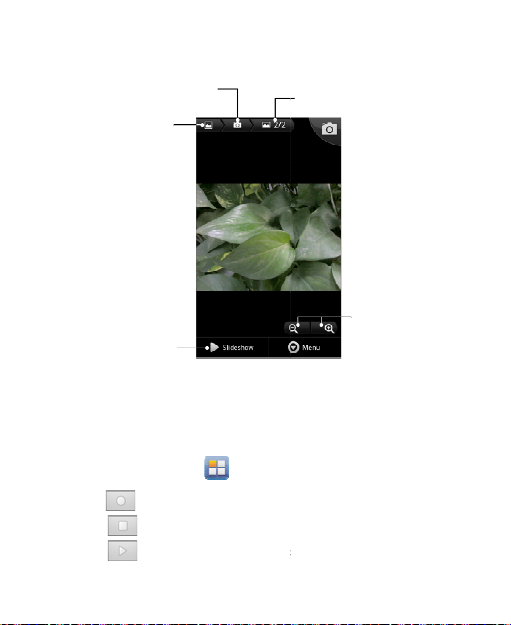
Opening Your Gallery
Gallery helps you view pictures and play videos. You can
also do some basic editing of your pictures – such as setting
them as wallpaper or contact icons and sharing with friends.
70
Page 71
e
c
Tap to return to the
previous folder
Tap to return
to Gallery.
Show the number of
pictures in the folder
Tap to view
pictures in the
folder in a
slideshow
Making Memorable Me
Sound Recorder enables you to r
You need a microSD card to use it
1. Tap Home Key > > Soun
2. Tap to start recording.
3. Tap to stop recording.
4. Tap to play back the voi
71
Tap to zoom
mos
cord your voice memos.
.
d Recorder.
e recording.
Page 72

5. Tap OK to save the voice record
i
delete the recording.
ng, or tap Discard to
TIPS: You can find your recordings i
Music > Playlists > My recordings
72
n Home Key > >
.
Page 73

Using Your Google
™
t
n
c
a
S
e
a
o
a
K
h
t
t
Signing in to your Google Accoun
Gmail and Contacts between your
you don’t have an account, you ca
1. Tap a Google application that n
such as Market.
2. Read the instructions and sele
3. If you have a Google account, t
name and password. Then tap
you don’t have a Google accou
Gmail
Gmail is a web-based email servic
you sign in to your Google accoun
synchronization settings, the Gm
automatically synchronized with y
web.
How you create and send a Gm
1. Open Gmail by tapping Home
2. Press Menu Key > Compose.
3. Enter the email address of the p
the ‘To’ field. If you’re sending t
separate the email addresses wi
as many recipients as you wan
Applications
lets you synchronize
phone and the web. And if
easily create one.
eed(s) a Google account,
t Next.
p Sign in. Enter your user
ign in. (Or tap Create if
nt.)
that’s configured when
t. Depending on your
il on your phone can be
ur Gmail account on the
il:
ey > > Gmail.
erson you’re contacting in
e email to several people,
h commas. You can add
.
73
Page 74

4. Enter the email subject, and then
t
p
l
s
n
u
h
a
e
f
f
p
e
5. Tap Menu Key > Send.
Using Google Calendar
Tap Home Key > > Calendar
and Google’s time management ap
calendar to schedule appointments,
other events. Your appointments wil
screen as scheduled. You can also
appointments to your Google accou
manage your schedule online on yo
Using Google Talk
Google Talk is Google’s instant mes
enables you to communicate with ot
it.
Opening Google Talk
Tap Home Key > > Talk.
Adding a New Friend
You can only add people who have
1. In the Friends list, press Menu K
2. Enter the Google account of the
Your friend will receive an invitation
Menu Key > More > Invites to see
write your email.
o use Google Calendar
lication. You can use the
including meetings and
be displayed on the
ynchronize
t, which enables you to
r PC.
saging program, which
er people who also use
Google Account.
y > Add fr iend.
riend you want to add.
rom Google. Press
ending invitations.
74
Page 75

Changing Your Online St
a
d
g
n
e
h
b
c
p
g
1. Tap the Talk status bar above t
2. Tap to change status an
message in the text box.
Starting a Chat
1. Tap a friend in the Friends list.
2. Chat with your friend by enterin
3. Tap Send.
Places
Google Places helps you find all ki
you.
1. Tap Home Key > Menu Key >
security and tick the Use GPS
wireless networks check box.
2. Tap Home Key > > Plac
being located. Your location, w
bottom of the screen.
3. Select a business category and
type of business near you will
You can also use the Find pla
to find the business you need.
4. Tap a result you are interested
details and reviews about that
tus
he Friends list.
then enter your status
text in the message box.
ds of businesses near
Settings > Location &
satellites or Use
s. Wait while you are
en found, is shown at the
the information of that
e displayed.
es search box on the top
in and check out the
lace. You can also see
75
Page 76

the place on Google Maps, find out how to get there, or
give that business a call.
Latitude
Google’s Latitude service is a social tool for sharing your
location information with selected friends.
Tap Home Key > > Latitude to enable Latitude service.
Each time you launch Maps application, your location will be
determined using GPS or the phone network, and your
Latitude status will be updated. You can tap Menu Key >
More > Latitude in Maps or Home Key > > Latitude to
see your status as well as that of your selected friends.
In Latitude, tap Menu Key to refresh friends’ status, see
them on Maps, add new friends, or change Latitude settings.
You can also turn off Latitude service by tapping Sign out of
Latitude in the settings of Latitude.
76
Page 77

Sorting out Your Phone Settings
Changing Display Settings
By tapping Home Key > Menu Key > Settings > Display,
you can adjust the display settings as you like:
• Brightness: Adjust brightness of the screen.
• Auto-rotate screen: Rotate the screen display as you
rotate the phone.
• Animation: Choose window animation.
• Screen timeout: Set the delay for the screen to
automatically turn off.
• HDMI: tick the HDMI to turn on/off the HDMI.
Sound Settings
By tapping Home Key > Menu Key > Settings > Sound,
you can adjust the sound settings, such as setting ringtones
and volume, turning on silent mode or vibration, allowing
sound feedback for touching keys, making selections,locking
the screen and making emergency calls.
• Silent Mode: Silence all sounds except media and alarms.
• Silence Ringer When Face Down: Mute an incoming call
when you flip the phone over.
• Vibrate: Set your device in vibration mode.
77
Page 78

• Enable Dolby Mobile: Enable / Disable Dolby Mobile.
• Volume: Set the volume of the Ringtone, Media and
Alarm.
• Phone ringtone / Notification ringtone: Select the
default ringtones for incoming calls and notifications.
• Audible touch tones: Play sound when using dial pad.
• Audible Selection: Play sound when making screen
selection.
• Screen lock sounds: Play sounds when locking and
unlocking the screen.
• Haptic feedback: Vibrate when pressing soft keys or on
certain user interface interactions.
• Emergency tone: Set the behavior when an emergency
call is placed.
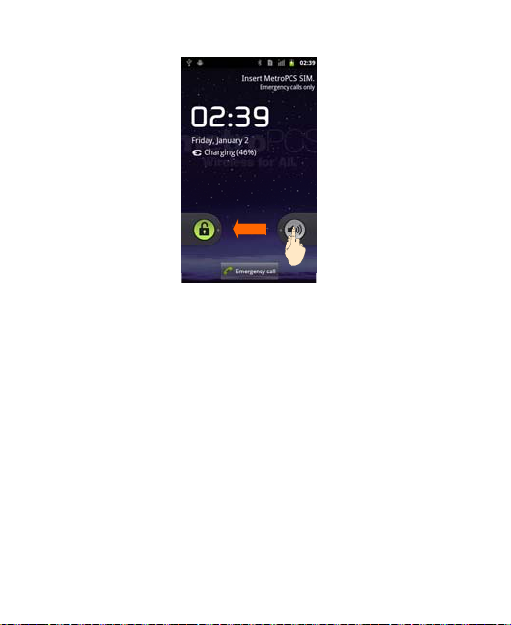
To quickly switch to silent mode, press the Volume down
Key or, if the screen is locked, drag to the left.
78
Page 79
Language Settings
You can change the language of your phone system in two
simple steps.
1. Tap Home Key > Menu Key > Settings > Language &
keyboard > Select language.
2. Select a language from the list given.
Mobile Network Services
Tap Home Key > Menu Key > Settings > Wireless &
networks > Mobile networks to select the network, allow
data services when roaming, switching network modes,
enable always-on mobile data, change the CDMA roaming
79
Page 80

mode, or check the data usage.
IMPORTANT: Data roaming may incur significant roaming
charges.
Security Settings
Here’s how to protect your phone from unauthorized use.
Protecting Your Phone with a Screen Unlock
Pattern
¾ Creating Your Screen Unlock Pattern
1. Tap Home Key > Menu Key > Settings > Location &
security > Set up screen lock > Pattern.
2. Read the instructions and tap Next.
3. Watch the example pattern and tap Next.
4. With a finger, draw your own pattern and tap Continue.
5. Draw the pattern again and tap Confirm.
6. Press Power Key to lock the screen.
TIPS: Clear the Use visible pattern box if you want to hide
the pattern as you draw it on the screen.
¾ Unlocking the Screen with Your Pattern
1. Press Power Key to wake up the screen.
2. Draw the pattern you set to unlock the screen.
If you make a mistake, your phone will ask you to try again.
80
Page 81

Protecting Your Phone with a PIN or
Password
¾ Creating a PIN or Password
1. Tap Home Key > Menu Key > Settings > Location &
security > Set up screen lock.
2. Tap PIN or Password.
3. Enter the numeric PIN or any password you like, and tap
Continue.
4. Enter it again and tap OK to confirm.
¾ Unlocking the Screen with Your PIN or Password
1. Press Power Key to wake up the phone.
2. Drag the icon to the right.
3. Enter the PIN or password you set.
4. Tap OK.
Disabling Screen Unlock Security
If you have created an unlock pattern, PIN or password, you
can disable it.
1. Tap Home Key > Menu Key > Settings > Location &
security > Change screen lock.
2. Draw the screen unlock pattern or enter your PIN/
password you have created.
3. Tap None.
81
Page 82

Setting up Credential Storage
This lets you select applications to access secure certificates
and other credentials.
¾ Enabling Secure Credentials
Tap Home Key > Menu Key > Settings > Location &
security.
Tap Set password and create a password for the credential
storage.
Tick the Use secure credentials box.
TIPS: You can also install encrypted certificates from your
microSD card by tapping Install from SD card.
¾ Deleting Secure Credentials
1. Tap Home Key > Menu Key > Settings > Location &
security.
2. Tap Clear storage to clear credentials.
Managing Your Device Memory
Tap Home Key > Menu Key > Settings > Storage.
You can view the space information for the microSD card and
the phone storage.
• Unmount SD card: You can unmount the card and safely
remove it without switching the phone off.
• Erase SD card: Erase all data on the memory card.
82
Page 83

Reset to Factory Setti
n
t
e
m
s
t
e
e
e
a
i
Tap Home Key > Menu Key > Se
Factory data reset > Reset phon
WARNING: All your personal infor
applications on your phone will be
gs
tings > Privacy >
> Erase everything.
ation and downloaded
erased after the resetting.
Managing Application
Tap Home Key > Menu Key > Se
• Manage applications: Manag
applications.
• Running services: Check curr
stop them if needed.
• Storage use: View storage us
• Battery use: View what has be
• Development: Set options for
Tick the Unknown sources check
installed applications from sources
Market. Note that you may risk you
by installing such applications.
How to Install an Applicat
You can install an application from
(Home Key > > Market) by s
tings > Applications.
or remove installed
ntly running services and
d by applications.
en using the battery.
pplication development.
box if you want to
other than the Android
r phone and personal data
on
the Android Market
electing the item you want
83
Page 84

to download and tapping Install.
g
u
e
i
n
n
a
o
O
e
You can also install a non-Marketin
allowed the installation of it. Make s
application developed for your devic
before installing it.
1. Copy the application file to the m
install the card in your phone.
2. Tap Home Key > > Filer, a
the application file is.
3. Tap the file to start installation.
4. Read and follow the installation i
with the application to complete t
How to Uninstall an Applic
You can only uninstall any applicati
downloaded and installed.
1. Tap Home Key > Menu Key >
applications > Download/All/
2. Flick the screen to scroll the ap
application that you want to uni
3. Tap Uninstall, and tap OK to c
application if you have
re that you select an
and processor type
croSD memory card and
d open the folder where
structions that come
he setup.
tion
n that you have
Applications > Manage
n SD card.
plication list to select the
nstall.
onfirm.
84
Page 85

Managing Other Settings
Search Settings
You can manage search settings and search history by
opening the Google Search application and tapping Menu
Key > Search settings.
• Google search: Adjust Google search settings.
• Searchable items: When you search for an item on your
phone, only the searchable items will be looked for.
You can also clear shortcuts to recently chosen search
suggestions.
Voice Interaction
You can set the text-to-speech and voice recognition options
by tapping Home Key > Menu Key > Settings > Voice input
& output.
NOTE: You need to download voice data in order to use the
text-to-speech function. Just tap Install voice data in
Text-to-speech settings.
Accessibility
Configure accessibility options for accessibility-related
applications.
About Phone
Check system updates, phone status and battery use, or
view legal information and software versions.
85
Page 86

Other Applications
b
a
o
e
r
e
M
o
r
4G mobile Hotspot
1. Tap Home Key > > 4G Mo
2. Tick the 4G Mobile Hotspot box,
your phone’s mobile data connecti
Alarms
3. Tap Home Key > > Alarm.
4. Tap the default alarm to configur
alarm, tap Menu Key > Add ala
5. Tick the Turn on alarm box and s
Repeat, Snooze, Duration, Vibra
Volume crescendo and Delay.
Note Pad
Note pad is for your memos. Tap
delete them, or to export the text t
microSD memory card. Hold an exi
share or export, or to change its title
Calculator
Tap Home Key > > Calculato
TIPS: Tap Menu Key > Advanced
ile.
nd then you can share
n over Wi-Fi.
it. Or, to create a new
m.
t up Name, Time,
te, Ringtone, Volume,
enu Key to add or
a txt file in the
sting note to edit, delete,
.
.
panel to use more sign
86
Page 87

calculation.
T
o
d
u
a
e
o
o
n
h
T
o
o
Task Manager
Tap Home Key > and select
stop applications.
MetroPCS Easy Wi-Fi
Find and connect to MetroPCS h
device.
@metro App Store
Keep the fun going with downloa
large variety of applications or c
your life with thousands of wallp
download your apps from the pr
Store on your MetroPCS phone,
metropcs.com!
IM and Social
One application merges Facebo
Windows Live, Yahoo and AOL I
in one spot on your MetroPCS p
ask Manager to view or
tspots on your mobile
able games, browse a
stomize your phone to fit
pers. Purchase and
-loaded @metro App
r buy online from
k and Twitter, PLUS,
stant Messengers all
one.
87
Page 88
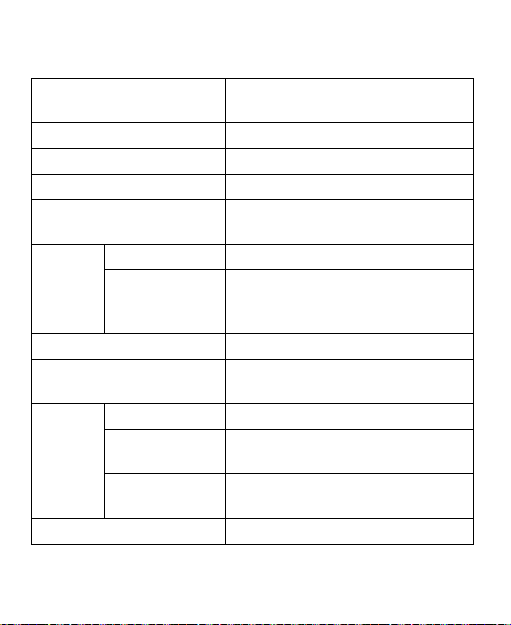
Specifications
Dimensions
Weight Approx. 160g (with battery)
Bearer CDMA 1X/EVDO/LTE support
OS Android 2.3.5
Main display dimension,
Resolution
Sensor type CMOS
Back
Camera
Internal memory ROM: 4 GB, RAM: 512MB
Removable memory card
Battery
Support Bluetooth, Wi-Fi
Still image
capture
resolution
Capacity 1780mAh
Standby time
Voice talk time
Approx. 130 mm × 68 mm × 13.7
mm
4.3", 480x320 (HVGA)
5M Pixels
Support microSD card, max.
capacity 32GB
Approx. 244 hours (subject to
network status)
Approx.240 min (subject to
network status)
88
 Loading...