

Page 1

FOR CK150
Page 2

USER MANUAL FOR CK150
HANDS-FREE CAR KIT
1. Introduction ..............................................................................2
2. Maintenance and Cleaning ......................................................3
3. Typical Installation....................................................................3
4. Installation Diagram .................................................................4
5. Installation Guide .....................................................................5
6. Operation ...............................................................................10
7. Technical Data .......................................................................12
1
Page 3
1. Introduction
Thank you for purchasing the hands-free car kit for your ZTE mobile phone. The handsfree kit provides a safe and convenient way to receive and make calls while on the move.
The choice of external and internally mounted car antennas provides increased gain and
coverage for areas where reception might be limited thereby extending the useable area of
your mobile phone service. Before installing or using the hands-free kit please read and
understand the manual thoroughly. It is recommended that you read the complete guide
before attempting installation.
Pay attention to traffic regulations and personal safety.
Always obey the local traffic regulations. Do not allow yourself to be
distracted by an incoming call and do not dial numbers while driving.
Use of your handsfree kit while driving could be in breach of the law
and you may be liable to a fine. Always keep your eyes on the road and
be mindful of traffic conditions. If you need to dial a number you
should pull off the road and bring the vehicle to a complete stop in a
safe place away from traffic.
Pro fe ssional Ins ta llation i s recomme nd ed
The installation of the handsfree kit is involves connecting wires to
your vehicle electrical system so you should seek professional
installation. Talk to your dealer or phone Accessory Warehouse on 1300
36 00 59.
Replace fuse with the same type
Always replace the fuse with the same type and rating.
2
Page 4
2. Maintenance and Cleaning
Occasionally clean all the unit parts to avoid build up of dust and dirt. Use a clean dry rag.
The use of any liquid may damage the finish and invalidate the warranty. Do not use
liquid cleaners, harsh chemicals or any abrasive materials.
3. Typical Instal lation
e.
d.
c.
b.
a.
a. Main Unit
b. Speaker
c. Cradle with swivel mount
d. Microphone
e. External Antenna (not included)
Kit also includes:
All cable assemblies, cable ties, mounting brackets, installation screws, personal
headphones, user manual and warranty card.
3
Page 5

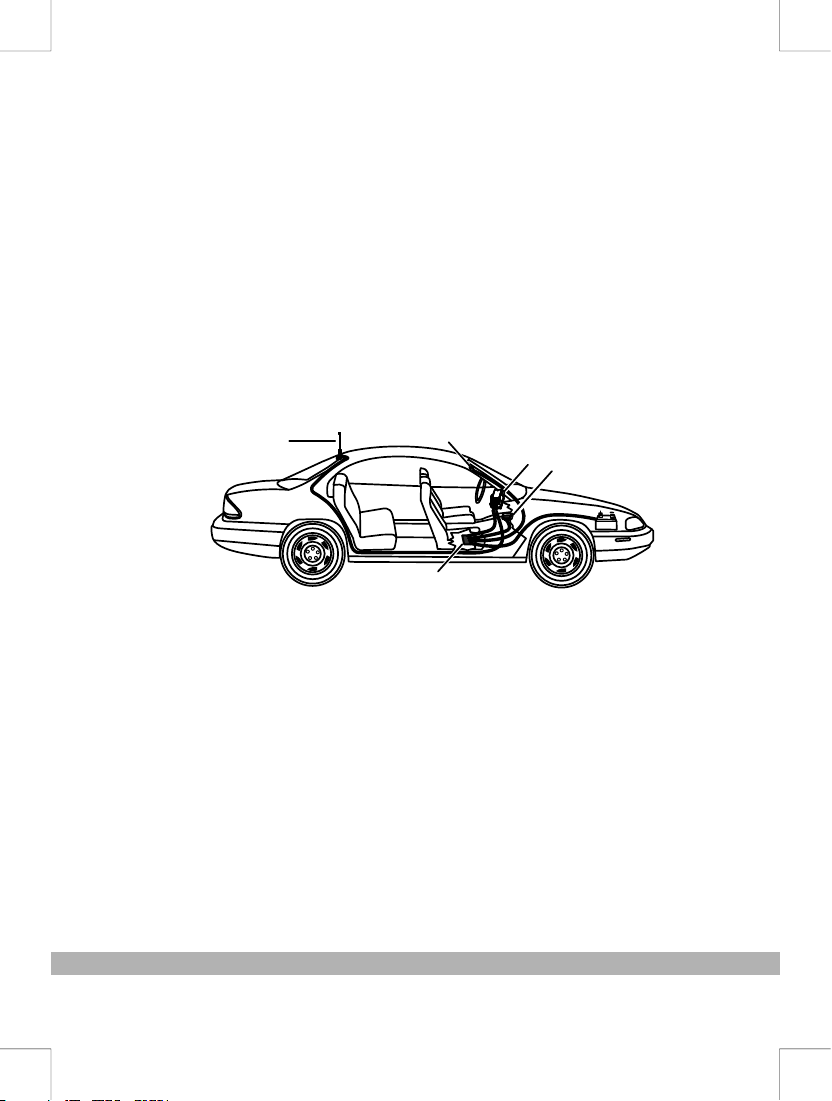
4. Installation Diagram
D.
A-3.
A-2.
A-1.
B+
GND
MUT E+
MUT E-
C.
B.
A.
F.
E.
Reference Description
A. Cradle
A-1. External Antenna Cable
A-2. Connection to main unit
A-3. Mini-D Plug
B. Main Unit
C. External Speaker
D. External Microphone
E. Power & Mute Cable (or cigarette lighter power cable)
F. Swivel Mount Bracket
Power Connection Mute (if required)
Red, fused — Battery + 12V DC Green --- +5V Mute to Stereo
Black --- 0V DC GND Yellow --- 0V GND Mute to Stereo
4
Page 6

5. Installation Guide
1. Before making any wiring changes switch off the car ignition.
2. Locate an accessories power cable that is switched off when the ignition is off.
(eg if the car stereo switches off when you remove the ignition key then connect the
hands free kit to the same power line).
3. Note some car stereos have a PIN number that is activated when you remove the
battery supply. Please check your manual before removing the power from the car
radio unit.
4. Find a suitable position to fix the handset cradle. The holder should be close
enough to the driver to allow the screen to be read but should not interfere with
driving or controls.
5. Be careful not to install the cradle where it might interfere with air bag
deployment.
Typi ca l Install at ion
5
Page 7

Cradle Installation
Once you have decided on a suitable position for the cradle then fix the mounting
bracket by removing the protective strip from the adhesive pad and sticking it to a
clean flat surface. Secure the bracket using the screws provided. The bracket has a
swivel mount which can be adjusted to various positions and tightened to lock it in
place. The handset cradle locates and locks into the tab on the bracket as shown
below. If the tab is at the bottom then simply rotate it 180 degrees.
6
Page 8

Main Unit Installation
Find a suitable place to locate the main unit. The cables from the cradle to the main
unit are approximately 1.5m long but you should check the cable run to make sure
it reaches before completing the installation. Typical locations are under the
passenger seat, in the passenger footwell or behind the central console. Do not
locate in the drivers footwell where the box could interfere with access to the
pedals.
Fix the main unit using the screws provided
7
Page 9

External Speaker Installation
Find a suitable place to locate the external speaker. The far side of the passenger
footwell is usually ideal but make sure the cable will reach the main unit (1.5m).
Position the speaker pointing towards the driver and a reasonable distance from the
microphone.
Speaker Mounting Bracket
Speaker Mounting Bracket
Secure th e br acket usi ng t he adhesive p ad and the scre ws p rovided .
Careful ly a ttach the s pe aker box to t he m ounting bra cket as shown .
8
Page 10

External Microphone Installation
Mount the microphone at head height on the driver's side pillar. Secure the
microphone using the adhesive pad and point the microphone towards the driver's
head position. Run the cable underneath the trim to conceal it.
Main Unit Cable Installation
Connect the red wire to a +12 V DC accessories supply which is normally off when
the ignition is off. This is to protect the car battery from discharging when the
engine is switched off. Normally the car radio, fan controls, rear demister etc are
switched off by the ignition switch so try and use one of these supplies. The green
and yellow wires are optional to connect the handsfree kit to the car radio mute
facility (if provided). The yellow wire connects to ground mute and the green wire
connects to +5V mute. Refer to your stereo manual for further instructions.
Some versions (zero install) have a cigarette lighter plug for easier installation.
Simply plug into your lighter socket.
Connect the cradle, speaker and microphone cables into the main unit and connect
the external antenna to the cable provided. All the connectors have unique fittings
so it is not possible to make any connection errors.
Installation Notes
Install the speaker away from the microphone to avoid feedback and to get
best possible voice quality.
Make sure all the wires will reach the main unit before fixing the accessories
Hide the cables under carpet and trim and do not run cables near the driver's
pedals or other controls.
9
Page 11
6. Operation
After completing the installation carefully insert your handset into the cradle. You will
need to open two rubber ports on the handset. The mini D connector on the cradle
connects into the bottom port of the handset and the antenna fits into the RF connector
port on the back of the handset.
Push the clamp buttons E and F together to fix the mobile tightly into the cradle.
The car kit icon will display on the handset screen showing the handsfree kit is connected.
Switch on the ignition and make a test call to check the speaker and microphone are
working. If not then make sure you have connected all the connectors into the main unit.
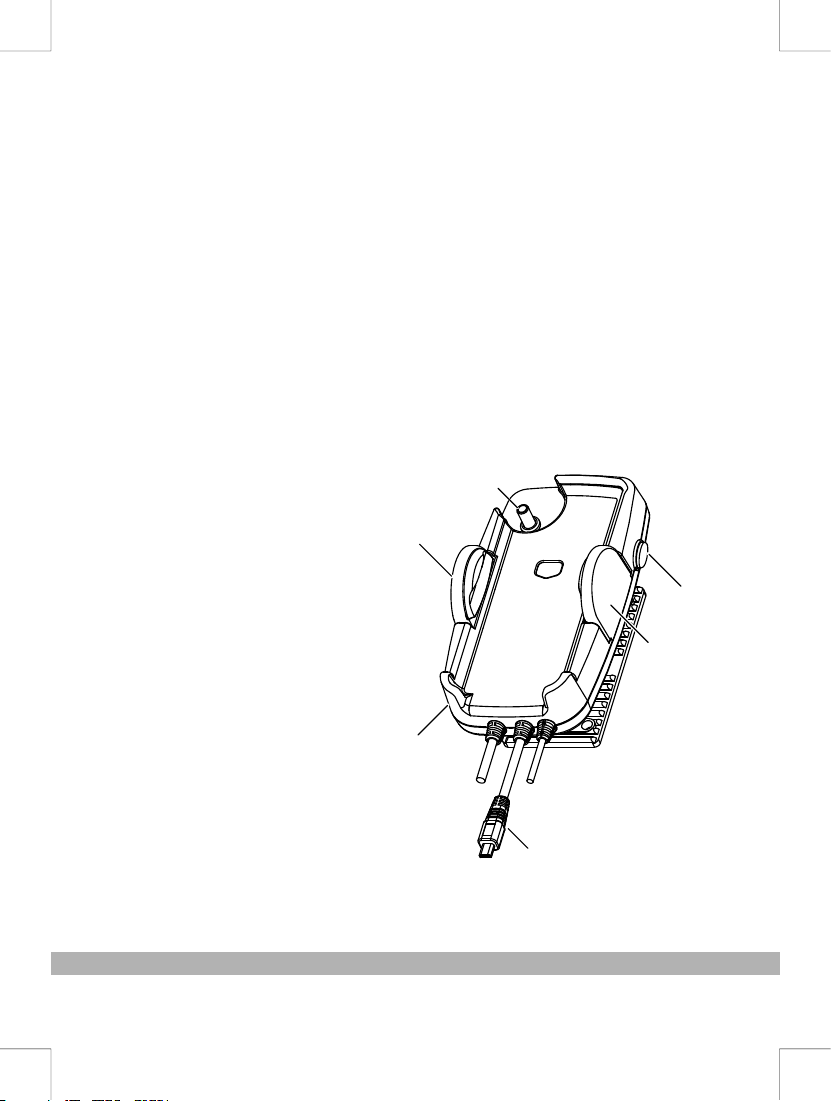
Cradle Fe at ures
A---- Release button
B----Antenna plug
C----Earphone socket
D----Mini D plug
E,F----Clamp buttons
B
E
A
F
C
D
10
Page 12

A
B
C
Answer a Call
Press the answer key 'A' on the handset to answer incoming calls. Press the key 'B'
on the handset to end the call.
Plug the headphones into the socket 'C' on the cradle and press the 'switch' button to
have a private conversation. (The button is on the personal headphone set)
Make a Call
Use speed dialing (see below) whenever possible and avoid dialing while driving. If
you need to dial a number you should pull off the road and bring the vehicle to a
complete stop in a safe place.
Speed Dialing
To set u p a sp eed dial pr es s Menu, Conta ct s, select a c on tact, Opt io ns, Set
Speed Dia l. N ow when you p re ss and hold tha t key the conta ct w ill be dial le d
using a sin gl e key press .
11
Page 13

Charging
The phone will automatically charge when connected to the hands-free kit.
Volume Controls
You can adjust the volume level by pressing volume keys on the mobile.
Car Security
Avoid leaving the phone connected and on view when the vehicle is left unattended
or when you park. For your own and your vehicle's security you should take your
mobile phone with you.
7. Technical Data
Volta ge Range: 11V - 30V DC .
Input Cur re nt: Stand-b y Cu rrent ≤15 mA
Audio Out pu t: 5W
Fuse: 3A Blade S ty le
This unit i s su itable fo r 24 V DC eg Truc ks and larg er vehicles .
Nominal 1 2V / 24V DC N egative G ro und.
Maximum C ur rent <1500 mA .
12
 Loading...