

Page 1

ZTE-C E520
CDMA 1X Digital Mobile Phone
User Manual
1
Page 2

Copyright © 2011 ZTE Corporation
All rights reserved
No part of this publication may be excerpted, reproduced, translated or utilized in any form
or by any means, electronic or mechanical, including photocopying and microlm, without
the prior written permission of ZTE Corporation.
The manual is published by ZTE Corporation. We reserve the right to make modications
on print errors or update specications without prior notice.
Version: R1.0
Edition time: 2011.07
Manual Number: 07958450XXXX
2
Page 3

Contents
1. Introduction ........................................................................................8
Overview ..........................................................................................................................8
Phone Overview ............................................................................................................8
Technical Specications ...................................................................................................9
Key Denitions .................................................................................................................9
Home screen .................................................................................................................. 11
Display Icons ..................................................................................................................12
2. Getting Started .................................................................................14
Battery ............................................................................................................................14
Installing the Battery ..................................................................................................14
Charging the Battery .................................................................................................14
Removing the Battery ................................................................................................15
microSD Card .................................................................................................................16
Inserting the microSD Card ....................................................................................... 16
Removing the microSD Card.....................................................................................16
Powering On/Off Your Phone .........................................................................................17
Locking/Unlocking the Keypad .......................................................................................18
Connecting to the Network .............................................................................................18
Activating Your Phone ....................................................................................................18
3. Calls ..................................................................................................19
Making a Voice Call ........................................................................................................19
3
Page 4

Making a Speed Dial Call ...............................................................................................19
Answering a Voice Call ...................................................................................................19
In-Call Features ..............................................................................................................20
Volume ......................................................................................................................20
Mute ..........................................................................................................................20
Speakerphone ........................................................................................................... 20
Advanced Features ...................................................................................................20
Three-Way Call ...............................................................................................................21
Call Waiting .................................................................................................................... 21
Call History .....................................................................................................................22
4. Entering Text ....................................................................................23
Word Mode ................................................................................................................23
Alphabetic Mode........................................................................................................24
Numeric Mode ........................................................................................................... 25
Symbol Mode ............................................................................................................25
5. Contacts ...........................................................................................26
Adding a New Contact ....................................................................................................26
Searching for a Contact ..................................................................................................26
Adding a Contact to a Group ..........................................................................................27
Setting Speed Dial to a Contact ..................................................................................... 27
6. Messaging ........................................................................................28
Sending a New SMS Message .......................................................................................28
Sending a New MMS Message ......................................................................................28
4
Page 5

Exchanging Messages in Conversations Mode .............................................................29
Message Folders ............................................................................................................29
Voicemail ........................................................................................................................30
Message Settings ...........................................................................................................30
Memory Info ...................................................................................................................30
7. Email & IM ........................................................................................31
8. Browser ............................................................................................31
Launching and Navigating the Browser.....................................................................31
9. Bluetooth ..........................................................................................33
Turning Bluetooth On/Off ................................................................................................33
Pairing with a New Bluetooth Device .............................................................................33
Managing Bluetooth ......................................................................................................34
10. Multimedia ......................................................................................35
Using the Music Player ...................................................................................................35
Creating a Playlist .....................................................................................................35
Managing a Playlist ...................................................................................................36
Playing Music ............................................................................................................37
Taking a Photo ................................................................................................................38
Recording a Video ..........................................................................................................38
Viewing Your Images ...................................................................................................... 39
Playing Your Videos .......................................................................................................40
Playing Your Voice memo le ......................................................................................... 41
5
Page 6

Formatting the microSD Card .........................................................................................41
11. Setting Up Your Phone ..................................................................42
Setting the Sound ...........................................................................................................42
Volume ......................................................................................................................42
Voice Call Ringers .....................................................................................................42
Message Ringers ......................................................................................................42
Keypad Tone .............................................................................................................43
Power On/Off Tone ....................................................................................................43
Alerts .........................................................................................................................43
Setting the Display .........................................................................................................43
Setting the System ......................................................................................................... 44
Call Setup ..................................................................................................................44
Automatic Keyguard .................................................................................................. 44
Memory Info ..............................................................................................................44
System Settings ........................................................................................................45
TTY Mode .................................................................................................................. 45
Security .....................................................................................................................45
HAC Mode .................................................................................................................46
Language .......................................................................................................................46
GPS ................................................................................................................................46
Data Roaming ................................................................................................................46
Airplane Mode ................................................................................................................ 47
Phone Info ......................................................................................................................47
6
Page 7

12. USB Mass Storage.........................................................................48
13. Other Facilities..............................................................................49
14. For Your Safety ..............................................................................51
General Care ..................................................................................................................51
Aircraft Safety .................................................................................................................53
Hospital Safety ............................................................................................................... 54
General Guidelines .........................................................................................................54
Road Safety ....................................................................................................................55
Vehicles Equipped with an Airbag ..................................................................................56
Third Party Equipment ....................................................................................................56
Efcient Use ................................................................................................................... 57
Radio Frequency (RF) Energy .......................................................................................57
Emergency Services ......................................................................................................58
FCC Compliance ............................................................................................................59
Use Your Phone with a Hearing Aid Device ...................................................................60
Turn on the HAC Setting ................................................................................................ 61
Copyright Notice .............................................................................................................62
Consumer Limited Warranty ...........................................................................................62
15. Glossary .........................................................................................66
16. Troubleshooting ............................................................................67
7
Page 8
1. Introduction
Overview
To guarantee your phone is always in its best condition, read this manual carefully and
keep it for future reference. To ensure your safety, read Section 14: For Your Safety thor-
oughly before using this phone for the rst time.
Note: The pictures and icons presented in this manual are meant for illustrative purposes
only and may not accurately represent the actual pictures and icons found on the phone.
Your phone contains the most up to date information.
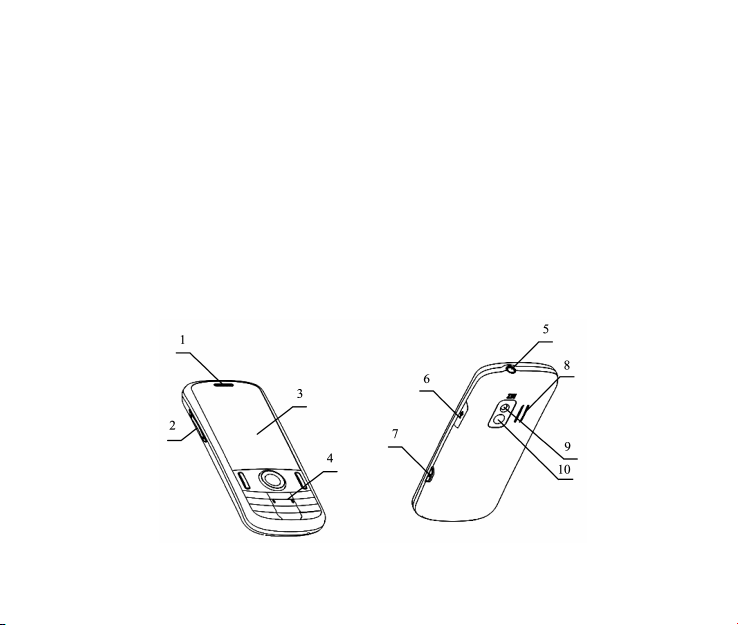
Phone Overview
8
Page 9
[1] Earpiece [6] USB Charger Port
[2] Volume Keys [7] Camera Key
[3] Display Screen [8] Speaker
[4] Keypad [9] Camera Lens
[5] 3.5mm Earphone Jack [10] Mirror
Technical Specications
Handset Type ZTE-C E520
Dimensions (L x W x H) 110 × 48 × 14.7 mm (4.3 × 1.9 × 0.6 in.)
Weight Less than 100 g (3.53 oz) including battery
Continuous Standby Time 210 hours (subject to the network)
Continuous Talk Time 360 minutes (subject to the network)
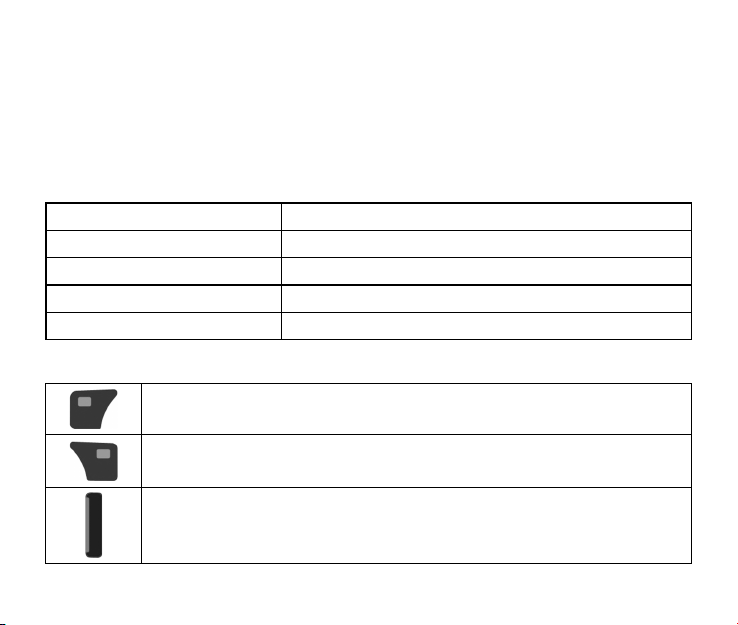
Key Denitions
Left Soft Key – Press to access the function listed above the key. From
Home screen, press to display the Contacts.
Right Soft Key –Press to access the function listed above the key. From
Home screen, press to access the Messaging.
Send Key – Press to make or receive a call. From Home screen, press to
display the All Calls list.
9
Page 10
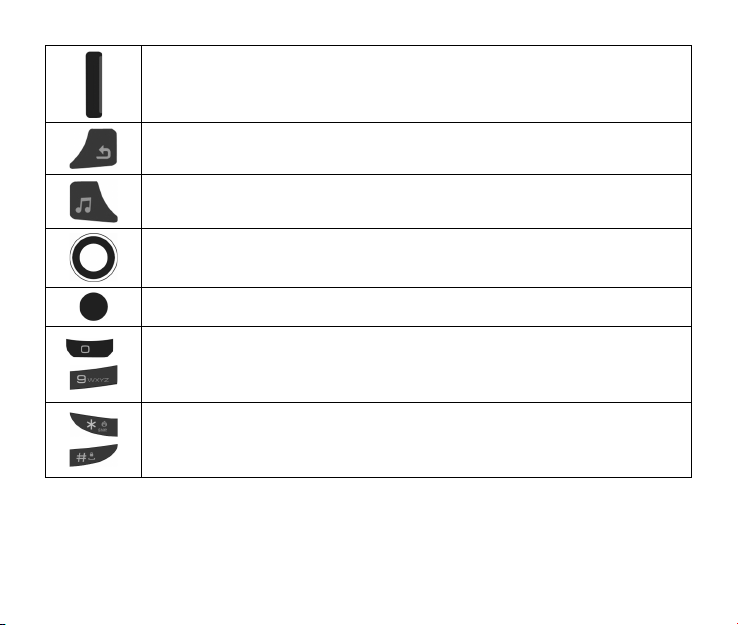
End Key – Press to end calls or close applications and return to Home
screen. Press and hold to power your phone on or off from Home screen.
Back Key – Delete characters during text entry mode. Press to return to the
previous menu or screen.
Music Player Key – Press to access the music player from Home screen.
Directional Key – Allows you to scroll through phone menu options and pro-
vides a shortcut to phone functions from Home screen.
OK Key – Conrm actions and make selections.
~
Alphanumeric Keys – Use to enter numbers and characters or to select
menu items. Press and hold the ‘1’ Key to launch Voicemail from Home
screen.
* Key and # Key – Press and hold the * Key to turn Vibration Mode on or off
on the Home screen. Press and hold the # Key to lock the keypad in Home
screen.
10
Page 11
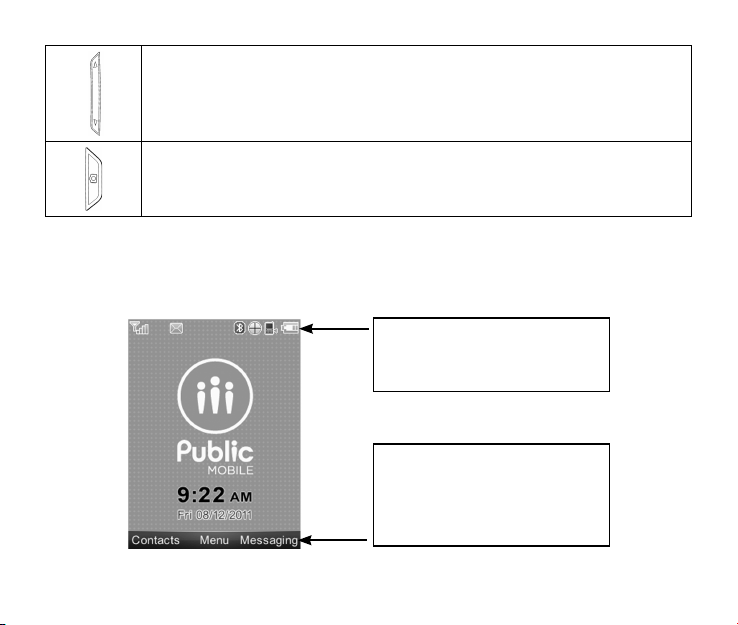
Volume Keys – Allows you to adjust the master volume or the earpiece volume during a call. Adjust the volume when playing music in the music player.
Camera Key – Press and hold to launch the camera from Home screen.
Home screen
When the phone is ready for use, and you have not entered any characters, the phone is in
Home screen.
Top Display Icons: Displays the network status, signal strength, battery
power, etc.
So ft Keys and OK Key Fu nc tion
Area: Displays the current functions
for the Left Soft Key, Right Soft Key
and OK Key.
11
Page 12
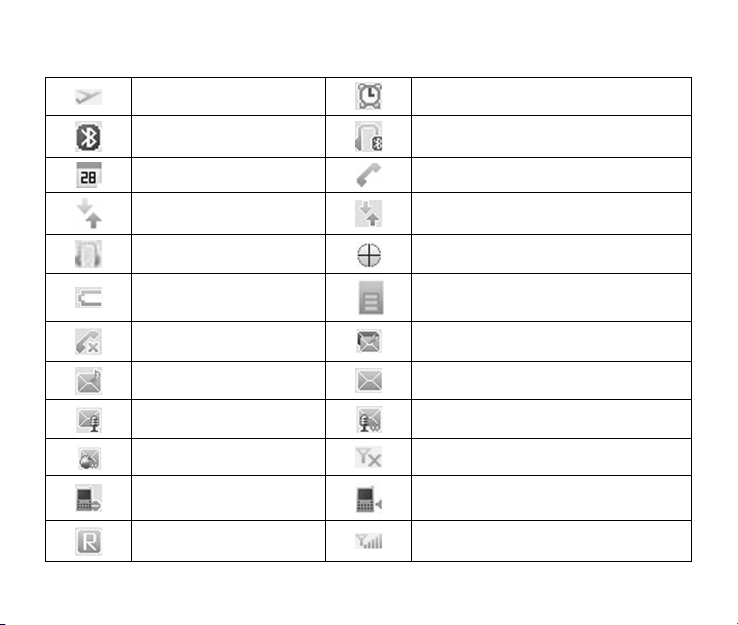
Display Icons
Airplane Mode Alarm
Bluetooth Bluetooth Headset
Calendar Call Connect
Data Dormant Data Transfer
Earphone GPS
Low Battery microSD Card Inserted
Missed Call New MMS and SMS Message
New MMS Message New SMS Message
New Voice Mail New Voice Mail and Web Message
New Web Message No Signal
Ringer Off Ringer On
Roaming Signal Strength
12
Page 13

Silent Mode SMS Full
Speaker On SSL (Web Security)
TTY Mode Urgent Message
Vibrate Alarm Vibration and Ringer Mode
Vibration Mode
13
Page 14
2. Getting Started
This chapter outlines the steps required to set up your phone, power on and activate on
your service provider’s network, etc. Follow the procedure below step-by-step to get started.
Battery
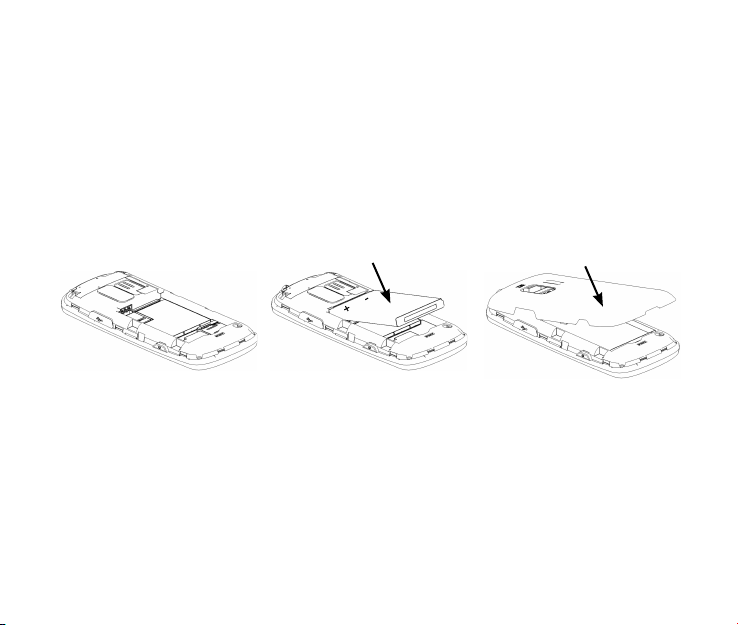
Installing the Battery
1 2 3
1. Insert the battery by aligning the contacts (1) and then gently press it down until it clicks
into place (2).
2. Replace the battery cover and snap it into place (3).
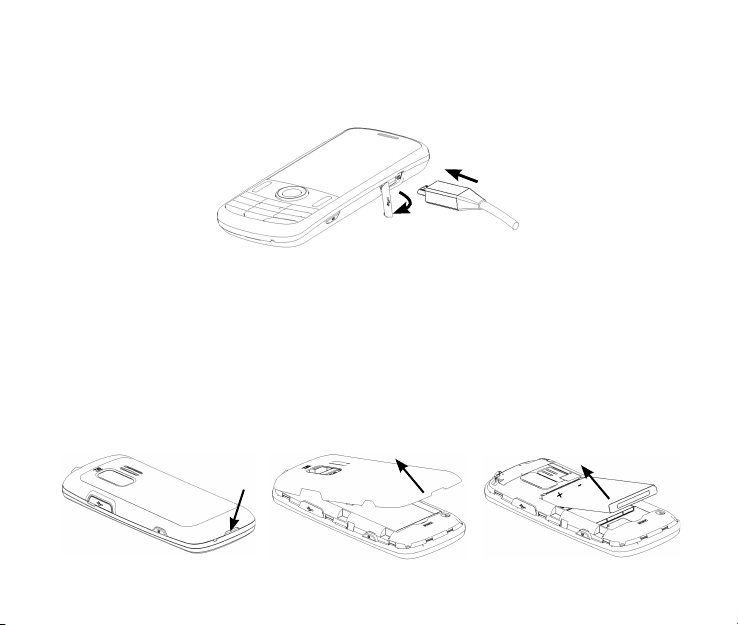
Charging the Battery
Your phone is powered by a rechargeable battery. The battery is not fully charged when
you purchase your phone, but there may be enough power in the battery to turn the phone
on. Charge the battery with the procedure indicated below.
14
Page 15
Note: For maximum battery performance, it is recommended that you completely charge
the battery before using the phone for the rst time. A new battery’s full performance is
achieved only after three complete charge and discharge cycles.
2
1
1. Pull the rubber USB cover out of the USB port and move it out of the way.
2. Plug the USB data cable into the phone's USB Charger Port (as shown in the above illustration) and the wall adapter end into an electrical outlet.
Removing the Battery
If you need to remove your phone’s battery, please turn the phone off and follow the procedure indicated below:
1 2 3
15
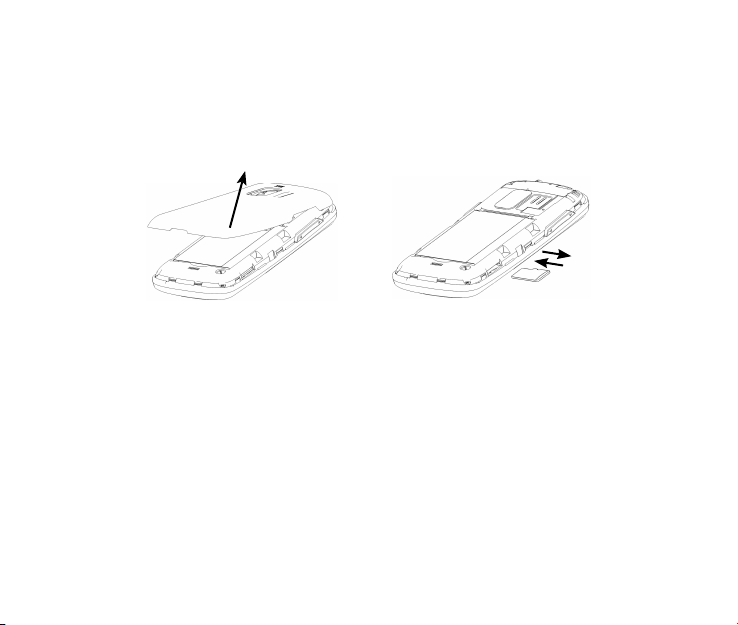
Page 16

1. Insert your ngernail into the back cover slot on the bottom of the phone and lift off the
back cover (1) (2).
2. Insert your ngernail into the slot and lift the battery from the compartment (3).
microSD Card
The microSD card gives your phone a very large memory capacity.
Notes: Your phone can support a microSD card with capacity up to 16GB.
Your phone allows you to transfer data between the microSD Card and a compatible PC.
Please refer to Section 12: USB Mass Storage.
microSD is a trademark of the SD Card Association.
Inserting the microSD Card
1. Open the back cover of the phone.
2. Handle the microSD card by the edges and carefully insert it into the microSD slot with
the cut edge oriented as shown in the following picture.
3. Push it until it clicks into position.
4. Close the back cover.
Removing the microSD Card
1. Open the back cover of the phone.
2. Push the microSD card to release it from the microSD slot on the phone.
16
Page 17
3. Pull the microSD card completely out of the slot.
4. Close the back cover.
Note: Do not remove the memory card while reading or writing to the card. Doing so may
cause data corruption on the card or phone. If possible, insert and remove the memory
card when the phone is powered off.
Powering On/Off Your Phone
To power on the phone, press and hold the End Key until the LCD screen lights up.
If the handset lock code has been activated, the phone will prompt you to enter the code.
The default lock code for an inactivated phone is 0000. Once you have activated your
handset, the default lock code will be the last 4 digits of your phone number.
To power off the phone, press and hold the End Key until the display turns off.
Warning: Do not power the phone on when wireless phone use is prohibited, or when it
may cause interference or danger.
17
Page 18

Locking/Unlocking the Keypad
To prevent accidental pressing of keys, your phone is equipped with the keyguard feature.
To lock the keypad, press and hold the # Key from the Home screen.
To unlock the keypad, press the Right Soft Key [Unlock] and then press the # Key.
Connecting to the Network
After your phone is powered on, it will automatically search for the network.
Activating Your Phone
Please contact your service provider for more information.
18
Page 19

3. Calls
Making a Voice Call
1. Enter a phone number including the full area code from the Home screen.
2. Press the Send Key to make the voice call.
3. Press the End Key to end the call.
Note: To make an emergency call, dial 911 and press the Send Key. If possible, remain
stationary and keep the line connected.
Making a Speed Dial Call
1. From the Home screen, press and hold the number key (2 to 9) for the Speed Dial entry
you would like to call and the call will be dialed automatically.
2. Press the End Key to end the call.
Note: The ‘1’ Key is assigned to the Voicemail function.
Answering a Voice Call
1. When a voice call comes in, press the Send Key to answer it.
2. Press the End Key to end the call.
Note: If your phone is connected to a compatible Bluetooth headset, you can answer or
end the call by pressing the Send/End Key on the Bluetooth headset.
19
Page 20

In-Call Features
Volume
During a call, you can adjust the earpiece volume by pressing the Volume Keys on the
side of the phone.
Mute
You can mute your voice during the call by pressing the Right Soft Key [Mute]. Press the
Right Soft Key [Unmute] to allow the caller to hear your voice again.
Speakerphone
Your phone has a speakerphone function that allows you to talk hands-free with the use of
the phone’s external speaker. To activate speakerphone, press the OK Key [Speaker] after
the call has been connected. Press the OK Key [Speaker] again to deactivate the speakerphone.
Advanced Features
To enter the advanced in-call features, press the Left Soft Key [Options] during a call. The
following options will be available:
1. Call Third Party: Enter and dial another number. Please refer to the following section:
Three-Way Call for detailed information.
2. Messaging: Switch to the Messaging menu during the call.
3. Contacts: Switch to the Contact List menu during the call.
4. Switch to Phone: Switch to talk on Phone.
20
Page 21

Three-Way Call
Your phone has a three-way calling feature, which enables you to have conference calls
with two parties. You can activate this function by following the procedure below:
1. Once a voice call has been established with Party A, press the Left Soft Key [Options]
and select Call Third Party.
2. The dialing window will appear. Enter the phone number of Party B and press the Send
Key.
3. When Party B answers the call, you will be connected with Party B only. Party A will remain on hold.
4. To activate the three-way call, press the Send Key again. You will be able to converse
with both parties simultaneously.
5. Press the Send Key again to end the call with Party B. You may press the End Key to
end both calls.
Call Waiting
Your phone can accept phone calls while another call is active. You can use the phone’s
call waiting feature as follows:
1. If you receive a call during an active conversation, the phone will prompt that there is an
incoming call and allow you to accept or reject the call.
2. Press the Left Soft Key to accept the call.
3. After accepting the call, you will be connected with the second caller, while the rst party
is put on hold. You may switch between callers by selecting Options→Swap.
21
Page 22

4. Press the End Key to disconnect from the active caller.
Note: When the End Key is pressed, both the active and holding users will be discon-
nected. If the holding user remains on the call, your phone will ring again. You may accept or reject the call.
Note: The three-way calling and call waiting features require network support and may result in additional charges. Contact your service provider for more information.
Call History
From the Home screen, select Menu→Calls to check the all, missed, incoming and outgoing calls and the call timers.
Tip: Press the Send Key from the Home screen to view the All Calls list.
22
Page 23
4. Entering Text
During text entry, you can press the Right Soft Key and select the input mode. The current
input mode is indicated above the Right Soft Key.
Tip: You can also press and hold the * Key to switch among word, alphabetic and numeric
mode during text entry.
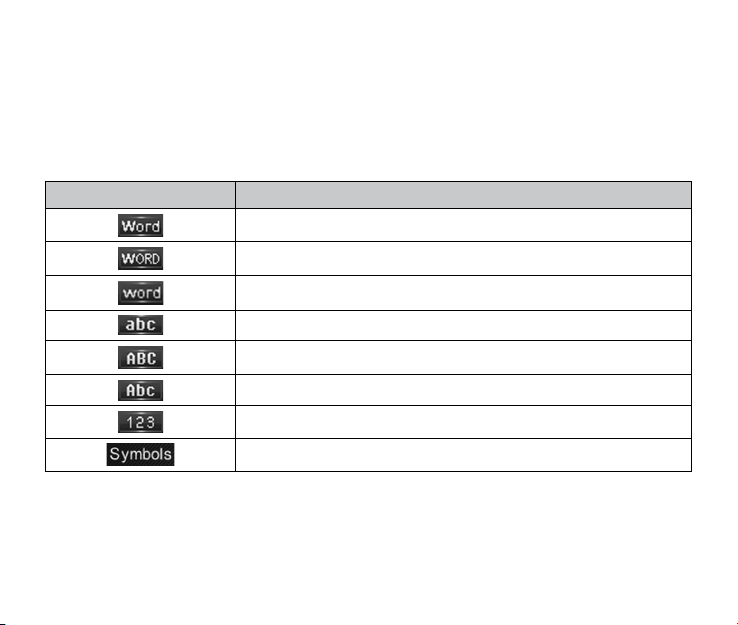
Display Symbol Text Entry Mode
English Standard Word predictive mode
English Uppercase Word predictive mode
English Lowercase Word predictive mode
Lowercase Alphabetic mode
Uppercase Alphabetic mode
Standard Alphabetic mode
Numeric mode
Symbols mode
Word Mode
Word mode allows you to input messages or text quickly with the built-in predictive dictionary.
23
Page 24

1. To activate Word Mode from the text entry eld, press the Right Soft Key, scroll to
Word, WORD or word, and press the OK Key.
2. Enter the rst few letters of your word with the keypad. Press each key only once for a
single letter. The word changes after each key press.
3. To display proposed matches, press the '0' Key until the appropriate word is displayed.
4. When the desired word is displayed, press the # Key to conrm and insert a space.
Note: In word mode, press the * Key to switch among uppercase, lowercase and standard
word mode.
In Spanish word mode, the text entering is the same as in English word mode.
Tip: In word mode, press and hold the alphanumeric keys to enter the numbers.
Alphabetic Mode
In Alphabetic mode, the alphanumeric keys are used to enter letters and numbers.
1. In the text input eld, press the Right Soft Key, scroll to abc, ABC or Abc, and press
the OK Key.
2. Press the key labeled with the target letter once for the rst letter, press twice for the
second letter, and so on. Press and hold the key labeled with the target number for that
number.
Note: In Alphabetic mode, press the * Key to switch among uppercase, lowercase and
standard alphabetic mode.
In standard alphabetic mode, the rst letter of a new sentence will be capitalized automatically.
24
Page 25

Numeric Mode
In Numeric mode, use the alphanumeric keys to enter the number.
1. In the text input eld, press the Right Soft Key and scroll to 123, then press the OK
Key.
2. Press the alphanumeric keys to enter the number directly shown on the keypad.
Note: Letters can’t be entered in this mode.
Symbol Mode
You can enter symbols in this mode.
1. In the text input eld, press the Right Soft Key and scroll to Symbols, then press the
OK Key.
2. Select the symbol you wish to enter by highlighting it using the Directional Key and
pressing the OK Key to select.
25
Page 26

5. Contacts
Your phone has an address book capable of storing 500 contacts containing phone numbers, E-mail address and many other elds.
Shortcut: To access the Contact List quickly, press the Directional Key up from the Home
screen.
Adding a New Contact
1. Select Menu→Contacts→New Contact from Home screen.
2. Enter the contact information such as the contact name, mobile phone number, Email
address, etc.
3. Press the OK Key [Save] to save the new contact.
Note: When entering the contact information, the contact name and a phone number or an
E-mail address must be entered in order to save the contact.
Searching for a Contact
1. Select Menu→Contacts→Contact List from Home screen.
2. Type the desired contact name in the search field at the bottom of the screen. The
phone will automatically scroll to the name that most closely matches your input.
26
Page 27

Adding a Contact to a Group
1. Select Menu→Contacts→Contact List from Home screen.
2. Select a desired contact and press the OK Key [View].
3. Press the OK Key [Edit] to edit the contact information.
4. Press the Directional Key up or down to highlight the Group eld and press the Direc-
tional Key left or right to select a desired group.
5. Press the OK Key [Save] to add the contact to the group.
Setting Speed Dial to a Contact
1. Select Menu→Contacts→Contact List from Home screen.
2. Select a contact you want to add to Speed Dial and press the Left Soft Key [Options].
3. Select Set Speed Dial and press the OK Key [Select].
4. Choose a Speed Dial location and press the OK Key [Set].
5. Press the OK Key to complete the setting.
27
Page 28

6. Messaging
Your phone has the functionalities of sending and receiving text messages (SMS), multimedia messages (MMS) and voice mail messages.
Shortcut: To access the Messaging menu quickly, press the Directional Key down from
the Home screen.
Sending a New SMS Message
1. Select Menu→Messaging→Send New from Home screen.
2. Enter the recipient’s number. You may press the OK Key [Add] to enter additional num-
bers after entering one number. You can also press the Left Soft Key [Options]→Con-
tacts to choose the recipient(s).
3. Enter the message in the text eld and press the OK Key [Send].
Sending a New MMS Message
1. Select Menu→Messaging→Send New from Home screen.
2. Enter the recipient’s number. You may press the OK Key [Add] to enter additional num-
bers after entering one number. You can also press the Left Soft Key [Options]→Con-
tacts to choose the recipient(s).
3. When entering the message, press the Left Soft Key [Options] to display the Options
menu. You can add images, tunes, videos, quick texts, signature, etc. to the message.
You can also enter the Cc/Bcc recipients and subject text.
4. After completing the message, press the OK Key [Send].
28
Page 29

Exchanging Messages in Conversations Mode
In Conversations, SMS and MMS messages which are sent to and received from a contact
(or number) are grouped into a conversation. You can exchange messages with a specic
contact in the conversation mode.
To exchange messages with a specic contact in the conversation mode:
1. Select Menu→Messaging→Conversations from Home screen.
2. All contacts or numbers which you have contacted via message are listed.
3. Select a desired contact (or number), and press the OK Key [View] to view the messages which were sent to and received from the contact or number.
4. Select a message and press the OK Key [View] to view its content. Press the Right Soft
Key [Reply] to reply to the contact.
5. Enter your message in the text eld and press the OK Key [Send] to send it.
Message Folders
The Inbox folder contains all of your received messages. In this folder, you can view
your received messages and reply to or forward the messages to another recipient.
The Outbox folder contains all messages that were not sent during the last attempt. In
this folder, you can edit or resend your messages.
The Drafts folder contains unnished messages. In this folder, you can complete and
send your messages.
The Sent folder contains messages that were sent successfully. In this folder, you can
edit or forward the messages to another recipient.
29
Page 30

The Saved folder contains saved messages. The messages saved in this folder will not
be deleted automatically. In this folder, you can reply to or forward the messages to another recipient.
The Quick Texts folder contains some preset templates for SMS/MMS, and you can
edit them.
Voicemail
When the Voicemail function is available, all unanswered calls to your phone can be transferred to your voice mailbox, even if your phone is not being used or is powered off. You
should set up your voice mailbox and personal greeting as soon as your phone is activated.
For more information, contact your service provider.
To check your voicemail box:
1. Select Menu→Messaging→Voicemail from Home screen.
2. Press the OK Key [Call].
3. Follow the prompts and listen to your messages.
Shortcut: To quickly access Voicemail, press and hold the ‘1’ Key from Home screen.
Message Settings
1. From Home screen, select Menu→Messaging→Message Settings.
2. Set your desired option for parameters.
Memory Info
From Home screen, select Menu→Messaging→Memory Info to show the amount of
available, used, and total memory for message.
30
Page 31

7. Email & IM
With the Mobile E-mail&IM application, you can connect your phone to your personal or
workplace e-mail accounts.
1. Select Menu > E-mail & IM from Home screen to launch the application.
2. Follow the onscreen instructions to set up your account and use the Mobile E-mail.
Note: For detailed information, please contact your service provider.
8. Browser
The browser feature on your phone allows you to view internet content. You can view specially designed versions of popular websites which include sports, weather, news, stock
quotes and many others. To access it, select Menu→Browser from Home screen.
Launching and Navigating the Browser
When you select Browser from the main menu, you will be connected to the service provider’s homepage automatically.
Press the Left Soft Key [Options] to display the following menu:
1. Home: Go to the homepage.
2. Forward: Navigate to the next web page within cached web pages.
3. Back: Return to the previous web page which has just been viewed.
4. Go To URL: Switch to the URL screen where web addresses can be input.
31
Page 32

5. Bookmarks: You can open the bookmark list and access the saved web addresses
quickly or create a new bookmark.
6. History: Browse previously viewed web addresses.
7. Save Page: You can save the current page or view the saved pages.
8. Show URL: Show detailed information for the current URL.
9. Search Web: Search via the search engine provided by your service provider.
10.Advanced: View the advanced menu for the web browser.
Home: Allows you to view and edit the homepage URL.
Multimedia: Allows you to set preferences for displaying pictures and background
music.
Clear Memory: Allows you to clear the stored cookies, cache, history, autoll re-
cords, etc.
Scroll Mode: Allows you to set the scroll mode and scroll speed for web browsing.
Send Referrer: Allows you to enable or disable adding the "referrer" eld into the
HTTP request header.
Security: Set the security options.
Exit: Exit from the browser.
#. About: Display detailed information for the browser.
32
Page 33

9. Bluetooth
Your phone is capable of connecting to a variety of Bluetooth wireless accessories. It allows you to transfer data between Bluetooth devices, talk with a Bluetooth wireless headset, etc. You may create and store 25 pairings within the phone and connect to one device
at a time. The approximate range for Bluetooth wireless technology is up to 30 feet (10
meters).
The Bluetooth menu allows you to search for Bluetooth wireless devices, and manage devices that have already been paired with your phone. To access the Bluetooth menu, select
Menu→Bluetooth from Home screen.
Turning Bluetooth On/Off
1. Select Menu→Bluetooth→Bluetooth Manager from Home screen.
2. Highlight Power and select On or Off by pressing the Directional Key left or right.
3. Press the OK Key to conrm.
Pairing with a New Bluetooth Device
1. Select Menu→Bluetooth→Bluetooth Device from Home screen.
2. Press the Right Soft Key [Search] to nd a new compatible device. If Bluetooth power
is set to off, you will be prompted to enable Bluetooth. Press the Left Soft Key [Yes] to
enable Bluetooth and press the Right Soft Key [Search] to continue.
3. The device will appear in the Bluetooth available devices menu once it has been located. Highlight the desired device and press the OK Key [Pair].
33
Page 34

4. The phone may prompt you for the pass code. Consult the Bluetooth accessory instruction manual for the correct pass code. Enter the pass code and press the OK Key. If the
phone doesn’t prompt you to input the pass code, follow the on-screen prompts to continue.
5. Once paired, you will see the device listed in the Bluetooth Device menu.
Managing Bluetooth
Select Menu→Bluetooth→Bluetooth Manager from Home screen. You can manage the
Bluetooth settings below:
Power: Turn Bluetooth on or off.
Discovery Mode: Disable or enable the discovery mode. If the discovery mode is
turned on, other devices can nd your phone within 3 minutes.
Device Name: Edit the Bluetooth device name for your phone. This name will appear on
other Bluetooth devices when your phone is located.
Address: Allows you to view the address of your Bluetooth device.
Device Type: Allows you to view your Bluetooth device type.
Support Proles: Allows you to view a listing of the Bluetooth proles supported by
your phone, such as HSP, HFP, OPP, A2DP, AVRCP, FTP, etc.
File Stored Device: Choose the default location to save your receiving le from the
paired device.
34
Page 35

10. Multimedia
Your phone has the capability to play audio and video les, capture and view images and
record videos. You can enjoy your music les stored on the microSD card with a built-in
music player.
Note: Please obey local laws concerning the copyright and intellectual property rights connected with any media les, including music, videos and images.
Using the Music Player
You can use the music player to play music les stored on your microSD card.
To access the music player, select Menu→Multimedia→Music Player from Home screen.
Shortcut: You can press the Music Player Key from the Home screen to access the music
player.
Note: Before using the music player, please store your music les in the My_Music folder
in the root directory of the microSD card. The phone will load the music les in this folder.
If the phone doesn’t create the My_Music folder automatically, you need to create it in the
root directory of the microSD card manually.
Creating a Playlist
1. Select Menu→ Multimedia→Music Player from Home screen.
2. Press the Directional Key to select Playlists and press the OK Key [Select].
3. Press the Right Soft Key [Create] to start creating a playlist.
4. Edit the playlist name and press the OK Key to conrm.
35
Page 36

5. Press the OK Key [Add] to add music les. You can choose music les from the All
Songs, Artists, Albums and Genres folders.
6. Press the Right Soft Key [Mark] to mark the desired music le(s) or select Options→
Mark All to mark all music les. Press the OK Key [Add] to add them to the playlist.
7. Press the OK Key [Play] to play the playlist.
Managing a Playlist
To rename or delete a playlist:
1. Select Menu→ Multimedia→Music Player→Playlists from Home screen.
2. Press the Directional Key to select an existing playlist, and press the Left Soft Key
[Options]→Rename to rename the selected playlist.
3. Press the Left Soft Key [Options]→Delete/Delete All to delete the selected playlist or
all playlists.
4. Press the Left Soft Key [Options]→Go to “Now Playing” to access the music playing
screen.
To add or remove music les to a playlist:
1. Select Menu→ Multimedia→Music Player→Playlists from Home screen.
2. Press the Directional Key to select an existing playlist, and press the OK Key [Select]
to view the playlist.
3. Press the Left Soft Key [Options]→Add songs and then you can add more music les
from the All Songs, Artists, Albums and Genres folders.
36
Page 37

4. Press the Left Soft Key [Options]→Remove and then you can mark the music les
and remove them from the playlist.
Playing Music
1. Select Menu→Multimedia→Music Player from Home screen.
2. Select Playlists and choose one of the existing playlists to play. You can also select
music les in the All Songs, Artists, Albums and Genres folders to play.
3. In the music player interface:
Press the OK Key to start and pause playing.
Press the Directional Key left or right to skip to the previous or next audio le.
Press and hold the Directional Key left or right to rewind or fast forward.
Press the Directional Key up to display the playlist.
Press the Directional Key down to minimize the music player. The music will still
play in the background. You can go to the idle screen to check the information for the
music le that is playing.
Press the Volume Keys to adjust the music playing volume.
Note: When the music is playing in the background, press the End Key in the standby
screen and the phone will prompt whether to close the music player. Press the Left Soft
Key [Yes] to stop playing and close the music player.
37
Page 38

Taking a Photo
1. Press and hold the Camera Key or select Menu→Multimedia→Camera from Home
screen to activate the camera.
2. Press the Left Soft Key [Options] and set options for photo taking.
3. You can press the Volume Keys to zoom in and out. Press the OK Key [Capture] or the
Camera Key to take a photo.
4. Press the OK Key [Save] to save the photo to My Images on the phone or the microSD
card.
5. Press the Left Soft Key [Send] to send the taken photo via MMS message. Press the
Right Soft Key [Discard] to discard the photo just taken.
Note: The zoom in and out feature is disabled when the image size is set to 960 x 1280.
In the camera interface, press the Directional Key right to activate the video camera.
Recording a Video
1. Select Menu→Camcorder or press the Right Soft Key [Camcorder] from Home
screen to activate the video camera.
2. Press the Left Soft Key [Options] and set options for video recording.
3. Press the OK Key [Record] to start recording. You can press the Volume Keys to
zoom in and out during recording.
4. Press the OK Key [Pause] to pause and press the OK Key [Resume] to continue re-
cording.
38
Page 39

5. Press the Right Soft Key [Stop] to stop recording.
6. Press the OK Key [Save] to save the video clip to My Videos on the phone or the mi-
croSD card.
7. If the size of the video clip is within the MMS length limit, you can press the Left Soft
Key [Send] to send it via MMS message. Press the Right Soft Key [Discard] to dis-
card the video clip just taken.
Note: The progress bar on the bottom of the screen indicates whether the size of the video
clip exceeds the MMS length limit.
In the video camera interface, press the Directional Key left to activate the camera to take
photos.
Viewing Your Images
1. Select Menu→Multimedia→My Images from Home screen.
2. Press the Left Soft Key [Options] and select Switch to Phone/MicroSD. You can view
the images on your phone or microSD card.
3. Highlight an image and press the OK Key [View] to view it.
4. When viewing the image, you can:
Press the Directional Key to view the previous and next images.
Press the Right Soft Key [Full Scr.] to view the image in full screen.
Press the Left Soft Key [Options]→Rotate and press the Left Soft Key [Rotate
Left] or the Right Soft Key [Rotate Right] to rotate the image.
39
Page 40

Press the Left Soft Key [Options]→Slide Show to view the images in a slide show.
Press the Back Key to exit from the slide show.
To set the slide timing, press the Left Soft Key [Options]→Slide Timing, select the
desired time and press the OK Key [Select].
Note: You can store the images in the My_Images folder in the root directory of the mi-
croSD card when saving to the microSD card. The phone will load images in this folder. If
the phone doesn’t create the My_Images folder on your microSD card, you can manually
create it in the root directory of the microSD card.
Playing Your Videos
1. Select Menu→Multimedia→My Videos.Home screen.
2. Press the Left Soft Key [Options] and select Switch to Phone/MicroSD. You can view
the videos on your phone or microSD card.
3. Select a video clip and press the OK Key [Play] to play it in the video player.
4. In the video player, you can
Press the OK Key to play and pause the playing.
Press and hold the Directional Key left or right to rewind or fast forward.
Press the Directional Key up to stop the playing.
Press the Directional Key down to play it in full screen. Press again to exit from the
full screen.
Press the Left Soft Key [Mute]/[Unmute] to mute or unmute the sound.
40
Page 41

5. Press the Right Soft Key [Exit] to stop the playing and exit to the video les list.
Note: You can store the video les in the My_Videos folder in the root directory of the mi-
croSD card when saving to the microSD card. The phone will load video les in this folder.
If the phone doesn’t create the My_Videos folder on your microSD card, you can manually
create it in the root directory of the microSD card.
Playing Your Voice memo le
1. Select Menu→Multimedia→My Tunes from Home screen.
2. Press the Left Soft Key [Options] and select Switch to Phone/MicroSD. You can view
the voice le on your phone or microSD card.
3. Select a voice memo le and press the OK Key [Play] to play it.
Formatting the microSD Card
1. Select Menu→Multimedia→Format MicroSD from Home screen.
2. The phone will prompt you that all les on the microSD card will be deleted. Select Yes
to continue or select No to cancel formatting.
Note: All les on the microSD card will be erased after formatting.
41
Page 42

11. Setting Up Your Phone
The Settings menu allows you to customize your phone’s display, sound, and various other
settings based on your preferences. To access the Settings menu, select Menu→Settings
from Home screen.
Setting the Sound
To access Sound Settings, select Menu→Settings→Sound Settings from Home screen.
Volume
Silent Mode: Enable or disable the silent mode.
Master Volume: Set the master volume level.
Earpiece: Set the volume level for the earpiece.
Voice Call Ringers
Default Ringer: Set the default ringtone for voice calls.
Unknown Calls: Set the ringtone for blocked or restricted phone numbers.
Roaming Calls: Set the ringtone for roaming calls.
Message Ringers
Voicemail: Set the ringtone for Voicemail.
Messaging: Set the ringtone for new text and multimedia messages.
Reminder: Set the reminder time for new messages.
42
Page 43

Keypad Tone
The Keypad Tone menu allows you to set the volume level of the keypad tone.
Power On/Off Tone
The Power On/Off Tone menu allows you to enable or disable the sound played during
power on and off.
Alerts
Minute Beep: The phone will alert you with a beep before the end of every minute dur-
ing a call if this feature is enabled.
Call Connect: The phone will alert you when a call is connected if this feature is en-
abled.
Call Lost: The phone will alert you when a call is lost if this feature is enabled.
Low Battery: The phone will alert you when the battery power is low if this feature is
enabled.
Roam Alert: The phone will alert you when system roaming happens if this feature is
enabled.
Setting the Display
To access Display Settings, select Menu→Settings→Display Settings from Home screen.
Banner: Edit the banner name displayed on the idle screen.
Banner Display: Choose to display the banner on the idle screen or not.
Wallpaper: Set the wallpaper for the idle screen.
43
Page 44

Screen Backlight: Set the screen backlight time.
Keypad Backlight: Set the keypad backlight time.
Digital Clock: Choose among Normal, Large and Off for the digital clock format.
Main Menu Style: Choose between Icon and List for the main menu style.
Dialing Font: Choose between Normal and Large for the size of dialing font.
Screen Brightness: Set the brightness level of the screen.
Setting the System
To access the System menu, select Menu→Settings→System from Home screen.
Call Setup
Call Answer: Set the way of answering a call.
Auto Answer: Set the delay time for auto answer or turn this feature off. This feature is
intended for use when your phone is connected to an optional hands-free headset.
Speed Dial: Enable or disable the speed dial feature.
Automatic Keyguard
When this feature is turned on, the keypad will be locked automatically after the phone is
inactive for about 20 seconds in Home screen.
Memory Info
The Memory Info menu allows you to view the used, available and total memory on your
phone and the microSD card.
44
Page 45

System Settings
Set Mode: Select the mode of choosing the network.
Note: Additional fees may apply when roaming on another network.
TTY Mode
Your phone is a TTY compatible device. Simply connect the TTY equipment to the earphone jack. The TTY Mode menu allows you to choose among the following settings:
TTY Full: Users who cannot talk or hear may use this setting to send and receive text
messages through TTY equipment.
TTY + Talk: Users who can talk, but cannot hear, may use this setting to talk through
the phone and receive responses via text messages.
TTY + Hear: Users who can hear, but cannot talk, may use this setting to listen to con-
versation of the other party, and respond via text messages.
TTY Off: Users who can hear and talk may use this setting to disable TTY support.
Security
Lock Mode: You can select Unlock, Lock or On Power Up. If On Power Up is select-
ed, the phone will be locked automatically when it is powered on.
Change Code: You can change the phone lock code. Enter the old lock code, input the
new code and input the new code again to conrm.
Reset Defaults: Reset all settings to factory defaults.
Note: You should input the phone lock code to enter the Security menu. The default lock
code for an inactivated phone is 0000.
45
Page 46

HAC Mode
This phone supports HAC (Hearing Aid Compatibility) function. When you turn on the HAC
mode and use a hearing aid with a Telecoil to answer the phone, it will help you hear more
clearly while speaking on the phone.
To access HAC Mode, select Menu→Settings→System→HAC Mode from Home screen.
For detailed information on HAC, please refer to Section 14: For Your Safety – Turn on
the HAC Setting.
Language
You can choose English or French for the phone language.
To access the Language menu, select Menu→Settings→Language from Home screen.
GPS
This phone supports the Global Positioning Service (GPS) location feature. It can identify
your location to the network. You can fully enable this GPS location feature or set GPS to
work only when you dial 911 from your phone.
To access the GPS menu, select Menu→Settings→GPS from Home screen.
E911 Only: GPS location feature is on only when you dial 911.
Data Roaming
If you disable this function, your mobile phone will close data function when roaming.
To enable or disable this function, select Menu→Settings→Airplane Mode→Enable or
Disable from Home screen.
46
Page 47

Airplane Mode
When Airplane Mode is turned on, all wireless communications are disabled. However, other functions such as the music player, camera and voice memo can still be used. When you
are in an airplane or other area where RF signals may cause interference, please activate
the airplane mode.
To turn the airplane mode on or off, select Menu→Settings→Airplane Mode: On/Off from
Home screen.
Phone Info
This menu allows you to view phone information such as the phone number, phone software version and icon glossary.
To access Phone Info, select Menu→Settings→Phone Info or Menu→Phone Info from
Home screen.
47
Page 48

12. USB Mass Storage
When a microSD card is inserted into your phone, the USB Mass Storage feature allows
you to transfer data between the microSD card and a compatible PC directly.
1. Insert the microSD card into your phone and connect your phone to a compatible PC
with a USB cable.
2. If the phone is not in Home screen, press the End Key to return to Home screen.
3. The phone will be in USB mode and you can transfer data between the microSD card
and PC.
4. If you want to exit from USB mode, select Menu→Settings→USB Mass Storage from
Home screen. Select Off and press the OK Key.
Note: If you want to activate USB mode, select Menu→Settings→USB Mass Storage
from Home screen. Select On and press the OK Key.
When your phone is in USB mode, please don’t remove the microSD card or USB cable.
48
Page 49

13. Other Facilities
Calculator
The phone provides simple calculating functions, such as addition, subtraction, multiplication and division.
Alarm Clock
You can set the alarm to ring if required. Select your desired alarm to congure in the alarm
list. (If there is no alarm, press the OK Key [New] to add a new alarm.)
Notes: The alarm will ring at the set time, even when the phone is powered off.
Calendar
You can conveniently access and modify your agenda.
Tip Calculator
With this feature, it will be easy to calculate the tip or determine how much each person
should pay in your group.
World Clock
You can check the current local time and date for major cities around the world.
Voice Memo
With this feature you can record voice memo.
Converter
This function allows you to convert currency.
49
Page 50

Info Portal
From the main menu select this to access the predened link provided by your service provider.
Downloads
From the main menu select Downloads, you can browse, purchase, and download apps
online.
Preloaded Files
From the main menu select Multimedia > Preloaded Files to view the preloaded les.
50
Page 51

14. For Your Safety
General Care
Your handset contains delicate electronic circuitry, magnets and battery systems. You
should treat it with care and give particular attention to the following points:
Do not allow the handset, battery or accessories to come into contact with liquids or
moisture at any time. Do not immerse it in any liquid.
Do not place the handset alongside computer disks, credit cards, travel cards or other
magnetic media. The information contained on the disks or cards may be affected by
the handset.
Do not paint the handset.
Do not leave the handset or battery in places where the temperature could exceed 140 ˚
F, e.g. on a car dashboard or a windowsill, behind glass in direct sunlight, etc.
Do not remove the handset battery while the handset is switched on.
Take care not to allow metal objects, such as coins or key rings, to contact or short cir-
cuit the battery terminals.
Do not dispose of batteries in re. The handset’s Li-ION batteries may be safely dis-
posed of at a Li-ION recycling point. Follow local requirements for recycling.
Do not put the handset’s battery in your mouth, as battery electrolytes may be toxic if
swallowed.
51
Page 52

Only use the battery with a charging system that has been qualied by ZTE. Use of an
unqualied battery or charger may present a risk of re, explosion, leakage, or other
hazard.
Do not disassemble, open, crush, bend, deform, puncture, or shred the handset.
Do not short circuit a battery or allow metallic or conductive objects to contact the bat-
tery terminals.
Promptly dispose of used batteries in accordance with local regulations.
Improper battery use may result in a re, explosion, or other hazard.
Do not put a battery into a microwave oven, dryer or high-pressure container.
Do not contact battery directly into an electric outlet or cigarette lighter charger. Use only
authorized chargers.
Do not puncture the battery with a sharp object such as a needle.
When the battery is disposed, be sure it is non-conducting by applying vinyl tape to the (+)
and (-) terminals.
Do not drop, throw, or subject the handset to rough treatment.
Stop using the battery if abnormal heat, odor, discoloration, deformation, or abnormal
condition is detected during use, charge or storage.
Do not use your handset with a damaged or deformed battery.
Do not solder the battery directly.
Remove the battery whose life cycle has expired from equipment immediately.
The earpiece may become warm during normal use. Also, the handset itself may be-
come warm while the battery is being charged.
52
Page 53

When a handset is in vibration mode, the vibration may cause the handset to move.
Be careful not to place the handset near heat sources (such as a heater).
Use a damp or anti-static cloth to clean the handset. Do not use an ordinary dry cloth
or electrostatic cloth. Do not use chemical or abrasive cleaners as these could damage
the casing.
Third party equipment: The use of third party equipment, cables, or accessories, not
made or authorized by ZTE, may invalidate the warranty of your phone and also adversely affect the phone’s safety and operation.
Remember to make backup copies of all important data on your handset.
Remember to recycle: The cardboard packing supplied with this handset is ideal for re-
cycling.
Warnings: In the unlikely event of a battery leak, take care to keep the battery discharge
away from your eyes and skin. If the leakage does come into contact with the eyes or skin,
ush thoroughly with clean water and consult with a doctor.
Aircraft Safety
Switch off your phone or activate the airplane mode when inside or near an aircraft. Use
of handsets in an aircraft may be dangerous to the operation of the aircraft and may dis-
rupt the cellular network. Failure to observe this instruction may lead to suspension or
denial of phone service to the offender, or legal action, or both.
Airplane mode allows you to use many of your phone’s features, such as calculator,
voice memos, and many others when you are in an airplane or other area where wire-
53
Page 54

less signals may cause interference. In the airplane mode, you are prohibited from making or receiving calls.
Hospital Safety
Switch off your phone and remove its battery in areas where handset use is prohibited.
Follow the instructions given by any respective medical facility regarding the use of cel-
lular handsets on their premises.
General Guidelines
Many jurisdictions have laws and regulations about taking pictures in public or private
areas regarding the processing and further use of such pictures. ZTE encourages its
customers to obey all laws and to honor the personal rights of others.
Check the roaming agreement availability with your network operator.
The use of mobile phones is not allowed in some radiation sensitive areas, such as
hospitals, research centers, and airplanes. The user is responsible for powering off the
device. If there is any uncertainty, the battery should be removed.
Observe any signs that indicate powering off your handset, such as those near gas sta-
tions or explosives.
If you have a heart condition, be careful with the setting of call vibration or tone volume.
This phone is capable of producing loud noises which may damage your hearing. Turn
down the volume before using headphones, Bluetooth stereo headsets or other audio
devices.
54
Page 55

Do not allow children to play with the handset, charger or batteries.
The operation of some medical electronic devices, such as hearing aids and pacemak-
ers, may be affected if a handset is used next to them. Observe any caution signs and
the manufacturer’s recommendations.
Take care not to put your phone in the back pocket of your pants and then sit on the
phone. Also, do not put your phone at the bottom of a bag where it may be subject to
excessive weight or pressure as this may damage the LCD and camera lens and cause
them to malfunction.
The phone contains metal and may cause a reaction for overly sensitive skin types.
Do not leave the phone discharged or without a battery for a long period of time. Other-
wise some data may be erased.
Road Safety
You must exercise proper control of your vehicle at all times. Give your full attention to
driving.
Observe all of the recommendations contained in your local trafc safety documenta-
tion.
Pull off the road and park before making or answering a call, if driving conditions require
so. Check if local laws and/or regulations restrict the use of cellular phones while driving.
You must not stop on the hard shoulder of a motorway to answer or make a call, except
in emergency situations.
55
Page 56

Switch off your handset at a refueling point, such as a gas station, even if you are not
refueling your own car.
Do not store or carry ammable or explosive materials in the same compartment as the
handset.
Electronic systems in a vehicle, such as anti-lock brakes, speed control and fuel injec-
tion systems are not normally affected by radio transmissions. The manufacturer of such
equipment may advise if it is adequately shielded from radio transmissions. If you suspect vehicle problems caused by the radio transmitter in the handset, consult your dealer and do not switch on the handset until your handset has been checked by a qualied
technician.
Vehicles Equipped with an Airbag
An airbag inates with great force. Do not place objects, including either installed or portable wireless equipment, in the area over the airbag or in the airbag deployment area. If
in-vehicle wireless equipment is improperly installed and the airbag inates, serious injury
could result.
Third Party Equipment
The use of third party equipment, cables or accessories, not made or authorized by ZTE,
may invalidate the warranty of the handset and also adversely affect the handset’s operation. For example, use only the ZTE charger supplied with the handset.
56
Page 57

Efcient Use
For optimum performance with minimum power consumption, do not cover the antenna
area (It’s on the bottom of your phone when you are holding it.) with your hand. Covering
the antenna affects the call quality, may cause the handset to operate at higher power levels than needed, and may shorten talk and standby times.
Radio Frequency (RF) Energy
This model phone meets the government’s requirements for exposure to radio waves.
This phone is designed and manufactured not to exceed the emission limits for exposure to
radio frequency (RF) energy set by the Federal Communications Commission of the U.S.
Government:
The exposure standard for wireless mobile phones employs a unit of measurement known
as the Specic Absorption Rate, or SAR. The SAR limit set by the FCC is 1.6 W/kg. Tests
for SAR are conducted using standard operating positions accepted by the FCC with the
phone transmitting at its highest certified power level in all tested frequency bands. Although the SAR is determined at the highest certied power level, the actual SAR level
of the phone while operating can be well below the maximum value. This is because the
phone is designed to operate at multiple power levels so as to use only the power required
to reach the network. In general, the closer you are to a wireless base station antenna, the
lower the power output.
The highest SAR value for this model phone as reported to the FCC when tested for use at
the ear is 1.23 W/kg and when worn on the body, as described in this user guide, is 0.771
57
Page 58

W/kg (Body-worn measurements differ among phone models, depending upon available
enhancements and FCC requirements.)
While there may be differences between the SAR levels of individual ZTE-C E520 phones
and at various positions, they all meet the government requirement.
The FCC has granted an Equipment Authorization for this model phone with all reported
SAR levels evaluated as in compliance with the FCC RF exposure guidelines. SAR information on this model phone is on le with the FCC and can be found under the Display
Grant section of http://www.fcc.gov/oet/ea/fccid after searching on
FCC ID: Q78-ZTE-C E520
For body worn operation, this phone has been tested and meets the FCC RF exposure
guidelines for use with an accessory that contains no metal and that positions the handset
a minimum of 1.5 cm from the body. Use of other enhancements may not ensure compliance with FCC RF exposure guidelines. If you do not use a body-worn accessory and are
not holding the phone at the ear, position the handset a minimum of 1.5 cm from your body
when the phone is switched on.
Emergency Services
To make an emergency call in any country:
1. Ensure your handset is ON and in service.
2. Press the End Key as many times as needed to clear the display and ready the device
for calls.
3. Enter a local emergency number, i.e., 911.
58
Page 59

4. Press the Send Key to dial the number. Follow instructions received and do not end the
call until told to do so.
Note: Tell the operator which service you require: Police, Ambulance, Fire Engine, Coastguard or Mountain Rescue Service. Give your position, and if possible, remain stationary
and maintain contact. Due to the nature of the cellular system, the connection of emergency calls cannot be guaranteed. You should never rely on any wireless device for essential
communication such as medical emergencies.
FCC Compliance
This device complies with part 15 of the FCC Rules. Operation is subject to the following
two conditions: (1) This device may not cause harmful interference, and (2) this device
must accept any interference received, including interference that may cause undesired
operation.
Caution: Changes or modications not expressly approved by the manufacturer could void
the user’s authority to operate the equipment.
NOTE: This equipment has been tested and found to comply with the limits for a Class B
digital device, pursuant to part 15 of the FCC Rules. These limits are designed to provide
reasonable protection against harmful interference in a residential installation. This equipment generates, uses and can radiate radio frequency energy and, if not installed and used
in accordance with the instructions, may cause harmful interference to radio communications. However, there is no guarantee that interference will not occur in a particular installation. If this equipment does cause harmful interference to radio or television reception,
59
Page 60

which can be determined by turning the equipment off and on, the user is encouraged to try
to correct the interference by one or more of the following measures:
Reorient or relocate the receiving antenna.
Increase the separation between the equipment and receiver.
Connect the equipment into an outlet on a circuit different from that to which the receiver
is connected.
Consult the dealer or an experienced radio/TV technician for help.
The antenna(s) used for this transmitter must not be co-located or operating in conjunction
with any other antenna or transmitter.
Use Your Phone with a Hearing Aid Device
Your ZTE-C E520 device is compliant with the FCC Hearing Aid Compatibility (HAC)
requirements. For additional HAC information, including the HAC rating of this product,
please refer to www.zteusa-support.com.
When some wireless phones are used near some hearing devices (hearing aids and cochlear implants), users may detect a buzzing, humming, or whining noise. Some hearing
devices are more immune than others to this interference noise, and phones also vary in
the amount of interference they generate. The wireless telephone industry has developed
ratings for some of their mobile phones to assist hearing device users in nding phones
that may be compatible with their hearing devices. Not all phones have been rated. Phones
that have been rated have a label on the box. Your ZTE-C E520 has been tested for hearing aid device compatibility and has an M[4] and/or T[4] rating.
60
Page 61

These ratings are not guaranteed. Results will vary, depending on the level of immunity of
your hearing device and the degree of your hearing loss. If your hearing device happens to
be vulnerable to interference, you may not be able to use a rated phone successfully. Trying out the phone with your hearing device is the best way to evaluate it for your personal
needs.
M-Ratings: Phones rated M3 or M4 meet FCC requirements and are likely to generate less
interference with hearing devices than phones that are not labeled. M4 is the better/higher
of the two ratings. T-Ratings: Phones rated T3 or T4 meet FCC requirements and are likely
to be more usable with a hearing device’s telecoil (“T Switch” or “Telephone Switch”) than
unrated phones. T4 is the better/higher of the two ratings. (Note that not all hearing devices
contain telecoils.) The more immune your hearing aid device is, the less likely you are to
experience interference noise from your wireless phone.
Hearing devices may also be measured for immunity to this type of interference. Your hearing device manufacturer or hearing health professional may help you nd results for your
hearing device.
For additional information about the FCC's actions with regard to hearing aid compatible
wireless devices and other steps the FCC has taken to ensure that individuals with disabilities have access to telecommunications services, please go to www.fcc.gov/cgb/dro.
Turn on the HAC Setting
When the HAC setting is on, your ZTE-C E520 sends the audio from your phone calls to
the telecoil rather than to the microphone of your hearing aid. You are likely to hear calls
61
Page 62

much better because volume is increased and background noise and feedback are diminished. The HAC setting improves only the calls you listen to through the earpiece. It does
not affect calls heard on the speakerphone or with a headset. It’s better to turn off the Bluetooth function when the HAC setting is on. HAC requires extra battery power, so watch your
battery consumption when it's turned on.
CAUTION: Do not turn on the HAC setting unless you use a hearing aid with a telecoil. Using this setting without a hearing aid or with a hearing aid without a telecoil may be harmful
to your hearing.
Copyright Notice
The video/audio recordings you make or download are protected by copyright laws. They
are for personal use only and must not be used without the permission of the copyright
owner.
Consumer Limited Warranty
ZTE ("Seller") offers you a limited warranty that the enclosed product or products (the
"Product") will be free from defects in material and workmanship for a period that expires
one year from the date of sale of the Product to you, provided that you are the original enduser purchaser of the Product and provided that your purchase was made from a supplier
authorized by the Seller. Transfer or resale of a Product will automatically terminate warranty coverage with respect to that Product. This limited warranty is not transferable to any
third party, including but not limited to any subsequent purchaser or owner of the Product.
62
Page 63

This limited warranty is applicable only to end users in the United States.
Seller will, at its sole and absolute discretion, either repair or replace a Product (which unit
may use refurbished parts of similar quality and functionality) if found by Seller to be defective in material or workmanship, or if Seller determines that it is unable to repair or replace
such Product, Seller will refund the purchase price for such Product, provided that the subject Product (i) is returned to a Seller authorized service center within the one year warranty
period, and (ii) is accompanied by a proof of purchase in the form of a bill of sale or receipted invoice which evidences that the subject Product is within the one year warranty period.
After the one year warranty period, you must pay all shipping, parts and labor charges. In
the event that the product is deemed un-repairable or has been removed from the list of
products supported by the Seller, you will only be liable for shipping and labor charges.
This limited warranty does not cover and is void with respect to the following: (i) any Product which has been improperly installed, repaired, maintained or modied; (ii) any Product
which has been subjected to misuse (including any Product used in conjunction with hardware electrically or mechanically incompatible or used with accessories not approved by
Seller), abuse, accident, physical damage, abnormal operation, improper handling, neglect,
exposure to re or liquid; (iii) any Product operated outside published maximum ratings; (iv)
cosmetic damage; (v) any Product on which warranty stickers or Product serial numbers
have been removed, altered, or rendered illegible; (vi) cost of installation, removal or reinstallation; (vii) signal reception problems (unless caused by defects in material and workmanship); (viii) damage the result of re, ood, acts of God or other acts which are not the
fault of Seller and which the Product is not specied to tolerate, including damage caused
63
Page 64

by mishandling, shipping and blown fuses; (ix) consumables (such as fuses); or (x) any
Product which has been opened, repaired, modied or altered by anyone other than Seller
or a Seller authorized service center.
USE ONLY SELLER APPROVED ACCESSORIES WITH SELLER PHONES. USE OF ANY
UNAUTHORIZED ACCESSORIES MAY BE DANGEROUS AND WILL INVALIDATE THE
PHONE WARRANTY IF SAID ACCESSORIES CAUSE DAMAGE OR A DEFECT TO THE
PHONE.
SELLER SPECIFICALLY DISCLAIMS LIABILITY FOR ANY AND ALL DIRECT, INDIRECT,
SPECIAL, GENERAL, PUNITIVE, EXEMPLARY, AGGRAVATED, INCIDENTAL OR CONSEQUENTIAL DAMAGES, EVEN IF ADVISED OF THE POSSIBILITY OF SUCH DAMAGES, WHETHER FORESEEABLE OR UNFORESEEABLE OF ANY KIND WHATSOEVER,
INCLUDING BUT NOT LIMITED TO LOSS OF PROFITS, UNANTICIPATED BENEFITS
OR REVENUE, ANTICIPATED PROFITS ARISING OUT OF USE OF OR INABILITY TO
USE ANY PRODUCT (FOR EXAMPLE, WASTED AIRTIME CHARGES DUE TO THE
MALFUNCTION OF A PRODUCT) OR CONTRIBUTION OR INDEMNITY IN RESPECT OF
ANY CLAIM RELATED TO A PRODUCT.
REPAIR OR REPLACEMENT OF A DEFECTIVE PRODUCT OR REFUND OF THE PURCHASE PRICE RELATING TO A DEFECTIVE PRODUCT, AS PROVIDED UNDER THIS
WARRANTY, ARE YOUR SOLE AND EXCLUSIVE REMEDIES FOR BREACH OF THE
LIMITED WARRANTY, AND SUBJECT TO THIS WARRANTY, THE PRODUCTS ARE
APPROVED AND ACCEPTED BY YOU "AS IS". SELLER MAKES NO OTHER WARRANTIES, REPRESENTATIONS OR CONDITIONS OF ANY KIND, ORAL OR WRIT-
64
Page 65

TEN, EXPRESS OR IMPLIED, STATUTORY OR OTHERWISE, WITH RESPECT TO
THE PRODUCTS, INCLUDING BUT NOT LIMITED TO ANY IMPLIED WARRANTY OR
CONDITION OF MERCHANTABILITY OR FITNESS FOR A PARTICULAR PURPOSE OR
AGAINST INFRINGEMENT OR ANY IMPLIED WARRANTY OR CONDITION ARISING
OUT OF TRADE USAGE OR OUT OF A COURSE OF DEALING OR COURSE OF PERFORMANCE. NO DEALER, DISTRIBUTOR, AGENT OR EMPLOYEE IS AUTHORIZED TO
MAKE ANY MODIFICATION OR ADDITION TO THIS WARRANTY.
Some jurisdictions do not allow the exclusion or limitation of incidental or consequential
damages, or allow limitations on how long an implied warranty lasts, so the above limitations or exclusions may not apply to you. This limited warranty gives you specic legal
rights, and you may also have other rights which vary from jurisdiction to jurisdiction.
For warranty service information, please call the following telephone number from anywhere in the continental United States: 1-888-8METRO8 (1-888-863-8768) or return to the
point of sale.
65
Page 66

15. Glossary
Abbreviation Description
A2DP Advanced Audio Distribution Prole
AC Alternating Current
AVRCP Audio/Video Remote Control Prole
CDMA Code Division Multiple Access
HAC Hearing Aid Compatibility
HFP Hands-free Prole
HSP Headset Prole
GPS Global Positioning System
NAM Number Assignment Module
OPP Object Push Prole
PC Personal Computer
RF Radio Frequency
SD Secure Digital
TTY Teletypewriter
USB Universal Serial Bus
66
Page 67

16. Troubleshooting
Fail to power on the phone
Check whether the battery has adequate capacity to power on.
The phone has powered off automatically
The battery capacity is quite low. Please charge the battery.
Can not connect to the network
Check whether the phone is in the CDMA network service area or move to other places to
try again.
No key tone when pressing the keys
Check whether the keypad tone has been disabled. You can set key tone settings by selecting Menu→Settings→Sound Settings→Keypad Tone from Home screen.
No incoming ringtone when receiving a call
Check whether the phone is set to Silent Mode or the phone volume is turned off by pressing the Volume Keys.
Can not send a message
Check the status of the network.
Can not receive a new message
Check whether the network condition is OK, then check whether the Inbox is full. If you turn
off the Auto Delete Inbox function, you may not receive new messages when the inbox is
in full status.
You should delete some messages and change the settings by selecting Menu→Messag-
67
Page 68

ing→Message Settings→Auto Delete Inbox from Home screen.
Can not answer an incoming call by the headset automatically
Check whether the Auto Answer function is on by selecting Menu→Settings→System→
Call Setup→Auto Answer from Home screen.
Can not establish Three-Way Call
Check the network condition and whether you have applied for this service from your network provider.
To dial an emergency call
You can still dial an emergency call even if the keypad is locked. Please enter the emergency number directly and press the Send Key.
68
Page 69

ZTE-C E520
Téléphone cellulaire numérique sans l AMRC 1X
Manuel d’utilisation
69
Page 70

Droit d’auteur © CORPORATION ZTE 2011.
Tous droits réservés.
Aucune partie de la présente publication ne peut être extraite, reproduite, traduite ou
utilisée sous quelque forme ou par tout moyen que ce soit, incluant la photocopie et le microlm, sans l’autorisation écrite préalable de ZTE Corporation.
Le manuel est publié par ZTE Corporation. ZTE se réserve le droit d’apporter des changements sur les erreurs d’impression ou de mettre à jour les spécications du produit sans
préavis.
Version: R1.0
Temps d'édition: Août 2011
Numéro du manuel: 07958450XXXX
70
Page 71

Table des matières
1. Introduction ......................................................................................76
Aperçu ............................................................................................................................76
Vue d’ensemble du téléphone ........................................................................................76
Spécications techniques ...............................................................................................77
Descriptions des touches ............................................................................................... 78
Mode veille ..................................................................................................................... 80
Afchage des icônes ...................................................................................................... 81
2. Pour commencer .............................................................................83
Batterie ...........................................................................................................................83
Installation de la batterie ...........................................................................................83
Chargement de la batterie .........................................................................................84
Retrait de la batterie .................................................................................................. 85
La carte microSD ............................................................................................................85
Insertion de la carte microSD .................................................................................... 85
Allumer/Éteindre l’appareil .............................................................................................86
Verrouillage/Déverrouillage du clavier ............................................................................87
Connexion au réseau ..................................................................................................... 88
Activation du téléphone ..................................................................................................88
3. Appels ...............................................................................................89
Effectuer un appel vocal .................................................................................................89
Effectuer un appel abrégé ............................................................................................. 89
71
Page 72

Répondre à un appel ......................................................................................................89
Fonctions d’appel ........................................................................................................... 90
Volume .....................................................................................................................90
Muet ..........................................................................................................................90
Haut-parleur ..............................................................................................................90
Fonctions avancées ..................................................................................................90
Appel à trois ...................................................................................................................91
Appel en attente ............................................................................................................. 91
Historique des appels .....................................................................................................92
4. Saisie de texte..................................................................................93
Mode alphanumérique...............................................................................................93
Mode Alphabétique....................................................................................................94
Mode numérique .......................................................................................................95
Mode de symboles ....................................................................................................95
5. Contacts ...........................................................................................96
Ajouter un nouveau contact ............................................................................................96
Chercher un contact .......................................................................................................96
Ajouter un contact au groupe ......................................................................................... 97
Congurer composition abrégée pour un contact ..........................................................97
6. Messagerie .......................................................................................98
Envoi d’un nouveau message SMS ...............................................................................98
Envoi d’un nouveau message MMS ...............................................................................98
72
Page 73

Échange des messages dans le mode Conversations ..................................................99
Les chiers de messages .............................................................................................100
Messagerie vocale .......................................................................................................100
Réglage de messages ..................................................................................................101
Info de mémoire ...........................................................................................................101
7. Courriel & IM ..................................................................................102
8. Navigateur ......................................................................................102
9. Bluetooth ........................................................................................104
Activation/Désactivation du Bluetooth ..........................................................................104
Couplage avec un nouvel appareil Bluetooth ...............................................................104
Gestion de Bluetooth ...................................................................................................105
10. Multimédia ....................................................................................106
Utilisation du lecteur de musique .................................................................................106
Créer les listes des pistes .......................................................................................106
Gérer des listes de pistes ........................................................................................107
Lecture de musique .................................................................................................108
Prendre une photo ........................................................................................................109
Enregistrer un clip vidéo ............................................................................................... 110
Voir vos images ............................................................................................................ 111
Lire vos clips vidéo ....................................................................................................... 112
Lire votre chier de mémo vocal ..................................................................................113
Formater la carte microSD ........................................................................................... 113
73
Page 74

11. Congurer votre téléphone ........................................................114
Conguration de son .................................................................................................... 114
Volume .................................................................................................................... 114
Sonneries des Appels vocaux ................................................................................. 114
Sonnerie des Messages .......................................................................................... 114
Tonalité du clavier.................................................................................................... 115
Activation/Désactivation de tonalité ........................................................................ 115
Alertes ..................................................................................................................... 115
Conguration d’Ecran ................................................................................................... 115
Conguration des Paramètres ...................................................................................... 116
Conguration d’Appel .............................................................................................. 116
Verrouillage du clavier automatique ........................................................................ 116
Info de Mémoire ......................................................................................................117
Conguration des Paramètres................................................................................. 117
Mode TTY ............................................................................................................... 117
Paramètres de Sécurité........................................................................................... 118
Mode HAC ............................................................................................................... 118
Langue .........................................................................................................................119
GPS .............................................................................................................................. 119
Roaming ....................................................................................................................... 119
Mode avion ................................................................................................................... 119
Information du téléphone.........................................................................................120
12. USB Mass Storage ......................................................................121
74
Page 75

13. Autres fonctions ..........................................................................122
14. Pour votre sécurité ......................................................................124
Entretien général ..........................................................................................................124
Sécurité à bord des avions ...........................................................................................126
Sécurité dans les hôpitaux ........................................................................................... 126
Directives générales .....................................................................................................127
Sécurité au volant .........................................................................................................128
Véhicules équipés de coussins gonables ...................................................................129
Équipement d’autres fabricants ....................................................................................129
Utilisation efcace ........................................................................................................129
Énergie radiofréquence ................................................................................................130
Services d’urgence .......................................................................................................131
Conformité avec FCC ...................................................................................................132
Utilisation du téléphone avec un appareil auditif .......................................................... 133
Activation du mode HAC .............................................................................................. 135
Droits d’auteur ..............................................................................................................136
Garantie Limitée ...........................................................................................................136
15. Glossaires ....................................................................................140
16. Dépannage ...................................................................................141
75
Page 76

1. Introduction
Aperçu
Pour garantir le meilleur fonctionnement de votre téléphone sans l, lisez attentivement
ce manuel et conservez-le pour la consultation à l’avenir. En vue d’éviter tout danger, nous
vous recommandons de lire entièrement la section 14 du manuel: Pour votre sécurité
avant de commencer d’utiliser ce téléphone pour la premi ère fois.
N.B.: Les images et les icônes présentées dans ce manuel sont seulement pour un but illustratif et peuvent se différer des images et des icônes réelles du téléphone. Votre appareil
contient des informations les plus récentes.
Vue d’ensemble du téléphone
76
Page 77

[1] Écouteur [6] Connecteur de charge de USB
[2] Touches de volume [7] Touche d’appareil photo
[3] Ecran [8] Haut-parleur
[4] Clavier [9] Objectif de l’appareil photo
[5] 3.5mm Prise d’écouteur [10] Mirroir
Spécications techniques
Type d’appareil ZTE-C E520
Dimensions (I x L x H) 110mm × 48mm × 14.7 mm (4.3 × 1.9 × 0.6 po.)
Poids Moins de 100 g (3.53 oz) (le poids de la batterie inclus)
Temps de veille continu 210 heures (varie selon le réseau)
Temps de conversation continue 360 minutes (varie selon le réseau)
77
Page 78
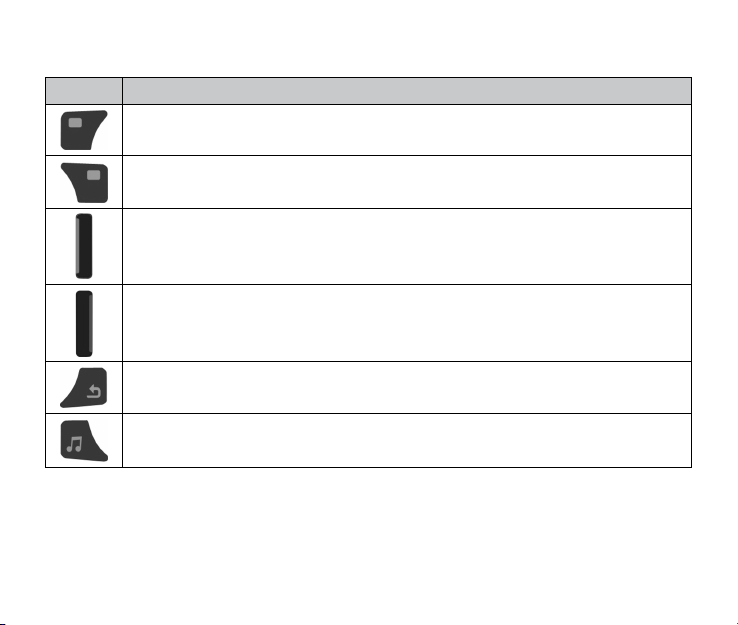
Descriptions des touches
Touche Fonction
Touche Logicielle Gauche– Pour accéder à la liste de contacts. Depuis le
mode Veille, appuyez sur cette touche pour voir la Liste de contacts.
Touche Logicielle Droite –Pour accéder à la liste de messages. Depuis le
mode Veille, appuyez sur cette touche pour voir le menu Messagerie.
Touche Envoyer – Pour effectuer ou recevoir un appel. Depuis le mode Veille,
appuyez sur cette touche pour voir l’Historique des appels.
Touche Fin – Pour mettre n aux appels et fermer les applications. Appuyez
longuement sur cette touche pour activer ou désactiver votre téléphone depuis
le mode Veille.
Touche Retour – Pour retourner au menu ou à l’ écran précédent. Depuis le
mode Saisie de texte, appuyez sur cette touche pour supprimer les caractères.
Touche de Musique – Pour accéder au lecteur de musique depuis le mode
Veille.
78
Page 79
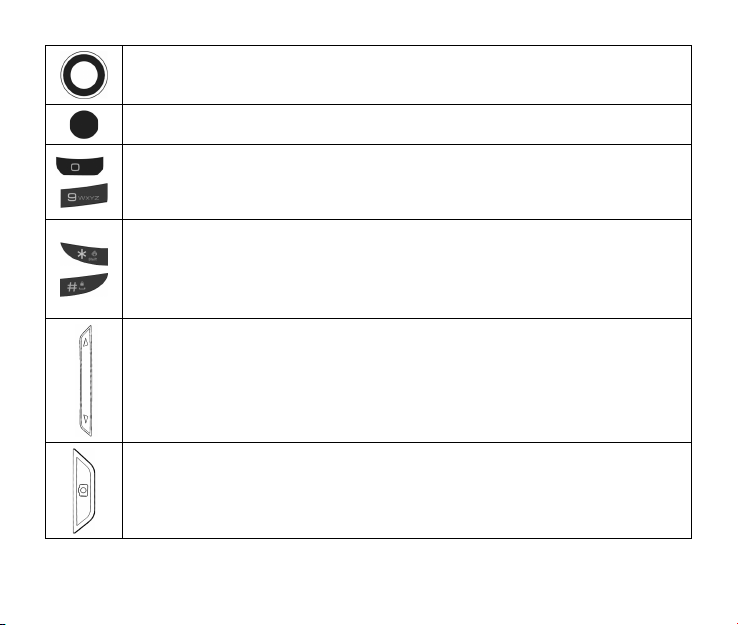
Touche de Navigation – Pour naviguer parmi les options du menu et accéder
rapidement aux fonctions du téléphone depuis le mode Veille.
Touche OK – Pour conrmer les opérations et effectuer les sélections.
~
Touches Alphabétiques/Numériques – Pour entrer les chiffres et les lettres
ou pour choisir les options du menu. Appuyez longuement sur la Touche ‘1’
pour accéder à la Messagerie depuis le mode Veille.
Touche # et * - Pour activer ou désactiver la fonction de vibration depuis le
mode Veille, appuyez longuement sur la Touche *.
Pour verrouiller le clavier depuis le mode Veille, appuyez longuement sur la
Touche #.
Touches de Volume –Pour régler le volume principal du téléphone, de l’écou-
teur durant un appel vocal ou le volume de la musique que vous écoutez à
partir de votre téléphone.
Touche Appareil-Photo – Pour prendre des photost depuis le mode Veille.
79
Page 80

Mode veille
Lorsque le téléphone est prêt à l'emploi et qu'aucun caractère n'a été saisi, il est en mode
Veille.
Espace réservé aux icônes: Afche
l’état du réseau, le niveau du signal
du réseau, le niveau de charge de la
batterie, etc.
Espace réservé aux touches de navigation: Affiche les fonctions suiv-
ants: la Touche Logicielle Gauche,
la Touche Logicielle Droite, et la
Touche OK.
80
Page 81
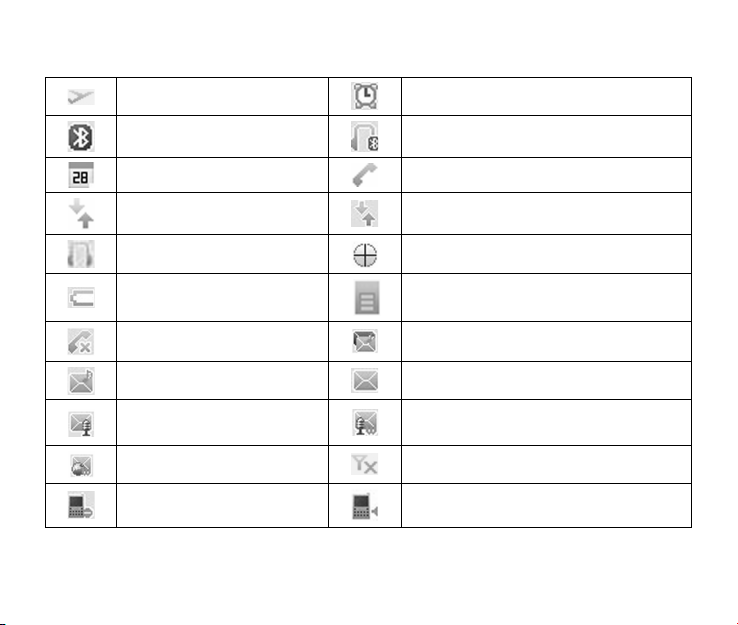
Afchage des icônes
Mode avion Réveil
Bluetooth Écouteur de Bluetooth
Calendrier Effectuer un appel
Donnée dormant Transfert de données
Écouteur GPS
Batterie faible Carte microSD insérée
Appel manqué Nouveau message MMS et SMS
Nouveau message MMS Nouveau message SMS
Nouveau message vocal
Nouvelle alerte de web Aucun signal du réseau
Sonnerie désactivée Sonnerie activée
Nouveau message vocal et message
web
81
Page 82

Roaming Niveau du signal du réseau
Mode silencieux SMS plein
Haut parleur activé SSL (Sécurité de web)
Mode TTY Message urgent
Alarme en vibration Mode de vibration et sonnerie
Mode de vibration
82
Page 83
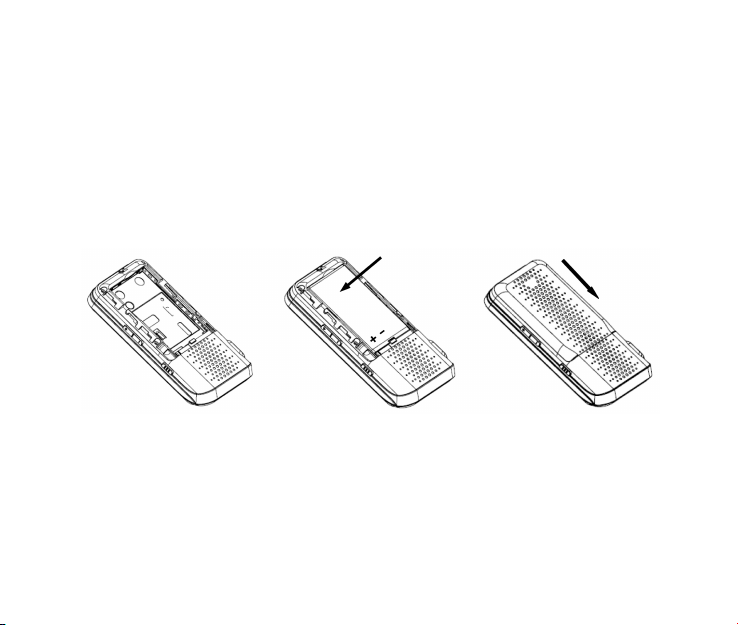
2. Pour commencer
Ce chapitre présente une vue d’ensemble des étapes requises pour congurer votre téléphone, le mettre sous tension et l’activer sur le réseau de votre fournisseur de services.
Suivez les instructions ci-dessous pour commencer.
Batterie
Installation de la batterie
1 2 3
1. Insérez la batterie en alignant avec les contacts (1) et pressez légèrement jusqu’à ce
qu’elle s’enclenche en position (2).
2. Replacez le couvercle de la batterie et glissez-le en position (3)
83
Page 84

Chargement de la batterie
Votre téléphone est activé au moyen d’une batterie rechargeable. Lorsque vous achetez
votre téléphone, la batterie n’est pas complètement chargée mais la charge est sufsante
pour vous permettre d’activer le téléphone. Vous devez charger la batterie comme suit :
N.B. : Pour assurer une performance optimale de la batterie, nous vous recommandons
de la charger complètement avant d’utiliser votre téléphone pour la première fois. Les nouvelles batteries ne fournissent une performance maximale qu’après trois cycles complets
de chargement/déchargement.
2
1
1. Dégagez le couvercle en caoutchouc qui protège le connecteur de charge de USB et
déplacez-le à l'écart.
2. Branchez l’adaptateur USB chargeur dans le connecteur de charge de USB du téléphone. Assurez-vous de placer le connecteur dans le bon angle : ne forcez pas sur le
connecteur.
84
Page 85
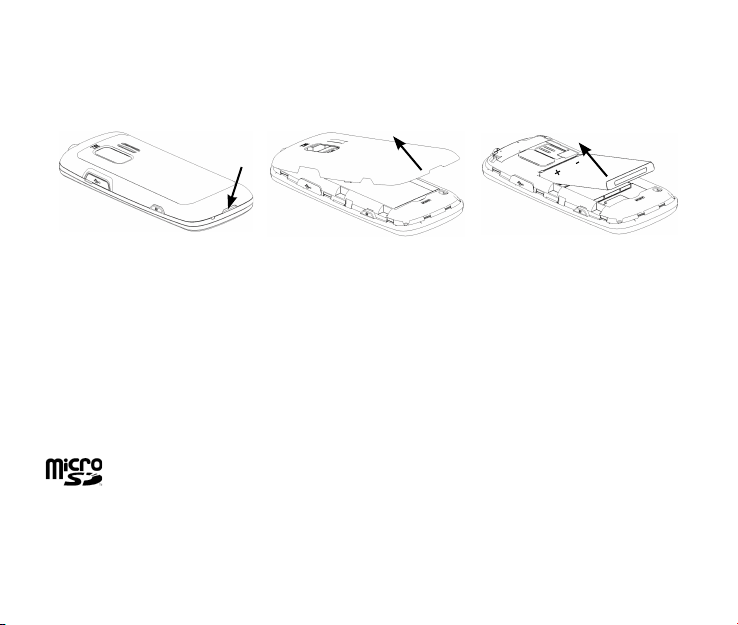
Retrait de la batterie
Si vous devez retirer la batterie de votre téléphone, veuillez procéder comme suit:
1 2 3
1. Glissez et enlevez le couvercle arrière tel que montré dans (1).
2. Insérez votre ongle dans l’ouverture et soulevez la batterie du compartiment (3).
La carte microSD
La carte microSD de votre téléphone donne une capacité de mémoire très importante, et
cette caractéristique vous permet de transférer des données entre la carte microSD et un
PC compatible. Veuillez vous référer à la section 12 du manuel: USB Mass Storage
N.B.: Votre téléphone peut se doter d’une carte de microSD avec une capacité jusqu’
à 16GB.
La carte microSD est une marque commerciale de ‘SD Card Association’.
Insertion de la carte microSD
1. Ouvrez le couvercle arrière du téléphone.
2. Prenez la carte microSD par les bords et l’insérez soigneusement dans la fente.
85
Page 86
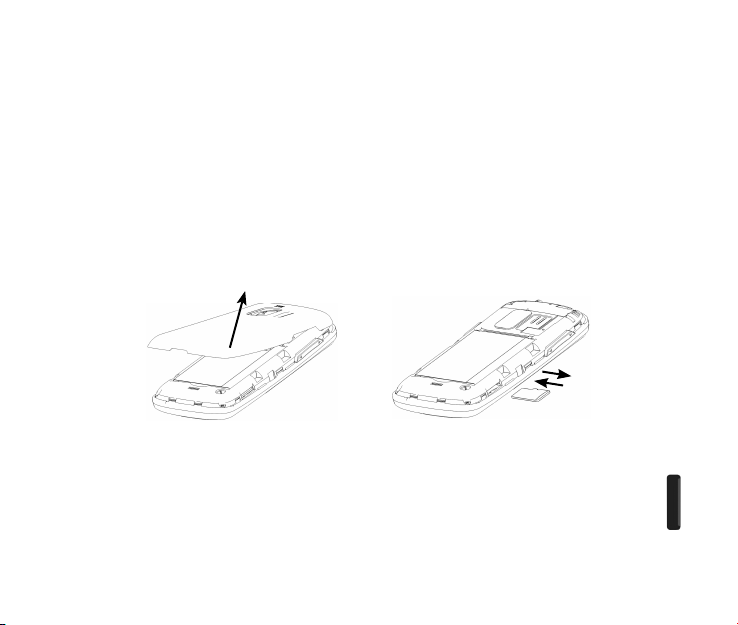
3. Poussez jusqu’à ce qu’elle s’enclenche.
4. Fermez le couvercle arrière.
Retrait de la carte microSD
1. Ouvrez le couvercle arrière du téléphone.
2. Poussez la carte microSD pour la libérer de la fente.
3. Retirez la carte microSD complètement hors de la fente.
4. Fermez le couvercle arrière.
N.B. : Ne retirez pas la carte mémoire pendant que l’appareil lit ou écrit la carte. Cela peut
entraîner l’altération des données sur la carte ou sur le téléphone. Si possible, insérez et
retirez la carte mémoire lorsque le téléphone est éteint.
Allumer/Éteindre l’appareil
Pour mettre votre téléphone sous tension, appuyez longuement sur la Touche Fin [ ]
pendant au moins trois secondes. Si le code de sécurité du téléphone est activé, le téléphone vous invite à entrer votre code. Le code prédéni est 0000.
86
Page 87

Une fois que votre téléphone sera activé, le code correspondra aux quatre derniers
chiffres de votre numéro de téléphone.
Il se peut que le code de sécurité ait été mis à jour par l’utilisateur. Si vous avez
perdu ou oublié le nouveau code de sécurité, veuillez contacter votre fournisseur de services.
Pour éteindre votre téléphone, appuyez longuement sur la Touche Fin [ ] pendant au
moins trois secondes depuis le mode Veille.
N.B. : N’allumez pas le téléphone dans les endroits où l’utilisation de téléphone sans l est
interdite ni dans des endroits où il pourrait provoquer des interférences ou présenter un
danger.
Verrouillage/Déverrouillage du clavier
Pour éviter l’appui accidentel des touches, votre téléphone est équipé d’une fonction de
verrouillage.
Pour verrouiller le clavier, appuyez longuement sur la Touche # depuis le mode Veille.
Pour déverrouiller le clavier, appuyez longuement sur la Touche Logicielle Droite
[Déverrouiller] et appuyez sur la Touche #.
87
Page 88

Connexion au réseau
Une fois que le téléphone est activé, ceci-ci tente automatiquement de se connecter au réseau.
Activation du téléphone
Veuillez contacter votre fournisseur de services pour plus d'informations.
88
Page 89

3. Appels
Effectuer un appel vocal
1. Entrez le numéro de téléphone avec l’indicatif régional depuis le mode Veille.
2. Appuyez sur la Touche Envoyer pour effectuer un appel vocal.
3. Appuyez sur la Touche Fin pour terminer l'appel.
N.B.: Pour effectuer un appel d’urgence, entrez le numéro ofciel d’urgence en vigueur
dans la région et appuyez sur la Touche Envoyer. Si possible, restez au même endroit et
gardez le contact.
Effectuer un appel abrégé
1. Depuis le mode Veille, faites déler jusqu’à la touche numérique afchée (2 à 9 ) pour
voir les numéros d’appels abrégés. Une fois que vous avez choisi le numéro, l’appel s’
effectuera automatiquement.
2. Appuyez sur la Touche Fin pour terminer l’appel.
N.B.: La Touche ‘1’ est assignée à la Messagerie.
Répondre à un appel
1. Lorsque vous recevez un appel, appuyez sur la Touche Envoyer pour y répondre.
2. Appuyez sur la Touche Fin pour terminer l’appel.
N.B.: Si votre téléphone est raccordé à un Casque Bluetooth compatible, vous pouvez
répondre ou terminer l’appel en appuyant sur la Touche Envoyer/Fin du Casque.
89
Page 90

Fonctions d’appel
Volume
Durant un appel, vous pouvez régler le volume de l’écouteur pendant l’appel en appuyant
sur les Touches de Volume qui se trouvent sur le côté du téléphone. Vous pouvez aussi
appuyer sur la Touche OK [Volume] pour faire déler vers le haut ou vers le bas pour le
réglage du volume.
Muet
Vous pouvez mettre le téléphone en fonction muet durant un appel en appuyant sur la Touche Logicielle Droite [Muet]. Appuyez sur la Touche Logicielle Droite [Sonore] pour
permettre votre interlocuteur d’entendre votre voix de nouveau.
Haut-parleur
Votre téléphone est doté d’une fonction haut-parleur qui vous permet de converser en
gardant vos mains libres. Pour utiliser cette fonction, appuyez sur la Touche Haut-parleur
sur le clavier une fois que l’appel a été émis. Appuyez de nouveau sur la Touche Haut-
parleur pour retourner au mode d’appel standard.
Fonctions avancées
Pour accéder aux fonctions d’appel avancés, choisissez Options pendant l’appel actif.
Les options disponibles sont :
1. Appeler le tiers : Permet d’appeler un autre numéro pour une conférence téléphonique
à trois. Veuillez vous référer à la section Appel à trois pour plus d’informations.
90
Page 91

2. Messagerie : Permet de changer en mode Message pendant un appel actif.
3. Contacts : Permet de changer en mode Contacts pendant un appel actif.
4. Passer au téléphone : Permet de changer en mode Parler au téléphone.
Appel à trois
Votre téléphone est doté d’une fonction de conférence téléphonique qui vous permet
de converser avec deux interlocuteurs. Vous pouvez activer cette fonction en procédant
comme suit :
1. Après avoir établi un appel vocal avec la personne A, appuyez sur la Touche Logicielle
Gauche[Options] et choisissez Appeler le tiers.
2. La fenêtre de composition du numéro d’appel apparaîtra. Entrez le numéro de téléphone de la personne B et appuyez sur la Touche Envoyer.
3. Lorsque la personne B répond à l’appel, vous serez connecté avec la personne B seulement. La personne A sera mise en attente.
4. Pour activer l’appel à trois, appuyez de nouveau sur la Touche Envoyer. Vous pouvez
alors parler simultanément avec vos deux interlocuteurs.
5. Appuyez de nouveau sur la Touche Envoyer pour terminer l’appel avec la personne B.
Vous pouvez appuyer sur la Touche Fin pour terminer les deux appels.
Appel en attente
Votre téléphone peut accepter d’autres appels pendant qu’un appel est en cours.
Vous pouvez congurer la fonction d’appel en attente comme suit :
91
Page 92

1. Si vous recevez un appel pendant une conversation active, le téléphone vous prévient
de l’appel entrant et vous permet d’y répondre ou de le refuser.
2. Appuyez sur la Touche Logicielle Gauche pour accepter l'appel.
3. Une fois que vous avez accepté le deuxième appel, vous êtes en communication avec
cet interlocuteur tandis que le premier interlocuteur est mis en attente. Pour passer d’
un appelant à l’autre, appuyez de nouveau sur la Touche Envoyer ou sélectionnez Op-
tions→Échange.
4. Appuyez sur la Touche Fin pour terminer l’appel avec la personne à qui vous parlez.
N.B. : Si vous appuyez sur la Touche Fin, le téléphone coupe la communication avec les
deux appelants. Si l’appelant en attente demeure en ligne, le téléphone sonne de nouveau.
Vous pouvez accepter ou refuser l’appel.
N.B. : Les fonctions d’appel à trois et d’appel en attente doivent être fournies par le réseau
et des frais supplémentaires peuvent s’appliquer. Contactez votre fournisseur de services
pour plus d’informations.
Historique des appels
Depuis le mode Veille, choisissez Menu→ Appels pour vérier tous les appels manqués,
entrants, sortants et minuteries.
Raccourcis clavier: Appuyez sur la Touche Envoyer depuis le mode Veille pour voir l’
historique des appels.
92
Page 93

4. Saisie de texte
Durant la saisie de texte, vous pouvez appuyer sur la Touche Logicielle Droite et choisir
le mode de texte que vous voulez. Le mode de texte activé est indiqué au-dessus de la
Touche Logicielle Droite.
Afchage de Symboles Mode de saisie de texte
Mode standard du mot intuitif
Mot majuscule du mode alphanumérique
Mot minuscule du mode alphanumérique
Mot minuscule
Mot majuscule
Mode alphanumérique standard
Mode numérique
Mode de symboles
Mode alphanumérique
Le mode alphanumérique vous permet d’entrer rapidement les messages ou textes à l’aide
d’un dictionnaire intuitif intégré .
1. Pour activer le mode alphanumérique depuis le mode Saisie de texte, appuyez sur la Tou-
che Logicielle Droite, et faites déler Mot, MOT ou mot et appuyez sur la Touche OK.
93
Page 94

2. Entrez les premières lettres du mot que vous souhaitez d’écrire. Pressez une touche
une seule fois pour chaque lettre que vous entrez. Le mot changera après chaque appui.
3. Pour afcher les mots correspondants, appuyez sur la Touche ‘0’ jusqu’à ce que le mot
que vous cherchez soit afché.
4. Lorsque le mot que vous cherchez est afché, appuyez sur la Touche # pour conrmer
et insérez un espace.
N.B.: Dans le mode alphanumérique, appuyez sur la Touche * pour passer entre le mode
majuscule, minuscule ou mode standard.
Dans le mode alphanumérique Espagnol, l’entrée du texte est la même que celle du mode
Anglais.
Raccourcis clavier: Dans le mode alphanumérique, appuyez longuement sur les touches
alphanumériques pour entrer les chiffres.
Mode Alphabétique
Dans le mode alphabétique, les touches alphanumériques sont utilisées pour entrer les
lettres et les chiffres.
1. Depuis le mode Saisie de texte, apppuyez sur la Touche Logicielle Droite, et faites
déler abc, ABC ou Abc et appuyez sur la Touche OK.
2. Appuyez sur la touche avec la lettre cible après la première lettre, appuyez deux fois
pour la deuxième lettre et ainsi de suite. Appuyez sur la touche avec le chiffre cible pour
le numéro.
94
Page 95

N.B.: Dans le mode alphabétique, appuyez sur la Touche * pour passer entre le mode ma-
juscule, minuscule ou mode standard alphabétique.
Dans le mode alphabétique, la première lettre d’une nouvelle phrase sera mise en lettre
majuscule automatiquement.
Mode numérique
Dans le mode numérique, les touches alphanumériques sont utilisées pour entrer les chiffres.
1. Depuis le mode Saisie de texte, appuyez sur la Touche Logicielle Droite et faites dé-
ler 123, puis appuyez sur la Touche OK.’
2. Appuyez sur les touches alphabétiques et numériques pour entrer le numéro directement afché sur le clavier.
N.B.: Les lettres ne peuvent pas être entrées dans ce mode.
Mode de symboles
Vous pouvez entrer les symboles dans ce mode.
1. Depuis le mode Saisie de texte, appuyez sur la Touche Logicielle Droite, et faites dé-
ler les Symboles, puis appuyez sur la Touche OK.
2. Choisissez le symbole que vous souhaitez d’entrer en soulignant à l’aide de la Touche
de Navigation et appuyez sur la Touche OK pour conrmer.
95
Page 96

5. Contacts
Votre téléphone est doté d’un carnet capable d’ajouter 500 contacts contenant leurs numéros de téléphone, adresses éléctroniques et plusieurs d’autres informations.
Raccourcis clavier: Pour accéder rapidement à la liste de contacts, vous pouvez appuyer
sur la Touche Logicielle Haut depuis le mode Veille.
Ajouter un nouveau contact
1. Choisissez Menu→Contacts→Nouveau Contact depuis le mode Veille.
2. Entrez l’information du contact tels que son nom, son numéro de téléphone et son adresse électronique.
3. Appuyez sur la Touche OK [Sauvegarder] pour sauvegarder les données du nouveau
contact.
N.B.: Lorsque vous entrez les informations du contact, son nom, son numéro de téléphone
ou son adresse électronique doit être entré pour sauvegarder le contact.
Chercher un contact
1. Choisissez Menu→Contacts→Liste de Contacts depuis le mode Veille.
2. Entrez le nom du contact que vous souhaitez de trouver dans le champs de recherche
en bas de l’écran. Le téléphone afchera automatiquement le nom qui correspond à
votre entrée.
96
Page 97

Ajouter un contact au groupe
1. Choisissez Menu→Contacts→Liste de Contacts depuis le mode Veille.
2. Choisissez un contact que vous souhaitez d’ajouter et appuyez sur la Touche OK [Voir].
3. Appuyez sur la Touche OK [Modier] pour modier l’information du contact.
4. Appuyez sur la Touche de Navigation pour souligner le champs du groupe puis ap-
puyez sur la Touche Logicielle Gauche ou Droite pour choisir le groupe.
5. Appuyez sur la Touche OK [Sauvegarder] pour ajouter le contact au groupe.
Congurer composition abrégée pour un contact
1. Choisissez Menu→Contacts→Liste de Contacts depuis le mode Veille.
2. Choisissez le contact que vous souhaitez d’ajouter dans les appels abrégés puis ap-
puyez sur la Touche Logicielle Gauche [Options].
3. Choisissez Congurer un appel abrégé puis appuyez sur la Touche OK [Choisir].
4. Choisissez un endroit pour sauvegarder l’appel abrégé et appuyez sur la Touche OK
[Congurer].
5. Appuyez sur la Touche OK pour compléter la conguration.
97
Page 98

6. Messagerie
Votre téléphone peut envoyer et recevoir des messages texte (Service de messages courts
SMS) et des messages vocaux.
Raccourcis clavier: Pour accéder rapidement au menu Messagerie, appuyez sur la Touche de Navigation Bas depuis le mode Veille.
Envoi d’un nouveau message SMS
1. Choisissez Menu→Messagerie→Envoyer nouveau depuis le mode Veille.
2. Entrez le numéro du destinataire. Vous pouvez appuyer sur la Touche OK [Ajouter]
pour entrer les numéros supplémentaires après avoir ajouté un numéro. Vous pouvez
aussi appuyer la Touche Logicielle Gauche [Options]→Contacts pour choisir le(s)
destinatire(s).
3. Entrez le message depuis le mode Saisie de texte, puis appuyez sur la Touche OK
[Envoi].
Envoi d’un nouveau message MMS
1. Choisissez Menu→Messagerie→Envoyer nouveau depuis le mode Veille.
2. Entrez le numéro du destinataire. Vous pouvez appuyer la Touche OK [Ajouter]
pour entrer les numéros supplémentaires après avoir ajouté un numéro. Vous pouvez
aussi appuyer la Touche Logicielle Gauche[Options]→Contacts pour choisir le(s)
destinatire(s).
98
Page 99

3. Lorsque vous entrez le message, appuyez sur la Touche Logicielle Gauche [Options]
pour voir les options. Vous pouvez ajouter les images, les tonalités, les textes rapides,
la signature au message. Vous pouvez également entrer les destinataires secondaires
et le sujet du texte.
4. Après avoir complété l’entrée du message, appuyez sur la Touche OK [Envoyer].
Échange des messages dans le mode Conversations
Dans le mode Conversations, les messages SMS et MMS qui sont envoyés ou reçus par
un autre contact (ou numéro) sont groupés dans une conversation. Vous pouvez échanger
les messages avec un contact dans le mode Conversations.
Pour échanger les messages avec un contact souhaité dans le mode Conversations:
1. Choisissez Menu→Messagerie→Conversations depuis le mode Veille.
2. Tous contacts ou numéros auxquels vous avez contactés via message sont classiés.
3. Choisissez un contact désiré (ou numéro), et appuyez sur la Touche OK [Voir] pour
voir les messages qui sont envoyés et reçus d’un autre contact ou d’un numéro. .
4. Choisissez un message et appuyez sur la Touche OK [Voir] pour voir le contenu. Ap-
puyez sur la Touche Logicielle Droite [Répondre] pour répondre au contact.
5. Entrez votre message dans le mode Saisie de texte et appuyez sur la Touche OK [En-
voyer] pour l’envoyer.
99
Page 100

Les chiers de messages
Le chier de la Boîte de réception contient tous les messages qui ont été reçus. Dans
ce chier, vous pouvez voir les messages reçus, et y répondre ou les envoyer à un autre destinataire.
Le chier de la Boîte d’envoi contient tous les messages qui n'ont pas été envoyés
avec succès. Dans ce chier, vous pouvez modier ou réenvoyer vos messages.
Le chier de Brouillons contient les messages qui n’ont pas été terminés. Dans ce
chier, vous pouvez compléter et envoyer vos messages.
Le chier d’Envoyé contient les messages qui ont été envoyés avec succès. Dans ce
chier, vous pouvez modier ou transmettre les messages à un autre destinatire.
Le chier de Sauvegardé contient les messages qui ont été sauvegardés. Les mes-
sages sauvegardés dans ce chier ne seront pas supprimés automatiquement. Dans
ce chier, vous pouvez répondre ou transmettre les messages à un autre destinataire.
Le dossier de Textes rapides contient des messages prédénis pour SMS/MMS que
vous pouvez modier.
Messagerie vocale
Lorsque le mode Messagerie vocale est activé, tous les appels non répondus peuvent
être transférés vers votre boîte/messagerie vocale, même si votre téléphone est hors tension ou s’il est éteint. Vous devez congurer votre messagerie vocale et message d’accueil
personnalisé dès la mise en service de votre téléphone
.
100
 Loading...