

Page 1
081704100233 Printed in Mexico
Todo lo que necesitas saber para iniciar.
All you need to know to get going.
Page 2

o
s oe. e a
.
B
B
B
B
B
B
B
o
o
o
o
o
o
o
o
o
o
o
o
s
s
s
s
s
s
t
t
t
t
t
t
t
M
M
M
M
M
M
M
o
o
o
o
o
o
b
b
b
b
b
b
b
i
i
i
i
i
i
i
l
l
l
l
l
l
l
e
e
e
e
e
e
®
®
S
S
S
S
S
S
S
i
i
i
i
i
i
i
n
n
n
n
n
n
A
A
A
A
A
A
A
b
b
b
b
b
b
b
u
u
u
u
u
u
s
s
s
s
s
s
o
o
o
o
o
o
s
s
s
s
s
s
2
Nota: Los servicios y las aplicaciones disponibles están sujetos a cambio.
Thanks for choosing Boost Mobile. This booklet introduces you to the
basics of getting started with Boost and your Boost Max.
Boost has always sought to stand for something more. We’ve listened
to you and worked to build a brand that’s more responsive and more
dedicated to satisfying your wants and needs. It’s our mission to let
you know that we’ll continue to take on the things that are wrong with
wireless so you can live your life...without compromise.
For ongoing support and resources, visit boostmobile.com/support.
There, you’ll fi nd guides, tutorials, and more to help you get the most
out of your phone.
Note: Available applications and services are subject to change at any time.
2
.
.
a tu teléfono.
Allí encontrarás guías, tutoriales y más para sacar el máximo provecho
Para obtener apoyo y recursos, visita espanol.boostmobile.com/support/.
vivir tu vida... sin dar concesiones.
que no funcionan en la comunicación inalámbrica para que puedas
misión dejarte saber que continuaremos ocupándonos de las cosas
dedicada a la satisfacción de tus deseos y necesidades. Es nuestra
escuchado y trabajamos para edifi car una marca más receptiva y más
Boost siempre se ha esforzado por brindar más calidad. Te hemos
para empezar a usar Boost y tu nuevo Boost Max.
Gracias por elegir Boost Mobile. Este folleto te introduce a lo básico
Page 3

3
U
U
U
U
U
U
s
s
s
s
a
a
a
a
n
n
n
n
d
d
d
d
d
d
o
o
o
o
e
e
e
e
s
s
s
s
t
t
t
t
t
t
a
a
a
a
g
g
g
g
u
u
u
u
í
í
í
í
í
í
a
a
a
a
Usn
g
Ths Guide
.
, Wi-Fi™ y más).
™
Boost Max.
support/device-support/
comunidad, visita espanol.boostmobile.com/
completa, videos, tutoriales y foros de la
adicional incluyendo la Guía del Usuario
de ayuda Boost Mobile. Para información
y descubre recursos y otra información
Encuentra consejos útiles para tu teléfono
Herramientas y recursos – página 23 –
Google Play
(realizar llamadas) a los más avanzados (usar
Boost, desde los conceptos básicos
las funciones de tu teléfono y los servicios
Usa tu teléfono – página 11 – Aprovecha
– página 7–
visita espanol.boostmobile.com/support/device-support/ para obtener guías, tutoriales y más
nunca le ha hecho daño a nadie).
páginas (aunque un curso para refrescar
probablemente puedes saltarte estas
estás familiarizado con teléfonos Android,
la pantalla de inicio e ingresar texto. Si
cómo desplazarte por tu teléfono, utilizar
Aprende algunos conceptos básicos sobre
Conceptos básicos Android™
batería y activar tu teléfono Boost.
por primera vez, incluyendo insertar la
tienes que hacer antes de usar tu teléfono
Prepárate – página 5 – Averigua lo que
y fácilmente.
Se divide en cuatro secciones para ayudarte a encontrar la información que necesitas rápida
Estaguía “Para empezar” está diseñada para ayudarte a confi gurar y usar tu nuevo
This Get Started guide is designed to help you set up and use your new Boost Max. It’s
divided into four sections to help you find the information you need quickly and easily.
Get Ready – page 5 – Find out what
you need to do before you use your
phone the first time, including inserting
a battery and activating your Boost phone.
Android Basics – page 7 – Learn some
basics about how to move around on your
phone, use the home screen, and enter text.
If you’re familiar with Android phones, you
can probably skip these pages (although a
refresher course never hurt anyone).
Use Your Phone – page 11 – Take
advantage of your phone’s features and
Boost services, from the basics (Making
Calls) to the more advanced (using Google
™
Play
, Wi-Fi™, and more).
Tools & Resources –
useful tips for your phone and discover
resources and other helpful Boost Mobile
information. For additional information
including the full User Guide, videos,
tutorials, and community forums, visit
boostmobile.com/support/device-support/.
page 23
–
Find
visit boostmobile.com/support/device-support/ for guides, tutorials, and more
3
Page 4

You
r Boost Max
T
T
T
T
T
T
u
u
u
u
B
B
B
B
B
B
o
o
o
o
o
o
o
o
s
s
s
s
t
t
t
t
t
t
M
M
M
M
M
M
a
a
a
a
x
x
x
x
Altavoz
Tecla inicio
Micrófono
4
Tecla menú
táctil
Pantalla
/bloqueo
encendido
Botón de
frontal
Cámara
Tecla atrás
volumen
Botón
Auricular
proximidad
LED
ambiental y de
Sensor de luz
Speaker
3.5mm Headset JackUICC Card Cover
Back Camera
Lens
Mic
MicroSD
Card Tray
Charger/
micro USB Jack
micro USB
cargador/
Conector para
MicroSD
la tarjeta
Bandeja de
Micrófono
trasera
Cámara
Conector del auricular de 3.5mmCubierta de la
de cámara
Botón
Flash
tarjeta UICC
Ambient Light and
Proximity
Sensor
Earpiece
Volume
Button
Back Key
4
Mic
LED
Home Key
Front Camera
Lens
Power/Lock
Button
Touchscreen
Camera Button
Menu Key
Flash
Page 5

5
P
P
P
P
P
P
P
r
r
r
r
e
e
e
e
p
p
p
p
a
a
a
a
r
r
r
r
a
a
a
a
t
t
t
t
t
t
u
u
u
u
t
t
t
t
t
t
e
e
e
e
l
l
l
l
l
l
l
é
é
é
é
é
é
é
f
f
f
f
f
f
f
o
o
o
o
n
n
n
n
o
o
o
o
Get Yor one ead
y
el servicio.
las indicaciones en la pantalla para iniciar
para encender tu nuevo teléfono y sigue
4. Mantén presionado el botón de encendido
para iniciar tu servicio.
llegues al fi nal aparecerá la opción de pago,
3. Sigue los pasos de activación y cuando
activación automatizado.
1-888-BOOST4U para usar el sistema de
Nota: También puedes llamar al
tu teléfono.
espanol.boostmobile.com para actualizar
una cuenta existente, visita mi cuenta en
activación. Si activas este teléfono nuevo en
el MEID y después haz clic en comenzar
activar. Sigue las indicaciones para ingresar
2. Ve a espanol.boostmobile.com y haz clic en
visita espanol.boostmobile.com/support/device-support/ para obtener guías, tutoriales y más
dígitos para activar tu teléfono.
del teléfono. Necesitarás este número de 18
compartimento de la parte superior trasera
teléfono en el paquete o dentro del
1. Encuentra el número MEID (DEC) de tu
Activa tu teléfono
proceso de confi guración.
completamente cargada antes de empezar el
Nota: La batería del teléfono debe estar
de corriente alterna (AC, en inglés) estándar.
3. Conecta el cabezal del cargador a un enchufe
del teléfono.
en el conector para cargador, en la base
2. Inserta el extremo pequeño del cable USB
del cargador.
1. Inserta el cable USB en el cabezal
Carga la batería
Charge the Battery
1. Insert the USB cable into the charging head.
2. Insert the small end of the USB cable into
the charger/accessory jack at the bottom of
the phone.
3. Plug the charging head into a standard AC
power outlet.
Note: The phone battery should be fully
charged before starting the setup process.
Activate Your Phone
1. Find your phone’s MEID (DEC) number on
the packaging or inside the cover on the back
of the phone at the top. You’ll need this 18-digit
number to activate your phone.
visit boostmobile.com/support/device-support/ for guides, tutorials, and more
2. Go to boostmobile.com/activate, follow the
prompts to enter the MEID, and then click
start activation process. If you are activating
this new phone on an existing account, visit
My Account on boostmobile.com to update
your handset.
Note: You can also call 1-888-BOOST4U to
use the automated activation system.
3. Continue through the activation steps and at
the end you will have the option to pay to get
your service started.
4. Press and hold the Power button to turn on
your new phone, and follow the onscreen
prompts to get started.
5
Page 6
Set U Your Phon
e
6
C
C
C
C
C
C
C
o
o
o
o
o
o
n
n
n
n
n
n
f
f
f
f
f
f
f
i
i
i
i
i
i
i
g
g
g
g
g
g
u
u
u
u
u
u
r
r
r
r
r
r
a
a
a
a
a
a
t
t
t
t
t
t
t
u
u
u
u
u
u
t
t
t
t
t
t
t
e
e
e
e
e
e
l
l
l
l
l
l
l
é
é
é
é
é
é
é
f
f
f
f
f
f
f
o
o
o
o
o
o
n
n
n
n
n
n
o
o
o
o
o
o
2. Toca Language > Español.
Once activated, you may want to set
certain options, including setting up your
™
Google
Account.*
Connections Optimizer
Following phone activation, you may see a
Connections Optimizer notice. Read the notice
and touch I Agree to allow your phone to
connect automatically to the best available
data network, including Wi-Fi.
Note: You can turn off Connections Optimizer
at any time. Touch
Mobile networks > Connections Optimizer and
then uncheck Connections Optimizer.
6
> > Settings >
Set Up a Google Account
Setting up a Google Account lets you access
many features of your Android phone. It also
allows you to sync Google contacts and apps
you may previously have used.
1. Touch > > Settings >
Add account > Google.
2. Follow the prompts to set up a new
Google Account or sign in to an existing
Google Account.
* You do not need to sign up for a Google
Account to use your phone; however, to
download content from the Google Play
Store app, you must link your phone to a
Google Account.
™
una cuenta Google.
, deberás enlazar tu teléfono a
™
Google Play
para la descarga de aplicaciones de
Google para usar tu teléfono; sin embargo,
* No necesitas inscribirte para una cuenta
tu cuenta de Google existente.
nueva cuenta de Google o inicia sesión en
2. Sigue las indicaciones para confi gurar una
Agregar cuenta > Google.
1. Toca > > Configuración >
Google que posiblemente usaste antes.
contactos anteriores y las aplicaciones de
Android. También te permite sincronizar tus
da acceso a muchas funciones de tu teléfono
La confi guración de una cuenta de Google te
Configura una cuenta de Google
> Redes móviles >
.*
Language & input.
1. Toca > > Configuración >
Cambia los menús del teléfono a español
desactiva la selección Connections Optimizer.
Optimizador de conexiones y después
Configuración
conexiones en todo momento. Toca > >
Nota: Puedes apagar el Optimizador de
de datos disponible, incluido el Wi-Fi.
se conecte automáticamente a la mejor red
toca en I Agree para permitir que el teléfono
Optimizador de conexiones. Lee el aviso y
posiblemente aparezca el aviso del
Al terminar la activación del teléfono,
Optimizador de conexiones
™
de Google
confi gurar algunas opciones, incluso tu cuenta
Una vez activado, es posible que quieras
Page 7
7
F
F
F
F
F
u
u
u
u
n
n
n
n
n
c
c
c
c
c
i
i
i
i
i
o
o
o
o
o
n
n
n
n
n
e
e
e
e
e
s
s
s
s
s
b
b
b
b
b
á
á
á
á
á
s
s
s
s
s
i
i
i
i
i
c
c
c
c
c
a
a
a
a
a
s
s
s
s
s
Bas
c Phone Fuctios
.
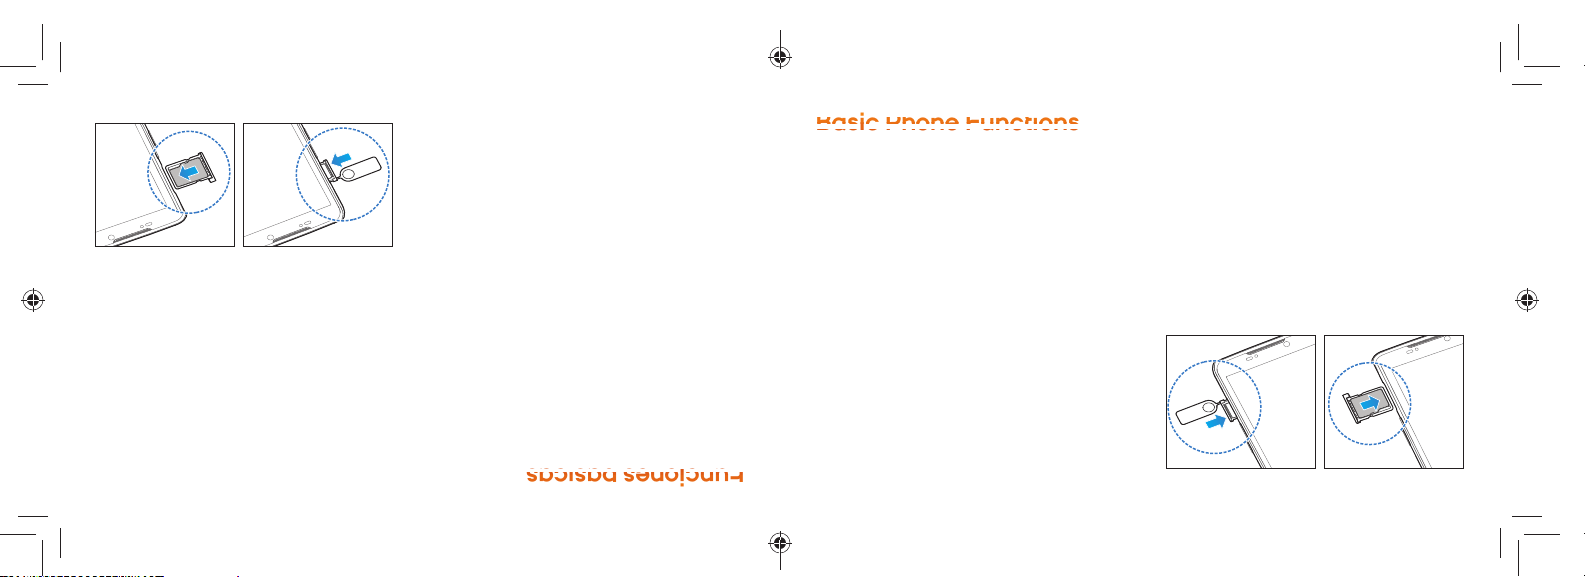
dentro de la ranura.
boca abajo y vuelve a insertar la bandeja
2. Jala la bandeja, coloca la tarjeta microSD
de la tarjeta microSD.
un seguro dentro del orifi cio en la bandeja
1. Inserta el extremo de un clip para papel o de
para fotos, videos, música y más.
aumentar la capacidad de almacenamiento
de memoria microSD opcional (no incluida), para
Tu teléfono es compatible para usar una tarjeta
Instala una tarjeta microSD opcional
visita espanol.boostmobile.com/support/device-support/ para obtener guías, tutoriales y más
desbloqueada, presiona el
apagar el teléfono.
y después toca Apagar > Aceptar para
Presiona y sujeta el botón de encendido
+
Apaga el teléfono
de encendido
botón
pantalla
Para encender la pantalla y visualizar la
+
del teléfono.
el botón de encendido en el lado derecho
Para apagar la pantalla rápidamente, presiona
+
Enciende y apaga la pantalla
Toca y sujeta START para desbloquearla.
+
Desbloquea la pantalla
botón de encendido.
Presiona y mantén presionado el
+
Enciende el teléfono
Turn the Phone On
+
Press and hold the Power button.
Unlock the Screen
+
Touch and hold START to unlock the screen.
Turn the Screen On and Off
+
To quickly turn the display screen off ,
press the Power button on the right side
of the phone.
+
To turn the screen on and display the unlock
screen, press the Power button.
Turn the Phone Off
+
Press and hold the Power button and then
touch Power off > OK to turn the phone off .
Install an Optional microSD Card
Your phone supports using an optional
microSD memory card (not included) to
increase storage space for pictures, videos,
music, and more.
1. Insert the end of a small paper clip or pin
into the hole on the microSD card tray.
2. Pull out the tray, place the microSD card in
face-down, and reinstall the tray into the slot.
visit boostmobile.com/support/device-support/ for guides, tutorials, and more
7
Page 8
You
r Hom
e Scree
T
T
T
T
T
u
u
u
u
u
p
p
p
p
p
a
a
a
a
a
n
n
n
n
n
t
t
t
t
t
a
a
a
a
a
l
l
l
l
l
l
l
l
l
l
a
a
a
a
a
p
p
p
p
p
r
r
r
r
r
i
i
i
i
i
n
n
n
n
n
c
c
c
c
c
i
i
i
i
i
p
p
p
p
p
a
a
a
a
a
l
l
l
l
l
8
paneles de pantalla de inicio.
de Widgets, y después deslízalo a uno de los
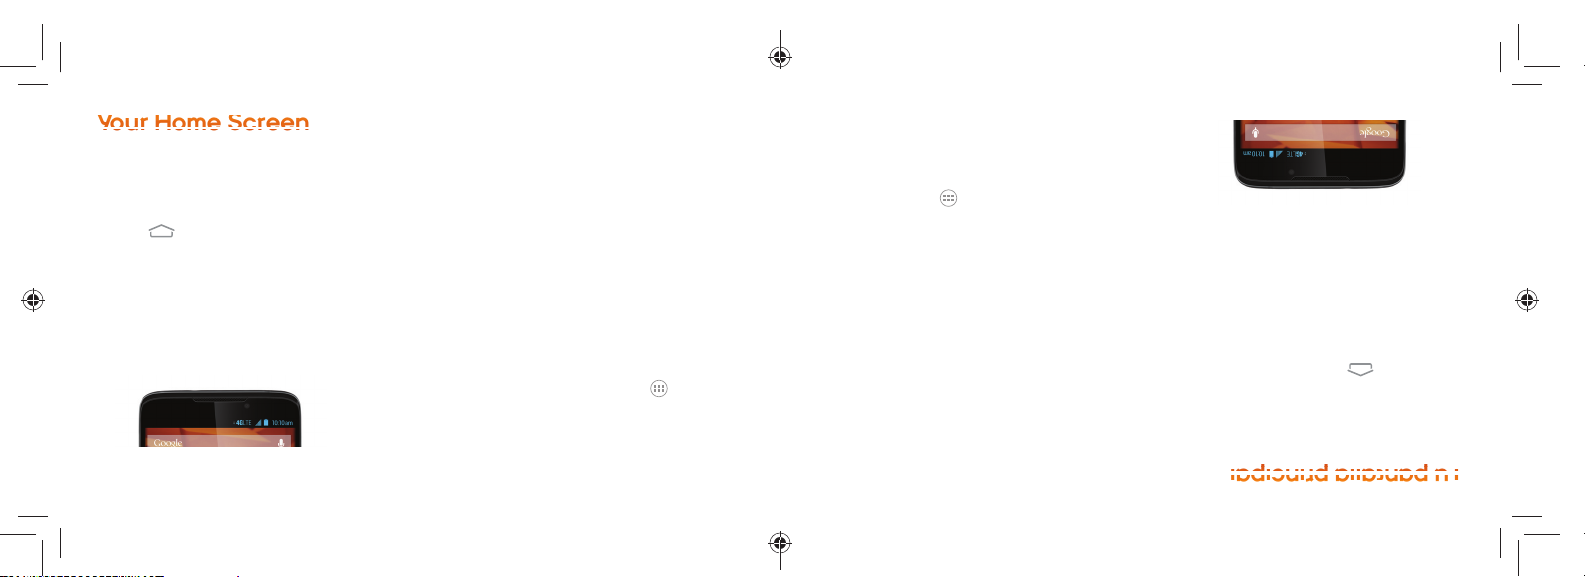
Viewing Your Home Screen
Your phone’s home screen extends
horizontally to fi ve full screens.
+
To display the main (center) home screen,
touch
+
To view extended screens, swipe the screen
left or right.
Status Bar
The status bar at the top of the home screen
lets you quickly see both your phone status
(connections, signal strength, battery, GPS)
and any current notifi cations.
8
from any screen.
Notifications Panel
You can expand the notifi cation area to see
more about your notifi cations.
1. Slide the notifi cations panel down.
2. Touch a notifi cation to open its application.
Add Items to Your Home Screen
Make your home screen yours by adding
apps, widgets, wallpaper and more.
+
Wallpaper: Touch and hold an empty
spot on your home screen to choose
your wallpaper.
+
Widgets and Shortcuts: Touch , touch and
hold an app shortcut from the Apps tab or a
widget from the Widgets tab and then drag it
to one of your home screen panels.
Aplicaciones o un widget desde la pestaña
atajo de la aplicación desde la pestaña de
Widgets y atajos: Toca , mantén tocado un
+
elegir tu fondo de pantalla.
espacio vacío en tu pantalla de inicio para
Fondo de pantalla: Mantén tocado un
+
aplicaciones, widgets, fondos de pantalla y más.
Personaliza tu pantalla de inicio al agregar
Agrega objetos a tu pantalla principal
aplicación asociada.
2. Toca una notifi cación para abrir la
1. Arrastra el panel de notifi caciones hacia abajo.
iconos de notifi cación.
ver más información detallada sobre los
Puedes expandir el área de notifi cación para
Panel de notificaciones
derecha.
desde cualquier pantalla.
notifi cación actual.
la señal, batería, GPS) al igual que cualquier
estado de tu teléfono (conexiones, potencia de
pantalla de inicio te permite ver rápidamente el
La barra de estado en la parte superior de tu
Barra de estado
pantalla hacia la izquierda o la
Para visualizar pantallas extendidas, desliza la
+
centro), toca
Para visualizar la pantalla principal de inicio (al
+
horizontalmente hasta cinco pantallas completas.
La pantalla principal de tu teléfono se extiende
Visualizando tu pantalla principal
Page 9
T
T
T
T
T
T
e
e
e
e
e
c
c
c
c
c
l
l
l
l
l
l
a
a
a
a
a
s
s
s
s
s
e
e
e
e
e
i
i
i
i
i
i
c
c
c
c
c
o
o
o
o
o
n
n
n
n
n
o
o
o
o
o
s
s
s
s
s
A
A
A
A
A
A
A
b
b
b
b
b
b
b
r
r
r
r
r
r
e
e
e
e
e
e
a
a
a
a
a
a
p
p
p
p
p
p
l
l
l
l
l
l
l
i
i
i
i
i
i
i
c
c
c
c
c
c
a
a
a
a
a
a
c
c
c
c
c
c
i
i
i
i
i
i
i
o
o
o
o
o
o
n
n
n
n
n
n
e
e
e
e
e
e
s
s
s
s
s
s
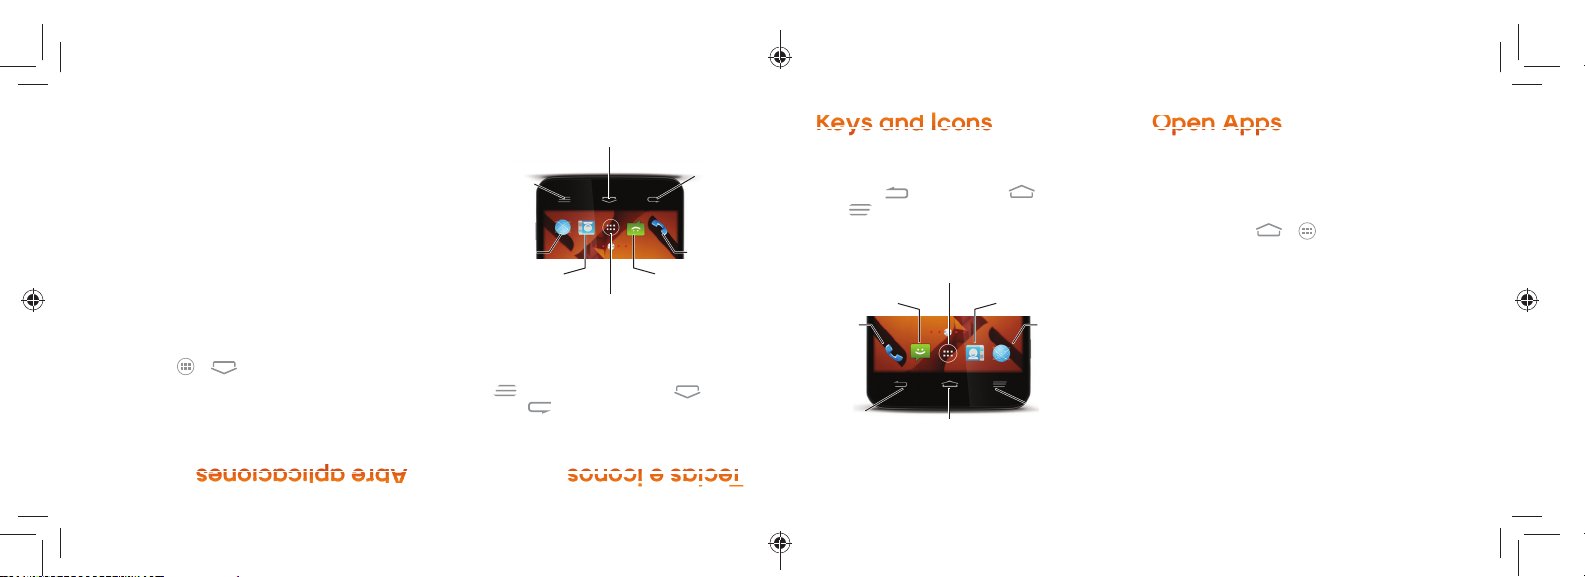
K
e
y
y
s and con
s
O
p
p
e A
p
p
s10T
9
Tecla de menú
Internet
Contactos
que estés buscando.
la derecha para encontrar la aplicación
tengas que desplazarte hacia la izquierda o
> y
después toca la aplicación. Puede que
tu página de inicio, toca
Si una aplicación no está disponible desde
+
pantallas principales, sólo tócala para abrirla.
Si una aplicación se encuentra en una de tus
+
Abre aplicaciones
), una tecla
visita espanol.boostmobile.com/support/device-support/ para obtener guías, tutoriales y más
Tecla de inicio
Aplicaciones
) y una tecla de menú ( ). Arriba
atrás
Tecla
Teléfono
Mensajes
pantallas de inicio.
que están disponibles desde todas las
de esta fi la hay una fi la de atajos principales
inicio (
encontrarás una tecla atrás (
En la parte frontal inferior del teléfono
Teclas e iconos
Keys and Icons
The bottom front of your phone contains a
Back key (
key (
shortcuts that are available from every
home screen.
Phone
Back
Key
), a Home key ( ), and a Menu
). Above this row is a row of primary
Messaging
Apps
People
Browser
Menu
Home
Key
visit boostmobile.com/support/device-support/ for guides, tutorials, and more
Key
Open Apps
+
If an app is on one of your home screens, just
touch it to open it.
+
If an app is not available from your home
screen,
touch >
app icon.
fi nd your app.
You may have to scroll right or left to
, and then touch the
9
Page 10

yyp
p
i
n
g
g
o
n Yor one
I
I
I
I
I
I
I
n
n
n
n
n
n
g
g
g
g
g
g
r
r
r
r
r
r
e
e
e
e
e
e
s
s
s
s
s
s
a
a
a
a
a
a
r
r
r
r
r
r
t
t
t
t
t
t
t
e
e
e
e
e
e
x
x
x
x
x
x
t
t
t
t
t
t
t
o
o
o
o
o
o
e
e
e
e
e
e
n
n
n
n
n
n
t
t
t
t
t
t
t
u
u
u
u
u
u
t
t
t
t
t
t
t
e
e
e
e
e
e
l
l
l
l
l
l
l
é
é
é
é
é
é
é
f
f
f
f
f
f
f
o
o
o
o
o
o
n
n
n
n
n
n
o
o
o
o
o
o
10
+
Choose a Keyboard
There are three preloaded touchscreen
keyboards available for typing on your phone:
Android keyboard, Swype, and TouchPal
Keyboard. A keyboard appears automatically
onscreen when you touch a text entry fi eld.
To select a keyboard:
1. With a keyboard displayed, slide the
notifi cations panel down and touch
Choose input method.
2. Touch a keyboard type to select it.
+
Android keyboard provides a traditional
typing experience. Just touch the letters to
enter text. To enter symbols or numbers,
touch
.
Swype lets you enter words by tracing over
the letters in a single motion. To enter
symbols or numbers with Swype,
touch
. For tips on using Swype,
touch and hold
+
TouchPal Keyboard off ers a number of
options for entering text, including trace
entry (similar to Swype), traditional typing,
alternate keyboard formats, and more. To
enter symbols or numbers with TouchPal,
touch
. For more information on using
TouchPal, touch
Google Voice Typing
Use your voice to enter text instead of typing.
1. From any screen where you can enter text,
touch the input fi eld to reveal the keyboard.
2. Depending on the keyboard type, touch or
and speak clearly.
.
> Help & About.
con claridad.
2. Según el tipo de teclado, toca o y habla
mostrar el teclado en la pantalla.
texto, toca el campo de entradas para
1. Desde una pantalla donde puedas ingresar
un teclado.
Usa tu voz para ingresar texto en lugar de
ingresar texto
Uso de dictado por voz de Google para
> Ayuda y acerca.
. Para más información en el
uso de TouchPal, toca
TouchPal, toca
más. Para ingresar símbolos o números con
tradicional, formatos de teclado alternativo y
ingreso de trazo (similar a Swype), teclado
opciones para ingresar texto, incluidos el
Teclado de TouchPal ofrece una cantidad de
+
.
.
.
Para consejos en el uso
de Swype, mantén tocado
con Swype, toca
continuo. Para ingresar símbolos o números
trazarla sobre las letras con un movimiento
Swype te permite escribir la palabra al
+
símbolos o número, toca
las letras para escribir el texto. Para escribir
de escritura a máquina tradicional. Sólo toca
Teclado de Android proporciona una forma
+
2. Toca un tipo de teclado para seleccionarlo.
Selecciona el método de entrada.
notifi caciones hacia abajo y después toca
1. Con el teclado a la vista, desliza el panel de
Para seleccionar un teclado:
cuando tocas el campo de ingreso de texto.
teclado aparece automáticamente en la pantalla
Android, Swype y teclado de TouchPal. El
precargados para que escribas: teclado de
Tu teléfono cuenta con tres teclados táctiles
Elige un teclado
Page 11

11
L
L
L
L
L
L
L
l
l
l
l
l
l
l
a
a
a
a
a
a
m
m
m
m
m
m
a
a
a
a
a
a
d
d
d
d
d
d
d
a
a
a
a
a
a
s
s
s
s
s
s
C
C
C
C
C
C
o
o
o
o
o
r
r
r
r
r
r
r
r
r
r
e
e
e
e
e
o
o
o
o
o
d
d
d
d
d
d
e
e
e
e
e
V
V
V
V
V
V
o
o
o
o
o
z
z
z
z
z
Cal
s
Voice
a
mensajes de correo de voz.
2. Sigue las indicaciones para escuchar tus
tu teléfono de Boost Mobile.
desde
®
desde tu
®
1. Llama a tu número de Boost Mobile
Recupera tus mensajes de correo de voz
configurar una contraseña de correo de voz.
Boost Mobile recomienda enfáticamente
contraseña y grabar tu nombre y saludo.
2. Sigue las instrucciones de voz para crear tu
teléfono de Boost Mobile.
1. Llama a tu número de Boost Mobile
tu teléfono:
y saludo personal tan pronto como se active
apagado. Debes confi gurar tu correo de voz
voz, incluso si tu teléfono está en uso o
transfi eren automáticamente a tu correo de
Todas las llamadas no contestadas se
Configura tu correo de voz
.
toca y
visita espanol.boostmobile.com/support/device-support/ para obtener guías, tutoriales y más
izquierdo del teléfono para silenciar el timbre.
Presiona el botón volumen en el lado
+
Silencia el timbre en una llamada
Arrastra para de la izquierda.
+
de voz
Manda una llamada directo a tu correo
la pantalla.
Arrastra para a la derecha en
+
Contesta una llamada entrante
4. Toca .
te equivocas.
para eliminar uno o más dígitos, si
Toca
3. Ingresa el número en el teclado del teléfono.
2. Toca y toca Teléfono .
mantén seleccionado START
1. Si la pantalla está encendida,
Realiza tu primera llamada de teléfono
Make a Phone Call
1. If the screen is locked, touch and hold START.
2. Touch and touch Phone .
3. Enter the number on the keypad. Touch
if you make a mistake.
4. Touch .
Answer an Incoming Call
+
Drag to on the right on the screen.
Send a Call Directly to Voicemail
+
Drag to on the left.
Mute the Ringer on a Call
+
Press the volume button on the left side
of the phone to mute the ringer.
visit boostmobile.com/support/device-support/ for guides, tutorials, and more
Set Up Your Voicemail
All unanswered calls are automatically
transferred to your voicemail, even if your
phone is in use or turned off . You should set
up your voicemail and personal greeting as
soon as your phone is activated:
1. Call your Boost Mobile
Boost Mobile phone.
2. Follow the voice prompts to create your
password and record your name and greeting.
Boost Mobile strongly recommends
setting a voicemail password.
Retrieve Your Voicemail
1. Call your Boost Mobile number from your
Boost Mobile phone.
2. Follow the prompts to listen to your
voicemail messages.
®
number from your
11
Page 12

Peo
p
p
e
12
P
P
P
P
P
P
e
e
e
e
e
r
r
r
r
r
s
s
s
s
s
o
o
o
o
o
n
n
n
n
n
a
a
a
a
a
s
s
s
s
s
número de teléfono principal del contacto.
Your phone’s People function lets you access and manage contacts from a variety of sources,
including Google and Corporate email accounts, contacts synced from your computer, and
contacts you’ve entered manually.
Save a Phone Number
1. Touch > .
2. Enter a phone number.
3. Touch Add to contacts.
4. Touch a name to add the phone number
to an existing contact or touch CREATE
NEW CONTACT.
5. Add any other information you want to save.
6. Touch DONE when you’re fi nished.
12
Add a New Entry to Contacts
1. Touch > > People .
2. Touch .
3. Touch any fi eld and use the onscreen
keyboard to enter the name, phone number,
and other contact details.
4. Add more data fi elds or a picture if desired,
and touch DONE.
Find a Contact
1. T
ouch >
touch
2. Enter the fi rst letter or letters of an entry.
3. Touch the contact to display its details.
> People , and then
.
3. Toca el contacto para que aparezca el
2. Ingresa la primera letra o letras de una entrada.
1. Toca > > Personas , y luego toca .
Recupera un contacto
si lo deseas, y toca FINALIZADO.
4. Agrega más campos de datos o una imagen
de contacto.
dirección de correo electrónico y otros datos
ingresa el nombre, número de teléfono, una
3. Toca cualquier campo para abrir el teclado, e
2. Toca .
1. Toca > > Personas .
Agrega una nueva entrada a contactos
.
6. Toca FINALIZADO cuando termines.
que deseas guardar.
5. Agrega cualquier otra información adicional
CREAR CONTACTO NUEVO.
teléfono a un contacto existente o toca
4. Toca un nombre para agregar el número de
3. Toca
Agregar a contactos
2. Ingresa un número de teléfono.
1. Toca > .
Guardar un número de teléfono
contactos sincronizados de tu computadora y contactos ingresados a manualmente.
de fuentes y manejarlos, incluyendo Gmail, cuentas de correo electrónico corporativo,
La función de Personas en tu teléfono te permite tener acceso a contactos de una variedad
Page 13

13
M
M
M
M
M
M
e
e
e
e
e
n
n
n
n
n
s
s
s
s
s
a
a
a
a
a
j
j
j
j
j
j
e
e
e
e
e
r
r
r
r
r
í
í
í
í
í
í
a
a
a
a
a
Messa
g
g
i
n
g
g
visita espanol.boostmobile.com/support/device-support/ para obtener guías, tutoriales y más
Send a Text Message
1. T
ouch > >Messaging .
2. Touch
.
3. Enter a phone number, email address, or
contact name in the To fi eld. (If available, touch
.
5. Si estás satisfecho con tu mensaje, toca
(Para Audio, toca Aceptar.)
4. Toca una foto o clip para seleccionarlo.
álbum o carpeta disponible.
(Imágenes, Video, Audio, etc.) y luego toca un
3. Toca un tipo de archivo multimedia
2. Toca
.
de texto.
1. Sigue los pasos 1 – 4 para enviar un mensaje
(mensajes multimedia)
Envía un mensaje con foto o video
.
(Si el teléfono
.
y escribe
.
>
Mensajería
5. Cuando hayas acabado, toca
tu mensaje.
4. Toca
Escribir mensaje
la dirección).
el contacto para completar
reconoce un contacto, verás una lista. Toca
en la casilla para texto Para.
3. Ingresa el número de teléfono del destinatario
2. Toca
1. Toca
>
Envía un mensaje de texto
a name from the list to fi nish the entry.)
4. Touch Type message and then type
your message.
5. When you are fi nished, touch .
visit boostmobile.com/support/device-support/ for guides, tutorials, and more
Send a Multimedia Message (MMS)
1. Follow steps 1 – 4 for sending a text message.
2. Touch .
3. Touch a media type (such as Pictures, Videos,
Audio, etc.) and then touch an available album
or folder.
4. Touch a picture or clip to select it. (For Audio,
touch the fi le and then touch OK.)
5. If you are satisfi ed with your message,
.
touch
13
Page 14

Messa
g
g
i
n
g
g
14
M
M
M
M
M
M
e
e
e
e
e
n
n
n
n
n
s
s
s
s
s
a
a
a
a
a
j
j
j
j
j
j
e
e
e
e
e
r
r
r
r
r
í
í
í
í
í
í
a
a
a
a
a
Access Messages
1. T
ouch > >Messaging .
2. From the Messaging screen, touch the
message you want to view.
–or–
1. Slide the Notifi cations panel down.
2. Touch the message you want to view.
Note: Text and MMS messages are collected in
ongoing “conversations,” so when you view a
message, you can scroll through the entire
history of your messages with that person.
14
Be a hero. Don’t drive distracted.
>
.
Sé un héroe. No te distraigas conduciendo.
Mensajería
>
mensajes con esa persona.
desplazarte por el historial completo de tus
cuando visualizas un mensaje, puedes
“conversación” en proceso; de esta forma,
para un contacto están recopilados en una
Nota: Todos tus mensajes de texto y MMS
2. Toca el mensaje que deseas ver.
hacia abajo.
1. Desliza el panel de notifi caciones
–o–
mensaje que deseas ver.
2. Desde la pantalla Mensajería, toca el
1. Toca
Accede a mensajes
Page 15

15
C
C
C
C
C
C
o
o
o
o
o
r
r
r
r
r
r
r
r
r
r
e
e
e
e
e
o
o
o
o
o
e
e
e
e
e
l
l
l
l
l
l
e
e
e
e
e
c
c
c
c
c
t
t
t
t
t
r
r
r
r
r
ó
ó
ó
ó
ó
ó
n
n
n
n
n
i
i
i
i
i
i
c
c
c
c
c
o
o
o
o
o
Ema
i
toca Finalizado.
único, ingresa el nombre saliente y después
5. Identifi ca tu nueva cuenta con un nombre
Siguiente para continuar.
opciones y permisos adicionales. Toca
4. Sigue las indicaciones para confi gurar
Contraseña e información del Servidor.
3. Ingresa un Dominio\Nombre de usuario,
después toca Siguiente.
2. Ingresa la Dirección y la Contraseña y
.
>
®
Configuración
®
Agregar cuenta > Corporativo
1. Toca > >
ingreso requerida.
Exchange Server para la información de
Nota: Ponte en contacto con tu administrador
Exchange ActiveSync
Configura una cuenta Microsoft
>
.
Configuración
visita espanol.boostmobile.com/support/device-support/ para obtener guías, tutoriales y más
cuenta y sigue las instrucciones.
Toca Confi g. manual, selecciona un tipo de
–o–
en pantalla.
3. Toca Siguiente y sigue las instrucciones
la cuenta de correo electrónico.
2. Ingresa la Dirección y la Contraseña para
Agregar cuenta > Correo
1. Toca > >
electrónico estándar
Configura una cuenta de correo
acceder a una cuenta Gmail.
2. Sigue las instrucciones para confi gurar o
Agregar cuenta > Google.
1. Toca > > Configuración >
Configura una cuenta Gmail™
solo lugar conveniente.
cuentas simultáneamente y manejarlas en un
teléfono te permiten acceder a múltiples
Las aplicaciones de correo electrónico de tu
Your phone’s Email applications let you access
and manage multiple email accounts
simultaneously in one convenient location.
Set Up a Gmail™ Account
1. Touch > > Settings >
Add account > Google.
2. Follow the instructions to set up or sign in to
a Gmail account.
Set Up a Standard Email Account
1. Touch > > Settings >
Add account > Email.
2. Enter the Email address and Password for
the email account.
3. Touch Next and follow on the onscreen
instructions.
–or–
Touch Manual setup, select an account type,
and follow the instructions.
visit boostmobile.com/support/device-support/ for guides, tutorials, and more
Set Up a Microsoft® Exchange
ActiveSync
Note: Contact your company’s Exchange Server
administrator for required sign-in information.
1. Touch > > Settings >
Add account > Corporate.
2. Enter your Email address and Password
information and then touch Next.
3. Enter a Domain\Username, Password, and
Server information.
4. Follow the prompts to set additional options
and permissions. Touch Next to continue.
5. Identify your new account with a unique
name, enter the outgoing name, and then
touch Done.
®
Account
15
Page 16

Ema
i
16
C
C
C
C
C
C
C
o
o
o
o
o
o
r
r
r
r
r
r
r
r
r
r
r
r
e
e
e
e
e
e
o
o
o
o
o
o
e
e
e
e
e
e
l
l
l
l
l
l
l
e
e
e
e
e
e
c
c
c
c
c
c
t
t
t
t
t
t
t
r
r
r
r
r
r
ó
ó
ó
ó
ó
ó
ó
n
n
n
n
n
n
i
i
i
i
i
i
i
c
c
c
c
c
c
o
o
o
o
o
o
> Adjuntar
Access Email Messages
1. Touch >
+
To view a diff erent inbox, touch the inbox
name at the top of the screen and then
touch the inbox you want to view.
2. From the inbox, touch the message you want
to view.
Send an Email Message
1. Touch > > Email .
+
If necessary, select the email account you
want to use.
2. Touch
3. Enter an email address in the To fi eld.
4. Enter a subject and a message.
+
To add attachments, touch >
Attach fi le and select an attachment.
5. Touch .
16
> Email .
.
Access Gmail Messages
1. Touch > > Gmail .
2. Select the inbox you want to view.
3. Touch a message to view it.
Send a Gmail Message
1. Touch > > Gmail .
2. Touch
.
3. Enter an email address or contact name.
4. Enter a subject and a message.
+
To add attachments, touch > Attach
picture or Attach video.
5. Touch
to send the message.
>
para enviar el mensaje.
.
5. Toca
Adjuntar imagen o Adjuntar video.
Para agregar adjuntos, toca
+
4. Ingresa un asunto y un mensaje.
o el nombre del contacto.
3. Ingresa una dirección de correo electrónico
2. Toca
1. Toca > > Gmail .
Envía un mensaje de Gmail
3. Toca el mensaje que quieras visualizar.
deseas ver.
2. Selecciona el buzón de entrada que
1. Toca > > Gmail .
Accede a los mensajes de Gmail
5. Toca .
.
.
y selecciona un adjunto.
Correo
>
Correo
un archivo
Para agregar adjuntos, toca
+
4. Ingresa un asunto y un mensaje.
en el campo Para.
3. Ingresa una dirección de correo electrónico
2. Toca
.
correo electrónico que quieres usar.
Si es necesario, selecciona la cuenta de
+
1. Toca > >
Envía un mensaje de correo electrónico
que quieras visualizar.
2. Desde el buzón de ingreso, toca el mensaje
buzón que deseas ver.
superior de la pantalla y luego toca el
toca el nombre del buzón en la parte
Para ver un buzón de entrada diferente,
+
1. Toca >
correo electrónico
Accede a los mensajes de
Page 17

17
C
C
C
C
C
á
á
á
á
á
m
m
m
m
a
a
a
a
r
r
r
r
a
a
a
a
y
y
y
y
V
V
V
V
V
i
i
i
i
i
d
d
d
d
d
e
e
e
e
o
o
o
o
c
c
c
c
á
á
á
á
á
m
m
m
m
a
a
a
a
r
r
r
r
a
a
a
a
Camer
a & Camcorder
o
Correo
. Sigue las instrucciones en
>
Galería
y selecciona
>
Galería
.
pantalla para enviar tu foto o videoclip.
Picasa, o
Mensajería, Bluetooth, Hangouts,
tal como
3. Toca y escoge un método para compartir,
video para enviar.
2. Toca y mantén presionada sobre una foto o
un álbum.
1. Toca >
Comparte fotos y videos
el video.
2. Toca un video y después toca para ver
1. Toca >
Mira videos
terminar la grabación.
3. Toca o presiona el botón de Cámara para
.
.
para explorar
una opción
y selecciona
o presiona el
.
>
Galería
> Cámara
visita espanol.boostmobile.com/support/device-support/ para obtener guías, tutoriales y más
grabar.
presiona el botón Cámara para comenzar a
lente de la cámara a tu objetivo y toca
2. Usando tu pantalla como visor, apunta el
la videocámara
1. Abre la cámara, y luego toca para abrir
Grabar un video
otras opciones.
en pantalla. Toca
2. Toca una foto y luego toca
un álbum.
1. Toca >
Visualiza fotos
el botón Cámara para tomar una foto
de la cámara a tu objetivo. Toca o presiona
2. Usando tu pantalla como visor, apunta el lente
botón Cámara para abrir la cámara
1. Toca >
Toma una foto
Take a Picture
1. Touch >
2. Using your display as a viewfi nder, aim
View Pictures
1. Touch >
2. Touch a picture and then touch an onscreen
Record a Video
1. Open the camera and then touch to
Camera Button to open the camera.
the camera lens at your subject, and then
touch
a picture.
an album.
option. Touch
open the camcorder
> Camera . or press the
or press the Camera Button to take
> Gallery and select
to explore other options.
.
visit boostmobile.com/support/device-support/ for guides, tutorials, and more
2. Using your display screen as a viewfi nder,
aim the lens at your subject, and touch
press the Camera Button to begin recording.
3. Touch or press the Camera Button to
stop recording.
View Videos
1. Touch >
2. Touch a video and then touch to view
the video.
Share Pictures and Videos
1. Touch > > Gallery and select
an album.
2. Touch and hold a picture or video to send.
3. Touch
such as Messaging, Bluetooth, Hangouts,
Picasa, or Email.
instructions to send your picture or video clip.
> Gallery
and select
Follow the onscreen
.
any of several methods
or
17
Page 18

WebWi
F
18
I
I
I
I
I
I
I
n
n
n
n
n
n
t
t
t
t
t
t
t
e
e
e
e
e
e
r
r
r
r
r
r
n
n
n
n
n
n
e
e
e
e
e
e
t
t
t
t
t
t
t
W
W
W
W
W
W
W
i
i
i
i
i
i
i
-
-
F
F
F
F
F
F
F
i
i
i
i
i
i
i
Go Online
1. Touch > > Browser. The fi rst time, you
may be prompted to enter your wireless
phone number.
2. From the home page, select categories,
navigate to websites, read blogs, download
content, and more.
+
Touch a category to open it.
+
For more options, touch
any page.
+
To scroll, slide your fi nger up or down
the page.
+
To zoom in or out, pinch the screen.
Note: Additional browsers, such as Chrome,
may also be available on your phone.
18
from
Connect to a Wi-Fi Network
When you’re in range of an available Wi-Fi
network, use your phone’s Wi-Fi feature to
access the Internet and other data services.
1. Touch > > Settings .
2. Touch the switch next to Wi-Fi and slide to
the ON position to turn Wi-Fi on.
3. Touch Wi-Fi and then touch touch >
Scan to display a list of available networks.
4. Touch a Wi-Fi network to connect. If
necessary, enter the security key (password)
and touch Connect.
(contraseña) y toca Conectar.
necesario, ingresa la clave de seguridad
4. Toca una red Wi-Fi para conectarte. Si es
visualizar una lista de redes disponibles.
3. Toca Wi-Fi y luego toca > Buscar para
el Wi-Fi.
desliza a la posición “Sí” para encender
2. Toca el interruptor que está junto a Wi-Fi y
.
Configuración
1. Toca > >
servicios de datos.
teléfono para acceder a Internet y otros
disponible, puedes usar la función Wi-Fi de tu
Cuando estás al alcance de una red Wi-Fi
Conéctate a una red Wi-Fi
desde
disponibles en tu teléfono.
adicionales como Chrome, pueden estar
Nota: Otras opciones de navegación
Para ampliar o reducir, pellizca la pantalla.
+
o hacia abajo por la página.
Para desplazarte, desliza tu dedo hacia arriba
+
cualquier página.
Para más opciones, toca
+
Toca una categoría para abrirla.
+
foros, descarga contenido y más.
categorías, navega a sitios de Internet, lee
2. Desde la página de inicio Boost, selecciona
ingresar tu número de teléfono móvil.
puede que recibas instrucciones para
1. Toca > > Navegar. La primera vez,
Navega por Internet
Page 19

19
G
G
G
G
G
G
o
o
o
o
o
o
o
o
o
o
g
g
g
g
g
l
l
l
l
l
l
e
e
e
e
e
P
P
P
P
P
P
l
l
l
l
l
l
a
a
a
a
a
y
y
y
y
y
y
y
y
y
y
S
S
S
S
S
S
e
e
e
e
e
r
r
r
r
r
v
v
v
v
v
i
i
i
i
i
i
c
c
c
c
c
i
i
i
i
i
i
o
o
o
o
o
s
s
s
s
s
m
m
m
m
m
ó
ó
ó
ó
ó
ó
v
v
v
v
v
i
i
i
i
i
i
l
l
l
l
l
l
e
e
e
e
e
s
s
s
s
s
G
G
G
G
G
G
o
o
o
o
o
o
o
o
o
o
g
g
g
g
g
l
l
l
l
l
l
e
e
e
e
e
Goo
g
g
l
e P
a
y
y
and Goo
g
g
e Moile Servces
cargar tus propios videos.
disponibles. Ingresa con tu cuenta Gmail para
Toca >
para
para navegar y ver videos
> YouTube
Ver y compartir videos.
YouTube –
+
comenzar a usar el servicio.
de Google. Toca > > Maps
Google Maps – El programa de localización
+
el servicio.
Hangouts para comenzar a usar
instantánea de Google. Toca > >
Hangouts – El servicio de mensajería
+
Google al igual que con Google Play.
a muchos servicios relacionados con
Google. Tu cuenta Gmail te permite acceder
Gmail – El servicio de correo electrónico
+
Servicios móviles Google
para iniciar
visita espanol.boostmobile.com/support/device-support/ para obtener guías, tutoriales y más
descargar aplicaciones de Google Play.
confi gurada en tu teléfono para comprar y
Nota: Deberás tener una cuenta Google
las indicaciones en pantalla.
el precio (para aplicaciones pagadas) y sigue
4. Toca Instalar (para aplicaciones gratuitas) o
descripción y reseñas de usuarios.
3. Toca una aplicación o juego para leer una
una búsqueda.
destacados o toca
2. Navega por las aplicaciones y juegos
Términos de Servicio.
Store, toca Aceptar para aceptar los
La primera vez que visitas Google Play
+
> Play Store .
1. Toca >
Descarga aplicaciones y juegos
para tu teléfono.
nuevas aplicaciones, libros, películas y música
Google Play™ es el lugar para encontrar
Google Play™ is the place to go to fi nd new
apps, games, movies, and more for your phone.
Download Apps and Games
1. Touch >
+
The fi rst time you visit the Google Play Store
app, touch Accept to accept the Terms
of Service.
2. Browse through featured apps and games, or
touch
to start a search.
3. Touch an item to read a description
and reviews.
4. Touch Install (for free apps) or the price
(for paid applications) and follow the
onscreen prompts.
Note: You must have a Google Account set up
on your phone to purchase and download
applications from Google Play.
> Play Store .
Google Mobile Services
+
Gmail – The Google mail service. Your Gmail
account lets you access many Google-related
services as well as the Google Play.
+
Hangouts – Google’s instant messaging
service. Touch > > Hangouts to
begin using the service.
+
Google Maps – The Google location program.
Touch > > Maps to begin using
the service.
+
YouTube – View and share videos. Touch >
> YouTube to browse through and view
available videos. Sign in with your Google
Account to upload your own videos.
visit boostmobile.com/support/device-support/ for guides, tutorials, and more
19
Page 20

Bluetoo
h
20
B
B
B
B
B
B
B
l
l
l
l
l
l
l
u
u
u
u
u
e
e
e
e
e
e
t
t
t
t
t
t
o
o
o
o
o
o
o
o
o
o
o
o
t
t
t
t
t
t
h
h
h
h
h
h
h
enviando el archivo.
4. Toca el nombre del equipo al cual estás
Pair and Connect With a
Bluetooth®-Capable Device
1. Turn Bluetooth on. (Touch > >
Settings
to Bluetooth and slide to the ON position.)
2. Touch Bluetooth and then touch the check
box next to your phone name to make
it discoverable.
3. Touch SEARCH FOR DEVICES. You’ll see a
list of in-range Bluetooth devices.
4. Touch a device from the list to initiate pairing.
5. Enter the passkey or PIN code, or verify the
shared key, and touch OK.
6. The external device will then have to also
accept the connection.
7. Once you’re paired with a device, your
connection should launch. The Bluetooth icon
shows your current connection status.
20
and then touch the switch next
Share Contacts, Files, or Pictures
Using Bluetooth
1. Open the app containing the fi le you want to
share (for example, t
2. Locate the fi le or entry you want to share.
+
You can send pictures and videos directly
from the camera or from Gallery, Calendar
events, Contacts (as vCards), music tracks,
and voice recordings. Not all devices can
receive all fi le types.
3. Depending on the app, touch > Share >
Bluetooth or touch and hold the fi le and
select Share (or Send) > Bluetooth.
4. Touch the name of the device to which you’re
sending the fi le.
ouch >
> ).
Compartir (o Enviar) > Bluetooth.
presionado el archivo y selecciona
Compartir > Bluetooth o toca y mantén
>
equipos podrán recibir todos los
música y grabaciones de voz. No
> ).
3. Dependiendo de la aplicación, toca
tipos de archivos.
todos los
pistas de
en
Calendario, Contactos (como vCards),
desde la cámara o desde Galería, eventos
Puedes enviar fotos y videos directamente
+
compartir.
2. Localiza el archivo o contacto que quieras
>
que quieras compartir (por ejemplo, toca
1. Abre la aplicación que contiene el archivo
usando Bluetooth
Comparte contactos, archivos o fotos
y después toca el
muestra el estado de la conexión actual.
deberá iniciarse tu conexión. El ícono Bluetooth
7. Una vez hayas hecho el enlace con un equipo,
que aceptar la conexión.
6. El equipo externo entonces también tendrá
verifi ca la clave compartida, y toca Vincular.
personal (PIN, por sus siglas en inglés), o
5. Ingresa la contraseña o código de identifi cación
el enlace.
4. Toca un equipo de la lista para iniciar
Bluetooth descubiertos al alcance.
teléfono mostrará una lista de equipos
3. Toca BÚSQUEDA DE DISPOSITIVOS. Tu
nombre de tu teléfono para que sea detectable.
2. Toca Bluetooth, y toca luego la casilla al lado del
posición Sí).
interruptor junto a Bluetooth y deslízalo a la
Configuración
1. Activa Bluetooth, (toca > >
capacitado para Bluetooth®
Enlaza y conéctate con un equipo
Page 21

21
D
D
D
D
D
D
D
e
e
e
e
e
e
s
s
s
s
s
s
c
c
c
c
c
c
a
a
a
a
a
a
r
r
r
r
r
r
g
g
g
g
g
g
a
a
a
a
a
a
r
r
r
r
r
r
M
M
M
M
M
M
M
o
o
o
o
o
o
b
b
b
b
b
b
b
i
i
i
i
i
i
i
l
l
l
l
l
l
l
e
e
e
e
e
e
I
I
I
I
I
I
I
D
D
D
D
D
D
D
Downoad Mob
e I
D
visita espanol.boostmobile.com/support/device-support/ para obtener guías, tutoriales y más
Mobile ID delivers the very best applications
como tu Mobile ID actual.
instalará automáticamente y se mostrará
4. Una vez que tu paquete se descargue, se
y Condiciones.
3. Selecciona Instalar y acepta los Términos
dentro del área de cobertura de la red.
completamente cargada, y que te encuentres
que tu equipo esté activado, la batería
Consejo: Antes de instalar Mobile ID, asegúrate
superior de la pantalla.
de aplicaciones instaladas en la parte
que ahora quieres elegir desde el carrusel
> >
Mobile ID, y después selecciona el paquete
instalados en tu teléfono, toca
5. Para cambiar entre paquetes de Mobile ID
, GPS y más.
™
, YouTube
®
Obtener nuevos IDs.
Para buscar un paquete adicional, toca
+
paquete ID disponible.
2. Desde la pantalla principal de ID, toca un
1. Toca > > Mobile ID.
Mobile ID se descarga e instala gratis.
Boost ID – Facebook
por Boost, en el paquete fácil de usar
para tu teléfono, cuidadosamente escogidas
Mobile ID ofrece las mejores aplicaciones
for your phone, handpicked by Boost, in one
easy-to-use Boost ID pack – Facebook
™
YouTube
is free to download and install.
1. Touch > > Mobile ID.
2. From the main ID screen, touch an available
3. Select Install and agree to the
4. Once your pack has completed downloading,
, GPS and more. The Boost ID pack
ID pack.
+
To search for additional packs, touch
Get New ID Packs.
Terms & Conditions.
it will automatically install and appear as your
current Mobile ID.
visit boostmobile.com/support/device-support/ for guides, tutorials, and more
®
,
5. To switch between Mobile ID packs installed
on your phone, touch
and then select the pack you want to switch
to from the installed app carousel at the top
of the screen.
Tip: Before you install Mobile ID, make sure your
device is activated, your battery is fully charged,
and you are in a network coverage area.
> > Mobile ID,
21
Page 22

Faceo
o
,
Twter & Mor
e
F
F
F
F
F
F
F
a
a
a
a
a
a
c
c
c
c
c
c
e
e
e
e
e
e
b
b
b
b
b
b
b
o
o
o
o
o
o
o
o
o
o
o
o
k
k
k
k
k
k
k
, T
T
T
T
T
T
T
w
w
w
w
w
w
i
i
i
i
i
i
i
t
t
t
t
t
t
t
t
t
t
t
t
t
t
e
e
e
e
e
e
r
r
r
r
r
r
y
y
y
y
y
y
M
M
M
M
M
M
M
á
á
á
á
á
á
á
s
s
s
s
s
s
22
Set up and access all your favorite social
networking apps on the go.
Set Up Social Networking Accounts
Before using your social networking accounts,
you may need to download them from the
Google Play Store app.
1. Touch >
2. Browse or search for the app you want to
download, for example Facebook, Twitter,
or Instagram.
3. Touch the app and then touch Install. Follow
the prompts to download and install the app.
22
> Play Store .
Use Social Networking Accounts
1. Touch > > Facebook (or Twitter,
Instagram, etc.).
2. Follow the onscreen instructions to sign into
your account, for example, by entering a user
name and password.
3. Update your status, post pictures, follow
your
favorite tweets, and more, all on
your Boost Max.
Note: Touch to access settings for your
apps, depending on the account type.
Tip: You can add home screen widgets for
many social networking apps. Touch
and then touch the Widgets tab. Touch and
hold a widget and then drag it to an empty
space on your home screen.
>
> y después toca la
para acceder a la
Boost Max.
un espacio vacío en la pantalla de inicio.
presionado un widget y después deslízalo a
pestaña de Widgets. Toca y mantén
sociales. Toca
de inicio para muchas aplicaciones de redes
Consejo: Puedes agregar widgets de pantalla
dependiendo del tipo de cuenta.
confi guración de tus aplicaciones,
Nota: Toc a
desde tu
comparte fotos, lee actualizaciones y más,
3. Envía actualizaciones de estatus,
y contraseña.
introduciendo tu nombre de usuario
acceder a tu cuenta, por ejemplo,
2. Sigue las instrucciones en pantalla para
Instagram, etc.).
1. Toca > > Facebook (o Twitter,
Usa tus cuentas de redes sociales
descargar e instalar la aplicación.
Instalar. Sigue los pasos en la pantalla para
3. Toca el ícono de la aplicación y luego toca
o Instagram.
descargar, como Facebook, Twitter,
2. Navega o busca la aplicación que quieras
> Play Store .
1. Toca >
aplicación Google Play Store.
podrías tener que descargarlas desde la
Antes de utilizar tus cuentas de redes sociales,
Configura cuentas de redes sociales
desde cualquier lugar.
aplicaciones de redes sociales favoritas
Confi gura y accede a todas tus
Page 23

23
C
C
C
C
C
C
C
o
o
o
o
o
o
n
n
n
n
n
n
f
f
f
f
f
f
f
i
i
i
i
i
i
i
g
g
g
g
g
g
u
u
u
u
u
u
r
r
r
r
r
r
a
a
a
a
a
a
c
c
c
c
c
c
i
i
i
i
i
i
i
ó
ó
ó
ó
ó
ó
ó
n
n
n
n
n
n
Settinggs
visita espanol.boostmobile.com/support/device-support/ para obtener guías, tutoriales y más
Aplicaciones y Conectar a PC.
device-support/.
en espanol.boostmobile.com/support/
la confi guración, consulta la Guía del Usuario
Para obtener información detallada acerca de
este dispositivo y Acerca del dispositivo.
desarrollador, Actualización del sistema, Activar
Sistema – Accesibilidad, Opciones del
sociales y más.
correo electrónico, cuentas de redes
de dichas cuentas como cuentas de
cuentas estén confi guradas, verás una lista
Cuentas – Añadir cuenta. Una vez que las
y Copia de seguridad y restablecer.
Personal – Servicios de ubicación, Seguridad
.
.
Configuración
Espacio de almacenamiento, Batería,
Pantalla, Fecha y hora, Teclado e idioma,
Dispositivo – Visor inteligente, Sonido,
de datos y Más.
de avión, Wi-Fi, Bluetooth, Redes móviles, Uso
Conexiones inalámbricas y redes – Modo
Las opciones de confi guración incluyen:
que quieres cambiar.
2. Selecciona la categoría de confi guraciones
y después toca
Desliza el panel de notifi caciones hacia abajo
–o–
1. Toca > >
Accede a Configuración
Explora maneras de personalizar tu teléfono, confi gura permisos y más en el menú Configuración.
Explore ways to customize and update your phone, set permissions, and more in the Settings menu.
Accessing Settings
1. Touch > > Settings .
–or–
Drag the notifi cations panel down and then
.
touch
2. Select a feature you want to confi gure.
Settings options include:
Wireless & Networks – Airplane mode,
Wi-Fi, Bluetooth, Mobile networks, Data usage,
and More.
Device – Smart Viewer, Sound, Display, Date
& time, Language & input, Storage, Battery,
Apps, and Connect to PC.
Personal – Location services, Security, and
Backup & reset.
visit boostmobile.com/support/device-support/ for guides, tutorials, and more
Accounts – Add account. Once accounts
have been confi gured, you’ll see a list of
confi gured accounts such as email
accounts, social networking accounts,
and more.
System – Accessibility, Developer options,
System updates, Activate this device, and
About phone.
For detailed information about settings,
please see the User Guide at
boostmobile.com/support/device-support/.
23
Page 24

Bater
y
y
Savin
g
g
T
i
p
p
s
24
C
C
C
C
C
o
o
o
o
n
n
n
n
s
s
s
s
e
e
e
e
j
j
j
j
j
o
o
o
o
s
s
s
s
p
p
p
p
a
a
a
a
r
r
r
r
a
a
a
a
a
a
a
a
h
h
h
h
h
o
o
o
o
r
r
r
r
r
r
r
r
a
a
a
a
r
r
r
r
b
b
b
b
b
a
a
a
a
t
t
t
t
e
e
e
e
r
r
r
r
í
í
í
í
í
a
a
a
a
-
Manage the Display Brightness and
Screen Timeout
+
T
ouch >
Display > Brightness to modify the
backlight setting as desired.
+
T
ouch >
Display > Sleep and select a screen
timeout setting.
+
To turn off the screen, press the Power button.
The phone will continue to function.
24
> Settings > Device >
> Settings > Device >
Manage Your Phone’s Wireless Functions
Disable the Wi-Fi, Bluetooth, and GPS
functions of the phone when you’re not
using them.
+
Slide open the Notifi cations panel and
touch Wi-Fi or Bluetooth to toggle these
options on or off .
+
Touch > > Settings > Location
services. Select or deselect the check
boxes next to the location options to
enable/disable location sources.
For more useful tips about battery care
and safety, see the User Guide at
boostmobile.com/support/device-support/.
support/device-support/.
Usuario en espanol.boostmobile.com/
y seguridad de la batería, consulta la Guía del
Para más consejos útiles sobre el cuidado
o desactivar las fuentes de localización.
marcados junto a las opciones para activar
borra la selección de los cuadros
Servicios de ubicación. Selecciona o
Toca > > Configuración >
+
desactivar estas opciones.
y toca Wi-Fi o Bluetooth para activar o
Desliza para abrir el panel de Notifi caciones
+
del teléfono cuando no las estés usando.
Desactiva las funciones Wi-Fi, Bluetooth y GPS
Maneja las funciones móviles de tu teléfono
>
>
Configuración
>
Configuración >
continuará funcionando.
Botón de encendido. El teléfono
Para apagar la pantalla, presiona el
+
entre al modo de suspensión (dormir).
corta duración antes de que el teléfono
Pantalla > Suspender y selecciona una
Toca
>
+
según deseado.
configuración de la luminosidad del fondo
Pantalla > Brillo para modifi car la
Toca
>
+
tiempo de pantalla activa
Maneja la luminosidad de la pantalla y el
Page 25

25
A
A
A
A
A
A
A
d
d
d
d
d
d
d
m
m
m
m
m
m
i
i
i
i
i
i
i
n
n
n
n
n
n
i
i
i
i
i
i
i
s
s
s
s
s
s
t
t
t
t
t
t
r
r
r
r
r
r
a
a
a
a
a
a
t
t
t
t
t
t
u
u
u
u
u
c
c
c
c
c
c
u
u
u
u
u
e
e
e
e
e
e
n
n
n
n
n
n
t
t
t
t
t
t
a
a
a
a
a
a
R
R
R
R
R
R
R
e
e
e
e
e
e
c
c
c
c
c
c
u
u
u
u
u
u
r
r
r
r
r
r
s
s
s
s
s
s
o
o
o
o
o
o
s
s
s
s
s
s
Man
age You
r AccoutResources
número telefónico.
cuenta y te ayudaremos a que conserves tu
Bloquearemos el saldo y la información de tu
1-888-BOOST-4U (1-888-266-7848).
llama inmediatamente a Boost al
Si alguna vez pierdes tu teléfono o te lo roban,
Teléfono extraviado/robado
>
> Boost Zone > My Device > User Manual.
Usuario completa en tu teléfono, al ir a:
En tu teléfono – Puedes ver la Guía del
+
boostmobile.com/support/device-support/.
equipos de Boost Mobile en: espanol.
página web de soporte técnico para los
Soporte técnico por internet – Visita la
+
activación de tus servicios.
Esta es una guía impresa para ayudarte con la
+
Recursos para tu teléfono
, o para realizar cambios a
®
visita espanol.boostmobile.com/support/device-support/ para obtener guías, tutoriales y más
activaste tu teléfono.
necesitarás recordar el mes y año en que
caso de que olvides el PIN de tu cuenta,
nos llames acerca de tu cuenta. Además, en
ingreses a My Account (Mi Cuenta) o cuando
ingresar el PIN de tu cuenta siempre que
dígitos durante la activación. Necesitarás
identifi cación personal) para la cuenta de 4
cuenta, debes confi gurar un PIN (número de
Por motivos de seguridad y para proteger tu
El PIN de tu cuenta
cuenta de Boost que creaste en la activación.
tu número de teléfono de 7 dígitos y el PIN de tu
acceder a My Account (Mi Cuenta) necesitarás
Cuenta) en espanol.boostmobile.com. Para
tu cuenta, puedes acceder a My Account (Mi
cuenta con Re-Boost
Para ver la información de tu cuenta, recargar tu
Administración de tu cuenta
Managing Your Account
You can go to ‘My Account’ at boostmobile.com
to view your account information, Re-Boost
to make account changes. To log into ‘My
Account,’ you will need your 7-digit phone
number and the Boost account PIN number you
set up at activation.
Your Account PIN
For security purposes, and to protect your
account, you must set up a 4-digit Account
PIN (personal identifi cation number) during
activation. You’ll need to enter your Account
PIN anytime you log in to ‘My Account’ or when
you call us about your account. Also, in case
you forget your Account PIN, you will need to
remember the month and year you activated
your phone.
visit boostmobile.com/support/device-support/ for guides, tutorials, and more
®
, or
Resources For Your Phone
+
This printed guide to get you up and running.
+
Online Support – Please visit the Boost
Mobile Device Support Webpage at:
boostmobile.com/support/device-support/.
+
On Your Phone – Access the full User Guide
on your phone by going to:
Boost Zone > My Device > User Manual.
Lost/Stolen Service
If your phone is ever lost or stolen, call
Boost immediately at 1-888-BOOST-4U
(1-888-266-7848). We will secure your
account balance and your account
information and help you keep your
phone number.
> >
25
Page 26

ReBoost
26
R
R
R
R
R
R
R
e
e
e
e
e
e
-
-
B
B
B
B
B
B
B
o
o
o
o
o
o
o
o
o
o
o
o
s
s
s
s
s
s
t
t
t
t
t
t
t
®
®
®
.
®
Pick How You Want To Pay
Boost Mobile® makes it easy to add money to
your account. You decide exactly how and
where you want to pay. Keep your account
active by using your phone and adding money
to your account.
Pay With Cash
Find an Authorized Re-Boost® Retailer near
you. Pick up a Re-Boost
as low as $10 at the register, where available.
26
®
Card or recharge for
Pay Anytime With A Credit/Debit Card
Dial #ADD (#233) to add money from your
phone or visit ‘My Account’ at boostmobile.
com to do it online. Securely register your
credit/debit card with Boost for more
convenient one-time payments or to set up
easy Auto Re-Boost
Set Up Worry-Free Payments With
Auto Re-Boost
It’s the easiest way to make sure your account
stays on and active. Use a credit card, debit
card or bank account—whatever’s best for
you. Visit boostmobile.com/reboost to get the
details on all your Re-Boost
SM
SM
payments.
®
options.
SM
.
SM
de Re-Boost
para obtener los detalles sobre las opciones
espanol.boostmobile.com/reboost/
de banco; lo que sea mejor para ti. Visita
de crédito, una tarjeta de débito o una cuenta
tu cuenta se mantenga activa. Usa una tarjeta
Es la manera más fácil para asegurar que
con Auto Re-Boost
Configura pagos sin preocupaciones
Auto Re-Boost
confi gurar los prácticos pagos automáticos con
únicos de manera más práctica o para
débito o crédito en Boost para realizar pagos
Internet. De forma segura, registra tu tarjeta de
Cuenta) en boostmobile.com para hacerlo por
desde tu teléfono o visita My Account (Mi
Marca #ADD (#233) para agregar fondos
tarjeta de crédito o débito
Paga en cualquier momento con una
o
®
te facilita la manera de agregar
®
donde esté disponible.
recarga desde $10 en una caja registradora,
cercana. Elige una Tarjeta Re-Boost
Encuentra la tienda autorizada Re-Boost® más
Paga en efectivo
usa tu teléfono y agrega crédito a tu cuenta.
quieres pagar. Para que tu cuenta siga activa,
fondos a tu cuenta. Tú decides cómo y dónde
Boost Mobile
Escoge cómo deseas pagar
Page 27

27
S
S
S
S
S
S
e
e
e
e
e
g
g
g
g
g
u
u
u
u
u
r
r
r
r
r
o
o
o
o
o
d
d
d
d
d
d
e
e
e
e
e
t
t
t
t
t
e
e
e
e
e
l
l
l
l
l
l
é
é
é
é
é
é
f
f
f
f
f
f
o
o
o
o
o
n
n
n
n
n
o
o
o
o
o
Phone Insranc
e
visita espanol.boostmobile.com/support/device-support/ para obtener guías, tutoriales y más
Can’t live without your phone?
los términos de cobertura.
phone-insurance/ para más información y
espanol.boostmobile.com/shop/plans/
seleccionar el Seguro de Teléfono. Visita
ve a la pestaña del plan de precio para
nuevo con el plan Mensual Sin Límite, después
días después de la compra de un teléfono
inicia sesión en Mi Cuenta dentro de los 30
o eléctrica fuera de garantía. Para inscribirte,
daño accidental, o si sufre una falla mecánica
teléfono estará cubierto contra pérdida, robo,
reembolso por reclamación aprobada, tu
teléfono, más un pago deducible sin
no te preocupes. Por un cargo mensual por
Obtén el Seguro de Teléfono hoy para que ya
¿No puedes vivir sin tu teléfono?
Get Phone Insurance today so you don’t have
to. For a monthly charge per phone, plus a
nonrefundable deductible per approved claim,
you are covered if your phone is lost, stolen,
accidentally damaged or has an out-of-warranty
mechanical or electrical breakdown. To enroll,
log in to My Account within 30 days of
purchasing a new phone with an accompanying
Monthly Unlimited Plan and go to the price plan
tab to select Phone Insurance. Visit
boostmobile.com/phoneinsurance for more
information and terms of coverage.
visit boostmobile.com/support/device-support/ for guides, tutorials, and more
27
Page 28

The services described in this guide may require a subscription to a service plan and/or may incur additional
charges. Not all services will work on all phones. See boostmobile.com for more details.
Portions of this guide are reproductions of work created and shared by Google and used according to terms
described in the Creative Commons 3.0 Attribution License.
Important Privacy Message. This phone is capable of determining its/your geographical location. To set controls
for access and use of your location information by others, touch
then select your location options from the list. Follow any applicable prompts These settings for the use of location
information can be turned on and off . For some applications and services you select, a phone must be turned on
and set to allow collection of location information in order to function.
Please be advised that if you use a third party application, the application may collect your personal information or
require Boost to disclose your customer information, including location information (when applicable), to the
application provider or some other third party. Boost’s policies do not apply to these third party applications.
Please carefully review the application’s terms of use and/or the application provider’s policies for more information
about how the application will collect, access, use or disclose your information before using a third-party
application. Terms of use and other policies usually are available on the application provider’s website.
©2013 Boost Worldwide, Inc. Gmail, Hangouts, Google Maps, YouTube, Android, Google, Picasa, Google Books,
Google Mobile Services, and Google Play are trademarks of Google, Inc. Other marks are property of their
respective owners. Screen images simulated. Appearance of device may vary.
> > Settings > Location services, and
de sus respectivos propietarios. Las imágenes de pantallas son simuladas. La apariencia del equipo puede variar.
Google Mobile Services y Google Play son marcas comerciales de Google, Inc. Las otras marcas son propiedad
©2014 Boost Worldwide, Inc. Gmail, Hangouts, Google Maps, YouTube, Android, Google, Picasa, Google Books,
generalmente están disponibles en el sitio web del proveedor de la aplicación.
revelará tu información antes de usar una aplicación de terceros. Los términos de uso y otras políticas
proveedor de la aplicación para más información sobre cómo la aplicación obtendrá, accederá, usará o
de terceros. Por favor, revisa cuidadosamente los términos de uso de la aplicación y/o las políticas del
aplique), a la aplicación del proveedor o de otro tercero. Las políticas de Boost no aplican a estas aplicaciones
personal o requerir que Boost revele tu información de cliente, incluyendo localización de información (cuando
Por favor, ten en cuenta que si usas una aplicación de terceros, la aplicación podría recopilar tu información
para permitir la recopilación de información de localización para que estos puedan funcionar.
apagadas. Para algunas aplicaciones y servicios que selecciones, el teléfono debe ser encendido y confi gurado
instrucción que aplique. Estas confi guraciones para el uso de localización de información pueden ser encendidas o
toca
>
>
y luego selecciona tus opciones de ubicación. Sigue cualquier
> Servicios de ubicación,
Configuración
confi gurar los controles de acceso y el uso de tu información de localización por otros,
Para
Mensaje de confi dencialidad importante. Este teléfono es capaz de determinar su/tu localización geográfi ca.
descritos en Creative Commons 3.0 Attribution License (licencia de atribución).
Partes de esta guía reproducen trabajo creado y compartido por Google y usado de acuerdo con los términos
para más detalles.
cargos adicionales. No todos los servicios funcionarán en todos los teléfonos. Visita espanol.boostmobile.com
Los servicios descritos en esta guía pueden requerir una suscripción a un plan de servicio y/o pueden incurrir
 Loading...