


ZTE BLADE V0850/
ZTE BLADE V8 MINI/
BLADE V8 mini/
ZTE BLADE V8 mini
User Manual
1

About This Manual
Thank you for choosing this ZTE mobile device. In order to keep
your device in its best condition, please read this manual and
keep it for future reference.
Copyright
Copyright © 2017 ZTE CORPORATION
All rights reserved.
No part of this publication may be quoted, reproduced, translated
or used in any form or by any means, electronic or mechanical,
including photocopying and microfilm, without the prior written
permission of ZTE Corporation.
Notice
ZTE Corporation reserves the right to make modifica tions on pr int
errors or update specifications in this guide without prior notice.
This manual has been designed with the utmost care to ensure
the accuracy of its con te nt. How e ve r, all statements, info rmation
and recommendations contained therein do not constitute a
warranty of any kind, either expressed or implied. Please refer to
For Your Safety to be sure t o use yo ur phone pr operly a nd sa fely.
We offer self-service for our smartphone users. Please visit the
ZTE official website (at
on self-service and supported product models. Infor mation on the
website takes precedence.
Disclaimer
ZTE Corporation expressly disclaims any liability for faults and
damages caused by unauthorized modifications of the software.
www.ztedevice.com) for more informa tio n
2

Images and screenshots used in this manual may differ from the
actual product. Content in this manual may differ from the actual
product or software.
Trademarks
ZTE and the Z T E logos are trademarks of Z T E Corporat ion.
Google and Android are trademarks of Google, Inc.
The Bluetooth
®
trademark and logos are owned by the Bluetooth
SIG, Inc. and any use of such trademarks by ZTE Corporation is
under license.
microSDXC Logo is a trad em ark of SD-3C, LLC.
Qualcomm® Snapdragon™ processors are products of
Qualcomm Technologies, Inc.
Qualcomm and Snapdragon are trademarks of Qualcomm
Incorpo rated, registered in t he United States and other countries.
Used with permission.
Other trademarks and trade names are the property of their
respective owners.
Version No.: R1.0
Edition Time: April 21, 2017
3

Contents
Getting Started ......................................................... 8
Getting to Know Your Phone .............................................. 8
Knowing the Keys ............................................................ 10
Installing the nano-SIM Card and microSDXC Card (Optional)
........................................................................................ 11
Charging the Battery ........................................................ 13
Powering On/Off .............................................................. 15
Locking/Unlocking the Screen and Keys ............................ 15
Gettin g t o Know the Home Screen ................................... 16
Personalizing.......................................................... 18
Turning On/Off System Sounds ........................................ 18
Switching to Silent or Vibration Mode ............................... 18
Using Do Not Disturb Mode ............................................. 19
Protecting Your Phone With Screen Locks ....................... 21
Using Your Fingerprint ..................................................... 21
Using Split Sc reen ........................................................... 23
Knowing the Basics ............................................... 25
Monitor ing the Phon e Status ............................................ 25
Managing Notifications ..................................................... 26
Entering Text ................................................................... 28
Connecting to Networks and Devices .................. 30
Connecting to Mobile Networks ........................................ 30
4

Connecting to Wi-Fi .......................................................... 31
Using Wi-Fi Direc t
Connecting to Bluetooth Devices ...................................... 34
Connecting to Your Computer via USB ............................. 37
Using the microSDXC Card as Portable Storage .............. 38
Using USB On-The-Go (OTG) .......................................... 40
Sharing Your Mobile Data Connection .............................. 40
®
.......................................................... 34
Phone Calls ............................................................ 43
Placing and Ending Calls ................................................. 43
Answering or Rejecting Calls ............................................ 44
Working Wit h the Call History ........................................... 45
Calling Your Contacts ....................................................... 46
Checking Voicemai l .......................................................... 46
Contacts ................................................................. 48
Checking Contact Details ................................................. 48
Adding a New Contact ...................................................... 48
Importing, Exporting, and Sharing Contacts ...................... 49
Working With Groups ....................................................... 51
Combine Duplicate Contacts ............................................ 52
Web Accounts ........................................................ 54
Adding o r R emoving Accounts .......................................... 54
Configuring Account Sync ................................................ 55
Email ....................................................................... 56
Settin g U p t he First Ema il Account ................................... 56
5

Checking Your Emails ...................................................... 56
Responding to an Email ................................................... 57
Writing an d Sending an Email .......................................... 58
Adding and Edit ing Email Accounts .................................. 58
Messaging .............................................................. 60
Opening the Messaging Screen ....................................... 60
Sending a Message ......................................................... 60
Replying to a Message .................................................... 61
Camera .................................................................... 62
Capturing a Photo ............................................................ 62
Recording a Video ........................................................... 65
Using Dual-Camera Modes .............................................. 66
Using Manual Camera Mode ........................................... 67
Upgrading the Phone Software ............................. 68
Troubleshooting ..................................................... 69
For Your Safety ...................................................... 73
General Safety................................................................. 73
FCC RF Exposure Information (SAR) ............................... 74
FCC Regulations ............................................................. 76
Distraction ....................................................................... 77
Product Handling ............................................................. 78
Electr ical Safet y ............................................................... 81
Radio Frequency Interference .......................................... 82
6

Explosive Enviro nments ................................................... 84
7

Front camera
Touch screen
Earpiece
Recent apps key
Home key
Back key
ight
Indicator light
Power
Volume
Headset jack
Front flash
Getting Started
Getting to Know Your Phone
Proximity & l
sensor
key
key
8
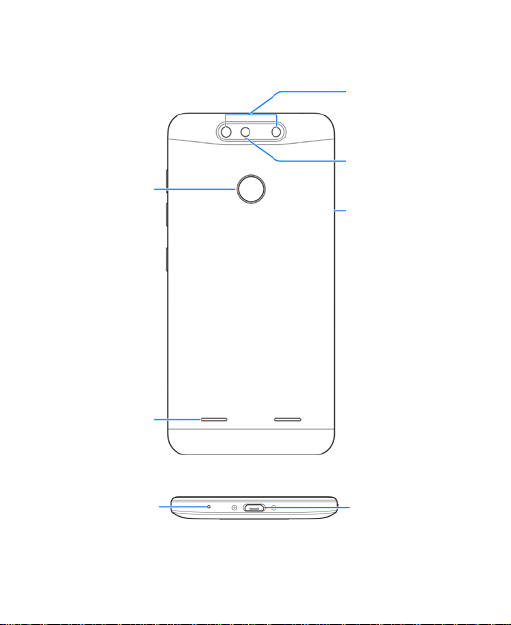
nano
microSD
card tray
Speaker
Back flash
Dual-lens camera
Fingerprint
sensor
rophone
Charging/
micro-USB jack
Mic
-SIM/
XC
9
•
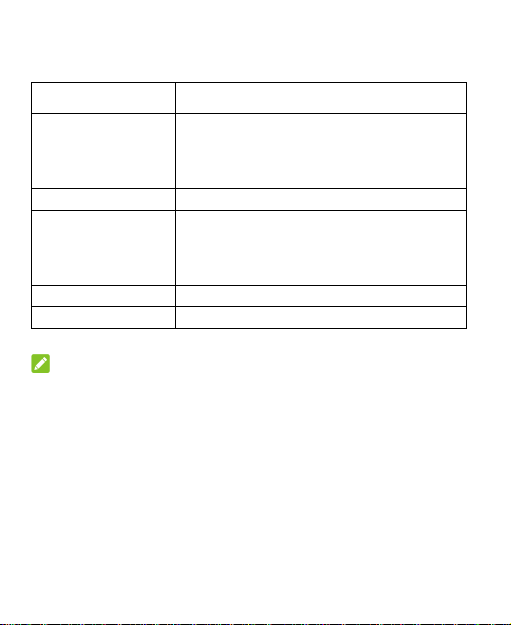
• Press to turn off or on the screen display.
Volume key
Press or hold to turn the volume up or down.
•
or Now
on Tap.
Back key
Touch to go to the previous screen.
Recent apps key
Touch to see recently used applications.
Knowing the Keys
Key Function
Press and hold to turn on or off airplane
Power key
Home key
NOTE:
The positions of the Back key and the Recent apps key are
interchangeable through Settings > Features > Navigation
keys.
mode, control sound and vibration, restart, or
power off.
Touch to return to the home screen from any
application or screen.
• Touch and hold to use Google Search
10

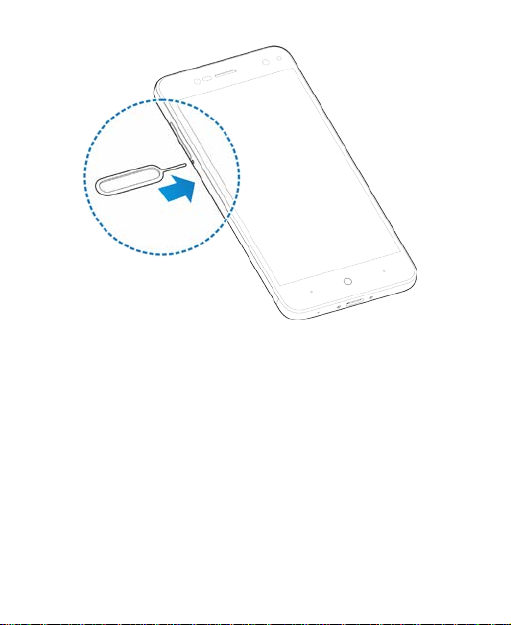
Installing the nano-SIM Card and microSDXC Card (Optional)
The nano-SIM card and t he microSDXC card can be ins talled or
removed while the phone is turned on. You need to unmount the
microSDXC card before removing it .
WARNING!
To avoid damage to the phone, do not use any other kind of SIM
cards, or any non-standard nano-SIM card cut from a SIM card.
You can get a standard nano-SIM card from your service
provider.
1. Insert the tip of the tray eject tool into the hole next t o the
nano-SIM/microSDXC card tray on the left side of the phone.
11
2. Pull out the card tray and place the nano-SIM/microSDXC
card on the tray with the gold-colored contacts facing down.
Then carefully slide the tray back into place.
12
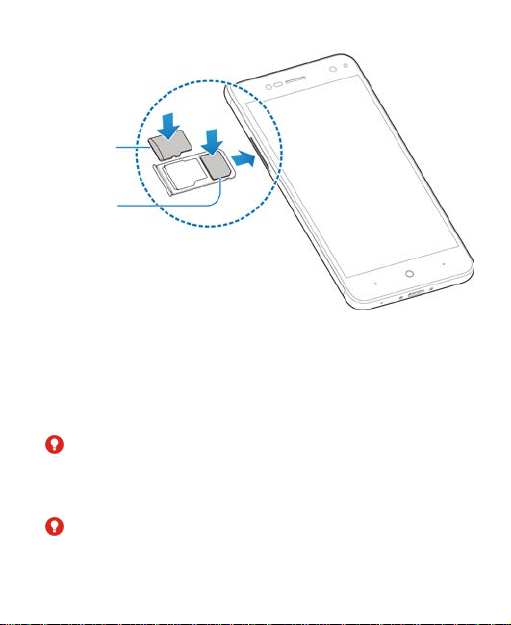
C
card
SIM
card
microSDX
nano-
Charging the Phone
Your phone’s battery should have enough power for the phone to
turn on, find a signal, and make a few calls. You should fully
charge t he battery as soon as poss ible.
WARNING!
Use only ZTE-approved chargers and cables. The use of
unapproved accessories could damage your phone or cau se the
battery to explode.
WARNING!
Do not remove the back cover. The battery is not removable.
Removal may cause fire or explosion.
13
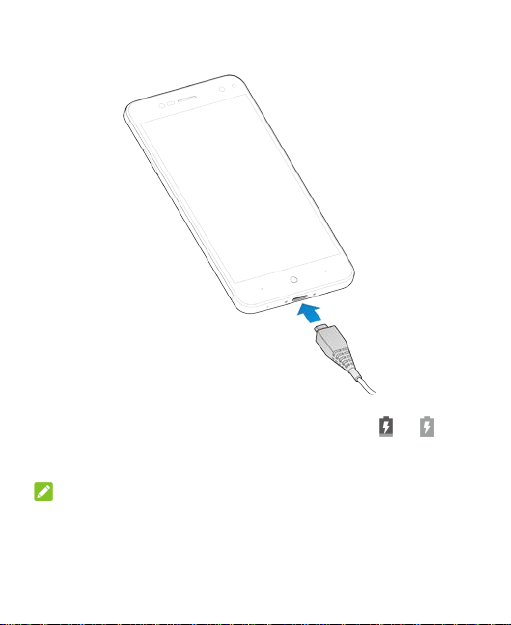
1. Connect the adapter to the charging jack.
2. Connect the charger to a standard AC power outlet. I f th e
phone is on, you’ll see a charging icon, such as
or ,
appear on the status bar.
3. Disconnect the charger when the battery is fully charged.
NOTE:
If the battery is extremely low, the phone may not power on even
while charging. In this case, charge the phone at least for 20
minutes before trying to power on again. Contact the cu stomer
service if you still cannot power on the phone af ter prolonged
14

charging.
Powering On/Off
• Press and hold the Power key to turn on your phone.
• To power off, press and hold the Power key and touch Power
off.
NOTE:
If the phone freezes or takes too long to respond, you can press
and hold the Power key for about 10 seconds to restart the
phone.
Locking/Unlocking the S c r een a nd K eys
Your phone allows you to quickly lock the screen and keys (put
the phone to sleep mode) when not in use and to turn the screen
back on and unlock it when you need it.
To lock the screen and keys:
To quickly turn the screen off and lock the keys, press the Power
key.
NOTE:
To save battery power, the phone automatically turns off the
screen after some time of inactivity. You will still be able to
receive messages and calls while the phone screen is off.
To unlock the screen and keys:
1. Press the Power key to turn the screen on.
2. Swipe up on the screen.
15
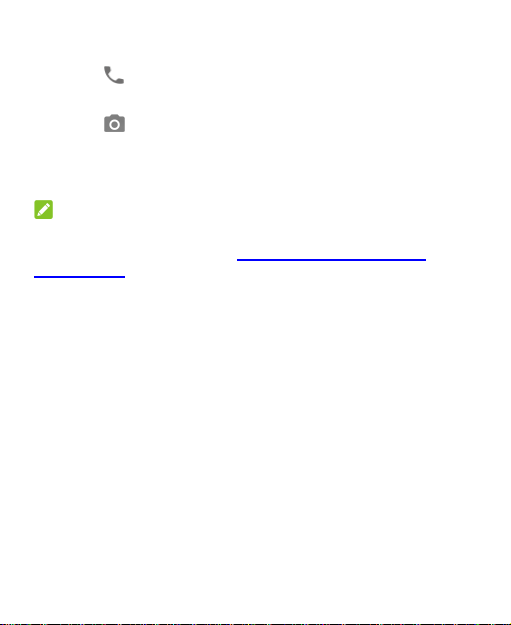
- or Swipe
- or Swipe
- or Touch a notificat ion twice consecutively t o open the related
app.
NOTE:
If you hav e s et a fingerprint, a pattern, a PIN or a complex
password for your phone (see
Screen Loc ks), you’ll need to press the Power key, draw the
pattern or enter the PIN/password to unlock your screen.
right to open the Phone app.
left to open the Camera app.
Protecting Your Phone With
Getting to Know the Home Screen
The home screen is the starting point for your phone’s
applications, functions, and menus. You can customize your
home screen by adding shortcuts, folders, w idgets, and more .
16
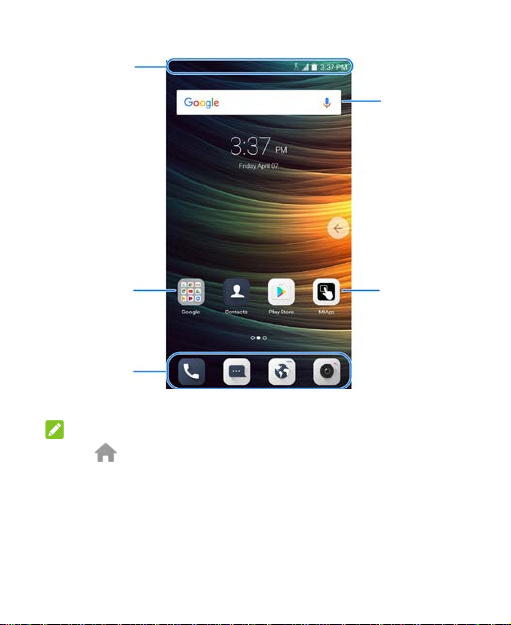
Status bar
Widget
Folder
Primary
shortcuts
Shortcut
NOTE:
Touch
main home screen.
at the top of a home screen thumbnail to set it as the
17

Personalizing
Turning On/Off System Sounds
1. Touch , and swipe left on the home screen. Touch
Settings > Sound.
2. Switch on or of f Dial pad tones, Screen locking sounds,
Touch sounds, Vibrate on tap, or Ringtone fade-in.
Switching to Silent or Vibration Mode
You can set t he phone to silent or vibration mode by using one of
the following methods.
• Press the Volume up or Volume down key when no media
application is active to show the volume management window.
Drag the slider to the left or keep pressing the Volume down
key to switch the phone to vibration mode. Press the Volume
down key in vibration mode to switch the phone to silent
mode.
• Swipe down from the top of t he screen to open the notification
panel and drag the panel dow nw ards. Touch Normal or
Vibrate to switch the phone to vibration or silent mode.
• Touch , and swipe left on the home screen. Touch
Settings > Sound > Sound m ode and select Vibrate or
Silent to switch to vi b r ation or silent mode.
• Press and hold the Power key and touch Ring or Silent to
switch to silent or vibration mode.
18

NOTE:
Silent and vibration modes will not silence your alarm sound.
Using Do Not Disturb Mode
You can limit interruptions with Do not disturb mode. This mode
silenc es y our phone so t hat it doesn’t make sounds or vibrate
when you don’t want it to.
To turn on Do not disturb mode:
1. Touch
Settings > Sound > Do not dis t urb.
2. Slide on the switch next to Do not disturb.
3. Touch Do not disturb mode to determine whether you allow
exceptions.
Priority only: Dis t urbance set as priorit y i nterrupt ions are
Alarms only: Only alarms sound or vibration is allowed.
Total silence: Forbid all disturbances.
NOTE:
To turn off Do not disturb mode quic kl y, p r ess
Volume up key.
To set exceptions for Do not disturb mode:
Y ou can set reminders , certain calls and message s as exceptions
when Do not disturb mode is on, so these ringtones, sounds and
vibration are not turned off.
1. Touch
Settings > Sound > Do not disturb.
, and swipe left on the home screen. Touch
allowed.
and hold the
, and swipe left on the home screen. Touch
19

2. When Do not dis turb is on, in the Sound allowed section,
touch the switches next to the items you want to allow. Touch
Messages or Incoming Call and set who can alert you of
their messages or calls.
NOTE:
To set exceptions based on apps, touch Settings > Notifications.
Select an app and switch on Sound notifications in Do not
disturb.
To set a Do not disturb rule:
If you want to allow all notifi ca tion alerts through most of the time,
but want to limit alerts during certain times (like at night or on the
weekends), you can set a rule for Do not distu rb m ode.
1. Touch Settings > Sound > Do not disturb.
2. Touch Add rule.
3. Select Time rule or Event rule, enter the rule nam e, and
touch OK.
4. For a time rule, set the days, the start and end times, and set
Do not disturb mode. F or an event rule, select a Calendar
account you want to make the rule for, select the type of reply
you want to use, and set Do not disturb mode.
NOTE:
To turn on or off a rule, touch it to open its details screen and then
touch the Turn on or turn off switch.
20

Protecting Your Phone With Screen Locks
You can protect your phone by creating a screen lock. When it is
enabled, you need to draw a pattern, enter a numeric PIN or
password to unlock the phone’ s screen and keys.
1. Touch Settings > Security > Screen lock.
2. Touch Swipe, Pattern, PIN or Complex password.
Touch Swipe to disable the screen lock. Anyone can
unlock the screen by touching the display and swiping up.
Touch Pattern to draw and redraw a pattern that you
must draw to unlock the screen.
Touch PIN or Complex password to set a numeric P IN
or a password that you must enter to unlock the screen.
3. For Pattern, PIN, or Complex Password lock, select how you
want notifications and their contents to show when the phone
is locked.
NOTE:
Remember the pattern, PIN or password you set. Otherw ise, you
will have to upgrade the phone software to use the phone. See
Upgrading the Phone Software.
Using Your Fingerprint
With the fingerprint sensor integrated in the Fingerprint sensor
key, you can register up to 5 fing erprints and use them to unlock
the phone or open bound apps.
21

NOTE:
The fingerprint feature is only usable when the screen lock
(Pattern, PIN or Complex password) is en abled. When the
screen lock is reset to Swipe, all regis t ered fingerprints are
erased.
Register a Fingerprint
1. Touch Settings > Security > Fingerprint.
2. Enter the screen lock pattern , PIN or password you set. If you
haven’t set a screen lock, follow the prompts to set it.
3. Touch Fingerprint management.
4. Touch Register or Add fingerprint.
5. Follow the prompts to record the center and the edges of a
finger.
6. Touch OK.
NOTE:
Touch an existing fingerprint record to change its name or delete
it.
Set Fingerprint Action s
1. Touch Settings > Security > Fingerprint.
2. Enter the screen lock pattern , PIN or password you set. If you
haven’t set a screen lock, follow the prompts to set it.
3. Touch the switches next to Take photo, or Answer call.
Take photo: Touch the fingerprint sensor to take a photo
when the Camera app is opened. No fingerprint
22

verification is needed.
Answer call: Touch the fingerprint sensor to answer
incoming calls. No fingerprint verification is needed.
4. Touch Fingerprint management.
5. Touch the switches next to Wake up and unlock your
phone, Access Private Space or Simple touch.
Wake up and unlock your phone: Touch the fingerprint
sensor to wake up the phone and unlock it with a
registered fingerprint.
Access Private Space: Touch the fingerprint sensor to
access privacy of Private Space.
Simple touch: When the screen lock (Pattern, PIN or
Complex password) is enabled, you can wake up the
phone, unlock it, and open different apps with different
registered fingerprints.
Using Split Screen
With the Split Screen feature, tw o applicatio ns can shar e the
phone screen, one on top of the other.
Enable Split Screen
1. Open one application that supports Split Screen.
2. Touch and hold the Re cent apps key. The current app
window shrinks to the top half of the screen, while the list of
recent apps appears on the bottom half.
NOTE:
23

You can also touch the Recent apps key and drag an app tab
from recent apps to the top half of the screen (the Drag here
to use split screen area).
3. On the bottom half of the screen, touch another app from
recent apps.
NOTE:
The Split Screen feature does not support all applications. If the
app you want to put at the bottom half of the screen is not in
recent apps, touch the Home key and find the app in the apps
list.
End Split Screen
Y ou can end Split Screen in two ways.
• Drag between the two app windows to the top or
bottom of the screen.
• Touch and hold the Recent apps key.
24
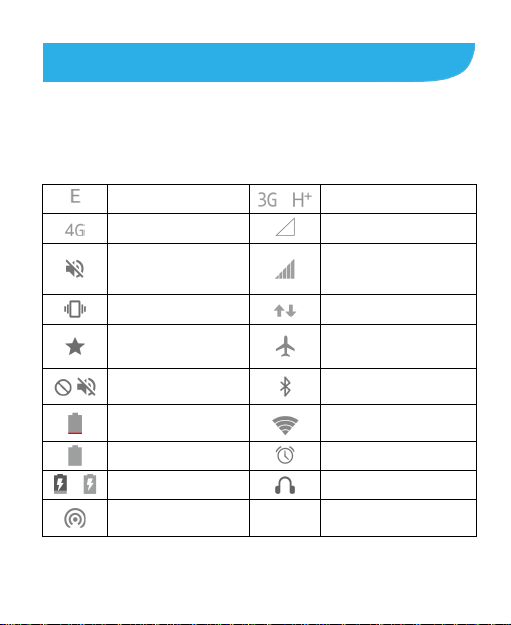
/
Silent mode or Do not
(Alarms only)
(Priority only)
Do not disturb mode on
(Total silence)
Connected to a Wi-Fi®
network or Wi-Fi in use
/
Portable Wi-Fi hotspot
on
Knowing the Basics
Monitoring the Phone Status
The status bar at the top of the home screen provides phone and
service s tatus icons on the right side. Bel ow are some of t he
icons you may see.
EDGE/2G connected
4G LTE connected
3G /HSPA+ connected
No signal
disturb mode on
Vibration mode
Do not disturb mode on
Battery low
Battery full
Battery charging
Signal strength
Mobile data in use
Airplane mode
Bluetooth® on
Alarm set
Wired headset connected
25
the Email app
/
New message(s) from
the Gmail™ app
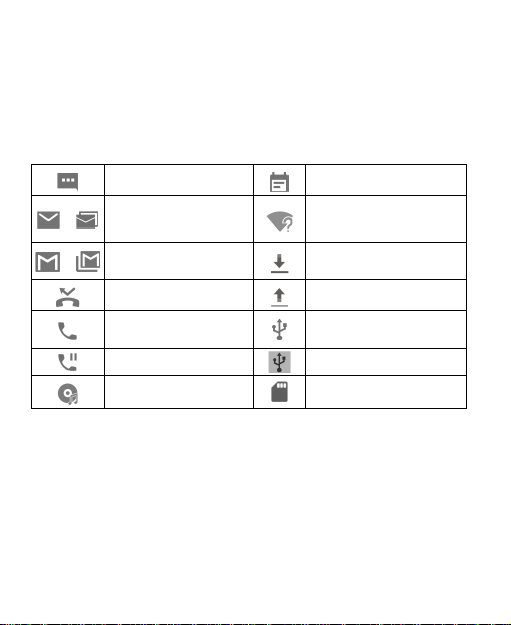
Managing Notifications
Notification Icons
The status bar at the top of the home screen provides notification
icons on the left. Be low are some of t he icons you m ay see.
New SMS
New message(s) from
/
Missed call
Upcoming event
New Wi-Fi network
detected
Downloading data
Sending data
Call in progress
Call on hold
Song playing
USB connected
USB tethering on
microSDXC card mounted
Open/Close the Notification Panel
Notifications report the arrival of new messages, calendar
events, and alarms, as well as ongoing events, suc h as when
you are playing music. You can open the notific ation pane l to
view the details of notifications.
• To open the notification panel, swipe your finger down on the
home screen or from the top of the screen.
26

• To close the notification panel, swipe your finger up on the
screen or touch the Back key.
Use Quick Settings
The Quick Settings make it convenient to view or change the
most common settings for your phone.
Open the notification panel and drag the panel downwards to find
the following Quick Settings on the screen.
• Wi-Fi: Touch to turn on or off Wi-Fi. Touch and hold to open
the Wi-Fi menu in Settings.
• Data: Touch to turn on or off mobile data for the nano-SIM
card.
• Normal/Vibrate/Silent: Touch to switch between sound,
vibration, and mute. Touch and hold to o pen the Sound me nu
in Settings.
• Bluetooth: Touch to turn on or off Bluetooth. Touch and hold
to open the Bluetooth menu in Settings.
• GPS: Touch to turn on or off GPS. Touch and hold to open the
Location menu in Settings.
• Hotspot: Touch to turn on or off the Portable Wi-Fi hotspot
feature. Touch and hold to open the Wi-Fi hotspot menu in
Settings.
• Airplane mode: Touch to turn on or off airplane mode.
• Auto-rotate: Touch to turn on or off the auto-rotate screen
feature.
• Sync: Touch to turn on or off auto-sync of accounts data.
Touch and hold to open the Accounts menu in Settings.
27

• Ultra power saving: Touc h to turn on or off Ultra Power
Saving Mode.
• Flashlight: Touch to turn on or of f the flash.
• Lock: Touch to lock and turn off the screen.
• Mi-POP: Touch to turn on or off Mi-POP. Touch and hold t o
open the Mi-POP menu in Settings.
• Brightness: Uncheck Auto and drag the brightness slider to
adjust the screen brightness.
NOTE:
In the Quick Settings screen, touch
Settings menu; touch the battery icon to open the Battery Usage
screen i n Settings > Power manager; touch EDIT at the bottom
to change co ntrol switch positio n.
at the top to get to the
Entering Text
You can enter text using the onscreen keyboard. Some apps
open it automatically. In others, you open it by touching where
you want to type. Touch the Back key to hide the ons creen
keyboard. You can also enter t ext by speaking with the Google
voice ty ping feature.
Enable or Disable Input Methods
1. Touch Settings > Advanced settings > Languages &
input > Virtual keyboard.
2. Touch Manage keyboards at the bottom.
3. Slide the switches beside the input methods to enable or
28

disable them.
Change Input Methods
1. When you use the onscreen keyboard to enter text, open the
notification panel and touch
2. Select the input method you need.
(Change keyboard).
NOTE:
The Change keyboard notification appears only w hen more than
one keyboard input method is installed and enabled.
29

Connecting to Networks and Devices
Connecting to Mobile Networks
Control Cellular Dat a Use
To enable or disable data access:
1. Touch Settings > Cellular networks.
2. Touch the switch next to Data enabled to enable or disable
cellular data use.
To get data services when roaming:
1. Touch Settings > Cellular networks.
2. Check or uncheck the Data roaming box.
NOTE:
Data roaming may incur significant roaming charges.
Select Network Type
1. Touch Settings > Cellular networks > Preferred network
type.
2. Touch the type of network you prefer to connect to.
Set Access Point Names
To connect to the Internet you can use the default Access Point
Names (APN). And if you want to add a new APN, please contact
30

the service provider to get the necessary information.
1. Touch Settings > Cellular networks.
2. Touch Access Point Names.
3. Touch
4. Touch each item to en ter the information yo u g et from your
service provider .
5. Touch
.
> Save to complete.
NOTE:
To set the APN to default settings, touch
> Reset to default.
Select Network Operator
1. Touch Settings > Cellular networks.
2. Touch Network operators.
3. Touch Search networks to search for all available networks
and select one to register manually. You can also touch
Choose automatically to select preferred network
automatically.
Connecting to Wi-Fi
Wi-Fi is a wireless netwkorking technology that can provide
Internet a ccess at distances of up to 100 meters (300 feet),
depending on the Wi-Fi router and your surroundings.
31

Turn Wi-Fi On and Connect to a Wi-Fi Network
1. Touch Settings > Wi-Fi.
2. Slide the Wi-Fi sw i tch to turn it on.
3. Touch a network name to connect to it.
4. If the network is secured, enter the password and touch
Connect.
NOTE:
Your phone automatically connec t s to prev iously used Wi-Fi
networks when they are in range.
Get Notified of Open Networks
1. Touch Settings > Wi-Fi.
2. Slide the Wi-Fi sw i tch to turn it on.
3. Touch .
4. Slide the Network notification switch.
When Wi-Fi is on, you receive notifications in the status bar when
your phone detects an open Wi-Fi network. Switch off thi s option
to turn off n otificat ions.
Add a Wi-Fi Network
You can add a Wi-Fi network if the network does not broadcast its
name (SSID), or when you are out of range.
To connect to a secured net work, you first need to get the
security details from the network's administrator.
32

1. Touch Settings > Wi-Fi.
2. Slide the Wi-Fi swi tch to turn it on.
3. Touch
4. Enter the network SSID (name). If necessary, enter security
5. Touch Save.
> Add network.
or other network configurati on details .
Connect to a WPS Network
Wi-Fi Protected Setup (WPS) is a f eature that m akes it easy t o
add your phone to the access points which support WPS.
You can use one of the following methods to connect your phone
to a wireless network using WPS.
Method one: WPS button (Recommended)
1. Touch Settings > Wi-Fi.
2. Slide the Wi-Fi switch to turn it on.
3. Touch
4. Press the WP S button on the ac ce ss p o i nt and the access
Method two: PIN number
1. Touch Settings > Wi-Fi.
2. Slide the Wi-Fi switch to turn it on.
3. Touch
4. The WPS PIN number displays on the screen. Enter the PIN
> WPS Push Button.
point will recognize your phone and add it to the network.
> WPS Pin Entry.
number into the access point's setup page.
33

After entering the PIN number, your phone automatically finds
the access point and configures the connection.
NOTE:
For detailed information about the WPS feature of the access
point, please refer to its us e r documents.
Using Wi-Fi Direct®
Wi-Fi Direct allows Wi-Fi devices t o share files and data directly
by connecting to each other without the need for wir eless access
points (hotspots).
To connect via Wi-Fi Direct:
1. Touch Settings > Wi-Fi.
2. If Wi-Fi is off, slide the Wi-Fi switch to turn it on.
3. Touch
4. Touch a device name below Peer devices to connect with it.
5. Once connected the device is displayed as “Connected” in
> Wi-Fi Direct. Your phone will search for other
devices enabled with Wi-Fi Direct connections.
The othe r device will r eceive a connection prompt and need
to accept the request for connection. Both devices ma y need
to enter a common PIN.
the Peer devices list.
Connecting to Bluetooth Devices
Bluetooth is a short -range wireless communication technology.
Phones or other devices with B luetooth capabilities can
exchange information wirelessly within a distance of about 10
34

meters (30 feet). The Bluetooth devices must be paired before
the communication is performed.
Turn Bluetooth On/Off
1. Touch Settings > Bluetooth.
2. Slide the Bluetooth switch at the top to turn it on or off.
When Bluetooth is on, the
icon appears in the stat us bar.
Pair With Another Bluetooth Device
1. Touch Settings > Bluetooth.
2. Slide the Bluetooth switch to turn it o n if Bluetooth is off.
Your phone automatically scans for and displays the IDs of all
available Bluetooth devices in range. You could touch
you want to scan again.
3. Touch the device you want to pair with.
4. Confirm that the Bluetooth passkeys are the same between
the two devices and touch Pair. Alternately, enter a Blu etooth
passkey and touch Pair.
Pairing is successfully completed when the other device
accepts the connection or the same passkey is entered.
if
NOTE:
The Bluetooth passkey may be fixed for certain devices, such as
headsets and hands-free car kits. You can try entering 0000 or
1234 (the most common passkeys), or refer to the docume nt s for
that device.
35

Forget (Unpair With) a Bluetooth Device
You can make your phone forget its pairing connection wit h
another Bluetooth device. To connect to the device again, you
need to search it and enter or confirm a passkey again.
1. Touch Settings > Bluetooth and ensure that Bluetooth is
turned on.
2. In the list of paired dev ices, touch t he icon
Bluetooth device you want to forget.
3. Touch Forget.
beside the
Send Data via Bluetooth
1. Open the appropriate application and select the file or item
you want to share.
2. Select the option for sharing via Bluetooth. The method may
vary by application and data type.
3. Touch a Bluetooth device the phone has paired with or wait
for it to search for new devices and touch one of them.
Receive Data via Bluetooth
1. Turn Bluetooth on before trying to receive data via Bluetooth.
2. Flick down the status bar and touch
3. Touch ACCEPT to start receiving the data.
Received files are stored automatically in a dedicated folder
(bluetooth, for instance) in the phone. You can access them with
the FileManager app.
NOTE:
36
.

Received co ntacts (vCard files) are automatically i mp orted to
your contact list.
Connecting to Your Computer via USB
You can connect your phone to a computer with a USB cable and
transfer music, pic tures, and other files in both direc tions. Your
phone stores these files in its phone storage or microSDXC card.
If you are using USB tethering, you must turn that off before you
can use USB to transfer f iles between your phone and computer.
Connect Your Phone to a Computer via USB
1. Connect your phone to the PC with a USB cable.
2. Open the notification panel and touc h
PC).
3. Choose one of the following options:
Charge only: Charge your phone via USB.
Install driver: Install the driver needed for some USB
connection modes (such as MTP). You only need to in stall
the driv er on the same P C o nce.
NOTE:
You can also install the driver on PC by running the
executable file in the new CD-ROM drive.
Connect to PC software: Connect your phone to the PC
and sync data on the phone to the PC.
NOTE:
To use Connect to PC software on Windows or Mac for
37
(Connected to a

the first time, you have to insta ll a driver on the PC.
Media device MTP: Transfer files on Windows
®
.
Mac
®
PC or
NOTE:
For Windows XP, please install the drivers and Media
Player 11 (or later version) when you use Media device
(MTP) for the first time.
Camera PTP: Transfer photos using camera software.
NOTE:
To make your phone connect to the computer automatically using
the selected connection type, check Do not remind me again.
Connect With Windows Media® Player
You can sync music, pictur e, and video files from the computer to
your phone via Windows Media Player on the computer.
1. Connect the phone wit h your computer via USB and choose
Media device MTP.
2. Open Windows Media Player and synchronize music, picture,
and video files.
Using the microSDXC Card as Po rtable Storage
You can use your microSDXC card as portable storage to save
photos, music, videos, downloaded files, and more.
38

When you in s tall a micr o SDXC card that has not been used on
your phone before, the phone will mount the card as portable
storage automatically.
To remove the microSDXC card from your phone:
If you need to remove the microSDXC card while the phone is on,
you must unmount it first.
1. Touch Settings > Advanced settings > Storage.
2. Touch
next to the card name in the Portable storage
section.
When the screen prompts the card is safely ejected, you can
now remove it from the phone.
To mount the microSDXC card:
When the microSDXC card is safely ejected, but still available, to
use this m icroSDXC card, you have to m ount it firs t .
1. Touch Settings > Advanced settings > Storage.
2. Touch the card name in the Portable storage section.
3. Touch Mount.
To erase the microSDXC card:
1. Touch Settings > Advanced settings > Storage.
2. Touch the card name in the Portable storage section.
3. Touch Format > Erase & format.
4. When the scr een prompts the card is ready, touch Done that
you can continue to use the microSDXC card.
39

Using USB On-The-Go (OTG)
Y our phone supports USB On-The-Go. You can connect the phone
and a USB peripheral device (such as a USB flash drive, a USB
mouse, or a USB keyboard) with an O T G adapter cable .
For example, when you connect the phone with a USB flash drive,
you can browse the files on the flash dri ve; connect the phone with
a USB mouse and you can navigate the phone with the mouse.
Sharing Your Mobile Data Connection
You can share your phone’s data capabilities through tethering or
by activating the Wi-Fi hotspot feature to create a mobile hotspot.
Share Your Mobile Data Connection via USB
You can access the Internet on your computer via the USB
tethering feature of your phone. The feature needs data
connection on a mobile network and may result in data charges.
NOTE:
You cannot transfer files between your phone and your computer
via USB while the phone is USB tethered.
1. Connect your phone to your computer with a USB cable.
2. Touch Settings > More.
3. Switch on USB tethering. A new network connection will be
created on your compu t er.
NOTE:
To stop sharing your data connection, swi tch o ff USB tether ing
40

or disconnect the USB cable.
Share Your Mobile Data Connection via Bluetooth
If your computer can obtain an Internet connection via Bluetooth,
you can configure your phone to share its mobile data con nection
with your computer.
1. Pair your phone wit h your computer via Bluetooth.
2. Configure your computer to obtain its network connection via
Bluetooth. For more information, please see your compu ter's
documents.
3. Touch Settings > More.
4. Switch on Bluetooth tethering. Your computer is now
sharing your phone's data connection.
NOTE:
To stop sharing your data connection, swi tch o ff Bluetooth
tethering.
Share Your Mobile Data Connection as a Wi-Fi Hotspot
You can share your phone’s data connection with other devices
by turni ng your phon e into a portab le Wi-Fi hotspot. The feature
needs data connection on a mobile network and may result in
data charges.
NOTE:
When the portable Wi-Fi hotspot feature is enabled, you cannot
41

use your phone’s Wi-Fi capability to access the Internet. You stil l
remain connected to the Internet via your mobile data netw ork.
1. Touch Settings > Wi-Fi hotspot.
2. Switch on Wi-Fi hotspot.
After a moment, the phone starts broadcasting its Wi-Fi
network name (SSID).
3. On another device, locate your phone via Wi-Fi and connec t
with it to start using the phone’s mobile data.
NOTE:
To stop sharing your data connection, swi tch o ff Wi-Fi hotspot.
Set Your Wi-Fi Hotspot
You can change the name of your phone's Wi-Fi network (SSID)
and secure it with a password.
1. Touch Settings > Wi-Fi hotspot.
2. Touch
Network name: Enter or edit a network SSI D ( name) that
Security: Choose a security option, None (not
3. Touch Save to save your settings.
and set the following options.
other devices see when scanning for Wi-Fi networks.
recommended) or WPA2 PSK (other users can access
your Wi-Fi hotspot only if they enter the correct password).
When you select WPA2 PSK, touch the Password field to
edit the security password.
42

Phone Calls
You can place calls from the Phone app, the Contacts app, or
other apps or widgets that display contact information. Wherever
you see a phone number, you can usually touch it to dial.
Placing and Ending Calls
Place a Call by Dialing
1. Touch > Phone.
2. If the dialpad is clos ed, touch
3. Enter the phone number or the contact name with the dialpad.
Touch
to delete incorrect digits.
NOTE:
As you enter the phone number or the contact name, your
phone searches for matching information in your contacts. If
you see the number and contact you want to call, touch it to
place the call immediately.
4. Touch
below the keypad to dial.
NOTE:
To make an international call, touch and hold the 0 k ey to enter
the plus (+) symbol. Next, enter the country code, followed by the
city/area code and then the phone number.
NOTE:
To redial the last call you made, just touch
to displ ay it.
to when the
43

phone number field is empty to enter the number automatically.
End a Call
During a call, touch on the screen.
Answering or Rejecting Calls
When you receive a phone call, the incoming call screen opens,
displaying the caller ID or the information about the caller that
you've entered in the Contacts app. Y ou can answer or rejec t t he
call, or reject it with a text message.
Answer a Call
When you receive a phone call, touch to answer the call.
- or –
If the screen is unlocked, slide down
NOTE:
To silence the ringer before answ ering the call, press either end
of the Volume key.
Reject a Call
When you receive a phone call, you can touch to r eje ct th e
call.
- or –
If the screen is lock e d, s lide up to reject the call.
44
to answer the call.

-or-
Y ou can tou ch
message or edit one to send to the caller.
to reject the call and select a preset text
Working With the Call History
The call history is a list of all the calls you've placed, received, or
missed. It provides a conv eni ent way to redial a number, return a
call, or add a number to your contacts.
To open the call history, you can touch
dialpa d is v isible, to uch
to hide it an d view the full call history.
Place a Call From the Call History
1. Open the call history.
2. Touch a listing to call back.
NOTE:
You can touch All calls, Incoming calls, Outgoing call s,
Missed calls, or Rejected calls to filter the record s by call type .
Add a Number From Call History as a Contact
1. Open the call history.
2. Touch
3. Touch
4. To add the number to an existing contact, touch Update
next to a listing.
.
existing contact and select a contact in the list. To add a
new contact, touch New contact.
45
> Phone. If the

Take Other Actions on a Call History Entry
Open the call history and touch next to a listing to view
detailed call information.
• Touch
• Touch and hold the number and select Edit before calling to
edit the number in the dialer before calling it, or select Copy
the number to copy the number to the clipboard.
• Touch
• Touch
• Touch
number is already in the contact list.
to delete the entry.
to call the number.
to send a message to the number.
at the top right to view the contact details if the
NOTE:
Y ou can tou ch and hold a listing in the call history screen and
select Delete call history to delete the listing or Delete multiple
call records to select and delete multiple listings.
Calling Your Contacts
1. Touch > Phone > Contacts.
2. Touch
next to a contact to place the call.
Checking Voicemail
If you have set the phone to divert calls to voicemail, callers can
leave voicemail messages when they cannot reach you. Here’s
how to check the messages they left.
46

1. Touch > Phone.
2. If the dialpad is clos ed, touch
to displ ay it.
3. Touch and hold the 1 key in the dialer. If prompted, enter your
voicemail password.
4. Follow the voice prompts to listen to and manage your
voicemail messages.
47

Contacts
You can add contacts on your phone and synchronize them with
the contacts in your Google account or other accounts that
support contact syncing.
To se e your con tacts, touch
can touch the tabs on the top of the screen to quickl y switch to
contact groups or the Phone app.
Checking Contact Details
1. Touch > Contacts to access your contact list.
2. Scroll through the list to view all your contacts.
3. Touch a co ntact to view its detai l s.
NOTE:
An index of initials is displayed on the right side of the screen.
Drag the list up or down to the in itial letter you need.
Adding a New Contact
1. Touch > Contacts.
> Contacts. From there, you
2. Touch
3. Touch the account field near the top of the screen to choose
where to save the contact. You can save the contact on the
phone, a nano-SIM card, or a web account you have added on
to add a new contact.
48

the phone.
4. Enter the contact nam e, phone numbers, emai l addresses,
and other inf o rmat i on .
5. Touch Save.
Importing, Exporting, and Sharing Contacts
You can import/export contacts from/to your nano-SIM cards or
the storages. This is especially useful when you need to transfer
contacts between different devices. You can also quickly share
contact s using Bluetooth, Google Drive, Gmail, Quick Shar e, or
Messaging.
Import Contacts From the nano-SIM Card
1. Touch > Contacts.
2. Touch
Import from SIM.
3. Check the cont ac ts you need and then touc h Import.
Import Contacts From the Storage
1. Touch > Contacts.
2. Touch
Import from storage.
3. Select the vCard file(s) and touch OK.
> Import/Export contacts > Import contacts >
> Import/Export contacts > Import contacts >
49

Export Contacts to the nano-SIM Card
1. Touch > Contacts.
2. Touch
Export to SIM.
3. Check the cont ac ts you need and then touc h Export.
> Import/Export contacts > Expor t cont a cts >
Export Contacts to the Storage
1. Touch > Contacts.
2. Touch
Export to phone storage / an SD card.
3. Select the contact accounts that will be exported and touch
OK.
4. The phone will prompt you with the name of the vCard file and
the directory in which the file will be saved. Touch OK to
create the file.
> Import/Export contacts > Expor t cont a cts >
Share Contacts
1. Touch > Contacts.
2. Touch
3. Check the contacts you want to share and then touch Share.
4. Choose how to share the contacts. Options depend on the
applications and services installed.
> Manage contacts > Share multiple.
50

Working With Groups
View Your Contact Groups
1. Touch > Contacts and touch the Groups tab.
2. Scroll through the list to view the groups you have created.
3. Touch a grou p to view its members.
NOTE:
To send a message or an email to all or some of the group
members, open the group and touch
Set Up a New Group
1. Touch > Contacts and touch the Groups tab.
2. Touch New group to create a new group.
3. If you have added contact accounts other than the phone,
select an account for the new group.
4. Touch the Group name field and enter the group name.
5. Touch Save.
6. Touch
members.
7. Touch Add.
and select the contacts you wish to be the group
51
.

Delete a Group
1. Touch > Contacts and touch the
2. Touch a group and t hen touch
3. Touch OK to disband the group. The contacts in the group
will not be deleted.
> Delete.
Groups
tab.
Edit a Group
1. Touch > Contacts and touch the Groups tab.
2. Touch a grou p.
3. Add or remove group members or rename the group as you
wish.
Touch to select contacts and add them to the group.
Touch > Remove members to select grou p m embers
and touch Remove members to move them out of the
group.
Touch > Rename to give the group a new name and
touch Save.
Combine Duplicate Contacts
As your phone synchronizes with multiple online accounts, y ou
may see dupl icate entries for the same contact. You can merge
all the separate information of a contact into one entry in the
contacts list.
52

1. Touch > Contacts.
2. Touch
contacts.
3. Touch OK.
4. Touch Done.
Fully duplicate contacts and partially duplicate ones you select
are combined.
> Manage contacts > Combine duplicate
53

Web Accounts
Adding or Removing A ccounts
Y ou can add multi ple Google accounts and Microsoft Exchange
ActiveSync
accounts depending on the apps installed on your phone.
Add an Account
1. Touch Settings > Accounts > Add account.
2. Touch the type of account you want to add.
3. Follow the onscreen steps to enter the information abou t th e
When the account is suc cessfull y added, it is displayed in the
Accounts menu.
Remove an Account
Removing an account will delete it and all information a s sociated
with it from your phone, such as emails and con t ac t s .
1. Touch Settings > Accounts.
2. Touch the acco unt category and then to uch the accou nt.
3. Touch
®
accounts. You may also ad d other kinds of
account. Most account s require a username and password,
but the details may vary. You may also need to obtain some
information from IT support or your system administrator.
> Remove account > Remove account.
54

Configuring A ccount Sync
Configure Auto Sync Setting
1. Touch Settings > Accounts.
2. Touch
Y ou can also turn on or off auto sync in the Quick Settings
screen.
Sync Manually
When auto-sync is turn ed off, you can sync account data
manually.
1. Touch Settings > Accounts.
2. Touch the account category and then the account you want
3. Touch
and check or uncheck Auto-sync data.
When automatic sync is turned on, changes you make
to information on your phone o r on the web are
automatically synced with each other.
When automatic sync is turned off, you need to sync
manually to collect emails, updates, or other recent
information.
NOTE:
to sync.
> Sync now.
55

Touch Email in the home screen to receive and send emails
from your webmail or other accounts, using POP3 or IMAP, or
access your Exchange ActiveSync account for your corporate
email needs.
Setting Up the First Email Account
1. When you ope n Email for the first time, enter yo u r email
address and password.
2. Touch NEXT to let the phone retrieve the network parameters
automatically.
NOTE:
Touch MANUAL SETUP if you want to enter these details
manually or set up an Exc hange ActiveSync account.
3. Follow the on-screen instruc tions to finish the setup.
Your phone will show the inbox of the email account and star t to
download email messages.
Checking Your Emails
Y our phone can automatically check for new emails at the
interval you set when setting up the account.
You can also check new emails manually by dragging down on
56

the message list.
Responding to an Email
Y ou can reply to or forward a message that you receive. You
can also delete messages and manage them in other ways.
Reply to or Forward an Email
1. Open the email you want to reply to or forw ard from the Inbox.
2. Do the following as you need:
To reply to the sender, touch .
To reply to the sender and all recipients of the original
email, touch
To forward the email to someone else, touch .
3. Edit your message and touch
Mark an Email as Unread
Y ou can return a read email to the unread state - for example, to
remind yourself to read it again later. You can also mark a batch
of emails as unread.
• While reading a message, touch .
• While in a message list (for instance, the Inbox), touch the
sender images beside the messages and then touch
.
.
.
57

Writing and Sending an Email
1. Open your email Inbox and touch .
NOTE:
If you hav e more than one email account added on the
phone, touch the sender line to select the account you want
to use for sending the message.
2. Enter a contact name or email address in the To field.
Separate each recipient with a comma. You can also touch
to add rec ipients from y our contacts.
NOTE:
To send a carbon copy or blind carbon copy to other
recipients, touch
and enter the contact names or email addresses.
3. Enter the email subject and compose the email text.
4. Touch
types of files as attachments.
5. Touch
message.
> Add Cc/Bcc to open the Cc/Bcc field
to add audio files, images, videos and other
at the top right of the screen to send the
Adding and Editing Email Accounts
Add an Email Account
After setting up your first email account, you can add more
58

email accounts and manage them separately.
1. Open Email to get the Inbox screen.
2. Touch
3. Follow the prompts to set up the account as you did with the
first one.
> Settings > Add account.
Edit an Email Account
You can change a number of settings for an account, including
how often you che c k for email, how you’re notified of new mails ,
your email signature, and details about the servers the account
uses to se nd and receive mails.
1. Open Email to get t h e Inbox screen.
2. Touch
you want to change.
3. Make the changes and touch
> Settings and touch the a ccount w hose settings
when you finish.
59

Messaging
Y ou c an use Messaging to exchange text message s ( SM S) a nd
multimedia messages (MMS).
Opening the Messaging Screen
Touch Messaging.
The Messaging screen opens, where you can create a new
message, search for messages, delet e m essages, or open an
ongoing message thread.
• Touch to write a new text or multimedia message.
• Touch to search for a message using keywords.
• Touch to view all your messages, unread messages, or
favourite messages. Touch Settings to change the
messaging settings.
• Touch to select message threads for deletion.
• Touch an existing message thread to open the conver sation
you’ve had with a certain number.
Sending a Message
1. On the Messaging screen, touch at the bottom.
2. Add recipients by one of the following w ay s.
60

Touch the To field and manually enter the recipient’s
number or the conta ct na me. If the p hone p resent s a few
suggestions, touch the one you want to add.
Select recipients from your contacts or call log by
touching
.
3. T ouch the Enter a message field and enter the message text.
4. If you want to send a multimedia message, touch
to
add a subject or attach a file to the message.
5. Touch
.
NOTE:
You can also include email addr esses as recipients for a
multimedia message.
Replying to a Message
Messages you receive are appended to existing threads of the
same number. If the new message comes from a new num ber,
a new thread is created.
1. On the Messaging screen, touch the thread that has the
message you want to reply to.
2. Type your reply in the text box at the bottom. You can touch
if you want to reply wit h an MMS.
3. Touch
.
61

Camera
You can use your phone to take photos and rec ord videos.
Photos and videos are s tored on the phone’s internal storage or
the installed microSDXC card. Y ou c an copy them to your
computer or access t hem in the Gallery app.
Capturing a Photo
1. Touch > .
2. Aim the came ra at the subject and make any necessa ry
adjustment. Auto camera mode is used by default.
62

Number
Function
1
Change the camera settings.
Change the flash setting, only available for the back
camera.
2
63

Number
Function
3
Switch to PHOTO camera mode.
4
Switch to VIDEO camera mode.
5
Exit the camera.
6
Select a filter.
7
Capture a picture.
8
Capture a LIVE photo.
9
View pictures and videos you have taken.
Use special photo or video camera modes including
Multi exposure, Time-lapse, and Slow motion.
11
Switch to DUAL camera mode.
Set a time delay before the camera takes a picture
automatically after you touch the shutter icon.
13
Switch between the front and back cameras.
Turn on or off the High-Dynamic Range (HDR) feature, only
available for the back camera.
10
Manual, Panorama, Beautify, Super night, Magic shutter,
12
14
WARNING!
Keep a safe distance when using the flash. Do not point the
flash towards the eyes of people or animals.
NOTE:
Y ou can spread or pinch on the screen to zoom in or out
before taking pictures.
3. Touch the area where you want the camera to focus, or
leave the camera to autofocus on the center of the image.
64

NOTE:
In the default PHOTO mode of the back camera, when you
touch the screen to focus, the exposure bar
beside the focus point. You can drag
adjust the exposure.
4. Lightly touch
can also b e used to take a photo.
. The Volume key and Fingerprint sensor
appears
up or down to
Recording a Video
Y ou can record normal-speed video clips. The back camera
also allows you to record slow motion or time lapse video.
1. Touch
2. Touch VIDEO if you want to capture a normal-speed video.
To capture slow motion or time lapse video, switch to the
back camera and touch … > SL OW MOTION or
TIME-LAPSE.
3. Aim the camera at the subject. Adjust focus, zo om, and
exposure.
NOTES:
• With the back camera, you can touch any area on the
screen to change the focus bef ore and durin g recording.
You can also touch an d hold the foc al point to lo c k it.
• When you ch ange the focus of the back cam era, the
> .
65

exposure bar appears beside the focal point. You can
drag
up or down to adjust the exposure.
• Spread or pinch on the screen to zoom in or out before and
during recording.
4. Touch
touch
to start recording a norm al-speed video clip, or
to recor d a slow motion or time lapse v ideo.
NOTE:
While the normal-speed or slow-motion recording is in
progress, touch
record a normal-speed or time-lapse video, touch
save the f rame as a separ ate photo.
5. Touch
or to stop recording.
to pause the recording. W hen you
to
Using Dual-Camera Modes
Capture unique pictures with the dual camera on the back of
your phone.
1. Touch
2. Touch DUAL and select a dual-camera mode.
BOKEH: Apply blur effect to out-of-focus parts of the
3D PHOTO: Capture two views pictures.
> .
image.
66

3. Lightly touch , Fingerpri nt se ns or or t he Volume key.
NOTE:
Y ou can chan ge the focus of the pictures taken in BOKEH mode.
Just open the picture in full screen and tou ch
area you want to focus, select a blur level, and touch
. Then touch the
.
Using Manual Camera Mode
Y ou can use manual camera mode to adjust more camera
options for your photo such as ISO , white balance, exposure, etc.
1. Touch
2. Touch … > MANUAL.
3. Aim the camera at the subject and you can make the
following adjustments.
Drag the green circle to any area on the screen that you
Drag the yellow square to any area on the screen where
Touch to unfold the options, including shutter speed,
4. Touch the shutter icon
> .
want to focus on. Touch and hold it to lock the focus.
you want t he camera to meter exposure so as to adjust
the phot o brightness. Touch an d hold the squa re to lock
exposure.
ISO, overall exposure, white balance, interval for time
lapse pictures, or focus.
to take the ph oto.
67

Upgrading the Phone Software
There are several ways t o upgrade your phone software:
• Use the online upgrade tool for mobile terminal products.
• Use the one-press upgrade package offered by your mobile
service provider.
• Use the upgrade package on your microSDXC card.
NOTE:
Visit the ZTE off icial handset service support website
(
http://www.ztedevice.com/support) and select your country or
region to learn more a bout the above upgrade meth ods, as well
as which phones and methods are supported.
68

Problem
Possible causes
Possible solution
The network signal is too
location,
effectively reach it.
The network is busy at the
calls).
such times, or try again after
You are too far away from a
base station for your service
provider.
You can request a service
provider.
End the call and dial again.
or
phone line.
Troubleshooting
If you encounter problems while using the phone, or if it
performs abnormally, you can refer to the chart below. If your
particular problem cannot be resolved using the information in
the chart, contact the dealer where you purchased the phone.
weak at your current
for example, in a basement
or near a tall building,
because wireless
transmissions cannot
Move to a location where
the network signal can be
properly received.
Poor reception
Echo or noise
current time (for example,
during peak times, there
may be too much network
traffic to handle additional
The network link quality is
poor on the part of your
service provider.
Avoid using the phone at
waiting a short time.
area map from your service
You may be switched to a
better-quality network link
69

Problem
Possible causes
Possible solution
End the call and dial again.
or
phone line.
Your service provider does
features.
The battery or battery
charger is damaged.
The phone’s temperature is
45 °C.
Adjust the battery charging
extremes of temperature.
Check all connectors to
have been properly made.
The standby time is related
standby time.
The battery is depleted. In
will be shortened.
The local telephone line
quality is poor.
Unable to
select certain
features
Cannot charge
the battery
Shortened
standby time
not support these features,
or you have not applied for
services that provide these
below 0 °C or higher than
The contact between the
battery and charger is poor.
to your service provider
system configuration. The
same phone used with
different service providers’
systems will not provide
exactly the same length of
high temperature
environments, battery life
You may be switched to a
better-quality network link
Contact your service
provider.
Contact the dealer.
environment to avoid
ensure that all connections
If you are located in an area
where signaling is weak,
temporarily power off the
phone.
Contact the dealer to
change a new battery.
70

Problem
Possible causes
Possible solution
If you are not able to
shorten standby time.
Change your location to one
Cannot turn
your phone on
Battery power has been
depleted.
Recharge the phone’s
battery.
Take the nano-SIM card to
testing.
The nano -SIM card is
inserted improperly.
Insert the nano-SIM card
properly.
There is debris on the
nano-SIM card contacts.
Use a soft, dry cloth to clean
the nano-SIM card contacts.
The nano-SIM card is
invalid.
Contact your service
provider.
You are not within the
network’s service area.
Check the service area with
your service provider.
Move to an open space, or if
move closer to a window.
Cannot answer
incoming calls
You have activated the Call
barring feature.
Cannot make
outgoing calls
You have activated the Call
barring feature.
connect to the network, the
phone will continue to send
out signals as it attempts to
locate a base station. Doing
so consumes battery power
and will consequently
where the network is
accessible, or temporarily
turn off your phone.
The nano -SIM card
malfunctions or is damaged.
nano-SIM card
error
Unable to
connect to the
network
The signal is poor.
your service provider for
you are inside a building,
Disable this feature.
Disable this feature.
71

Problem
Possible causes
Possible solution
feature.
Contact your service
the nano-SIM card.
is
Uninstall the software that
may cause the problem.
Upgrade the phone
software.
Reset the phone to factory
status.
You have activated the
Fixed dialing numbers
PIN Code
blocked
Phone
crashes,
reboots,
freeze, or
cannot be
powered on
You have entered an
incorrect PIN code three
consecutive times.
Some third-party software
not compatible with your
phone.
Disable this feature..
provider. If the service
provider provides the
nano-SIM card’s PUK code,
use the PUK code to unlock
72

For Your Safety
while driving.
your ear or body while
making calls.
Small parts may cause
periods.
General Safety
Don’t mak e or receive
handheld calls while
driving. Never text
Keep your phone at
least 5 mm away from
choking.
Y our phone can
produce a loud sound.
Avoid contact with
anything magnetic.
Don’t use at gas
stations.
Y our phone may
produce a bright or
flashi ng light.
Don’t dispose of your
phone in fire.
To prevent possible
hearing damage, do
not listen at high
volume levels for long
Avoid extreme
temperatures.
73

pacemakers and other
devices.
Turn off when asked to
Turn off when told to in
communications.
Keep away from
electronic medical
in hospitals and
medical facilities.
aircrafts and airports.
Turn off when near
explosive materials or
liquids.
Avoid contact with
liquids. Keep your
phone dry.
Do not attempt to
disassemble your
phone.
Only use a pproved
accessories.
Don’t rely on your
phone as a primary
device for emergency
FCC RF Exposure Information (SAR)
This phone is designed and manufactured not to exceed the
emission limits for exposure to radio frequency (RF) energy set
by the Federal Communications C om mission of t he United
States.
During SA R t es tin g , th i s d e vic e was set to transmi t a t it s hi ghest
certified power level in all tested frequency bands, and placed
in positions that simulate RF exposure in usage against the
head with no separation, and near the body with t he separation
74

of 5 mm. Although the SAR is determined at the highest
certified power level, the actual SAR level of the device while
operating can be well below the maximum value. This is
because the phone is designed to operate at multiple power
levels so as to use only the pow er required to rea ch the network.
In general, the closer you are to a wireless base station
antenna, the lower the power output.
The exposure standard for wireless devices employs a unit of
measurement known as the Specific Absorpt ion Rate, or
SAR. The SAR limit s et by the FCC is 1.6 W/kg.
This device is complied with SAR for general population
/uncontrolled ex posure limi ts in ANSI/IEEE C95. 1-1992 and
had been tested in accordance with the measurement methods
and procedures specified in IEEE1528.
The FCC has granted an Equipment Aut horization for this
model phone with all reported SAR levels evaluated as in
compliance with the FCC RF exposure guidelines. SAR
information on this model phone is on file with the FCC and can
be found under the Display Grant section of
www.fcc.gov/oet/ea/fccid after searching on FCC ID:
SRQ-BLADEV8MINI.
For this device, the highest reported SAR value for usage against
the head is 1.342 W/kg, for usage near the body is 1.554 W/kg.
While th ere may be differences between the SAR levels of
various phones and at various positions, they all meet the
governm ent requir ement.
SAR compliance for body-worn operation is based on a
75

separation distance of 10 mm between the unit and the human
body. Carry this device a t least 10 mm away from your body to
ensure RF exposure level compliant or lower to the reported
level. To support body-worn operation, choose the belt clips or
holsters that do not contain metallic components to maintain a
separation of 10 mm between this device and your body.
RF exposure compliance with any body-worn accessory that
contains metal was not tested nor certified, and using such
body-worn accessory should be avoided.
FCC Regulations
This mobile phone complies with part 15 of t he FCC Rules.
Operation is subject to the f o llowing two conditions: (1) This
device may not cause harm ful interference, and (2) this device
must accept any interference received, including interference
that may cause undesired operation.
This mobile phone has been tested and found to co mply with the
limits for a Class B digital de vice, pursuant to Par t 15 of th e F C C
Rules. These limits are designed to provide reasonable
protection against harmful interference in a residential inst allation.
This equipment generates, uses and can radiate radio frequency
energy and, if not installed and used in ac cordan ce with the
instructions, may cause harmful interference to radio
communications. However, there is no guarantee that
interference will not occur in a particular installation . If thi s
equipment does cause harmful interference to radio or tele vision
reception, which can be determined by turning the equipmen t o ff
76

and on, the user is encouraged to try to corre ct the inter feren ce
by one or more of the following measures:
• Reorient or relocate the receiving antenna.
• Increase the separation between the equipment and receiver.
• Connect the equipment into an outlet on a circuit different
from that to which the receiver is connected.
• Consult the dealer or an experienced radio/TV technici an fo r
help.
CAUTION:
Changes or modifications not expressly approved by the party
responsible for compliance could void the user’s authority to
operate the equipment.
Distraction
Driving
Full att ention must be given to driving at all times in order to
reduce the ris k of an ac c ide nt . Us ing a phone while driving
(even with a ha n ds-free kit) c an cause distraction and lead to
an accident. You must comply with local laws and regulations
restrict i ng th e use of wire l es s dev ice s whil e dr iv in g.
Operating Machinery
Full attenti on mus t be given to operati ng t he mac hi ne ry i n
order to red uce th e r isk of an ac cide nt.
77

Product Handling
General Statement on Handling and Use
You alone are responsible for how you use your phone and any
consequ ences of the use.
You must always switch off your phone wherever the use of a
phone is prohibited. Use of your phone is subject to safety
measures designed to protect users and their environment.
Always treat your phone and its accessories with care and keep
them in a clean place.
Keep the screen and camera lens clean. Unclean screen or
camera lens may slow down the phone's reaction to your
operations or lower image quality.
Clean your phone and its acce ssories w ith a soft material such a s
cleaning cloth for eyeglass lenses. Do not use alcohol or other
corrosive substances for cleaning or allow them to get inside.
Do not expose your phone or its accessories to open flames or lit
tobacco products.
Do not expose your phone accessories to liquid, moisture or high
humidity.
Do not drop, throw or try to bend your phone or its accessories.
Do not paint your phone or its accessories.
Do not attempt to disassemble your phone or its accessories,
only authorized personnel can do so.
Do not expose or use your phone or its accessories in an
environment with or that can reach extreme temperatures,
minimum - [5] and maximum + [50] degrees Celsius.
78

Do not place your phone inside or near heating equipment or
high pressure containers, such as water heaters, microwave
ovens, or hot cooking utensils. Otherwise, your phone may be
damaged.
Please check local regulations for dis posal of electronic products.
Do not carry your phone in your back pocket as it could break
when you sit down.
Small Children
Do not leave your phone and its accessories within the reach of
small children or allow them to play with it.
They could hurt themselves or others, or could accidentally
damage the phone.
Your phone contains small par ts with sharp edges that may
cause an injury or may bec ome detached and create a choking
hazard.
Demagnetization
To avoid the risk of demagnetization, do not allow electronic
devices or magnetic media close to your phone for a long time.
Electrostatic Discharge (ESD)
Do not touch the metallic connectors of the nano-SIM card.
Antenna
Do not touch the antenna unnecessarily.
79

Normal Use Position
When placing or receiving a phone call, hold your phone to your
ear, with the bottom toward your mouth.
Air Bags
Do not place your phone in the area over an air bag or in the air
bag deployment area as an airbag inflates with great force and
serious injury could occur.
Place your phone safely before driving your vehicle.
Seizures/Blackouts
Your phone can produce a bright or flashing light. A small
percentage of people may be susceptible to blackouts or
seizures (even if they hav e never had one before) when exposed
to flashing lights or light pat terns such as when playi ng games or
watching videos. If you have experienced seizures or blackouts
or have a family hist ory of such occ urrences, please cons ult a
physician. To reduce the ris k of blackouts or seizures, you can
use your phone in a well-lit room and take frequent breaks.
Repetitive Strain Injuries
To minimize the risk of Repeti tive St rain Injury (RSI) when texting
or playing games with your phone:
• Do not grip the phone too tightly.
• Press the b uttons lightly.
80

• Use the special features which are designed to minimize the
times of p ressing but tons, such as Me s sage Templates and
Predictive Text.
• Take frequent breaks to stretch and relax.
Emergency Calls
This phone, like any other wireless p hone, operat es using radio
signals, which cannot guarantee c onnection in all conditions.
Therefore, you should not rely solely on any wireless phone for
emergency communications.
Loud Noise
This phone is capable of producing loud noises, which may
damage your hearing. Turn down the volume before using
headphones, Bluetooth headsets or other audio devices.
Phone Heat
Your phone may become warm during charging and normal use.
Electrical Safety
Accessories
Use only approved accessories.
Do not connect with incompatible products or accessories.
Take care not to touch metallic objects, suc h as coins or ke y
rings, o r allow them to c ontact or short-circuit the charging jack.
81

Never puncture the surface of the phone with sharp objects.
Connection to a Car
Seek professional advice when connecting a phone interface to
the vehicle electri ca l system.
Faulty and Damaged Products
Do not attempt to disassemble the phone or its accessories.
Only qualified personnel can service or repair the phone or its
accessories.
If your phone (or its acc essories) has been subm e rg ed in wat er,
punctured, or subjec ted to a severe fall, do not use it until you
have taken it to be checked at an authorized service center.
Radio Frequency Interference
General Statement on Interference
Care must be taken when using your phone in close proximity to
personal medical devices, such as pacemakers and hearing aids.
Please consult your doctor an d the device manufacturers to
determine if the operation of your phone may interfere with the
operation of your medical devices.
Pacemakers
Pacemaker manufacturers recommend that a mini mu m
82

separation of 15 cm be maintained between a mobile phone and
a pacemaker to avoid potential interfere nce with the p acemaker.
To achieve this, use the phone on the opposite ear to your
pacemaker and do not carry it in a breast pocket.
Hearing Aids
People with hearing aids or other cochlear implants may
experience interfering noises when using wireless devices or
when one is nearby.
The level of interference depends on the type of the hearing
device and the distance from the interference source. Increasing
the separation between them may reduce the interference. You
may also consult your hearing aid manufacturer to discuss
alternatives.
Medical Equipment
Switch off yo ur wire l ess d ev ic e when you a re requested to do
so in hosp itals, clin ic s or health c are facilities. These requests
are designed to prevent possible interference with sensitive
medical equipment.
Hospitals
Turn off your wireless device when requested to do so in hospitals,
clinics or health care facilities. These requests are designed to
prevent possible interference with sensitive medical equipment.
83

Aircraft
Switch off your wireless device whenever you are instructed to do
so by airport or airline staff.
Consult the airline staff about the use of wireless devices on
board the aircraft and enable airplane mode of your phone when
boarding an aircraft.
Interference in Vehicles
Please note that bec ause of possib le inter fer ence to
electronic equipm ent , s om e v ehic le manufacturers forbid the
use of mo bile phones in their vehicles unless a hands-free kit
with an external antenna is included in the installation.
Explosive Environments
Gas Stations and Explosive Atmospheres
In locations with potentially explo sive atmospheres, obey all
posted signs to turn off wireless devices s uch as your phone or
other radio equipment.
Areas with potentially explosive atmospheres include fueling
areas, below decks on boats, fuel or chemical transfer or storage
facilities, and areas where the air contains chemicals or particles,
such as grain, dust, or m etal powders.
84

Blasting Caps and Areas
Power off your mobile phone or wireless device when in a
blasting area or in areas where signs are posted to power off
“two-way radios” or “electronic devices” to avoid interfering with
blasting operations.
85
 Loading...