

Page 1

e
E
a
ZTE
Us
BLAD
r Manu
V8
l
1
Page 2

T
e
f
h
r
t
a
h
p
a
e
n
e
n
s
O
m
n
t
h
o
e
c
d
y
a
r
e
a
t
v
d
e
r
o
r
d
p
o
d
v
r
c
k
s
c
e
n
d
e
e
r
About
Thank you
your devic
keep it for
Copyrig
Copyright
All rights
No part of
or used in
including p
permission
his Manual
for choosing thi
in its best cond
uture reference.
t
© 2017 ZTE C
eserved.
his publication
ny form or by a
otocopyi ng and
of ZTE Corpora
ZTE mobile de
ition, please rea
RPORATION
ay be quoted, r
y means, elect
microfilm, with
ion.
ice. In order to
this manual an
produced, tran
onic or mechani
ut the prior writt
eep
d
lated
al,
n
Notice
ZTE Corpo
errors or u
notice.This
ensure the
information
constitute
Please ref
properly a
We offer s
visit the ZT
information
Informatio
ration reserve s t
date specificat i
manual has be
accuracy of its
and recommen
warranty of an
r to For Your S
d safely.
lf-service for ou
E official websit
on self-service
on the website
e right to make
ns in this guide
n designed with
ontent. Howeve
ations containe
kind, either ex
fety to be sure t
smart terminal
(at www.ztede
nd supported p
akes preceden
modifications o
without prior
the utmost care
, all statements,
therein do not
ressed or implie
use your phon
evice users. Pl
ice.com) for mo
oduct models.
e.
print
to
.
ase
e
2
Page 3

Disclaimer
ZTE Corporation expressly disclaims any liability for faults and
damages caus ed by unauthori zed modifications of the software.
Images and screenshots used in this manual may differ from the
actual product. Content in this manual may di ffer from the actual
product or software.
Trademarks
ZTE and the ZTE logos are trademarks of the ZTE Corpor ation.
Google and Android are trademarks of Google, Inc.
®
The Bluetooth
trademark and logos are owned by the Bluetoot h
SIG, Inc. and any use of such trademarks by ZTE Corporation is
under license.
microSDXC logo is a trademark of SD-3C, LLC.
®
Qualcomm
Snapdragon™ processors are products of
Qualcomm Technologies, Inc.
Qualcomm and Snapdragon are trademarks of Qualcomm
Incorporated, registered in the United States and other countri es.
Used with permission.
Manufactured under license from Dolby Laboratories. Dolby,
3
Page 4

Dolby Audio, and the double-D symbol are trademark s of Dolby
Laboratories.
Manufactured under license from Dolby Laboratories. Dolby,
Dolby Atmos, and the double-D symbol are trademarks of Dolby
Laboratories.
Other trademarks and trade nam es are the property of their
respective owners.
Version No.: R1.0
Edition Time:January 3, 2017
4
Page 5

e
w
r
e
n
g
a
n
s
c
y
n
n
e
g
n
a
c
.
r
I
s
e
e
H
.
a
r
a
g
r
n
n
s
e
n
e
S
L
v
.
.
.
.
.
.
.
.
.
.
.
.
.
.
.
.
.
.
.
.
.
.
.
Cont
Getting
Getti
Kno
Insta
Cha
Pow
Setti
Lock
Usin
Getti
Person
nts
Started .......
ng to Know You
ing the Keys ....
lling the nano-S
ging the Battery
ring On/Off ......
g Up for the Fir
ing/Unlocki ng th
the Touch Scr
ng to Know the
lizing .........
.....................
Phone ..............
..........................
M Card and mic
..........................
..........................
t Time ..............
Screen and K
en .....................
ome Screen ....
.....................
.....................
.........................
.........................
roSDXC card ....
.........................
.........................
.........................
ys ....................
.........................
.........................
.....................
...... 8
........ 8
...... 10
...... 10
...... 11
...... 14
...... 14
...... 14
...... 15
...... 16
.... 18
Cha
Adju
Swit
Appl
Cha
Setti
Prot
Usin
Knowi
Moni
Man
Conne
ging Ringtone
ting Volume .....
hing to Silent o
ing New Wallp
ging Scr een Bri
g the Home S c
cting Your Pho
Your Fingerpri
g the Basic
toring the Phon
ging Notificatio
ting to Netw
nd Notification
..........................
Vibration Mode
pers ..................
htness .............
een Effect .........
e With Screen
t .......................
.....................
Status .............
s ......................
orks and De
ound ................
.........................
.........................
.........................
.........................
.........................
ocks .................
.........................
.....................
.........................
.........................
ices .............
...... 18
...... 18
...... 19
...... 19
...... 20
...... 20
...... 20
...... 21
.... 23
...... 23
...... 24
.... 25
5
Page 6

Connecting to Mo bile Networks ......................................... 25
Connecting to Wi-Fi® ......................................................... 27
Using Wi-Fi Direct® ............................................................ 28
Connecting to Bluetooth® Devices ..................................... 29
Sharing Your Mobile Data Connection ............................... 30
Phone Calls ............................................................ 33
Placing and Endi ng Calls ................................................... 33
Answering or Rejecting Calls ............................................. 34
Checking Voicemail ........................................................... 35
Contacts ................................................................. 36
Adding a New Contact ....................................................... 36
Working With Favorite Contacts ........................................ 37
Email ....................................................................... 38
Setting up the first email account ..... . ......... ......... ........ ...... 38
Writing and sending an email ........................................ .... 39
Reply to or forward an email .............................................. 39
Changing general email settings ....................................... 40
Messaging .............................................................. 41
Opening the Messagin g Screen ........................................ 41
Sending a Messa ge ........... . ....................... . ........ . ........ . ..... 41
Replying to a Message ...................................................... 42
Changing Message Settings .............................................. 42
Camera .................................................................... 43
Capturing a Photo ............................................................. 43
6
Page 7

Recording a Video ............................................................. 45
Using Other Camer a Modes ... ........................................... 46
Using Dual Camera Mode ................................................. 47
Troubleshooting ..................................................... 48
For Your Safety ...................................................... 52
General Safety ................................................................... 52
FCC RF Exposure Information (SAR) ................................ 53
FCC Regulations ............................................................... 54
Distraction .......................................................................... 56
Product Handling ....................... ..................................... . .. 56
Electrical Safety ................................................................. 61
Radio Frequency Interference ........................................... 62
Explosive Environments .................................................... 64
7
Page 8
g
a
x
t
d
n
e
k
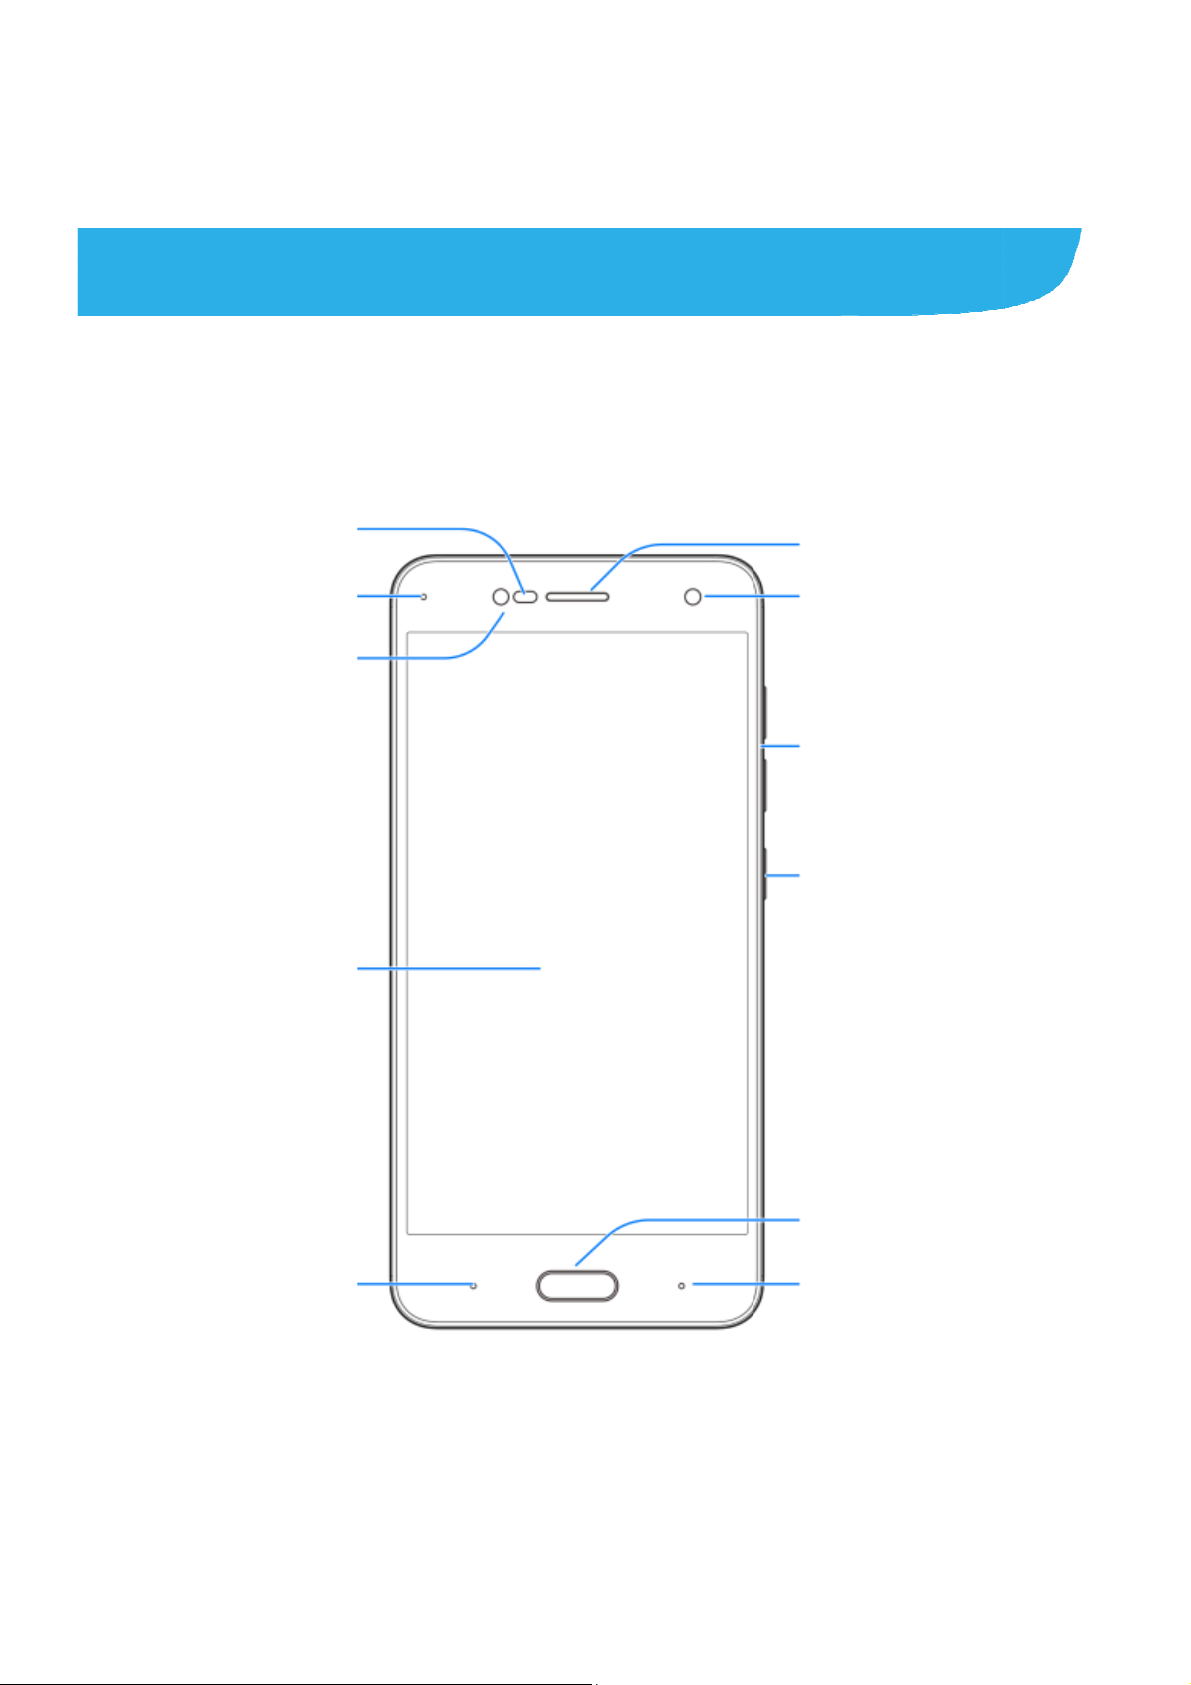
Gettin
Gettin
Pro
light
Indica
Fro
g Starte
to Know
imity &
sensor
or light
nt flash
Your Pho
e
Earpiece
Front camera
Volume keys
Power key
Touch
B
screen
ck key
8
Home key/
Fingerprint s
Recent apps
nsor
ey
Page 9

Dual-lens camera
Flash
Headset jack
Dual-lens camera
nano-SIM/
microSDXC
card tray
Charging/
micro-USB Jack
Speaker
9
Page 10

n
e
S
S
N
d
s
y
n
o
o
s
e
d
t
e
n
b
e
o
s
e
n
r
h
e
e
h
c
e
n
e
d
e
s
Knowi
Key
Power key
Home key
Recent apps
Back key
Volume keys
NOTE:
g the Ke
Function
Press a
airplane
Press t
Press t
applicati
Used a
key Touch to se
Touch to go
Press or hol
s
d hold toselect ph
mode, power off o
turn off or on the
return to the hom
on or screen.
the fingerprint se
the recently used
to the previous sc
either end to turn
ne modes, turn o
r restart your phon
creen display.
screen from any
sor.
apps.
een.
the volume up or
/off
.
own.
The positio
ns of the Recen
interchang
keys.
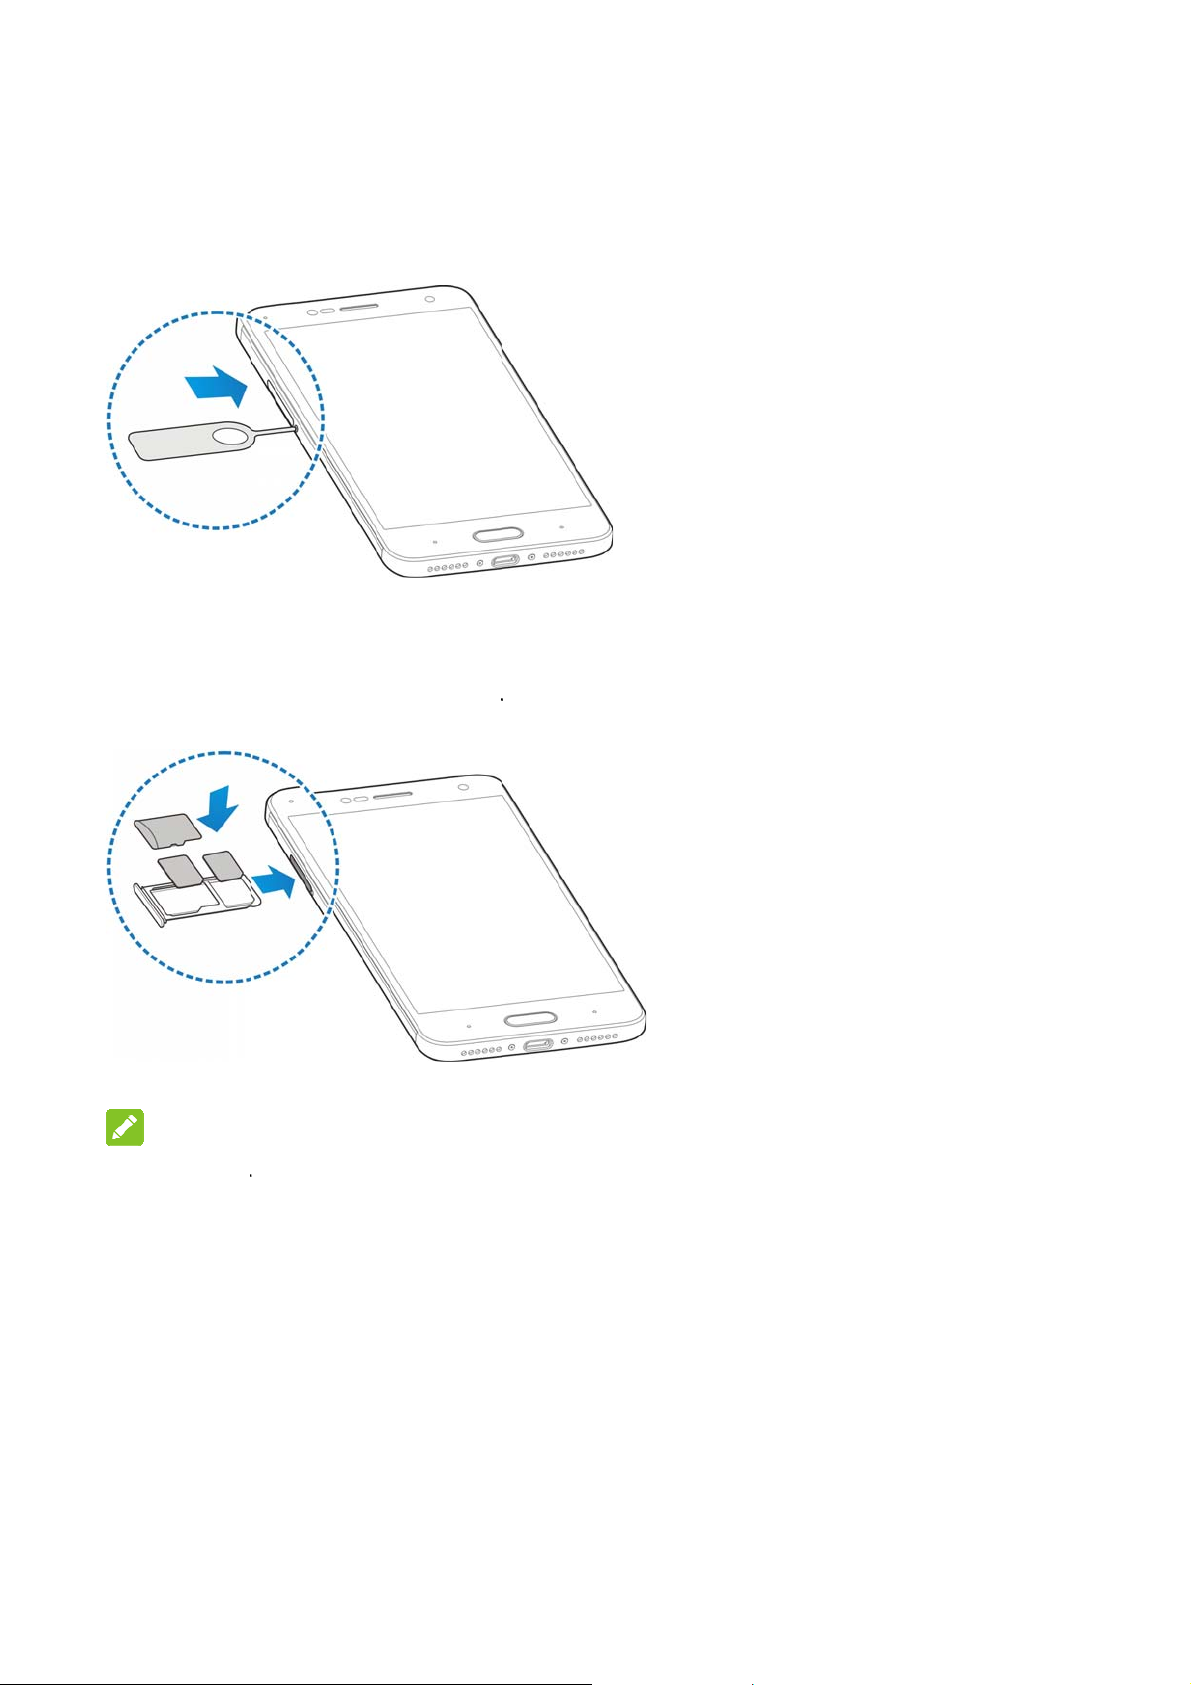
Installi
ng the na
micro
The nanophone is tu
WARNI
1. To avoid
any nonstandard
rned on.
nano-SIM card from
able through S
DXC card
IM card(s) can
G!
amage to the phon
tandard nano-SIM c
appskey and t
ttings >Featur
o-SIM Ca
e installed or r
, do not use any ot
ard cut from a SIM
your service provid
e Back key are
d > Navigation
rd and
moved while th
er kind of SIM card
ard. You can get a
r.
, or
10
Page 11
h
t
r
c
c
g
n
c
c
r
G
k
k
a
u
e
M
d
n
d
s
a
d
o
h
l
2. Insert t
3. Pull ou
and pla
shown.
e tip of the tray eje
the card tray. You
ce a nano-SIM card
Carefully slide the t
t tool into the hole n
an place a nano-S I
or a microSDXC car
ay back into place.
xt to the card tray.
card on the right c
on the left card slo
rd slot,
t, as
NOTE:
The two ca
conne
conne
Char
Your pho
turn on, fi
d slots support 4G/3
t with4G/3G networ
t with 3G/2G networ
ing the B
e’s battery sho
nd a signal, and
/2G networks .Whe
s, the other installe
s.
ttery
ld have enough
make a few call
11
one nano-SIM car
nano-SIM cardcan
power for the p
. You should fu
is set to
nly
one to
ly
Page 12

r
d
I
T
d
e
h
c
r
w
r
a
o
e
n
t
h
m
e
L
e
t
b
k
n
h
n
e
n
charge the
If the batte
screen. As
exact batte
Screen an
WARN
Use only Z
unapprove
battery to
CAUTI
Do not cha
yourself. T
authorized
battery as soon
y is low, there
you charge you
ry level on the lo
Keys.
NG!
E-approved ch
access ories c
xplode.
ON:
ge the built-in r
e battery can o
servic e prov ider
as possible.
ill be a pop-up
phone, t he scr
ck screen. See
rgers and cabl
uld damage you
chargeable bat
ly be changed
.
essage on the
en will tell you t
ocking/Unlocki
s. The use of
r phone or caus
ery in your pho
y ZTE or ZTE
e
g the
the
e by
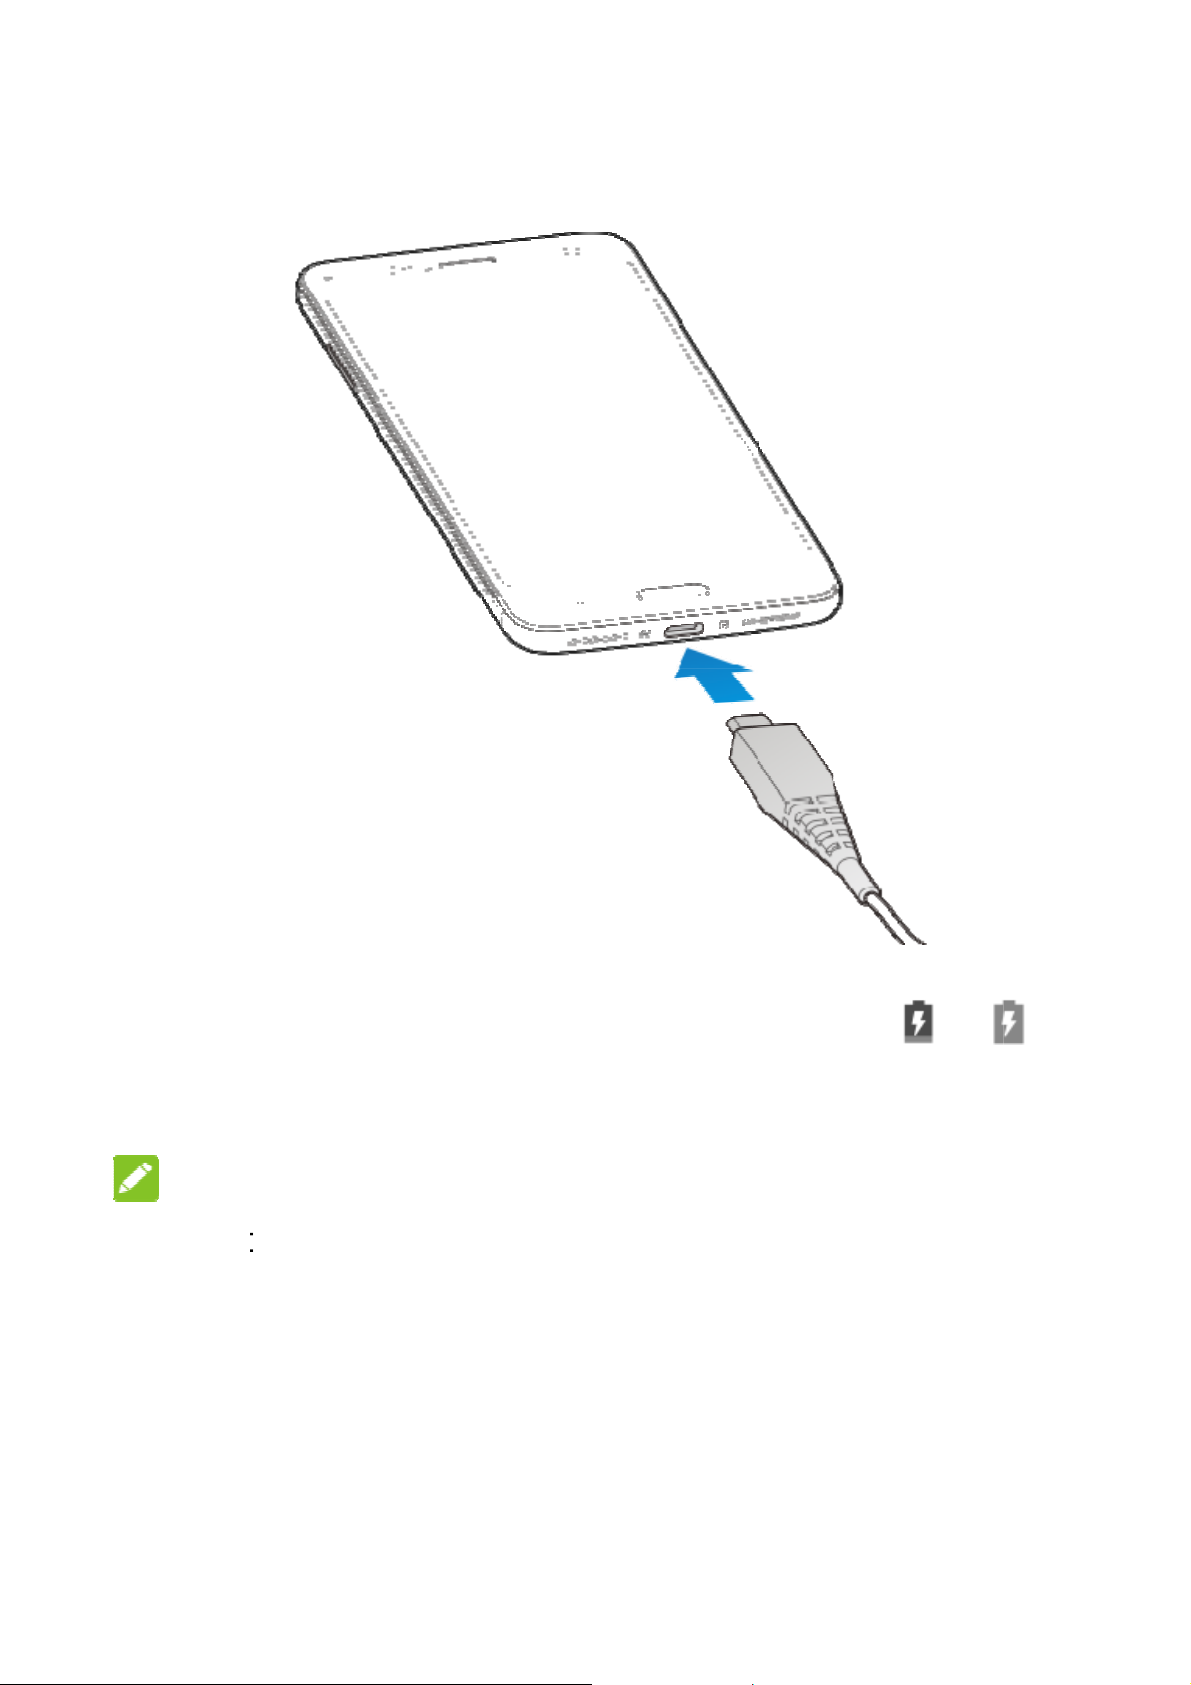
1. Conne
adapte
the con
t the adapter to
is inserted with
nector into the c
he charging jac
the correct orie
arging jack.
. Ensure that th
tation. Do not fo
e
rce
12
Page 13
e
e
a
E
t
e
r
d
o
e
b
e
s
f
e
e
t
e
e
a
t
2. Conn
phon
appe
3. Disco
NOT
If the bat
the phon
after cha
customer
prolonge
ct the charger t
is on, you’ll se
r on the status
nnect the charg
:
ery is extremely
even when it i
ging the phone
service if you st
charging.
a standard AC
a charging icon
ar.
r when the batt
low, you may b
being charged.
or at least 20 mi
ill cannot power
13
power outlet. If
, such as or
ry is fully charg
unable to pow
In this case, try
nutes. Contact
on the phon e af
he
,
d.
r on
gain
er
Page 14

i
a
e
e
g
f
a
o
G
e
e
t
f
w
h
e
r
e
o
y
T
a
n
)
e
o
n
s
s
m
o
o
u
w
r
c
e
d
r
f
(
Power
Press
To pow
options
NOTE
If the phon
and hold th
phone.
Settin
When you
reset it to f
ng On/Of
nd hold the Po
off, press and
menu. Touch S
:
freezes or tak
e Power key fo
Up for th
irst power on y
ctory settings,
er key to turn o
hold the Power
ut down.
s too long to re
over 10 second
First Ti
ur phone after y
ou need to do s
your phone.
key to open the
pond, you can p
to force restart
e
u purchase it o
me settings be
ress
the
ore
using it.
Touch the l
and then t
up Wi-Fi,
Lockin
Keys
Your phon
the phone i
screen bac
To lock th
To quickly
anguage field to
uch GET SATR
oogle services,
g/Unlocki
allows you to q
nto sleep mode
k on and unlock
screen and k
urn the screen
select the lang
ED. Then follo
dd fingerprint a
g the Sc
uickly lock the s
when not in us
it when you nee
ys:
ff and lock the k
age you want to
the prompt s to
nd other options
een and
reen and keys
and to turn the
it.
eys, press the P
use
set
.
put
ower
14
Page 15

E
b
ft
m
d
c
E
s
a
g
n
h
n
t
t
r
o
ro
d
c
h
w
o
o
h
o
h
o
r
s
n
h
key.
NOT
To save
screen a
receive
To unloc
1. Press
2. Drag
-or-
You can
appli
NOT
:
attery power, th
er some time of
essages and ca
k the screen a
the Power key
towards
rag toward
ation shortcuts.
S:
e phone automa
inactivity. You
lls while the pho
d keys:
o turn the scree
.
s any direction t
tically turns off t
ill still be able t
ne screen is off.
n on.
access the
e
You c
when
If you
for yo
Lock
PIN/p
Usin
Your pho
variety of
Touc
an pull out the s
the screen is tu
have set an unl
ur phone (seeP
), you’ll need to
ssword to unlo
the Touc
e’s touch scree
touch gestures.
arts on the left f
ned on.
ck pattern, PIN
tecting Your P
raw the pattern
k your screen.
Screen
n lets you contr
r a quick view o
or Complex pas
one With Scree
or enter the
l actions thro ug
action
word
a
15
Page 16

When you want to type using the onscreen keyboard, select
onscreen items such as application an d settings icons, or
press onscreen buttons, simply touch them with your f inger.
Touch and Hold
To open the available options for an item (for example, a
message or link in a web page), touch and hold the item.
Swipe or Slide
To swipe or slide means to quickly drag your finger v ertically
or horizontally across the screen.
Drag
To drag, press and hold your finger with some pressure
before you start to move your finger. While dragging, do not
release your finger until you have reached the target position.
Pinch
In some apps (s uch as Maps, Browser, and Gallery), you can
zoom in and out by placing two finger s on the screen at once
and pinching them together (to zoom out) or spreading them
apart (to zoom in) .
Rotate the screen
For most screens, you can automat ically change the screen
orientation from portrait to l andscape by turning th e phone
sideways.
Getting to Know the Home Screen
The home screen is the starting point for your phone’s
applications, functions, and menus. You can cust omize your
home screen by adding folders, widgets, and more.
Status bar
16
Page 17

Widget
Wallpaper
Folder
Applicati on icons
Primary icons
Extended Home Screens
Your home screen is extendable, providing more space for
shortcuts, folder s, widgets, and more . Simply swipe left or right
on the screen to see the extended panels.
17
Page 18

i
f
h
e
R
R
h
O
i
h
e
v
p
s
V
o
a
f
i
s
o
N
n
o
e
d
o
l
n
c
n
u
j
a
e
o
u
f
p
Perso
Chang
Sound
You can cu
default noti
1. Press t
touchS
2. Touch
3. Touch
4. Scroll t
want to
nalizing
ng Ringt
stomize the def
ication sound.
e Home key, sl
ttings>Sound.
ingtones.
ingtones/Mes
rough the ringt
use.
ne and N
ult incoming cal
de on the scree
age tone/Notifi
ne list and sele
tification
ringtone and th
and
cation tone.
t the ringtone y
u
5. Touch
Adjust
1. Press t
Sound.
2. Drag th
Alarm
each ty
NOTE:
You can ad
use by pre
press the
.
ng Volum
e Home key, sli
sliders below
olume, and Ri
e of audio.
just the media v
sing the Volum
olume key to a
e
de on the scree
otification vol
g volume to ad
lume when a m
key. If no medi
just ringtone v ol
and touch Sett
me, Media vol
ust the volume
edia application
application is a
ume (or the ear
ings >
me,
or
is in
ctive,
iece
18
Page 19

volume during a call) .
Switching to Silent or Vibration Mode
You can set the phone to silent or vibration mode by using one of
the following methods.
Swipe down from the top of the screen to open the notification
panel anddrag the panel downwards. Touch Normal or
Vibrate to switch the phone tovi bration or si lent mode.
Press the Home key, slide on the screen and touchSettings >
Sound >Sound mode and selec t Vibrate or Silent to switch
to vibration or silent mode.
Press and hold the Power key and touch Ring or Mute to
switch to silent or vibration mode.
Applying New Wallpapers
You can set the wallpaper for the home scr een and lock screen.
1. Press the Home key, sl ide on the screen a nd touch
Settings >Themes & wallpapers > Wallpapers.
2. Touch Home screen wallpaper or Lock scre en wallpaper
and select a built -in static wallpaper, or touch Gallery to
select a picture, crop it, and use it as the wallpaper.
NOTE:
Other way to set t he home screen wallpaper and the lock screen
wallpaper:
Touch and hol d an empty area of the home screen and select
Customize launcher >Wallpaper tab. Then select a built-in
19
Page 20

n
h
i
h
y
e
o
s
s
o
g
m
m
a
w
e
o
t
o
u
p
n
i
a
s
e
a
e
e
P
e
a
e
n
c
o
g
r
E
o
m
v
t
c
m
.
t
m
r
m
r
n
image or a
to take a p
Chang
1. Press t
Displa
2. Drag th
NOTE:
With the pr
adjust the
brightnes
feature on
image from yo
oto as the wall
ng Scree
e Home key, sl
> Brightness l
slider to manu
ximity and light
creen brightnes
box in the Brig
r off.
r gallery. You c
aper.
Brightn
de on the scree
evel.
lly adjust the s
sensor, your ph
for available li
tness lev el sc
n also touch Ca
ss
and touch Sett
reen brightness
ne can automa
ht. Check Auto
een to turn the
era
ings >
ically
atic
Settin
Set the ani
on the ho
1. Touch
2. In the
launch
3. Pick an
Touch
e screen betwe
indow that app
effect and the p
Protec
Locks
You can pr
the Hom
ation effect th
nd hold an emp
r >Effect.
ther effects unti
ing Your
tect your phon
Screen
t appears when
n different pane
ty area of the h
ars at the bot to
hone will demon
l you find the fa
hone Wi
by creati ng a s
ffect
you swipe left o
ls.
me screen.
, touch Custo
strate how it wo
orite one.
h Screen
reen lock. Whe
right
ize
ks.
it is
20
Page 21

enabled, you n eed to swipe the scr een, draw a pattern or enter a
numeric PIN or a password to unlock the pho ne’s screen and
keys.
1. Press the Home key, slide on the screen and touch Settings >
Security>S cr een lock .
2. Touch Swipe, Pattern, PIN or ComplexPassword.
NOTE:
Remember the pattern, PIN, or password you set. Otherwise, you
will have to upgr ade the phone sof t ware to use the pho ne.
Using Your Fingerprint
With the fingerpr int sensor on the Home key of your phone, you
can register up to 5 fingerprints and use them to unlock the
phoneor open a bound app.
NOTE:
The fingerpri nt feature is only usable when the screen lock
(Pattern, PIN number or Complex password) is enabled. When
the screen lock is reset to Swipe, all registered fingerprints are
erased.
Register a Fingerprint
1. Press the Home key, slide on the screen and touch
Settings >Secur ity >Fingerprint.
2. Select your backup screen lock method and set whether to
use it to further protect your phone .
3. Touch Regist er or Fingerprint management >Add
21
Page 22

fingerprint.
4. Follow the prompts to record the center and then the edges of
a finger.
5. Touch OK.
NOTE:
Touch an existing fingerprint record to c hange its name or delete
it.
Set Fingerprint Functions
1. Press the Home key, slide on the screen and
touchSettings >Security >Fingerprint.
2. Set the functions you need.
Unlock your phone: Place your finger on the fingerprint
sensor to unlock the phone when the screen is off or
locked.
Simple touch: Plac eyour finger on the fingerprint s ensor
to launch a boundap p when the screen is off or locked.
22
Page 23

w
t
u
D
A
g
P
B
P
o
e
d
a
e
o
a
e
A
h
n
Kno
Monit
The statu
service s
icons yo
E
3G
4G
ir
No
ing the
oring the
s bar at the top
atus icons on th
may see.
GE/2G connected
/HSPA+ connecte
connected
plane mode
signal
asics
hone St
f the home scr
right side. B el
Batt
Batt
/
Batt
Vibr
Blu
tus
en provides ph o
w are some of t
ery low
ery full
ery charging
tion mode
tooth on
ne and
e
Si
nal strength
nano-SIM card
No
talled
ins
S on
G
Con
nected to a Wi-Fi
lar
m set
etwork
23
Page 24

e
N
N
N M C C U
S
c
e
n
n
m
W
o
n
e
s
c
h
t
Manag
Notifica
The status
icons on th
/
ing Notifi
tion Icons
bar at the top of
left. Below are
ew message
ew email
ew Gmail messag
issed call
all in progress
all on hold
ations
the home scree
some of the ico
Upco
Incomi
New
Downl
Sendi
USB t
provides notifi
s you may see.
ing event
ng file via Bluetoot
i-Fi network detec
ading data
g data
thering is on
ation
ed
/
ong is playing
SB connected
Portab
direct i
le Wi-Fi hotspot or
on
Wi-Fi
24
Page 25

n
c
e
o
u
e
n
h
a
n
h
T
m
n
h
t
o
M
a
t
s
t
e
s
t
s
N
s
t
w
p
k
e
e
d
e
g
n
e
o
Con
Devi
Conn
Contr
You can
card.
To enabl
1. Press
Setti
2. Touc
ecting t
es
cting to
l Mobile D
se or disable th
or disable da
the Home key,
gs >Mobile ne
the switch next
Networ
obile Net
ta Use
e mobile data s
a access:
lide on the scr
works.
to Data enable
s and
works
rvice of the nan
en and touch
.
-SIM
To get d
1. Press
Setti
2. Touc
NO
Data roa
Select
1. Press
Setti
2. Touc
3. Selec
ta services wh
the Home key,
gs >Mobile ne
the switch next
E:
ing may incur
Preferred
the Home key,
gs >Mobile ne
Preferred net
the network ty
n roaming:
lide on the scr
works.
to Data roamin
ignificant roami
etwork Typ
lide on the scr
works.
ork type.
e you would pre
en and touch
and touch OK.
g charges.
e
en and
fer the pho ne to
25
Page 26

t
N
h
g
N
k
a
n
e
e
t
P
h
e
A
e
A
e
i
w
o
n
o
m
y
w
i
a
e
e
e
n
r
a
d
w
f
n
n
>
P
o
o
u
connec
Select
1. Press t
Settin
2. Touch
networ
3. Touch
You ca
preferr
Set Acc
To connec
with.
etwork Op
e Home key, sl
s >Mobile net
etwork operat
s.
network in the
also touch Ch
d network auto
ss Point N
to the Internet
rator
de on the scree
orks.
rs to search fo
etwork list to re
ose automatic
atically.
ames
ou can use the
and touch
all available
gister manually.
lly to select
efault Access
oint
Names (A
the service
1. Press t
touchS
2. Touch
3. Touch
service
4. Touch
NOTE:
To set the
N). And if you
provider to get t
e Home key, sl
ttings >Mobile
ccess Point N
ach item to ent
provider.
>Save to compl
PN to default s
ant to add a ne
he necessary in
de on the scree
networks.
mes > .
r the informatio
te.
ttings, touch
APN, please c
ormation.
and
you get from y
Reset to defa
ntact
ur
lt.
26
Page 27

e
a
W
r
.
t
h
E
n
W
a
(
d
.
t
W
r
c
d
s
o
e
r
n
o
w
W
n
n
o
m
o
e
t
s
v
r
h
t
s
e
n
e
n
t
-
d
e
Conn
Wi-Fi is a
Internet
the Wi-Fi
Turn
Netwo
1. Press
Wi-Fi
2. Slide
3. Touc
4. If the
Conn
network is secu
cting to
wireless netwo
ccess at distan
router and your
i-Fi On an
k
the Home key,
heswitch next t
a network nam
ect.
i-Fi®
king techn ology
es of up to 100
surroundings.
Connect t
lide on the scre
Wi-Fito turn on
to connect to i
ed, enter the pa
that can pro vid
eters, dependi
a Wi-Fi
n andtouchSet
Wi-Fi.
.
sword and touc
g on
ings >
h
NOT
Your pho
networks
Add a
You can
its name
range.
To conne
security
1. Press
Wi-Fi
2. Slide
:
e automatically
when they are i
i-Fi Netw
dd a Wi-Fi net
SSID) or add a
ct to a secured
etails from the
the Home key,
heswitch next t
connects to pre
range.
rk
ork if t he netwo
i-Fi network w
etwork, you fi rs
etwork's admini
slide on the sc r
Wi-Fi to turn o
iously used Wi
k does not broa
en you are out
need to get the
trator.
en and touchS
Wi-Fi.
Fi
cast
of
ttings >
27
Page 28

h
r
S
W
c
s
h
e
s
a
h
p
o
F
.
u
c
e
r
i
.
W
e
c
B
v
s
e
c
n
e
c
o
y
u
e
c
w
i
e
3. Touch
4. Enter t
or othe
5. Touch
Using
Wi-Fi Dire
by connect
points (hot
NOTE:
Activating t
connection
>Add network
e network SSID
network config
ave.
i-Fi Dire
t allows Wi-Fi d
ng to each othe
pots).
his feature will d
.
(name). If nece
ration details.
t®
vices to share fi
without the ne
isconnect your
sary, enter sec
les and data dir
d for wireless a
urrent Wi-Fi net
rity
ctly
cess
ork
1. Press t
touchS
2. Touch
device
3. Touch
The ot
to acce
commo
4. Once c
the Wi-
e Home key, sl
ttings >Wi-Fi.
> Wi-Fi Direct
enabled with
device name b
er device will re
t the request.
n PIN.
nnected the de
i Directscreen.
de on the scree
Your phone will
i-Fi Direct conn
low Peer devi
eive a connecti
oth devices ma
ice is displayed
and
search for other
ctions.
es to connect w
n prompt and n
need to enter a
as “Connected”
th it.
ed
in
28
Page 29

Connecting to Bluetooth® Devices
Bluetooth® is a short-range wirel ess communication tec hnolo gy.
Phones or other devices with Bl uetooth capabilities can
exchange information wirelessl y within a distance of about 10
meters (32.8 feet ). The Bluetooth d evices must be paired b efore
the communication is performed.
Turn Bluetooth On/Off
1. Press the Home key, sli de on the s cr een an d touc hSettings >
Bluetooth.
2. Slide theswit ch next to Bluetooth to turn on or off Bl uetooth.
When Bluetooth is on, the icon appears in the status bar.
Pair With Another Bluetooth Device
1. Press the Home key, s lide on t he s creen an d touchSettings >
Bluetooth.
2. Slide theswit ch to turn Bluetooth on if Bluetooth is off.
Your phone automatically scans for and displays the IDs of all
available Bluet ooth devices in range .
3. Touch the devic e you want to pair with.
4. Confirm that the Bluetooth passkeys are the same between
the two devices and touch Pair. Alternately, enter a Bluetooth
passkey and touch Pair.
Pairing is successfully completed when the other dev ice
accepts the connection or the same passkey is entered.
29
Page 30

o
m
g
n
Y
c
e
t
h
c
h
o
a
e
y
a
o
s
D
o
w
e
y
i
g
t
c
r
r
C
e
r
e
e
e
n
w
n
t
S
r
.
l
W
NOTE:
The Blueto
headsets a
1234 (the
that device
Sharin
You can sh
by activati
hotspot.
Share
You can a
tethering f
connection
th passkey ma
nd handsf ree ca
ost common p
.
Your M
are your phone’
g the mobile hot
ur Mobile
cess the Interne
ature of your ph
on a mobile net
be fixed for ce
r kits. You can t
sskeys) or refer
bile Data
data capabiliti
pot feature to c
ata Conn
t on your compu
ne. The featur
ork and may r
tain devices suc
y entering 00 00
to the documen
onnectio
s through tetheri
eate a portable
ction via U
ter via the USB
needs data
sult in data cha
h as
or
sfor
n
ng or
i-Fi
B
ges.
NOTE:
You canno
via USB w
1. Conne
2. Press t
More.
3. Switch
created
NOTE:
To stop sh
or disconn
transfer files b
ile the phone is
t your phone to
e Home key, sl
nUSB tetherin
on your compu
ring your data
ct the USB cabl
tween your pho
USB tethered.
our computer
de on the scree
. A new networ
er.
onnection, swit c
e.
30
e and your com
ith a USB cable
and touch Sett
k connection wil
h offUSB tether
puter
ings >
be
ing
Page 31

Y
c
y
g
o
m
.
h
n
E
g
Y
H
s
g
t
r
E
e
e
h
y
u
n
e
d
e
e
o
n
h
a
n
a
n
s
e
c
t
n
F
s
s
e
n
i
p
e
t
h
e
e
a
Y
Share
Blueto
If your co
you can
with your
1. Pair
2. Confi
Bluet
docu
3. Press
More
4. Switc
shari
our Mobil
oth
mputer can obta
onfigure your p
computer.
our phone with
ure your comp
oth. For more i
ents.
the Home key,
onBluetooth t
g your phon e' s
Data Con
in an Internet co
one to share its
our computer vi
ter to obtain its
formation, plea
slide on the scr
thering. Your
ata connection.
ection via
nnection via Blu
mobile data con
Bluetooth.
etwork connect
e see your com
en and touchS
omputer is now
tooth,
ection
on via
uter's
ttings >
NOT
To stop s
tetherin
Share
Wi-Fi
You can
by turnin
needs da
data cha
NOT
When th
use your
:
haring your data
.
our Mobil
otspot
hare your phon
your phon e int
a connection o
ges.
:
portable Wi-Fi
phone’s Wi-Fi c
connection, swi
Data Con
’s data connec t
a portable Wi-
a mobile netwo
otspot feature i
pability to acce
ch offBluetoot
ection as a
ion with other d
i hotspot. The f
rk and may res u
enabled, you c
s the Internet.
vices
ature
lt in
nnot
ou still
31
Page 32

h
e
o
k
t
o
a
t
i
h
o
o
a
c
n
c
d
o
n
p
remain con
1. Press t
touchS
2. Switch
After a
networ
3. On ano
with it t
NOTE:
To stop sh
nected to the In
e Home key, sl
ttings >Wi-Fi
n Wi-Fi hotsp
moment, the ph
name (SSID ).
her device, loc
start using the
ring your data
ernet via your m
de on the scree
otspot.
t.
ne starts broad
te your phone vi
phone’s mobile
onnection, swit c
obile data netw
and
asting its Wi-Fi
a Wi-Fi and con
ata.
h off Wi-Fi hots
rk.
ect
ot.
32
Page 33

n
p
w
o
n
a
tNO
h
e
h
T
a
t
d
a
a
b
c
o
n
a
w
e
h
m
c
c
h
e
d
n
t
n
o
o
t
y
e
m
Pho
You can
apps or
see a ph
Placi
Place
1. Press
2. Enter
the Home key
the phone num
o delete incorre
e Calls
lace calls from
idgets that displ
ne number, y ou
g and En
Call by Di
he Phone app, t
ay contact infor
can usually tou
ing Calls
ling
nd touch .
er with the on-s
t digits.
e People app,
ation. Whereve
h it to dial.
reen keypad. T
r other
r you
uch
As yo
matc
place
numb
3. Touc
NO
To m
enter
follow
TE:
u enter digits, y
. If you see the
the call immedi
r.
belo
ES:
ke an internatio
the plus (+) sym
ed by the city/ar
ur phone searc
umber you wan
tely without ent
the keypad to
nal call, touch a
bol. Next, enter
a code and the
es for contacts
t to dial, touch it
ring the rest of t
ial.
d hold the 0 ke
he country c od
the phone nu
hat
to
he
to
,
ber.
33
Page 34

To redial the last call you made, just touch to when
the phone number field is empty to enter the number
automatically.
End a Call
During a call, touch on the screen.
Answering or Rejecting Calls
When you receive a phone call, the incoming call screen opens,
displaying the c aller ID or t he information about the c aller that
you've entered in theContacts app. You can answer or reject the
call, or reject it with a text message.
Answer a Call
When you receive a phone call, slide down t o answer the
call.
NOTE:
To silence the ringer before answering the call, you can press the
Volume key or the Power key.
Reject a Call
When you receive a phone call, slide upto reject the call.
34
Page 35

Checking Voicemail
If you have set the pho ne to divert calls to voicemail, callers can
leave voicemail mess ages when they cannot r each you. Here’s
how to check the messages they left.
1. Press the Hom e key and touch >Phone.
2. If the dialpad is closed, touch to display it.
3. Touch and hold the 1 keyin the dialer. If prompted, enter your
voicemail password.
4. Follow the voice prompts to listen to and manage your
voicemail messages.
35
Page 36

u
n
r
g
h
h
o
a
n
h
h
S
e
s
h
o
i
e
n
c
e
e
h
p
n
e
n
r
w
e
h
e
s
Conta
You can p
the contact
support co
To see you
and touch
the screen
contacts.
Addin
cts
t contacts on yo
s in your Googl
tact syncing.
contacts , pres
. From there,
to quickly switc
a New C
ur phone and s y
account or oth
the Home key,
you can touch t
to contact grou
ntact
nchronize them
r accounts that
slide on the scr
e tabs on the to
s or favorite
ith
en
p of
1. Press t
2. Touch
3. Touch t
where t
phone,
the pho
4. Enter t
and ot
5. Touch
e Home key, sl
to add a n
e account field
save the conta
nano-SIM card
e.
e contact nam
er information.
ave.
de on the scree
w contact.
ear the top of th
t. You ca n sa ve
, or a web accou
, phone numbe
and touch .
screen to choo
the contact on t
t you have add
s, email addres
e
e
d on
es,
36
Page 37

c
a
i
h
v
h
a
e
F
s
h
t
s
a
o
h
n
e
t
o
r
e
c
o
s
Worki
Favorite
access.
Add a
You can
you can f
1. Press
2. Touc
Remo
ng With F
ontacts are list
Contact to
dd the contacts
nd them quickly
the Home key,
a contact and t
e a Contac
vorite C
d at the top of t
avorites
you use freque
.
lide on the scr
en touch a
From Fav
ntacts
e contacts list f
tly to favorites
en and touch
the top.
rites
r easy
o that
.
1. Press
2. Touc
the Home key,
a favorite cont
lide on the sc
ct and then tou
en and touch
h at the top.
.
37
Page 38

H
e
u
c
g
y
s
N
o
N
T
n
A
t
e
e
o
l
M
r
f
p
e
h
s
n
n
b
y
i
e
s
U
m
a
Email
Press the
it to receiv
accounts,
ActiveSyn
Settin
1. When
addres
2. Touch
3. Enter y
4. Touch
ome key, slide
and send emai
sing POP3 or I
account for you
up the fi
ou open Email
.
EXT.
ur password.
EXT to let the
n the screen a
s from your we
AP, or access
r corporate ema
st email a
or the first time,
hone retrieve th
d select Email.
mail or other
our Exchange
l needs.
count
enter your email
network para
se
eters
automa
NO
You ca
MANU
5. Follow
Your phon
download
tically.
E:
also enter thes
L SETUP or w
he on-screen in
will show the i
mail messages.
details manual
en automatic se
tructions to fini
box of the email
38
ly by touching
tup fails.
h the setup.
account and st
rt to
Page 39

n
O
e
e
r
O
n
e
s
h
h
h
a
y
e
o
n
x
d
y
A
s
c
g
g
w
a
o
m
u
t
s
a
t
n
m
o
e
t
c
e
Writi
1. Open
If you
phon
to us
2. Enter
Sepa
To se
recipi
name
your email Inbo
N
have more than
for sending the
a contact name
ate each recipie
N
g and se
TE:
, touch the sen
TE:
d a carbon cop
nts, touch >
or email addre
ding an e
and touch
one email acco
er line to sel ect
message.
or email addres
nt with a comm
or blind carbon
dd Cc/Bcc and
ses.
ail
.
nt added on th
he account you
in the To field.
.
copy to other
enter the conta
want
t
3. Enter
4. Touc
attac
5. Touc
mess
Repl
1. Open
2. Do th
the email subje
to add ima
ments.
at the top ri
to or for
the email you w
T
reply to the sen
ge.
following as y
t and compose
es, videos and
ht of the scree
ard an e
nt to reply to or f
u need:
der, touch .
he email text.
other types of fi l
to send the
ail
rward from the I
s as
nbox.
39
Page 40

e
a
o
w
u
i
E
h
e
o
l
a
t
n
G
t
e
u
s
a
To r
ply to the send
r and all recipie
nts of the origin
l
em
To f
For
3. Edit yo
Chang
1. Genera
2. Open
3. Touch
4. Make t
il, touch
rward the emai
ard.
r message and
ng gener
l settings apply
mail to get the I
>Settings>
e changes and
r > Reply all.
to someone els
touch .
l email s
o all email acco
box screen.
eneral setti ng
ouch when
e, touch or
ttings
nts you add.
.
you finish.
>
40
Page 41

s
u
i
i
e
e
onufew
e
u
h
h
O
o
M
e
s
e
t
o
r
s
m
h
S
a
w
n
t
u
t
e
s
e
S
’
g
Mes
You can
multimed
Open
Pressthe
Sendi
1. On th
2. Add r
aging
se Messagi ng t
a messages (M
ng the M
Home keyand t
ng a Mes
Messages scr
cipients by on e
exchange text
S).
ssaging
ouch .
age
en, touch
of the following
messages (SM
creen
t the bottom.
ays.
) and
T
uch the To field
mber or the con
S
to
3. Touc
text.
4. If you
add a
5. Touc
the Enter ame
want to send a
.
N
suggestions , t
lect recipients f
ching .
subject or attac
TE:
and manually e
act name. If the
uch the one yo
om your contac
sage field and
ultimedia mes
a file to the m
ter the recipient
phone presents
want to add.
s or call log by
nter the messa
age, touch
ssage.
s
a
e
to
41
Page 42

n
e
T
a
d
n
y
b
a
g
o
y
i
m
s
s
a
e
a
e
e
e
y
a
e
s
t
e
s
r
e
t
g
e
t
b
u
h
You ca
multim
NO
Do not
want to
charge
Replyi
Messages
same num
a new thre
1. On the
Messages scre
also include e
dia message.
E:
dd a message
send a text me
for a multimedi
g to a M
ou receive are
er. If the new m
d is created.
ail addresses a
ubject or any a
sage. Otherwis
message.
ssage
ppended to exi
essage comes f
n, touch the thr
recipients for a
tachment if you
you may be
ting threads of
om a new num
ad that has the
he
er,
messa
2. Type y
if
3. Touch
Chang
Touch
messaging
e you want to r
ur reply in the t
ou want to repl
.
ng Mess
Settings in th
settings.
ply to.
xt box at the bo
with an MMS.
ge Settin
Messages scr
tom. You can to
s
en to change t
ch
e
42
Page 43

e
u
n
c
a
u
h
t
o
u
o
s
e
e
n
n
c
e
d
.
a
e
r
Cam
You can
Photos a
You can
Gallery
Capt
1. Press
2. Aim t
adjus
ra
se your phone t
d videos are st
opy them to yo
pp.
ring a Ph
the Home key,
e camera at th
ment. Auto cam
o take photos a
red on the pho
r computer or a
to
lide on the scre
subject and ma
ra mode is use
d record videos
e’s internal stor
cess them in th
nand touch
ke any necessa
by default.
ge.
.
y
43
Page 44

Number Function
1 Switch between the front and back cameras.
2
3
4 Change the flash setting.
5 Change the camera settings.
6
7 Exit the camera.
8 Select a color effect or other special effects.
9 Capture a picture.
10 Capture a LIVE photo.
11 View pictures and videos you have taken.
Set a time delay before the camera takes a picture
automatically after you touch the shutter icon.
Turn on or off the High-Dynamic Range (HDR) feature, only
available for the back camera.
Switch among video camera, photo camera, or dual photo
camera mode.
Use special photo or video camera modes including
12
Panorama, Manual, Time-lapse, Multiexposure, Super
night, and so on.
WARNING!
Keep a safe distance when using the fl ash. Do not point the
flash towards the eyes of people or animals.
NOTE:
You can spread or pinch on the screen to zoom in or out before
taking pictur es.
44
Page 45

h
a
r
y
a
u
F
r
r
w
h
p
W
h
c
u
s
t
e
a
d
d
p
s
M
e
a
c
e
u
a
a
u
e
v
n
e
a
s
n
o
o
r
a
e
3. Touc
leave
NOTE
In Auto c
exposure
up o
4. Lightl
take
NOTE
When yo
BEAUTI
the area where
the camera to a
:
mera mode, wh
bar appear
down to adjust
touch . Th
photo.
:
use the front c
Y to use smile
you want the ca
tofocus on the
en you touch th
beside the foc
he exposure.
Volume key c
mera, you can
etection or bea
mera to focus, o
enter of the im
screen to focu
s point. You ca
n also be used t
lso touch
ty face.
r
ge.
, the
drag
r
Reco
You can
also allo
1. Press
2. Touc
To ca
SLO
3. Aim t
the s
and d
ding a Vi
ecord normal-s
s you to record
the Home key,
VIDEO if you w
ture slow motio
MOTION or TI
e camera at th
reen that yo u w
uring recording.
eo
eed video clips.
low motion or ti
lide on the scre
ant to capture a
n or time lapse
E-LAPSE.
subject. You ca
nt the camcord
The back came
me lapse video.
nand touch
normal-speed vi
ideo, touch … >
touch any are
r to focus on b
a
.
deo.
on
fore
45
Page 46

t
t
a
n
r
O
p
u
n
r
w
o
s
c
v
t
m
n
w
w
o
e
e
s
m
g
e
o
f
y
NOTE:
You can sp
and during
NOTE:
When you
recording,
You can dr
4. Touch
touch
NOTE:
While the
pause the
read or pinch on
recording.
ouch the sc ree
he exposure ba
g up or do
to start rec
to record a
ormal-speed re
ecording. When
the screen to z
to focus during
appears b
n to adjust the
rding a normallow motion or ti
ording is in pro
you record a no
om in or out be
normal-speed
side the focus p
xposure.
peed video clip,
e lapse video.
ress, touch
rmal-speed or
ore
oint.
or
to
time-lapse
photo.
5. Touch
Using
Besides ca
camera ap
modes. To
ideo, touch
or to s
ther Ca
pturing photos a
offers other po
ch … in the vie
to save the fra
op recording.
era Mode
d videos in the
erful and inter
finder scr een t
me as a separat
s
traditional way,
sting camera
find them all.
e
our
46
Page 47

PANORAMA: Capture panorama pictures.
MANUAL: use manual came ra mode to ad just mo re cam era
options for your photo such as ISO, whi te balan ce, exposu re,
etc.
SUPER NIGHT: Capture pictures in low-light environment.
BEAUTIFY: Capture pictures in beautify mode.
MULTI EXPOSURE: Capture two pictures for collage.
MAGIC SHUTTER: Capture water fl ow, star trail, or car trail
SLOW MOTION: Capture slow motion video clips.
TIME-LAPSE: Set the time interval between each frame
when you shot time lapse videos with t he back camera.
Using Dual Camera Mode
You can use dual-lens camera to take phot os, giving you an
excellent visual experience .
1. Pressthe Home key, slide on the screenand touch .
2. Touch DUAL.
3. Touch BOKEH or 3D PHOTO.
4. Aim the camera at the subject and make any neces sary
adjustment.
5. Touch the shutter icon to take the photo.
47
Page 48

b
p
c
o
s
n
w
a
s
u
e
u
c
c
o
m
u
e
r
p
h
g
c
v
n
p
Avoi
h
a
v
e
n
u
e
n
v
g
o
Troub
If you enco
performs a
particular
the chart,
Problem
Poor recepti
leshooti
unter problems
normally, you c
roblem cannot b
ontact the deale
Possible cau
n The network si
weak at your c
location, for ex
basement or n
building, beca
transmissions
effectively rea
g
hile using the
n refer to the c
e resolved usin
r where you pur
es Pos
nal is too
rrent
mple, in a
ar a tall
se wireless
annot
h it.
Mo
the
pro
hone, or if it
art below. If yo
the information
hased the phon
sible solution
e to a location wh
etwork signal can
erly received.
r
in
e.
re
be
Echo or noi
The network is
current time (f
during peak ti
may be too m
traffic to handl
calls).
You are too far
base station fo
provider.
e Poor network li
the part of you
provider.
busy at the
r example,
es, there
ch network
additional
away from a
r your service
nk quality on
service
d using the phone
suc
wait
You
are
pro
End
You
bett
pho
times, or try agai
ing a short time.
can request a ser
map from your se
ider.
the call and dial a
may be switched t
r-quality network l
e line.
at
after
ice
rvice
ain.
a
ink or
48
Page 49

Problem Possible causes Possible solution
Unable to
select certain
features
Battery not
charging
Poor local telephone line
quality.
Your service provider does
not support these features,
or you have not applied for
services that provide these
features.
The battery or battery
charger is damaged.
The phone’s temperature is
below 0°C or higher than
45°C.
Poor contact between the
End the call and dial again.
You may be switched to a
better-quality network link or
phone line.
Contact your service
provider.
Contact the dealer.
Adjust the battery charging
environment to avoid
extremes of temperature.
Check all connectors to
Shortened
standby time
battery and charger.
The standby time is related
to your service provider
system configuration. The
same phone used with
different service providers’
systems will not provide
exactly the same length of
standby time.
The battery is depleted. In
hightemperature
environments, battery life
will be shortened.
ensure that all connections
have been properly made.
If you are located in an area
where signaling is weak,
temporarily power off the
phone.
Use a new battery.
49
Page 50

Problem Possible causes Possible solution
Cannot turn
your phone on
nano-SIM card
error
If you are not able to
connect to the network, the
phone will continue to send
out signals as it attempts to
locate a base station. Doing
so consumes battery power
and will consequently
shorten standby time.
Battery power has been
depleted.
nano-SIM card malfunction
or damage.
nano-SIM card inserted
improperly.
Change your location to one
where the network is
accessible, or temporarily
turn off your phone.
Recharge the phone’s
battery.
Take the nano-SIM card to
your service provider for
testing.
Insert the nano-SIM card
properly.
Unable to
connect to the
network
Debris on the nano-SIM
card contacts.
nano-SIM card invalid. Contact your service
You are not within the
network’s service area.
Poor signal. Move to an open space, or if
You have activated the
Fixed dial numbers
feature.
Use a soft, dry cloth to clean
the nano-SIM card contacts.
provider.
Check the service area with
your service provider.
you are inside a building,
move closer to a window.
Disable this feature. See
Use Fixed Dialing Numbers
.
50
Page 51

Problem Possible causes Possible solution
PIN Code
blocked
Phone
crashes,
reboots,
freeze, or
cannot be
powered on
You have entered an
incorrect PIN code three
consecutive times.
Some third-party software is
not compatible with your
phone.
Contact your service
provider. If the service
provider provides the
nano-SIM card’s PUK code,
use the PUK code to unlock
the nano-SIM card.
Reset the phone to factory
status.
Uninstall the software that
may cause the problem.
Upgrade the phone
software.
51
Page 52

o
a
o
e
m
o
Av
e
e
c
r
y
e
h
e
u
a
s
u
e
t
u
g
o
a
Avo
m
Avo
a
nacc
o
n
l
u
e
For Y
Gener
D
ha
dri
dri
K
10
bo
S
ch
ur Safet
l Safety
n’t make or receiv
ndheld calls while
ving. Never text w
ving.
ep your phone at l
mm away from yo
dy while making c
all parts may cau
oking.
Do
ile
ast
Yo
r
bri
lls.
e Do
ph
To
n’t use at gas stati
r phone may prod
ht or flashing light
n’t dispose of your
ne in fire.
prevent possible
ns.
uce a
.
Y
ur phone can prod
a l
oud sound.
oid contact with
an
ything magnetic.
K
ep away from
pa
cemakers and oth
ctronic medical
el
de
vices.
Tu
rn off when asked
ho
spitals and medica
ilities.
fa
Tu
rn off when told to
crafts and airports.
ai
ce
r
o in
l
in
he
ring damage, do
list
en at high volume
long periods.
for
id extreme
te
peratures.
id contact with liq
Ke
ep your phone dry.
n’t take your phon
Do
rt.
ap
O
ly use approved
essories.
ot
evels
ids.
52
Page 53

Turn off when near
explosive materials or
liquids.
Don’t rely on your phone
for emergency
communications.
FCC RF Exposure Information (SAR)
This phone is designed and manufactured not to exceed the
emission limits for exposure to radio frequency (R F) energy set
by the Federal Communic ations Commission of the United
States.
During SAR testing, this device was set to transmit at its highest
certified power level in all tested frequency bands, and placed
in positions that si mulate RF exposure in usage against the
head with no separation, and near th e body with the se paration
of 10 mm. Although the SAR is determined at the highest
certified power lev el, the actual SAR level of the device while
operating can be well below the maximum value. This is
because the phone is designed to operate at multiple power
levels so as to use only the power required to reach the network.
In general, the closer you are to a wireless base station
antenna, the lower the power output.
The exposure standard for wireless devices employs a unit of
measurement known as the Specific Absorption Rate, or
SAR. The SAR limit set by the FC C is 1.6W/kg.
This device is complied with SAR for general population
/uncontrolled ex posure limits in ANSI/IEEE C95.1-1992 and
had been teste d in accordance with the measurement met hods
and procedures specified in IEEE 1528.
53
Page 54

The FCC has granted an Equipment Authorization for this
model phone with all reported SAR levels evaluated as in
compliance with t he FCC RF exposure guidelines. SAR
information on this model phone is on file with the FCC and can
be found under t he Display Grant section of
www.fcc.gov/oet/ea/fccid after searching on FCC
ID:SRQ-ZTEBLADEV8.
For this device, the highest reported SAR value for usage against
the head is 0.598W/kg, for usage near the body is 0.797 W/kg.
While there may be differences between the SAR levels of
various phones and at various positions, they all meet the
government req uirement.
SAR complianc e for body-worn oper ation is based on a
separation di stance of 10 mm betwe en the unit and the human
body. Carry this device at least 10 mm away fr om your body to
ensure RF expos ure level compli ant or lower to the reported
level. To supp ort body-worn o peration, choose the belt clips or
holsters t hat do not contain metallic components to maintai n a
separation of 10 mm between this dev ice and your body.
RF exposure c ompliance with any body -worn accessor y that
contains metal was not tested nor certified, and using such
body-worn accessory should be avoided.
FCC Regulations
This mobile phone complies with part 15 of the FCC Rules.
Operation is subject to the following two conditions: (1) This
device may not cause harmful interference, and (2) this device
54
Page 55

must accept any interference received, including interference
that may cause undesired operation.
This mobile phone ha s been tested and found to comply with the
limits for a Class B digital device, pursuant to Part 15 of the FCC
Rules. These limits are designed to provide reasonable
protection against harmful interference in a residential installation.
This equipment generates, uses and can radiate radio frequency
energy and, if not installed and used in accordance with the
instructions, may cause harmful interference to radio
communications. However, there is no guarantee that
interference will not occur in a particular installation. If this
equipment does cause harmful interference to radio or television
reception, which can be determined by turning the equipment off
and on, the user is encouraged to try to correct the interference
by one or more of the following measures:
Reorient or relocate the receiving antenna.
Increase the separation between the equipment and receiver.
Connect the equipment i nto an outlet on a circuit different
from that to whic h the receiver is connected.
Consult the dealer or an experie nced radio/TV techni cian for
help.
CAUTION:
Changes or modifications not expres sly approved by the party
responsible for compliance could v oid the user’s authority to
operate the equipment.
55
Page 56

Distraction
Driving
Full attention must be giv en to driving at all times in order to
reduce the risk of an accident. Us ing a phone while dr iving (even
with a hands free kit) can cause distraction and lead to an
accident. You mu st comply with local laws and regulations
restricting the use of wireless devices while driving.
Operating Machinery
Full attention must be giv en to operating machinery in order to
reduce the risk of an accident.
Product Handling
General Statement on Handling and Use
You alone are responsible for how you use your phone and any
consequenc es of its use.
You must always tur n off your phone wherever the use of a
phone is prohibited. Use of your pho ne is subject to safety
measures desi gned to protect us ers and their environment.
Always treat your phone and it s accessories with care and
56
Page 57

keep it in a clean and dust-free place.
Keep the screen and camer a lens clean. Unclean screen or
camera lens may slow down the phone's reaction to your
operations or lower image quality.
Clean the deviceand its accessories with a soft material such
as cleaning cloth for eyeglass lenses. Do not use alcohol or
other corrosive substances for cleaning or allow them to get
inside.
Do not expose your phone or its accessories to open flames
or lit tobacco prod ucts.
Do not expose your phone or its accessories to liquid,
moisture or high humidity.
Do not drop, throw or try to bend your phone or its
accessories.
Do not paint your phone or its accessories.
Do not attempt to disassemble your phone or its
accessor i es.Only authorized personnel c an do so.
Do not expose or use your phone or its accessories in a
environment with or that can reach extreme temperatures,
minimum - [5] and maximum + [50] degr ees Celsius.
57
Page 58

Do not place your phone inside or near heating equipments or
high press ure containers, such as water heaters, microwave
ovens, or hot cooking utensils. Otherwise, your phone may be
damaged.
Please check local regulations for disposal of electronic
products.
Do not carry your phone in y our back pocket as it c ould break
when you sit down.
Small Children
Do not leave your phone and its acces sories within the reach of
small children or allow them to play with it.
They could hurt t hemselves or others, or could accidentally
damage the phone.
Your phone contains small parts with sharp edg es that may
cause an injury or may become detached and create a choking
hazard.
Demagnetization
To avoid the risk of demagnetization, do not allow electronic
devices or magnetic media to be close to your phone for a long
58
Page 59

time.
Electrostatic Discharge (ESD)
Do not touch the nano-SIM card’s metal connectors.
Antenna
Do not touch the antenna unnecessarily.
Normal Use Position
When placing or receiving a phone c all, hold your pho ne to your
ear, with the bottom towards your mout h.
Air Bags
Do not place a phone in the area ov er an air bag or in the air bag
deployment area as an airbag inf lates with great force and
serious injury could result.
Store the phone safely before driving your vehicle.
Seizures/Blackouts
The phone can produce a bright or flashing light. A small
percentage of people may be susc eptible to blackout s or
seizures (even if they have never had one before) when exp osed
59
Page 60

to flashing lights or light patterns such as whe n playing games or
watching video. If you have experienced seizures or blackouts or
have a family hist ory of such occurrences, please consult a
physician.
Repetitive Strain Injuries
To minimize the risk of Repetitive Strain Injury (RSI) when texting
or playing games with your phone:
Do not grip the phone too tightly.
Press the buttons lightly.
Use the special features which are designed to minimize the
times of press i ng buttons, such as Mess age Templates and
Predict ive Text.
Take many breaks to stretch and relax.
Emergency Calls
This phone, like any wireless phone, operates using radio signals,
which cannot gu arantee connect ion in all conditions. Therefore,
you must never rely solely on any wireless phone for emergency
communications.
60
Page 61

Loud Noise
This phone is capable of producing loud noises , which may
damage your hearing. Turn down th e volume before using
headphones, Bluetooth stereo headsets or other audio devices.
Phone Heating
Your phone may become warm during charging and during
normal use.
Electrical Safety
Accessories
Use only approved accessories.
Do not connect wit h incompatible products or accessories .
Take care not to touch or allow metal objects , such as coins or
key rings, to contact or short-circuit in the battery terminals.
Never punctur e the surface of the battery with sharp objects.
Connection to a Car
Seek profess ional advice when c onnecting a phon e interface t o
the vehicle elec trical system.
61
Page 62

Faulty and Damaged Products
Do not attempt to disassemble the phone or its acc essor ies.
Only qualified personnel can service or repair the phone or it s
accessories.
If your phone (or its accessories) has been submerged in water,
punctured, or subjected to a severe fall, do not use it until you
have taken it t o be checked at an authorized service center.
Radio Frequency Interference
General Statement on Interference
Care must be taken when using the phone in close proximity to
personal medical devices, such as pacemakers and hearing aids.
Pacemakers
Pacemaker manufact urers recommend that a minimu m
separation of 15 cm be maintained between a mobile phone and
a pacemaker to avoid potential interference with t he pacemaker.
To achieve this, use the phone on the opposite ear to your
pacemaker an d do not carry it i n a breast pocket.
62
Page 63

Hearing Aids
People with hearing aids or other cochlear implants may
experience inter fering noises when using wireless devices or
when one is nearby.
The level of interference will depend on the type of hearing device
and the distance from the interference source. Increasing the
separation between them may reduce the interference. You may
also consult your hearing aid manufacturer to discuss alternatives.
Medical Devices
Please consult your doctor and the device manufacturer to
determine if operation of your phone may interfere with the
operation of your medical device.
Hospitals
Turn off your wireless de vice when requested to do so in hospitals,
clinics or health care facilities. These requests are designed to
prevent possible interference with sensitive medical equipment.
Aircraft
Turn off your wireless device whenever you are instruct ed to do
63
Page 64

so by airport or airline staff.
Consult the airl ine staff about the use of wireless devices
onboard the aircraft. If your device offers a ‘flight mode’, this must
be enabled prior to boarding an aircraft.
Interference in Cars
Please note that because of possible interference wi th electronic
equipment, some v ehicle manufacturers forbid the use of mobile
phones in their vehicles unless a hands-free kit with an external
antenna is included in the installation.
Explosive Environments
Gas Stations and Explosive Atmospheres
In locations with p otentially explosive atmospheres, obey all
posted signs to turn off wireless devices such as your phone or
other radio eq uipment.
Areas with potentially explosive atmospheres include fueling
areas, below decks on boats, fuel or chemical transfer or storage
facilities, and areas where the air contains chemicals or particles,
such as grain, dust, or metal powders.
64
Page 65

Blasting Caps and Areas
Power off your mobil e phone or wireless device when in a
blasting area or in areas posted pow er off “two-way radios” or
“electronic devices” to avoid interfering with blasting operations.
IFT: “La operación de este equipo está sujeta a las siguientes condiciones:
1) Este equipo no causará interferencias perjudiciales
2) Este equipo aceptar cualquier interferencia, incluyendo la que pueda causar
su operación no deseada.”
DATOS ELECTRICOS DE OPERACIÓN:
TELEFONO: 3.87 Vcc
ADAPTADOR D E CORRIENTE ca/cc :
Entrada: 100-240 Vca 50/60Hz 300mA
Salida: 5Vcc 1 500mA
65
 Loading...