

Page 1

Happy Phone 3G 4.0’’
User Manual
1
Page 2
Getting Started
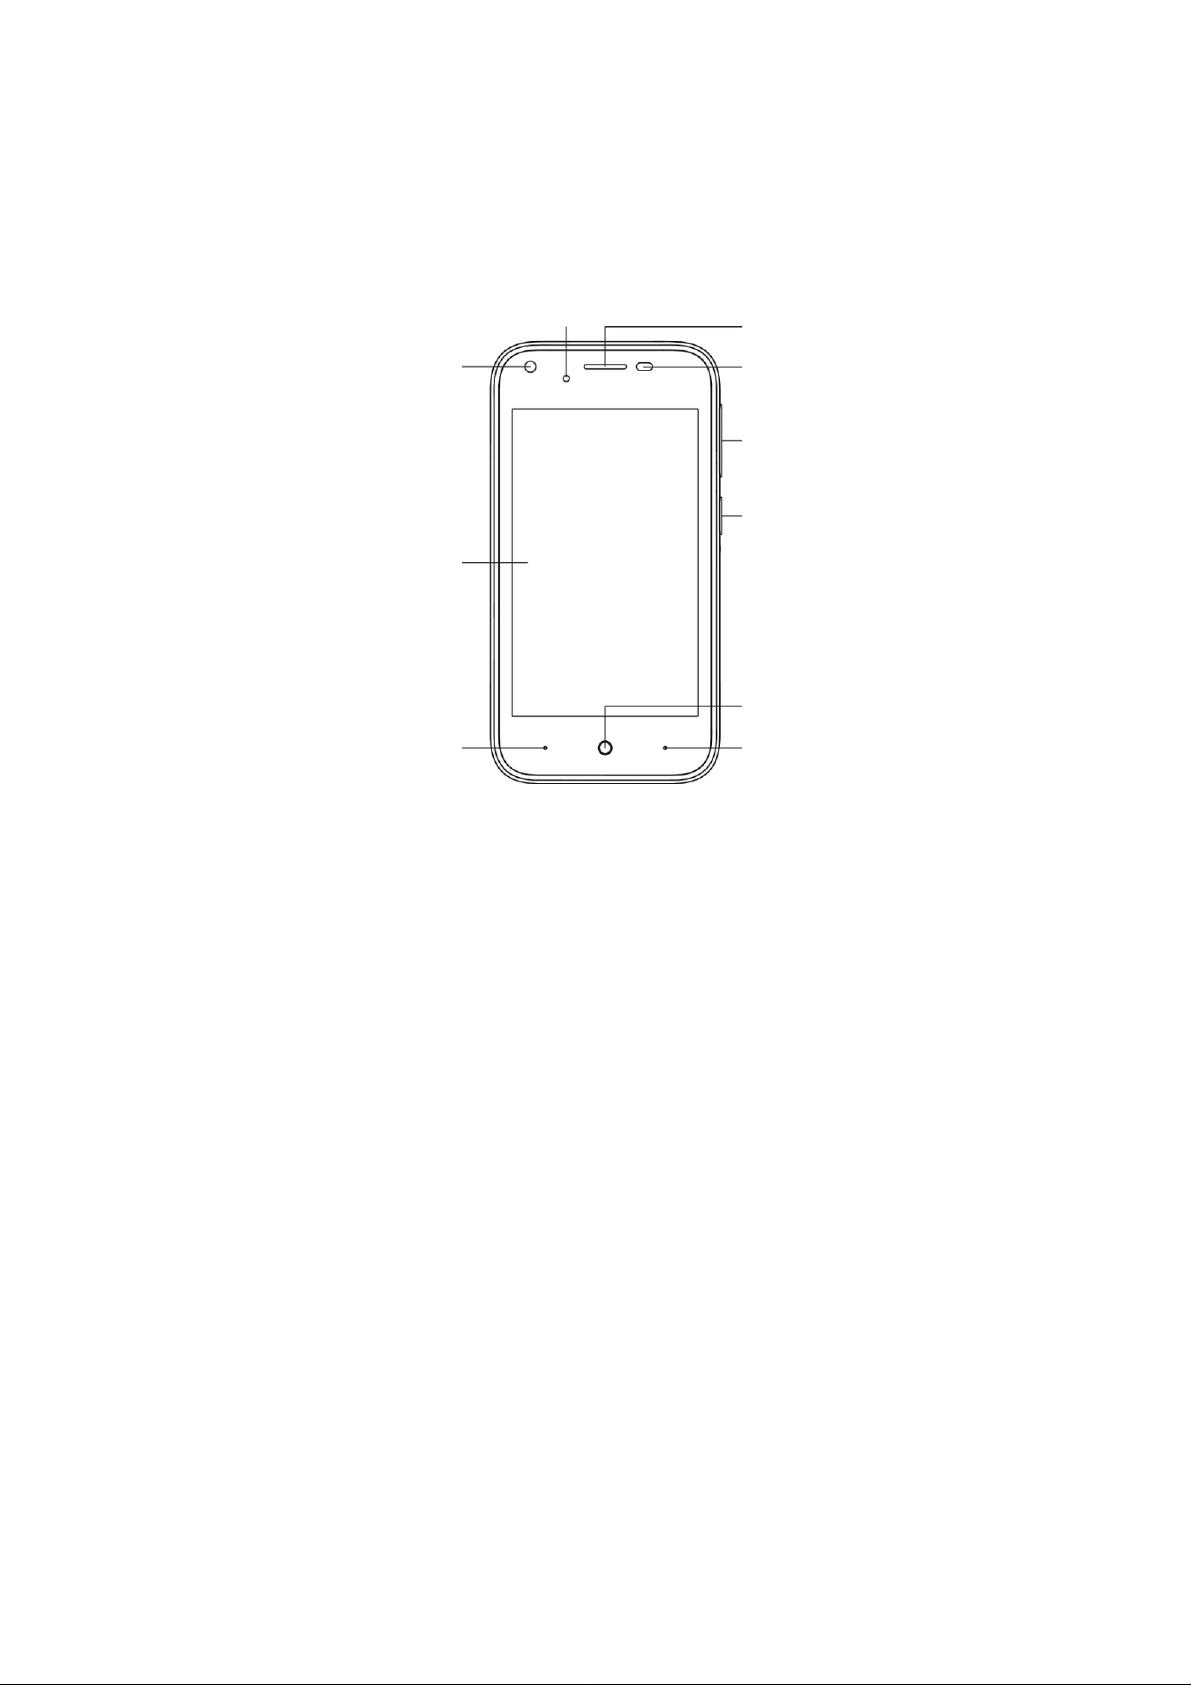
Overview
Indicator
Receiver
Front Camera
Sensor
Volume Key
Power Key
Touch Screen
Home Key
Hardkey-Menu Hardkey-Back
2
Page 3
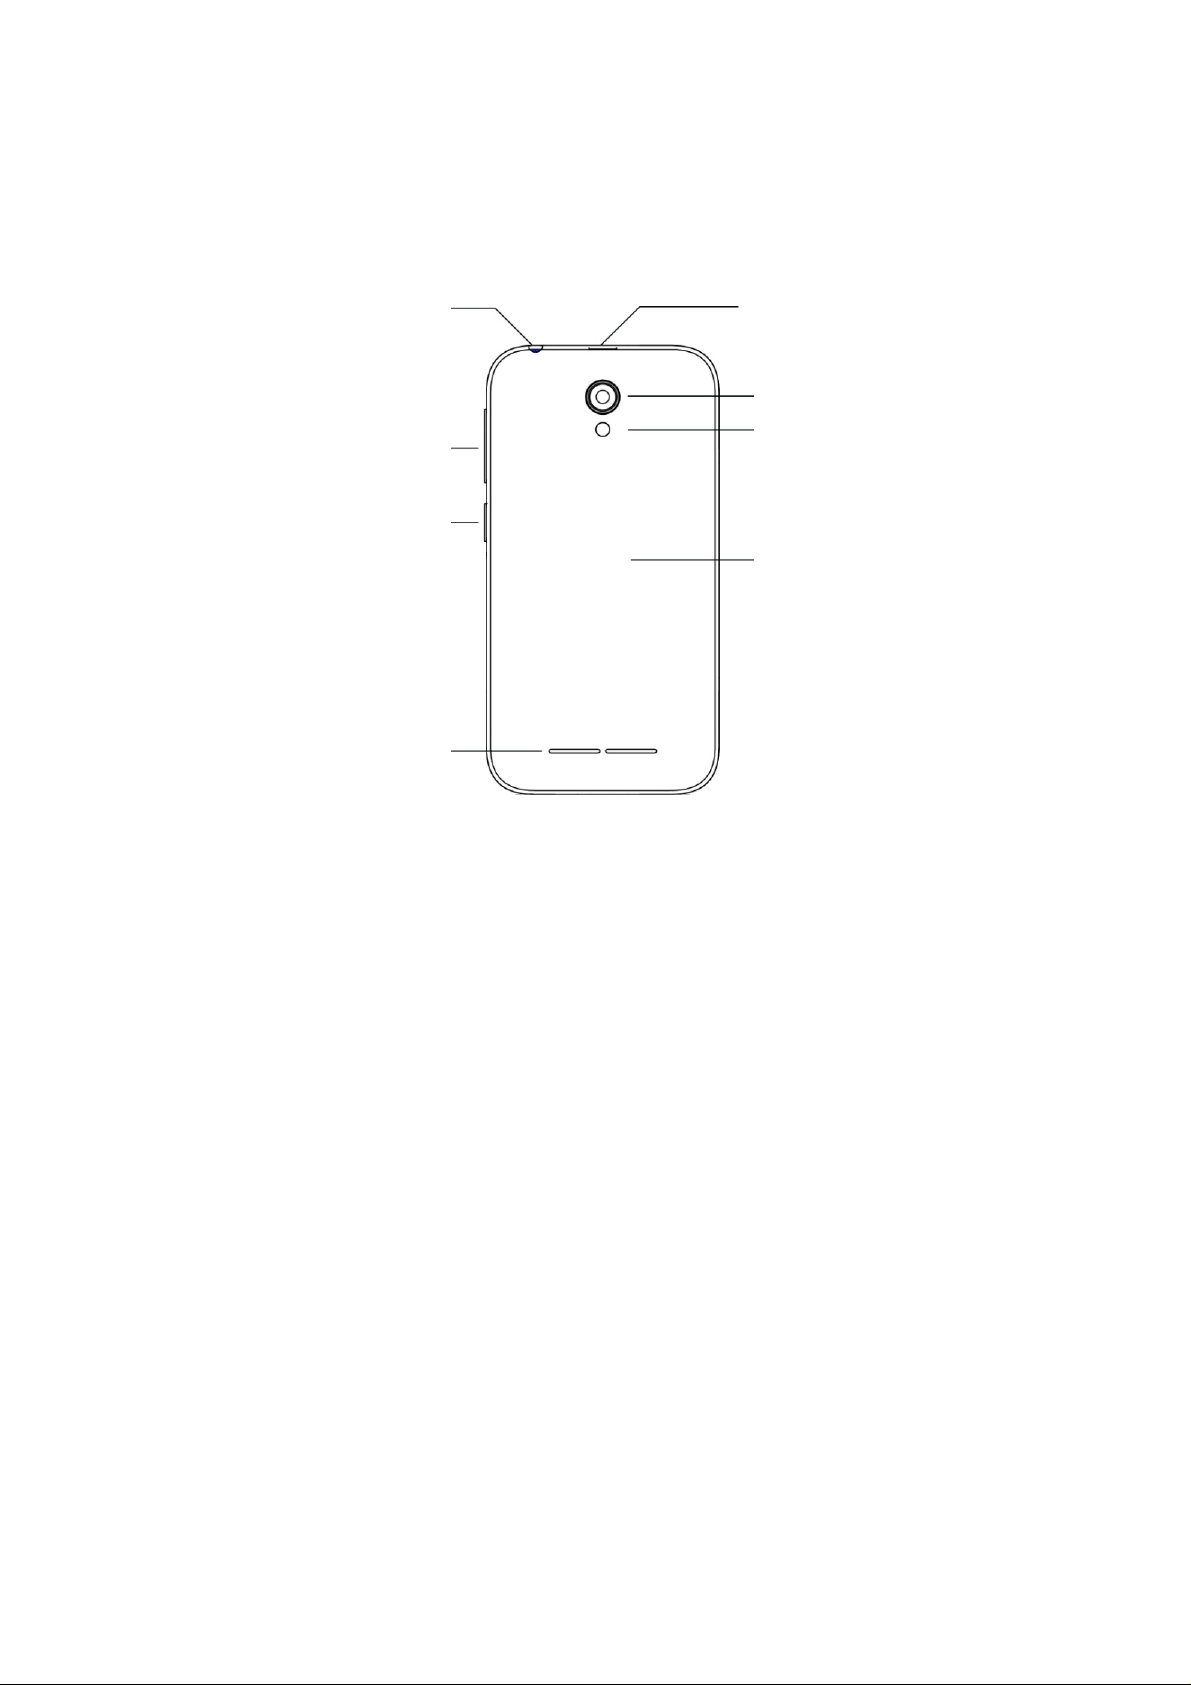
Headset Jack
Charging/USB Jack
Volume Key
Power Key
Loud Speaker
Flash Lamp
Back Cover
3
Page 4

Keys Explained
.
Key Function
Power Key
Home Key
Hard Key-Menu
Hard Key-Back Press to go to the previous screen.
Volume Keys Press or hold to turn the volume up or
Hold to turn on or off Airplane mode, or
to power off, or restart.
Press to switch your phone to Sleep
mode.
Press to wake up your phone.
Press to return to the Home Screen
from any application or screen.
Hold to see Google search.
Touch and hold to see recently used
applications
down.
Setting Up Your Phone for the First Time
When you first power on your phone after you purchase it or reset it to factory
settings (see chapter Sorting out Your Phone Settings – Personal: Reset to
Factory Settings), you need to do some settings before using it.
Flick the language field to select the language and touch . Then follow the
prompts to set up Wi-Fi, Name, Protect your phone, Google services and
other options.
Switching to Sleep Mode
To save battery power, Sleep Mode suspends your device to a
low-power-consumption state while the display is off. Your device also goes
into Sleep Mode by itself when the display is automatically turned off after a
certain period of time. You can start sleep mode by the following method.
Press Power Key to switch to Sleep Mode.
Waking Up Your Phone
1. Press Power Key to activate your screen display.
2. Tap the icon, drag to the left, enter the camera; drag to the right,
enter the dial.
3. Swipe up the screen to unlock the screen.
NOTE: If you have set an unlock pattern, PIN or password for your phone
(see chapter Sorting out Your Phone Settings – Security Settings) you’ll
need to draw the pattern or enter the PIN/password to unlock your screen.
Touch Control
You can use finger gestures to control your phone. The controls on your
4
Page 5

touch-screen change dynamically depending on the tasks you’re performing.
4. Tap the buttons, icons, or applications to select items or to open
applications.
5. Flick the screen to scroll up, down, left or right.
6. Point, drag and drop to move particular items across the screen.
7. Double-tap the screen to zoom in/out an image.
NOTE: You can view the phone screen in portrait or landscape orientation
simply by holding it upright or turning it on its side. Not all screens are
viewable in landscape.
Home Screen
In the Home screen, besides the shortcut icon is displayed, you can also
set your own wallpaper, add the widgets or application shortcuts
or remove them as you like.
Extended Home Screen
The Home Screen extends beyond the screen width, giving you loads more
space to add more stuff. Simply slide your finger to the left or right.
you need,
Choosing Your Wallpaper
1. Press Home Key to return to the Home Screen.
2. Tap Menu Key and select WALLPAPERS.
3. Choose the image or animation you want to use as the wallpaper.
Some cropping may be needed for Gallery images.
4. Tap Set Wallpaper.
Adding Items to Your Home Screen
1. Press Home Key>tap to enter the Application Program Interface
2. In the list of applications, touch and hold the icon until the main screen
appears, move the application icon to the idle position, release the finger.
Removing Items from Your Home Screen
1. Press Home Key to return to the Home Screen.
2. Tap and hold the item you want to delete until the remove icon appears
on the to p o f t h e screen.
3. Drag the item to the remove icon and release your finger when
the item turns red.
5
Page 6
Status
o
w
r
nMisBaNeNeUS
t
e
o
R
a
h
n
e
g
s
d
o
c
e
w
w
T
e
s
o
u
y
o
P
a
m
o
o
o
g
s
o
D
n
i
s
w
t
o
e
n
t
o
t
c
d
p
e
e
A
a
e
w
i
p
a
e
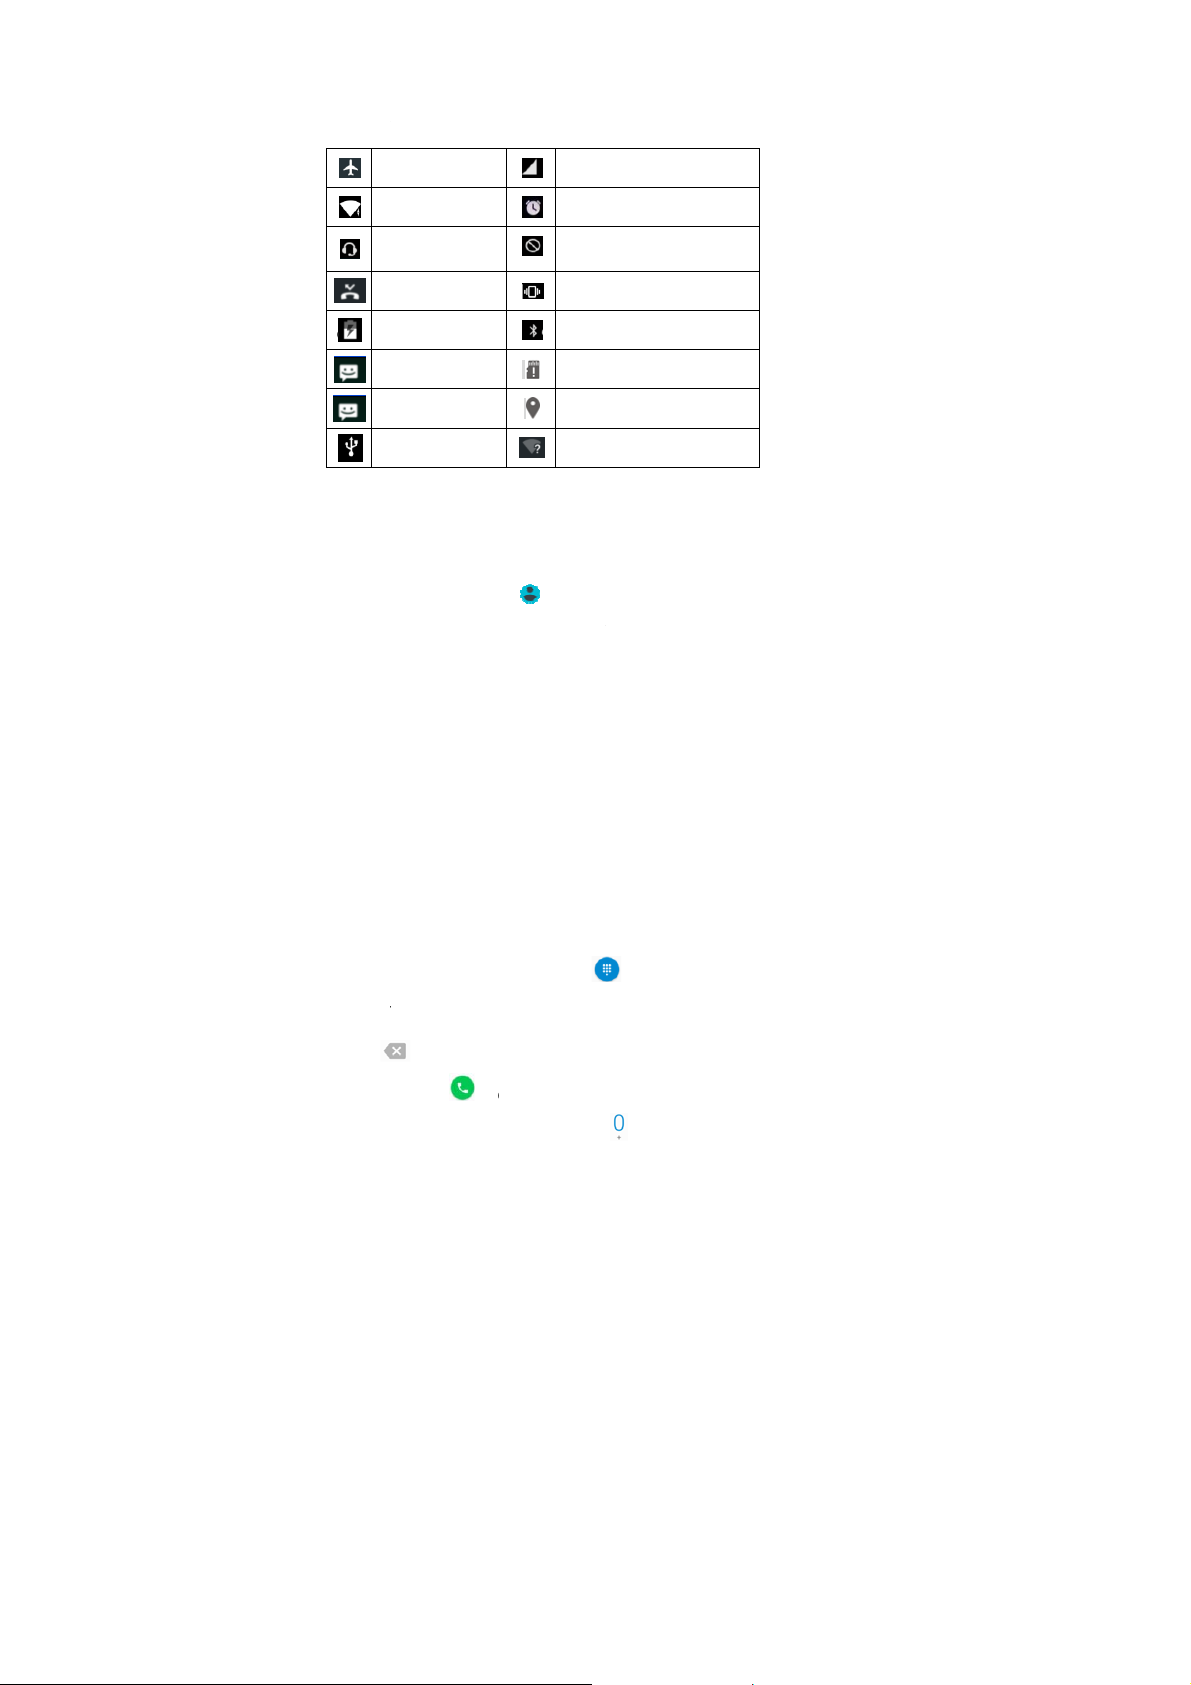
Your ph
Here’s
Ai
Wi
Wi
co
and Notifi
ne will tell you
hat they mean.
plane mode
-Fi in use
red headset
nected
sed call
ation Icons
xactly what’s
Signal
Alarm s
Ringer
Vibrate
oing on by sho
trength
et
ff
mode
wing you simpl
icons.
Using
Flick the
the Notif
Messag
panel. T
Open
1. Hold
ppl
2. Tap t
Maki
There ar
do.
ttery charging
w SMS
w MMS
B connected
he Notifica
status bar do
ication Panel,
s and so on.
hide the pan
ecently-U
Menu Key fr
ications yo
e application
g Calls
many ways t
Bluetoo
microS
GPS o
New W
tion Panel
nwards from a
here you can
ap to open
l, tap on the lo
ed Applica
m any scre
used rece
ou want to ope
make a call wi
th on
HC card remove
-Fi network dete
cross the top o
ee your calen
the shortcuts
er edge of th
ions
n. The phon
tly.
n.
h your phone.
d
ted
f the screen to
ar events, ne
anel from notif
panel, drag u
will displ
nd they’re all
open
cation
.
y the
asy to
Callin
1. Pres
2. Enter
Tap
Tap the
TIPS: T
from the
Home key > t
the phone nu
to delete wr
ial icon bel
make internati
hone
p Phone >
ber using the
ng digits.
w the keypad
nal calls, hold
on the Home
n-screen keyp
o dial.
to enter the
6
Screen.
d.
“+”.
Page 7

Calling from Your Contacts
1. Press Home key > tap > Contacts.
2. Slide your finger to scroll the contacts list and tap the contact name you
want to call, when the contact details appear, click on the number; choose
the SIM card to dial.
You can search for a contact by tapping on the screen.
Calling from Your Call Log
1. Press Home key > tap Phone > Recents.
2. Swipe up the screen, then tap the View full call history to open the call
records, respectively touch all, missed, outgoing, incoming call button to
display a list of the corresponding call records.
3. Tap the contact you need, when the contact details appear, click on the
number; choose the SIM card to dial.
Calling from a Text Message
If a text message contains a phone number that you want to call, you can
make the call while viewing the text message.
1. Press Home key > tap Messaging.
2. Tap the conversation and then find the message that contains the phone
number you need.
3. Tap the message, the phone will list the options.
Receiving Calls
Answering a Call
Tap the icon, drag to right to answer the call.
Rejecting a Call
Tap the icon, drag to left to reject the call.
Using Options During a Call
During a call, you will see a number of onscreen options. Touch an option to
select it.
Touch to switch to the keypad when you need to enter
a code (for example, the PIN for your voicemail or bank
account) during the call.
7
Page 8

Touch to turn on or off the speaker.
Touch to mute or unmute your microphone.
Touch to hold or unhold the current call.
Ending a Call
Tap to finish a call.
Contacts
You can add contacts on your phone and sy nchronize them w ith the co ntacts in
your Google account or other accounts that support contact sy ncing.
To see your contacts, Press Home key > tap > Contacts.
Creating a Contact
1. Tap from the Contacts Screen.
2. Choose the storage location to save the contact.
3. Enter the contact name, phone numbers, and other information, and
then touch Add new contact to save the contact.
Searching for a Contact
1. Tap on the Contacts Screen.
2. Input the contact name you want to search for. The contacts matched will
be listed.
Messaging
Your SMS (text message) and MMS (multimedia messaging service) are
combined in t o o ne menu in Home Key > tap Messaging.
The Message Box
Instead of an inbox and outbox, your phone organizes all Messaging you sent
and received into one box, where Messaging exchanged with the same
number are grouped into one message thread in the Messaging Screen. You
can tap a thread to see the conversation you have had with someone.
Sending a Message
3. Press Home key > tap Messaging.
4. Tap to create new message.
5. Enter the recipient’s number or name. As you type, matching contacts will
appear. Tap a suggested contact to add as a recipient. You can also tap
8
Page 9

t
T
s
A
t
M
g
n
g
t
e
n
o
o
w
e
n
o
p
o select recipi
e
a
a
i
s
u
e
e
m
e
>
n
s
u
e
e
e
n
S
p
w
o
y
m
e
c
s
m
e
c
p
t
p
e
g
d
c
k
o
e
m
h
e
b
m
g
o
i
c
n
o
o
r
p
a
t
u
g
t
e
i
s
y
o
M
nts from the co
ntacts.
6. Tap
If you
touch
slide
7. Tap
NOTE:
MMS au
from an
Messa
The pho
To chan
Touch
Choose
input fro
In the K
that you
ype message
want to send
the paper clip
how to the me
to send yo
dd an attachm
omatically. Lik
MS, it’ll auto
e Settings
e’s message s
e them, tap
Input Setti
he touch input
m Home Scree
yboard & inp
need.
nd type your
multimedia m
con to atta
sage.
r message.
nt to text mes
wise if you re
atically becom
ttings are pre-
Settings from
gs
ettings by tap
n.
t methods se
essage.
ssage, touch t
h pictures, vid
age and it will
ove all attach
a text messa
onfigured for y
the Messaging
ing > Sett
ction, you can
e > Attach
os, audio, or
e converted in
ents and the s
e.
u to use immed
Screen.
ngs > Langua
hoose the set
or
o an
bject
iately.
e &
ings
Getti
Your ph
Internet
You can
mobile n
The net
Home k
switch to
Addi
To get c
service
phone, p
You can
g Conn
ne’s impressiv
r your corporat
use default co
etwork, or Wi-F
ork connection
y > tap >
the On / OFF
g a Ne
nnected via yo
rovider. Also if
lease contact y
view settings b
cted to
networking ca
network with
nection settin
i.
can be enable
ettings >SIM
osition to set.
Networ
ur mobile netw
the networks s
ur provider to
pressing Ho
he Inter
abilities allow y
ase.
s to connect t
/ disabled man
ards>Cellula
Connec
rk you need a
ttings are not
get the necess
e key > tap
9
et
u to access th
the Internet v
ually. Just pres
data, then tap
tion
data plan with
re-configured
ry information.
>Settings >
a your
Press
the
our
n your
ore >
Page 10

Cellular
o
s
W
s
n
e
a
f
d
i
e
o
n
h
e
s
i
k
n
c
c
a
e
W
a
n
r
F
p
a
h
s
e
t
h
a
0
m
n
o
r
n
c
w
.
e
S
o
s
a
e
t
i
U
W
C
k
e
e
c
o
e
e
c
c
t
s
o
t
networks> Ac
ess Point Na
es.
Turnin
Wi-Fi pr
feet.
1. Pres
2. Click
the
Conne
1. Pres
Whe
phon
settin
2. Tap
NOTE: I
passwor
Check
You can
g On Wi-Fi
vides wireless
Home key > t
next to th
i-Fi function.
cting to a
Home key > t
the Wi-Fi is o
has detected
gs.
n access point
security featu
.
ng the Wi-
check the Wi-F
Internet access
p > Setti
Wi-Fi menu t
i-Fi Netwo
p > Setti
, the Wi-Fi ac
are displayed
to connect to it
es are implem
i Network
i network by lo
over distances
gs.
turn it on, clic
k
gs > Wi-Fi.
ess points, or
ith their nam
nted, you’ll n
tatus
king at the i
of up to about
you can
“hotspots”, tha
s and security
ed to enter a
on in the statu
300
turn off
your
bar.
USB t
Share y
Enabli
TIPS: T
Therefor
phone a
Connect
Disabl
Unchec
network.
Enabli
You can
internet
NOTE:
thering &
ur phone’s dat
g USB tet
e PC acces
, set up the n
a modem.
your phone to
ng USB tet
USB tethering,
g the Wi-F
use the phone
onnection with
ortable hot
connection vi
ering
es the Intern
tworks connec
he computer w
ering
or unplug the
i Hotspot
s a portable
one or more P
pot
USB or as a p
t via the ph
ion correctly b
th a USB cabl
SB cable dire
LAN router, to
or other devi
1
ortable Wi-Fi h
ne’s mobile n
fore you try to
, select USB te
tly off the USB
share your pho
es.
tspot.
etwork.
use the
hering.
shared
ne’s
Page 11

t
a
>
W
c
i
>
w
o
o
r
h
o
s
s
s
o
a
-
o
F
e
t
F
p
F
f
e
y
s
s
W
x
r
d
1
c
t
a
g
k
e
g
d
n
r
b
o
s
a
o
m
o
t
h
n
t
T
e
t
o
w
s
o
G
y
a
t
a
c
o
h
n
o
o
o
a
When
phone’
You c
he portable Wi
s applications t
n configure the
Fi hotspot fun
access the in
Wi-Fi hotspot
tion is enabled,
ernet via its Wi
s follows:
you can’t use
-Fi connection.
our
1. Press
hotspot
it on.
2. Tap
portab
conne
Disabl
Press H
hotspot
OFF pos
Bro
You can
connecti
Press H
There a
Tap t
Home key > ta
portable Wi-
i-Fi hotspot s
le Wi-Fi hotspo
t to it.
ng the Wi-
ome key >ta
portable Wi-
ition to turn it o
sing the
use your phon
n.
me Key > tap
e different wa
e address bar
.
p > Settin
i hotspot, clic
ttings and us
. Now you can
i Hotspot
> Settin
i hotspot an
f.
Internet
to get on the I
> Browse
s to open we
to enter the we
s >More > Te
next to t
r manageme
find the hotspo
s > More>
click the Wi-F
ternet via a n
.
pages:
bsite you want
hering & port
e Wi-Fi hotspo
t to set up & m
on other devi
ethering & p
i h otspot switc
twork or Wi-Fi
o browse. The
ble
to turn
nage
es and
rtable
to the
tap
Tap
Brows
When y
Pres
Pres
Pres
Using
If you kn
a web p
name an
>Bookmark
ing Option
u browse the
> Exit to e
> Bookma
> Settings
Bookmarks
w the Web ad
ge, open it and
d save it.
and select a b
eb, you can al
it.
ks and select
to configure br
ress, you can
tap > Add t
okmark、hist
o do the follo
bookmark、hi
wser settings.
anually add bo
bookmarks.
1
ry or offline to
ing:
tory or offline t
kmarks. To bo
ive the bookm
pen.
open.
kmark
rk a
Page 12

Editin
g
S
s
c
t
n
S
s
c
a
e
o
v
i
s
s
o
n
u
w
k
y
o
a
w
s
o
o
k
o
a
c
a
I
e
E
d
e12
e
O
e
h
o
w
a
y
l
l
b
d
e
o
u
i
i
s
e
d
e
E
1. Open
a Bookma
a Browser
rk
indow.
2. Tap
ele
3.
hor
4. Sele
5. Edit
Deleti
1. Open
2. Tap
ele
3.
hor
4. Sele
Chang
Tap >
E-m
E-mail r
the purp
the recei
> Bookmar
ct an item
tcut menu p
t Edit bookm
he Title or URL
g a Bookm
a Browser
> Bookmark
ct an item y
tcut menu p
t Remove boo
ing Browse
Settings from
il
fers to writing
se is to achiev
er.
s.
ou want to
ps up.
rks.
, and then tap
ark
indow.
.
u want to d
ps up.
mark and tap
r Settings
a browser wind
r file through t
e the informati
dit and ho
K to save it.
lete and ho
OK to confirm.
ow to change
e Internet, sen
n interaction b
d on it unt
d on it unt
rowser setting
and receive l
tween the sen
l the
l the
.
tters,
er and
Login
1. Pres
2. Input
choo
NOTE: y
account.
Sendi
3. Tap
4. Ente
5. If yo
pictu
n E-mail
Home Key >t
your E-mail ac
e a suitable w
u need in the
g a E-mail
to create n
r the recipient
still want to a
res, audio, vid
p > E-mail.
ount and pass
y to login E-m
nternet before
w E-mail.
-mail address.
d attachments
os, or attach ot
ord, then acc
il.
ou use E-mail
in the mail, yo
hers.
rding to your n
to register an
can tap to
ed to
-mail
attach
Page 13

6. Tap
t
h
w
i
s
B
e
h
n
p
r
n
o
m
t
R
m
s
n
R
l
u
e
a
t
m
a
e
e
u
w
o
a
e
r
a
e
n
g
o
r
M
o13
m
x
o
s
n
h
h
c
o
Y
n
s
e
t
c
o
u
y
n
a
s
c
t
v
e
H
n
,
r
r
w
s
m
m
o
o
h
c
d
p
e
h
a
s
c
to send yo
r E-mail.
Blue
Bluetoot
devices
distance
commun
1. Pres
2. Click
the
3. Tap
rang
4. Tap t
mess
Whe
com
TIPS: Ta
try to pai
Taki
Your ph
ooth
is a short-rang
ith Bluetooth c
of about 10 me
cation is perfor
Home Key >t
next to th
icon will app
luetooth. Yo
.
e device you
age prompt.
both devices t
leted.
p your device n
with your phon
g Pictur
ne has came
wireless com
pabilities can e
ers. The Blueto
ed.
p >Setting
Bluetooth me
ar in the status
r phone will s
ant to pair wit
be paired ac
me to make y
e.
s with
function. Ope
unication tech
change inform
th devices mu
> Bluetooth.
u to turn it on.
bar.
ow all visible
and operate a
ept the connec
ur phone disco
our Cam
it by pressing
ology. Phones
tion wirelessly
t be paired bef
When Bluetoot
Bluetooth devi
cording to the
ion, the pairing
erable if other
ra
ome Key >ta
r other
within a
re the
is on,
es in
is
evices
>Ca
Tap
FM
With the
save the
depends
works a
To tu
FM
Playi
You can
Before p
era.
o take a pictur
adio
FM Radio, you
on your pho
on the covera
an antenna, s
e in, plug you
adio.
ng Your
play digital aud
aying music, y
. To view it, ju
can search for
e. Note that th
e of the radio s
always conne
headset into y
usic
io files from yo
u need to cop
t slide the pho
radio channels
quality of the
ation in your a
t the headset
ur phone. Pre
r phone’s me
music files to
e screen to th
listen to them,
adio broadcast
ea. The wired
hen using the
s Home key>t
ory card in Mu
emory card lo
left.
and
eadset
radio.
p >
ic.
ation.
Page 14

1. Press Home Key >tap > Music to open the Music Screen.
2. Click the Music category label> music files to start playing.
3. Adjust the volume with Volume Keys.
Opening Your Gallery
Press Home Key > tap > Gallery. You can use Gallery to view pictures
and play videos. You can also do some basic editing of your pictures – such
as setting them as wallpaper or contact photo, and sharing with friends.
Making Voice Memos
Sound Recorder enables you to record voice memos and listen to
them whenever you like.
1. Press Home Key > tap > Sound Recorder.
2. Tap to start recording.
3. Tap to stop recording.
4. Tap OK to save the voice recording after stop, or tap CANCEL to delete
the recording.
Sorting out Your Phone Settings
Setting Date and Time
1. Press Home Key > tap > Settings > Date & time.
2. Tap Automatic Date & time and select 'Use network-provided time' or
'Use GPS-provided time' or select 'off' if you want to set the time and date
by yourself.
3. Set time zone, Tick 'Automatic time zone' or uncheck manually select the
time zone.
Display Settings
Press Home Key > tap > Settings > Display, you can adjust the di spl ay
settings as you like:
Wallpaper: Select a background image for the Home Screen.
Sleep: Set the length of time of inactivity before the screen turns off.
Daydream: Control what happens when the phone is docked and/or
sleeping.
Font size: Set the font size of the text on the screen.
14
Page 15

Audio Profiles Settings
By pressing Home Key > tap > Settings > Audio profiles. When
you choose the General mode, you can adjust the sound settings,
such as ringtone, volume and vibrate.
Language Settings
You can change the language of your phone system in two simple steps.
1. Press Home Key > tap > Settings > Language &input>Language.
2. Select a language from the list given.
Disabling Data Services
Press Home Key > tap > Settings>SIM cards>Cellular data, then tap
the switch to the OFF position to Close.
Switching Networks
1. Press Home Key > tap > Settings > More > Cellular networks >
Network operators.
2. Tap the SIM card you want to set.
3. Tap Search networks to register manually, or tap Choose
automatically.
Setting Access Point Names
To connect to the Internet you can use the default Access Point Names
(APN). And if you want to add a new APN, please contact the service
provider to find out more.
Press Home Key > tap > Settings > More > Cellular networks >
Access Point Names.
Security Settings
Here’s how to protect your phone and SIM card from unauthorized use.
Protecting Your Phone with a Pattern
Creating Your Screen Unlock Pattern
1. Press Home Key > tap > Settings > Security > Screen lock >
Pattern.
2. Drag your finger to connect at least four dots, draw the pattern.
3. Touch CONTINUE.
15
Page 16

4. Redraw your pattern to confirm.
Unlocking the Screen with Your Pattern
1. Press Power Key to wake up the screen.
2. Draw the pattern you set to unlock the screen.
Protecting Your Phone with a PIN or Password
Creating a PIN or Password
1. Press Home Key > tap > Settings > Security > Screen lock.
2. Tap PIN or Password.
3. According to the instruction to complete your PIN or password settings.
Unlocking the Screen with Your PIN or Password
1. Press Power Key to wake up the phone.
2. Enter the PIN or password you set.
Disabling Screen Unlock Security
If you have created an unlock pattern, PIN or password, you can disable it.
1. Press Home Key > tap > Settings > Security > Screen lock.
2. Draw the screen unlock pattern or enter your PIN/ password you have
created if required.
3. Tap None.
Protecting Your SIM Card with a PIN
Every SIM card comes with a PIN. The initial PIN is provided by your mobile
phone carrier. It’s best to lock your SIM card as soon as you can.
1. Press Home Key > tap > Settings > Security > Set up SIM card
lock.
2. Choose the SIM card you want set.
3. Tick the Lock SIM card check box.
4. Enter the PIN you’ve been given and tap OK.
TIPS: If you enter the wrong SIM PIN more times than allowed, your SIM card
will be locked and you cannot access the mobile phone network. Contact
your operator for a PIN Unlock Key (PUK) to restore the SIM card.
Changing Your SIM PIN
You can change the PIN you’ve been given to one easier for you to
16
Page 17

remember and harder for others to guess.
1. Press Home Key > tap > Settings > Security > Set up SIM card
lock.
2. Choose the SIM card you want set.
3. Make sure you already tick the Lock SIM card check box.
4. Tap Change SIM PIN.
Managing Your Device Memory
Press Home Key > tap > Settings > Storage.
You can view the space information of the SD card and the internal storage.
Unmount SD card: You can unmount the SD card to safely remove it.
Erase SD card: Erase all data on the SD card.
Time Switch Machine
Press Home Key > tap > Settings >Time Switch Machine
You can control the mobile phone startup and shutdown by setting the power
switch on and off time
Personal: Reset to Factory Settings
Press Home Key > tap > Settings > Factory data reset > Factory data
reset > RESET PHONE > ERASE EVERYTHING.
WARNING: All your personal information and downloaded applications on
your phone will be erased after the resetting.
Applications
See apps installed on your phone and manage them.
Press Home Key > tap > Settings > Apps.
Touch an app in the Downloaded, Running, or All tab to see its information.
You can stop the app, uninstall the app, clear data and cache, or move the
app between the internal storage and the memory card.
NOTE: Not all applications can be moved or uninstalled.
Managing Other Settings
Text-to-speech Output
You can set the text-to-speech and voice recognition options by pressing
Home Key > tap > Settings> Language & input > Text-to-speech
17
Page 18

output.
s
r
o
sto
a
s
k
m
Y
u
D
h
d
Foa
S
c
h
T
p
A
m
Kpo
m
S
n
h
m
Sin
a
a
s
>
a
c
n
d
r
e
y
a
y
d
s
8
t
o
ca
m
m
a
n
g
n
r
n
d
d
d
n
s
y
e
y
e
e
m
d
o
o
e
d
p
w
a
e
n
e
m
Acces
You can
by pressi
Othe
Clock
Press H
Tap the
and
Calcul
You can
1. Pres
2. Clic
arith
For
Prod
ibility
configure acce
ng Home Key
Applic
me Key > tap
top of the s
p watch fu
tor
use the phone
Home Key >
the button cor
etic.
our Saf
ct Safet
o not use
and-held while
riving
or body-worn
peration maint
separation of
1
0mm
mall parts may
ause a choking
azard
his device ma
roduce a loud
s
ound
void contact wi
agnetic media
eep away from
acemakers an
ther personal
edical devices
witch off when
i
structed in
ospitals and
edical facilitie
witch off when
structed in
ircrafts and
irports
sibility options
tap > Set
for accessibilit
ings> Access
tions
> Clock, y
reen icon
ctions fro
irectly perfor
tap > Calc
esponding with
u can view the
n be switch
the clock int
simple mathe
ulator.
the calculator
ty
Inform
in This
th Avoi
Avoi
tion
Do
ot use while
re-fu
elling
device may pr
ht or flashing l
a bri
Do
ot dispose of it
fire
revent possible
To p
ing damage, d
hea
liste
at high volum
level
s for long perio
Extreme
Tem
eratures
any contact
liqui
, keep it dry
Do
ot attempt to
disa
semble
Onl
use approved
acc
ssories
-related applic
ibility.
clock or set th
d to the cou
rface.
atical calculati
isplay, perfor
duce
ight
in a
not
s.
ith
tions
alarm.
tdown
ons.
basic
1
Page 19

Switch off in
explosive
environments
Do not rely on this device
for emergency
communications
FCC Regulations
The 15.19 statement is used. They should have used the one for Licensed
devices: “This device complies with part 15 of the FCC Rules. Operation is
subject to the condition that this device does not cause harmful interference.”
CAUTION:
Changes or modifications not expressly approved by the manufacturer could
void the user’s authority to operate the equipment.
The antenna(s) used for this transmitter must not be co-located or operating
in conjunction with any other antenna or transmitter.
NOTE:
This equipment has been tested and found to comply with the limits for a
Class B digital device, pursuant to part 15 of the FCC Rules.
These limits are designed to provide reasonable protection against harmful
interference in a residential installation. This equipment generates, uses and
can radiate radio frequency energy and, if not installed and used in
accordance with the instructions, may cause harmful interference to radio
communications. However, there is no guarantee that interference will not
occur in a particular installation. If this equipment does cause harmful
interference to radio or television reception, which can be determined by
turning the equipment off and on, the user is encouraged to try to correct the
interference by one or more of the following measures:
Reorient or relocate the receiving antenna.
Increase the separation between the equipment and receiver.
Connect the equipment into an outlet on a circuit different from that to
which the receiver is connected.
Consult the dealer or an experienced radio/TV technician for help.
Body-Worn Operation
This device was tested for typical body-worn operations. To comply with RF
exposure requirements, a minimum separation distance of 1.0 cm must be
19
Page 20

maintained between the user’s body and the device, including the antenna.
Third-party belt-clips, holsters, and similar accessories used by this device
should not contain any metallic components. Body accessories that do not
meet these requirements may not comply with RF exposure requirements
and should be avoided. Use only the supplied or an approved antenna.
20
 Loading...