

ZTE AT Z998 User Manual
User Guide
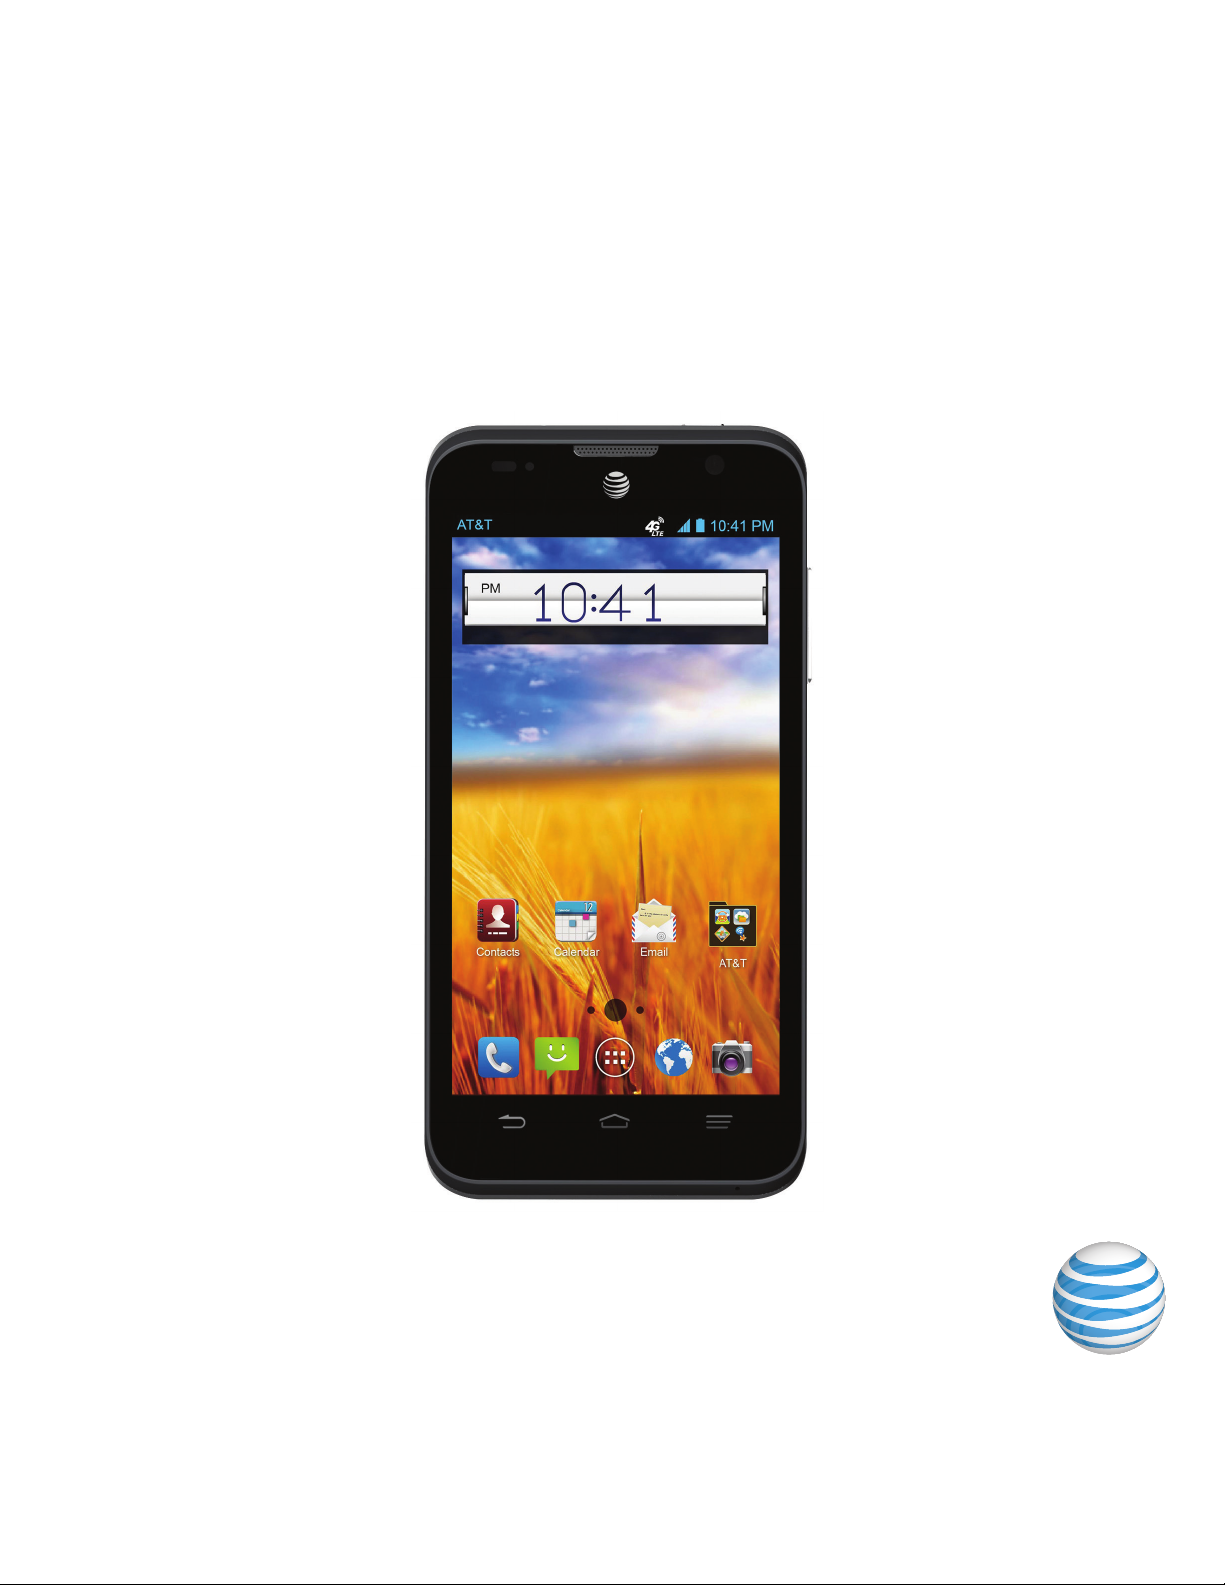
AT&T Z998

Devices purchased for use on AT&T’s system are designed for use exclusively on AT&T’s
system. You agree that you won’t make any modifications to the Equipment or programming
to enable the Equipment to operate on any other system. A voice plan is required on all
voice-capable devices, unless specifically noted otherwise in the terms governing your
agreement. Some devices or plans may require you to subscribe to a data plan.
Your phone is designed to make it easy for you to access a wide variety of content. For your
protection, we want you to be aware that some applications that you enable may involve the
location of your phone being shared. For applications available through AT&T, we offer privacy
controls that let you decide how an application may use the location of your phone and
other phones on your account. However, the AT&T privacy tools do not apply to applications
available outside of AT&T. Please review the terms and conditions and the associated privacy
policy for each location-based service to learn how location information will be used and
protected. In addition, your AT&T phone may be used to access the Internet and to download, and/or purchase goods, applications, and services from AT&T or elsewhere from third
parties. AT&T provides tools for you to control access to the Internet and certain Internet
content. These controls may not be available for certain devices which bypass AT&T controls.
AT&T may collect certain types of information from your device when you use AT&T services
to provide customer support and to improve its services. For more information on AT&T’s
Privacy Policy, visit att.com/privacy.
microSD™ is a trademark of SanDisk. The Bluetooth
®
word mark and logos are registered
trademarks owned by Bluetooth SIG, Inc.
Copyright © 2013 ZTE CORPORATION.
All rights reserved.
No part of this publication may be excerpted, reproduced, translated or utilized in any form
or by any means, electronic or mechanical, including photocopying and microfilm, without
the prior written permission of ZTE Corporation.
The manual is published by ZTE Corporation. We reserve the right to make modifications on
print errors or update specifications without prior notice.
Version No. : V2.0
Edition Time: August 2013
Manual No. : 079584505366

Getting Started .......................................................................1
Phone Setup. . . . . . . . . . . . . . . . . . . . . . . . . . . . . . . . . . . . . . . . . . . . . . . . . . . . . . . . . . . . . . . . . . . . . . . . 1
Switching Your Phone On/Off .....................................................3
Getting Around .....................................................................4
Get to Know Your Phone ...........................................................5
Key Functions ......................................................................6
Phone Calls ...........................................................................12
How to Make Calls .................................................................12
How to Receive Calls ..............................................................13
Adjusting Your Call Settings .......................................................15
Contacts ..............................................................................17
Importing and Exporting Contacts ...............................................17
Creating a Contact ................................................................18
Adding a Contact to Favorites ....................................................19
Searching for a Contact ...........................................................19
Creating a New Group ............................................................19
Entering Text ........................................................................20
Android™ Keyboard ..............................................................20
TouchPal Keyboard ...............................................................21
Choosing Touch Input Settings .................................................. 24
Contents
iContents

Messaging ........................................................................... 25
Message Box .....................................................................25
Sending a Message ............................................................... 25
Changing Message Settings ...................................................... 26
Email .................................................................................28
Creating an Email Account ......................................................28
Receiving Email ................................................................... 28
Composing and Sending an Email ..............................................28
Replying to or Forwarding an Email .............................................. 29
Deleting an Email Account ....................................................... 29
Email Settings ....................................................................29
Connecting to the Internet ........................................................30
Adding a New GPRS/EDGE/3G/4G/4G LTE Connection .......................30
Turning on Wi-Fi® .................................................................30
Connecting to a Wi-Fi Network ...................................................31
Checking the Wi-Fi Network Status ..............................................31
Browsing the Internet ..............................................................32
Opening a Web Page ............................................................. 32
Browsing Options ................................................................ 32
Opening Another Browser Window .............................................33
Using Bookmarks ................................................................. 33
Changing Browser Settings ......................................................34
Using Google Chrome™ ..........................................................34
ii Contents

Bluetooth® ..........................................................................35
Using Bluetooth ..................................................................35
Entertainment ......................................................................36
Taking Pictures with Your Camera ...............................................36
Adjusting Camera Settings ......................................................36
Sharing a Picture ................................................................. 37
Opening Your Gallery ............................................................38
Shooting Video with Your Camcorder ..........................................39
Adjusting Your Video Settings ...................................................39
Sharing a Video ...................................................................40
Playing Your Videos ..............................................................40
Adding Music to Your Phone ......................................................41
Playing Your Music ................................................................42
Making Memorable Memos ......................................................44
Applications ......................................................................... 45
Alarm .............................................................................45
Calculator ........................................................................45
Facebook® ........................................................................ 45
File Manager ......................................................................46
Kingsoft Office ...................................................................46
NotePad ..........................................................................46
Task Manager .....................................................................46
Timer .............................................................................47
Twitter® ...........................................................................47
Voice Dialer ....................................................................... 47
iiiContents

iv Contents
Google™ Applications ..............................................................48
Google Search and Google Now ................................................48
Gmail™ ............................................................................49
Google Play™ .....................................................................50
Using Google Calendar. . . . . . . . . . . . . . . . . . . . . . . . . . . . . . . . . . . . . . . . . . . . . . . . . . . . . . . . . . . 50
Using Google Talk™ ................................................................51
Google Local™ ....................................................................52
Google Music™ ....................................................................53
Google+™ ......................................................................... 53
Google Maps™ ....................................................................53
Messenger ........................................................................ 53
Navigation ........................................................................53
News & Weather .................................................................53
Play Books ........................................................................54
Play Magazines ...................................................................54
Play Movies & TV .................................................................54
Voice Search .....................................................................54
YouTube™ ........................................................................54
Phone Settings ...................................................................... 55
Setting Date and Time ...........................................................55
Display Settings ..................................................................55
Sound Settings ................................................................... 55
Language Settings ................................................................56
Mobile Network Services. . . . . . . . . . . . . . . . . . . . . . . . . . . . . . . . . . . . . . . . . . . . . . . . . . . . . . . . . 56
Security Settings .................................................................56
Managing Your Device Memory .................................................. 59

vContents
Factory Reset ..................................................................... 59
Managing Applications ...........................................................59
Managing Other Settings .........................................................60
For Your Safety ......................................................................62
General Safety. . . . . . . . . . . . . . . . . . . . . . . . . . . . . . . . . . . . . . . . . . . . . . . . . . . . . . . . . . . . . . . . . . . . 62
FCC Regulations. . . . . . . . . . . . . . . . . . . . . . . . . . . . . . . . . . . . . . . . . . . . . . . . . . . . . . . . . . . . . . . . . . 63
RF Exposure Information (SAR) .................................................64
Hearing Aid Compatibility (HAC) ................................................65
CTIA ...............................................................................67
Distraction ........................................................................68
Product Handling .................................................................68
Electrical Safety ..................................................................72
Interference ......................................................................72
Explosive Environments .........................................................74
Specifications .......................................................................75
Warranty ............................................................................76
Limited Warranty ................................................................. 77
How to Get Warranty Service .................................................... 78
Other Warranty Programs .......................................................78
vi

Getting Started
Phone Setup
Installing the SIM Card and Battery
Power off your phone before installing or replacing
the battery or SIM card.
Remove the back cover as shown.
Insert the SIM card into the card slot with the
cut corner oriented as shown.
Carefully insert the battery with the contacts
located against the metal springs. Push down
on the battery until it is fully seated.
Replace the back cover.
1Getting Started
Inserting a microSD™ Card
Insert a microSD card (not included) with
the gold-colored contacts facing down.
Replace the back cover.
Removing the Battery and
SIM/microSD Card
Power off your phone.
Remove the back cover.
Lift the battery up and out.
Slide the SIM card out.
Slide the microSD card out.
Charging the Battery
Note: For best performance, charge the battery
fully prior to using the phone for the first time.
Insert the charger’s connector into the
charging port. Be sure to insert the
connector in the correct orientation.
Do not force the connector into the port.
Plug the charger into a standard
AC wall outlet.
When the battery is fully charged,
unplug the charger and disconnect
it from the phone.
2 Getting Started
Switching Your Phone On/Off
Make sure the SIM card is in your phone and the battery is charged.
• Press and hold the Power/Lock Key to turn on your phone.
• To turn it off, press and hold the Power/Lock Key to open the options menu.
Tap Power off
OK.
Setting Up Your Phone for the First Time
When you first power on your phone after you purchase it or reset it to factory
settings (see Phone Settings – Factory Reset), you need to set up your phone
settings before using it.
Scroll the language list to highlight the language you need and then
tap Start.
If you have a Gmail account, tap Yes to sign in to Google. Tap No if you do not
have an account.
To create a Google account, tap Get an account. You can also tap
Not now to set up an account later.
Configure the Google location options and tap .
Input your name and tap .
Read the Google services information and tap .
Tap Finish to complete setup.
Switching to Sleep Mode
To save battery power, Sleep Mode suspends your phone in a low-powerconsumption state while the display is off. Your phone also goes into Sleep Mode
by itself when the display is automatically turned off after a certain period of time,
which you can set by pressing
System settings Display Sleep from the
home screen.
Press the Power/Lock Key to switch to Sleep Mode.
3Getting Started

Waking Up Your Phone
Press the Power/Lock Key to activate your screen display.
Tap and hold
to unlock the screen.
Note: If you have set an unlock pattern, PIN, or password for your phone
(see Phone Settings – Security Settings) you’ll need to draw the pattern or enter
the PIN/password to unlock your screen.
Getting Around
Touch Control
Use the touchscreen to control your phone. The controls on your touchscreen
change dynamically depending on the tasks you’re performing.
Tap the buttons, icons, or applications to select items or to open applications.
Keep your finger on an item to see the available options.
Swipe the screen to scroll up, down, left, or right.
Drag and drop to move particular items across the screen.
Pinch with two fingers or double-tap the screen to zoom in/out on a web page
or an image.
Note: You can view the phone screen in portrait or landscape orientation simply
by holding it upright or turning it on its side.
4 Getting Started
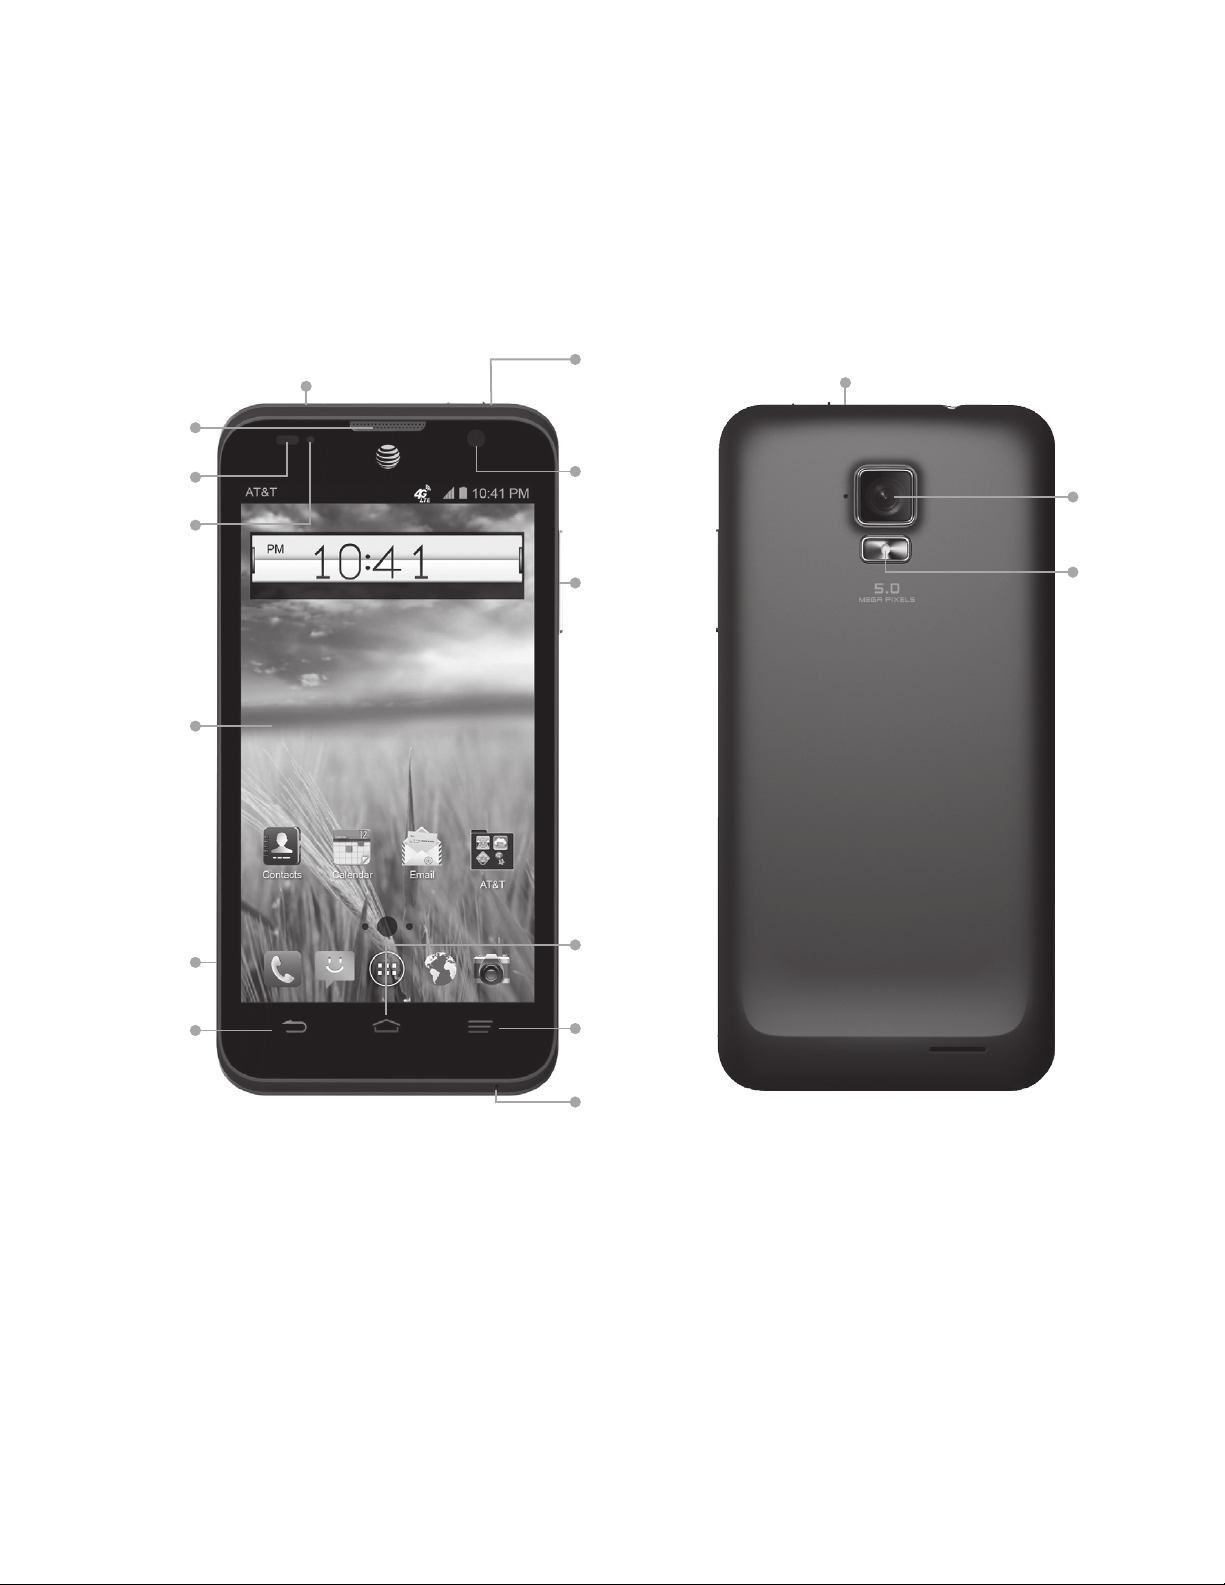
Get to Know Your Phone
5Getting Started
Earpiece
Headset
jack
Back key
Touchscreen
Menu
key
Home
key
Power/lock key
Microphone
Volume
up/down
keys
Camera
lens
Micro USB
charging
port
Microphone
Status LED
Promixity
sensor
Camera
lens
Flash

6 Getting Started
Key Functions
Key Function
Power/Lock Key
Press and hold to turn phone on/off, change sound
setting to silent/vibration/sound, set to Airplane mode, or
to restart the phone.
Press to switch your phone to Sleep Mode.
Press to wake up your phone.
Home Key
Tap to return to the main home screen from any
application or screen.
Tap and hold to see recently used applications.
Menu Key Tap to see the options for the current screen.
Back Key Tap to go to the previous screen.
Volume Keys Adjust the volume of the phone.
7Getting Started
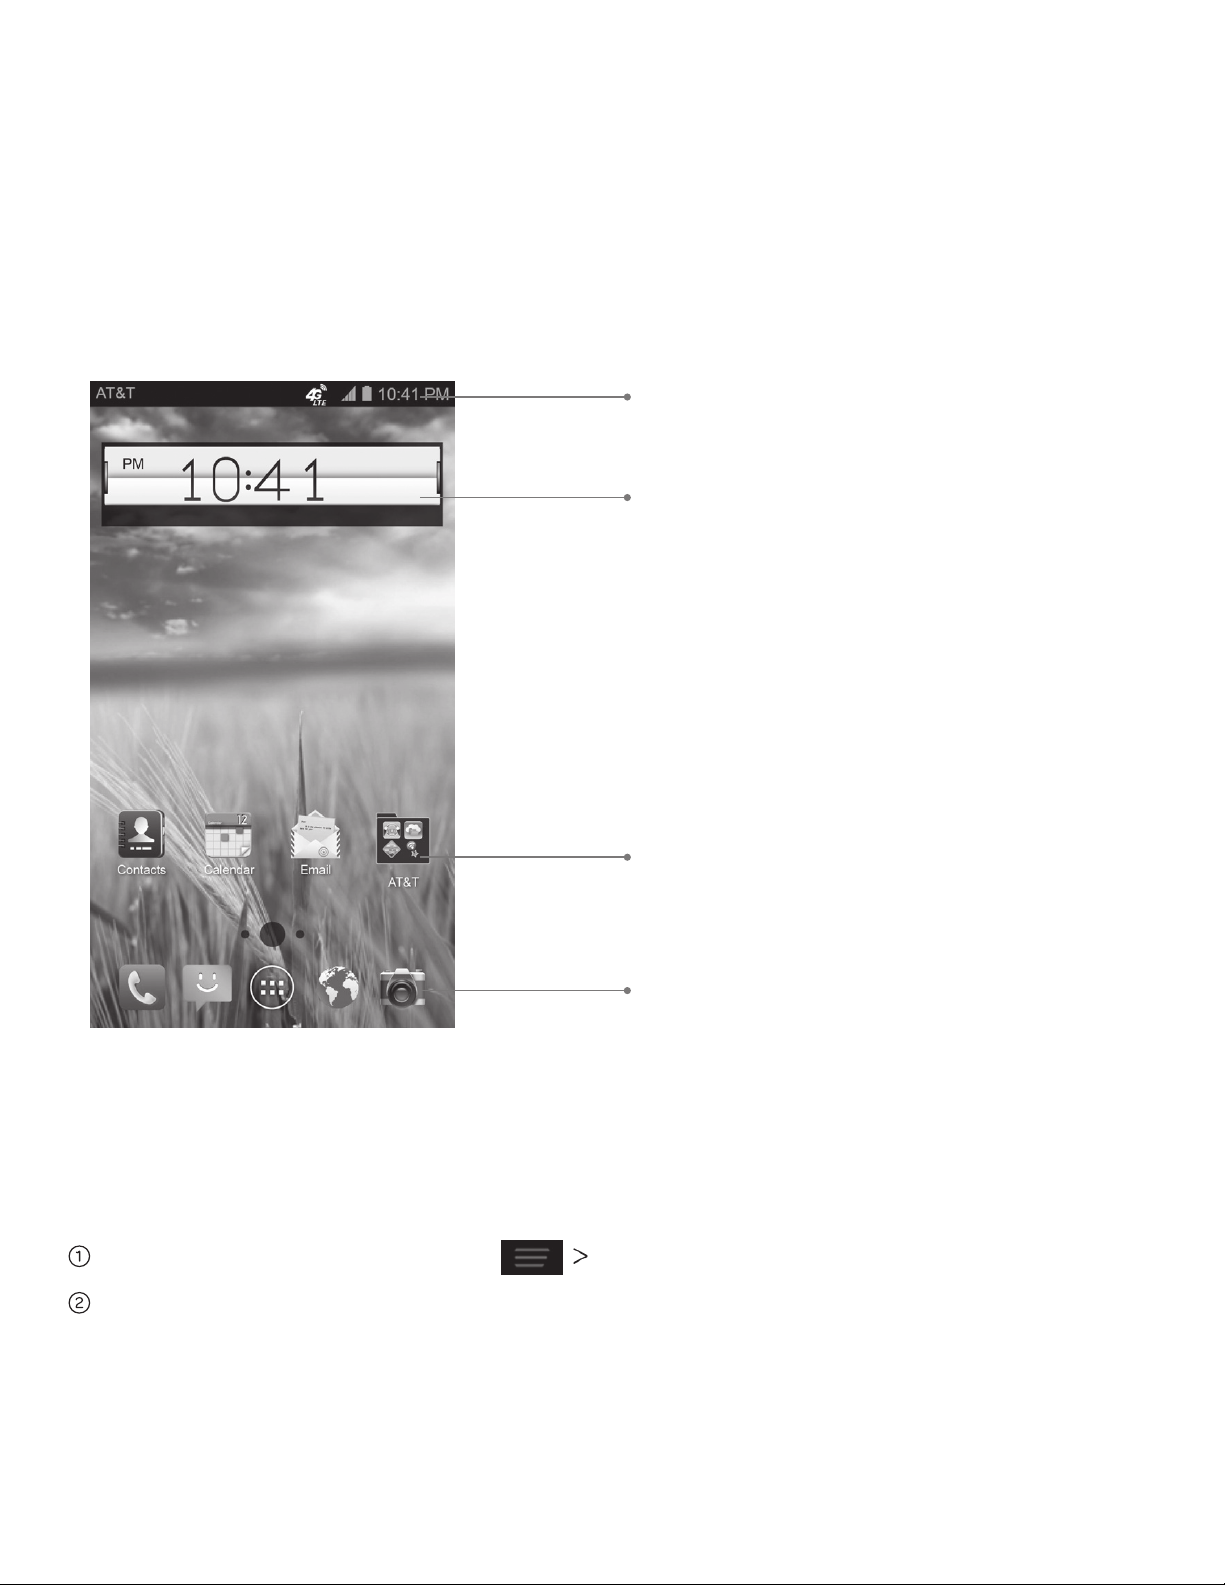
Home Screens
You can customize your home screens. Set your own wallpaper, add the widgets or
application shortcuts you need, or remove them as you like.
Navigating Your Home Screens
Your phone comes with three home screens, giving you more space to add more
items. Simply swipe your finger to the left or right to see each home screen.
Choosing Your Wallpaper
From the home screen, press Wallpaper.
Tap Home or Lock screen.
Shortcuts
Status and
notification bar
Favorite shortcuts
Widget

8 Getting Started
Tap Gallery, Live Wallpapers or Wallpapers and choose the image or
animation you want to use as the wallpaper. Some cropping may be needed for
Gallery images.
Tap Done (for Gallery images) or Set wallpaper.
Note: Live wallpapers are not available for the lock screen.
Adding Items to Your Home Screen
Tap .
Tap the Apps or Widgets tab to find the application or widget you desire.
Tap and hold the icon of the item you wish to add and then drag it to the home
screen.
Removing Items from Your Home Screen
Tap and hold the item you want to delete until Remove appears on
the screen.
Drag the item to
Remove and release your finger when the item turns red.
Creating a Folder
On a home screen, tap and hold an app icon and drag it to folder.
You can add more apps to the folder by dragging icons to the folder.
Tap the folder to open it and access items in the folder.
To name the folder, open it and tap Unnamed Folder.
Enter a name and tap Done.
Deleting Items from a Folder
Tap a folder to open it.
Tap and hold an icon and drag it to Remove. Release the icon when it turns red.
9Getting Started
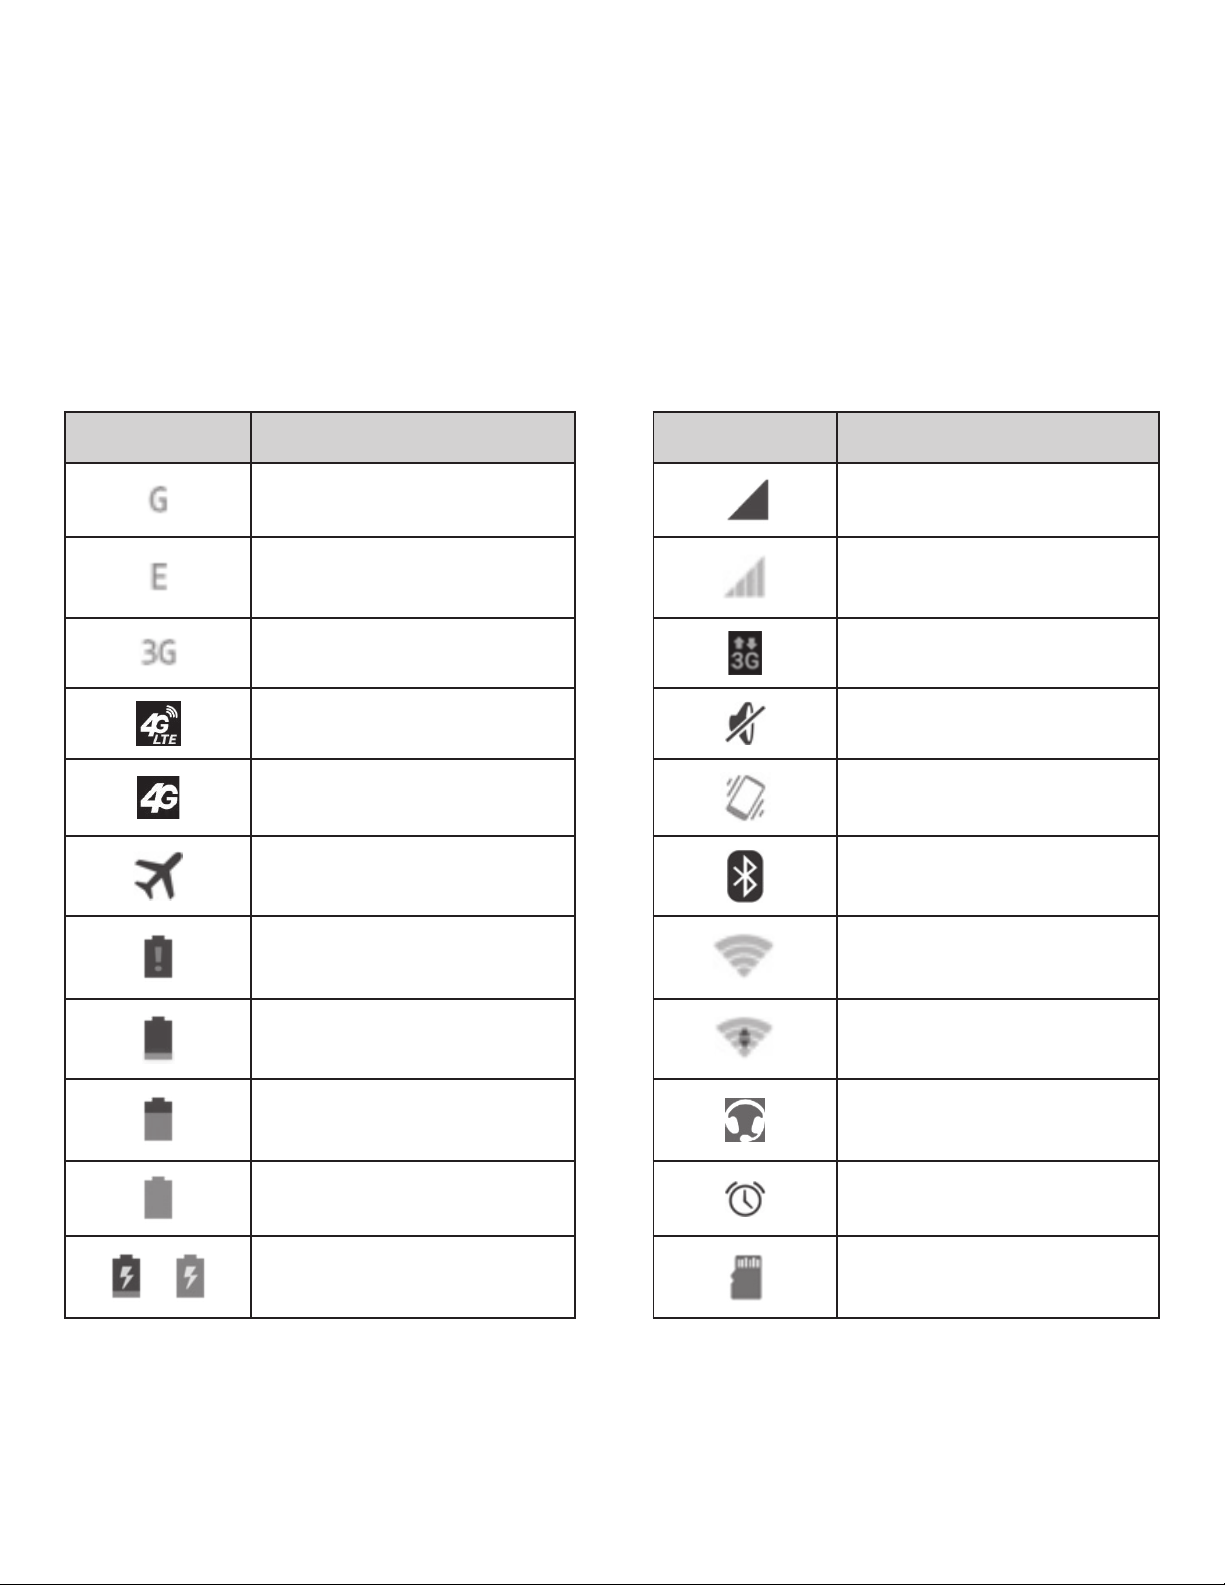
Status and Notification icons
Your phone will tell you exactly what’s going on by showing you simple icons. Here’s
what they mean.
Indicators and Icons
Indicator What it means Indicator What it means
GPRS connected No signal
EDGE connected Signal strength
3G connected Mobile data in use
4G LTE connected Ringer off
4G connected Vibrate mode
Airplane mode Bluetooth on
Battery empty
Connected to a
Wi-Fi network
Battery low Wi-Fi in use
Battery partially
drained
Wired headset
connected
Battery full Alarm set
/
Battery charging
microSD card
unmounted
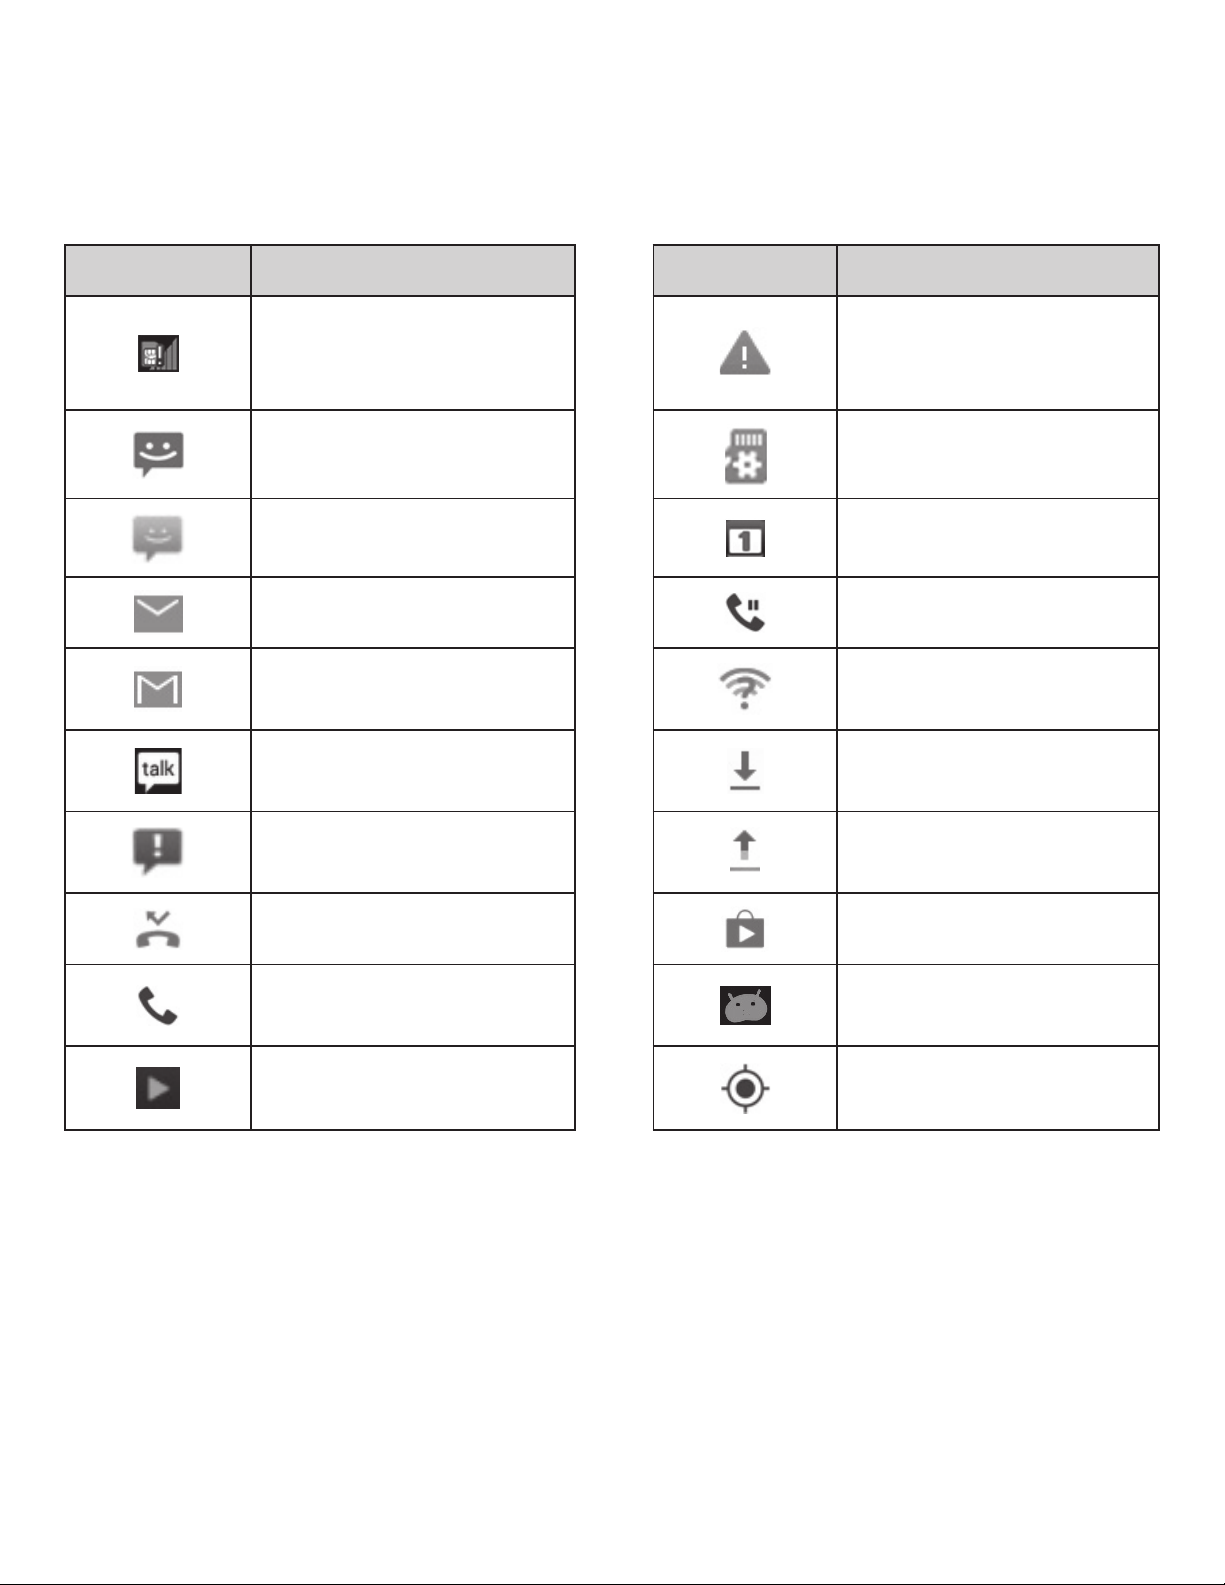
10 Getting Started
Indicator What it means Indicator What it means
No SIM card installed
microSD card
unexpectedly
removed
New SMS
Preparing microSD
card
New MMS Upcoming event
New email Call on hold
New Gmail message
New Wi-Fi network
detected
New Google Talk
instant message
Downloading data
Problem with SMS/
MMS delivery
Sending data
Missed call Updates available
Call in progress
USB debugging
connected
Song is playing GPS on
11Getting Started
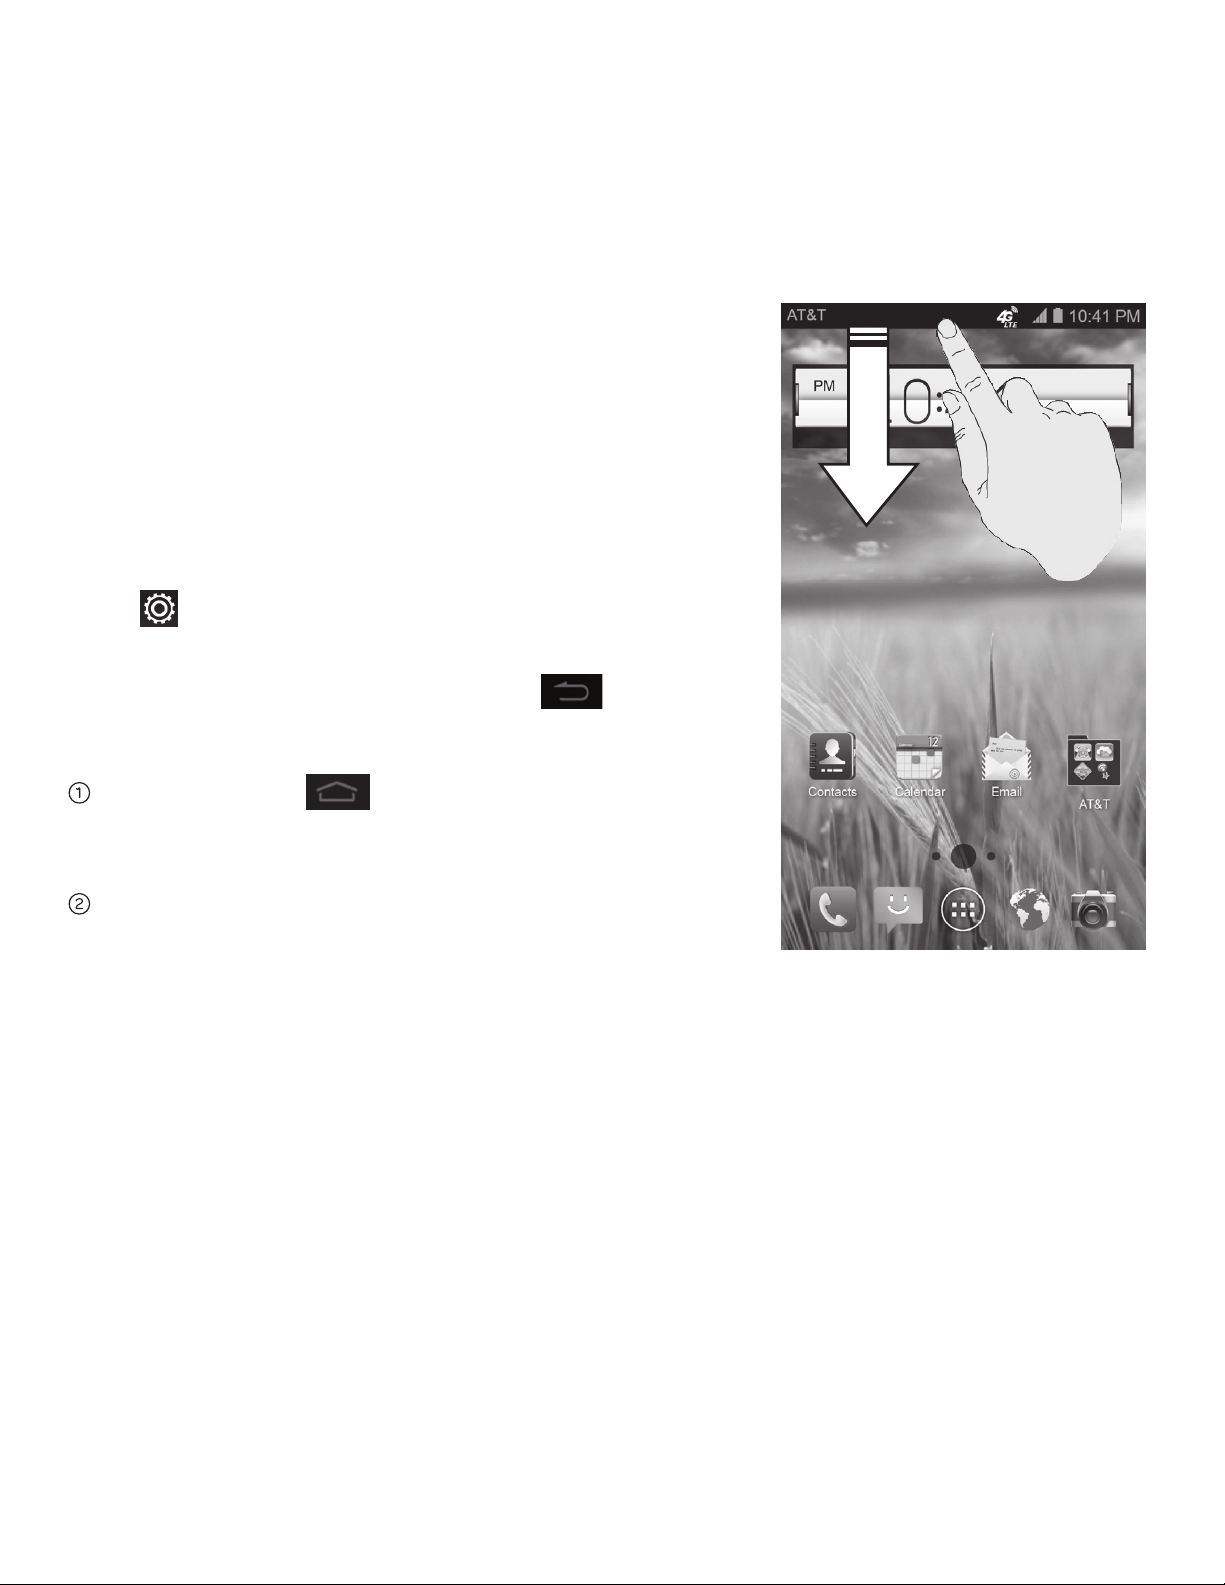
Using the Notifications Panel
The Notifications panel provides quick access
to alerts including new messages, emails, and
software updates.
• To open the Notifications panel, tap the top
of the home screen and swipe down with
your finger.
• Swipe right to clear individual notifications
or tap X to clear all.
• Tap to access the full Settings menu.
• To close the Notifications panel, swipe up from
the bottom of the screen or press .
Reopen Recently Used Applications
Press and hold
from any screen.
The phone will display applications you
used recently.
Tap the application you want to open.
12 Phone Calls
Phone Calls
How to Make Calls
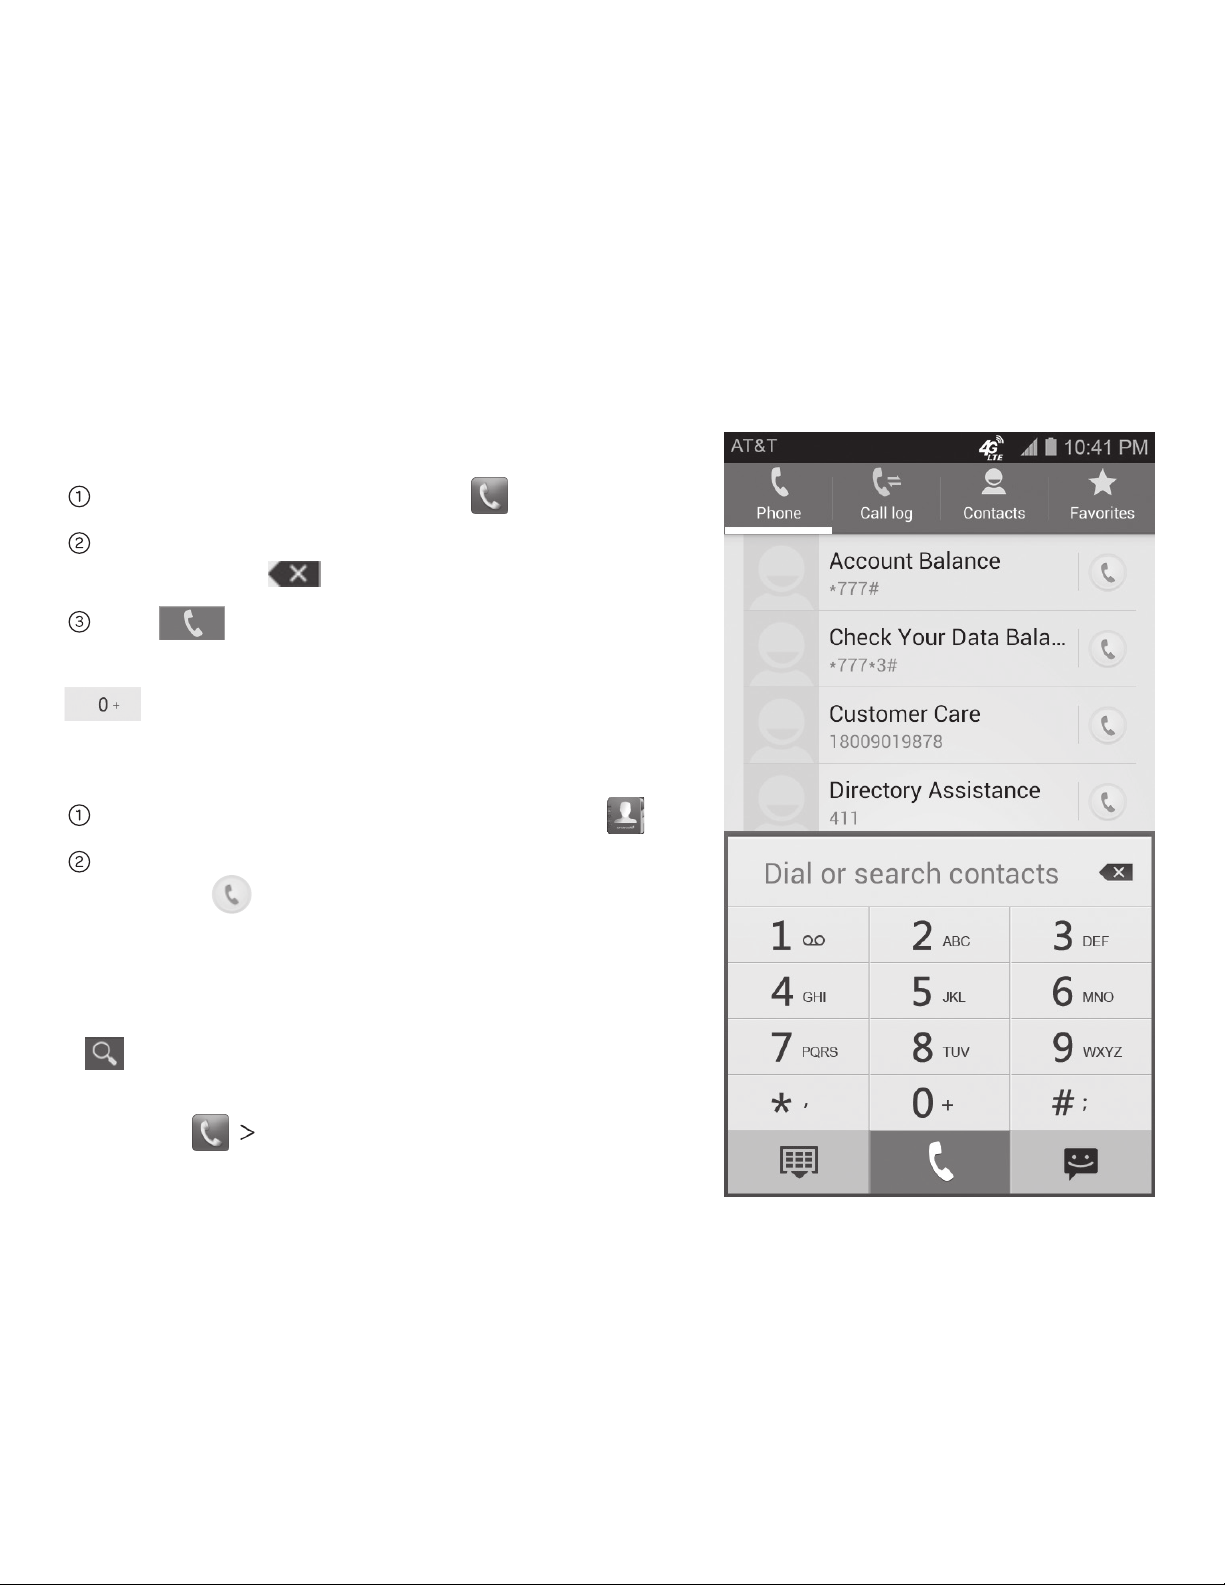
There are many ways to make a call with your phone, and they’re all easy to do.
Calling from the Dialer
From the home screen, tap
.
Enter the phone number with the on-screen
keypad. Tap to delete wrong digits.
Tap
to place the call.
Tip: To make international calls, tap and hold
to enter the “+”.
Calling from Your Contacts
From the home screen, tap Contacts .
Swipe your finger to scroll the contacts list
and tap next to the contact you want
to call.
Tips:
• You can search for a contact by tapping
and entering the contact name.
• You can also access your contacts by
tapping Contacts.
Calling from Your Call History
From the home screen, tap Call log.
Tap next to the number you want to call.
Calling from a Text Message
If a text message contains a phone number that you want to call, you can make the
call while viewing the text message.
From the home screen, tap .
Tap the conversation and then the message that contains the phone number
you need.
Tap the number.
Tap Call.
How to Receive Calls
Answering a Call
Drag to the center of the screen to answer the call.
Rejecting a Call
Drag to the center of the screen to reject the call.
Drag to the center of the screen to send a text message to the caller. Choose
the default message or send a custom one.
13Phone Calls

Muting a Call
During a call, you can mute your microphone so that the person you are speaking
to cannot hear you, but you can still hear them.
Tap Mute to turn your microphone off. To turn your microphone back on,
tap Mute again.
Putting a Call on Hold
During a call, you can put it on hold by tapping Hold.
Tip: If you accept an incoming call while you’re on another call, the first call
automatically goes on hold. Tap Swap to switch between the two callers.
Turning the Speakerphone On/Off
Tap Speaker during a call to turn the speakerphone on. Tap Speaker again to turn
off the speakerphone.
Adding a Call
During a call, tap Add call and dial a number. When you call another number, the
first call automatically goes on hold.
Swapping Calls
To switch between callers, tap Swap.
Merging Calls
To merge two calls and create a conference call, tap Merge calls.
Note: The maximum number of callers on a call varies by carrier.
Ending a Call
Tap
to finish a call.
14 Phone Calls
Adjusting Your Call Settings
You can open the Call Settings menu by tapping Settings.
Fixed Dialing Numbers
Restrict outgoing calls to a fixed set of numbers. To
do this you must know your SIM’s PIN2 code. Not all
carriers support this functionality.
Quick responses Edit Quick response to rejected callers.
Voicemail
Select a voicemail service provider (your carrier
is the default), or edit the voicemail number if
necessary.
TTY mode
Choose a TTY mode after connecting the TTY
device to the phone’s headset port.
A TTY device can allow people who have
hearing or speech disabilities to communicate
by telephone.
Hearing aids
Turn on/off hearing aid compatibility. When you turn
on the hearing aid compatibility and use a hearing
aid with a Telecoil to answer the phone,
it will help you hear more clearly during the
phone call.
DTMF tones
Set the length of dual-tone multi-frequency (DTMF)
signal tones: Normal or Long.
Speed dial Set contacts as speed dials for keys 2-9.
15Phone Calls
Call Barring Settings Forbid certain types of calls.
Call forwarding
Forward your incoming calls to a different number.
You can choose when to forward: Always forward,
Forward when busy, Forward when unanswered,
or Forward when unreachable.
Additional settings
Caller ID: Choose whether people you call can see
your number.
Call waiting: See new incoming calls while you’re on
another call.
16 Phone Calls
Adjusting Your Call Settings (continued)
Contacts
You can add contacts on your phone and synchronize them with the contacts in
your Google account or other accounts that support contact syncing.
To see your contacts, tap Contacts
on the home screen. From there, you can
tap the tabs on the top to quickly switch to Phone, Call log, or Favorites.
Importing and Exporting Contacts
You can import or export contacts from/to your SIM card, phone storage, or
microSD card. This is especially useful when you need to transfer contacts
between different devices.
Importing Contacts from the SIM Card or Exporting to the Card
From the Contacts screen, press Import/export.
Choose to import or export contacts. If you have more than one account set
up on your phone, you will need to select the account to which you’d like to
import contacts. If not, your phone will automatically display the contacts.
Tap the contacts you want to import or export. Or, just tap to select
all contacts.
Tap Import or Export.
17Contacts

Importing Contacts from Phone Storage/microSD Card or
Exporting to Phone Storage/Card
From the Contacts screen, press Import/export.
Choose to import or export contacts. If you have more than one account set
up on your phone, you will need to select the account to which you’d like to
import contacts.
Note: Files will be saved to/pulled from the microSD card when one is inserted
in the phone.
• For import, you should have vCard files saved on the Phone/microSD card.
If there’s more than one vCard file, choose to import one, multiple, or all
vCard files. Tap the vCard file and tap OK.
• For export, select a vCard type and tap OK to create the file on the Phone/
microSD card.
Creating a Contact
From the Contacts screen, tap to add a new contact.
Tap AT&T Address Book to choose where to save the contact.
Enter the contact name, phone numbers, email addresses, postal addresses,
and other information.
Tap Done to save the contact.
18 Contacts
Adding a Contact to Favorites
From the Contacts screen, tap the contact you want to add to Favorites.
Tap next to the contact’s name.
Searching for a Contact
Tap at the bottom of the Contacts screen.
Enter the contact name you want to search for. Matching contacts will
be listed.
Creating a New Group
From the Contacts screen, tap .
Tap .
Enter the group name and tap Done.
Tap
and select the contacts you wish to be the group members.
Tap .
To send messages to the group members, you can tap a group and then
press
Send group message.
19Contacts
 Loading...