

Page 1
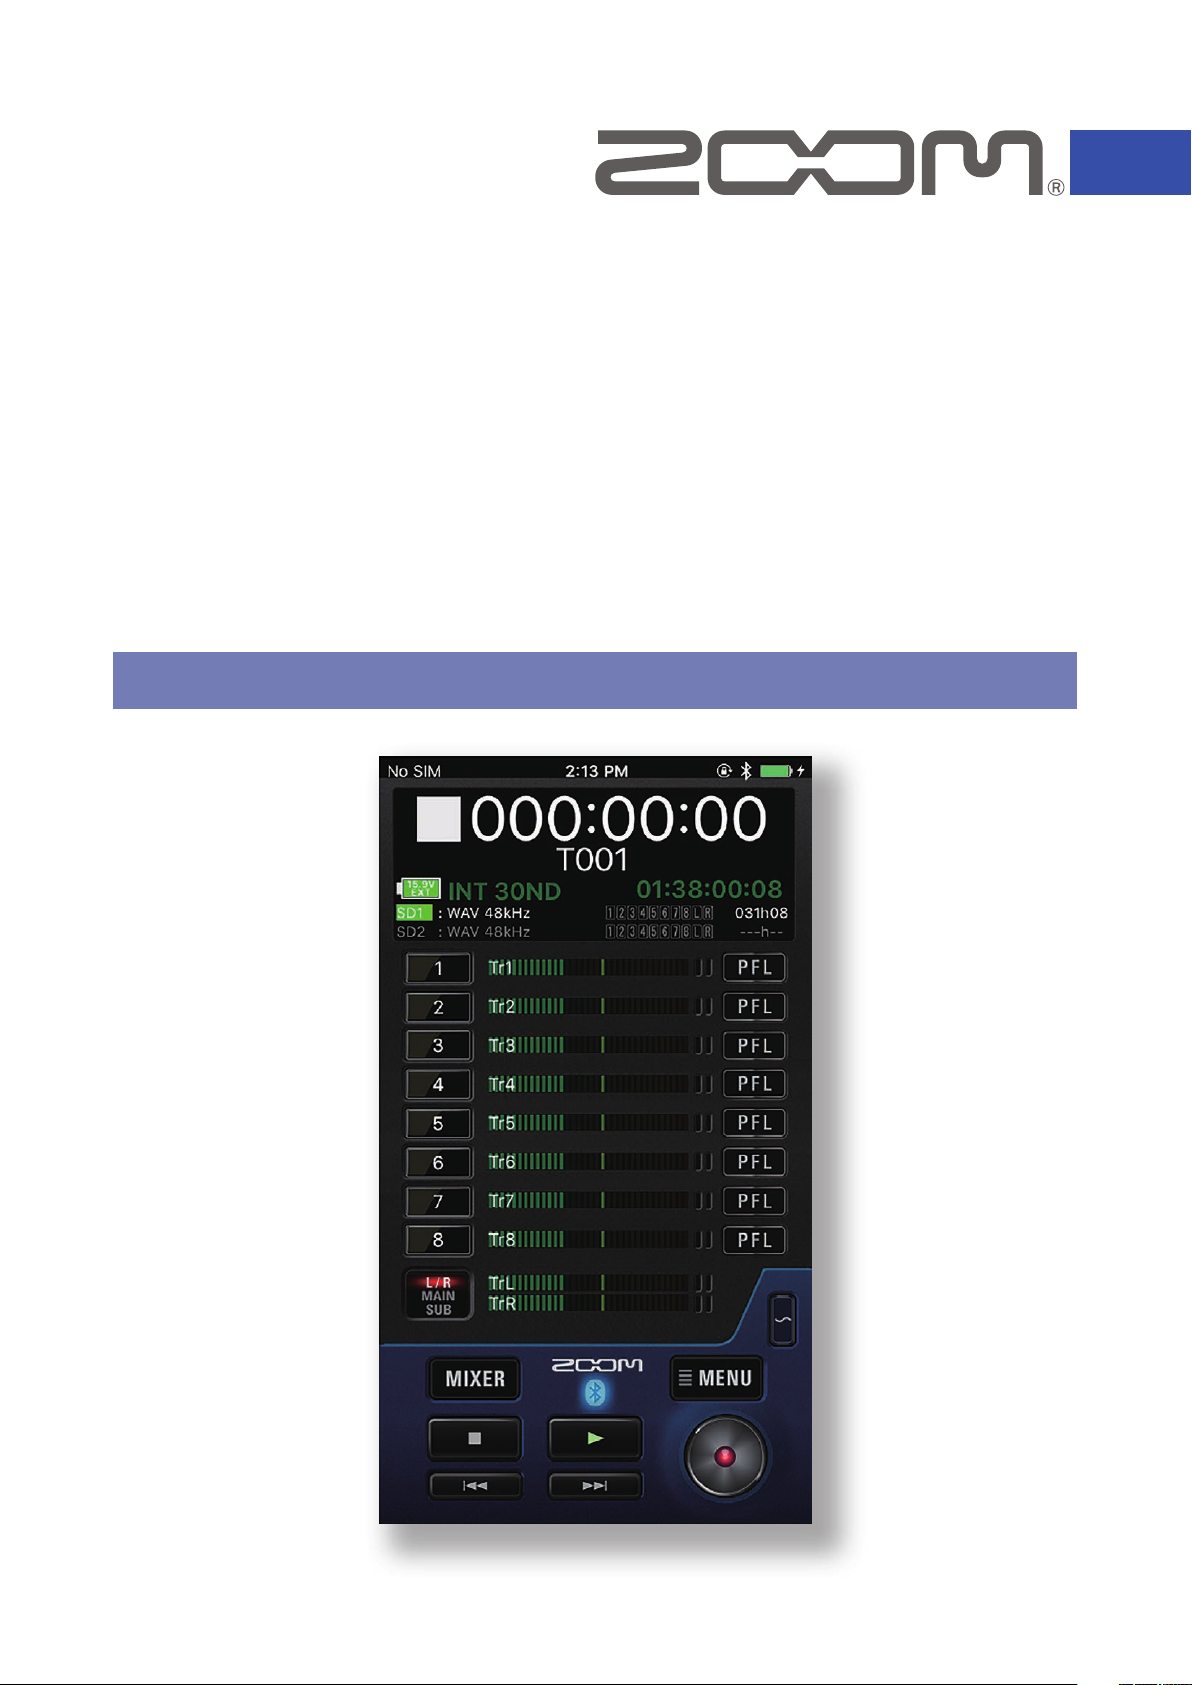
F8 Control for iOS/iPadOS
Version 2.3
F8 Control for Android
Version 1.0
Operation Manual
© 2022 ZOOM CORPORATION
Copying or reprinting this manual in part or in whole without permission is prohibited.
This document cannot be displayed properly on black-and-white displays.
Page 2

Contents
Introduction . . . . . . . . . . . . . . . . . . . . . . . . . . . . . . . . . . . . . . . . . . . . . . . . . . . . . . . . . . . 3
Copyrights . . . . . . . . . . . . . . . . . . . . . . . . . . . . . . . . . . . . . . . . . . . . . . . . . . . . . . . . . . . . 3
Installing F8 Control . . . . . . . . . . . . . . . . . . . . . . . . . . . . . . . . . . . . . . . . . . . . . . . . . . . . 4
On iOS/iPadOS devices . . . . . . . . . . . . . . . . . . . . . . . . . . . . . . . . . . . . . . . . . . . . . . . . 4
On Android devices . . . . . . . . . . . . . . . . . . . . . . . . . . . . . . . . . . . . . . . . . . . . . . . . . . . 4
Connecting with the recorder . . . . . . . . . . . . . . . . . . . . . . . . . . . . . . . . . . . . . . . . . . . . . 5
Operation screen overview . . . . . . . . . . . . . . . . . . . . . . . . . . . . . . . . . . . . . . . . . . . . . . . 7
Navigation between screens . . . . . . . . . . . . . . . . . . . . . . . . . . . . . . . . . . . . . . . . . . . 7
HOME screen . . . . . . . . . . . . . . . . . . . . . . . . . . . . . . . . . . . . . . . . . . . . . . . . . . . . . . . . 9
MIXER screen . . . . . . . . . . . . . . . . . . . . . . . . . . . . . . . . . . . . . . . . . . . . . . . . . . . . . . 12
Character input screen . . . . . . . . . . . . . . . . . . . . . . . . . . . . . . . . . . . . . . . . . . . . . . . 13
Preparing to record . . . . . . . . . . . . . . . . . . . . . . . . . . . . . . . . . . . . . . . . . . . . . . . . . . . . 14
Setting SD card for recording and recording file format . . . . . . . . . . . . . . . . . . . . 14
Recording . . . . . . . . . . . . . . . . . . . . . . . . . . . . . . . . . . . . . . . . . . . . . . . . . . . . . . . . . . . . 15
Selecting inputs . . . . . . . . . . . . . . . . . . . . . . . . . . . . . . . . . . . . . . . . . . . . . . . . . . . . . 15
Linking inputs as a stereo pair . . . . . . . . . . . . . . . . . . . . . . . . . . . . . . . . . . . . . . . . . 15
Adjusting input levels . . . . . . . . . . . . . . . . . . . . . . . . . . . . . . . . . . . . . . . . . . . . . . . . 16
Recording . . . . . . . . . . . . . . . . . . . . . . . . . . . . . . . . . . . . . . . . . . . . . . . . . . . . . . . . . . 16
Setting various functions related to recording . . . . . . . . . . . . . . . . . . . . . . . . . . . . 17
Changing recording take settings . . . . . . . . . . . . . . . . . . . . . . . . . . . . . . . . . . . . . . 18
Playing recordings . . . . . . . . . . . . . . . . . . . . . . . . . . . . . . . . . . . . . . . . . . . . . . . . . . . . . 20
Selecting a take for playback . . . . . . . . . . . . . . . . . . . . . . . . . . . . . . . . . . . . . . . . . . 20
Playing recordings. . . . . . . . . . . . . . . . . . . . . . . . . . . . . . . . . . . . . . . . . . . . . . . . . . . 20
Mixing takes . . . . . . . . . . . . . . . . . . . . . . . . . . . . . . . . . . . . . . . . . . . . . . . . . . . . . . . . 21
Folder and take operations . . . . . . . . . . . . . . . . . . . . . . . . . . . . . . . . . . . . . . . . . . . . . . 22
Opening the FINDER screen . . . . . . . . . . . . . . . . . . . . . . . . . . . . . . . . . . . . . . . . . . . 22
Opening SD cards and folders . . . . . . . . . . . . . . . . . . . . . . . . . . . . . . . . . . . . . . . . . 22
Working with folders and takes . . . . . . . . . . . . . . . . . . . . . . . . . . . . . . . . . . . . . . . . 23
Settings related to input signals . . . . . . . . . . . . . . . . . . . . . . . . . . . . . . . . . . . . . . . . . . 25
Adjusting the input signal monitoring balance . . . . . . . . . . . . . . . . . . . . . . . . . . . 25
Making individual track settings. . . . . . . . . . . . . . . . . . . . . . . . . . . . . . . . . . . . . . . . 26
Settings related to output . . . . . . . . . . . . . . . . . . . . . . . . . . . . . . . . . . . . . . . . . . . . . . . 28
Adjusting output levels . . . . . . . . . . . . . . . . . . . . . . . . . . . . . . . . . . . . . . . . . . . . . . . 28
Settings related to ambisonic recording . . . . . . . . . . . . . . . . . . . . . . . . . . . . . . . . . . . 29
Making settings for ambisonic recording . . . . . . . . . . . . . . . . . . . . . . . . . . . . . . . . 29
Settings related to the auto mix function . . . . . . . . . . . . . . . . . . . . . . . . . . . . . . . . . . 30
Activating the auto mix function . . . . . . . . . . . . . . . . . . . . . . . . . . . . . . . . . . . . . . . 30
Recording a slate tone . . . . . . . . . . . . . . . . . . . . . . . . . . . . . . . . . . . . . . . . . . . . . . . . . . 31
Recording . . . . . . . . . . . . . . . . . . . . . . . . . . . . . . . . . . . . . . . . . . . . . . . . . . . . . . . . . . 31
Disabling the slate tone . . . . . . . . . . . . . . . . . . . . . . . . . . . . . . . . . . . . . . . . . . . . . . 31
Other functions . . . . . . . . . . . . . . . . . . . . . . . . . . . . . . . . . . . . . . . . . . . . . . . . . . . . . . . 32
Showing track names . . . . . . . . . . . . . . . . . . . . . . . . . . . . . . . . . . . . . . . . . . . . . . . . 32
Pop-up display function . . . . . . . . . . . . . . . . . . . . . . . . . . . . . . . . . . . . . . . . . . . . . . 32
F8 Control and an FRC-8 can be used at the same time . . . . . . . . . . . . . . . . . . . . 33
Setting the date and time . . . . . . . . . . . . . . . . . . . . . . . . . . . . . . . . . . . . . . . . . . . . . 33
Viewing the F8 Control version . . . . . . . . . . . . . . . . . . . . . . . . . . . . . . . . . . . . . . . . 34
Using F8 Control in the background . . . . . . . . . . . . . . . . . . . . . . . . . . . . . . . . . . . . 34
2
Page 3
Introduction
F8 Control is a remote control application designed for use with F8/
F8n/F8n Pro Multitrack Field Recorders (hereafter, “the recorder” in this manual). Including control of recording, playback and mixer adjustments, this app
allows you to operate the recorder from an smartphone/tablet.
This manual does not explain operation of the recorder unit itself. See the F8/
F8n/F8n Pro Operation Manual for detailed information about all its functions.
Copyrights
iOS. iPadOS is a trademark or registered trademark of Apple Inc.
App Store is a service mark of Apple Inc.
iOS is a trademark or registered trademark of Cisco Systems, Inc. in the USA
and other countries and is used under license.
Android™ and Google Play are trademarks or registered trademarks of Google
LLC.
®
The Bluetooth
SIG, Inc., and these marks are used under license by ZOOM CORPORATION.
word mark and logo are registered trademarks of Bluetooth
Product names, registered trademarks and company names in this document
are the property of their respective companies. All trademarks and registered
trademarks in this document are for identification purposes only and are not
intended to infringe on the copyrights of their respective owners.
Recording from copyrighted sources, including CDs, records, tapes, live performances, video works and broadcasts, without permission of the copyright
holder for any purpose other than personal use is prohibited by law. ZOOM
CORPORATION will not assume any responsibility related to infringements of
copyrights.
3
Page 4
Installing F8 Control
On iOS/iPadOS devices
Open the App Store on the iOS/iPadOS device and search for "F8 Control".
1.
Tap "GET" on the F8 Control screen.
2.
This will install F8 Control on the device.
On Android devices
Open the Google Play store on the Android device and search for “F8
1.
Control”.
Tap “Install” on the F8 Control screen.
2.
This will install F8 Control on the device.
NOTE
· When using F8 Control, always use the latest versions of the recorder firmware and the F8
Control app.
4
Page 5
Connecting with the recorder
Start the recorder.
1.
On the recorder, select the iOS/iPadOS version.
2.
Use MENU > SYSTEM > Bluetooth > iOS Version (F8 Control) to select the iOS/iPadOS version used by the connected device.
• iOS 9 – 12: iOS 9–12
• iOS/iPadOS 13 or later: iOS 13
• Android: iOS 13
This operation is not necessary when using an F8n Pro.
Press on the recorder several times until the Home Screen reopens.
3.
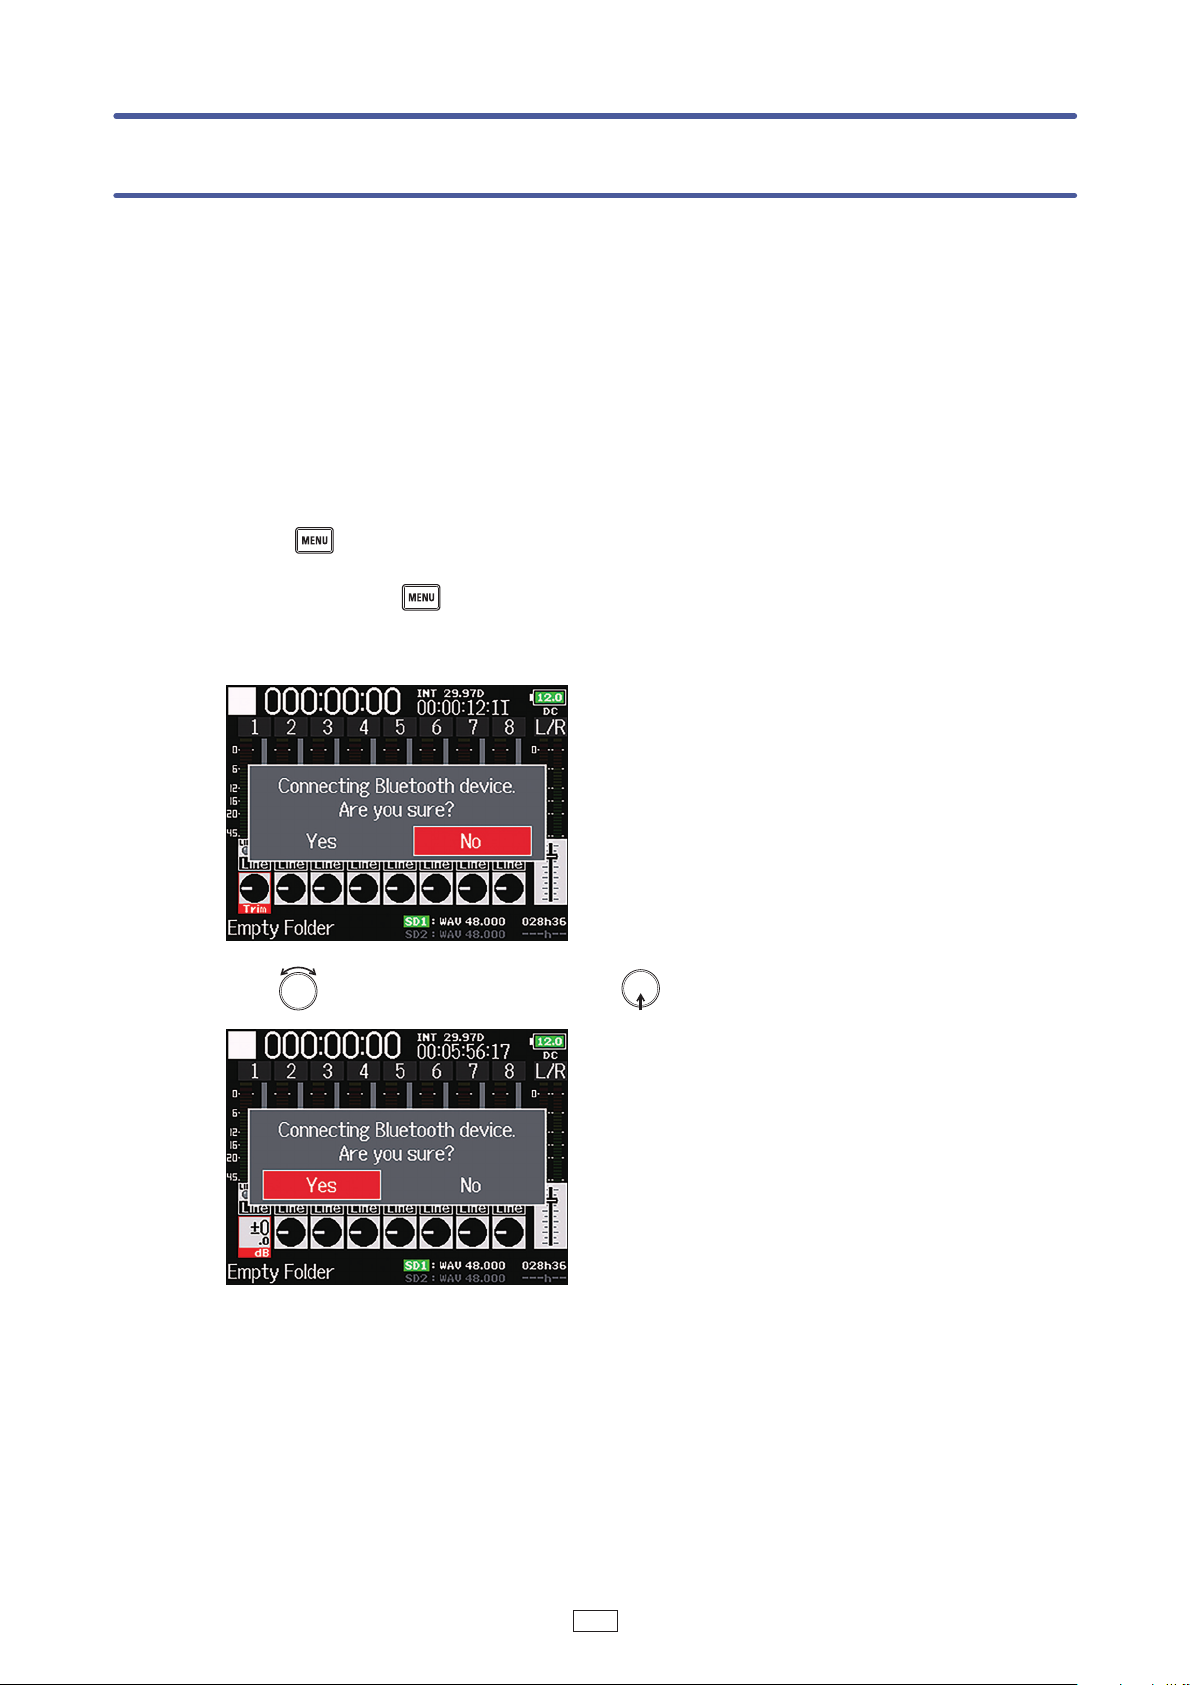
Press and hold on the recorder.
4.
A confirmation message appears on the display of the unit.
Use to select "Yes", and press .
5.
5
Page 6
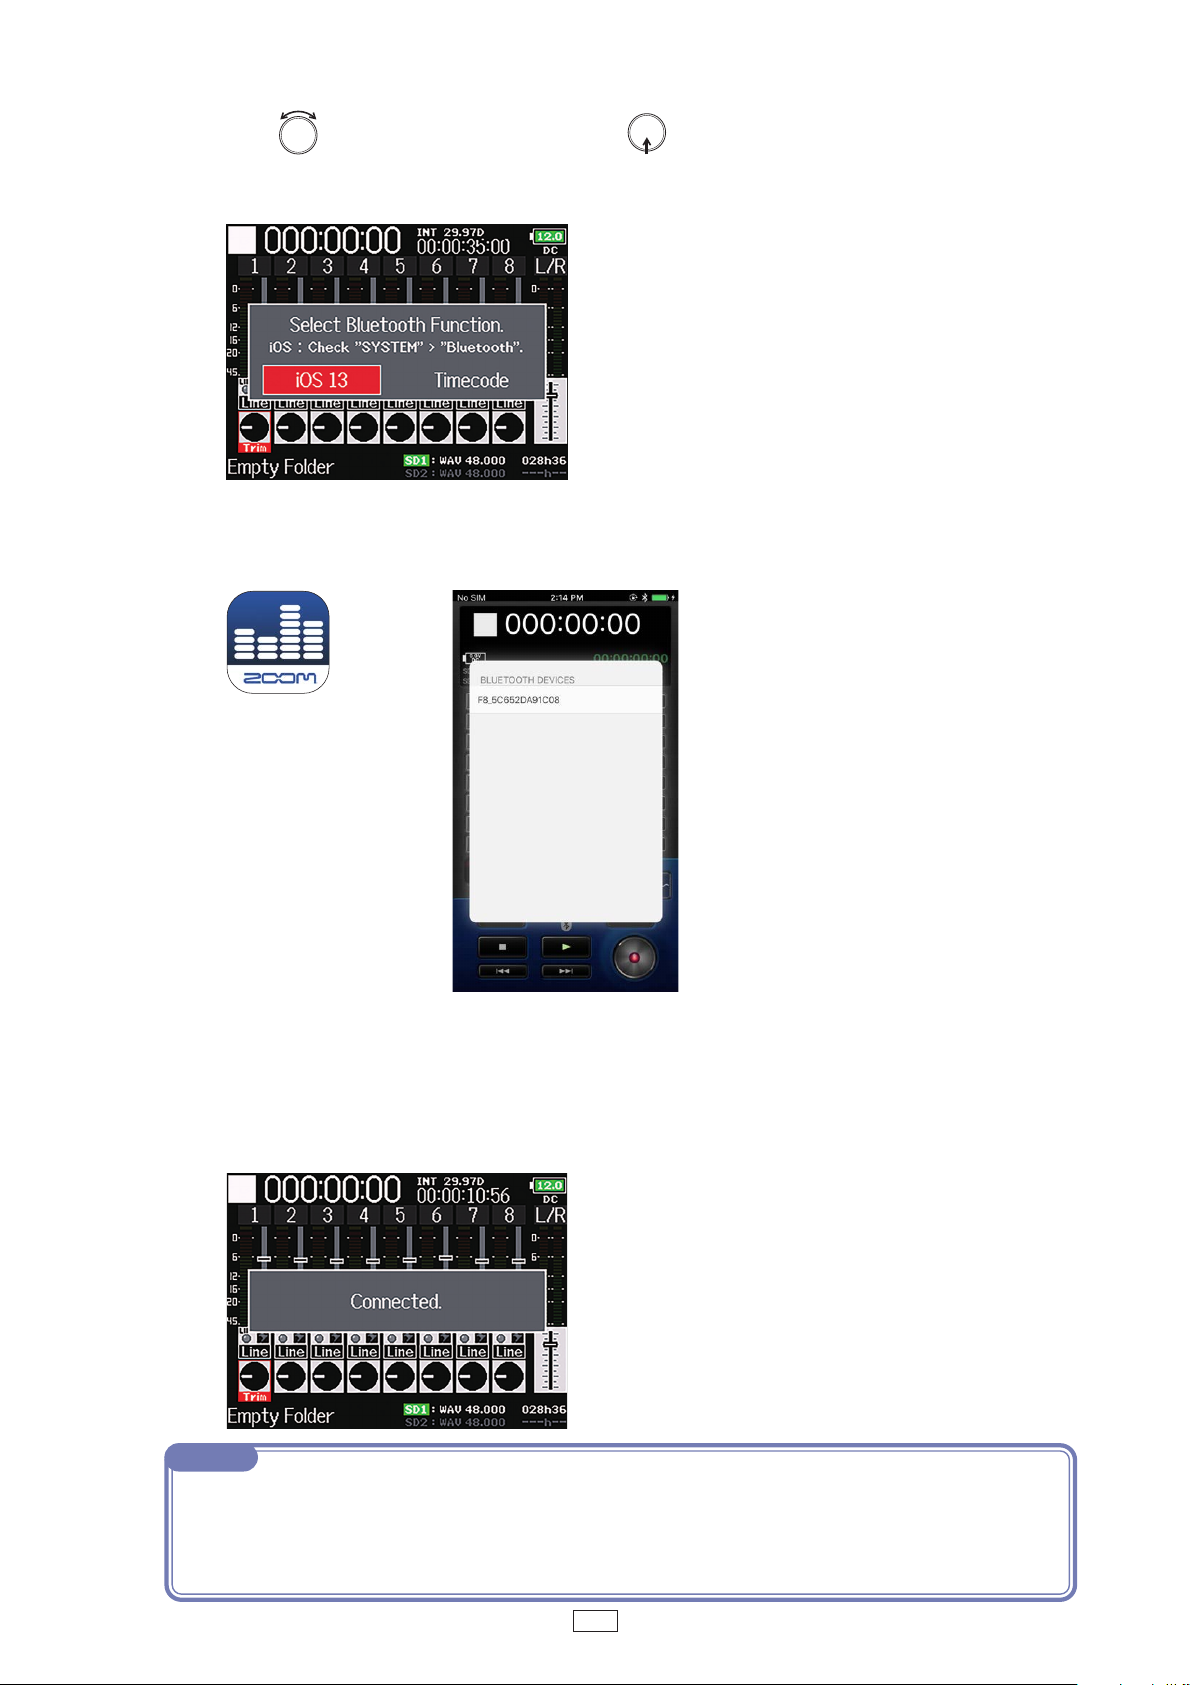
Use to select “iOS”, and press .
6.
On an F8n Pro, select “F8 Control”.
Tap the F8 Control icon on the smartphone/tablet.
7.
F8 Control will launch, and the Bluetooth Devices list will open.
Select the name/ID of the device to use.
8.
Tap the device name/ID to connect to the recorder.
When connection completes, “Connected.” will appear on the unit display.
If iOS 9-12 is set as the iOS Version (on the F8 Control), the Bluetooth Devices list will not
be shown. The nearby Bluetooth device will be connected automatically.
NOTE
· If connection is not successful, move the smartphone/tablet closer to the recorder or move both to
a place where nothing interferes with radio waves and start F8 Control again. Confirm also that the
Bluetooth function of the smartphone/tablet can be used. If connection is still not possible, follow
the instructions in the smartphone/tablet operation manual to unregister the recorder as a Bluetooth device on it. Then, repeat the procedures from the beginning.
6
Page 7
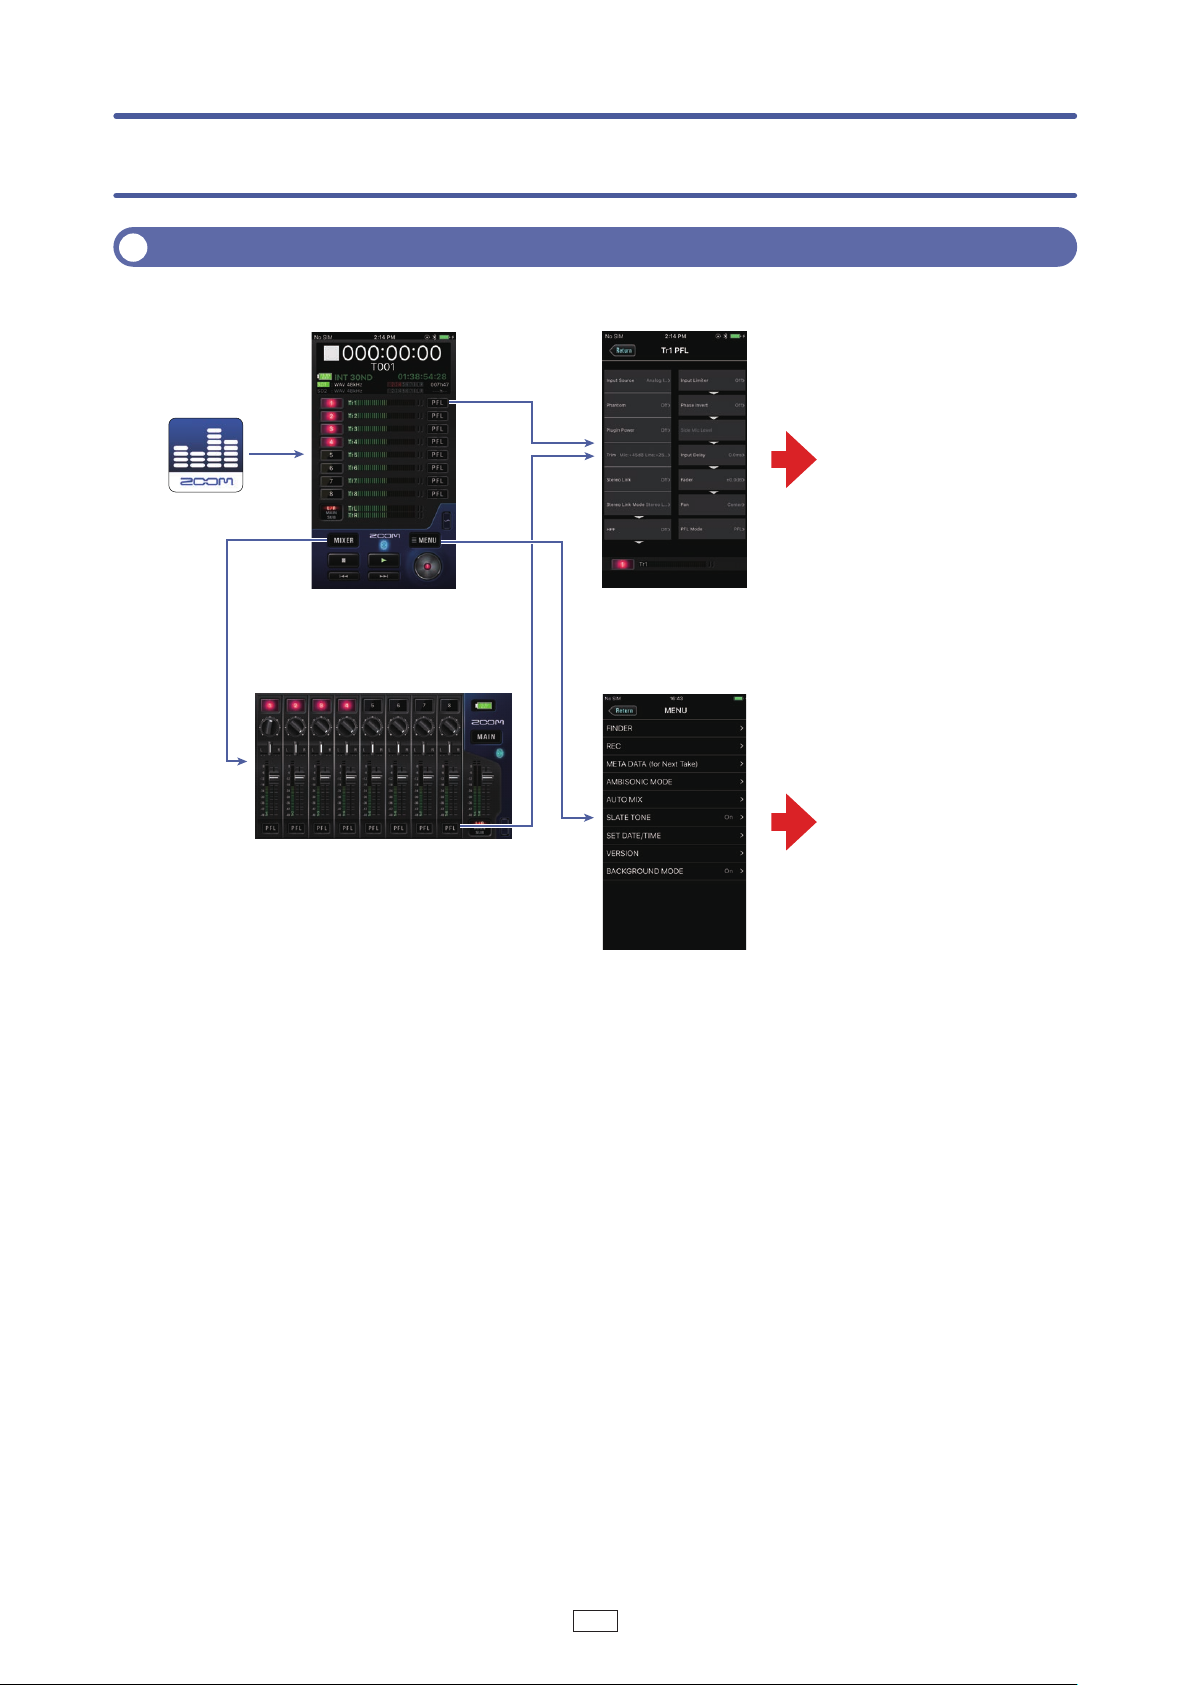
Operation screen overview
MENU screen
Launch
Navigation between screens
■ On iOS
HOME screen PFL screen
Setting screens
for various functions
FINDER screen,
REC screen, etc.
MIXER screen
7
Page 8
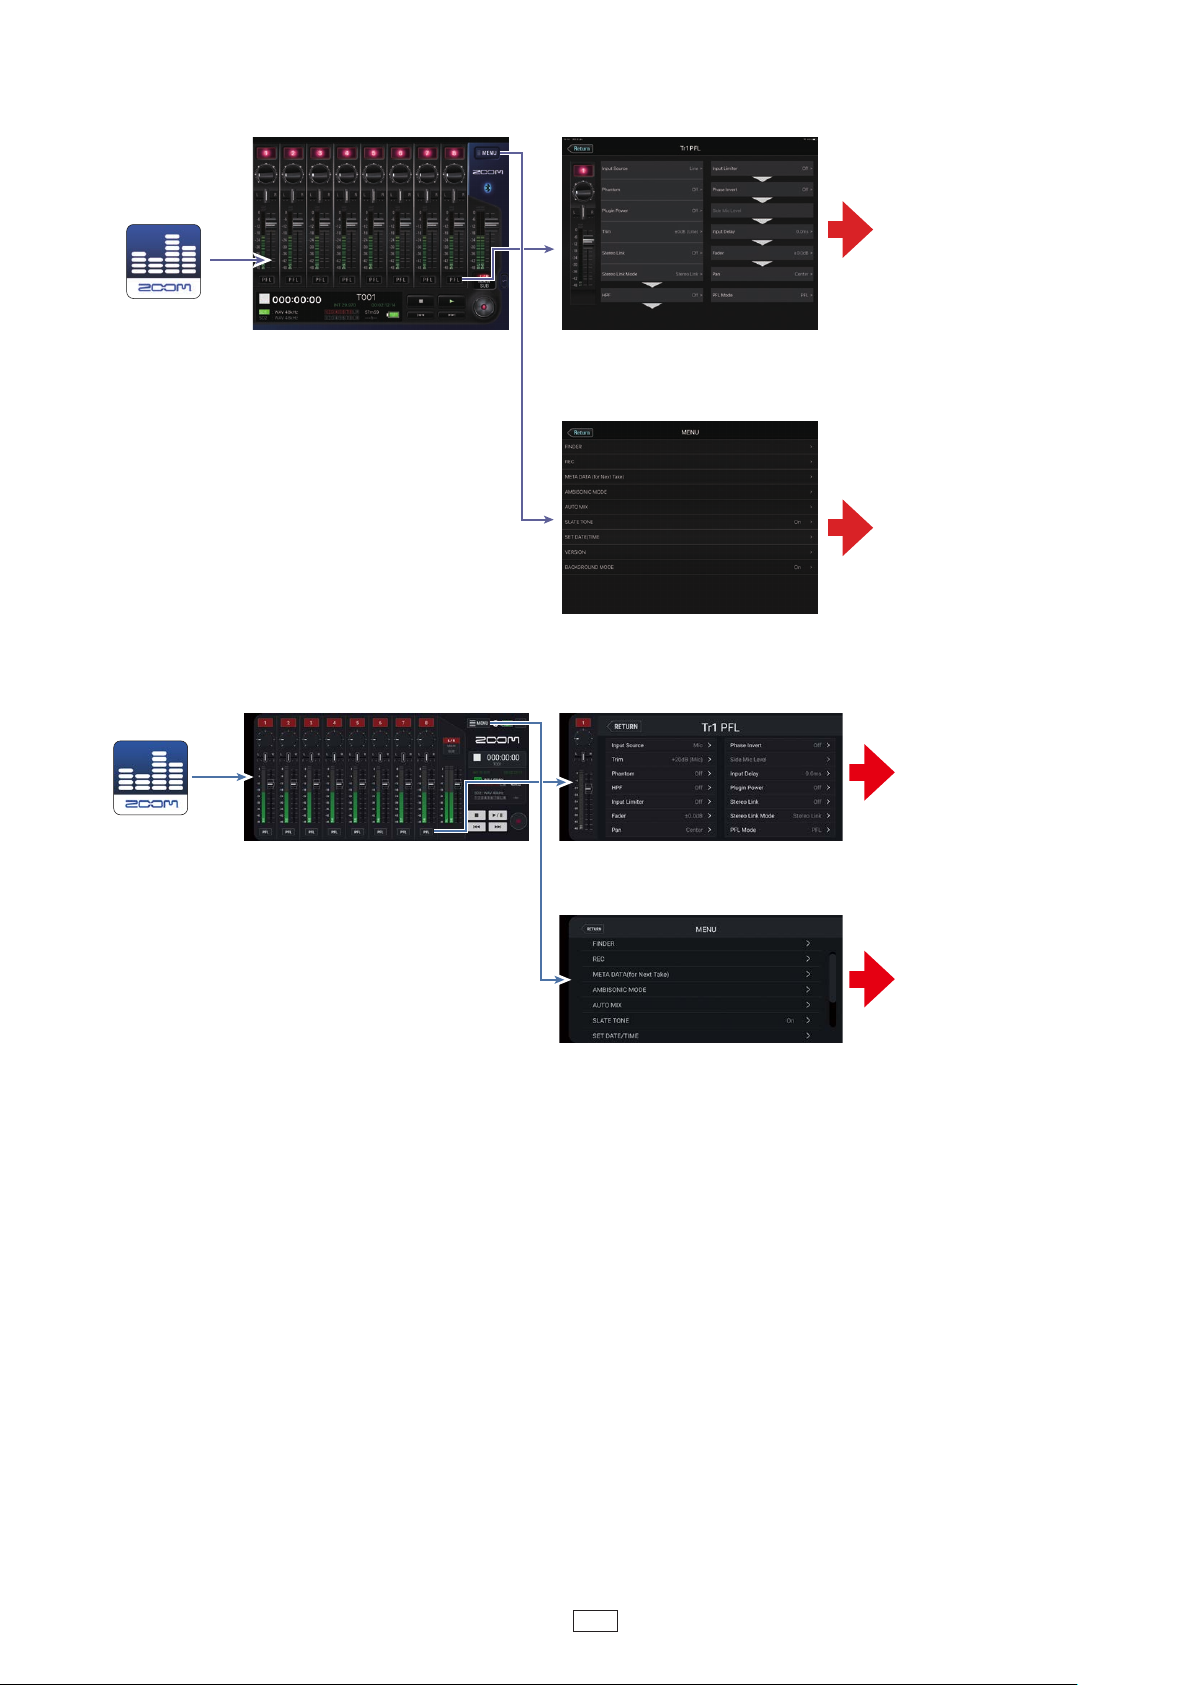
■ On iPadOS
Launch
for various functions
MENU screen
Launch
for various functions
MENU screen
Setting screens
■ On Android
HOME screen
HOME screen PFL screen
PFL screen
FINDER screen,
REC screen, etc.
Setting screens
FINDER screen,
REC screen, etc.
8
Page 9
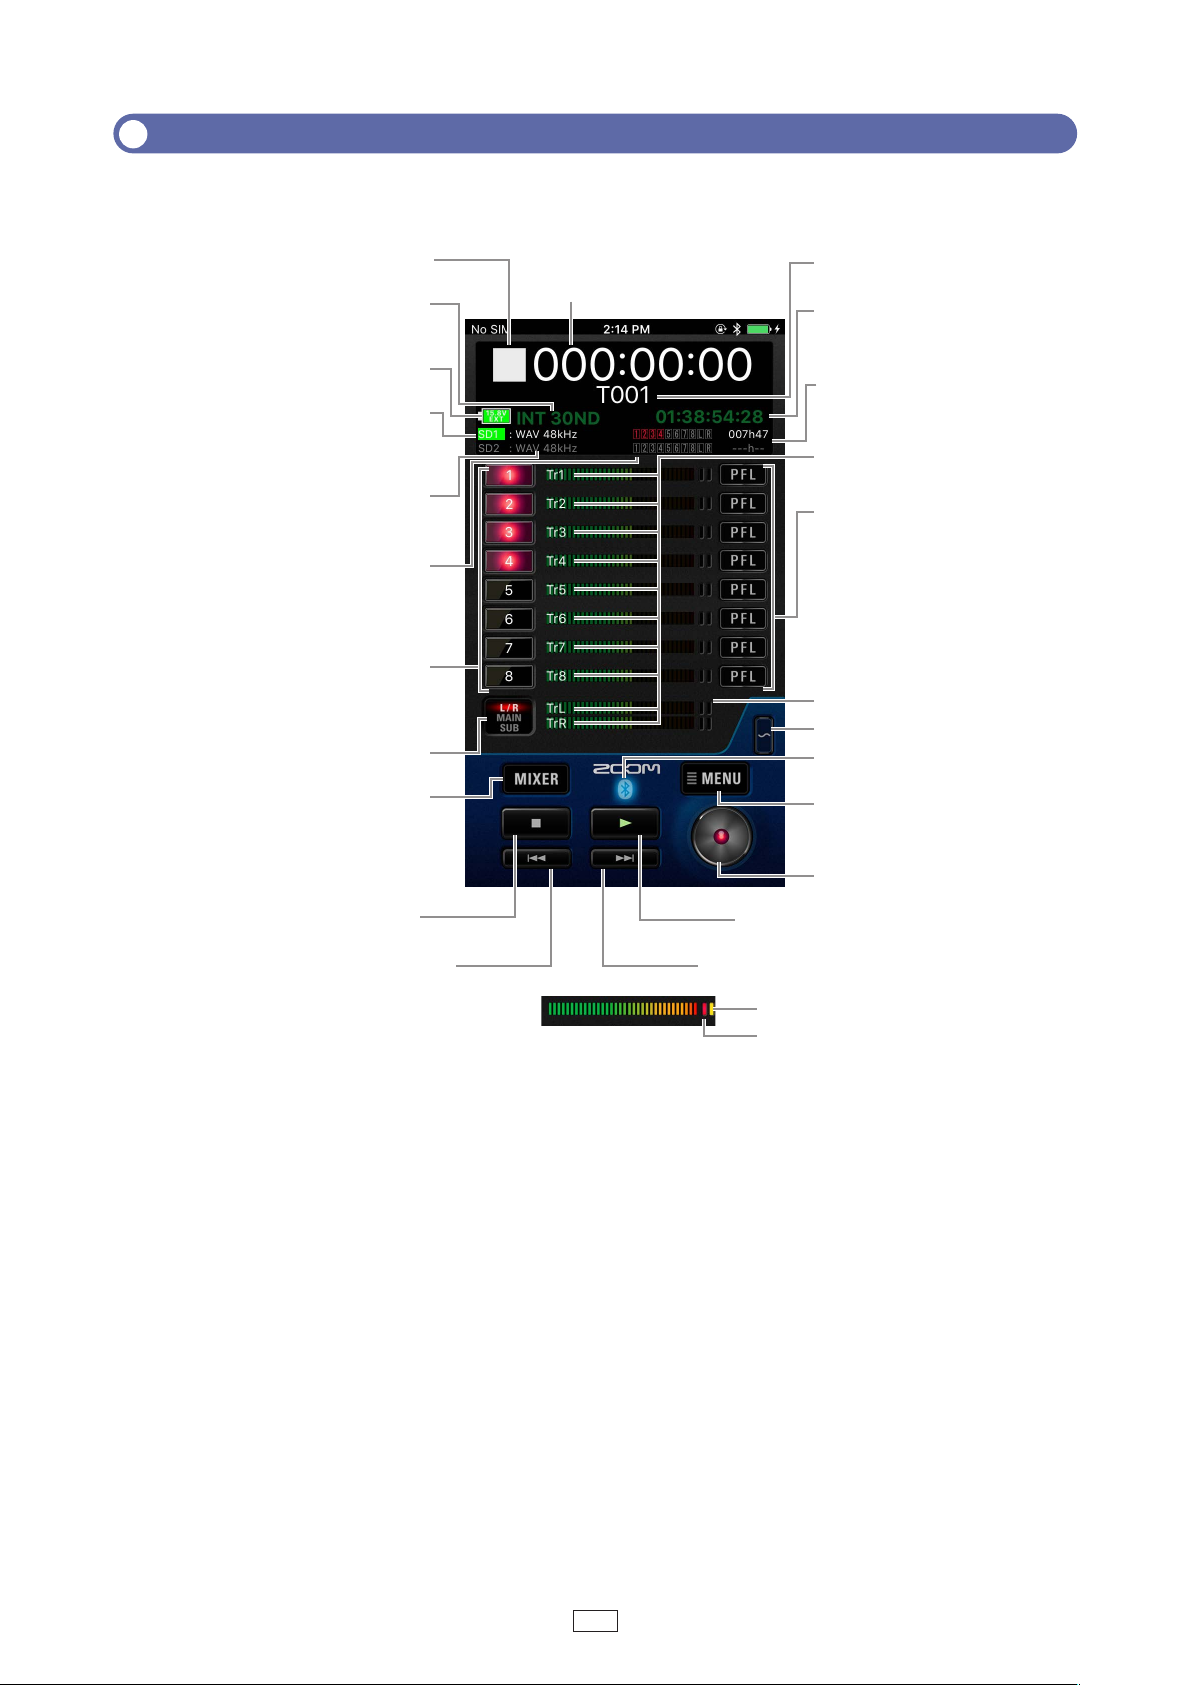
HOME screen
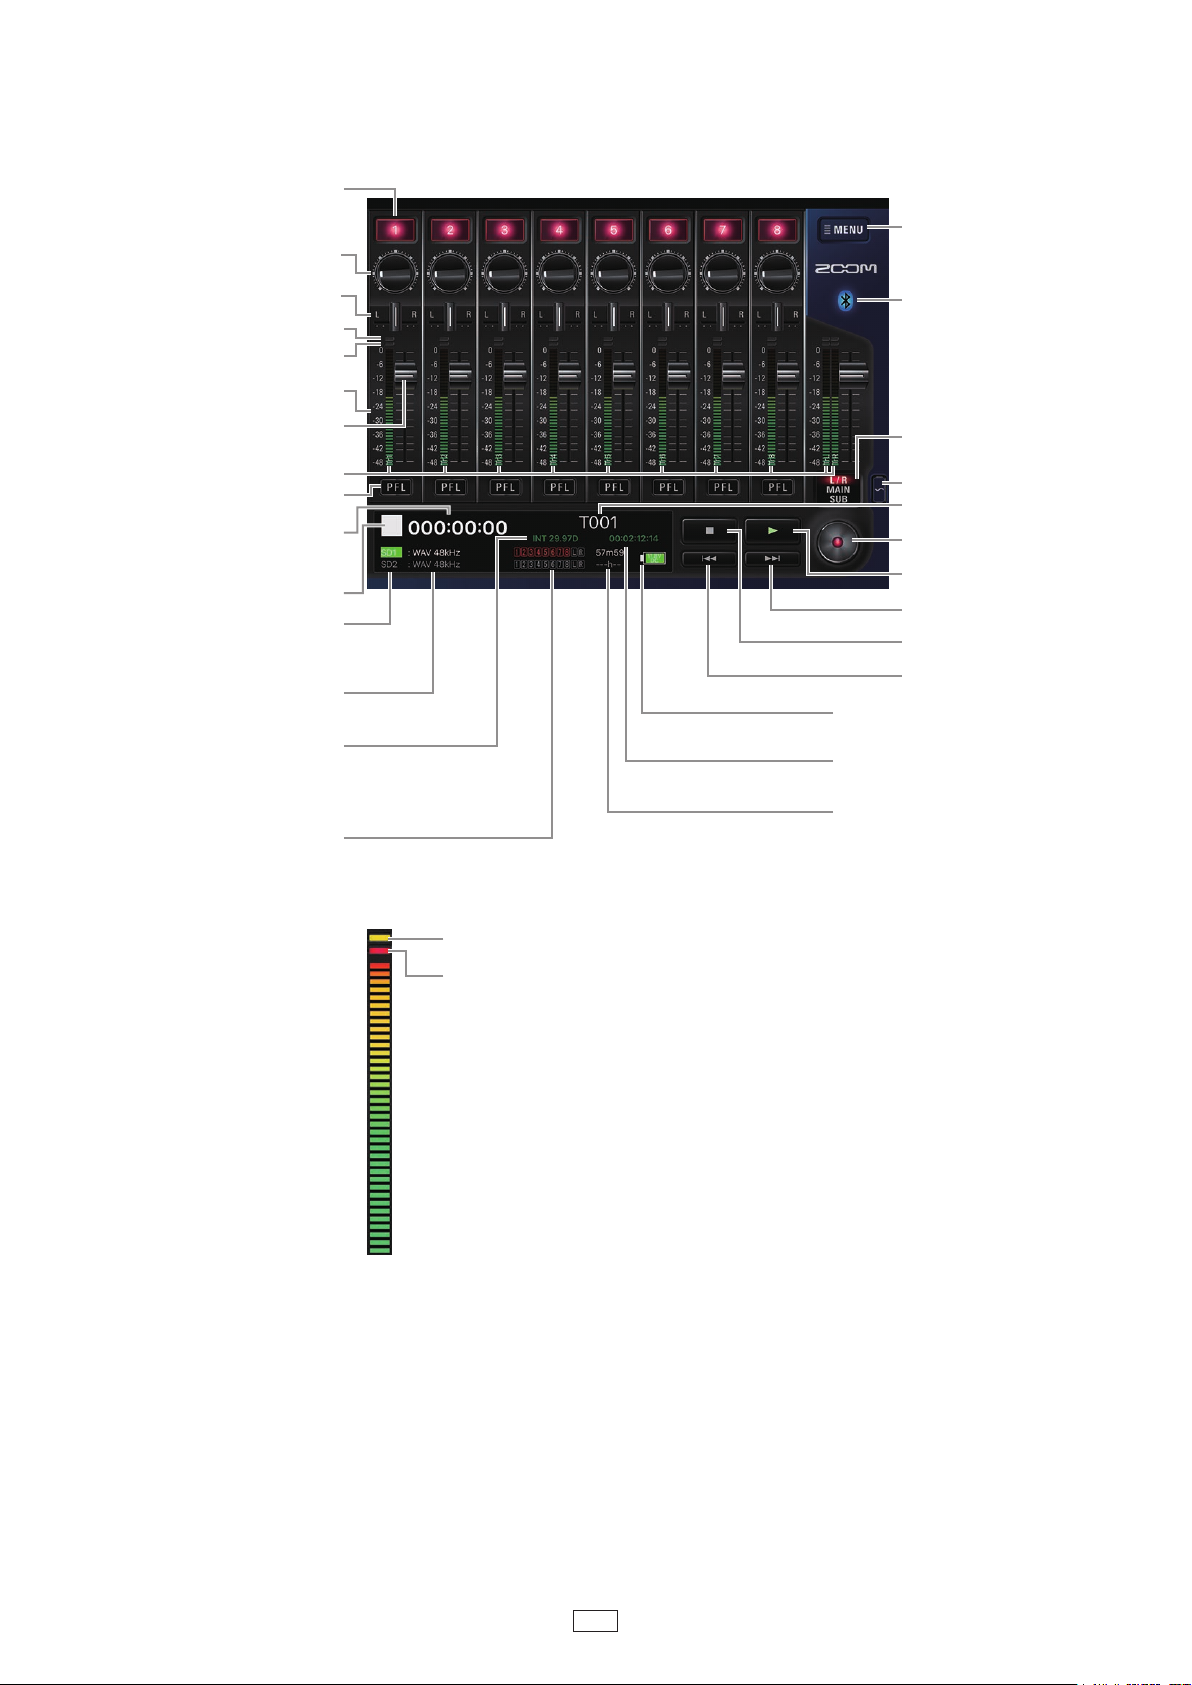
Status icon
Take name
Counter
When F8 Control launches, the HOME screen appears.
■ On iOS
playback/elapsed recording time)
Timecode frame rate
INT: internal EXT: external input
Power source type
and remaining power
Playback card
Green: used for playback
Grey: no card
(
Recording/playback
timecode
When recording:
remaining recordable
time When playing back:
remaining playback time
Track Name
Recording/playback file
format and sampling rate
Track status
Red: record
Green: play back
Grey: do not record/play back
Track 1-8 selection buttons
Lit: input enabled
Unlit: input disabled
OUTPUT display
switch button
MIXER button
STOP button
Search backward button
Level meter
PFL buttons
Level meters
Slate tone button
Bluetooth status
Blue: Connected
MENU button
REC button
PLAY/PAUSE button
Search forward button
Limiter indicator
Clipping indicator
9
Page 10
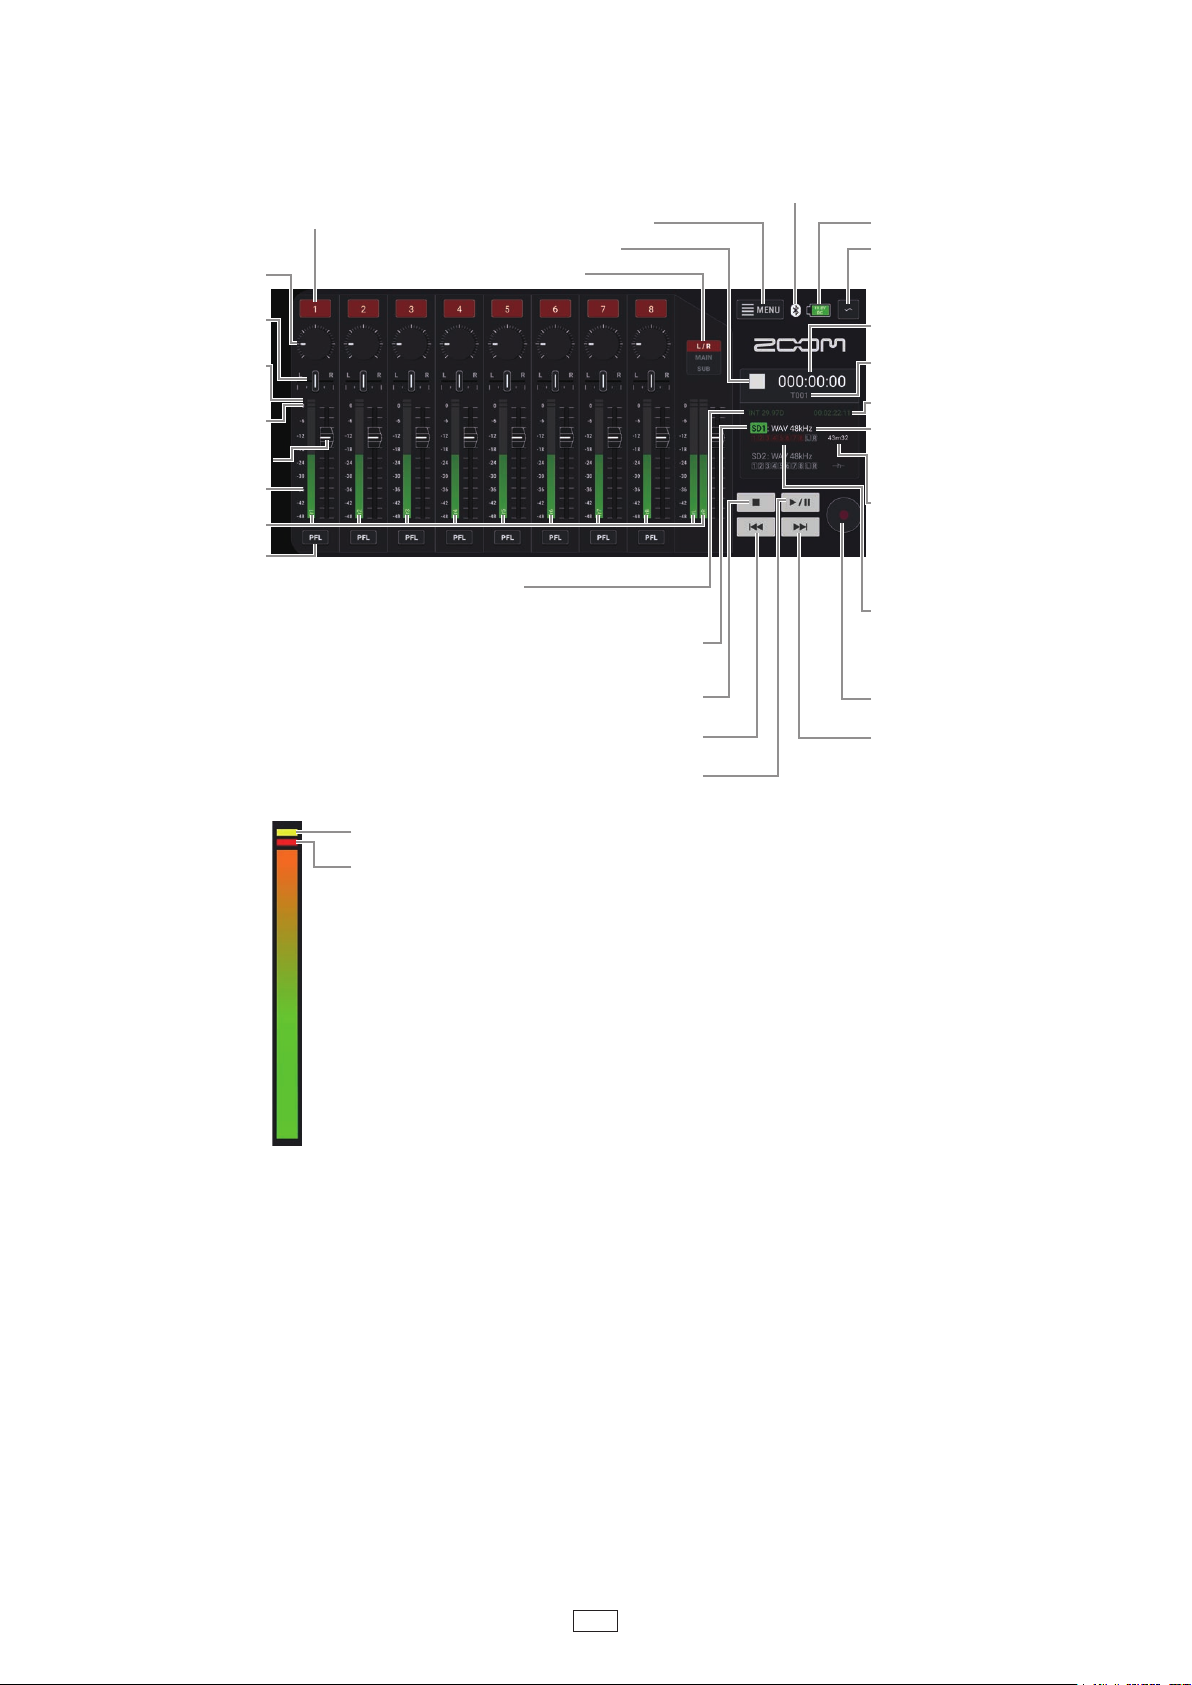
■ On iPad
Track 1–8 selection buttons
Lit: Input enabled
Unlit: Input disabled
Input trim knobs
Pan faders
Limiter indicators
Clipping indicators
Level meters
Level faders
Track names
PFL buttons
Counter
(playback time/elapsed
recording time)
Status icon
Playback card
Green: Selected for playback
Gray: No card
Recording/playback file
formats, sample rates
Timecode frame rate
INT: Internal
EXT: External input
Recording/playback tracks
Red: Recording tracks
Green: Playback tracks
Gray: Tracks not recorded
or played
MENU button
Bluetooth status
Blue: Connected
Output switch
button
Slate tone button
Take name
REC button
PLAY/PAUSE
button
FF button
STOP button
REW button
Power type and
remaining amount
Recording/playback
timecode
When recording:
Remaining recording time
When playing:
Remaining playback time
Limiter indicator
Clipping indicator
Level meter
10
Page 11
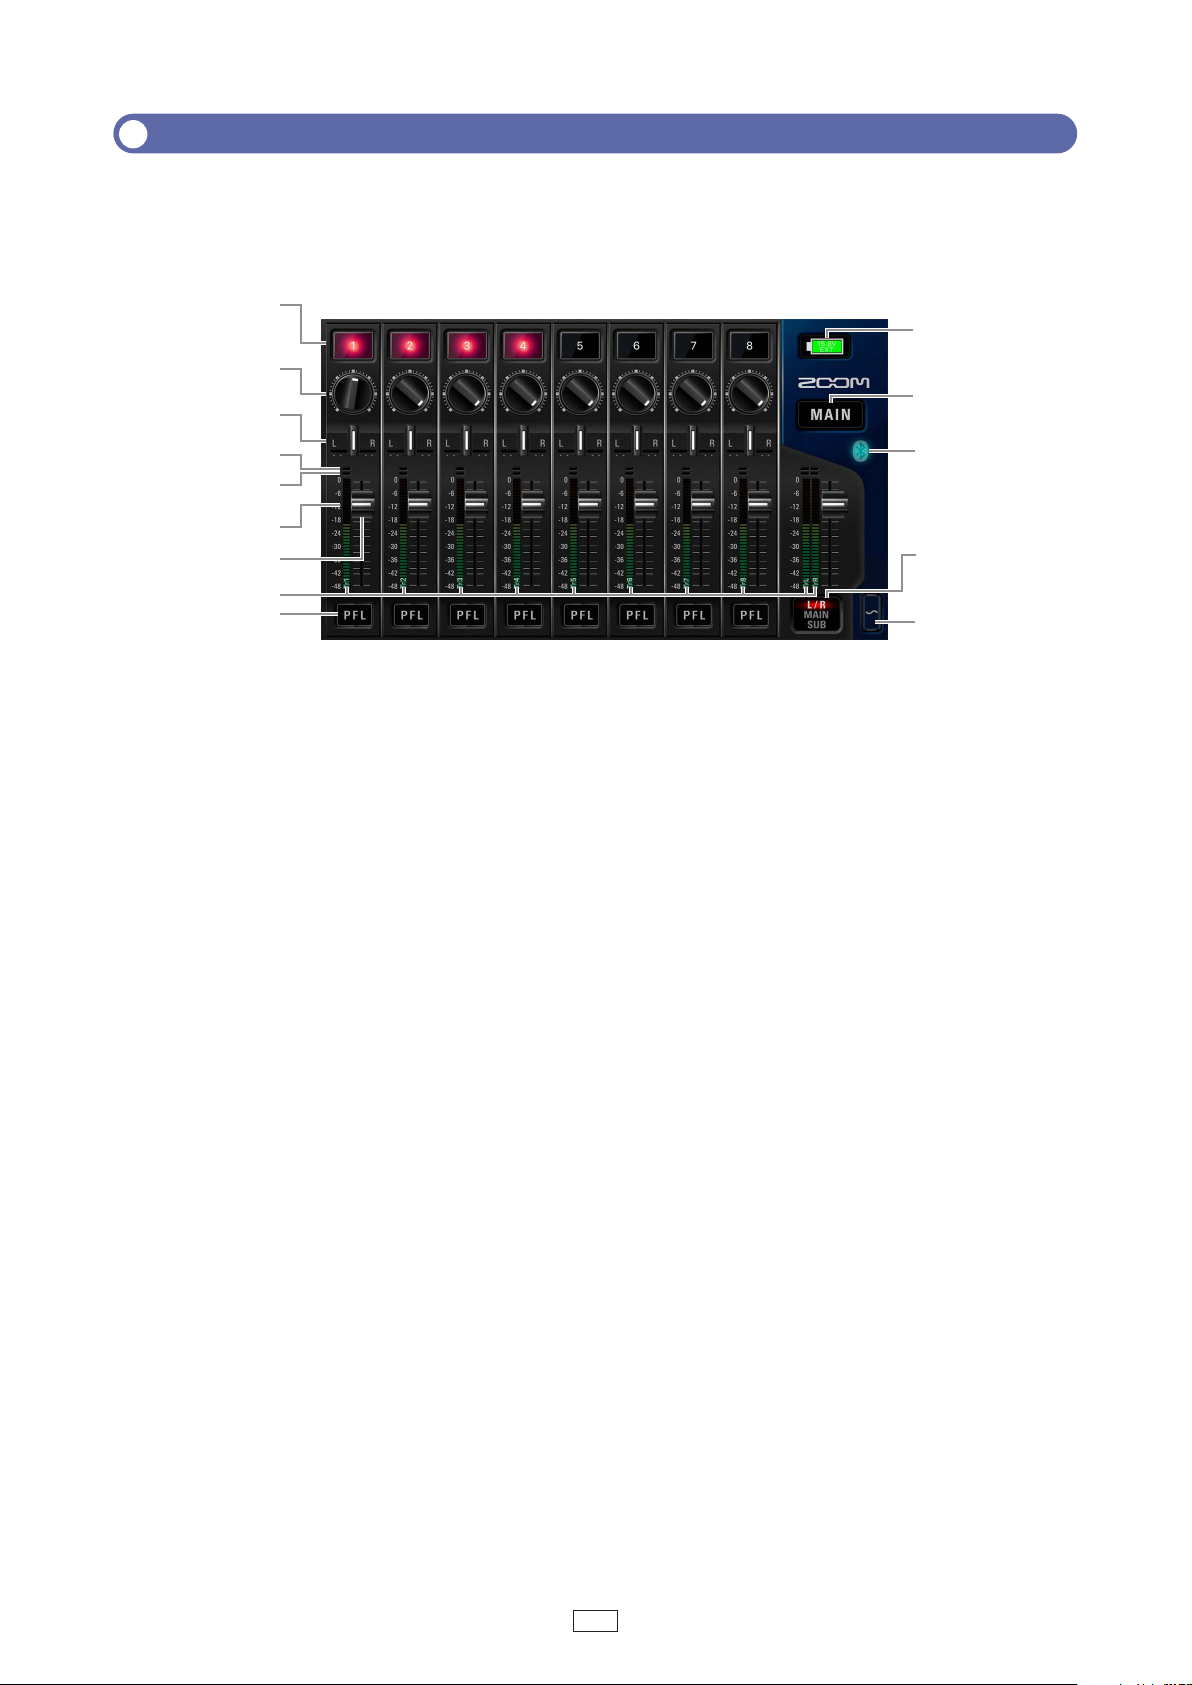
■ On Android
Track 1-8 selection buttons
Lit: Input enabled
Unlit: Input disabled
Input trim knobs
Pan faders
Limiter
indicators
Clipping
indicators
Level faders
Level meters
Track names
PFL buttons
Output switch button
Timecode frame rate
INT: Internal
EXT: External input
MENU button
Status icon
Green: Selected for playback
Playback card
Gray: No card
STOP button
REW button
Bluetooth status
Blue: Connected
Power type and
Slate tone button
Counter
(playback time/
elapsed recording time)
Take name
Recording/playback
timecode
Recording/playback file
formats, sample rates
When recording:
Remaining recording time
When playing:
Remaining playback time
Recording/playback
tracks
Red: Recording tracks
Green: Playback tracks
Gray: Tracks not recorded or
played
REC button
FF button
Limiter indicator
Clipping indicator
Level meter
PLAY/PAUSE button
11
Page 12
MIXER screen
Return to HOME screen
Power source
Track 1-8
In the iPad and Android versions, all MIXER screen operations are possible on the
HOME screen. There is no separate MIXER screen.
■ On iOS
selection buttons
Input trim knobs
Pan faders
Limiter
indicators
Clipping indicators
Level meters
Level faders
Track Name
PFL buttons
type and
remaining power
MAIN button
Bluetooth
status
OUTPUT display
switch button
Slate tone
button
12
Page 13
Character input screen
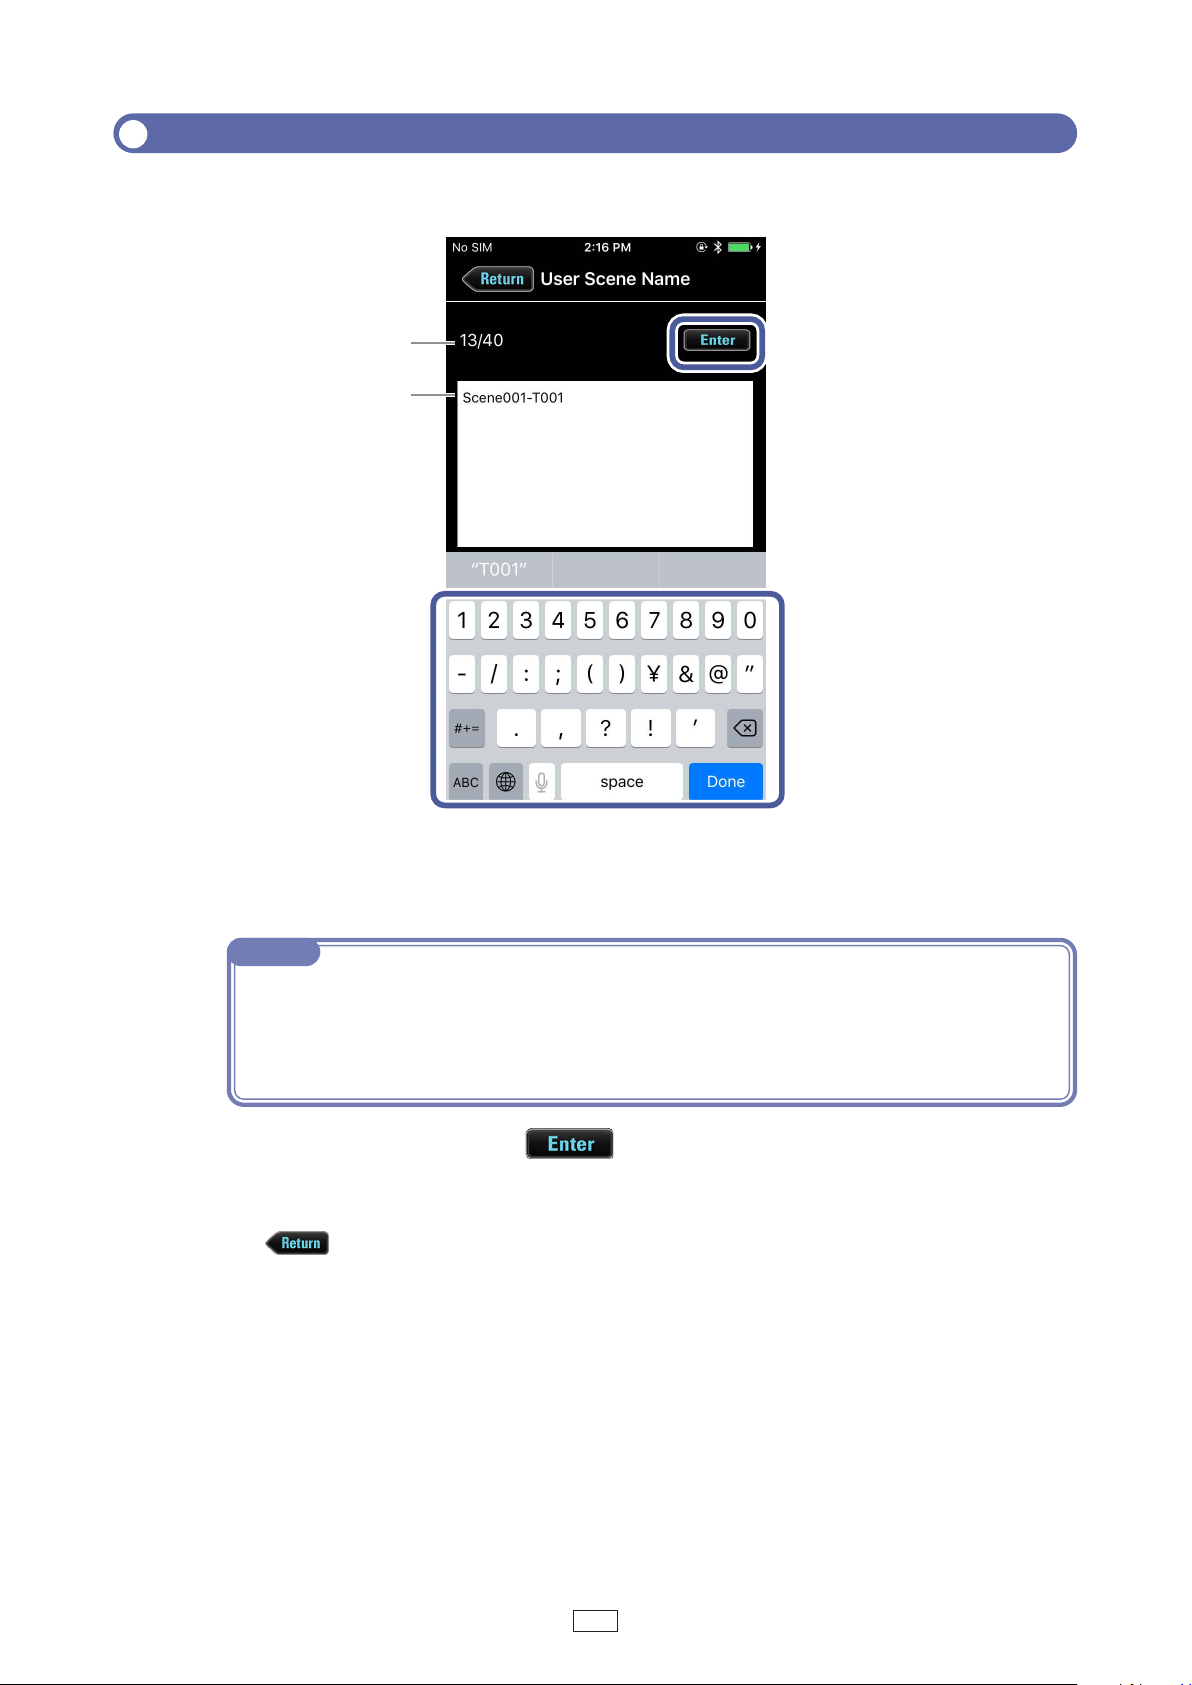
The character input screen appears for inputting the names of takes and folders,
for example.
Number of characters
(input/total possible)
Text box
1
Input characters using the keyboard.
1.
The input characters appear in the text box.
2
NOTE
· The following characters can be input.
(space) ! # $ % & ' ( ) + , - 0 1 2 3 4 5 6 7 8 9 ; = @ A B C D E F G H I J K L M N O P Q R S T U V W
X Y Z [ ] ^ _ ` a b c d e f g h i j k l m n o p q r s t u v w x y z { } ~
Except when inputting a "Note", you cannot put an @ mark or a space at the beginning.
When done inputting, tap .
2.
Confirm the input characters.
Tap
to cancel the input.
13
Page 14
Preparing to record
2
3
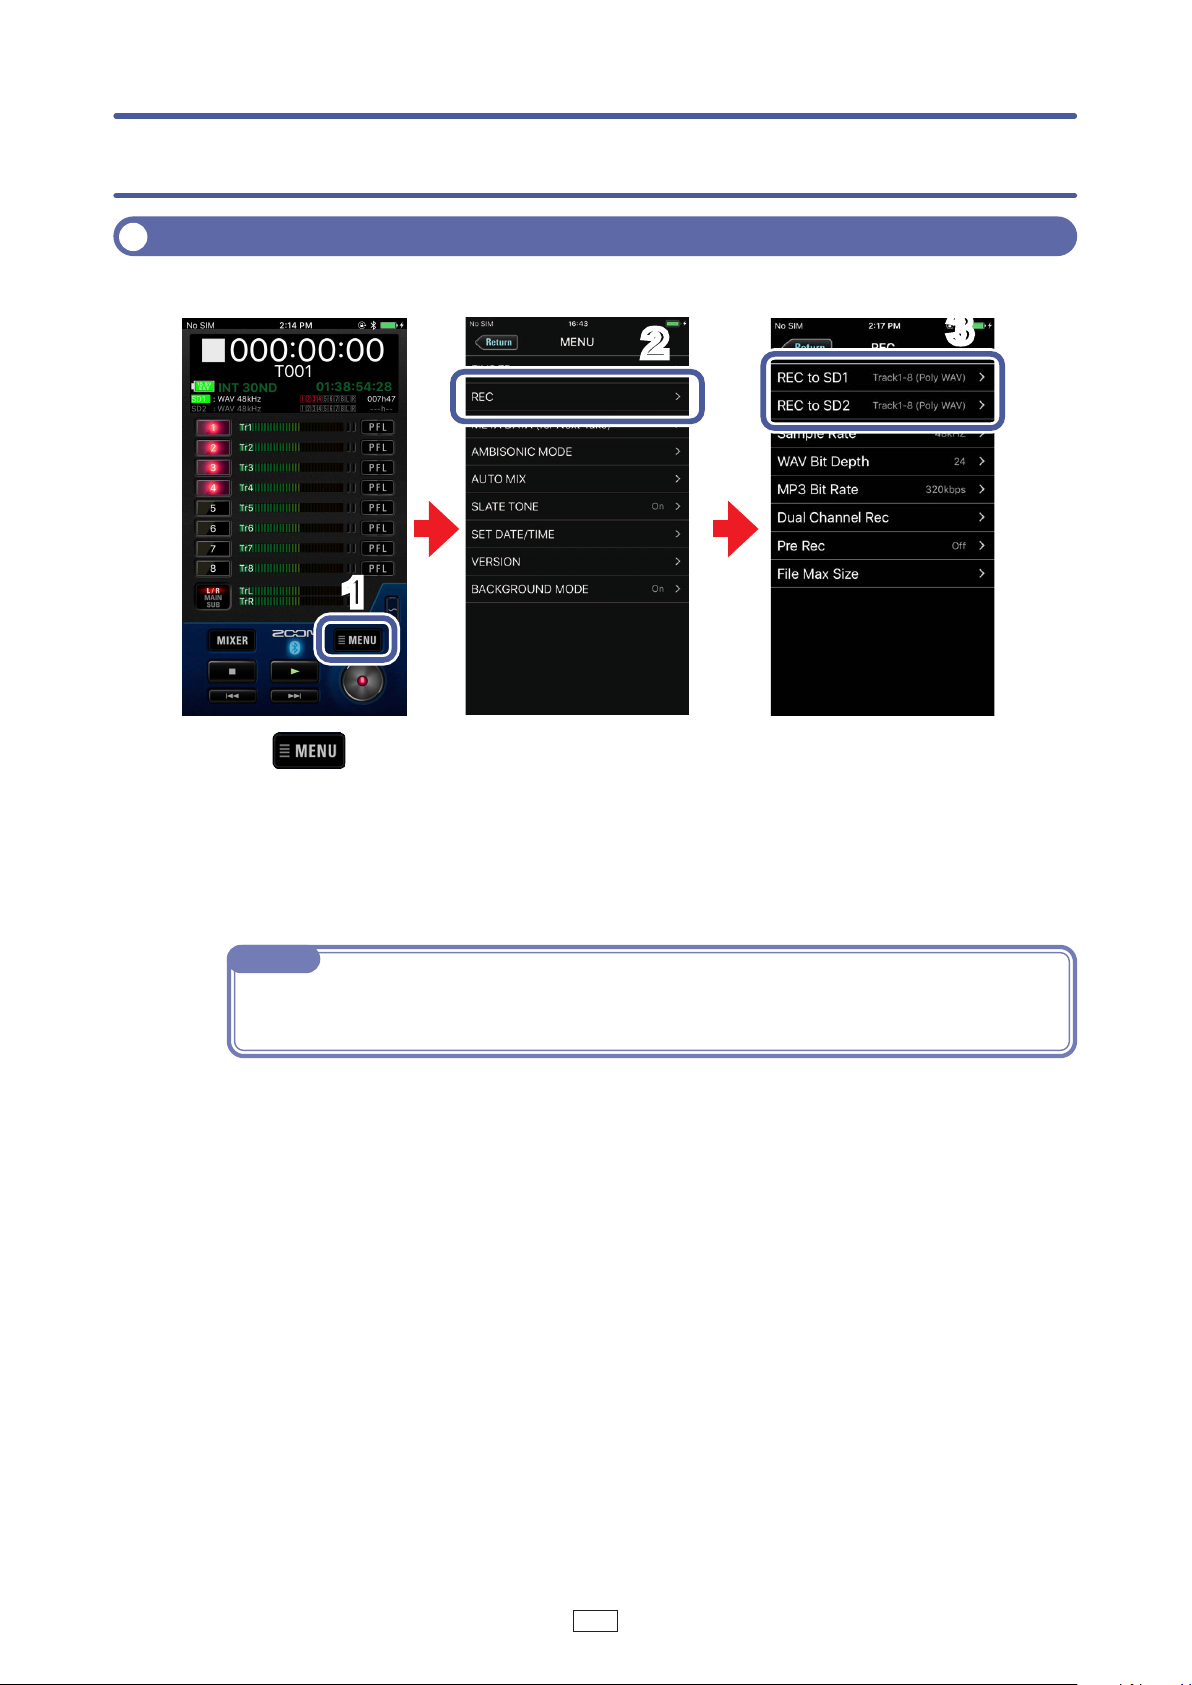
Setting SD card for recording and recording file format
The recording file format can be set independently for SD card slots 1 and 2.
1
Tap on the HOME screen.
1.
Tap "REC" on the MENU screen.
2.
Tap "REC to SD1" or "REC to SD2" on the REC screen, and change the
3.
settings.
NOTE
· For details, see "Enabling recording on SD cards and setting file formats" in the unit's manual.
14
Page 15
Recording
Selecting inputs
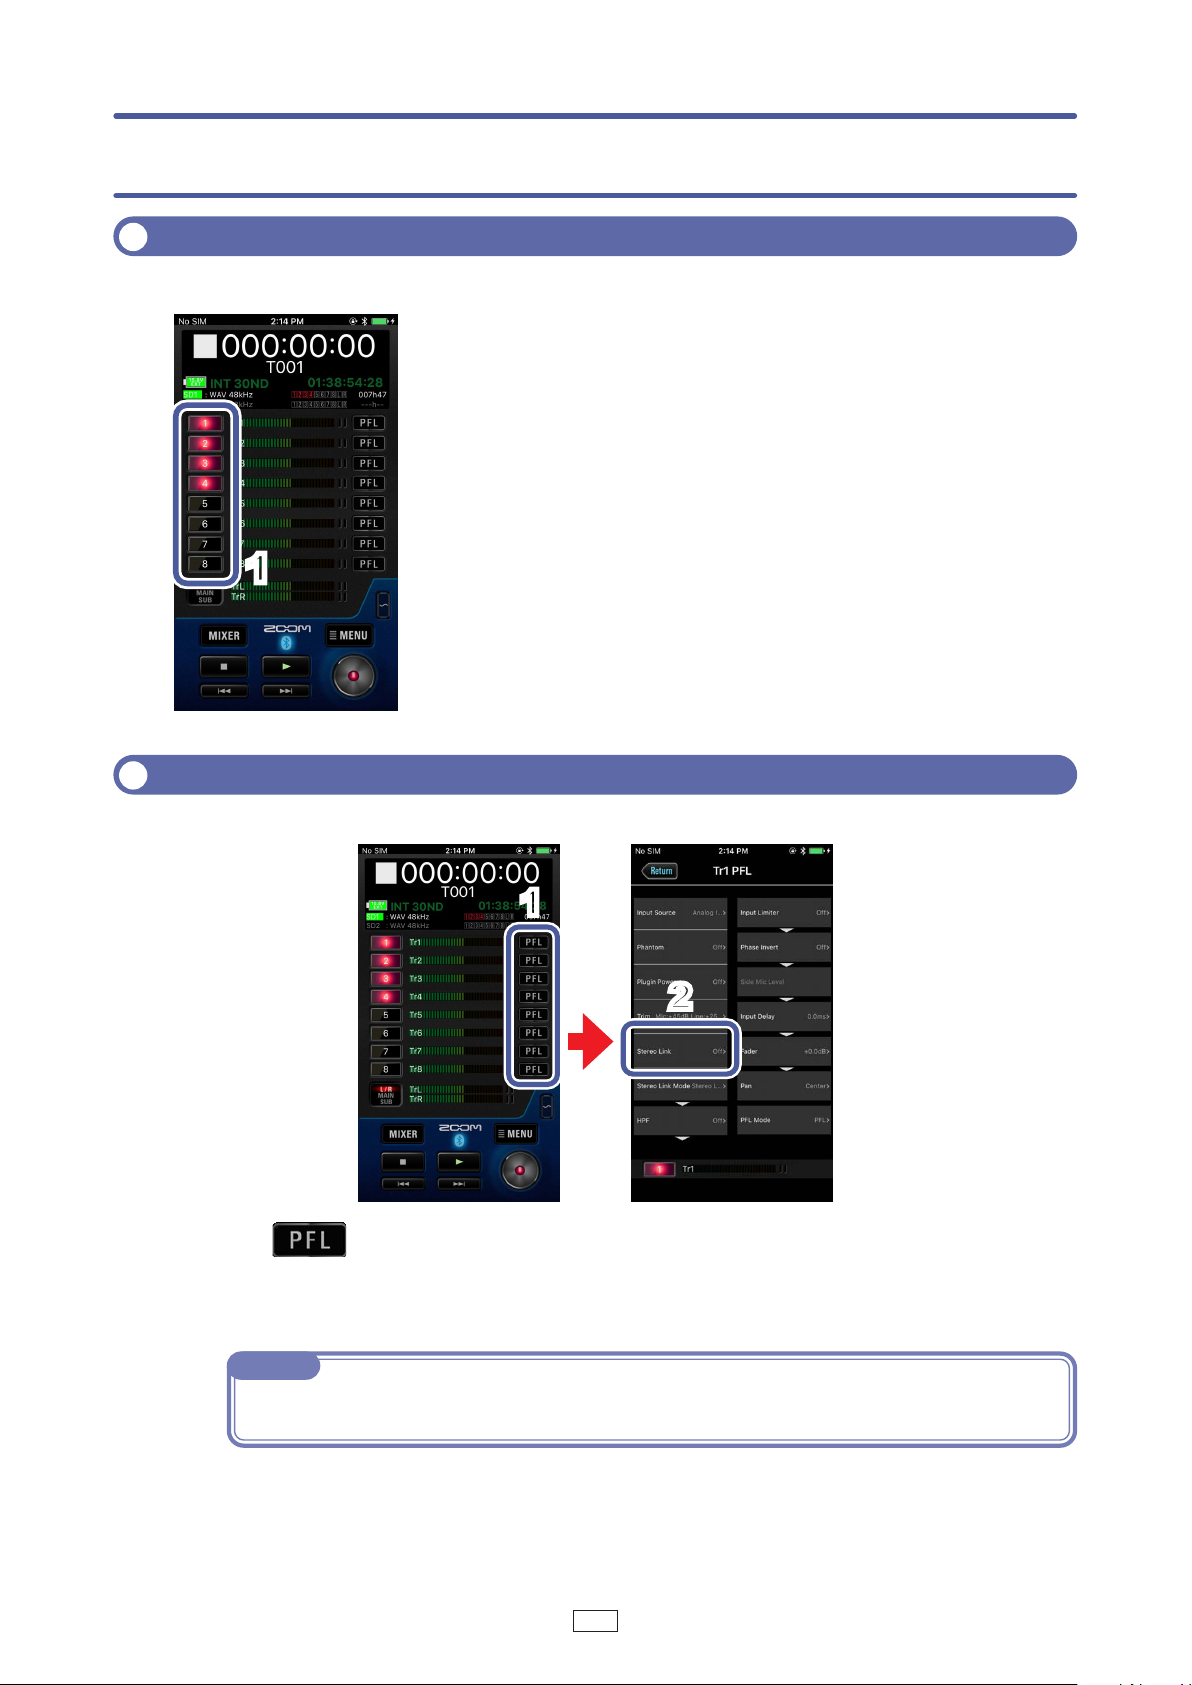
Select which among Inputs 1–8 to use.
1.
1
Tap the track selection buttons on the HOME
screen for the inputs to record.
The buttons light red for the tracks that will be recorded and
appear dark for those that will not be recorded.
Linking inputs as a stereo pair
You can use track pairs 1/2, 3/4, 5/6 and 7/8 as stereo tracks.
1
2
Tap on the HOME screen for a track to link it in stereo.
1.
Tap "Stereo Link" on the PFL screen, and change the setting.
2.
NOTE
· For details, see "Selecting inputs and adjusting levels" in the unit's manual.
15
Page 16
Adjusting input levels
2
1
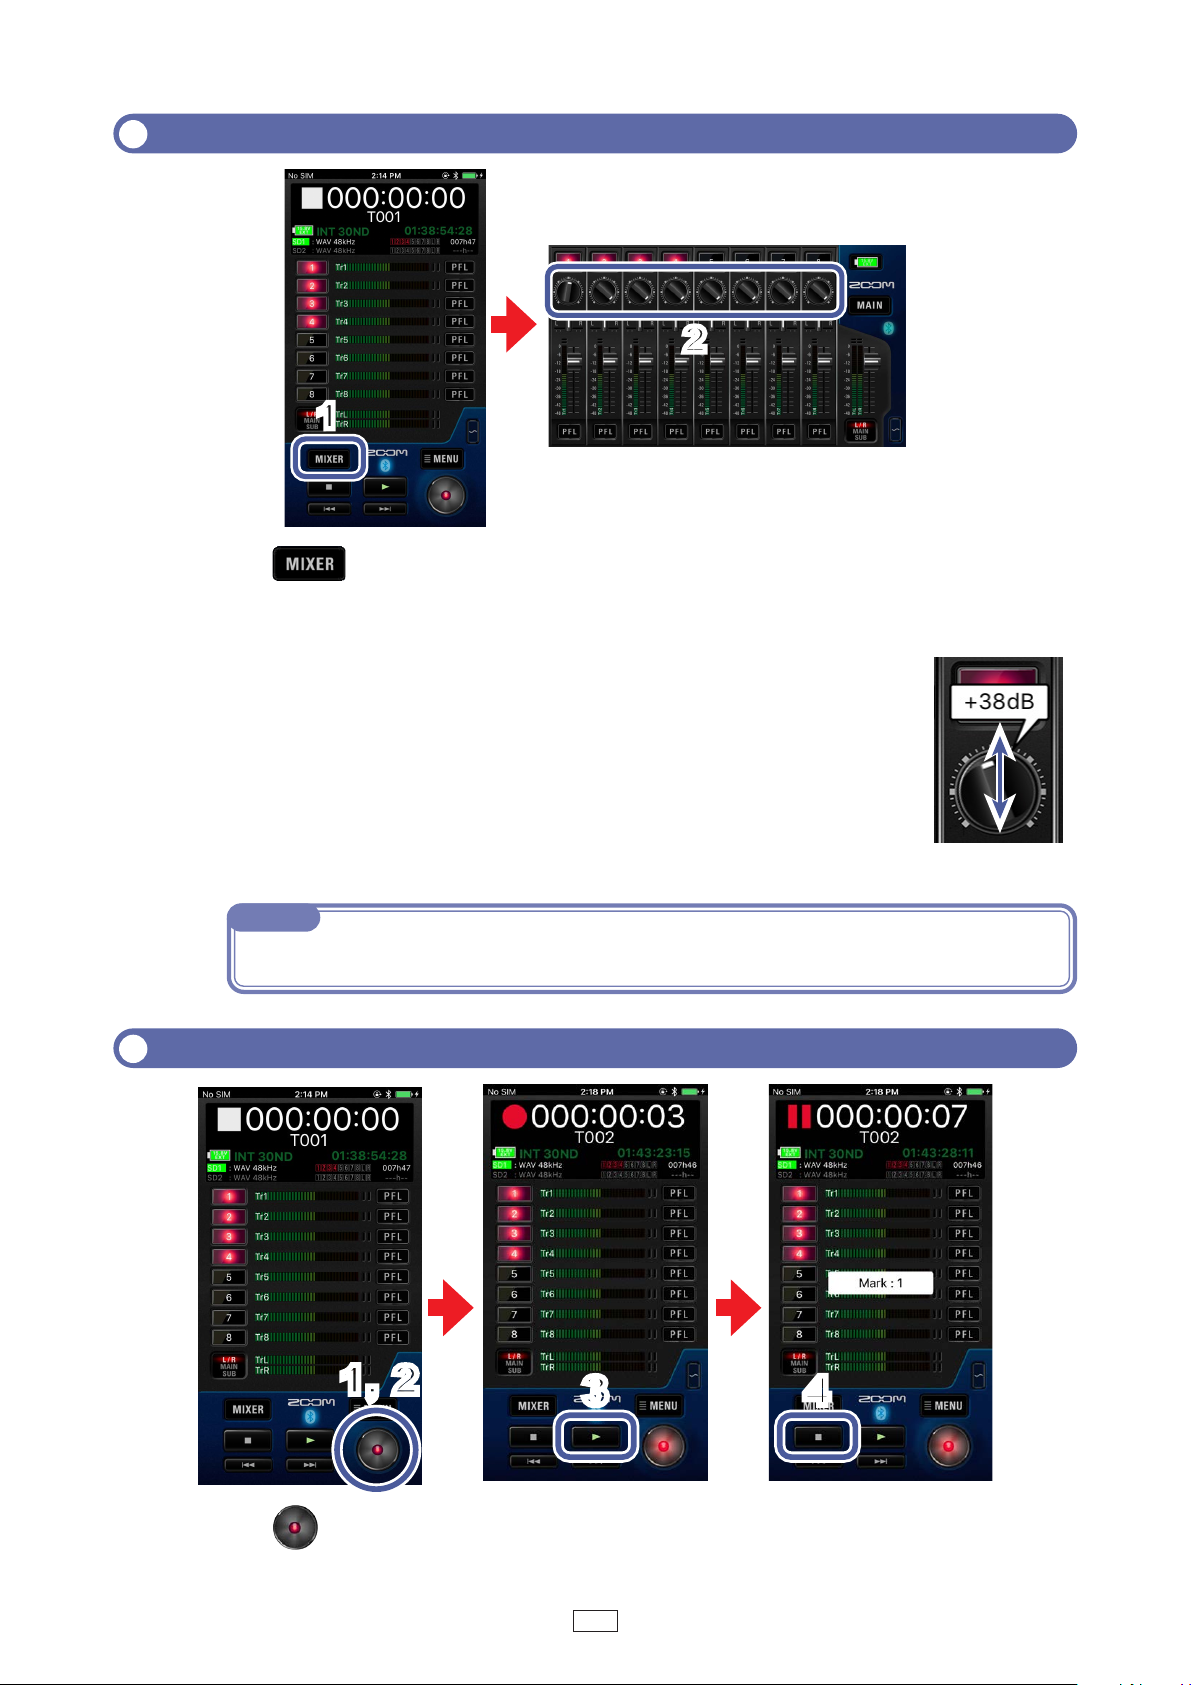
Tap on the HOME screen.
1.
On iPadOS or Android, skip this step.
On the MIXER screen (HOME screen on iPad), drag up/
2.
down the input trim knob for a track to adjust its level.
NOTE
· Double-tap an input trim knob to reset it to the default value.
Recording
Tap on the HOME screen.
1.
1, 2
3
4
16
Page 17
Tap to start a new take when recording.
2
2.
This will end the current take, start a new take and continue to record without interruption.
Tap to pause.
3.
Tap again to restart recording.
Tap to stop.
4.
Setting various functions related to recording
3
1
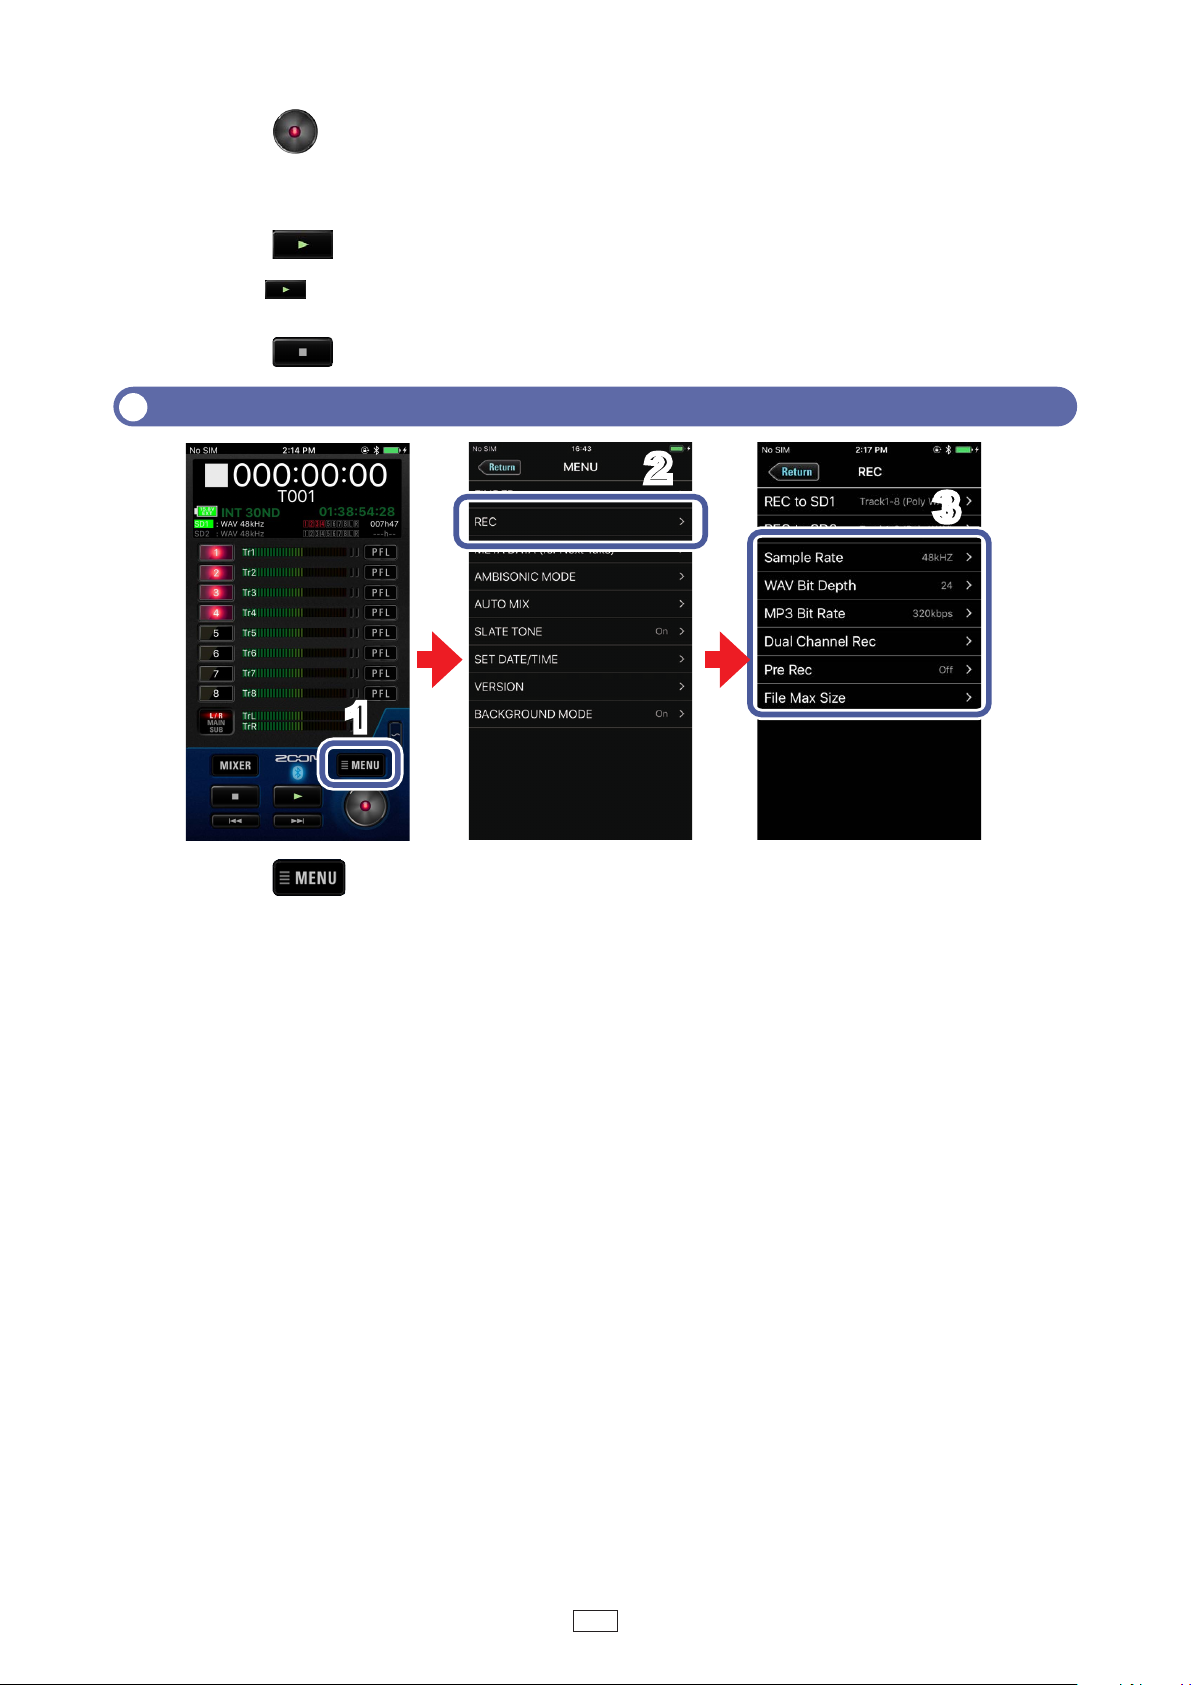
Tap on the HOME screen.
1.
Tap "REC" on the MENU screen.
2.
Tap a setting on the REC screen and change it.
3.
■ Sample Rate
Set the sampling rate used to record files.
■ WAV Bit Depth
Set the bit depth of WAV files.
■ MP3 Bit Rate
Set the bit rate of recorded MP3 files.
■ Dual Channel Rec
Set the dual channel recording function to On/Off.
When connected to an F8n Pro, this function cannot be used.
■ Pre Rec
Set the pre-recording function, which captures audio before recording starts, to On/Off.
17
Page 18
■ File Max Size
3
Set the maximum size of recording files (Size).
Set whether or not the total recording time shown on the HOME screen is reset when the
maximum recording file size is reached (Time Counter).
NOTE
· For details, see the following sections in the unit’s manual.
Setting the sampling rate (Sample Rate)
Setting WAV file bit depth (WAV Bit Depth)
Setting MP3 file bit rate (MP3 Bit Rate)
Simultaneously recording tracks at different levels (Dual Channel Rec)
Capturing audio before recording starts (Pre Rec)
Maximum file size (File Max Size)
Showing total recording times for long recordings (Time Counter)
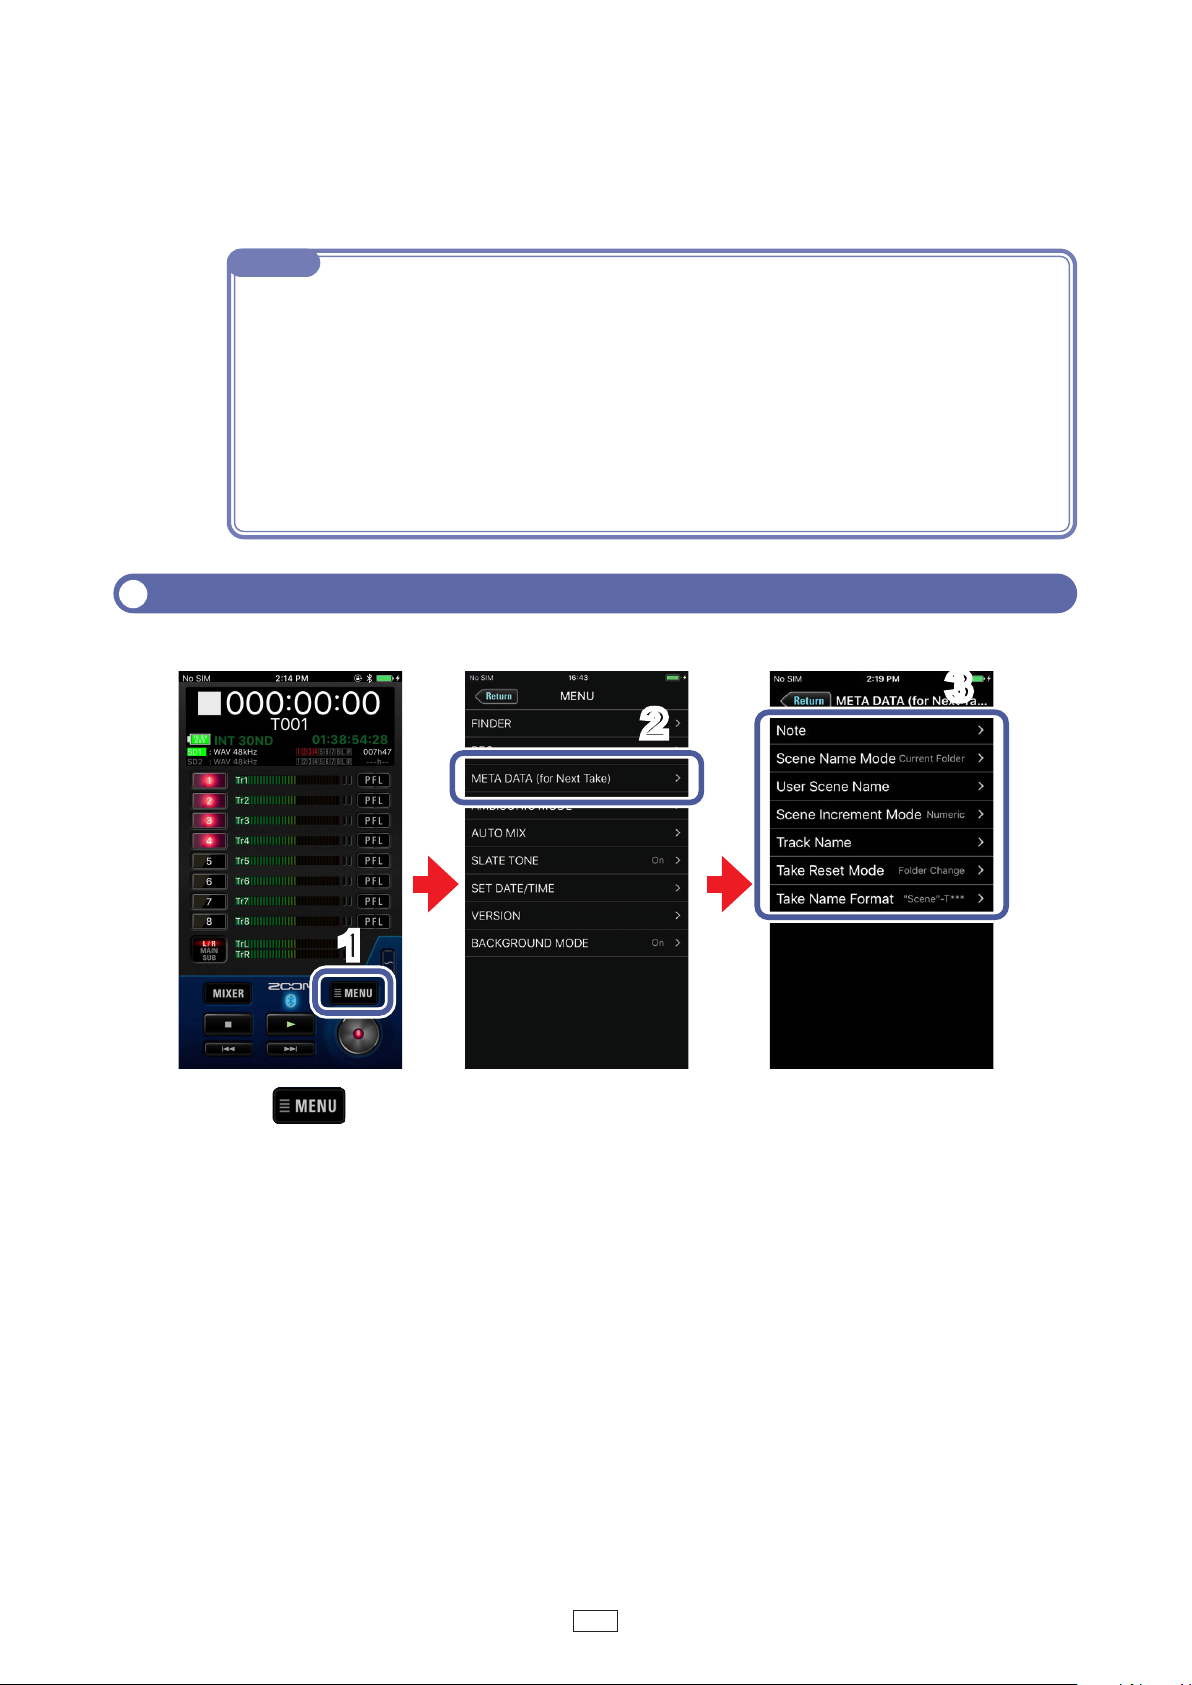
Changing recording take settings
You can change the recording take scene name, for example.
2
1
Tap on the HOME screen.
1.
Tap “META DATA (for Next Take)” on the MENU screen.
2.
Tap a setting and then change it.
3.
■ Note
Input characters for a note to use as metadata in the next take recorded.
■ Scene Name Mode
Set how the scene name will be assigned (mode) to the next take recorded.
■ User Scene Name
If Scene Name Mode is set to User Name, set the scene name used here.
18
Page 19

■ Scene Increment Mode
Set how the scene name number will be advanced for the next take recorded.
■ Track Name
Edit the track name used for the next take recorded.
■ Take Reset Mode
Set the conditions to reset the name that will be given to the next take recorded.
■ Take Name Format
Set the name format used for the next take recorded.
NOTE
· For details, see “Recording take settings” in the unit’s manual.
19
Page 20
Playing recordings
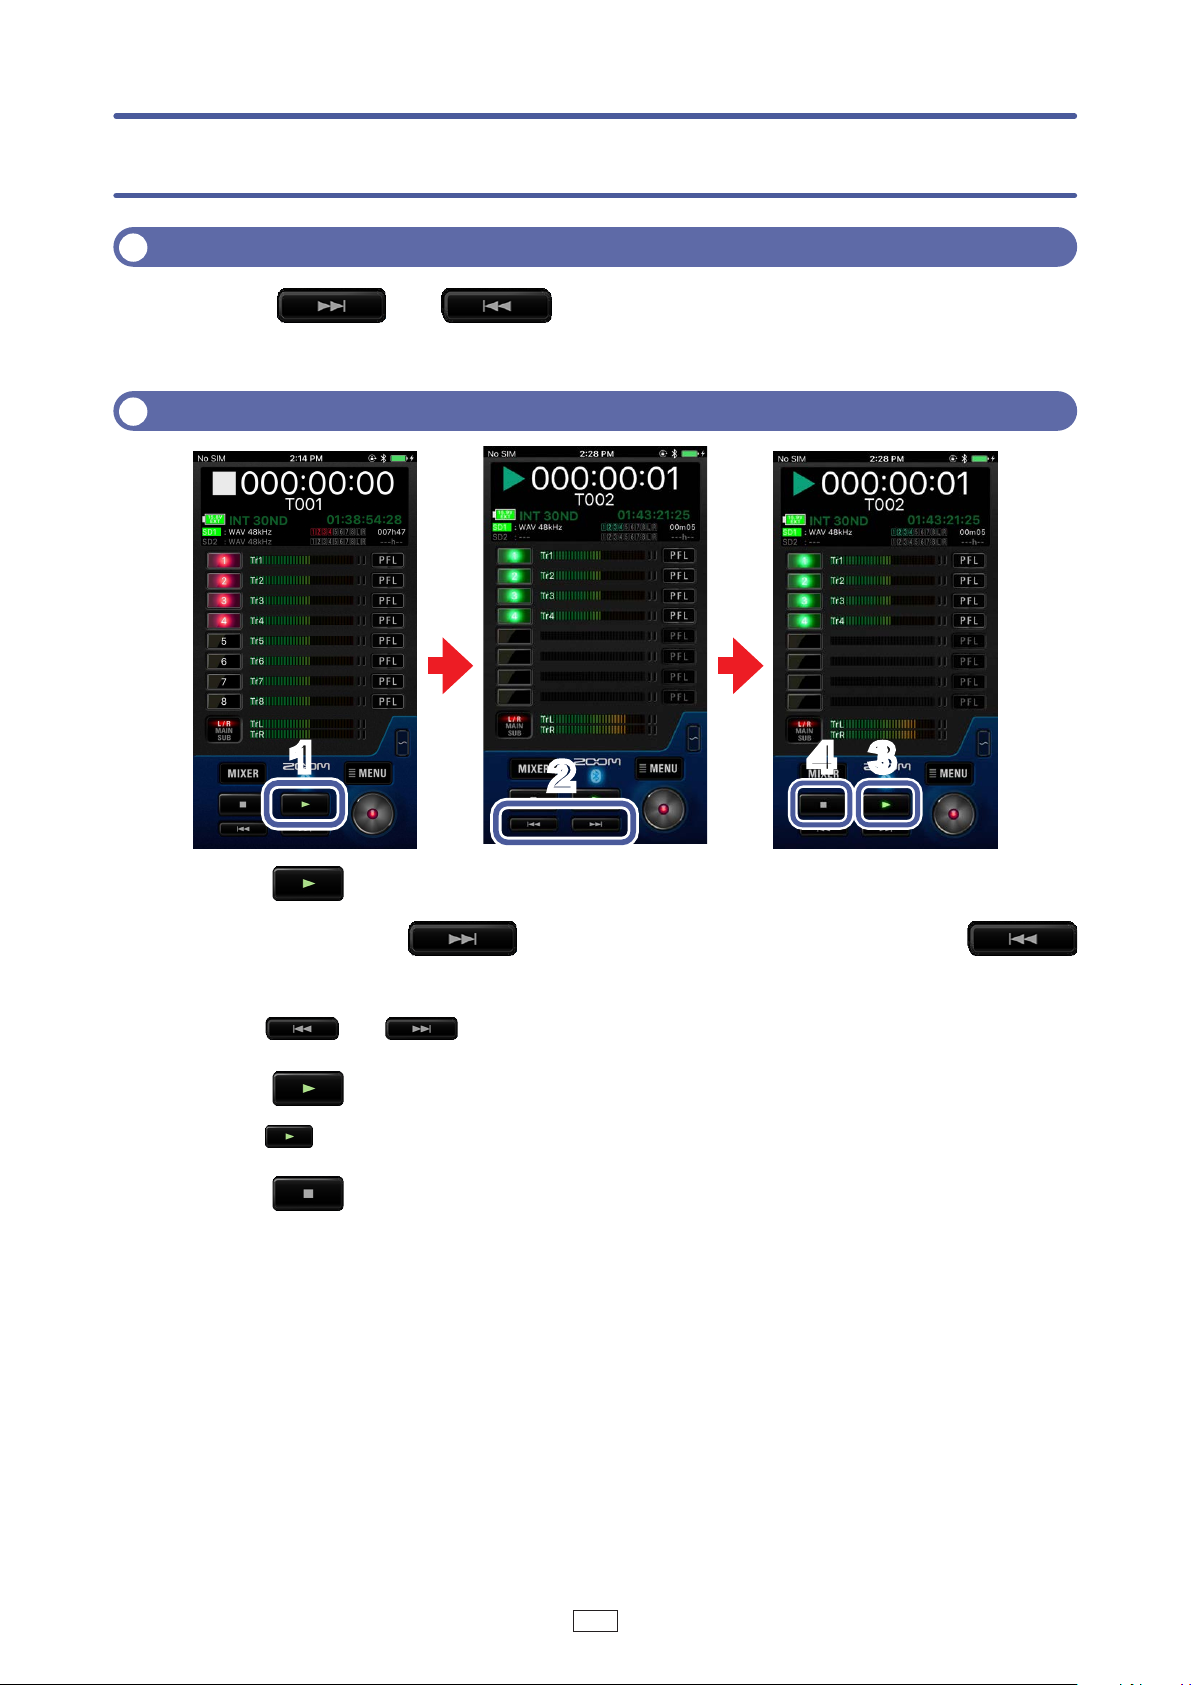
Selecting a take for playback
Use and on the HOME screen.
1.
Doing this changes the playback take.
Playing recordings
1
4 3
2
Tap on the HOME screen.
1.
Touch and hold to search forward, and touch and hold
2.
to search backward.
Tap and to jump to marks.
Tap to pause.
3.
Tap again to restart playback.
Tap to stop.
4.
20
Page 21
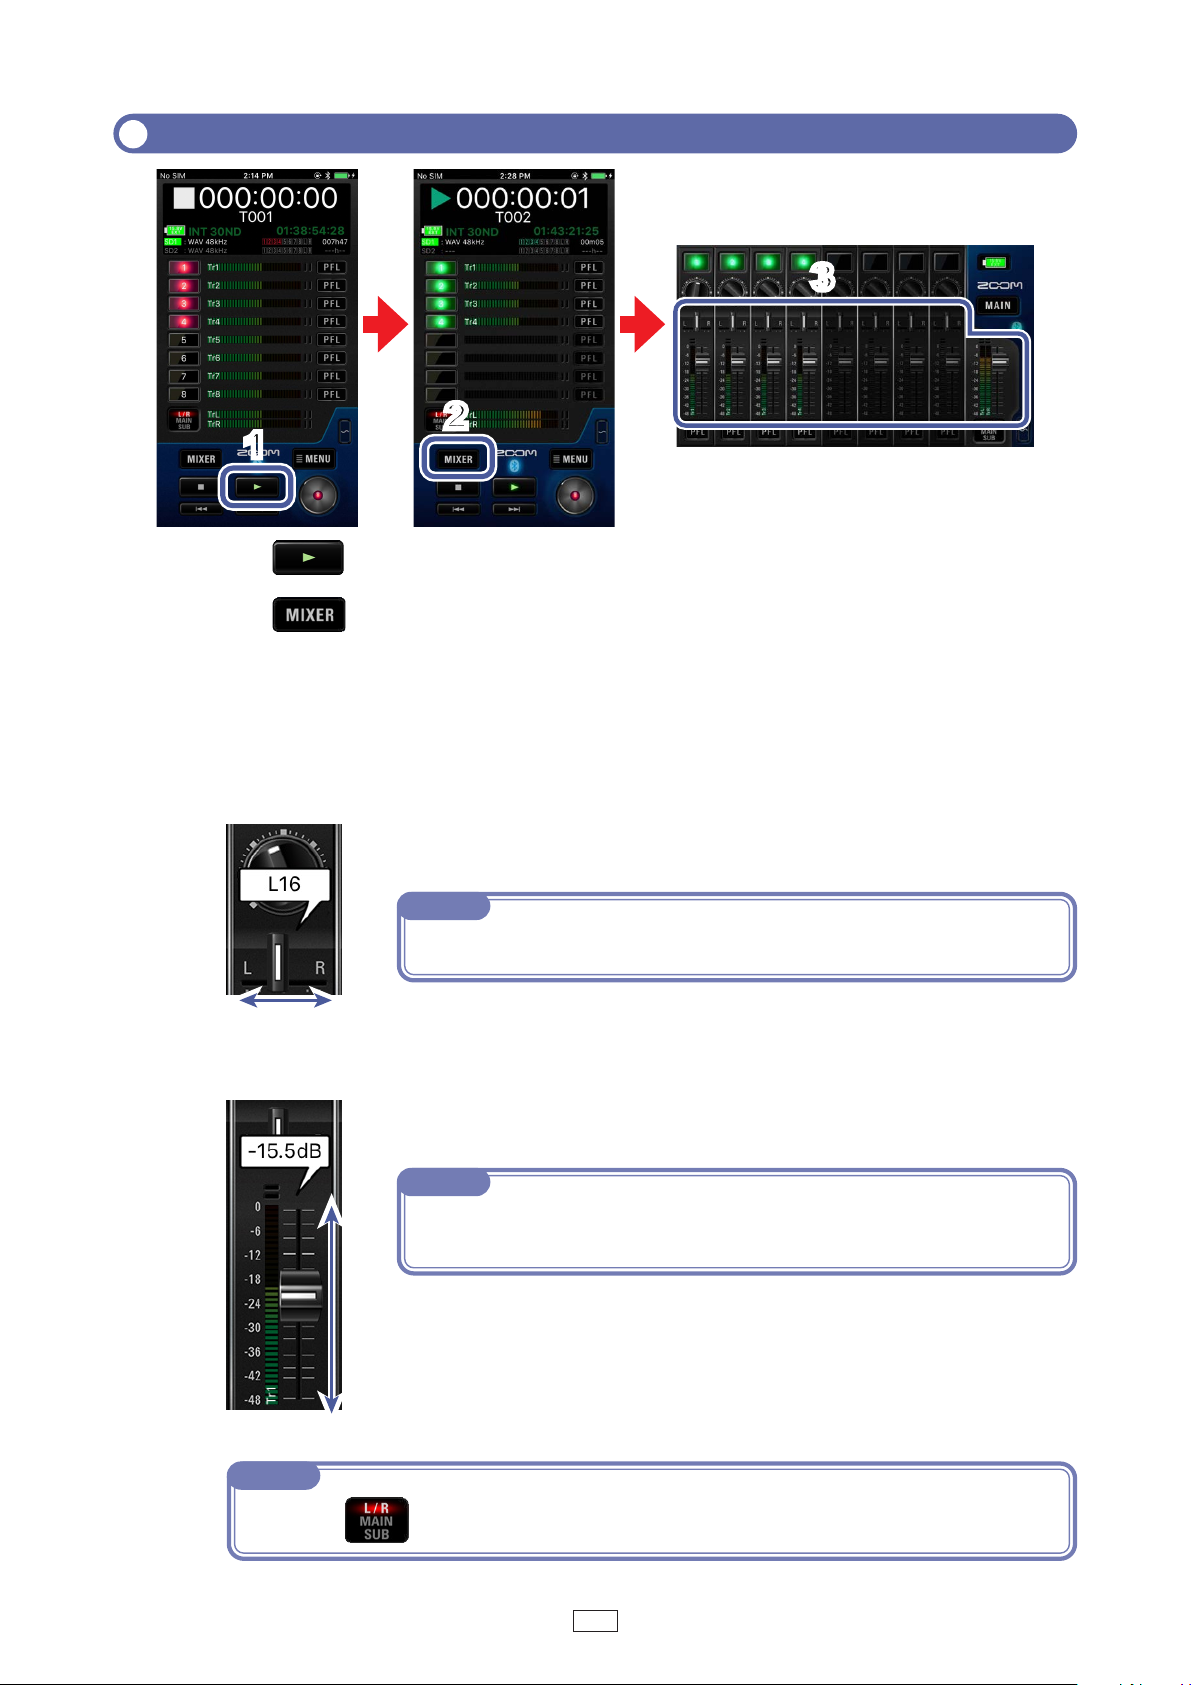
Mixing takes
3
2
1
Tap on the HOME screen.
1.
Tap .
2.
On iPadOS or Android, skip this step.
Adjust parameter settings on the MIXER screen (HOME screen on iPad).
3.
■ Adjusting pan faders
Drag a pan fader left and right to adjust its value.
NOTE
· Double-tap a pan fader to reset it to the default value.
■ Adjusting level faders
Drag a level fader up and down to adjust its value.
NOTE
· Double-tap a level fader to reset it to the default value.
If already set to its default value, doing this mutes the track.
NOTE
· If you tap to switch to L/R, you can change the L/R level.
21
Page 22
Folder and take operations
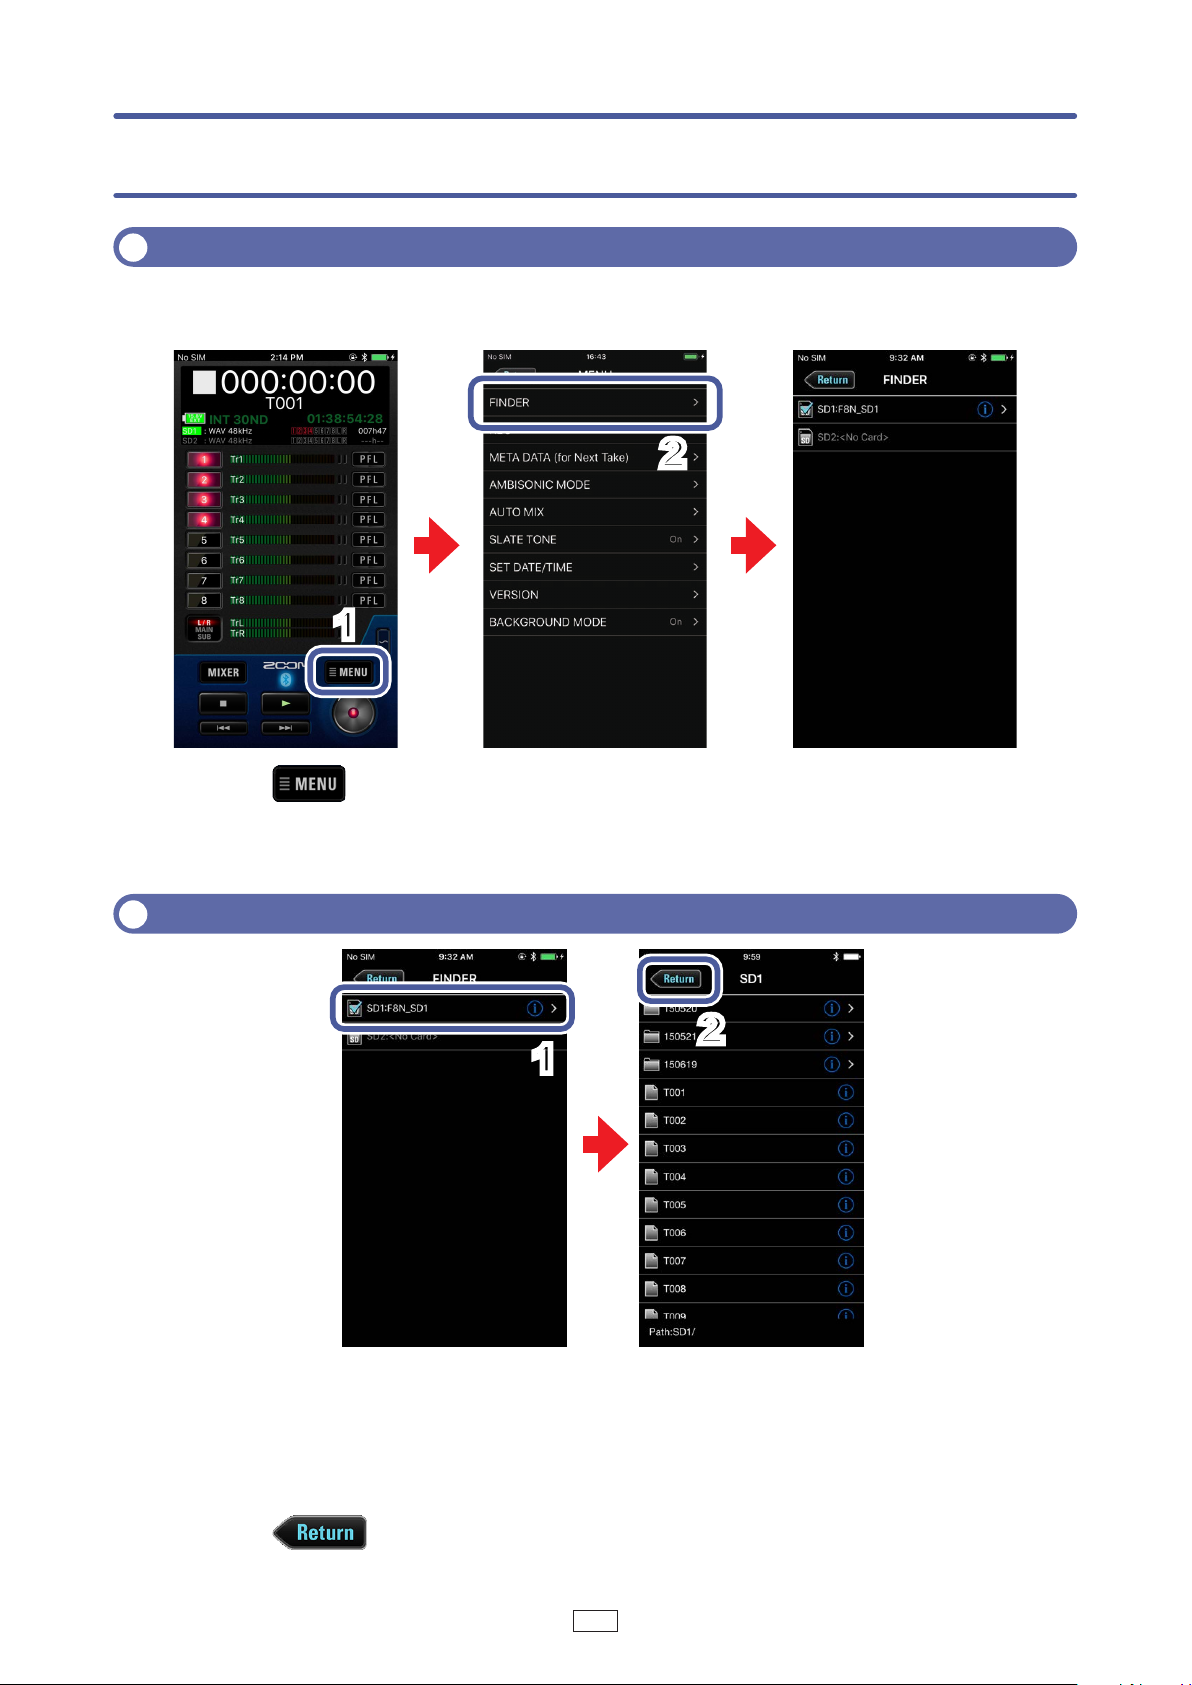
Opening the FINDER screen
Check and edit folders and takes on SD cards in the
screen.
2
1
Tap on the HOME screen.
1.
Tap “FINDER” on the MENU screen.
2.
recorder
on the FINDER
Opening SD cards and folders
1
On the FINDER screen, tap the name of the SD card or folder that you
1.
want to open.
A list of folders and takes inside that SD card/folder is shown.
2
Tap to move up one level.
2.
22
Page 23
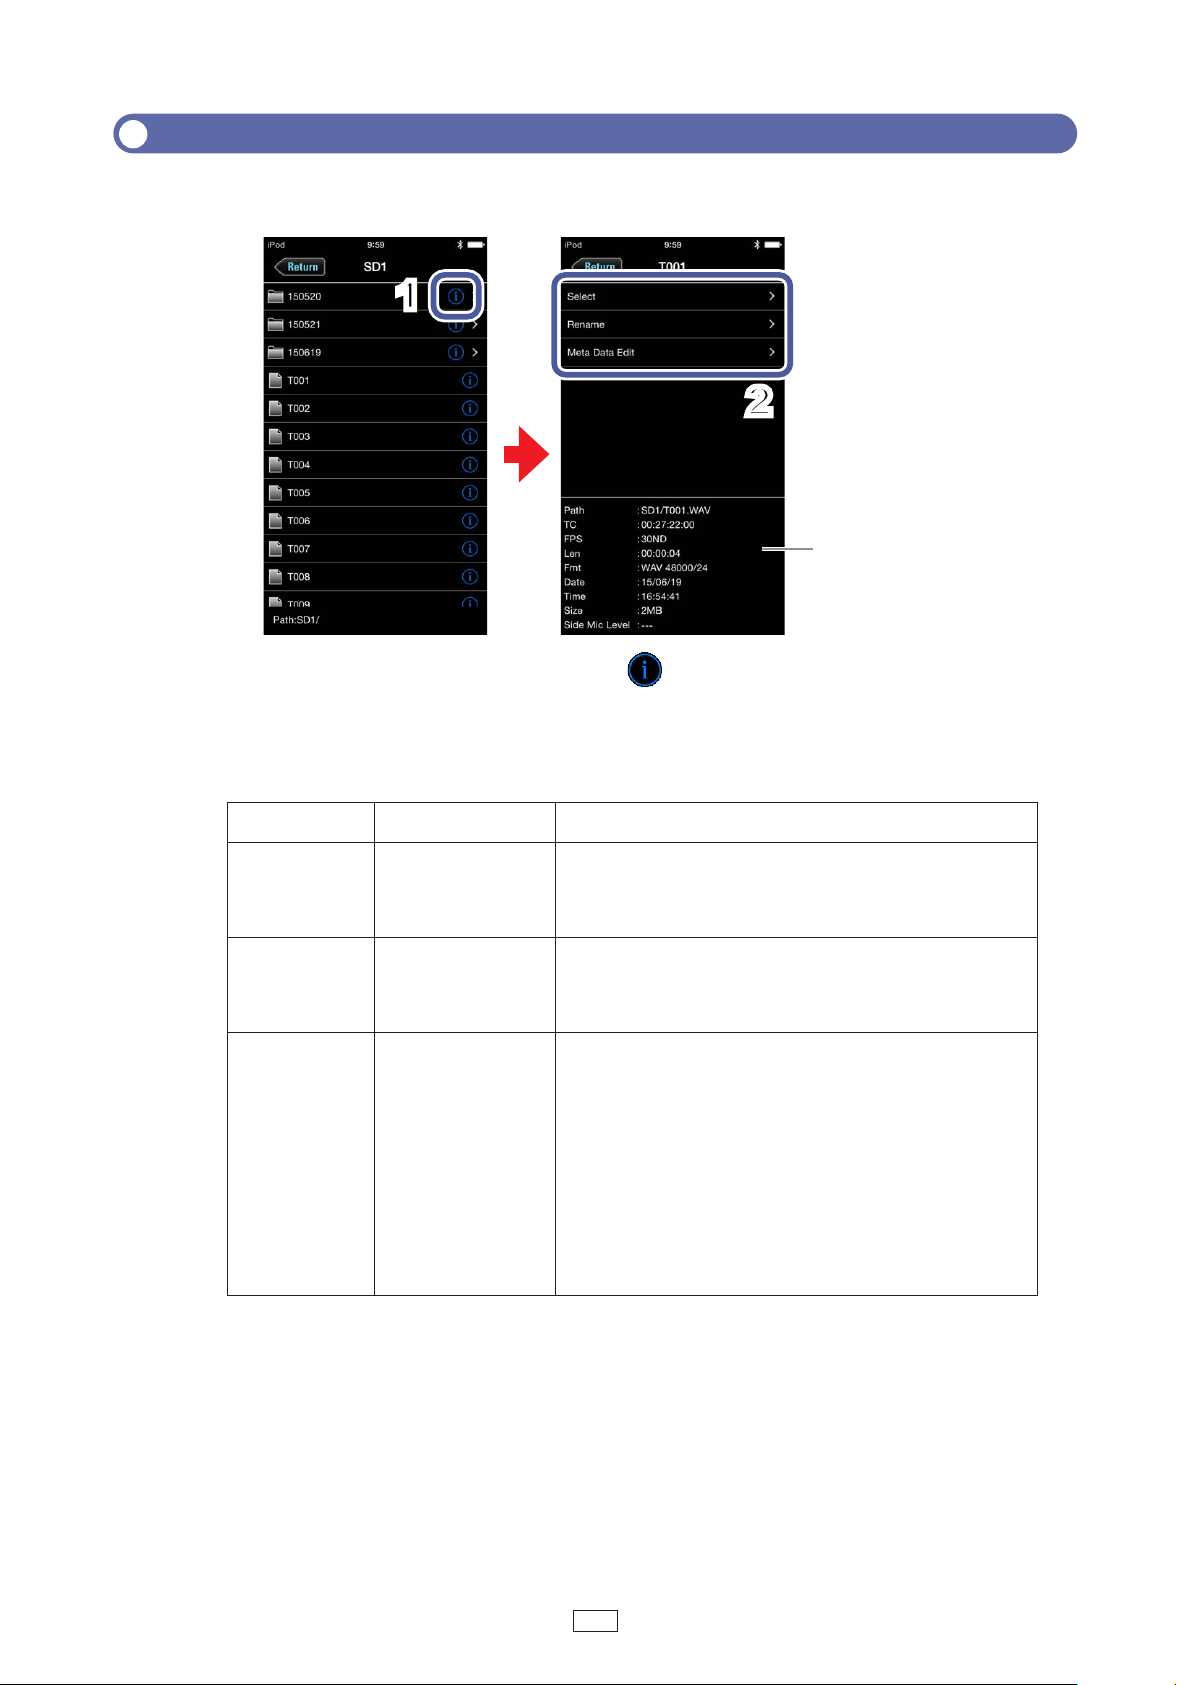
Working with folders and takes
When working with folders and takes, you can check their information, change
their names and edit their metadata.
1
2
Information
To work with a folder/take, tap the to the right of its name.
1.
This opens the OPTIONS screen where you can check the following information.
Explanation of information shown
Selected item Data item name Description
SD card Free
Size
Remain
Folder Path
Date
Time
Tak e Path
TC
FPS
Len
Fmt
Date
Time
Size
Side Mic Level
Open space
Size
Remaining recordable time
Folder path
Date created
Time created
Take path
Timecode
Frame rate
Length
Recording format
Date created
Time created
Size
Mid-side side mic level
23
Page 24
Tap an item to change its setting or work with it.
2.
■ Select
Use this procedure to select the folder that contains the take to be played back or the folder
to use for recording takes, and return to the HOME screen.
NOTE
· The first take inside the selected SD card or folder will be set as the playback take.
■ Rename
Change the folder or take name. See "Character input screen" (→P. 13) for how to input
characters.
■ Meta Data Edit
Check and edit take information (metadata).
NOTE
· For details, see "Checking and editing take metadata" in the unit's manual.
24
Page 25
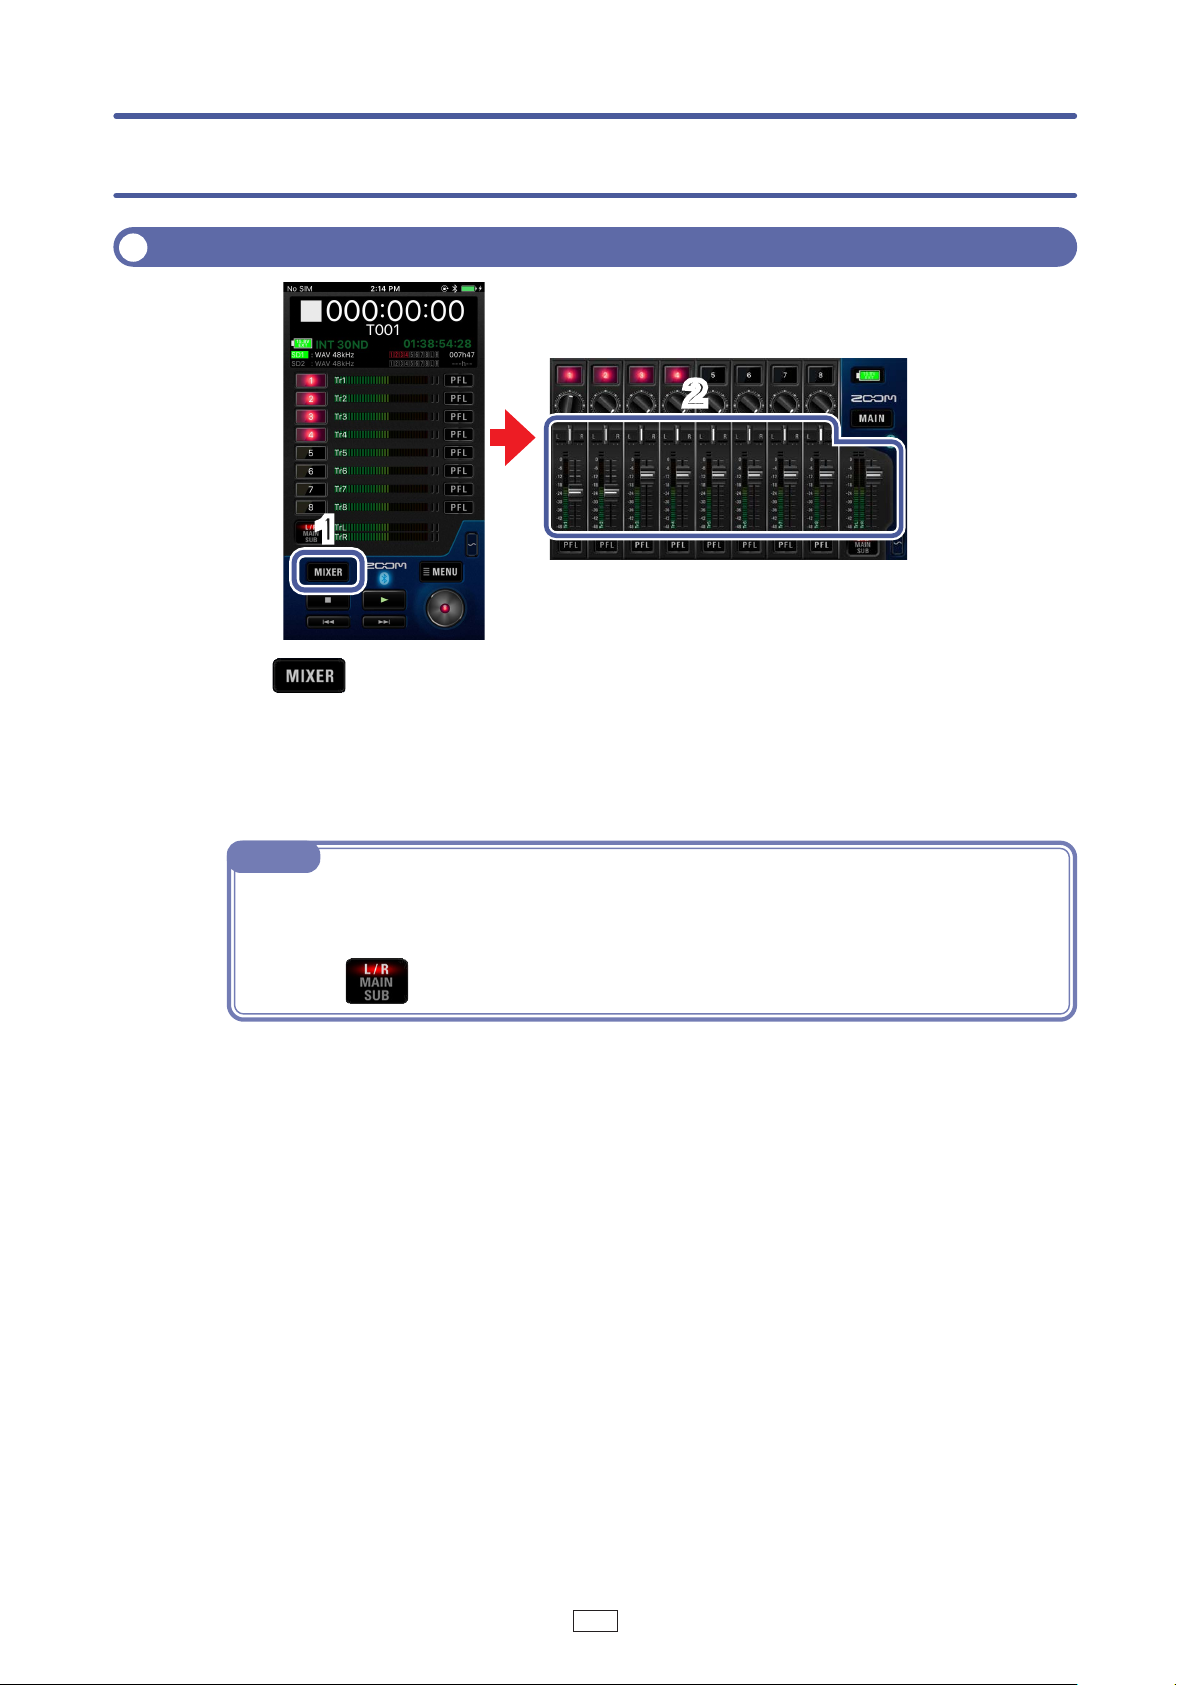
Settings related to input signals
Adjusting the input signal monitoring balance
2
1
Tap on the HOME screen.
1.
On iPadOS or Android, skip this step.
Adjust the parameter settings.
2.
NOTE
· See "Mixing takes" for how to make adjustments. (→P. 21)
· These volume and pan settings only affect the monitoring signals. They have no effect on
recorded data.
· If you tap
to switch to L/R, you can change the L/R level.
25
Page 26
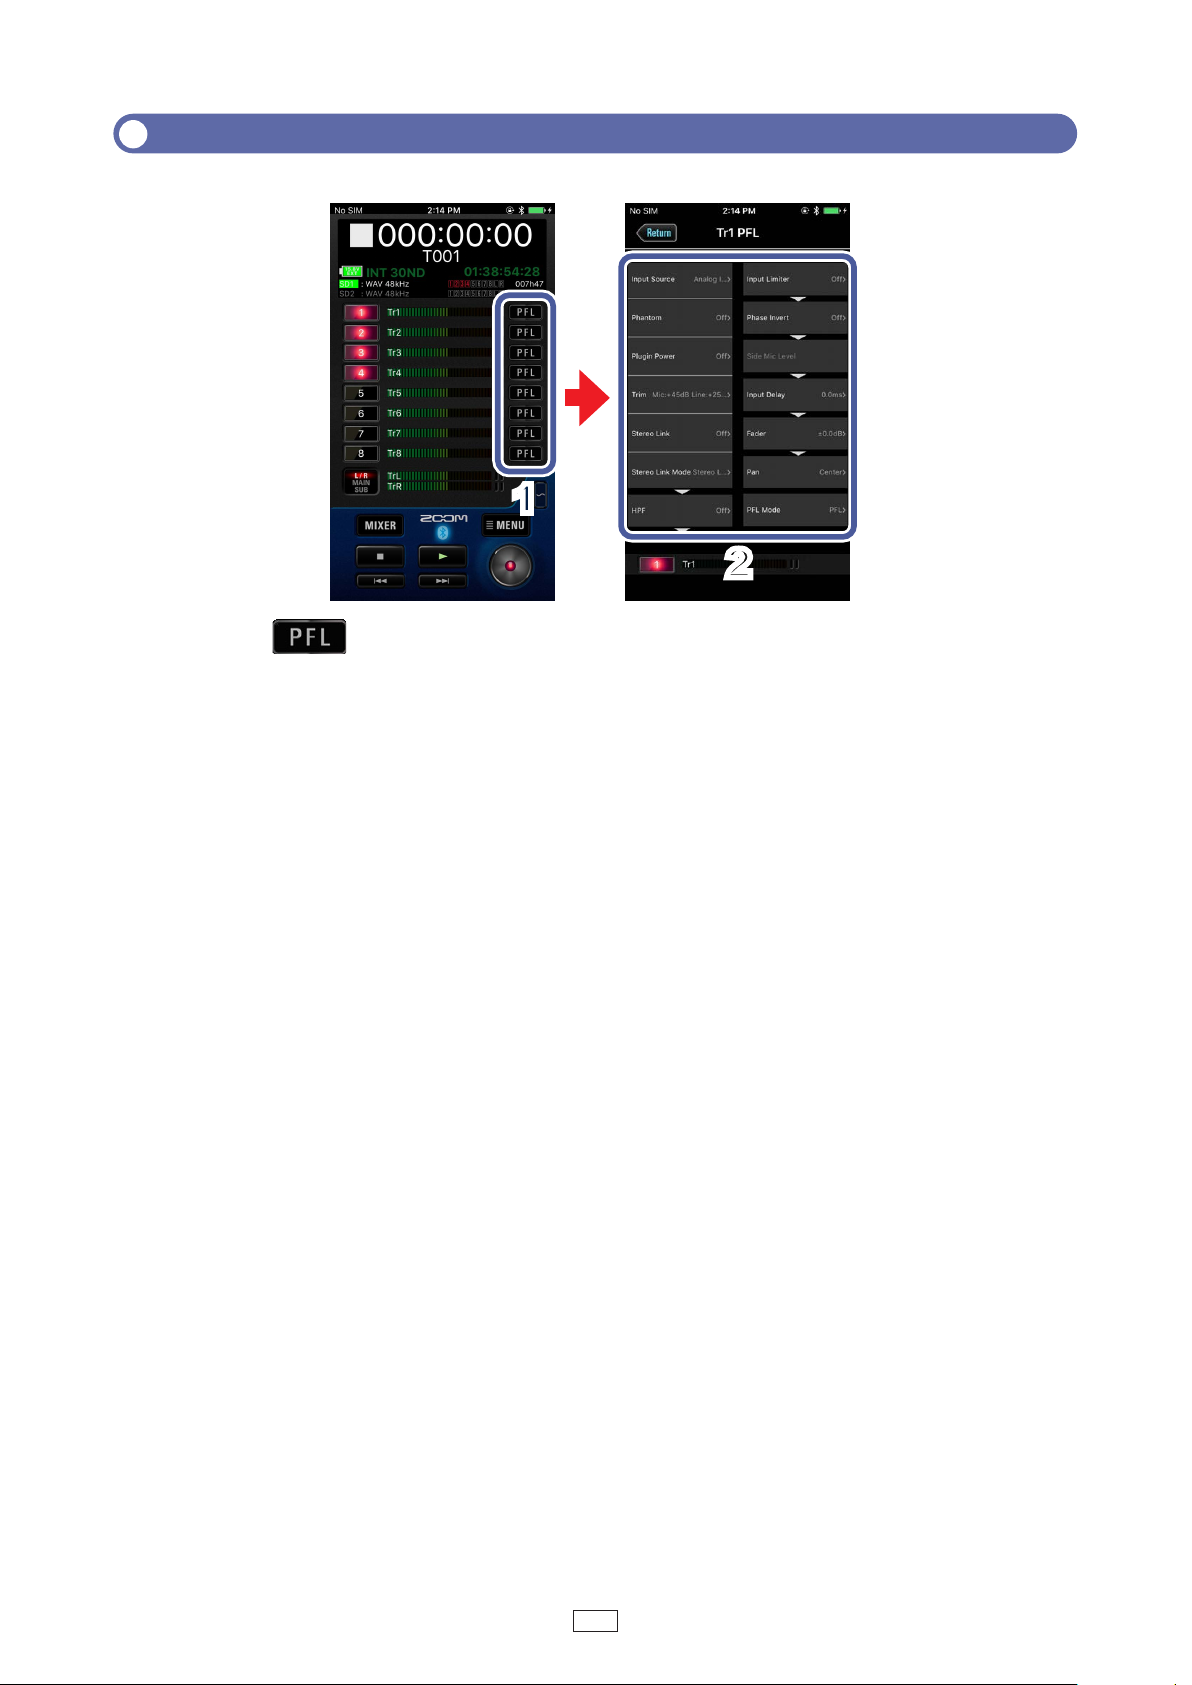
Making individual track settings
Use the PFL screen to make settings for individual tracks.
1
Tap on the HOME screen for the track to set.
1.
This opens the PFL screen.
2
Tap the setting to change on the PFL screen and change it.
2.
■ Input Source
Set the input source of each track.
■ Phantom
Phantom power can be turned on/off and it is voltage set for each input separately.
■ Plugin Power
Make this setting when a mic that is compatible with plug-in power is connected to the mic
capsule MIC/LINE input jack.
■ Tr i m
This adjusts the input level.
■ Stereo Link
This sets the stereo linking of the input.
■ Stereo Link Mode
Signals from a mid-side format stereo mic input through stereo-linked tracks are converted
to an ordinary stereo signal.
■ HPF
The high pass filter can cut low frequencies to reduce the sound of wind, vocal pops and
other noise.
■ Input Limiter
The limiter can prevent distortion by controlling input signals that have excessively high
levels.
26
Page 27
■ Phase Invert
The phase of the input signal can be inverted.
■ Side Mic Level
You can adjust the side mic level (stereo width) before recording for tracks that use a midside mic capsule.
■ Input Delay
If there are differences in the timing of input sounds, use this function to correct them when
recording.
■ Fader
Adjusts the level of the input signal.
■ Pan
Adjusts the stereo balance of the sound.
■ PFL Mode
On the PFL screen, you can set the monitoring sound to be either pre-fader listening (PFL)
or post-fader solo (SOLO).
NOTE
· For details, see the following sections in the unit's manual.
Setting the input source (Input Source)
Changing the phantom power settings (Phantom)
Changing the plugin power setting (Plugin Power)
Selecting inputs and adjusting levels
Converting mid-side input to ordinary stereo (Stereo Link Mode)
Cutting low-frequency noise (HPF)
Input limiter
Inverting the input phase (Phase Invert)
Adjusting the side level of a mid-side mic capsule (Side Mic Level)
Delaying input signals (Input Delay)
Setting the monitoring volume on the PFL screen (PFL Mode)
27
Page 28
Settings related to output
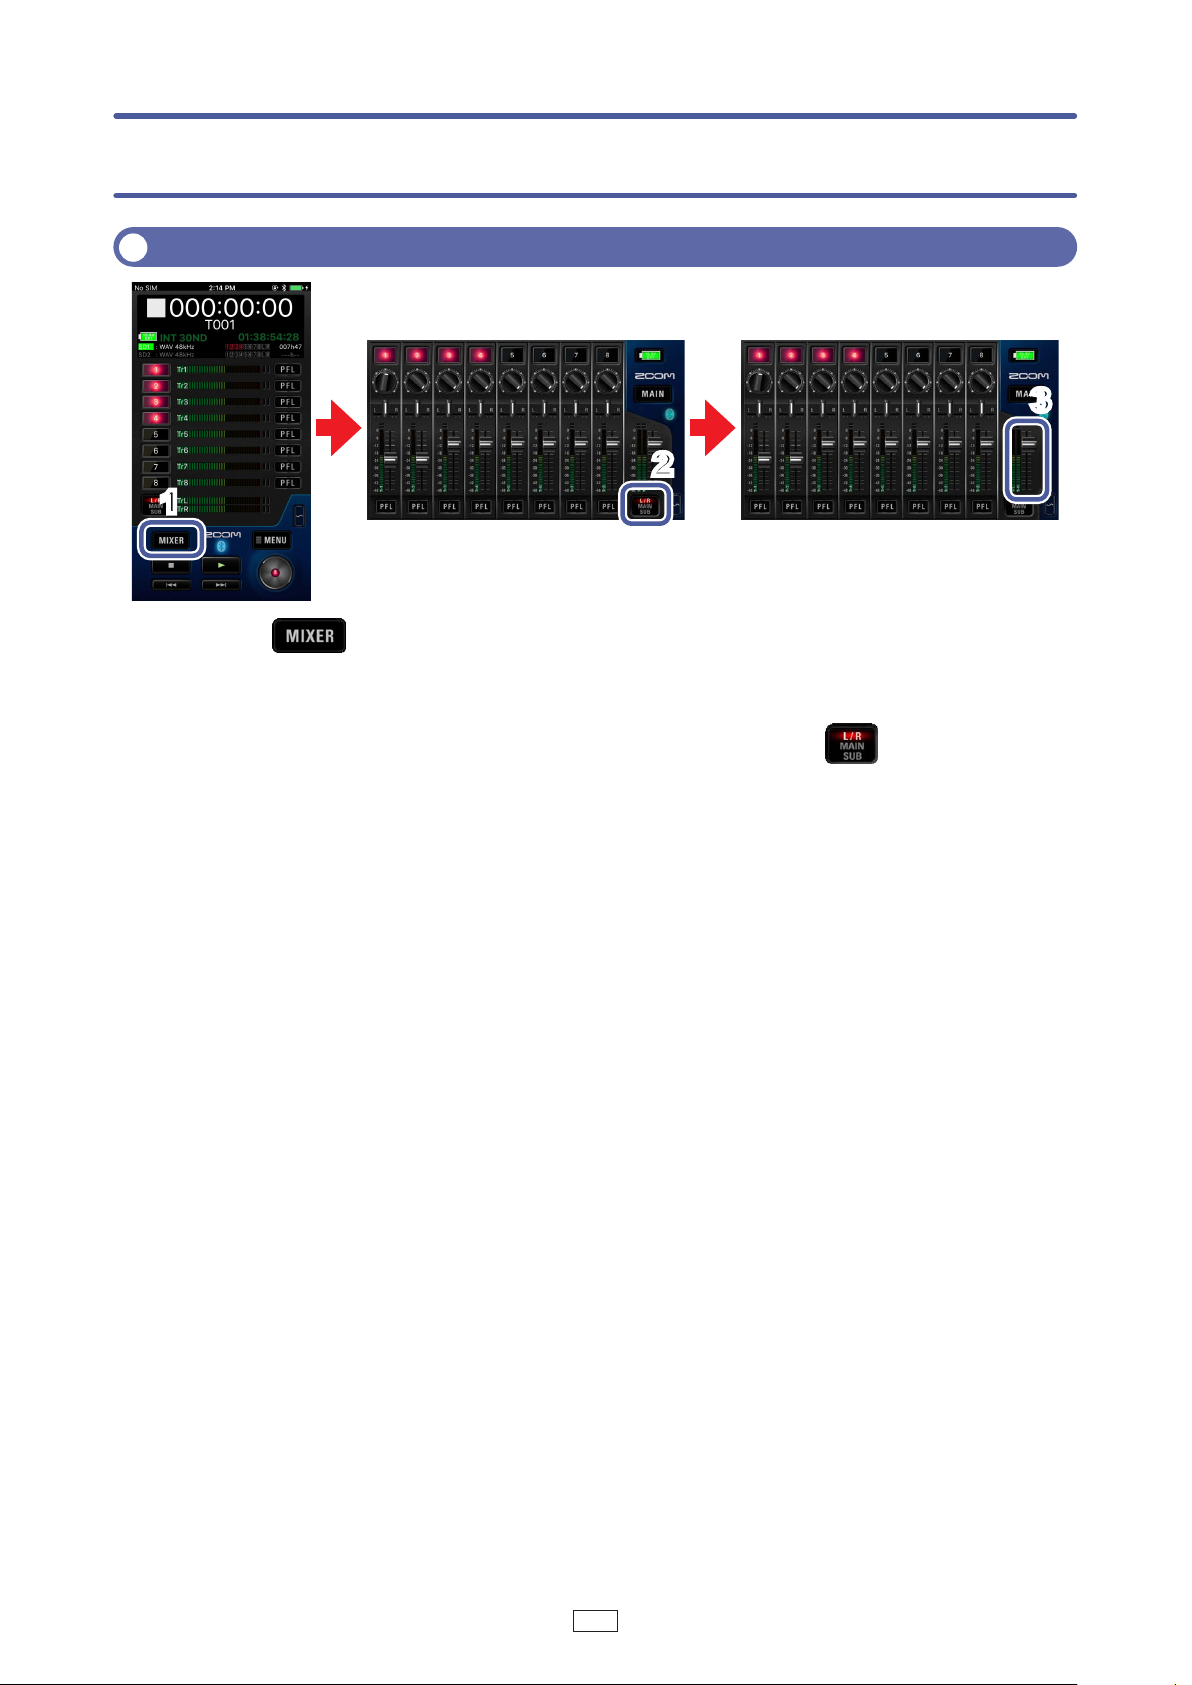
Adjusting output levels
3
2
1
Tap on the HOME screen.
1.
On iPadOS or Android, skip this step.
On the MIXER screen (HOME screen on iPad), tap to switch to the
2.
MAIN or SUB screen.
Drag output level faders up and down to adjust their levels.
3.
28
Page 29
Settings related to ambisonic recording
3
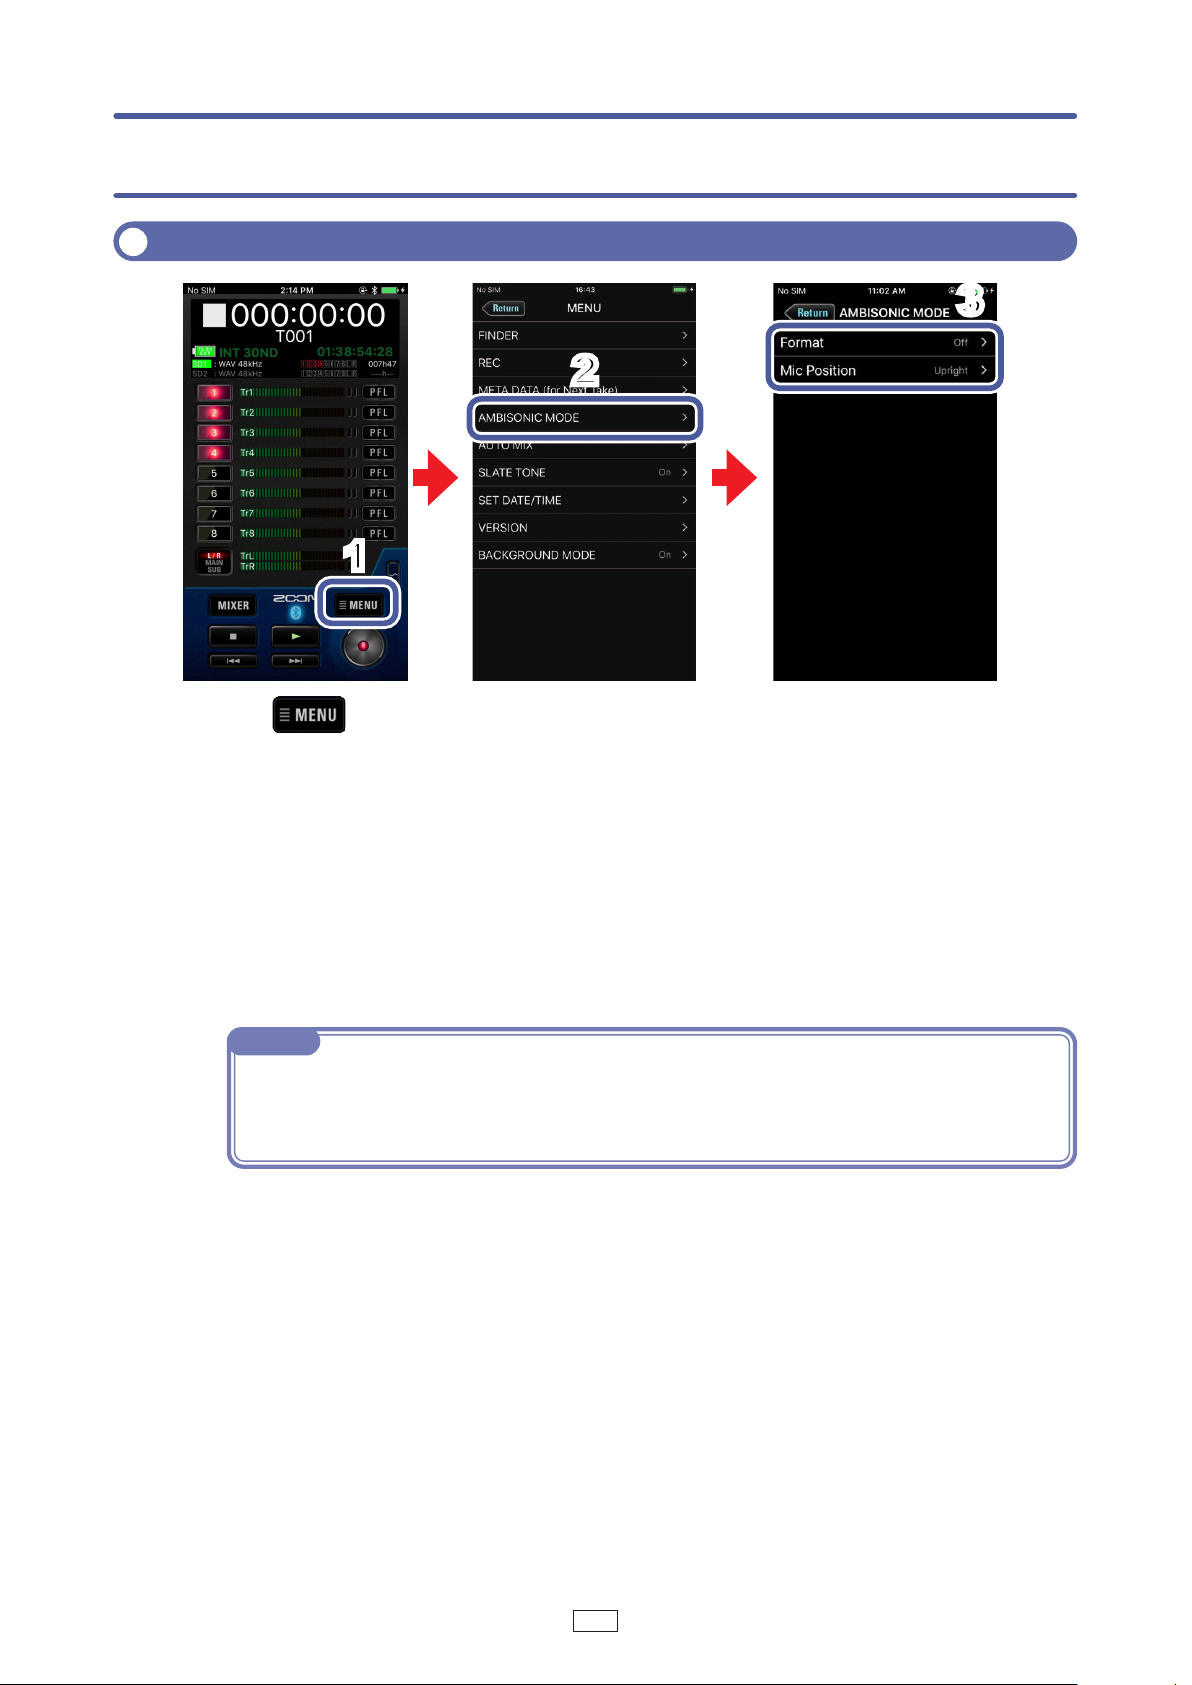
Making settings for ambisonic recording
2
1
Tap on the HOME screen.
1.
Tap “AMBISONIC MODE” on the MENU screen.
2.
Tap a setting on the AMBISONIC MODE screen and change it.
3.
■ Format
Set the ambisonic recording format.
■ Mic Position
Set the mic position used for ambisonic recording.
NOTE
· For details, see the following sections in the unit’s manual.
Setting the format of Ambisonic Mode
Setting the mic position used for ambisonic recording (Mic Position)
29
Page 30
Settings related to the auto mix function
3
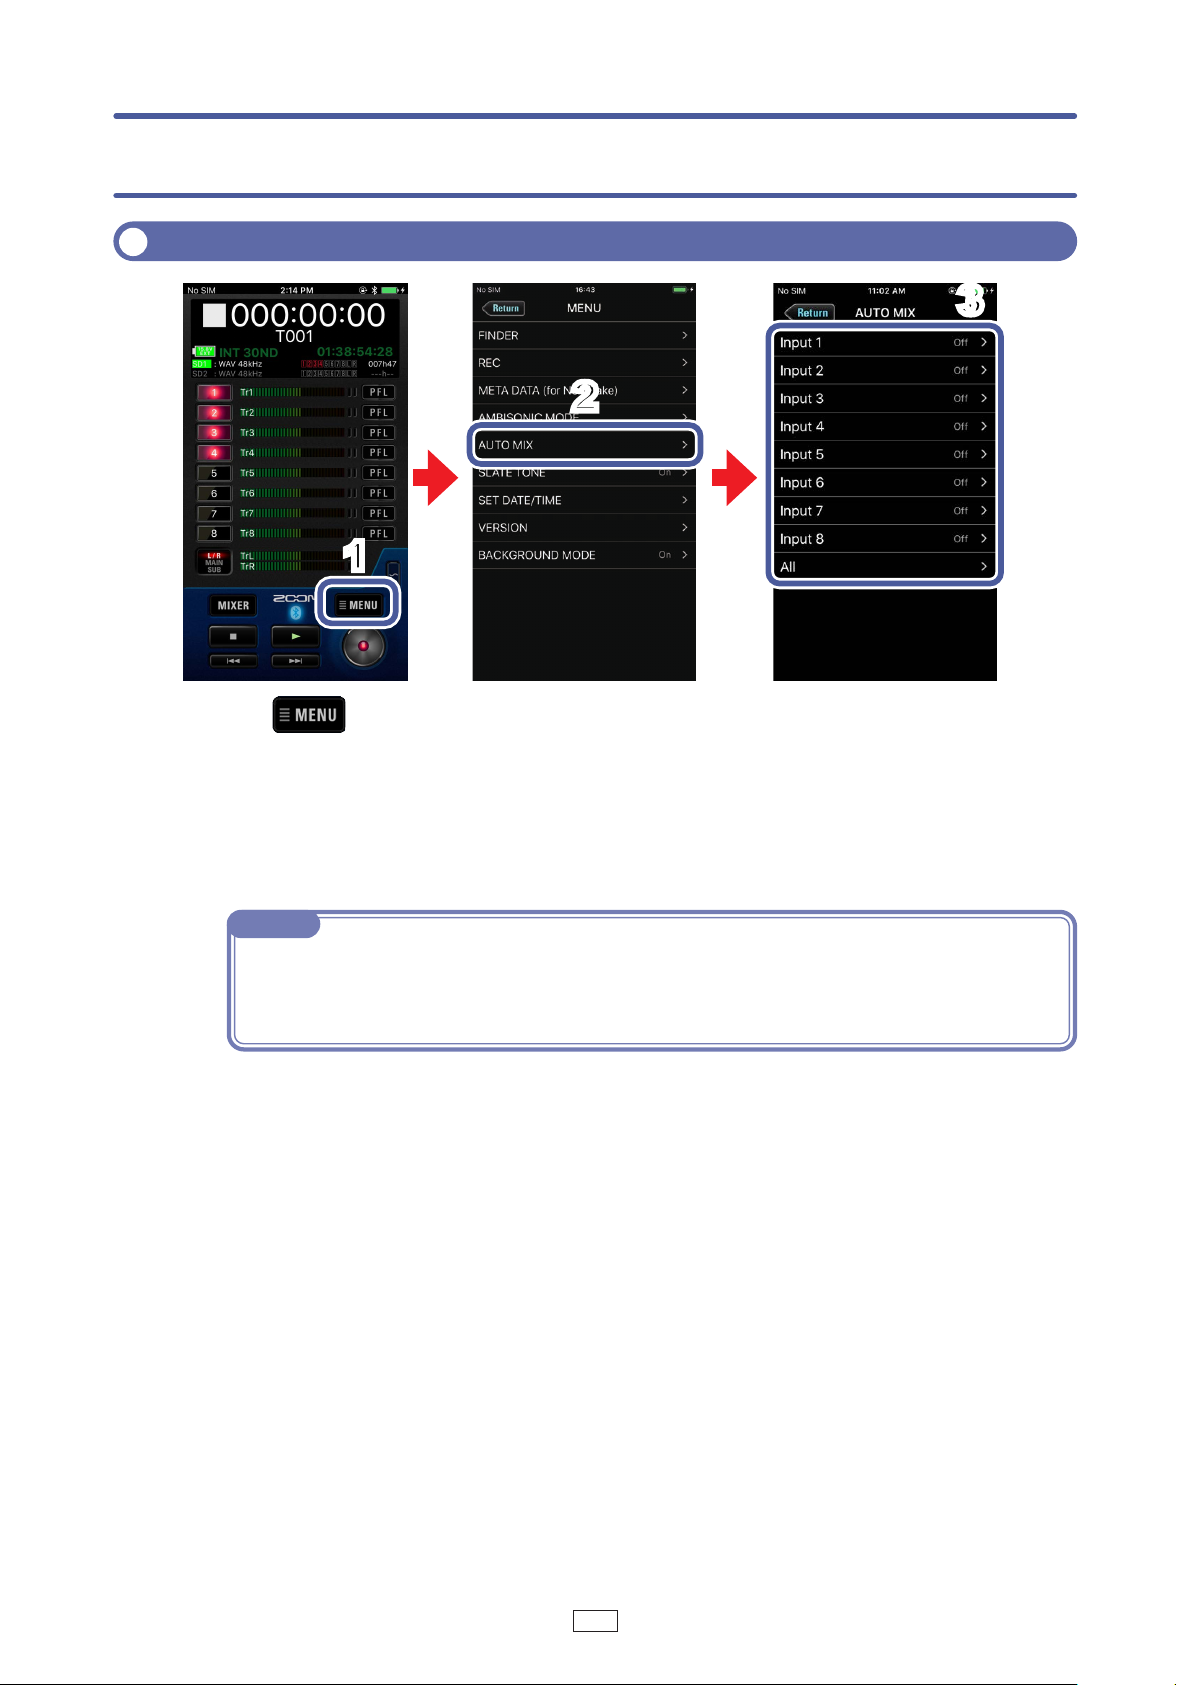
Activating the auto mix function
2
1
Tap on the HOME screen.
1.
Tap “AUTO MIX” on the MENU screen.
2.
Tap input tracks on the AUTO MIX screen to enable the auto mix function
3.
for them.
NOTE
· Select All to set all the tracks at the same time.
· For details, see the following sections in the unit’s manual.
Changing the automatic mixing setting (Auto Mix)
30
Page 31
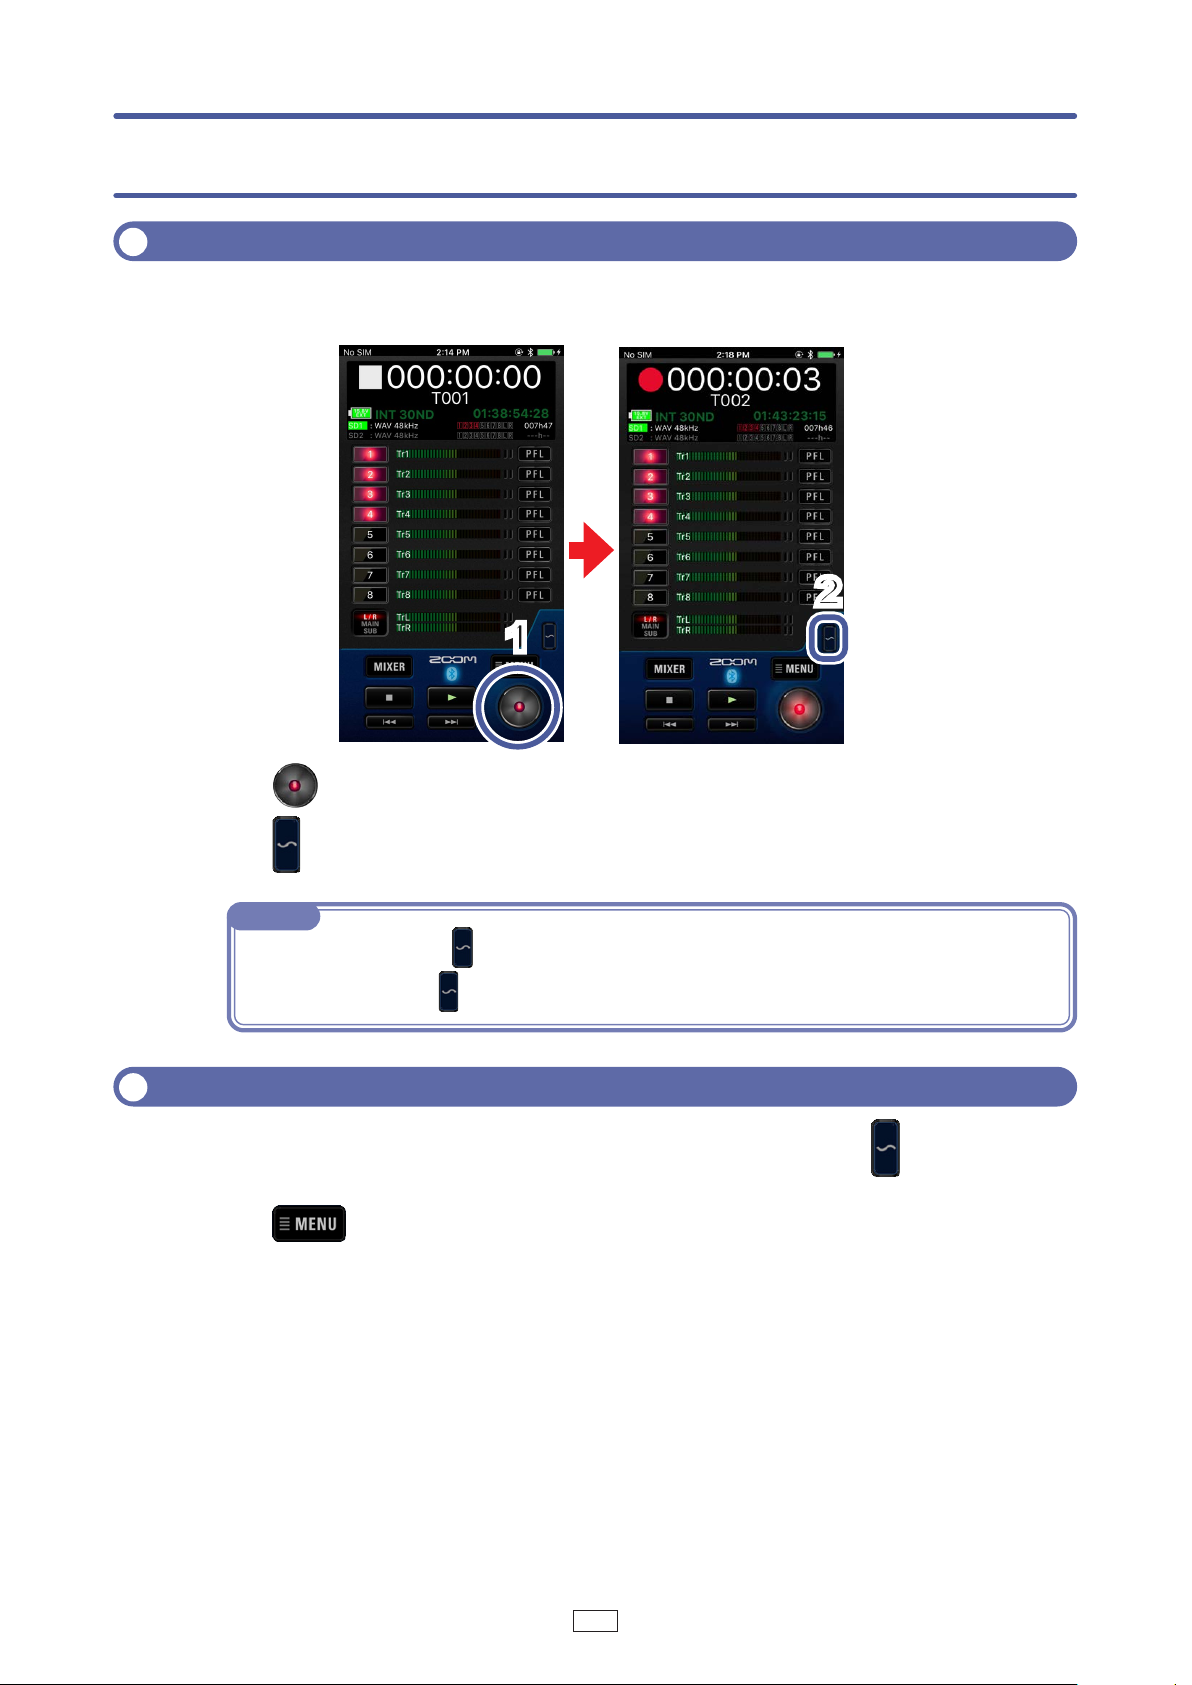
Recording a slate tone
Recording
By adding a slate tone when the recording starts, aligning it to a video file during
editing will be easier.
2
1
Tap on the HOME screen.
1.
Tap on the HOME screen.
2.
NOTE
• If you touch and hold for one or more seconds, slate tone input will be enabled until you
disable it by tapping
again.
Disabling the slate tone
You can set the slate tone so that it will not be enabled if is accidentally
pushed.
Tap on the HOME screen.
1.
Tap "SLATE TONE" on the MENU screen.
2.
Tap "Off (Lock)" on the SLATE TONE screen.
3.
31
Page 32
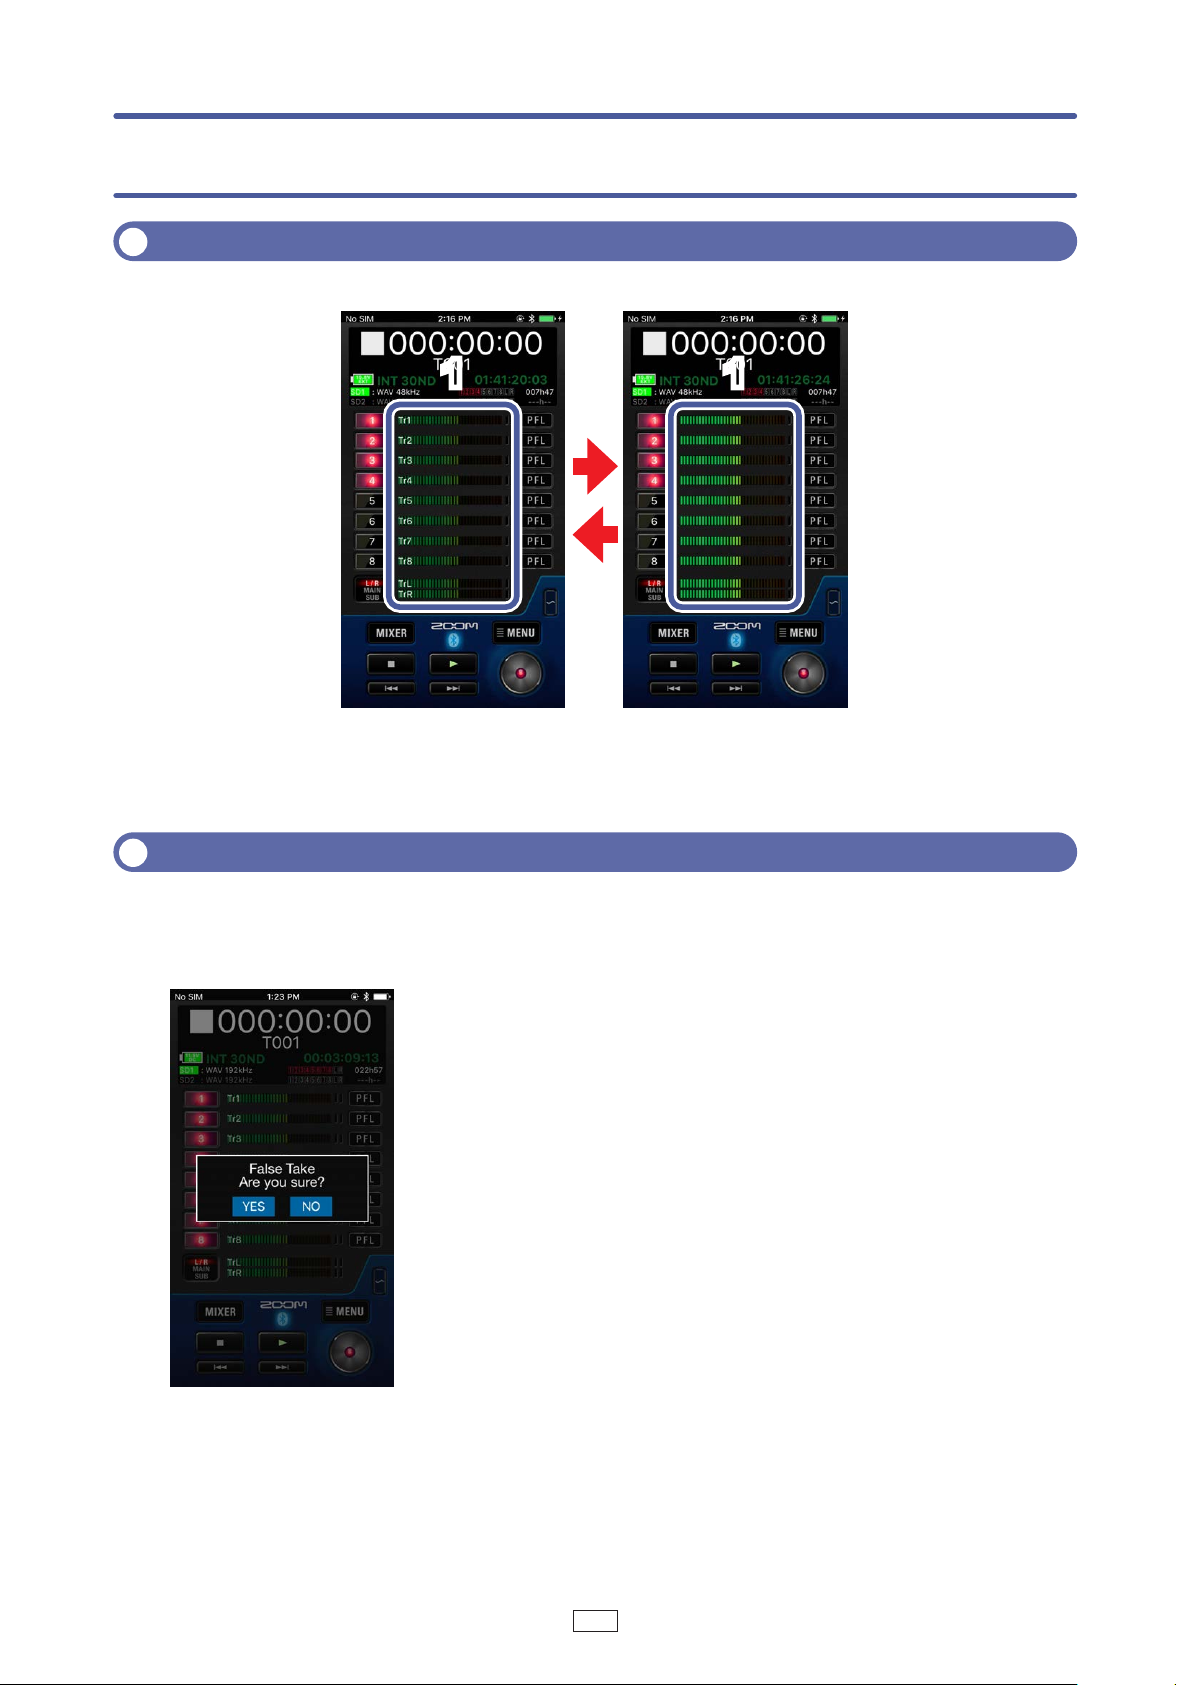
Other functions
Showing track names
The name of each track can be shown.
1
Tap a level meter.
1.
Tapping alternately shows or hides all the track names.
1
Pop-up display function
Pop-ups shown on the recorder are also shown on the F8 Control app.
Moreover, when a selection pop-up that shows YES/NO or other options appears,
an option can be selected by tapping it.
32
Page 33
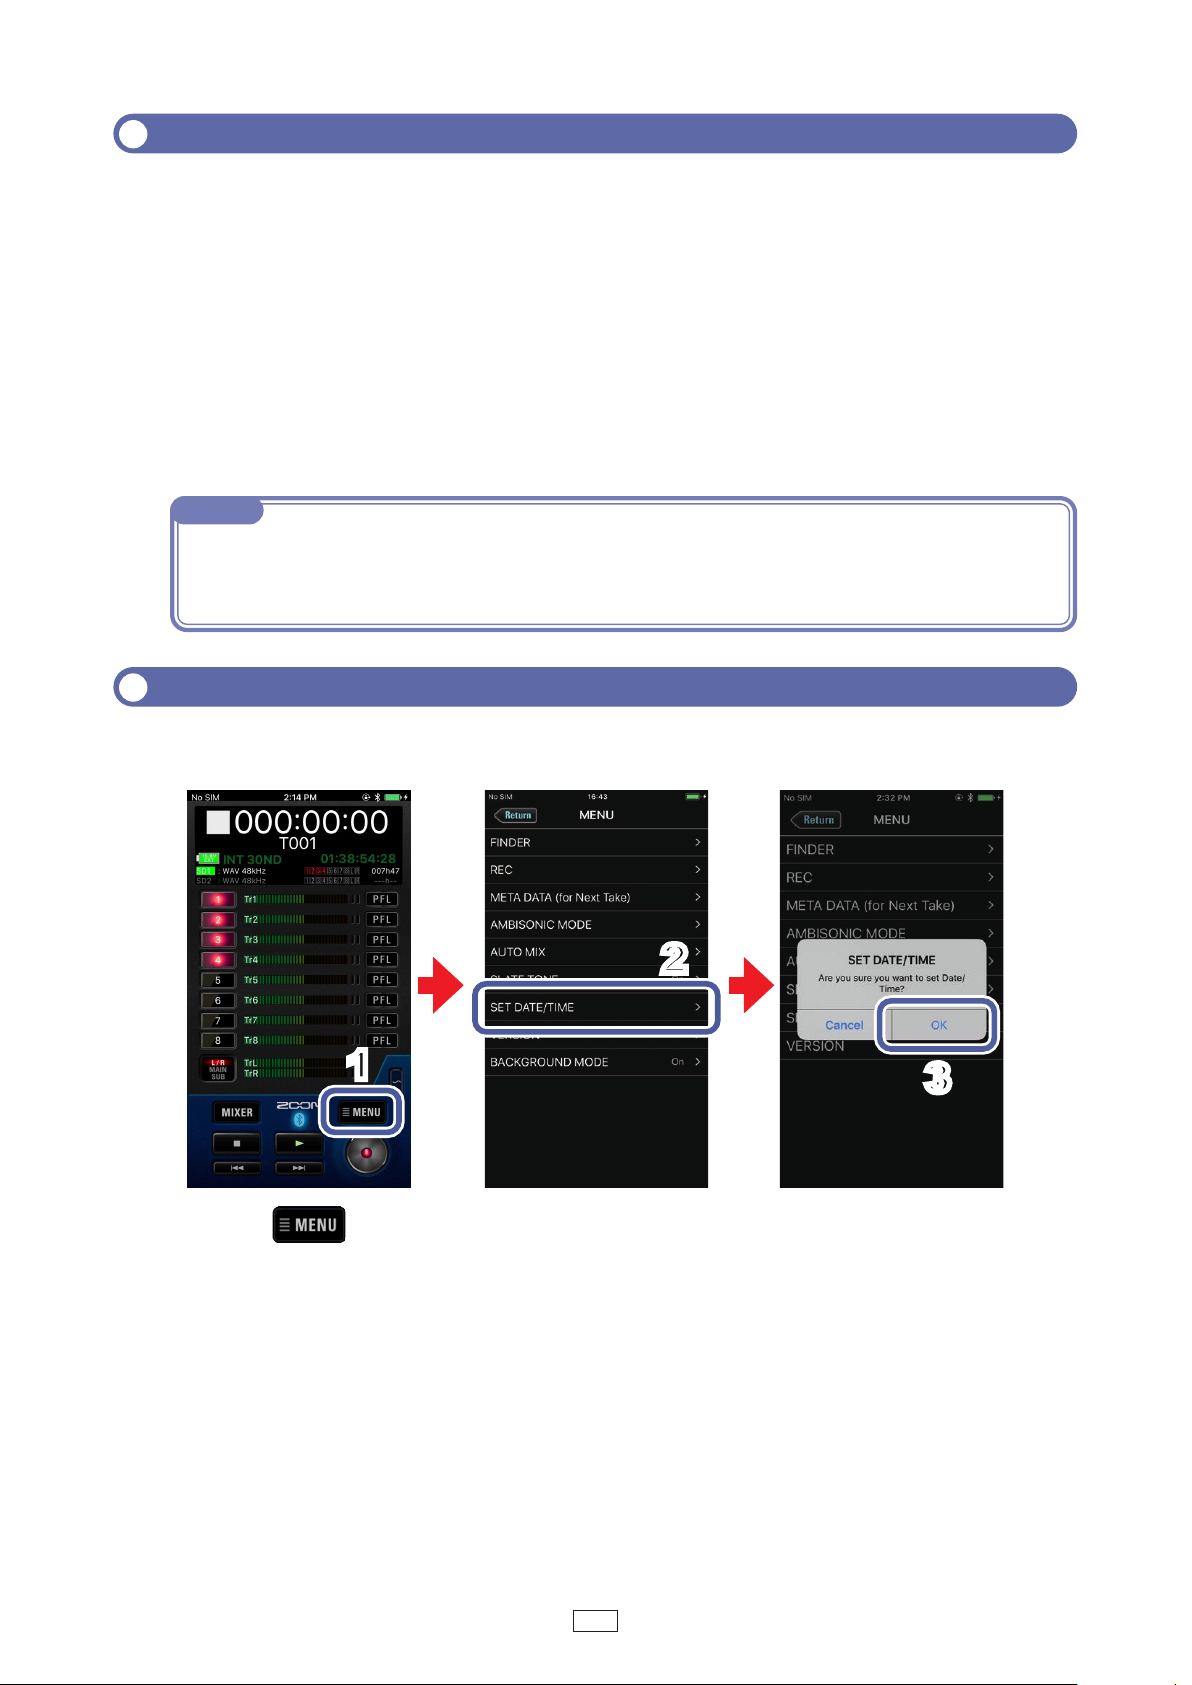
F8 Control and an FRC-8 can be used at the same time
While F8 Control is connected to a recorder, an
the recorder and used at the same time.
When using F8 Control and an
a monitor. For this reason, only the following F8 Control functions will be usable.
Other functions will be disabled.
· OUTPUT display switch button
· MIXER button (iPhone only)
· MAIN button (iPhone only)
· Switching track name display on/off (→P.32)
NOTE
· When the recorder is being used as an audio interface, the recorder cannot be connected with F8
Control.
· For details about using the FRC-8, see “Using an FRC-8” in the recorder manual.
FRC-8
at the same time, F8 Control functions as
FRC-8
can also be connected to
Setting the date and time
The recorder
phone/tablet.
date and time can be set to the system clock values of the smart-
1
Tap on the HOME screen.
1.
Tap "SET DATE/TIME" on the MENU screen.
2.
Tap "OK" on the confirmation pop-up.
3.
This completes setting the recorder date and time.
2
3
33
Page 34
Viewing the F8 Control version
You can check the F8 Control version.
Tap on the HOME screen.
1.
Tap "VERSION" on the MENU screen.
2.
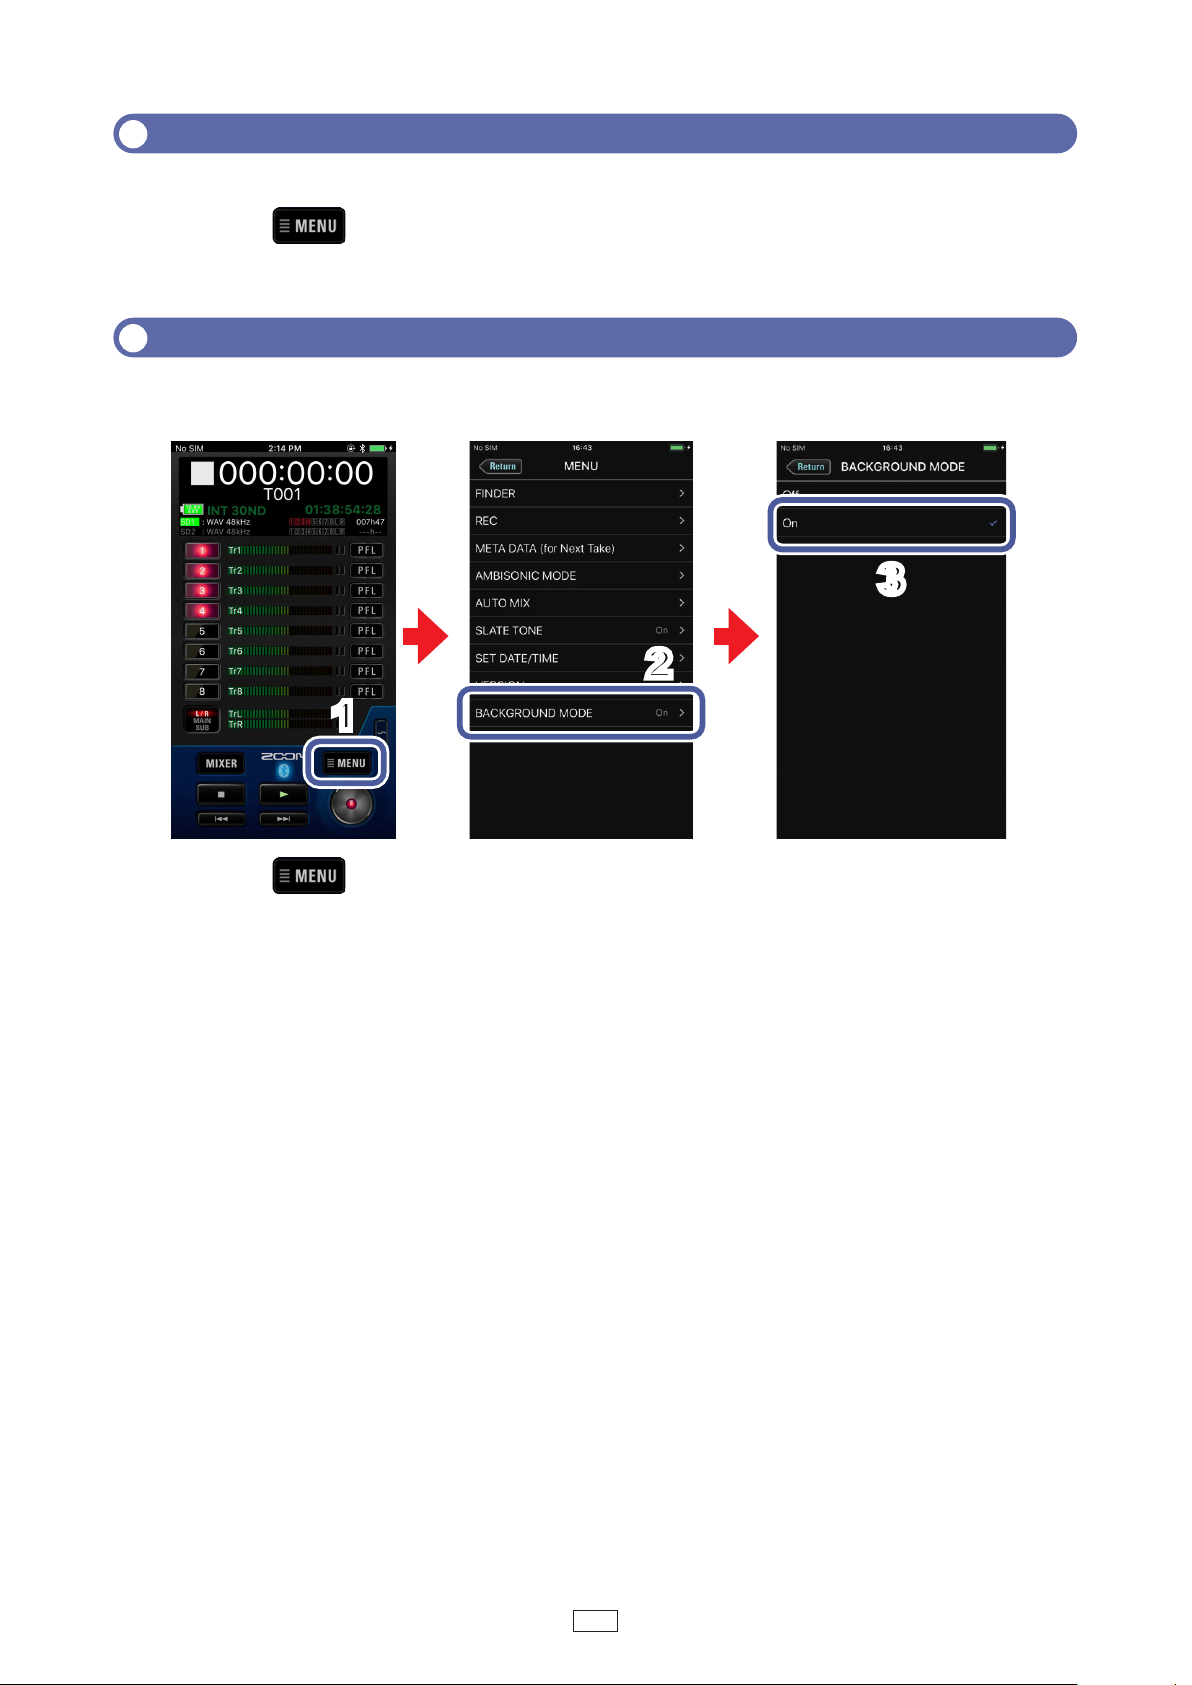
Using F8 Control in the background
F8 Control can continue operating in the background on an smartphone/
tablet without disconnecting from the recorder.
3
2
1
Tap on the HOME Screen.
1.
Tap “BACKGROUND MODE” on the MENU screen.
2.
Tap “On” on the BACKGROUND MODE screen.
3.
34
Page 35

ZOOM CORPORATION
4-4-3 Kanda-surugadai, Chiyoda-ku, Tokyo 101-0062 Japan
35
zoomcorp.com
Z2I-3385-05
 Loading...