


TYPE EC15--
H0516700 Rev C
VORTEX-PRO™
Robotic Pool Cleaner
Owner's Manual
 WARNING
FOR YOUR SAFETY - For anything other than the routine cleaning and maintenance described in this manual, this product must be serviced by a pool technician who is licensed and qualified in pool equipment by the jurisdiction in which the product will be installed where such state or local requirements exist. In the event no such state or local requirement exists, the pool technician must be a professional with sufficient experience in pool equipment installation and maintenance so that all of the instructions in this manual can be followed exactly. Improper installation and/or operation will void the warranty.

Table of Contents
Section 1. |
Important Safety Instructions........ |
3 |
|
Section 2. |
Cleaner Specifications.................... |
4 |
|
2.1 |
General Specifications........................................ |
4 |
|
Section 3. |
Assembly......................................... |
4 |
|
3.1 |
Unpacking........................................................... |
4 |
|
3.2Assembling the Transport Caddy
(VX50 4WD and VX55 4WD).............................. |
5 |
3.3Connecting the Control box to Caddy (VX50 4WD / VX55 4WD)
|
or Base (VX40 / VX45 4WD)............................... |
7 |
3.4 |
Connecting Floating Cable to Control Box.......... |
7 |
Section 4. Operation......................................... |
8 |
|
4.1 |
Submerging the Cleaner..................................... |
9 |
4.2 |
The VX40 Cleaner Control box......................... |
10 |
4.3The VX45 4WD and VX50 4WD
|
Cleaner Control box.......................................... |
10 |
4.4 |
The VX55 4WD Cleaner Control box................. |
11 |
4.5 |
Starting the Cleaner........................................... |
11 |
4.6 |
Stopping the Cleaner |
|
|
and Removing from the Pool............................ |
12 |
4.7Operating the Cleaner with
|
the Remote Control (VX55 4WD only).............. |
12 |
4.8 |
Synchronizing the Remote Control................... |
13 |
4.9 |
Storing the Cleaner .......................................... |
13 |
Section 5. Programming the Cleaner ............. |
14 |
|
5.1 |
Displaying Current Day and Time..................... |
14 |
5.2 |
Changing the Clock Day and Time................... |
14 |
5.3 |
Changing Default Cleaning Times.................... |
14 |
5.4 |
Programming Cleaning Cycles......................... |
15 |
5.5 |
Canceling Cleaning Cycles............................... |
15 |
Section 6. Cleaning and Maintenance........... |
16 |
|
6.1 |
Cleaning the Filter Canister.............................. |
16 |
6.2. |
Cord Tangling.................................................... |
17 |
6.3 |
Replacing the Brushes...................................... |
18 |
6.4 |
Replacing the Tyres.......................................... |
19 |
Section 7. Troubleshooting............................ |
21 |
|
7.1 |
Using the Information LED for |
|
|
Troubleshooting (VX40 Cleaner)....................... |
21 |
7.2Viewing Cleaner Status Information for Troubleshooting (VX45 4WD,
VX50 4WD, and VX55 4WD)............................ |
21 |
7.3 General Troubleshooting................................... |
22 |
7.4Control Box Error Codes (VX45 4WD,
VX50 4WD and VX55 4WD)............................. |
23 |
THANK YOU FOR PURCHASING THIS ROBOTIC POOL CLEANER BY ZODIAC®.
YOUR CLEANER HAS BEEN DESIGNED AND MANUFACTURED TO BE EASILY INSTALLED AND TO PROVIDE LOW MAINTENANCE OPERATION. A WARRANTY CARD IS SUPPLIED IN THE BOX. PLEASE GO TO ZODIAC.COM.AU TO REGISTER FOR WARRANTY.
Taking these steps will help ensure prompt warranty service, should it be required. If service is required, please contact your original dealer. If the original dealer does not perform warranty service, please visit www.zodiac.com.au to locate an independent service company near you. If you are unable to locate a service company, please call our After Sales Support Team at 1300 763 021.
In the case your product may require a service or warranty repair, please retain the original carton to transport your cleaner in.
2 |
H0516700_REV C |
Section 1. Important Safety Instructions
Congratulations on purchasing the Zodiac robotic cleaner. Please read through the entire manual before installing the cleaner. Your cleaner must be installed and operated as specified.
READ AND FOLLOW ALL INSTRUCTIONS
 WARNING
Failure to comply with the following warnings can increase risk of fire or electrocution which can result in property damage and serious injury, including loss of life.
PREVENT ELECTRICAL SHOCK
To reduce risk of electrical shock:
•The cleaner is to be installed in accordance with the relevant requirements of the Australian wiring rules AS/NZS 3000. Also refer to the installation instructions relating to the swimming pool equipment for which the cleaner will be an integral part. The cleaner is to be supplied through a Residual Current Device (RCD) with a rated residual operating current of 30mA.
•Do not enter pool while the robotic cleaner is in water.
•Do not bury cord. Locate cord so as to prevent it from being damaged by lawn mowers, hedge trimmers and other equipment.
•To reduce the risk of electrical shock, do not use the robotic cleaner or control box if the cord is worn or damaged. Contact Zodiac Customer Care Service 1300 763 021 immediately for proper servicing and replacement of the damaged cord.
•Double insulation—For continued protection against possible electric shock, use only identical replacement parts when servicing. Do not attempt repair of the robotic cleaner, control box, power cord, or floating cable.
•Use only the power supply provided with the product.
•NEVER OPEN Control box.
•DO NOT USE AN EXTENSION CORD TO CONNECT THE UNIT TO ELECTRIC SUPPLY; PROVIDE A PROPERLY LOCATED RCD
PROTECTED POWER OUTLET. THE CONTROL BOX SHOULD BE PLACED NEAR THE RCD PROTECTED POWER OUTLET
POINT.
PREVENT CHILD INJURY AND DROWNING
•To reduce the risk of injury, do not permit children or persons with reduced physical, sensory or mental capabilities, or lack of experience and knowledge to operate this product.
•Do not let anyone, especially small children, sit, step, lean, or climb on any equipment installed as part of your pool’s operational system.
 CAUTION
Failure to comply with the following warnings could cause damage to pool equipment or personal injury.
•The robotic cleaner must be installed and operated as specified.
•This product is intended for use with permanently-installed pools. Do not use with storable pools. A permanently-installed pool is constructed in or on the ground or in a building such that it cannot be readily disassembled for storage. A storable pool is constructed so that it is capable of being readily disassembled for storage and reassembled to its original integrity.
•Clean the filter canister after each use.
•Do not use the product in your pool if the water temperature is above 35˚ C (95˚ F) or below 13˚ C (55˚ F).
 CAUTION
USE OF THE ZODIAC ROBOTIC CLEANER IN A VINYL LINER POOL
Certain vinyl liner patterns are particularly susceptible to rapid surface wear of pattern removal caused by objects coming into contact with the vinyl surface, including pool brushes, pool toys, floats, fountains, chlorine dispensers, and automatic pool cleaners. Some vinyl liner patterns can be seriously scratched or abraded simply by rubbing the surface with a pool brush. Ink from the pattern can also rub off during the installation process or when it comes into contact with objects in the pool. Zodiac Pool Systems, Inc., is not responsible for, and the Limited Warranty does not cover, pattern removal, abrasion or markings on vinyl liners.
SAVE THESE INSTRUCTIONS
H0516700_REV C |
3 |
|
Section 2. Cleaner Specifi cations
2.1General Specifi cations
The general specifications for the cleaner are as follows:
Control box |
220-240 VAC, 50 Hz; short circuit-proof |
supply |
safety isolating type |
voltage |
|
|
|
Supply voltage |
30 V DC |
Installed load |
150 W max |
Cable length |
VX45 4WD: 15m |
|
VX40/ / VX50 4WD: 18m |
|
VX55 4WD: 21m |
Cleaner size |
43 x 48 x 27 cm |
(WxDxH) |
|
Weight of Cleaner |
9.5 kg |
Packed weight |
19 kg |
Filtration |
All-purpose fi lter canister |
Cycle lengths |
Variable programming for cleaning |
|
fl oor, walls, and waterline. |
|
From 1.5 - 3.0 hours. |
Filter Canister |
200 microns |
The cleaner is a double-insulated product. A doubleinsulated electrical appliance is one which has been designed in such a way that it does not require a safety connection to ground. The basic requirement for double-insulation is that no single failure can result
in dangerous voltage becoming exposed so that it might cause an electric shock and that this is achieved without relying on an earthed (grounded) metal casing. This is achieved by having two (2) layers of insulating material surrounding live parts or by using reinforced insulation. Therefore, devices having double-insulated construction, such as this cleaner, do not utilize a grounded (three-prong) cord/plug.
Section 3. Assembly
3.1Unpacking
The packaging should contain the following items:
•Robotic cleaner
•Control box
•Control box base (VX40 and VX45)
•Remote Control (VX55 4WD only)
•Transport and storage caddy assembly components (VX50 4WD and VX55 4WD only)
B |
x 2 |
C x 2 |
D |
x 2 |
|
|
|||
A |
|
|
|
E x 2 |
|
|
|
|
F
H
G
I 
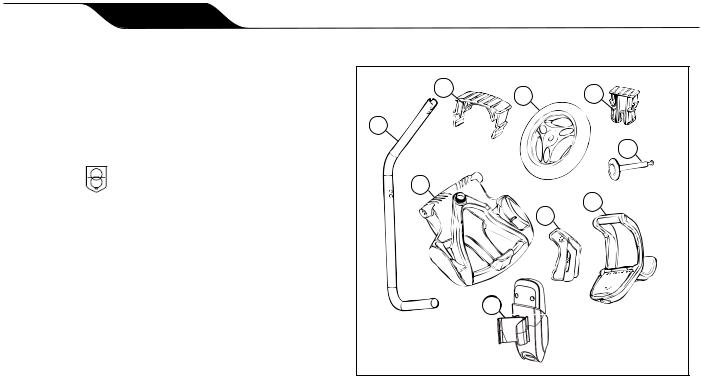
Figure 1. Transport Caddy Assembly Components (VX50 4WD / VX55 4WD)
(a)handle frame
(b)support blocks (x 2)
(c)wheels (x 2)
(d)wheel locking clips (x 2)
(e)wheel axle / hubcap (x 2)
(f)base unit
(g)cleaner hook
(h)caddy handle
(i)remote control hook (VX55 4WD only)
When unpacking the cleaner and its components:
•Check to make sure each component is in the box.
•Check cleaner and components for damage during transport.
•If there are any missing parts or damage, contact Zodiac® at 1300 763 021.
.
4 |
H0516700_REV C |

3.2Assembling the Transport Caddy (VX50 4WD and VX55 4WD)
1.Unscrew the handnut from the base unit (Figure 2).
Figure 2. Remove Handnut from Base Unit
2.Insert the metal handle frame tubing into the base unit with notch end at the top, then rotate so the bends are away from you. (Figure 3)
3.Push base unit down (Figure 3) so the metal handle frame is seated in the recess on the underside of the base.
Figure 3. Connect Metal Frame to Base Unit
4.Slide the handnut over the tube and twist to tighten onto base unit (Figure 4).
Figure 4. Twist Handnut to Secure Frame
5.Snap two (2) support blocks into place (Figure 5).
6.Slide axle and hubcap piece through center of wheel and attach to base unit. Snap locking clip into place to secure wheel. Repeat to attach both wheels (Figure 5).
Figure 5. Snap in Support Blocks and Attach
Wheels
7.Slide the control box base / caddy handle attachment down over the metal tubing until it snaps into place. (See Figure 6).
H0516700_REV C |
5 |
|
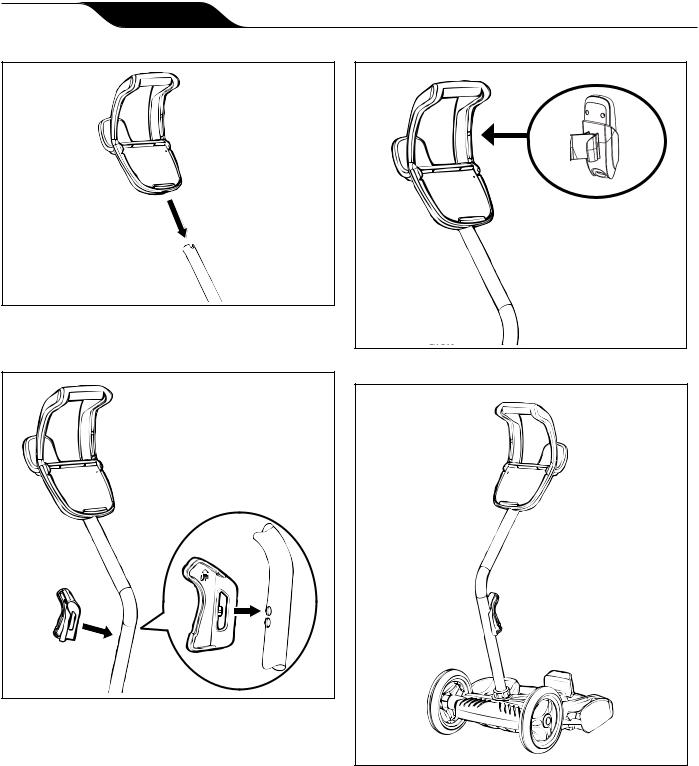
Figure 6. Attach Caddy Handle
8.Align cleaner hook pins with the top holes in the handle tube and snap into place (Figure 7).
Figure 7. Snap Cleaner Hook into Place
9.(VX55 4WD only) Locate pin on the remote control holder and align it with the recepticle on the handle of the caddy to attach the remote control box to caddy (Figure 8).
Figure 8. Snap Remote Control Holder into Place
Figure 9. Fully Assembled Transport Caddy
6 |
H0516700_REV C |
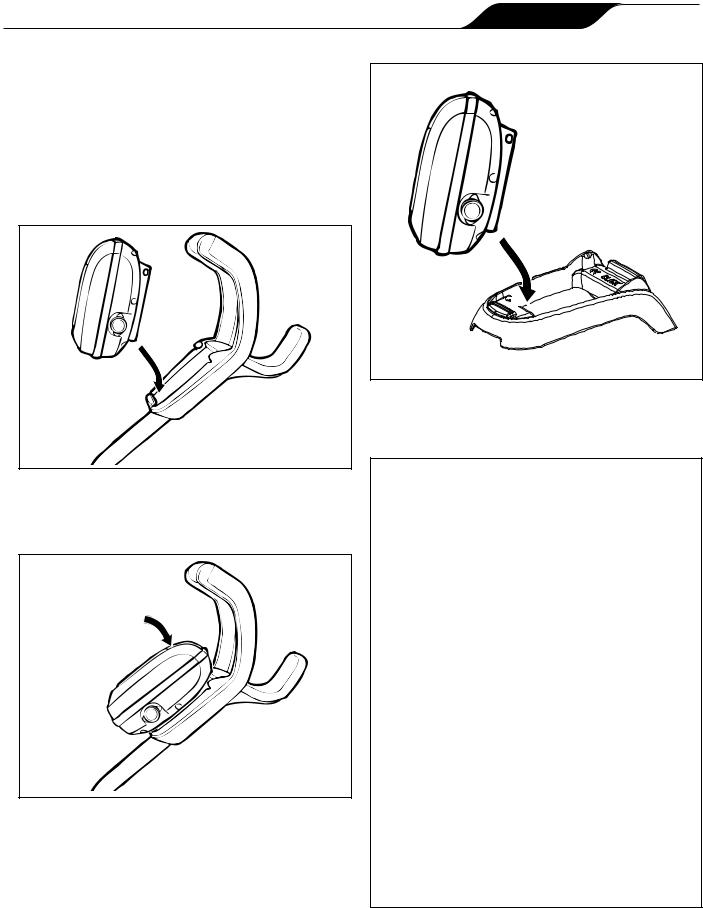
3.3Connecting the Control box to Caddy (VX50 4WD / VX55 4WD) or Base (VX40 /VX45 4WD)
VX50 4WD / VX55 4WD:
1.Align the bottom of the control box with the notch at bottom of the control box hook on the caddy (Figure 10).
Figure 10. Align Control box with Caddy Hook
2.Press control box onto the caddy hook until it snaps and locks into position (Figure 11).
Figure 11. Attach the Control box onto Caddy
VX40 and VX45 4WD:
1.Align the bottom of the control box with the notch in the base (see Figure 12).
2.Press control box down firmly to snap in place.
Figure 12. Attach Control box to Base
3.4Connecting Floating Cable to Control Box
 WARNING
Failure to comply with the following warnings can increase risk of fire or electrocution which can result in property damage and serious injury, including loss
of life.
PREVENT ELECTRICAL SHOCK
•Keep the control box at least 3.5 m from the edge of the pool.
•The cleaner is to be installed in accordance with the relevant requirements of the Australian wiring rules AS/NZS 3000. Also refer to the installation instructions relating to the swimming pool equipment for which the cleaner will be an integral part. The cleaner is to be supplied through a Residual Current Device (RCD) with a rated residual operating current of 30mA.
•Do not use an extension cord to connect the control box.
•Do not allow anyone to swim while the cleaner is in the pool.
•The control box is water-resistant, not waterproof. In order to prevent electrocution, never submerge the control box or leave exposed to inclement weather.
1.Unscrew the protective cap for the power cable from the side of the control box by turning counter-clockwise (Figure 12).
H0516700_REV C |
7 |
|
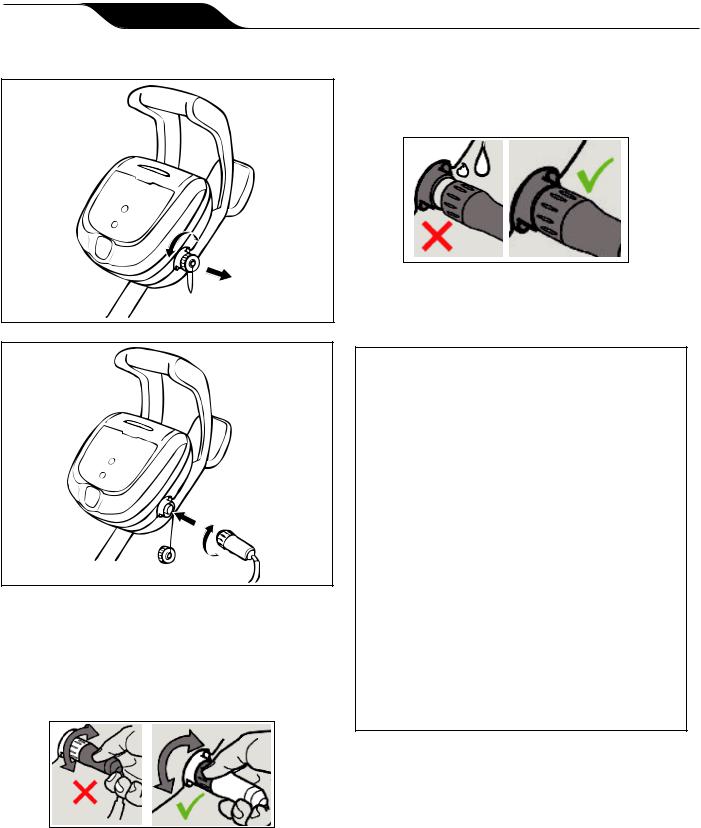
Figure 13. Remove Protective Cap
Figure 14. Connect Power Cable
2.Grip the notched end of the floating power cable, insert into the control box, and turn clockwise to tighten. (Figure 14.)
NOTE: To avoid damaging the power cable, do not try to twist the entIre cable housing (see below).
NOTE: To avoid exposing the power cable connector pins to water, be sure the connector is screwed in all the way and there is no gap. (see below).
Section 4. Operation
 CAUTION
To prevent damage to the cleaner, be sure to adhere to the following guidelines:
•Remove the cleaner from the pool after the cleaning cycle is completed and store on the caddy out of direct sunlight or inclement weather.
•For VX40 and VX45 4WD models where caddy is not included in the pack, store the cleaner out of direct sunlight or inclement weather. Store the control box on the base as shown in Figure 12.
•Never lift the cleaner out of the pool by the floating cable. Always use the lift feature to remove cleaner from the pool.
•Take additional care when lifting the cleaner out of the pool. It becomes heavier when filled with water.
•Always remove the cleaner from pool when super chlorinating or adding acid.
•Do not handle cleaner while it is in operation.
IMPORTANT
•Always make sure the cleaner head is fully submerged before you begin operation.
•Clean the filter canister after each cleaning cycle.
•Do not leave your cleaner in the pool on a permanent basis.
•At the end of each cycle, remove the cleaner from the pool. Start at the cleaner head and untangle any coils in the cable before storing the cleaner.
8 |
H0516700_REV C |
 Loading...