

Page 1

Z-Plex 10
User’s Guide
Model Number: Z-PLEX-10-24-DOC-SC
June 2000
Zhone Technologies
Page 2

Running Head
Trademarks:
SECHTOR 300 and Z-Plex are registered trademarks of Zhone Technologies
Zhone and the Zhone logo are registered trademarks of Zhone Technologies
All other trademarks and registered trademarks are the property of their respective holders.
Model No.
COPYRIGHT
This publication is protected by copyright law. No part of this publication may be copied or distributed, transmitted,
transcribed, stored in a retrieval system, or translated into any human or computer language in any form or by any
means, electronic, mechanical, magnetic, manual or otherwise, or disclosed to third parties without the express written permission from Zhone Technologies.
Zhone Technologies makes no repr esen tation or warranties with res pect to the co ntents hereo f and s pecifically di sclaims any implied warranties of merchan tability, noninfringement, or fitness for a particular purpose. Fu rther,
Zhone Technologies reserves the right to revise this publication and to make changes from time to time in the contents hereof without obligation of Zhone Technologies to notify any person of such revision or changes.
©
2000 Zhone Technologies. All rights reserved.
Page 3

REGULATORY INFORMATION
Federal Commun ic at i ons Commission (F CC)
Part 15 Regulation For Telephone Equipment
The product descri bed he rei n has been tested and f ound to comply with the limi ts for a Class
“A” Digital Device, pursuant to Part 15 of the FCC Rules. These limits are designed to provide
reasonable protection against harmful interference when the equipment is operated in a
commercial environment. This equipment generates, uses and can radiate radio frequency
energy , and, i f not installed and used according t o instructions i n this Operations Manual, may
FCC Part 68 Regulatory Information
cause harmful interference to radio communications. Operation of this equipment in a
residential area is li kely to cause ha rmfu l inter fere nce in which ca se the user will be requir ed
to correct the interference at their expense.
The authority to operate this equipment is conditioned on the requirement that no
modifications will be made to the equipment unless t he changes or modificatio ns are expressly
approved by the manufacturer.
This equipment was tested with sh ielded input/out put and interface cable s. It is recommended
that shielded cables be used with th e equipmen t to reduce interference whenever th e
possibilit y of interference is suspected.
Notice to Users of T1 Service
This equipment complies with part 68 of the FCC rules. On the bottom of the chassis is a label
that contains, among other information, the FCC certification number of this system. If
requested, this information must be provided to the telephone company.
The applicable certification jack (USOC) used on this equipment is the RJ48C. Before
connecting your unit, you must inform the telephone company of the following information:
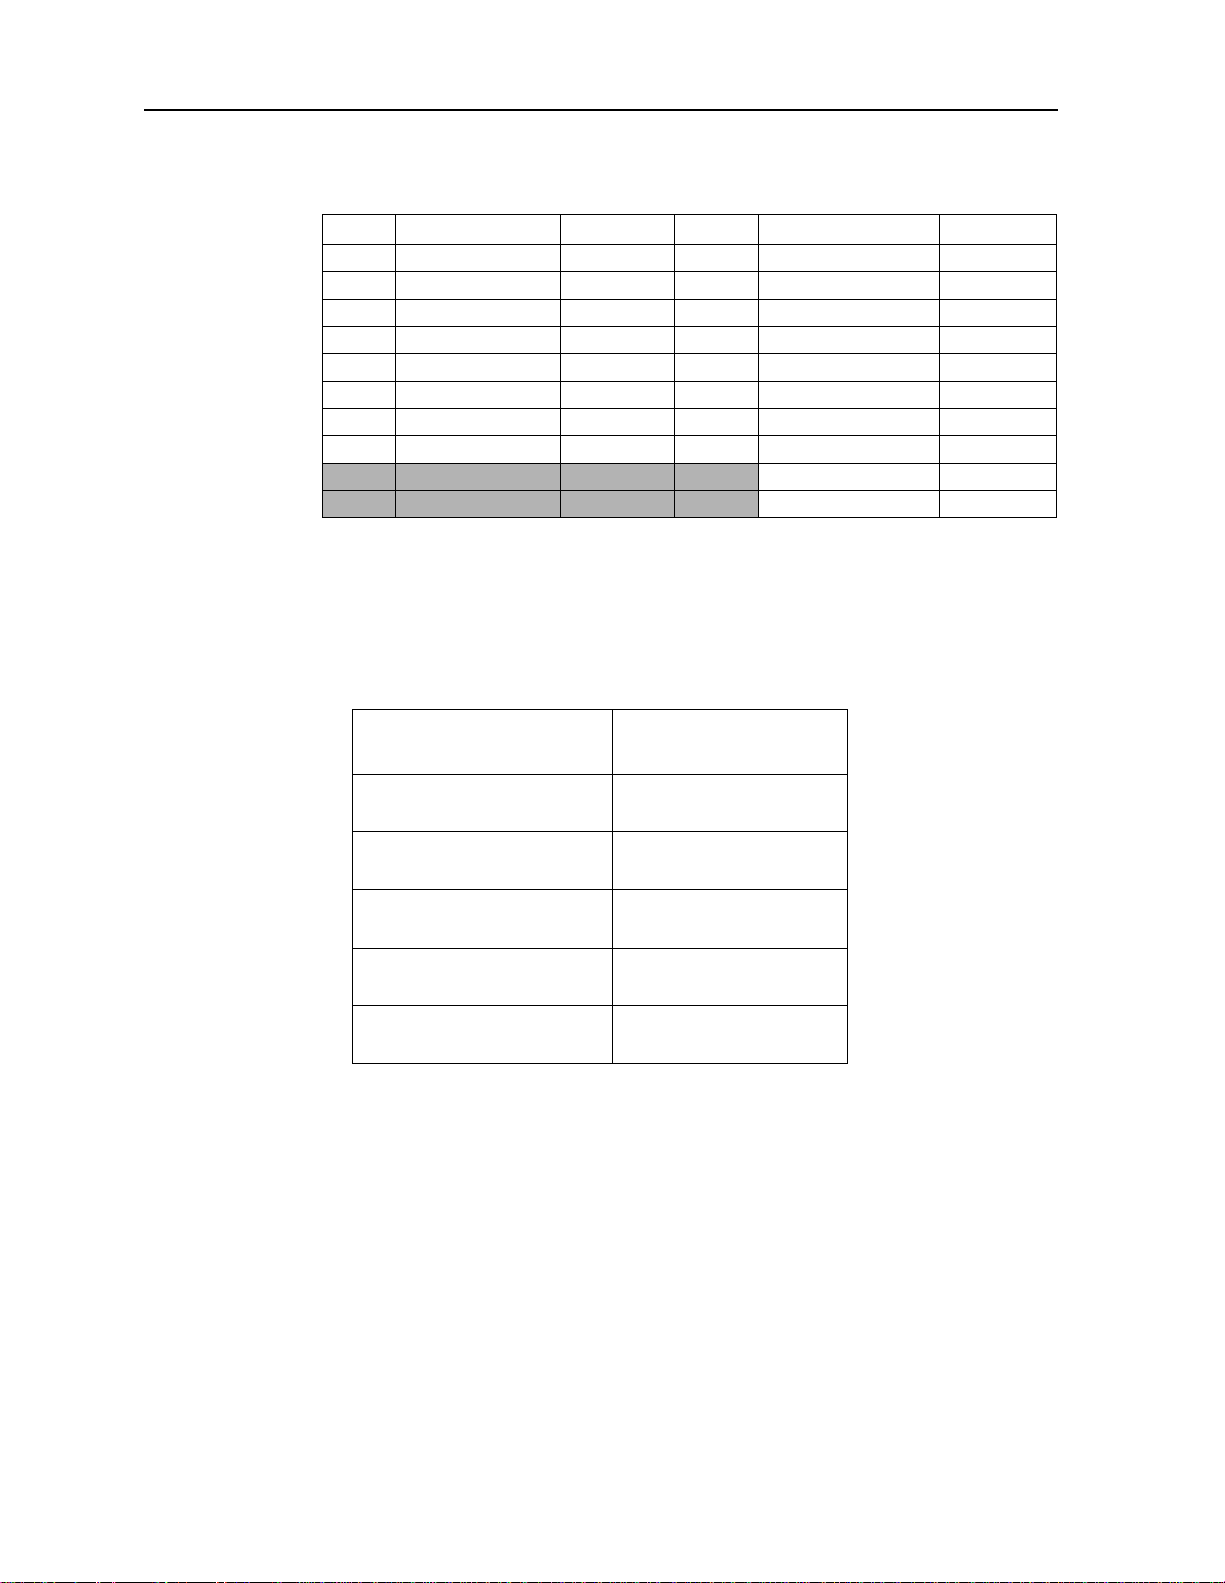
Port ID REN/SOC FIC USOC
W1-1 6.0Y 04DU9-BN RJ48C
W1-1 6.0Y 04DU9-DN RJ48C
W1-1 6.0Y 04DU9-1KN RJ48C
W1-1 6.0Y 04DU9-1SN RJ48C
W1-1 6.0Y 04DU9-1ZN RJ48C
This equipment is designe d to be connected to the t elephone network or premi ses wiring using
a compatible modular jack that is part 68 compliant. See installation instructions for details.
Note that the Ringer Equivalence Number (or REN), is not applicable for this system’s T1
digital ports.
Page 4

Running Head
If this equipment (Z-Plex 10) causes harm to the telephone network, the telephone company
will notify you in advance that temporary discontinuance of service may be required. But if
advance notice isn’t practical, the telephone company will notify the customer as soon as
possible. Also, you will be advise d of your right to file a complaint with the FCC if you be lieve
it is necessary.
The telephone company may make changes to its facilities, equipment, operations or
procedures that could affect the operation of the equipment. If this happens the telephone
company will provide advance notice so you can make the necessary modifications to
maintain uninterrupted service.
If trouble is experienced with thi s equipment, or for repair or warranty information, plea se
contact the service center at:
Zhone Technologies, 48664 Milmont Drive, Fremont, CA., 95132, Telephone 510-353-7600
If this equipment is causing harm to the telephone network, the telephone company may
request that you disconnect the equipment until the problem is resolved.
Model No.
In the event of equipment malfunction, all repairs must be performed by the equipment
manufacturer , or an authorized agent . It is the responsibility of us ers requiring service to r eport
the need for service to the equipment manufacturer, or to one of its authorized agents.
Connection to party line service is subject to state tariffs. (Contact the state public utility
commission, public service commission or corporation commission for information).
Country-Specific Regulatory Compliance Information
CANADA
Industrie Canada Requirements
NOTICE TO USERS OF THE CANADIAN TELEPHONE NETWORK
The Industrie Canada l abel identifies certified equipment. This certif ication mean s that the
equipment meets certain telecommunications network protective, operational and safety
requirements. The Department does not guarantee the equipment will operate to the user's
satisfaction.
Before installing this equipment, ensure that it is permissible to connect to the facilities of the
local telecommunications company. The equipment must be installed using an acceptable
method of connection. In some cases , the company's inside wiring ass ociated with a single line
individual service may be extended by means of a certified connector assembly (telephone
extension cord). The customer should be aware that compliance with above conditions may
not prevent degradation of service in some situations.
Page 5

Repairs to certified equipment should be made by an authorized Canadian maintenance
facility designated by the supplier. Any repairs or alterations made by the user to this
equipment, or equipment malfunctions, may give the telecommunications company cause to
request the user to disconnect the equipment.
Users should ensure for their own protection that the electrical ground connections of the
power utility , tele phone lines and int ernal metallic water pipe system, if prese nt, are connected
together. This precaution may be particularly important in rural areas.
CAUTION!
Do not attempt to make such connections yourself; contact the appropriate electrical inspection
authority, or electrician, as applicable.
The Ringer Equivalence Number (REN) assigned to each terminal device denotes the
percentage of the total load to be connected to a telephone loop that is used by the device to
prevent overloading. The termination on a loop may consist of any combination of devices
subject only to the requirement that the total REN of all the devices doe s not excee d fi ve (5) .
The Ringer Equivalence Number (REN) of this equipment is not applicable.
Page 6

Running Head
Model No.
Page 7

Contents
Chapter 1 Introduction
1.1 Product overview ............................................................................................1-1
1.2 Features ..........................................................................................................1-2
1.3 Benefits ...........................................................................................................1-2
1.4 TR-08 .............................................................................................................1-2
1.5 Managing the ZPlex .................................................... ...................................1-3
1.5.1 SNMP.........................................................................................................1-3
1.5.2 CLI..............................................................................................................1-4
1.5.3 TFTP...........................................................................................................1-4
1.6 Product specifications ....................................................................................1-4
Chapter 2 Installing the ZPlex
Contents
2.1 Product description .........................................................................................2-1
2.1.1 Back panel..................................................................................................2-1
2.1.2 Front panel..................................................................................................2-2
2.2 Unpacking the product ...................................................................................2-2
2.2.1 Packing materials................................... .....................................................2-2
2.2.2 Kit of parts.......................................................................................... ........2-2
2.2.3 Product User Guide....................................................................................2-2
2.2.4 Hardware, cabling, and optional accessories..............................................2-3
2.2.5 Who to call for help....................................................................................2-3
2.3 Installing the product ......................................................................................2-3
2.3.1 Choosing a site for the product...................................................................2-3
2.3.2 Temperature specifications.........................................................................2-3
2.3.3 Precautionary procedures...........................................................................2-3
2.4 Rack mounting ...............................................................................................2-5
2.5 Locating the product on a desktop .................................................................2-6
2.6 Wall mounting ................................................................................................2-7
Chapter 3 Electrical Installation
3.1 Connector type ...............................................................................................3-1
3.2 Data port connector pinouts ...........................................................................3-2
3.2.1 FXO/FXS connectors .................................................................................3-3
3.2.2 RJ48 connector...........................................................................................3-4
3.3 Power requirements ........................................................................................3-4
3.3.1 Power installation.......................................................................................3-4
3.3.1.1 AC power installation.............................................................................3-4
3.3.1.2 DC power installation.............................................................................3-5
Zhone Technologies / vii
Page 8

Running Head
Contents
3.4 Alarm ............................................................................................................. 3-5
3.5 Grounding requirements ................................................................................ 3-6
3.6 Cabling ........................................................................................................... 3-6
Chapter 4 Configuring the ZPlex
4.1 Using the command line interface ................................................................. 4-1
4.2 Quick start system configuration ................................................................... 4-2
4.2.1 Logging in and out of the system............................................................... 4-4
4.2.2 Setting the date........................................................................................... 4-4
4.2.3 Configuring a management interface......................................................... 4-4
4.2.4 Configuring system contact information ................................................... 4-6
4.3 Configuring SNMP ........................................................................................ 4-6
4.4 Configuring T1 interfaces .............................................................................. 4-7
4.5 Configuring a T1 drop and insert interface ................................................... 4-8
4.6 Configuring FXS ports .................................................................................. 4-8
4.7 Configuring FXO ports .................................................................................. 4-9
4.8 Configuring the V.35 data port .................................................................... 4-10
4.9 Adding and deleting routes .......................................................................... 4 -11
4.9.1 Adding and deleting network routes........................................................ 4-11
4.9.2 Adding and deleting host routes .............................................................. 4-12
4.9.3 Displaying routes.....................................................................................4-12
4.9.3.1 Displaying host routes......................................................................... 4-13
4.9.3.2 Displaying network routes...................................................................4-13
4.10 Miscellaneous commands ............................................................................ 4-14
4.10.1 Rebooting the system...............................................................................4-14
4.10.2 Displaying flash information................................................................... 4-14
4.10.3 Displaying timeslot usage........................................................................ 4-14
4.10.4 Displaying list of alarms.......................................................................... 4-14
4.10.5 Displaying and clearing list of history alarms......................................... 4-15
Model No.
Chapter 5 Diagnostics
5.1 T1 loopbacks .................................................................................................. 5-1
5.2 BER testing .................................................................................................... 5-3
5.2.1 Activating a BER test for an entire T1 line ............................................... 5-3
5.2.2 Activating a BER test for individual timeslots.......................................... 5-3
5.3 Data port loopback ......................................................................................... 5-4
5.4 FXO/FXS ports loopbacks ............................................................................. 5-5
5.4.1 Configuring FXO loopbacks...................................................................... 5-6
5.4.2 Configuring FXS loopbacks...................................................................... 5-6
5.5 LED Indicators .............................................................................................. 5-7
5.5.1 Ethernet LED.............................................................................................5-7
5.5.2 T1 LEDs..................................................................................................... 5-7
viii \ Zhone Technologies
Page 9

Appendix A Alphabetical Reference
A.1 Parameter reference .......................................................................................A-1
A.1.1 Configuration groups.................................................................................A-2
A.1.2 Alphabetic reference..................................................................................A-5
A.2 Command reference ....................................................................................A-29
A.3 Error messages ............................................................................................A-30
A.4 CLI reference ...............................................................................................A-32
A.4.1 Basic control commands..........................................................................A-32
A.4.2 Movement and search commands ...........................................................A-33
A.4.3 Insert and change commands...................................................................A-35
A.4.4 Delete commands ....................................................................................A-36
A.4.5 Put and undo commands..........................................................................A-36
Contents
Zhone Technologies / ix
Page 10

Running Head
Contents
Model No.
x \ Zhone Technologies
Page 11

Introduction Product overview
Chapter 1
Introduction
This chapter introduces you to the features and benefits of the integrated access solution that permits
voice and data integration in a single unit. It includes the following topics:
Product overview page 1-1
Features page 1-2
Benefits page 1-2
TR-08 page 1-2
Managing the Z-Plex page 1-3
Product specifications page 1-4
1.1 Product overview
Bundled service depl oyment is a snap thanks t o this product. It allows cost-effect ive and quick
deployment of analog voice and data services on dual T1 access trunks.
The product sports a sleek, low profile chassis which is configured through a command line
interface or SNMP. LEDs are provided for monitoring th e statu s of the pro duct unde r nor mal
operation as well as under test conditi ons . Maintenan ce and diagno stic s are furt her enhan ced
via loopbacks and test patterns. Additionally, a remote office can use networks loopbacks to
verify that the unit is operating normally.
network loopbacks can be used to test from a remote office.
The product addresses access needs for sites requiring economical adaptation of FXO/FXS
analog voice-based key systems and PBXs to T1 se rvices. The product suppor ts TR-08 as well
as ESF and D4 framing. Additionally, the product provides a high speed V.35 port for
connecting to routers for bundled service arrangements. For sites needing up to 24 analog
lines, with or without data requirements, this product is an ideal solution.
The product’s primary function is to allow for remote termination of lines from a
centrally-locate d switch. Data po rts are also pr ovided on the unit for those applicat ions where
high speed data deployment is required.
The product is complementary to the leading integrated access device systems and solutions.
Zhone Technologies / 1-1
Page 12

Running Head
Features Introduction
Model No.
1.2 Features
• Voice and data channel bank with integral CSU/DSX interface
• Sleek, low profile, one rack unit (1 RU) chassis
• From 12 to 16 FXS analog voice ports
• Up to 8 FXO ports
• One high speed V.35 data port
• Extensive diagnostics
• LED status indicators for maintenance
• TR-08 support
1.3 Benefits
• Minimal installation cos ts—remote configuration through a command line interface
(CLI) or SNMP.
• Flexibility—One RU design allows easy installation in tight spaces. Rack or wall
mounting or desktop placement options are available.
• Simplified maintenance—LEDs help monitor equipment status under both normal
operation as well as test mode. Loopback access and test pattern availability further
enhance maintenance and diagnostics, all simplified and configurable from a network
management system.
1.4 TR-08
The TR-TSY-000008 BellcoreTM standard (commonly referred to as TR-08) describes the
generic requirements for interfacing between local digi tal switches and remote digital
terminals via the SLC
TR-08 has three operational modes. The Z-Plex supports Mode I:
• Mode I is a non-concentrated, non-blocking configuration where each channel is
assigned a dedicated DS0 time slot.
• Mode II is a concentrated configuration (allows blocking) with 48 channels sharing
24 DS0 time slots. T ime slot s are ass igned on a demand ba sis for t he duration of the ca ll.
• Mode III is a non-concentrated mode used for coin and D4 single-circuit channel banks.
R
96 digital loop carrier system.
The RT channel numbering scheme supported by the product is described in Bellcore
publication TR-TSY-0000008.
1-2 \ Zhone Technologies
Page 13

Introduction Managing the Z-Plex
When a T1 port is configured for TR-08 format, the voice channels assigned to this port are
identified by channel number (according to the TR-TSY-000008 document), which may be
different from the T1 time slot number. The product supports only Shelf A. The relation
between a channel number and corresponding slot number for TR-08 is shown in the
following table.
Channel
Numbers
Time slots 135791113151719212324681012141618202224
123456789101112131415161718192021222324
1.5 Managing the Z-Plex
The Z-Plex provides the following interfaces to configure the unit:
• Serial (craft)—An out-of-band RS232 serial interface.
• DS0—The DS0 management channel en capsulates IP traf fic in HDLC fra mes using DS0
24.
• Ethernet —You can telnet to the Z-Plex over the Ethernet to manage the unit.
• IP over FDL —The Z-Plex unit supports IP over FDL as a way to configure the system
via the CLI. The IP over FDL connection is different than the standard FDL interface
which provides error chec king for T1 int erfaces. The t wo FDL interf aces canno t be used
at the same time.
You can configure the Z-Plex using any of the following methods:
• SNMP
• CLI
• TFTP
1.5.1 SNMP
The Z-Plex supports Simple Net work Management Prot ocol (SNMP) version 1 and version 2
for system management. Network object variables are management information base II
(MIB-II) compliant.
SNMP can be accessed over a number of IP interfaces, including IP over FDL, the DS0 24
management channel, or the Ethernet interface. The SNMP agent on the Z-Plex uses to port
161 of UDP for management traffic and UDP port 162 for error events and SNMP traps.
The MIBs fo r the Z-Plex control the following:
Zhone Technologies / 1-3
Page 14

Running Head
Product specifications Introduction
Model No.
• T1 configuration, performance statistics, alarm conditions, and diagnostics.
• FXS/FXO configuration, status, and diagnostics.
• Data port configuration, status, and diagnostics.
• General chassis management, field upgrades, and alarms.
1.5.2 CLI
The CLI is an easy- to-us e int erfac e that is functi onall y sim ila r to S NMP. The CLI commands
are equivalent to SNMP get and set commands and allow you to quickly configure the unit.
The interface is accessible both via telnet and through a local serial port. You can configure
the same elements with the CLI as you c an with SNMP.
1.5.3 TFTP
Trivial File Transport Protocol (TFTP) is used by the Z-Plex perform bulk downloads of
configuration infor mation and to support field so ftware upgrade s. TFTP is accessi ble through
telnet only.
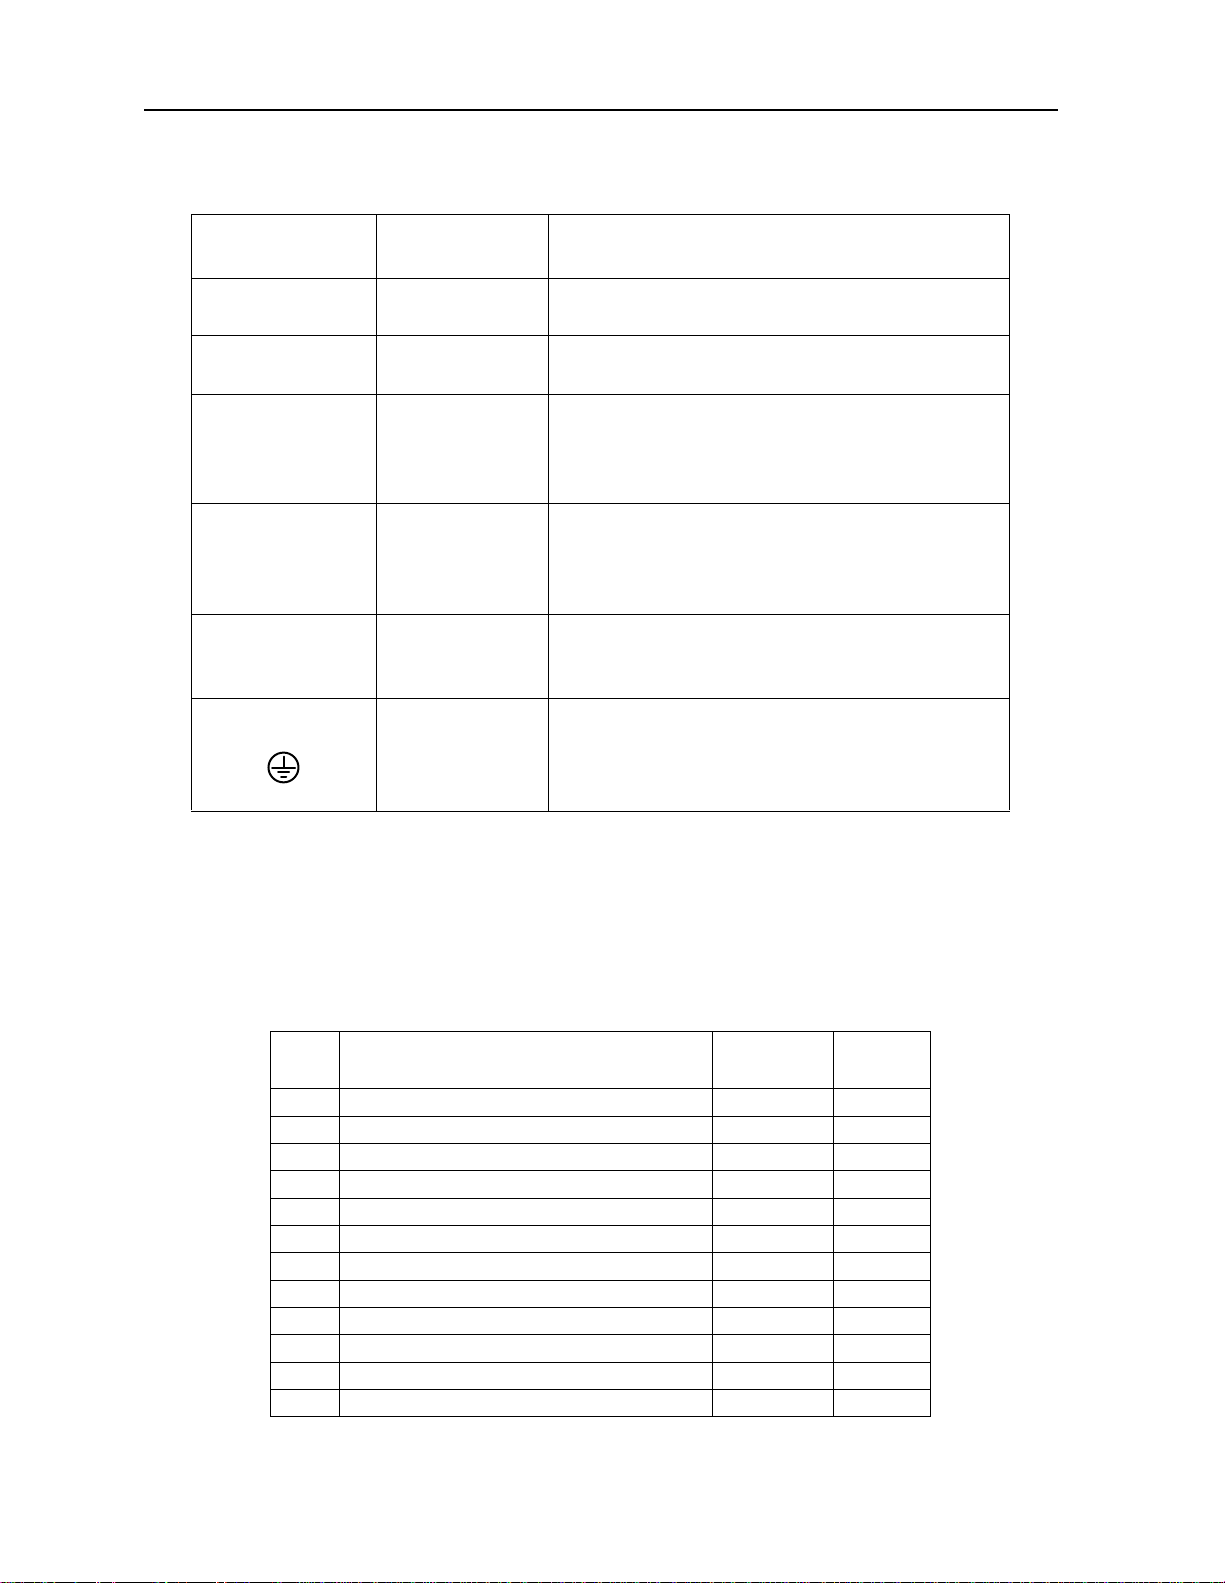
1.6 Product specifications
Chassis
Specification
Installation Desktop
Power Supply 90 - 260 VAC, 50-60 Hz
Ring Generator Nominal 86 VRMS
Environment Operating Temperature
Regulatory
Compliance
FCC Reg #
Height
Width
Depth
Weight
Storage Temperature
Relative Humidity
1.75 inches; with feet, 2 inches (44.45 mm; with feet, 50.8 mm)
17.25 inches (438.15 mm)
9 inches (228.6 mm)
Approximately 10 pounds (4.54 kg)
Wall mount
Rackmount
42 - 56 VDC
Integrated AC/DC converter and ringing generator
Frequency 16.7, 20, 25, 50 Hz
DC Component: -48 volts DC nomial
Crest factor cf, where 1.2=<cf=<1.6
Ringing Capability: 40 VRMS across 1 REN at the end of a 400 ohms loo p
0
c to +500c (230F to 1220F)
-5
0
-40
c to +700c (-400F to 1580F)
5 to 95% Humidity, Non-condensing
FCC Part 15 Class A
UL 1950 and CSA 950
FCC Part 68 and Industry Canada CS-03
6RTUSA-35287-DE-N
1-4 \ Zhone Technologies
Page 15

Introduction Product specifications
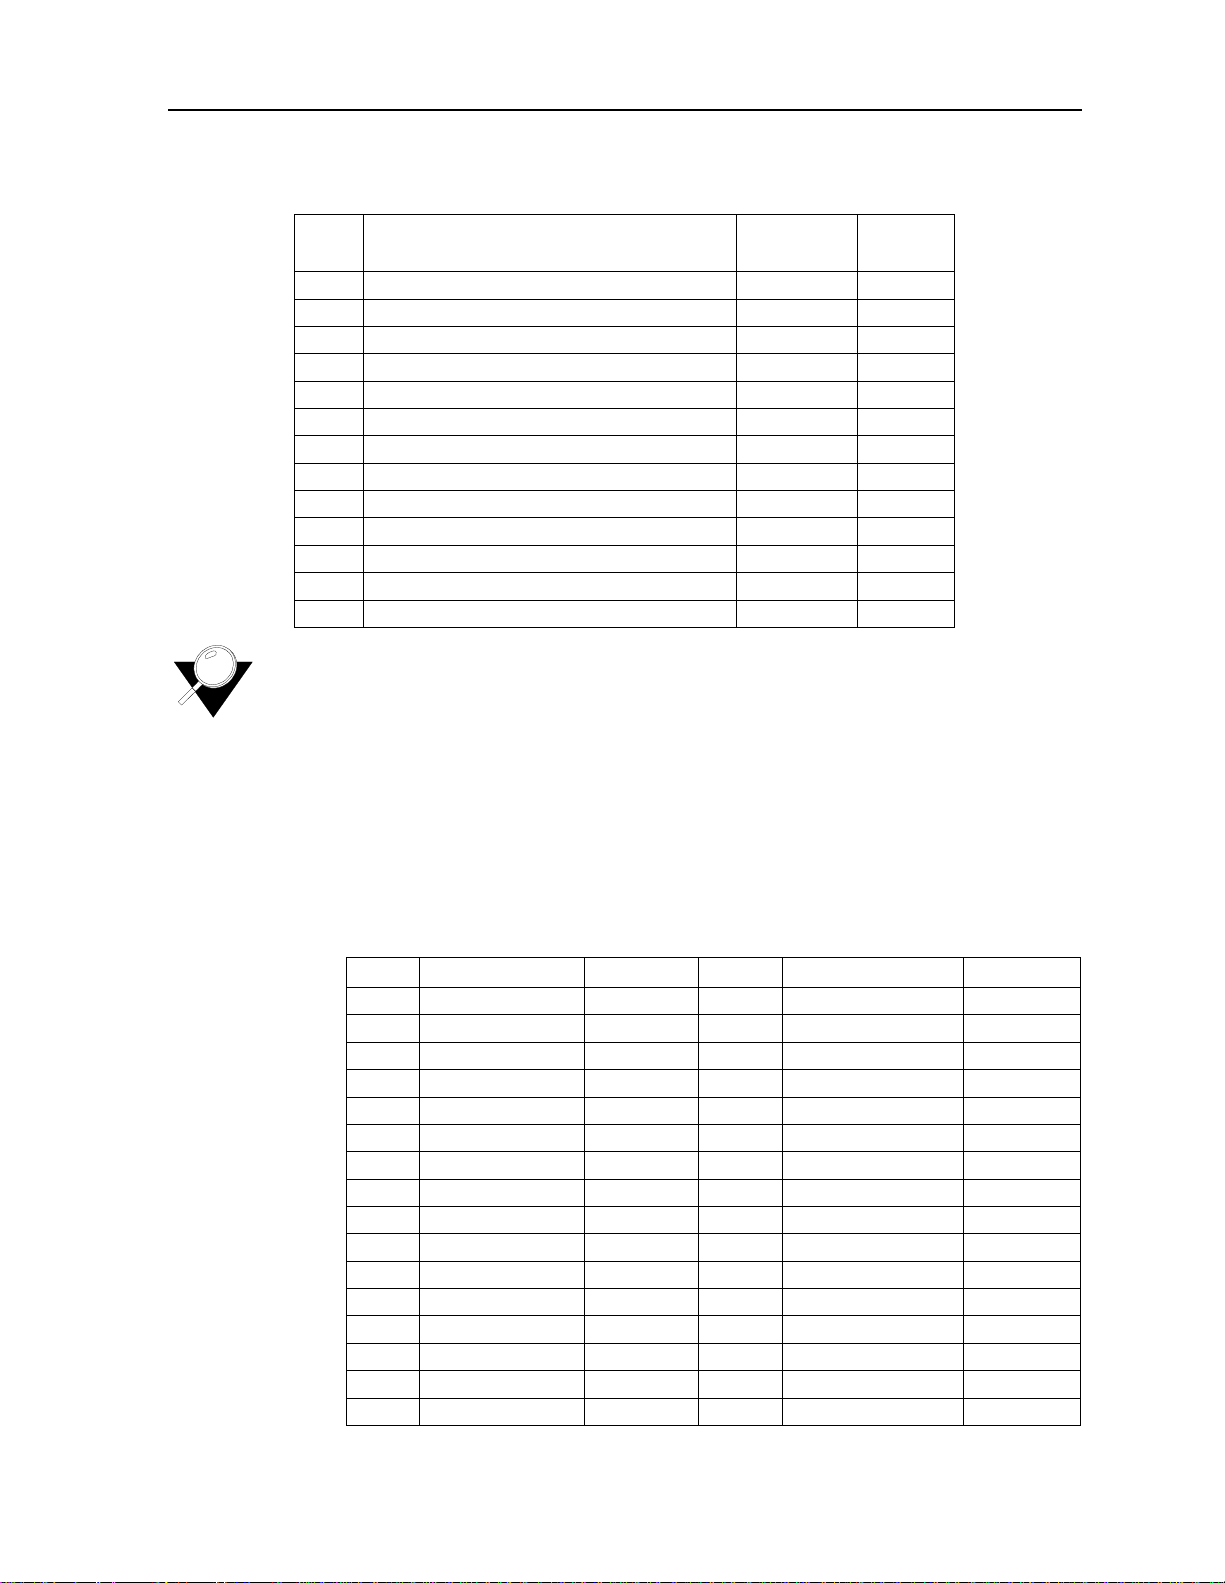
T1 interface Physical
Frame format
Line code
Line equalization
CSU line build Out (LBO)
DSX line length
Clocking
FDL
Input level
TR08 support
Diagnostics
FXS interface Physical
FXS supervision mode
FXS signaling
TLP
Impedance
Ringing voltage
Loop length
Others
FX0 interface Physical
FXO supervision mode
FXO signaling
TLP
Loop length
Others
Data interf ace Physical
Frame format
Data Rate
Gender
Hardware signaling
Diagnostics
10Base-T interface Physical
Frame format
Interface speed
Protocols
Diagnostics
Serial port Physical
Electrical
Interface speed
Protocols
Diagnostics Extensive power-up self test
Alarm contacts The alarm connector is OPEN during NOR MA L op e rating conditions
Two RJ48
D4, ESF, SLC96 (TR-08)
AMI, B8ZS
0 to 133 ft., 134 to 266 ft., 267 to 533 ft., 534 to 655 ft.
0 dB, -7.5 dB, -15.0 dB, -22.5 dB, auto matic receive sensitivity
0.6 dB for 0 - 250 ft, 1.8 dB for 251 - 500 ft, 3.0 dB for 501 - 700 ft
Internal Stratum 4, line
Per ANSI T1.403, AT&T Pub TR62411
+3.0dB to -36dB
Universal voice grade (UVG), single-party (SP) signaling
QRSS, line loopback, CSU LB de te ct io n, performance statistics over FDL , ba nt am
jacks for in-session T1 monitoring
One 50-pin female amphenol, up to 24 ports
FXS, FXS-DN, FXS-DN-Wink, TR-08
Loop Start, Ground Start, Loop Start with forward Disconnect, Ground Start
Immediate, Ground Start Automatic, Universal Voice Grade, Universal Voice Grade
Automatic, Single-Party
Increments of 1dB, -3dB to +9dB on transmit; -9dB to +3dB on rec ei ve
600 Ohm
50 VRMS, on hook transmission for Calle r ID su pport
At least 800 Ohms external resi sta nce including set
CLASS features (distinctive ringing, Caller ID)
compatibility with V.34 and V90 modem standards
One 50-pin female amph enol, up to 8 ports
FXO, dial pulse termination
Loop Start, Ground Start, Loop Start with force d Disc onnect, Ground Start with
forced Disconnect, DPT
Increments of 1dB, -3dB to +9dB on transmit; -9dB to +3dB on rec ei ve
600 Ohm
At least 800 Ohms external resi sta nce including set
CLASS features (distinctive ringing, Caller ID)
compatibility with V.34 and V90 modem standards
One V.35 port (female DB25)
Transparent HDLC (NRZ, NRZI)
Nx56K, Nx64K (N=1-24)
DCE
RTS/CTS with on, off, auto
RTS/CTS programmable delay from 0 to 100msec
Local and line loopba cks.
One RJ45
Ethernet IEEE802.3
10Mbps
IP, SNMP and telnet
SNMP and telnet management, alarm traps
One female DB9
RS232
9600, 19,200, 38,400 bps. The de fau lt is 9600
Asynchronous
LED Indicators
QRSS Test Pattern on T1; 2047 Test Pattern on Data ports
Loopbacks for FXO/FXS, T1 and Data ports
CSU Loopback detection
Performance statistics over FDL
Bantam jacks for in-session T1 monitoring and line testing
Alarm connector CLOSES for duration of major alarms only.
The contacts close both alarm connector and 25th pair of Amphe nol connector.
Zhone Technologies / 1-5
Page 16

Running Head
Product specifications Introduction
Model No.
1-6 \ Zhone Technologies
Page 17
Installing the Z-Plex Product description
Chapter 2
Installing the Z-Plex
This chapter gives you quick, simple instructions to get you up and running. You will also
learn how to install and mount the product. This chapter includes the following topics:
Product description page 2-1
Unpacking the product page 2-2
Installing the product page 2-3
Rack mounting page 2-5
Locating the product on a desktop page 2-6
Wall mounting page 2-6
2.1 Product description
The Z-Plex multiplexor i s a compact, next- generati on multi-s ervice acc ess device t hat can be
deployed today in a TDM network to provide support for traditional legacy services. It is
cost-effecti ve T1 channel bank, capable of mul ti pl exi ng up t o 24 FXS channels and one data
port onto a single T1 interface. All configurations are accessible by SNMP based network
management, CLI, and by a local serial interface.
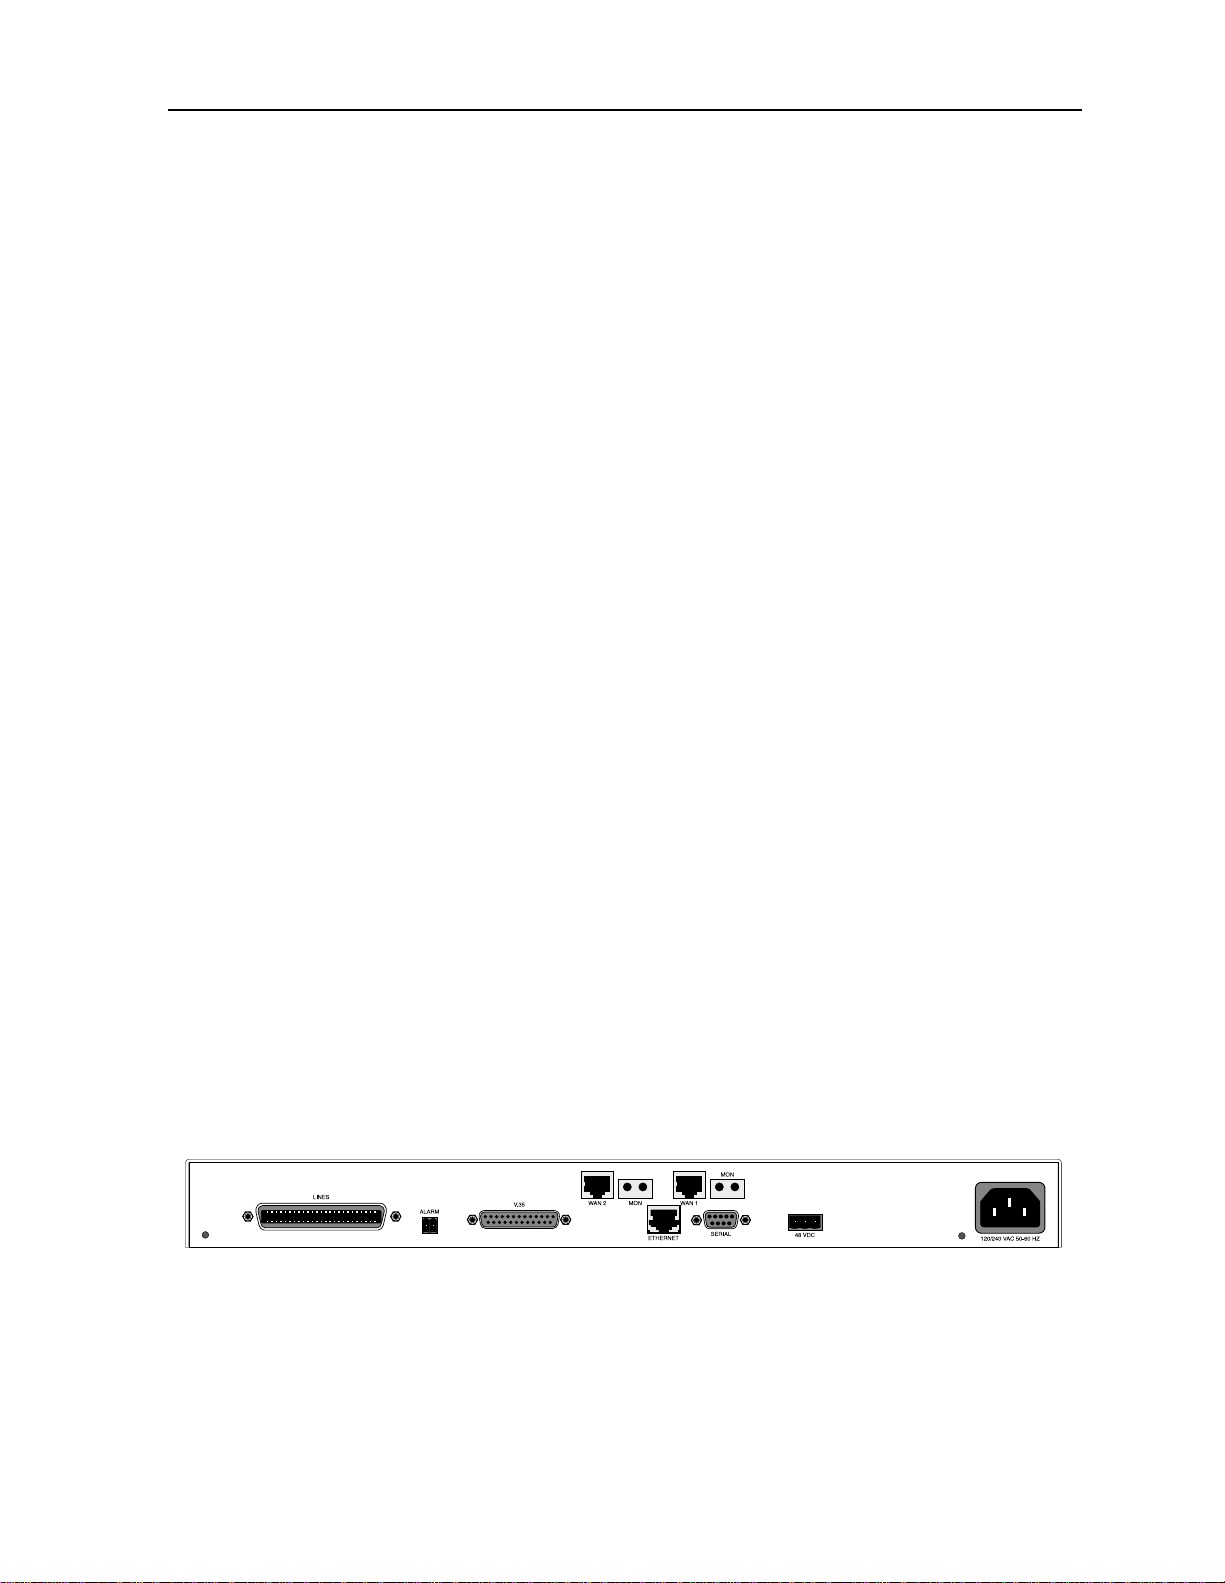
2.1.1 Back panel
The back panel of the Z-Plex provides connectors for the network interfaces and power
supplies.
Zhone Technologies / 2-1
Page 18

Running Head
Unpacking the product Installing the Z-Plex
Model No.
2.1.2 Front panel
The Z-Plex front panel provides LEDs for monitoring the status of the unit.
2.2 Unpacking the product
This product is ship ped as a comple te package that includes this user’s guide . After unpac king
the carton, check to ens ure that all items are included in the box by reviewing aga ins t the Kit
of Parts list shown below. In the event any items are missing, contact your distributor for
further instructions.
2.2.1 Packing materials
Keep all the packaging materials for future use in case the unit has to be returned for
maintenance and/or replacement.
2.2.2 Kit of parts
• 2 Mounting brackets
• A 3-Conductor DC power plug
• A 2-Conductor external alarm plug
• 6 #6 x 5/16” Type B Flat-head screws
• 8 #6 Pan-head screws
• 1 AC power c ord
• CD with User’s Guide
2.2.3 Product user’s guide
This guide contains instructions for common tasks: configuration, installation, maintenance,
and testing of the unit.
2-2 \ Zhone Technologies
Page 19

Installing the Z-Plex Installing the product
2.2.4 Hardware, cabling, and optional accessories
The product comes packaged with an AC power cord to provide power to the unit. It is also
shipped with two angle brackets and screws for rack mounting.
2.2.5 Who to call for help
Contact your distributor if any items are missing, or if you want to order another unit.
2.3 Installing the product
The product can be installed in a rack, on a desktop, or attached to a wall using appropriate
wall anchors and brackets. It is necessary to read the information that follows to ensure proper
reliability of the unit.
2.3.1 Choosing a site for the product
When choosing a site f or th e pr oduct, make sure that you fol lo w the i nst al lat ion instructions.
Provide adequate ventilation and ample room for cable routing.
2.3.2 Temperature specifications
• Shipping and storage: -40oc to +70oc (-40oF to 158oF)
o
• Operating range: -5
• Relative Humidity: 5% to 95% non-condensing
Note: The product is equipped with a fan to ensure proper cooling and reliability. In the
event that the installation environment temperature exceeds the temperature
specifications, it is recommended that adjustments be made. Improper operation
outside of these temperatures may result in performance degradation.
c to +50oc (23oF to 122oF)
2.3.3 Important Safety Instructions
There are several precautions to take before installing and/or servicing the product.
Read and follow all warning notices and instructi ons marked on the product or included in this
guide.
Zhone Technologies / 2-3
Page 20

Running Head
Installing the product Installing the Z-Plex
1. Never install telephone wiring during a lightning storm.
2. Never install this product in a wet location.
3. Never install telep hone jack s in we t lo cat ions unless the jack is specifically designed for
this purpose only.
4. Never touch uninsulated telephone wires or terminals unless the telephone line has first
been disconnected at the network interface.
5. Use caution when installing or modifying telephone lines.
6. Never attempt to service this product unless you are an authorized service technician.
Doing so can result in injury or damage to the unit and void all warranties.
7. This product is intended for use with a three-wire grounding type plug. This is a safety
feature. Equipment groundi ng is vita l to e nsure safe oper ation . Do not defeat the purpose
of the grounding type plug by modifying the plug or using an adapter.
Model No.
8. Prior to installation use an outlet tester or a voltmeter to check the AC receptacle for the
presence of earth g round. I f the rece pta cle is n ot proper ly gro unded, t he ins tall ation must
not continue until a qualified electrician has corrected the problem. In addition, a
connection for earth or saf ety grounding i s provided on the chassis . It is a #6 threaded stud
located next to the AC in let recepta cle.
9. Slots and openings in th e product are provided for ven tilation. T o ensure reliab le operation
of the product and to protect it from overheating, these slots and openings must not be
blocked or covered.
10. DO NOT allow anything to rest on the power cord and do not locate the product where
persons could step or walk on the power cord.
11. DO NOT attempt to service this product yourself. To avoid exposure to dangerous high
voltage points or other risks, refer all servicing to qualified service personnel.
12. Special cables, which may be required by the regulatory inspection authority for the
installation site, are the responsibility of the buyer.
13. When installed in the final configuration, the product must comply with the applicable
Safety Standards and regulatory requirements of the country in which it is installed. If
necessary, consult with the appropriate regulatory agencies and inspection authorities to
ensure compliance.
14. A rare phenomenon can create a voltage potential between the earth grounds of two or
more buildings. If products installed in separate bui ldings ar e interconn ected, the vol tage
potential may cause a hazardous condition. Consult a qualified electrical consultant to
determine whether or not this p henomenon e xists and , if necess ary, implement corrective
action prior to interconnecting the product.
2-4 \ Zhone Technologies
Page 21
Installing the Z-Plex Rack mounting
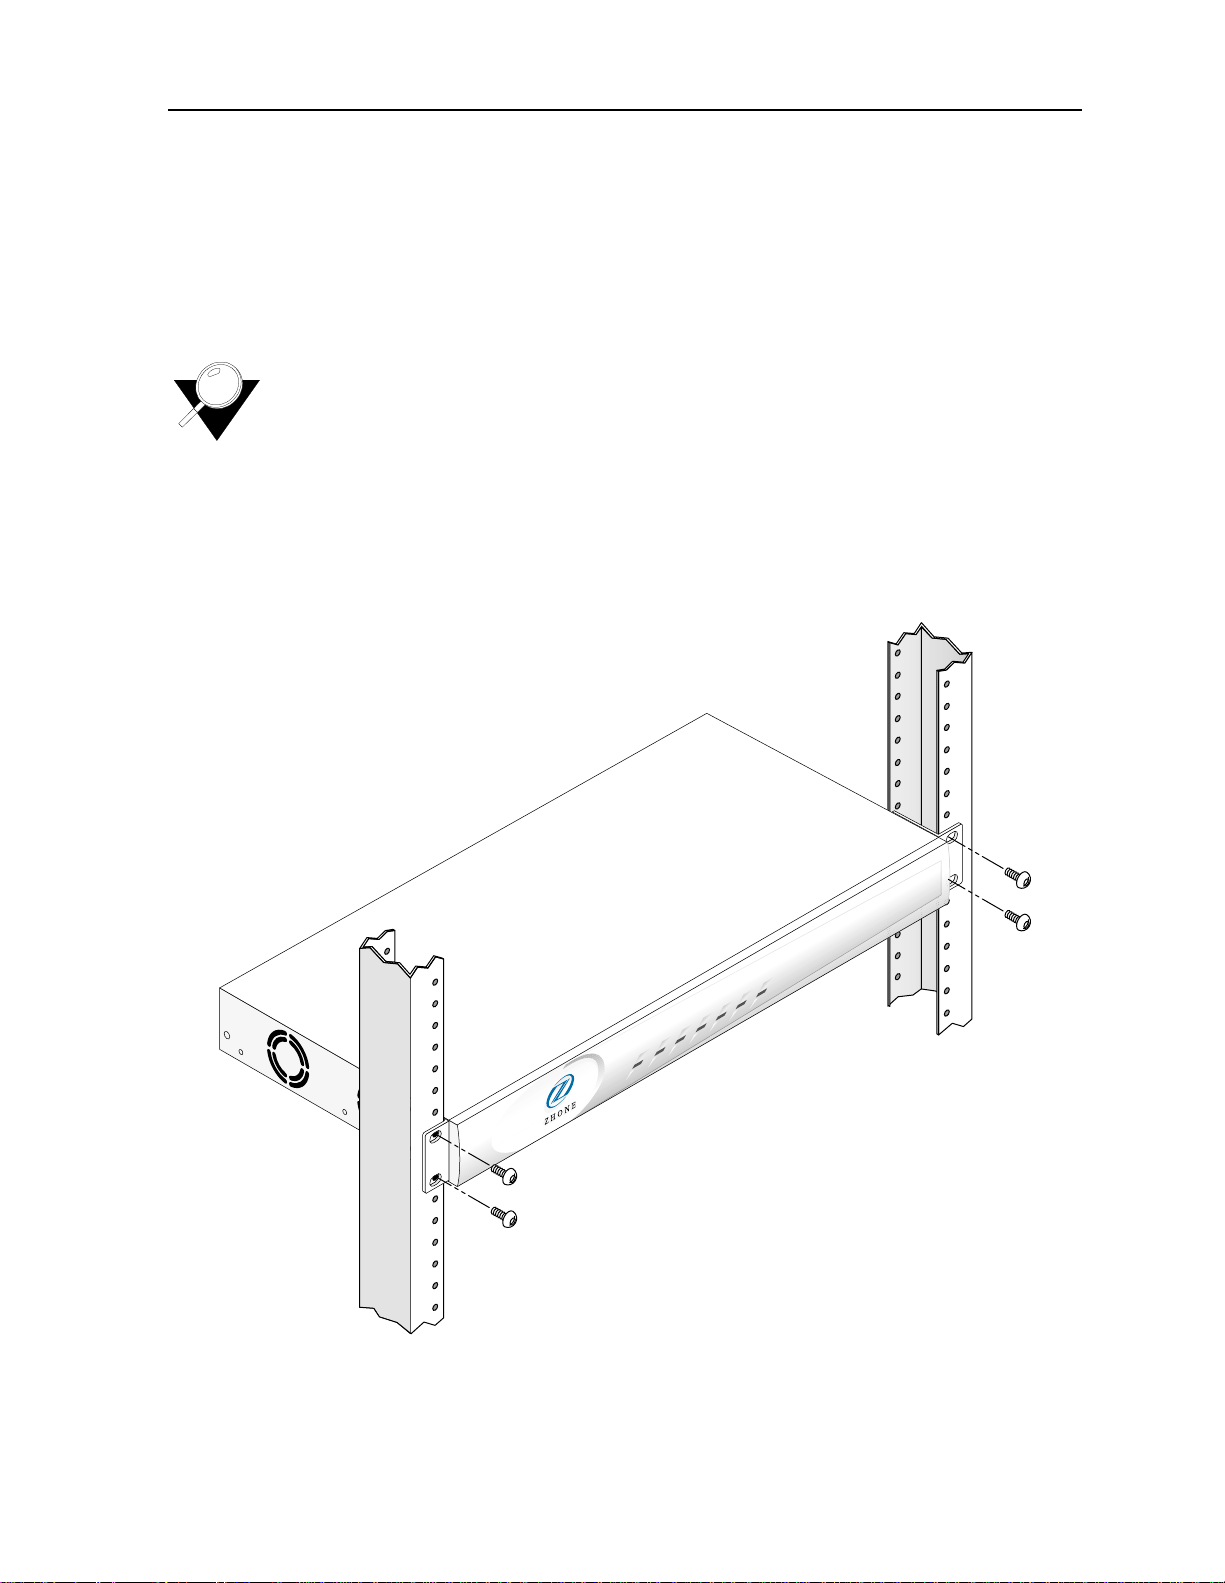
2.4 Rack mounting
The product chassis comes with brackets for rack mounting; and the chassis is designed to
accommodate brackets for front center or rear mounting. The installation site for rack
mounting should provide proper room for ventilation and cable routing.
Note: Check all gr ounding instru ctions when install ing the unit in a rack. Pr oper gr ounding
is mandatory at all times.
Figure 2-1 depicts a 19 inch rack mount configuration.
Figure 2-1. Rack mounting the Z-Plex
Zhone Technologies / 2-5
Page 22

Running Head
Locating the product on a desktop Installing the Z-Plex
Model No.
2.5 Locating the product on a desktop
Each unit can be easily set on top of a desk or table. A stable environment is necessary for
peak performance of each unit. The chassis should be placed on a flat, smooth surface, such
as a table, that is free of contaminants. This surface should be capable of supporting a fully
equipped chassis. Be sure to allow enough clearance above and below the chassis for proper
air circulation. The metal brackets and feet furnished with the chassis must be used for this
purpose.
2.6 Wall mounting
Prior to wall mounting check to see if the environ ment is stable and free from any extreme
temperatures, humidity or vibrations of any sort. The unit should be mounted with the fan to
the top with at least 2 inches of clear space on the sides, above, and below for adequate air
flow. Allow at least 6 inches for cable clearance.
When attaching unit(s) to a wall make sure that appropriate fasteners such as masonry
anchors, heavy duty wood screws or expansion bolts are used for heavy objects.
Note: Additional support hardware may be necessary (not i nclud ed with u nit) to secu r e th e
unit properly to the wall. If the surface is not solid enough to hold the unit and
attached cabling, it is recommended that a small piece of 3/4” plywood be fastened
to the wall before attaching the unit. This will help ensure a more stable environment.
2-6 \ Zhone Technologies
Page 23

Electrical Installation Connector type
Chapter 3
Electrical Installation
When you are ready to go be yond t he basi cs of th e pro duct, u se this chapte r to lear n sp ecifics
on grounding, cabling, and the necessary power requirements for operation. It includes the
following topics:
Connector type page 3-1
Data port connector pinouts page 3-2
Power requirements page 3-4
Alarm page 3-5
Grounding requirements page 3-6
Cabling page 3-7
3.1 Connector type
The product is equippe d with several types of electrical connections to the network and power
sources. The table below lists each one of the connectors along with their functionality.
Table 3-1. Backpanel connectors
Connector Name Connector Type Description
FXS/FXO lines 50 pin amphenol Up to 24 FXS/FXO Tip-and-Ring pair
Signals: TIP, RING for FXS.
Alarm 2 position
(plug included
with kit of parts)
V.35 DB25 female V.35 data port signals.
A relay closure that sends alarms out to an
external alarm system.
RS-232 serial DB9 Asynchronous craft port for local management.
10BaseT Ethernet RJ45 Ethernet port for remote management over IP.
Zhone Technologies / 3-1
Page 24
Running Head
Data port connector pinouts Electrical Installation
Model No.
Table 3-1. Backpanel connectors (Continued)
Connector Name Connector Type Description
WAN 1 line RJ48 Transmit and receive pairs for T1 network access.
WAN 2 line RJ48 Transmit and receive pairs for T1 network access.
Dual bant am jack
(monitor jacks) for
both WAN lines
42-56VDC (+-G)
0.9A Max
90-260VAC 0.6A
50/60Hz
3-position
(plug included
with kit of parts)
AC receptacle Power input when external AC voltage is used to
Earth Ground Permanent Earth Ground Connection
For bridged access onto the T1 transmit and
receive pa irs; used fo r test.
For DC power input.
power the unit.
(Note: FXS GND must be connected to earth
ground regardless of powering method used.)
3.2 Data port connector pinouts
Table 3-2 describes the signals and pins for the V.35 data port. The pin assignments are
associated with the use of Zhone cable part number PRM-000-01261M (F).
Pin Signal Source V.35
1Shield A
2 Transmit Data A DTE P
3 Re cei ve Data A DCE R
4 Request to Send DTE C
5 Clear to Send DCE D
6 Data Set Ready DCE E
7 Ground B
8 Receive Line Signal Detector DCE F
9 Recei ve Timing A DCE X
10 Not Connected
11 Terminal Timing B Not Used
12 Transmit Timing A DCE AA
3-2 \ Zhone Technologies
Table 3-2. DCE DB25 data port female connector
Page 25
Electrical Installation Data port connector pinouts
Table 3-2. DCE DB25 data port female connector (Continued)
Pin Signal Source V.35
13 Not Connected
14 Transmit Data B DTE S
15 Transmit Timing B DCE Y
16 Recei ve Data B DCE T
17 Recei ve Timing B DCE V
18 Not Connected
19 Not Connected
20 Data Terminal Ready DTE H
21 Remote Loopback DTE N
22 Local Loopback DTE J
23 Not Connected
24 Terminal Timing A Not Used U
25 Test Mode DCE NN
Note: For purposes of connection and function, the product should be considered a DCE.
3.2.1 FXO/FXS connectors
Table 3-3 lists the FXS/FXO connector pinouts.
Table 3-3. 25-pair female amphenol connector
Port Designation Pin Port Designation Pin
1 T 26 13 T 38
1R 1 13R 13
2 T 27 14 T 39
2R 2 14R 14
3 T 28 15 T 40
3R 3 15R 15
4 T 29 16 T 41
4R 4 16R 16
5 T 30 17 T 42
5R 5 17R 17
6 T 31 18 T 43
6R 6 18R 18
7 T 32 19 T 44
7R 7 19R 19
8 T 33 20 T 45
8R 8 20R 20
Zhone Technologies / 3-3
Page 26
Running Head
Power requirements Electrical Installation
Model No.
Table 3-3. 25-pair female amphenol connector (Continued)
Port Designation Pin Port Designation Pin
9 T 34 21 T 46
9R 9 21R 21
10 T 35 22 T 47
10 R 10 22 R 22
11 T 36 23 T 48
11 R 11 23 R 23
12 T 37 24 T 49
12 R 12 24 R 24
Alarm contact 2 50
Alarm contact 1 25
3.2.2 RJ48 connector
Table 3-4 lists the T1 RJ48 connector pinouts.
Table 3-4. T1 connector pinouts
RJ-48(F) Pin Signal
1R1
2T1
4R
5T
3, 6, 7, 8 Not assigned
3.3 Power requirements
The installation s ite should have a 90-260VAC power recepta cle readily avai lable to power u p
the unit. The unit can als o be powered by -42 to 56 VDC. The power r ecepta cle sh ould not be
controlled by a light switch.
3-4 \ Zhone Technologies
Page 27
Electrical Installation Alarm
3.3.1 Power installation
3.3.1.1 AC power installation
This product is equipped with an AC receptacle located on the back of the unit.
3.3.1.2 DC power installation
When wiring to an exter nal power source, such as a batte ry rack, fuse pa nel, or circuit breaker ,
make sure that the correct rating of wire is used. It is recommended you use 20 to 18 gauge
wire.
Note:
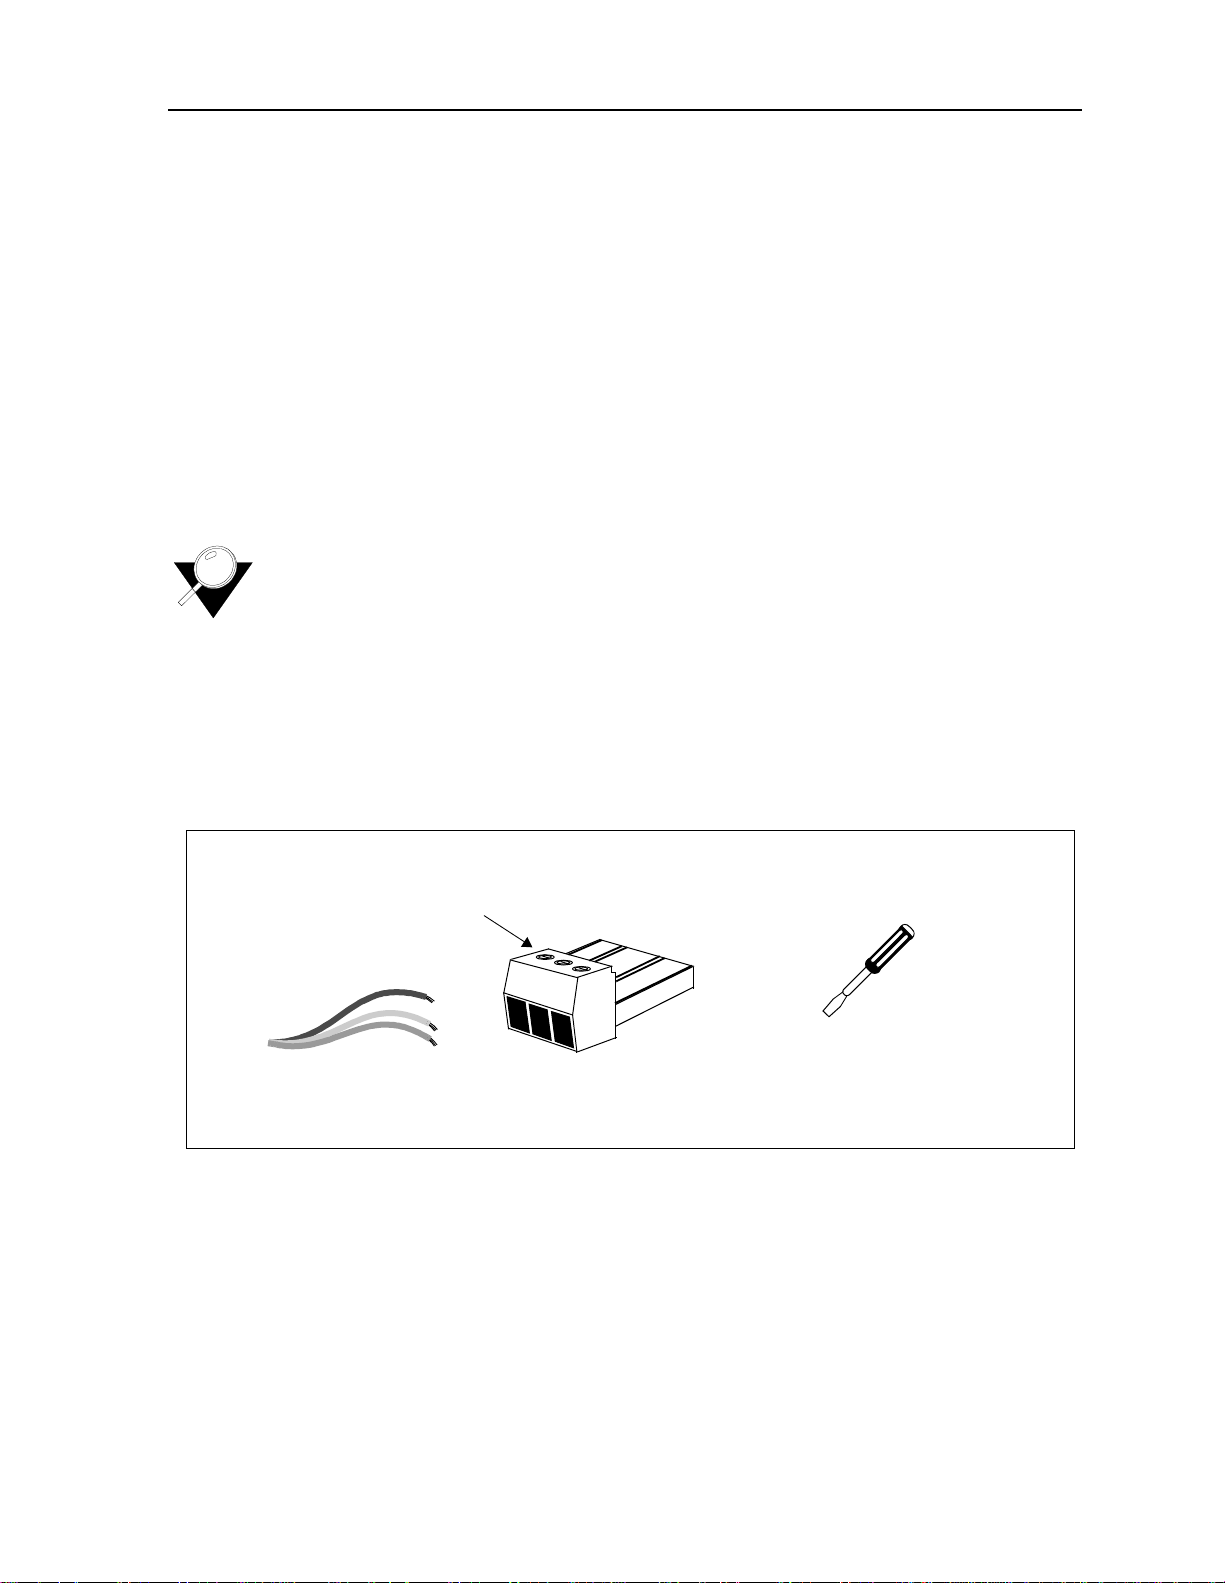
Note: Note that the DC Power Pl ug is or ange in co lor, matching the r ec ipr ocal orange rear
(located on top of adapter)
The product can have both an AC and DC power source connected to it at the same
time. These two power in puts will shar e the power l oad. However, if one fails the other
will carry the full load
panel receptacle.
Wire tightening screws
Wire
(not supplied)
3.4 Alarm
.
Figure 3-1. CD power plug
DC Power Plug (supplied)
+
G
Small Screwdriver
(not supplied)
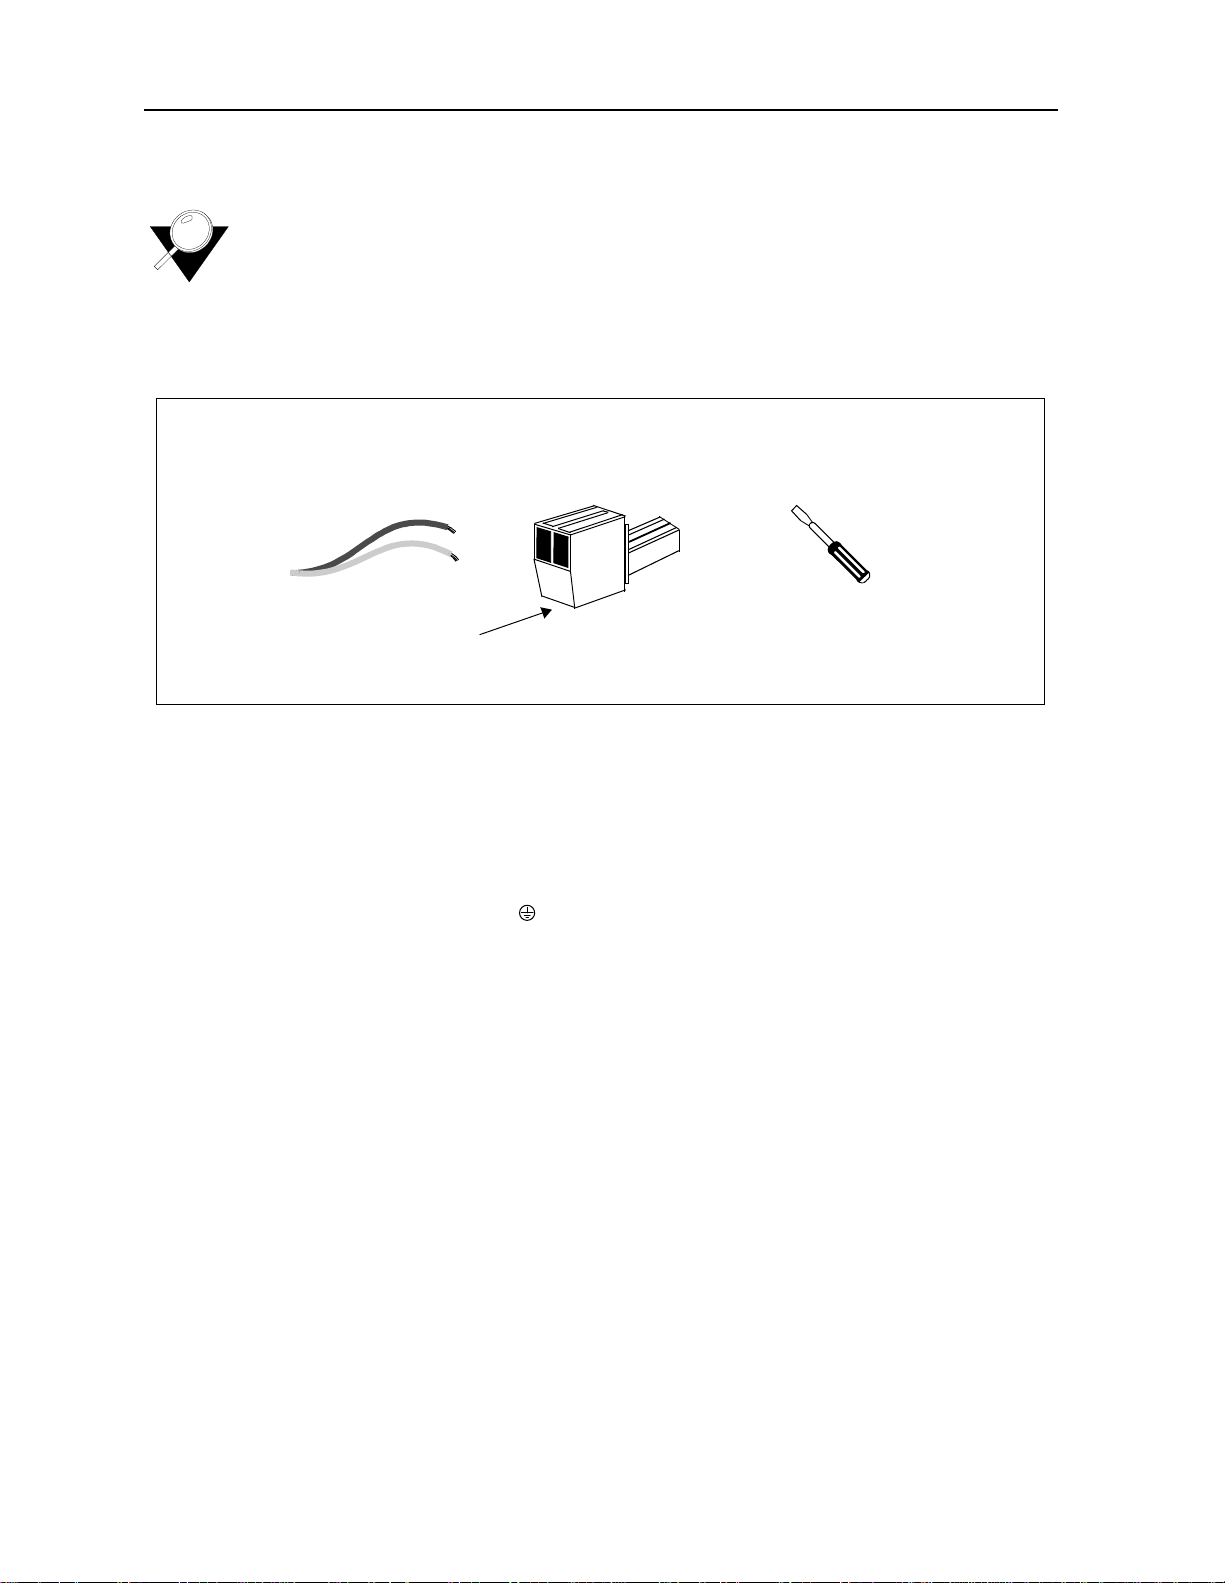
The product is equipped with an external alarm connector (located on the rear panel of the
unit) that will close in the event of an alarm condition such as: T1 failure, internal failure, or
power failure. A Red alarm is detected by the T1 interface and responded to by issuing the
yellow alarm signal on the T1. The figure below illustrates the alarm connector. It is
recommended you use 26 to 24 gauge twisted-pair wire.
Zhone Technologies / 3-5
Page 28
Running Head
Grounding requirements Electrical Installation
Note: Note that the External Alarm Plug is black in color, matching the reciprocal black
rear panel receptacle.
Model No.
Figure 3-2. Alarm closure plug
Alarm Closur e Pl ug (supplied)
Wire
(not supplied)
Wire tightening screws
(located under adapter)
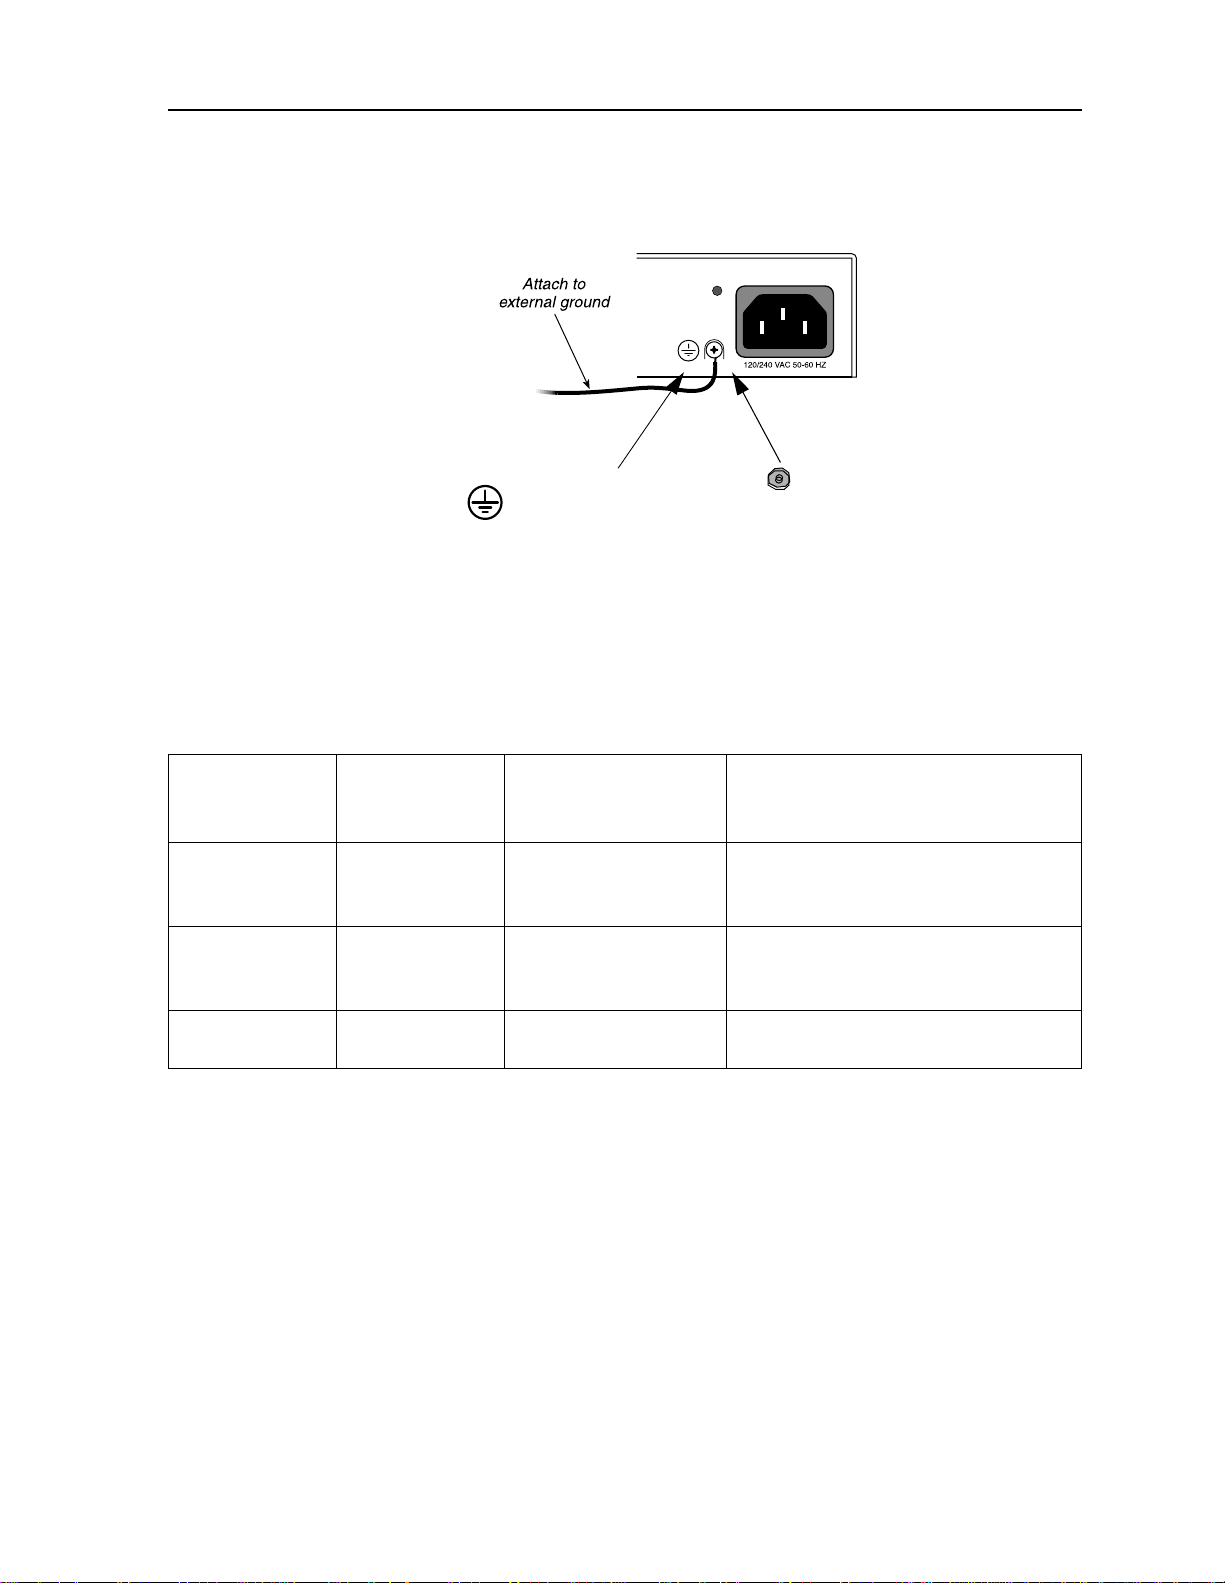
3.5 Grounding requirements
Due to the UL regula tory re quiremen ts, a mounting stud is requi red f or con necti on of t he AC
input earth ground lead to the product chassis. The ground lead must be connected to the
chassis using a No. 6 nut and lock washer combination. Th e mounting loc ation is lab eled with
the IEC 417 No. 5019 symbol ( ) to identify this as the AC earth ground connection point.
This mounting stud is located next to the IEC 320 AC input connector.
The loop battery return a nd the FXS digital and anal og circuitry must shar e a common ground.
The access point on the back panel of the product allows connection to an external battery
return lead which will be physicall y connect ed to the FXS circui t ground. This acce ss point is
provided as part of the DC power input connector.
Small Screwdriver
(not supplied)
3-6 \ Zhone Technologies
Page 29
Electrical Installation Cabling
Figure 3-3. Grounding the unit
Grounding symbol
Screw , SEMS, INT
TTH,10-32x3/8 L
steel, zinc
3.6 Cabling
Table 3-5 describes the cables recommended for use with the Z-Plex unit.
Table 3-5. Recommended cables
Cable Used for
Voice FXS/FXO ports 800-00060-01 50-pin Amphenol (M) to 50 pin
Data Data Port
V.35
AC Power AC Power Input 200-00009-01 AC Power Cable (6’)
Manufacturer Part
Number
Amphenol (M) (5’)
CBL-DB25M-V35-ST DB25M to M34F (Straight through)
(5’)
Description
Zhone Technologies / 3-7
Page 30

Running Head
Cabling Electrical Installation
Model No.
3-8 \ Zhone Technologies
Page 31

Configuring the Z-Plex Using the command line interface
Chapter 4
Configuring the Z-Plex
In this chapter you will learn how to configure the Z-Plex unit using the CLI. It includes the
following topics:
Using the command line interface page 4-1
Quick start system configuration page 4-2
Configuring SNMP page 4-6
Configuring T1 interfaces page 4-7
Configuri ng a T1 drop and insert interface page 4-8
Configuring FXS ports page 4-8
Configuring FXO ports page 4-9
Configuring the V.35 data port page 4-10
Adding and deleting routes page 4-11
System maintenance commands page 4-15
4.1 Using the command line interface
The CLI commands use the following format:
SET group:parameter:index:value to change th e value of a read/write parameters.
GET group:parameter:index:value for read-onl y parameters or to view t he current
configuration of a parameter without making any changes.
• group identifies the configuration grouping of the parameter. For example, T1CFG.
• parameter identifies the actual configuration element. For example, FRAME.
• index identifies the phy si cal inde x of t he el ement you want to configure. Most elemen ts
have an index of 1. T1 li nes have 2 indexes, which correspond to t he 2 WAN interface s.
For example, to activate the first T1 line, enter the following command:
Zhone Technologies / 4-1
Page 32

Running Head
Quick start system configuration Configuring the Z-Plex
SET T1CFG:STATE:1:ACTV
To read the current frame slips on the f irst T1 line, e nter the following comm and:
GET PMCUR:SLIP:1
Keep in mind the following important information:
• The CLI is case sensitive.
• Keywords must be entered completely. There are no keyboard shortcuts.
• The backspace and delete keys are supported.
• Command history is supported.
For complete informat ion about the CLI parameters and syntax, see Appendix A, “Alphabetic
Reference.”
Model No.
4.2 Quick start system configuration
You must perform the initial configuration of the system via the serial (craft) interface. After
you have completed the init ial configurati on, you can manage the Z-Plex unit using any of the
methods described in “Configuring a management interface” on page 4-4.
To access the serial port, you must configure your terminal interface software with the
following settings:
• 9600bps
• 8 stop bits
• No party
• 1 data bit
After the system boots up, perform the following procedures from the serial interface:
1. Log into the system (the default user name is “user”, the default password is “password”):
login> user
login> ********
user>
2. Assign the system an IP address and a netmask. For example:
user> SET CPUCFG:MASK:1:255.255.255.252
user> SET CPUCFG:IP:1:192.168.8.21
4-2 \ Zhone Technologies
Page 33

Configuring the Z-Plex Quick start system configuration
3. Change the default user password. For example:
user> SET USER:PASSWD:zplex321
The password can be from 7 to 12 charac ters long. The password is u sed any time you log
into the Z-Plex unit to m anage it.
4. Configure SNMP agent addresse s, community str ings, and enabl e traps, if ne cessary. For
example:
user> SET CPUCFG:IPHOST1:1:192.168.10.21
user> SET CPUCFG:IPHOST2:1:192.168.10.22
user> SET CPUCFG:RDCOMSTRING:1:W23rw
user> SET CPUCFG:WTCOMSTRING:1:q34mw
5. Configure a management interface, either DS024, Ethernet, or IP over FDL. (FDL over
typically used only for a connection to a Premisys IMACs). For example, the following
commands configure a DS0 management interface:
user> SET T1CFG:DS0:1:ON
user> SET CPUCFG:MASKHDL:1:255.255.255.252
user> SET CPUCFG:IPHDL:1:192.168.8.22
6. Assign static routes if ne cessary . For example , the following command confi gures a static
host route to 62.6.5.34 with a gateway of 192.168.8.21 (the IP address of the Z-Plex
Ethernet interface):
SET ROUTE:ADDHOSTRT:10:62.6.5.34:192.168.8.21
Static routes might be necessary to telnet into the Z-Plex to manage it.
7. Set the date on the system. For example, the following commands prompt you for the
system dat e:
user> SET DATE
The system prompts you for the date in mm:dd:yyyy hh/mm/ss format.
8. Configure basic system contact information such as name, location, and contact.
user> SET SYSTEM:SYSCONTACT:Scott_Berman
user> SET SYSTEM:SYSNAME:ZPlex-10-2-1
user> SET SYSTEM:SYSLOCATION:10th_flr-rack_2-unit_1
9. Reboot the system:
user> REBOOT
Zhone Technologies / 4-3
Page 34

Running Head
Quick start system configuration Configuring the Z-Plex
The first time you configure an IP address, you must reboot the system.
Model No.
4.2.1 Logging in and out of the syst em
You must log into the system to manage it. Note that only one administrative user can be
logged into the Z-Plex unit at a time. The defau lt use rna me is “user”, the default pa sswor d i s
“password”.
For example, to log int o the system:
login> user
login> ********
user>
To log out of the system, enter the logout command:
user> logout
Users are automatically logged out of the system under the following circumstances:
• If a user is lo gged into the serial interface and a nother user logs in via telnet or another
interface.
• After 10 minutes, inactive sessions are automatically logged out.
4.2.2 Setting the date
Use the DATE command to set the date on the system. For example, the following command
sets the system date to 1:30 PM, May 1, 2000:
user> SET DATE:05/01/2000 13:30:00
4.2.3 Configuring a management interface
You can configure the Z-Plex over the following interfaces:
• Local
• DS0
• Ethernet
• IP over FDL
The following sections describe how to configure each of these interfaces.
4-4 \ Zhone Technologies
Page 35

Configuring the Z-Plex Quick start system configuration
Configuring the local management channel
The Z-Plex unit provides an out-of-b and RS232 serial (cr aft) inte rface for manag ing the unit.
To access the serial port, configure your terminal interface software w ith the foll owing
settings:
• 9600bps
• 8 stop bits
• No party
• 1 data bit
Configuring the DS0 management channel
The DS0 management channel encapsulates IP traffic in HDLC frames using DS0 24. The
following command enables the DS0 management channel:
SET T1CFG:DS0:1:ON
The next series of example commands configures the IP information for the DS0 interface:
user> SET CPUCFG:MASKHDL:1:255.255.255.252
user> SET CPUCFG:IPHDL:1:192.168.8.22
If you are connecti ng to an IMACs uni t over the DS0 mana gement chan nel, y ou must tu rn of f
the HDLC headers that the Z- Pl ex un it nor mally uses to encapsula te the management traff i c.
Note that only WAN 2 supports the DS0 management channel.
Configuring the Ethernet management channel
You can telnet to the Z-Plex over the Et hernet t o manage the unit. You must first conf igure an
IP address and a netmask for the unit, as in the following example:
user> SET CPUCFG:MASK:1:255.255.255.252
user> SET CPUCFG:IP:1:192.168.8.21
After you have confi gured the IP address of the unit, you can telnet into it and c onfigure it with
the CLI.
Configuring the IP over FDL management channel
The Z-Plex unit supports IP over FDL as a way to configure the system via the CLI. The IP
over FDL connection is different than the standard FDL interface which provides error
checking for T1 interfaces. The two FDL interfaces cannot be used at the same time.
Zhone Technologies / 4-5
Page 36

Running Head
Configuring SNMP Configuring the Z-Plex
The following example configures the IP over FDL interface:
user> SET CPUCFG:MASKFDL:1:255.255.255.252
user> SET CPUCFG:IPFDL:1:192.168.8.22
For most applications, the default MTU of 1500 is appropriate. If you need to change it, use
the MTUFDL command as in the following example:
user> SET CPUCFG:MTUFDL:1:1200
Model No.
4.2.4 Configuring system contact information
The following example configures system contact and description information:
user> SET SYSTEM:SYSCONTACT:Scott_Berman
user> SET SYSTEM:SYSNAME:ZPlex-10-2-1
user> SET SYSTEM:SYSLOCATION:10th_flr-rack_2-unit1
4.3 Configuring SNMP
You can configure the Z-Plex unit usi ng SNMP as wel l as sp ecify SNMP tra p reci pient s. The
Z-Plex sen ds traps wh en the follo wing major alarms oc cur: resets, red alarm s, or yellow
alarms.
To configure SNMP on the Z-Plex you must:
• Configure th e IP addresses of the SNMP trap recipients
• Specify SNMP community strings
• Specify whether traps are enabled
The following example configures SNMP o n the Z-Plex unit:
1. Configure SNMP read/write and read community strings:
user> SET CPUCFG:RDCOMSTRING:1:publicpassword
user> SET CPUCFG:WTCOMSTRING:1:2Ws34rt
2. Enable SNMP traps (if necessary):
user> SET CPUCFG:SNMPTRAP:1:ON
3. Configure up to 3 SNMP traps recipients (if necessary):
user> SET CPUCFG:IPHOST1:1:192.168.21.23
4-6 \ Zhone Technologies
Page 37

Configuring the Z-Plex Configuring T1 interfaces
user> SET CPUCFG:IPHOST2:1:192.168.21.24
user> SET CPUCFG:IPHOST3:1:192.168.21.25
4.4 Configuring T1 interfaces
The two T1 interfaces on the Z-Plex unit can be used for either voice or data, with the
following restrictions:
• 24 voice ports are supported, and can be from either T1 line
• 24 data ports are supported, and must be from only one T1 line
The following example configures the first T1 interface:
1. Activate the line:
user> SET T1CFG:STATE:1:ACTV
2. Specify the type of interface (CSU or DSX):
user> SET T1CFG:TYPE:1:CSU
3. Specify the framing:
user> SET T1CFG:FRAME:1:ESF
4. Specify the encoding:
user> SET T1CFG:CODE:1:B8ZS
5. Specify the line length (for DSX interfaces) or the buildout (for CSU interfaces):
user> SET T1CFG:LINELEN:1:N15
6. Specify the clock source:
user> SET T1CFG:CLKSRC:1:WAN1
7. Specify what type of standard FDL you will use:
user> SET T1CFG:FDL:1:ANSI
Note that if you enable standard FDL, you cannot use the IP over FDL interface for
management. FDL is not supported on WAN 2.
8. Enable IP over FDL (if necessary):
user> SET T1CFG:FDL_IP:1:OFF
9. Enable the DS0 management channel (if necessary):
Zhone Technologies / 4-7
Page 38

Running Head
Configuring a T1 drop and insert interface Configuring the Z-Plex
user> SET T1CFG:DS0:1:OFF
Model No.
4.5 Configuring a T1 drop and insert interface
A T1 drop and insert takes some channels from an incoming T1 interface and drops some of
them out to a PBX and the rest to an outgoi ng data path. The drop and ins ert interf ace must be
configured as a DSX.
Configuring a T1 drop and in sert int erface re quires tha t you activ ate the int erface an d specify
the channels you want to drop out to a PBX. The following commands configure a drop and
insert inte rface and specify that the first four T1 time slots are sent to a PBX:
user> SET DICFG:STATE:ACTV
user> SET DICFG:TS:0000000f
To specify time slots, use a hexadecimal map of the form ffffffff, where each digit represents
the hexadecimal value of 4 time slots, with a 1 in each channel you want to drop and insert.
For more information a bout confi guring t he TS paramet er, see “TS ( data port )” on page A- 24.
4.6 Configuring FXS ports
Foreign Exchange S t at ion (FXS) enables users to connect the Z-Plex uni t to a two-way (bo th
inbound and outbound ca lls) PBX trunk or a key s ystem tr unk. The FXS p orts e ncode an al og
(voice, VF) signals to a digital bitstream at the local system for transmission over a T1 or E1
network. It also decodes the digital signals to analog at the remote system.
The following example configures the first FXS port and specifies that the DS0s come in on
the first T1 interface (WAN 1):
1. Before making configuration changes to an FXO/FXS port, set it to STDBY mode:
user> SET FXSCFG:STATE:1:STDBY
2. Specify the FXS mode:
user> SET FXSCFG:MODE:1:FXSDN
3. Specify the FXS port:
user> SET FXSCFG:WAN:1:1
4. Specify the T1 time slots used for the FXS ports:
user> SET FXSCFG:TS:1:1-6
5. Specify the FXS type:
4-8 \ Zhone Technologies
Page 39

Configuring the Z-Plex Configuring FXO ports
user> SET FXSCFG:TYPE:1:LSFD
6. Specify whether trunk conditioning is being used:
user> SET FXSCFG:TRNKC:1:ON
7. Specify whether you want the Z-Plex unit to provide ringback.
user> SET FXSCFG:RNGBK:1:ON
The default of OFF is appropri ate for cases when the network servic e does not provide an
audible ringing tone to the calling party.
8. Specify the Transmit TLP setting, which controls the amount of gain or loss added to a
voice signal from the CPE before it is encoded to digital PCM:
user> SET FXSCFG:TTLP:1:-3
9. Specify the Receive Transmission Level Poi nt (TLP), which controls t he amount of gain
or loss added to the incoming signal after it is decoded to analog:
user> SET FXSCFG:RTLP:1:-8
10. Activate the port:
user> SET FXSCFG:STATE:1:ACTV
4.7 Configuring FXO ports
Foreign Exchange Off ice (FXO) ports manage the flow of FXO voice traf fic over the network.
The FXO port translates an analog signal to a digital bi t str eam at the local sys te m and di gital
to analog at the remote system. All FXO ports have a two-wire interface.
The following example configures the first FXO por t an d spe ci fi es t hat the DS0s come in on
the second T1 interface (WAN 2):
1. Before making configuration changes to an FXO/FXS port, set it to STDBY mode:
user> SET FXOCFG:STATE:2:STDBY
2. Specify the FXO mode:
user> SET FX0CFG:MODE:2:FXSDN
3. Specify the WAN line used for the FXO ports:
user> SET FX0CFG:WAN:2
4. Specify the T1 time slots used for the FXO ports:
Zhone Technologies / 4-9
Page 40

Running Head
Configuring the V.35 data port Configuring the Z-Plex
user> SET FX0CFG:TS:2:7-15
5. Specify the FXO type:
user> SET FX0CFG:TYPE:2:LS
6. Specify whether you want the Z-Plex unit to provide ringback. For example:
user> SET FXOCFG:RNGBK:2:ON
The default of OFF is appropri ate for cases when the network servic e does not provide an
audible ringing tone to the calling party.
7. Specify whether trunk conditioning is being used:
user> SET FX0CFG:TRNKC:2:ON
8. Specify the Transmit TLP setting, which controls the amount of gain or loss added to a
voice signal from the CPE before it is encoded to digital PCM.
Model No.
user> SET FX0CFG:TTLP:2:-3
9. Specify the Receive Transmission Level Poi nt (TLP), which controls t he amount of gain
or loss added to the incoming signal after it is decoded to analog.
user> SET FX0CFG:RTLP:2:-8
10. Activate the port:
user> SET FX0CFG:STATE:2:ACTIVE
4.8 Configuring the V.35 data port
The Z-Plex unit uses the V.35 port to interface directly with Data Service Units/Channel
Service Units (DSU/CSUs) supporting data traffic up to and including 64 kbps. A four-wire
circuit can connect th e V.35 port to a DSU/CSU up to four miles away. In the switched 56 kbps
mode, customers access the net work on an as-needed basis vi a dial-up commands. The system
must be equipped to provide -48 VDC power to fully support the V.35 port.
The following is an example of configuring the V.35 port:
1. Specif y the data ra te of the port:
For example:
user> SET DPCFG:RATE:1:64K
2. Specify the clocking for the port:
user> SET DPCFG:CLK:1:NORMAL
4-10 \ Zhone Technologies
Page 41

Configuring the Z-Plex Adding and deleting routes
3. Specify the T1 interface the data is coming in on:
user> SET DPCFG:WAN:1:2
4. Specify the number of channels:
user> SET DPCFG:NCHAN:1:24
5. Specify the start channel:
user> SET DPCFG:SCHAN:1:1
6. The remaining commands s pecify the operation control le ads of the V.35 port. By def ault,
all the port leads are off. If your configuration requires you to change them, use the
following commands:
user> SET DPCFG:TM:1:(ON/OFF)
user>
user>
user>
user>
SET DPCFG:DSR:1:ON
SET DPCFG:RLSD:1:(ON/OFF)
SET DPCFG:CTS:1:(ON/OFF)
SET DPCFG:CTSDELAY:1:(0-100)
7. If you’ve made changes to the WAN, SCHAN, or NCHAN parameters, the system
automatically sets the port to STDBY mode. You must then re-activate it as follows:
user> SET DPCFG:STATE:1:ACTV
4.9 Adding and deleting routes
You can create up to 16 static host routes and 16 static network routes. Static routes in the
Z-Plex enable it to reach management stations.
4.9.1 Adding and deleting network routes
To add a network route, enter the following command:
user> SET ROUTE:ADDNETRT:x:destination:gateway
Where x is the number of the route, destination is the destinat io n address, and gateway is the
gateway address. For example, the following command creates a network route (route
number 1) to the 192.168.0.0 network using the gateway 128.23.21.1:
user> SET ROUTE:ADDNETRT:1:192.168.0.0:128.23.21.1
To delete a network route, enter the following command:
Zhone Technologies / 4-11
Page 42

Running Head
Adding and deleting routes Configuring the Z-Plex
user> SET ROUTE:DLTNETRT:x:destination:gateway
For example, the following command deletes a network route (route number 2) from the
192.168.0.0 network using the gateway 128.23.22.1:
user> SET ROUTE:DLNETRT:1:192.168.0.0:128.23.22.1
Model No.
4.9.2 Adding and deleting host routes
To add a host route, enter the following command:
user> SET ROUTE:ADDHOSTRT:x:destination:gateway
Where x is the number of the route, destination is the destinat io n address, and gateway is the
gateway address. For example, t he foll owin g command crea tes a hos t route (rout e number 1)
from 192.168.8.21 using the gateway 128.23.21.1:
user> SET ROUTE:ADDHOSTRT:1:192.168.8.21:128.23.21.1
To delete a network route, enter the following command:
user> SET ROUTE:DLTHOSTRT:x:destination:gateway
For example, the following command deletes a host route (rout e number 2) from 192.168.9.21
using the gateway 128.23.22.1:
user> SET ROUTE:DLHOSTRT:1:192.168.9.21:128.23.22.1
4.9.3 Example routing configuration
Figure 4-1 on page 4-13 provides an example routing configuration for the Z-Plex.
4-12 \ Zhone Technologies
Page 43

Configuring the Z-Plex Adding and deleting routes
Figure 4-1. Example routing configuration
DS0 management channel
IP address: 128.23.0.1
Mask: 255.255.255.252
Network B
128.23.0.0
Z-Plex A
Ethernet interface
IP address: 192.168.8.22
Mask: 255.255.255.0
Network A
192.168.8.0
DS0 management channel
IP address: 128.23.0.2
Mask: 255.255.255.252
Z-Plex B
In the example network in Figure 4-1, the Z-Plex unit A has two IP interfaces: a DS0
management interface wit h an address of 128.23.0.1; an d an Ethernet interface wit h an address
of 192.168.8.22 and a netm ask of 255.255.255.252. The Z- Plex unit B has a DS0 management
interface with the address of 128.23.0.2.
When you configure an Ethernet address and a DS0 address on Z-Plex unit A, the Z-Plex
creates the route from network A to network B. However, in order for the Z-Plex unit B to
route IP traffic back to network A, you must create a network route on unit B. This network
route uses the IP address of unit A the gateway. You can configure this route as follows:
user> SET ROUTE:ADDNETRT:1:192.168.0.0:128.23.0.1
Alternatively, you can create a default route and specify the IP address of the unit A as the
gateway:
user> SET ROUTE:ADDNETRT:1:0.0.0.0:128.23.0.1
4.9.4 Displaying routes
To display routes for interfaces, enter the following command:
Zhone Technologies / 4-13
Page 44

Running Head
Adding and deleting routes Configuring the Z-Plex
user> GET ROUTE:SHOWINTF:1
ROUTE NET TABLE
destination gateway flags Refcnt Use Interface
-------------------------------------------------------
128.8.23.0 128.23.0.2 101 0 0 hd0
192.168.8.0 128.23.0.1 3 0 0 hd0
------------------------------------------------------ROUTE HOST TABLE
destination gateway flags Refcnt Use Interface
-------------------------------------------------------
127.0.0.1 127.0.0.1 5 1 0 lo0
-------------------------------------------------------
Model No.
Table 4-1explains the interfaces in the route table.
Table 4-1. Route Display Values
hd0 Time slot 24 management
cpm0 Ethernet management
fdl0 FDL management
lo0 Loopback interface (local)
4.9.4.1 Displaying host routes
To display information about all host routes, enter the ROUTE:HOSTALL:x command.
For example:
user> GET ROUTE:HOSTALL:1
>Host Destination 1: 192.168.21.32
>Host Gateway 1: 12.12.1.1
>Host Destination 2: 192.168.43.66
>Host Gateway 2: 122.54.1.1
>Host Destination 3: 192.111.87.4
>Host Gateway 3: 165.87.43.1
Field Explanation
T o display informat ion about particular hos t routes, enter the ROUTE:HOST :x command.
For example, the following command displays information about host route 1:
4-14 \ Zhone Technologies
Page 45

Configuring the Z-Plex System maintenance commands
user> GET ROUTE:HOST:1
>The Host Destination is: 192.168.21.32
>The Host Gateway is: 12.12.1.1
4.9.4.2 Displaying network routes
T o display informat ion about all host route s, enter the ROUTE:NET ALL:x command . For
example:
user> GET ROUTE:NETALL:1
>Net Destination 1: 172.16.0.0
>Net Gateway 1: 12.12.0.0
To display information about particular network routes, enter the ROUTE:NET:x
command. For example, the foll owing co mmand di splay s info rmatio n ab out hos t rout e 1:
user> GET ROUTE:NET:1
>The Net Destination is: 172.16.0.0
>The Net Gateway is: 12.12.0.0
4.10 System maintenance commands
This section describes the Z-Plex system maintenance commands.
4.10.1 Rebooting the system
To reboot the system, enter the following command:
user> REBOOT
4.10.2 Displaying flash information
To display information about the code images in flash, enter the following command:
user> QUERYIMAGE
Original Code
->Software version : EMPTY
->Checksum : 0x0
BANK1
->Software version : ZPLEX10_1.0.0#6
->Checksum : 0x50a78d4c
Zhone Technologies / 4-15
Page 46

Running Head
System maintenance commands Configuring the Z-Plex
BANK2
->Software version : ZPLEX10_1.0.0#6
->Checksum : 0x50a78d4c
Active bank is 1
Model No.
4.10.3 Displaying timeslot usage
To display information about the T1 timeslot usage, enter the following command:
user> QUERYTS
TS 24, WAN 1, SERVICE IP
4.10.4 Displaying list of alarms
To display information about the active alarms, enter the following command:
user> QUERYALARM
There are no Active Alarms
4.10.5 Displaying and clearing list of history alarms
To display information about the history alarms, enter the following command:
user> QUERYHALARM
17 MINOR RESET 0:0:0:3 0:0:0:3
17 WAN1 MAJOR LOF 0:0:9:4 0:0:9:4
18 WAN1 MAJOR LOF 0:0:9:6 0:0:9:6
3 WAN1 MAJOR LOS 0:0:8:35 0:0:8:35
4 WAN1 MAJOR LOF 0:0:8:35 0:0:8:37
5 WAN1 MAJOR LOF 0:0:8:39 0:0:8:39
6 WAN1 MAJOR LOF 0:0:8:41 0:0:8:41
7 WAN1 MAJOR LOF 0:0:8:43 0:0:8:43
8 WAN1 MAJOR LOF 0:0:8:45 0:0:8:45
9 WAN1 MAJOR LOF 0:0:8:47 0:0:8:47
10 WAN1 MAJOR LOF 0:0:8:49 0:0:8:49
11 WAN1 MAJOR LOF 0:0:8:51 0:0:8:51
12 WAN1 MAJOR LOF 0:0:8:53 0:0:8:53
13 WAN1 MAJOR LOF 0:0:8:55 0:0:8:55
14 WAN1 MAJOR LOF 0:0:8:57 0:0:8:57
15 WAN1 MAJOR LOF 0:0:8:59 0:0:8:59
To clear the history alarms, enter the following command:
user> CLEARHALARM
4-16 \ Zhone Technologies
Page 47

Configuring the Z-Plex System maintenance commands
4.10.6 Activating code in bank 1
To activate the code in bank 1, enter the following command:
user> ACTIVEBANK1
4.10.7 Activating code in bank 2
To activate the code in bank 2, enter the following command:
user> ACTIVEBANK2
4.10.8 TFTP downloading
To download software via TFTP to the Z-Plex unit, enter the following command:
user> TFTPDLD
This command initiates a TFTP download. It prompts for the IP address of the server , the code
bank to download the image to, and the filename of the software image.
Zhone Technologies / 4-17
Page 48

Running Head
System maintenance commands Configuring the Z-Plex
Model No.
4-18 \ Zhone Technologies
Page 49

Diagnostics T1 loopbacks
Chapter 5
Diagnostics
This chapter describes how to perform loopbacks on the Z-Plex unit interfaces. It also
describes the system’s LEDs. It includes the following topics:
T1 loopbacks page 5-1
BER testing page 5-3
Data port loopbacks page 5-4
FXO and FXS ports loopback page 5-6
LED indicators page 5-9
5.1 T1 loopbacks
The T1 interfaces support local and line (network) loopbacks:
• During a line (network) loopback, the signal is looped back to the network. The receive
T1 signal is looped onto the transmit T1within the framer chip.
• During a local loopback, the signal is looped back to the user. The transmit T1 signal is
looped onto the receive T1within the LIU.
The Z-Plex unit supports ESF loopback detection sent from remote equipment. These codes
are ANSI T1.403 compatible with DS1 networks and allow the unit to detect a latching
loopback to remote DS1 equipment. The Z-Plex detects payload loopback (PLB), network
loopback (NLB), and line loopback (LLB). The Z-Plex also supports TR 54016 for loop up
and loop down cases.
Figure 5-1 on page 5-2 illustrates T1 loopbacks on the Z-Plex unit.
Zhone Technologies / 5-1
Page 50

Running Head
T1 loopbacks Diagnostics
Model No.
Figure 5-1. T1 loopbacks
T1 Loopback
T1 Network
Receive
CPU
Receive
CPE Device
Network or Remote Loopback
Transmit
LIU
FRAMER
Transmit
T1 Network
Receive
CPU
Receive
CPE Device
Local Loopback
Transmit
LIU
FRAMER
Transmit
The incoming T1 Signal is looped
inside the T1 Framer and returned
to the T1 Network. This exercises
the T1 Line Interface Unit and the
T1 Framer with the exception of the
HDLC controller and clock switching
circuitry.
To activate a loopback, enter the following command:
user> SET T1CFG:LOOPBACK:x:(LINEON/LOCALON)
where x is the number of the T 1 interface to loopback. T o end the lo opback, enter the following
command:
user> SET T1CFG:LOOPBACK:x:(LINEOFF/LOCALOFF)
5-2 \ Zhone Technologies
The outcoming T1 Signal is l ooped
inside the T1 LIU and returned to
the CPE Device. This exercises the
T1 Line Interface Unit, T1 Framer,
CPU, Data Port Interface, and the
FXS Interface with the exception of the
HDLC controller.
Page 51

Diagnostics BER testing
5.2 BER testing
The bit error rat e (BER) test s ends a data pat tern and mea sures the bit error rate on the selec ted
interface. The Z-Plex supports BER tests on entire T1 lines or on individual time slots. The
BER test supports the following BER test patterns:
• Quasi-ran dom signal source (QRSS)
• ALT (10101010)
• 2047
During a BER test, all connections between either the data ports or the FXS/FXO ports and
the T1 interface are broken and a test pattern is transmitted onto the T1 interface. During the
test, the WAN LED blinks green.
5.2.1 Activating a BER test for an en tire T1 line
To configure a BER test on an entire T1 line, enter the following command:
user> SET T1CFG:BERT:x:(QRSS/ALT/2047)
where x is the number of the T1 interfa ce to loopback. T o en d the BER test, enter the following
command:
user> SET T1CFG:BERT:x:OFF
While the BER test is acti ve, you can inse rt r andom BIT err ors i nto t he te st da ta st ream us ing
the following command:
user> SET T1BE:ERRINS:x:BIT
5.2.2 Activating a BER test for individual time slots
To configure a BER test on single T1 timeslot:
1. Specify the BER test pattern for the test:
user> SET T1CFG:BERT:x:(QRSS/ALT/2047)
where x is the number of the T1 interface to apply the pattern to.
2. Activate the BER test:
user> SET T1CFG:TSBERTON:x:(1-24)
3. To de-activate the BER test:
Zhone Technologies / 5-3
Page 52

Running Head
Data port loopbacks Diagnostics
user> SET T1CFG:TSBERTOFF:x:(1-24)
Model No.
5.3 Data port loopbacks
The V.35 port supports line and local loopbacks:
• A line (network) loopback breaks the transmit signal on the network side between the
data port and the T1 interface and loops th e data port receive signal onto the tr ansmit side.
• A local loopback breaks the rec eive signal on the network side betw een the data port and
the T1 interface and loops the data p ort transmit signal onto the receive side.
Figure 5-2 on page 5-5 illustrates data port loopbacks on the Z-Plex unit.
5-4 \ Zhone Technologies
Page 53

Diagnostics Testing FXO and FXS ports
Figure 5-2. Data port loopbacks
T1 Network
Receive
CPU
Receive
CPE Device
Data Ports 1 and 2
Network or Remote Loopback
Transmit
LIU
FRAMER
Transmit
T1 Network
Receive
CPU
Receive
CPE Device
Data Ports 1 and 2
Local Loopback
Transmit
LIU
FRAMER
Transmit
The selected DS0s are lo op ed back
after leaving the Framer a nd upon
reaching the CPU. The CPU i s used
to control this loopback via the TSA.
Subsystems T1 Line Interface Unit,
T1 Framer, and CPU are exercised.
To activate a data port loopback, use the following command:
user> SET DPCFG:LOOPBACK:1:(LINE/LOCAL)
To de-activate a data port loopback, use the following command:
user> SET DPCFG:LOOPBACK:1:OFF
5.4 Testing FXO and FXS ports
The Z-Plex unit provides the following testing capabilities for FXO and FXS ports:
The Data Port in terface sign al i s
looped ins ide the CPU and
returned to the dat a port interface.
Subsystems CPU and the Data
Port Interface a re exercised.
Zhone Technologies / 5-5
Page 54

Running Head
Testing FXO and FXS ports Diagnostics
• Loopbacks
• Setting and viewing the transmit and receive ABCD signaling bits
• Setting the tip and ring leads
• Reading the tip and ring statistics
Model No.
5.4.1 FXO and FXS ports loopback
The FXO/FXS ports support analog and digital loopbacks:
• During an analog loopback, the decoded analog signal is sent back to the far end after
decoding and then re-encoding it.
• During a digital loopback, the incoming digital DS0 signal is sent back to the far end
without decoding it.
In the case of unas signed channels, the loopback interface provides an idle t ermination. Figure
5-3 illustrates FXO/FXS loopbacks.
5-6 \ Zhone Technologies
Page 55

Diagnostics Testing FXO and FXS ports
Figure 5-3. FXO and FXS loopbacks
Network
T1/E1
PCM Bus
DS0
Digital
Loopback
CODEC
Digital-to-Analog
Converter
Analog
Loopback
5.4.1.1 Configuring FXO loopbacks
To activate an FXO port loopback, use the following command:
user> SET FXOCFG:LOOP:1:(DGTL/ANLG)
where x is the number of the port to loopback.
To de-activate an FXO loopback, use the following command:
user> SET FXOCFG:LOOP:1:OFF
5.4.1.2 Configuring FXS loopbacks
To activate an FXS port loopback, use the following command:
user> SET FXSCFG:LOOP:1:(DGTL/ANLG)
FXS Card
where x is the number of the port to loopback.
To de-activate an FXS loopback, use the following command:
Zhone Technologies / 5-7
Page 56

Running Head
Testing FXO and FXS ports Diagnostics
user> SET FXSCFG:LOOP:1:OFF
Model No.
5.4.2 Using test mode on the FXO and FXS ports
FXO and FXS ports can be set to test mode, during which you can:
• Set and view the transmit and receive ABCD signaling bits
• Set the tip and ring leads
• View the tip and ring statistics
To use test mode, you must first enable it. For example, to enable test mode on port 1, enter
the following command:
user> SET FXSTST:TEST:1:ON
To exit test mode, enter the OFF command:
user> SET FXSTST:TEST:1:OFF
5.4.2.1 Setting or viewing the transmit ABCD signaling bits
The TxAB (Transmi t ABCD) parameter enables you to ei ther monitor the st atus of the ABCD
signaling bits bei ng transmitted towards the network or set a specific ABCD patte rn for testing
the transmit side of the circuit.
To specify a transmit ABCD bit pattern on an FXO port, enter the following command:
user> SET FXOTST:TXAB:n:(00/01/10/11)
To specify a transmit ABCD bit pattern on an FXS port, enter the following command:
user> SET FXSTST:TXAB:n:(00/01/10/11)
To view the transmit ABCD bit pattern being used on an FXO port, enter the following
command:
user> GET FXOTST:TXAB:n
To view the transmit ABCD bit pattern being used on an FXS port, enter the following
command:
user> GET FXSTST:TXAB:n
5-8 \ Zhone Technologies
Page 57

Diagnostics LED indicators
5.4.2.2 Viewing the receive ABCD signaling bits
The RxAB (receive ABCD) setting is a read-only parameter that displays the ABCD pattern
for testing the receive side of the circuit.
To view the ABCD receive bit pattern on an FXO port, enter the following command:
user> GET FXOTST:RXAB:n
To view the ABCD receive bit pattern on an FXS port, enter the following command:
user> GET FXSTST:RXAB:n
5.4.2.3 Viewing the tip and ring statistics
The Tip a nd Ring Sta tus information field describe s what the att ached device is doing with the
Tip and Ring leads of the FXO or FXS port.
To view the tip and ring status information for an FXO port, enter the following command:
user> GET FXOTST:TRSTAT:n
To view the tip and ring status information for an FXS port, enter the following command:
user> GET FXSTST:TRSTAT:n
5.5 LED indicators
This section explains how to interpret the LED indicat or lights loc ated on the front panel of
the Z-Plex unit.
5.5.1 Alarm LED
A single tri-color LED i ndicates the overall syst em alarm status. T able 5-2 descri bes the Alarm
LED.
LED Description
Table 5-1. Alarm LED
RED (ON) System is in an alarm condition.
RED (BLINKING) System has failed Power-On Self Test (POST).
Zhone Technologies / 5-9
Page 58

Running Head
LED indicators Diagnostics
Model No.
5.5.2 Ethernet LED
A single green LED indicates the operational status of the Ethernet port. If the LED is
blinking, the Ethernet port is connected and transmitting traffic.
5.5.3 WAN LEDs
The WAN LEDs indica te the transmission status of the two T1 interface ports and their
loopback status. Both T1 indicators are implemented by two tri-color (green/red/yellow)
LEDs. Table 5-2 describes the WAN LEDs.
Table 5-2. WAN LEDs
LED Description
GREEN (ON) Normal operation, no alarm.
RED (ON) Major alarm. No signal or loss of frame. Loss of signal indicates the
Rx signal at the T1 port is below a sufficient level. Loss of frame
indicates the line cannot recover framing from the Rx signal.
RED (BLINKING) Returning to normal state after a major alarm.
YELLOW (BLINKING) Minor alarm. Excessive error rate. This indicates the T1 framer is
able to recover framing from the Rx signal, but the measured bit error
rate is greater than or equal to allowable limits.
YELLOW (ON) Minor alarm. Loss of signal or loss of frame on remote side.
GREEN (BLINKING) WAN test in progress.
5.5.4 Power LED
A single green LED indicates the operational status of the power supply to the unit. If the LED
is ON, the power is connected.
5-10 \ Zhone Technologies
Page 59

Alphabetical Reference Parameter reference
Appendix A
Alphabetical Reference
This chapter provides a reference to the Z-Plex CLI parameters, commands, and syntax. It also
includes s ystem error messages. It includes the following topics:
Parameter reference page A-1
Command reference page A-30
Error messages page A-31
CLI reference page A-33
A.1 Parameter reference
This section provides a listing of configuration groups in the Z-Plex CLI and an alphabetic
reference of all Z-Plex parameters .
A.1.1 Configuration groups
Table A-1 describes the Z-Plex configuration groups and the parameters in each group.
Table A-1. Configuration groups in the Z-Plex
Group Index Description Parameters
CPUCFG 1 System-level configuration such as
system IP address and host IP
addresses.
IP
IPFDL
IPHDL
IPHOST1
IPHOST2
IPHOST3
MASK
MASKFDL
MASKHDL
MTUFDL
MTUHDL
SNMPTRAP
WTCOMSTRING
Zhone Technologies / A-1
Page 60

Running Head
Parameter reference Alphabetical Reference
Model No.
Table A-1. Configuration groups in the Z-Plex (Continued)
Group Index Description Parameters
DPCFG 1 Data port configuration, such as
activation and clocking.
FARPMCUR 1 Current far end statistics for the T1
interfaces.
LOOP
MODE
RNGBK
RTLP
RxAB
ST ATE
TEST
TRCNTRL
TRNKC
TRSTAT
TS
TTLP
TxAB
TYPE
WAN
ALLFARCUR
BES
ES
LOFC
SES
SLIP
UAS
FARPMTOT 1 Total far end statistics for the T1
interfaces.
FXOCFG A single value
between 1 and
24, or a range of
values.
A-2 \ Zhone Technologies
FXO port configuration, including
state, mod e, and type.
ALLFARTOT
BES
ES
LOFC
SES
SLIP
UAS
LOOP
MODE
RTLP
ST ATE
TRNKC
TS
TTLP
TYPE
WAN
Page 61

Alphabetical Reference Parameter reference
Table A-1. Configuration groups in the Z-Plex (Continued)
Group Index Description Parameters
FXOTST A single va lue
between 1 and
24, or a range of
values.
FXSCFG A single value
between 1 and
24, or a range of
values.
FXSTST A single value
between 1 and
24, or a range of
values.
Test mode for FXO ports. RXAB
TEST
TRCNTRL
TRSTAT
TXAB
FXS port configuration, including
state, mod e, and type.
Test mode for FXS ports. RXAB
LOOP
MODE
RNGBK
RTLP
ST ATE
TRNKC
TS
TTLP
TYPE
WAN
TEST
TRCNTRL
TRSTAT
TXAB
PMCUR 1A single value
between 1 and
24, or a range of
values.
PMINT A single value
between 1 and
24, or a range of
values.
Current statistics for the T1 interfaces. ALLCUR
BES
ES
LOFC
SES
SLIP
UA
Interval sta tistics for the T1 interf aces. ALLINT
BES
ES
LOFC
SES
SLIP
UAS\
Zhone Technologies / A-3
Page 62

Running Head
Parameter reference Alphabetical Reference
Model No.
Table A-1. Configuration groups in the Z-Plex (Continued)
Group Index Description Parameters
PMTOT A single value
between 1 and
24, or a range of
values.
SYSTEM 1 System contact information. SYSCONTACT
T1BE A single value
between 1 and
24, or a range of
values.
T1CFG 1 T1 line configuration, including state,
Total statistic s for the T1 in terfaces. ALLTOT
BES
ES
LOFC
SES
SLIP
UA
SYSNAME
SYSDESC
SYSLOCATION
Inserts T1 bit errors during bit error
test.
type, framing, and encoding.
ERRINS
BERT
CLKSRC
CODE
DS0
ERRINS
FDL
FDL_IP
FRAME
HDLC
LINELEN
LOOPBACK
PATTERN
ST ATE
TSBERTOFF
TSBERTON
TYPE
A.1.2 Alphabetic reference
This section contains an alphabetic reference to all CLI parameters.
A-4 \ Zhone Technologies
Page 63

Alphabetical Reference Parameter reference
ALLCUR
Displays ES, BES, UAS, SES, SLIP, and LOFC errors for the current 15 minute interval.
Configuration group: PMCUR
Syntax:
ALLFARCUR
Displays ES, BES, UAS, SES, SLIP, and LOFC errors for the current 15 minute interval.
Configuration group: FARPMCUR
Syntax:
ALLFARTOT
Displays ES, BES, UAS, SES, SLIP, and LOFC errors for the total of each interval.
Configuration group: FARPMTOT
Syntax:
ALLFARINT
Displays ES, BES, UAS, SES, SLIP, and LOFC errors for the specific 15 minutes interval,
when interval is specified.
GET PMCUR:ALLCUR:x
GET FARPMCUR:ALLFARCUR:x
GET FARPMCUR:ALLFARCUR:x
Configuration group: FARPMINT
Syntax:
ALLINT
Displays ES, BES, UAS, SES, SLIP, and LOFC errors for the specific 15 minutes interval,
when interval is specified.
Configuration group: PMINT
Syntax:
ALLTOT
Displays ES, BES, UAS, SES, SLIP, and LOFC errors for the total of each interval.
Configuration group: PMTOT
GET FARPMINT:ALLFARINT:x
GET PMINT:ALLINT:x:(0-95)
Zhone Technologies / A-5
Page 64

Running Head
Parameter reference Alphabetical Reference
Syntax: GET PMTOT:ALLTOT:x
Model No.
BERT
Activates a bit error rate test (BERT) on a T1 line. The BER test sends a data pattern and
measures the bit error rate on the selected time slot. Possible values are:
• OFF (default): terminates the BER test.
• QRSS (quasi-random signal source): activates the BER test and sends a QRSS pattern
during the BER test.
• ALT10: sends a 10101010 pattern during the BER test.
• 2047: sends a 2047 test pattern during the BER test.
Note that you cannot perform a BER test and a loopback test simultaneously.
Configuration group: T1CFG
BES
CLK
Syntax:
See also: PATTERN, TSBERTOFF, TSBERTON
BES (bursty errored second): indicates the total number of seconds with more than one and
fewer than 320 CRC-6 (ESF), BPV (D4/D-frame), or CRC-4 (E1) errors.
Configuration group: PMCUR, PMT OT, PMINT, FARPMCUR, FARPMTOT, FARPMINT
Syntax:
Syntax: GET (PMINT, FARPMINT):x:(0-95)
Specifies whether the data port clock is inverted. DTE clocking usually requires a Normal
setting. If synchronization problems occur, specify the clock is inverted. Possible values are:
• NORMAL (default)
• INVERTED
(GET/SET) T1CFG:BERT:X:(QRSS/ALT/2047/OFF)
GET (PMCUR, PMTOT, FARPMCUR, FARPMTOT):x
Configuration group: DPCFG
Syntax:
A-6 \ Zhone Technologies
(GET/SET) DPCFG:CLK:1:(NORMAL/INVERTED)
Page 65

Alphabetical Reference Parameter reference
CLKSRC
Clocking source for T1 line. Possible values are:
CODE
• WAN1:
• WAN2
• INTERNAL: Clocking received from internal 1.544Mhz Stratum 4 clock.
If the external clock fails, the uni t switches to the internal clock. When the extern al clock is
restored, the unit switches back to the external clock source.
Configuration group: T1CFG
Syntax:
T1 line encoding. Possible values are:
• B8ZS
• AMI
Configuration group: T1CFG
Syntax:
Clock for the T1 interface derived from the line receive signal.
(GET/SET) T1CFG:CLKSRC:x:(WAN1/WAN2/INTERNAL)
(GET/SET) T1CFG:CODE:x:(B8ZS/AMI)
CTS
The Clear To Send (CTS) setting controls when data is sent. Some DTE equipment must
receive a CTS signal before transm itting data. Possible v alues are:
• ON:
• OFF (default):
• AUTO:
Configuration group: DPCFG
Syntax:
CTSDELAY
The Clear To Send (CTS) Delay setting delays changes in the CTS signal in the local mode.
Enter the value you need in millise conds. If you do not know what value you need, start with
0 (zero) ms and increase the value gradually until you no longer experience problems. The
CTS option above must be set to ON before the CTS DELAY setting has any effect.
(GET/SET) SET DPCFG:CTS:1:(ON/OFF)
Zhone Technologies / A-7
Page 66

Running Head
Parameter reference Alphabetical Reference
Specify a value from 0 to 100ms in multiples of 10.
Configuration group: DPCFG
Model No.
CUR
Syntax:
Current T1 near-end statistics. Possible values are:
• ES (errored sec onds): indicate s the t otal nu mber of s econds i n whic h one or more fr ames
• SES (severely errored second): indicates the total number of seconds in which the bit
• BES (bursty errored second): indicates the total number of seconds with more than one
• UAS (unavailable secon d): indicate s the total numbe r of seconds du ring which servi ce is
• LOFC (loss of frame count): indic ates t he tot al number of ti mes a Loss Of Frame ( LOF)
(GET/SET) DPCFG:CTSDELAY:1:(0-100)
with CRC-5 errors were detected. This field is read-only.
error rate exceeded one bit per thousand (1 x 10⁻³)
and fewer than 320 CRC-6 (ESF), BPV (D4/D-frame), or CRC-4 (E1) errors.
unavailable. An unavailable signal state is declared after ten consecutive SESs are
logged. An unavailable state is cleared after ten consecutive non-SESs are logged.
Unavailable Seconds are also accumulated if the card has an out-of-service (OOS)
condition.
is declared. An LOF is declared after 2.5 seconds of a continuous Loss Of
Synchronization (LOS) or Out-Of-Frame (OOF) condition. The LOF is cleared after no
more than 15 consecutive seconds without another LOS or OOF.
.
DS0
• SLIP: (slipped second): indicates the total number of seconds that contain one or more
controlled slips. A con trolled slip is the delet i on or replication of a T1 frame by the
receiving equipment.
Specifies whether the DS0 management interface is enabled. When enabled, the DS0
management channel encapsulates IP traffic in HDLC frames using DS0 24. Possible values
are:
• ON
• OFF (default)
Configuration group: T1CFG
Syntax:
(GET/SET) T1CFG:DS0:X:(ON/OFF)
A-8 \ Zhone Technologies
Page 67

Alphabetical Reference Parameter reference
DSR
The Data Set Ready (DSR) option allows you to define whether the V.35 port DSR control
lead should be held on (high) or off (low).
Possible values are:
• ON:
• OFF (default):
Configuration group: DPCFG
ERRINS
ES
FDL
Syntax:
Specifies that random bits are inserted while the BERT test is active for the entire T1. The only
supported value is BIT.
Configuration group: T1CFG
Syntax:
The ES (errored seconds) option indicates the total number of seconds in which one or more
frames with CRC-5 errors were detected. This field is read-only.
Configuration group: PMCUR, PMTOT, PMINT, FARPMCUR,FARPMTOT, FARPMINT
Syntax:
Syntax: GET (PMINT, FARPMINT):ES:x:(0-95)
(GET/SET) DPCFG:DSR:1:(ON/OFF)
(GET/SET) T1BE:ERRINS:X:BIT
GET (PMCUR, PMTOT, FARPMCUR, FARPMTOT):ES:x
Type of FDL. Possible values are:
• ANSI
• ATT
• OFF (default)
Notes
• This setting is only required if FRAME is set to ESF.
Zhone Technologies / A-9
Page 68

Running Head
Parameter reference Alphabetical Reference
• WAN 2 does not support FDL.
Configuration group: T1CFG
Model No.
FDL_IP
FRAME
Syntax:
Specifies whether th e FDL over IP manag ement interface is enabled. FDL is a 4 Kbps channel
normally used to manage the T1 link. When the FDL is used to carry management data, it is
no longer able to carry T1 management data.
Possible values are:
• ON
• OFF (default)
Configuration group: T1CFG
Syntax:
Specifies T1 framing and dat a link format. ESF frame f ormat require s FDL to be set. Possible
values are:
(GET/SET) T1CFG:FDL:X:(ANSI/ATT/OFF)
(GET/SET) T1CFG:FDL_IP:X:(ON/OFF)
HDLC
• D4
• ESF (default): If ESF is selected, FDL messaging type must also be selected (and will
• SLC96
(No data link selection required with D4 setting)
invoke additional setting options, such as AT&T or ANSI).
Notes
• WAN 2 does not support SLC96.
Configuration group: T1CFG
Syntax:
Possible values are:
• HDR_ON (default)
• HDR_OFF
(GET/SET) T1CFG:FRAME:X:(D4/ESF/SLC96)
A-10 \ Zhone Technologies
Page 69

Alphabetical Reference Parameter reference
Notes
• If you are connecting to Premisys IMACS on DS0 mgmt channel (time slot 24), set
HDLC to HDR_OFF.
• HDR_ON is compatible with the Cisco implementation of HDLC headers.
• Note that DS0 is only valid on WAN 1.
Configuration group: T1CFG
INT
IP
Syntax:
Interval statistics. P ossible val ues are:
• ES
• SES
• BES
• UAS
• LOFC
• SLIP
System IP address.
Configuration group: CPUCFG
Syntax:
(GET/SET) T1CFG:HDLC:X:(HDR_ON/HDR_OFF)
(GET/SET) CPUCFG:IP:1:(ip address)
IPFDL
IPHDL
IP address used for FDL traffic.
Configuration group: CPUCFG
Syntax:
IP address used for HDLC traffic over the DS0 management channel.
Configuration group: CPUCFG
Syntax:
(GET/SET) CPUCFG:IPFDL:1:(ip address)
(GET/SET) CPUCFG:IPHDL:1:(ip address)
Zhone Technologies / A-11
Page 70

Running Head
Parameter reference Alphabetical Reference
Model No.
LINELEN
Specifies the CSU line build out or the DSX line length. For a CSU, possible values are:
• 00 (0dB)
LOFC
• N75 (
• N15 (
• N22 (-22.0dB)
For a DSX, possible values are:
• D0 (0-132 feet)
• 133 (133-265 feet)
• 266 (266-398 feet)
• 399 (399-532 feet)
• 533 (533-654 feet)
• 655 (655-700 feet)
Configuration group: T1CFG
Syntax:
T1CFG:LINELEN:X:(00/N75/N15/N22/D0/133/266/399/533/655)
-7.5dB)
-15.0dB)
(GET/SET)
LOFC (loss of frame count) indicates the total number of times a Loss Of Frame (LOF) is
declared. An LOF is declared after 2.5 seconds of a continuous Loss Of Synchronization
(LOS) or Out-Of-Frame (OOF) condition. The LOF is cleared after no more than 15
consecutive seconds without another LOS or OOF.
Configuration group: MCUR, PMTOT, PMINT, FARPMCUR,FARPMTOT, FARPMINT
Syntax:
Syntax: GET (PMINT, FARPMINT):LOFC:x:(0-95)
GET (PMCUR, PMTOT, FARPMCUR, FARPMTOT):LOFC:x
LOOP (FXO)
Loopback for the FXO port. Possible values are:
• OFF (default)
• DGTL: during an analog loopback, the decoded analog signal is sent back to th e far end
after decoding and then re-encoding it.
A-12 \ Zhone Technologies
Page 71

Alphabetical Reference Parameter reference
• ANLG: during a digital l oop back, t he inco ming digi tal DS0 si gnal i s sent back t o the far
end without decoding it.
Configuration group: FXOCFG
Syntax:
(GET/SET) FXOCFG:LOOP:n:(OFF, DGTL, ANLG)
LOOP (FXS)
Loopback for the FXS port. Possible values are:
• OFF (default)
• DGTL: during an analog loopback, the decoded anal og signal is sent back to the far end
after decoding and then re-encoding it.
• ANLG: during a digital l oop back, t he inco ming digi tal DS0 si gnal i s sent back t o the far
end without decoding it.
Configuration group: FXSCFG
Syntax:
(GET/SET) FXSCFG:LOOP:n:(OFF, DGTL, ANLG)
LOOPBACK (V.35)
Loopback for the V.35 port. Possible values are:
• LINE:
• LOCAL:
• OFF (default):
Configuration group: DPCFG
Syntax:
(GET/SET) DPCFG:LOOPBACK:1:(LINE/LOCAL/OFF)
LOOPBACK (T1)
Loopback for the T1 lin e. Loopback tests terminate after 10 minutes. Po ssible values are:
• LINEOFF: deactivates a line loopback
• LINEON: activates a line loopback
• LOCALOFF: deactivates a line loopback
• LOCALON
Configuration group: T1CFG
Syntax:
(GET/SET) T1CFG:LOOPBACK:X:(LINEOFF/LINEON/LOCALOFF/LOCALON)
: activates a local loopback
Zhone Technologies / A-13
Page 72

Running Head
Parameter reference Alphabetical Reference
Model No.
MASK
System network mask.
Configuration group: CPUCFG
Syntax:
MASKFDL
Network mask used for IP over FDL traffic.
Configuration group: CPUCFG
Syntax:
MASKHDL
Network mask used for IP over HDLC traffic.
Configuration group: CPUCFG
Syntax:
MODE (FXO)
Possible values are:
• FXO (default)
(GET/SET) CFG:MASK:1:(net mask)
(GET/SET) CPUCFG:MASKFDL:1:(net mask)
(GET/SET) CPUCFG:MASKHDL:1:(net mask)
• FXODN
• DPT
See Table A-2 for a list of supported MODE and TYPE settings.
Configuration group: FXOCFG
Syntax:
(GET/SET) FXOCFG:MODE:n:(FXO,FXODN,DPT)
Table A-2. Supported MODE and TYPE settings for FXO and FXS ports
Modes Supported types
FXS LS LSFD GS GSA GSI
FXS-DN LS LSFD GS GSA GSI
A-14 \ Zhone Technologies
Page 73

Alphabetical Reference Parameter reference
Table A-2. Supported MODE and TYPE settings for FXO and FXS ports
Modes Supported types
FXS-DN WINK LS LSFD GS GSA GSI
TR-08 SP UVG UVGA
FXO LS LSFD GS GSA
FXODN LS LSFD GS GSA
DPT DPT
MODE (FXS)
FXS supervision mode. The Mode setting should be determined by the type of equipment to
which you are connecting to th e port. All options use two- wire balanced connections . Possible
values are:
• FXS (default): Foreign exchange subscriber. This
system to a two-way (both inbound an d outbound calls) PBX trunk or a key system trunk.
The system requires a ringing generator for this option.
• FXSDN: Foreign exchange subscriber-defined network. This option provid es acce ss to
new services offered by advanced networks from many major carriers. The system
requires a ringing generator for this option.
• FXSDNWINK: Foreign exchange su bscriber -defined network wink s tart operati on. This
option uses the same type of signali ng as FXSDN and provides a 150-milli second delay,
then a 200-millisecond “wink” back to the central office when the FXS port sees an
off-hook condition from the central office. The system requires a ringing generator for
this option.
• TR08: Fram e format signaling and data link a s defined in
circuits using AT&T Subscriber Loop Carri ers (SL C-96) fa cili ties . This option connect s
the port to one-way outgoing trunks from a PBX, CENTREX, key system, or telephone
set to an SLC channel. The SLC96 mode also must be active on the associated WAN
interface.
See Table A-2 on page A-14 for a list of supported MODE and TYPE settings.
Configuration group: FXSCFG
Syntax:
(GET/SET) FXSCFG:MODE:n:(FXS,FXSDN,FXSDNWINK,TR08)
option enables you to connect the
TR-TSY-000008 Mode 1 for
Zhone Technologies / A-15
Page 74

Running Head
Parameter reference Alphabetical Reference
Model No.
NCHAN
Specifies the number of time slots onto which data from the T1 line will be mapped. Note that
starting time slots must also be selected for each data port. Channels must be contiguous.
Possible values are from 1 to 24. The default is 0.
Configuration group: DPCFG
Syntax: (GET/SET) DPCFG:NCHAN:1:(1-24)
PATTERN
The Pattern parameter specifies the test pattern for use with a BERT test on a single DS0.
Pattern applies to all time slots but you can activate the BER test on any time slot.
Possible values are:
• OFF (default):
RATE
• QRSS (quasi-random signal source): sends a QRSS pattern during the BER test.
• ALT10: sends a 10101010 pattern during the BER test.
• 2047: sends a 2047 test pattern during the BER test.
Configuration group: T1CFG
See TSBERTON, TSBERTOFF
Syntax:
Rate for the data port. Each port on t he V.35 port can be independently configured to oper at e
at speeds of 56Kbps or 64Kbps, where N equals 1 to 24.
Possible values are:
• 64K (the default): Data ports receive and transmit data at multiples of 64Kbps clear
• 56K: Data ports receive and transmit data at multiples of 56Kbps clear channel.
Configuration group: DPCFG
(GET/SET) T1CFG:PATTERN:X:( QRSS/ALT/2047/OFF)
channel. If you specify 64Kbps, you must set T1 CODE to B8ZS.
Syntax:
A-16 \ Zhone Technologies
(GET/SET) DPCFG:RATE:1:(56K/64K)
Page 75

Alphabetical Reference Parameter reference
RLSD
The Receive Level Signal Detect (RLSD) option allows you to define whether the RLSD
control lead is held ON (high) or OFF (low).
Possible values are:
• ON:
• OFF (default):
Configuration group: DPCFG
Syntax:
RNGBK
Specifies whether a ringback tone is generated by the system and sent towards the network.
Possible values are:
• OFF (default): Ringback provided by PBX or switch
• ON: Ringback tones will be sent on the corresponding DS0s for the duration of ringing
on the line.
Configuration group: FXSCFG
Syntax:
RTLP (FXO)
The Receive Transmission Level Point (RTLP) setting controls the amount of gain or
attenuation added to signals after they are decoded to analog signals. To increase the signal
level, set the RTLP setting to a positive number (the larger the number, the more gain is
added). To decrease the signal level, set the RTLP setting to a negative number (the more
negative the number , t he more the si gnal level is de creased). For example, an incoming signal
at -5 dBm can be increased to -3 dBm by setting RTLP to +2 dB.
(GET/SET) DPCFG:RLSD:1:(ON/OFF)
(GET/SET) FXSCFG:RNGBK:n:(OFF, ON)
Possible values are from -9.0dB to 3.0dB. The default is 0dB.
Configuration group: FXOCFG
Syntax:
(GET/SET) FXOCFG:RTLP:n:(-9 to 3)
Zhone Technologies / A-17
Page 76

Running Head
Parameter reference Alphabetical Reference
Model No.
RTLP (FXS)
The RTLP setting controls the amount of gain or loss added to the incoming signal after it is
decoded to analog. To increase the signal level, set the RTLP setting to a positive value (the
larger the numbe r, the more gain is added). To decrease the signal lev el, set the RTLP setting
to a negative value (the more negative the number, the more the signal level is decreased).
For example, an incomin g signal at -5.0d Bm can be incr eased to -3.0 dBm by setting RTLP to
+2 dB. The RTLP range is -9.0dB to 3.0dB.
Configuration group: FXSCFG
Syntax:
RxAB (FXO)
The RxAB setting is a read-only parameter that displays the ABCD pattern for testing the
receive sid e of the circuit. Possibl e values are:
• 00
• 01
• 10
• 11
Configuration group: FXOTST
Syntax:
RxAB (FXS)
The RxAB setting is a read-only parameter that displays the ABCD pattern for testing the
receive sid e of the circuit. Possibl e values are:
(GET/SET) FXSCFG:RTLP:n:(-9 to 3)
GET FXOTST:RXAB:n
Possible values are:
• 00
• 01
• 10
• 11
Configuration group: FXSTST
Syntax:
A-18 \ Zhone Technologies
GET FXSTST:RXAB:n
Page 77

Alphabetical Reference Parameter reference
SCHAN
Specifies the first T1 time slot that d ata from the data port will be mapped .
Configuration group: DPCFG
SES
SLIP
Syntax:
SES (severely errore d second): indica tes the total numbe r of seconds in whi ch the bit error rate
exceeded one bit per thousand (1 x 10⁻³)
Configuration group: MCUR, PMTOT, PMINT, FARPMCUR,FARPMTOT, FARPMINT
Syntax:
Syntax: GET (PMINT, FARPMINT):SES:x:(0-95)
SLIP: (slipped second): indicates the total number of seconds that contain one or more
controlled slips. A controlled slip is the deletion or replication of a T1 or E1 frame by the
receiving equipment.
Configuration group: PMCUR, PMTOT, PMINT, FARPMCUR,FARPMTOT, FARPMINT
Syntax:
(GET/SET) DPCFG:SCHAN:1:(1-24)
.
GET (PMCUR, PMTOT, FARPMCUR, FARPMTOT):SES:x
GET (PMCUR, PMTOT, FARPMCUR, FARPMTOT):SLIP:x
Syntax: GET (PMINT, FARPMINT):LOFC:SLIP:x:(0-95)
STATE (V.35)
State of V.35 ports. Possible values are:
• ACTV
• STDBY (default): Unassigned should be channels be set to STDBY.
Note that the V.35 port must be s et to STDBY wh ile you are making configur ation c hanges to
the WAN, SCHAN, or NCHAN parameters. After setting the parameters, set the STATE to
ACTIVE.
Configuration group: DPCFG
Syntax:
(GET/SET) DPCFG:STATE:1:(ACTV/STDBY)
Zhone Technologies / A-19
Page 78

Running Head
Parameter reference Alphabetical Reference
Model No.
STATE (T1 drop and insert)
State of T1 drop and insert ports. Possible values are:
• ACTV
• STDBY
Configuration group: T1CFG
Syntax:
STATE (FXO)
State of FXO ports. Possible values are:
• ACTV
• STDBY (default): Unassigned should be channels be set to STDBY.
Configuration group: FXOCFG
Syntax:
STATE (FXS)
State of FXS ports. Possible values are:
• ACTV
• STDBY (default): Unassigned should be channels be set to STDBY.
Configuration group: FXSCFG
(GET/SET) T1CFG:STATE:1:(ACTV/STDBY)
(GET/SET) FXOCFG:STATE:n:(ACTV/STDBY)
Syntax:
(GET/SET) FXSCFG:STATE:n:(ACTIVE/STANDBY)
STATE (T1)
State of T1 po r ts. Possible values are:
• ACTIVE
• STDBY (default)
Configuration group: T1CFG
Syntax:
A-20 \ Zhone Technologies
(GET/SET) T1CFG:STATE:X:(ACTV/STDBY)
Page 79

Alphabetical Reference Parameter reference
SYSCONTACT
System contact information. Enter a string of up to 25 characters. Note that spaces are not
allowed.
Configuration group: SYSTEM
Syntax:
(GET/SET) SYSTEM:SYSCONTACT:(String)
SYSDESCR
System description informat ion. Enter a strin g of up to 25 characters. Note that spaces are not
allowed.
Configuration group: SYSTEM
Syntax:
(GET/SET) SYSTEM:SYSDESCR:(String)
SYSLOCATION
System location information. En ter a string of up to 25 characters. Note that sp aces are no t
allowed.
Configuration group: SYSTEM
Syntax:
(GET/SET) SYSTEM:SYSLOCATION:(String)
SYSNAME
System na me.
Configuration group: SYSTEM
Syntax:
SYSUPTIME
100s of seconds since last system reset.
Configuration group: SYSTEM
Syntax:
TEST (FXO)
Test shows if the port is in the test mode.
Possible values are:
(GET/SET) SYSTEM:SYSNAME:(String)
(GET/SET) SYSTEM:SYSUPTIME:(String)
Zhone Technologies / A-21
Page 80

Running Head
Parameter reference Alphabetical Reference
• OFF (default)
• ON
Configuration group: FXOCFG
Model No.
Syntax:
TEST (FXS)
Test shows if the port is in the test mode. Possible values are:
• OFF (default)
• ON
Configuration group: FXSTST
Syntax:
TM
Possible values are:
• ON:
• OFF (default):
Configuration group: DPCFG
(GET/SET) FXOTST:TEST:n:(ON/OFF)
(GET/SET) FXSTST:TEST:n:(ON/OFF)
Syntax:
(GET/SET) DPCFG:TM:1:(ON/OFF)
TOT
Current near-end statistics. Possible values are:
• ES
• SES
• BES
• UAS
• LOFC
• SLIP
TRCNTL (FXO)
The Tip and Ri ng Control informat ion field sh ows the current status of the Ti p and Ring leads
of the FXO port from the perspective of the system. The possible values are:
A-22 \ Zhone Technologies
Page 81

Alphabetical Reference Parameter reference
• LOOP: Tip and Ring leads are tied together.
• OPEN: Ring lead is not connected to either the Tip or to ground.
• RING_GND: the Ring lead is grounded.
Configuration group: FXOCFG
TRCNTRL (FXS)
The Tip a nd Ring Control s pecifies t he tip and r ing leads of the FXS port from the perspe ctive
of the system.
Possible values are:
• TgRb (Tip lead is grounded and -48V is applied to the Ring lead)
• ToRb (Tip lead is open and -48V is applied to the Ring lead)
• TbRg (-48V is applied to the Tip lead and the Ring lead is grounded)
• RING (the ringing voltage is applied between tip and ring)
Configuration group: TXSTST
Syntax:
TRNKC (FXO)
The Trunk co nditioning se tting speci fies whether the FXO port should sen d the idle pattern to
the network upon declar ation of a Carrier Group Alarm (CGA) on the WAN link to which the
port is assigned. In most cases, leave the trunk conditioning setting at its default setting.
Possible values are:
• OFF (default)
• ON
Configuration group: FXOCFG
Syntax:
TRNKC (FXS)
The Trunk co nditioni ng settin g specifi es whether the FXS port sh ould send th e idle pat tern to
the network upon declar ation of a Carrier Group Alarm (CGA) on the WAN link to which the
port is assigned. In most cases, leave the trunk conditioning setting at its default setting.
(GET/SET) TXSTST:TRCNTRL:n:(TgRb/ToRb/TbRg/RING)
(GET/SET) FXOCFG:TRNKC:n:(OFF, ON)
Possible values are:
Zhone Technologies / A-23
Page 82

Running Head
Parameter reference Alphabetical Reference
• OFF
• ON (default)
Configuration group: FXSCFG
Model No.
Syntax:
(GET/SET) FXSCFG:TRNKC:n:(OFF, ON)
TRSTAT (FXO)
The Tip a nd Ring Sta tus information field describe s what the att ached device is doing with the
Tip and Ring leads of the FXO port.
Possible values are:
• NORMAL
• REVERSE
• OPEN
• RINGING
• TIP_GND
Configuration group: FXOCFG
TRSTAT (FXS)
Read only field. Possible values are:
• LOOP
• OPEN
• RING_GND
Configuration group: FXSCFG
TS (data port)
Specify the t ime slots for T1 drop and insert. The TS param eter uses the form ffffffff, where
each digit corresponds to 4 time slots (0 through 31). Ass ign a 1 to each time slot you want to
be used for drop and insert. Then, for each group of 4 time slots, convert the value to its
hexadecimal equivalent.
A-24 \ Zhone Technologies
Page 83

Alphabetical Reference Parameter reference
Figure 5-4 illustrat es how to determ ine the TS value if you want to use t he first fou r time slots
for drop and insert (
Figure 5-4.Time slot assignment for drop and insert
0000000f).
Time slots
Time slot
assignment
Hex value
Configuration group: T1CFG
Syntax:
TS (FXO)
Specify the time sl ots u sed for FXO servi ce. By def ault, time s lot 1 is ma pped to FXO p ort 2 ,
time slot 2 is mapped to FXO port 2, and so on.
Notes
• Each time slot assignment must be unique, even if the time slots are on different WAN
31 30 29 28 27 26 25 24 23 22 21 20 19 18 17 16 15 14 13 12 11 10 9 8 7 6 5 4 3 2 1 0
0 000 0 0 000 00 00 0 000 000 0 000 0 000 11 11
0000000f
(GET/SET) FXSCFG:TS:n:(00000000-ffffffff)
lines.
Configuration group: FXOCFG
Syntax:
See also: WAN (FXO)
TS (FXS)
Specify the time slots used for FXS service. By default, t ime sl ot 1 is map ped t o FXS port 2,
time slot 2 is mapped to FXS port 2, and so on.
Notes
• Each time slot assignment must be unique, even if the time slots are on different WAN
Configuration group: FXSCFG
(GET/SET) FXOCFG:TS:n:(1-24)
lines.
Zhone Technologies / A-25
Page 84

Running Head
Parameter reference Alphabetical Reference
Syntax: (GET/SET) FXSCFG:TS:n:(1-24)
See also: WAN (FXS)
Model No.
TSBERTOFF
De-activates a BER test on the specified channel.
Possible values are:
• 1-24
Configuration group: T1CFG
See also: BERT, PATTERN
Syntax:
TSBERTON
Actives a BER test on the specified channel.
Possible values are:
• 1-24
Configuration group: T1CFG
See also: BERT, PATTERN
Syntax:
TTLP (FXO)
Specifies transmit FXO attenuati on. Possible values are from 9.0dB to -3.0dB. The default
value is 0dB.
Configuration group: FXOCFG
(GET/SET) T1CFG:TSBERTOFF:X:(1-24)
(GET/SET) T1CFG:TSBERTON:X:(1-24)
Syntax:
(GET/SET) FXOCFG:TTLP:n:(-3 to 9)
TTLP (FXS)
The Trans mit TLP se tting co ntrols the amo unt of ga in or l oss added to a vo ice sign al from t he
CPE before it is encoded to digital PCM. To increase the signal level, set the TTLP setting to
a negative value. The more negative the number , the more gain is added. T o decr ease the signal
A-26 \ Zhone Technologies
Page 85

Alphabetical Reference Parameter reference
level, set the TTLP setting to a positive value (the more positive the number, the more the
signal level is decreased). For example, an incoming signal at -5 dBm can be increased to -2
dBm by setting the TTLP to -3 dB. The TTLP range is -9.0dB to 3.0dB. The default is 0dB.
Configuration group: FXSCFG
Syntax:
TxAB (FXO)
The TxAB (Tr ansmit ABCD) para meter a llows you to eithe r monit or the stat us of the ABCD
signaling bits bei ng transmitted towards the network or set a specific ABCD patte rn for testing
the transmit side of the circuit. Possible values are:
• 00
• 01
• 10
• 11
Configuration group: FXOTST
Syntax:
TxAB (FXS)
The TxAB (Tr ansmit ABCD) para meter a llows you to eithe r monit or the stat us of the ABCD
signaling bits bei ng transmitted towards the network or set a specific ABCD patte rn for testing
the transmit side of the circuit. Possible values are:
(GET/SET) FXSCFG:TTLP:n:(-3 to 9)
(GET/SET) FXOTST:n:(00/01/10/11)
• 00
• 01
• 10
• 11
Configuration group: FXSTST
Syntax:
TYPE (FXO)
The Type settin g match es the signal ing b ehavio r of th e FXO eq uipment to t he remote s wit ch.
Possible values are:
• LOOP (Loop start):
(GET/SET) FXSTST:n:(00/01/10/11)
used with traditional telephone stations and simple PBX trunks.
Zhone Technologies / A-27
Page 86

Running Head
Parameter reference Alphabetical Reference
• LPFD (Loop start-forward disconnect): Provides disconnect when FXS is connected to
voice messaging system.
• GS (Ground start): Used with two-way PBX trunks.
• GSA (Ground start autom atic): Used with equipment requiring fast response time to
central office (CO).
• DPT
See Table A-2 on page A-14 for a list of supported MODE and TYPE settings.
Configuration group: FXOCFG
Model No.
TYPE (FXS)
The Type settin g matches the sig nal in g behavior of the FXS equipment to the r emote switch.
Possible values are:
• LS (Loop start):
• LSFD (Loop start-forward disconnect): Provides disconnect when FXS is connected to
voice messaging system. Typically used when connecting to automated answering
equipment.
• GS (Ground start): Used with two-w ay PBX trunks. This setting helps prevent glaring
and call collisions.
• GSA (Ground start autom atic): Used with equipment requiring fast response time to
central office (CO).
• GSI (Ground start immediate): Used with equipment requiring fast response time to the
station or PBX.
• SP (Single party): SLC-96 single party service.
• UVG (Universal voice grade): Toll quality voice for SLC-96.
• UVGA (Universal voice grade automatic):
SLC-96.
Changing the Supervis ion type causes all F XS calls on the af fected FXS line groups to be reset
to the idle state each time a setting is changed. Any active calls in that FXS line group are
dropped.
See Table A-2 on page A-14 for a list of supported MODE and TYPE settings.
used with traditional telephone stations and simple PBX trunks.
Used with some non-B ell switche s for
Configuration group: FXSCFG
Syntax:
A-28 \ Zhone Technologies
(GET/SET) FXSCFG:TYPE:n:(LS, LSFD, GS, GSA, GSI, SP, UVG, UVGA)
Page 87

Alphabetical Reference Parameter reference
TYPE
Type of T1 interface. Possible values are:
• DSX: Z-Plex presents DSX characteristics.
• CSU: (default) Z-Plex presents CSU characteristics.
Configuration group: T1CFG
UAS
WAN
Syntax:
UAS (unavailable second): indicates the total number of seconds during which service is
unavailable. An unavai lable signa l state is declared a fter ten co nsecutive SESs are logged. An
unavailable state is cleared after ten consecutive non-SESs are logged. Unavailable Seconds
are also accumulated if the card has an out-of-service (OOS) condition.
Configuration group: PMCUR, PMTOT, PMINT, FARPMCUR,FARPMTOT, FARPMINT
Syntax:
Syntax: GET (PMINT, FARPMINT):UAS:x:(0-95)
Species the T1 interface whose data is sent out the V.35 port.
Possible values are:
• 1 (default)
(GET/SET) T1CFG:TYPE:X:(CSU/DSX)
GET (PMCUR, PMTOT, FARPMCUR, FARPMTOT):UAS:x
• 2
Configuration group: DPCFG
Syntax:
WAN (FXO)
The T1 WAN interface used to provide FXO service. The default is WAN 1.
Configuration group: FXOCFG
Syntax:
See also: TS (FXO)
(GET/SET) DPCFG:WAN:1:(1/2)
(GET/SET) FXOCFG:WAN:n:(1/2)
Zhone Technologies / A-29
Page 88

Running Head
Command reference Alphabetical Reference
Model No.
WAN (FXS)
The T1 WAN interface used to provide FXS service. The default is WAN 1.
Configuration group: FXSCFG
Syntax:
See also: TS (FXS)
(GET/SET) FXSCFG:WAN:n:(1/2)
A.2 Command reference
This section provides a reference for the Z-Plex CLI commands.
ACTIVEBANK1
Activates code in bank 1.
ACTIVEBANK2
Activates code in bank 2.
CLEARHALARM
Clears the history alarm list.
DATE
Prompts for the date and time in the fo llowing format: mm/dd/yyyy hh:mm:ss.
LOGIN
Prompts for login. The default user name is user; the default password is password.
QUERYIMAGE
Displays information about the images in flash memory.
QUERYTS
Displays t he time slot usage.
QUERYALARM
Displays a list of active alarms.
A-30 \ Zhone Technologies
Page 89

Alphabetical Reference Error messages
QUERYHALARM
Displays a list of history alarms.
REBOOT
Reboots the system.
TFTPDLD
This command initiates a TFTP download. It prompts for the IP address of the server , the code
bank to download the image to, and the filename of the software image.
A.3 Error messages
Table A-3 describes the error messages.
Table A-3. Error messages
Message Explanation
FDL mgmt not supported
on this wan
Invalid instance number.
Valid range is 1-16
Invalid Loopback Loopback activated while another loop back (either local or remote)
Invalid MTU size valid
range is 128-1500
Invalid parameter value Invalid parameter value in SET command.
Invalid time slot valid
range is 1-24
Tried to activate FDL on WAN 2. Only WAN 1 supports IP over
FDL.
Invalid index for a static route.
is active.
Invalid MTU size.
Tried to assign invalid TS.
Invalid Wan Number Tried to enter an invalid WAN number.
IP broadcast address
cannot be used
User tried to assign broadcast IP address. The Z-Plex unit does not
support broadcast IP addresses.
Zhone Technologies / A-31
Page 90

Running Head
Error messages Alphabetical Reference
Model No.
Table A-3. Error messages (Continued)
Message Explanation
Loopback type mismatch User tried to deactivate a line loopback while local loopback is
active.
NCHAN set to 0 please
configure the numbers of
channels
Parameter not found Invalid parameter in GET or SET command.
Password must be
between 7 and 12
character
Please configure IP
address for DS0
Please configure IP
address for FDL mgmt
Reserved IP address Tried to assign reserved IP address to an interface.
SLC96 on WAN2 is not
supported
User tried to configure the starting channels (SCHAN) without
configuring number of channels (NCHAN).
New password not between 7 and 12 characters.
After activating a DS0 manage ment channel, you must assign it a n IP
address.
After activating a IP over FDL management channel, you must
assign it an IP address.
Tried to specify SLC96 framing for the WAN 2 interface. SLC 96
framing is only supported on WAN 2.
Subsystem not found Parameter configuration group not found.
Syntax Error No argument to the GET or SET command.
T able Index is bey ond the
limit 0-95
TFTP download failed TFTP download error.
This is not a FXS/FXO
Port
TS already taken Tried to assign an already assigned time slot to another use.
A-32 \ Zhone Technologies
The requested performance interval and enter value is out of range.
Tried to configure an FXS or FXO port when not supported.
Page 91

Alphabetical Reference CLI reference
A.4 CLI reference
The basic CLI commands are divided into the following categories:
• Basic cont rol commands
• Movement and searching commands
• Insert and change commands
• Delete commands
• Put and undo commands
The following sections describe these commands.
A.4.1 Basic control commands
T able A-4 d escribes the basic c ommands to edit , delete, and ent er commands i nto the system.
Table A-4. Basic control commands
Command Description
h [size] Display the shell history if no argument; otherwise set history
buffer to the specified si ze.
ESC Switch the line editing mode from regular input mode.
ENTER Enter line and leave edit mode.
CTRL + H Delete a character (backspace).
CTRL + U Delete and entire li ne (in edit mode).
CTRL + L R edraw a line (in edit mode).
CTRL + D Complete a symbol name (in edit mode) or end shell session (in
input mode).
CTRL + S Suspend output.
CTRL + Q Resume output.
Zhone Technologies / A-33
Page 92

Running Head
CLI reference Alphabetical Reference
Model No.
A.4.2 Movement and search commands
Table A-5 describes the movement and search commands.
Table A-5. Movement and search commands
Command Description
nG Go to command n.
/string Search for the specified string backward in the history buffer.
?string Search for the specified string forward in the history buffer.
n Repeats the last search.
nk or n- Execute the nth previous shell command.
nj or n+ Execute the nth next shell command.
nh Move the cursor n characters to the left.
nl or SPACE. Move the cursor n characters to the right.
nw Move the cursor n words forward.
(Words are separated by blanks or punctuation.)
nW Move the cursor n large words forward.
(Large words are separated by blanks only.)
ne Move the cursor to the end of the next nth word.
(Words are separated by blanks or punctuation.)
nE Move the cursor to the end of the next nth large word.
(Large words are separated by blanks only.)
nb Move the cursor back n words.
(Words are separated by blanks or punctuation.)
nB Move the cursor back n large words.
(Large words are separated by blanks only.)
$ Move cursor to end of the current line.
A-34 \ Zhone Technologies
Page 93

Alphabetical Reference CLI reference
Table A-5. Movement and search commands (Continued)
Command Description
0 Move cursor to the beginning of the line.
^ Move cursor to the first non-blank character.
fc Search forward for the character c.
Fc Search backward for the character c.
A.4.3 Insert and change commands
Table A-6 describes the insert and change commands.
Table A-6. Insert and change commands
Command Description
a Append text.
A Append text at the end of line.
i Insert text.
I Insert text at the end of the line.
ns C hange n characters.
nc SPACE Change n characters.
cw Change word.
cc or S Change the entire line.
c$ or C Change from cursor to end of line.
c0 Change from the cursor to the beginning of the line.
R Type over characters.
Zhone Technologies / A-35
Page 94

Running Head
CLI reference Alphabetical Reference
Model No.
Table A-6. Insert and change commands (Continued)
Command Description
nrc Replace following n characters with c.
~ Toggle case, lower to upper, or upper to lower.
A.4.4 Delete commands
Table A-7 describes the delete commands.
Table A-7. Delete commands
Command Description
nx Delete n characters, beginning at the cursor.
nX Delete n c haracters to the left of the cursor.
dw Delete word.
dd Delete entire line.
d$ or D Delete text from the cursor to the end of the line.
d0 Delete text from the cursor to the beginning of the line.
A.4.5 Put and undo commands
Table A-7 describes the put and undo commands.
Table A-8. Put and undo commands
Command Description
p Put last deletion after the cursor.
P Put last deletion before the cursor.
A-36 \ Zhone Technologies
Page 95

Alphabetical Reference CLI reference
Table A-8. Put and undo commands (Continued)
Command Description
u Undo last command.
Zhone Technologies / A-37
Page 96

Running Head
CLI reference Alphabetical Reference
Model No.
A-38 \ Zhone Technologies
Page 97

Index
A
AC power, i nstallation 3-5
accessing the serial port 4-5
accessorie s, described 2-3
ACTIVEBANK1 command A-30
ACTIVEBANK2 command A-30
administra tive users
login access
alarm LED 5-9
alarms
described
ALLCUR parameter A-5
ALLFARCUR parameter A-5
ALLFARINT parameter A-5
ALLFARTOT parameter A-5
ALLINT parameter A-5
ALLTOT para meter A-5
4-4
3-5
B
backpanel
connectors
described 2-1
basic control commands A-33
BER testing
activating for an entire T1 line
activating for individual time slots 5-3
BERT parameter A-6
BES parameter A-6
3-1
C
cabling
specifications
channel numbers 1-3
CLEARHALARM command A-30
CLI 4-1
command format 4-1
described 1-4
important information 4-2
IP over FDL 4-5
parameters A-1
CLI parameters A-4
CLI referenc e A-33
3-7
5-3
basic control commands A-33
CLK parameter A-6
CLKSRC parameter A-7
CODE parameter A-7
command line interface 4-1
commands A-30
configuration 4-2
DSO management channel 4-5
Ethernet management channel 4-5
initial 4-2
IP over FDL management channel 4-5
local management channel 4-5
logging in 4-4
logging out 4-4
setting the date 4-4
system contact information 4-6
T1 drop and insert inte rface 4-8
T1 interfaces 4-7
terminal interface softw are settings 4-2
using SNMP 4-6
configuration groups A-1
FARPMCUR A-2
FARPMTOT A-2
FXOCFG A-2
FXOTST A-3
FXSCFG A-3
FXSTST A-3
PMCUR A-3
PMINT A-3
PMTOT A-4
SYSTEM A-4
T1BE A-4
T1CFG A-4
configuring a management interface 4-4
connectors
backpanel
FXO pinouts 3-3
V.35 pinouts 3-2
CPUCFG A-1
craft interface 4-2
CTS parame ter A-7
CTSDELAY parameter A-7
CUR parameter A-8
3-1
Zhone Technologies / Index-1
Page 98

D
data port
defining drop and insert channels
data port lo opback 5-4
activating 5-5
diagnosing 5-4
DATE command A-30
DC power, i nstallation 3-5
default MTU 4-6
default password 4-4
default username 4-4
desktop
placing unit on
DPCFG A-2
Drop and insert
defining channels
DS0 management channel 4-5
DS0 parame ter A-8
DS1 networks
ANSI T1.403 compatibility
DSR parameter A-9
2-6
A-24
E
5-1
A-24
receive ABCD bits 5-9
supported MODE A-14
supported TYPE A-14
test mode 5-8
tip and rings statistics 5-9
transmit ABCD bits 5-8
FXOCFG A-2
FXS loopbacks
configuring
FXS pinouts 3-3
FXS ports
pinouts
receive ABCD bits 5-9
supported MODE A-14
supported TYPE A-14
testing 5-8
tip and ring statistics 5-9
transmit ABCD bits 5-8
FXSCFG A-3
5-7
3-3
G
grounding
system
3-6
ERRINS parameter A-9
error messages A-31
ES parameter A-9
ESF loopback detection 5-1
Ethernet
LED
5-10
Ethernet management channel 4-5
Ethernet, LED 5-10
F
FARPMCUR A-2
FARPMTOT A-2
FDL interfaces
restrictions
FDL parameter A-9
FDL_IP pa rameter A-10
FRAME parameter A-10
front panel
described
FXO loopbacks
configuring
FXO ports
pinouts
4-5
2-2
5-7
3-3
H
HDLC parameter A-10
I
installation
choosing site
overview 2-3
rack mounting 2-5
safety prec autions 2-3
wall mounting 2-6
INT parameter A-11
interfaces
FXO pinouts
FXS pinouts 3-3
V.35 pinouts 3-2
IP over FDL management channel 4-5
IP parameter A-11
IP traffic
encapsulation
IPFDL parameter A-11
IPHDL param eter A-11
2-3
3-3
4-5
Index-2 / Zhone Technologies
Page 99

L
latching loopback
detection
LED
Ethernet
LED indicators 5-9
Ethernet 5-10
T1 5-10
WAN 5-3
LEDs
described
Ethernet 5-10
Power 5-10
line loopbacks 5-1
LINELEN parameter A-12
local loopbacks 5-1
local management channel 4-5
LOFC parameter A-12
logging in 4-4
default password 4-4
default username 4-4
logging out 4-4
automatically 4-4
login access 4-4
LOGIN command A-30
LOOP (FXO) parameter A-12
LOOP (FXS) parameter A-13
LOOPBACK (T1) parameter A-13
LOOPBACK (V.35) parameter A-13
5-1
5-10
5-9
M
management
types of system
MASK parameter A-14
MASKFDL parameter A-14
MASKHDL parameter A-14
MODE (FXO) parameter A-14
MODE (FXS) parameter A-15
1-3
N
NCHAN parameter A-16
network loopbacks 5-1
P
parameters A-1
PATTERN parameter A-16
PMCUR A-3
PMINT A-3
PMTOT A-4
power
AC
3-5
DC 3-5
LED 5-10
specifications 1-4
system requirements 3-4
Q
QUERYALARM command A-30
QUERYHALARM command A-31
QUERYIMAGE command A-30
QUERYTS command A-30
Quick start system configuration
procedures
quick start system configuration 4-2
4-2
R
rack mounting
described
RATE parameter A-16
read/write parameters 4-1
read-only parameters 4-1
REBOOT command A-31
red alarms 4-6
resets 4-6
RLSD parameter A-17
RNGBK parameter A-17
RTLP (FXO) parameter A-17
RTLP (FXS) parameter A-18
RxAB (FXO) parameter A-18
RxAB (FXS) parameter A-18
2-5
S
safety
precautions
SCHAN parameter A-19
SES parameter A-19
setting the date 4-4
SLIP parameter A-19
slot numbers 1-3
SNMP 4-6
overview 1-3
2-3
Zhone Technologies / Index-3
Page 100

read community strings 4-6
SNMP trap recipients
specifying
SNMP traps
alarms
enabling 4-6
specifications
cabling
power 1-4, 3-4
temperature 2-3
Z Plex 1-4
STATE (FXO) parameter A-20
STATE (FXS) parameter A-20
STATE (T1 drop and insert) parameter A-20
STATE (T1) parameter A-20
STATE (V.35) parameter A-19
syntax
commands
parameters A-1
SYSCONTACT parameter A-21
SYSDESCR parameter A-21
SYSLOCATION parameter A-21
SYSNAME parameter A-21
SYSTEM A-4
system
alarms
grounding 3-6
system contact information 4-6
system description information 4-6
SYSUPTI ME parameter A-21
4-6
4-6
3-7
A-1
3-5
T1BE A-4
T1CFG A-4
telnetting 4-5
TEST (FXO) parameter A-21
TEST (FXS) parameter A-22
test mode
FXO and FXS ports
TFTP
described
TFTPDLD command A-31
TM parameter A-22
TOT parameter A-22
TR 54016 5-1
TR-08
channel numbering
described 1-2
TRCNTL (FXO) parameter A-22
TRCNTRL (FXS) parameter A-23
TRNKC (FXO) parameter A-23
TRNKC (FXS) parameter A-23
TRSTAT (FXO) parameter A-24
TRSTAT (FXS) parameter A-24
TS (data port) parameter A-24
TS (FXO) parameter A-25
TS (FXS) parameter A-25
TS parameter, defining A-24
TSBERTOFF parameter A-26
TSBERTON parameter A-26
TYPE (FXS) parameter A-28
TYPE parameter A-29
1-4
5-8
1-2
T
T1
activating BER testing
data restrictions 4-7
drop and in sert interfa ce 4-8
error checki ng 4-5
indexes 4-1
interfaces 4-7
LEDs 5-10
reading frame slips 4-2
voice restrictions 4-7
WAN interfaces 4-1
T1 lines
activating
T1 loopbacks 5-1
activating 5-2
diagnosing 5-1
Index-4 / Zhone Technologies
4-1
5-3
U
UAS parameter A-29
unassigned channels
loopback termination
5-6
V
V.35
pinouts for
V.35 port
line and local loopbacks
voice channels 1-3
3-2
5-4
W
WAN (FXO) parameter A-29
WAN (FXS) parameter A-30
 Loading...