

ZIS2415 ACTIVE
STACJA PAROWA
Паровая станция
/ Steam station
ZIS2415 ACTIVE
INSTRUKCJE UŻYTKOWANIA
PL
Stacja parowa
USER MANUAL
EN
Steam station
BENUTZERHANDBUCH
DE
Dampfstation
NÁVOD K POUŽITÍ
CZ
Parní stanice
NAVODILA ZA UPORABO
SK
Parná stanica
HASZNÁLATI UTASÍTÁS
HU
Gőzállomás
INSTRUCȚIUNI DE UTILIZARE
RO
Stație de călcat cu aburi
ИНСТРУКЦИЯ ПО ПРИМЕНЕНИЮ
RU
Паровая станция
ИНСТРУКЦИИ ЗА УПОТРЕБА
BG
Парогенератор за обработване на дрехи
ІНСТРУКЦІЯ ПО ЗАСТОСУВАННЮ
UA
Парогенератор
13
3
4
9
1
2
6
5
12
7
10
11
8

PLPL
DZIĘKUJEMY ZA WYBÓR MARKI ZELMER. DOKŁADAMY STARAŃ, ABY PRODUKT DZIAŁAŁ W
SPOSÓB ZADOWALAJĄCY I PRZYJEMNY.
OSTRZEŻENIE
Przed rozpoczęciem korzystania z produktu prosimy uważnie przeczytać instrukcję obsługi i
przechowywać ją w bezpiecznym miejscu, aby móc z niej skorzystać w przyszłości.
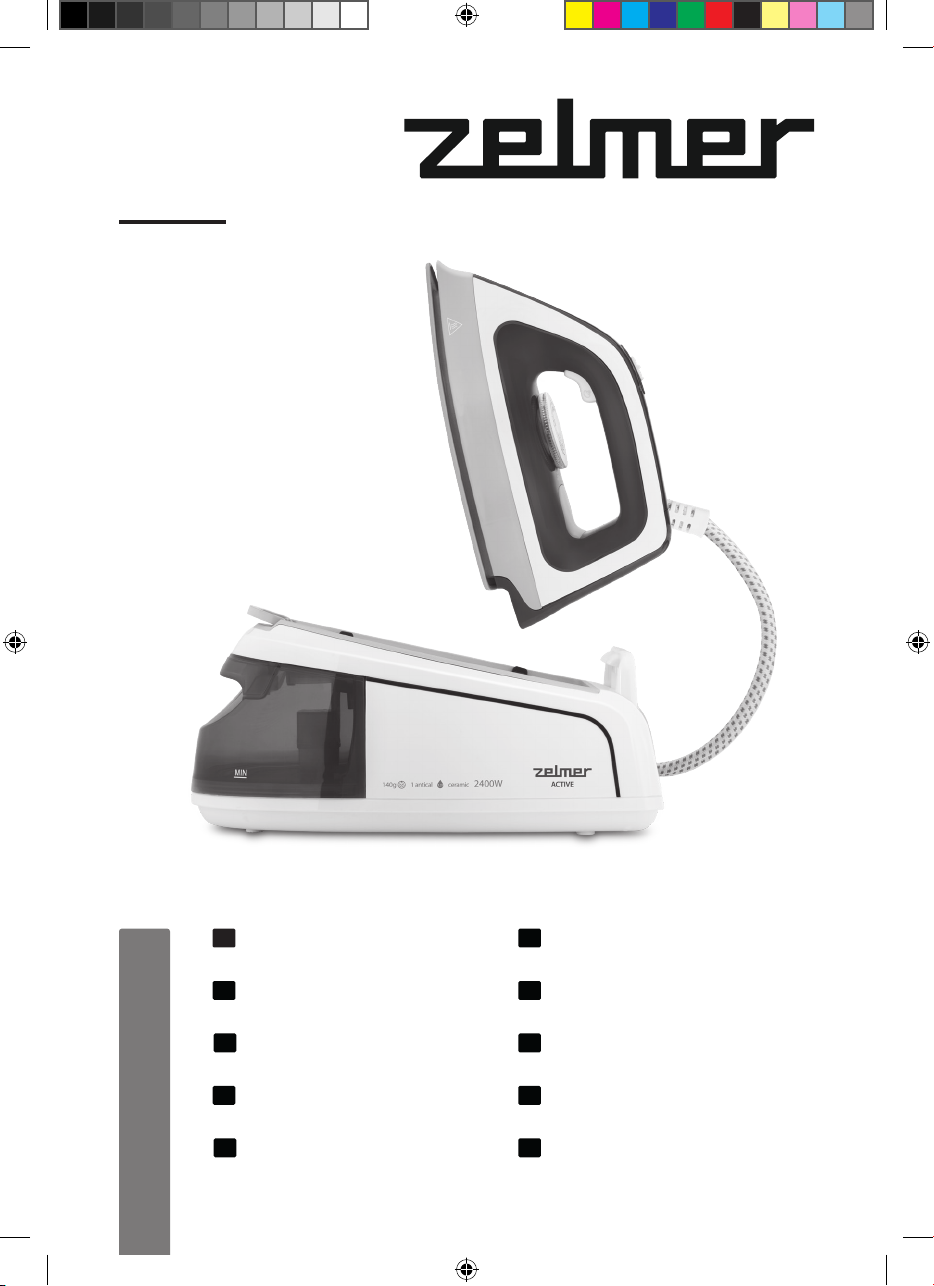
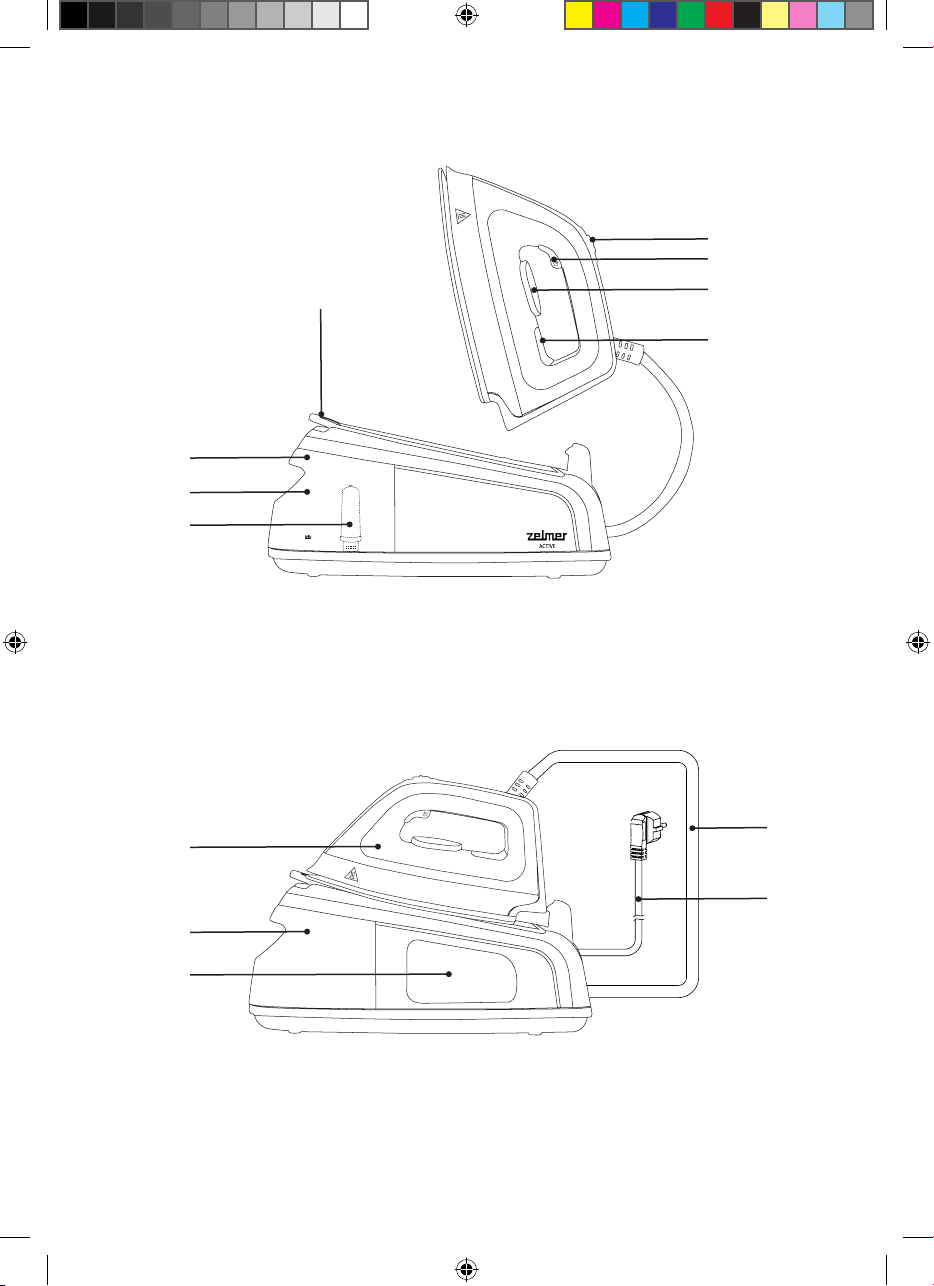
OPIS
1. Zaślepka wlotu wody
2. Zbiornik wody
3. Regulator pary
4. Spust pary
5. Lampka kontrolna temperatury
6. Pokrętło regulacji temperatury
7. Żelazko
8. Stacja
9. Blokada żelazka
10. Przewód łączący
11. Przewód zasilający
12. Przechowywanie kabla zasilającego
13. Wkład antywapienny
INSTRUKCJE DOTYCZĄCE BEZPIECZEŃSTWA
Urządzenie może być obsługiwane przez dzieci w
wieku od 8. roku życia oraz przez osoby o ograniczonej
sprawności zycznej, sensorycznej lub psychicznej i
osoby nieposiadające wystarczającego doświadczenia
oraz wiedzy pod warunkiem, że będą one nadzorowane
lub zostaną poinstruowane w zakresie bezpiecznej
obsługi urządzenia i będą rozumiały zagrożenia
związane z taką obsługą. Nie należy dopuszczać,
aby dzieci bawiły się urządzeniem. Dzieci nie mogą
przeprowadzać czynności czyszczenia ani konserwacji
urządzenia bez nadzoru.
Jeżeli przewód zasilania jest uszkodzony, dla
bezpieczeństwa musi zostać wymieniony przez
producenta, autoryzowany serwis lub odpowiednio
wykwalikowaną osobę.
3

PL
PL
Żelazka nie można zostawiać bez nadzoru, jeżeli jest
podłączone do zasilania.
Wtyczkę należy wyjąć z gniazda przed napełnieniem
zbiornika wodą.
Żelazko musi być używane i przechowywane na
stabilnej i płaskiej powierzchni.
Podczas umieszczania żelazka na podstawie
dopilnować, aby powierzchnia, na której leży podstawa,
była stabilna.
Żelazko nie może być używane, jeżeli zostało
upuszczone, przecieka lub nosi widoczne ślady
uszkodzeń.
Trzymać żelazko i przewód poza zasięgiem dzieci
poniżej 8. roku życia, jeżeli jest zasilane lub odstawione
do ochłodzenia.
Instrukcje bezpiecznego napełniania zbiornika wody
znajdują się w sekcji dotyczącej napełniania zbiornika
wody.
UWAGA. Gorące powierzchnie. Powierzchnie
mogą być gorące podczas używania żelazka.
Przed podłączeniem urządzenia do zasilania ustawić
żelazko w pozycji odblokowanej. Aby zablokować
żelazko, odczekać, aż żelazko ochłodzi się całkowicie, i
zostanie odłączone od zasilania.
Urządzenie jest przeznaczone do użytku na
maksymalnej wysokości do 2000m n.p.m.
WAŻNE OSTRZEŻENIA
Urządzenie przeznaczone jest wyłącznie do użytku domowego i w żadnym wypadku nie może być
używane do zastosowań komercyjnych lub przemysłowych. Nieprawidłowe używanie lub niewłaściwa
obsługa produktu powoduje unieważnienie gwarancji.
4

PLPL
Przed podłączeniem urządzenia do sieci sprawdzić, czy napięcie zasilania jest takie samo, jak wskazane
na tabliczce znamionowej urządzenia.
W przypadku używania adaptera upewnić się, że może osiągnąć natężenie 16 A i ma wtyczkę z
uziemieniem.
W trakcie korzystania z urządzenia przewód zasilający nie może być zaplątany ani owinięty wokół
urządzenia.
Nie używać, nie podłączać ani nie odłączać urządzenia od sieci, mając mokre dłonie lub stopy.
Nie ciągnąć za przewód zasilający w celu odłączenia urządzenia. Nie używać przewodu do wieszania
urządzenia.
Nie kierować strumienia pary bezpośrednio w stronę ludzi ani zwierząt.
Nie podstawiać urządzenia pod kran w celu napełnienia zbiornika. Nie zanurzać urządzenia w wodzie
ani innych płynach.
W przypadku jakiejkolwiek awarii lub uszkodzenia natychmiast odłączyć urządzenie od sieci
i skontaktować się z ocjalnym działem wsparcia technicznego. Aby zapobiec jakiemukolwiek
niebezpieczeństwu, nie należy otwierać obudowy urządzenia. Naprawy lub procedury dotyczące
urządzenia może wykonywać tylko wykwalikowany personel z ocjalnego działu wsparcia technicznego
marki.
Urządzenie należy czyścić według wskazówek znajdujących się w sekcji dotyczącej konserwacji
i czyszczenia.
EUROGAMA SP. Z O. O. nie ponosi odpowiedzialności za szkody poniesione przez ludzi, zwierzęta lub
przedmioty z powodu niestosowania się do ostrzeżeń.
Przed pierwszym użyciem
Przed użyciem stacji pary przeczytać instrukcję obsługi i upewnić się, że budowa stacji pary i jej funkcje
są zrozumiałe. Usunąć wszelkie materiały opakowaniowe i etykiety przed użyciem urządzenia po raz
pierwszy.
Przy pierwszym użyciu z urządzenia mogą szybko uwalniać się zapachy lub opary. Nie rozpylać pary po
raz pierwszy na ubraniach, ponieważ na stopie mogą znajdować się zabrudzenia.
Używana woda
Urządzenie należy napełniać wodą z kranu. Jeżeli woda w miejscu używania żelazka jest twarda lub
półtwarda, używać mieszanki wody z kranu z wodą destylowaną lub demineralizowaną zakupioną
w sklepie w proporcji, odpowiednio, 2:1 i 1:1 (woda destylowana:woda z kranu). Skontaktować się z
dostawcą wody w celu ustalenia rodzaju wody w miejscu używania żelazka. Nie używać wyłącznie
destylowanej lub demineralizowanej wody, wody deszczowej, wody zmiękczanej, wody zapachowej,
wody z innych urządzeń, np. z chłodziarek, klimatyzatorów, suszarek lub innych rodzajów wody
przygotowanej w domu.
Napełnianie zbiornika wody
Wyjąć zbiornik wody ze stacji i napełnić przez wlot wody. NIE przekraczać wskaźnika poziomu MAX.
Upewnić się, że zbiornik wody został prawidłowo umieszczony z powrotem w stacji.
INSTRUKCJA OBSŁUGI
NB: Jeżeli prasowanie parowe odbywa się po raz pierwszy lub produkt nie był używany przez
pewien czas, ustawić regulator temperatury na pozycję prasowania parowego i stale naciskać
przycisk pary do czasu, aż para nie pojawi się. Proces ten może potrwać kilka minut.
Ustawić stację pary na stabilnym podłożu – stole, blacie lub desce do prasowania.
Podłączyć jednostkę do gniazdka zasilającego i włączyć ją przyciskiem zasilania.
Ustawić temperaturę za pomocą pokrętła, wybierając rodzaj tkaniny do prasowania.
Uwaga: W przypadku prasowania parowego proponujemy ustawić pokrętło temperatury w pozycji MAX.
5

PL
PL
Jeżeli wskaźnik świetlny żelazka wyłączy się, urządzenie jest gotowe do użycia.
Uwaga: W czasie całej operacji wskaźnik świetlny pracy żelazka będzie włączał się i wyłączał w
nieregularnych odstępach. Jest to normalne zjawisko.
W celu uzyskania wyrzutu pary wybrać pozycję pary za pomocą regulatora pary i nacisnąć spust pary,
Wybrać ustawienie pary, naciskając i przytrzymując przycisk pary. Ustawienie pary można wyłączyć w
dowolnym czasie przez zwolnienie przycisku pary. Nacisnąć blokadę pary ze stałą parą bez naciskania
przycisku pary.
Wskazówki dotyczące prasowania
Prasowanie rozpocząć od tkanin wymagających niskiej temperatury, a na końcu prasować tkaniny
wymagające wyższej temperatury.
W przypadku tkanin z włókien mieszanych ustawić niższą temperaturę prasowania.
W przypadku ubrań wełnianych naciskać regularnie przycisk pary nad ubraniem bez bezpośredniego
dotykania go żelazkiem.
W przypadku grubych tkanin ustawić temperaturę w pozycji MAX.
Tabela prasowania
Poniżej prezentujemy tabelę ustawień temperatury wymaganej do różnych rodzajów włókien wraz z
zalecaną metodą prasowania.
Oznakowanie Materiał, na przykład
. (1 kropka) Włókno octanowe, elastan, poliamid, polipropylen
. . (2 kropki)
… (3 kropki) / MAX Bawełna, len
Prasowanie parowe w pionie
Ta funkcja umożliwia wygładzanie zagnieceń w ubraniach lub zasłonach w podobny sposób do
parownicy do ubrań. Wysokie ciśnienie pary w stacji pary może powodować strumienie pary podczas
trzymania żelazka w pionie. W celu uzyskania najlepszych wyników używać delikatnych lub jasnych
tkanin. Kierować parę tylko na ubrania w bezpiecznej przestrzeni i dopilnować stosowania zaleceń
producenta.
OSTRZEŻENIE: NIE kierować pary na ubranie, które jest noszone, ani na ubranie na osobie.
włókno miedziowe, poliester, jedwab, włókno triacetatowe,
wiskoza, wełna
KONSERWACJA I CZYSZCZENIE
Blokada żelazka
Blokada łatwego przenoszenia przymocowana do podstawy może być używana do łatwego
przenoszenia stacji pary. W tym celu podnieść blokadę ruchem do góry do momentu zatrzaśnięcia w
odpowiedniej pozycji. Przed użyciem stacji pary uchwyt do łatwego przenoszenia musi być z powrotem
zablokowany na podstawie; nacisnąć i przytrzymać uchwyt, zwolnić przycisk i delikatnie opuścić go z
powrotem.
Czyszczenie
Wyłączyć stację pary i odłączyć wtyczkę od zasilania.
Opróżnić zbiornik wody.
Regularnie czyścić stopę ceramiczną wilgotnym, niemetalowym czyścikiem.
Wytrzeć zewnętrzne elementy stacji parowej miękką ściereczką.
6

PLPL
NIE używać ściernych środków czyszczących, detergentów ani innych środków chemicznych do
czyszczenia stacji pary.
Wymiana wkładu antywapiennego
Regularnie wymieniać wkład zmiękczający wodę. Przy umiarkowanej eksploatacji (dwa razy w tygodniu)
i w zależności od twardości wody w miejscu używania stacji pary wkład antywapienny zmiękczający
wodę należy wymieniać co 3–6 miesięcy.
Uwaga: Nie używać jednostki bez wkładu zmiękczającego wodę!
1. Wyjąć zbiornik wody ze stacji.
2. Pociągnąć wkład antywapienny i wyjąć go do wymiany. W celu wyjęcia wkładu odkręcić go i ostrożnie
wyjąć go na zewnątrz. Odłączyć przewód od wkładu i podłączyć go do nowego wkładu. Dokręcić nowy
wkład do zbiornika wody.
Uwaga: Zachować ostrożność – w korpusie wkładu może znajdować się woda.
Zainstalować nowy wkład zmiękczający wodę.
7

PL
PL
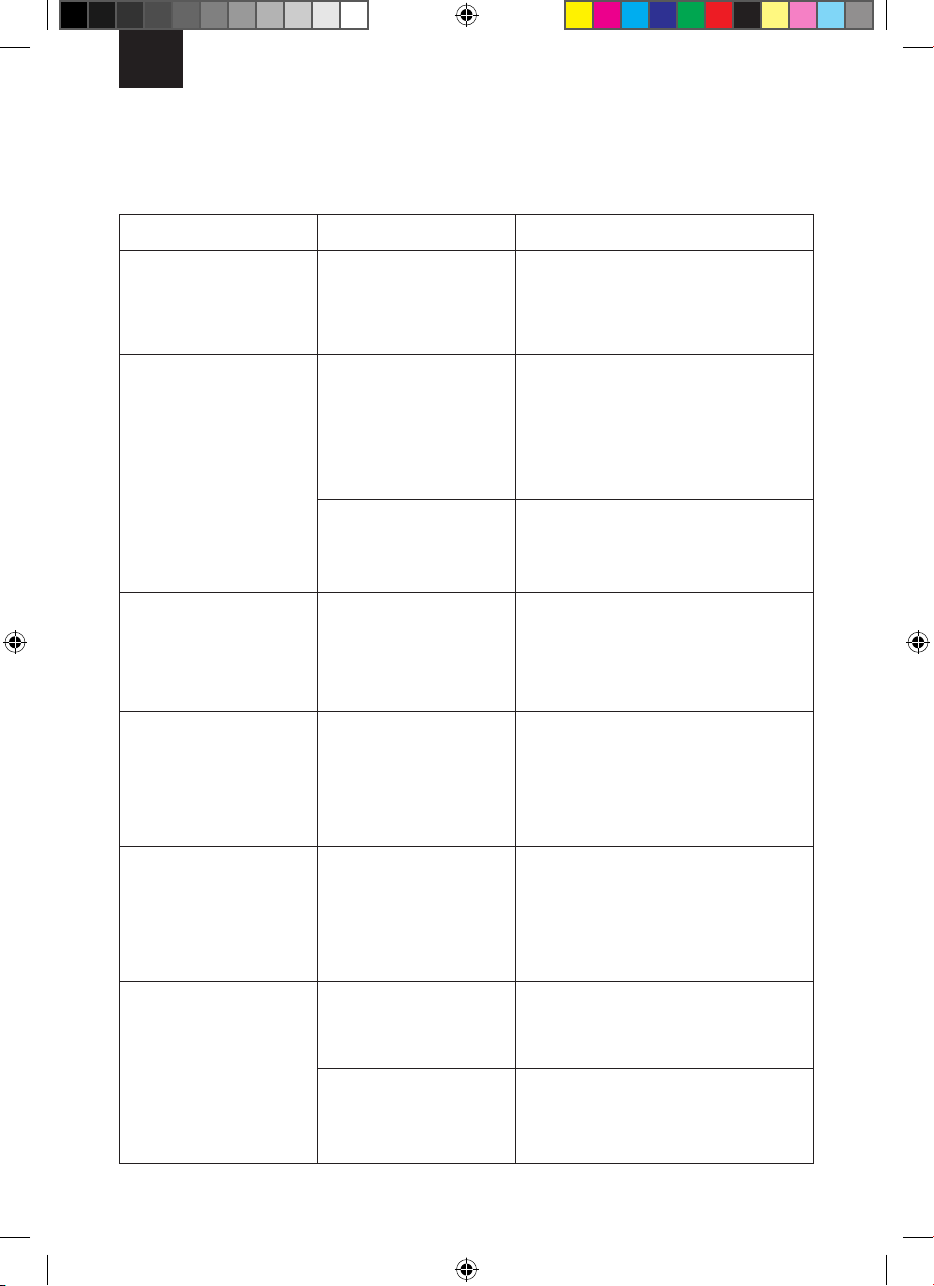
Instrukcja rozwiązywania problemów
Przed skontaktowaniem się z naszym centrum wsparcia należy zapoznać się z poniższą tabelą
rozwiązywania problemów w przypadku jakichkolwiek problemów, które mogą się pojawić
Problem Potencjalna przyczyna Rozwiązanie
Jednostka nie nagrzewa
ani nie wytwarza pary.
Lampka wskaźnika
zasilania
nie świeci się.
Przez otwory w stopie
wycieka woda
Jednostka nie jest
podłączona do zasilania.
Woda skondensowała się
w przewodach, ponieważ
używasz urządzenia
po raz pierwszy lub nie
używałeś go od pewnego
czasu.
Podłącz do gniazdka elektrycznego.
Naciskaj spust pary z dala od deski do
prasowania do czasu, aż żelazko będzie
wytwarzać parę.
Przez otwory w stopie
wydostają się białe
zacieki.
Przez otwory w stopie
wydostają się brązowe
zacieki i zostawiają plamy
na pościeli.
Stopa jest brudna lub
przypalona i może
plamić ubrania. Ubranie
przywiera do stopy.
Urządzenie nie wytwarza
pary lub wytwarza
niewiele pary.
Stopa nie jest
dostatecznie ciepła.
W produkcie wytworzył się
kamień, ponieważ wkład
antywapienny nie był
regularnie zmieniany.
Używasz chemicznych
produktów
odkamieniających lub
dodatków do wody do
prasowania.
Prasujesz ze zbyt wysoką
temperaturą.
Zbiornik wody jest pusty. Napełnij zbiornik wody.
Stopa nie jest
dostatecznie ciepła.
Odczekaj, aż stopa dostatecznie się
nagrzeje lub zwiększ temperaturę
prasowania.
Zmień wkład antywapienny.
Nie dodawaj tego rodzaju produktów do
zbiornika wody ani do komory pary.
Ustaw pokrętło temperatury na niższą
pozycję.
Odczekaj, aż stopa dostatecznie się
nagrzeje lub zwiększ temperaturę
prasowania.
8

PLPL
EKOLOGICZNA UTYLIZACJA
To urządzenie jest oznaczone zgodnie z Dyrektywą Europejską 2012/19/UE
oraz polską Ustawa z dnia 11 września 2015 r. „O zużytym sprzęcie elektrycznym
i elektronicznym” (Dz.U. z dn. 23.10.2015 poz. 11688) symbolem
przekreślonego kontenera na odpady.
Takie oznakowanie informuje, że sprzęt ten, po okresie jego użytkowania nie może być
umieszczany łącznie z innymi odpadami pochodzącymi z gospodarstwa domowego.
Użytkownik jest zobowiązany do oddania go prowadzącym zbieranie zużytego sprzętu elektrycznego
i elektronicznego. Prowadzący zbieranie, w tym lokalne punkty zbiórki, sklepy oraz gminne jednostki,
tworzą odpowiedni system umożliwiający oddanie tego sprzętu.
Właściwe postępowanie ze zużytym sprzętem elektrycznym i elektronicznym przyczynia się do
uniknięcia szkodliwych dla zdrowia ludzi i środowiska naturalnego konsekwencji, wynikających z
obecności składników niebezpiecznych oraz niewłaściwego składowania i przetwarzania takiego
sprzętu.
Mamy nadzieję, że produkt przyniesie Państwu wiele satysfakcji.
9

PL
EN
WE WOULD LIKE TO THANK YOU FOR CHOOSING ZELMER. WE WISH THE PRODUCT
PERFORMS TO YOUR SATISFACTION AND PLEASURE.
WARNING
Please read the instructions for use carefully prior to using the product. store these in a safe place for
future reference.
DESCRIPTION
1. Water Inlet Cover
2. Water Tank
3. Steam selector
4. Steam Trigger
5. Temperature pilot lamp
6. Temperature Control Dial
7. Iron
8. Station
9. Iron lock
10. Interconnection Cord
11. Power Cord
12. Power cord storage
13. Anti-scale cartridge
SAFETY INSTRUCTIONS
This appliance can be used by children aged from 8
years and above and persons with reduced physical,
sensory or mental capabilities or lack of experience
and knowledge if they have been given supervision or
instruction concerning use of the appliance in a safe
way and understand the hazards involved. Children
shall not play with the appliance. Cleaning and user
maintenance shall not be made by children without
supervision.
If the supply cord is damaged it must be replaced by
the manufacturer, its service agent or similarly qualied
persons in order to avoid a hazard.
The iron must not be left unattended while it is
connected to the supply mains.
The plug must be removed from the socket-outlet
10
PLEN
before the water reservoir is lled with water.
The irons must be used and rested on a at, stable
surface
When placing the iron on its stand, ensure that the
surface on which the stand is placed is stable.
The iron is not to be used if it has been dropped, if there
are visible signs of damage or if it is leaking.
Keep the iron and its cord out of reach of children less
than 8 years of age when it is energized or cooling
down.
Instruction for the safe relling of the water reservoir are
given in lling the water tank section.
CAUTION. Hot surfaces. Surfaces are liable to
get hot during use.
Before connecting the appliance to the mains, put the
iron in the unlocked position. To block the iron, wait until
the appliance has cooled down completely and has
been unplugged from the mains.
This device is designed for use at a maximum altitude
up to 2000m above sea level.
IMPORTANT WARNINGS
This appliance is designed for home use and should never be used for commercial or industrial use
under any circumstances. Any incorrect use or improper handling of the product shall render the
warranty null and void.
Prior to plugging in the product, check that your mains voltage is the same as the one indicated on the
product label.
If you use one adaptor, make sure it can reach 16 A and is provided with earth socket
The mains connection cable must not be tangled or wrapped around the product during use.
Do not use the device, or connect and disconnect to supply mains with the hands and / or feet wet.
Do not pull on the connection cord in order to unplug it or use it as a handle
Do not direct steam at people and animals.
Do not place the appliance under the tap to ll the water tank, or immerse it in water or other liquids.
Unplug the product immediately from the mains in the event of any breakdown or damage and contact
11

PL
EN
an Ofcial Technical support service. In order to prevent any risk of danger, do not open the device. Only
qualied technical personnel from the brand´s Ofcial Technical support service may carry out repairs or
procedures on the device.
Proceed according to the conservation and cleaning section of this manual for cleaning.
B&B TRENDS S.L. disclaims all liability for damages that may occur to people, animals or objects, for
the non-observance of these warnings.
Before the rst use
Before using the Steam Station, please ensure you read the user manual and understand all parts and
features of the Steam Station. Be sure to remove any packaging material and labels before using for the
rst time.
In the rst use they can break off odors or fumes that sent quickly. Do not spray for the rst time on
clothes and there may be traces of dirt on the soleplate.
Water to be used
The device is designed for use with tap water. If the water in your area is hard or semi-hard use mix
tap water with distilled or demineralized water purchased in stores, in the ratio 2:1 and 1:1 respectively
(distilled water: tap water). Check with your water supplier to determine the type of water in your area.
Never use 100% distilled or demineralized, rain water, softened water, scented water, water from other
appliances such as refrigerators, air conditioners, dryers or other types of home water preparation water.
Filling the Water Tank
Remove the water tank from the station and ll it through the water inlet cover. Do NOT ll over the MAX
level indicator.
Make sure when placing it back to the station that it ts correctly.
OPERATING INSTRUCTIONS
NB: If it is the rst time you have steam-ironed or if the product has not been used for some time,
turn the temperature control to a steam ironing position and press the steam button continuously
until steam comes out. This process can take a few minutes.
Place the Steam Station on a rm level table, bench or ironing board.
Plug the unit into a power outlet and switch on at the power point.
Adjust the temperature dial in terms of choose the kind of fabrics that you want to iron.
Note: If you want to use the steam ironing, we suggest you to adjust the temperature dial on MAX.
When the iron operating light indicator goes out the device will be ready for use.
Note: During the whole operating time, the iron operating light indicator will go on and off in erratic
intervals, this is normal.
To make the steam jet come out, select the steam position with the steam selector and press the steam
trigger, and if you want to stop the steam release the steam trigger, in a few seconds steam will stop.
Select the steam setting by pressing and holding the steam button. The steam setting can be switched
off at any time by releasing the steam button. Push the steam locker with continues steamer without
pressing the steam button.
Ironing Tips
Start with the fabrics to be ironed at a low temperature and nish with those that need higher
temperatures.
For mixed bre fabric, set the ironing temperature to a lower setting.
For woollen garments, press the steam trigger repeatedly over the garment without physically touching it
with the iron.
For thicker fabrics, raise the iron temperature at MAX position.
12

PLEN
Ironing Guide Chart
Below is a guide on the temperature setting required for different types of fabric, along with the
recommended iron method.
Marking Material, for example
. (1 dot) Acetate, elastane, polyamide, polypropylene
. . (2 dots) Cupro, polyester, silk, triacetate, viscose, wool
… (3 dots) / MAX Cotton, linen
Vertical Steam Ironing
This feature allows you to smooth out creases in garments or drapery in a similar manner to a garment
steamer. The high steam pressure of the Steam Station can provide bursts of steam while holding the
iron vertically. For best results, utilise on delicate or light fabrics. Only direct steam at hanging garments
in a safe area and ensure you always refer to garment manufacturer recommendations.
WARNING: DO NOT direct the steam onto a garment that is being worn or at any person.
MAINTENANCE AND CLEANING
Iron lock
The easy carry locker attached to the base unit can be used to transport the steam Station with ease.
To do so, lift it in an upward motion until it clicks into position. Before using the Steam Station, the easy
carry handle must be locked back into position against the base unit; press and hold the handle release
button and carefully lower it back to place.
Cleaning
Turn off the Steam Station and unplug at the power outlet.
Empty the water tank.
Regularly clean the ceramic soleplate with a damp, non-metallic washing pad.
Wipe the exterior of the Steam Station with a soft cloth.
Do NOT use abrasive cleaners, detergent or other chemicals to clean the Steam Station.
Change anti-scale cartridge
Replace the water softening cartridge regularly. At moderate use (twice a week) and depending on the
water hardness in your region the water softening anti-scale cartridge should be replaced every 3-6
months.
Note: Do not use the unit without the water softening cartridge!
1. Remove the water tank from the station.
2. Pull anti-calc cartridge upwards and remove it for changing. In order to remove it, rstly unscrew it and
carefully take it out. Disconnect the hose from the cartridge and connect it to the new cartridge. Screw
the new cartridge back to the water tank.
Note: Be careful - there can be water inside the cartridge body.
Install a new water-softening cartridge to its place.
13
PL
EN
Troubleshooting Guide
Please consult troubleshooting table below for any issues you may face prior to contacting our support
center.
Problem Possible cause Solution
Unit fails to heat up and
steam. Power indicator
light does not illuminate.
Water runs out of the
holes in the soleplate.
Unit is not plugged in. Plug into electrical outlet.
Water has condensed in
the pipes because you are
using for the rst time or
you have not used it for
some time.
Press the steam trigger away from your
ironing board until the iron produces
steam.
White streaks come
through the holes in the
soleplate.
Brown streaks come
through the holes in the
soleplate and stain the
linen.
The soleplate is dirty or
brown and may stain the
garment. The clothe sticks
in the soleplate.
There is no steam or there
is little steam.
The soleplate is not hot
enough.
The product has a buildup of scale because the
anti-calc cartridge has not
been changed regularly.
You are using chemical
descaling agents or
additives in the water for
ironing.
You are ironing at too high
a temperature.
The water tank is empty. Fill the water tank.
The soleplate is not hot
enough.
Wait until the iron soleplate is hot enough
or increase the temperature of the
soleplate.
Change the anti-calc cartridge
Never add this type of product in the
water tank or in the steam chamber.
Adjust the temperature dial to a lower
heat setting.
Wait until the iron soleplate is hot enough
or increase the temperature of the
soleplate
14
PLEN
ADVISE ON DISPOSAL
This product complies with European Directive 2012/19/EU on electrical and electronic
devices, known as WEEE (Waste Electrical and Electronic Equipment), provides the legal
framework applicable in the European Union for the disposal and reuse of waste electronic
and electrical devices. Do not dispose of this product in the bin, instead going to the
electrical and electronic waste collection centre closest to your home.
We hope that you will be satised with this product.
15

PL
DE
WIR MÖCHTEN UNS BEI IHNEN BEDANKEN, DASS SIE SICH FÜR ZELMER ENTSCHIEDEN
HABEN. WIR HOFFEN, DASS DAS PRODUKT ZU IHRER ZUFRIEDENHEIT UND IHREM
VERGNÜGEN FUNKTIONIERT.
ACHTUNG
Bitte lesen Sie die Gebrauchsanweisung vor der Anwendung des Produkts aufmerksam durch.
Bewahren Sie diese zur späteren Einsichtnahme an einem sicheren Ort auf.
BESCHREIBUNG
1. Wassereinfüllabdeckung
2. Wassertank
3. Dampfwahlschalter
4. Dampfauslöser
5. Temperatur-Kontrollleuchte
6. Temperaturwahlscheibe
7. Bügeln
8. Station
9. Bügelverschluss
10. Verbindungskabel
11. Netzkabel
12. Aufbewahrung des Netzkabels
13. Anti-Kalk-Kartusche
SICHERHEITSHINWEISE
Dieses Gerät kann von Kindern ab 8 Jahren und
von Personen mit eingeschränkten körperlichen,
sensorischen oder geistigen Fähigkeiten oder
mangelnden Erfahrungen und Kenntnissen benutzt
werden, wenn sie beaufsichtigt werden oder in den
sicheren Gebrauch des Gerätes eingewiesen wurden
und die damit verbundenen Gefahren verstehen. Kinder
dürfen nicht mit dem Gerät spielen. Die Reinigung
und Wartung darf nicht von Kindern ohne Aufsicht
durchgeführt werden.
Bei Beschädigung des Netzkabels muss dieses
vom Hersteller, seinem Servicepartner oder ähnlich
qualizierten Personen ausgetauscht werden, um eine
Gefährdung zu vermeiden.
Das Bügeleisen darf nicht unbeaufsichtigt bleiben,
16
PLDE
solange es an das Stromnetz angeschlossen ist.
Der Stecker muss aus der Steckdose gezogen werden,
bevor der Wasserbehälter mit Wasser befüllt wird.
Die Bügeleisen müssen auf einer achen, stabilen
Oberäche verwendet und abgestellt werden
Wenn das Bügeleisen auf seinen Ständer gestellt wird,
ist darauf zu achten, dass die Oberäche, auf der der
Ständer steht, stabil ist.
Das Bügeleisen darf nicht benutzt werden, wenn es
fallen gelassen wurde, wenn es sichtbare Anzeichen
von Schäden aufweist oder wenn es undicht ist.
Bewahren Sie das Bügeleisen und sein Kabel
außerhalb der Reichweite von Kindern unter 8 Jahren
auf, wenn es mit Strom versorgt wird oder es gerade
abkühlt.
Anweisungen zur sicheren Auffüllung des
Wasserbehälters benden sich im Abschnitt zum
Wassertank.
VORSICHT. Heiße Oberächen. Die Oberächen
können bei der Anwendung heiß werden.
Bevor das Gerät an das Stromnetz angeschlossen wird,
stellen Sie das Bügeleisen in die entsperrte Position.
Um das Bügeleisen zu blockieren, warten Sie ab, bis
das Gerät komplett abgekühlt und vom Stromnetz
getrennt ist.
Dieses Gerät ist für den Einsatz in einer maximalen
Höhe von 2000 m über dem Meeresspiegel ausgelegt.
WICHTIGE WARNHINWEISE
Dieses Gerät ist für den Haushaltsgebrauch konzipiert und sollte unter keinen Umständen für den
17

PL
DE
gewerblichen oder industriellen Gebrauch verwendet werden. Jede unsachgemäße Verwendung oder
unsachgemäße Handhabung des Produkts führt zum Erlöschen der Garantie.
Überprüfen Sie vor dem Anschluss des Geräts, ob Ihre Netzspannung mit der auf dem Typenschild
angegebenen übereinstimmt.
Falls Sie einen Adapter verwenden, stellen Sie sicher, dass er imstande ist, 16 A zu erreichen und dass
er mit einer Schutzkontaktsteckdose ausgestattet ist.
Das Netzanschlusskabel darf während der Verwendung nicht verwickelt oder um das Produkt gewickelt
werden.
Benutzen Sie das Gerät nicht, schließen Sie es nicht an und trennen Sie es nicht vom Stromnetz, wenn
Sie nasse Hände und / oder Füße haben.
Ziehen Sie nicht am Netzkabel, um den Stecker zu ziehen, und verwenden Sie es nicht als Griff.
Dampf nicht auf Menschen und Tiere richten.
Stellen Sie das Gerät nicht unter den Wasserhahn, um den Wassertank zu befüllen, tauchen Sie es
zudem nicht in Wasser oder andere Flüssigkeiten.
Trennen Sie das Produkt im Falle einer Panne oder Beschädigung sofort vom Stromnetz und wenden
Sie sich an einen ofziellen technischen Kundendienst. Um Gefahren zu vermeiden, darf das Gerät nicht
geöffnet werden. Nur qualiziertes technisches Personal des ofziellen technischen Kundendienstes der
Marke darf Reparaturen oder Eingriffe an dem Gerät durchführen.
Verfahren Sie bei der Reinigung entsprechend des Abschnitts bezüglich Konservierung und Reinigung in
diesem Handbuch.
B&B TRENDS S.L. lehnt jede Haftung für Schäden ab, die an Menschen, Tieren oder Gegenständen
entstehen könnten, falls diese Warnhinweise nicht beachtet werden.
Vor dem ersten Gebrauch
Bevor Sie die Dampfstation benutzen, lesen Sie sich bitte die Bedienungsanleitung durch und
verstehen Sie sämtliche Teile und Funktionen der Dampfstation. Stellen Sie sicher, das gesamte
Verpackungsmaterial und Etiketten vor der ersten Anwendung zu entfernen.
Beim ersten Einsatz können Gerüche oder Dämpfe entstehen, die schnell entweichen. Sprühen Sie
das erste Mal nicht auf Kleidungsstücke, da Spuren von Schmutz auf der Basisplatte vorhanden sein
könnten.
Zu verwendendes Wasser
Das Gerät ist für die Anwendung mit Leitungswasser ausgerichtet. Falls das Wasser in Ihrer Umgebung
hart oder halbhart ist, vermischen Sie das Leitungswasser mit destilliertem oder entmineralisiertem
Wasser, das Sie in Geschäften gekauft haben, im Verhältnis von 2:1 bzw. 1:1 (destilliertes Wasser:
Leitungswasser). Prüfen Sie bei Ihrem Wasserversorger, um welche Art von Wasser es sich in
Ihrer Umgebung handelt. Verwenden Sie nie 100 % destilliertes oder entmineralisiertes Wasser,
Regenwasser, enthärtetes Wasser, Duftwasser, Wasser aus anderen Geräten wie Kühlschränken,
Klimaanlagen, Trocknern oder andere Arten von Haushaltswasser.
Befüllung des Wassertanks
Entfernen Sie den Wassertank von der Station und befüllen Sie ihn durch die Wassereinfüllabdeckung.
Befüllen Sie NICHT bis oberhalb der MAX-Füllstandsanzeige.
Achten Sie bei der Positionierung auf der Station darauf, dass es korrekt sitzt.
BETRIEBSANWEISUNGEN
ANM.: Falls Sie zum ersten Mal dampfbügeln oder falls das Produkt schon längere Zeit nicht
verwendet wurde, stellen Sie den Temperaturregler auf eine Dampfbügelposition und drücken Sie
den Dampfknopf kontinuierlich, bis Dampf herausaustritt. Dieser Vorgang kann ein paar Minuten
dauern.
Positionieren Sie die Dampfstation auf einen stabilen ebenen Tisch, einer Bank oder einem Bügelbrett.
Stecken Sie das Gerät in eine Steckdose und schalten Sie es ein.
18
PLDE
Stellen Sie die Temperaturwahlscheibe derart ein, dass Sie die Art an Stoffen auswählen können, die Sie
bügeln möchten.
Hinweis: Falls Sie dampfbügeln möchten, empfehlen wir Ihnen, die Temperaturwahlscheibe auf MAX
einzustellen.
Wenn die Betriebsanzeige des Bügeleisens erlischt, ist das Gerät betriebsbereit.
Hinweis: Während der gesamten Betriebszeit leuchtet die Betriebsanzeige des Bügeleisens in
unregelmäßigen Intervallen auf und erlischt, das ist normal.
Um den Dampfstrahl austreten zu lassen, wählen Sie die Dampfposition mithilfe des
Dampfwahlschalters und drücken Sie den Dampfauslöser, und falls Sie die Freigabe des Dampfes
stoppen möchten, wird der Dampf innerhalb weniger Sekunden gestoppt.
Wählen Sie die Dampfeinstellung, indem Sie die Dampftaste drücken und gedrückt halten. Die
Dampfeinstellung lässt sich jederzeit durch Loslassen der Dampftaste ausschalten. Drücken Sie den
Dampfverschluss mit kontinuierlichem Dämpfer, ohne die Dampftaste zu drücken.
Bügeltipps
Beginnen Sie mit den auf niedriger Temperatur zu bügelnden Stoffen und bügeln Sie letztendlich die
Stoffe, die höhere Temperaturen erfordern.
Im Falle von Mischgewebe stellen Sie die Bügeltemperatur auf eine niedrigere Einstellung.
Drücken Sie bei Wollkleidung den Dampfauslöser wiederholt über dem Kleidungsstück, ohne es mit dem
Bügeleisen zu berühren.
Für dickere Stoffe erhöhen Sie die Bügeltemperatur auf MAX-Position.
Tabelle als Bügelleitfaden
Im Folgenden nden Sie eine Anleitung zur Temperatureinstellung für unterschiedliche Stoffarten sowie
die empfohlene Bügelmethode.
Markierung Material, zum Beispiel
. (1 Punkt) Acetat, Elastan, Polyamid, Polypropylen, usw.
. . (2 Punkte) Cupro, Polyester, Seide, Triacetat, Viskose, Wolle, usw.
… (3 Punkte) / MAX Baumwolle, Leinen
Vertikales Dampfbügeln
Mit dieser Funktion lassen sich Falten in Kleidungsstücken oder Stoffen ähnlich wie bei einem
Kleidungsdampfer glätten. Der hohe Dampfdruck der Dampfstation kann zu Dampfstößen führen,
während das Bügeleisen vertikal gehalten wird. Für beste Ergebnisse benutzen Sie es auf empndlichen
oder leichten Stoffen. Richten Sie Dampf nur auf hängende Kleidungsstücke in einer sicheren
Umgebung und achten Sie darauf, sich jederzeit an die Empfehlungen des Kleidungsherstellers zu
halten.
ACHTUNG: Richten Sie den Dampf NICHT auf ein Kleidungsstück, das gerade getragen wird, oder auf
eine Person.
WARTUNG UND REINIGUNG
Bügelverschluss
Der an der Basiseinheit angebrachte, leichte Tragegriff lässt sich zum einfachen Transport der
Dampfstation anwenden. Heben Sie ihn hierfür mit einer Aufwärtsbewegung an, bis er einrastet. Vor
der Anwendung der Dampfstation muss der einfache Tragegriff wieder gegen die Basiseinheit verriegelt
19

PL
DE
werden; drücken und halten Sie den Entriegelungsknopf des Griffs gedrückt und senken Sie ihn wieder
vorsichtig ab.
Reinigung
Schalten Sie die Dampfstation aus und ziehen Sie den Netzstecker aus der Steckdose.
Entleeren Sie den Wassertank.
Reinigen Sie die Keramik-Basisplatte in regelmäßigen Abständen mit einem feuchten, nichtmetallischen
Waschpad.
Wischen Sie die Außenseite der Dampfstation mit einem weichen Tuch ab.
Verwenden Sie KEINE scheuernden Reiniger, Reinigungsmittel oder andere Chemikalien, um die
Dampfstation zu reinigen.
Anti-Kalk-Kartusche auswechseln
Tauschen Sie die Wasserenthärtungskartusche regelmäßig aus. Bei mäßiger Anwendung (zweimal
pro Woche) und je nach Wasserhärte in Ihrer Umgebung sollte die Anti-Kalk-Kartusche zur
Wasserenthärtungs alle 3-6 Monate ausgetauscht werden.
Hinweis: Verwenden Sie das Gerät nicht ohne die Wasserenthärtungskartusche!
1. Entfernen Sie den Wassertank von der Station.
2. Ziehen Sie die Anti-Kalk-Kartusche nach oben und entfernen Sie diese, um sie auszutauschen. Um
sie zu entfernen, schrauben Sie diese zuerst ab und nehmen sie vorsichtig heraus. Trennen Sie den
Schlauch von der Kartusche und verbinden Sie ihn mit der neuen Kartusche. Schrauben Sie die neue
Kartusche wieder in den Wassertank.
Hinweis: Gehen Sie vorsichtig vor - es könnte sich Wasser im Kartuschengehäuse benden.
Bringen Sie eine neue Wasserenthärtungskartusche an ihrem Platz an.
20
PLDE
Leitfaden zur Fehlerbehebung
Bitte konsultieren Sie die nachfolgende Tabelle zur Fehlerbehebung für sämtliche Probleme, die Ihnen
begegnen könnten, bevor Sie unser Support-Center kontaktieren.
Problem Mögliche Ursachen Lösung
Das Gerät heizt sich nicht auf
und produziert keinen Dampf.
Die Betriebsanzeige leuchtet
nicht auf.
Wasser läuft aus den Löchern
in der Basisplatte.
Das Gerät ist nicht
eingesteckt.
Innerhalb der Rohre ist
Wasser kondensiert, da Sie
es zum ersten Mal anwenden
oder eine längere Zeit nicht
benutzt haben.
In die Steckdose einstecken.
Drücken Sie den Dampfauslöser
vom Bügelbrett weg, bis das
Bügeleisen Dampf erzeugt.
Weiße Streifen kommen
aus den Löchern in der
Basisplatte.
Braune Streifen kommen aus
den Löchern in der Basisplatte
und verfärben das Leinen.
Die Basisplatte ist
schmutzig oder braun und
könnte Flecken auf dem
Kleidungsstück hinterlassen.
Die Kleidung bleibt in der
Basisplatte stecken.
Es kommt kein oder nur wenig
Dampf heraus.
Die Basisplatte ist nicht heiß
genug.
Das Produkt weist
Kalkablagerungen auf, da
die Anti-Kalk-Kartusche nicht
regelmäßig ausgetauscht
wurde.
Sie verwenden beim Bügeln
chemische Entkalkungsmittel
oder Zusatzstoffe im Wasser.
Sie bügeln bei zu hoher
Temperatur.
Der Wassertank ist leer. Befüllen Sie den Wassertank.
Die Basisplatte ist nicht heiß
genug.
Warten Sie ab, bis die Basisplatte
des Bügeleisens heiß genug ist,
oder erhöhen Sie die Temperatur
der Basisplatte.
Tauschen Sie die Anti-KalkKartusche aus
Füllen Sie diese Art von Produkt
nie in den Wassertank oder in die
Dampfkammer.
Stellen Sie die
Temperaturwahlscheibe auf eine
niedrigere Temperatur ein.
Warten Sie ab, bis die Basisplatte
des Bügeleisens heiß genug ist,
oder erhöhen Sie die Temperatur
der Basisplatte.
21

PL
DE
HINWEISE ZUR ENTSORGUNG
Dieses Produkt entspricht der europäischen Richtlinie 2012/19/EG über Elektro- und
Elektronik-Altgeräte, bekannt als WEEE (Waste Electrical and Electronic Equipment),
die den in der Europäischen Union geltenden Rechtsrahmen für die Entsorgung und
Wiederverwendung von Elektro- und Elektronikaltgeräten schafft. Entsorgen Sie dieses
Produkt nicht in der Mülltonne, sondern in der Elektro- und Elektronik-Abfallsammelstelle in
der Nähe Ihres Hauses.
Wir hoffen, dass Sie mit diesem Produkt zufrieden sind.
22

PLCZ
RÁDI BYCHOM VÁM PODĚKOVALI, ŽE JSTE SI VYBRALI SPOLEČNOST ZELMER. DOUFÁME, ŽE
VÁM BUDE PRODUKT DOBŘE SLOUŽIT.
VAROVÁNÍ
Před použitím produktu si pozorně přečtěte návod k použití. Uložte jej na bezpečném místě pro budoucí
použití.
POPIS
1. Plnící uzávěr nádrže
2. Vodní nádrž
3. Regulace napařování
4. Tlačítko parního rázu
5. Kontrolka teploty
6. Termoregulace
7. Žehlička
8. Podstavec pro žehličku
9. Bezpečnostní zámek
10. Propojovací kabel
11. Napájecí kabel
12. Skladování napájecího kabelu
13. Kazeta proti vodnímu kameni
BEZPEČNOSTNÍ POKYNY
Spotřebič mohou používat děti od 8 let věku a osoby
s omezenými fyzickými, smyslovými a mentálními
schopnostmi nebo nedostatečnými zkušenostmi a
znalostmi, pokud jsou pod dohledem nebo byly poučeny
ohledně bezpečného použití spotřebiče a rozumí
možným rizikům. Děti si se spotřebičem nesmějí hrát.
Čištění a údržbu nesmějí provádět děti bez dohledu.
Pokud dojde k poškození přívodního kabelu, musí
být vyměněn výrobcem nebo zástupcem servisu či
podobně kvalikovanou osobou, aby se eliminovalo
nebezpečí.
Nikdy nenechávejte žehličku bez dozoru, pokud je
připojena do elektrické sítě.
Před naplněním nádrže vodou, nesmí být zástrčka
zapojena do elektrické sítě.
23

PL
CZ
Žehličku používejte na rovném a stabilním povrchu
Při pokládání žehličky na stojan se ujistěte, že povrch,
na kterém je stojan umístěn, je stabilní.
Nepoužívejte žehličku, pokud upadla nebo vykazuje
viditelné známky poškození či pokud z ní vytéká voda.
Udržujte žehličku a její napájecí kabel mimo dosah dětí
mladších 8 let, jakmile je připojena k elektrické síti nebo
chladne.
Pokyny k bezpečnému doplňování vodní nádrže jsou
uvedeny v části plnění vodní nádrže.
POZOR. Horký povrch. Během používání se
povrch spotřebiče může zahřát.
Před připojením spotřebiče k elektrické síti odjistěte
žehličku z podstavce. Chcete-li žehličku zajistit na
podstavci, odpojte ji od elektrické sítě a počkejte, až
zcela vychladne.
Spotřebič je určen pro použití v nadmořské výšce do
2000 m n. m.
DŮLEŽITÁ UPOZORNĚNÍ
Tento spotřebič je určen pro domácí použití a za žádných okolností by neměl být nikdy používán pro
komerční nebo průmyslové použití. Nesprávné použití nebo nesprávné zacházení s produktem bude mít
za následek neplatnost záruky.
Před zapojením produktu zkontrolujte, zda je síťové napětí stejné jako napětí uvedené na štítku
produktu.
Pokud použijete prodlužovací kabel, dbejte na to, aby měl k dispozici dvoupólovou zástrčku 16 A s
uzemněním
Během používání nesmí být síťový napájecí kabel zamotaný nebo omotaný kolem produktu.
Nepoužívejte zařízení ani jej nepřipojujte a neodpojujte od elektrické sítě mokrýma rukama a / nebo
nohama.
Netahejte za připojovací kabel spotřebiče, jestliže ho chcete odpojit od zásuvky elektrického proudu.
Nepoužívejte kabel jako madlo.
Nesměrujte proud páry ve směru osob nebo zvířat.
Neumisťujte spotřebič pod kohoutek, abyste naplnili nádržku na vodu, ani jej neponořujte do vody nebo
jiných tekutin.
V případě poruchy nebo poškození okamžitě odpojte produkt ze sítě a kontaktujte technickou podporu
společnosti. Abyste předešli jakémukoli nebezpečí, zařízení neotevírejte. Opravy zařízení smí provádět
24

PLCZ
pouze kvalikovaný personál z ociální technické podpory značky produktu.
Při čištění postupujte podle části o údržbě a čištění v tomto návodu.
B&B TRENDS S.L. Společnost se zříká veškeré odpovědnosti za škody způsobené osobám, zvířatům
nebo majetku v důsledku nedodržování těchto varování.
Před prvním použitím
Před prvním použitím parní stanice si pečlivě přečtěte tento návod k použití a ujistěte se, že rozumíte
všem funkcím přístroje. Před prvním použitím odstraňte veškerý obalový materiál a štítky.
Při prvním použití se mohou objevit pachy, které rychle zmizí. Poprvé spotřebič nepoužívejte ihned na
oděvy, na žehlící ploše mohou být stopy nečistot.
Jakou použít vodu
Používejte pouze vodu z vodovodu. Pokud je vaše voda tvrdá nebo polotvrdá, smíchejte vodu z
vodovodu s destilovanou nebo demineralizovanou vodou zakoupenou v obchodech v poměru 2:1 a 1:1
(destilovaná voda:voda z vodovodu). Typ vody zjistíte u vašeho dodavatele. Nikdy nepoužívejte 100%
destilovanou nebo demineralizovanou, dešťovou vodu, změkčenou vodu, vonnou vodu, vodu z jiných
spotřebičů, jako jsou ledničky, klimatizace, sušičky nebo jinak upravenou vodu.
Plnění nádržky na vodu
Vyjměte nádrž na vodu z podstavce a naplňte ji vodou. Nepřekračujte maximální hladinu vody, která je
naznačena ryskou.
Při umístění nádrže zpět do podstavce se ujistěte, že je na svém místě.
PROVOZNÍ POKYNY
Poznámka: Pokud používáte napařovací žehličku poprvé nebo jste produkt nepoužili delší dobu,
nastavte termostat do pozice pro žehlení párou a opakovaně stiskněte tlačítko parního rázu,
dokud neuvidíte vycházet páru. Tento proces může trvat několik minut.
Umístěte parní stanici na stabilní vodorovný stůl, lavici nebo žehlicí prkno.
Připojte jednotku do elektrické zásuvky a zapněte ji.
Podle druhu tkaniny, kterou chcete vyžehlit, nastavte termostat.
Poznámka: Pokud chcete použít žehlení párou, doporučujeme nastavit termostat na MAX.
Jakmile kontrolka provozu zhasne, žehlička je připravena k použití.
Poznámka: Po celou dobu používání bude kontrolka provozu žehličky v nepravidelných intervalech
problikávat, což je normální.
Chcete-li aktivovat funkci parního rázu, vyberte pomocí regulátoru napařování pozici pára a stiskněte
tlačítko parního rázu. Pokud chcete páru zastavit, uvolněte tlačítko parního rázu a pára během několika
sekund přestane vycházet.
Vyberte nastavení páry stisknutím a podržením tlačítka ovládání páry. Nastavení páry lze kdykoli
vypnout uvolněním tlačítka ovládání páry. Uzamkněte tlačítko přesunutím aretace směrem dolů, čímž
nebude nutné při napařování držet tlačítko ovládání páry stisknuté.
Tipy pro kvalitní žehlení
Začněte s žehlením prádla, které vyžaduje nejnižší teplotu a pokračujte k druhům tkanin, které vyžadují
vyšší teplotu.
Při žehlení směsových tkanin nastavte termostat na nejnižší teplotu.
U vlněných oděvů opakovaně stiskněte tlačítko parního rázu, aniž byste se látky žehličkou fyzicky
dotýkali.
U silnějších tkanin nastavte termostat na maximální teplotu.
25

PL
CZ
Průvodce žehlením
Níže je uveden průvodce nastavením teploty pro různé typy tkanin spolu s doporučenou metodou
žehlení.
Označení Materiál, například
. (1 tečka) Acetát, elastan, polyamid, polypropylen
. . (2 tečky) Cupro, polyester, hedvábí, triacetát, viskóza, vlna
… (3 tečky) / MAX Bavlna, len
Vertikální žehlení párou
Tato funkce umožňuje vyhladit záhyby na oděvech nebo závěsech podobným způsobem jako napařovač
oděvů. Držte žehličku ve svislé poloze, vysoký tlak vyvinutý v parní stanici vygeneruje silný proud.
Nejlepších výsledků dosáhnete při použití na jemné nebo tenké textilie. Proud páry směřujte pouze na
zavěšený oděv na bezpečném místě a vždy dbejte doporučení výrobce oděvů.
VAROVÁNÍ: NESMĚŘUJTE proud páry na oděv, který má někdo na sobě nebo na osoby.
ÚDRŽBA A ČIŠTĚNÍ
Bezpečnostní zámek
Přístroj je vybaven bezpečným zámkem pro snadné přenášení, který žehličku uzamkne k základně.
Chcete-li žehličku uzamknout k základně, zvedněte ji směrem nahoru, dokud nezaklapne na své místo.
Před použitím parní stanice musí být madlo pro snadné přenášení zajištěno v poloze proti základní
jednotce; stiskněte a podržte uvolňovací tlačítko madla a opatrně jej spusťte zpět na místo.
Čištění
Vypněte parní stanici a odpojte ji od elektrické zásuvky.
Vyprázdněte nádrž na vodu.
Keramickou žehlicí plochu pravidelně čistěte navlhčenou nekovovou mycí houbou.
Vnější část parní stanice otřete měkkým hadříkem.
K čištění parní stanice NEPOUŽÍVEJTE abrazivní čisticí prostředky, detergenty ani jiné chemikálie.
Výměna kazety proti vodnímu kameni
Vyměňujte kazetu proti vodnímu kameni pravidelně. Při standardním používání (dvakrát týdně) a v
závislosti na úrovni tvrdosti vaší vody doporučujeme kazetu vyměňovat jednou za 3 až 6 měsíců.
Poznámka: Nepoužívejte jednotku kazety proti vodnímu kameni!
1. Vyjměte vodní nádrž ze stanice.
2. Vytáhněte kazetu proti vodnímu kameni směrem nahoru a vyměňte ji. Pokud chcete kazetu odstranit,
nejprve ji vyšroubujte a opatrně vyjměte. Odpojte hadici od kazety a připojte ji k nové kazetě.
Zašroubujte novou kazetu zpět do vodní nádrže.
Poznámka: Buďte opatrní - uvnitř těla kazety se může nacházet voda.
Nainstalujte novou kazetu na k tomu určené místo.
26

PLCZ
Řešení problémů
Než se obrátíte na naše středisko podpory, prostudujte si níže uvedenou tabulku, která je věnována
řešení problémů.
Problém Možná příčina Řešení
Jednotka se nezahřívá a
neprodukuje páru.
Kontrolka napájení
nesvítí.
Jednotka není zapojena. Zapojte ji do elektrické zásuvky.
Z otvorů v žehlící ploše
vytéká voda.
V otvorech žehlicí plochy
se objevují bílé skvrny.
V otvorech žehlicí plochy
se objevují hnědé skvrny
a špiní prádlo.
Na žehlicí desce jsou
nečistoty nebo je
zahnědlá a může špinit
prádlo. Na žehlící plochu
se přichytává látka.
Voda zkondenzovala v
potrubí, protože používáte
páru poprvé nebo jste ji
delší dobu nepoužívali.
Žehlicí plocha není
dostatečně horká.
V žehličce se utvořil
vodní kámen, protože
kazeta proti vodnímu
kameni nebyla pravidelně
vyměňována.
Používáte chemické
prostředky proti tvorbě
vodního kamene nebo
přísady do vody pro
žehlení.
Žehlíte při příliš vysoké
teplotě.
Nádrž na vodu je prázdná. Naplňte nádrž na vodu.
Stiskněte tlačítko parního rázu a
žehličku přitom držte mimo žehlicí prkno.
Počkejte, až začne vydávat páru
Počkejte, až bude žehlicí plocha
dostatečně horká, nebo zvyšte teplotu
žehlicí plochy.
Vyměňte kazetu proti vodnímu kameni
Do vodní nádrže nikdy nepřidávejte
žádné přísady.
Nastavte termostat na nižší teplotu.
Není pára nebo je jí
nedostatek.
Žehlicí plocha není
dostatečně horká.
Počkejte, až bude žehlicí plocha
dostatečně horká, nebo zvyšte teplotu
žehlicí plochy.
27

PL
CZ
JAK PRODUKT ZKLIKVIDOVAT
Tento produkt je v souladu se směrnicí Evropského parlamentu a Rady 2012/19/EU o
elektrických a elektronických zařízeních známých jako WEEE (Odpadní elektrická a
elektronická zařízení), zavádí právní rámec platný v Evropské unii pro likvidaci a opětovné
použití odpadních elektronických a elektrických zařízení. Tento produkt nevyhazujte do
koše, ale odevzdejte ho do sběrného dvora, který je nejblíže k vašemu bydlišti.
Doufáme, že budete s tímto produktem spokojeni.
28

PLSK
ĎAKUJEME, ŽE STE SI VYBRALI ZNAČKU ZELMER. VERÍME, ŽE VÁM NÁŠ VÝROBOK PRINESIE
VEĽA RADOSTI A BUDETE S NÍM SPOKOJNÍ.
UPOZORNENIE
Pred použitím výrobku si pozorne prečítajte tieto pokyny. Návod na použitie si uschovajte na bezpečnom
mieste pre budúcu potrebu.
POPIS
1. Kryt plniaceho otvoru na vodu
2. Nádržka na vodu
3. Regulátor pary
4. Tlačidlo parného rázu
5. Svetelná kontrolka teploty
6. Koliesko regulácie teploty
7. Žehlička
8. Stanica
9. Zámok žehličky
10. Spojovací kábel
11. Napájací kábel
12. Odkladací priestor na napájací kábel
13. Filter proti tvorbe vodného kameňa
BEZPEČNOSTNÉ POKYNY
Tento spotrebič môžu používať deti vo veku od
8 rokov a osoby so zníženými fyzickými, zmyslovými
alebo mentálnymi schopnosťami, alebo nedostatkom
skúseností a vedomostí, ak sú pod dohľadom, alebo
boli poučené o používaní spotrebiča bezpečným
spôsobom a porozumeli príslušným nebezpečenstvám.
Deti sa so spotrebičom nesmú hrať. Deti bez dohľadu
nesmú spotrebič čistiť, ani vykonávať údržbu.
Ak je napájací kábel poškodený, musí ho vymenť
výrobca, jeho servisný zástupca alebo podobne
vyškolená osoba, aby sa predišlo nebezpečenstvu.
Keď je žehlička pripojená k elektrickej sieti,
nenechávajte ju bez dozoru.
Pred plnením nádržky na vodu je nutné vytiahnuť
zástrčku z elektrickej zásuvky.
29

PL
SK
Žehliaca a odkladacia plocha pre žehličku musí byť
rovná a stabilná.
Pri ukladaní žehličky do stojana sa uistite, že plocha, na
ktorej je stojan umiestnený, je stabilná.
Žehličku nepoužívajte, ak vám spadla, sú na nej
viditeľné známky poškodenia alebo ak z nej uniká voda.
Žehličku a jej napájací kábel uchovávajte mimo
dosahu detí mladších ako 8 rokov, predovšetkým, keď
je pripojená do elektrickej zásuvky alebo ak práve
chladne.
Pokyny na bezpečné plnenie nádržky na vodu sú
uvedené v časti „Plnenie nádržky na vodu“.
POZOR. Horúce povrchy. Povrchové plochy
môžu byť pri používaní horúce.
Pred pripojením spotrebiča k elektrickej sieti dajte
žehličku do odblokovanej polohy. Ak chcete žehličku
zablokovať, počkajte kým úplne vychladne a odpojte ju
z elektrickej siete.
Spotrebič je určený na používanie v maximálnej výške
do 2000 m.n.m.
DÔLEŽITÉ UPOZORNENIA
Tento spotrebič je navrhnutý na použitie v domácnosti a za žiadnych okolností ho nikdy nepoužívajte na
komerčné alebo priemyselné účely. Akékoľvek nesprávne použitie alebo nesprávne zaobchádzanie s
výrobkom má za následok stratu platnosti záruky.
Pred zapojením výrobku skontrolujte, či je vaše sieťové napätie rovnaké ako napätie uvedené na
výrobnom štítku.
Ak používate adaptér, uistite sa, že môže dosiahnuť 16 A a je vybavený uzemnenou zástrčkou.
Hlavný napájací kábel nesmie byť počas použitia pokrútený alebo omotaný okolo výrobku.
Zariadenie nepoužívajte, ani ho nepripájajte a neodpájajte z elektrickej siete, ak máte mokré ruky alebo
nohy.
Neodpájajte spotrebič zo sieťovej zásuvky ťahom za napájací kábel, ani ho nepoužívajte ako rukoväť
Nesmerujte paru na ľudí ani na zvieratá.
Pri plnení nádržky na vodu prístroj neumiestňujte pod vodovodný kohútik, ani ho neponárajte do vody
alebo iných tekutín.
30

PLSK
V prípade poruchy alebo poškodenia okamžite odpojte výrobok z elektrickej siete a kontaktujte ociálnu
technickú podporu. Zariadenie neotvárajte, aby ste predišli akémukoľvek nebezpečenstvu. Opravy alebo
zásahy na zariadení môžu vykonávať iba kvalikovaní technici z ociálnej technickej podpory značky.
Pri čistení postupujte v súlade s časťou o údržbe a čistení v tejto príručke.
Spoločnosť B&B TRENDS S.L. sa zrieka akejkoľvek zodpovednosti za škody, ktoré môžu vzniknúť
ľuďom, zvieratám alebo predmetom v dôsledku nedodržania týchto upozornení.
Pred prvým použitím
Pred použitím parného generátora si prečítajte príručku pre používateľa a oboznámte sa so všetkými
súčasťami a funkciami parného generátora. Pred prvým použitím odstráňte všetky obaly a štítky.
Pri prvom použití sa z prístroja môžu uvoľniť pachy alebo výpary, ktoré sa však rýchlo stratia. Pri prvom
použití nekropte odev, pretože na žehliacej ploche môžu byť stopy nečistôt.
Akú vodu treba používať
Žehlička je určená na použitie s vodou z vodovodu. Ak je voda vo vašej oblasti tvrdá alebo polotvrdá,
zmiešajte vodu z vodovodu s destilovanou alebo demineralizovanou vodou, ktorú dostanete kúpiť
v obchode, a to v pomere 2:1 resp. 1:1 (destilovaná voda:voda z vodovodu). Overte si u svojho
dodávateľa vody, aký typ vody je vo vašej oblasti. V žiadnom prípade nepoužívajte 100 % destilovanú
alebo demineralizovanú vodu, dažďovú vodu, mäkčenú vodu, parfumovanú vodu, vodu z iných
spotrebičov, napríklad z chladničiek, klimatizačných jednotiek, sušičiek, alebo vodu z iných zariadení na
úpravu vody pre domácnosti.
Plnenie nádržky na vodu
Nádržku na vodu vyberte zo stanice a cez plniaci otvor ju naplňte vodou. NENAPĹŇAJTE viac, ako je
ryska MAXIMÁLNEHO naplnenia.
Pri vkladaní nádržky na vodu späť do stanice sa uistite, že správne zapadla na svoje miesto.
NÁVOD NA OBSLUHU
Poznámka: Ak používate parnú žehličku po prvý raz alebo ak ste výrobok nepoužívali dlhší čas,
koliesko regulácie teploty nastavte do polohy pre žehlenie s parou, stlačte tlačidlo parného
rázu a podržte ho stlačené, kým zo žehličky nezačne vychádzať para. Tento proces môže trvať
niekoľko minút.
Parný generátor položte na pevný rovný stôl, lavicu alebo žehliacu dosku.
Spotrebič pripojte k elektrickej zásuvke a zapnite prívod napätia.
Koliesko regulácie teploty nastavte do polohy podľa typu textílie, ktorú chcete ožehliť.
Poznámka: Ak chcete použiť funkciu žehlenia s parou, odporúčame nastaviť koliesko regulácie teploty
do maximálnej polohy.
Keď svetelná kontrolka prevádzky zhasne, žehlička je pripravená na použitie.
Poznámka: Počas používania žehličky sa svetelná kontrolka prevádzky bude v nepravidelných
intervaloch zapínať a vypínať – to je normálny jav.
Ak chcete použiť prúd pary, regulátor pary nastavte do polohy pre naparovanie a stlačte tlačidlo parného
rázu. Ak chcete prúd pary zastaviť, pustite tlačidlo parného rázu a prúd pary sa do niekoľkých sekúnd
zastaví.
Funkciu naparovania môžete aktivovať stlačením a podržaním tlačidla naparovania. Funkciu
naparovania môžete kedykoľvek vypnúť tak, že pustíte tlačidlo naparovania. Ak chcete použiť funkciu
kontinuálneho naparovania bez toho, aby ste museli neustále držať stlačené tlačidlo naparovania,
stlačte zámok pary.
Tipy pre žehlenie
Začnite textíliami, ktoré je potrebné žehliť pri nízkej teplote, a na záver ožehlite odevy, ktoré si vyžadujú
vyššiu teplotu.
Na žehlenie zmesových tkanín nastavte nižšiu teplotu.
31

PL
SK
Odevy z vlny žehlite tak, že budete opakovane stláčať tlačidlo parného rázu, pričom žehličku budete
držať nad odevom bez toho, aby ste sa ňou dotkli odevu.
Na žehlenie hrubších tkanín zvýšte teplotu žehlenia na maximum.
Tabuľka s odporúčanými nastaveniami pre žehlenie
Nižšie uvádzame odporúčané nastavenia teploty pre rôzne druhy tkanín, ako aj odporúčané metódy
žehlenia.
Označenie Materiál (príklad)
. (1 bodka) Acetát, elastan, polyamid, polypropylén
. . (2 bodky) Cupro, polyester, hodváb, triacetát, viskóza, vlna
… (3 bodky)/MAX. Bavlna, ľan
Žehlenie s parou vo zvislej polohe
Táto funkcia umožňuje žehliť záhyby na odevoch alebo závesoch podobným spôsobom ako pri použití
naparovača odevov. Parný generátor má funkciu vyvíjania pary pod vysokým tlakom, vďaka ktorej
dokáže vyvíjať parné rázy pri držaní žehličky vo zvislej polohe. Najlepšie výsledky dosiahnete pri žehlení
jemných a ľahkých tkanín. Paru smerujte len na odevy zavesené na bezpečnom mieste a dbajte na to,
aby ste vždy dodržiavali odporúčania výrobcu odevu.
UPOZORNENIE: Paru v ŽIADNOM PRÍPADE nesmerujte na odev, ktorý má niekto oblečený.
ÚDRŽBA A ČISTENIE
Zámok žehličky
Pre pohodlnejšie prenášanie parného generátora môžete použiť zámok pre jednoduché prenášanie,
ktorý sa nachádza na základnej jednotke. Stačí, ak zámok nadvihnete tak, aby zacvakol do zaistenej
polohy. Pred použitím parného generátora je rukoväť pre jednoduché prenášanie nutné vrátiť do
zaistenej polohy na základnej jednotke; stlačte uvoľňovacie tlačidlo rukoväte, podržte ho stlačené
a zároveň opatrne sklopte rukoväť späť na jej miesto.
Čistenie
Parný generátor vypnite a odpojte ho z elektrickej zásuvky.
Vyprázdnite nádržku na vodu.
Keramickú žehliacu plochu pravidelne čistite navlhčenou nekovovou hubkou na umývanie riadu.
Vonkajší povrch parného generátora utrite jemnou handričkou.
Na čistenie parného generátora NEPOUŽÍVAJTE abrazívne čistiace prostriedky, detergenty a iné
chemikálie.
Výmena ltra proti tvorbe vodného kameňa
Pravidelne vymieňajte lter na zmäkčovanie vody. Pri stredne intenzívnom používaní (dvakrát týždenne)
a podľa tvrdosti vody vo vašej oblasti je lter proti tvorbe vodného kameňa a na zmäkčenie vody
potrebné meniť každých 3 – 6 mesiacov.
Poznámka: Parný generátor nepoužívajte bez ltra na zmäkčovanie vody!
1. Nádržku na vodu vyberte zo stanice.
2. Filter proti tvorbe vodného kameňa potiahnite smerom hore a vyberte ho, aby ste ho mohli vymeniť za
nový. Filter vyberiete tak, že ho najprv odskrutkujete a potom opatrne vytiahnete von. Z ltra odpojte
hadičku a pripojte ju k novému ltru. Nový lter naskrutkujte do nádržky na vodu.
Poznámka: Dávajte pozor – vo vnútri ltra môže byť voda.
Namiesto pôvodného ltra namontujte nový lter na zmäkčovanie vody.
32

PLSK
Sprievodca pre riešenie problémov
V prípade akýchkoľvek problémov, s ktorými sa môžete stretnúť, , si najskôr preštudujte nižšie uvedenú
tabuľku a následne kontaktujte naše centrum technickej podpory.
Problém Možná príčina Riešenie
Jednotka sa neohrieva
a nevyvíja paru Svetelná
kontrolka napájania
nesvieti.
Cez otvory v žehliacej
ploche vyteká voda.
Jednotka nie je pripojená
k elektrickej sieti.
V kanálikoch
skondenzovala voda,
pretože žehličku
používate prvýkrát
alebo ste ju dlhší čas
nepoužívali.
Zapojte ju do elektrickej zásuvky.
Stlačte a podržte tlačidlo parného rázu,
kým zo žehličky nezačne vychádzať
para. Žehličku pritom držte mimo
žehliacej dosky.
Cez otvory v žehliacej
ploche vychádzajú biele
úlomky.
Cez otvory v žehliacej
ploche vychádzajú
hnedasté čiastočky, ktoré
znečisťujú bielizeň.
Žehliaca plocha je
znečistená alebo hnedá
a môže znečistiť odev. Na
žehliacu plochu sa lepí
tkanina.
Žehlička nevyvíja paru
alebo iba malé množstvo
pary.
Žehliaca plocha nie je
dostatočne horúca.
V spotrebiči sa vytvoril
vodný kameň, pretože ste
pravidelne nevymieňali
lter proti vodnému
kameňu.
Do vody, ktorú ste
použili na žehlenie, ste
pridali chemické látky na
odstraňovanie vodného
kameňa alebo iné prísady.
Žehlíte pri príliš vysokej
teplote.
Nádržka na vodu je
prázdna.
Žehliaca plocha nie je
dostatočne horúca.
Počkajte, kým sa žehliaca plocha zohreje
na dostatočnú teplotu, alebo zvýšte
teplotu pomocou kolieska regulácie
teploty.
Vymeňte lter proti tvorbe vodného
kameňa.
Nikdy nepridávajte podobné produkty do
nádržky na vodu alebo do parnej komory.
Koliesko regulácie teploty nastavte na
nižšiu teplotu.
Naplňte nádržku na vodu.
Počkajte, kým sa žehliaca plocha zohreje
na dostatočnú teplotu, alebo zvýšte
teplotu pomocou kolieska regulácie
teploty.
33

PL
SK
ODPORÚČANIE K LIKVIDÁCII
Tento výrobok je v súlade s európskou smernicou 2012/19/EÚ o odpade z elektrických a
elektronických zariadení (OEEZ), ktorá vymedzuje právny rámec platný v Európskej únii, čo
sa týka likvidácie a opätovného použitia odpadu z elektronických a elektrických zariadení.
Tento výrobok nevyhadzujte do koša, ale ho zaneste do najbližšieho zberného strediska pre
elektrický a elektronický odpad.
Veríme, že budete s týmto výrobkom spokojní.
34

PLHU
KÖSZÖNJÜK, HOGY A ZELMERT VÁLASZTOTTA! BÍZUNK BENNE, HOGY A TERMÉK AZ
ELVÁRÁSAINAK MEGFELELŐEN TELJESÍT, ÉS SOK ÖRÖMÉT LELI BENNE.
FIGYELMEZTETÉS
A termék használatának megkezdése előtt olvassa el gyelmesen a használati utasítást, majd tegye el
biztonságos helyre későbbi használatra.
MEGNEVEZÉS
1. Vízbemenet fedele
2. Víztartály
3. Gőzválasztó
4. Gőzadagoló kar
5. Hőmérséklet-visszajelző
6. Hőmérséklet-szabályozó tárcsa
7. Vasaló
8. Állomás
9. Vasaló retesz
10. Összekötő kábel
11. Tápkábel
12. Tápkábel tároló
13. Vízlágyító patron
BIZTONSÁGI UTASÍTÁSOK
A berendezést gyermekek (8 éves kortól) és
csökkent zikai, érzékszervi vagy szellemi képességű
személyek, valamint a megfelelő tapasztalattal
vagy ismeretekkel nem rendelkező személyek is
használhatják, amennyiben felügyelet alatt teszik ezt,
vagy amennyiben utasításokat kaptak a berendezés
biztonságos használatára vonatkozóan és tájékoztatták
őket a berendezéssel kapcsolatos veszélyekről.
Gondoskodjon róla, hogy a gyerekek ne játszanak a
berendezéssel. Gyermekek csak felnőtt felügyelete
mellett végezhetnek tisztítást és felhasználói
karbantartást a berendezésen.
A balesetveszély elkerülése érdekében a sérült
tápkábel cseréjét bízza a gyártóra, a gyártó
szervizmunkatársára vagy más szakemberre.
A vasalót nem szabad őrizetlenül hagyni, amikor
35

PL
HU
csatlakoztatva van a hálózathoz.
A víztartály feltöltése előtt a dugaszát ki kell húzni az
aljzatból.
A vasalót vízszintes, stabil felületen kell használni és
tartani.
Ha a vasalót az állványára helyezi, gondoskodjon róla,
hogy az állvány stabil felületen álljon.
A vasalót tilos használni, ha leesett, láthatóan
károsodott vagy szivárog.
Ügyeljen rá, hogy ne nyúlhasson 8 évnél atalabb
gyermek a vasalóhoz és a kábeléhez, ha az áram alatt
vagy még hűl.
A víztartály biztonságos feltöltését a víztartállyal
foglalkozó rész ismerteti.
VIGYÁZAT! Forró felületek. A felületek használat
közben felforrósodhatnak.
Mielőtt a készüléket csatlakoztatná az aljzathoz, oldja
ki a vasalót. A vasaló rögzítése előtt várja meg, amíg a
készülék teljesen lehűl, majd húzza ki az aljzatból.
A készülék maximum 2000 méteres tengerszint feletti
magasságig használható.
FONTOS FIGYELMEZTETÉSEK
A berendezés otthoni használatra lett tervezve. Kereskedelmi és ipari használata tilos! A termék nem
rendeltetésszerű használata vagy nem megfelelő kezelése a garancia elvesztésével jár.
A termék hálózathoz csatlakoztatása előtt ellenőrizze, hogy a hálózati feszültség megfelel-e a termék
címkéjén feltüntetett értékeknek.
Átalakító használata esetén ügyeljen rá, hogy az legalább 16 A terhelhetőségű és földelt legyen.
Ügyeljen rá, hogy használat közben ne tekeredjen a tápkábel a termék köré.
Ne használja a készüléket, illetve ne csatlakoztassa aljzathoz vagy húzza ki onnan, ha nedves a keze
és/vagy vizes helyen áll mezítláb.
A dugasznál fogva húzza ki a tápkábelt.
Ne irányítsa a gőzt másokra vagy állatokra.
36

PLHU
Ne helyezze csap alá a berendezést, valamint ne merítse vízbe vagy más folyadékba a víztartály
feltöltése céljából.
A termék meghibásodása vagy sérülése esetén azonnal húzza ki a tápkábelt, és forduljon
szakemberhez. A veszélyek elkerülése érdekében ne nyissa fel a készüléket. Kizárólag a gyártó
hivatalos szervizmunkatársai végezhetnek javításokat vagy egyéb eljárásokat a készüléken.
A tisztítással kapcsolatban kövesse a jelen kézikönyv tisztításra és karbantartásra vonatkozó részében
található utasításokat.
Az B&B TRENDS S.L. nem vállal felelősséget a személyi sérülésekért és vagyoni károkért, amennyiben
azok a jelen gyelmeztetések gyelmen kívül hagyásából erednek.
Az első használat előtt
A gőzállomás használata előtt feltétlenül olvassa el a kezelési utasítást, és ismerje meg annak összes
alkatrészét és funkcióját. Az első használat előtt feltétlenül távolítson el róla minden csomagolóanyagot.
Az első használat előtt a terméknek jellegzetes szaga lehet, ez azonban gyorsan elmúlik. Az első
alkalommal ne a ruhákra permetezzen, mert a talplemez koszos lehet.
A használandó víz
A készülék csapvízzel való használatra készült. Ha a használati helyen kemény vagy félkemény a víz,
keverje a csapvizet boltban kapható desztillált vagy ioncserélt vízzel 2:1 vagy 1:1 arányban (desztillált
víz:csapvíz). Érdeklődje meg a vízműveknél, hogy milyen keménységű a víz az adott használati helyen.
Ne használjon 100%-ban desztillált vagy ioncserélt vizet, esővizet, lágyított vizet, illatosított vizet, más
készülékekből, például hűtőszekrényből vagy légkondicionáló rendszerből, szárítóból származó vagy
egyéb otthon előkészített vizet.
A víztartály feltöltése
Távolítsa el a víztartályt az állomásról és töltse fel a vízbemeneten keresztül. NE töltse a tartályt a MAX
szintjelzés fölé!
Amikor visszahelyezi az állomásra, ellenőrizze a tartály megfelelő illeszkedését.
HASZNÁLATI UTASÍTÁS
Megjegyzés: Ha első ízben vasal gőzzel vagy a terméket már régóta nem használta, fordítsa a
hőmérséklet szabályozót gőzvasalás helyzetbe, majd nyomja addig a gőzölés gombot, amíg
áramlani nem kezd a gőz. Ez az eljárás pár percig is eltarthat.
Helyezze a gőzállomást vízszintes, stabil felületű asztalra, padra vagy vasalódeszkára.
Csatlakoztassa hálózati aljzathoz, majd kapcsolja be.
A hőmérséklet-szabályozó tárcsát a vasalni kívánt anyagnak megfelelően állítsa be.
Megjegyzés: Ha a gőzöléses vasalást használná, a hőmérséklet-szabályozó tárcsát a MAX fokozatra
célszerű állítani.
Amikor a vasaló üzemi visszajelzője kialszik, a készülék készen áll a használatra.
Megjegyzés: A vasaló üzemi visszajelzője a használat során szabálytalan időközönként ki- és bekapcsol,
ami nem rendellenesség.
A gőzsugár használatához válassza ki a gőzválasztón a gőzölés helyzetet és nyomja meg a gőzadagoló
kart. A gőzkibocsátás befejezéséhez engedje el a gőzadagoló kart, és a gőzölés pár másodperc múlva
leáll.
A gőzölés kiválasztásához nyomja meg hosszan a gőzölés gombot. A gőzölés a gőzölés gombot
felengedve bármikor kikapcsolható. A gőzölés reteszt megnyomva a gomb nyomva tartása nélkül is
használhatja a gőzölés funkciót.
Vasalási tippek
Kezdje a vasalást az alacsonyabb hőmérsékletet igénylő anyagokkal, és fejezze be azokkal, amelyek
forróbb vasalót igényelnek.
37

PL
HU
Vegyes szövetnél állítsa az alacsonyabb értékre a vasalási hőmérsékletet.
Gyapjú esetén nyomja meg többször a gőzadagoló kart a ruhaanyag fölött elhaladva a vasalóval
anélkül, hogy a vasaló hozzáérne.
Vastagabb szövet esetén állítsa MAX értékre a hőmérsékletet.
Táblázatos vasalási útmutató
Az alábbi útmutató a különféle szövetekhez szükséges hőmérsékleti értékeket mutatja be az ajánlott
vasalási módszerrel együtt.
Jelölés Anyag, például
. (1 pötty) Acetát, elasztán, poliamid, polipropilén
. . (2 pötty) Cupro, poliészter, selyem, triacetát, viszkóz, gyapjú
… (3 pötty)/MAX Pamut, len
Gőzölős vasalás függőlegesen
A funkció a ruhagőzölőkhöz hasonlóan teszi lehetővé a gyűrődések kisimítását ruházaton, függönyökön.
A gőzállomás nagy gőznyomása jóvoltából a vasaló függőlegesen tartva is képes gőzsugarat
kibocsátani. A legjobb eredmény érdekében használja nom, könnyű szöveteken. A gőzsugarat csak
biztonságos helyen irányítsa a lógó ruhára, és mindig tartsa be a ruházat gyártójának javaslatait.
FIGYELMEZTETÉS: NE irányítsa a gőzsugarat olyan ruhára, amelyet épp visel valaki!
KARBANTARTÁS ÉS TISZTÍTÁS
Vasaló retesz
Az alapegységhez rögzített fogantyú rész megkönnyíti a gőzállomás szállítását. A használathoz hajtsa
fel kattanásig. A gőzállomás használatához a szállítást megkönnyítő fogantyút vissza kell hajtani az
alapegységre; a fogantyút kioldó gombot nyomva tartva hajtsa vissza óvatosan a fogantyút a helyére.
Tisztítás
Kapcsolja ki a gőzállomást és húzza ki a hálózati aljzatból.
Ürítse ki a víztartályt.
Tisztítsa meg rendszeresen a kerámia talplemezt nedves, nem fémes mosópárnával.
Törölgesse le a gőzállomás külső felületét puha törlőkendővel.
NE használjon csiszoló hatású tisztítószert, oldószert, sem egyéb vegyszert a gőzállomás tisztításához!
A vízlágyító patron cseréje
Cserélje rendszeresen a vízlágyító patront. Közepesen gyakori (heti kétszeri) használat esetén és a
helyi víz keménységétől függően a vízlágyító patront cserélje 3–6 havonta.
Megjegyzés: Ne használja a készüléket vízlágyító patron nélkül!
1. Távolítsa el a víztartályt az állomásról.
2. A cseréhez felfelé húzza ki a vízlágyító patront. Az eltávolításához először csavarja ki, majd óvatosan
vegye ki. Válassza le a tömlőt a patronról, és csatlakoztassa az új patronhoz. Csavarja be az új
patront a víztartályba.
Megjegyzés: Vigyázzon – a patron házában víz lehet.
Helyezze be az új vízlágyító patront a helyére.
38

PLHU
Hibaelhárítási útmutató
Ha problémába ütközik, nézze át az alábbi hibaelhárítási táblázatot, mielőtt az ügyfélszolgálathoz
fordulna.
Hiba Lehetséges ok Megoldás
A készülék nem melegszik
és nem gőzöl. A működést
jelző fény nem világít.
A készülék nincs bedugva. Dugja be a hálózati aljzatba.
Víz jön a talplemez
furataiból.
Fehér csíkok jönnek ki a
talplemez furataiból.
Barna csíkok jönnek ki a
talplemez furataiból és
foltot hagynak a vásznon.
A talplemez koszos
vagy barna, és foltot
hagy a ruhán. A ruha a
talplemezhez ragad.
Ez az első használat
során vagy hosszabb
üzemszünetet követően a
csövekben lerakódott víz.
A talplemez nem elég
meleg.
A termékben vízkő
rakódott le, mert a
vízlágyító patront nem
cserélték rendszeresen.
A vasalóhoz használt víz
vegyi vízlágyítót vagy
adalékokat tartalmaz.
Túl magas hőmérsékleten
vasal.
A víztartály kiürült. Töltse fel a víztartályt.
A készüléket a vasalódeszkától eltartva
nyomja addig a gőzadagoló kart, amíg el
nem kezd áramlani a gőz.
Várja meg, amíg a talplemez
kellően felmelegszik, vagy növelje a
hőmérsékletét.
Cserélje ki a vízlágyító patront
Ne töltsön ilyen terméket a víztartályba
vagy a gőzkamrába.
Állítsa alacsonyabbra a tárcsával a
hőmérsékletet.
Nem jön vagy alig jön gőz.
A talplemez nem elég
meleg.
Várja meg, amíg a talplemez
kellően felmelegszik, vagy növelje a
hőmérsékletét.
39

PL
HU
HULLADÉKELHELYEZÉSI TANÁCSOK
A termék megfelel az elektromos és elektronikus készülékekre vonatkozó 2012/19/
EU szabványnak (más néven WEEE szabvány), mely az elektromos és elektronikus
készülékek ártalmatlanításának és újrahasznosításának a jogi keretrendszerét adja az
Európai Unióban. A termék nem háztartási hulladékként kezelendő; a terméket a lakóhelye
szerinti elektromos és elektronikus hulladékok gyűjtőhelyére kell eljuttatni.
Reméljük, hogy megelégedéssel használja termékünket!
40

PLRO
Vă mulțumim că ați ales erul de călcat ZELMER. NE DORIM CA PRODUSUL SĂ FUNCȚIONEZE
CONFORM AȘTEPTĂRILOR DVS.
ATENȚIE!
Vă rugăm să citiți cu atenție instrucțiunile de utilizare înainte de a folosi produsul. Păstrați-le într-un loc
sigur pentru consultare ulterioară.
DESCRIERE
1. Capac de alimentare cu apă
2. Rezervor de apă
3. Selector aburi
4. Declanșator abur
5. Lampă indicatoare pentru temperatură
6. Buton pentru controlul temperaturi
7. Fier de călcat
8. Stație
9. Buton blocare er de călcat
10. Cablu de interconectare
11. Cablu de alimentare
12. Spațiu depozitare cablu de alimentare
13. Sistem protecție împotriva depunerilor de tartru
INSTRUCȚIUNI DE SIGURANȚĂ
Acest aparat poate utilizat de copiii cu vârste
începând de la 8 ani și de persoane cu capacități
zice, senzoriale sau mentale reduse sau care nu dețin
experiența și cunoștințele necesare utilizării acestuia,
cu condiția să e supravegheate sau să li se ofere
instrucțiuni cu privire la utilizarea aparatului într-un mod
sigur și să înțeleagă pericolele implicate. Este interzis
copiilor să se joace cu acest aparat. Sunt interzise
curățarea și întreținerea aparatului de către copii
nesupravegheați.
În cazul în care cablul de alimentare este deteriorat,
acesta trebuie înlocuit de către producător sau de către
reprezentantul de service sau de către o persoană cu o
calicare similară, pentru a evita orice pericol.
Fierul de călcat nu trebuie lăsat supravegheat atunci
când este conectat la sursa de alimentare.
Ștecărul trebuie scos din priză, înainte de a umple
41
PL
RO
rezervorul cu apă.
Fierul de călcat trebuie folosit și așezat pe o suprafață
dreaptă și stabilă
Atunci când așezați erul de călcat în suport, asigurați-
vă că suprafața pe care se aă suportul este stabilă.
Fierul de călcat nu trebuie folosit dacă a fost trântit sau
dacă prezintă semne de deteriorare vizibile sau de
scurgere.
Nu lăsați erul și cablul la îndemâna copiilor cu vârsta
mai mică de 8 ani, atunci când este în priză sau când
se răcește.
Instrucțiunile pentru reumplerea în siguranță a
rezervorului de apă sunt prezentate în secțiunea despre
umplerea rezervorului de apă.
ATENȚIE! Suprafețe erbinți. Suprafețele sunt erbinți
în timpul utilizării.
Înainte de a conecta aparatul la sursa de
alimentare, puneți erul în poziția deblocat.
Pentru a bloca erul de călcat, așteptați până
când aparatul s-a răcit complet și a fost deconectat de
la priză.
Dispozitivul este destinat utilizării la o altitudine de până
la 2000 m deasupra nivelului mării.
AVERTISMENTE IMPORTANTE
Acest aparat este conceput pentru uz casnic și nu trebuie utilizat niciodată în scopuri comerciale
sau industriale, indiferent de situație. Orice utilizare incorectă sau manevrare necorespunzătoare ale
aparatului vor duce la pierderea garanției.
Înainte de a conecta aparatul la o sursă de electricitate, vericați dacă tensiunea rețelei dumneavoastră
corespunde cu cea indicată pe eticheta produsului.
Dacă utilizați un adaptor, asigurați-vă că poate ajunge la 16 A și este prevăzut cu priză de împământare
În timpul utilizării, cablul de conectare la sursa de electricitate trebuie să nu e încurcat sau înfășurat în
jurul produsului.
Nu folosiți dispozitivul și nu îl conectați și deconectați de la priză cu mâinile și/sau picioarele ude.
Nu trageți de cablul de conectare pentru a-l deconecta de la sursa de electricitate sau nu îl folosiți ca
mâner
Nu îndreptați jetul de abur asupra oamenilor și animalelor.
42

PLRO
Nu așezați aparatul sub robinet pentru a umple rezervorul de apă sau nu îl scufundați în apă sau în alte
lichide.
Deconectați produsul imediat de la sursa de alimentare în caz de defecțiune sau avarie și contactați un
service ocial de asistență tehnică. Pentru a preveni orice risc de pericol, nu deschideți aparatul. Numai
personalul tehnic calicat din service-ul ocial de asistență tehnică al mărcii poate efectua reparații sau
proceduri pe aparat.
Pentru curățare, procedați în conformitate cu secțiunea din acest manual referitoare la păstrare și
curățare.
B&B TRENDS S.L. nu își asumă răspunderea cu privire la pagubele față de oameni, animale sau
obiecte, ca urmare a nerespectării acestor avertismente.
Înainte de prima utilizare
Înainte de a utiliza Steam Station (stația cu aburi), vă rugăm să vă asigurați că citiți manualul de utilizare
și că înțelegeți toate părțile și caracteristicile stației cu aburi. Asigurați-vă că îndepărtați orice material de
ambalare și etichete înainte de prima utilizare.
La prima utilizare, aparatul poate emite mirosuri sau aburi, care se vor atenua rapid. Nu pulverizați din
prima pe haine, deoarece capul cu abur poate avea urme de murdărie.
Tipul de apă
Dispozitivul este conceput pentru a folosit cu apă de la robinet. Dacă apa din zona dvs. este dură sau
semi-dură, folosiți apa de la robinet cu apă distilată sau demineralizată disponibilă în magazine, într-un
raport de 2:1, respectiv 1:1 (apă distilată: apă de la robinet). Consultați furnizorul dvs. de apă pentru a
determina tipul de apă din zona dvs. Nu folosiți niciodată apă distilată sau demineralizată în proporție de
100%, apă de ploaie, apă dedurizată, apă parfumată, apă de la alte aparate, cum ar frigidere, aparate
de aer condiționat, uscătoare sau alte tipuri de apă pentru prepararea apei de uz casnic.
Umplerea rezervorului de apă
Scoateți rezervorul de apă din stație și umpleți-l prin capacul de alimentare cu apă. NU depășiți
indicatorul de nivel MAX.
Asigurați-vă că atunci când îl așezați înapoi la stație, se așază corect.
Instrucțiuni de utilizare
NB: Dacă este prima dată când călcați cu abur sau dacă produsul nu a fost utilizat de ceva timp,
rotiți controlul temperaturii într-o poziție de călcare cu abur și apăsați butonul aburului continuu
până când iese abur. Acest proces poate dura câteva minute.
Așezați stația de aburi pe o masă, pe o bancă sau pe o masă de călcat fermă.
Conectați unitatea la o priză și porniți la punctul de alimentare.
Reglați butonul de temperatură în funcție de tipul de țesături pe care doriți să le călcați.
Notă: Notă: Dacă doriți să folosiți călcarea cu aburi, vă recomandăm să reglați butonul de temperatură
pe MAX.
Când indicatorul luminos de funcționare a erului se stinge, dispozitivul va gata de utilizare.
Notă: Pe întregul timp de funcționare, indicatorul luminos de funcționare a erului se va aprinde și se va
stinge la intervale neregulate - acest lucru este normal.
Pentru a face jet de abur, selectați poziția aburului cu selectorul de abur și apăsați declanșatorul de abur,
iar dacă doriți să opriți eliberarea aburului, dați drumul la declanșatorul de abur și, în câteva secunde,
aburul se va opri.
Selectați setarea aburului ținând apăsat butonul de abur. Reglarea aburului poate dezactivată oricând
prin eliberarea butonului pentru abur. Apăsați butonul de abur continuu și nu va mai trebui să apăsați
butonul pentru abur.
Sfaturi pentru călcat
Începeți cu țesăturile care trebuie să e călcate la o temperatură scăzută și terminați cu cele care au
nevoie de temperaturi mai ridicate.
43

PL
RO
Pentru țesăturile din bre mixte, setați temperatura de călcare la o setare mai scăzută.
Pentru articolele din lână, apăsați în mod repetat pe declanșatorul de abur, peste îmbrăcăminte, fără a
atinge articolul cu erul.
Pentru țesături mai groase, ridicați temperatura erului în poziția MAX.
Diagrama Ghidului de călcare
Mai jos este prezentat un ghid privind setarea temperaturii necesare pentru diferite tipuri de țesături,
împreună cu metoda de călcare recomandată.
Simbol Material, de exemplu
. (1 punct) Acetat, elastan, poliamidă, polipropilenă
. . (2 puncte) Cupro, poliester, mătase, triacetat, viscoză, lână
… (3 puncte)/MAX Bumbac, pânză
Călcare verticală cu abur
Această caracteristică vă permite să neteziți cutele articolelor de îmbrăcăminte sau ale draperiilor într-o
manieră similară cu un er cu abur pentru îmbrăcăminte. Presiunea ridicată a aburului stației cu abur
poate provoca explozii de abur în timp ce erul este ținut în poziție verticală. Pentru cele mai bune
rezultate, utilizați pe țesături delicate sau ușoare. Îndreptați aburul numai înspre hainele agățate într-o
zonă sigură și asigurați-vă că țineți întotdeauna cont de recomandările producătorului de îmbrăcăminte.
ATENȚIE: NU direcționați aburul pe o îmbrăcăminte care este purtată sau către nicio persoană.
ÎNTREȚINERE ȘI CURĂȚARE
Buton blocare er de călcat
Butonul de blocare pentru transportarea ușoară atașat la unitatea de bază poate utilizat pentru a
transporta stația cu abur cu ușurință. Pentru a face acest lucru, ridicați-l printr-o singură mișcare în sus
până când face clic pe poziție. Înainte de a utiliza stația cu aburi, mânerul pentru transportarea ușoară
trebuie să e xat din nou în poziția de blocare, împotriva unității de bază; apăsați și mențineți apăsat
butonul de eliberare a mânerului și coborâți-l apoi cu atenție.
Curăţare
Opriți stația de aburi și deconectați-o la sursa de alimentare.
Goliți rezervorul cu apă.
Curățați regulat talpa ceramică cu un tampon de spălare nemetalic, umed.
Ștergeți exteriorul stației cu aburi cu o cârpă moale.
NU folosiți produse de curățat abrazive, detergenți sau alte substanțe chimice pentru a curăța stația cu
aburi.
Sistem protecție împotriva depunerilor de tartru
Schimbați cartușul de dedurizare a apei în mod regulat. La o utilizare moderată (de două ori pe
săptămână) și în funcție de duritatea apei din regiunea dvs., cartușul de dedurizare a apei ar trebui
înlocuit la ecare 3-6 luni.
Notă: A nu se utiliza unitatea fără cartușul de dedurizare a apei!
1. Scoateți rezervorul de apă din stație.
2. Trageți cartușul anti-calcar în sus și scoateți-l pentru a schimbat. Pentru a-l scoate, în primul rând,
deșurubați-l și scoateți-l cu atenție. Deconectați furtunul de la cartușul vechi și conectați-l la noul
cartuș. Înșurubați noul cartuș în rezervorul de apă.
Notă: Aveți grijă - în interiorul corpului cartușului poate să e apă.
Instalați un nou cartuș de dedurizare a apei în locul respectiv.
44

PLRO
Ghid de depanare
Vă rugăm să consultați tabelul de depanare de mai jos pentru orice probleme cu care vă confruntați,
înainte de a contacta centrul nostru de asistență.
Problemă Cauză posibilă Soluție
Unitatea nu se încălzește
și nu face aburi.
Indicatorul de alimentare
nu se aprinde.
Iese apă din găurile din
talpă.
Unitatea nu este conectată
la o sursă de alimentare.
Apa s-a condensat în
conducte deoarece utilizați
unitatea pentru prima dată
sau nu ați folosit-o de ceva
timp.
Conectați-o la o sursă de curent
electric.
Apăsați declanșatorul de abur departe
de masa de călcat, până când erul
produce abur.
Dâre albe se scurg din
găurile din talpă.
Dâre brune ies prin găurile
din talpă și pătează
materialul.
Talpa este murdară sau
maro și poate colora
materialul. Materialul se
lipește de talpă.
Nu este produs abur sau
este produs foarte puțin.
Talpa nu este sucient de
erbinte.
Produsul are o cantitate mai
mare de tartru, deoarece
cartușul anti-calc nu a fost
schimbat în mod regulat.
Utilizați agenți chimici de
detartrare sau aditivi în apa
pentru călcat.
Călcați la o temperatură
prea mare.
Rezervorul de apă este gol. Umpleți rezervorul cu apă.
Talpa nu este sucient de
erbinte.
Așteptați până când talpa de er
este sucient de erbinte sau crește
temperatura plăcii.
Schimbați cartușul anti-calcar
Nu adăugați niciodată acest tip de
produse în rezervorul de apă sau în
camera cu aburi.
Reglați butonul pentru temperatură la o
temperatură mai scăzută.
Așteptați până când talpa de er
este sucient de erbinte sau crește
temperatura plăcii.
45

PL
RO
SFATURI PENTRU ELIMINARE
Acest produs respectă Directiva Europeană 2012/19 / UE privind dispozitivele electrice
și electronice, cunoscută sub denumirea de DEEE (deșeuri de echipamente electrice și
electronice), asigură cadrul legal aplicabil în Uniunea Europeană pentru eliminarea și
reutilizarea deșeurilor de echipamente electrice și electronice. Nu aruncați acest produs
la gunoi, ci mergeți la cel mai apropiat centru de colectare a deșeurilor de echipamente
electrice și electronice.
Sperăm că veți mulțumit de acest produs!
46

PLRU
БЛАГОДАРИМ ЗА ВЫБОР ПРОДУКЦИИ ZELMER. МЫ УВЕРЕНЫ, ЧТО ЭТО ИЗДЕЛИЕ БУДЕТ
ДОЛГО ПРИНОСИТЬ ВАМ ПОЛЬЗУ И УДОВОЛЬСТВИЕ.
ПРЕДУПРЕЖДЕНИЕ
Перед использованием изделия рекомендуем внимательно ознакомиться с этой инструкцией,
которую следует хранить в надежном месте для обращения к ней в будущем.
ОПИСАНИЕ
1. Крышка отверстия для воды
2. Резервуар для воды
3. Регулятор пара
4. Кнопка пара
5. Контрольная лампа температуры
6. Шкала терморегулятора
7. Подставка для
8. утюга
9. Блокировка утюга
10. Соединительный шнур
11. Шнур питания
12. Место хранения шнура питания
13. Картридж для очистки от накипи
ИНСТРУКЦИИ ПО БЕЗОПАСНОСТИ
Допускается использование прибора детьми
старше восьми лет и людьми с ограниченными
физическими, двигательными и психическими
способностями, а также людьми, не имеющими
достаточного опыта или знаний для его
использования, только под присмотром или если
они были обучены безопасному пользованию
прибором и осознают возможную опасность,
связанную с неправильной эксплуатацией прибора.
Не позволяйте детям играть с прибором. Дети могут
очищать и осуществлять обслуживание прибора,
только если они находятся под присмотром.
Если кабель питания поврежден, в целях
безопасности он должен быть заменен
производителем, его авторизованным сервисным
агентом или специалистом с аналогичной
47

PL
RU
квалификацией.
Запрещено оставлять утюг без присмотра, когда он
включен в розетку.
Перед заполнением резервуара для воды
необходимо извлечь вилку утюга из розетки.
Утюг следует использовать и хранить на плоской
стабильной поверхности
Утюг следует размещать на подставке, которая
стоит на стабильной поверхности.
Не следует использовать утюг после падения, если
на нем имеются видимые признаки повреждения
или если он протекает.
Утюг и шнур следует хранить в местах, не доступных
для детей младше 8 лет, а также исключить их
контакт с прибором, который подключен к розетке
или остывает.
Инструкции по безопасному заполнению резервуара
водой описаны в разделе, посвященном этому
резервуару.
ВНИМАНИЕ. Горячие поверхности.
Поверхности могут сильно нагреваться во
время эксплуатации.
Перед подключением прибора к сети установите
утюг в разблокированном положении. Чтобы
заблокировать утюг, дождитесь полного остывания
прибора после выключения из розетки.
Данное устройство предназначено для
использования на максимальной высоте до 2000 м
над уровнем моря.
48

PLRU
ВАЖНЫЕ ПРЕДУПРЕЖДЕНИЯ
Этот прибор предназначен для домашнего использования и никогда и ни при каких
обстоятельствах не может быть использован в коммерческих или промышленных целях. Любое
ненадлежащее использование или неправильное обращение с прибором делает гарантию
недействительной.
Перед подключением устройства убедитесь в том, что напряжение в сети соответствует значению,
указанному на этикетке изделия.
В случае использования переходника убедитесь в том, что он подходит для силы тока 16 А и
имеет розетку с заземлением
Следите за тем, чтобы сетевой кабель не был запутан или намотан на прибор во время его
эксплуатации.
Запрещено использовать прибор, включать или отключать его от сети, касаясь его мокрыми
руками и/или ногами.
Не тяните за сетевой кабель, чтобы отключить прибор, и не подвешивайте на него устройство
Не направляйте струю пара на людей или животных.
При заполнении резервуара для воды не ставьте прибор под кран и не погружайте его в воду или
другие жидкости.
При поломке или повреждении незамедлительно отключите прибор от сети и обратитесь в
официальную службу технической поддержки. В целях безопасности не открывайте устройство.
Только квалифицированный технический персонал из официальной службы технической
поддержки компании может выполнять ремонт или другие виды технических операций на
приборе.
Выполняйте очистку в соответствии с указаниями, приведенными в разделах данного руководства,
посвященных хранению и очистке прибора.
B&B TRENDS S.L. Компания снимает с себя всякую ответственность за ущерб, который может
быть нанесен людям, животным или предметам вследствие несоблюдения приведенных
инструкций.
Перед первым использованием
Перед эксплуатацией паровой станции прочитайте руководство пользователя и удостоверьтесь
в том, что понимаете назначение всех деталей и функций паровой станции. Перед первым
использованием снимите всю упаковку и бирки.
Во время первого использования прибора может появиться пар или запах, которые быстро
улетучатся. При первом включении не распыляйте пар на одежду, поскольку на подошве утюга
могут быть следы грязи.
Качество воды
Прибор работает с водопроводной водой. Если вода в вашем регионе является жесткой или
полужесткой, смешайте воду из-под крана с дистиллированной или деминерализованной водой
из магазина в соотношении 2:1 и 1:1 соответственно (соотношение дистиллированной воды к
водопроводной воде). Данные о типе воды в вашем регионе можно получить у водоснабжающей
компании. Запрещено использовать 100%-ную дистиллированную или деминерализованную
воду, дождевую воду, умягченную воду, туалетную воду, воду из других приборов, например,
холодильников, кондиционеров, сушильных барабанов или других типов систем подготовки воды в
домашних условиях.
Заполнение резервуара с водой
Снимите резервуар с водой со станции и заполните его через крышку отверстия для воды.
ЗАПРЕЩЕНО заполнять выше индикатора максимального уровня «MAX».
Поставьте резервуар обратно на станцию в правильное положение.
49

PL
RU
ИНСТРУКЦИИ ПО ЭКСПЛУАТАЦИИ
Примечание: Во время первой глажки с паром или если прибор долгое время не
использовался, установите терморегулятор в положение парового глаженья, нажмите и
удерживайте кнопку пара, пока не появится пар. Этот процесс может занять несколько
минут.
Разместите паровую станцию на устойчивом столе, рабочей поверхности или гладильной доске.
Вставьте вилку прибора в розетку и включите питание.
Отрегулируйте шкалу терморегулятора для ткани, которую нужно погладить.
Примечание: Если необходим режим парового глаженья, рекомендуется установить шкалу
терморегулятора в максимальное положение «MAX».
Когда индикатор работы утюга погаснет, прибор будет готов к работе.
Примечание: Во время всего процесса эксплуатации этот индикатор работы будет периодически
загораться и гаснуть, что является нормальным.
Чтобы активировать паровую форсунку, выберите положение пара на парорегуляторе и нажмите
кнопку пара. Если пар больше не требуется, отпустите кнопку пара, и подача пара прекратится
через несколько секунд.
Выбор настройки пара осуществляется нажатием и удержанием кнопки пара. В любой момент
подачу пара можно отключить, отпустив кнопку пара. После нажатия кнопки блокировки пара
отпариватель будет работать без нажатия кнопки пара.
Советы по глажке
Начинайте глажку с изделий, которые требуют минимального температурного режима, а
заканчивайте изделиями, которым нужна высокая температура глажки.
Для тканей с разными типами волокон устанавливайте температуру на меньшее значение.
Для шерстяных изделий постоянно нажимайте кнопку пара над самим изделием, без физического
контакта с утюгом.
Для более толстой ткани увеличьте температуру до максимального положения «MAX».
Таблица с рекомендациями по глажке
Ниже показана справочная таблица с температурными настройками для разных видов ткани, а
также рекомендованные методы глажки.
Маркировка Пример материала
. (1 точка)
. . (2 точки)
… (3 точки)/МАКС. хлопок, лен
Вертикальная глажка с паром
Эта функция позволяет разглаживать складки на одежде или шторах аналогично отпаривателю
для одежды. Паровая станция может выдавать импульсы пара под высоким давлением, когда
утюг находится в вертикальном положении. Наилучшие результаты достигаются на деликатных
или легких тканях. Пар следует направлять на висящее изделие только в безопасной зоне и
всегда учитывать рекомендации производителя изделий.
ПРЕДУПРЕЖДЕНИЕ: ЗАПРЕЩЕНО направлять пар на человека или на одежду, которая надета
на человека.
ткань на основе ацетата, эластана, полиамида,
полипропилена
купроволокно, шелк, шерсть, ткань на основе
полиэстера, триацетата, вискозы
50

PLRU
ТЕХНИЧЕСКОЕ ОБСЛУЖИВАНИЕ И ЧИСТКА
Блокировка утюга
В основании прибора имеется фиксатор для транспортировки, чтобы паровую станцию можно
было удобно переносить. Для этого поднимите его вверх, чтобы защелкнуть в положении
блокировки. Перед применением паровой станции рукоятку для удобной транспортировки следует
заблокировать на основании прибора; нажмите и удерживайте кнопку отпускания рукоятки и
аккуратно опустите ее обратно на место.
Очистка
Отключите паровую станцию и извлеките вилку из розетки.
Опорожните резервуар для воды.
Регулярно очищайте керамическую подошву утюга влажной неметаллической мочалкой.
Протирайте внешнюю поверхность паровой станции мягкой тканью.
ЗАПРЕЩЕНО использовать абразивные чистящие вещества, моющие средства или других
химические вещества для очистки паровой станции.
Замена картриджа для очистки от накипи
Регулярно меняйте картридж умягчения воды. В случае умеренного использования (дважды в
неделю) и в зависимости от жесткости воды в вашем регионе картридж для очистки от накипи и
умягчения воды следует менять каждые 3–6 месяцев.
Примечание: Запрещено использовать прибор без картриджа умягчения воды!
1. Снимите резервуар для воды со станции.
2. Потяните картридж для очистки от накипи вверх и снимите его для замены. Чтобы извлечь, его
сначала необходимо открутить и аккуратно достать. Отключите шланг от старого картриджа и
подключите его к новому. Прикрутите новый картридж обратно к резервуару для воды.
Примечание: Соблюдайте осторожность: внутри картриджа может присутствовать вода.
Установите новый картридж для умягчения воды на место.
51

PL
RU
Руководство по поиску и устранению неисправностей
Прежде чем связаться с центром технического обслуживания, рекомендуем проконсультироваться
с таблицей по поиску и устранению неисправностей ниже.
Неисправность Возможная причина Решение
Прибор не нагревается и
не образует пар. Индикатор
питания не светится.
Прибор не включен. Включите в розетку.
Вода вытекает из
отверстий на подошве
утюга.
Из отверстий в подошве
утюга выходят белые
полоски.
Из отверстий на подошве
утюга появляются
коричневые полоски и
оставляют пятна на ткани.
Подошва утюга грязная
или коричневая; возможно
загрязнение одежды. Ткань
прилипает к подошве
утюга.
В трубах образовался
водяной конденсат,
поскольку вы используете
прибор в первый раз или
давно его не использовали.
Подошва утюга
недостаточно горячая.
В приборе скопилась
накипь по причине
нерегулярной замены
картриджа от накипи.
Вы используете химические
присадки или средства
удаления накипи в воде для
глажки.
Слишком высокая
температура глажки.
Нажимайте кнопку пара в
направлении от гладильной
доски, пока утюг не начнет
производить пар.
Дождитесь, пока подошва утюга
станет достаточно горячей, или
увеличьте температуру.
Замените картридж для очистки
от накипи
Запрещено добавлять такие
средства в резервуар для воды
или в камеру пара.
Установите более низкое
значение на шкале температуры.
Пар отсутствует или
образуется в малом
количестве.
52
Резервуар с водой пуст. Заполните резервуар с водой.
Подошва утюга
недостаточно горячая.
Дождитесь, пока подошва утюга
станет достаточно горячей, или
увеличьте температуру.

PLRU
РЕКОМЕНДАЦИИ ПО УТИЛИЗАЦИИ
Изделие соответствует Директиве Европейского парламента и Совета Европейского
Союза 2012/19/ЕС (WEEE) об отходах электрического и электронного оборудования,
устанавливающей правовые рамки, применимые в Европейском Союзе для
утилизации и повторного использования отработанных электронных и электрических
устройств. Не выбрасывайте это изделие вместе с бытовыми отходами. Его следует
утилизировать в ближайшем к вам пункте сбора электрических и электронных
приборов.
Мы надеемся, что вы останетесь довольны нашей продукцией.
53

PL
BG
БЛАГОДАРИМ ВИ, ЧЕ ИЗБРАХТЕ ZELMER. ЖЕЛАЕМ ВИ ПРИЯТНА РАБОТА И
УДОВЛЕТВОРЕНИЕ С ТОЗИ ПРОДУКТ.
ВНИМАНИЕ
Прочетете внимателно инструкциите за употреба, преди да използвате продукта. Съхранявайте ги
на сигурно място за бъдеща справка.
ОПИСАНИЕ
1. Капак на входа за вода
2. Резервоар за вода
3. Селектор за пара
4. Задействащ механизъм за пара
5. Пилотна лампа за температурата
6. Циферблат за контролиране на температурата
7. Ютия
8. Станция
9. Заключващ механизъм за ютията
10. Свързващ кабел
11. Захранващ кабел
12. Съхранение на захранващия кабел
13. Касета против варовик
ИНСТРУКЦИИ ЗА БЕЗОПАСНОСТ
Този уред може да се използва от деца от 8-годишна
възраст нагоре и лица с намалени физически,
сетивни или умствени способности или без
опит и познания, ако те биват надзиравани или
инструктирани относно използването на уреда
по безопасен начин и разбират опасностите,
свързани с това. Децата не бива да си играят с
уреда. Почистването и поддръжката от страна на
потребителя не бива да се извършва от деца без
надзор.
Ако захранващият кабел е повреден, той трябва да
бъде заменен от производителя, неговия сервизен
агент или лица с подобна квалификация, за да се
избегне опасност.
Не оставяйте ютията без надзор, ако е свързана към
електрическата мрежа.
54

PLBG
Извадете щепсела от контакта преди пълнене на
резервоара за вода.
Ютията трябва да се използва и да се съхранява
върху плоска и стабилна повърхност
Уверете се, че поставката за ютията е върху
стабилна повърхност, преди да поставите уреда
върху нея.
Ютията не трябва да се използва, ако е била
изпусната, ако има видими признаци на повреда или
ако има изтичане.
Когато ютията и нейният кабел са свързани
към захранването или уредът е във фазата на
охлаждане, ги съхранявайте на място, недостъпно
за деца под 8 години.
Инструкции за безопасно пълнене на резервоара за
вода са дадени в раздела за пълнене на резервоара
за вода.
ВНИМАНИЕ! Горещи повърхности. Повърхностите
подлежат на нагряване по време на употреба.
Преди да свържете уреда към електрическата
мрежа, поставете ютията в отключено положение.
За да блокирате ютията, изчакайте уредът да се
охлади напълно, като трябва да бъде изключен от
електрическата мрежа.
Това устройство е проектирано за употреба на
максимална надморска височина до 2000 м над
морското равнище.
ВАЖНИ ПРЕДУПРЕЖДЕНИЯ
Уредът е предназначен изключително за домашна употреба и в никакъв случай не трябва да
се използва за търговски или промишлени цели. Всяко използване не по предназначение или
неправилно боравене с продукта прави гаранцията невалидна.
55

PL
BG
Преди да включите продукта в контакта, проверете дали мрежовото ви напрежение е същото като
това, посочено на етикета на продукта.
Ако използвате адаптер, се уверете, че той може да достигне 16 A и че е заземен
Захранващият кабел не трябва да се заплита или да се увива около продукта по време на
употреба.
Не използвайте уреда, не го включвайте или изключвайте към/от електрическата мрежа с мокри
ръце и/или крака.
Не дърпайте свързващия кабел, за да го изключите от контакта и не го използвайте за дръжка
Не насочвайте парата към хора или животни.
Не пълнете резервоара за вода директно от чешмата, не потапяйте уреда във вода или други
течности.
Изключете незабавно продукта от електрическата мрежа в случай на авария или повреда и
се свържете с упълномощена служба за техническа поддръжка. За да предотвратите риск от
опасност, не отваряйте устройството. Само квалифициран технически персонал от официалната
служба за техническа поддръжка на марката може да извършва ремонти или процедури на
устройството.
За да почистите уреда, следвайте инструкциите в раздела за съхранение и почистване от
настоящото ръководство.
B&B TRENDS S.L. отхвърля всякаква отговорност за вреди, от които може да пострадат хора,
животни или предмети, поради неспазването на тези предупреждения.
Преди първата употреба
Преди да използвате парната станция, не забравяйте да прочетете ръководството за
експлоатация и да разберете всички части и функции на парната станция. Уверете се, че сте
отстранили всички опаковъчни материали и етикети преди да използвате уреда за първи път.
По време на първото използване е възможно да се отделят миризми или дим, които ще изчезнат
за кратко време. По време на първата употреба не пръскайте дрехите, тъй като може да има
следи от прах върху плочата.
Вода, която да се използва
Устройството е предназначено за използване с чешмяна вода. Ако водата във вашия район е
твърда или полутвърда, смесете я с дестилирана или деминерализирана вода, която може да
бъде закупена в магазин в съотношение 2:1 и 1:1 (дестилирана вода: чешмяна вода). Проверете
при Вашия доставчик на водата вида на водата във Вашия район. Никога не използвайте 100%
дестилирана или деминерализирана вода, дъждовна вода, омекотена вода, ароматизирана вода,
вода от други уреди като хладилници, климатици, сушилни или други видове вода в къщата.
Пълнене на резервоара за вода
Свалете резервоара за вода от станцията и го напълнете през капака на входа за вода. НЕ
пълнете над индикатора за ниво MAX.
Уверете се, че при поставяне обратно в станцията, резервоарът приляга правилно.
ИНСТРУКЦИИ ЗА УПОТРЕБА
Забележка: Ако гладите с пара за пръв път или ако продуктът не е бил използван известно
време, завъртете регулатора на температурата до позиция за гладене с пара и натиснете
бутона за пара продължително, докато излезе пара. Този процес може да отнеме няколко
минути.
Поставете парната станция върху здрава нивелирана маса, пейка или дъска за гладене.
Вкарайте щепсела на уреда в електрически контакт и го включете от копчето за включване.
Регулирайте циферблата за температурата, за да съответства на типа материя, която ще гладите.
Забележка: Ако искате да използвате гладене с пара, ви препоръчваме да завъртите циферблата
56

PLBG
за температурата до позиция MAX.
Когато светлинният индикатор за работа на ютията светне, уредът е готов за употреба.
Забележка: През цялото време на работа светлинният индикатор за работа на ютията ще светва и
изгасва на нередовни интервали – това е нормално.
За да накарате да излезе струя пара, изберете позицията за пара със селектора за пара и
натиснете задействащия механизъм за пара, а ако искате да спрете освобождаването на пара,
освободете задействащия механизъм за пара и след няколко секунди парата ще спре.
Изберете настройката за пара, като натиснете и задържите бутона за пара. Настройката за
пара може да се изключи по всяко време чрез освобождаване на бутона за пара. Ако натиснете
заключващия механизъм за пара, парата ще продължи да излиза, без да натискате бутона за
пара.
Съвети за гладене
Започнете да гладите първо материите, нуждаещи се от ниска температура, и завършете с тези,
нуждаещи се от по-висока температура.
При смесени материи задайте температурата на гладене на по-ниска настройка.
За вълнени дрехи натиснете задействащия механизъм за пара неколкократно върху дрехата, без
да я докосвате физически с ютията.
При по-плътни материи увеличете температурата на ютията до позиция MAX.
Таблица с указания за гладене
По-долу ще намерите указания за температурната настройка, необходима за различни видове
материи, заедно с препоръчания метод на гладене.
Маркировка Материя, например
. (1 точка) Ацетат, еластан, полиамид, полипропилен
. . (2 точки) Купро, полиестер, коприна, триацетат, вискоза, вълна
… (3 точки) / МАКСИМАЛНА
ТЕМПЕРАТУРА
Гладене с вертикална пара
Тази функция ви позволява да изглаждате гънки в дрехи или завеси по начин, подобен на парен
уред за дрехи. Високото налягане на парата на парната станция може да осигури струи пара,
докато държите ютията вертикално. За най-добри резултати използвайте върху деликатни или
леки материи. Насочвайте парата само към закачени дрехи в безопасна зона и винаги спазвайте
препоръките на производителя на дрехата.
ВНИМАНИЕ: НЕ насочвайте парата към дреха, която е облечена, или към човек.
Памук, лен
ПОДДРЪЖКА И ПОЧИСТВАНЕ
Заключващ механизъм за ютията
Заключващият механизъм за лесно носене, прикрепен към основния модул, може да се използва
за транспортиране на парната станция с лекота. За да направите това, повдигнете с движение
нагоре, докато щракне на мястото си. Преди да използвате парната станция, дръжката за лесно
носене трябва да се заключи обратно на позиция срещу основния модул; натиснете и задръжте
бутона за освобождаване на дръжката и внимателно я спуснете обратно на място.
Почистване
57

PL
BG
Изключете парната станция и извадете кабела й от контакта.
Изпразнете резервоара за вода.
Почиствайте редовно керамичната плоча с влажна, неметална гъба за миене.
Избърсвайте външната част на парната станция с мека кърпа.
НЕ използвайте абразивни почистващи средства, препарати или други химикали за почистване на
парната станция.
Смяна на касетата против варовик
Подменяйте редовно касетата за омекотяване на водата. При умерено използване (два пъти
седмично) и в зависимост от твърдостта на водата във вашия регион, касетата против варовик за
омекотяване на водата трябва да се подменя на всеки 3-6 месеца.
Забележка: Не използвайте уреда без касетата за омекотяване на водата!
1. Свалете резервоара за вода от станцията.
2. Издърпайте касетата против варовик нагоре и я отстранете за подмяна. За да я отстраните,
първо я развинтете и след това внимателно я извадете. Разкачете маркуча от касетата и го
свържете към новата касета. Завинтете новата касета обратно за резервоара за вода.
Забележка: Бъдете внимателни – вътре в касетата може да има вода.
Поставете нова касета за омекотяване на водата на нейното място.
58

PLBG
Упътване за разрешаване на проблеми
Преди да се свържете с нашия център за поддръжка вж. таблицата за разрешаване на проблеми
по-долу за всякакви проблеми, които може да срещнете.
Проблем Възможна причина Решение
Уредът не се нагрява
и не изпуска пара.
Индикатор Вкл./Изкл не
светва.
През дупките на плочата
тече вода.
Уредът не е включен в
контакт.
Водата е кондензирала
в тръбите, защото
използвате ютията за
пръв път или не сте я
използвали дълго време.
Включете го в електрически контакт.
Натиснете задействащия механизъм
за пара от дъската за гладене, докато
от ютията излезе пара.
През дупките на плочата
се появяват бели черти
от парата.
През дупките на плочата
излизат кафяви ивици и
цапат дрехите.
Плочата е замърсена
или кафява и може да
изцапа дрехата. Дрехата
се залепва на плочата.
Не излиза пара или
излиза малко пара.
Плочата не е достатъчно
гореща.
В уреда се е натрупал
варовик, защото
касетата против варовик
не е била подменяна
редовно.
Използвате химически
вещества или добавки за
премахване на варовик
във водата за гладене.
Гладите при прекалено
висока температура.
Резервоарът за вода е
празен.
Плочата не е достатъчно
гореща.
Изчакайте, докато плочата на ютията
е достатъчно гореща или увеличете
температурата на плочата.
Подменете касетата против варовик
Никога не добавяйте този тип продукт
в резервоара за вода или в камерата
за пара.
Регулирайте циферблата за
температурата до по-ниска настройка.
Напълнете резервоара за вода.
Изчакайте, докато плочата на ютията
е достатъчно гореща или увеличете
температурата на плочата.
59

PL
BG
СЪВЕТ ЗА ИЗХВЪРЛЯНЕ
Този продукт е в съответствие с европейската Директива 2012/19/ЕС за
електрическите и електронните устройства, известна като ОЕЕО (отпадъци от
електрическо и електронно оборудване), която осигурява правната рамка, приложима
в Европейския съюз, за изхвърляне и повторно използване на отпадъци от електронни
и електрически уреди. Не изхвърляйте този продукт в кошчето за боклук. Вместо това
отидете до най-близкия център за събиране на електрически и електронни отпадъци.
Надяваме се да останете доволни от този продукт.
60

PLUA
МИ ХОТІЛИ Б ПОДЯКУВАТИ ВАМ ЗА ВИБІР ZELMER. МИ БАЖАЄМО, ЩОБ ПРОДУКТ
ПРАЦЮВАВ І ПРИНОСИВ ВАМ ЗАДОВОЛЕННЯ.
ПОПЕРЕДЖЕННЯ
Перед використанням продукту уважно прочитайте цю інструкцію з використання. Зберігайте її у
безпечному місці для подальшого використання.
ОПИС
1. Кришка впуску води
2. Бак для води
3. Селектор пари
4. Пуск пари
5. Індикаторна лампочка температури
6. Регулятор температури
7. Праска
8. Парогенератор
9. Блокування праски
10. З’єднувальний шнур
11. Шнур живлення
12. Місце для зберігання шнура живлення
13. Картридж для захисту від накипу
ІНСТРУКЦІЇ З БЕЗПЕКИ
При використанні цього приладу дітьми старше
8 років та особами з обмеженими фізичними,
сенсорними або розумовими здібностями, а також
недостатнім досвідом або знаннями такі особи
мають перебувати під наглядом, або ж їм має
бути роз’яснено правила безпечного поводження з
приладом, і вони усвідомили небезпеки, які виходять
від нього. Не можна допускати, щоб діти грали з
приладом. Очищення й призначене для користувача
техобслуговування забороняється виконувати дітям,
за винятком випадків, коли вони це роблять під
наглядом.
Якщо шнур живлення пошкоджено, для уникнення
небезпеки його має бути замінено виробником, його
агентом із сервісу або аналогічно кваліфікованими
особами.
61

PL
UA
Під час підключення до електромережі праска не
має залишатися без нагляду.
До наповнення бака водою штепсельна вилка має
бути відключена з розетки.
Праски мають використовуватися й спиратися на
рівну стійку поверхню.
Розміщуючи праску на її підставці, переконайтесь у
тому, що поверхня, на якій розміщується підставка, є
стійкою.
Праску не можна використовувати, якщо вона впала,
якщо є видимі ознаки пошкодження або якщо вона
протікає.
Зберігайте праску та її шнур у місці, недоступному
для дітей у віці до 8 років, коли вона підключена до
електромережі або охолоджується.
Інструкція щодо безпечного наповнення бака для
води наведена в розділі, присвяченому наповненню
бака для води.
ОБЕРЕЖНО. Гарячі поверхні. Під час
використання поверхні можуть нагріватися.
Перш ніж підключити прилад до електромережі,
встановіть праску в розблоковане положення.
Щоб заблокувати праску, зачекайте, доки
прилад повністю охолоне й буде відключений від
електромережі.
Цей прилад призначений для використання на
максимальній висоті до 2000 м над рівнем моря.
ВАЖЛИВІ ПОПЕРЕДЖЕННЯ
Цей прилад призначений для домашнього використання й за жодних обставин не має
62

PLUA
використовуватися в комерційних або промислових цілях. Будь-яке неналежне використання
продукту або неправильне поводження з ним робить гарантію недійсною.
Перед тим як підключити продукт до електроживлення, переконайтесь у тому, що напруга мережі є
такою, яка вказана на етикетці продукту.
Якщо ви використовуєте один перехідник, переконайтеся в тому, що він може витримати 16 А та
забезпечений заземленням.
Під час використання кабель підключення до мережі не має заплутуватися або обмотуватися
навколо продукту.
Не використовуйте прилад, не підключайте його до електромережі й не відключайте від неї,
торкаючись приладу мокрими руками й/або ногами.
Не тягніть за шнур підключення, щоб від’єднати його від електроживлення, і не використовуйте
його як ручку.
Не направляйте пару на людей і тварин.
Не кладіть прилад під кран, щоб наповнити резервуар для води, і не занурюйте його у воду або
інші рідини.
У разі поломки або пошкодження приладу негайно відключіть його від електроживлення й
зверніться до офіційної служби технічної підтримки. Для уникнення небезпеки не відкривайте
прилад. Виконувати ремонт приладу або будь-які операції з ним може тільки кваліфікований
технічний персонал з офіційної служби технічної підтримки бренду.
Під час очищення дійте відповідно до розділу цього керівництва щодо зберігання й очищення.
B&B TRENDS S.L. відмовляється від будь-якої відповідальності за шкоду, яка може буде
спричинена людям, тваринам або речам внаслідок недотримання цих попереджень.
Перед першим використанням
Перш ніж користуватися парогенератором, переконайтеся в тому, що ви прочитали керівництво
користувача і зрозуміли всі частини й функції парогенератора. Перед першим використанням
обов’язково видаліть будь-який пакувальний матеріал й етикетки.
Під час першого використання прилад може виробляти запах або дим, які швидко
розповсюджуються. Використовуючи уперше, не розбризкуйте на одяг; крім того, на підошві
можуть бути сліди бруду.
Вода для використання
Прилад призначений для використання з водопровідною водою. Якщо вода у вашій місцевості є
жорсткою або напівжорсткою, змішуйте водопровідну воду з дистильованою чи демінералізованою
водою, придбаною в магазинах, у співвідношенні 2:1 та 1:1 відповідно (дистильована
вода:водопровідна вода). Зверніться до свого постачальника води, щоб визначити тип води
у вашій місцевості. Ніколи не використовуйте 100%-но дистильовану або демінералізовану,
дощову воду, пом’якшену воду, ароматизовану воду, воду з інших приладів, як-от холодильники,
кондиціонери, сушарки чи інші види води для приготування води для побутових потреб.
Наповнення бака для води
Вийміть бак для води з парогенератора й наповніть його через кришку впуску води. НЕ наповнюйте
вище індикатора рівня MAX (максимум).
Коли повертаєте бак на його місце на парогенераторі, переконайтесь у тому, що він
встановлюється правильно.
ІНСТРУКЦІЯ З ЕКСПЛУАТАЦІЇ
Примітка: Якщо ви вперше прасуєте парою або продукт не використовувався протягом
певного часу, поверніть регулятор температури в положення прасування парою і тримайте
кнопку пари постійно натиснутою, доки пара не вийде. Цей процес може зайняти кілька
хвилин.
63

PL
UA
Помістіть парогенератор на міцний рівний стіл, лавку або дошку для прасування.
Підключіть прилад до розетки й увімкніть його.
Налаштуйте регулятор температури з урахуванням типу тканини, яку ви хочете прасувати.
Примітка: Якщо ви хочете скористатися прасуванням парою, ми радимо вам відрегулювати
регулятор температури на MAX (максимум).
Коли світловий індикатор роботи праски згасне, прилад буде готовий до використання.
Примітка: Протягом усього часу роботи світловий індикатор роботи праски буде вмикатися й
вимикатися з нестабільними інтервалами; це нормально.
Щоб випустити струмінь пари, виберіть положення пари за допомогою селектора пари й натисніть
на пуск пари. Якщо ви хочете зупинити пару, відпустіть пуск пари, і через кілька секунд пара
припиниться.
Виберіть значення пари, натиснувши й утримуючи кнопку пари. Значення пари можна вимкнути
в будь-який час, відпустивши кнопку пари. Натисніть на важіль пари, щоб активувати режим
безперервної пари й відпустіть кнопку пари.
Поради щодо прасування
Почніть з тканин, які слід прасувати при низькій температурі, і закінчіть тими, що потребують більш
високих температур.
Для тканин зі змішаного волокна встановіть більш низьке значення температури прасування.
Що стосується вовняного одягу, натисніть пуск пари кілька разів над одягом, фізично не
торкаючись його праскою.
Для більш товстих тканин підніміть температуру праски в положення MAX (максимум).
Керівництво з прасування
Нижче наведено керівництво щодо значень температури, необхідної для різних типів тканин, а
також рекомендований спосіб прасування.
Маркування Матеріал, наприклад
. (1 крапка) Ацетат, еластан, поліамід, поліпропілен
. . (2 крапки) Купро, поліестер, шовк, триацетат, віскоза, вовна
… (3 крапки)/MAX (максимально) Бавовна, льон
Вертикальне прасування парою
Ця функція дозволяє розгладжувати складки на одязі або тканинах аналогічно відпарювачу
для одягу. Високий тиск пари парогенератора може призводити сплески пари, якщо праска
утримується вертикально. Для отримання найкращих результатів використовуйте тонкі або
легкі тканини. Направляйте пару на підвішений одяг у безпечному місці й завжди звіряйтеся з
рекомендаціями виробника одягу.
ПОПЕРЕДЖЕННЯ: НЕ спрямовуйте пару на людину або на одяг, який надітий на людину.
ТЕХНІЧНЕ ОБСЛУГОВУВАННЯ Й ОЧИЩЕННЯ
Блокування праски
Парогенератор можна транспортувати за допомогою легкої переноски, прикріпленої до базового
блоку. Для цього піднімайте її вгору до клацання. Перед використанням парогенератора, легку
ручку-переноску необхідно знову зафіксувати на базовому блоку; натисніть і утримуйте кнопку
звільнення ручки й обережно опустіть її назад на місце.
64

PLUA
Очищення
Вимкніть парогенератор і відключіть його від розетки.
Спорожніть бак для води.
Регулярно очищайте керамічну підошву вологим неметалевим мийним тампоном.
Протріть зовнішню сторону парогенератора м’якою ганчіркою.
Для очищення парогенератора НЕ використовуйте абразивні засоби для чищення, миючі засоби й
інші хімічні речовини.
Картридж для захисту від накипу
Регулярно замінюйте картридж для пом’якшення води. При помірному застосуванні (два рази на
тиждень) і залежно від жорсткості води у вашому регіоні слід змінювати картридж для пом’якшення
води кожні 3–6 місяців.
Примітка: Не використовуйте прилад без картриджа для пом’якшення води!
1. Вийміть бак для води з парогенератора.
2. Витягніть картридж для захисту від накипу й вийміть його для заміни. Для того щоб його
вийняти, спочатку відкрутіть його й обережно дістаньте. Від’єднайте шланг від картриджа й
підключіть його до нового картриджа. Прикрутіть новий картридж назад до бака для води.
Примітка: Будьте уважні: всередині корпусу картриджа може бути вода.
Встановіть новий картридж для пом’якшення води.
65

PL
UA
Керівництво з пошуку й усунення несправностей
Перш ніж звертатися в наш центр підтримки, зверніться до таблиці з пошуку й усунення
несправностей нижче щодо будь-яких проблем, з якими ви можете зіткнутися.
Проблема Можлива причина Рішення
Прилад не нагрівається
й не виробляє пару.
Не горить індикатор
живлення.
Вода витікає з отворів на
підошві.
Прилад не підключено. Підключіть до електричної розетки.
Вода конденсується
в трубках, оскільки
ви використовуєте
праску вперше або
не використовували її
протягом певного часу.
Натискайте на пуск пари подалі від
дошки для прасування, доки праска не
випустить пару.
З отворів на підошві
з’являються білі смуги.
З отворів на підошві
з’являються коричневі
смуги й заплямовують
білизну.
Підошва брудна або
коричнева й може
заплямувати одяг.
Тканина прилипає до
підошви.
Немає пари або мало
пари.
Підошва не досить
гаряча.
У продукті утворився
накип, оскільки картридж
для захисту від накипу
не було замінено
своєчасно.
Ви використовуєте
хімічні речовини для
видалення накипу або
добавки у воді для
прасування.
Ви прасуєте при занадто
високій температурі.
Бак для води порожній. Наповніть бак для води.
Підошва не досить
гаряча.
Зачекайте, доки праска підошви
достатньо не нагріється, або
підвищить температуру підошви.
Замініть картридж для захисту від
накипу.
Ніколи не додавайте продукти такого
типу в бак для води або в парову
камеру.
Відрегулюйте регулятор температури
на більш низьку температуру.
Зачекайте, доки праска підошви
достатньо не нагріється, або
підвищить температуру підошви.
66

PLUA
ПОРАДИТИ ЩОДО УТИЛІЗАЦІЇ
Цей продукт відповідає європейській Директиві 2012/19/EU щодо електричних і
електронних пристроїв, відомих як WEEE (Відходи електричного й електронного
обладнання), яка забезпечує законодавчу базу, що застосовується в Європейському
союзі щодо утилізації й повторного використання відходів електронних і електричних
приладів. Не викидайте цей продукт у смітник, а зверніться до центру збору відходів
електричного й електронного обладнання, найближчого до вашого дому.
Сподіваємося, ви будете задоволені цим продуктом.
67

PROCEDURA SERWISOWA
1. Okres gwarancji wynosi: 24 miesiące od daty sprzedaży dla klientów indywidualnych i 12 miesięcy
od daty sprzedaży dla przedsiębiorców.
2. W przypadku stwierdzenia usterki, klient może złożyć reklamację w miejscu zakupu. Jeżeli nie jest
to możliwe, prosimy o kontakt telefoniczny z Autoryzowanym Serwisem pod nr tel. 22 824 44 93 lub za
pośrednictwem adresu e-mail: serwis@zelmer.pl
3. Warunkiem przyjęcia sprzętu do serwisu jest:
- ważny dowód zakupu (paragon/ faktura VAT),
4. Usterki ujawnione w okresie gwarancji mogą być usuwane tylko przez Autoryzowany Serwis w
możliwie jak najkrótszym terminie od 14 do 21 dni roboczych.
5. Wysyłka produktu do serwisu odbywa się za pośrednictwem rmy kurierskiej określonej przez
Autoryzowany Serwis na koszt rmy Eurogama Sp. z o.o., po wcześniejszym zgłoszeniu usterki do
serwisu centralnego i uzyskaniu numeru zgłoszenia serwisowego - nr RMA.
6. Produkt zwracany do serwisu musi posiadać pełną dokumentację, tzn. opis usterki, skan dowodu
zakupu, dokładny adres zwrotny oraz nr tel. kontaktowego.
7. Reklamowane produkty muszą spełniać ogólnie przyjęte normy higieny, w przeciwnym razie
Autoryzowany Serwis ma prawo odmowy naprawy urządzenia.
8. Paczki przesłane bez wcześniejszego zgłoszenia i nadanego nr RMA nie będą przyjmowane i
zostaną odesłane na koszt nadawcy.
9. Produkt powinien być odesłany w oryginalnym opakowaniu i odpowiednio zabezpieczony do
transportu.
10. Po otrzymaniu produktu i werykacji zasadności zgłoszenia przez Autoryzowany Serwis, produkt
podlega naprawie lub wymianie na nową sztukę.
11. W przypadku konieczności wymiany produktu na nowy, Klient Końcowy uzyskuje nową sztukę
od Sprzedawcy lub Dystrybutora, a w przypadku braku możliwości wymiany sprzętu zwrot pieniędzy
od Sprzedawcy. Dalsze rozliczenie powyższych operacji odbywa się drogą księgową pomiędzy
rmą Eurogama Sp. z o.o. a Dystrybutorem za pomocą odpowiednich dokumentów korygujących. W
celu uzyskania dodatkowych informacji dotyczących dokumentów korygujących prosimy o kontakt
telefoniczny z Działem Księgowym rmy Eurogama pod nr tel. 22 824 44 93 lub za pośrednictwem
adresu e-mail: renata.piasek@zelmer.pl
12. Uszkodzenia mechaniczne towaru traktowane są jako uszkodzenia powstałe z winy użytkownika i
nie podlegają naprawom gwarancyjnym.
13. W przypadku braku oryginalnego opakowania Firma Eurogama nie odpowiada za szkody powstałe
w transporcie.
14. W przypadku uszkodzenia sprzętu w transporcie wymagany jest poprawnie spisany protokół
szkody z przedstawicielem rmy spedycyjnej.
68

15. Po upływie okresu gwarancji Autoryzowany Serwis może dokonać odpłatnej naprawy
gwarancyjnej. Koszt naprawy jest ustalany indywidualnie w zależności od możliwości i skomplikowania
naprawy. W celu sprawdzenia możliwości oraz kosztów naprawy prosimy o kontakt telefoniczny z
Autoryzowanym Serwisem pod nr tel. 22 824 44 93 lub za pośrednictwem adresu e-mail: serwis@
zelmer.pl
16. Autoryzowany Serwis prowadzi sprzedaż akcesoriów oraz części zamiennych w zależności
od dostępności. W przypadku potrzeby zakupu prosimy o kontakt telefoniczny z Autoryzowanym
Serwisem pod nr tel. 22 824 44 93 lub za pośrednictwem adresu e-mail: serwis@zelmer.pl w celu
sprawdzenia dostępności oraz kosztów.
17. W przypadku dodatkowych pytań dotyczących napraw prosimy o kontakt telefoniczny z
Autoryzowanym Serwisem pod nr tel. 22 824 44 93 lub za pośrednictwem adresu e-mail: serwis@
zelmer.pl
18. Gwarancja niniejsza nie wyłącza, nie ogranicza ani nie zawiesza uprawnień kupującego z tytułu
niezgodności rzeczy sprzedanej z umową - wynikających z ustawy z dnia 30 maja 2014 r. o prawach
konsumenta oraz ustawy z dnia 23 kwietnia 1964 r. – Kodeks cywilny, w tym z tytułu rękojmi za wady
zyczne rzeczy sprzedanej. Wykonanie uprawnień z gwarancji nie wpływa na odpowiedzialność
sprzedawcy z tytułu rękojmi. W razie wykonywania przez Kupującego uprawnień z gwarancji
bieg terminu do wykonania uprawnień z tytułu rękojmi ulega zawieszeniu z dniem zawiadomienia
sprzedawcy o wadzie. Termin ten biegnie dalej od dnia odmowy przez Gwaranta wykonania
obowiązków wynikających z gwarancji albo bezskutecznego upływu czasu na ich wykonanie.
69

EN / WARRANTY REPORT
B&B TRENDS, S.L. guarantees compliance of this product for the use for which it is intended for a
period of two years. In the case of breakdown during the term of this warranty, users are entitled to repair
or else the replacement of the product at no charge if the former is unavailable, unless one of these
options proves impossible to fulll or is disproportionate. In this case, you can then opt for a reduction in
price or cancellation of the sale, which must be dealt with directly with the sales vendor. This also covers
replacement of spare parts provided that the product has been used according to the recommendations
specied in this manual for both cases, and has not been tampered with by any third party that is not
authorised by B&B TRENDS, S.L. The warranty will not cover any parts subject to wear and tear.
This warranty does not affect your rights as a consumer in accordance with the provisions in Directive
1999/44/EC for member states of the European Union.
USE OF WARRANTY
Customers must contact a B&B TRENDS, S.L. authorised Technical Service for repair of the product.
Since any tampering of the same by anyone not authorised by B&B TRENDS, S.L., or the careless or
improper use of the same shall render this warranty null and void. The warranty must be fully completed
and delivered along with the receipt or delivery docket for the effective exercise of rights under this
warranty.
This warranty should be retained by the user as well as the invoice, receipt or the delivery docket to
facilitate the exercise of these rights. For technical service and after-sales care outside the Polish
territory, please submit your query to the point of sale where you purchased the item or check for further
aftersales information at www.zelmer.com
DE / GARANTIE-ERKLÄRUNG
B&B TRENDS, S.L. garantiert die Konformität dieses Produkts für den Verwendungszweck, für den es
bestimmt ist, für einen Zeitraum von zwei Jahren. Im Falle eines Ausfalls während der Laufzeit dieser
Garantie sind die Benutzer dazu berechtigt, das Produkt kostenlos zu reparieren oder zu ersetzen, wenn
die erste Option nicht möglich ist, es sei denn, eine dieser Optionen erweist sich als nicht erfüllbar oder
ist unverhältnismäßig. In diesem Fall können Sie eine Preissenkung oder Stornierung des Verkaufs
wählen, was direkt mit dem Verkäufer zu klären ist. Dies gilt auch für den Austausch von Ersatzteilen,
sofern das Produkt im Falle beider Optionen gemäß den in dieser Anleitung enthaltenen Empfehlungen
verwendet und nicht von einem Dritten manipuliert wurde, der nicht der B&B TRENDS, S.L. zugelassen
ist. Die Garantie deckt keine Verschleißteile ab. Diese Garantie betrifft nicht Ihre Rechte als Verbraucher
gemäß den Bestimmungen der Richtlinie 1999/44/EG für die Mitgliedstaaten der Europäischen Union.
INANSPRUCHNAHME DER GARANTIE
Kunden müssen sich bezüglich der Reparatur des Produkts an einen von B&B TRENDS, S.L.
zugelassenen technischen Kundendienst wenden.
Jede Manipulation durch Dritte, die nicht von B&B TRENDS, S.L. zugelassen ist, oder die unvorsichtige
oder unsachgemäße Verwendung des Produkts führt zum Erlöschen dieser Garantie. Die Garantie muss
vollständig ausgefüllt und zusammen mit dem Kaufbeleg oder Lieferschein zurückgesendet werden, um
die im Rahmen dieser Garantie geltenden Rechte ausüben zu können.
Diese Garantie sollte vom Benutzer zusammen mit der Rechnung, dem Kaufbeleg oder dem
Lieferschein aufbewahrt werden, um die Ausübung dieser Rechte zu erleichtern. Bei einem technischen
Service und Kundendienst außerhalb des polnischen Hoheitsgebiets richten Sie Ihre Anfrage bitte an die
Verkaufsstelle, bei der Sie das Produkt erworben haben, oder informieren Sie sich unter www.zelmer.
com über weitere Kundendienstinformationen.
70

CZ / ZÁRUČNÍ ZPRÁVA
Společnost B&B TRENDS, S.L. poskytuje na tento produkt dvouletou záruční lhůtu v případě jeho
použití v souladu s určením. Dojde-li během záruční lhůty k poruše, jsou uživatelé oprávněni nechat si
produkt bezplatně opravit, případně vyměnit, není-li oprava možná, s výjimkou případů, kdy některou z
těchto možností nelze provést nebo kdy je její provedení nepřiměřené. V takovém případě se můžete
rozhodnout pro slevu z kupní ceny nebo zrušení prodeje, které musí být řešeno přímo s prodejcem. To
zahrnuje i výměnu náhradních dílů za předpokladu, že byl produkt používán v souladu s doporučeními
uvedenými v této příručce a že s ním nemanipulovala žádná třetí strana, která není autorizována
společností B&B TRENDS, S.L. Záruka se nevztahuje na žádné součásti podléhající opotřebení. Tato
záruka nemá vliv na vaše spotřebitelská práva v souladu s ustanoveními směrnice 1999/44/ES platné
pro členské státy Evropské unie.
POUŽITÍ ZÁRUKY
Pro opravu produktu musejí zákazníci kontaktovat technický servis autorizovaný společností B&B
TRENDS, S.L.
Pokud s produktem manipulovala osoba bez autorizace společnosti B&B TRENDS, S.L. nebo byl
produkt používán neopatrně či nesprávně, ztrácí tato záruka platnost. Pro účinné uplatnění vašich práv
plynoucích z této záruky je třeba záruku kompletně vyplnit a přiložit k ní účtenku nebo
dodací list.
Pro snazší uplatnění těchto práv doporučujeme, aby si uživatel ponechal tuto záruku a spolu s ní i
fakturu, účtenku nebo dodací list. Pro technickou podporu a poprodejní péči mimo území Polska zašlete
dotaz na prodejní místo, kde jste si výrobek zakoupili, nebo si projděte další informace o poprodejních
službách na adrese www.zelmer.com
SK / ZÁRUKA
Spoločnosť B&B TRENDS, S.L. ručí, že tento výrobok spĺňa po dobu dvoch rokov požiadavky týkajúce
sa použitia, na ktoré je určený. V prípade poruchy počas doby platnosti tejto záruky majú používatelia
právo na bezplatnú opravu prípadne výmenu produktu, ak oprava nie je k dispozícii, okrem prípadu, že
sa jedna z týchto možností nedá splniť alebo je neprimeraná. V tomto prípade si môžete zvoliť zníženie
ceny alebo zrušenie predaja, čo je potrebné riešiť priamo s predajcom. Vzťahuje sa to aj na výmenu
náhradných dielov za predpokladu, že sa výrobok používal v súlade s odporúčaniami uvedenými v
tejto príručke pre obidva prípady a že doň nezasahovala žiadna tretia strana, ktorá nemá povolenie od
spoločnosti B&B TRENDS, S.L. Záruka sa nevzťahuje na diely podliehajúce opotrebeniu. Táto záruka
nemá vplyv na vaše práva spotrebiteľa v zmysle ustanovení smernice 1999/44/ES, ktorá platí pre
členské štáty Európskej únie.
UPLATNENIE ZÁRUKY
V prípade žiadosti o opravu výrobku musia zákazníci kontaktovať autorizovaný technický servis
spoločnosti B&B TRENDS, S.L.
Všetky neoprávnené zásahy osobami, ktoré nemajú povolenie zo strany spoločnosti B&B TRENDS, S.L.
, prípadne neopatrné alebo nesprávne použitie výrobku rušia platnosť tejto záruky. Na účinné uplatnenie
práv vyplývajúcich z tejto záruky musí byť záruka úplne vyplnená a doručená s príjmovým dokladom
alebo dokladom o dodaní.
Používateľ by si mal túto záruku ako aj faktúru, príjmový doklad alebo dodací list ponechať, aby sa
uplatnenie týchto práv uľahčilo. V prípade technického servisu a popredajnej starostlivosti mimo
poľského územia pošlite svoju žiadosť predajcovi, u ktorého ste si výrobok kúpili, alebo si pozrite ďalšie
informácie o popredajných službách na adrese www.zelmer.com
71

HU / GARANCIA
Az B&B TRENDS, S.L. két évre garantálja a termék rendeltetésszerű használatát. Ha a termék a
garancia időtartama alatt meghibásodik, a terméket díjmentesen megjavítjuk, vagy ha a javítás nem
lehetséges, díjmentesen kicseréljük azt, kivéve, ha e lehetőségek valamelyike nem lehetséges vagy
aránytalan költséggel járna. Ebben az esetben a felhasználó kérheti a termék árának leszállítását,
vagy elállhat a vásárlástól. Ezekben az esetekben közvetlenül az értékesítést végző kereskedőhöz kell
fordulni. A garancia a pótalkatrészeket is fedezi, amennyiben a terméket a jelen kézikönyvben leírtak
betartásával használták, és az B&B TRENDS, S.L. vállalaton kívül más nem végzett rajta semmilyen
műveletet. A garancia a normál elhasználódás és kopás által érintett alkatrészekre nem vonatkozik. Ha
Ön az Európai Unió valamelyik tagállamának a polgára, ez a garancia nem korlátozza az Ön 1999/44/
EK irányelv előírásnak megfelelő fogyasztói jogait.
A GARANCIA ÉRVÉNYESÍTÉSE
Ha a terméket javítani kell, vegye fel a kapcsolatot az B&B TRENDS, S.L. hivatalos szervizével.
A termék a B&B TRENDS, S.L. által felhatalmazottaktól eltérő felek általi illetéktelen módosítása/
javítása, valamint a termék gondatlan vagy nem rendeltetésszerű használata esetén a garancia érvényét
veszti. A felhasználó abban az esetben élhet a garanciális jogaival, ha a garancialevelet hiánytalanul
kitöltötték,
és a nyugtával vagy a szállítási dokumentumokkal együtt átadták.
A garanciális jogok gyakorlásához a felhasználó köteles bemutatni a garancialevelet és a számlát,
nyugtát vagy szállítási dokumentumot. Lengyelországon kívül a műszaki szerviz és a vevőszolgálati
szolgáltatások igénybevétele érdekében forduljon ahhoz az üzlethez, ahol a terméket vásárolta, vagy
olvassa el a vevőszolgálati információkat a www.zelmer.com oldalon
RO / RAPORT DE GARANŢIE
B&B TRENDS, S.L. garantează conformitatea acestui produs cu scopul pentru care a fost conceput,
pentru o perioadă de doi ani. În cazul defectării pe perioada acestei garanții, utilizatorii au dreptul să
repare sau să înlocuiască produsul gratuit, dacă prima variantă nu este disponibilă, cu excepția cazului
în care una dintre aceste opțiuni se dovedește a imposibil de îndeplinit sau nu este disproporționată.
În acest caz, puteți opta pentru o reducere de preț sau anularea vânzării, care trebuie tratată direct cu
furnizorul de vânzări. Această garanție acoperă și înlocuirea pieselor de schimb, cu condiția ca produsul
să fost folosit conform recomandărilor specicate în acest manual, pentru ambele cazuri, și să nu
fost modicat de o terță parte care nu este autorizată de B&B TRENDS, S.L. Garanția nu va acoperi
nici o piesă supusă uzurii. Această garanție nu afectează drepturile dvs. în calitate de consumator, în
conformitate cu prevederile Directivei 1999/44/CE pentru statele membre ale Uniunii Europene.
UTILIZAREA GARANŢIEI
Clienții trebuie să contacteze un serviciu tehnic autorizat de B&B TRENDS, S.L. în vederea reparării
produsului.
Astfel orice modicare a produsului efectuată de orice persoană neautorizată de B&B TRENDS, S.L. sau
utilizarea neglijentă sau necorespunzătoare a acestuia va anula această garanție. Garanția trebuie să
e completată integral și livrată împreună cu borderoul de primire sau expediere, în vederea exercitării
efective a drepturilor în baza acestei garanții.
Această garanție trebuie păstrată de către utilizator alături de factură, borderoul de primire sau
expediere, pentru a facilita exercitarea acestor drepturi. Pentru serviciul tehnic și serviciul de postvânzare în afara teritoriului Poloniei, trimiteți întrebările dvs. la punctul de vânzare de la care ați
achiziționat articolul sau consultați informații de post-vânzare suplimentare la www.zelmer.com
72

RU / ГАРАНТИЙНОЕ ОБСЛУЖИВАНИЕ
Компания B&B TRENDS, S.L. предоставляет гарантию на данное изделие сроком 2 года с момента
приобретения нового изделия потребителем, если изделие будет применяться по назначению.
В случае поломки во время гарантийного срока пользователи имеют право на бесплатный
ремонт или замену изделия, если ремонт будет невозможен. Эта гарантия также включает
замену запчастей, если изделие эксплуатировалось согласно рекомендациям, указанным в этом
руководстве, и не было отремонтировано сторонними специалистами, не уполномоченными
компанией B&B TRENDS, S.L. . Гарантия не распространяется на запчасти, подверженные
эксплуатационному износу. Эта гарантия не влияет на права потребителя согласно условиям
Директивы 1999/44/EC для стран — членов Европейского союза.
ПРИМЕНЕНИЕ ГАРАНТИИ
Клиенты обязаны связаться с сервисным центром, уполномоченным компанией B&B TRENDS,
S.L. на проведение ремонта изделий.
Любые манипуляции с изделием специалистами, не уполномоченными компанией B&B TRENDS,
S.L. , небрежное или нецелевое использование изделия приведут к аннулированию гарантии.
Гарантийное обслуживание предоставляется при условии предоставления потребителем
документа о покупке – кассового чека.
Пользователь обязан хранить кассовый чек, чтобы облегчить процесс выполнения гарантийных
работ. Для получение технического обслуживания и послепродажного обслуживания за пределами
Польши следует передать запрос в точку продажи, где была выполнена покупка товара, или
уточнить информацию по послепродажному обслуживанию на сайте www.zelmer.com
Срок службы изделия 2 года с даты продажи в условиях эксплуатации и хранения при
температуре от 0°С до 40°С.
BG / ГАРАНЦИОНЕН ОТЧЕТ
B&B TRENDS, S.L. гарантира, че този продукт съответства на употребата, за която е
предназначен, за срок от две години. В случай на отказ през гаранционния срок потребителите
имат право да ремонтират продукта или евентуално да го заменят безплатно, ако не може
да се ремонтира, освен ако един от тези варианти се окаже невъзможен за изпълнение или
e непропорционален. В такъв случай можете да изберете намаляване на цената или отмяна
на продажбата, което се уговаря директно с продавача. Гаранцията покрива и смяната на
резервните части, но при условие че продуктът е използван съобразно препоръките, посочени в
това ръководство за двата случая, както и ако не е предприеман опит за намеса от трето лице,
което не е упълномощено за тази цел от B&B TRENDS, S.L. . Гаранцията не покрива никакви
амортизирани части. Тази гаранция не засяга Вашите права като потребител в съответствие с
разпоредбата в Директива 1999/44/ЕО за държавите членки на Европейския съюз.
ИЗПОЛЗВАНЕ НА ГАРАНЦИЯТА
Клиентите трябва да се свържат с оторизиран технически сервиз на B&B TRENDS, S.L. за ремонт
на продукта.
Всяка намеса в продукта от неупълномощено от B&B TRENDS, S.L. лице или небрежна или
неправилна употреба на същото лице анулира настоящата гаранция. Гаранцията трябва да се
попълни изцяло и да се връчи заедно с касовата бележка или приемно-предавателния протокол,
за да може действително да се упражняват правата по тази гаранция.
Гаранцията следва да остане у потребителя заедно с фактурата, касовата бележка или
приемно-предавателния протокол с цел улесняване упражняването на тези права. За техническо
обслужване и следпродажбен сервиз извън полска територия заявката се подава в търговския
обект, където е закупена стоката, или може да проверите за допълнителна следпродажбена
информация на www.zelmer.com
73

UA / ГАРАНТІЙНЕ ОБСЛУГОВУВАННЯ
Компанія B&B TRENDS, S.L. гарантує, що цей виріб прослужить протягом двох років, якщо
використовуватиметься за призначенням. Гарантія на даний виріб становить 2 роки з моменту
придбання нового виробу споживачем. У разі поломки під час гарантійного терміну користувачі
мають право на безкоштовний ремонт або заміну виробу, якщо ремонт буде неможливий, за
винятком випадків, коли один з цих варіантів буде неможливо виконати або він буде несумірним.
У цьому випадку покупець має право вибрати зниження ціни або скасування покупки, що слід
обговорювати безпосередньо з продавцем. Ця гарантія також включає заміну запчастин, якщо в
обох випадках виріб експлуатувався відповідно до рекомендацій, зазначених у цьому керівництві, і
його не було відремонтовано сторонніми фахівцями, не уповноваженими компанією B&B TRENDS,
S.L. . Гарантія не поширюється на запчастини, які піддаються експлуатаційному зносу. Ця гарантія
не впливає на права споживача згідно з умовами Директиви 1999/44/EC для країн — членів
Європейського Союзу.
ЗАСТОСУВАННЯ ГАРАНТІЇ
Клієнти зобов’язані зв’язатися з сервісним центром, уповноваженим компанією B&B TRENDS, S.L.
на проведення ремонту виробів.
Будь-які маніпуляції з виробом фахівцями, не уповноваженими компанією B&B TRENDS,
S.L. , недбале або нецільове використання виробу призведуть до втрати гарантії. Гарантійне
обслуговування офіційно ввезеного в Україну виробу надається за умови надання споживачем
документа про придбання. В Україні таким документом може бути касовий, фіскальний, товарний
чек, видаткова накладна або інший встановлений законодавством фіскальний документ, який
підтверждує дату придбання зазначеного виробу.
Користувач зобов’язаний зберігати документ про придбання виробу, щоб полегшити процес
виконання гарантійних робіт. Для отримання технічного й післяпродажного обслуговування в
Україні, слід передати запит у точку продажу, де було виконано покупку товару, або уточнити
інформацію з післяпродажного обслуговування на сайті www.zelmer.com
74

75

Паровая станция / Парогенератор
Series: ZIS. MOD: ZIS2415
220-240V~ 50-60Hz 2000-2400W
Type: DF-188A
Made in China / Сделано в Китае / 3роблeно в Китаї
B&B TRENDS, S.L.
C. Cataluña, 24 · P.I. Ca N’Oller
08130 Santa Perpètua de Mogoda
(Barcelona) · España
04/2021
www.zelmer.com
 Loading...