

Page 1
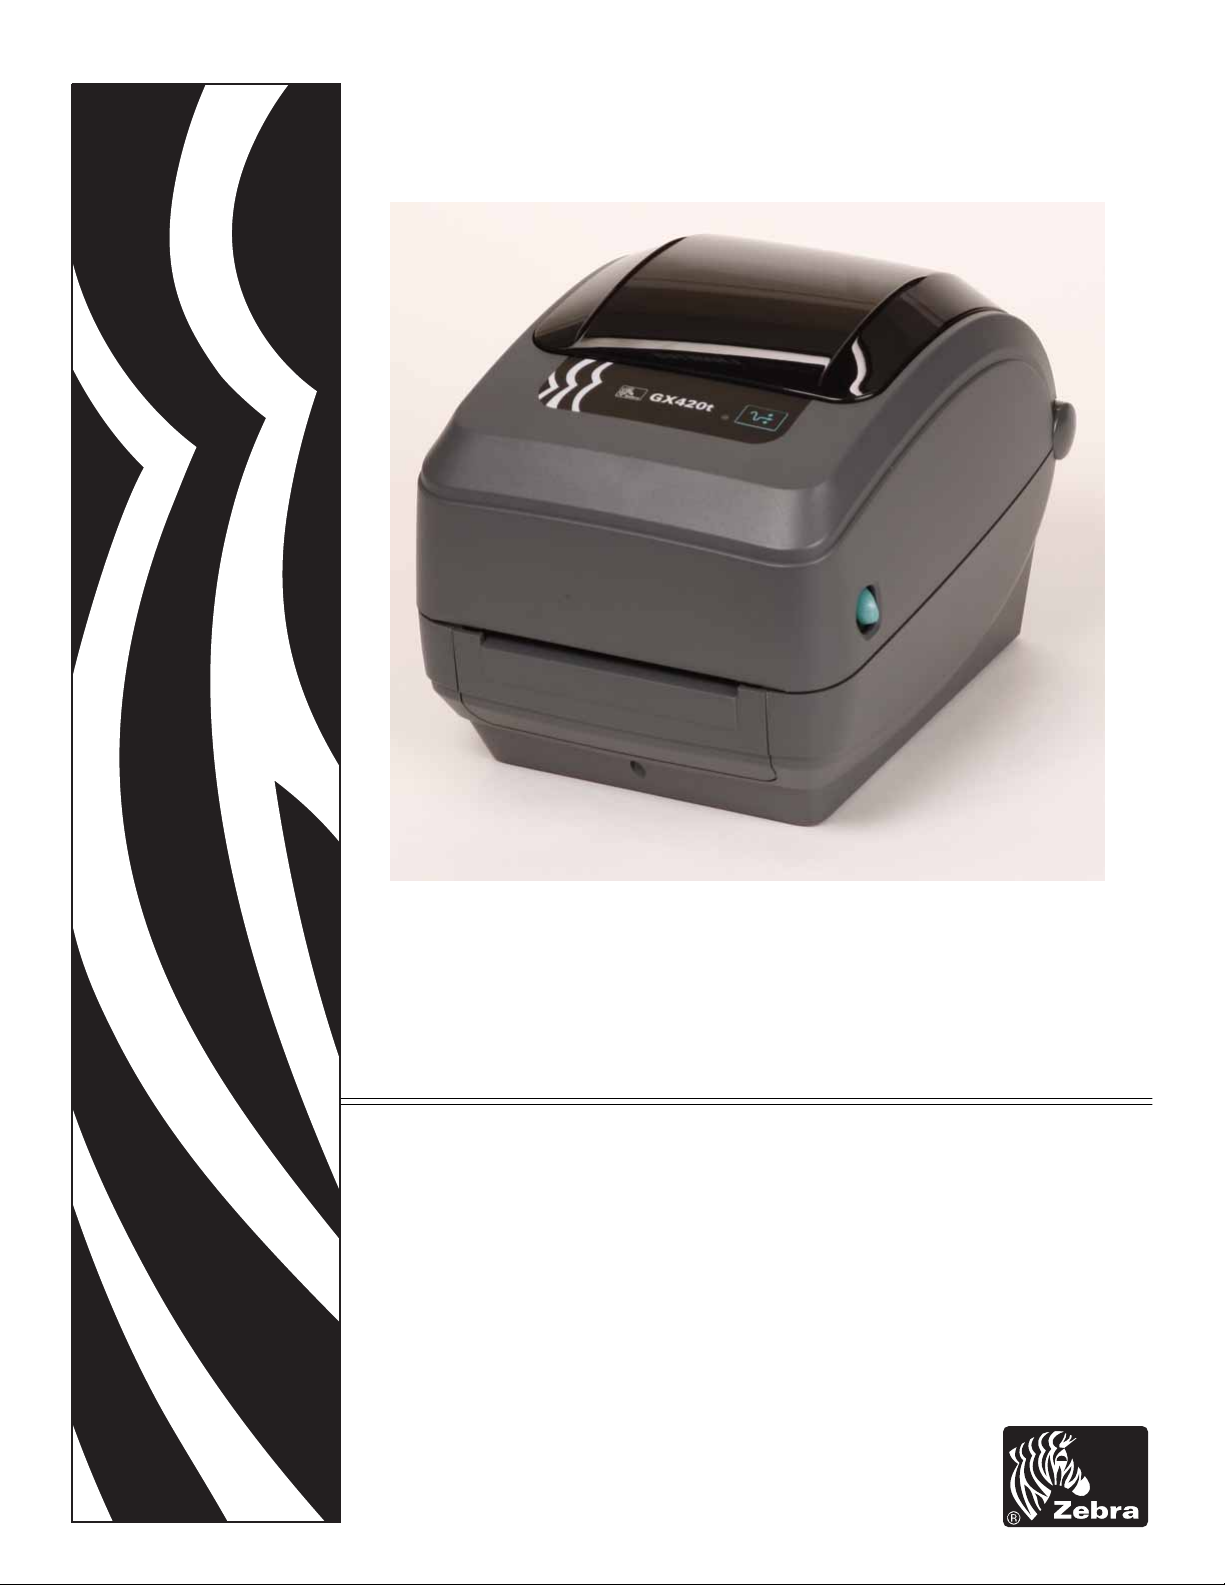
Zebra GX420t / GX430t
Desktop Thermal Printer
User Guide
Page 2

ii
©2008 ZIH Corp. The copyrights in this manual and the software and/or firmware in the
label printer described therein are owned by ZIH Corp. Unauthorized reproduction of this
manual or the software and/or firmware in the label printer may result in imprisonment of
up to one year and fines of up to $10,000 (17 U.S.C.506). Copyright violators may be
subject to civil liability. All trademarks and registered trademarks are property of their
respective owners. All rights reserved.
This product may contain ZPL®, ZPL II®, and ZebraLink™ programs; Element Energy
3
Equalizer™ Circuit; E
®; and Monotype Imaging fonts. Software ©ZIH corp. All rights
reserved worldwide.
ZebraLink and all product names and numbers are trademarks, and Zebra, the Z ebra logo,
ZPL , ZPL II, Element Energy Equalizer circuit, and E3 Circuit are registered trademarks
of ZIH Corp. All rights reserved worldwide.Monotype®, Intellifont® and UFST® are
trademarks of Monotype Imaging, Inc. registered in the United States Patent and
Trademark Office and may be registered in certain jurisdictions.
CG Triumvirate is a trademark of Monotype Imaging, Inc. and may be registered in some
jurisdictions.
TrueType® is a trademark of Apple Computer, I nc. registered in the United States Patent
and Trademark Office and may be registered in certancertain jurisdictions.
Proprietary Statement
This manual contains proprietary information of Zebra Technologies Corporation and its
subsidiaries (“Zebra Technologies”). It is intended solely for the information and use of
parties operating and maintaining the equipment described herein. Such proprietary
inform ation may not be used, reproduced, or disclosed to any other parties for any other
purpose without the express written permission of Zebra Technologies.
Product Improvements
Continuous improvement of products is a policy of Zebra Technologies. All specifications
and designs are subject to change without notice.
Liability Disclaimer
Zebra Technologies takes steps to ensure that its published Engineering specifications and
manuals are correct; however, errors do occur. Zebra Technologies reserves the right to
correct any such errors and disclaims liability resulting therefrom.
Limitation of Liability
In no event shall Zebra Technologies or anyone else involved in the creation, production,
or delivery of the accompanying product (including hardware and software) be liable for
any damages whatsoever (including, without limitation, consequential damages including
loss of business profits, business interruption, or loss of business information) arising out
of the use of, the results of use of, or inability to use such product, even if Zebra
Technologies has been advised of the possibility of such damages. Some jurisdictions do
not allow the exclusion or limitation of incidental or consequential damages, so the above
limitation or exclusion may not apply to you.
Canadian DOC Compliance Statement
This Class B digital apparatus complies with Canadian ICES-003.
Cet appareil numérique de la classe B est conforme à la norme NMB-003 du Canada.
980612-001 Rev. A GX420t / GX430t User Guide 12/14/07
Page 3
FCC Compliance Statement
This device complies with Part 15 rules. Operation is subject to the following two conditions:
1. This device may not cause harmful interference, and
2. This device must accept any interference received, including interference that may cause
undesired operation.
This equipment has been tested and found to comply with the limits for Class B Digital
Devices, pursuant to Part 15 of the FCC Rules. These limits are designed to provide reasonable
protection against harmful interference when the equipment is operated in a residential
environment. This equipment generates, uses, and can radiate radio frequency energy and, if
not installed and used in accordance with the product manuals, may cause harmful interference
to radio communications. However, there is no guarantee that interference will not occur in a
particular installation. If this equipment does cause harmful interference to radio or television
reception, the user is encouraged to do one or more of the following measures:
• Reorient or relocate the receiving antenna.
• Increase the separation between the equipment and receiver.
• Connect the equipment into an outlet on a circuit different from that to which the receiver
is connected.
iii
• Consult the dealer or an experienced RF service technician for help.
The user is cautioned that any changes or modifications not expressly approved by Zebra
Technologies could void the user’s authority to operate the equipment. To ensure compliance,
this printer must be used with fully shielded communication cables.
G Series Printers
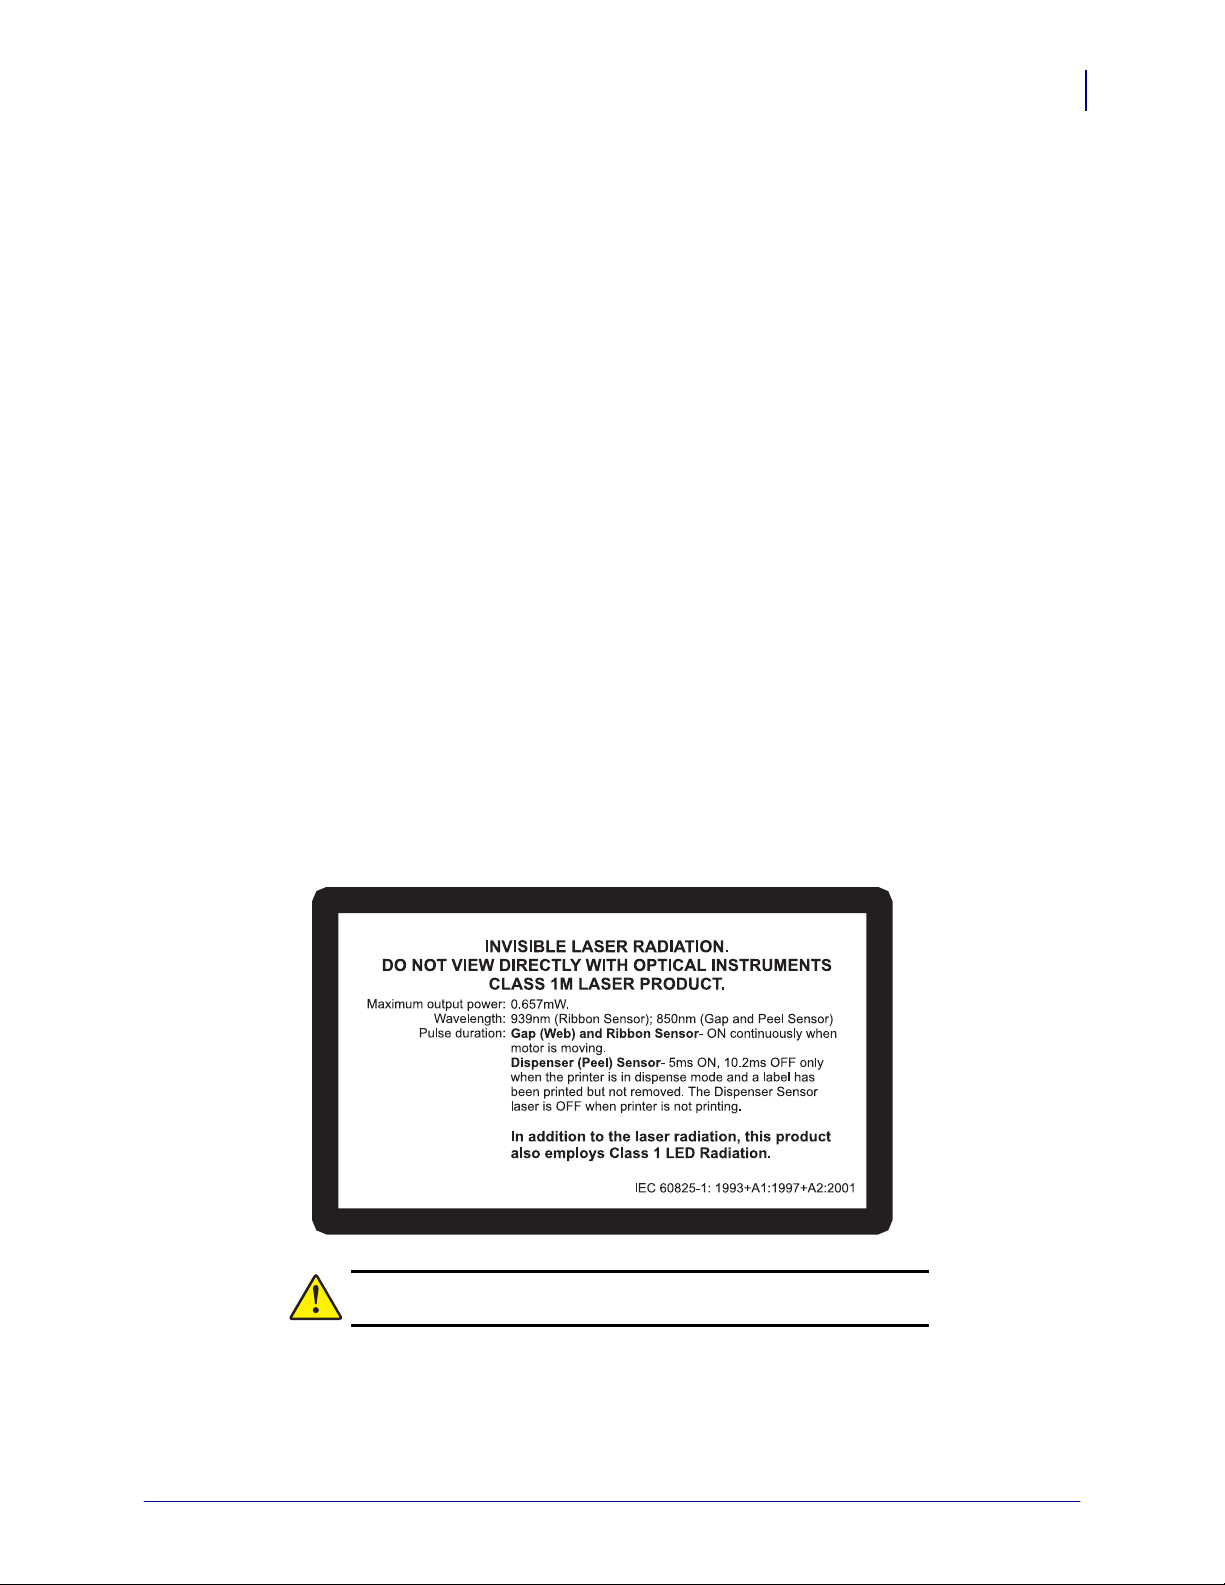
Caution • CLA SS 1M LAS ER PRODUC T
• Vi ewin g th e la ser outpu t wi th certai n opt ical i nstru men ts (f or exam pl e, eye l oops, magnifiers and mi croscopes) within
a dis tance of 100mm m ay pose an ey e h azard.
• Use of cont rol s or adjust men ts or perf ormance of procedu res oth er than thos e specif ied herei n may resul t in haza rdous
radi ati on ex posure.
• Do not tam per or attem pt to repai r any se nsor i nside this product. No servi ceable sensors insi de.
• Do not star e into Gap ( Web) or Dis penser ( Peel) s ensors . Avoid pos sibl e exposure t o haz ardous lase r radi ati ons.
12/14/07 GX420t / GX430t U ser Guide 980612-001 Rev. A
Page 4

iv
Environmental Management
Do not dispose of this product in unsorted municipal waste. This product is recyclable, and
should be recycled according to y our local standards.
For more information, please see our website at:
Web address: www.zebra.com/environment
980612-001 Rev. A GX420t / GX430t User Guide 12/14/07
Page 5

About This Document
This section provides y ou with contact information, document structure and organization, and
additional reference documents.
Contents
Who Should Use This Document . . . . . . . . . . . . . . . . . . . . . . . . . . . . . . . . . . . . . . . . . . . . vi
Document Conventions . . . . . . . . . . . . . . . . . . . . . . . . . . . . . . . . . . . . . . . . . . . . . . . . . . viii
12/14/07 GX420t / GX430t U ser Guide 980612-001 Rev. A
Page 6

About This Document
vi
Who Should Use This Document
Who Should Use This Document
This User Guide is intended for use by any person who needs to operate or to troubleshoot
problems with the printer.
How This Document Is Organized
The User Guide is set up as follows:
Section Description
Introduction on page 1 This section describes what you get in your
Getting Started on page 11 This section describes how to set up your printer
shipping box and provides an overview of printer
features. This section also has procedures that
describe how to open and close the printer and
report any problems.
for the first time and use the most common
operating procedures for loading media.
Print Operations on page 29 This section provides media and print handling,
font and language support, and the set up of less
common printer configurations.
Printer Options on page 47 This section covers the common printer options
and accessories with brief descriptions and how to
get y ou started using or configuring your printer
option or accessory.
Maintenance on page 65 This section provides routine cleaning and
maintenance procedures.
Troubleshooting on page 79 This section provides information about printer
error reporting that you might need for printer
troubleshooting. Assorted diagnostic tests are
included.
Appendix on page 91 This section provides additional interface
information and wiring diagrams to assist with
printer to host system integration (typically a PC).
980612-001 Rev. A GX420t / GX430t User Guide 12/14/07
Page 7

Contacts
Web Site
The Americas
About This Document
Visit us at: http://www.zebra.com
Technical Support via the Internet is available 24 hours per day, 365 days per year.
Go to http ://w ww.zeb ra.com/support.
Regional Headquarters Technical Support Customer Ser vice Dept .
Zebra Tech nol ogi es Intern ati onal ,
LLC
333 Corporate Woods Parkway
Vernon Hi ll s, Il li nois 60061.3109
U.S.A
T: +1 847 793 2600
Toll -free +1 800 423 0422
F: +1 847 913 8766
T: +1 877 A SK ZEBR A (275 9327)
F: +1 847 913 2578
Hardwar e: t s1@zebra.com
Softw are: ts3@ze bra.com
For prin ters, par ts, medi a, and ribbon ,
pleas e call your di stribu tor, or
contact us.
T: +1 877 A SK ZEBR A (275 9327)
E: cl ien tcare@z ebra.com
Contacts
vii
Europe, Africa, Middle East, and India
Regional Headquarters Technical Support Internal Sales Dept .
Zebra Tech nol ogi es Europe L im ited
Zebra H ouse
Th e Val ley Cen tre, G ordon R oad
Hi gh Wycomb
Buckinghamshire, HP13 6EQ, UK
T: +44 (0) 1494 472872
F: +44 (0) 1494 450103
T: +44 (0) 1494 768298
F: +44 (0) 1494 768210
Germany: Tsgermany@zebra.com
France: Ts fran ce@zebr a.com
Spain /Portu gal : Tsspai n@z ebra.com
Al l ot her are as: Tseu rope@z ebra.com
Asia Pacific
Regional Headquarters Technical Support Customer Ser vice
Zebra Techn ologies Asi a Paci fic, LLC
120 Robi nson Road
#06-01 Parakou Bu i ldi ng
Sin gapore 068913
T: +65 6858 0722
F: +65 6885 0838
T: +65 6858 0722
F: +65 6885 0838
E: China: tschi na@zebra.com
Al l ot her are as:
tsasi apaci fi c@zebra.com
For prin ters, par ts, medi a, and ribbon ,
pleas e call your di stribu tor, or
contact us.
T: +44 (0) 1494 768316
F: +44 (0) 1494 768244
E: cseur ope@zebra.com
For prin ters, par ts, medi a, and ribbon ,
pleas e call your di stribu tor, or
contact us.
T: +65 6858 0722
F: +65 6858 0836
12/14/07 GX420t / GX430t U ser Guide 980612-001 Rev. A
Page 8
About This Document
viii
Document Conventions
Document Conventions
The following conventions are used throughout this document to convey certain information.
Alternate Color (online only) Cross-references contain hot links to other sections in this
guide. If you are viewing this guide online in .pdf format, you can click the cross-reference
(blue text) to jump directly to its location.
Command Line Examples Command line examples appear in Courier New font. For
example, type
Files and Directories File names and directories appear in Courier New font. For
example, the
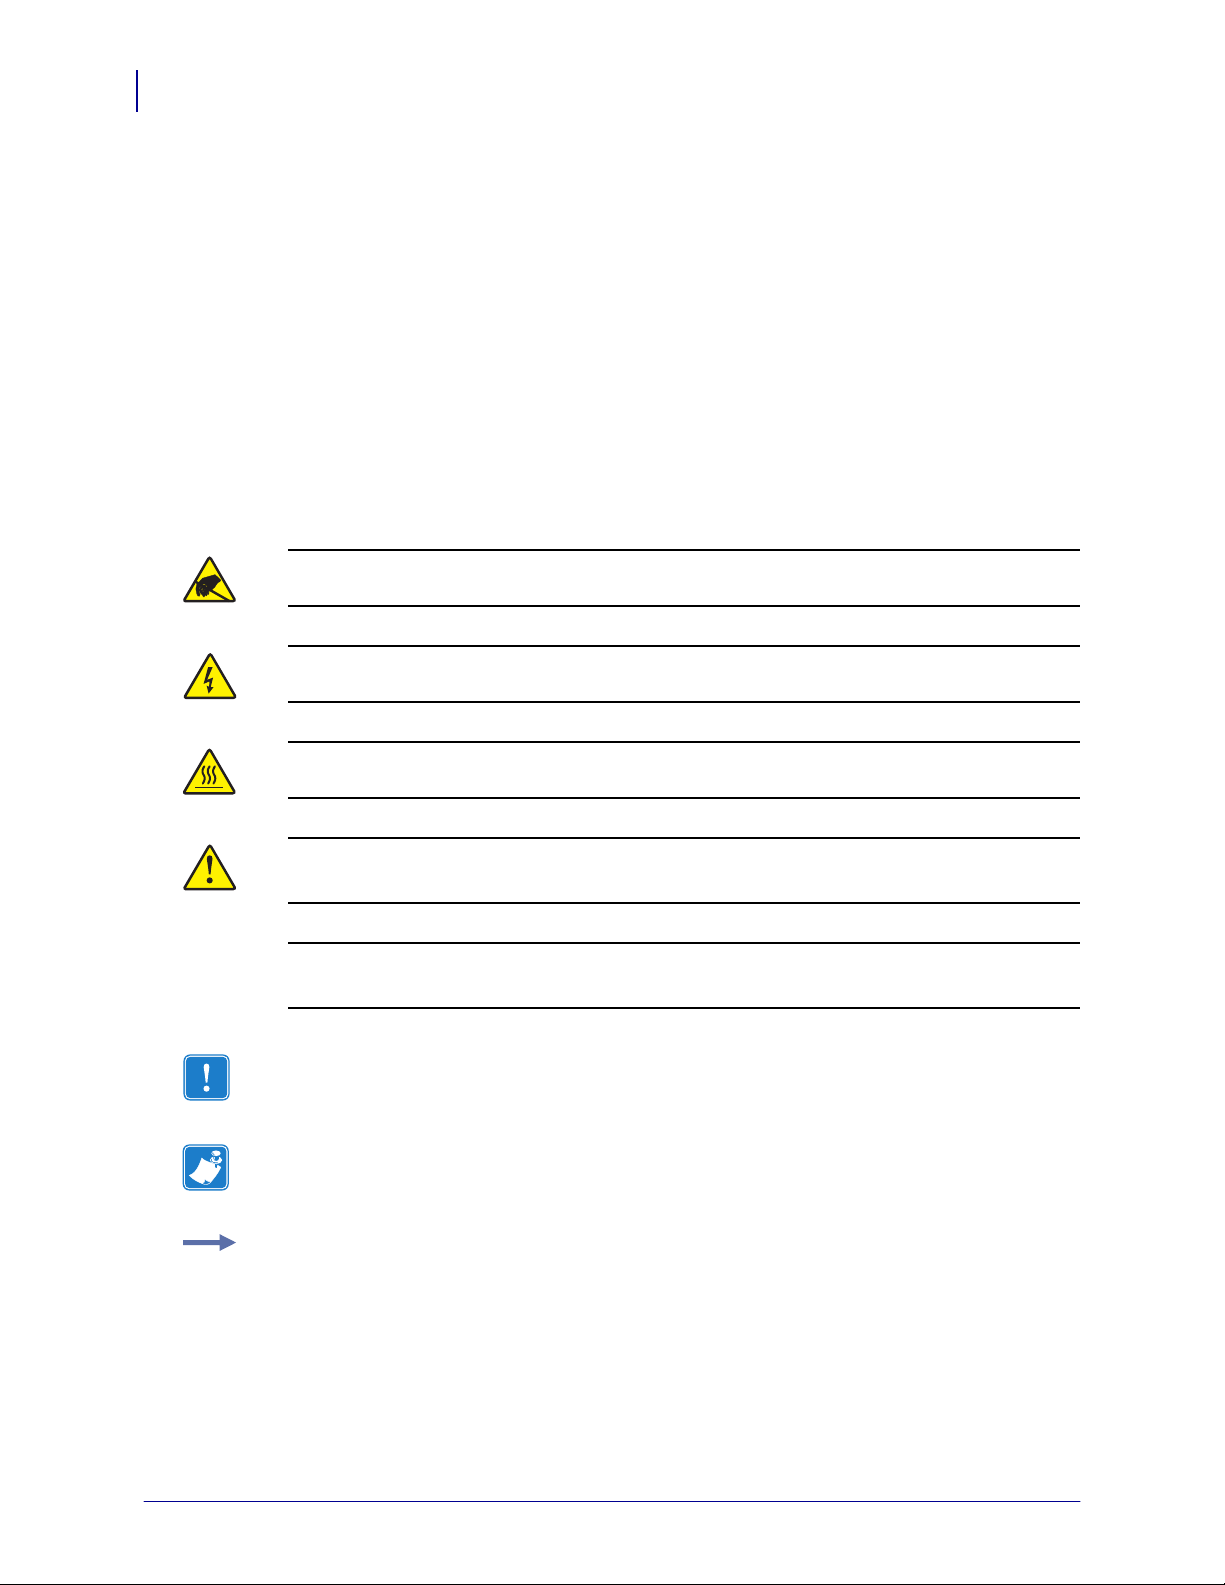
Icons Used
Caution • Warns you of the potential for electrostatic discharge.
ZTools to get to the Post-Install scripts in the bin directory.
Zebra<version number>.tar file and the /root directory.
Caution • Warns you of a potential electric shock situation.
Caution • Warns you of a situation where excessive heat could cause a burn.
Caution • Advises you that failure to take or avoid a specific action could result in physical
harm to you.
Caution • (N o icon) Advises you that failure to take or avoid a specific action could result in
physical harm to the hardware.
Important • Advises you of information that is essential to complete a task.
Note • Indicates neutral or positive information that emphasizes or supplements important
points of the main text.
Example • Provides an example, often a scenario, to better clarify a section of text.
980612-001 Rev. A GX420t / GX430t User Guide 12/14/07
Page 9

Contents
About This Document . . . . . . . . . . . . . . . . . . . . . . . . . . . . . . . . . . . . . . . . . . . . . . . v
Who Should Use This Document . . . . . . . . . . . . . . . . . . . . . . . . . . . . . . . . . . . . . . . . . . . . vi
How This Document Is Organized . . . . . . . . . . . . . . . . . . . . . . . . . . . . . . . . . . . . . . . . . . . vi
Contacts . . . . . . . . . . . . . . . . . . . . . . . . . . . . . . . . . . . . . . . . . . . . . . . . . . . . . . . . . . . . . . . vii
Web Site . . . . . . . . . . . . . . . . . . . . . . . . . . . . . . . . . . . . . . . . . . . . . . . . . . . . . . . . . . . .vii
The Americas . . . . . . . . . . . . . . . . . . . . . . . . . . . . . . . . . . . . . . . . . . . . . . . . . . . . . . . . vii
Europe, Africa, Middle East, and India . . . . . . . . . . . . . . . . . . . . . . . . . . . . . . . . . . . . .vii
Asia Pacific . . . . . . . . . . . . . . . . . . . . . . . . . . . . . . . . . . . . . . . . . . . . . . . . . . . . . . . . . .vii
Document Conventions. . . . . . . . . . . . . . . . . . . . . . . . . . . . . . . . . . . . . . . . . . . . . . . . . . . viii
1 • Introduction . . . . . . . . . . . . . . . . . . . . . . . . . . . . . . . . . . . . . . . . . . . . . . . . . . . . 1
GX Series Thermal Printers . . . . . . . . . . . . . . . . . . . . . . . . . . . . . . . . . . . . . . . . . . . . . . . . 2
What’s in the Box? . . . . . . . . . . . . . . . . . . . . . . . . . . . . . . . . . . . . . . . . . . . . . . . . . . . . . . . 3
Unpack and Inspect the Printer . . . . . . . . . . . . . . . . . . . . . . . . . . . . . . . . . . . . . . . . . . 3
Printer Features . . . . . . . . . . . . . . . . . . . . . . . . . . . . . . . . . . . . . . . . . . . . . . . . . . . . . . 5
Operator Controls . . . . . . . . . . . . . . . . . . . . . . . . . . . . . . . . . . . . . . . . . . . . . . . . . . . . . 7
2 • Getting Started . . . . . . . . . . . . . . . . . . . . . . . . . . . . . . . . . . . . . . . . . . . . . . . . . 11
Attaching Power . . . . . . . . . . . . . . . . . . . . . . . . . . . . . . . . . . . . . . . . . . . . . . . . . . . . . . . . 12
Loading Roll Media . . . . . . . . . . . . . . . . . . . . . . . . . . . . . . . . . . . . . . . . . . . . . . . . . . . . . . 13
Preparing Media . . . . . . . . . . . . . . . . . . . . . . . . . . . . . . . . . . . . . . . . . . . . . . . . . . . . . 13
Placing the Roll in the Media Compartment . . . . . . . . . . . . . . . . . . . . . . . . . . . . . . . . 14
Loading Transfer Ribbon. . . . . . . . . . . . . . . . . . . . . . . . . . . . . . . . . . . . . . . . . . . . . . . . . . 17
Printing a Test (Printer Configuration) Label. . . . . . . . . . . . . . . . . . . . . . . . . . . . . . . . . . . 21
Hooking Up the Printer and Computer . . . . . . . . . . . . . . . . . . . . . . . . . . . . . . . . . . . . . . . 22
Interface Cable Requirements . . . . . . . . . . . . . . . . . . . . . . . . . . . . . . . . . . . . . . . . . . 22
Communicating with the Printer . . . . . . . . . . . . . . . . . . . . . . . . . . . . . . . . . . . . . . . . . 28
12/14/07 GX420t / GX430t U ser Guide 980612-001 Rev. A
Page 10

x
3 • Print Operations . . . . . . . . . . . . . . . . . . . . . . . . . . . . . . . . . . . . . . . . . . . . . . . 29
Determining Printer Configuration. . . . . . . . . . . . . . . . . . . . . . . . . . . . . . . . . . . . . . . . . . . 30
Thermal Printing . . . . . . . . . . . . . . . . . . . . . . . . . . . . . . . . . . . . . . . . . . . . . . . . . . . . . . . . 30
Modes of Printing . . . . . . . . . . . . . . . . . . . . . . . . . . . . . . . . . . . . . . . . . . . . . . . . . . . . . . . 31
Print Media Types . . . . . . . . . . . . . . . . . . . . . . . . . . . . . . . . . . . . . . . . . . . . . . . . . . . . . . . 31
Determining Thermal Media Types. . . . . . . . . . . . . . . . . . . . . . . . . . . . . . . . . . . . . . . 33
Replacing Supplies . . . . . . . . . . . . . . . . . . . . . . . . . . . . . . . . . . . . . . . . . . . . . . . . . . . . . . 33
Adding a New Transfer Ribbon. . . . . . . . . . . . . . . . . . . . . . . . . . . . . . . . . . . . . . . . . . 33
Replacing a Partially Used Transfer Ribbon . . . . . . . . . . . . . . . . . . . . . . . . . . . . . . . . 34
Adjusting the Print Width. . . . . . . . . . . . . . . . . . . . . . . . . . . . . . . . . . . . . . . . . . . . . . . . . . 34
Adjusting the Print Quality. . . . . . . . . . . . . . . . . . . . . . . . . . . . . . . . . . . . . . . . . . . . . . . . . 34
Media Sensing . . . . . . . . . . . . . . . . . . . . . . . . . . . . . . . . . . . . . . . . . . . . . . . . . . . . . . . . . 35
Ribbon Overview. . . . . . . . . . . . . . . . . . . . . . . . . . . . . . . . . . . . . . . . . . . . . . . . . . . . . . . . 36
When to Use Ribbon. . . . . . . . . . . . . . . . . . . . . . . . . . . . . . . . . . . . . . . . . . . . . . . . . . 36
Coated Side of Ribbon . . . . . . . . . . . . . . . . . . . . . . . . . . . . . . . . . . . . . . . . . . . . . . . . 36
Printing on Fan-Fold Media. . . . . . . . . . . . . . . . . . . . . . . . . . . . . . . . . . . . . . . . . . . . . . . . 38
Printing with Externally Mounted Roll Media. . . . . . . . . . . . . . . . . . . . . . . . . . . . . . . . . . . 40
Fonts and Your Printer . . . . . . . . . . . . . . . . . . . . . . . . . . . . . . . . . . . . . . . . . . . . . . . . . . . 41
Identifying Fonts in Your Printer . . . . . . . . . . . . . . . . . . . . . . . . . . . . . . . . . . . . . . . . . 41
Localizing the Printer with Code Pages . . . . . . . . . . . . . . . . . . . . . . . . . . . . . . . . . . . 42
Asian fonts and Other Large Font Sets. . . . . . . . . . . . . . . . . . . . . . . . . . . . . . . . . . . . 42
Getting Asian Fonts . . . . . . . . . . . . . . . . . . . . . . . . . . . . . . . . . . . . . . . . . . . . . . . . . . 42
Stand Alone Printing . . . . . . . . . . . . . . . . . . . . . . . . . . . . . . . . . . . . . . . . . . . . . . . . . . . . . 43
Sending Files to the Printer. . . . . . . . . . . . . . . . . . . . . . . . . . . . . . . . . . . . . . . . . . . . . . . . 44
Transferring files with the Firmware Downloader . . . . . . . . . . . . . . . . . . . . . . . . . . . . 44
Print Meter . . . . . . . . . . . . . . . . . . . . . . . . . . . . . . . . . . . . . . . . . . . . . . . . . . . . . . . . . . . . 46
4 • Printer Options . . . . . . . . . . . . . . . . . . . . . . . . . . . . . . . . . . . . . . . . . . . . . . . . 47
Label Dispenser Option . . . . . . . . . . . . . . . . . . . . . . . . . . . . . . . . . . . . . . . . . . . . . . . . . . 48
Moveable Blackline Sensor Option. . . . . . . . . . . . . . . . . . . . . . . . . . . . . . . . . . . . . . . . . . 51
Adjusting the Moveable Blackline Sensor for Black Mark or Notches . . . . . . . . . . . . 52
Cutter Option. . . . . . . . . . . . . . . . . . . . . . . . . . . . . . . . . . . . . . . . . . . . . . . . . . . . . . . . . . . 54
Loading Media with the Cutter Option . . . . . . . . . . . . . . . . . . . . . . . . . . . . . . . . . . . . 55
ZebraNet® 10/100 Internal Print Server Option . . . . . . . . . . . . . . . . . . . . . . . . . . . . . . . . 58
Printer Network Configuration Status Label . . . . . . . . . . . . . . . . . . . . . . . . . . . . . . . . 59
RTC and Full Flash Memory Option . . . . . . . . . . . . . . . . . . . . . . . . . . . . . . . . . . . . . . . . . 60
Asian Fonts - Printer Accessory . . . . . . . . . . . . . . . . . . . . . . . . . . . . . . . . . . . . . . . . . . . . 61
KDU — Printer Accessory. . . . . . . . . . . . . . . . . . . . . . . . . . . . . . . . . . . . . . . . . . . . . . . . . 62
KDU and G-Series Printer Serial Port Adapter Installation. . . . . . . . . . . . . . . . . . . . . 63
KDU Plus — Printer Accessory. . . . . . . . . . . . . . . . . . . . . . . . . . . . . . . . . . . . . . . . . . . . . 64
980612-001 Rev. A GX420t / GX430t User Guide 12/14/07
Page 11

5 • Maintenance . . . . . . . . . . . . . . . . . . . . . . . . . . . . . . . . . . . . . . . . . . . . . . . . . . . 65
Cleaning . . . . . . . . . . . . . . . . . . . . . . . . . . . . . . . . . . . . . . . . . . . . . . . . . . . . . . . . . . . . . . 66
Cleaning the Printhead . . . . . . . . . . . . . . . . . . . . . . . . . . . . . . . . . . . . . . . . . . . . . . . . 67
Media Path Considerations. . . . . . . . . . . . . . . . . . . . . . . . . . . . . . . . . . . . . . . . . . . . . 68
Platen Cleaning and Replacement . . . . . . . . . . . . . . . . . . . . . . . . . . . . . . . . . . . . . . . 70
Other Printer Maintenance . . . . . . . . . . . . . . . . . . . . . . . . . . . . . . . . . . . . . . . . . . . . . 72
Replacing the Printhead . . . . . . . . . . . . . . . . . . . . . . . . . . . . . . . . . . . . . . . . . . . . . . . . . . 73
6 • Troubleshooting . . . . . . . . . . . . . . . . . . . . . . . . . . . . . . . . . . . . . . . . . . . . . . . 79
Status Light Descriptions . . . . . . . . . . . . . . . . . . . . . . . . . . . . . . . . . . . . . . . . . . . . . . . . . 80
Status Light Error Resolutions . . . . . . . . . . . . . . . . . . . . . . . . . . . . . . . . . . . . . . . . . . . . . 80
Print Quality Problems . . . . . . . . . . . . . . . . . . . . . . . . . . . . . . . . . . . . . . . . . . . . . . . . . . . 82
Manual Calibration . . . . . . . . . . . . . . . . . . . . . . . . . . . . . . . . . . . . . . . . . . . . . . . . . . . . . . 85
Troubleshooting Tests. . . . . . . . . . . . . . . . . . . . . . . . . . . . . . . . . . . . . . . . . . . . . . . . . . . . 86
Printing a Configuration Label . . . . . . . . . . . . . . . . . . . . . . . . . . . . . . . . . . . . . . . . . . 86
Recalibration. . . . . . . . . . . . . . . . . . . . . . . . . . . . . . . . . . . . . . . . . . . . . . . . . . . . . . . . 86
Resetting the Factory Default Values . . . . . . . . . . . . . . . . . . . . . . . . . . . . . . . . . . . . . . . . 87
Communications Diagnostics . . . . . . . . . . . . . . . . . . . . . . . . . . . . . . . . . . . . . . . . . . . . . . 87
Feed Button Modes. . . . . . . . . . . . . . . . . . . . . . . . . . . . . . . . . . . . . . . . . . . . . . . . . . . . . . 89
xi
A • Appendix . . . . . . . . . . . . . . . . . . . . . . . . . . . . . . . . . . . . . . . . . . . . . . . . . . . . . 91
Universal Serial Bus (USB) Interface . . . . . . . . . . . . . . . . . . . . . . . . . . . . . . . . . . . . . . . . 92
Parallel Interface . . . . . . . . . . . . . . . . . . . . . . . . . . . . . . . . . . . . . . . . . . . . . . . . . . . . . . . . 93
Ethernet Interface . . . . . . . . . . . . . . . . . . . . . . . . . . . . . . . . . . . . . . . . . . . . . . . . . . . . . . . 94
Serial Port Interface . . . . . . . . . . . . . . . . . . . . . . . . . . . . . . . . . . . . . . . . . . . . . . . . . . . . . 95
12/14/07 GX420t / GX430t U ser Guide 980612-001 Rev. A
Page 12

xii
980612-001 Rev. A GX420t / GX430t User Guide 12/14/07
Page 13

1
Introduction
This section describes what you get in your shipping box and provides an overview of printer
features. This includes procedures that describe how to open and close the printer and report
any problems.
Contents
GX Series Thermal Printers . . . . . . . . . . . . . . . . . . . . . . . . . . . . . . . . . . . . . . . . . . . . . . . . 2
What’s in the Box?. . . . . . . . . . . . . . . . . . . . . . . . . . . . . . . . . . . . . . . . . . . . . . . . . . . . . . . 3
Unpack and Inspect the Printer . . . . . . . . . . . . . . . . . . . . . . . . . . . . . . . . . . . . . . . . . . . . . 3
Your Printer . . . . . . . . . . . . . . . . . . . . . . . . . . . . . . . . . . . . . . . . . . . . . . . . . . . . . . . . . . . . 4
Printer Features . . . . . . . . . . . . . . . . . . . . . . . . . . . . . . . . . . . . . . . . . . . . . . . . . . . . . . . . . 5
Operator Controls. . . . . . . . . . . . . . . . . . . . . . . . . . . . . . . . . . . . . . . . . . . . . . . . . . . . . . . . 7
12/14/07 GX420t / GX430t U ser Guide 980612-001 Rev. A
Page 14

Introduction
2
GX Series Thermal Printers
GX Series Thermal Printers
The Zebra GX model is the best in class desktop thermal printer with the widest range of
features. The GX420t printer provides thermal transfer and direct thermal printing at speeds up
to 6 ips (inches per second) at a 203 dpi (dots per inch) print density. The GX430t printer
provide thermal transfer and direct thermal printing at speeds up to 4 ips at a 300 dpi print
density. Both the GX420t and GX430t support both ZPL and EPL Zebra printer programming
languages and a wide variety of interface and feature options.
The G-Series™ printer features:
• Automatic printer language detection and switching between ZPL and EPL programming
and label formats.
• OpenAccess™ design for simplified media loading.
• The industry’s easiest ribbon loading design.
• Color-coded operator controls and media guides.
• Resident scalable font, supports font download, Unicode fonts and resident bitmap fonts.
• Improved printer performance: faster print speeds, 32-bit processor, and VCSEL laser
media sensing.
• Printhead test and maintenance reporting.
The GX printers offer a wide range of printer options:
• Label Dispense (Peel-Off)
• Internal 10/100 Print Server and Ethernet Interface
• Moveable Black Mark Sensor
• Receipt and general media cutters
• On-board RTC (Real Time Clock) and Full Flash memory
• Asian Language support with printer configuration options for the large Simplified and
Traditional Chinese, Japanese, or Korean character sets.
This users guide provides all of the information y ou will need to operate your printer on a daily
basis. To create label formats, refer to your programming guides or label design applications
such as Zebra Designer.
Your printer, when connected to a host computer, functions as a complete system for printing
labels and tags.
Note • Many printer settings may also be controlled by your printer’s driver or label design
software. Refer to the driver or software documentation for more information.
980612-001 Rev. A GX420t / GX430t User Guide 12/14/07
Page 15
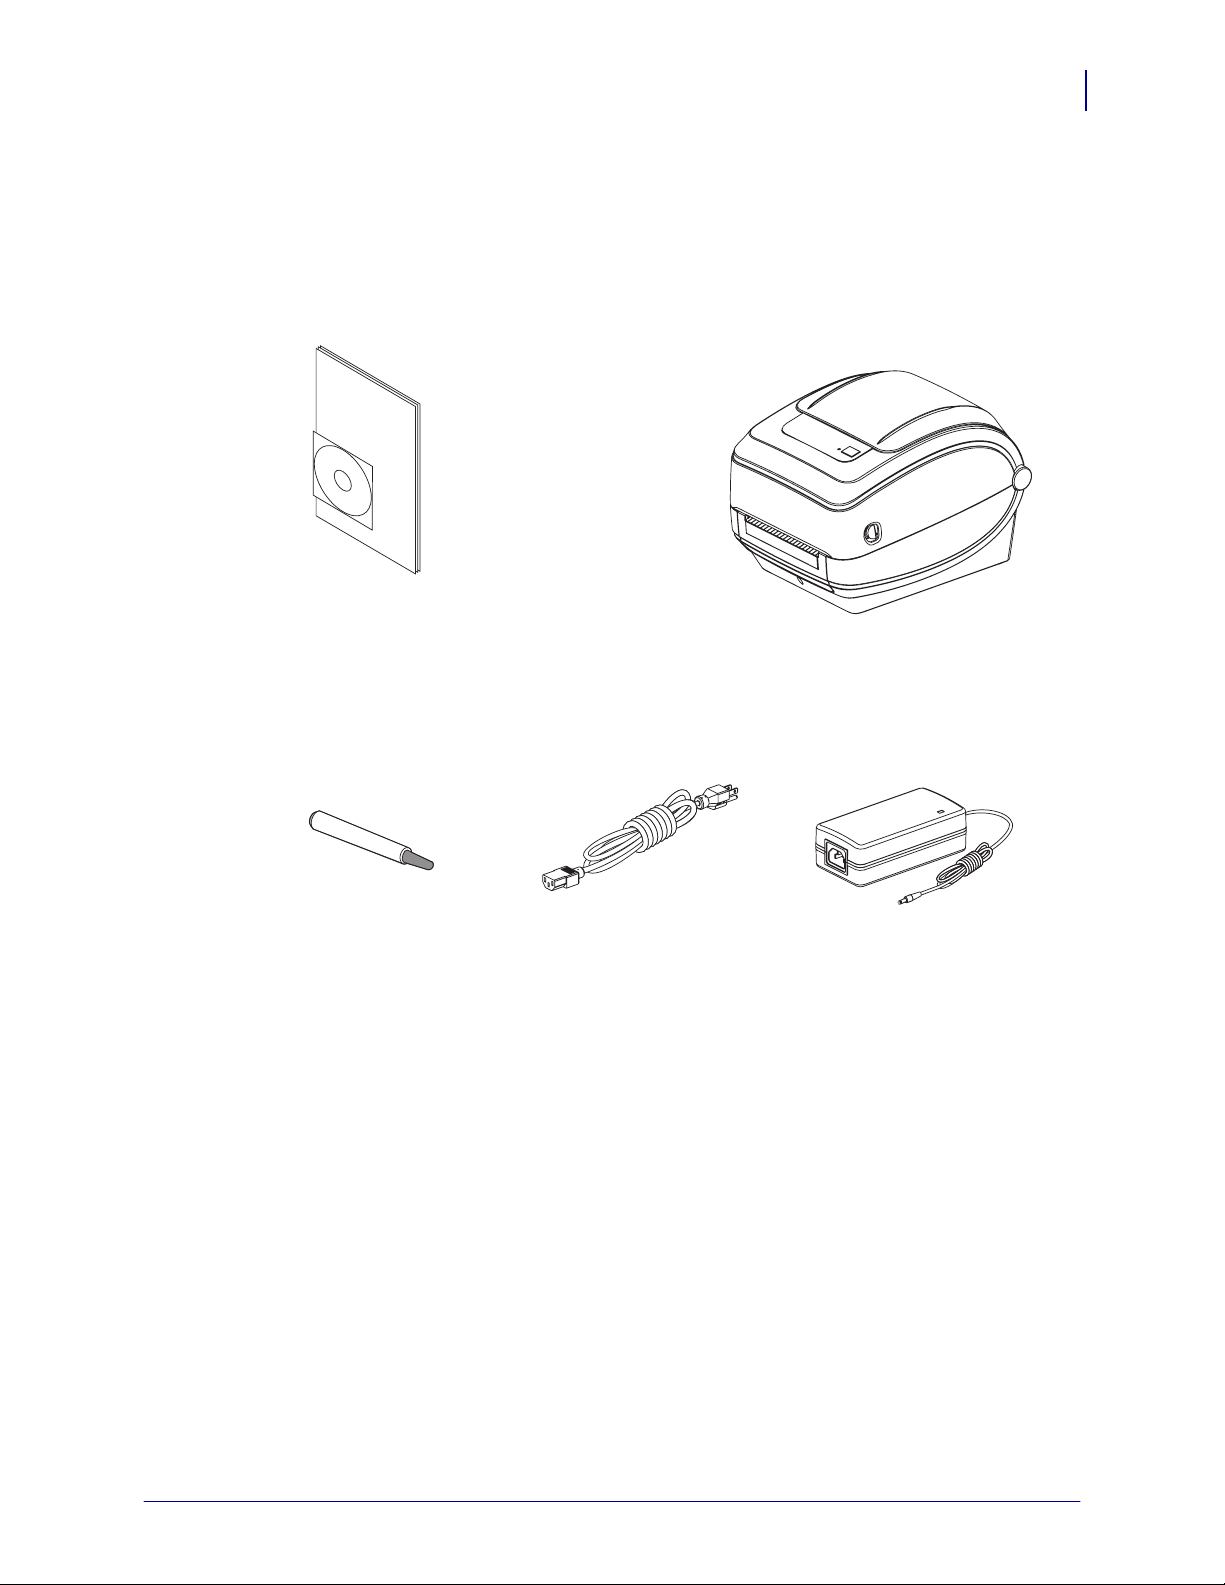
What’s in the Box?
Save the carton and all packing materials in case y ou need to ship or store the printer later.
After unpacking, make sure you have all parts. Follow the procedures for inspecting the
printer to familiarize yourself with printer parts so you can follow the instructions in this book.
Documentation
and Software
Prin ter
Introduction
What’s in the Box?
3
Cl ean in g
Pen
varies by locale or region
Unpack and Inspect the Printer
When you receive the printer, immediately unpack it and inspect for shipping damage.
• Save all packing materials.
• Check all exterior surfaces for damage.
• Open the printer and inspect the media compartment for damage to components.
If you discover shipping damage upon inspection:
• Immediately notify the shipping company and file a damage report. Zebra
Technologies Corporation is not responsible for any damage incurred during shipment
of the printer and will not cover the repair of this damage under its warranty policy.
Power
Supply
Powe r Cord
• Keep all packaging material for shipping company inspection.
• Notify your authorized Zebra reseller
12/14/07 GX420t / GX430t U ser Guide 980612-001 Rev. A
Page 16
Introduction
d
4
What’s in the Box?
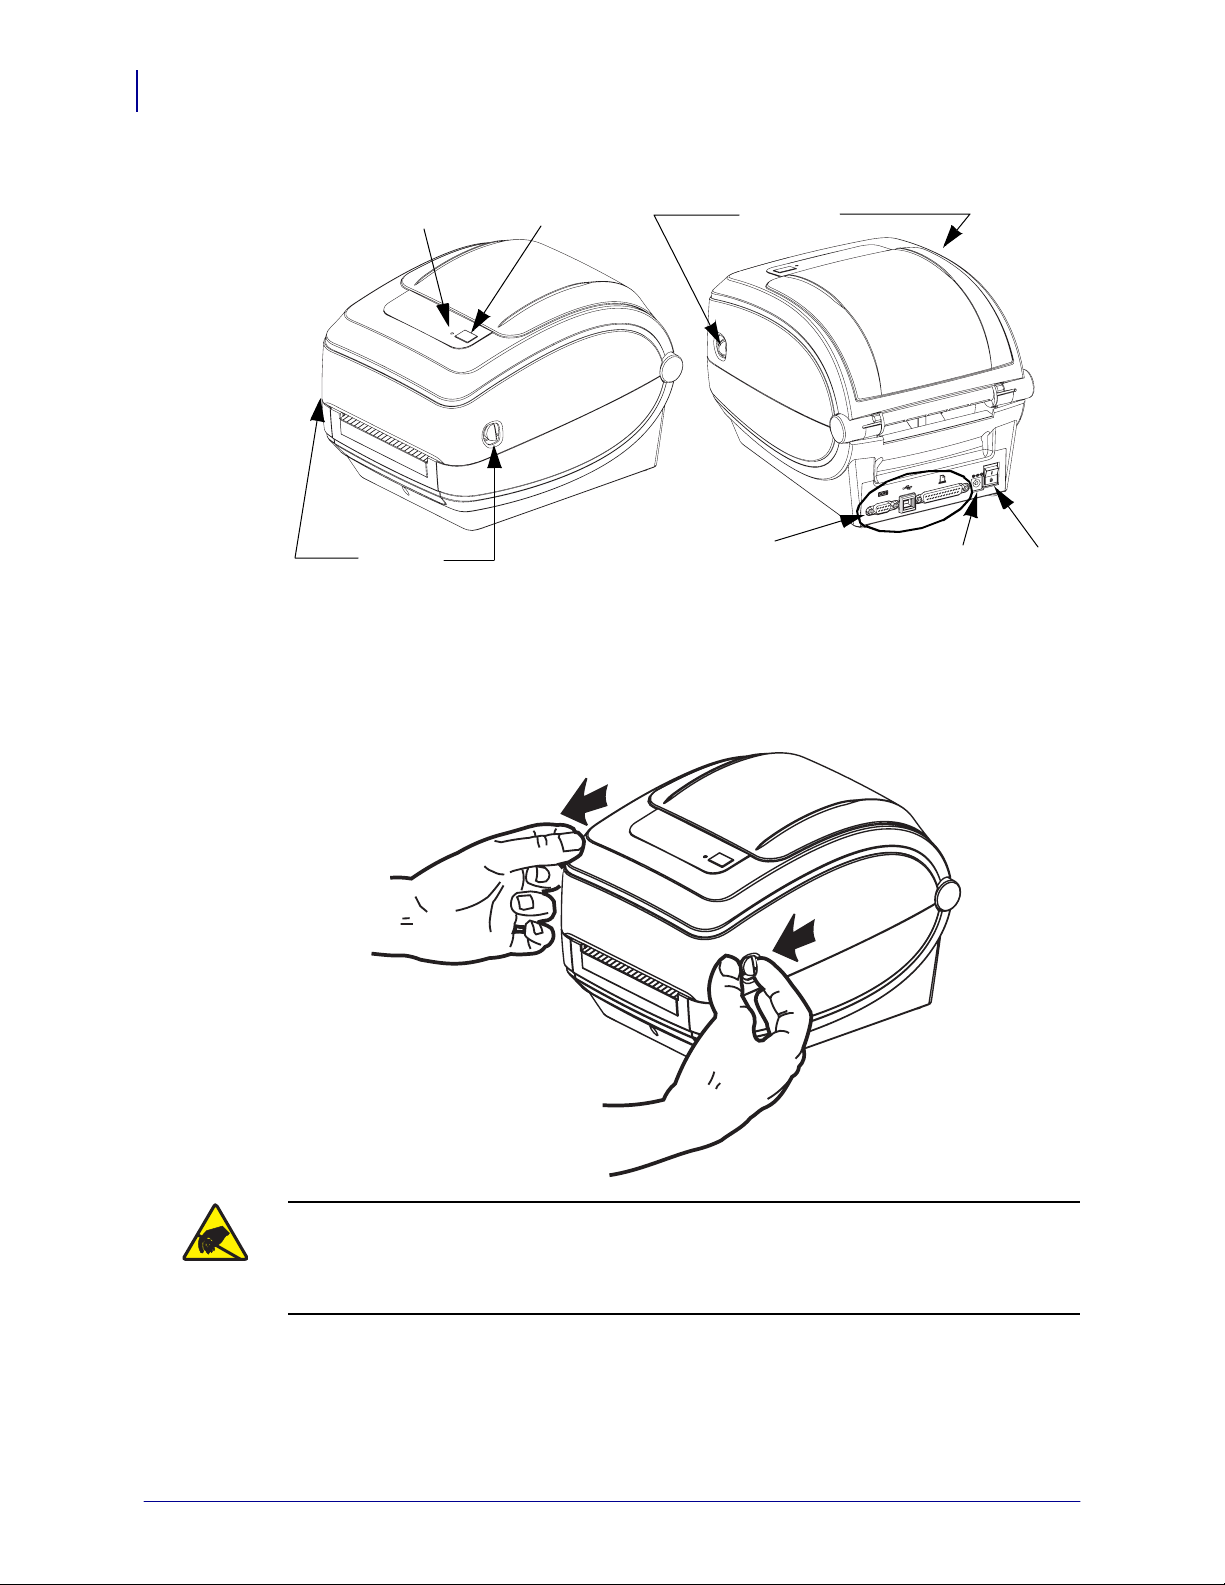
Your Printer
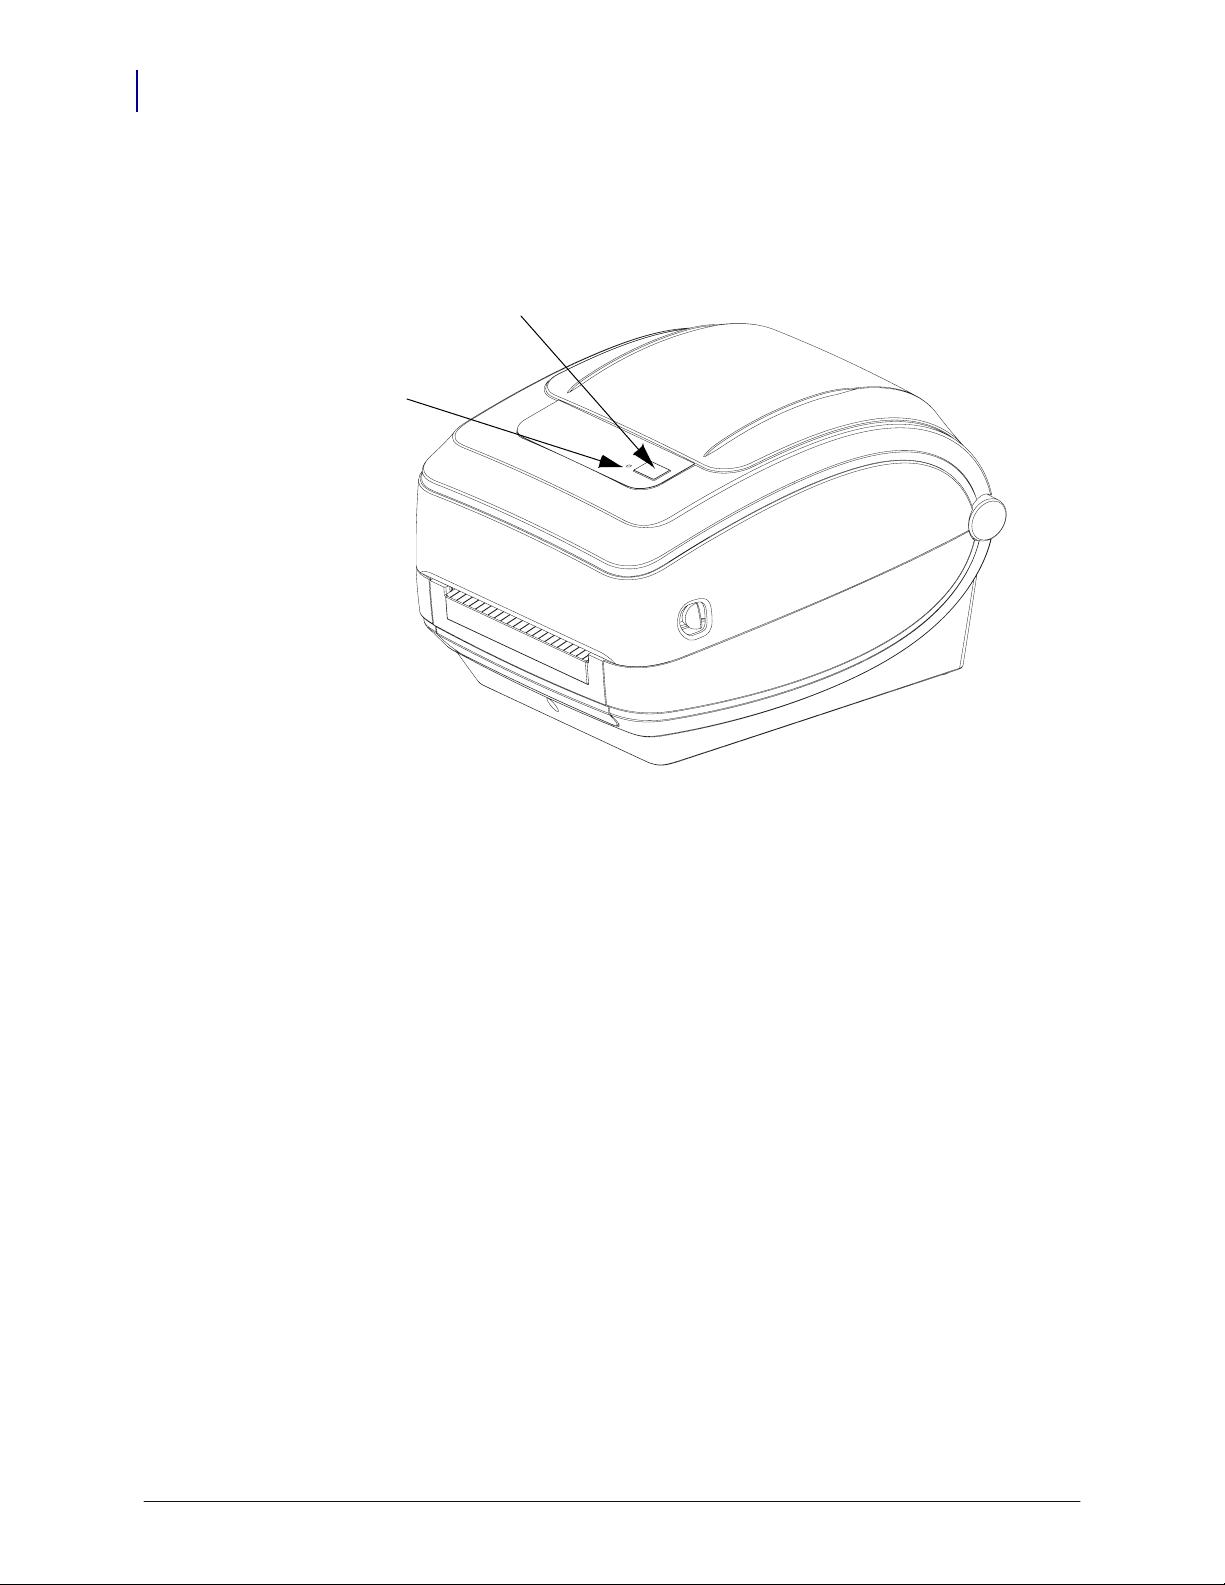
Status
Light
Fee
Button
Release
Latches
Release
Latches
Opening the printer
To access the media compartment, y ou must open the printer. Pull the release latches towards
you and lift the cover. Check the media compartment for loose or damaged components.
Interface
Connectors
DC Power
Receptacle
Power
Switch
Caution • The discharge of electrostatic energy that accumulates on the surface of the
human body or other surfaces can damage or destroy the printhead or electronic
components used in this device. You must observe static-safe procedures when working
with the printhead or the electronic components under the top cover.
980612-001 Rev. A GX420t / GX430t User Guide 12/14/07
Page 17
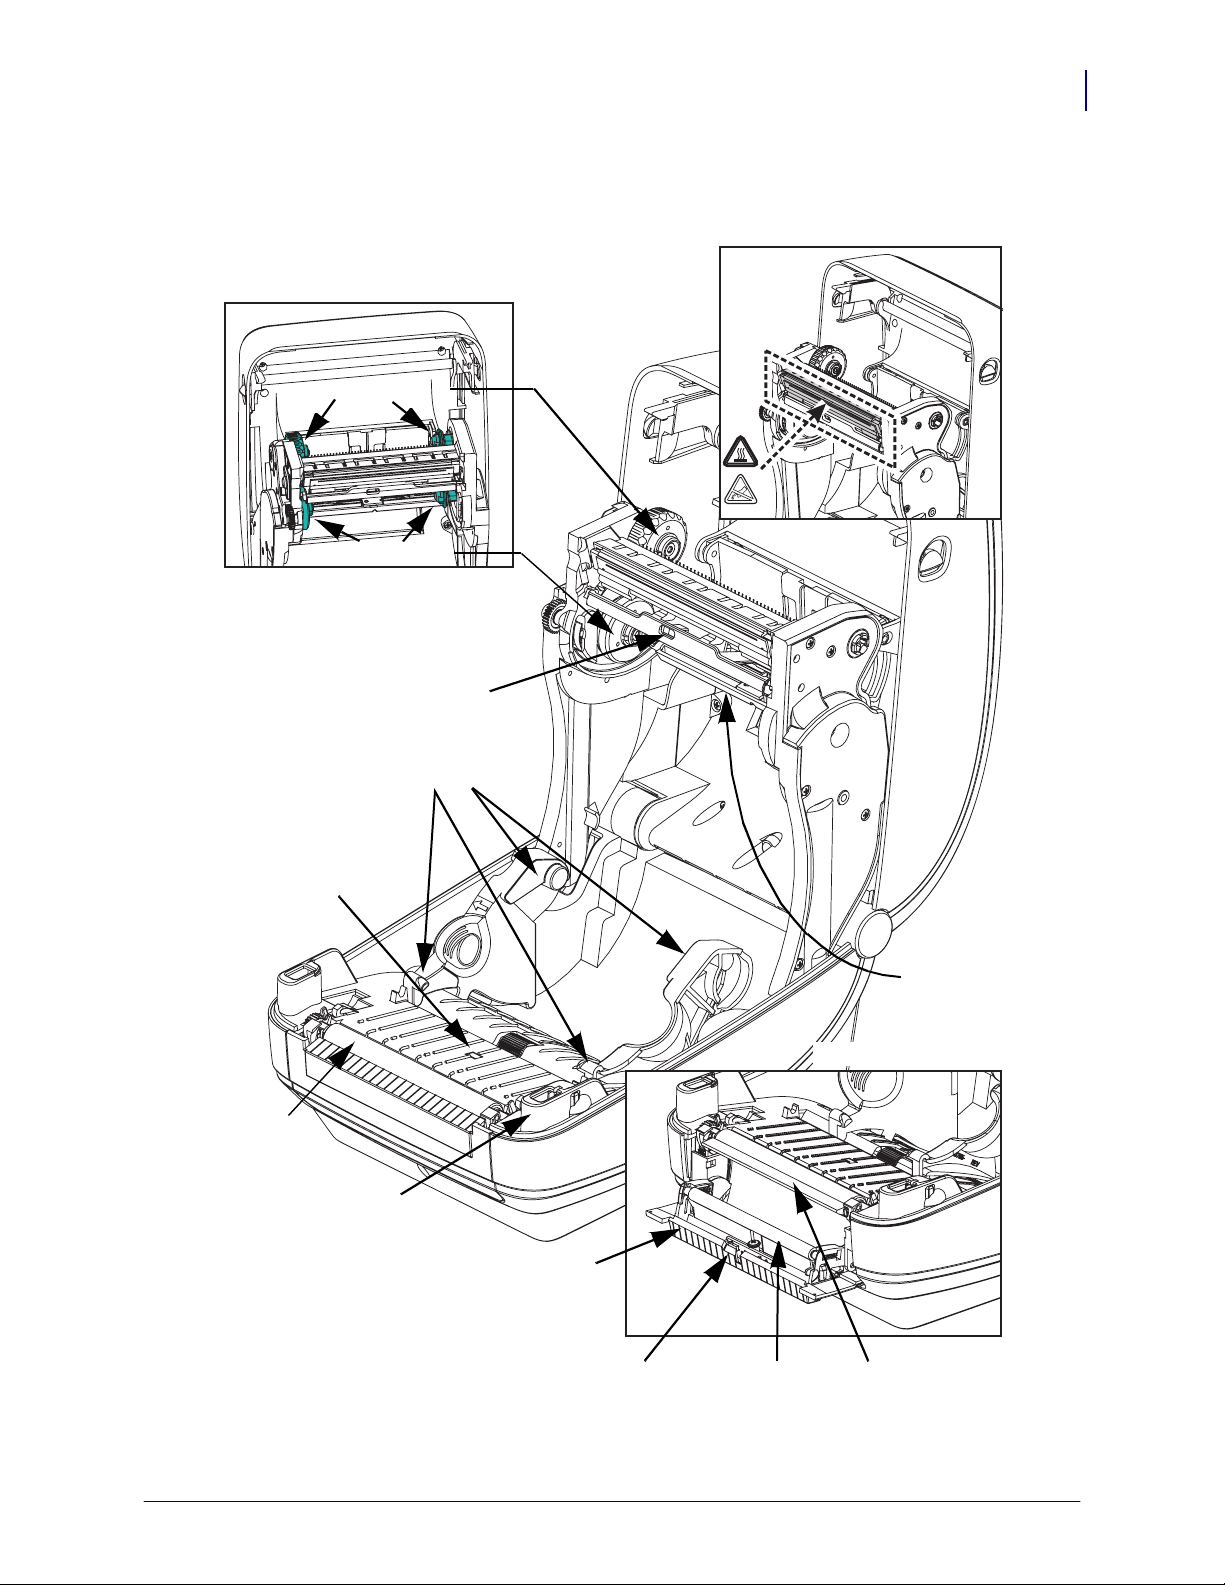
Printer Features
Ribbon Roll Holders
Take Up Spindles
Supply Spindles
Printhead
Introduction
What’s in the Box?
5
Ribbon Trailer Sensor
Roll Holders and
Media Guides
Black-Line
Sensor
Plat en
Roller
Head-Up Sensor
(inside)
GAP
Sensor
Dispenser Option
Dispenser Door
(open)
Sensor Peel Bar
12/14/07 GX420t / GX430t U ser Guide 980612-001 Rev. A
Pinch Roller
Page 18
Introduction
6
What’s in the Box?
Moveable Blackline
Sensor (Option)
Media Cutter
(Option)
980612-001 Rev. A GX420t / GX430t User Guide 12/14/07
Page 19
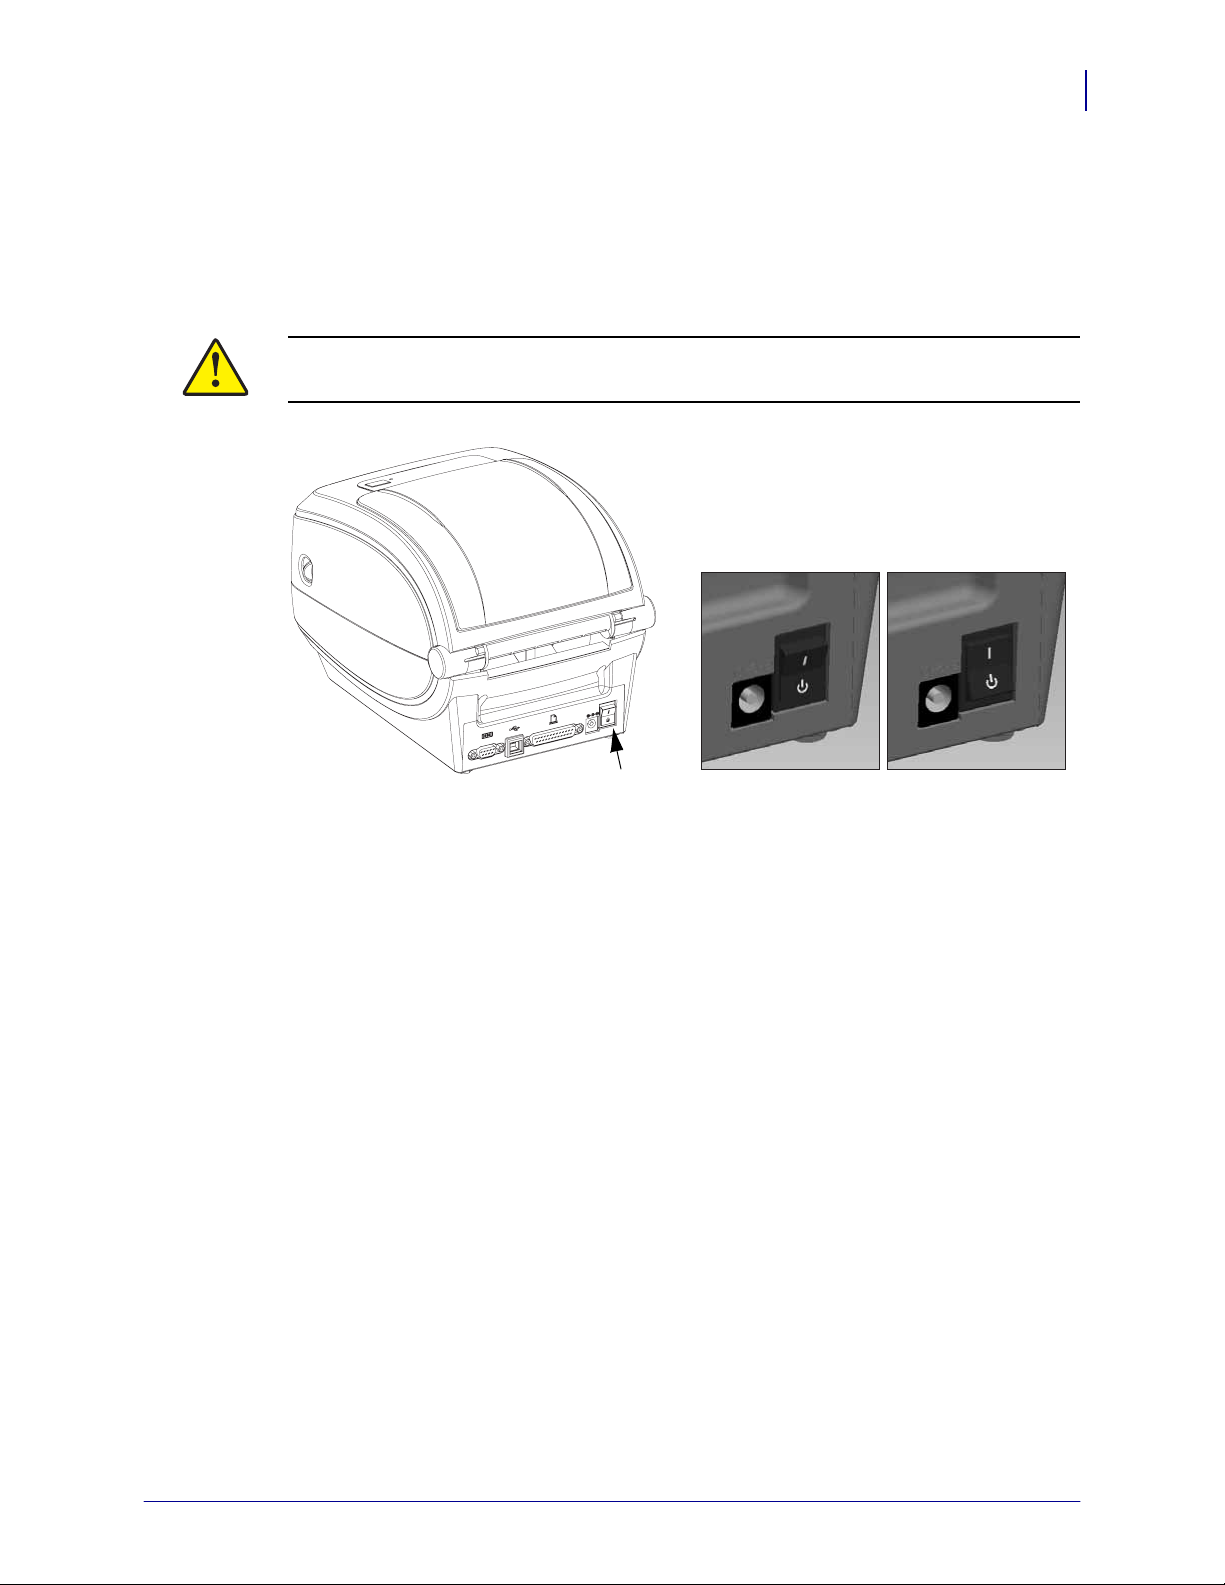
Operator Controls
Power Switch
Press up to turn ON or down to turn OFF the printer.
Caution • The printer power should be turned off before connecting or disconnecting the
communications and power cables.
Power Switch
Introduction
What’s in the Box?
7
Feed Button
• Tap the Feed button once to force the printer to feed one blank label.
• Press the Feed button to take the printer out of a “pause” condition. The printer is put into
“pause” by either a programming command or an error condition. See What the Status
Light is Telling You on page 80 in the Troubleshooting chapter.
• Use the Feed button for printer setup and status (see Feed Button Modes on p age 89 in the
Troubleshooting chapter).
Power Switch
Power OFF
Power ON
12/14/07 GX420t / GX430t U ser Guide 980612-001 Rev. A
Page 20
Introduction
8
What’s in the Box?
Status Light
Located on the top case next to the feed button, the status light functions as a printer
operational indicator (see See Rev. A in the Troubleshooting chapter).
Feed
Button
Status
Light
980612-001 Rev. A GX420t / GX430t User Guide 12/14/07
Page 21
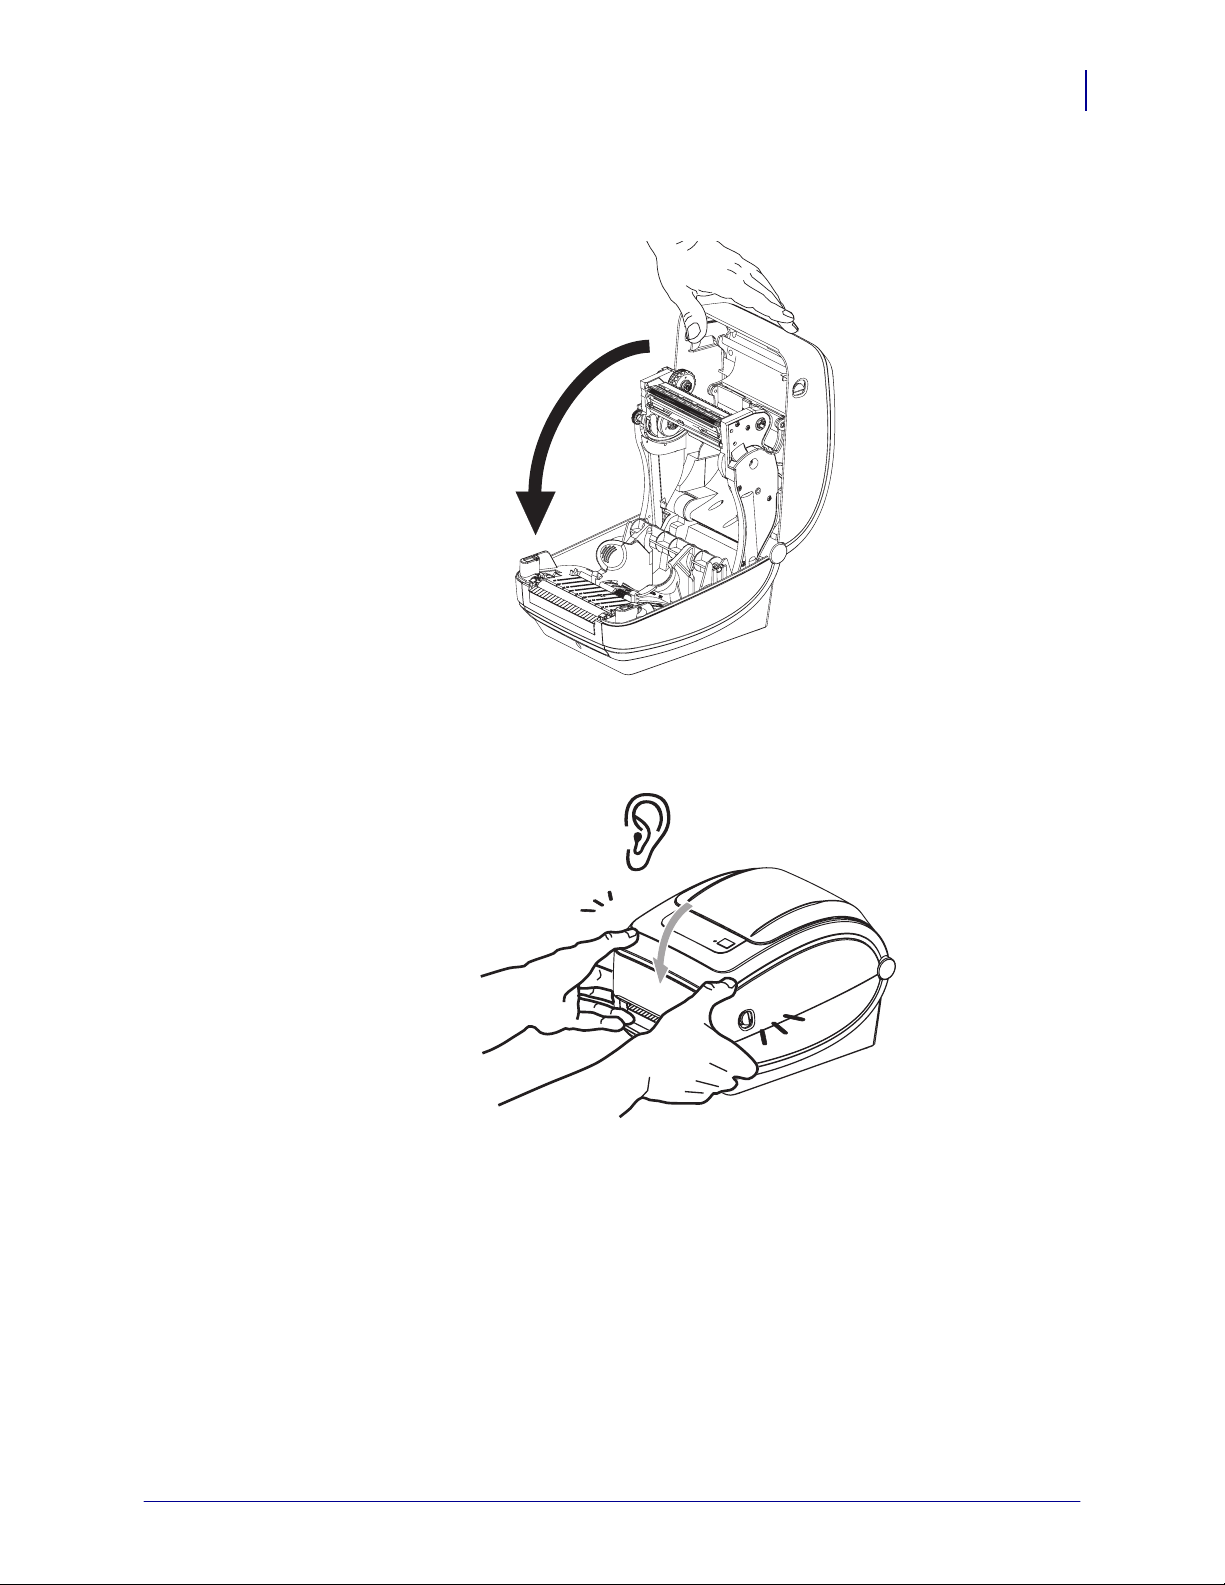
Closing the printer
1. Lower the top cover.
Introduction
What’s in the Box?
9
2. Press down until the cover snaps closed.
12/14/07 GX420t / GX430t U ser Guide 980612-001 Rev. A
Page 22

Introduction
10
What’s in the Box?
Notes • ___________________________________________________________________
__________________________________________________________________________
__________________________________________________________________________
__________________________________________________________________________
__________________________________________________________________________
__________________________________________________________________________
__________________________________________________________________________
__________________________________________________________________________
__________________________________________________________________________
__________________________________________________________________________
980612-001 Rev. A GX420t / GX430t User Guide 12/14/07
Page 23

2
Getting Started
This section describes how to set up y our printer for the first time and use the most common
operating procedures for loading media.
Contents
Attaching Power . . . . . . . . . . . . . . . . . . . . . . . . . . . . . . . . . . . . . . . . . . . . . . . . . . . . . . . . 12
Loading Roll Media . . . . . . . . . . . . . . . . . . . . . . . . . . . . . . . . . . . . . . . . . . . . . . . . . . . . . 13
Loading Transfer Ribbon . . . . . . . . . . . . . . . . . . . . . . . . . . . . . . . . . . . . . . . . . . . . . . . . . 17
Printing a Test (Printer Configuration) Label . . . . . . . . . . . . . . . . . . . . . . . . . . . . . . . . . . 21
Hooking Up the Printer and Computer. . . . . . . . . . . . . . . . . . . . . . . . . . . . . . . . . . . . . . . 22
12/14/07 GX420t / GX430t U ser Guide 980612-001 Rev. A
Page 24
Getting Started
12
Attaching Power
Attaching Power
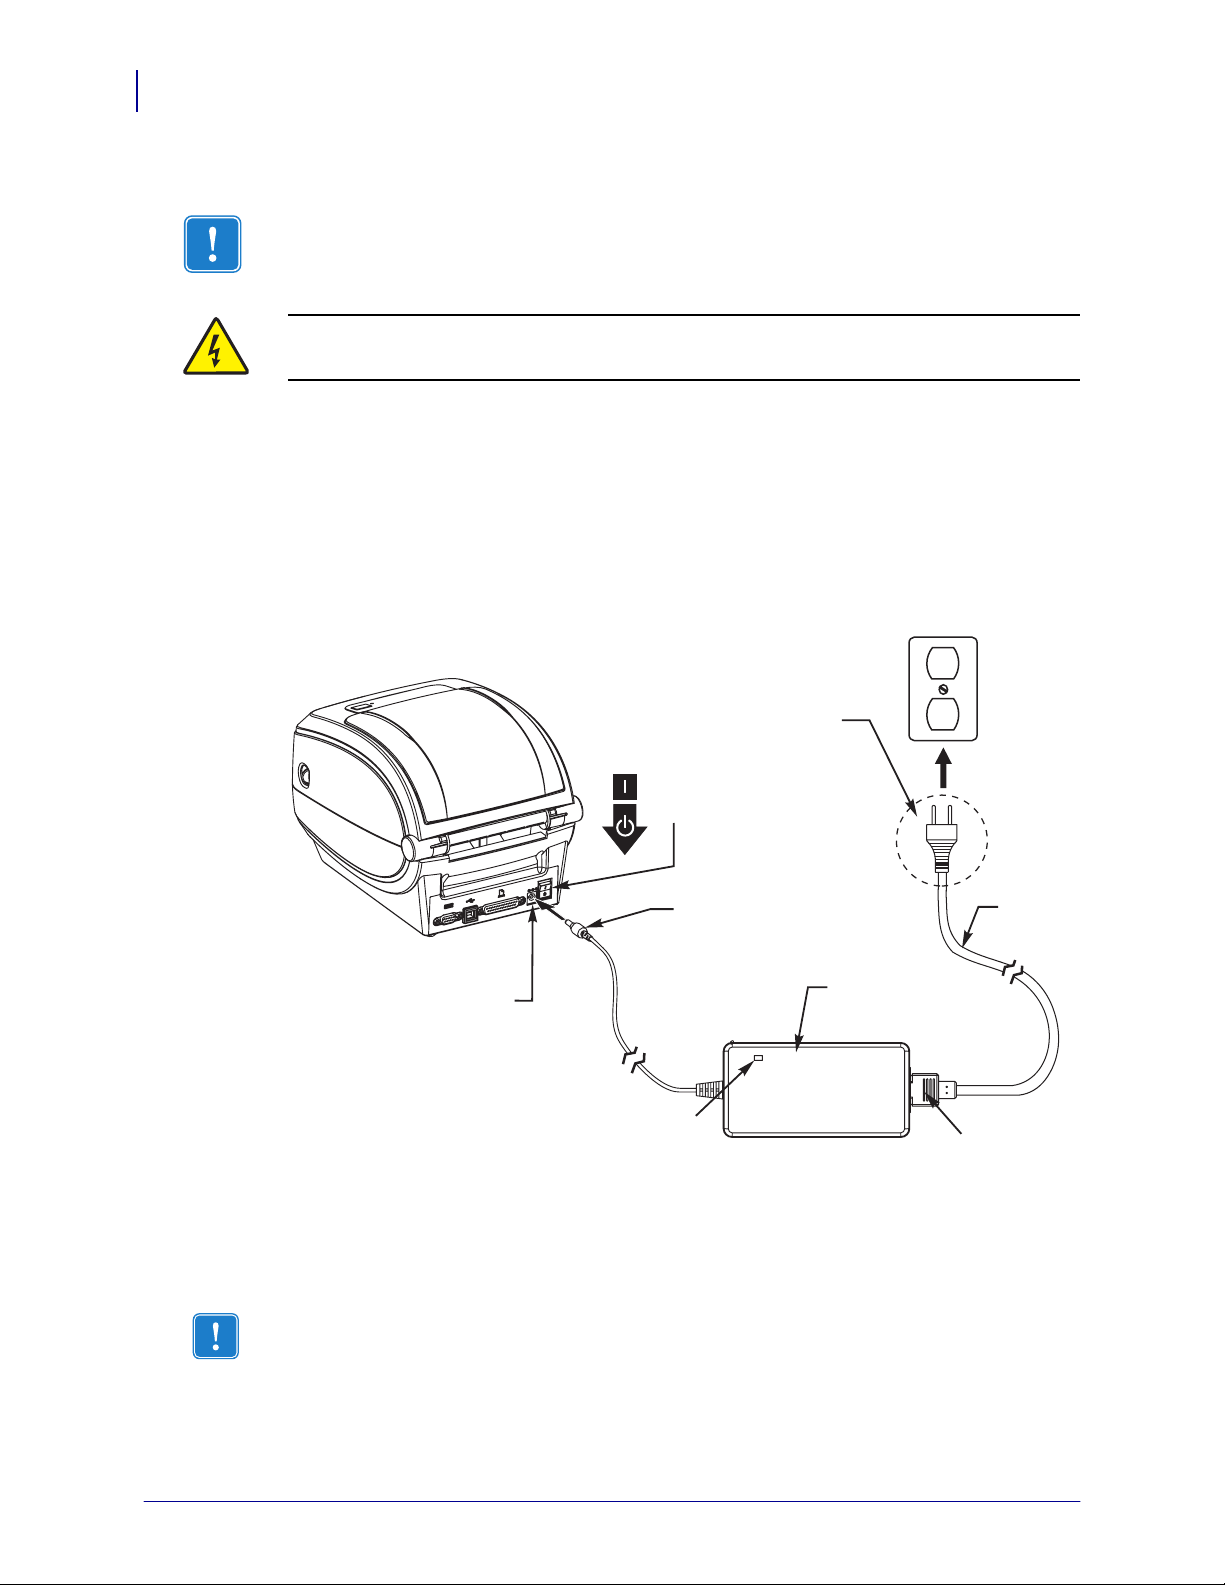
Important • Set up your printer so that y ou can handle the power cord easily if needed. To
make certain the printer cannot carry electrical current, you must separate the power cord
from the power supply receptacle or AC electrical outlet.
Caution • Never operate the printer and power supply in an area where they can get wet.
Serious personal injury could result!
1. Make sure the printer’s power switch is in the off position (down).
2. Insert the AC power cord into the power supply.
3. Plug the other end of the cord into an appropriate AC electrical outlet. Note: The active
power light will go on if power is on at the AC outlet.
4. Insert the power supply’s power connector into the printer’s power receptacle.
Printer
Power
Receptacle
Power
Switch
Power
Connector
Active Power Light
Plug Varies
by Country
AC
Powe r
Cord
Powe r
Suppl y
IEC 60320
C-13
Note • Ensure the appropriate power cord with a three (3) prong plug and an IEC 60320-C13
connector are used at all times. These power cords must bear the relevant certification mark of
the country in which the product is being used.
980612-001 Rev. A GX420t / GX430t User Guide 12/14/07
Page 25
Loading Roll Media
When you load media, you must place the roll onto the media hangers.
You must use the correct media for the type of printing you require.
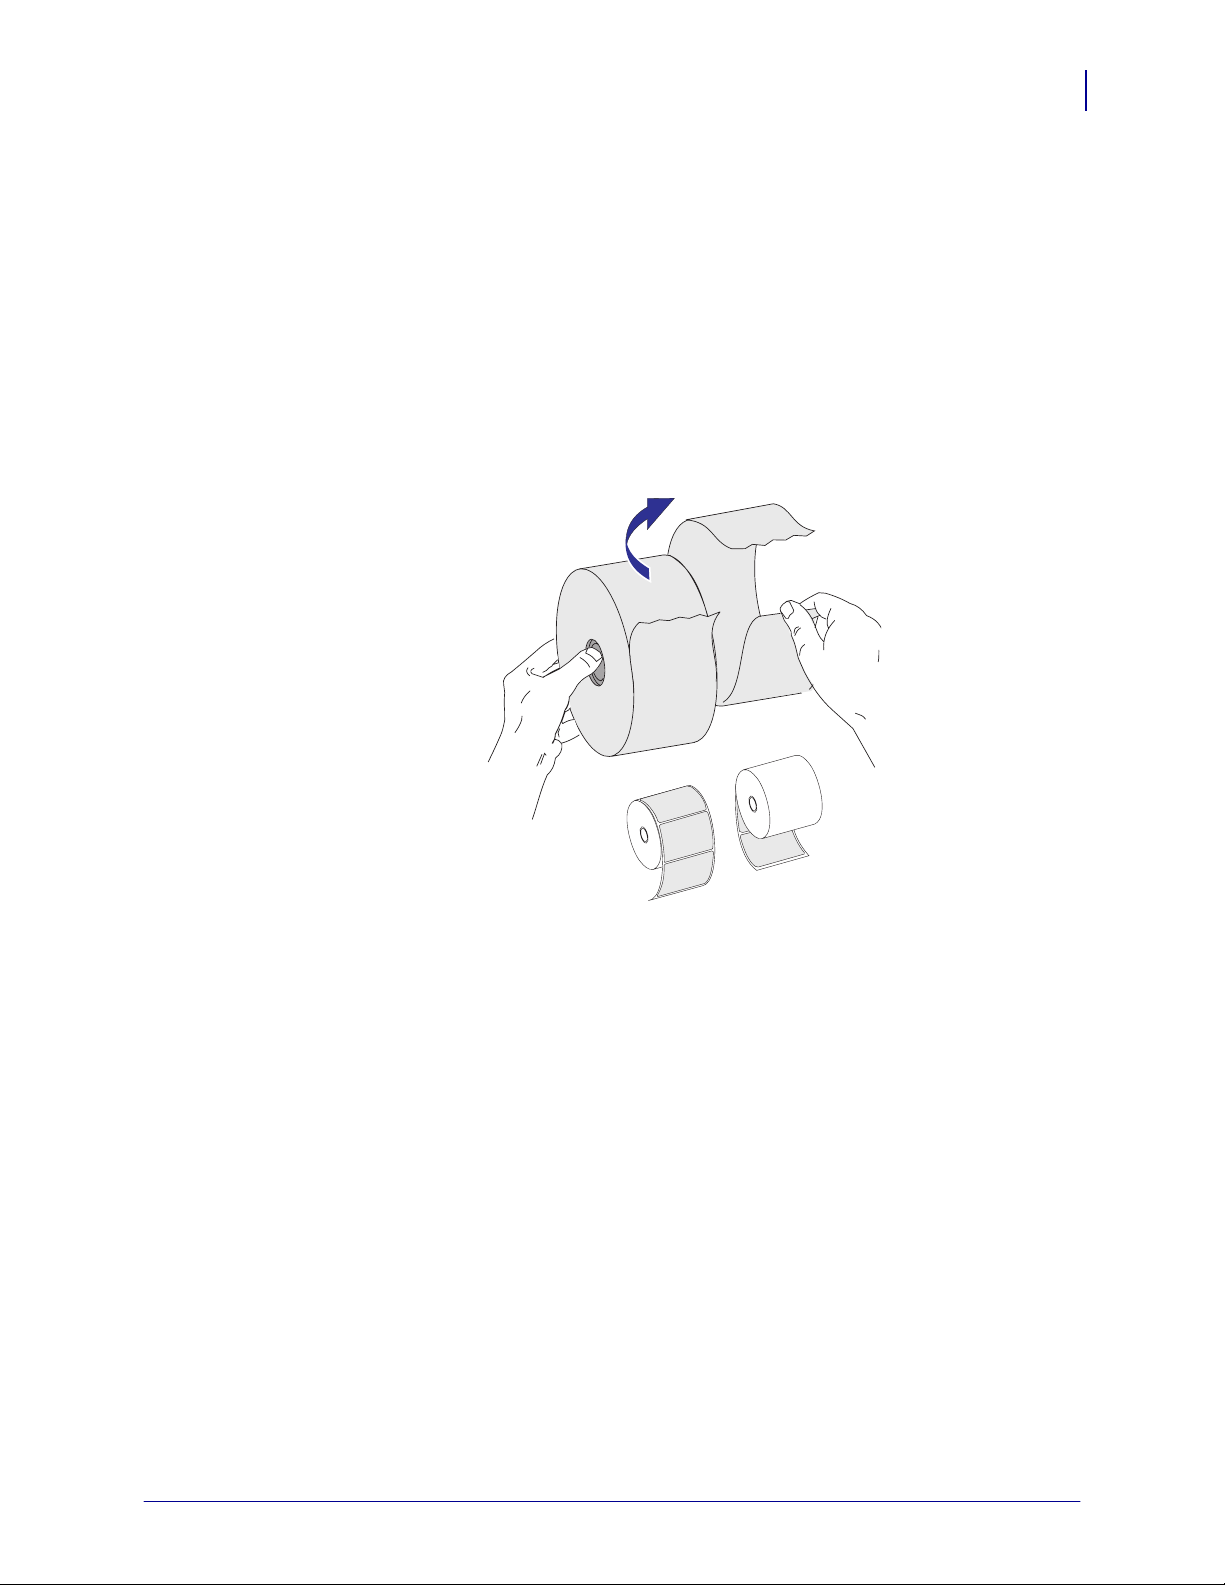
Preparing Media
Whether your roll media is inside or outside wound, you load it into the printer the same way.
• Remove the outside length of media. During shipment, handling, or storage, the roll may
become dirty or dusty. Removing the outside length of media avoids dragging adhesive or
dirty media between the printhead and platen.
Getting Started
Loading Roll Media
13
12/14/07 GX420t / GX430t U ser Guide 980612-001 Rev. A
Page 26

Getting Started
14
Loading Roll Media
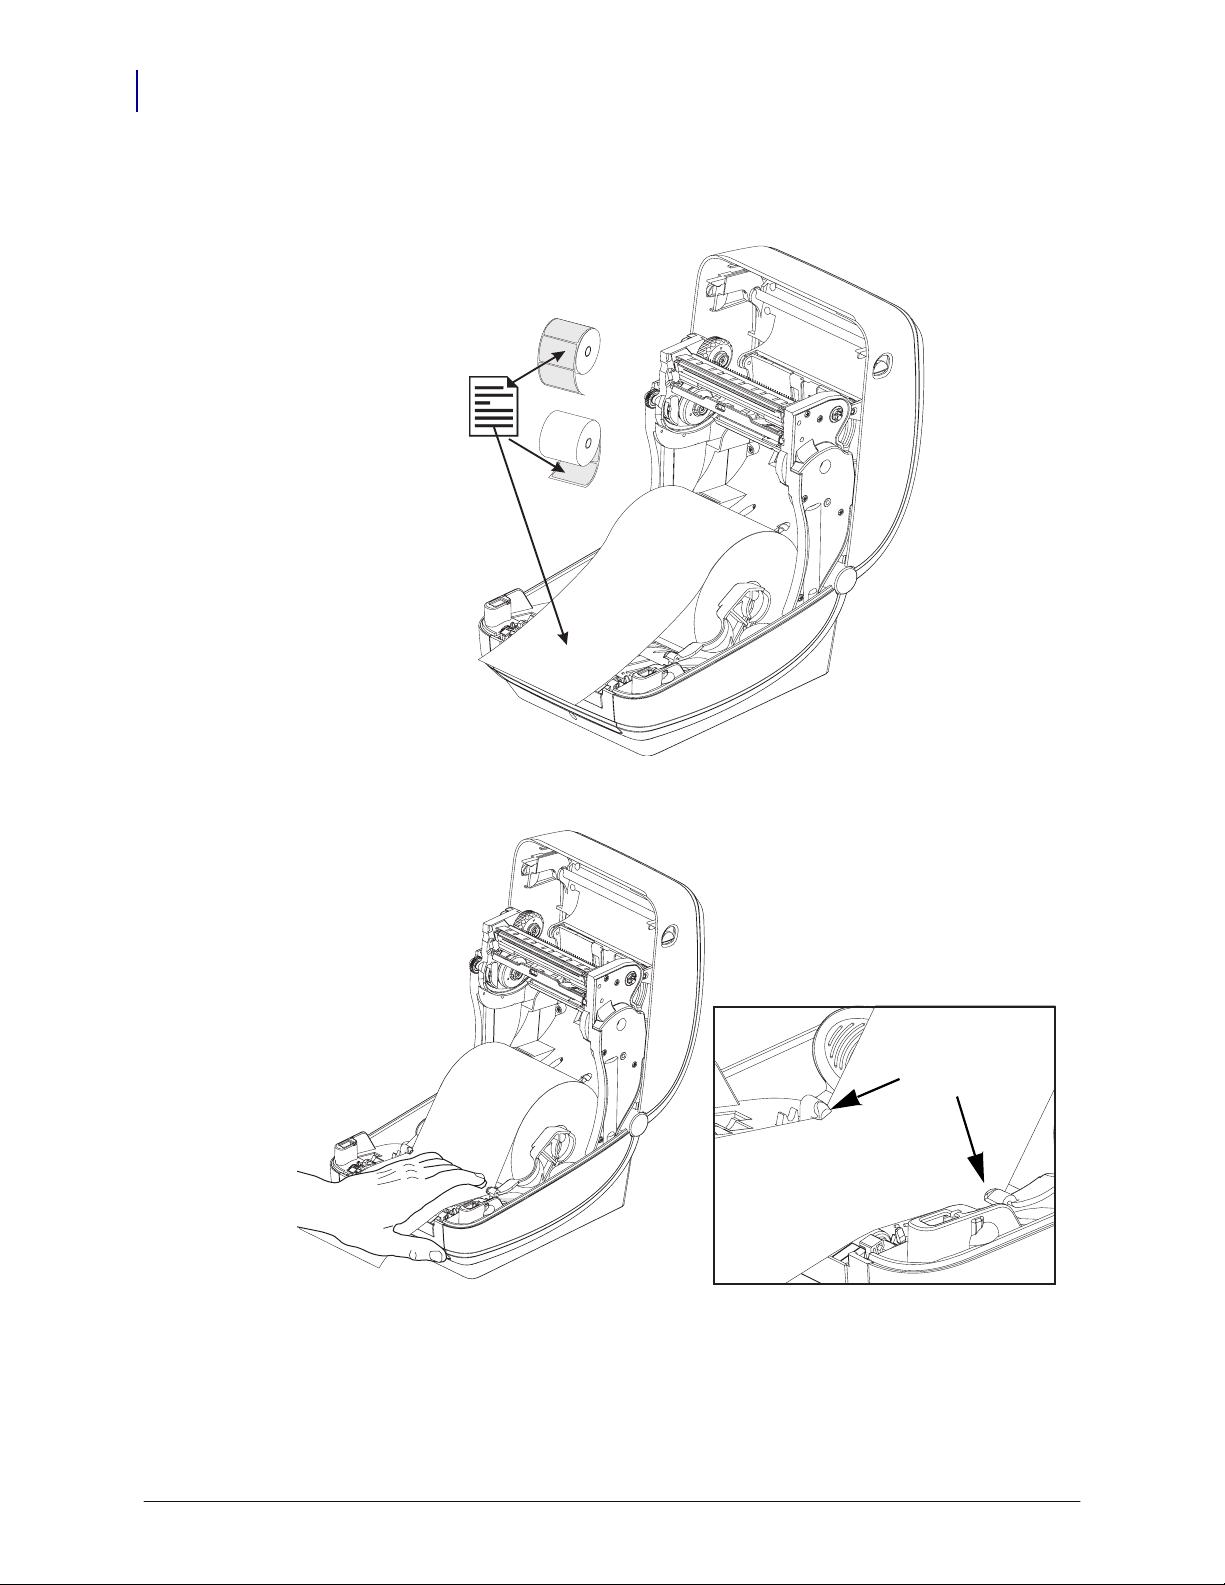
Placing the Roll in the Media Compartment
1. Open the printer. Remember that you need to pull the release latch levers toward the front
of the printer.
2. Open the media roll holders. Pull the media guides open with your free hand and place the
media roll on the roll holders and release the guides. Orient the media roll so that its
printing surface will face up as it passes over the platen (drive) roller.
980612-001 Rev. A GX420t / GX430t User Guide 12/14/07
Page 27
Getting Started
Loading Roll Media
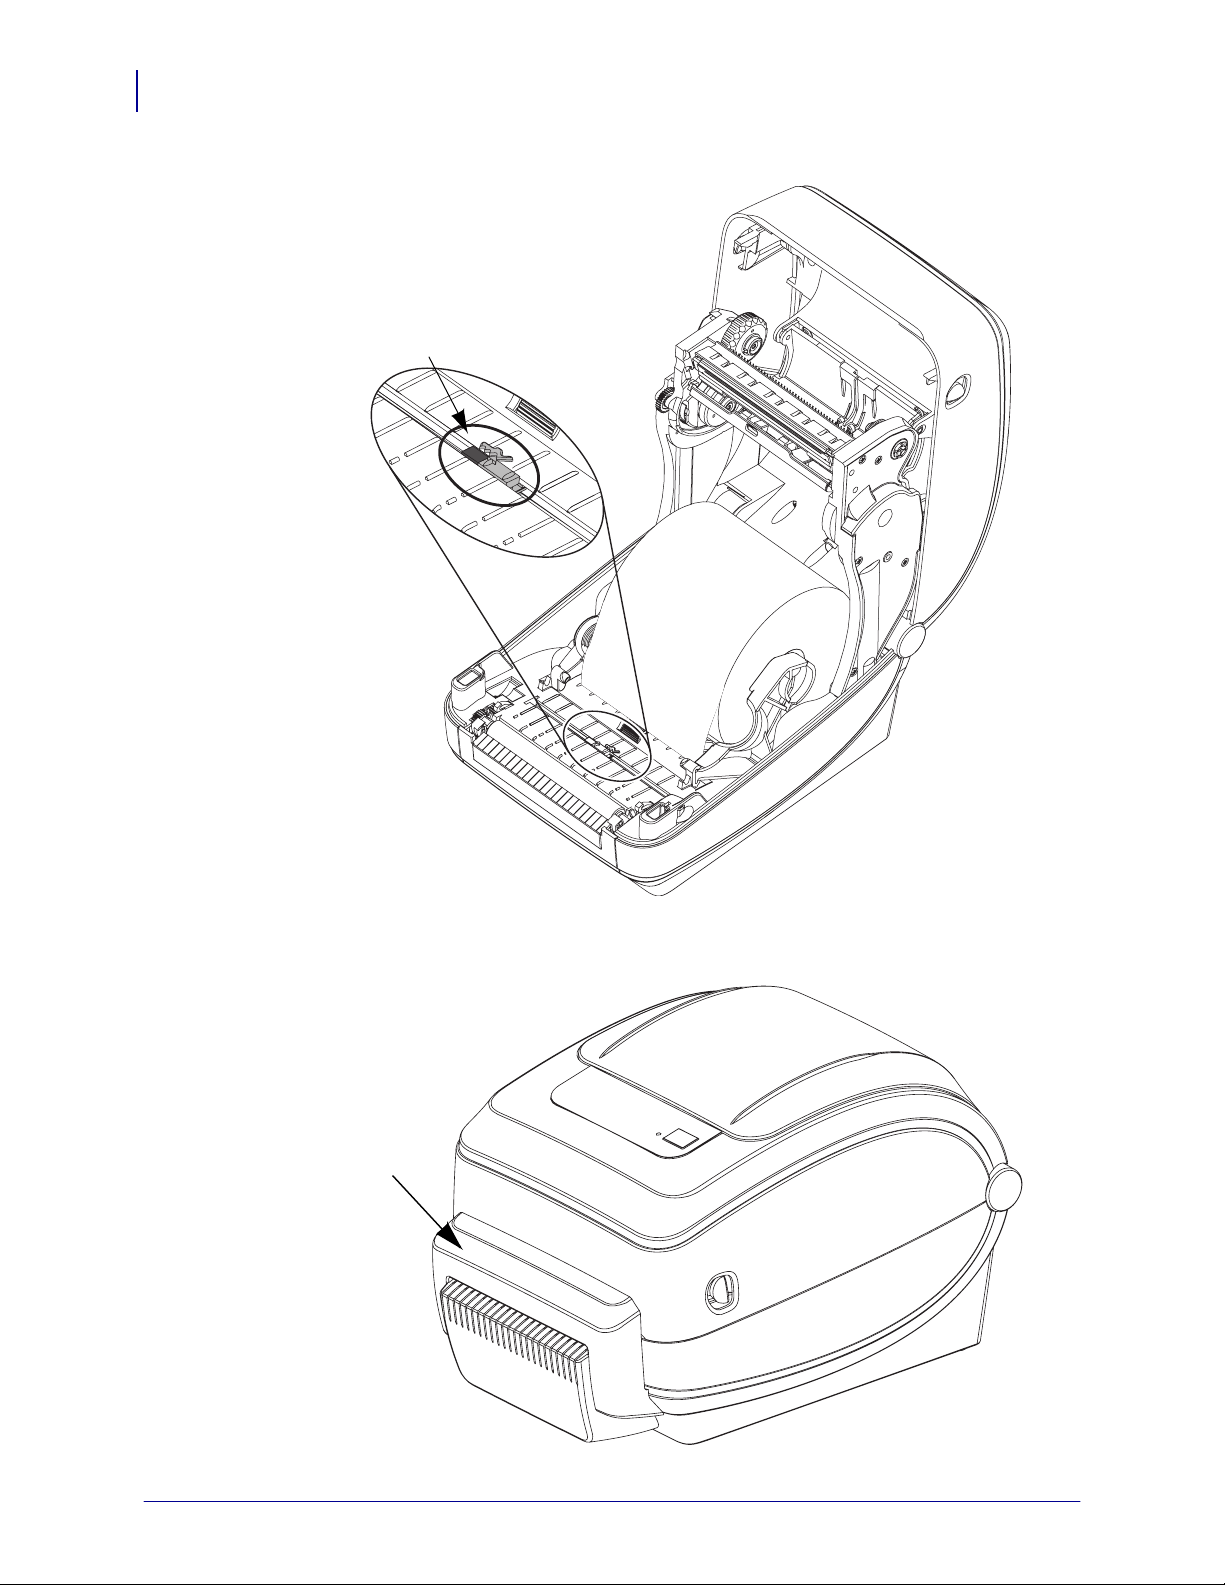
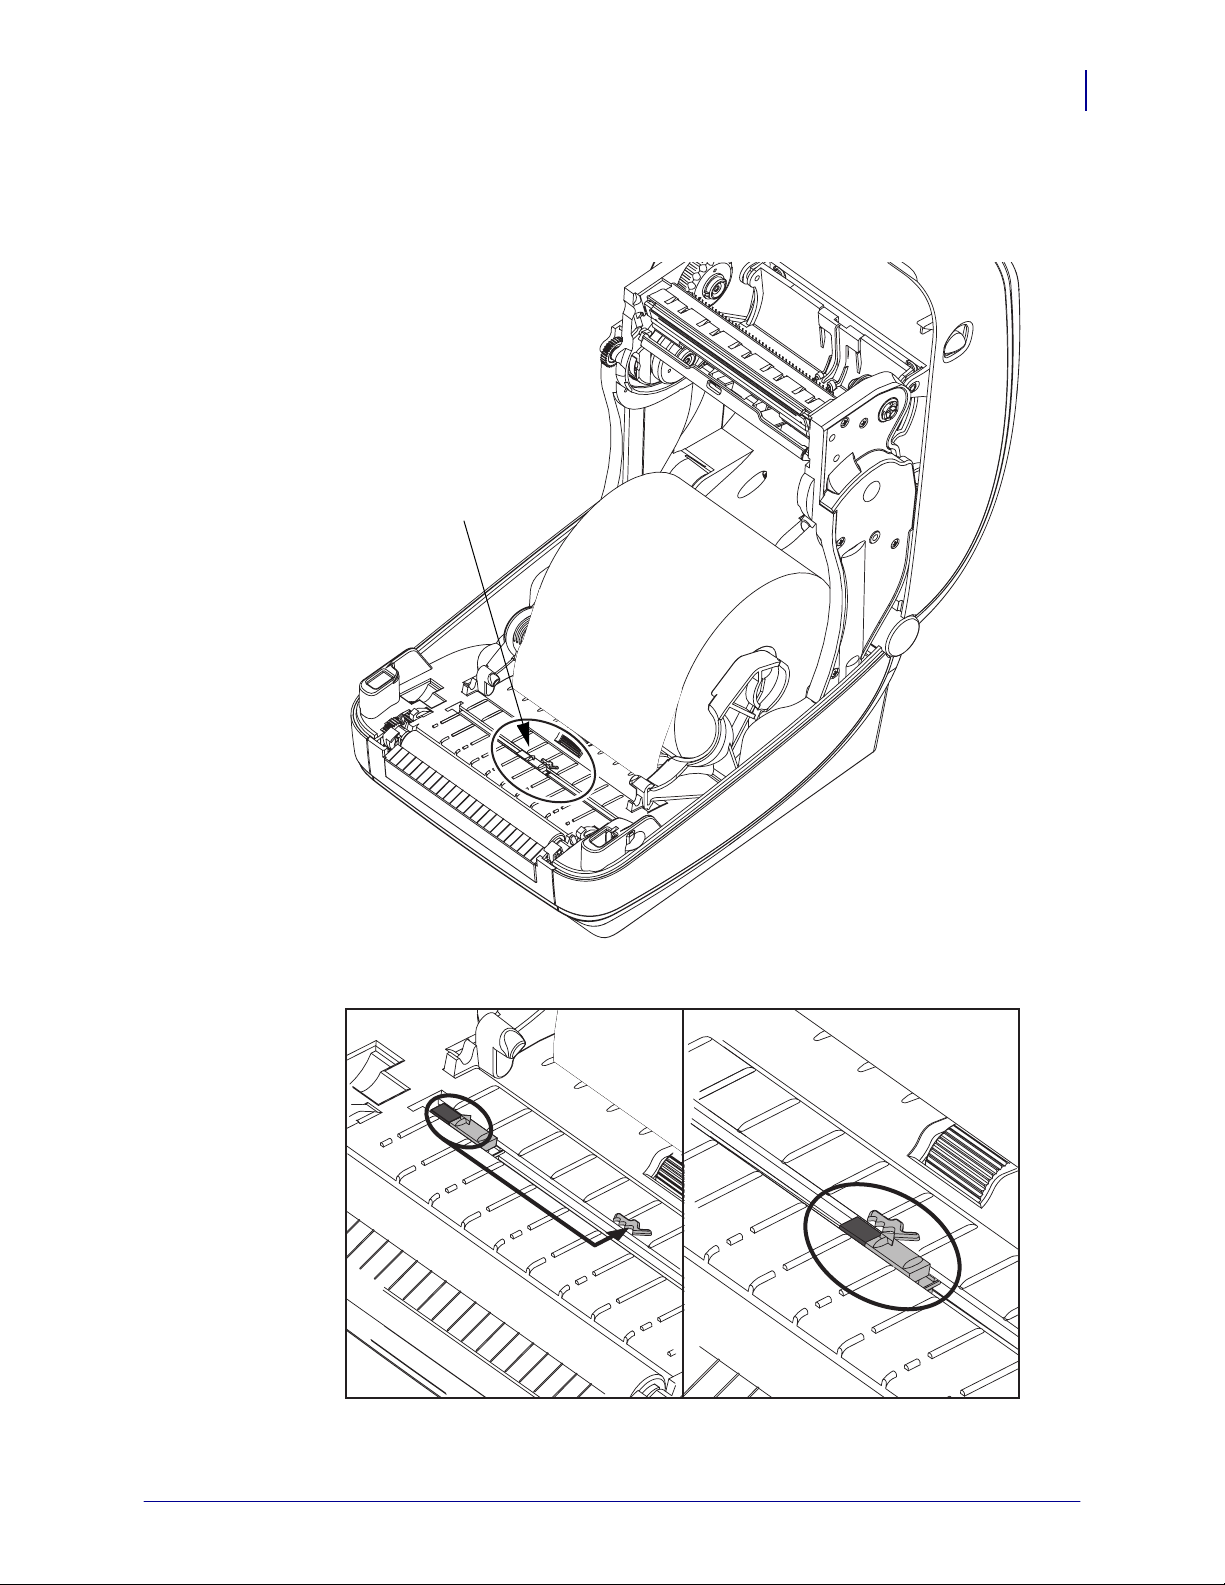
3. If your printer includes the moveable blackline sensor option, verify that the sensor is
aligned in the center default position. This is the standard operating position for media
sensing. When the sensor is moved from the default position, the printer will only detect
blackline, black mark and notched marker media.
Printer Optional:
Moveable
Blackline Sensor
15
Off Center
Blackline Sensing Only
12/14/07 GX420t / GX430t U ser Guide 980612-001 Rev. A
Default - Gap (Web) Sensing
Standard Operating Position
Page 28
Getting Started
16
Loading Roll Media
4. Pull the media so that it extends out of the front of the printer. Verify the roll turns freely.
The roll must not sit in the bottom of the media compartment. Verify that media’s printing
surface is facing up.
5. Push the media under both of the media guides.
Under Media
Guides
6. Close the printer. Press down until the cover snaps closed.
980612-001 Rev. A GX420t / GX430t User Guide 12/14/07
Page 29

Loading Transfer Ribbon
Transfer ribbons come in several varieties and in some cases colors to match y our application
needs. Zebra brand transfer ribbons are specifically designed for your printer and Zebra brand
media. Using non-Zebra brand or media or ribbon not approved for use in your Zebra printer
may damage your printer or printhead.
• The media and ribbon types should be matched to provide y ou with optimal print results.
• Alway s use ribbon that is wider than the media to protect the printhead from wear.
• For direct thermal printing, do not load ribbon in the printer.
Your printer needs to use Zebra Uni-Ribbons (universal ribbon). Uni-Ribbons have a ribbon
out trailer (reflector) to stop printing when empty. Zebra Uni-Ribbons will work on older
model Zebra desktop printers too.
Uni-Ribbons are identified with a color coded leader.
• Blue - Performance Wax (5319)
• Silver - Premium Wax/Resin (3200)
• Gold - Performance Resin (5095) for sy nthetics (6 ips max. speed)
and coated paper (4 ips max. speed)
Getting Started
Loading Transfer Ribbon
17
• Red - Premium Resin (5100) for synthetics (4 ips max. speed)
Before following these steps, prepare the ribbon by removing its wrapping and pulling its
adhesive strip free.
Notch
Adhesive Strip
Right Side
(printer and roll)
See Ribbon Overview on page 36 for more information on ribbon use.
12/14/07 GX420t / GX430t U ser Guide 980612-001 Rev. A
Page 30
Getting Started
18
Loading Transfer Ribbon
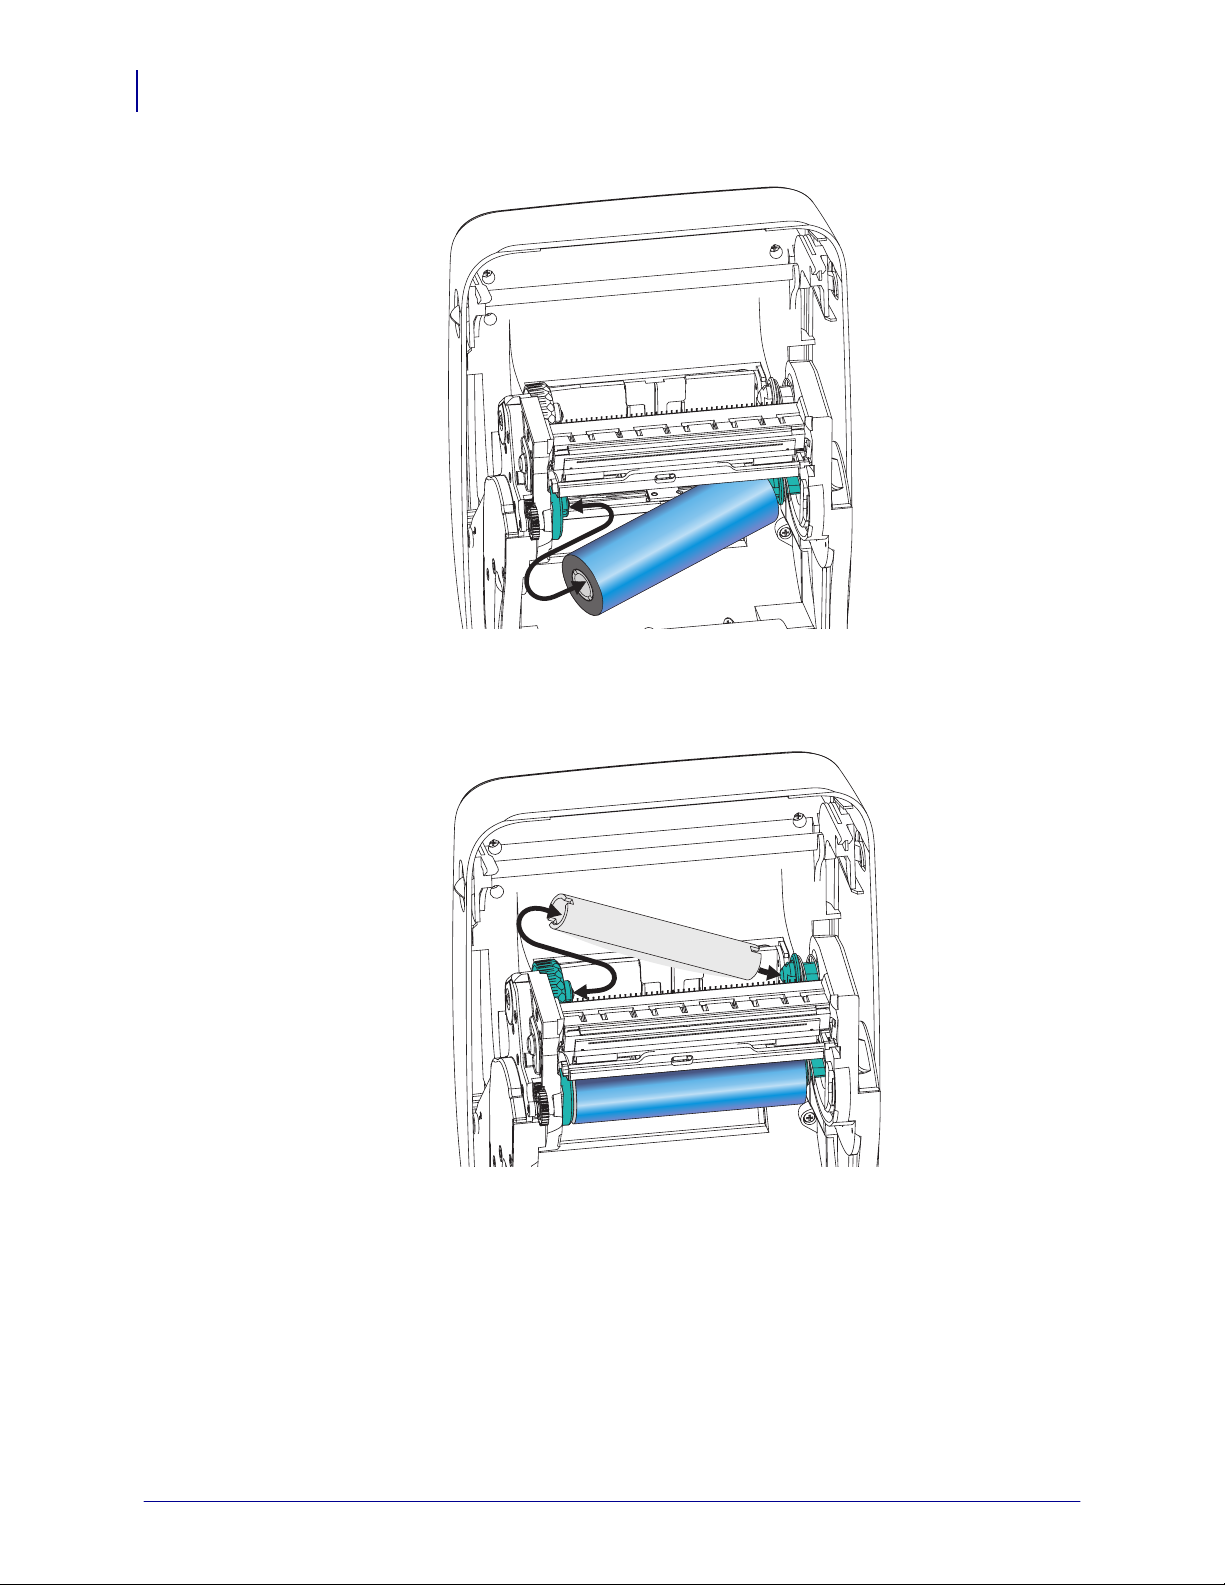
1. With the printer open, place a new ribbon roll on printer’s lower ribbon supply spindles.
Rotate the roll until the notches align and lock into the left side of the supply hub.
2. Place an empty ribbon core on printer’s take-up spindles. Rotate the ribbon core until the
notches align and lock into the left side of the take-up hub.
You can find your first ribbon take-up core in the packing box. Subsequently, use the
empty supply core to take up the next roll of ribbon.
980612-001 Rev. A GX420t / GX430t User Guide 12/14/07
Page 31

Getting Started
Loading Transfer Ribbon
3. Pull the transfer ribbon’s leader off the roll and attach it with the adhesive strip on the
leader to the empty ribbon core on the supply spindle. Center the ribbon on the ribbon
core.
19
12/14/07 GX420t / GX430t U ser Guide 980612-001 Rev. A
Page 32

Getting Started
20
Loading Transfer Ribbon
4. Rotate the thumb wheel on the left side of the supply spindle until the ribbon is pulled
tight across the printhead.
5. Verify that the media is loaded and ready to print and then close the printer cover.
6. Press the Feed button to have the printer feed a minimum of 10 cm (4 inches) of media to
remove slack and ribbon wrinkle, and to align the ribbon on the spindles.
7. Change the print mode setting from direct thermal printing to thermal transfer to set the
printer’s temperature profiles for thermal transfer media. This can be done with the printer
driver, application software, or printer programming commands.
• When controlling printer operations with ZPL programming, refer to the Media Type
^MT) ZPL II command (follow the instructions in the ZPL Programming Guide).
(
• When controlling printer operations with EPL Page Mode, refer to the Options (O)
EPL2 command (follow the instructions in the EPL2 Programmer’s Guide).
Your printer is now ready to print.
980612-001 Rev. A GX420t / GX430t User Guide 12/14/07
Page 33

Printing a Test (Printer Configuration) Label
Printing a Test (Printer Configuration) Label
Before you connect the printer to your computer, make sure that the printer is in proper
working order.
You can do this by printing a configuration label.
1. Make sure the media is properly loaded and the top cover of the printer is closed. Then,
turn the printer power on if you have not already done so. If the printer initializes with the
status light blinking green (pause mode), press the Feed button once to set the printer in
Ready (to print) mode. See the Troubleshooting on p age 79 if the printer’s status light
does not turn solid green (Ready).
2. Press the Feed button two to three times to allow the printer to calibrate the printer for the
installed media. The printer may feed several labels during this process.
3. When the status light is solid green, press and hold the Feed button until the status light
flashes once.
4. Release the Feed button. A configuration label will print.
If you cannot get this label to print, refer to Getting Started on page 11.
Getting Started
21
12/14/07 GX420t / GX430t U ser Guide 980612-001 Rev. A
Page 34

Getting Started
22
Hooking Up the Printer and Computer
Hooking Up the Printer and Computer
The Zebra G-Series printers support a variety of interface options and configurations. These
include: Universal Serial Bus (USB) interface, RS232 Serial, Parallel (IEEE 1284.4) and
10/100 Ethernet.
GX420 and GX430 Printers
• USB, Serial and Parallel
• USB, Serial, and Ethernet
Caution • Keep the power switch in the OFF position when attaching the interface cable.
The power cord must be inserted into the power supply and the power receptacle on the
back of the printer before connecting or disconnecting the communications cables.
Important • This printer complies with FCC “Rules and Regulations,” Part 15, for Class B
Equipment, using fully shielded data cables. Use of un-shielded cables may increase radiated
emissions above the Class B limits.
Interface Cable Requirements
Data cables must be of fully shielded construction and fitted with metal or metallized
connector shells. Shielded cables and connectors are required to prevent radiation and
reception of electrical noise.
To minimize electrical noise pickup in the cable:
• Keep data cables as short as possible (6 foot [1.83 m] recommended).
• Do not tightly bundle the data cables with power cords.
• Do not tie the data cables to power wire conduits.
.
980612-001 Rev. A GX420t / GX430t User Guide 12/14/07
Page 35

USB Interface Requirements
Universal Serial Bus (version 2.0 compliant) provides a fast interface that is compatible with
your existing PC hardware. USB’s “plug and play” design makes installation easy. Multiple
printers can share a single USB port/hub.
When using a USB cable (not supplied with your printer), verify that the cable or cable
packaging bears the “Certified USB™” mark (see below) to guarantee USB 2.0 compliance.
Getting Started
Hooking Up the Printer and Computer
.
USB Cable
23
12/14/07 GX420t / GX430t U ser Guide 980612-001 Rev. A
Page 36

Getting Started
24
Hooking Up the Printer and Computer
Serial Communications
The required cable must have a nine-pin “D” type (DB-9P) male connector on one end, which
is plugged into the mating (DB-9S) serial port located on the back of the printer. The other end
of this signal interface cable connects to a serial port at the host computer. Depending on the
specific interface requirements, this will most likely be a Null Modem (cross-over) cable.
Early models of Zebra printers running the EPL programming ty pically utilized a straight
through signal connections cable (no cross-over). For pinout information, refer to Appendix A.
Note • The printer design does not allow for the use non-molded cables such as hand-made
cables with large clam shell connector covers.
The serial port communication settings between the printer and host (typically a PC) must
match for reliable communication. The Bits per second (or Baud rate) and Flow control are the
most common settings that get changed. The hosts (typically a Windows PC) needs to have the
data Flow control changed to match the printer’s default communication method: Hardware
and is noted by the Host Handshake setting DTR/Xon/Xoff. This combined hardware
(DTR) and software (Xon/Xoff) mode may need to change depending upon the non-Zebra
application software and the serial cable variation in use.
Serial communications between the printer and the host computer can be set by :
• Autobaud synchronization
• ZPL programming ^SC command
• EPL programming Y command
• Resetting the printer to its default printer configuration.
Autobaud
Autobaud synchronization allows the printer to automatically match the communication
parameters of the host computer. To autobaud:
1. Press and hold the feed button until the green status LED flashes once, twice, and then
three times.
2. While the status LED flashes, send the ^XA^XZ command sequence to the printer.
3. When the printer and host are synchronized, the LED changes to solid green. (No labels
will print during autobaud synchronization.)
ZPL ^SC Command
Use the Set Communications (^SC) command to change the communications settings on the
printer.
1. With the host computer set at the same communications settings as the printer, send the
^SC command to change the printer to the desired settings.
2. Change the host computer settings to match the new printer settings.
Refer to the ZPL Programming Guide for more information about this command.
980612-001 Rev. A GX420t / GX430t User Guide 12/14/07
Page 37

Getting Started
Hooking Up the Printer and Computer
EPL Y Co mmand
Use the serial port setup (Y) command to change the communications settings on the printer.
1. With the host computer set at the same communications settings as the printer, send the
Y command to change the printer to the desired settings. Note: the Y command does not
support setting the data flow control, use the Xon/Xoff setting.
2. Change the host computer settings to match the new printer settings.
Refer to the EPL Page Mode Programming Guide for more information about this command.
Resetting the Default Serial Port Parameters
Do the following to reset the communications parameters on the printer to the factory defaults
(serial communication settings are: 9600 baud, 8 bit word length, NO parity, 1 stop bit, and
DTR/XON/XOFF data flow control).
1. Press and hold the feed button until the green status LED flashes once, waits a moment
and flashes twice, and then waits again before flashing three times (release immediately).
2. While the status LED rapidly flashes amber and green, press the feed button. Serial
communications between the printer and the host computer can be set by the ZPL ^SC
command or the EPL Y command.
25
Note • Early models of Z ebra printers running the EPL programming language had 9600
baud, NO
parity, 8 data bits, 1 stop bit and a HARDWARE and SOFTWARE (merged) data
control (essentially DTR/Xon/Xoff) as the default serial port settings. The Windows operating
system flow control setting was Hardware for most applications.
Tighten
Serial Cable
12/14/07 GX420t / GX430t U ser Guide 980612-001 Rev. A
Page 38

Getting Started
26
Hooking Up the Printer and Computer
Parallel Port
The required cable must have a twenty-five pin “D” type (DB-25P) male connectors on both
ends with a straight through wiring connections (IEEE 1284 A-A parallel interface
specification). Tighten the cable connector’s screw locks to secure the cable to the printer and
computer.
Note • The printer design does not allow for the use non-molded cables such as hand-made
cables with clam shell connector covers.
Parallel Cable
980612-001 Rev. A GX420t / GX430t User Guide 12/14/07
Page 39

Ethernet
G
LED Amb
LED
The printer requires UTP RJ45 Ethernet cable rated CAT-5 or better.
For more information on configuring y our printer to run on a compatible Ethernet based
network, see the ZebraNet® 10/100 Internal Print Server manual. The printer must be
configured to run on y our LAN (local area network). The print server on board your printer
can be accessed through the printer’s web pages.
Getting Started
Hooking Up the Printer and Computer
27
Ethernet Cable
(RJ45 Connector)
Ethernet Status/Activity Indicators
LED Status Description
Both OFF No Ethernet link detected
Green 100 Mbps link detected
Green with the Amber
100 Mbps link and Ethernet activity detected
flickering on and off
Amber 10 Mbps link detected
Amber with the Green
10 Mbps link and Ethernet activity detected
flickering on and off
reen
er
12/14/07 GX420t / GX430t U ser Guide 980612-001 Rev. A
Page 40

Getting Started
28
Hooking Up the Printer and Computer
Communicating with the Printer
Begin installing the Zebra Windows Driver and then turn on the printer. If the operating
system automatically starts a ‘Add new hardware’ wizard, then close the wizard and continue
installing the driver.
Universal Serial Bus (USB) Communications
The printer is a terminal device when using a universal serial bus interface. You can refer to
the Universal Serial Bus Specification for details regarding this interface. Scanners, scales or
other data input devices must use the serial port to send data to the printer.
USB and Parallel Port Printer Detection and Windows® operating systems
Windows Vista, Windows XP, Windows 2000 and Windows 98 Second Edition (USB only)
operating sy stems support the USB and bidirectional parallel port communications with
printers. The Zebra Windows Driver supports your printer in these operating systems.
These operating systems automatically detect the printer when connected via the USB
interface. The operating sy stem automatically starts a “Add new hardware’ wizard when
connecting the printer for the first time to the PC. Close the wizard. Install the Zebra Windows
Driver found on the user’s CD or for the latest driver go to www.zebra.com
parallel port and then media size (closest match). Click on the ‘Print test page’ button to verify
a successful installation.
. Select the USB or
The Windows operating system will detect and re-link a previously installed printer if it is
reconnected to the USB interface or power is turned on after the PC has finished its restart of
the operating system. Ignore the new device detected warnings and close the Task bar prompts.
Wait several seconds for the operating system to match the printer to the driver software. The
warnings will quit and the printer now should be ready to begin printing.
Serial Port and Windows® operating systems
The Windows operating system default settings for the serial port communication closely
match the printer’s defaults settings with one exception; the data Flow Control settings. The
Windows default data Flow Control setting is NONE. The G-Series printer requires data Flow
Control set to Hardware.
Note • The G-Series printer does not support Windows Serial Port Plug and Play (PnP)
device detection at this time.
980612-001 Rev. A GX420t / GX430t User Guide 12/14/07
Page 41

3
Print Operations
This section provides media and print handling, font and language support, and the setup of
less common printer configurations.
Contents
Determining Printer Configuration . . . . . . . . . . . . . . . . . . . . . . . . . . . . . . . . . . . . . . . . . . 30
Print Media Types . . . . . . . . . . . . . . . . . . . . . . . . . . . . . . . . . . . . . . . . . . . . . . . . . . . . . . 31
Replacing Supplies . . . . . . . . . . . . . . . . . . . . . . . . . . . . . . . . . . . . . . . . . . . . . . . . . . . . . 33
Media Sensing . . . . . . . . . . . . . . . . . . . . . . . . . . . . . . . . . . . . . . . . . . . . . . . . . . . . . . . . . 35
Ribbon Overview . . . . . . . . . . . . . . . . . . . . . . . . . . . . . . . . . . . . . . . . . . . . . . . . . . . . . . . 36
Printing on Fan-Fold Media . . . . . . . . . . . . . . . . . . . . . . . . . . . . . . . . . . . . . . . . . . . . . . . 38
Printing with Externally Mounted Roll Media . . . . . . . . . . . . . . . . . . . . . . . . . . . . . . . . . . 40
Fonts and Your Printer . . . . . . . . . . . . . . . . . . . . . . . . . . . . . . . . . . . . . . . . . . . . . . . . . . . 41
Sending Files to the Printer . . . . . . . . . . . . . . . . . . . . . . . . . . . . . . . . . . . . . . . . . . . . . . . 44
Print Meter . . . . . . . . . . . . . . . . . . . . . . . . . . . . . . . . . . . . . . . . . . . . . . . . . . . . . . . . . . . . 46
12/14/07 GX420t / GX430t U ser Guide 980612-001 Rev. A
Page 42

Print Operations
30
Determining Printer Configuration
Determining Printer Configuration
The G-Series printer uses a ZPL printer configuration status label to report the printer’s
configuration status for both EPL and ZPL operations.The ZPL style label provides a more
intuitive and functionally descriptive naming conventions than the EPL style printer status
label. Operational status (darkness, speed, media type, etc.), installed printer options (network,
interface settings, cutter, etc.) and printer description information (serial number, model name,
firmware version, etc.) are all includes on the status label.
To get an EPL style printer configuration status label, send the printer the EPL U command.
See the EPL programmer’s guide for more information on the various EPL U commands and
interpreting the settings display ed on these labels.
The printer configuration status label can be localized for up to 16 languages. Use the ZPL
programming command
label.
See Printing a Test (Printer Configuration) Label on p age 21 or Feed Button Modes
on page 89 for information on accessing the printer configuration status label.
^KD to modify the displayed language for most status items on this
Thermal Printing
Caution • The printhead becomes hot while printing. To protect from damaging the
printhead and risk of personal injury, avoid touching the printhead. Only use the cleaning
pen to perform printhead maintenance.
Caution • The discharge of electrostatic energy that accumulates on the surface of the
human body or other surfaces can damage or destroy the printhead or electronic
components used in this device. You must observe static-safe procedures when working
with the printhead or the electronic components under the top cover.
980612-001 Rev. A GX420t / GX430t User Guide 12/14/07
Page 43

Modes of Printing
You can operate this printer in many different modes and media configurations:
• Direct thermal printing (which uses heat sensitive media to print).
• Thermal transfer printing (which uses ribbon to heat transfer print to the media).
• Standard Tear-Off mode allows you to tear off each label (or batch print a strip of labels)
after it is printed.
• Label Dispense Mode: If an optional dispenser is installed, the backing material can be
peeled away from the label as it is printed. After this label is removed, the next one is
printed.
• Media Cutting: If an optional media cutter is installed, the printer can cut the label liner
between labels, receipt paper or tag stock depending upon the cutter option purchased.
• Stand-alone: The printer can run in a stand-alone mode (not connected to a computer)
using the printer’s auto running label form feature (programming based) or by using an
data input device. This mode accommodates data input devices, such as scanners, weigh
scales, Zebra KDU Plus or KDU (Keyboard Display Unit) with a KDU Adapter, etc., via
the printer’s serial port.
Print Operations
Modes of Printing
31
• Shared network printing: Printers configured with the Ethernet interface option include an
internal print server with ZebraLink printer configuration web page and ZebraNet Bridge
software for managing and monitoring status of Zebra printers on a network.
Print Media Types
Important • Zebra strongly recommends the use of Zebra-brand supplies for continuous
high-quality printing. A wide range of paper, polypropylene, polyester, and vinyl stock has
been specifically engineered to enhance the printing capabilities of the printer and to prevent
premature printhead wear. To purchase supplies, go to http://www.zebra.com/howtobuy.
Your printer can use various types of media:
• Standard media—Most standard (non-continuous) media uses an adhesive backing that
sticks individual labels or a continuous length of labels to a liner.
• Continuous roll media—Most continuous roll media is direct thermal media (similar to
FAX paper) and is used for receipt or ticket style printing.
• Tag stock—Tags are usually made from a heavy paper (up to 0.0075in./0.19mm thick).
Tag stock does not have adhesive or a liner, and it is typically perforated between tags.
For more information on basic media types, see Table 1.
The printer typically uses roll media, but you can use fan-fold or other continuous media too.
Use the correct media for the type of printing you require. When printing without a ribbon, you
must use direct thermal media. When using ribbon, you must use thermal transfer media.
12/14/07 GX420t / GX430t U ser Guide 980612-001 Rev. A
Page 44
Print Operations
32
Print Media Types
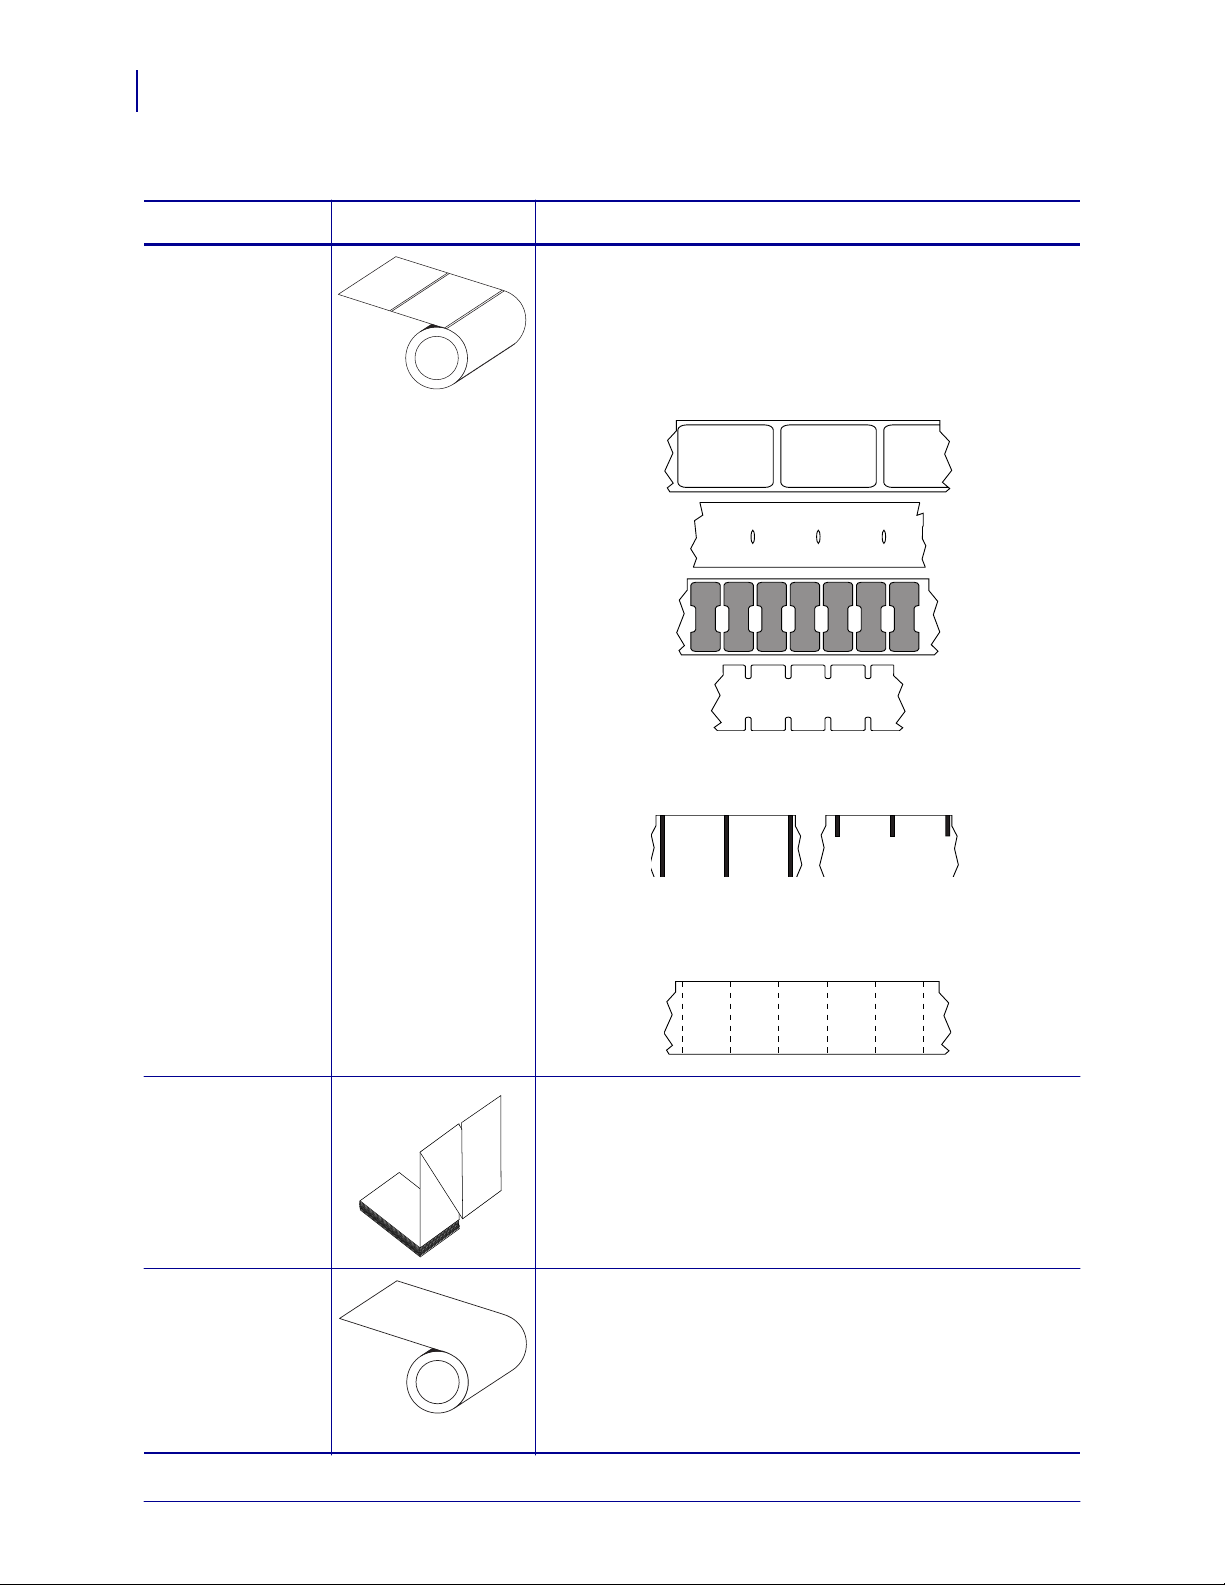
Table 1 • Types of Media Roll and Fanfold Media
Media Type How It Looks Description
Non-Continuous
Roll Media
Roll media is wound on a core that can be 1 in. to 3 in. (25 to
76 mm) in diameter. Labels have adhesive backing that sticks
them to a liner, and they are separated by gaps, holes, notches,
or black marks. Tags are separated by perforations. Individual
labels are separated by one or more of the following methods:
• Web m edia separates labels by gaps, holes, or notches.
• Black mark media uses pre-printed black marks on the back
side of the media to indicate label separations.
Non-Continuous
Fanfold Media
Continuous
Roll Media
• Perforated media has perforations that allow the labels or
tags to be separated from each other easily. The media may
also have black marks or other separations between labels
or tags.
Fanfold media is folded in a zigzag pattern. Fanfold media can
have the same label separations as non-continuous roll media.
The separations would fall on or near the folds.
Roll media is wound on a core that can be 1 in. to 3 in. (25 to
76 mm) in diameter. Continuous roll media does not have
gaps, holes, notches, or black marks to indicate label
separations. This allows the image to be printed anywhere on
the label. Sometimes a cutter is used to cut apart individual
labels. With continuous media, use the transmissive (gap)
sensor so the printer can detect when the media runs out.
980612-001 Rev. A GX420t / GX430t User Guide 12/14/07
Page 45

Determining Thermal Media Types
Thermal transfer media requires ribbon for printing while direct thermal media does not.
To determine if ribbon must be used with a particular media, perform a media scratch test.
To perform a media scratch test, complete these steps:
1. Scratch the print surface of the media with a finger nail or pen cap. Press firmly and
quickly while dragging it across the media surface. Direct thermal media is chemically
treated to print (expose) when heat is applied. This test method uses friction heat to expose
the media.
2. Did a black mark appear on the media?
If a black mark... Then the media is...
Does not appear on the media Thermal transfer. A ribbon is required.
Appears on the media Di r ect ther mal . No ribbon is required.
Print Operations
Replacing Supplies
33
Replacing Supplies
If labels or ribbon run out while printing, leave the printer power on while reloading (data loss
results if you turn off the printer). After you load a new label or ribbon roll, press the Feed
button to restart.
Alway s use high quality, approved labels, tags and ribbons. If adhesive backed labels are used
that don’t lay flat on the backing liner, the exposed edges may stick to the label guides and
rollers inside the printer, causing the label to peel off from the liner and jam the printer.
Permanent damage to the printhead may result if a non-approved ribbon is used as it may be
wound incorrectly for the printer or contain chemicals corrosive to the printhead.
Adding a New Transfer Ribbon
If ribbon runs out in the middle of a print job, the indicator lights red and the printer waits for
you to add a fresh roll.
1. Keep the power on as you change ribbon.
2. Open the top cover, then cut the used ribbon so you can remove the cores.
3. Load a new ribbon roll. If necessary, review the Ribbon Loading steps.
4. Close the top cover.
5. Press the Feed button to restart printing.
12/14/07 GX420t / GX430t U ser Guide 980612-001 Rev. A
Page 46

Print Operations
34
Adjusting the Print Width
Replacing a Partially Used Transfer Ribbon
To remove used transfer ribbon, perform the following steps.
1. Cut the ribbon from the take-up roll.
2. Remove the take-up roll and discard used ribbon.
3. Remove the supply roll and tape the end of any fresh ribbon to prevent it from
unwrapping. When reinstalling a partially used supply roll, tape the cut end onto the
empty take-up roll.
Adjusting the Print Width
Print width must be set when:
• You are using the printer for the first time.
• There is a change in media width.
Print width may be set by :
• The Windows printer driver or application software such as Zebra Designer.
• The five-flash sequence in Feed Button Modes on page 89.
• Controlling printer operations with ZPL programming; refer to the Print Width (^PW)
command (consult your ZPL Programming Guide).
• Controlling printer operations with EPL Page Mode programming, refer to the Set Label
Width (
q) command (consult your EPL Programmer’s Guide).
Adjusting the Print Quality
Print quality is influenced by the heat or density (setting) of the printhead, the print speed, and
the type of media you are using. Only by experimenting will you find the optimal mix for your
application.
Note • Media manufactures may have specific recommendations for speed settings for your
printer and the media. Some media types have lower maximum speeds than y our printer’s
maximum speed.
The relative darkness (or density) setting can be controlled by:
• The six-flash sequence in Feed Button Modes on page 89. This will overwrite any ZPL
and EPL programmed darkness/density settings.
• The Set Darkness (
• The Density (D) EPL command (consult your EPL Programmer’s Guide).
If you find that the print speed needs to be adjusted, use:
• The Windows printer driver or application software such as Zebra Designer.
• The Print Rate (^PR) command (consult your ZPL Programming Guide).
• The Speed Select (
980612-001 Rev. A GX420t / GX430t User Guide 12/14/07
~SD) ZPL command (consult your ZPL Programming Guide).
S) command (consult your EPL Programmer’s Guide).
Page 47

Media Sensing
The G-Series printer has automatic media sensing capability. The printer is designed to
continuously check and adjust media length sensing for minor variations. Once the printer is
printing or feeding media, the printer continually checks and adjusts the media sensing to
accommodate for minor changes in media parameters from label to label on a roll and from
roll to roll of media. The printer will automatically initiate a media length calibration if the
expected media length or the label to label gap distance has exceeded the acceptable variation
range when starting a print job or Feeding media. The automatic media sensing in the G-Series
printers works the same for printer operations that use EPL and ZPL label formats and
programming.
If the printer does not detect labels or blacklines (or notches with blackline sensing) after
feeding the media the default maximum label length distance of 39 inches (1 meter), then the
printer will switch to continuous (receipt) media mode. The printer will keep these settings
until changed by software, programming or a manual calibration with different media.
Optionally, the printer can be set to do a short media calibration after printer power up or when
closing the printer with power on. The printer will then feed up to three labels while
calibrating.
Print Operations
Media Sensing
35
The printer’s media settings can be verified by printing a Printer Configuration label. See the
Printing a Test (Printer Configuration) Label on page 21 for more details.
The maximum distance that the automatic media type detection and sensing will check can be
reduced by using the ZPL Maximum Label Length command (^ML). It is recommended that
this distance be set to no less than two times the longest label being printed. If the largest label
being printed was a 4 by 6 inch label, then the maximum label (media) length detection
distance can be reduced from the default distance of 39 inches down to 12 inches.
If the printer has difficulty automatically detecting the media type and auto-calibrating, see
Manual Calibration on page 85 to perform an extensive calibration. It includes a printed graph
of sensor operation for your media. This method disables the printer’s automatic media
sensing capability until the printer’s default parameters are reset to the factory defaults with
the four flash Feed button mode. See the Feed Button Modes on page 89 for more details.
The automatic media calibration can be modified, turned on or turned off to meet your needs.
Sometimes print job conditions require that the printer use all the media on a roll. The two
automatic media conditions, power up with media loaded and closing the printer with power
on, can be controlled individually with the ZPL Media Feed command, ^MF. The feed action
discussed in the ZPL programmers guide for the ^MF command is primarily for automatic
media sensing and calibration. The automatic media calibration that controls the dy namic
media (label to label) calibration is the ^XS command. If multiple media types of different
lengths, material or detection methods (web/gap, blackline or continuous) are used, you should
not change these settings.
The media calibration and detection process can also be refined to match the media type
loaded into the printer. Use the ZPL Media Tracking command (^MN) to set the media type.
Sometimes the printer can detect preprinted media as the gap between labels or the liner
backing with print as a blackline marks. If the ^MN parameter for continuous media is set, then
the print does not preform the automatic calibration. The ^MN command also includes an
automatic calibration parameter (^MNA) to return the printer to its default setting to
automatically detect all media types.
12/14/07 GX420t / GX430t U ser Guide 980612-001 Rev. A
Page 48

Print Operations
36
Ribbon Overview
Ribbon Overview
Ribbon is a thin film that is coated on one side with wax, resin, or wax resin, which is
transferred to the media during the thermal transfer process. The media determines whether
you need to use ribbon and how wide the ribbon must be. When ribbon is used, it must be as
wide as or wider than the media being used. If the ribbon is narrower than the media, areas of
the printhead are unprotected and subject to premature wear.
When to Use Ribbon
Thermal transfer media requires ribbon for printing while direct thermal media does not.
Direct thermal media should never be used with ribbon. Bar codes and graphics can get
distorted. To determine if ribbon must be used with a particular media, perform a media
scratch test.
Coated Side of Ribbon
Ribbon can be wound with the coated side on the inside or outside. This printer can only use
ribbon that is coated on the outside. If y ou are unsure which side of a particular roll of ribbon
is coated, perform an adhesive test or a ribbon scratch test to determine which side is coated.
Ou tside In side
To determine which side of a ribbon is coated, complete these steps:
Ribbon Test with Adhesive
If you have labels available, perform the adhesive test to determine which side of a ribbon is
coated. This method works well for ribbon that is already installed.
To perform an adhesi ve test, complete these steps:
1. Peel a label from its liner.
2. Press a corner of the sticky side of the label to the outer surface of the roll of ribbon.
3. Peel the label off of the ribbon.
4. Observe the results. Did flakes or particles of ink from the ribbon adhere to the label?
If ink from the ribbon... Then...
Adhered to the label The ribbon is coated on the outside and can be used with
the G-Series printer.
Did not adhere to the label The ribbon is coated on the inside and can not be used in
the G-Series printer.
980612-001 Rev. A GX420t / GX430t User Guide 12/14/07
Page 49

Ribbon Scratch Test
Perform the ribbon scratch test when labels are unavailable.
To perform a ribbon scratch test, complete these steps:
1. Unroll a short length of ribbon.
2. Place the unrolled section of ribbon on a piece of paper with the outer surface of the
ribbon in contact with the paper.
3. Scratch the inner surface of the unrolled ribbon with your fingernail.
4. Lift the ribbon from the paper.
5. Observe the results. Did the ribbon leave a mark on the paper?
If the ribbon... Then...
Left a mark on the paper The ribbon is coated on the outside and can be used with
the G-Series printer.
Print Operations
Ribbon Overview
37
Did not leave a mark on the
paper
The ribbon is coated on the inside and can not be used in
the G-Series printer.
12/14/07 GX420t / GX430t U ser Guide 980612-001 Rev. A
Page 50

Print Operations
38
Printing on Fan-Fold Media
Printing on Fan-Fold Media
Printing on fan-fold media requires you to adjust the media guide’s stop position.
1. Open the top cover.
Fan-Fold
Media Path
2. Adjust the media guide stop position with the green thumb wheel. Use a piece of the fan-
fold media to set the stop position. Rotate the wheel toward you open the guides wider.
Rotate the wheel away from you to make the media guide narrower.
980612-001 Rev. A GX420t / GX430t User Guide 12/14/07
Page 51

3. Insert the media through the slot at the rear of the printer.
4. Run the media between the hangers.
Print Operations
Printing on Fan-Fold Media
39
5. Close the top cover.
12/14/07 GX420t / GX430t U ser Guide 980612-001 Rev. A
Page 52

Print Operations
40
Printing with Externally Mounted Roll Media
Printing with Externally Mounted Roll Media
The G-Series printer accommodates externally mounted roll media similar to the printer’s
support of fan-fold media. The printer requires the media roll and stand combination to have a
low initial inertia to pull the media off the roll. The G-Series motor has 30% more torque than
the Zebra 2800 Series desktop printers to provide improved media handling and speed.
Zebra at this time does not offer an external media option for the G-Series printer.
Externally Mounted Roll Media Consi derations:
• The media ideally should enter the printer directly behind the printer through the fan-fold
media slot in the rear of the printer. See Printing on Fan-Fold Media on page 38 for media
loading.
• Lower the print speed to decrease the chance of motor stalls. The roll typically has the
highest inertia when trying to start the roll moving. Larger media roll diameters require the
printer to have more torque applied to get the roll moving.
• The media should move smoothly and freely. The media should not slip, skip, jerk, bind
and then move, etc. when mounted on your media stand.
• The printer should not touch the media roll.
• The printer should not slip or lift up off the operating surface.
980612-001 Rev. A GX420t / GX430t User Guide 12/14/07
Page 53

Fonts and Your Printer
The G-Series printer supports your language and font requirements with a variety of internal
fonts, on-board font scaling, international font sets and character code page support, Unicode
support, and font download.
The G-Series printer’s font capabilities are programming language dependent. The EPL
programming language provides for basic bitmapped fonts and international code pages. The
ZPL programming language provides advanced font mapping and scaling technology to
support outline fonts (TrueType™ or OpenType™) and Unicode character mapping as well as
basic bitmapped fonts and character code pages. ZPL and EPL programming guides describe
and document the fonts, code pages, character access, listing fonts, and limitations for their
respective printer programming languages. See the printer programming guides for
information on Text, Fonts and Character support.
The G-Series printer includes utilities and application software that support font download into
the printer for both printer programming languages.
Identifying Fonts in Your Printer
Print Operations
Fonts and Your Printer
41
Fonts and memory are shared by the programming languages in the printer. Fonts can be
loaded in many memory areas in the G-Series printer. ZPL programming can recognize EPL
and ZPL fonts. EPL programming can only recognize EPL fonts. See the respective
programmer guides for more information on fonts and printer memory.
ZPL Fonts:
• To manage and download fonts for ZPL print operation, use ZebraNet Bridge.
• To display all of the fonts loaded in your G-Series printer, send the printer the ZPL
command ^WD. See the ZPL Programmers Guide for details.
• Bitmap fonts in the various printer memory areas are identified by the .FNT file
extension in ZPL.
• Scalable fonts are identified with the .TTF, .TTE or .OTF file extensions in ZPL.
EPL does not support these fonts.
• The six fonts LMu.FNT through LMz.FNT are EPL Line Mode fonts and are not
available for use in EPL programming on thermal transfer G-Series printers.
• When display ed in ZPL, the EPL Soft fonts have are separated into two groupshorizontal and vertical. The EPL Soft fonts are noted with single lowercase alpha
characters (a-z) followed by an uppercase H or V and the .FNT file extension.
EPL Fonts:
• To download fonts for EPL print operation, use the EPL Font Downloader.
• To display Soft Fonts (ext.) available to EPL, send the printer the EPL command EI.
• Asian Fonts in G-Series printers are display ed as Soft Fonts, but are still accessible as
documented in the A command in the EPL programmer’s guide.
• All EPL fonts displayed are bitmap fonts. They do not include the .FNT file extension
or the horizontal (H) or vertical (V) designators that are display ed with the ZPL
command ^WD as described above in ZPL Fonts.
12/14/07 GX420t / GX430t U ser Guide 980612-001 Rev. A
Page 54

Print Operations
42
Fonts and Your Printer
Localizing the Printer with Code Pages
Asian fonts and Other Large Font Sets
• To remove non Asian EPL fonts with EPL programming, use the EK command.
• To remove EPL Asian fonts from the printer, use the ZPL ^ID command.
The G-Series printer supports two sets of language, region and character sets for permanent
fonts loaded into the printer for each printer programming language, ZPL and EPL. The printer
supports localization with common international character map code pages.
• For ZPL code page support, including Unicode, see the ^CI command in the ZPL
programmer’s guide.
• For EPL code page support, see the I command in the EPL programmer’s guide.
Asian language pictographic fonts have large character sets with thousands of characters that
support single language code page. In order to support the large Asian character sets, the
industry adopted a double-byte (67840 maximum) character sy stem instead of the single-byte
characters (256 maximum) used by Latin based language characters to address large font sets.
In order to address multiple languages with a single font set, Unicode was invented. A
Unicode font supports one or more code points (relate these to code page character maps) and
is accessed in a standard method that resolves character mapping conflicts. The ZPL
programming language supports Unicode; EPL does not. Both of the printer’s programming
languages support the large pictographic double-byte character Asian font sets.
Asian language support requires additional memory support by the G-Series printer configured
with the RTC and Full Flash Memory factory option. The number of fonts that can be
downloaded is dependent upon the amount of available flash memory not already in use and
the size of the font to be downloaded.
Some large Unicode fonts are too large to be installed in the printer with the RTC and Full
Flash Memory factory option such as MS (Microsoft) Arial Unicode font (23MB) or the
Andale font (22MB) offered by Zebra. These large font sets typically support a large number
of languages as well.
Getting Asian Fonts
Asian font sets are downloaded into the printer by the user or integrator. The fonts are
purchased separately from the printer.
• Simplified and Traditional Chinese (ZPL and EPL)
• Japanese — JIS and Shift-JIS mappings (ZPL and EPL)
• Korean (ZPL including Johab and EPL)
• Thai (ZPL only)
980612-001 Rev. A GX420t / GX430t User Guide 12/14/07
Page 55

Stand Alone Printing
Your printer can be configured to work without being attached to a computer. The printer has
the ability to automatically run a single label form. One or more downloaded label forms can
be accessed and run with a terminal or wedge device or a Zebra KDU (keyboard display unit)
to call a label form. These methods allow the developer to incorporate data input devices, such
as scanners or weight scales, to the printer via the serial port.
Label formats can be developed and stored in the printer to support labels that have:
• No data entry required and print when the Feed button is pressed.
• No data entry required and print when a label is removed from the printer’s optional label
dispenser.
• One or more data variables to be entered via the terminal or wedge device. The label will
print after the last variable data field has been input.
• One or more label formats that are called by scanning bar codes containing programming
to run a label form.
• Label forms designed to work as a process chain with each label including a bar code
containing the programming to run the next label in the process sequence.
Print Operations
Stand Alone Printing
43
Both printer programming languages support special label forms that will automatically run
after a power cycle or reset. The ZPL looks for a file named AUTOEXEC.ZPL and EPL
looks for a label form named AUTOFR. If both files are loaded in the G-Series printer, then
only the AUTOEXEC.ZPL will run. The EPL AUTOFR form runs until it is disabled. Both
files must be deleted from the printer followed by a reset or a power cycle to completely
remove the files.
Note • The G-Series EPL AUTOFR command can only be disabled with NULL character
(00 hex or ASCII 0). The G-Series printer will ignore the other character that normally
disables the AUTOFFR form operation in EPL printers, the XOFF character (13 hex or
ASCII 19).
The G-Series printer can source up to 750mA through the serial port’s 5 volt line; see
Appendix A for more information on the printer’s serial port interface.
12/14/07 GX420t / GX430t U ser Guide 980612-001 Rev. A
Page 56

Print Operations
44
Sending Files to the Printer
Sending Files to the Printer
Files can be sent to the printer from the Microsoft Windows operating systems by using the
Zebra Firmware (and File) Downloader found on the user's CD or at
method is common for both programming languages, all G-Series wired interfaces (including
USB) and wired network printers.
Transferring files with the Firmware Downloader
1. Install the printer. Verify communication is working properly by using the drivers Pr i n t
Test Page located on the printer driver properties window.
2. Install the Zebra Firmware Downloader on your system.
3. Find the Firmware Downloader by selecting start > Programs > Zebra.
www.zebra.com. This
4. Select the Printer menu and run the Auto-Detect.
980612-001 Rev. A GX420t / GX430t User Guide 12/14/07
Page 57

Print Operations
Sending Files to the Printer
5. Click on your Zebra printer to select the printer for download.
6. Select the File menu and click on the Sel ect Fir mwar e File.. . . Use the Browser window
to select your file for download to your printer.
45
7. Select the Printer menu and click on the Download to Selected (printer). The
downloader may display a download status indicator to show download progress of larger
files.
12/14/07 GX420t / GX430t U ser Guide 980612-001 Rev. A
Page 58

Print Operations
46
Print Meter
Print Meter
The G-Series printer has the capability to report printhead maintenance alerts. The printer can
provide cleaning and early warning of end of calculated printhead life alerts. If the RTC (Real
Time Clock) is installed in the printer, the printhead life and history reporting will also include
the date. By default, print metering alerts are disabled.
Many of the print meter messages and reports are customize able. See the ZPL or EPL
Programming Guides for more information on the Print Meter.
To active the Print Meter Alerts, send one of the following commands to the printer:
•EPL command oLY
•ZPL command ^JH,,,,,E
980612-001 Rev. A GX420t / GX430t User Guide 12/14/07
Page 59

4
Printer Options
This section covers the common printer options and accessories with brief descriptions and
how to get you started using or configuring your printer option or accessory.
Contents
Label Dispenser Option . . . . . . . . . . . . . . . . . . . . . . . . . . . . . . . . . . . . . . . . . . . . . . . . . . 48
Moveable Blackline Sensor Option . . . . . . . . . . . . . . . . . . . . . . . . . . . . . . . . . . . . . . . . . 51
Cutter Option . . . . . . . . . . . . . . . . . . . . . . . . . . . . . . . . . . . . . . . . . . . . . . . . . . . . . . . . . . 54
ZebraNet® 10/100 Internal Print Server Option . . . . . . . . . . . . . . . . . . . . . . . . . . . . . . . . 58
RTC and Full Flash Memory Option. . . . . . . . . . . . . . . . . . . . . . . . . . . . . . . . . . . . . . . . . 60
Asian Fonts - Printer Accessory. . . . . . . . . . . . . . . . . . . . . . . . . . . . . . . . . . . . . . . . . . . . 61
KDU — Printer Accessory . . . . . . . . . . . . . . . . . . . . . . . . . . . . . . . . . . . . . . . . . . . . . . . . 62
KDU Plus — Printer Accessory . . . . . . . . . . . . . . . . . . . . . . . . . . . . . . . . . . . . . . . . . . . . 64
12/14/07 GX420t / GX430t U ser Guide 980612-001 Rev. A
Page 60

Printer Options
48
Label Dispenser Option
Label Dispenser Option
The factory installed label dispenser option allows you to print a label with backing
(liner/web) being removed from the label as it prints, ready for application. When printing
multiple labels, removing the dispensed (peeled) label notifies the printer to print and dispense
the next label.
To use dispenser-mode correctly, use your printer driver to activate the label (taken) sensor
along with these typical label settings which include but are not limited to length, noncontinuous (gap), and web (liner). Otherwise, you must send the ZPL or EPL programming
commands to the printer.
When programming in ZPL, you can use the following command sequences shown below and
refer to y our ZPL Programming Guide for more information on ZPL programming.
When programming in EPL, send the Options (O) command with the ‘P’ command parameter
OP) to enable the Label Taken sensor. Other printer option parameters may also be included
(
with the Options command string. Refer to your EPL Programmer’s Guide for more
information on programming with EPL and the Options (
^XA ^MMP ^X Z
^XA ^JUS ^XZ
O) command behaviors.
1. Load y our labels into the printer. Close the printer and press the Feed button until a
minimum of 4 inches or 100 millimeters of exposed labels exit the printer. Remove the
exposed labels from the liner.
980612-001 Rev. A GX420t / GX430t User Guide 12/14/07
Page 61

2. Lift the liner over the top of the printer and open the dispenser door.
Printer Options
Label Dispenser Option
49
3. Insert the label liner between the dispenser door and the printer body.
12/14/07 GX420t / GX430t U ser Guide 980612-001 Rev. A
Page 62

Printer Options
50
Label Dispenser Option
4. Close the dispenser door.
5. Press the Feed button to advance the media.
6. During the print job, the printer will peel off the backing and present a single label. Taking
the label from the printer to allow the printer to print the next label. Note: If you did not
activate the label taken sensor to detect the removal of the dispensed (peeled) label with
software commands, the printer will stack and eject peeled labels.
980612-001 Rev. A GX420t / GX430t User Guide 12/14/07
Page 63

Moveable Blackline Sensor Option
The factory installed optional moveable blackline sensor allows the printer to use media with
black line(s) or marks or notches (holes) on the back side of the media (or media liner) that are
not located in the center of the media.
The moveable blackline sensor can not properly sense continuous media or labels (for interlabel gap sensing) if the sensor is not in the default sensing position, see below.
Printer Optional:
Moveable
Blackline Sensor
Printer Options
Moveable Blackline Sensor Option
51
Off Center
Blackline Sensing Only
12/14/07 GX420t / GX430t U ser Guide 980612-001 Rev. A
Default - Gap (Web) Sensing
Standard Operating Position
Page 64

Printer Options
52
Moveable Blackline Sensor Option
Adjusting the Moveable Blackline Sensor for Black Mark or Notches
Load the media. Before closing the printer, adjust the moveable blackline sensor as follows:
1. Flip the media back over the roll to expose the black marks on the backside (non printing
side) of the media. This is not required for notched media.
Black Marks
2. Slide the moveable sensor from the center default position to align with the black marks.
The arrow on the moveable sensor should line up with the right edge of the black mark for
marks on either side of the media (left side show).
980612-001 Rev. A GX420t / GX430t User Guide 12/14/07
Page 65

Printer Options
Moveable Blackline Sensor Option
53
12/14/07 GX420t / GX430t U ser Guide 980612-001 Rev. A
Page 66

Printer Options
54
Cutter Option
Cutter Option
The printer supports two factory installed media cutter options for full width cutting of label
liner, tag or receipt media. These cutter options are all supported in a single cutter housing
design. The type of cutter option installed in your printer can be verified by printing a printer
configuration status label. The cutter options are:
• A medium duty cutter for cutting label liner and light tag media (LINER/TAG)
Maximum Paper Weight (thickness): up to 180 g/m2 (0.0077 in.)
Life*: 2 million cuts: 0.5 mil to 5 mil stock (10-120 g/m2)
1 million cuts: 5 mil to 7.5 mil stock (120-180 g/m2)
750,000 cuts: 7.5 mil to 10 mil (180-200 g/m2)
* - Exceeding the maximum media weight (density/hardness) and thickness will
shorten the cutters usable life or can cause the cutter to fail (jam or other error).
• Cut Width: 4.25 inches (108 mm) maximum to 0.75 inches (19 mm) minimum
• Minimum distance between cuts (label length): 1 inch (25.4 mm). Cutting shorter
media lengths between the cuts may cause the cutter to jam or error.
• By default, the cutter operations include a self cleaning preventive maintenance
cleaning cut after every twenty -fifth cut. This feature can be disabled via ZPL or EPL
SGD (Set/Get/DO) programming command (
cutter.clean_cutter) but is not
recommended.
Warning • There are no operator serviceable parts in the cutter unit. Never remove the
cutter cover (bezel). Never attempt to insert objects or fingers in to the cutter mechanism.
Important • Tools, cotton swabs, solvents (including alcohol), etc. all may damage or shorten
the cutter’s usable life or cause the cutter to jam.
980612-001 Rev. A GX420t / GX430t User Guide 12/14/07
Page 67

Loading Media with the Cutter Option
1. Open the printer. Remember that you need to pull the release latch levers toward the front
of the printer.
Printer Options
Cutter Option
55
2. Open the media roll holders. Pull the media guides open with your free hand and place the
media roll on the roll holders and release the guides. Orient the media roll so that its
printing surface will be up as it passes over the platen (drive) roller.
12/14/07 GX420t / GX430t U ser Guide 980612-001 Rev. A
Page 68

Printer Options
56
Cutter Option
3. If your printer includes the moveable blackline sensor option, verify that the sensor is
aligned in the center default position. This is the standard operating position for media
sensing. When the sensor is moved from the default position, the printer will only detect
blackline, black mark and notched marker media.
Moveable Sensor
Off Center
Blackline Sensing Only
980612-001 Rev. A GX420t / GX430t User Guide 12/14/07
Default - Gap (Web) Sensing
Standard Operating Position
Page 69

Printer Options
Cutter Option
4. Thread the media through the cutter’s inside slot so that it extends out of the front of the
printer. Verify the roll turns freely. The roll must not sit in the bottom of the media
compartment. Verify that media’s printing surface is facing up.
57
5. Push the media under both of the media guides.
Under Media
Guides
6. Close the printer. Press down until the cover snaps closed.
12/14/07 GX420t / GX430t U ser Guide 980612-001 Rev. A
Page 70

Printer Options
58
ZebraNet® 10/100 Internal Print Server Option
ZebraNet® 10/100 Internal Print Server Option
The ZebraNet® 10/100 Internal Print Server (PS) is an optional factory installed device that
TM
connects the network and your ZebraLink
with a browser interface for printer and print server settings. If you use the ZebraNet
-enabled printer. The print server provides you
TM
Bridge
Zebra network printer management software, you can easily access the specialized features of
TM
a ZebraLink
enabled printer.
Printer with 10/100 Internal PS—10/100 Internal PS gives y our printer these features:
• Print server and printer setup using a browser
• Remote monitoring and configuration capability of the 10/100 Internal PS using a
browser
•Alerts
• The ability for you to send unsolicited printer status messages via E-mail-enabled
devices
TM
ZebraNet
Bridge — ZebraNetTM Bridge is a software program that works with the
10/100 Internal PS and enhances the features of ZebraLink resident within ZPL-based printers.
The features include the following:
TM
• ZebraNet
Bridge allows you to locate printers automatically. ZebraNetTM Bridge
searches on parameters such as IP address, subnet, printer model, printer status, and
many other user-defined characteristics.
• Remote Configuration — Manage all your Zebra label printers throughout the
enterprise without having to travel to remote sites or physically handle any printers.
Any Zebra printer connected to the enterprise network can be accessed from the
TM
ZebraNet
Bridge interface and configured remotely through an easy-to-use
graphical user interface.
TM
• Printer Alerts, Status, Heartbeat Monitoring and event Notification — ZebraNet
Bridge lets you configure multiple event alerts per device with different alerts directed
to different people. Receive alerts and notifications by e-mail, cell phone/pager, or
TM
through the ZebraNet
Bridge Events tab. View alerts by printer or group, and filter
by date/time, severity, or trigger.
• Configure and Copy Printer Profiles — Copy and paste settings from one printer to
another or broadcast them to an entire group. ZebraNet Bridge allows you to copy
printer settings, printer-resident files (formats, fonts, and graphics), and alerts with a
click of the mouse. Create printer profiles—virtual “golden printers”—with desired
settings, objects, and alerts, and clone or broadcast them as if they were real printers,
providing extensive savings in setup time. Printer profiles are also an excellent way to
back up a printer’s configuration for crisis recovery.
980612-001 Rev. A GX420t / GX430t User Guide 12/14/07
Page 71

ZebraNet® 10/100 Internal Print Server Option
Printer Network Configuration Status Label
G-Series printers with the ZebraNet® 10/100 Internal Print Server option on-board print an
additional printer configuration status label for information needed to establish and trouble
shoot network printing. The following printout is printed with the ZPL
Printer Options
~WL command.
59
The regular printout of the configuration status label has some of the printer’s network settings
such as IP Address, on the lower half of the printout.
The printer’s IP address is needed to identify and configure the printer for operations on your
network. See the ZebraNet® 10/100 Internal Print Server manual for more information.
12/14/07 GX420t / GX430t U ser Guide 980612-001 Rev. A
Page 72

Printer Options
60
RTC and Full Flash Memory Option
RTC and Full Flash Memory Option
Printers with the factory installed RTC (Real Time Clock) and Full Flash Memory option
allow you to create highly customizable printer applications, improve printer productivity and
flexibility, and provide extra memory to store more forms, graphics (logos), fonts, and the
large Asian font sets.
The RTC allows the label form developer to include:
• Time Date Stamping
• Pre or Post Datin g
• Allows Date/Time date to be included on printed form without altering the form
• Provide dates and times without needing to generate them with the host sy stem,
application software or programmatically by another process (e.g. a database report).
The RTC enhances the printer’s ability to operate in a stand-alone configuration (e.g. not
connected to a host or PC). A common use would be to provide a date stamp to a tag, ticket,
label or receipt printed on demand. See Stand Alone Printing on page 43 for more details.
The RTC feature supports both ZPL and EPL printer programming. The two programming
behaviors that display
time and date change
the time and date are independent of each other. The commands that set
them for both printer languages.
Caution • The optional RTC assembly has a three volt lithium battery. You can discern a low
or flat battery if the printer provides a consistently delayed date stamp. Battery replacement
must be performed by a qualified service technician. Only use a Zebra approved replacement
battery.
Important • Recycle batteries according to local your guidelines and regulations. Wrap the
battery when disposing (or storing) to avoid a short circuit.
DO NOT short circuit the battery. Short circuiting the battery may result in heat
generation, fire or bursting.
DO NOT heat, disassemble or dispose of battery in fire.
The Full Flash Memory provides an additional 8 Megabytes to the printer’s standard
4 Megabytes of printer memory for a total of 12 Megabytes printer memory.
980612-001 Rev. A GX420t / GX430t User Guide 12/14/07
Page 73

Asian Fonts - Printer Accessory
Asian font sets are downloaded into the printer by the user or integrator. Your G-Series printer
must have the RTC and Full Flash Printer Memory option installed to support the large Asian
font files. The fonts are obtained separately from the printer.
• Simplified and Traditional Chinese (ZPL and EPL)
• Japanese — JIS and Shift-JIS mappings (ZPL and EPL)
• Korean (ZPL including Johab and EPL)
• Thai (ZPL only)
See Fonts and Your Printer on page 41 for more details on Asian fonts.
Printer Options
Asian Fonts - Printer Accessory
61
12/14/07 GX420t / GX430t U ser Guide 980612-001 Rev. A
Page 74

Printer Options
62
KDU — Printer Accessory
KDU — Printer Accessory
The KDU (key board display unit) is a small terminal unit that interfaces with the printer for
accessing EPL label forms stored in the printer.
The KDU is strictly a terminal and does not have the capability to store data or set up
parameters. The KDU is used for the following functions:
• List label forms stored in printer
• Retrieve label forms stored in printer
• Input variable data
• Printing labels
The KDU was designed for Zebra EPL printers. The EPL printer’s serial port was configured
for DCE (data communication equipment) communications configuration. The G-Series
printer has a DTE (data terminal equipment) serial port configuration. Because of the KDU
and G-Series have different wiring configurations, a KDU serial port adapter is needed to
properly supply power to the KDU and enable communications between them.
980612-001 Rev. A GX420t / GX430t User Guide 12/14/07
Page 75

KDU — Printer Accessory
KDU and G-Series Printer Serial Port Adapter Installation
1. Switch the printer power to OFF.
2. Align the adapter between the KDU’s serial connector and the serial interface on the
printer.
KDU
Serial Port
Adapter
Printer Options
63
3. Plug the adapter onto the printer’s serial interface; use a small, slotted screwdriver to
tighten the screws and secure the adapter.
4. Plug the KDU’s cable onto the adapter; tighten the screws to secure the cable.
v
12/14/07 GX420t / GX430t U ser Guide 980612-001 Rev. A
Page 76

Printer Options
64
KDU Plus — Printer Accessory
KDU Plus — Printer Accessory
The KDU Plus is a terminal device with memory for storing files and maintaining one or more
remote printers. The KDU Plus has a larger laptop style keyboard than the Zebra’s original
KDU design.
The KDU Plus is designed for the following functions:
• List label forms stored in printer
• Retrieve label forms stored in printer
• Input variable data
• Printing labels
• File storage and transfer
The KDU Plus is designed to work with ZPL and EPL printers by dy namically detecting and
switching the printer’s communications configuration (DTE or DCE) to match y our Zebra
printer. By default, the KDU Plus will start up forms mode. This is compatible with the
operation of Zebra’s original KDU. The KDU Plus is configurable to work in ZPL or terminal
modes too.
The KDU Plus has file transfer and storage capabilities. This is great for maintaining remote
and stand alone printers with label forms, logos and smaller font sets.
The KDU Plus has two configurable serial port and a PS/2 port to connect to other data input
devices such as scanners, weigh scales, etc..
The +5 volts from the printer’s serial (pin 9) provides power for the KDU Plus and any
additional input devices attached to the KDU Plus.
Maximum total current draw for the G-Series printer’s serial port: 750mA
The KDU Plus’s current without external input devices attached is: 50mA
120m A*
45mA*
25mA*
Current Draw
* - Not real values
50mA
( 45mA + 120mA + 25mA ) + 50mA < Max. Current
Caution • The KDU Plus’s input ports (AUX1, AUX2, and PS/2 style) are not fused.
Exceeding the total current draw available could damage an input device, KDU Plus, or
the printer.
980612-001 Rev. A GX420t / GX430t User Guide 12/14/07
Page 77

Maintenance
This section provides routine cleaning and maintenance procedures.
5
Contents
Cleaning . . . . . . . . . . . . . . . . . . . . . . . . . . . . . . . . . . . . . . . . . . . . . . . . . . . . . . . . . . . . . . 66
Cleaning the Printhead . . . . . . . . . . . . . . . . . . . . . . . . . . . . . . . . . . . . . . . . . . . . . . . . 67
Media Path Considerations . . . . . . . . . . . . . . . . . . . . . . . . . . . . . . . . . . . . . . . . . . . . . 68
Platen Cleaning and Replacement . . . . . . . . . . . . . . . . . . . . . . . . . . . . . . . . . . . . . . . 70
Other Printer Maintenance. . . . . . . . . . . . . . . . . . . . . . . . . . . . . . . . . . . . . . . . . . . . . . 72
Replacing the Printhead. . . . . . . . . . . . . . . . . . . . . . . . . . . . . . . . . . . . . . . . . . . . . . . . . . 73
12/14/07 GX420t / GX430t U ser Guide 980612-001 Rev. A
Page 78

Maintenance
66
Cleaning
Cleaning
When you clean the printer, use one of the following supplies that best suits your needs:
Cleaning Supplies
Order
Quantity
Intended Purpose
Cleaning pens (105950-035) Set of 12 Clean printhead
Cleaning swabs (105909-057) Set of 25 Clean media path, guides and sensors
You can obtain cleaning supplies at
www.zipzebra.com.
The cleaning process takes just a couple of minutes using the steps outlined below.
Printer Part Method Interval
Printhead Let the printhead to cool for a minute, then use a
new cleaning pen to swab the dark line on the
printhead cleaning from the center to the outside
edges of the printhead.
See Cleaning the Printhead on page 67
Platen roller Remove the platen roller to clean. Clean the
When using ribbon:
after every roll of
ribbon; when using
direct thermal: after
every roll of media.
As needed.
roller thoroughly with 90% medical-grade
alcohol and a cleaning swab or lint-free cloth.
See Platen Cleaning and Replacement
on page 70
Peel bar Clean it thoroughly with 90% medical-grade
Media path
alcohol and a fiber-free cleaning swab.
Let alcohol dissipate and the printer dry
completely.
Exterior Water-dampened cloth.
Interior Gently brush out printer.
Caution • Adhesives and media material can over time transfer onto the printer
components along the media path including the platen and printhead. This build-up can
accumulate dust and debris. Failure to clean the printhead, media path and platen roller
could result in inadvertent loss of labels, label jams and possible damage to the printer.
Important • Using too much alcohol can result in contamination of the electronic
components requiring a much longer drying time before the printer will function properly.
980612-001 Rev. A GX420t / GX430t User Guide 12/14/07
Page 79

Cleaning the Printhead
Alway s use a new cleaning pen on the printhead (an old pen carries contaminants from its
previous uses that may damage the printhead).
Caution • The printhead becomes hot while printing. To protect from damaging the
printhead and risk of personal injury, avoid touching the printhead. Use only the cleaning
pen to perform maintenance.
When you load new media, y ou can also clean the printhead.
1. Rub the cleaning pen across the dark area of the printhead. Clean from the middle to the
outside. This will move adhesive transferred from the edges of media to the printhead
outside of media path.
2. Wait one minute before closing the printer.
Maintenance
Cleaning
67
12/14/07 GX420t / GX430t U ser Guide 980612-001 Rev. A
Page 80

68
Maintenance
Cleaning
Media Path Considerations
Use a cleaning swab to remove debris, dust or crust that has built-up on the holders, guides and
media path surfaces.
1. Use the alcohol in the cleaning swab to soak the debris to break up the adhesive.
2. Wipe the ridges to remove accumulated debris.
3. Wipe the inside edges of both edge guides to remove any built-up residue.
4. Wait one minute before closing the printer.
Discard the cleaning swab after use.
Platen
Peel
Bar
Pinch
Roller
Media
Guides
Ridges
Ridges
980612-001 Rev. A GX420t / GX430t User Guide 12/14/07
Page 81

Sensor Cleaning
Dust can accumulate on the media sensors.
1. Gently brush away dust; if necessary, use a dry swab to brush away dust. If adhesives or
other contaminates remain, use an alcohol moistened swab to break it up.
2. Use a dry swab to remove any residue that may be left from the first cleaning.
Maintenance
Cleaning
69
3. Repeat steps 1 and 2 as required until all residue and streaks are removed form the sensor.
.
Ribbon Trailer
Sensor
Black-Line
Sensor
Gap
Sensor
Label Taken
Sensor
12/14/07 GX420t / GX430t U ser Guide 980612-001 Rev. A
Page 82

70
Maintenance
Cleaning
Platen Cleaning and Replacement
The standard platen (drive roller) normally does not require cleaning. Paper and liner dust can
accumulate without effecting print operations. Contaminates on the platen roller can damage
the printhead or cause the media to slip or stick when printing. Adhesive, dirt, general dust,
oils and other contaminates should be cleaned immediately off the platen.
Clean the platen (and media path) whenever the printer has significantly poorer performance,
print quality or media handling. The platen is the print surface and drive roller for your media.
If sticking or jamming continues even after cleaning, you must replace the platen.
The platen can be cleaned with a fiber-free swab (such as a Texpad swab) or a lint free, clean,
damp cloth very lightly moistened with medical grade alcohol (90% pure or better).
1. Open the cover (and dispenser door). Remove media from platen area.
2. Pull the platen bearing latch release tabs on the right and left sides towards the front of the
printer and rotate them up.
Platen Bearings
980612-001 Rev. A GX420t / GX430t User Guide 12/14/07
Page 83

3. Lift the platen out of the printer’s bottom frame.
Maintenance
Cleaning
71
4. Clean the platen with the alcohol moistened swab. Clean from the center out. Repeat this
process until the all of the roller surface has been cleaned. If there has been heavy
adhesive build-up or label jam, repeat with a new swab to remove residual contaminates.
Adhesives and oils, for example, may be thinned by the initial cleaning but not completely
removed.
5. Install the platen in the printer. Discard the cleaning swabs after use - do not reuse.
6. Make sure the bearings and drive gear are on the shaft of the platen.
12/14/07 GX420t / GX430t U ser Guide 980612-001 Rev. A
Page 84

72
Maintenance
Cleaning
7. Align the platen with the gear to the left and lower it into the printer’s bottom frame.
8. Rotate the platen bearing latch release tabs down on the right and left sides towards the
rear of the printer and snap them into place.
Allow the printer to dry for one minute before closing the dispenser door, media cover or
loading labels.
Other Printer Maintenance
There are no user level maintenance procedures beyond those detailed in this section. See the
Troubleshooting on page 79 for more information on diagnosing printer and print problems.
980612-001 Rev. A GX420t / GX430t User Guide 12/14/07
Page 85

Replacing the Printhead
If you need to replace the printhead, read the procedure and review the removal and
installation steps before actually replacing the printhead.
Caution • Prepare your work area by protecting against static discharge. Your work area
must be static-safe and include a properly grounded conductive cushioned mat to hold the
printer and a conductive wrist strap for yourself.
Caution • Turn the printer power off and unplug the power cord before replacing the
printhead.
Printhead Removal
1. Open the printer. Remove any transfer ribbon from the printer.
2. Use a small flat bladed screwdriver to remove the ribbon guide. Gently pry the guide
right-side tab from the ribbon frame. Pull the left side of the ribbon guide out.
Maintenance
Replacing the Printhead
73
Ribbon Guide
12/14/07 GX420t / GX430t U ser Guide 980612-001 Rev. A
Page 86

Maintenance
74
Replacing the Printhead
3. Use a blunt tipped tool to press the release tab on the right side and then the left side of the
printhead. The tool diameter can be from 0.10 to 0.15 inches (2.5 to 3.8 mm).
Insert the tool into the ribbon frame's printhead release access (the round) opening. Push
the release tab and gently pull the printhead bracket down..
980612-001 Rev. A GX420t / GX430t User Guide 12/14/07
Page 87

Maintenance
Replacing the Printhead
4. Gently but firmly pull the two printhead cable bundles’ connectors off of the printhead.
75
5. Gently but firmly pull the green ground wire off the printhead.
12/14/07 GX420t / GX430t U ser Guide 980612-001 Rev. A
Page 88

Maintenance
76
Replacing the Printhead
Replacing the Printhead
1. Push the left side printhead connector into the printhead. The connector is key ed to only
insert one way.
2. Connect the green ground wire to the printhead.
3. Push the right side printhead wire connector onto the printhead.
4. Check that the ground wire and wire bundles are still connected to the printhead.
980612-001 Rev. A GX420t / GX430t User Guide 12/14/07
Page 89

Maintenance
Replacing the Printhead
5. Insert the printhead bracket’s the tab into slot in the ribbon frame assembly. Align the
printhead spring slots to the five posts and snap the printhead into the ribbon frame.
Post
Slot
Tab
77
Spring
Slot
Spring
Post
Spring
Slot
12/14/07 GX420t / GX430t U ser Guide 980612-001 Rev. A
Page 90

Maintenance
78
Replacing the Printhead
6. Place the left hand side of the ribbon guide into the ribbon frame. Swing the right side of
the ribbon guide into the slot and snap it into position.
7. Verify that the printhead moves up and down freely when pressure is applied and remains
locked when released.
8. Clean the printhead. Use a new pen to wipe body oils (finger prints) and debris of the
printhead. Clean from the center of the printhead to the outside. See Cleaning the
Printhead on page 67.
9. Reload media. Plug in the power cord, turn on the printer and print a status report to
ensure proper function. See Printing a Test (Printer Configuration) Label on page 21.
980612-001 Rev. A GX420t / GX430t User Guide 12/14/07
Page 91

6
Troubleshooting
This section provides information about printer error reporting that you might need for printer
troubleshooting. Assorted diagnostic tests are included.
Contents
Status Light Descriptions . . . . . . . . . . . . . . . . . . . . . . . . . . . . . . . . . . . . . . . . . . . . . . . . . 80
Status Light Error Resolutions . . . . . . . . . . . . . . . . . . . . . . . . . . . . . . . . . . . . . . . . . . . . . 80
Print Quality Problems . . . . . . . . . . . . . . . . . . . . . . . . . . . . . . . . . . . . . . . . . . . . . . . . . . . 82
Manual Calibration . . . . . . . . . . . . . . . . . . . . . . . . . . . . . . . . . . . . . . . . . . . . . . . . . . . . . . 85
Troubleshooting Tests . . . . . . . . . . . . . . . . . . . . . . . . . . . . . . . . . . . . . . . . . . . . . . . . . . . 86
Resetting the Factory Default Values. . . . . . . . . . . . . . . . . . . . . . . . . . . . . . . . . . . . . . . . 87
Communications Diagnostics. . . . . . . . . . . . . . . . . . . . . . . . . . . . . . . . . . . . . . . . . . . . . . 87
Feed Button Modes . . . . . . . . . . . . . . . . . . . . . . . . . . . . . . . . . . . . . . . . . . . . . . . . . . . . . 89
12/14/07 GX420t / GX430t U ser Guide 980612-001 Rev. A
Page 92

Troubleshooting
80
Status Light Descriptions
Status Light Descriptions
What the Status Light is Telling You
LED Status and Color Printer Status
Off Off 1
Solid Green On 2
Solid Amber Stopped 3
Flashing Green Normal Operation 4
Flashing Red Stopped 5
Double Flashing Green Paused 6
Flashing A mber Paused 7
Alternately Flashing Green and Red Needs Service 8
Flashing Red, Red and Green Needs Service 9
Status Light Error Resolutions
1. The printer is not receiving power.
• Have y ou turned on the printer power?
• Check power connections from the wall outlet to the power supply, and from the power
supply to the printer.
For a Resolution,
Refer to Number:
• Disconnect the printer from the wall outlet for 30 seconds and then reconnect the printer to
the wall outlet.
2. The printer is on and in an idle state.
No action necessary.
3. The printer has failed its power on self test (POST).
• If this error occurs right after y ou turn on the printer, contact an authorized reseller for
assistance. When the printer is operating normally, the printer status light will be amber
for about 10 seconds before turning green (solid or blinking).
There is a memory error.
• If this error occurs after you have been printing, turn the printer power off and on, and
then resume printing.
980612-001 Rev. A GX420t / GX430t User Guide 12/14/07
Page 93

The printhead needs to cool down.
• If this error continues, turn the printer power off for five minutes or more, and then turn
on. If the amber light persists, then the printer requires service.
4. The printer is receiving data.
• As soon as all of the data has been received, the status LED will turn green and the printer
will automatically resume operation.
5. The media is out.
• Follow the instructions for Loading Roll Media on page 13 in the Getting Started section,
and then press the Feed button to resume printing.
The ribbon is out.
• The printer has sensed the end of the ribbon roll. Replace the ribbon.
Troubleshooting
Status Light Error Resolutions
81
The printhead is open.
• Close the top cover and then press the Feed button to resume printing.
6. The printer is paused.
• Press the Feed button to resume printing.
7. The printhead is over temperature.
• Printing will stop until the printhead cools to an acceptable printing temperature. When it
does, the printer will automatically resume operation.
8. FLASH memory is not programmed.
• Return the printer to an authorized reseller.
9. The printhead or motor has had a critical failure.
• Return the printer to an authorized reseller.
12/14/07 GX420t / GX430t U ser Guide 980612-001 Rev. A
Page 94

Troubleshooting
82
Print Quality Problems
Print Quality Problems
No print on the label.
• The media may not be direct thermal media when printing without ribbon (i.e. thermal
transfer). See the test procedure Determining Thermal Media Types on p age 33.
• For thermal transfer printers, the media may not be outside wound or approved for use in
the G-Series printer. See the following ribbon test procedures: Ribbon Test with Adhesive
on page 36 and Ribbon Scratch Test on page 37.
• Is the media loaded correctly? Follow the instructions for Loading Roll Media on page 13
in the Getting Started section. For printing using transfer ribbon, see Loading Transfer
Ribbon on page 17.
The printed image does not look right.
• The printhead is dirty. Clean the printhead.
• The printhead is under temperature.
• Adjust the print darkness and/or print speed.
•Use the
Programming Guide.
•Use the
Guide.
• Manually adjust print darkness with the six-flash sequence of Feed Button Modes
on page 89.
• The Windows printer driver or application software may change these settings and
may require a change to optimize print quality.
• The media being used is incompatible with the printer. Be sure to use the recommended
media for y our application, and always use Zebra-approved labels and tags.
• Verify that the printer power supply in use is rated at 100 Watts of DC output.
• The printhead has worn out. The printhead is a consumable item and will wear out due to
friction between the media and printhead. Using unapproved media may shorten life or
damage your printhead. Replace the printhead.
• The platen may need cleaning or replacement. The platen (driver) roller maybe losing
traction due to:
• Foreign objects attached to its surface,
• The rubbery smooth surface has become polished and slippery, or
^PR (speed) and ~SD (darkness) commands referenced in the ZPL
D (darkness/density) and S (speed) commands in the EPL Programmer’s
• There is damage to the normally smooth and flat print surface such as box knife cuts.
980612-001 Rev. A GX420t / GX430t User Guide 12/14/07
Page 95

Troubleshooting
Print Quality Problems
There are long tracks of missing print (blank vertical lines) on
several labels.
• The printhead is dirty. Clean the printhead.
• The printhead elements are damaged.
The printing does not start at the top of the label or misprinting of
one to three labels.
• The media may not be threaded correctly. Follow the instructions for Loading Roll Media
on page 13 in the Getting Started section.
• The printer needs to be calibrated. Refer to the two-flash sequence of Feed Button Modes
on page 89 in this section.
• ZPL Label Formats - The correct media sensor may not be activated. Manual calibration
selects the media sensing method for the labels being used (refer to the
the ZPL Programming Guide).
^MN command in
83
• ZPL Label Formats - Verify that the Label Top (
application (consult the ZPL Programming Guide).
• EPL Label Formats - The correct media sensor may not be activated for label dispensing,
blackline or notch sensing, or for Gap/Web sensing. Manual calibration selects the media
sensing method for the labels being used (refer to the
Programmer’s Guide).
• EPL Label Formats - Verify that the Set Label Length (Q) command is correctly set for
your application (consult the EPL Programmer’s Guide).
^LT) command is correctly set for your
O and Q commands in the EPL
A ZPL label format was sent to, but not recognized by, the printer.
• Is the printer in pause mode? If so, press the Feed button.
• If the status LED is on or flashing, refer to What the Status Light is Telling You on page 80.
• Make sure the data cable is correctly installed.
• A communications problem has occurred. First, make sure that the correct
communications port on the computer is selected. Refer to Communicating with the
Printer on page 28 in the Getting Started section.
• Verify the correct Format and Control Prefix on the printer match what you are using in
your ZPL programmed label format. The default Format (COMMAND CHAR) is Caret
(^) character and the Control (CONTROL CHAR) is a Tilde (~) character. Verify the
characters with the Configuration Status label printout. Refer to the one-flash sequence of
Feed Button Modes on page 89 to print this label.
12/14/07 GX420t / GX430t U ser Guide 980612-001 Rev. A
Page 96

Troubleshooting
84
Print Quality Problems
A EPL label format was sent to, but not recognized by, the printer.
• Is the printer in pause mode? If so, press the Feed button.
• If the printer has label dispensing enabled, the printer may be waiting for the label to be
removed. The liner/web must be properly threaded through the label dispenser mechanism
(peeler) to correctly operate in label dispense mode, refer to Label Dispenser Option
on page 48.
• If the status LED is on or flashing, refer to What the Status Light is Telling You on page 80.
• Make sure the data cable is correctly installed.
• A communications problem has occurred. First, make sure that the correct
communications port (USB) on the computer is selected. Refer to Communicating with
the Printer on page 28 in the Getting Started section.
980612-001 Rev. A GX420t / GX430t User Guide 12/14/07
Page 97

Manual Calibration
Manual calibration is recommended whenever you are using pre-printed media or if the printer
will not correctly auto calibrate.
1. Make sure media is loaded.
2. Turn on the printer power.
3. Press and hold the Feed button until the green status light flashes once, then twice and
then continuing until the flash groups reach the group of seven flashes. Release the Feed
button.
4. The printer will set the media sensor for the label backing being used. After it is done
making this adjustment, the roll will automatically feed until a label is positioned at the
printhead. A profile of the media sensor settings (similar to the example below) will print.
Upon completion, the printer will save the new settings in memory and the printer is ready
for normal operation.
5. Press the Feed button. One entire blank label will feed. If this does not happen, try
defaulting (refer to the four-flash sequence in “Feed Button Modes” later in this chapter)
and recalibrating the printer.
Troubleshooting
Manual Calibration
85
Note • Performing a manual calibration disables the auto calibration function. To return to
auto calibration, default the printer (refer to the four-flash sequence in Feed Button Modes
on page 89 in this section).
12/14/07 GX420t / GX430t U ser Guide 980612-001 Rev. A
Page 98

Troubleshooting
86
Troubleshooting Tests
Troubleshooting Tests
Printing a Configuration Label
To print out a listing of the printer’s current configuration, refer to the one-flash sequence in
Feed Button Modes on page 89 in this section
Recalibration
Recalibrate the printer if it starts to display unusual symptoms, such as skipping labels. Refer
to the two-flash sequence in Feed Button Modes on page 89 in this section.
980612-001 Rev. A GX420t / GX430t User Guide 12/14/07
Page 99

Resetting the Factory Default Values
Sometimes, resetting the printer to the factory defaults may solve some problems. Refer to the
four-flash sequence in Feed Button Modes on page 89 in this section.
Communications Diagnostics
If there is a problem transferring data between the computer and printer, try putting the printer
in the communications diagnostics mode. The printer will print the ASCII characters and their
respective hexadecimal values (a sample is shown below) for any data received from the host
computer. To find out how,
There are multiple ways to enter hex data dump mode:
•The ~JD ZPL command
•The dump EPL command
• On power up with the Feed button pressed. Refer to the power off mode procedure in Feed
Button Modes on page 89 in this section.
Troubleshooting
Resetting the Factory Default Values
87
The printer will print ‘Now in DUMP’ (see below) and advance to the top of the next label.
12/14/07 GX420t / GX430t U ser Guide 980612-001 Rev. A
Page 100

Troubleshooting
88
Communications Diagnostics
The following example of a communications DUMP mode printed out. The printout displays
hexadecimal data 00h-FFh (0-255 decimal) with a unique character for each hexadecimal
value displayed above the hexadecimal data.
The blank lines between the lines of data are where serial port and Bluetooth data handling
errors get logged. The errors are:
• F = Frame Error
• P = Parity Error
• N = Noise Error
• O = Data Overrun Error
To exit the diagnostic mode and resume printing, turn off and then turn on the printer. An
alternate method for exiting the diagnostic mode is to press the Feed button as many times as it
takes to clear the printer’s command buffer and print ‘Out of DUMP’ on the label.
980612-001 Rev. A GX420t / GX430t User Guide 12/14/07
 Loading...