

Page 1
ZQ220
Mobile Printer
User Guide
P11029 27- 001 Rev. A
December 2018
Page 2

Contents
Proprietary Statements ...................................................... 5
Document Conventions ..................................................... 7
Introduction to the ZQ220 Printer ..................................... 8
Unpacking and Inspection ..................................................................9
Reporting Damage .............................................................................9
ZQ220 Technology ...........................................................................10
Battery .............................................................................................10
QR Code .......................................................................................... 11
Made for iPhone (MFi) .....................................................................12
Near Field Communication (NFC) ....................................................12
Printer Overview ............................................................... 13
Getting Ready to Print ...................................................... 15
Battery ..............................................................................................15
Removing the Battery ......................................................................15
Removing the Battery Tape Insulator ...............................................16
Installing the Battery ........................................................................17
Battery Safety ..................................................................................18
Charger Safety .................................................................................18
Charging the Battery ........................................................................19
AC-to-USB Charger ........................................................................19
Loading Media Procedure ................................................................21
Operator Controls ............................................................................23
Standard User Controls ...................................................................23
LCD Control Panel ...........................................................................23
2
ZQ220 User Guide
Page 3

Information Screen ...........................................................................25
Conguration Screen ......................................................................26
Buttons .............................................................................................27
Power-Up Sequences ......................................................................27
Verify the Printer is Working ............................................................. 27
Printing a Conguration Report ........................................................27
Connecting the Printer .....................................................................28
Cable Communication ......................................................................29
USB Communications ......................................................................29
Zebra Setup Utilities .........................................................................30
Wireless Communications with Bluetooth ........................................30
Bluetooth Networking Overview .......................................................30
Bluetooth Security Modes ................................................................31
Bluetooth Minimum Security Modes ................................................32
Setting Up the Software ...................................................................33
Designing Labels .............................................................................34
Using Pre-Printed Receipt Media .....................................................35
Black Mark Dimensions (Receipt Media) .........................................35
Label Areas ......................................................................................36
Label Design Examples ...................................................................37
Keep-Out Areas ...............................................................................38
Near Field Communication (NFC) ....................................................38
NFC Use Cases ...............................................................................39
Wearing the Printer ..........................................................................40
Swivel Belt Clip ................................................................................40
Adjustable Shoulder Strap ...............................................................41
Soft Case .........................................................................................42
Preventive Maintenance ..................................................................43
Extending Battery Life ......................................................................43
General Cleaning Instructions ..........................................................43
LCD Control Panel Indicators ..........................................................46
Troubleshooting Topics ....................................................................46
Troubleshooting Tests ......................................................................48
Printing a Conguration Label ..........................................................48
Communications Diagnostics ...........................................................48
Specications ................................................................... 52
3
ZQ220 User Guide
Page 4

Printing Specications ......................................................................52
Memory and Communications Specications ..................................52
Label Specications .........................................................................53
Physical, Environmental and Electrical Specications ..................... 53
CPCL Font and Bar Code Specications and Commands ...............54
Printer Dimensions ...........................................................................55
Printer Accessories ..........................................................................56
Appendix A ........................................................................ 57
USB Cables .....................................................................................57
Appendix B ........................................................................ 58
Media Supplies ................................................................................58
Appendix C ........................................................................ 58
Maintenance Supplies ......................................................................58
Appendix D ........................................................................ 59
Appendix E ........................................................................ 60
Battery Disposal ...............................................................................60
Product Disposal ..............................................................................60
Appendix F ........................................................................ 61
Alert Messages ................................................................................61
Appendix G ....................................................................... 62
Using Zebra.com ..............................................................................62
Appendix H ........................................................................ 64
Product Support ...............................................................................64
4
ZQ220 User Guide
Page 5

Proprietary Statements
Copyright
© 2018 ZIH Corp and/or its afliates. All rights reserved. ZEBRA and the st ylized
Zebra head are trademarks of ZIH Corp., registered in many jurisdic tions worldwide.
All other trademarks are the property of their respective owners.
Information in this document is subject to change without notice.
For further information regarding legal and proprietary statements, please go to:
COPYRI GHTS AND T RADEMARKS: Fo r complete copyr ight and tr ademark i nformation, go to w ww.zebra.com/copyright
WARRANTY: For complete wa rranty i nformat ion, go to www.zebra.com/warranty
END USER L ICENSE AG REEMENT: For complet e EULA inf ormati on, go to www.zebra.com/eula
Terms of Use
Proprietary Statement: This manual contains proprietary information of Zebra
Technologies Corporation and its subsidiaries (“Zebra Technologies”). It is intended
solely for the information and use of parties operating and maintaining the equipment
described herein. Such proprietary information may not be used, reproduced, or
disclosed to any other parties for any other pur pose without the express, written
permission of Zebra Technologies.
Product Improvements: Continuous improvement of products is a policy of Zebra
Technologies. All specications and designs are subject to change without notice.
Liability Disclaimer: Zebra Technologies takes steps to ensure that its published
Engineering specications and manuals are correct; however, errors do occur. Zebra
Technologies reser ves the r ight to correct any such errors and disclaims liability
resulting therefrom.
Liability Disclaimer: Zebra Technologies takes steps to ensure that its published
Engineering specications and manuals are correct; however, errors do occur. Zebra
Technologies reser ves the r ight to correct any such errors and disclaims liability
resulting therefrom.
Limitation of Liability: In no event shall Zebra Technologies or anyone else involved in
the creation, production, or delivery of the accompanying product (including hardware
and software) be liable for any damages whatsoever (including, without limitation,
consequential damages including loss of business prots, business interr uption, or loss
of business information) arising out of the use of, the results of use of, or inability to use
such product, even if Zebra Technologies has been advised of the possibility of such
damages. Some jur isdictions do not allow the exclusion or limitation of incidental or
consequential damages, so the above limitation or exclusion may not apply to you.
5
ZQ220 User Guide
Page 6
“Made for iPod”, “Made for iPhone”, and “Made for iPad” mean that an electronic accessory has
been designed to connect specically to iPod, iPhone, or iPad, respectively, and has been certied
by the developer to meet A pple perfor mance standards. Apple is not responsible for the operation
of this device or its c ompliance with safety and regulatory standards. Please note that the use of this
accessory with iPod, iPhone, or iPad may af fect wireless performanc e.
Bluetooth® is a registered trademark of the Bluetooth SIG.
© 1996 –2009, QNX Software Systems GmbH & C o. KG. All rights reserved. Published under license
by QNX Sof tware Systems Co.
All other brand names, product names, or trademarks belong to their respective holder s.
©
2018 ZIH Corp.
Works with:
Certied by:
43
IP
6
ZQ220 User Guide
Page 7
Document Conventions
The following graphic icons are used throughout the documentation
set. These icons and their associated meanings are described
below.
Caution • Warns you of the potential for electrostatic discharge.
Caution • Warns you of a potential electric shock situation.
Caution • Warns you of a situation where excessive heat could
cause a burn
Caution • Advises you that failure to take or avoid a specic action
could result in physical harm to you.
Caution • Advises you that failure to take or avoid a specic action
could result in physical harm to the hardware.
Important • Advises you of information that is essential to complete
a task.
Note • Indicates neutral or positive information that emphasizes or
supplements important points of the main text.
7
ZQ220 User Guide
Page 8

Introduction to the ZQ220 Printer
This user guide gives you the information you will need to
operate the ZQ220 Mobile Printer. The printer uses some of the
latest technologies such as USB charging (Type-C connector),
an embedded Dual Mode Bluetooth 2.1 + EDR/4.1 Low Energy
module, Near Field Communication (NFC) and Made for iPhone®
(MFi). MFi printers provide Apple co-processor (MFi) support which
allows an Apple device such as an iPhone or iPad® to authenticate
and connect over Bluetooth®.
This printer uses CPCL programming language. To create and
print labels using this language, refer to the Programming Guide
for CPCL (p/n P1073699-001). See “Appendix G” on page 62 for
instructions on how to access manuals on zebra.com.
ZQ220 Software Utilities:
• ZebraNet Bridge Enterprise™: printer conguration, eet
management
• Zebra Setup Utility: single printer conguration, quick setup
• ZebraDesigner Pro v2: label design
• ZebraDesigner Drivers: Windows® driver
• OPOS Driver: Windows driver
• Legacy SDK (part of Multiplatform SDK that supports limited
legacy freatures.)
These utilities can be found on the Zebra website at
http://www.zebra.com/support. (See “Appendix G” on page 62.)
8
ZQ220 User Guide
Page 9
Unpacking and Inspection
Zebra Technologies Corporation
Zebra Technologies Corporation
• Check all exterior surfaces for damage.
• Open the media cover (see “Loading Media Procedure” on page
21) and inspect the media compartment for damage.
In case shipping is required, save the carton and all packing
material.
475 Half Day Road, Suite 500
Lincolnshire, IL 60069 USA
T: +1 847.634.6700 or +1 800.423.0442
In the Americas contact:
475 Half Day Road, Suite 500
Lincolnshire, IL 60069 USA
T: +1 847.634.6700 or +1 800.423.0442
In Europe, Africa, the Middle East, and India contact:
Zebra Technologies Europe Limited
Dukes Meadow, Millboard Road
Bourne End
Buckinghamshire SL8 5XF, UK
T: +44 (0)1628 556000
F: +44 (0)1628 556001
120 Robinson Road
#06-01 Parakou Building
Singapore 068913
T: +65 6858 0722
F: +65 6885 0838
AA18153-104 Rev. B
AA18153-104
August 2012
(Adapter and plugs do not ship
with EMEA and LATAM printers)
Reporting Damage
If you discover shipping damage:
• Immediately notify and le a damage report with the shipping
company. Zebra Technologies Corporation is not responsible for
any damage incurred during shipment of the printer and will not
cover the repair of this damage under its warranty policy.
• Keep the carton and all packing material for inspection.
• Notify your authorized Zebra re-seller.
9
ZQ220 User Guide
Page 10

ZQ220 Technology
The ZQ220 printer uses several technologies made popular in other
Zebra Mobile Printer product lines, as well as newer, state-of-theart technologies.
Battery
The printer uses a 2-cell Li-Ion battery pack (p/n BTRY-MPV24MA1-01) with a charge time of under four (4) hours using a 10W
USB charger or cigarette-to-USB adapter. The battery allows the
printers to print reliably without recharge for three (3) work days
under the following conditions: 25 stops per day and will power up
the device 25 times per day; up to 500 3x8.5 in. receipts per 8-hour
shift with 13% coverage.
Operating Temperature Charging Temperature Storage Temperature
-10˚C to +50˚C
(14˚F to 122˚F)
The ZQ220 printer will only function properly with genuine Zebra
battery packs.
0˚C to +40˚C
(32˚F to 104˚F)
-20˚C to +60˚C
(-4˚F to 140˚F)
Note • Power down the printer before removing the battery to
minimize the risk of corruption.
10
ZQ220 User Guide
Page 11
Printing Technology
The ZQ220 printer uses the Direct Thermal method to print
human-readable text, graphics, and barcodes. It incorporates a
sophisticated print engine for optimal printing under all operational
conditions. Direct thermal printing uses heat to cause a chemical
reaction on specially treated media. This reaction creates a
dark mark wherever a heated element on the printhead comes
in contact with the media. Because the printing elements are
arranged very densely at 203 dpi (dots per inch) horizontal and
200 dpi vertical, highly legible characters and graphic elements
may be created a row at a time as the media is advanced past the
printhead. This technology has the advantage of simplicity, as there
is no requirement for consumable supplies such as ink or toner.
However, because the media is sensitive to heat, it will gradually
lose legibility over long periods of time, especially if exposed to
environments with relatively high temperatures or in direct sunlight.
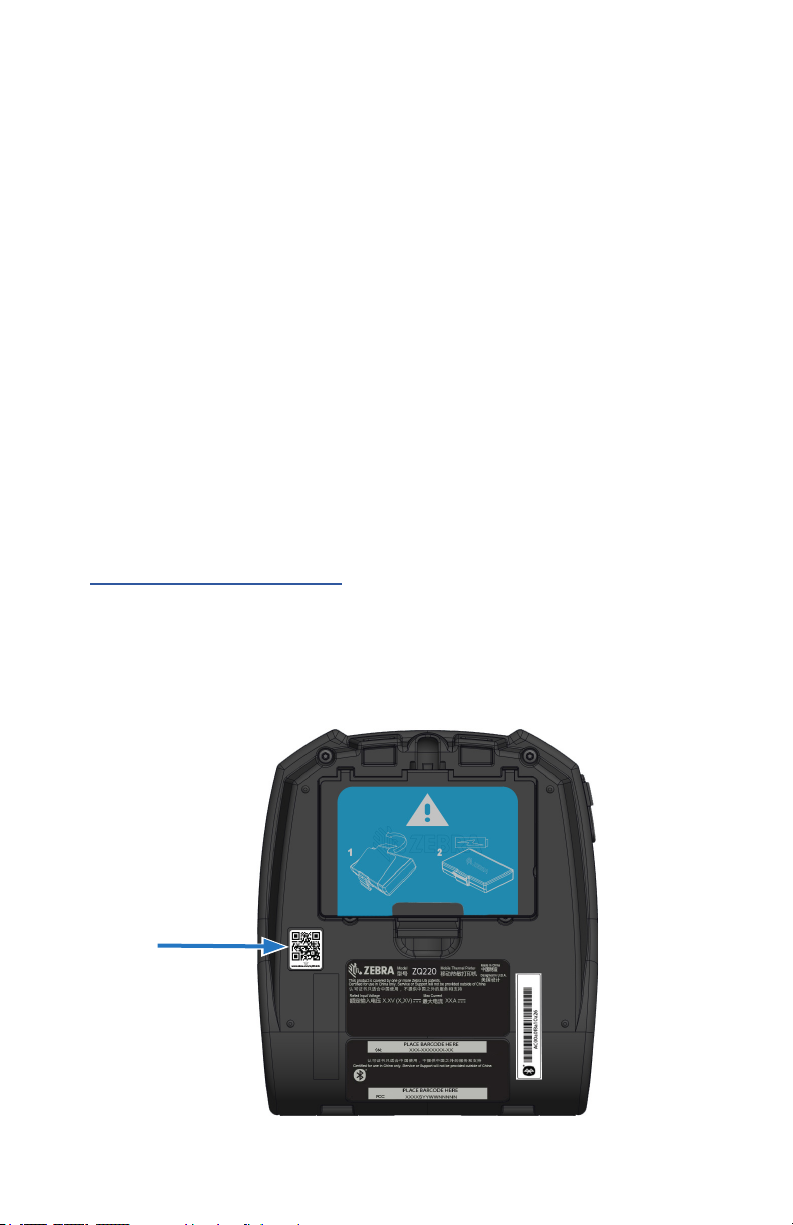
QR Code
The QR barcode includes human readable text URL, for example
www.zebra.com/zq220-info, which links the user to printer
information and short videos on topics such as buying supplies,
features overview, loading media, printing a conguration report,
cleaning instructions, and accessory information.
QR Code
Figure 1 • QR Code
11
ZQ220 User Guide
Page 12

Made for iPhone (MFi)
The ZQ220 printer supports communication with Apple devices
running iOS 10 or later over a standalone Bluetooth 4.1 radio.
Near Field Communication (NFC)
The printer supports a passive NFC tag which complies with
the “Android Standard Tag format” because Android devices are
the most common found on the market today. The NFC tag is
programmed from the factory and supports Bluetooth pairing to
enable a tablet, smartphone, or terminal to automatically pair with
the printer via a Bluetooth connection (within the bounds of the
security prole being used).
The NFC tag also supports app launching whereby an app
developed either by Zebra or a third party will launch on an NFCenabled smartphone, tablet or terminal. Similarly, the NFC tag
enables launching to a web support page via a tablet, smartphone,
or terminal.
12
ZQ220 User Guide
Page 13
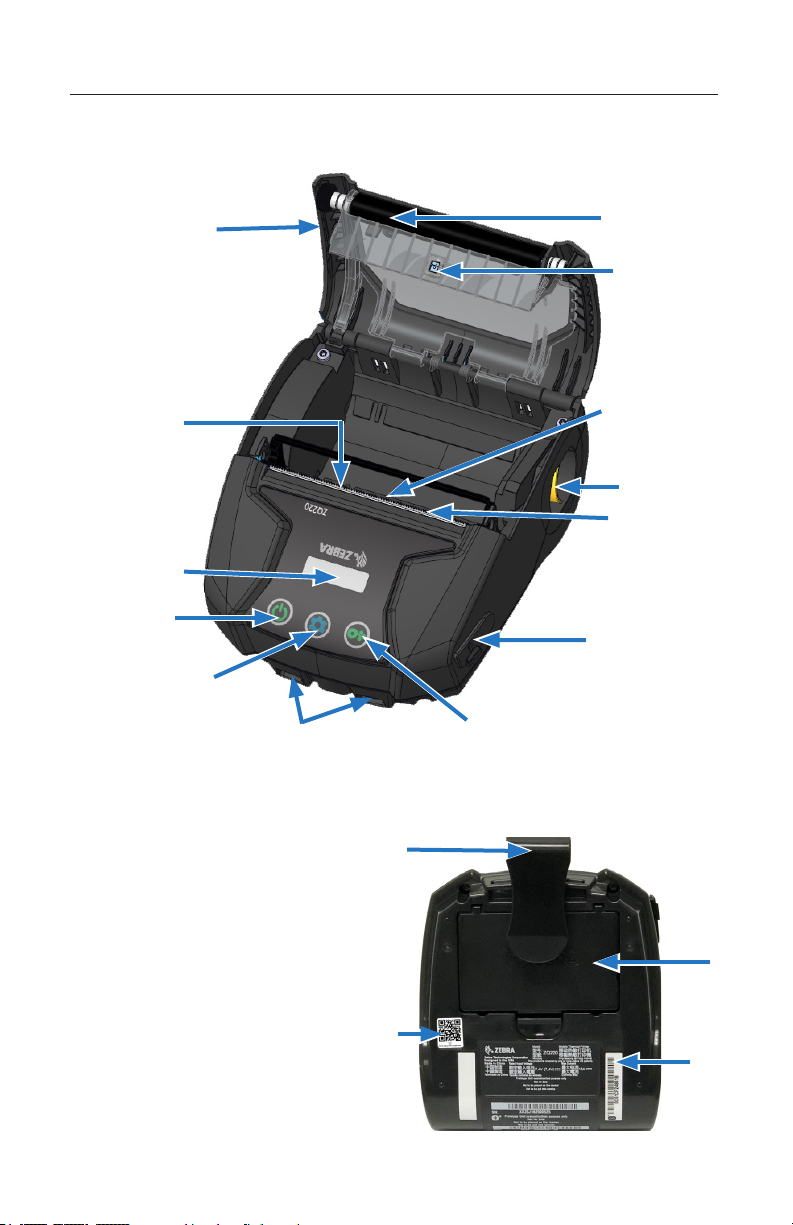
Printer Overview
Figure 2 • Overview of Features
10
12
11
13
1
2
3
4
5
6
9
8
7
1. Platen Roller
2. Back Side Sensor
3. Front Side Sensor
4. Latch Release Lever
5. Tear Bar
6. USB Port
7. Feed Button
8. Strap Posts
9. Congure Button
10. Power Button
11. LCD Display
12. Printhead
13. Media Cover
14. Belt Clip
15. Battery
16. MAC Address Label
17.
18.
14
17
13
ZQ220 User Guide
QR Code
Print Touch Icon (pg. 14)
15
16
Page 14
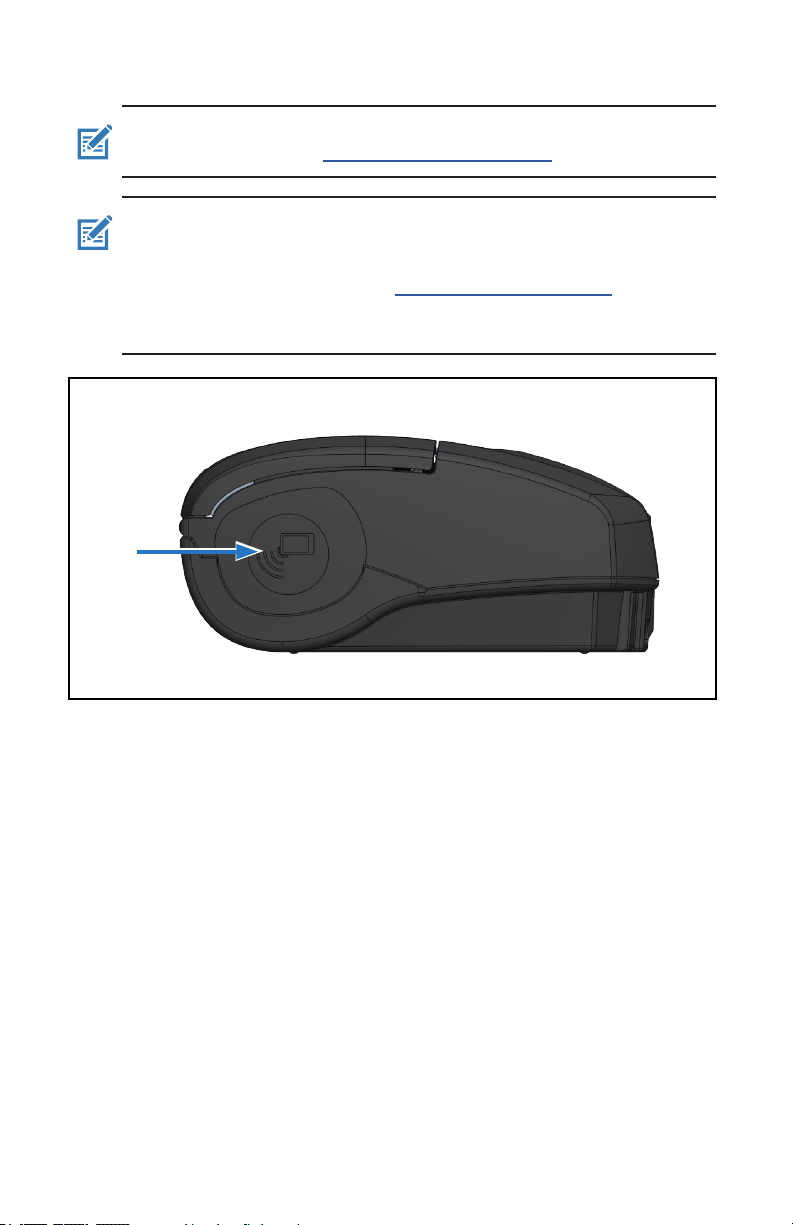
Note • Scanning the QR code with a smartphone will provide printer
specic information at www.zebra.com/zq220-info.
Note • Tapping the Zebra Print Touch™ icon with a Near Field
Communication (NFC) enabled smartphone will provide instant
access to printer-specic information. For more information about
NFC and Zebra products, go to http://www.zebra.com/nfc. Bluetooth
pairing applications via NFC is also possible. See the Zebra Legacy
SDK for more information.
18
14
ZQ220 User Guide
Page 15
Getting Ready to Print
Battery
Installing/Removing Battery & Battery Tape Insulator
Important • Batteries are shipped in sleep mode to preserve their
maximum capacity while in storage prior to initial use. Plug in the
USB adapter (see “AC-to-USB Charger” on page 19) to wake it up
before using for the rst time.
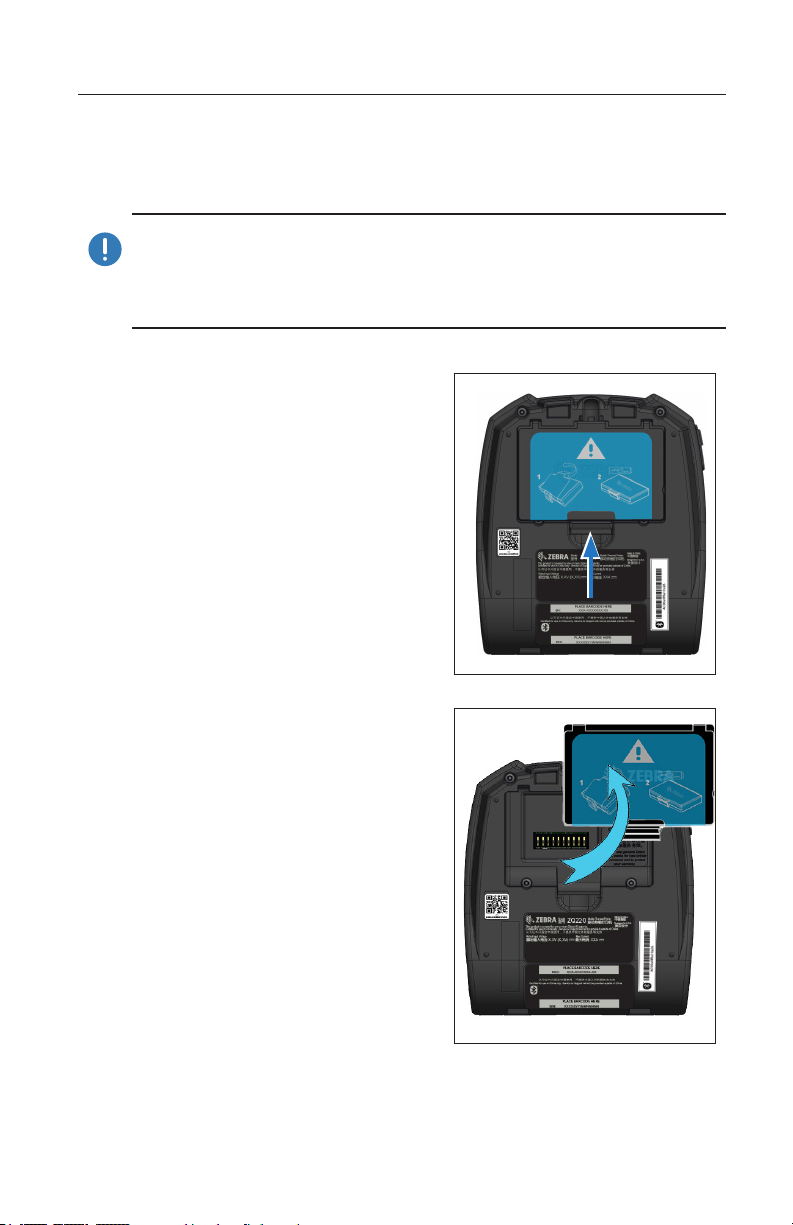
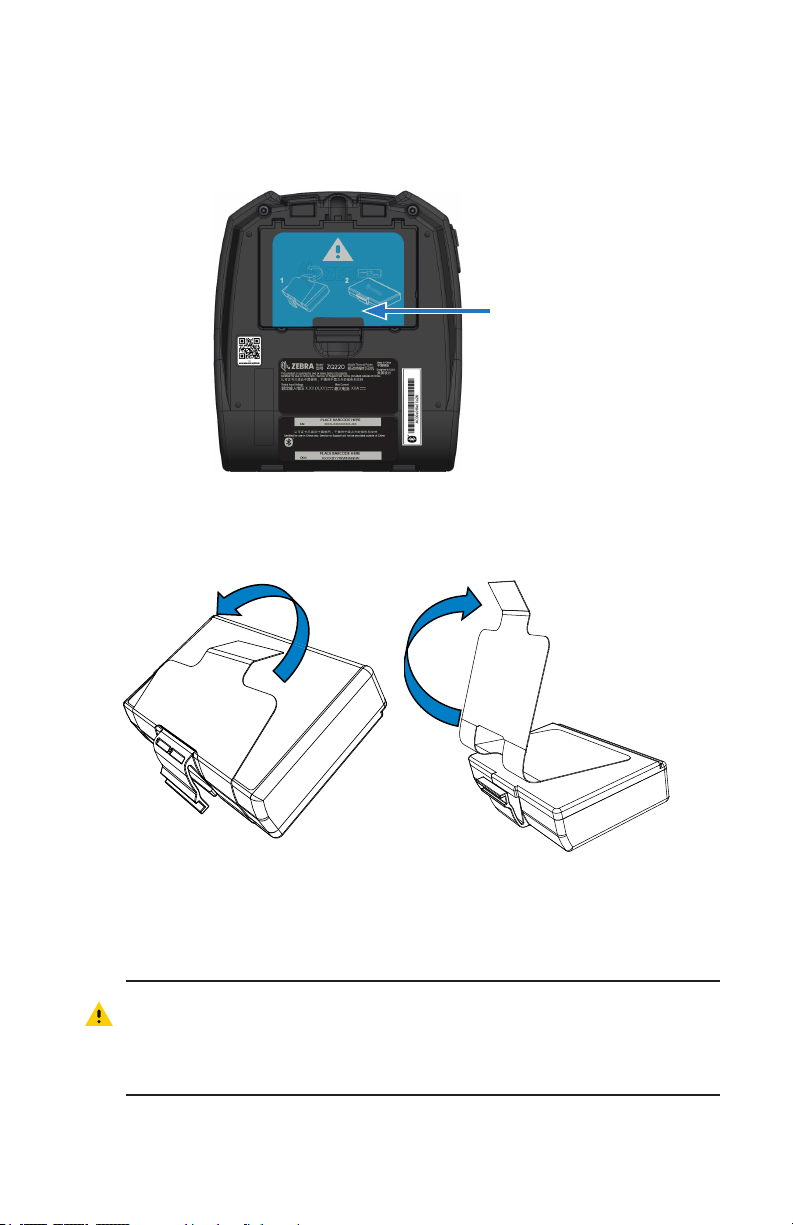
Removing the Battery
1. If a belt clip is present on the
bottom of the printer, rotate it
such that it provides clear ance for the battery.
2. Depress the latch on the
battery pack where indicated.
3. Rotate the pack away from
the battery well. Lift the
battery up and out of the
printer.
ZQ220 User Guide
15
Page 16
Removing the Battery Tape Insulator
The battery tape insulator is designed to cover the battery contacts
and allow the printer to be shipped with the battery installed.
Battery Tape
Insulator
1. Pull up on the tape insulator tab
located on the bottom of the batter y
pack.
2. Peel back the tape insulator and
remove it from the top of the battery
pack. Discard upon removal.
Caution • Battery can explode, leak or catch re if improperly
charged or exposed to high temperature. Do not disassemble, crush,
puncture, short external contacts or dispose of in re or water.
Charge on a Zebra approved Lithium-Ion charger only.
16
ZQ220 User Guide
Page 17
Installing the Battery
1. Locate the battery
compartment on the bottom of
the printer (where indicated).
2. Swivel the belt clip (if
present) to access the battery
compartment.
3. Insert the battery into the
printer as shown. (It is not
possible to insert the pack in
the incorrect orientation.)
4. Rock the battery into the
compartment as shown until it
locks in place.
ZQ220 User Guide
17
Page 18
Battery Safety
Caution • Avoid accidental short circuiting of any battery. Allowing
battery terminals to contact conductive material will create a short
circuit which could cause burns and other injuries or could start a
re.
Important • Always refer to the Important Safety Information data
sheet shipped with each printer and the Technical Bulletin shipped
with each battery pack. These documents detail procedures to
ensure maximum reliability and safety while using this printer.
Important • Always dispose of used batteries properly. See
“Appendix E” on page 60 for more battery recycling information.
Caution • Use of any charger not approved specically by Zebra for
use with its batteries could cause damage to the battery pack or the
printer and will void the warranty.
Caution • Do not incinerate, disassemble, short circuit, or expose to
temperatures higher than 60oC (140oF).
Charger Safety
Do not place any charger in locations where liquids or metallic
objects may be dropped into the charging bays.
18
ZQ220 User Guide
Page 19
Charging the Battery
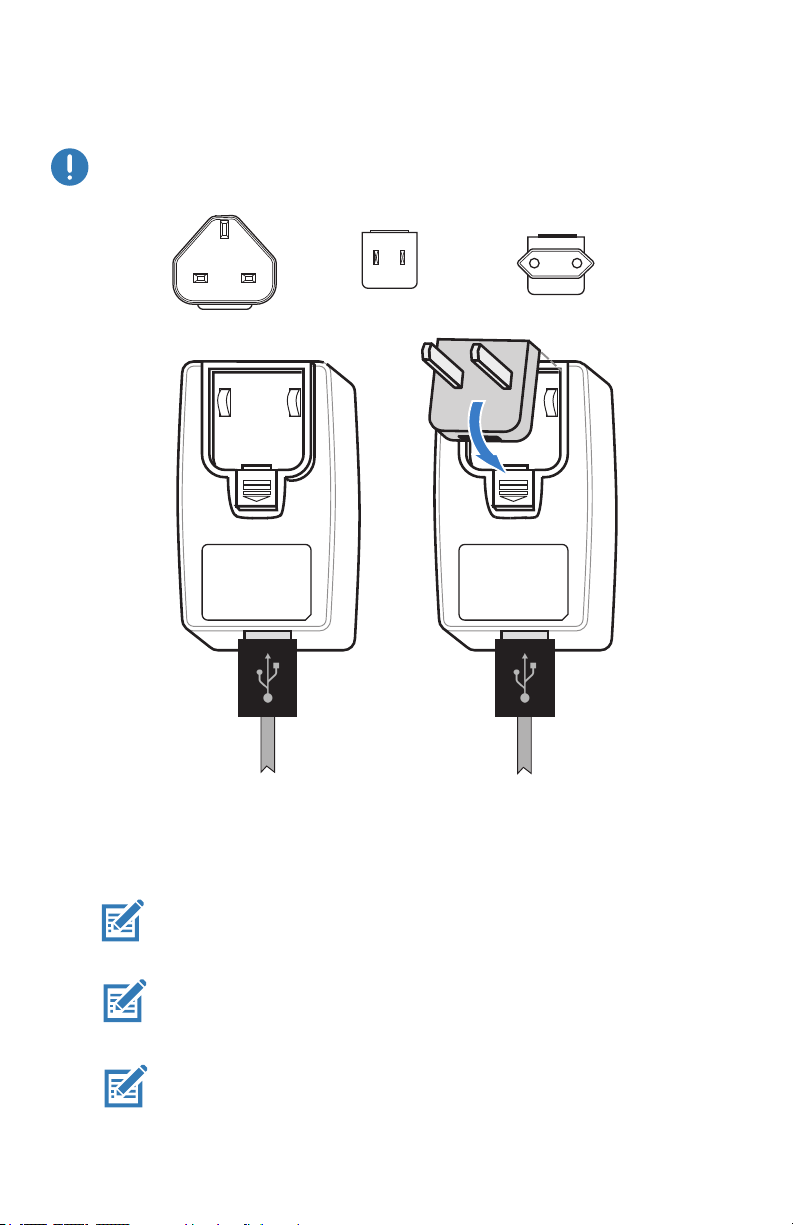
AC-to-USB Charger
Important • You must charge the battery fully before using the printer
for the rst time.
Adapter Plugs
Install the adapter plug into the Power Supply by hooking the top
edge into the adapter’s receptacle cavity and rotating it until it
snaps into place.
Note • Verify that the adapter plug shipped with your Printer is the
correct one for your region.
Note • The battery can also be charged using the 3-slot charger, but
only after rmware modications have been made to the charger.
See “Printer Accessories” on page 56 for part numbers.
Note • Batteries which have reached partial charge capacity may be
used, however, it is recommended that you allow the batteries to
reach a full charge to maintain maximum battery life.
19
ZQ220 User Guide
Page 20
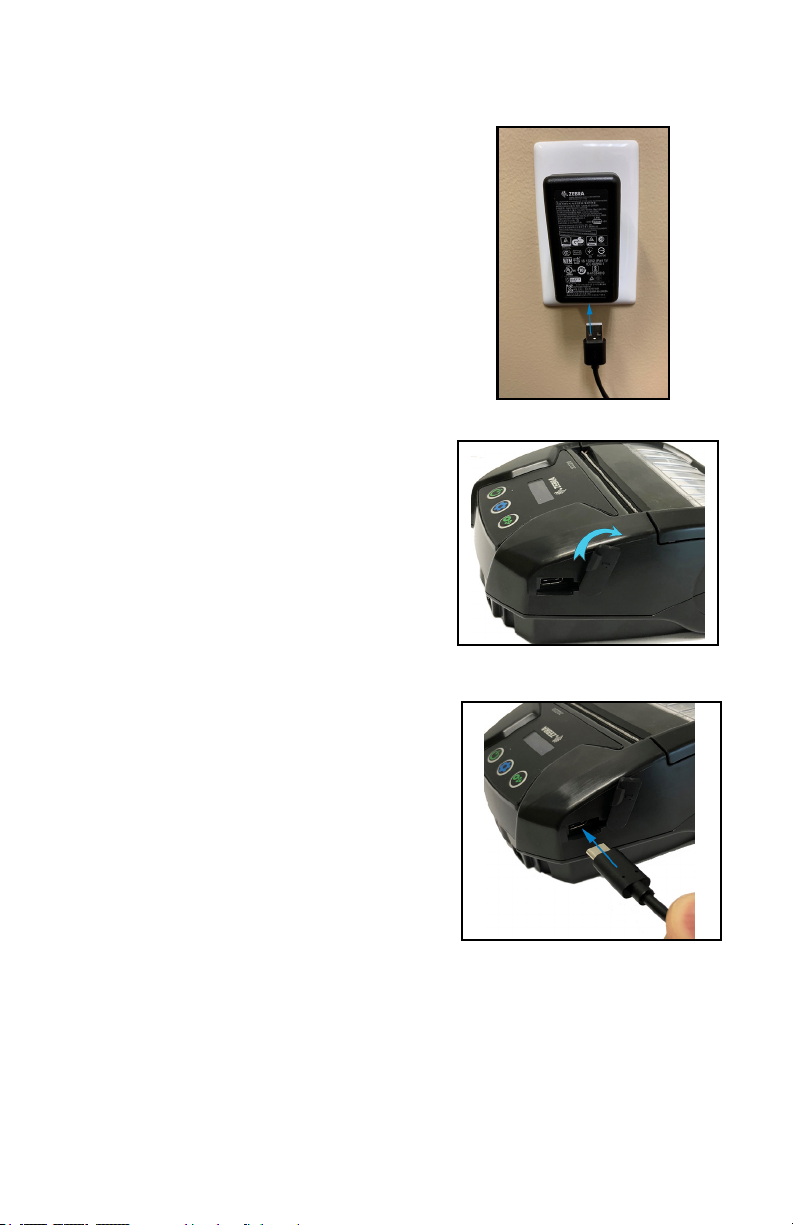
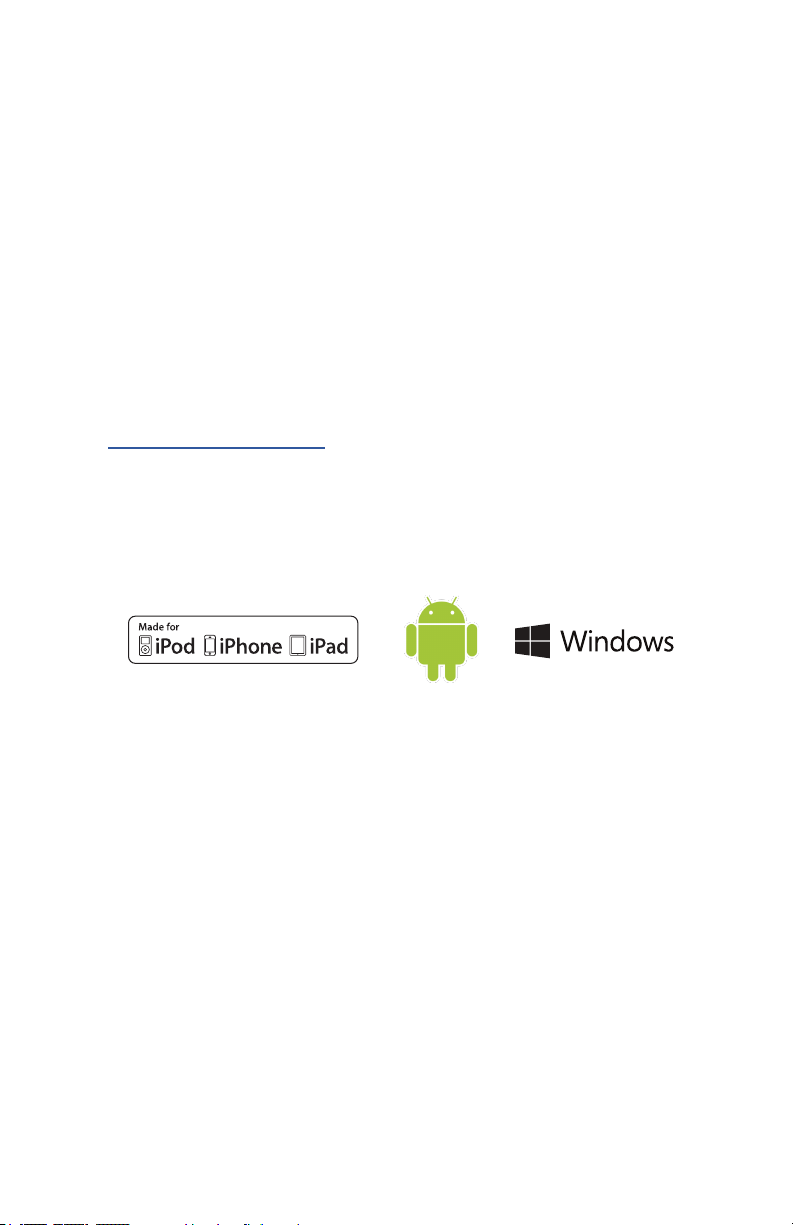
AC-to-USB Charger (cont.)
1. Connect the male end of the
AC-to-USB adapter into an
appropriate power outlet using
the appropriate plug for your
region.
2. Connect one end of the USB
charging cable to the adapter
(as shown).
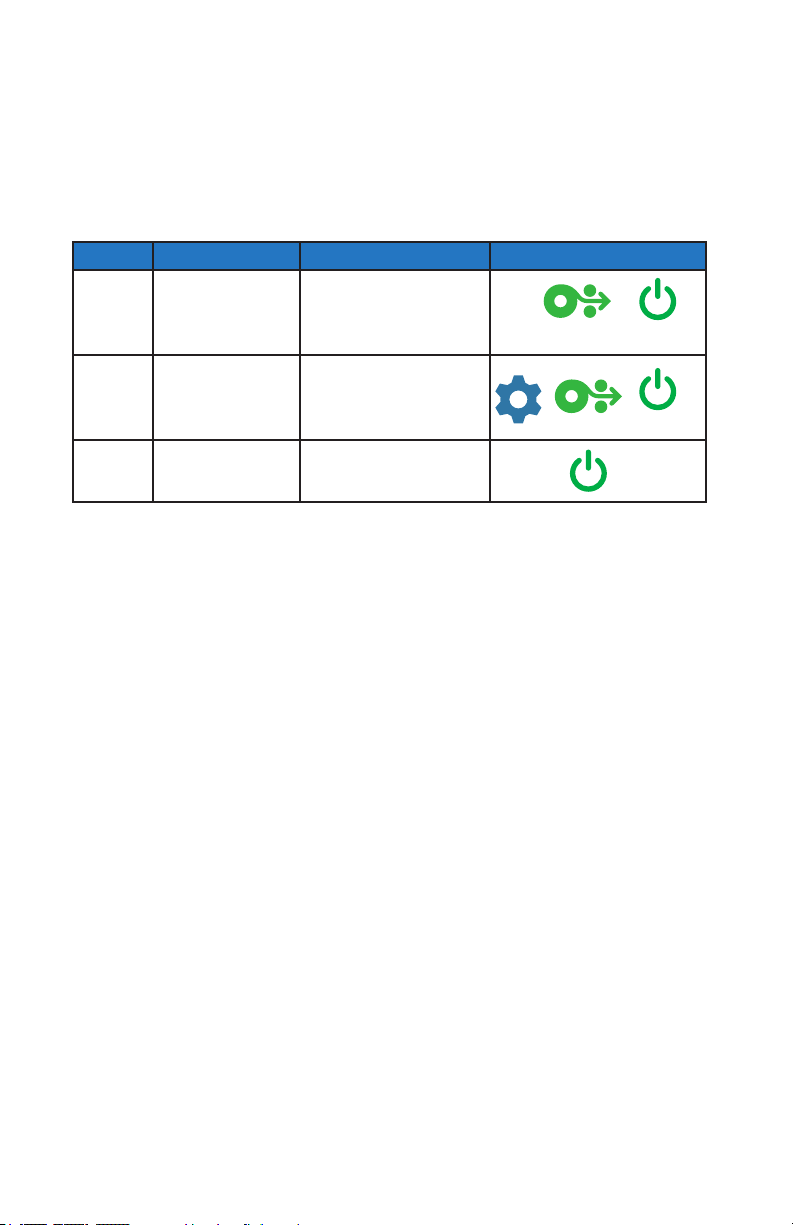
3. Rotate the rubber door on the
side of the printer to access
the USB port.
4. Connect the other end of the
USB cable to the port on the
side of the printer.
5. The printer will power-on and
begin charging.
20
ZQ220 User Guide
Page 21

Loading Media in the Printer
Loading Media Procedure
Press the Latch Release Lever on the side of the printer as shown in
“1” below. The Media Cover will open automatically.
Rotate the Media Cover back completely as shown in “2”, exposing
the media compartment.
Figure 3 • Opening the Printer
Media
Cover
Media
Compartment
Latch
Release Lever
1
Note • The printers also have the option to use media spacers
(p/n KIT-MPV-MD3SPR1-5) which are placed in the media compartment
and allow the printer to accept 76.2 mm (3 in.), 58 mm (2.3 in.) and 50.8
mm (2 in.) wide paper.
21
ZQ220 User Guide
Page 22

Insert the roll of media (in the orientation shown) in the media
compartment. The media roll will be able to spin freely inside the
media compartment.
Figure 4 • Loading Media (cont.)
Close the media cover as shown below and the paper will advance
through the paper path.
Figure 5 • Loading Media (cont.)
Pull Media out of
Printer
Close Media
Cover
Note • Please refer to the Programming Guide (P1099958-001) for
information on changing the setting to adjust the media feed length
via a Set-Get-Do (SGD).
22
ZQ220 User Guide
Page 23

Operator Controls
The ZQ220 printer comes equipped with a three-button user
interface for menu navigation (see “Figure 6 • Control Panel” on
page 23). The printer also features an OLED display which stays
lit while the printer is powered on to indicate to the user that the
printer is on.
Standard User Controls
The standard controls have three (3) buttons that perform the
following user functions.
• The Power Button turns the printer on and off.
• The Media Feed Button advances a length of media which is
determined by the type of media being used. Label media will be
advanced to the next gap or bar sense marker. Journal (plain)
media will be advanced by a length determined by the printer’s
software. When in Conguration Screen mode, the Feed Button
may be used to select a function highlighted on the display.
• The Conguration Button allows the user to scroll between
functions on the display.
Figure 6 • Control Panel
Power Button
Press to turn unit on.
Printer boots up in
approx. 1 second.
Press for 5 seconds to
turn unit off.
Conguration Button
Press to alter printer
parameters, print a conguration report or dismiss
an acknowledged message.
23
ZQ220 User Guide
Media Feed Button
Press to advance a blank
label or a software-determined
length of journal media.
Press to navigate while in
Conguration Screen mode.
Page 24

LCD Control Panel
The LCD control panel allows the user to view content in one of
three modes: Operation Screen mode; Information Screen mode;
and Conguration Screen mode. The default mode which the user
sees upon powering up the printer is Operation Screen mode. This
mode is the display shown when the printer is idle, printing and/or
receiving data and has no need to convey information beyond icons
shown on the display. The LCD can display up to ve (5) status
icons, including Status, Media, Data, Bluetooth and Battery.
• Status Icons: Convey the following printer status conditions:
Ready : Indicates printer is fully operational.
Warning : Indicates there is a condition the user should be
aware of but the printer is still functional.
Error : Indicates there is something wrong with the printer
that prevents some basic functionality from being used.
• Media Icon: Conveys information about the printer’s media.
Media Present : Media is loaded and ready to print.
Media Out : No media loaded in the printer.
Door Open : Media cover is unlatched.
• Data Icons:
: Printer is not receiving data.
: Printer is receiving data.
• Bluetooth Icon: Determines the state of the Bluetooth radio.
Connected:
Disconnected: No icon
• Battery Icon: Displays battery charge status.
Battery Level : 0 to 4 bars.
Battery Level while charging : 0 to 4 bars with lightning bolt.
Power from USB : Battery with USB icon inside.
Battery Low: Battery icon with zero bars.
Charge Error : Battery with error icon inside.
24
ZQ220 User Guide
Page 25

Information Screen
The Information Screen is displayed when text must be used to
convey information to the user. The display is split into two viewing
areas: The top portion will display the same icons previously
described on the Operation Screen; the bottom portion will display
text messages. There are two (2) types of messages that can be
displayed on the Information Screen as described below.
1. Timed Messages: These messages will appear for a specic
period of time, and then be removed. For example, after
powering up the printer and the printer is ready to print, the
message “PRINTER READY” will appear for 30 seconds.
ZQ220
PRINTER READY
2. User Activity Messages: These messages require that the user
performs a needed action. For example, when the printer is out
of media, a “MEDIA OUT” message will be displayed until new
media is loaded in the printer.
ZQ220
MEDIA OUT
25
ZQ220 User Guide
Page 26

The following User Activity Messages are supported by the printer:
DOWNLOAD FW HEAD UNDERTEMP
DOWNLOAD FAILED BATTERY TOO LOW
PAIRING: 123456 MEDIA OUT
PAIRING ONGOING HEAD OPEN
PAIRING ACCEPTED CHARGE ERROR
PAIRING REJECTED NO PRINTING
PAIRING FAILED BATTERY LOW
PAIRING SUCCESS PRINTER READY
HEAD OVERTEMP
When the Information Screen is used to display text messages, it
replaces the Operation Screen. When the text message has been
acknowledged, the printer will return to the Operation Screen.
Conguration Screen
The Conguration Screen is used as a means to alter printer
parameters or initiate printing a conguration label. Specically, the
user will be able to change the following parameters.
• Darkness. The user can increase or decrease the darkness by
pressing the Media Feed button.
• Power Up. The user can select either Feed On or Feed Off by
pressing the Media Feed button.
• Head Close: The user can select either Feed On or Feed Off by
pressing the Media Feed button.
• Print: The user can print a conguration report by pressing the
Media Feed button.
• MAC Address: The user can select either Display On or Display
Off by pressing the Media Feed button.
• Exit Conguration: The user can exit the Conguration Screen
and return to the Operation Screen by pressing the Media Feed
button.
26
ZQ220 User Guide
Page 27
Buttons
The user has the ability to use the printer’s multi-button interface to
run the following power-up and runtime sequences.
Power-Up Sequences
Seq. # Function Keys Button
1 Two Key Report Hold down Feed button
2 Forced Download Hold down the
3 Turn printer On
or Off
while pressing and
releasing the Power
Button
Conguration and Feed
buttons while pressing
Power Button
Power button
Verify the Printer is Working
Before you connect the printer to your computer or portable data
terminal, make sure that the printer is in proper working order. You
can do this by printing a conguration label using the “two key”
method. If you can’t get this label to print, refer to “Troubleshooting
Topics” on page 46.
Printing a Conguration Report
1. Turn the printer off. Load the media compartment with journal
media (media with no black bars or gaps on the back).
2. Press and hold the Feed Button.
3. Press and release the Power button and keep the Feed button
pressed. When printing starts, release the Feed button. The
unit will print a line of interlocking “x” characters to ensure all
elements of the print head are working, print out the version of
software loaded in the printer, and then print the report.
You can also print a conguration report by turning the printer on,
pressing the Conguration button multiple times until you get to
the SETTINGS-PRINT screen, and then pressing the Media Feed
button to print the report.
27
ZQ220 User Guide
Page 28
The report indicates model, serial number, baud rate, and more
detailed information on the printer’s conguration and parameter
settings. (See “Troubleshooting Tests” on page 48 for sample
printouts and a further discussion on how to use the conguration
label as a diagnostic tool.)
Connecting the Printer
The printer must establish communications with a host terminal
which sends the data to be printed. Communications occur in four
(4) basic ways:
• Via a cable using USB 2.0 protocols. Windows drivers that
support printing via Serial, USB and the network are included
in the Zebra Designer Driver which can be downloaded from
www.zebra.com/drivers.
• Via Bluetooth short range radio frequency link.
• Via WinMobile®, Blackberry®, and Android® devices using
standard Bluetooth protocol.
• Via Bluetooth to an Apple® iOS device.
28
ZQ220 User Guide
Page 29

Cable Communication
Caution • The printer should be turned off before connecting or
disconnecting a communications cable.
The standard cable connection for the printers is a USB 2.0
communication and charging cable. One end of the cable has a
USB Type-A connector while the other end is USB Type-C.
USB Communications
The small Type C connector on the USB cable plugs into the
printer. The connector is not keyed and therefore can be plugged in
in either direction. However, do not try to force the cable if it does
not plug in. The Type A end of the cable must be plugged into any
USB 2.0 host port. The printers utilize the USB cable to charge the
printer (see ”AC-to-USB Charger (cont.)” on page 20) and for
communications between the printer and computer.
Figure 7 • USB Cable Communication with PC
LAN
ZebraDesigner Driver uses Windows drivers that support printing
via USB and the network. Other terminals or communications
29
ZQ220 User Guide
Page 30

devices may require the installation of special drivers to use the
USB connection. Consult the factory for further details.
Zebra Setup Utilities
Before you start to congure your printer for use on a Local Area
Network (LAN), you will need some basic information which
will enable you to establish the network conguration for your
printer. Zebra Setup Utilities (ZSU) provides a quick and easy
way to congure your printers for a variety of purposes, including
setting them up for wireless communications either on a Local
Area Network (LAN) or using the international Bluetooth™
communications standard.
Once ZSU has been downloaded to your computer, attach the USB
cable to the printer and computer as shown in Figure 6. Refer to
Wireless Conguration Guide (p/n P1048352-001) to follow the
steps necessary for setting up and conguring your printer via ZSU.
Go to https://www.zebra.com/us/en/support-downloads.html
to download ZSU and the Wireless Conguration Guide. (See
“Appendix G” on page 62 for details on navigating zebra.com.)
Wireless Communications with Bluetooth
Bluetooth is a worldwide standard for the exchange of data
between two devices via radio frequencies. This form of pointto-point communication does not require access points or other
infrastructure. Bluetooth radios are relatively low powered to help
prevent interference with other devices running at similar radio
frequencies. This limits the range of a Bluetooth device to about
10 meters (32 feet). The default for the printers is Class 2. Both
the printer and the device it communicates with must follow the
Bluetooth standard.
Bluetooth Networking Overview
Each Bluetooth enabled printer is identied by a unique Bluetooth
Device Address (BDADDR). This address resembles a MAC
address whereby the rst three bytes are vendor, and the last
three bytes are device (e.g. 00:22:58:3C:B8:CB). This address
is labeled on the back of the printer via a barcode for ease of
pairing (see “Figure 8 • BT Communications” on page 33). In
order to exchange data, two Bluetooth enabled devices must
establish a connection. Bluetooth software is always running in
30
ZQ220 User Guide
Page 31

the background, ready to respond to connection requests. One
device (known as the client) must request/initiate a connection with
another. The second device (the server) then accepts or rejects
the connection. A Bluetooth enabled printer will normally act as a
slave creating a miniature network with the terminal sometimes
referred to as a “piconet”. Discovery identies Bluetooth devices
that are available for pairing whereby the master device broadcasts
a discovery request and devices respond. If a device is not
discoverable, the master cannot pair unless it knows the BDADDR
or has previously paired with the device. If both devices support
Bluetooth 2.1 or higher they will use Security Level 4 Secure Simple
Pairing (SSP), a mandatory security architecture that features two
(2) association models: Numeric Comparison and Just Works (no
user conrmation).
Bluetooth Security Modes
Security Mode 1
If a BT>/= 2.1 device is pairing
with a BT</= 2.0 device, it falls
back to BT 2.0 compatibility
mode and behaves the same as
BT 2.0. If both devices are BT
>/= 2.1, Secure Simple Pairing
must be used according to the
BT spec.
Security Mode 2
If a BT >/= 2.1 device is pairing
with a BT </= 2.0 device, it falls
back to BT 2.0 compatibility
mode and behaves the same as
BT 2.0. If both devices are BT
>/= 2.1, Secure Simple Pairing
must be used according to the
BT spec.
Security Mode 3
If a BT >/= 2.1 device is pairing
with a BT </= 2.0 device, it falls
back to BT 2.0 compatibility
mode and behaves the same as
BT 2.0. If both devices are BT
>/= 2.1, Secure Simple Pairing
must be used according to the
BT spec.
Security Mode 4: Simple Secure Pairing
Simple Secure Pairing: a new security architecture introduced supported in BT >= 2.1. Service-level
enforced, similar to mode 2. Mandatory when both devices are BT >= 2.1. There are four association
models currently supported by mode 4. Security requirements for services must be classied as one of the
following: authenticated link key required, unauthenticated link key required, or no security required. SSP
improves security through the addition of ECDH public key cryptography for protection against passive
eavesdropping and man-in-the-middle (MITM) attacks during pairing.
Numeric Comparison Just Works
Designed for situation where both devices
are capable of displaying a six-digit number
and allowing user to enter “yes” or “no”
response. During pairing, user enters “yes” if
number displayed on both devices matches
to complete pairing. Differs from the use of
PINs in legacy (BT<=2.0) pairing because the
number displayed for comparison is not used
for subsequent link key generation, so even if
it is viewed or captured by an attacker, it could
not be used to determine the resulting link or
encryption key.
Designed for situation where one (or
both) of the pairing devices has neither
a display nor keyboard for entering digits
(e.g., Bluetooth headset). It performs
authentication step 1 in the same manner
as as numeric comparison, but the user
cannot verify that both values match, so
MITM (man-in-the-middle) protection is not
provided. This is the only model in SSP
that does not provide authenticated link
keys.
31
ZQ220 User Guide
Page 32

Each mode, except for Just Works, has Man-In-The-Middle
(MITM) protection, meaning no third device can view the data
being passed between the two devices involved. The SSP mode
is usually negotiated automatically based on the capabilities
of both the master and slave. Lower security modes can be
disabled via the bluetooth.minimum_security_mode SGD.
The bluetooth.minimum_security_mode SGD sets the
lowest security level at which the printer will establish a Bluetooth
connection. The printer will always connect at a higher security
level if requested by the master device. To change the security
mode and security settings in the printers, use Zebra Setup Utilities.
Bluetooth Minimum Security Modes
Set-Get-Do BT Version of Master Device (>2.1)
bluetooth.minimum_security_mode=1
bluetooth.minimum_security_mode=2
bluetooth.minimum_security_mode=3
bluetooth.minimum_security_mode=4
bluetooth.bluetooth_PIN
Secure Simple Pairing
Just Works/Numeric Comparison
Secure Simple Pairing
Just Works/Numeric Comparison
Secure Simple Pairing
Numeric Comparison
Secure Simple Pairing
Numeric Comparison
Not Used
The ZQ220 printer also features bonding for Bluetooth. The printer
caches pairing info so devices stay paired through power cycles
and disconnects. This eliminates the need to re-pair on every
connection establishment.
The bluetooth.bonding SGD is on by default.
32
ZQ220 User Guide
Page 33

Note • For detailed information on Bluetooth, please refer
to the Bluetooth Wireless User Guide (P1068791-002) at:
http://www.zebra.com/us/en/support-downloads.html
In addition, the printers support a “scan and pair” function via a
handheld device and the MAC Address label on the bottom of the
printer (see “Figure 8 • BT Communications” on page 33). The
ZQ220 printer also features passive Near Field Communication
(NFC) technology. Using the “Print Touch” feature located on the
side of the printer, end users can automatically pair with a handheld
device that supports NFC technology. The NFC tag has the printer’s
BDADDR encoded in a URL on the tag. Simply touching the NFC
handheld device to the “Print Touch” icon on the printer will connect
and pair the handheld device to the printer.
Figure 8 • BT Communications
33
ZQ220 User Guide
Page 34

Setting Up the Software
The printer uses Zebra’s CPCL Programming language which was
designed for mobile printing applications. CPCL is fully described
in the CPCL Programming Guide (p/n P1073699-001) available
on-line at https://www.zebra.com/manuals. You can also use
ZebraDesigner Pro v2, Zebra’s Windows® based label creation
program which uses a graphical interface to create and edit labels
in either language. See “Appendix G” on page 62 for tips on
downloading the Designer Pro application from Zebra’s Web site.
Designing Labels
The following examples provide guidelines for designing labels
for the printers, specically for Gap Media, Black Bar Media
and Journal Media. The illustrations for each media type dene
recommended tolerances, keep-out zones and safe printing
zones designed to avoid any vertical registration issues during
printing. Dimensions are determined based on product registration
capabilities and Zebra-recommended media tolerances.
Figure 9 • Gap Media
Top edge of
die-cut label
1.59 mm
Bottom edge of
die-cut label
CPCL Label
1.25 mm
Safe Printing Zone
1.25 mm
ZQ220 User Guide
Height
Max Label Height = “H” = 2.5 mm
34
1.59 mm
Media Feed Direction
“H”
Page 35

Figure 10 • Journal Media
Safe Printing Zone
1.59 mm
Figure 11 • Black Bar Label Media
1.25 mm
CPCL Label
Height
1.59 mm
Media Feed Direction
Black Bar
1.59 mm1.59 mm
Black Bar
Safe Printing Zone
Safe Printing Zone
1.25 mm
Max Label Height = “H” = 2.5 mm
35
ZQ220 User Guide
Media Feed Direction
“H”
Page 36

Using Pre-Printed Receipt Media
The ZQ220 printer supports alignment of pre-printed receipts by
using the out of paper sensor located near the printhead.
Black Mark Dimensions (Receipt Media)
The reective media black marks (or black bar/marks) should
extend past the centerline of the roll on the front side of the paper.
• Minimum mark width: 0.59 in. (15 mm) perpendicular to the edge
of the media, and centered within the width of the roll.
• Mark length: 0.19 - 0.24 in. (4.8 - 6.0 mm) parallel to the edge of
the media.
Label Areas
The media/black bar sensor detects the dark, pre-printed bar on
the media, so a path in the center of the paper must be kept free of
dark, pre-printed graphics.
Note • Dark, pre-printed graphics refer to any symbols, barcodes,
text and/or colored areas that have been applied to the receipt paper
rolls before they have ever been used in the printer.
Figure 12 • Label Areas
Keep
dark color
pre-printed
graphics,
barcodes,
and text
out of the
path
of the
bar sensor.
0.59 in.
(15 mm)
36
ZQ220 User Guide
Page 37

Label Design Examples
1 2 3 4 5 6 7 8 9
This section shows examples of labels with and without problems.
Figure 13 • Label Design Examples
ACME COLLEGE
PARKING
VIOLATION
PROBLEM LABEL DESIGN
The dark color, pre-printed text and graphics
are in the path of the black bar at the bottom
of the receipt.
ACME RECEIPT
ACME COLLEGE
VIOLATION
PARKING
GOOD LABEL DESIGN
The center path to the black bar is free of
dark color, pre-printed text and graphics.
ACME RECEIPT
Quality FIRST
Quality FIRST
1 2 3 4 5 6 7 8 9
PROBLEM LABEL DESIGN
The dark color, pre-printed text and graphics
are in the path of the black bar at the bottom
of the receipt.
Note • Complete information on using pre-printed receipt paper can be found
GOOD LABEL DESIGN
The center path to the black bar is free of
dark color, pre-printed text and graphics.
in the FORM command in the CPCL Programming Guide (P1073699-001) at
www.zebra.com/manuals.
37
ZQ220 User Guide
Page 38

Keep-Out Areas
At times, incomplete printing of text and/or graphics appear
because minimum margins are not provided during label design.
The recommended minimum margins, or “keep out areas” are
shown in Figure 14.
Figure 14 • Keep Out Areas
0.59 in.
(15 mm)
* *
*
*
*
Receipt Paper with Black Bars
* Maintain a minimum “keep out area” of
1/16 in. (1.59 mm) from the two outer edges
of the paper roll and from the black bars.
Note • The length of each “continuous” receipt is determined by the data sent
to the printer.
Continuous Receipt Paper
(without Black Bars)
* Maintain a minimum “keep out area” of
1/16 in. (1.59 mm) from the two outer edges
of the paper roll.
Near Field Communication (NFC)
Devices using NFC may be active or passive. A passive device,
such as a ZQ220 printer with an NFC tag, contains information that
other devices can read but does not read any information itself. An
active device, such as a smartphone, can read the information on
the printer’s NFC tag, but the tag itself does nothing except transmit
the info to authorized devices.
*
38
ZQ220 User Guide
Page 39

Figure 15 • Near Field Communication (NFC) Pairing
http://www.zebra.com/nfc
NFC Use Cases
• Bluetooth Pairing – used to cause a tablet, smart phone or
terminal to automatically pair with the printer via a Bluetooth
connection, within the bounds of the security prole being used.
This shall contain the BT address and serial number of the printer.
• App launching – used to cause an app, developed either by
Zebra or a third party to be executed on a smartphone, tablet or
terminal
• Web site launching – used to cause a smart phone, tablet or
terminal to display a web site developed by Zebra or a third party
developer
Note • Tapping the Zebra Print Touch™ icon with a Near Field
Communication (NFC) enabled smartphone will provide instant
access to printer-specic information. For more information about
NFC and Zebra products, go to http://www.zebra.com/nfc. Bluetooth
pairing applications via NFC is also possible. Please see Zebra
Legacy SDK for more information.
39
ZQ220 User Guide
Page 40

Wearing the Printer
Swivel Belt Clip
The ZQ220 printer has a plastic swivel belt clip included as a
standard feature.
To install or remove the belt clip:
1. Remove the battery pack.
2. Slide the belt into the slot on the bottom of the printer.
3. Reinstall the battery pack.
To use the belt clip:
Hook the belt clip over your belt, and ensure that the clip is securely
attached to the belt. The belt clip will pivot to allow you to move
freely while wearing the printer.
Figure 16 • Printer with Belt Clip
Belt Clip
40
ZQ220 User Guide
Page 41

Adjustable Shoulder Strap
Refer to Figure 17 if your printer is equipped with the shoulder strap
option (p/n SG-MPV-SDSTP1-01).
Figure 17 • Using the Optional Shoulder Strap
1. Clip one end of the shoulder strap
to the post (circled) on the front
side of the printer.
2. Clip the opposite end of the strap
to the second post (circled) to
secure.
3. The printer will hang securely from
both clips and the strap can be
adjusted to be longer or shorter in
length.
41
ZQ220 User Guide
Page 42

Soft Case
The ZQ220 printer has a soft case option (p/n SG-MPV-SC31-01)
that also allows you to carry the printer using the shoulder strap.
Figure 18 • Using the Soft Case
1. Lift up the top ap of the soft case
which is secured with Velcro. Insert
the printer in the case with the
bottom of the printer facing forward
in this orientation.
2. Turn the case around to access the
LCD display and user controls
which are visible through the
plastic window. The bottom half
of the plastic window can be lifted
to access the paper path.
42
ZQ220 User Guide
Note • The shoulder strap option
can be used with the soft case by
securing the ends of the shoulder
strap on the two metal rings on the
soft case.
Page 43

Preventive Maintenance
Extending Battery Life
• Never expose the battery to direct sunlight or temperatures over
40° C (104° F) when charging.
• Always use a Zebra charger designed specically for Lithium-Ion
batteries. Use of any other kind of charger may damage the
battery.
• Use the correct media for your printing requirements. An
authorized Zebra re-seller can help you determine the optimum
media for your application.
• If you print the same text or graphic on every label, consider
using a pre-printed label.
• Choose the correct print darkness, and print speed for your
media.
• Use software handshaking (XON/XOFF) whenever possible.
• Remove the battery if the printer won’t be used for a day or more
and you’re not performing a maintenance charge.
• Consider purchasing an extra battery.
• Remember that any rechargeable battery will lose its ability to
maintain a charge over time. It can only be recharged a nite
number of times before it must be replaced. Always dispose of
batteries properly. Refer to “Appendix F” on page 61 for more
information on battery disposal.
General Cleaning Instructions
Caution • Avoid possible personal injury or damage to the printer.
Never insert any pointed or sharp objects into the printer. Always
turn off the printer before performing any cleaning procedures. Use
care when working near the tear bars as the edges are very sharp.
Warning • The printhead can get very hot after prolonged printing.
Allow it to cool off before attempting any cleaning procedures.
Only use a Zebra cleaning pen (not supplied with the printer) or
a cotton swab with 90% medical grade alcohol for cleaning the
printhead.
Caution • Use only cleaning agents specied in the following tables.
Zebra Technologies Corporation will not be responsible for damage
caused by any other cleaning materials used on this printer.
43
ZQ220 User Guide
Page 44
Cleaning
Area Method Interval
Printhead Use a Zebra cleaning pen to
Platen Surface
(Linered)
Platen Surface
(Linerless)
Scraper
(Linerless Units
Only)
Tear Bar Clean thoroughly with 90%
Printer Exterior Water-dampened cloth or
Printer Interior Gently brush out printer.
Interior of units
with Linerless
Platens
swab the thin gray line on the
printhead, cleaning the print
elements from the center
to the outside edges of the
printhead.
Rotate the platen roller and
clean it thoroughly with a
ber-free swab, or lint free,
clean, damp cloth lightly
moistened with medical
grade alcohol (90% pure or
better) (Figure 19).
Rotate platen roller and
clean with a ber-free swab
and 1 part liquid soap
(Palmolive or Dawn) and 25
parts water. Use pure water
to clean after soap/water
mixture. (Figure 20)
Use adhesive side of media
to clean scraper on linerless
units. (Figure 20)
medical grade alcohol and a
cotton swab. (Figure 19)
90% medical grade alcohol
wipe.
Ensure the Backside Sensor
and Frontside Sensor
windows are free of dust.
(Figure 19)
Clean thoroughly with 90%
medical grade alcohol and
a ber-free swab. (See
Figure 20 for specic target
areas for interior cleaning.)
After every ve rolls of media
(or more often, if needed).
When using linerless type
media, cleaning is required
after every roll of media.
After every ve rolls of media
(or more often, if needed)
Clean platen only if there is
an issue during printing, i.e.,
media not releasing from the
platen. (*See Note below.)
After every ve rolls of
media (or more often, if
needed).
As needed
As needed
As needed
After every ve rolls of media
(or more often, if needed).
Note • This is an emergency procedure only to remove foreign
contaminates (oils, dirt) from the platen that can damage the
printhead or other printer components. This procedure will shorten
or even exhaust the linerless platen’s useable life. If the linerless
media continues to jam after cleaning and feeding 1 to 2 meters (3 to
5 feet) of media, replace the platen.
44
ZQ220 User Guide
Page 45

Back Side
Sensor
Front Side
Sensor
Figure 19 • Cleaning (Linered)
Platen
Roller
Printhead
Elements
Tear Bar
Platen
Roller
Platen
Holder
Media
Compartment
Figure 20 • Cleaning (Linerless)
Scraper
Printhead
Elements
45
ZQ220 User Guide
Page 46

LCD Control Panel Indicators
The printer’s display shows several icons which indicate the status
of various printer functions (See “Information Screen” on page
25). Check the indicator status, then refer to the Troubleshooting
topic referenced in the chart to resolve the problem.
Troubleshooting Topics
1. No power:
• Check that battery is installed properly.
• Recharge or replace battery as necessary.
Caution • Always dispose of batteries properly. Refer to “Appendix
F” on page 61 for more information on proper battery disposal.
2. Media does not feed:
• Be sure media cover is closed and latched.
• Check media compartment for any binding.
• Ensure most recently printed label is removed (only in peel
mode).
• Ensure label sensor is not blocked.
3. Poor or faded print:
• Clean printhead.
• Check quality of media.
4. Partial or missing print:
• Check media alignment.
• Clean print head.
• Ensure media cover is properly closed and latched.
5. Garbled print:
• Check baud rate.
6. No print:
• Check baud rate.
• Replace battery.
• Check cable to terminal.
• Invalid label format or command structure. Place printer in
Communications Diagnostic (Hex Dump) Mode to diagnose
problem.
46
ZQ220 User Guide
Page 47

7. Reduced battery charge life:
• If battery is older than one year, short charge life may be due to
normal aging.
• Check battery health.
• Replace battery.
8. displayed:
• Data icon is normal while data is being received.
9. or displayed:
• Check that media is loaded and that the media cover is closed
and securely latched.
10. Communication error:
• Check baud rate.
• Replace cable to terminal.
11. Label jam:
• Open head release latch and media cover.
• Remove and reinstall media.
12. Skip Labels:
• Check media for top of form sense mark or label gap.
• Check that the maximum print eld has not been exceeded on
label.
• Ensure bar or gap sensor is not blocked or malfunctioning.
13. Blank LCD screen:
• Make sure printer is turned on.
• No application loaded or application corrupted: reload program.
14. No NFC Connectivity
• Ensure smartphone is positioned 3 inches (7.62 cm) or closer to
the Print Touch icon on the side of the printer.
47
ZQ220 User Guide
Page 48

Troubleshooting Tests
Printing a Conguration Label
To print out a listing of the printer’s current conguration, follow
these steps:
1. Turn the printer off. Load the media compartment with journal
media (media with no black bars printed on the back).
2. Press and hold the Feed Button.
3. Press and release the Power button and keep the Feed button
pressed. When printing starts, release the Feed button.
Note • The conguration report can also be pressing the
Conguration button and navigating to SETTINGS>PRINT.
Refer to “Figure 21 • Conguration Label” on page 50 for sample
conguration printouts.
Communications Diagnostics
If there is a problem transferring data between the computer
and the printer, try putting the printer in the Communications
Diagnostics Mode (also referred to as the “DUMP” mode). The
printer will print the ASCII characters and their text representation
(or the period ‘.’, if not a printable character) for any data received
from the host computer.
To enter Communications Diagnostics Mode:
1. Print a conguration label as described above.
2. At the end of the diagnostics report, the printer will print: “Press
FEED key to enter DUMP mode”.
3. Press the FEED key. The printer will print: “Entering DUMP
mode”.
Note • If the FEED key is not pressed within 3 seconds, the printer
will print “DUMP mode not entered” and will resume normal
operation.
4. At this point, the printer is in DUMP mode and will print the ASCII
hex codes of any data sent to it, and their text representation (or
“.” if not a printable character).
48
ZQ220 User Guide
Page 49

Additionally, a le with a “.dmp” extension containing the ASCII
information will be created and stored in the printer’s memory.
It can be viewed, “cloned” or deleted using the ZebraNet
Bridge application. (Refer to the ZebraNet Bridge Enterprise
documentation for more information.)
To terminate the Communications Diagnostics Mode and re-turn the
printer to normal operations:
1. Turn the printer OFF.
2. Wait 5 seconds.
3. Turn the printer ON.
Contacting Technical Support
If the printer fails to print the conguration label, or you encounter
problems not covered in the Troubleshooting Guide, contact
Zebra Technical Support. Technical Support addresses and phone
numbers for your area can be found in “Appendix H” on page 64
of this manual.
You will need to supply the following information:
• Model number and type (e.g., ZQ220)
• Unit serial number (Found on the large label on the back of the
printer, also found in the conguration label printout.)
• Product Conguration Code (PCC) (15 digit number found on the
label on the back of the unit)
49
ZQ220 User Guide
Page 50

Figure 21 • Conguration Label
Sensors: (Adj)
Front Bar:0
Head Temperature: 28 C
Voltage:7.18V
Resident Fonts:
Font Sizes Chars
------- ----- -----
0 0- 6 20-FF
1 0 20-80
2 0- 1 20-59
3 0 64-2E
4 0- 7 20-FF
5 0- 3 20-FF
6 0 20-44
7 0- 1 20-FF
(ICON .CPF) 0
(GBUNSG16.CPF) 0
(DEJAVU12.CPF) 0
(DEJAVU14.CPF) 0
(DEJAVU16.CPF) 0
(DEJAVU20.CPF) 0
File Directory:
File Size
--------------- --------
INDEX .WML 853
INFO_TIM.WML 394
INFO_ACK.WML 361
CONFIG .WML 2352
BTPAIR .WML 1217
ICON .CPF 4988
TT0003M .TTF 169188
GBUNSG16.CPF 1420810
DEJAVU12.CPF 5323
DEJAVU14.CPF 7001
DEJAVU16.CPF 8183
DEJAVU20.CPF 10288
2KEY .TXT 1748
10632000 Bytes Free
End of report
Press FEED key to enter
Diagnostics Mode
XXXXXXXXXXXXXXXXXXXXXXXXXXXXXX
Zebra ZQ220
Serial Number:
XXZSJ182500525
PCC: ZQ22-A0E02KE-00
Name: XXZSJ182500525
Firmware: V88.01.01P563
RAM
Chksum: 12DF
Build Date Nov 2 2018
Build Time 08:33:47
Universal Serial Bus:
2.0 Full Speed Device
Manufacturer String: Zebra Tec
hnologies
Product String: ZTC ZQ620-203d
pi CPCL
ID string: off
Bluetooth:
Bluetooth Spec: 4.1
Firmware: 5.5.3
Date: 10/03/2017
Local Name:
XXZSJ182500525
Discoverable: on
Security Mode: 1
Enable: on
Address: OC:61:CF:24:86:18
0C61CF24861B
Power Management:
In-activity Timeout:1200 Secs
Low-battery Timeout:60 Secs
Voltage :7.18V
Low-bat Warning :7.14V
Low-bat Shut-down :6.82V
Power On Cycles :3
Memory:
Flash :16777215 Bytes
RAM :16711679 Bytes
Label:
Width : 72 mm
Height: 8191 mm
Printhead Test
Identies Printer
as a ZQ220
Printer Serial
Number
Firmware Version
BluetoothTM
Radio Address
Flash and RAM
Memory Installed
50
ZQ220 User Guide
Page 51

Figure 21a • Conguration Label (cont.)
Sensors: (Adj)
Front Bar:0
Head Temperature: 28 C
Voltage:7.18V
Resident Fonts:
Font Sizes Chars
------- ----- ---- 0 0- 6 20-FF
1 0 20-80
2 0- 1 20-59
3 0 64-2E
4 0- 7 20-FF
5 0- 3 20-FF
6 0 20-44
7 0- 1 20-FF
(ICON .CPF) 0
(GBUNSG16.CPF) 0
(DEJAVU12.CPF) 0
(DEJAVU14.CPF) 0
(DEJAVU16.CPF) 0
(DEJAVU20.CPF) 0
File Directory:
File Size
--------------- ------- INDEX .WML 853
INFO_TIM.WML 394
INFO_ACK.WML 361
CONFIG .WML 2352
BTPAIR .WML 1217
ICON .CPF 4988
TT0003M .TTF 169188
GBUNSG16.CPF 1420810
DEJAVU12.CPF 5323
DEJAVU14.CPF 7001
DEJAVU16.CPF 8183
DEJAVU20.CPF 10288
2KEY .TXT 1748
10632000 Bytes Free
End of report
Press FEED key to enter
Diagnostics Mode
Resident Human
Readable Fonts
Installed
Files loaded in
printer memory
(includes prescaled or scalable
fonts)
51
ZQ220 User Guide
Page 52

Specications
Note • Printer specications are subject to change without notice.
Printing Specications
Parameter ZQ220
Print Width Up to 72 mm (2.91 in.)
Print Speed 63.5 mm (2.5 in.)/second
Printhead Burn
Line to Tear Edge
Distance
Printhead Life 390K inches of paper feed MTBF when using Zebra media.
Print Density 203 dots/in. or better
Memory and Communications Specications
Parameter ZQ220
Flash Memory 16 MB
SDRAM Memory 16 MB
Wireless
Communications
Embedded Dual Mode Bluetooth 2.1+EDR/4.1 Low Energy with
integrated antenna and modular certication
4.8 mm (0.19 in.)
1
1
1. Memory conguration on your printer may be ascertained by printing a conguration
label as detailed on “Printing a Conguration Label” on page 48.
52
ZQ220 User Guide
Page 53

Label Specications
Parameter ZQ220
Media Width Standard:80 mm +/- 0.75 mm (3.15 in. +/- 0.02 in.)
Min/Max Label
Length
Black Bar Sensor to
Printhead Burnline
Distance
Media Thickness
(except Tag)
Max Tag Thickness 0.1397 mm (5.5 mils)
Max Label Roll
Outer Diameter
Inner Core
Diameters
Black Mark Location The reective media black marks should be centered on media
Black Mark
Dimensions
Note • Use Zebra brand direct thermal media that is outside wound.
Media may be reective (black mark) sensing, or transmissive (gap)
sensing, die-cut, continuous or linerless. For die-cut labels, use only
full auto dies.
*Optional: 76.2 mm +/- 0.65 mm (3 in. +/- 0.025 in.)
*Optional: 58 mm +/- 0.65 mm (2.28 in. +/- 0.025 in.)
*Optional: 50.8 mm +/- 0.65 mm (2 in. +/- 0.025 in.)
12.5 mm (0.5 in.) minimum (Unconstrained max length in line
print mode)
16 mm (0.63 in.) +/-
0.635 mm (0.025 in.)
0.058 to 0.1575 mm (2.28 to 6.2 mils)
50 mm (1.97 in.)
Media 3.5 mm or less: 12.7 mm (0.5 in.)
Media > 3.5 mm: 22.2 mm (0.875 in.)
roll
Minimum mark width: 12.7 mm (0.5 in.)
Mark length: 2.4-11 mm (0.09 to 0.43 in.)
* Optional media requires the use of spacers (KIT-MPV-MD3SPR1-5).
Physical, Environmental and Electrical Specications
Parameter ZQ220
Weight w/ battery 1.0 lbs. (0.45 kg)
Operating: -10 °C to 50 °C (14 °F to 122 °F)
Temperature
Relative Humidity Operating/Storage: 10% to 90% non-condensing
Battery 2-Cell Battery Lithium-Ion, 7.26 VDC (nominal);
Intrusion
Protection (IP)
Rating
IP43 (without optional environmental case)
Storage: -20 °C to 60 °C
(-4 °F to 140 °F)
Charging: 0 °C to 40°C
(32 °F to 104 °F)
53
ZQ220 User Guide
Page 54

CPCL Font and Bar Code Specications and Commands
Standard Fonts SWIS721.CSF - CPCL scalable font; DEJAVU12.CPF - Pre-
Available Optional Fonts Optional International character sets: Chinese 16 x 16 (trad), 16
Linear Bar Codes
Available
2-D Bar Codes Available RSS:
Rotation Angles 0°, 90°, 180°, and 270°
Scaled fonts; DEJAVU14.CPF - Pre-Scaled fonts; DEJAVU16.
CPF - Pre-Scaled fonts; DEJAVU20.CPF - Pre-Scaled
fonts; English/Latin9 built in EZ320; MUTOS16.CPF - Utah,
Vietnamese, 16x16 bitmap; CTUNMK24.CPF - M Kai;
Traditional Chinese, 24x24 bitmap; NSMTTC16.CPF - New
Sans MT; Traditional Chinese, 16x16 bitmap.
x 16 (simplied),24 x 24 (simplied); Japanese 16 x 16, 24 x 24
Barcode (CPCL Command)
Codabar (CODABAR, CODABAR 16)
UCC/EAN 128 (UCCEAN128)
Code 39 (39, 39C, F39, F39C)
Code 93 (93)
Code 128 (128)
EAN 8, 13, 2 and 5 digit extensions (EAN8, EAN82, EAN85,
EAN13, EAN132, and EAN135)
EAN-8 Composite (EAN8)
EAN-13 Composite (EAN13)
Plessey (PLESSEY)
lnterleaved 2 of 5 (I2OF5)
MSI (MSI, MSI10, MSI1110)
FIM/POSTNET (FIM)
TLC39 (TLC39)
UCC Composite A/B/C (128(Auto))
UPCA, 2 and 5 digit extensions (UPCA2 and UPCA5)
UPCA Composite (UPCA)
UPCE, 2 and 5 digit extensions (UPCE2 and UPCE5)
UPCE Composite (UPCE)
Aztec (AZTEC)
MaxiCode (MAXICODE)
PDF 417 (PDF-417)
QR Code (QR)
RSS-14 (RSS-Subtype 1)
RSS-14 Truncated (RSS-Subtype 2)
RSS-14 Stacked (RSS-Subtype 3)
RSS-14 Stacked Omnidirectional
(RSS-Subtype 4)
RSS Limited (RSS-Subtype 5)
RSS Expanded (RSS-Subtype 6)
54
ZQ220 User Guide
Page 55
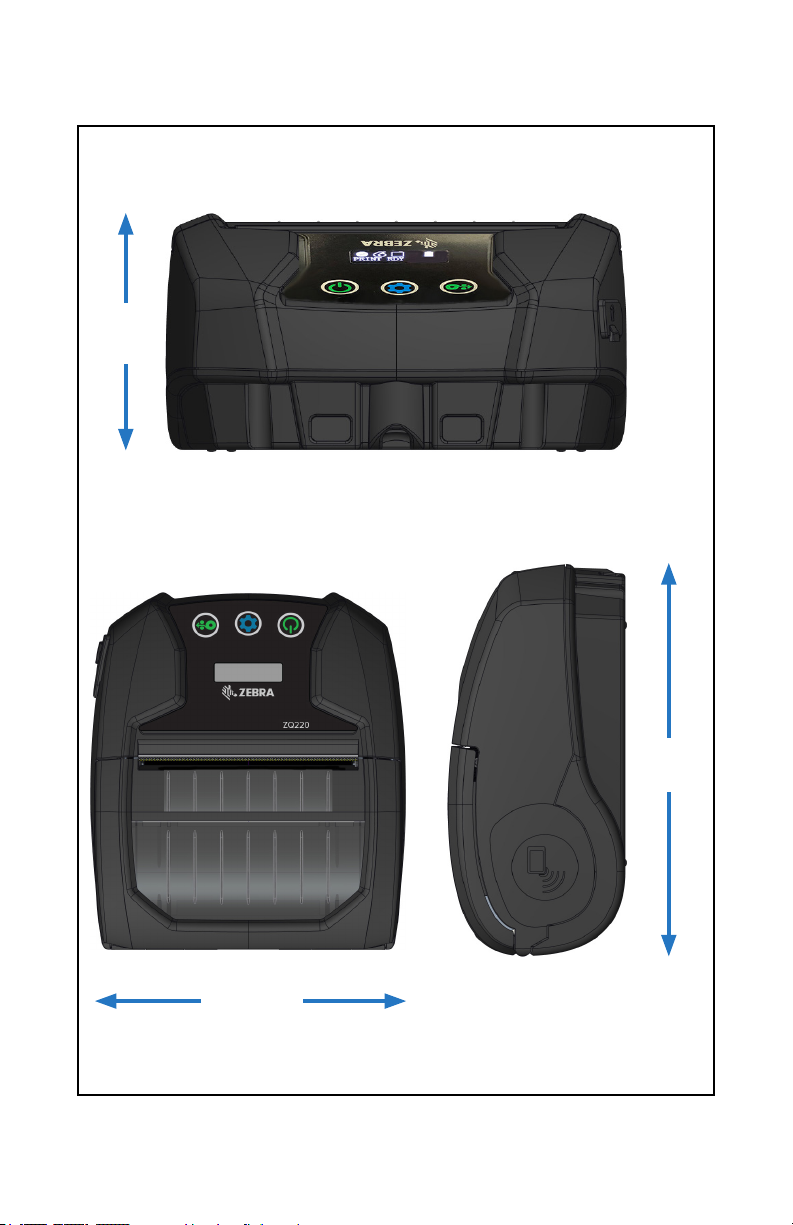
Figure 22 • Printer Dimensions
58.8 mm
(2.31 in.)
Height
129.5 mm
(5.09 in.)
114.5 mm
(4.5 in.)
Width Length
55
ZQ220 User Guide
Page 56

Printer Accessories
Region Part # Description
NALA PWR-WUA5V12W0US AC to USB Adaptor; ZQ3 (US)
EU PWR-WUA5V12W0GB AC to USB Adaptor; ZQ3 (UK)
EU PWR-WUA5V12W0EU AC to USB Adaptor; ZQ3 (EU)
LA PWR-WUA5V12W0BR AC to USB Adaptor; ZQ3 (BR)
AP PWR-WUA5V12W0IN AC to USB Adaptor; ZQ3 (IN)
AP PWR-WUA5V12W0KR AC to USB Adaptor; ZQ3 (KR)
WW CHG-AUTO-USB1-01 Cigarette to USB Adapter; ZQ3
WW BTRY-MPV-24MA1-01 Spare 2450 mAh battery for ZQ220/ZQ120
WW KIT-MPV-MD3SPR1-5 Spacers for ZR138/ZQ120/ZQ220 media
WW SG-MPV-SC31-01 Soft Case ZR138/ZQ120/ZQ220
WW SG-MPV-SDSTP1-01 Shoulder Strap ZQ220/ZQ120/ZR138
WW KIT-MPM-BLTCLP5-01 Belt Clip for ZQ300 Series, Qty. 5
NA SAC-MPP-3BCHGUS1-01 3-slot Battery Charger, ZQ6/ZQ5 (US)
EU SAC-MPP-3BCHGEU1-01 3-slot Battery Charger, ZQ6/ZQ5 (EU)
EU SAC-MPP-3BCHGUK1-01 3-slot Battery Charger, ZQ6/ZQ5 (UK)
LA SAC-MPP-3BCHGBR1-01 3-slot Battery Charger, ZQ6/ZQ5 (BR)
AP SAC-MPP-3BCHGAU1-01 3-slot Battery Charger, ZQ6/ZQ5 (AU)
AP SAC-MPP-3BCHGCN1-01 3-slot Battery Charger, ZQ6/ZQ5 (CN)
AP SAC-MPP-3BCHGIN1-01 3-slot Battery Charger, ZQ6/ZQ5 (IN)
WW CBL-MPV-USB1-01 USB Cable (Type A to Type C), ZQ220 QTY1
WW CBL-MPV-USB1-05 USB Cable (Type A to Type C), ZQ220 QTY5
compartment to accept 3” (76.2), 2.3”(58) and 2”
(50.8) wide paper, (5 sets; 2 per set)
Note • For more information on Zebra accessories, go to
https://www.zebra.com/us/en/products/accessories/printer-print-engine.html.
Note • Refer to “Appendix A” on page 57 for additional information
on Data I/O cables.
Note • The 3-slot battery charger can only be used after rmware
modications have been made to the charger.
56
ZQ220 User Guide
Page 57

Appendix A
USB Cables
Part Numbers P1081545; ASSY,CABLE,USB A TO C
Pin 1
Pin 4
A1
B12
A12 A1
A1, B1, A12, B12
A6
A7
A4, B4, A9, B9
Type-C Plug Wire Type-A Plug
Pin
#
A1,B1,
A12,B12
A4,B4,A9,
B9
A5 CC See Note 1
B5 VCONN
A6 Dp1 3 UTP_Dp 3 D+
A7 Dn1 4 UTP_Dn 2 D-
Notes:
1. Pin A5 (CC) of the USB Type-C plug shall be connected to VBUS through resistor Rp (56 kΩ
+/- 5%).
2. Contacts B6 and B7 should not be present in the USB Type-C plug.
3. All VBUS pins shall be connected together within the USB Type-C plug. Bypass capacitors are
not required for the VBUS pins in this cable.
4. All ground return pins shall be connected together within the USB Tupe-C plug.
5. Shield and GND grounds shall be connected within the USB Type-C and USB 2.0 Standard-A
plugs on both ends of the cable assembly.
6. All UsB Type-C plug pins that are not listed in this table shall be open (not connected).
Signal
Name
GND 1 GND_PWrt1 4 GND
VBUS 2 PWR_VBUS1 1 VBUS
Shield Braid Shield Shell Shield
Wire
#
Signal
Name
Pin
#
-
Signal
Name
57
ZQ220 User Guide
Page 58

Appendix B
Media Supplies
To insure maximum printer life and consistent print quality and
performance for your individual application, it is recommended that
only media produced by Zebra be used.
Advantages include:
• Consistent quality and reliability of media products.
• Large range of stocked and standard formats.
• In-house custom format design service.
• Large production capacity which services the needs of many
large and small media consumers including major retail chains
world wide.
• Media products that meet or exceed industry standards.
For more information go the Zebra website (www.zebra.com) and
select the Products tab.
Appendix C
Maintenance Supplies
In addition to using quality media provided by Zebra, it is
recommended that the printer be cleaned as prescribed in
“Cleaning” on page 44. The following item is available for this
purpose:
• Cleaning Pen (12 pack): p/n 105950-035
58
ZQ220 User Guide
Page 59

Appendix D
Serial and PCC Number Locations
Serial Number
Barcode
PCC Barcode
Important • Due to compliance and customs restraints, an integrator
may not be able to ship a printer purchased in one country to
another country based on the limitations imposed by regional SKUs.
The country code identied in the printer SKU determines the area of
the world in which the printer can be used.
59
ZQ220 User Guide
Page 60

Appendix E
Battery Disposal
The EPA certied RBRC® Battery Recycling Seal
on the Lithium-Ion (Li-Ion) battery supplied with
your printer indicates Zebra Technologies
Corporation is voluntarily participating in an
industry program to collect and recycle these
batteries at the end of their useful life, when taken
out of service in the United States or Canada. The RBRC program
provides a convenient alternative to placing used Li-Ion batteries
into the trash or the municipal waste stream, which may be illegal in
your area.
Important • When the battery is depleted, insulate the terminals with
tape before disposal.
Please call 1-800-8-BATTERY for information on Li-Ion battery
recycling and disposal bans/restrictions in your area.
Zebra Technologies Corporation’s involvement in this program
is part of our commitment to preserving our environment and
conserving our natural resources.
Outside North America, please follow local battery recycling
guidelines.
Product Disposal
The majority of this printer’s components are
recyclable. Do not dispose of any printer
components in unsorted municipal waste. Please
dispose of the battery according to your local
regulations, and recycle the other printer
components accordingto your local standards.
For more information, please see our web site at:
http://www.zebra.com/environment.
60
ZQ220 User Guide
Page 61

Appendix F
Alert Messages
The printers will display the following alert messages on the
Information Screen to inform the user of various performance
conditions that might occur with the ZQ220.
Event Type English Phrase
Download Firmware User Activity Download FW
Download Failed User Activity Download Failed
BT Pairing PIN Timed – 30 seconds.
Conguration button accepts
pairing pin. If timeout expires,
go to BT Pairing Failed Alert.
BT Pairing Ongoing User Activity Pairing Ongoing
BT Pairing Accepted Timed – 5 seconds Pairing Accepted
BT Pairing Rejected Timed – 5 seconds Pairing Rejected
BT Pairing Failed Timed – 5 seconds Pairing Failed
BT Pairing Success Timed – 5 seconds Pairing Success
Head Over temp User Activity Head Overtemp
Head Under temp User Activity Head Undertemp
Battery Too Low User Activity Battery Too Low
Media Out User Activity Media Out
Head Open User Activity Head Open
Charge Error User Activity Charge Error
Battery Missing User Activity No Printing
Battery Low User Activity Battery Low
Printer Ready Timed – 30 seconds Printer Ready
Pairing: 123456
61
ZQ220 User Guide
Page 62

Appendix G
Using Zebra.com
The following examples illustrate the search function on Zebra’s
website for nding specic documents and downloads.
Example 1: Finding the User Guide.
Go to http://www.zebra.com/us/en/support-downloads.html
Type the appropriate printer name in search box.
Type Printer Name
(i.e., ZQ220)
Click on “Manuals” tab on the printer main page.
62
ZQ220 User Guide
Page 63

Click on the dropdown menu to choose your language, and then
click on the download button next to the selected manual.
63
ZQ220 User Guide
Page 64

Appendix H
Product Support
To contact product support in your region, go to:
https://www.zebra.com/contact.
When calling with a specic problem regarding your printer, please
have the following information on hand:
• Model number/type (e.g., ZQ220).
• Unit serial number.
• Product Conguration Code (PCC) (refer to “Appendix E” on page
60)
64
ZQ220 User Guide
Page 65

Index
A
Accessories 40–65, 56
Appendix A, USB Cables 58
Appendix B, Media Supplies 59
Appendix C, Maintenance Supplies 59
Appendix D, Parameters Menus 60
Appendix E, Battery Disposal 61
Appendix F, Alert Messages 62
Appendix G, Using Zebra.com 63
Appendix H, Product Support 65
B
Battery, installing 15
Battery pack
Power Precision 10
Battery Safety 18
Belt Clip 40
Black Mark Dimensions 35
Bluetooth 30
Bluetooth, minimum security modes
32
Bluetooth, networking 30
Bluetooth, security modes 31
C
Cable Communication 29
Charger, battery 18–65
Charger Safety 18
Communications Diagnostics 48
Conguration Label, sample 50
CPCL Font and Bar Code
Specications and Commands
54
D
Designing Labels 34
Dimensions, ZQ220 55
Document Conventions 7
G
General Cleaning Instructions 43
ZQ220 User Guide
Getting Ready to Print 15
H
Home Menu Screen 26
I
Installing the Battery 15
Introduction to the ZQ220 Printers 8
L
Label Areas 36
Label Design Examples 37
LCD Control Panel 24, 46
M
Made for iPhone (MFi) 12
Media, loading 21
N
Near Field Communication (NFC) 12,
38
P
Power-Up Sequences 27
Preventive Maintenance 43
Printer Status Icons 25
Printing Method
Direct Thermal 11
Programming language
CPCL 8
Q
QR Code 11
S
Shoulder Strap 41
Smart Battery, PowerPrecision+ 10
Smart Charger-2 (SC2) Single Battery
Charger 21
Soft Case 42
Specications, label 53
Specications, memory and
communications 52
Specications, physical, environmental
and electrical 55
65
Page 66

Specications, printing 52
Status Bar Icons 25
T
Troubleshooting, tests 48
Troubleshooting, topics 46
V
Verify printer is working 27
W
Wearing the Printer 40
Z
Zebra Setup Utilities 30
ZPL Font and Bar Code Specications
and Commands 55
ZQ220 Accessories 56
66
ZQ220 User Guide
Page 67

Zebra Technologies Corporation
3 Overlook Point
Lincolnshire, IL 60069 USA
P: +1 847.634.6700 or F: +1 847.913.8766
67
ZQ220 User Guide
 Loading...