

Page 1
Zebra ZP 450™
Desktop Thermal Printer
User Guide
Page 2

ii
© 2008 ZIH Corp.. All trademarks and registered trademarks are property of their
respective owners. All rights reserved.
This manual contains proprietary information of Zebra Technologies Corporation and its
subsidiaries (“Zebra Technologies”). It is intended solely for the information and use of
parties operating and maintaining the equipment described herein. Such proprietary
inform ation may not be used, reproduced, or disclosed to any other parties for any other
purpose without the express written permission of Zebra Technologies.
The copyrights in this manual and the software and/or firmware in the label printer
described therein are owned by ZI H Corp. Unauthorized reproduction of this manual or
the software and/or firmware in the label printer may result in imprisonm ent of up to one
year and fines of up to $10,000 (17 U.S.C.506). Copyright violators may be subject to
civil liability.
This product may contain ZPL ®, Z PL II®, and Z ebraLink™ programs; element Energy
3
Equalizer™ Circuit; E
®; and AGFA fonts. Software ©ZIH corp. All rights reserved
worldwide.
ZebraLink and all product names and numbers are trademarks, and Zebra, the Z ebra logo,
ZPL , ZPL II, Element Energy Equalizer circuit, and E3 Circuit are registered trademarks
of ZIH Corp. All rights reserved worldwide.Monotype®, Intellifont® and UFST® are
trademarks of Monotype Imaging, Inc. registered in the United States Patent and
Trademark Office and may be registered in certain jurisdictions.
CG Triumvirate is trademarks of Monotype Imaging, Inc. and may be registered in some
jurisdictions.
TrueType® is a trademark of Apple Computer, I nc. registered in the United States Patent
and Tradem ark Office and may be registered in certancertain jurisdictions.
Product Improvements
Continuous improvement of products is a policy of Zebra Technologies. All specifications
and designs are subject to change without notice.
Liability Disclaimer
Zebra Technologies takes steps to ensure that its published Engineering specifications and
manuals are correct; however, errors do occur. Zebra Technologies reserves the right to
correct any such errors and disclaims liability resulting therefrom.
Limitation of Liability
In no event shall Zebra Technologies or anyone else involved in the creation, production,
or delivery of the accompanying product (including hardware and software) be liable for
any damages whatsoever (including, without limitation, consequential damages including
loss of business profits, business interruption, or loss of business information) arising out
of the use of, the results of use of, or inability to use such product, even if Zebra
Technologies has been advised of the possibility of such damages. Some jurisdictions do
not allow the exclusion or limitation of incidental or consequential damages, so the above
limitation or exclusion may not apply to you.
Canadian DOC Compliance Statement
This Class B digital apparatus complies with Canadian ICES-003.
Cet appareil numérique de la classe B est conforme à la norme NMB-003 du Canada.
980546-003 B ZP 450™ User Gu ide 12/17/07
Page 3

FCC Compliance Statement
This device complies with Part 15 rules. Operation is subject to the following two conditions:
1. This device may not cause harmful interference, and
2. This device must accept any interference received, including interference that may cause
undesired operation.
This equipment has been tested and found to comply with the limits for Class B Digital
Devices, pursuant to Part 15 of the FCC Rules. These limits are designed to provide reasonable
protection against harmful interference when the equipment is operated in a residential
environment. This equipment generates, uses, and can radiate radio frequency energy and, if
not installed and used in accordance with the product manuals, may cause harmful interference
to radio communications. However, there is no guarantee that interference will not occur in a
particular installation. If this equipment does cause harmful interference to radio or television
reception, the user is encouraged to do one or more of the following measures:
• Reorient or relocate the receiving antenna.
• Increase the separation between the equipment and receiver.
• Connect the equipment into an outlet on a circuit different from that to which the receiver
is connected.
iii
• Consult the dealer or an experienced radio/TV technician for help.
The user is cautioned that any changes or modifications not expressly approved by Zebra
Technologies could void the user’s authority to operate the equipment. To ensure compliance,
this printer must be used with fully shielded communication cables.
ZP Family Printers
DO NOT VIEW DIRECTLY WITH OPTICAL INSTRUMENTS
Maximum output power:
Caution • CLA SS 1M LAS ER PRODUCT
INVISIBLE LASER RADIATION.
CLASS 1M LASER PRODUCT.
Wavelength:
Pulse duration:
0.657mW.
850nm.
Gap (Web) Sensor
moving.
Dispenser (Peel) Sensor
when the printer is in dispense mode and a label has
been printed but not removed. The Dispenser Sensor
laser is OFF when printer is not printing.
- ON continuously when motor is
- 5ms ON, 10.2ms OFF only
IEC 60825-1: 1993+A1:1997+A2:2001
• Vi ewin g th e laser ou tput wi th certai n opt ical i nstru ment s (f or exampl e, ey e loops, magnifiers and m i croscopes) within
a dis tance of 100mm m ay pose an ey e haz ard.
• Use of cont rol s or adjustm ent s or perf ormance of procedu res other than th ose speci f ied herei n may resul t in hazardous
radi ati on exposu re.
• Do not tam per or attem pt to repai r any se nsor i nsi de this product. No servi ceabl e sensors i nsi de.
• Do not star e into Gap ( Web) or Dispenser (Peel ) sen sors. Avoid possibl e exposure t o haz ardous laser radi ation s.
12/17/07 ZP 450™ User Guide 980546-003 B
Page 4

iv
Notes • ___________________________________________________________________
__________________________________________________________________________
__________________________________________________________________________
__________________________________________________________________________
__________________________________________________________________________
__________________________________________________________________________
__________________________________________________________________________
__________________________________________________________________________
__________________________________________________________________________
__________________________________________________________________________
980546-003 B ZP 450™ User Gu ide 12/17/07
Page 5

Contacts
Preface
This section provides y ou with contact information, document structure and organization, and
additional reference documents.
You can contact Zebra Technologies at any of the following:
Visit us at: www.zebra.com
Our Mailing Addresses:
Zebra Techn ologies Corporation
333 Corporate Woods Parkway
Vernon Hills, Illinois 60061.3109 U.S.A
Telephone: +1 847.793.2600
Toll-free (USA) +1 800.423.0422
Fax: +1 847.913.8766
Zebra Technologies Europe Limited
Zebra House
The Valley Centre, Gordon Road
High Wycombe
Buckinghamshire HP13 6EQ, UK
Telephone: +44 (0)1494 472872
Fax: +44 (0)1494 450103
12/17/07 ZP 450™ User Guide 980546-003 B
Page 6
Preface
vi
Environmental Management
Support
You can contact Zebra support at:
Web Address: www.zebra.com/SS/service_support.htm
Note • The web address is case-sensitive.
US Phone Number +1 847.913.2259
UK/International Phone Number +44 (0) 1494 768289
Environmental Management
Do not dispose of this product in unsorted municipal waste. This product is recy clable, and
should be recycled according to y our local standards.
For more information, please see our website at:
Web address: www.zebra.com/environment
Document Conventions
The following conventions are used throughout this document to convey certain information:
s
Alternate Color (online only) Cross-references contain links to other sections in this guide.
If you are viewing this guide online, click the blue text
to jump to its location.
Command Line Examples All command line examples appear in Courier New font.
For example, type the following to get to the Post-Install scripts in the
bin directory:
Ztools
Files and Directories All file names and directories appear in Courier New font. For
example, the
Zebra<version number>.t ar file and the /root directory.
Cautions, Important, Note, and Example
Caution • Warns you of the potential for electrostatic discharge.
Caution • Warns you of a potential electric shock situation.
Caution • Warns you of a situation where excessive heat could cause a burn.
980546-003 B ZP 450™ User Gu ide 12/17/07
Page 7

Preface
Related Documents
Caution • Advises you that failure to take or avoid a specific action could result in physical
harm to you.
Caution • Advises you that failure to take or avoid a specific action could result in physical
harm to the hardware.
Caution • Advises you need to wear protectiv e eyeware.
Important • Advises y ou of information that is essential to complete a task.
Note • Indicates neutral or positive information that emphasizes or supplements important
points of the main text.
vii
Example • Provides an example, often a scenario, to better clarify a section of text.
Tools • Tells you what tools you need to complete a given task.
Related Documents
The following documents might be helpful references:
• ZPL Programming Guide
• EPL Programm ing Guide
12/17/07 ZP 450™ User Guide 980546-003 B
Page 8

Preface
viii
Related Documents
Notes • ___________________________________________________________________
__________________________________________________________________________
__________________________________________________________________________
__________________________________________________________________________
__________________________________________________________________________
__________________________________________________________________________
__________________________________________________________________________
__________________________________________________________________________
__________________________________________________________________________
__________________________________________________________________________
980546-003 B ZP 450™ User Gu ide 12/17/07
Page 9

Contents
• Preface . . . . . . . . . . . . . . . . . . . . . . . . . . . . . . . . . . . . . . . . . . . . . . . . . . . . . . . . . v
Contacts . . . . . . . . . . . . . . . . . . . . . . . . . . . . . . . . . . . . . . . . . . . . . . . . . . . . . . . . . . . . . . . .v
Support . . . . . . . . . . . . . . . . . . . . . . . . . . . . . . . . . . . . . . . . . . . . . . . . . . . . . . . . . . . . . vi
Environmental Management. . . . . . . . . . . . . . . . . . . . . . . . . . . . . . . . . . . . . . . . . . . . . . . . vi
Document Conventions. . . . . . . . . . . . . . . . . . . . . . . . . . . . . . . . . . . . . . . . . . . . . . . . . . . . vi
Related Documents . . . . . . . . . . . . . . . . . . . . . . . . . . . . . . . . . . . . . . . . . . . . . . . . . . . . . . vii
1 • Introduction . . . . . . . . . . . . . . . . . . . . . . . . . . . . . . . . . . . . . . . . . . . . . . . . . . . . 1
What’s in the Box? . . . . . . . . . . . . . . . . . . . . . . . . . . . . . . . . . . . . . . . . . . . . . . . . . . . . . . . 2
Inspecting the Printer . . . . . . . . . . . . . . . . . . . . . . . . . . . . . . . . . . . . . . . . . . . . . . . . . . . . . 3
Mini-CD on Printer Storage. . . . . . . . . . . . . . . . . . . . . . . . . . . . . . . . . . . . . . . . . . . . . . 5
2 • Getting Started . . . . . . . . . . . . . . . . . . . . . . . . . . . . . . . . . . . . . . . . . . . . . . . . . . 7
Modes of Printing . . . . . . . . . . . . . . . . . . . . . . . . . . . . . . . . . . . . . . . . . . . . . . . . . . . . . . . . 7
Attaching Power . . . . . . . . . . . . . . . . . . . . . . . . . . . . . . . . . . . . . . . . . . . . . . . . . . . . . . . . . 8
Loading Roll Media . . . . . . . . . . . . . . . . . . . . . . . . . . . . . . . . . . . . . . . . . . . . . . . . . . . . . . . 9
Preparing Media . . . . . . . . . . . . . . . . . . . . . . . . . . . . . . . . . . . . . . . . . . . . . . . . . . . . . . 9
Placing the Roll in the Media Compartment . . . . . . . . . . . . . . . . . . . . . . . . . . . . . . . . 10
Operator Controls . . . . . . . . . . . . . . . . . . . . . . . . . . . . . . . . . . . . . . . . . . . . . . . . . . . . . . . 12
Printing a Test Label . . . . . . . . . . . . . . . . . . . . . . . . . . . . . . . . . . . . . . . . . . . . . . . . . . . . . 14
Hooking Up the Printer and Computer . . . . . . . . . . . . . . . . . . . . . . . . . . . . . . . . . . . . . . . 15
Interface Cable Requirements . . . . . . . . . . . . . . . . . . . . . . . . . . . . . . . . . . . . . . . . . . 15
Communicating with the Printer . . . . . . . . . . . . . . . . . . . . . . . . . . . . . . . . . . . . . . . . . 19
Adjusting the Print Width. . . . . . . . . . . . . . . . . . . . . . . . . . . . . . . . . . . . . . . . . . . . . . . . . . 20
Adjusting the Print Quality. . . . . . . . . . . . . . . . . . . . . . . . . . . . . . . . . . . . . . . . . . . . . . . . . 20
3 • Operations & Options . . . . . . . . . . . . . . . . . . . . . . . . . . . . . . . . . . . . . . . . . . . 21
Thermal Printing . . . . . . . . . . . . . . . . . . . . . . . . . . . . . . . . . . . . . . . . . . . . . . . . . . . . . . . . 22
Replacing Supplies. . . . . . . . . . . . . . . . . . . . . . . . . . . . . . . . . . . . . . . . . . . . . . . . . . . . . . 22
12/17/07 ZP 450™ User Guide 980546-003 B
Page 10

Contents
x
Printing in Dispenser Mode. . . . . . . . . . . . . . . . . . . . . . . . . . . . . . . . . . . . . . . . . . . . . . . . 23
Printing on Fan-Fold Media. . . . . . . . . . . . . . . . . . . . . . . . . . . . . . . . . . . . . . . . . . . . . . . . 28
ZebraNet® 10/100 Internal Print Server Option . . . . . . . . . . . . . . . . . . . . . . . . . . . . . . . . 29
Printer Network Configuration Status Label . . . . . . . . . . . . . . . . . . . . . . . . . . . . . . . . 30
Liner-less Media Printing . . . . . . . . . . . . . . . . . . . . . . . . . . . . . . . . . . . . . . . . . . . . . . . . . 31
Sending Files to the Printer. . . . . . . . . . . . . . . . . . . . . . . . . . . . . . . . . . . . . . . . . . . . . . . . 32
Transferring files with the Firmware Downloader . . . . . . . . . . . . . . . . . . . . . . . . . . . . 32
Media Sensing . . . . . . . . . . . . . . . . . . . . . . . . . . . . . . . . . . . . . . . . . . . . . . . . . . . . . . . . . 34
4 • Maintenance . . . . . . . . . . . . . . . . . . . . . . . . . . . . . . . . . . . . . . . . . . . . . . . . . . . 35
Cleaning . . . . . . . . . . . . . . . . . . . . . . . . . . . . . . . . . . . . . . . . . . . . . . . . . . . . . . . . . . . . . . 35
Printhead Cleaning . . . . . . . . . . . . . . . . . . . . . . . . . . . . . . . . . . . . . . . . . . . . . . . . . . . 36
Media Path Cleaning . . . . . . . . . . . . . . . . . . . . . . . . . . . . . . . . . . . . . . . . . . . . . . . . . 37
Platen Considerations. . . . . . . . . . . . . . . . . . . . . . . . . . . . . . . . . . . . . . . . . . . . . . . . . 39
Lubrication . . . . . . . . . . . . . . . . . . . . . . . . . . . . . . . . . . . . . . . . . . . . . . . . . . . . . . . . . . . . 40
Replacing the Platen. . . . . . . . . . . . . . . . . . . . . . . . . . . . . . . . . . . . . . . . . . . . . . . . . . . . . 41
Replacing the Printhead . . . . . . . . . . . . . . . . . . . . . . . . . . . . . . . . . . . . . . . . . . . . . . . . . . 43
5 • Troubleshooting . . . . . . . . . . . . . . . . . . . . . . . . . . . . . . . . . . . . . . . . . . . . . . . 45
Resolutions . . . . . . . . . . . . . . . . . . . . . . . . . . . . . . . . . . . . . . . . . . . . . . . . . . . . . . . . . . . . 45
Print Quality Problems . . . . . . . . . . . . . . . . . . . . . . . . . . . . . . . . . . . . . . . . . . . . . . . . . . . 47
Manual Calibration . . . . . . . . . . . . . . . . . . . . . . . . . . . . . . . . . . . . . . . . . . . . . . . . . . . . . . 49
Troubleshooting Tests. . . . . . . . . . . . . . . . . . . . . . . . . . . . . . . . . . . . . . . . . . . . . . . . . . . . 50
Printing a Configuration Label . . . . . . . . . . . . . . . . . . . . . . . . . . . . . . . . . . . . . . . . . . 50
Recalibration. . . . . . . . . . . . . . . . . . . . . . . . . . . . . . . . . . . . . . . . . . . . . . . . . . . . . . . . 50
Resetting the Factory Default Values . . . . . . . . . . . . . . . . . . . . . . . . . . . . . . . . . . . . . . . . 51
Feed Button Modes. . . . . . . . . . . . . . . . . . . . . . . . . . . . . . . . . . . . . . . . . . . . . . . . . . . . . . 53
Repackaging the Printer for Return . . . . . . . . . . . . . . . . . . . . . . . . . . . . . . . . . . . . . . . . . 55
6 • Interfaces . . . . . . . . . . . . . . . . . . . . . . . . . . . . . . . . . . . . . . . . . . . . . . . . . . . . . 57
Universal Serial Bus (USB) Connector. . . . . . . . . . . . . . . . . . . . . . . . . . . . . . . . . . . . . . . 57
Ethernet Interface . . . . . . . . . . . . . . . . . . . . . . . . . . . . . . . . . . . . . . . . . . . . . . . . . . . . . . . 58
Serial Port Interface . . . . . . . . . . . . . . . . . . . . . . . . . . . . . . . . . . . . . . . . . . . . . . . . . . . . . 59
980546-003 B ZP 450™ User Gu ide 12/17/07
Page 11

1
Introduction
This section describes what you get in your shipping box and provides an overview of printer
parts. This section also has procedures that describe how to open and close the printer and
report any problems.
Hello!
Thank you for choosing a Zebra® desktop printer, a high-quality on-demand printer
manufactured by the industry leader in quality, service, and value—Zebra Technologies
Corporation. For over 25 years, Zebra Technologies Corporation has provided customers with
the highest caliber of products and support.
Your printer is a high-quality on-demand printer. The printer provides direct-thermal printing.
This manual provides all of the information you will need to operate y our printer on a daily
basis. To create label formats, refer to your programming guide. This guide is available by
contacting y our distributor or dealer.
Your printer, when connected to a host computer, functions as a complete sy stem for printing
labels and tags.
Note • Many printer settings may also be controlled by your printer’s driver or label
preparation software. Refer to the driver or software documentation for more information.
12/17/07 ZP 450™ User Guide 980546-003 B
Page 12
Intro duction
2
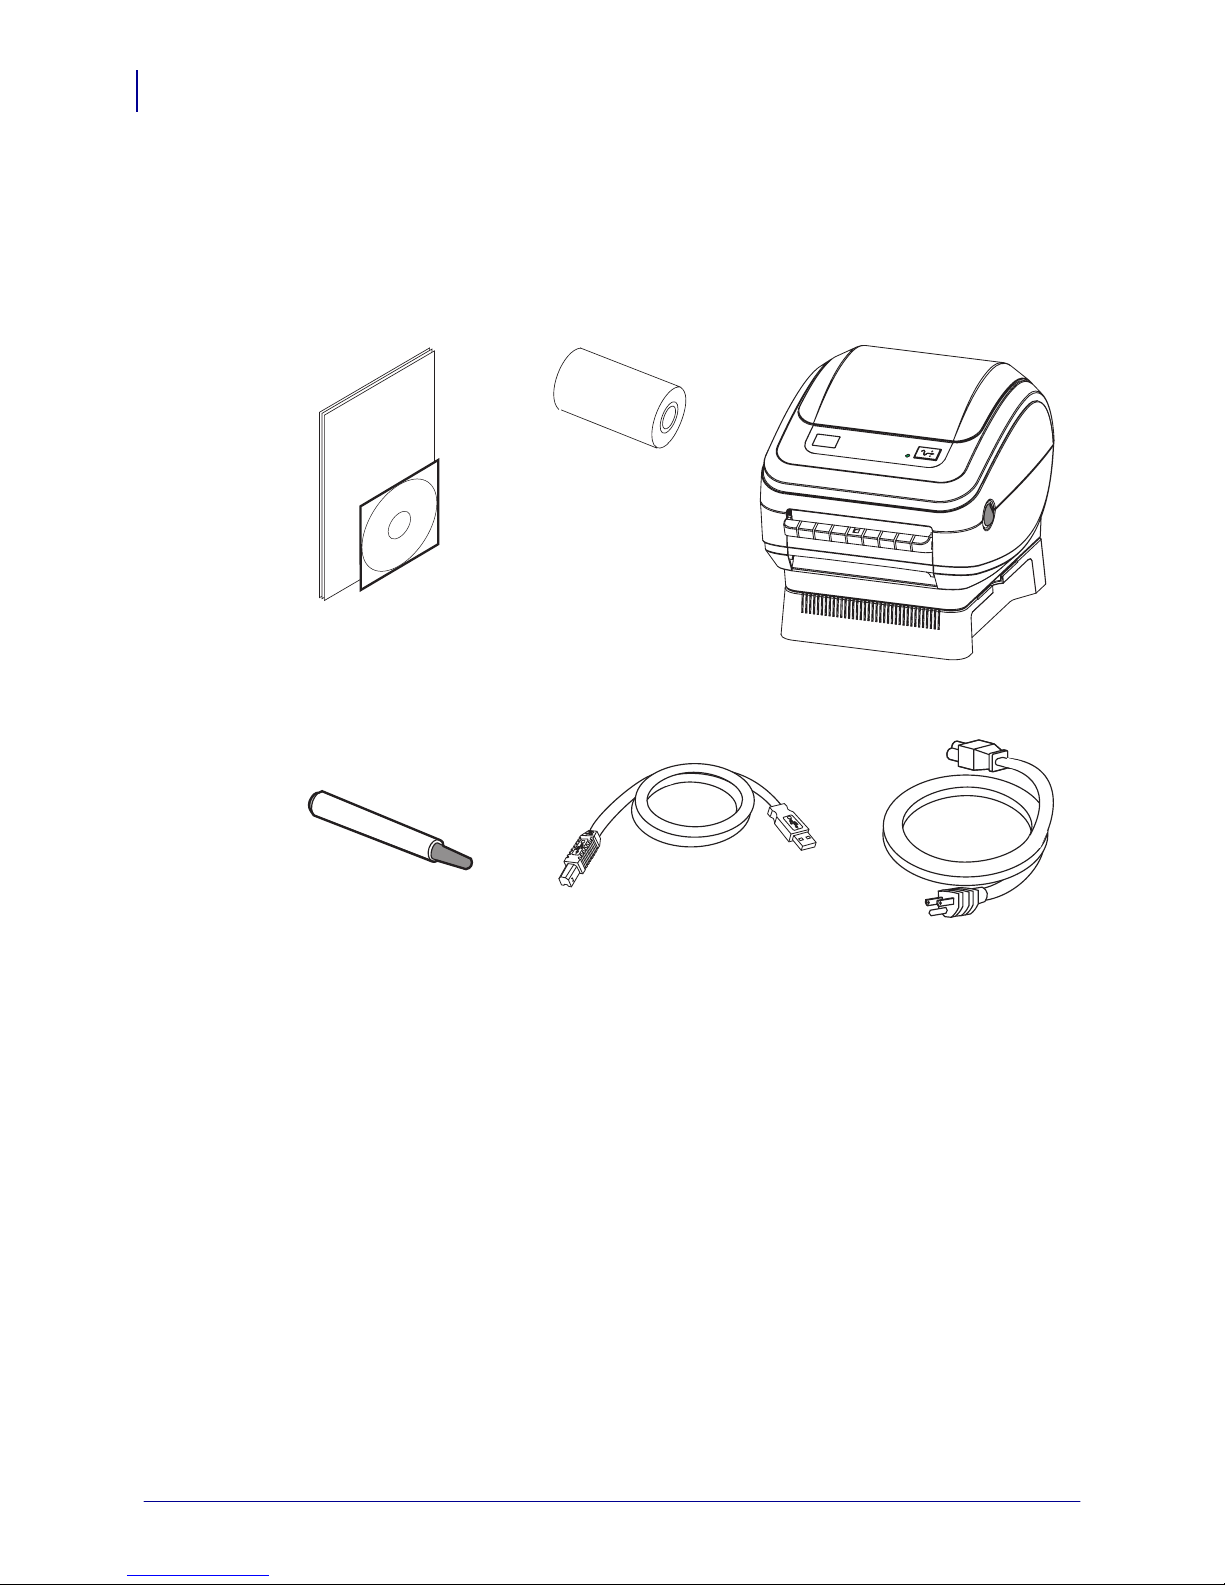
What’s in the Box?
What’s in the Box?
Save the carton and all packing materials in case y ou need to ship or store the printer later.
After unpacking, make sure you have all parts. Follow the procedures for inspecting the printer
to familiarize yourself with printer parts so you can follow the instructions in this book.
Prin ter
Sample
Labels
Documentation
and Software
Cl eaning
Pen
Interface
Cable
Powe r
Base
Power
Cord
980546-003 B ZP 450™ User Gu ide 12/17/07
Page 13
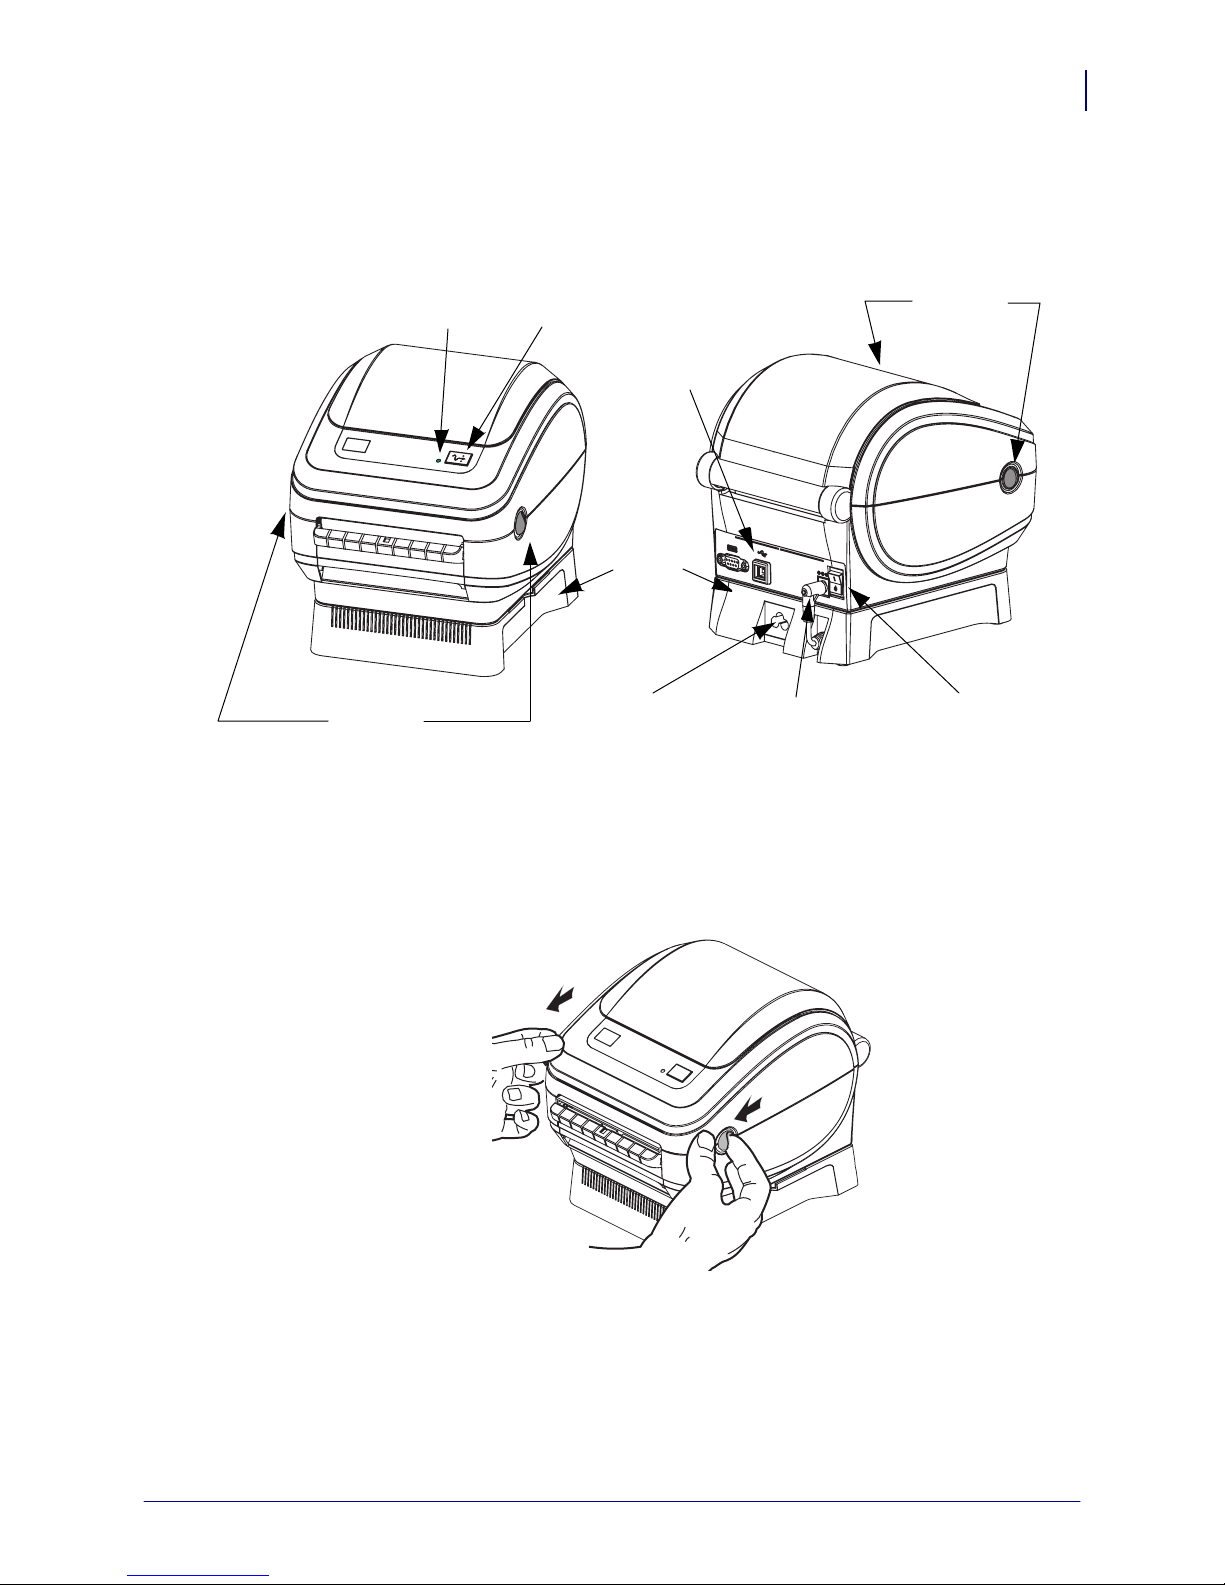
Inspecting the Printer
Look at the outside of the printer and make sure that all parts are present.
Introduction
Inspecting the Printer
3
Status
Light
Release
Latches
Opening the printer
Feed
Button
Interface
Connectors
Power
Base
Power
Supply
Receptacle
Active
Power
Light
Release
Latches
Power
Switch
To access the media compartment, you must open the printer. Pull the release latches towards
you and lift the cover.
12/17/07 ZP 450™ User Guide 980546-003 B
Page 14
Intro duction
4
Inspecting the Printer
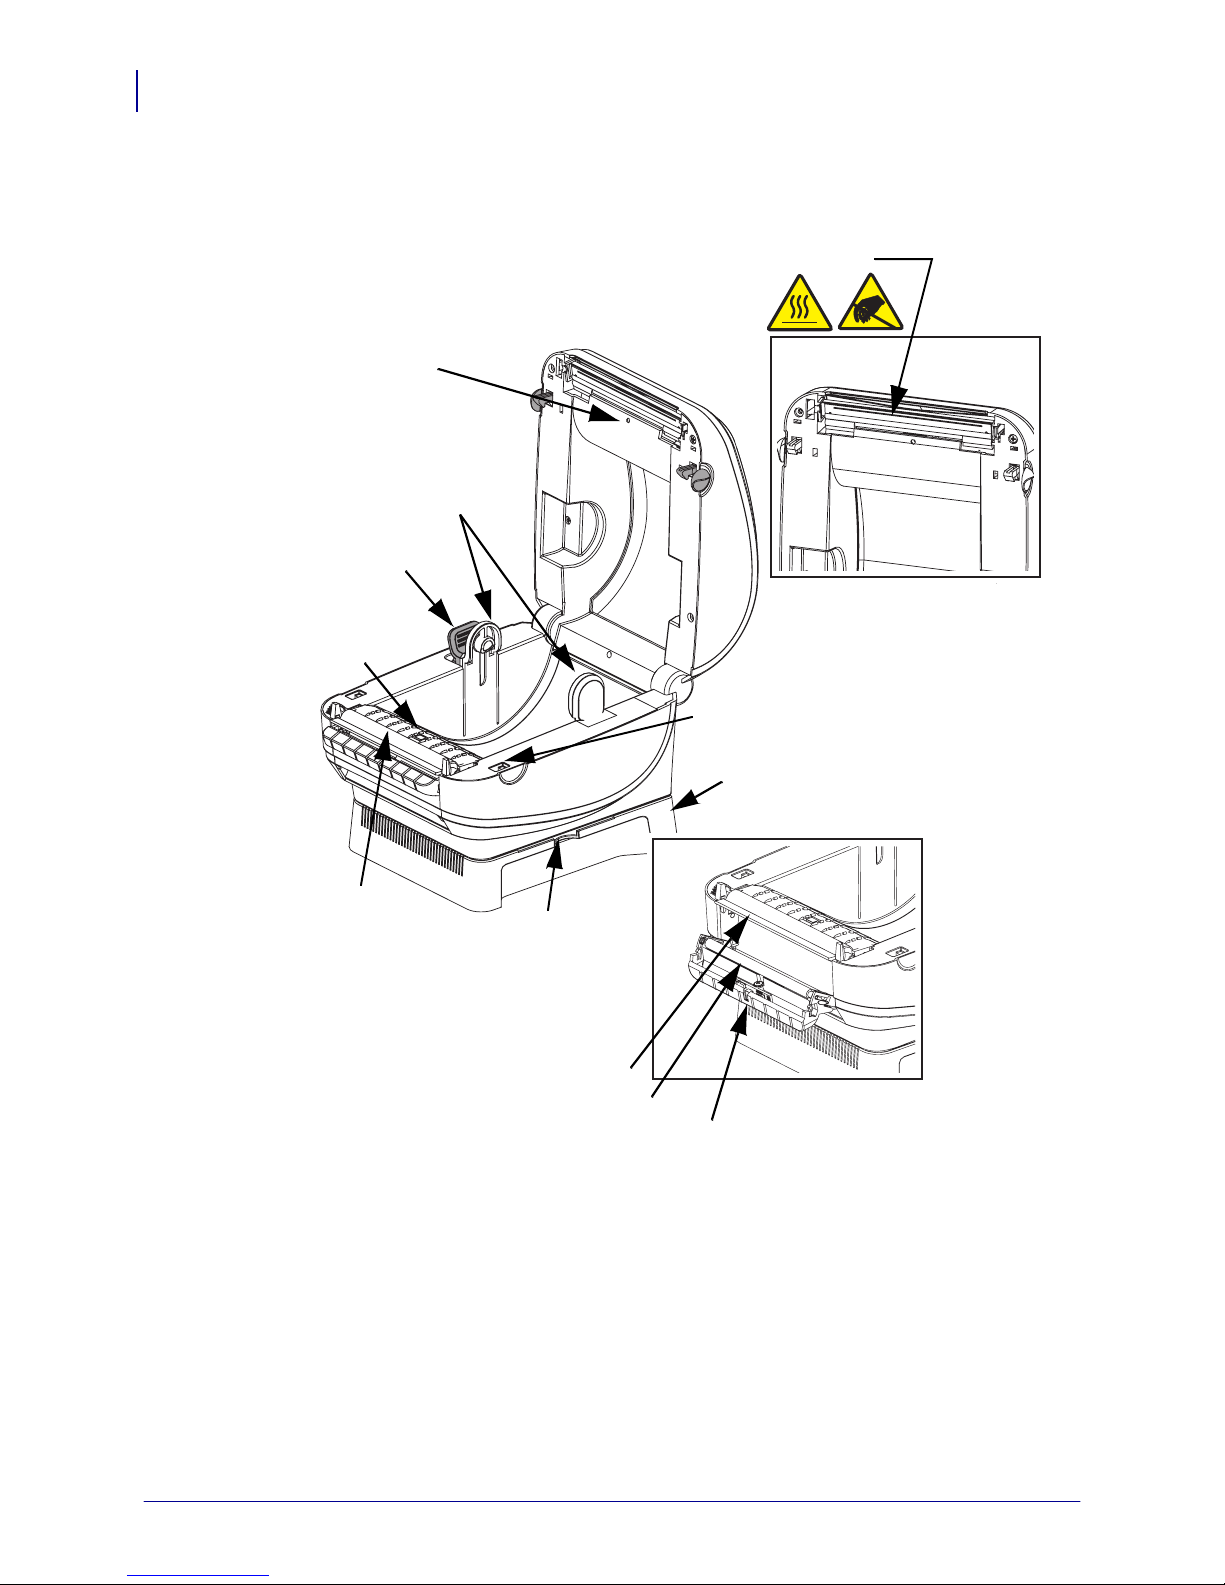
After opening the printer, check the media compartment.
Printhead
Gap
Sensor
Media
Hangers
Pull
Black-Line
Sensor
Platen
Roller
Head-Up Sensor
(inside)
Power Base
Dispenser Open
Mini-CD Storage
Bar
Roller
Sensor
980546-003 B ZP 450™ User Gu ide 12/17/07
Page 15
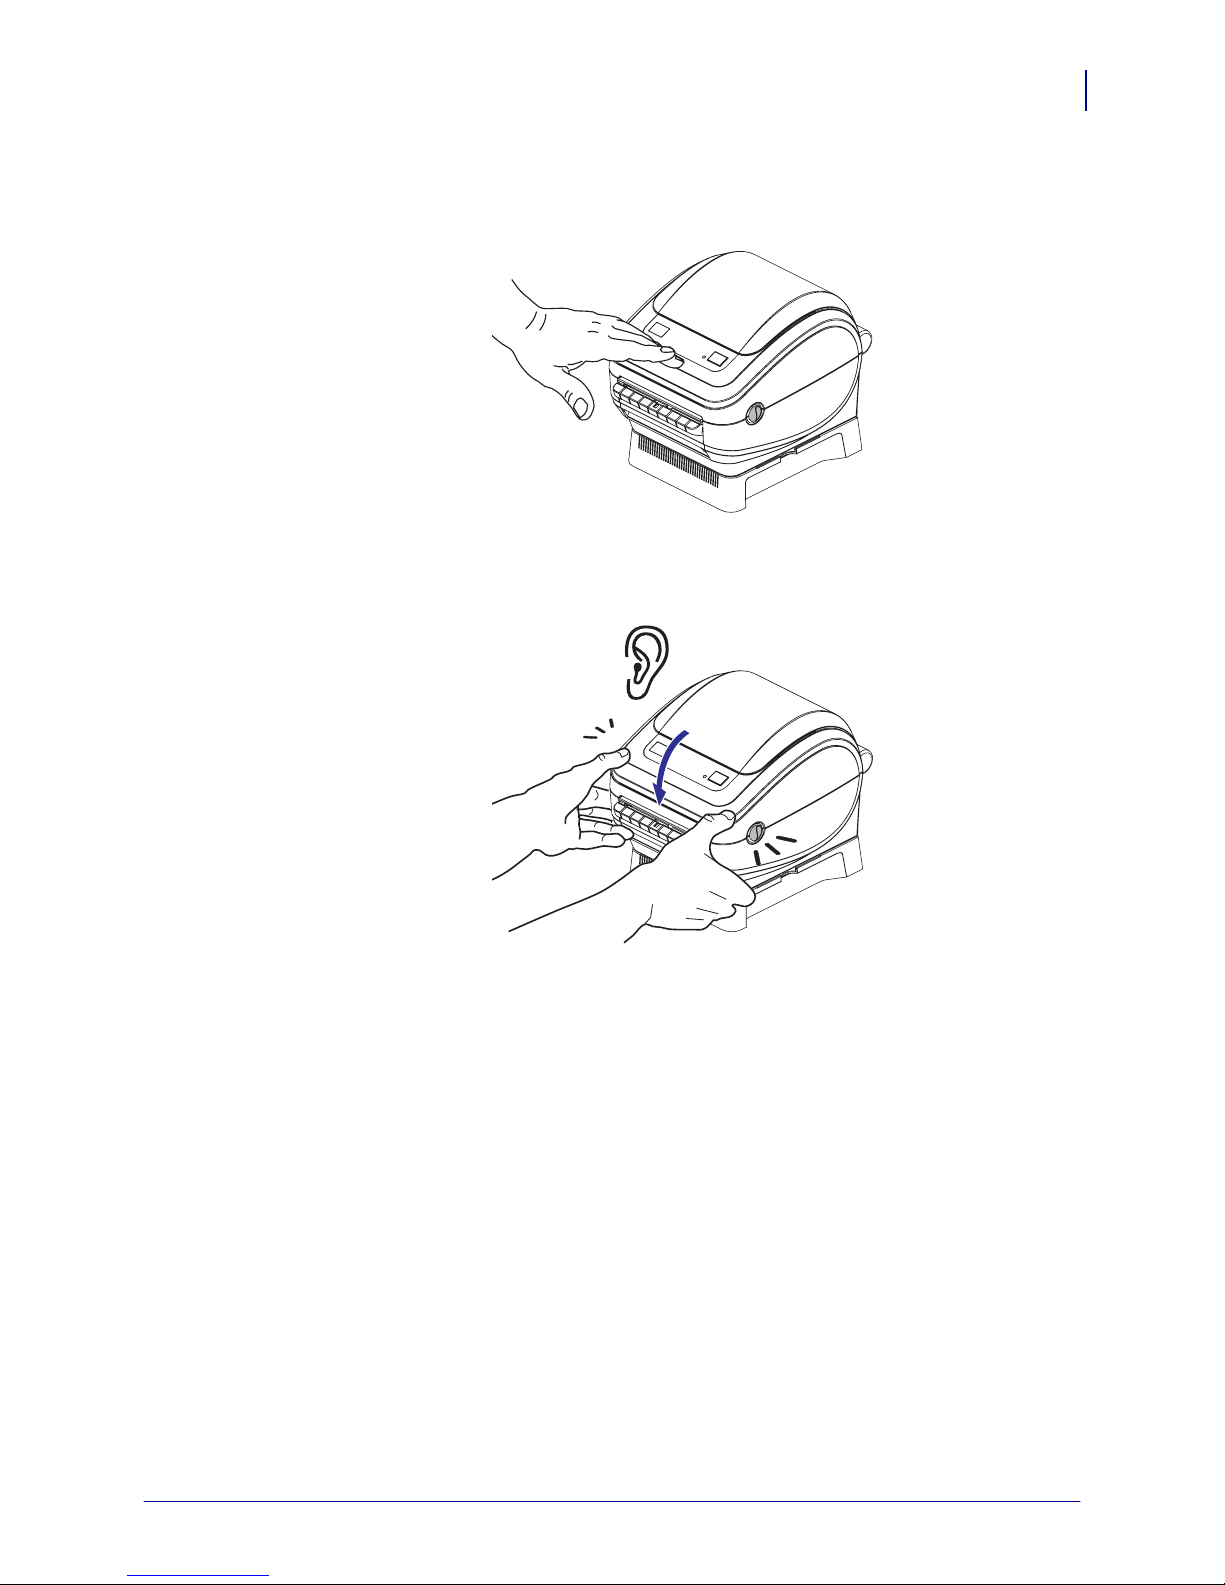
Closing the printer
1. Lower the top cover.
2. Press down until the cover snaps closed.
Introduction
Inspecting the Printer
5
Reporting Damage
If you discover damage or missing parts:
• Immediately notify and file a shipping damage report.
• Keep the carton and all packing material for inspection.
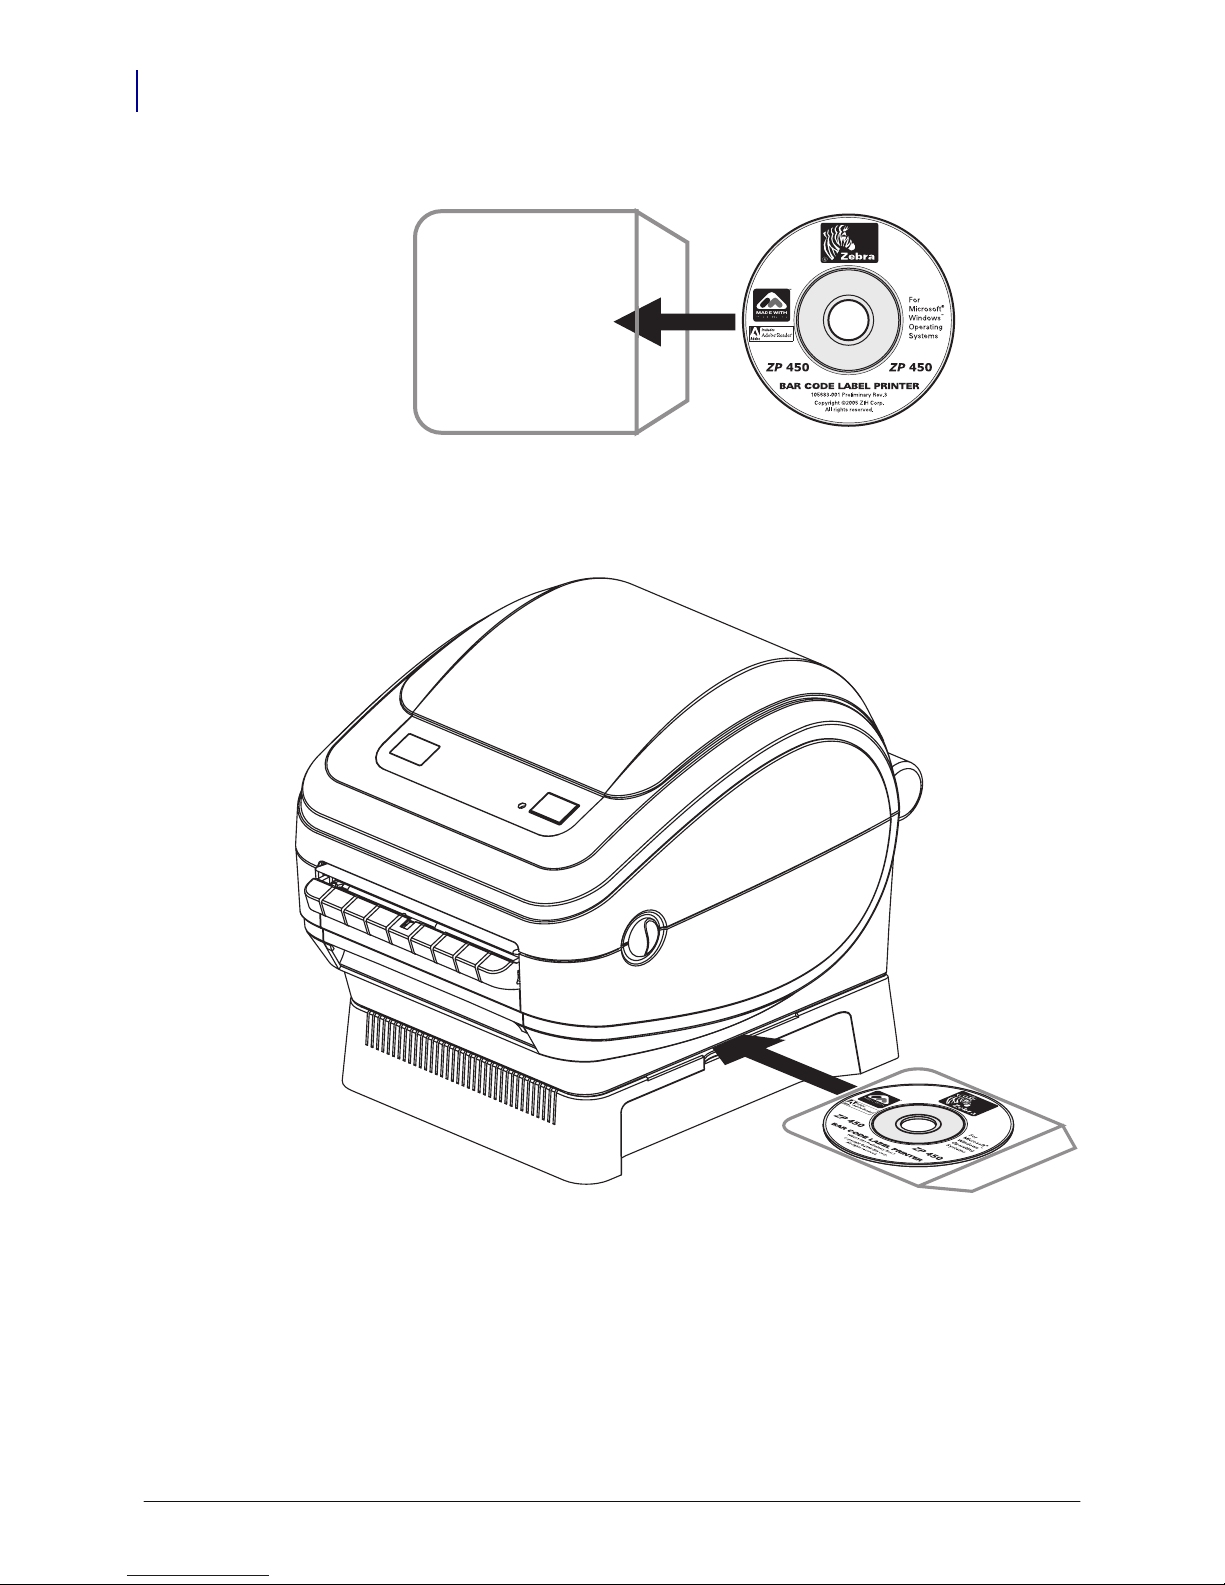
Mini-CD on Printer Storage
The printer has a mini-CD storage slot molded between the printer and its power base. Please
keep the mini-CD there for quick access to maintenance, troubleshooting, printer usage
animations, media, contact information and more.
12/17/07 ZP 450™ User Guide 980546-003 B
Page 16
Intro duction
6
Inspecting the Printer
1. Always place the mini-CD in its plastic sleeve to protect th e mini-CD from damage.
2. Slide the plastic sleeve with the m ini-CD inside, into the printer.
980546-003 B ZP 450™ User Gu ide 12/17/07
Page 17

This section describes how to set up your printer for the first time and use the most common
operating procedures for loading media in tear-off mode.
Modes of Printing
2
Getting Started
You can operate this printer in different modes:
• Standard tear-off mode allows you to tear off each label (or a strip of labels) after it is
printed.
• Dispense mode will peel the backing material away from the label as it is printed. After
this label is removed, the next one is printed.The printer typically uses roll media, but you
can use fan-fold or other continuous media as well.
For procedures to use optional equipment and features, refer to Operations & Options
on page 21.
12/17/07 ZP 450™ User Guide 980546-003 B
Page 18
Getting Started
8
Attaching Power
Attaching Power
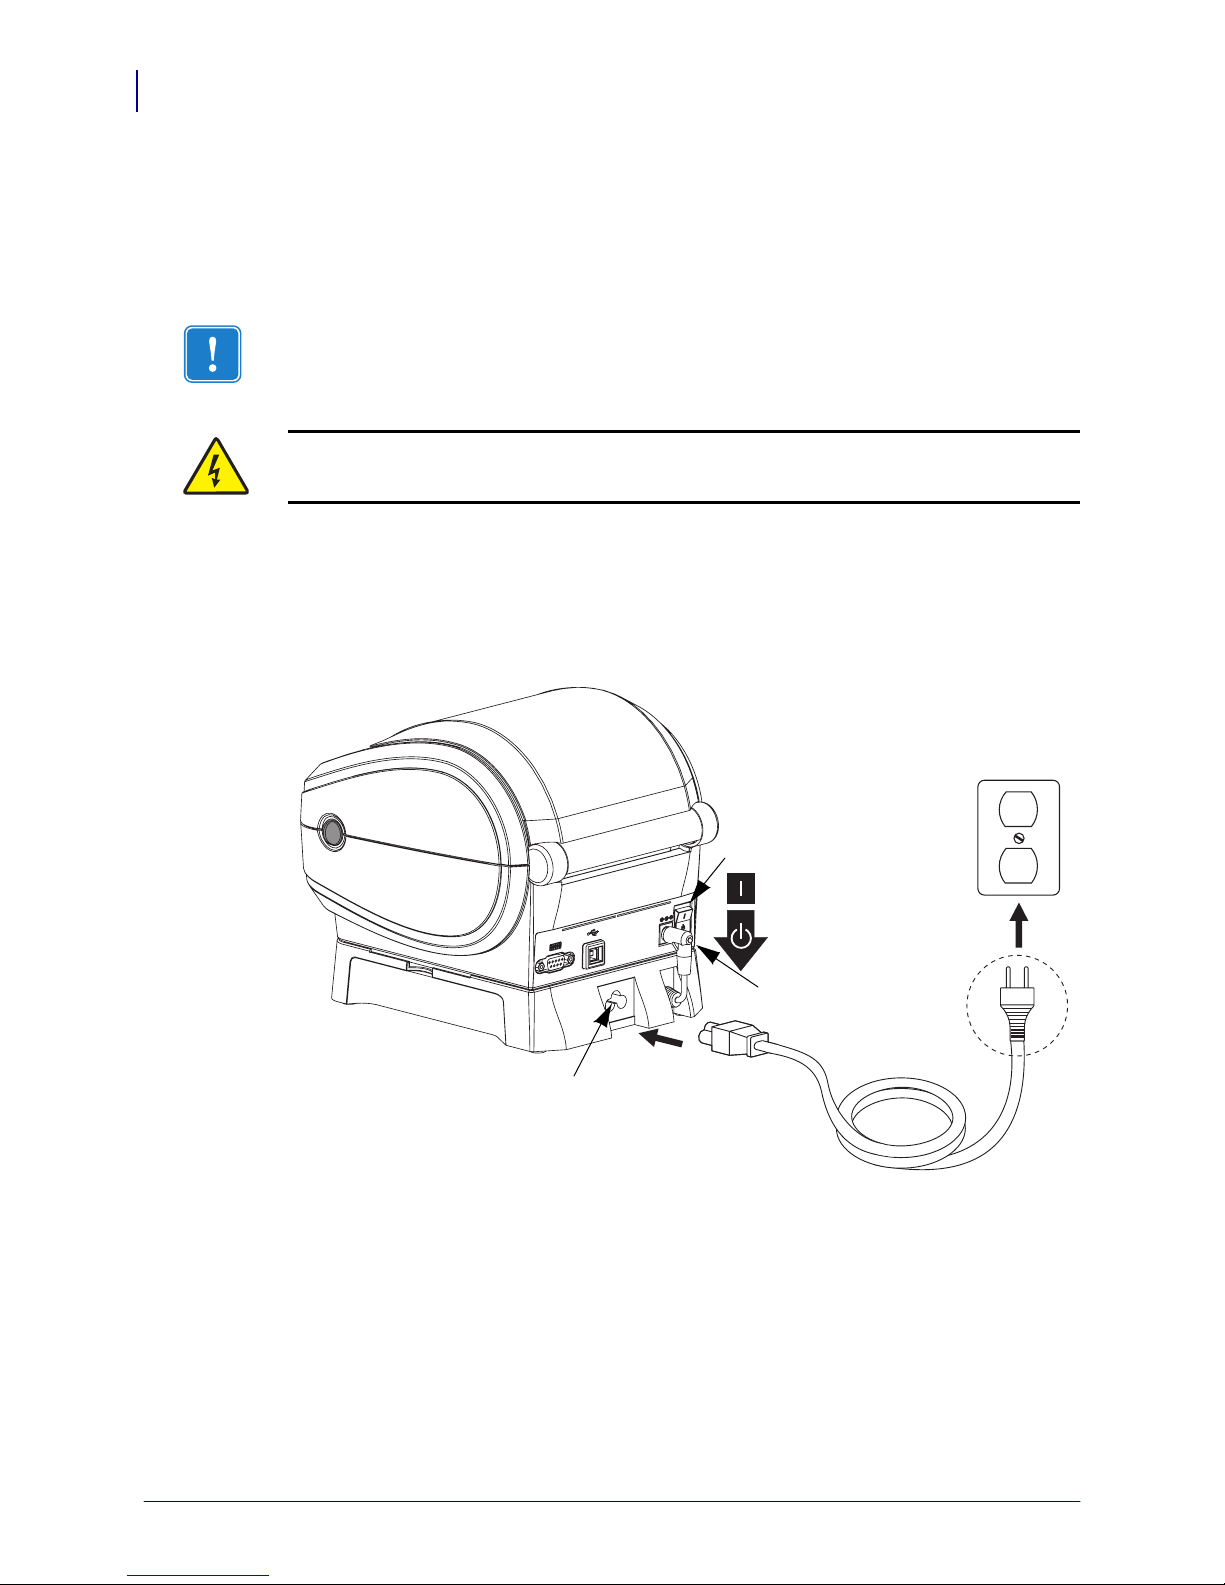
Important • Set up your printer so that you can handle the power cord easily if needed. To
make certain the printer cannot carry electrical current, you must separate the power cord from
the power supply receptacle or AC electrical outlet.
Caution • Never operate the printer an d power supply in an area where they can get wet.
Serious personal i njury could result!
1. Make sure the power switch is in the off position (down).
2. Insert the AC power cord into the power supply.
3. Plug the other end of the cord into an appropriate A C electrical outlet.
Printer
Power
Base
Power
Supply
Receptacle
Power
Switch
Act ive
Power
Light
Power
Connector
Plug Varies
by Country
AC Power
Cord
980546-003 B ZP 450™ User Gu ide 12/17/07
Page 19

Loading Roll Media
When you load media, y ou must place the roll on the media hangers.
You must use the correct media for the type of printing you require. You must use direct
thermal media.
Preparing Media
Whether your roll media is inside or outside wound you load it into the printer the same way.
• Remove the outside length of media. During shipment, the roll may become dirty when
handled or dusty when stored. Removing the outside length avoids dragging adhesive or
dirty media between the printhead and platen.
Getting Started
Loading Roll Media
9
12/17/07 ZP 450™ User Guide 980546-003 B
Page 20
Getting Started
10
Loading Roll Media
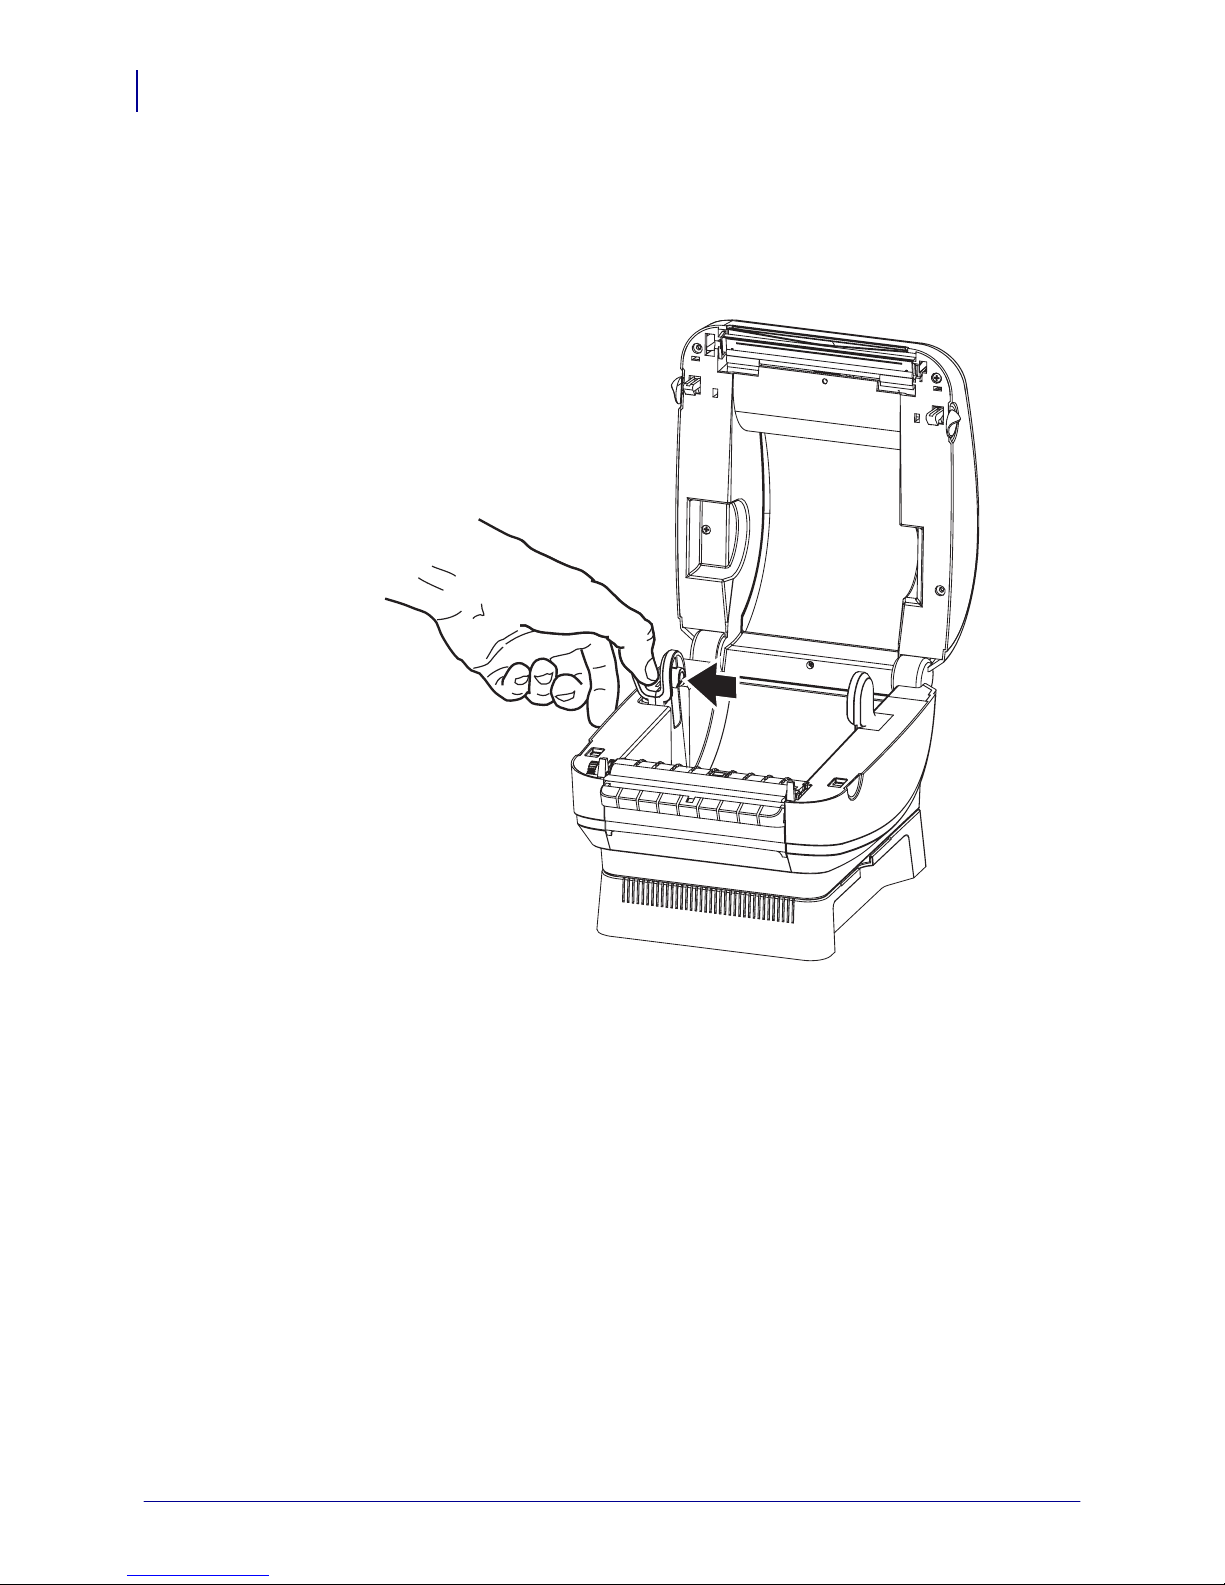
Placing the Roll in the Media Compartment
1. Open the printer. Remember that you need to pull the release levers toward the front of the
printer.
2. Pull the left media hanger to the side.
3. Orient the media roll so that its printing surface will be up as it passes over the platen.
980546-003 B ZP 450™ User Gu ide 12/17/07
Page 21
Getting Started
Loading Roll Media
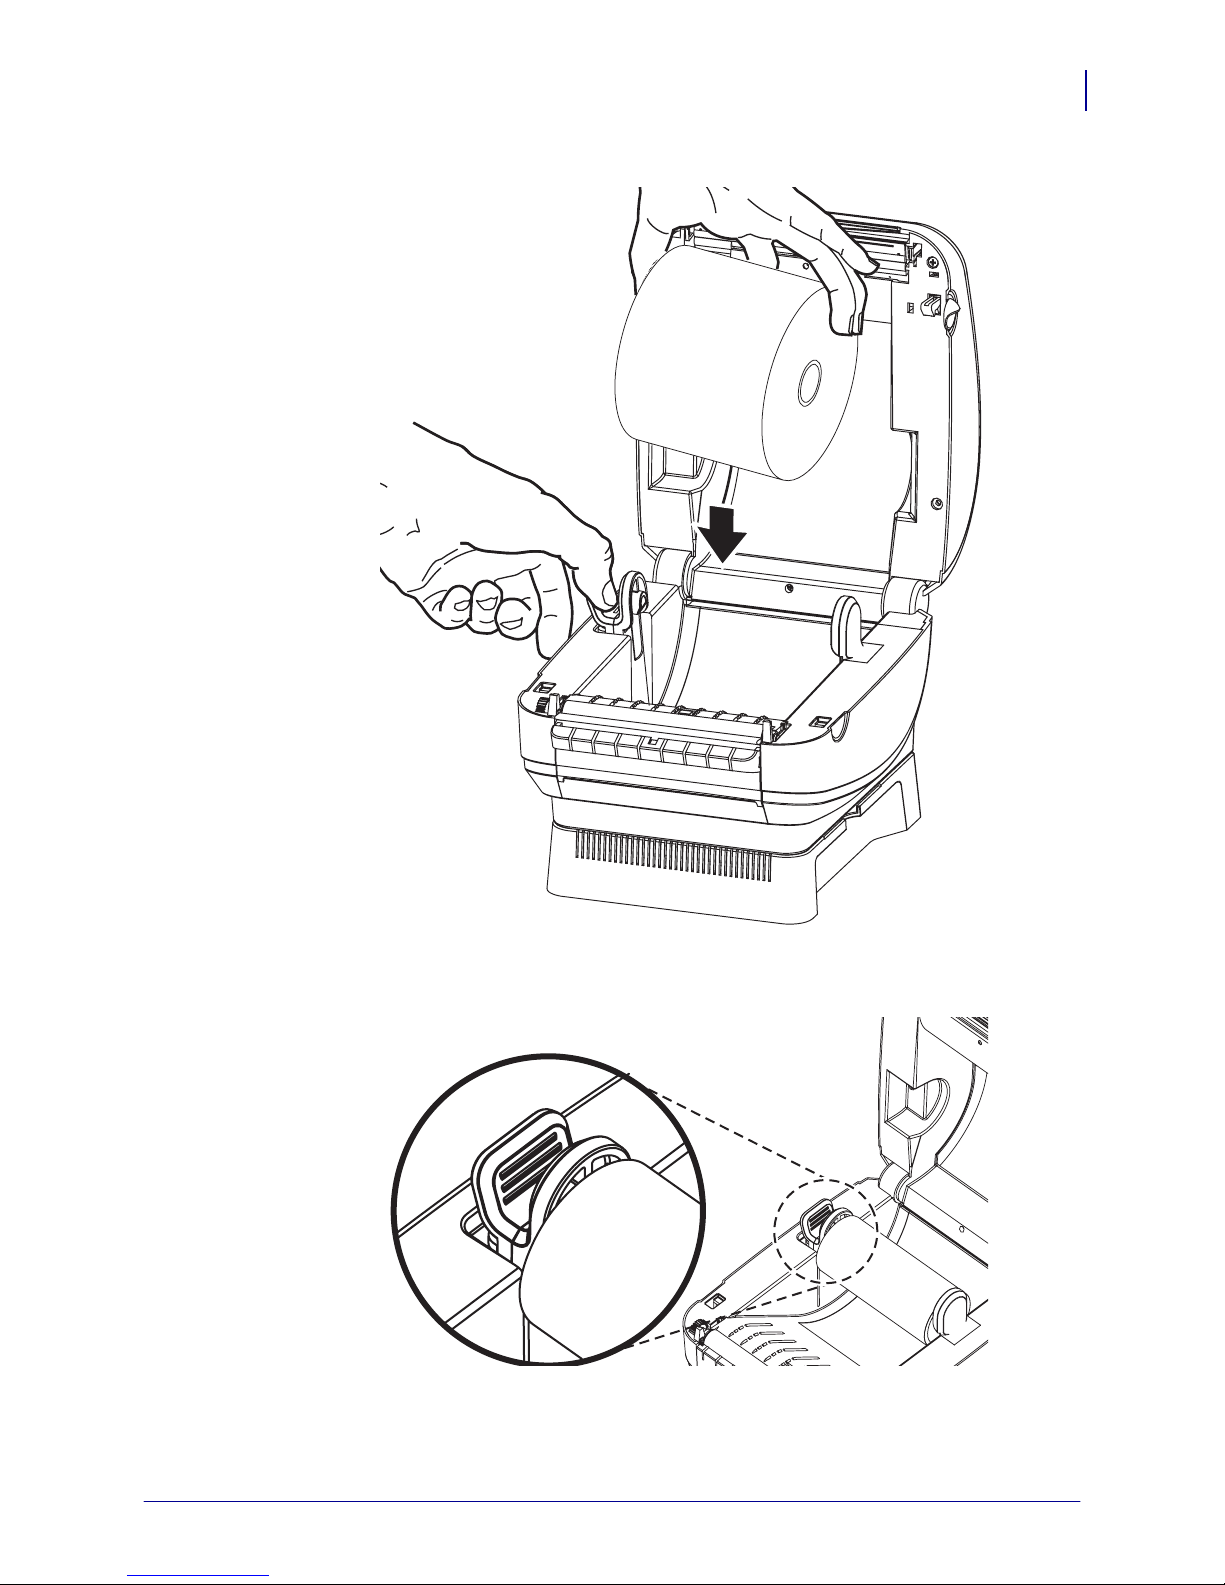
4. Lower the roll between the hangers and release the left hanger onto the core.
11
5. Verify the core rests on the hangers and the roll turns freely. The roll must not sit in the
bottom of the media compartment.
12/17/07 ZP 450™ User Guide 980546-003 B
Page 22

Getting Started
12
Operator Controls
Operator Controls
Power Switch
Press up to turn ON or down to turn OFF the printer.
Important • To make certain the printer cannot carry electrical current, you must separate the
power cord from the power supply receptacle or AC electrical outlet. Set up y our printer so
that you can handle the power cord easily if needed.
Caution • The power should be turned off before connecting or disconnecting the
communication s and power cables.
Active Power Light
Located at the rear of the printer, the active power light indicates that electrical power is
energizing the printer.
Power
Switch
Active
Power
Light
980546-003 B ZP 450™ User Gu ide 12/17/07
Page 23

Feed Button
• Tap the Feed button once to force the printer to feed one blank label.
• Press the Feed button to take the printer out of a “pause” condition. The printer is put into
“pause” by either a programming command or an error condition. See What the Status
Light is Telling You on page 45 in the Troubleshooting chapter.
• Use the Feed button for printer setup and status (see Feed Button Modes on p age 53 in the
Troubleshooting chapter).
Status Light
Located on the top case next to the feed button, the status light functions as a printer
operational indicator (see See What the Status Light is Telling You on page 45 in the
Troubleshooting chapter).
Feed
Button
Getting Started
Operator Controls
13
Status
Light
12/17/07 ZP 450™ User Guide 980546-003 B
Page 24

Getting Started
14
Printing a Test Label
Printing a Test Label
Before you connect the pri nter to your computer, make sure that the printer is in proper
working order.
You can do this by printing a configuration label.
1. Make sure the media is properly loaded and the top cover of the printer is closed. Then,
turn the printer power on if you have not already done so. If the printer initializes with the
status light blinking green (pause mode), press the Feed button once to set the printer in
Ready (to print) mode. See the What the Status Light is Telling You on page 45 if the
printer’s status light does not turn solid green (Ready).
2. Press the Feed button two to three times to allow the printer to calibrate the printer for the
installed media. The printer may feed several labels during this process.
3. When the status light is solid green, press and hold the Feed button until the status light
flashes once. Release the Feed button. A configuration label will print. If you cannot get
this label to print, refer to Getting Started on page 7.
980546-003 B ZP 450™ User Gu ide 12/17/07
Page 25

Hooking Up the Printer and Computer
Your printer will have a combination of interfaces: USB and Serial or USB and Ethernet.
Caution • Keep the power switch in the OFF position when attaching the interface cable.
The power cord must be inserted into the power ba se on the back of the printer before
connecting or disconnecting the communications cables.
Getting Started
Hooking Up the Printer and Computer
15
Important • This printer complies with FCC “Rules and Regulations,” Part 15, for Class B
Equipment, using fully shielded data cables. Use of unshielded cables may increase radiated
emissions above the Class B limits.
Interface Cable Requirements
Data cables must be of fully shielded construction and fitted with metal or metallized
connector shells. Shielded cables and connectors are required to prevent radiation and
reception of electrical noise.
To minimize electrical noise pickup in the cable:
• Keep data cables as short as possible (6’ [1.83 m] recommended).
• Do not tightly bundle the data cables with power cords.
• Do not tie the data cables to power wire conduits.
USB Interface Requirements
Universal Serial Bus (version 2.0 compliant) provides a fast interface that is compatible with
your existing PC hardware. USB’s “plug and play” design makes installation easy. Multiple
printers can share a single USB port/hub.
.
When using USB cable not supplied with your printer, verify that the cable or cable packaging
bears the “Certified USB™” mark (see below) to guarantee USB 2.0 compliance.
12/17/07 ZP 450™ User Guide 980546-003 B
Page 26

Getting Started
16
Hooking Up the Printer and Computer
Serial Communications
The required cable must have a nine-pin “D” type (DB-9P) male connector on one end, which
is plugged into the mating (DB-9S) serial port located on the back of the printer. The other end
of this signal interface cable connects to a serial port at the host computer. Depending on the
specific interface requirements, this will most likely be a Null Modem (cross-over) cable.
Early models of Zebra printers running the EPL programming ty pically utilized a straight
through signal connections cable (no cross-over). For pinout information, refer to Appendix A.
Note • The printer design does not allow for the use non-molded cables such as hand-made
cables with large clam shell connector covers.
The serial port communication settings between the printer and host (typically a PC) must
match for reliable communication. The Bits per second (or Baud rate) and Flow control are the
most common settings that get changed. The hosts (typically a Windows PC) needs to have the
data Flow control changed to match the printer’s default communication method: Hardware
and is noted by the Host Handshake setting DTR/Xon/Xoff. This combined hardware
(DTR) and software (Xon/Xoff) mode may need to change depending upon the non-Zebra
application software and the serial cable variation in use.
Serial communications between the printer and the host computer can be set by :
• Autobaud synchronization
• ZPL programming ^SC command
• EPL programming Y command
• Resetting the printer to its default printer configuration.
Autobaud
Autobaud synchronization allows the printer to automatically match the communication
parameters of the host computer. To autobaud:
1. Press and hold the feed button until the green status LED flashes once, twice, and then
three times.
2. While the status LED flashes, send the ^XA^XZ command sequence to the printer.
3. When the printer and host are synchronized, the LED changes to solid green. (No labels
will print during autobaud synchronization.)
ZPL ^SC Command
Use the Set Communications (^SC) command to change the communications settings on the
printer.
1. With the host computer set at the same communications settings as the printer, send the
^SC command to change the printer to the desired settings.
2. Change the host computer settings to match the new printer settings.
Refer to the ZPL Programming Guide for more information about this command.
980546-003 B ZP 450™ User Gu ide 12/17/07
Page 27

Getting Started
Hooking Up the Printer and Computer
EPL Y Co mm and
Use the serial port setup (Y) command to change the communications settings on the printer.
1. With the host computer set at the same communications settings as the printer, send the
Y command to change the printer to the desired settings. Note: the Y command does not
support setting the data flow control, use the Xon/Xoff setting.
2. Change the host computer settings to match the new printer settings.
Refer to the EPL Page Mode Programming Guide for more information about this command.
Resetting the Default Serial Port Parameters
Do the following to reset the communications parameters on the printer to the factory defaults
(serial communication settings are: 9600 baud, 8 bit word length, NO parity, 1 stop bit, and
DTR/XON/XOFF data flow control).
1. Press and hold the feed button until the green status LED flashes once, waits a moment
and flashes twice, and then waits again before flashing three times (release immediately).
2. While the status LED rapidly flashes amber and green, press the feed button. Serial
communications between the printer and the host computer can be set by the ZPL ^SC
command or the EPL Y command.
17
Note • Early models of Z ebra printers running the EPL programming language had 9600
baud, NO
parity, 8 data bits, 1 stop bit and a HARDWARE and SOFTWARE (merged) data
control (essentially DTR/Xon/Xoff) as the default serial port settings. The Windows operating
system flow control setting was Hardware for most applications.
12/17/07 ZP 450™ User Guide 980546-003 B
Page 28

Getting Started
G
LED Amb
LED
18
Hooking Up the Printer and Computer
Ethernet
The printer requires UTP RJ45 Ethernet cable rated CAT-5 or better.
For more information on configuring y our printer to run on a compatible Ethernet based
network, see the ZebraNet® 10/100 Internal Print Server manual. The printer must be
configured to run on y our LAN (local area network). The print server on board your printer
can be accessed through the printer’s web pages.
(RJ45 Connector)
Ethernet Cable
Ethernet Status/Activity Indicators
LED Status Description
Both OFF No Ethernet link detected
Green 100 Mbps link detected
Green with the Amber
100 Mbps link and Ethernet activity detected
flickering on and off
Amber 10 Mbps link detected
Amber with the Green
10 Mbps link and Ethernet activity detected
flickering on and off
reen
er
980546-003 B ZP 450™ User Gu ide 12/17/07
Page 29

Hooking Up the Printer and Computer
Communicating with the Printer
Universal Serial Bus (USB) Communications
The printer is a terminal device when using a universal serial bus interface. You can refer to
the Universal Serial Bus Specification for details regarding this interface.
USB Printer Detection and Windows® operating systems.
Windows 98 Second Edition, Windows 2000 and Windows XP and later operating systems
support the USB communications with printers. The Zebra Windows Driver supports your
printer in these operating systems.
These operating systems automatically detect the printer when connected via the USB
interface. The operating system automatically starts a “Add new hardware’ wizard when
connecting the printer for the first time to the PC. Close the wizard. Install the Zebra Windows
Driver found on the user’s CD. Select the USB port and media size (closest match). Click on
the ‘Print test page’ button to verify a successful installation.
Getting Started
19
The Windows operating sy stem will detect and relink a previously installed printer if it is
reconnected to the USB interface or power is turned on after the PC has finished it’s restart of
the operating system. Ignore the new device detected warnings and close the Task bar prompts.
Wait several seconds for the operating system to match the printer to the driver software. The
warnings will quit and the printer now should be ready to begin printing.
Serial Port and Windows® operating systems
The Windows operating sy stem default settings for the serial port communication closely
match the printer’s defaults settings with one exception; the data Flow Control settings. The
Windows default data Flow Control setting is NONE. The printer requires data Flow Control
set to Hardware.
Note • The printer does not support Windows Serial Port Plug and Play (PnP) device
detection at this time.
12/17/07 ZP 450™ User Guide 980546-003 B
Page 30

Getting Started
20
Adjusting the Print Width
Adjusting the Print Width
Print width must be set when:
• You are using the printer for the first time.
• There is a change in media width.
Print width may be set by:
• The Windows printer driver or application software such as Zebra Designer.
• The five-flash sequence in Feed Button Modes on p age 53.
• Controlling printer operations with ZPL programming; refer to the Print Width (^PW)
command (consult your ZPL Programming Guide).
Controlling printer operations with EPL Page Mode programming, refer to the Set Label
Width (
q) command (consult your EPL Programmer’s Guide).
Adjusting the Print Quality
Print quality is influenced by the heat of the printhead, the speed of the media and the type of
media y ou are using. Only by experimenting will you find the optimal mix for your
application.
The relative darkness (or density) setting can be controlled by:
• The six-flash sequence in Feed Button Modes on page 53. This will overwrite any ZPL
and EPL programmed darkness/density settings.
• The Set Darkness (
• The Density (D) EPL command (consult your EPL Programmer’s Guide).
If you find that the print speed needs to be adjusted, use:
• The Windows printer driver.
• The Print Rate (^PR) command (consult your ZPL Programming Guide).
The Speed Select (
~SD) ZPL command (consult your ZPL Programming Guide).
S) command (consult your EPL Programmer’s Guide).
980546-003 B ZP 450™ User Gu ide 12/17/07
Page 31

Operations & Options
This section helps you get the most from your printer.
You must use programming to control many of the printer’s functions.
Example • The ~JL command controls label length.
3
^XA^JUS^XZ command saves the new settings to flash memory.
The
For detailed information about creating labels using ZPL, refer to the ZPL Programming
Guide or visit our web site at www.zebra.com
To improve print quality, changing both print speed and density may be required to achieve the
desired results. Your application’s printer driver provides control of the speed and heat
(density).
.
12/17/07 ZP 450™ User Guide 980546-003 B
Page 32

Operations & Options
22
Thermal Printing
Thermal Printing
Caution • The prin thead becomes hot while prin ting. To protect from damaging the
printhead an d risk of personal injur y, avoid touching the printhead. Use only the cleaning pen
to perform maintenance.
Caution • The discharge of elect rostatic energy that accumula tes on the surface of the
human body or other surfaces can damage or destroy the printhead or electronic
components used in t his device. You must observe stati c-safe procedures when working with
the printh ead or the electronic components u nder the top cover.
You must use the correct media for the type of printing you require. You must use direct
thermal media.
Replacing Supplies
If labels run out while printing, leave the printer power on while reloading (data loss results if
you turn off the printer).
Alway s use high quality, approved labels and tags. If adhesive backed labels are used that
don’t lay flat on the backing liner, the exposed edges may stick to the label guides and rollers
inside the printer, causing the label to peel off from the liner and jam the printer. Approved
supplies can be ordered from your dealer.
980546-003 B ZP 450™ User Gu ide 12/17/07
Page 33

Printing in Dispenser Mode
The factory installed label dispenser option allows you to print a label with backing (liner/
web) being removed from the label as it prints, ready for application. When printing multiple
labels, removing the dispensed (peeled) label notifies the printer to print and dispense the next
label.
To use dispenser-mode correctly, use your printer driver to activate the label (taken) sensor
along with these typical label settings which include but are not limited to length, noncontinuous (gap), and web (liner). Otherwise, you must send the ZPL or EPL programming
commands to the printer.
When programming in ZPL, you can use the following command sequences shown below
and refer to your ZPL Programming Guide for more information on ZPL programming.
When programming in EPL, send the Options (O) command with the ‘P’ command
parameter (
included with the Options command string. Refer to your EPL Programmer’s Guide for more
information on programming with EPL and the Options (
OP) to enable the Label Taken sensor. Other printer option parameters may also be
^XA ^MMP ^X Z
^XA ^JUS ^XZ
Operations & Options
Printing in Dispenser Mode
O) command behaviors.
23
12/17/07 ZP 450™ User Guide 980546-003 B
Page 34

Operations & Options
24
Printing in Dispenser Mode
1. Load y our labels into the printer. Close the printer and press the feed button until a
minimum of 4 inches or 100 millimeters of exposed labels exit the printer. Remove the
exposed labels from the liner.
980546-003 B ZP 450™ User Gu ide 12/17/07
Page 35

Printing in Dispenser Mode
2. Lift the liner over the top of the printer and open the dispenser door.
Operations & Options
25
12/17/07 ZP 450™ User Guide 980546-003 B
Page 36

Operations & Options
26
Printing in Dispenser Mode
3. Insert the label liner between the dispenser door and the printer body.
4. Close the dispenser door.
980546-003 B ZP 450™ User Gu ide 12/17/07
Page 37

5. Press the Feed button to advance the media.
Operations & Options
Printing in Dispenser Mode
27
6. Set the label (taken) sensor to detect removed labels. This is set by the Windows printer
driver (a configuration setting), y our application software or via the printer’s EPL or ZPL
programming languages.
7. During the print job, the printer will peel off the backing and present a single label. Take
the label from the printer to allow the printer to print the next label. Note: If you skipped
step six, the printer will stack and eject peeled labels.
12/17/07 ZP 450™ User Guide 980546-003 B
Page 38

Operations & Options
28
Printing on Fan-Fold Media
Printing on Fan-Fold Media
Printing on fan-fold media requires y ou to prepare the media hangers.
1. Open the top cover.
2. Place an empty core between the media hangers.
3. Insert the media through the slot at the rear of the printer.
4. Run the media between the hangers and above the empty core.
5. Close the top cover.
980546-003 B ZP 450™ User Gu ide 12/17/07
Page 39

ZebraNet® 10/100 Internal Print Server Option
ZebraNet® 10/100 Internal Print Server Option
Operations & Options
29
The ZebraNet® 10/100 Internal Print Server (PS) is an optional factory installed device that
TM
connects the network and your ZebraLink
with a browser interface for printer and print server settings. If you use the ZebraNet
-enabled printer. The print server provides y ou
TM
Bridge
Zebra network printer management software, y ou can easily access the specialized features of
TM
a ZebraLink
enabled printer.
Printer with 10/100 Internal PS—10/100 Internal PS gives y our printer these features:
• Print server and printer setup using a browser
• Remote monitoring and configuration capability of the 10/100 Internal PS using a
browser
•Alerts
• The ability for you to send unsolicited printer status messages via E-mail-enabled
devices
TM
ZebraNet
Bridge — ZebraNetTM Bridge is a software program that works with the
10/100 Internal PS and enhances the features of ZebraLink resident within ZPL-based printers.
The features include the following:
TM
• ZebraNet
Bridge allows you to locate printers automatically. ZebraNetTM Bridge
searches on parameters such as IP address, subnet, printer model, printer status, and
many other user-defined characteristics.
• Remote Configuration — Manage all your Zebra label printers throughout the
enterprise without having to travel to remote sites or physically handle any printers.
Any Zebra printer connected to the enterprise network can be accessed from the
TM
ZebraNet
Bridge interface and configured remotely through an easy-to-use
graphical user interface.
TM
• Printer Alerts, Status, Heartbeat Monitoring and event Notification — ZebraNet
Bridge lets you configure multiple event alerts per device with different alerts directed
to different people. Receive alerts and notifications by e-mail, cell phone/pager, or
TM
through the ZebraNet
Bridge Events tab. View alerts by printer or group, and filter
by date/time, severity, or trigger.
• Configure and Copy Printer Profiles — Copy and paste settings from one printer to
another or broadcast them to an entire group. ZebraNet Bridge allows you to copy
printer settings, printer-resident files (formats, fonts, and graphics), and alerts with a
click of the mouse. Create printer profiles—virtual “golden printers”—with desired
settings, objects, and alerts, and clone or broadcast them as if they were real printers,
providing extensive savings in setup time. Printer profiles are also an excellent way to
back up a printer’s configuration for crisis recovery.
12/17/07 ZP 450™ User Guide 980546-003 B
Page 40

Operations & Options
30
ZebraNet® 10/100 Internal Print Server Option
Printer Network Configuration Status Label
ZP-Series printers with the ZebraNet® 10/100 Internal Print Server option on-board print an
additional printer configuration status label for information needed to establish and trouble
shoot network printing. The following printout is printed with the ZPL
~WL command.
The regular printout of the configuration status label has some of the printer’s network settings
such as IP Address, on the lower half of the printout.
The printer’s IP address is needed to identify and configure the printer for operations on your
network. See the ZebraNet® 10/100 Internal Print Server manual for more information.
980546-003 B ZP 450™ User Gu ide 12/17/07
Page 41

Liner-less Media Printing
The ZP-Series printer includes a liner-less media printing option. The liner-less media printer
includes a non-stick platen (drive) roller. The liner-less platen roller has a sponge-like wavy
surface with a thin layer on the outer surface impregnated with silicon. The silicon is
continuously squeezed out of the roller when printing and feeding media. When the printer is
paired with specially formulated, Zebra approved liner-less media; the operator can print, tearoff and apply labeling without removing any label backing or liner.
The specially formulated Zebra approved liner-less media has a printing surface that does not
allow the specially formulated acry lic adhesive stick to media (or the liner-less platen roller).
Only use Zebra approved liner-less media with liner-less printers.
Note • Keep a spare liner-less platen available. The liner-less platen has a limited life. The
thin layer of silicon is eventually squeezed out of the liner-less platen with use and will begin
jamming media.
The liner-less platen is normally self cleaning. Foreign materials, dust and adhesive will be
removed by the media’s adhesive backing.
Cleaning a liner-less platen shortens or ends the platen’s usable life.
Operations & Options
Liner-less Media Printing
31
See Platen Considerations on page 39 for more information on your printer’s platen and
maintenance.
12/17/07 ZP 450™ User Guide 980546-003 B
Page 42

Operations & Options
32
Sending Files to the Printer
Sending Files to the Printer
Files can be sent to the printer from the Microsoft Windows operating systems by using the
Zebra Firmware (and File) Downloader found on the user's CD or at
method is common for both programming languages, all wired interfaces (including USB) and
wired network printers.
Transferring files with the Firmware Downloader
1. Install the printer. Verify communication is working properly by using the drivers Pr i n t
Test Page located on the printer driver properties window.
2. Install the Zebra Firmware Downloader on your system.
3. Find the Firmware Downloader by selecting start > Programs > Z ebra.
www.zebra.com. This
4. Select the Pri n ter menu and run the Auto-Detect.
980546-003 B ZP 450™ User Gu ide 12/17/07
Page 43

Operations & Options
Sending Files to the Printer
5. Click on your Zebra printer to select the printer for download.
6. Select the File menu and click on the Select Fir mware Fil e.. . . Use the Browser window
to select your file for download to your printer.
33
7. Select the Pri n ter menu and click on the Download to Selected (printer). The
downloader may display a download status indicator to show download progress of larger
files.
12/17/07 ZP 450™ User Guide 980546-003 B
Page 44

Operations & Options
34
Media Sensing
Media Sensing
The printer has automatic media sensing capability. The printer is designed to continuously
check and adjust media length sensing for minor variations. Once the printer is printing or
feeding media, the printer continually checks and adjusts the media sensing to accommodate
for minor changes in media parameters from label to label on a roll and from roll to roll of
media. The printer will automatically initiate a media length calibration if the expected media
length or the label to label gap distance has exceeded the acceptable variation range when
starting a print job or Feeding media. The automatic media sensing in the ZP-Series printers
works the same for printer operations that use EPL and ZPL label formats and programming.
If the printer does not detect labels or blacklines (or notches with blackline sensing) after
feeding the media the ZP 450 printer’s default maximum label length distance of 13 inches,
then the printer will switch to continuous (receipt) media mode. The printer will keep these
settings until changed by software, programming or a manual calibration with different media.
Optionally, the printer can be set to do a short media calibration after printer power up or when
closing the printer with power on. The printer will then feed up to three labels while
calibrating.
The printer’s media settings can be verified by printing a Printer Configuration label. See the
Printing a Test Label on page 14 for more details.
The maximum distance that the automatic media type detection and sensing will check can be
reduced by using the ZPL Maximum Label Length command (^ML). It is recommended that
this distance be set to no less than two times the longest label being printed. If the largest label
being printed was a 4 by 6 inch label, then the maximum label (media) length detection
distance can be reduced from the ZPL default distance of 39 inches down to 12 inches. Your
printer has a default distance of 13 inches
If the printer has difficulty automatically detecting the media type and auto-calibrating, see
Manual Calibration on page 49 to perform an extensive calibration. It includes a printed graph
of sensor operation for your media. This method disables the printer’s automatic media
sensing capability until the printer’s default parameters are reset to the factory defaults with
the four flash Feed button mode. See the Feed Button Modes on page 53 for more details.
The automatic media calibration can be modified, turned on or turned off to meet your needs.
Sometimes print job conditions require that the printer use all the media on a roll. The two
automatic media conditions, power up with media loaded and closing the printer with power
on, can be controlled individually with the ZPL Media Feed command, ^MF. The feed action
discussed in the ZPL programmers guide for the ^MF command is primarily for automatic
media sensing and calibration. The automatic media calibration that controls the dynamic
media (label to label) calibration is the ^XS command. If multiple media types of different
lengths, material or detection methods (web/gap, blackline or continuous) are used, you should
not change these settings.
The media calibration and detection process can also be refined to match the media type
loaded into the printer. Use the ZPL Media Tracking command (^MN) to set the media type.
Sometimes the printer can detect preprinted media as the gap between labels or the liner
backing with print as a blackline marks. If the ^MN parameter for continuous media is set, then
the print does not preform the automatic calibration. The ^MN command also includes an
automatic calibration parameter (^MNA) to return the printer to its default setting to
automatically detect all media ty pes.
980546-003 B ZP 450™ User Gu ide 12/17/07
Page 45

Cleaning
4
Maintenance
When you clean the printer, use one of the following supplies that best suits your needs:
:
Cleaning Supplies Order Quantity Intended Purpose
Cleaning pens Set of 12 Clean printhead
Cleaning swabs Set of 25 Clean media path, guides and sensors
The cleaning process takes just a couple of minutes using the steps outlined below.
Printer Part Method Interval
Printhead Let the printhead to cool for a minute, then use a
new cleaning pen to swab the dark line on the
printhead from end to end.
Platen roller See “Platen Considerations” in the Maintenance
chapter. Manually rotate the platen roller. Clean it
thoroughly with 90% medical-grade alcohol and a
fiber-free cleaning swab (such as a alcohol filled
Texpad swab or alcohol moistened lint-free
cloth).
Peel bar Clean it thoroughly with cleaning swab (such as a
Media path
Exterior Water-dampened cloth.
Interior Gently brush out printer.
alcohol filled Texpad swab or alcohol moistened
lint-free cloth).
Let alcohol dissipate and the printer dry
completely.
When using direct
thermal: after every
roll of media.
As needed.
12/17/07 ZP 450™ User Guide 980546-003 B
Page 46

36
Maintenance
Cleaning
Caution • Adhesives an d coatings of media can over time transfer onto the printer
components along the media path including the platen and printhead. This build-up can
accumulate dust and debris. Failure to clean the printhead, media path and platen roller
could result in inadvertent loss of labels, l abel jams and possible damage to the printer.
Important • Using too much alcohol can result in contamination of the electronic components
requiring a much longer drying time before the printer will function properly.
Printhead Cleaning
Alway s use a new cleaning pen on the printhead (an old pen carries contaminants from its
previous uses that may damage the printhead).
Caution • The prin thead becomes hot while prin ting. To protect from damaging the
printhead an d risk of personal injur y, avoid touching the printhead. Use only the cleaning pen
to perform maintenance.
When you load new media, y ou can also clean the printhead.
1. Rub the cleaning pen across the dark area of the printhead. Clean from the middle to the
outside. This will move adhesive transferred from the edges of media to the printhead
outside of media path.
2. Wait one minute before closing the printer.
980546-003 B ZP 450™ User Gu ide 12/17/07
Page 47

Media Path Cleaning
Use a cleaning swab (such as a Texpad swab or alcohol moistened lint-free cloth) to remove
debris, dust or crust that has built-up on the holders, guides and media path surfaces. Do not
touch or clean the printhead with the same cleaning swab or cloth.
1. Use the alcohol in the cleaning swab (or cloth) to soak the debris so that it breaks up.
2. Wipe the ridges to remove accumulated debris.
3. Wipe the inside edges of both label edge guide walls to remove any built-up residue.
4. Wipe the label guide’s curved surface to remove accumulated debris. Do not wipe debris
or alcohol into the gap sensor. Tamp the gap sensor with a dry swab to remove any excess
alcohol that may get onto the sensor.
5. Wait one minute to dry before closing the printer.
Discard the cleaning swab or cloth after use.
Label Guide
(curved surface)
Gap Sensor
Maintenance
Cleaning
37
Platen
Ridges
Label Edge
Guides
(Walls)
12/17/07 ZP 450™ User Guide 980546-003 B
Page 48

38
Maintenance
Cleaning
Sensor Cleaning
Dust can accumulate on the media sensors.
1. Gently blow away dust; if necessary, use a dry swab to brush away dust. If adhesives or
other contaminates remain, use an alcohol moistened cleaning swab (such as a Texpad
swab) to break up the foreign material.
2. Use a dry swab several times to remove any residue that may be left from the first
cleaning.
.
Gap
Sensor
Black-Line
Sensor
980546-003 B ZP 450™ User Gu ide 12/17/07
Page 49

Platen Considerations
The standard platen (drive roller) normally does not require cleaning. Paper and liner dust can
accumulate without effecting print operations. Contaminates on the platen roller can damage
the printhead or cause the media to slip when printing. Adhesive, dirt, general dust, oils and
other contaminates should be cleaned immediately off the platen.
Clean the standard platen (and media path) whenever the printer has significantly poorer
performance, print quality or media handling. The platen is the print surface and drive roller
for your media. If sticking or jamming continues even after cleaning, you must replace the
platen.
Cleaning the liner-less platen removes the outer layer of silicon. If contaminates other than
adhesive and paper dust are on your platen, you may need to clean your platen. This will
shorten your platen’s usable life.
Reminder - Always clean the printhead before installing a new media roll to help prevent
adhesive buildup on the printhead and adhesive transfer to the platen. Adhesive buildup on the
printhead should always be cleaned from the middle of the printhead to the outside. Any
adhesive residue will be moved outside of the media feed and print area. Discard the cleaning
pen after each cleaning to keep diluted adhesive from building up on the pen and transferring
to the printhead surface. This is the most common cause of media feed (jamming, slippage and
stalls) and print quality issues.
Maintenance
Cleaning
39
Standard Media Platen Cleaning
The platen can be cleaned with a fiber-free swab (such as a Texpad swab) or a lint free, clean,
damp cloth very lightly moistened with medical grade alcohol (90% pure or better).
1. Open the media door and remove the media.
2. Remove the platen from the printer (see Replacing the Platen on page 41).
3. Clean the platen surface with the alcohol moistened swab. Rotate the platen while
swabbing. Repeat this process two to three times with a new swab to remove residual
contaminates. Adhesives and oils, for example, may be thinned by the initial cleaning but
not completely removed.
4. Install the platen in the printer (see Replacing the Platen on page 41).
5. Discard the cleaning swab after use.
Allow the printer to dry for one minute before loading labels.
Liner-less Platen Cleaning
Normal Cleaning: If the liner-less platen roll has adhesive or paper dust build-up at the edges
of the media path, use the following procedure to remove the material. Do not use this
procedure to remove foreign contaminates (oils, dirt, etc.), see the Foreign Contaminates
Cleaning procedure.
1. Open the printer and remove the liner-less media.
2. Remove the platen roller. Use the platen replacement procedure.
12/17/07 ZP 450™ User Guide 980546-003 B
Page 50

40
Maintenance
Lubrication
3. Remove several inches of new liner-less media from the roll.
4. Gently tamp the adhesive and paper dust off of the platen roller with the adhesive side of
the liner-less media.
5. Clean the printhead. Use the printhead cleaning procedure. Remember to clean the
adhesive buildup on the head from the middle of the printhead to the outside.
6. Replace the platen roller.
7. Load the media. Let it extend out of the printer. Press the Feed button to verify that it is
operating correctly. Remove excess media.
Liner-less Platen Foreign Contaminates Cleaning: This is an stop gap procedure only to
remove foreign contaminates (oils, dirt) from the liner-less platen that can damage the
printhead or other printer components. This procedure will shorten or even exhaust the
platen’s useable life!
The liner-less platen can be cleaned with a fiber-free swab (such as a Texpad swab) or a lintfree, clean, damp cloth very lightly moistened with medical grade alcohol (90% pure or
better).
1. Open the printer and remove the liner-less media.
2. Liner-less platen rollers can damage easily. Gently swab the platen surface with the
alcohol moistened swab to clean. Rotate the platen or remove the platen while swabbing.
Repeat this process two to three times with a new swab to remove residual contaminates.
Adhesives and oils, for example, may be thinned by the initial cleaning but not completely
removed.
3. Discard the used cleaning swabs.
4. Allow the printer to dry for one minute before loading media. Load the liner-less media
roll. Let it extend out of the printer.
5. All of the non-stick coating was removed from the surface by cleaning. Feed a meter (39
inches) or more of media while gently pulling the media. This keeps the media from
wrapping around the platen roller and jamming in the printer. Feeding media causes the
roller to leach more silicon to the surface.
Note: If the liner-less media continues to jam after cleaning and feeding 1 to 2 meters (3 to 5
feet) of media, replace the liner-less platen.
Lubrication
Caution • No lubrica ting agents of any kind should be used on this printer. Some
commercially available lubricants, if used, will damage the finish and the mechanical parts
inside the prin ter.
980546-003 B ZP 450™ User Gu ide 12/17/07
Page 51

Replacing the Platen
Removal
Open the printer and remove any media.
1. Press the tabs on the right and left sides out. Then rotate them up.
Maintenance
Replacing the Platen
41
2. Lift the platen out of the printer’s bottom frame.
12/17/07 ZP 450™ User Guide 980546-003 B
Page 52

Maintenance
42
Replacing the Platen
Installation
1. Make sure the bearings are on the shaft of the platen.
2. Align the platen with the gear to the left and lower it into the printer’s bottom frame.
3. Rotate the tabs back and snap them into place.
980546-003 B ZP 450™ User Gu ide 12/17/07
Page 53

Replacing the Printhead
In the event you need to replace the printhead, read the procedure and review the removal and
installation steps before actually replacing the printhead.
Caution • Prepare your work area by protecting against static discharge. Your work area
must be static-sa fe and include a properly gr ounded conductive cushioned mat to hold the
printer and a conductive wrist strap for yourself.
Caution • Turn th e printer power off and un plug the power cord before replacing the
printhead.
Removal
1. Open the cover. Press the printhead to the left; then, release the right side catch.
Maintenance
Replacing the Printhead
43
2. Let the printhead fall forward; pull it free of the top case if necessary.
12/17/07 ZP 450™ User Guide 980546-003 B
Page 54

Maintenance
44
Replacing the Printhead
3. Unplug both bundles of printhead wires from their connectors.
Installation
1. Align the printhead to plug the left and right connectors into the wire bundles.
2. Slide the printhead into the left side and jog it into the right side catch.
Clean the printhead as described under Printhead Cleaning on page 36.
Reload media. Plug in the power cord, turn on the printer and print a status report to ensure
proper function.
980546-003 B ZP 450™ User Gu ide 12/17/07
Page 55

5
Troubleshooting
What the Status Light is Telling You
LED Status and Color Printer Status
Off Off 1
Solid Green On 2
Solid Amber Stopped 3
Flashing Green Normal Operation 4
Flashing Red Stopped 5
Double Flashing Green Paused 6
Flashing A mber Paused 7
Alternately Flashing Green and Red Needs Service 8
Flashing Red, Red and Green Needs Service 9
Resolutions
1. The printer is not receiving power.
• Have y ou turned on the printer power?
• Check power connections from the wall outlet to the power supply, and from the power
supply to the printer.
For a Resolution,
Refer to Number:
• Disconnect the printer from the wall outlet for 30 seconds and then reconnect the printer to
the wall outlet.
2. The printer is on and in an idle state.
No action necessary.
12/17/07 ZP 450™ User Guide 980546-003 B
Page 56

Troubles hooting
46
Resolutions
3. The printer has failed its power on self test (POST).
• If this error occurs right after y ou turn on the printer, contact an authorized reseller for
assistance.
There is a memory error.
• If this error occurs after you have been printing, turn the printer power off and on. Then,
resume printing.
The printer needs to cool or requires service.
• If this error continues, turn the printer power off for five minutes or more. Then, turn on. If
the amber light persists, then the printer requires service.
4. The printer is receiving data.
• As soon as all of the data has been received, the status LED will turn green; then, the
printer will automatically resume operation.
5. The media is out.
• Follow the instructions for Loading Roll Media on p age 9 in the Getting Started section.
Then, press the feed button to resume printing.
The printhead is open.
• Close the top cover. Then, press the feed button to resume printing.
6. The printer is paused.
• Press the feed button to resume printing.
7. The printhead is under temperature.
• Continue printing while the printhead reaches the correct operating temperature.
The printhead is over temperature.
• Printing will stop until the printhead cools to an acceptable printing temperature. When it
does, the printer will automatically resume operation.
8. FLASH memory is not programmed.
• Return the printer to an authorized reseller.
9. The printhead or motor has had a critical failure.
• Return the printer to an authorized reseller.
980546-003 B ZP 450™ User Gu ide 12/17/07
Page 57

Print Quality Problems
No print on the label.
• You must use direct thermal media for printing. Direct thermal media is chemically treated
to print (expose) when heat is applied. A finger nail or pen cap may be used to test for
direct thermal media by pressing firmly and quickly dragging it accross the media surface.
This test method uses friction heat to expose the media.
• Is the media loaded correctly? The media’s print surface must face up to make contact
with the printhead. Follow the instructions for Loading Roll Media on page 9 in the
Getting Started section.
The printed image does not look right.
• The printhead is dirty. Clean the printhead.
• The printhead is under temperature.
• Adjust the print darkness and/or print speed.
Troubleshooting
Print Quality Problems
47
•Use the
Programming Guide.
•Use the
Guide.
• Manually adjust print darkness with the six-flash sequence of Feed Button Modes
on page 53.
• The Windows printer driver or application software may change these settings and
may require a change to optimize print quality.
• The media being used is incompatible with the printer. Be sure to use the recommended
media for y our application, and always use Zebra-approved labels and tags.
• The printhead has worn out. The printhead is a consumable item and will wear out due to
friction between the media and printhead. Using unapproved media may shorten life or
damage your printhead. Replace the printhead.
• The platen may need cleaning or replacement. The platen (driver) roller maybe losing
traction due to:
• Foreign objects attached to its surface,
• The rubbery smooth surface has become polished and slippery, or
• There is damage to the normally smooth and flat print surface such as box knife cuts.
^PR (speed) and ~SD (darkness) commands referenced in the ZPL
D (darkness/density) and S (speed) commands in the EPL Programmer’s
There are long tracks of missing print (blank vertical lines) on
several labels.
• The printhead is dirty. Clean the printhead.
• The printhead elements are damaged. Follow the instructions for Replacing the Printhead
on page 43 in the Maintenance section).
12/17/07 ZP 450™ User Guide 980546-003 B
Page 58

Troubles hooting
48
Print Quality Problems
The printing does not start at the top of the label, or misprinting of
one t o three labels.
• The printer needs to be calibrated for the media. Refer to the two-flash sequence of Feed
Button Modes on page 53 in this section.
• The correct media sensor may not be activated. Manual calibration selects the media
sensing method for the labels being used (refer to the
Programming Guide).
^MN command in the ZPL II
• Verify that the Label Top (
ZPL II Programming Guide).
^LT) command is correctly set for y our application (consult the
A ZPL label format was sent to, but not recognized by, the printer.
• Is the printer in pause mode? If so, press the feed button.
• If the status LED is on or flashing, refer to Feed Button Modes on page 53 in this chapter.
• Make sure the data cable is correctly installed.
• A communications problem has occurred. First, make sure that the correct
communications port on the computer is selected. Refer to Hooking Up the Printer and
Computer on page 15 in the Getting Started section.
980546-003 B ZP 450™ User Gu ide 12/17/07
Page 59

Manual Calibration
Manual calibration is recommended whenever you are using pre-printed media or if the printer
will not correctly auto calibrate.
1. Make sure media is loaded.
2. Turn on the printer power.
3. Press and hold the Feed button until the green status light flashes once, then twice and
then continuing until the flash groups reach the group of seven flashes. Release the Feed
button.
4. The printer will set the media sensor for the label backing being used. After it is done
making this adjustment, the roll will automatically feed until a label is positioned at the
printhead. A profile of the media sensor settings (similar to the example below) will print.
Upon completion, the printer will save the new settings in memory and the printer is ready
for normal operation.
5. Press the Feed button. One entire blank label will feed. If this does not happen, try
defaulting (refer to the four-flash sequence in “Feed Button Modes” later in this chapter)
and recalibrating the printer..
Troubleshooting
Manual Calibration
49
Note • Performing a manual calibration disables the automatic media type detection the is
part of the automatic media sensing (and calibration) function. To return to auto calibration,
default the printer (refer to the four-flash sequence in Feed Button Modes on page 53 in this
section).
12/17/07 ZP 450™ User Guide 980546-003 B
Page 60

Troubles hooting
50
Troubleshooting Tests
Troubleshooting Tests
Printing a Configuration Label
To print out a listing of the printer’s current configuration, refer to the one-flash sequence in
Feed Button Modes on page 53 in this section
Recalibration
Recalibrate the printer if it starts to display unusual symptoms, such as skipping labels. Refer
to the two-flash sequence in Feed Button Modes on page 53 in this section.
980546-003 B ZP 450™ User Gu ide 12/17/07
Page 61

Resetting the Factory Default Values
Sometimes, resetting the printer to the factory defaults solves some of the problems. Refer to
the four-flash sequence in Feed Button Modes on page 53 in this section.
Communications Diagnostics
If there is a problem transferring data between the computer and printer, try putting the printer
in the communications diagnostics mode. The printer will print the ASCII characters and their
respective hexadecimal values (a sample is shown below) for any data received from the host
computer. To find out how,
There are multiple ways to enter hex data dump mode:
•The ~JD ZPL command
•The dump EPL command
• On power up with the Feed button pressed. Refer to the power off mode procedure in Feed
Button Modes on page 53 in this section.
Troubleshooting
Resetting the Factory Default Values
51
The printer will print ‘Now in DUMP’ (see below) and advance to the top of the next label.
12/17/07 ZP 450™ User Guide 980546-003 B
Page 62

Troubles hooting
52
Communications Diagnostics
The following example of a communications DUMP mode printed out. The printout displays
hexadecimal data 00h-FFh (0-255 decimal) with a unique character for each hexadecimal
value displayed above the hexadecimal data.
The blank lines between the lines of data are where serial port and Bluetooth data handling
errors get logged. The errors are:
• F = Frame Error
• P = Parity Error
• N = Noise Error
• O = Data Overrun Error
To exit the diagnostic mode and resume printing, turn off and then turn on the printer. An
alternate method for exiting the diagnostic mode is to press the Feed button as many times as it
takes to clear the printer’s command buffer and print ‘Out of DUMP’ on the label.
980546-003 B ZP 450™ User Gu ide 12/17/07
Page 63

Feed Button Modes
With th e print er power of f , press and h old th e Feed button while you turn on the power.
Flash Sequence Action
Rapid Red
Flashing
Amber
Green
Troubleshooting
Feed Button Modes
Power O ff Mode (Communications Diagnostics Mode)
Fir mw are Dow nload Mode - The printer starts rapidl y fl ash i ng red to denote en try into
the Fi rmware D own load mode. Rel easi ng the Feed but ton h ere wi ll start i ni ti al i zing the
pri nter f or downl oad. The pri nter is ready to start downl oading firmware when the status
li ght beg i ns to sl owl y f l ash between red and green.
See Sending Files to the Printer on pag e 32 for m ore in formati on on using the Firmware
(and Fi le) Down l oad uti li ty avai labl e for use wi th this printer.
Norm al Oper ations Mode - T he pri nter con tinues into a normal printer ini tialization.
Rel easi ng th e Feed but ton h ere wi ll all ow the pri n ter to st art normal ly without fi rmware
downl oad or operati ng in com munications diagnostics mode.
Com mu nication s Diagnostic (Dump) Mode - Rel ease the Feed bu tton imm ediatel y after
the printer status light turns green. Th e pri nter wi l l print ‘Now in DUMP’ at th e top of the
label and then adv ance to th e nex t l abel. After pri nti ng the firs t l abel, the pri nter w il l
automaticall y enter into diagnostic mode i n which the printer prints out a literal
represen tati on of all data subsequ entl y recei ved.
To exit the diagnostic mode and resume printing, turn off and then turn on the printer. An
alternate method for exiting the diagnostic mode is to press the Feed button as many times
as it takes to clear the printer’s command buffer and print ‘Out of DUMP’ on the label.
53
12/17/07 ZP 450™ User Guide 980546-003 B
Page 64

Troubles hooting
54
Feed Button Modes
Power On Modes
With the pri nter power on and top cover clos ed, press and hol d t he Feed but ton for sev eral seconds. The green status LED
will flash a number of times in sequence. T he ex pla nation at th e ri ght (A cti on) shows what h appens when you rel ease th e
key af ter t he start spe cif i c number of fl ashes an d before th e nex t f lash sequen ce starts.
Flash Sequence Action
Conf igurati on Status - Pri nts a det ail ed prin ter conf ig urati on stat us l abel. T he l abel can be
*
*
**
*
**
***
*
**
***
used t o veri f y printing, assist printer to com puter communication configuration,
mai ntenan ce, trou bl esh ooting, and help us with customer care communications.
Standar d Media Cali brati on - Th e pri nter detect s and set s medi a type an d medi a length,
and i t adju sts th e medi a sensors f or opti m al perf orm ance with the instal led m edia. Th e
pri nter w il l f eed one to f our l abels.
Note: Users familiar with the Zebra EPL desktop printer use this Feed mode to repl ace
power-up AutoSensing calibration.
Serial Por t Configu rati on - Applies only to printers with serial interface ports.
To reset th e com munication param eters. Press an d rele ase the Feed button whil e the LED
rapi dly fl ashes a mber a nd green .
For aut obaud sy nchron i zati on: Sen d the ^X A^X Z com mand s equence to the pri nter wh i le
the L ED r apidl y f las hes amber and g reen. When th e prin ter an d host are synch ron ized, the
LED chan ges to sol i d green . NOTE: No labels will print during autobaud synchron i zati on.
Factor y Defaults - Resets th e printer to the def ault factory set tings and modes. See the
conf i gurati on labe l f or a l i st of the pri mar y settings affected by thi s Feed Mode option .
Other set ti ngs are excl usi vely set, vi ewed and con trol led by program m ing are also reset.
Th e prin ter th en perf orms a stan dard m edi a cal ibrati on.
****
*
**
***
Print Width Adjustment - Prints a successi on boxe s starti ng at t he mi nim um pri nt wi dth
and ending in the pri nter’s m axim um print width in 4mm i ncrem ents. Press the Feed bu tton
once when the pri nter has reached the desired max im um print width. Note t hat th e printer
dri ver an d appl i cati ons ca n overri de thi s setti ng.
****
*****
*
**
***
****
*****
P r in t D ar kn ess ( Den sity) Adjustment - Prints a succession of bar code simulation
pattern s starting at the m inimum darkness (pri nt densi ty/h eat) an d ending i n the printer’s
max i mum dar kness i n i ncrem ents of f our (4) usi ng th e ZPL darkn ess setting range val ues.
Press th e Feed but ton once t he patt ern i s clear an d legi ble. Do n ot con tinue to increase t he
darkness setting. Bar code li ne wi dths may becom e di storted reducing readabil ity. Note
that the printer driver and appl icat ion s can ov erri de this setti ng.
******
*
**
***
****
*****
Manual Media Cali br ation - The pri nter runs extensive tests to detect an d set m edi a type
and media length, and then it adjusts the media sensors for optimal perform ance wi th th e
in stal l ed m edi a. Manu al cal ibrati on i s recomm ended whenev er y ou are usi ng pre-printed
medi a, print on the liner or if the printer will not correctly auto calibrat e. A gr aphical
profi le of th e medi a sensi ng wil l print. See Manual Cal ibration on pag e 49 for m ore detai ls
and con si deration s.
******
*******
If the Feed button r emains pressed after a 8-fl ash sequence, the printer exits the configuration mode
when the Feed button is released.
980546-003 B ZP 450™ User Gu ide 12/17/07
Page 65

Repackaging the Printer for Return
Before repackaging your printer for return, please call customer service to get a Return
Material Authorization (RMA) tracking number.
To repackage your printer, use the saved packaging materials or ask your customer service
representative to send a new printer packaging kit.
Items to return : Printer, power cord and USB cable.
1. Place the printer in the plastic bag.
Troubleshooting
Repackaging the Printer for Return
55
2. Place the bagged printer between the two ridged foam shells and place them into the carton.
12/17/07 ZP 450™ User Guide 980546-003 B
Page 66

Troubles hooting
56
Repackaging the Printer for Return
3. Place the power cord and USB cable on the top of the foam shell in the carton.
4. Seal the carton.
980546-003 B ZP 450™ User Gu ide 12/17/07
Page 67

Interfaces
Universal Serial Bus (USB) Connector
The figure below displays the cable wiring required to use the printer’s USB interface.
6
Pin No. Description
1 Vbus
2 D–
3 D+
4 Ground
Shel l Shield/Drain Wire
For printer supported operating sy stems and drivers, see the software and documentation CD
or visit the Zebra printer web site at:
www.up s.z ebra.com
For information on the USB interface, go to the USB web site at:
www.usb.org
12/17/07 ZP 450™ User Guide 980546-003 B
Page 68

Interfa ces
58
Ethernet Interface
Ethernet Interface
This interface requires a UTP RJ45 Ethernet cable rated CAT-5 or better.
The table below provides the cable’s pinout assignments.
Signal Pin Pin Signal
Tx+ 1 1 Tx+
Tx- 2 2 Tx-
Rx+ 3 3 Rx+
—4 4—
—5 5—
Rx- 6 6 Rx-
—7 7—
—8 8—
4
3
2
1
5
6
7
8
980546-003 B ZP 450™ User Gu ide 12/17/07
Page 69

Serial Port Interface
Pin Descri ption
1 Not used
2 RXD (receive data) input to the printer
3 TXD (transmit data) output from the printer
4 DTR (data terminal ready) output from the printer -- controls
5 Chassis ground
6 DSR (data set ready) input to the printer
7 RTS (request to send) output from the printer -- always in the
8 CTS (clear to send) - Not used by the printer
9 +5 V @ 0.75 A fused
The maximum current available through the serial and/or parallel port is not to
exceed a total of 0.75 Amps.
when the host may send data
ACTIVE condition when the printer is turned on
Interfaces
Serial Port Interface
59
When XON/XOFF handshaking is selected, data flow is controlled by the ASCII
control codes DC1 (XON) and DC3 (XOFF). The DTR control lead will have no
effect.
Interconnecting to DTE Devices — The printer is configured as data terminal
equipment (DTE). To connect the printer to other DTE devices (such as the serial
port of a personal computer), use an RS-232 null modem (crossover) cable. Figure
31 shows the required cable connections.
Interconnecting to DCE Devices — When the printer is connected via its RS-232
interface to data communication equipment (DCE) such as a modem, a STANDARD RS-232 (straight-through) interface cable must be used. Figure 32 shows
the connections required for this cable.
Connecting to the KDU (Keyboard Display Unit) — The KDU was designed for
DCE printer connections and requires a Zebra custom serial port gender changing
adapter. The KDU now includes the KDU adapter and the Zebra kit part number
for the KDU Adapter is 105934-088.
12/17/07 ZP 450™ User Guide 980546-003 B
Page 70

Interfa ces
60
Serial Port Interface
Connecting the Printer to a DTE Device
DB -25S
Conn ector
to DTE Device (PC)
DB-9P
Connect or
to Printer
DB-9S
Conn ector
to DT E Dev i ce (PC)
Connecting the Printer to a DCE Device
DB-25S
Conne ctor
to DCE Device
DB-9P
Conn ector
to Printer
DB-9S
Conn ector
to DCE Devi ce
DB-9P
Conn ector
to Pri nter
DB-9P
Conn ector
to Pri nter
980546-003 B ZP 450™ User Gu ide 12/17/07
 Loading...