

Zebra Zebra Printer Setup Utilities Printer Setup Utility for Android with Security Assessment Wizard

Printer Setup Utility
for Android™ with
Security Assessment
Wizard
User Guide
P1085291-06EN

ZEBRA and the stylized Zebra head are trademarks of Zebra Technologies Corporation, registered in
many jurisdictions worldwide. All other trademarks are the property of their respective owners.
© 2022 Zebra Technologies Corporation and/or its affiliates. All rights reserved.
Information in this document is subject to change without notice. The software described in this document
is furnished under a license agreement or nondisclosure agreement. The software may be used or copied
only in accordance with the terms of those agreements.
For further information regarding legal and proprietary statements, please go to:
SOFTWARE:http://www.zebra.com/linkoslegal
COPYRIGHTS:http://www.zebra.com/copyright
WARRANTY:http://www.zebra.com/warranty
END USER LICENSE AGREEMENT: http://www.zebra.com/eula
Terms of Use
Proprietary Statement
This manual contains proprietary information of Zebra Technologies Corporation and its subsidiaries
(“Zebra Technologies”). It is intended solely for the information and use of parties operating and
maintaining the equipment described herein. Such proprietary information may not be used, reproduced,
or disclosed to any other parties for any other purpose without the express, written permission of Zebra
Technologies.
Product Improvements
Continuous improvement of products is a policy of Zebra Technologies. All specifications and designs are
subject to change without notice.
Liability Disclaimer
Zebra Technologies takes steps to ensure that its published Engineering specifications and manuals are
correct; however, errors do occur. Zebra Technologies reserves the right to correct any such errors and
disclaims liability resulting therefrom.
Limitation of Liability
In no event shall Zebra Technologies or anyone else involved in the creation, production, or delivery of the
accompanying product (including hardware and software) be liable for any damages whatsoever
(including, without limitation, consequential damages including loss of business profits, business
interruption, or loss of business information) arising out of the use of, the results of use of, or inability to
use such product, even if Zebra Technologies has been advised of the possibility of such damages. Some
jurisdictions do not allow the exclusion or limitation of incidental or consequential damages, so the above
limitation or exclusion may not apply to you.
2

Contents
Terms of Use ................................................................................................................... 2
Proprietary Statement ............................................................................................... 2
Product Improvements ............................................................................................. 2
Liability Disclaimer .................................................................................................... 2
Limitation of Liability ................................................................................................. 2
Contents .............................................................................................................................................. 3
Introduction and Installation ............................................................................................................. 6
Target Audience .............................................................................................................. 6
Requirements .................................................................................................................. 7
Printer Platform ......................................................................................................... 7
Firmware Requirements ........................................................................................... 7
Connectivity .............................................................................................................. 7
Feature Overview ..................................................................................................... 8
Installing Zebra Printer Setup Utility ................................................................................ 9
Sideloading ................................................................................................................... 10
Discovery and Connectivity ............................................................................................................. 11
Printer Discovery Methods ............................................................................................ 11
Print Touch (Tap and Pair) ............................................................................................ 12
Discover Printers .................................................................................................... 13
Bluetooth Pairing via the Settings Menu ................................................................. 14
Manually Select Printer ........................................................................................... 14
Bluetooth and Limited Pairing Mode ............................................................................. 15
Printer Ready State ....................................................................................................... 20
Error on Connecting ...................................................................................................... 20
Protected Mode ............................................................................................................. 21
Deselect a Printer .......................................................................................................... 21
3

Contents
Media Setup ....................................................................................................................................... 22
Media Settings .............................................................................................................. 22
Print Quality ...................................................................................................................................... 24
Manually Adjust Print Quality ........................................................................................ 25
Darkness Control .......................................................................................................... 26
Print Quality Assistant ................................................................................................... 27
Available Files and Printer Actions ................................................................................................. 29
Available Files ............................................................................................................... 29
Printer Actions ............................................................................................................... 29
Printer Actions Elements ........................................................................................ 30
Enable FIPS 140-2 Setting ..................................................................................... 31
Device Language Selector and Printer Emulation Management .................................................. 34
Introduction ................................................................................................................... 34
Device Language Selector ............................................................................................ 34
Set the Device Language ....................................................................................... 35
Printer Emulation Management ..................................................................................... 35
Download the Printer Emulation Zip File ................................................................ 36
Access the Printer Emulation Zip File ........................................................................... 36
Copy the Printer Emulation Zip File to Your Device ............................................... 36
Drag and Drop using a USB Connection ................................................................ 37
Install the Printer Emulation .................................................................................... 37
Print Templates ................................................................................................................................. 40
Using a Print Template .................................................................................................. 41
Adding a Template ........................................................................................................ 41
Removing a Template ................................................................................................... 42
Remote Server Settings ................................................................................................................... 44
Introduction ................................................................................................................... 44
Accessing the Weblink Server Settings .................................................................. 45
Configuring the Weblink Server Settings ................................................................ 45
Accessing the MQTT Server Settings .................................................................... 46
Configuring the MQTT Server Settings .................................................................. 47
4

Contents
Printer Information ........................................................................................................................... 50
Zebra Printer Setup Utility Application Screens ............................................................ 50
Zebra Assist ............................................................................................................ 52
App Settings .................................................................................................................. 52
About ...................................................................................................................... 53
Capture and Send a Settings File .................................................................................................... 54
Capture or Save Settings to a File ................................................................................ 54
Send Settings File to a Printer ...................................................................................... 55
Send a Settings File to Zebra Assist ............................................................................. 55
Demos ................................................................................................................................................ 57
Using the Asset Tag Demo ........................................................................................... 58
Using the Traffic Ticket Demo ....................................................................................... 59
Using the Photo Badge Demo ....................................................................................... 60
5

Introduction and Installation
This section provides information about Zebra Printer Setup Utility Application and includes supported
operating systems, connectivity, printers, and devices.
Zebra Printer Setup Utility is an Android
a Zebra printer running Link-OS
displays as the application provides an improved method to connect to a printer, configure, and determine
its status via a mobile device.
IMPORTANT: Depending on your printer model, this application may have limited functionality. Some
application features will not be available for the detected printer model. Features that are unavailable are
grayed out or not shown on the menus.
Zebra Printer Setup Utility is available on Google Play
Target Audience
™
™
application (app) that assists with the set up and configuration of
. This application is particularly useful for printers that do not have LCD
™
.
Zebra Printer Setup Utility is intended for all customers and partners. Moreover, Zebra Printer Setup Utility
may be used by Zebra Technical Support as part of a fee-based service called Install-Configure-Assist
(ICA). As part of the service, customers are instructed how to download the application and receive guided
support throughout the set up process.
6

Requirements
Printer Platform
Zebra Printer Setup Utility supports the following Zebra printers:
Mobile Printers Desktop Printers Industrial Printers Print Engines
• iMZ series
Introduction and Installation
• ZD200 series
• ZT111
• ZE500 series
• QLn series
• ZQ112 and ZQ120
• ZQ210 and ZQ220
• ZQ300 series
• ZQ500 series
• ZQ600 series
• ZR118, ZR138,
ZR318, ZR328,
ZR338, ZR628, and
ZR638
Firmware Requirements
The application supports printers running Link-OS 3 through Link-OS 6.7.
Printer models ZQ112, ZQ210, ZQ220, ZR118, ZQ120, ZR128 and ZR138 require a minimum printer OS
version of 88.01.04.
Printer models ZD220, ZD230, and ZD888 require a minimum printer OS version of 89.21.16.
Connectivity
• ZD400 series
• ZD500
• ZD600 series
• ZD888
series
• ZT200 series
• ZT400
• ZT500 series
• ZT600 series
series
The application supports the following types of connectivity:
• Bluetooth Classic
• Bluetooth Low Energy (Bluetooth LE)
• Wired/Ethernet
• Wireless
• USB On-The-Go
Operating Systems
The application is tested with and supported on the following Android versions:
• 8.x
• 9.x
• 10.x
• 11.x
• 12.x
• 13.x
7

Device Platform
The application is tested with and supported on the following Android devices:
A-H I-Z Zebra ET-MC Zebra O-X
Bluebird EF500
Introduction and Installation
Intermac CK3X
Zebra ET
Zebra Omnii XT51
Bluebird RFR900
Captuvo Sled
Densco BHT-1281
Google Nexus
Google Pixel 4a
Honeywell 99EX
Honeywell Dolphin
Honeywell Dolphin 99GX
The amount of viewable information on a given device varies by screen size, and may require you to scroll
to access all of the information.
Feature Overview
The features listed below are explained in detail in other areas of this guide.
• Printer discovery via multiple connectivity methods.
• Support for Bluetooth Low Energy (Bluetooth LE), Bluetooth Classic, Wired and Wireless network, and
USB.
Intermec CK
Intermec CN
Panasonic CF-53
Rogue TC8000 Android
443
Samsung Galaxy S10
Seuic AUTOID9
Urovo i6200s-CN
Zebra ET1
Zebra ET55
Zebra MC
Zebra MC3100
Zebra MC40 V4-1-1
Zebra MC45
Zebra MC55
Zebra MC67
Zebra MC75
Zebra MC9500
Zebra TC
Zebra TC51
Zebra TC55
Zebra TC57
Zebra TC70
Zerba ET50 Windows
Zerba TC25
Zerba TC52
Zerba WT600
Zerba XSLATE R12
• Simple printer to mobile computer pairing, using the Print Touch system.
• Connectivity Wizard for configuring connection settings.
• Media Wizard for configuring key Media settings.
• Print Quality Wizard for optimizing output legibility.
• Access to extensive printer status information including details on the printer’s serial number, battery
status, media settings, connectivity options, and odometer values.
• Connectivity to popular file sharing services.
• Ability to retrieve and send files stored on the mobile device or on a cloud storage provider.
• File transfer – used to send file contents or OS updates to the printer.
• Easy to use Printer Actions, including calibrate media, print a directory listing, print a configuration
label, print a test label, and restart the printer.
• Install, enable, and disable Printer Emulation languages.
• Printer Security Assessment Wizard to assess printer security posture, compare your settings against
security best practices, and make changes based on your conditions to increase protection.
8
Introduction and Installation
Installing Zebra Printer Setup Utility
Zebra Printer Setup Utility is available on Google Play.
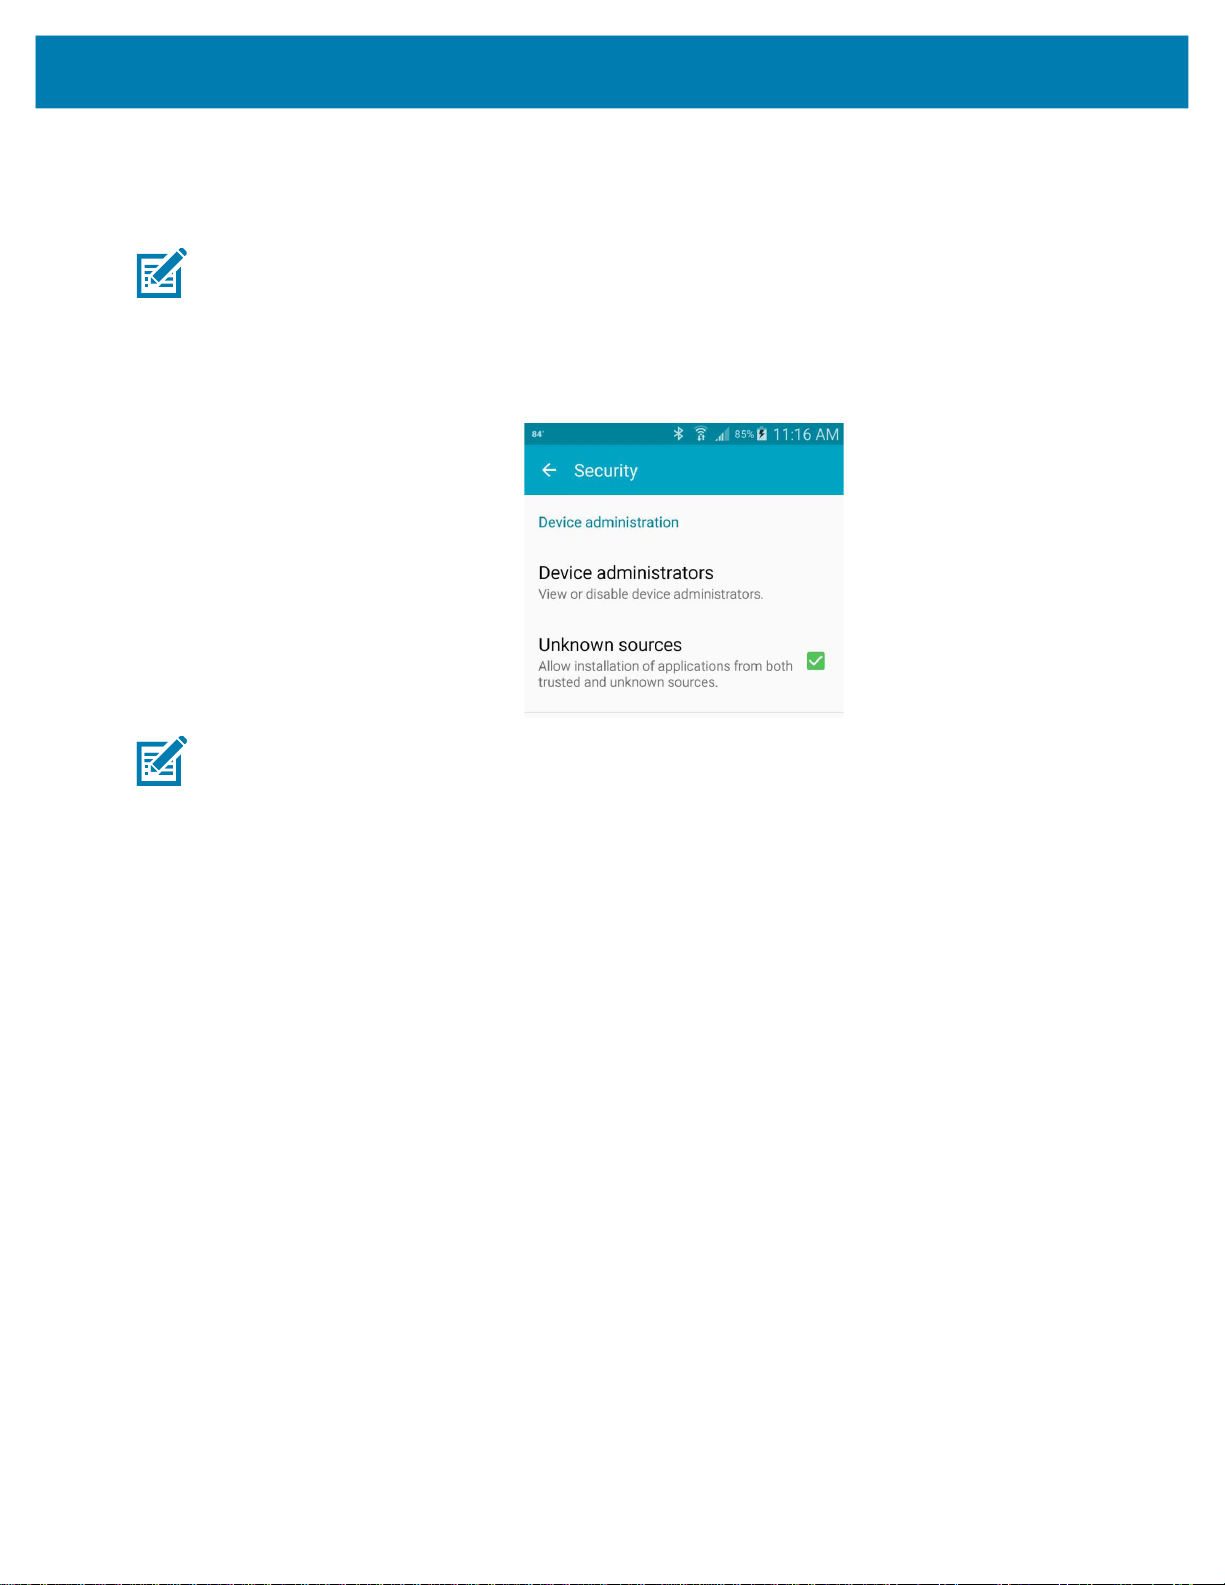
NOTE: If you download the application from anywhere other than Google Play, your security setting must
be enabled to download and install non-market applications. To enable this function:
1. From the main Settings screen, tap Security.
2. Tap Unknown sources.
3. A check mark is displayed to indicate it is active.
NOTE: If you download the Zebra Printer Setup Utility application (.apk) to a laptop/desktop computer
instead of directly to the Android device, you will also need a generic utility to transfer the .apk file to the
Android device and install it. An example of a generic utility is Android File Transfer from Google, which
allows Mac OS X 10.5 and higher users to transfer files to their Android device. You can also sideload the
Zebra Printer Setup Utility .apk; see Sideloading on page 10.
9

Sideloading
Sideloading means installing applications without using the official application stores such as Google Play,
and includes those times when you download the application to a computer.
To sideload the Zebra Printer Setup Utility application:
1. Connect your Android device to the computer using the appropriate USB (or micro USB) cable.
2. Open two Windows Explorer windows on your computer: one window for the device and one for the
3. Drag and drop the Zebra Printer Setup Utility application (.apk) from the computer to your device.
4. See Figure 1. Open the file manager application on your device. (For example, on a Samsung Galaxy
5. Locate the Zebra Printer Setup Utility application in the files on your device and tap it to initiate the
Introduction and Installation
computer.
Because you will need to find the file later, note the location where you placed it on your device.
HINT: It is generally easiest to place the file in the root directory of your device rather than inside a
folder.
5, your file manager is My Files. Alternatively, download a file manager application on Google Play.)
installation.
Figure 1 Sideload Installation
10

Discovery and Connectivity
This section describes the discovery methods and using the Connectivity Wizard.
IMPORTANT: Depending on your printer model, this application may have limited functionality. Some
application features will not be available for the detected printer model. Features that are unavailable are
grayed out or not shown on the menus.
Printer Discovery Methods
The following methods describe how to use Zebra Printer Setup Utility to discover and connect to your
printer.
• Tap and Pair with a printer (recommended)
• Discover Printers
• Manually select your printer
• Bluetooth Classic or Bluetooth Low Energy pairing via your device Settings menu
For successful network discovery, your mobile device should be connected to the same subnet as your
printer. For Bluetooth communications, Bluetooth must be enabled on your device and printer. NFC must
be enabled to use the Print Touch feature. Refer to the user documentation for your device or printer for
further details on configuring the printer and device.
NOTES:
• Bluetooth discovery can only retrieve the Friendly Name and MAC Address.
If you encounter issues with printer discovery (and at times when Zebra Printer Setup Utility may not
be able to discover your printer), you may need to manually enter your printer’s IP address.
Having your printer and mobile device on the same subnet gives you the greatest chance of
successfully discovering the printer.
• If your printer has both Bluetooth and network connections enabled, Zebra Printer Setup Utility will
pair via the network. If this is the first time you have connected to any printer (or if you have recently
unpaired from this printer), and you are pairing via Bluetooth, you are prompted to confirm the
pairing request (2) on both the printer and the device (see Figure 2).
• Starting with Link-OS v6, the bluetooth.discoverable function is now off by default and other devices
cannot see or connect to the printer. With discoverability disabled, the printer still makes
connections with a remote device that was previously paired.
11

RECOMMENDATION: Only keep discoverable mode enabled while paring to a remote device. Once
paired, discoverable mode is disabled. Starting with Link-OS v6, a new feature was introduced to enable
limited discovery. Holding down the FEED button for 5 seconds will enable limited discovery. The printer
automatically exits limited discovery mode after 2 minutes have elapsed, or a device has successfully
paired with the printer. This enables the printer to operate safely with discoverable mode disabled until a
user with physical access to the printer activates it. Upon entering Bluetooth Pairing Mode, the printer
provides feedback that the printer is in Pairing Mode using one of these methods:
• On printers with a Bluetooth Classic or Bluetooth Low Energy screen icon or Bluetooth/Bluetooth Low
Energy LED, the printer shall flash the screen icon or LED on and off every second while in pairing
mode.
• On printers without a Bluetooth Classic or Bluetooth LE screen icon or Bluetooth Classic or
Bluetooth LE LED, the printer shall flash the Data icon or LED on and off every second while in pairing
mode.
• Specifically, on the ZD510 model, the 5 flash LED sequence places the printer into Bluetooth Pairing
Mode.
Print Touch (Tap and Pair)
The Near Field Communication (NFC) tag on the Zebra printer and your smartphone or tablet may be used
to establish radio communication with each other by tapping the devices together or bringing them into
close proximity (typically 4 cm (1.5 in) or less).
Discovery and Connectivity
Zebra Printer Setup Utility acknowledges the start of the Print Touch process, the pairing, any associated
errors, and the successful discovery of the printer.
IMPORTANT:
• NFC must be enabled on your device to use the Print Touch feature. If you do not know where the NFC
location on your device is, refer to your device’s documentation. The NFC location is often at one of the
device’s corners, but could be elsewhere.
• Certain Android phones may not pair via Print Touch. Use one of the other connection methods.
• When you scan an NFC tag, the Printer Setup Utility performs a search for connection types in the
following order, and connects to the first one that is successful:
a. Network
b. Bluetooth Classic
c. Bluetooth LE
NOTE: If you encounter issues with printer discovery (for example, Zebra Printer Setup Utility may not
discover your printer), manually enter your printer’s IP address.
Having your printer and Android device on the same subnet will give you the greatest chance of
successfully discovering the printer.
To pair with a printer via Print Touch:
1. Launch the Zebra Printer Setup Utility application on your device.
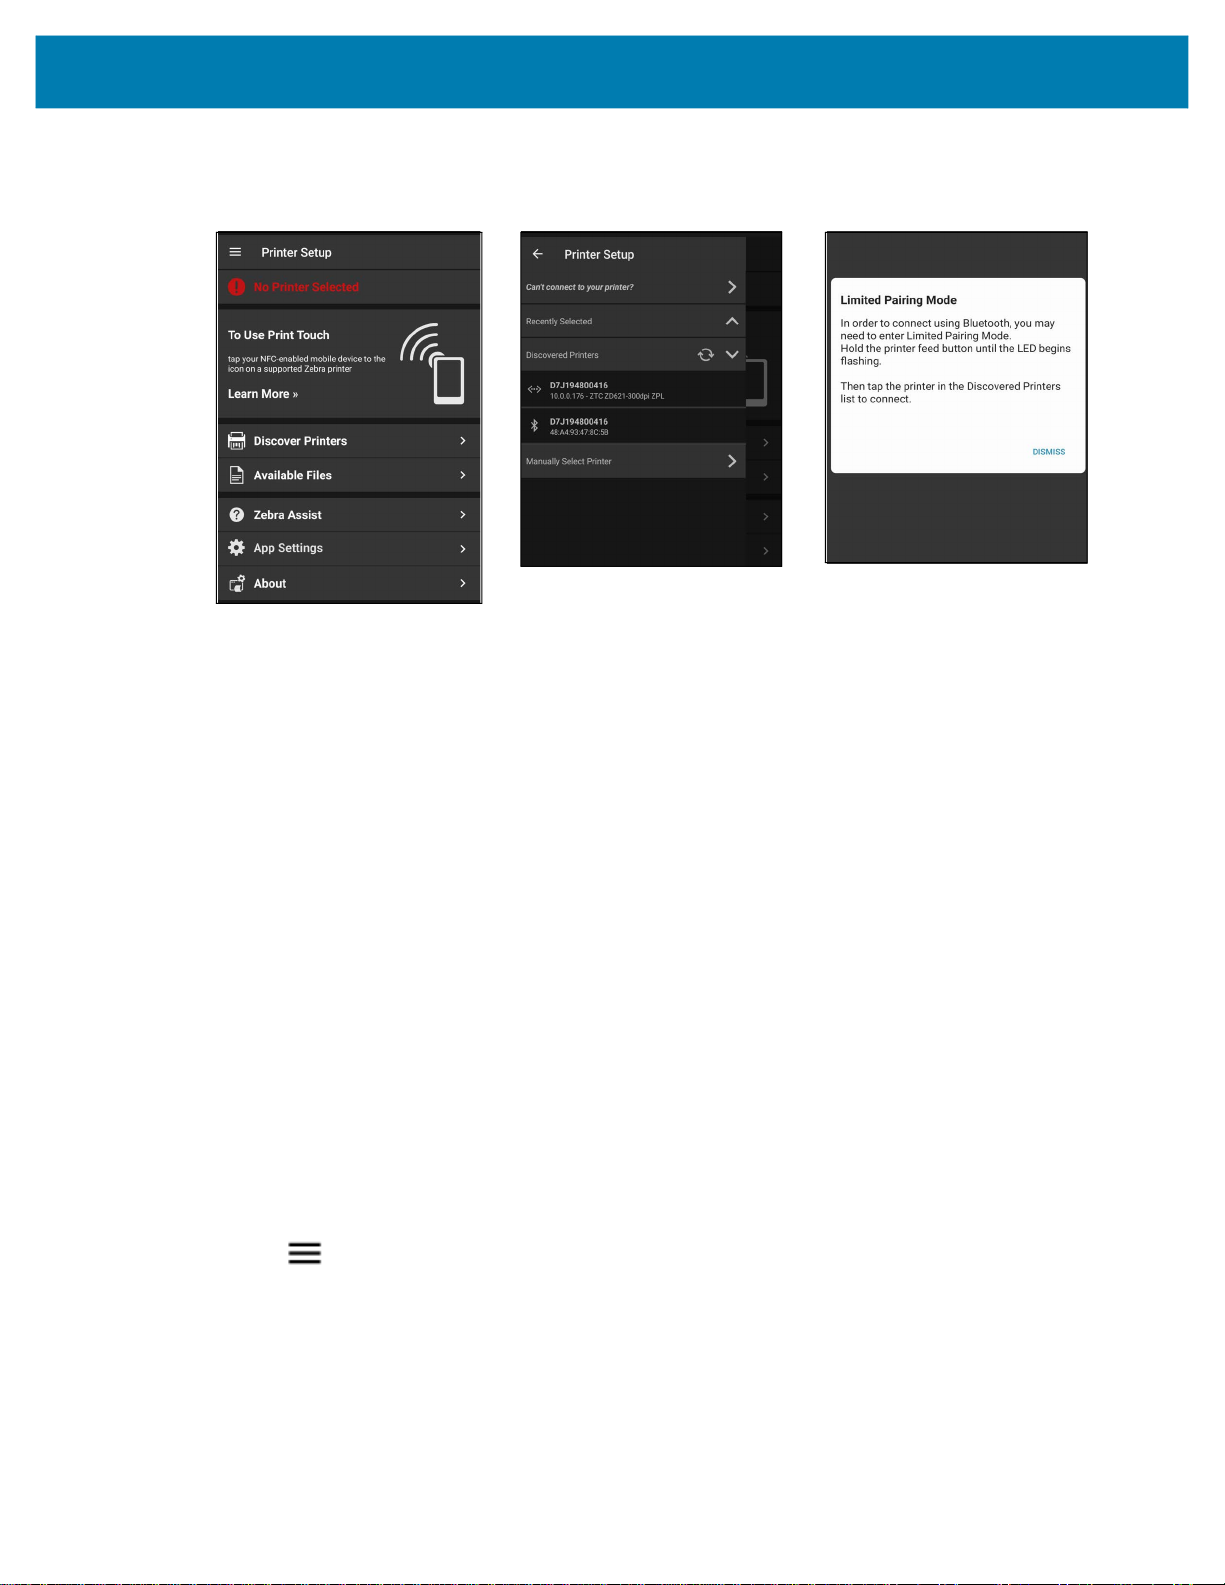
2. See Figure 2. Upon launching for the first time, it will indicate No printer selected (1).
The simplest method to set up a connection to your printer with an NFC-enabled device is to use the
Print Touch
icon on the outside of the printer:
3. Do one of the following:
feature on printers that support Print Touch. Printers supporting Print Touch will have this
12

Discovery and Connectivity
• Tap your device’s NFC location against the Print Touch icon on the printer. Zebra Printer Setup
Utility finds and connects to the printer. Follow the on-screen prompts.
• On printers with enhanced security enabled, press and hold the FEED button for 10 seconds until
either the Bluetooth/Bluetooth Low Energy icon or the data light flashes; this puts the printer in a
discoverable mode. Tap your device’s NFC location against the Print Touch icon on the printer.
Zebra Printer Setup Utility finds and connects to the printer. Follow the on-screen prompts.
Figure 2 Zebra Printer Setup Utility Dashboard (First Time Use)
(1) Side Drawer (2) Bluetooth Pairing
Confirmation
Discover Printers
To discover printers without using Print Touch:
1. See Figure 3. From the Dashboard, tap Menu.
2. If no printers have previously been discovered, tap Discover Printers (1). If you have previously
discovered printers, tap Refresh in the Printer Setup side drawer (2).
Zebra Printer Setup Utility searches and displays a list of discovered Bluetooth and network connected
printers. At the completion of the discovery, the Discovered Printers group is updated. Progress dialogs
are displayed during the discovery process.
3. Tap the desired printer in the list (2).
Zebra Printer Setup Utility finds and connects to the printer based on your Bluetooth or network
connection.
4. If you are unable to connect to your printer, tap Can’t connect to your printer? (2).
13
Discovery and Connectivity
Figure 3 Manually Select a Printer
(1) Printer Setup (2) Side Drawer (3) Limited Pairing Mode
Bluetooth Pairing via the Settings Menu
You may pair your mobile device with your printer using the device’s Settings menu.
To pair with a printer using the Settings menu on your device:
1. On your device, go to the Settings menu.
2. Select Connected Devices.
A list of paired devices will appear, as well as a list of unpaired devices.
3. Tap +Pair new device.
4. Tap on the device you wish to pair with.
5. Confirm the pairing code is the same on both your device and on the printer.
A new scan discovers and shows the paired devices, as well as other available devices. You may pair
with another printer on this screen, initiate a new scan, or exit the menu.
Manually Select Printer
To add a printer using Manually Select Printer:
1. Open the Dashboard.
2. Tap Menu to open the Side Drawer.
3. See Figure 4. Tap Manually Select Printer.
4. Enter the printer’s DNS/IP address, and then tap Search to begin the discovery.
14

Discovery and Connectivity
Figure 4 Manually Select a Printer
Side Drawer Manually Select the Printer
Bluetooth and Limited Pairing Mode
If you are using Bluetooth and are unable to connect to your printer, try putting your printer in Limited
Pairing Mode.
NOTE: Limited Pairing Mode applies to printers running Link-OS 6 and later.
1. See Figure 5. Tap Can’t connect to your printer? in the Printer Setup side drawer (1).
2. Follow the instructions (2) on the screen to put your printer in Limited Pairing Mode.
Figure 5 Limited Pairing Mode
(1) Side Drawer (2) Limited Pairing Mode
15

Connectivity Wizard
The Connectivity Settings screen is where you can adjust the connection settings on the printer for
wired/Ethernet, wireless, or Bluetooth.
To change your Connectivity Settings:
1. See Figure 6. From the Dashboard, tap Connectivity Settings (1).
• indicates the printer is connected and ready to print.
• indicates there is a communication error with the printer.
• If the printer is not connected the background is grayed out.
2. Select your method (Wired Ethernet, Wireless, or Bluetooth) to connect to the printer, and follow the
prompts.
Figure 6 Dashboard Screen and Connectivity Settings
(1) Dashboard Screen (2) Connectivity Screen
Discovery and Connectivity
16
Discovery and Connectivity
Wired Ethernet
Wired Ethernet is used when a printer is connected to your LAN using an Ethernet cable. The advantage of
a wired connection is that it is generally faster than a wireless (WiFi) or Bluetooth connection.
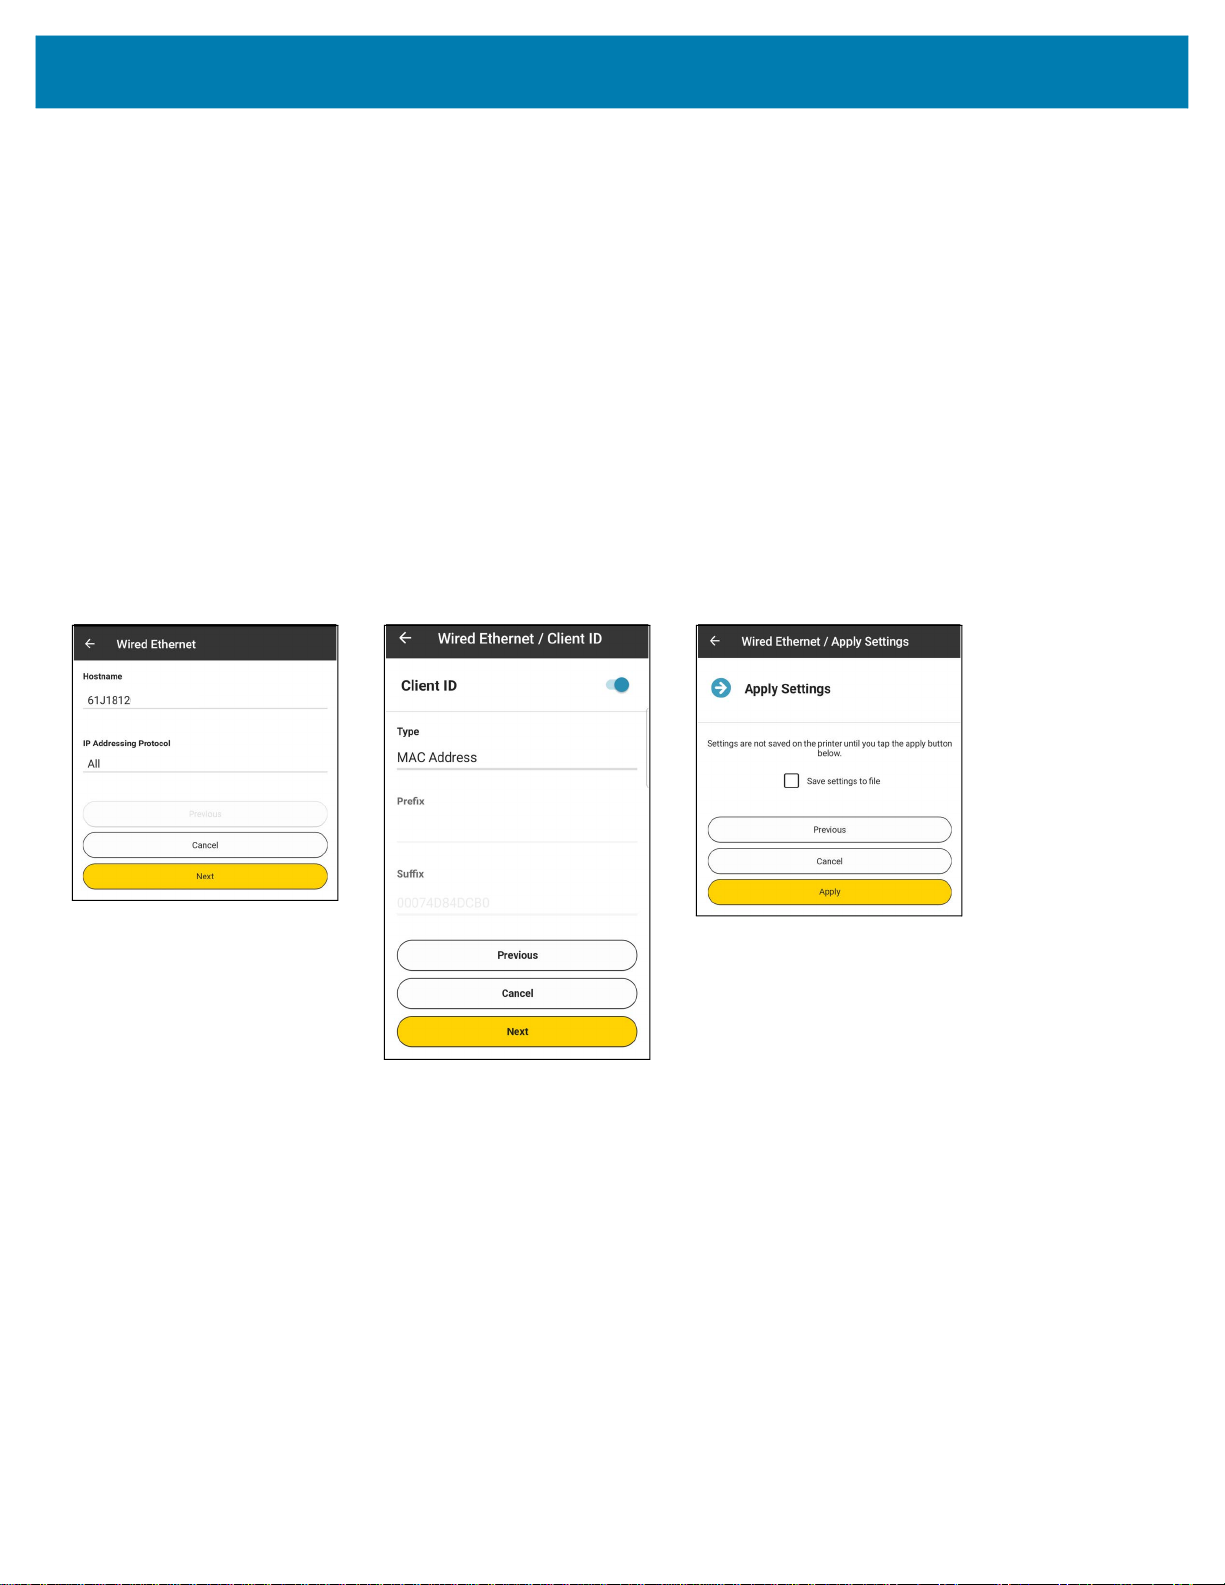
See Figure 7. Within the Wired/Ethernet Settings menu, you may change, save, and apply the following
elements:
• Hostname (1)
• IP Addressing Protocol (1)
• Client ID (2)
• Client ID Type (2)
•
Save settings to file (3). Follow the prompts to save the file to your preferred location.
•
Apply (3) settings on the printer
Figure 7 Wired Settings Screens
(1) Hostname and IP (2) Client ID Screen (3) Apply Settings Screen
17

Wireless
Discovery and Connectivity
Wireless is the term used to describe any computer network where there is no physical wired connection
between sender and receiver. Rather, the network is connected by radio waves and/or microwaves to
maintain communications. Within the Wireless Settings (see Figure 8) menus, you may change, save, and
apply the following elements:
• Wireless Menu (1)
• Hostname
• Turn Wireless on/off
• IP Addressing Protocol
• Power Save Mode
• Wireless / Client ID Menu (2)
• Client ID
• Client Type
• IP Address, Subnet Mask, Default Gateway (applicable when Permanent IP Addressing protocol is
selected)
• Wireless / Details Screen (3)
• ESSID
• Security Mode
• Wireless Band
• Channel List
NOTE: WEP security mode has been removed from Link-OS v6 firmware, but is still applicable in Link-OS
v5.x and earlier.
• Wireless / Apply Settings Screen (4)
• Save settings to file. Follow the prompts to save the file to your preferred location.
• Apply settings on the printer
Figure 8 Wireless Settings Screens
(1) Hostname and IP (2) Client ID Screen (3) Details Screen (4) Apply Settings Screen
18

Bluetooth
Bluetooth is a method where devices such as cell phones, computers, and printers can be easily
interconnected using a short-range wireless connection. The transceiver operates on a frequency band of
2.45 GHz that is available globally (with some variation of bandwidth in different countries).
Within the Bluetooth Settings menus, you may change, save, and apply the following elements:
• Bluetooth Menu (1)
• Bluetooth / Advanced Menu (2)
Discovery and Connectivity
• Enable/Disable Bluetooth
• Discoverable
• Friendly Name
• Authentication PIN
• Minimum Bluetooth Security Mode
• Bonding
• Enable Reconnect
• Controller Mode
•
Bluetooth / Apply Settings Screen (3)
• Save settings to file. Follow the prompts to save the file to your preferred location.
• Apply Settings
Figure 9 Bluetooth Settings Screens
(1) Bluetooth (2) Bluetooth / Advanced (3) Apply Settings Screen
19

Unpair a Printer
If you must unpair a Bluetooth-connected printer (for example, for troubleshooting purposes), do so using
the Settings menu, not inside the Zebra Printer Setup Utility application. If you prefer to deselect a printer,
see Deselect a Printer on page 21.
To unpair a Bluetooth-connected printer:
1. On your device, go to the Settings menu.
2. Select Bluetooth.
A list of paired devices will appear.
3. Tap on the Settings icon beside the printer to be unpaired.
4. Tap on Unpair.
A new scan discovers and shows the available devices. You may pair with a printer on this screen,
initiate a new scan, or exit the menu.
Printer Ready State
Discovery and Connectivity
The ready state of the printers are checked at specific times. A pop-up box displays a warning if any of the
printers are offline or not ready to print. Ready states are checked:
• Upon start-up of the application
• When the application gets focus back
• At the end of the discovery process
• When a printer is selected
Error on Connecting
Certain printer/device combinations may experience a delay when an error dialog appears or when trying
to reconnect. Allow up to 75 seconds for the process to complete.
20
Protected Mode
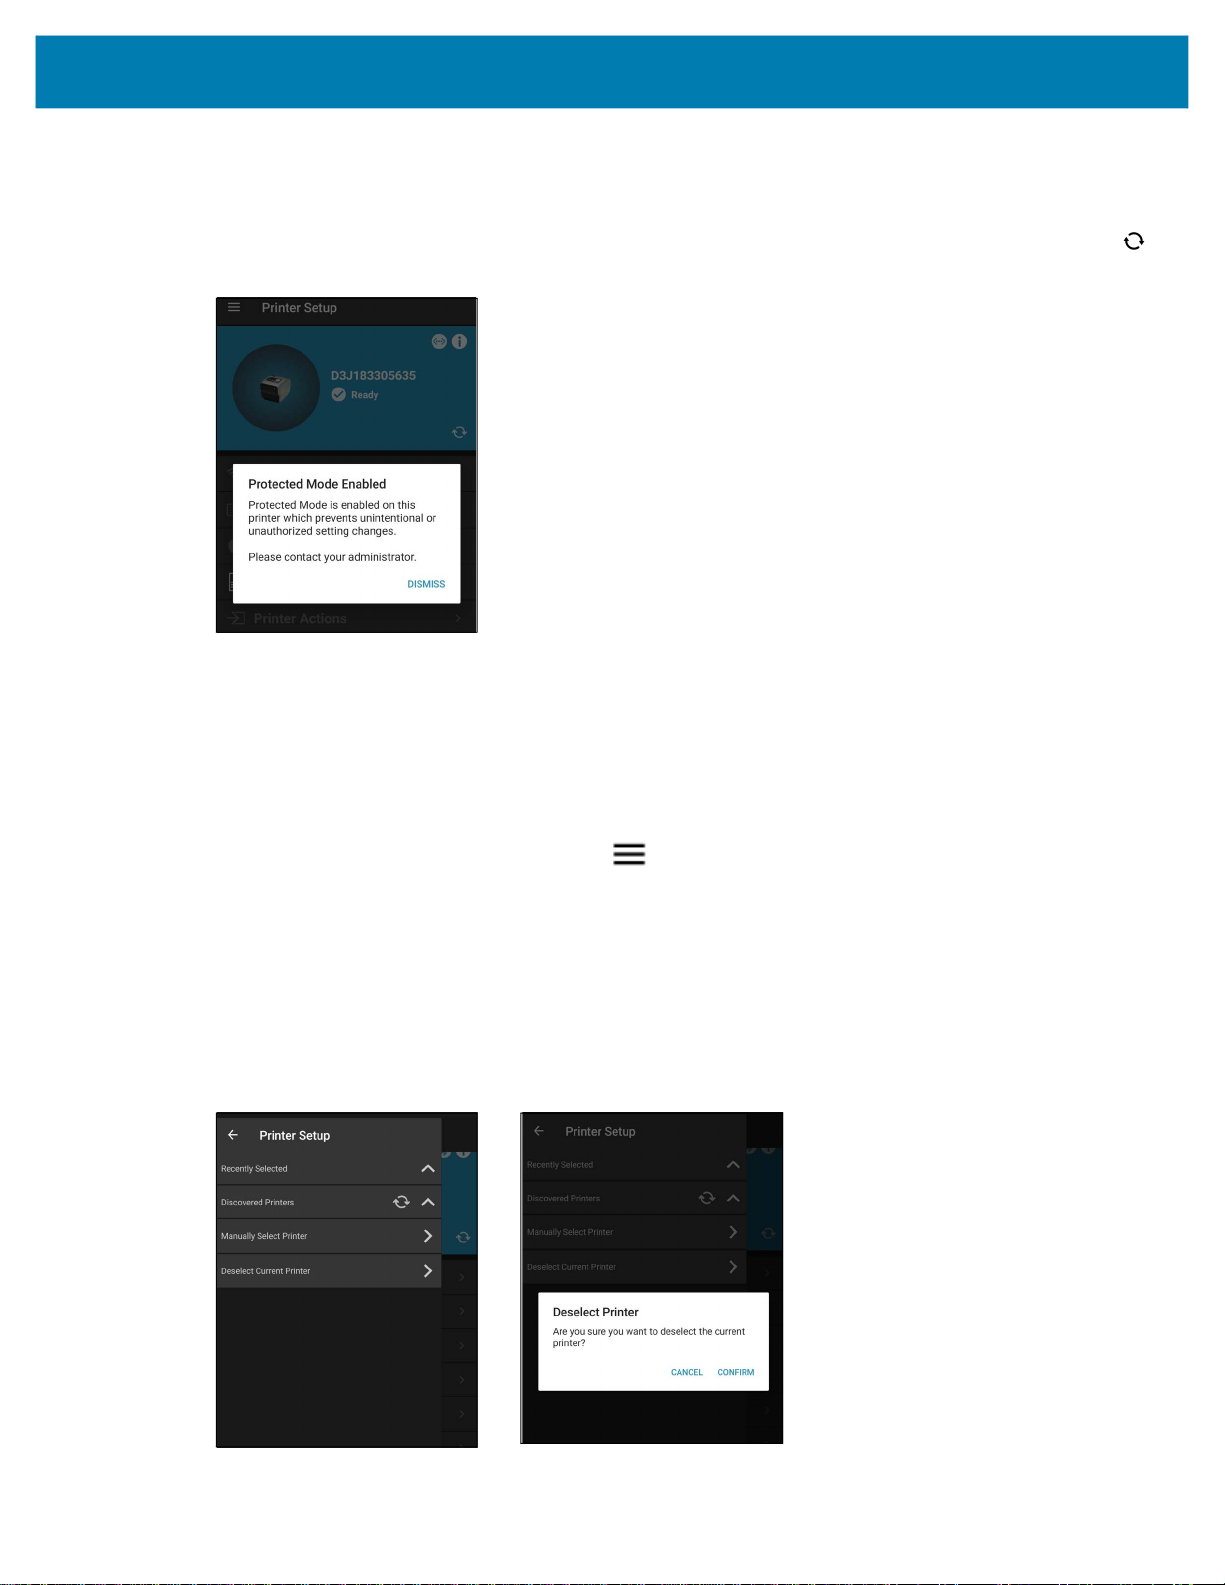
You may view, but not change, the settings of a printer in Protected Mode. If your printer is in Protected
Mode, you will receive a notification upon connection. Tap DISMISS to close the window, and then click
Refresh on the dashboard to retrieve the settings.
Discovery and Connectivity
Deselect a Printer
To disconnect the Printer Setup Utility from a printer, choose Deselect printer. This is a good option if
you only need to step away for a short time and want an easy way to reconnect with the same printer.
To deselect a printer:
1. See Figure 10. From the Dashboard, tap Menu to open the Side Drawer.
2. Tap Deselect Current Printer (1).
• Tap CONFIRM to deselect the printer.
The printer will remain available in the Recently Selected menu.
• Tap CANCEL to cancel the operation.
Figure 10 Manually Deselect a Printer
(1) Side Drawer (2) Confirm Deselection
21

Media Setup
This section describes the steps to set up the media parameters and calibrate the sensors.
IMPORTANT: The options shown under Media Settings depend on the printer model to which you are
connected. Features that are unavailable are grayed out or not shown on the menus.
Media Settings
The Media Settings menu provides details on the current media, including width and length, and the media
type. From this menu, you may change the media type, width, length, and orientation.
To change your Media Settings:
1. See Figure 11. From the Dashboard, tap Media Settings (1). From this screen, you can see the
current media settings.
• Tap Media Settings (2) again to change
• Tap Print Test Label to print test labels with the current settings.
Figure 11 Dashboard and Media Settings Screens
(1) Dashboard Screen (2) Media Settings Screen
Media Type, Width, or Length.
22

Media Setup
2. Tap Media Settings again to enter a series of detailed menus. See Figure 12. Within the Media
Settings menus, you may adjust, apply, and save the following elements:
• Media Screen (1)
• Adjust the
• Adjust the
• Adjust the Length
• Adjust the Orientation
• Media Details Screen (2)
• Adjust the
• Adjust the Type of Transfer (direct thermal or thermal transfer)
• Adjust the Media Handling (rewind, tear off, cutter, etc.)
• Media / Apply Settings Screen (3)
•
Save settings to file.
•
Apply settings on the printer.
Figure 12 Media Settings Screens
(1) Media Screen (2) Media / Details Screen (3) Apply Settings Screen
Media Type (label/tag or receipt)
Width
Media Type (continuous, gap, or black mark)
23

Print Quality
This section provides instructions to view and adjust the print quality of your printer.
IMPORTANT: Depending on your printer model, this application may have limited functionality. Some
application features will not be available for the detected printer model. Features that are unavailable are
grayed out or not shown on the menus.
Figure 13 Dashboard Screen and Print Quality Settings
(1) Dashboard Screen (2) Print Quality Screen
24

Print Quality
Manually Adjust Print Quality
You may manually adjust the print quality of your printer.
To manually adjust print quality:
1. See Figure 14. From the Dashboard, tap Print Quality (1).
2. Tap Manually Adjust (2).
Figure 14 Dashboard, Print Quality, Speed and Darkness, and Apply Settings Screens
(1) Dashboard Screen (2) Print Quality Screen (3) Speed and Darkness (4) Apply Settings
3. Within the Manually Adjust menu, you may adjust and apply the following elements:
• Speed and Darkness Screen (3)
Move the slider to change each setting.
• Apply Settings Screen (4)
•
Save settings to file. Follow the prompts to save the file to your preferred location.
•
Apply settings on the printer.
NOTE: When using a ZQ112, ZQ210 or ZR118, the displayed darkness value is the ZPL value converted
from the CPCL darkness value.
25
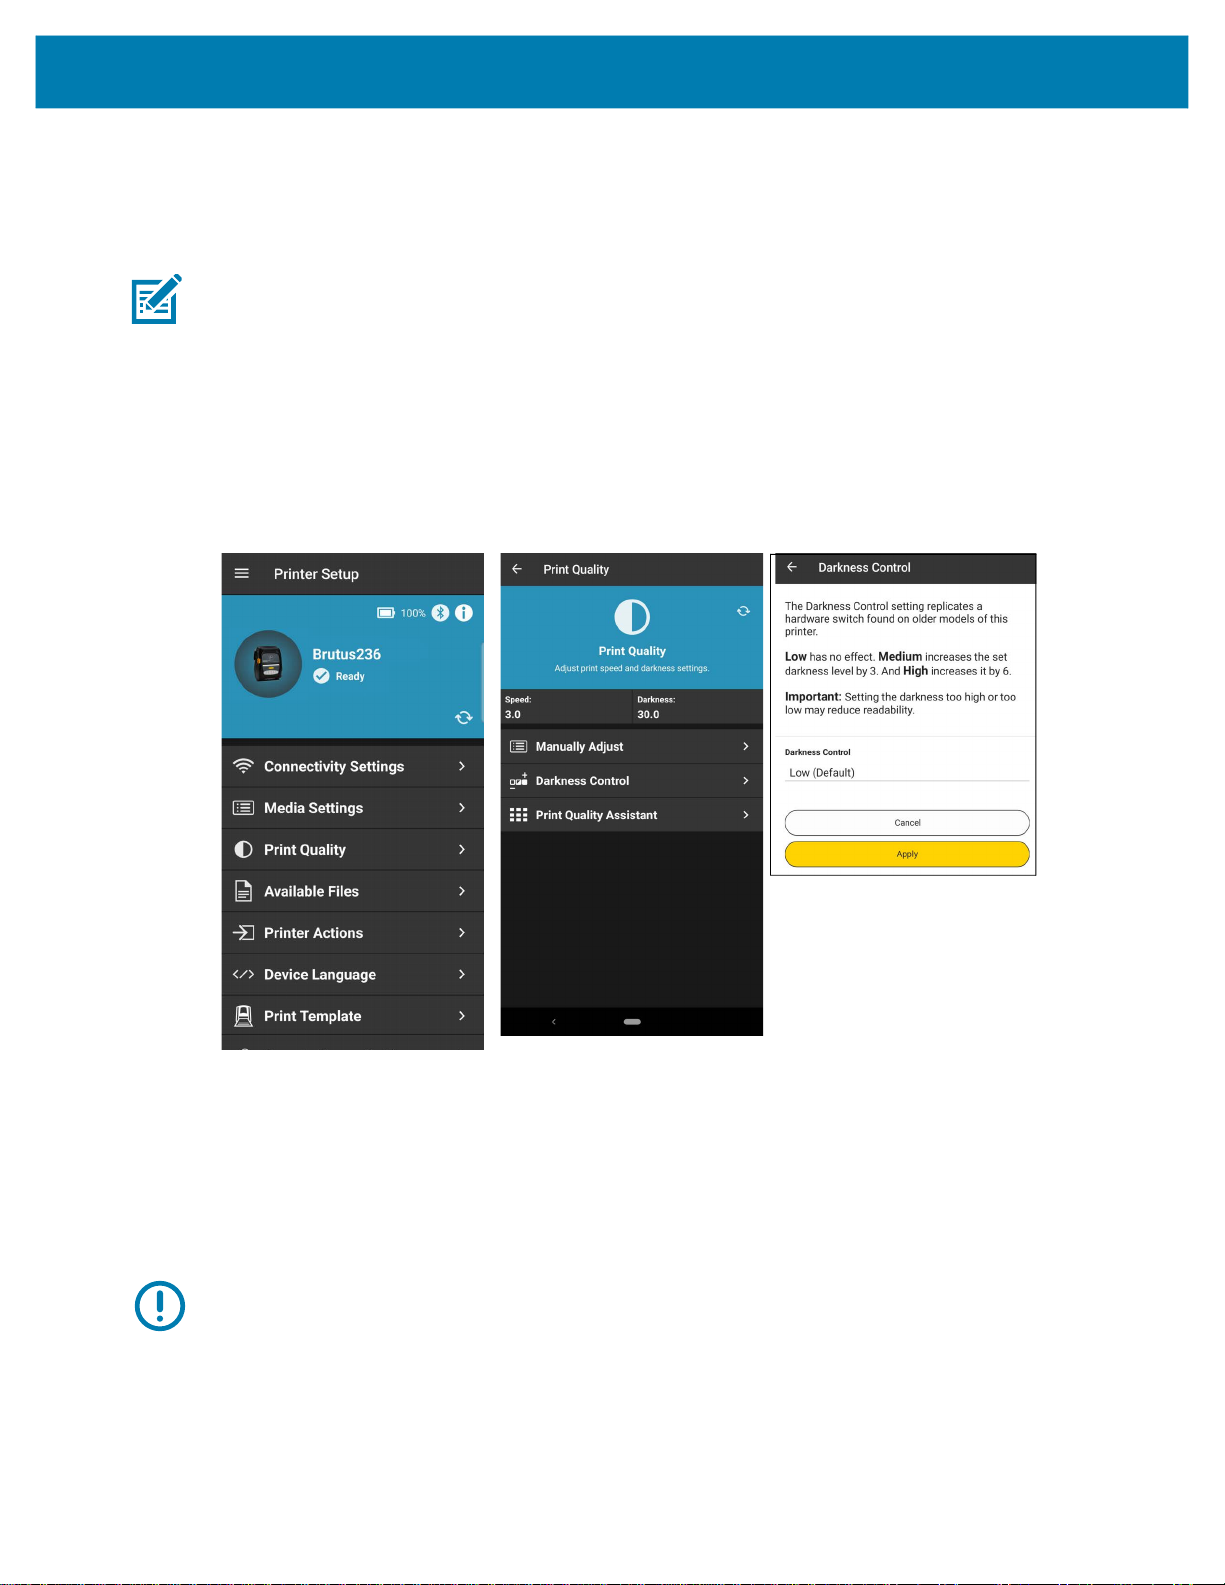
Darkness Control
The Darkness Control setting replicates a hardware switch found on certain older models of printers, and is
used to increase the darkness level by preset amounts.
NOTE: The Darkness Control option will not show for all printers. The preferred method is to use the Print
Quality Assistant to set speed and darkness.
To adjust the darkness control:
1. See Figure 15. From the Dashboard, tap Print Quality (1).
2. Tap Darkness Control (2).
Figure 15 Dashboard Screen, Print Quality Settings, and Darkness Control Screens
(1) Dashboard Screen (2) Print Quality Screen (3) Darkness Control
Print Quality
3. Tap Darkness Control to change the setting.
• Low (Default) - has no effect on the darkness level.
• Medium - increases the darkness level by 3.
• High - increases the darkness level by 6.
4. Tap Apply to save the settings on the printer.
IMPORTANT: Setting the darkness too high or too low may reduce readability on your printed labels.
26

Print Quality Assistant
The Print Quality Assistant permits you to print preset speed and darkness settings on labels, save and
apply these values, and ultimately fine-tune your printed labels.
IMPORTANT: The ZD510 printer speed and darkness settings are determined by the printer cartidge that
is installed. The Print Quality Assistant will not change any values on this printer.
To open Print Quality Assistant:
1. See Figure 16. From the Dashboard, tap Print Quality (1).
2. Tap Print Quality Assistant (2) to enter a series of detailed menus.
Figure 16 Dashboard Screen and Print Quality Settings
(1) Dashboard Screen (2) Print Quality Screen
Print Quality
See Figure 17. Within the Print Quality Assistant menus, you may adjust and apply the following
elements:
• Sample Labels Screen (1)
Adjust the No. of Labels to Print
• Generate Test Labels (2)
The numbers of labels printed is determined by the entry in the previous screen.
• Select a Label Screen (3)
a. Adjust the
b. Tap the Label Identifier to select one of the preset Speed and Darkness options.
i. AA - Speed 2.0, Darkness 15.0
Label Identifier
. You may pick from 4, 9, 16, or 25 labels.
27

Print Quality
ii. AB - Speed 4.0, Darkness 15.0
iii. BA - Speed 2.0, Darkness 30.0
iv. BB - Speed 4.0, Darkness 30.0
• Apply Settings Screen (4)
•
Save settings to file. Follow the prompts to save the file to your preferred location.
•
Apply settings on the printer.
Figure 17 Print Quality Settings Screens
(1) Sample Labels Screen (2) Generating Test Labels (3) Select a Label (4) Apply Settings
28

Available Files and Printer Actions
This section describes the Available Files and Printer Actions features in the Zebra Printer Setup Utility. It
also includes information about FIPS 140-2 and the Security Assessment Wizard.
IMPORTANT: Depending on your printer model, this application may have limited functionality. Some
application features will not be available for the detected printer model. Features that are unavailable are
grayed out or not shown on the menus.
Available Files
If you tap on Available Files, a list of files is displayed. From this list, if you tap on a file name, a dialog is
displayed with the option to send the file to the printer. This feature is used to send files containing ZPL,
SGD commands, or printer operating system files to the printer.
After installing a firmware file, you may need to reconnect the printer. See Discovery and Connectivity on
page 11 for more information.
Printer Actions
All actions on this menu except for the Security Assessment Wizard are performed immediately. For
example, if you select
that action, and you will see the printer feeding media out during the calibration. For the Security
Assessment Wizard, enter a set of supplemental screens.
1. See Figure 18. From the Dashboard, tap Printer Actions (1).
2. Select the desired action.
Calibrate Media, the printer performs that function immediately after you select
29

Available Files and Printer Actions
Figure 18 Dashboard and Printer Actions Screens
(1) Dashboard Screen (2) Printer Actions Screen
Printer Actions Elements
Within the Printer Actions Settings menu, you may choose from the following elements:
• Calibrate Media - automatically starts a media calibration on the printer.
• Print Directory List - automatically prints a list of files stored on the printer.
• Print Configuration Label - automatically prints a configuration label.
• Print Test Label - automatically prints a test label.
• Restart Printer - automatically restarts the printer.
• Security Assessment - accesses the Security Assessment wizard.
• FIPS 140-2 - controls FIPS 140-2 compliance mode, which will disable Bluetooth on the printer.
NOTE: The FIPS option will not show for all printers.
• Enable
troubleshooting.
IMPORTANT: If you are using a Bluetooth LE connection, you must power cycle the printer to exit
diagnostics mode.
Diagnostics - enables Diagnostic mode, which should only be used for advanced
30
Available Files and Printer Actions
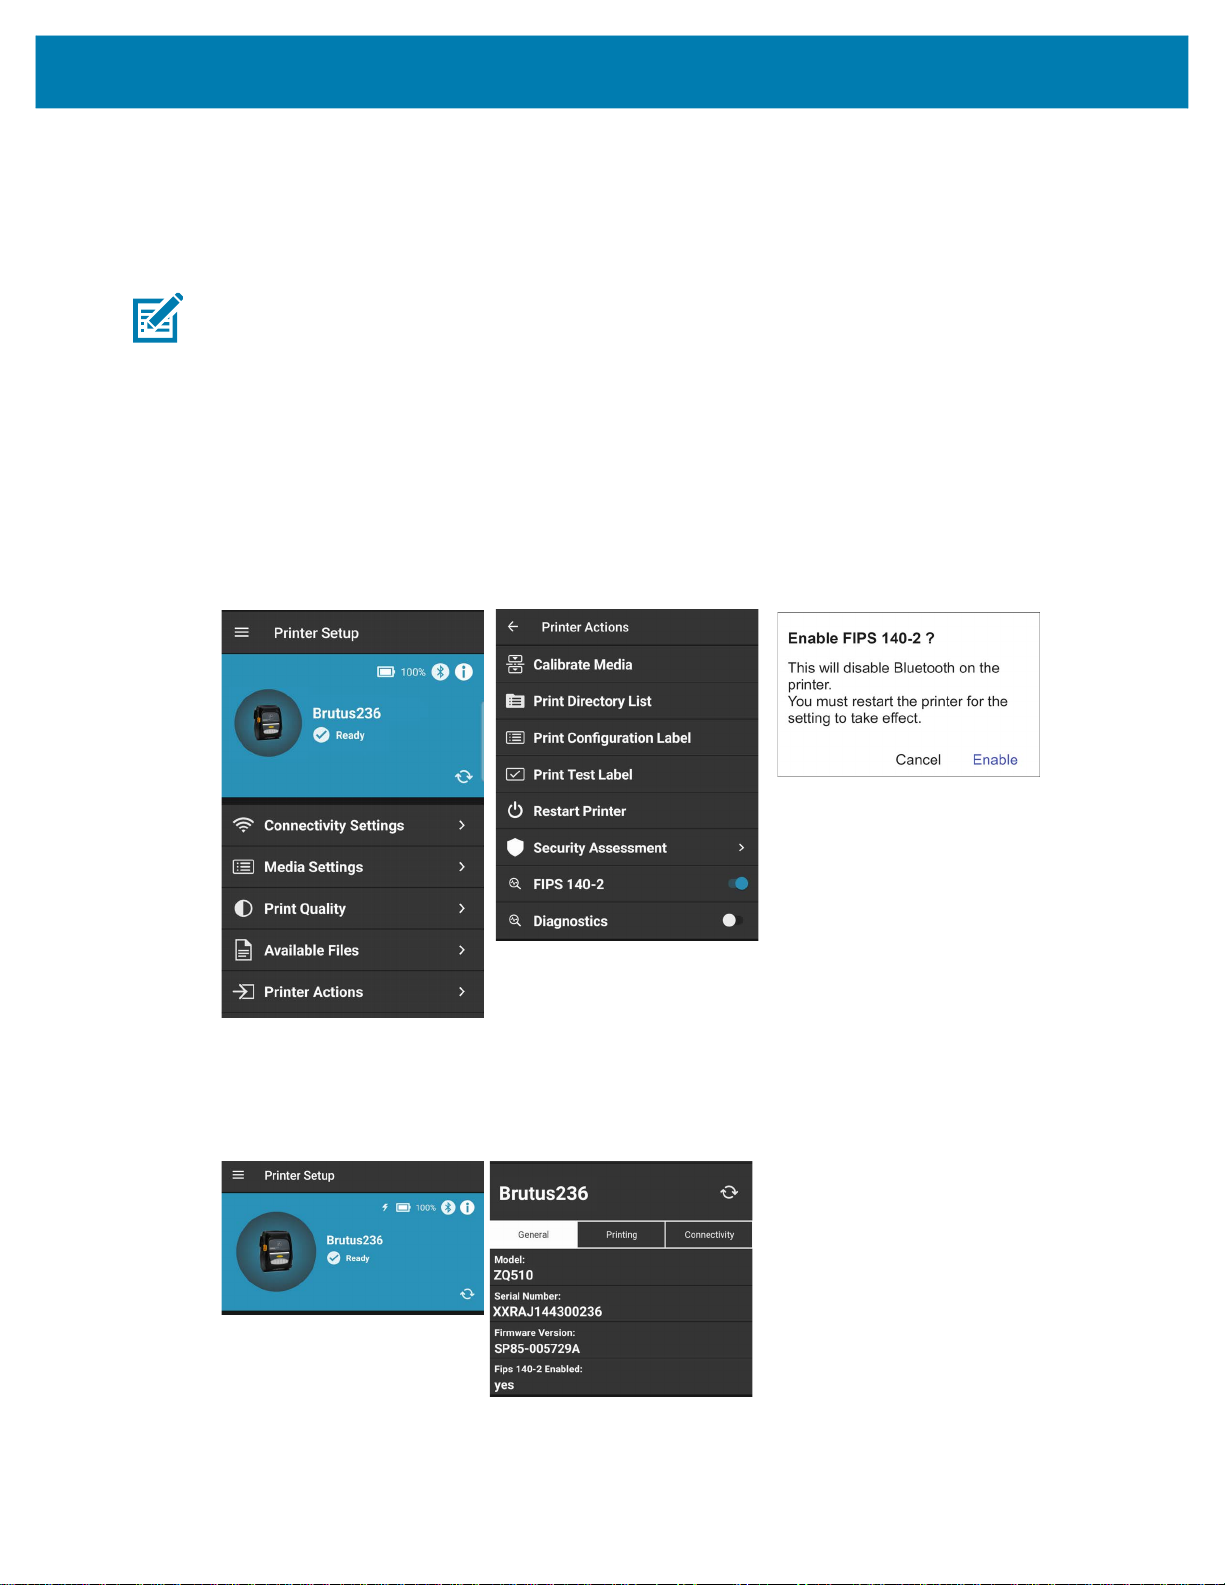
Enable FIPS 140-2 Setting
FIPS stands for Federal Information Processing Standards. It was developed to validate and record certain
requirements for a range of cybersecurity matters, and define which are acceptable. Enable this option to
comply with FIPS 140-2.
NOTE: The FIPS option will only show for printers that support it.
To enable FIPS 140-2:
1. See Figure 19. From the Dashboard, tap Printer Actions (1).
2. Tap FIPS 140-2 (2).
3. Tap Enable (3) at the prompt.
4. Restart the printer.
Figure 19 Dashboard and Printer Actions Screens
(1) Dashboard Screen (2) Printer Actions Screen (3) Enable FIPS Screen
When FIPS is enabled, the setting is displayed in the General Tab. See Figure 20.
Figure 20 Information Icon and General Tab Screens
(1) Information Icon (2) General Tab
31

Available Files and Printer Actions
Security Assessment Wizard
IMPORTANT: Before implementing any recommended changes from the Security Assessment Wizard,
you should verify them in a test environment before implementing across your printer network.
1. See Figure 21. From the Dashboard, tap Printer Actions (1).
2. Tap Security Assessment (2). Tap About the Assessment (3) for more information (4).
3. Tap Scan Now (3) to start the Security Assessment scan.
4. Tap the communication interface (Bluetooth, Wireless, or Local) which you use for normal printer
operations (5).
NOTE: There is only a single menu option for Bluetooth; if selected, it will use either the Bluetooth Classic
or Bluetooth LE option you chose for your connectivity.
The Security Assessment wizard starts scanning for risks (6). Once the scan is finished, the Scan
Results (7) are displayed.
• indicates there is no risk.
• indicates a moderate risk that may need to be addressed.
• indicates a high-level risk that should be addressed.
• indicates that there is no risk associated because the feature is not in use or enabled on your
printer.
5. From the Scan Results page, tap on a risk to display the Risk Details (8).
6. From the Scan Results page, tap Get Full Report to have a full report sent to your email address (9).
Once you enter your email and submit, you will then have the option to select an email client.
NOTE: An email account is required to be setup on your device to email the security report. The default
email application for your mobile device is used to send the report.
Figure 21 Security Assessment Screens
(1) Dashboard Screen (2) Printer Actions Screen (3) Security Assessment
32

Available Files and Printer Actions
(4) About Screen (5) Communication Interface (6) Scanning for Risks
(7) Scan Results (8) Risk Details (9) Email Report
33

Device Language Selector and Printer Emulation Management
This section provides information about Device Language Selector and Printer Emulation Management in
Zebra Printer Setup Utility.
IMPORTANT: Depending on your printer model, this application may have limited functionality. Some
application features will not be available for the detected printer model. Features that are unavailable are
grayed out or not shown on the menus.
NOTE: Printer Emulation was formerly known as Virtual Device.
Introduction
A device language is a language that is native to Zebra printers and is factory installed. These languages
send commands to the printer to perform specific functions. To select and apply a device language, see
Device Language Selector on page 34.
A printer emulation is an application which emulates another company’s printer language. Generally, a
printer emulation includes a subset of their printer commands. Unlike device languages, Printer Emulations
are not native to Zebra printers and must be installed on printers.
Most printer emulation apps are delivered via zip file; contain a small script file and a text file; and can be
installed quickly. There are two exceptions:
• Virtual Device-I
• Virtual Device-D
IMPORTANT: These printer emulations are complete firmware downloads. These are very large files, will
take a substantial amount of time to download and install on the printer, and will reboot your printer twice.
These two printer emulations are also mutually exclusive, so only one is installed on the printer at a time.
To install a printer emulation, see Printer Emulation Management on page 35.
Device Language Selector
Device Language includes native Zebra supported languages (and printer emulators previously loaded) on
the printer. Only those languages (or printer emulators) loaded on the printer are displayed on the Set
Device Language screen. See Figure 22.
The Device Language Selector permits you to change the device language used to communicate with the
Zebra printer. Device Languages change depending on the printer to which you want to send commands.
For example, Line Print will only appear as a native Device Language for certain mobile printers such as
the ZQ210 or the ZQ510 printers, and will not appear as a native Device Language for the ZD410 printer.
34

Device Language Selector and Printer Emulation Management
Set the Device Language
To set the Device Language:
1. See Figure 22. From the Dashboard, tap Device Language (1).
The Device Language currently in use is indicated (2).
2. Tap </> Set Device Language (2) to make a change.
3. On the Set Device Language screen (3), tap the language you wish to use, and then tap Apply.
NOTE: The currently active device language is selected by default.
Figure 22 Dashboard and Device Languages Screens
(1) Dashboard Screen (2) Device Languages
Screen
(3) Set Device Language
Printer Emulation Management
Printer Emulations are on-printer applications that allow printers running Link-OS to use legacy languages
normally associated with other printer brands. Multiple Printer Emulations (except for Virtual Device-I and
Virtual Device-D as noted previously) can be downloaded to a single printer. It is not necessary (or
possible) to remove Printer Emulations from printers; users simply choose between command languages
as needed.
Printer Emulation Management is performed using the Device Language option on the Dashboard. To
install the Printer Emulation, you must download a zip file to your mobile device.
There are two ways to install the printer emulation via Zebra Printer Setup Utility:
35

Device Language Selector and Printer Emulation Management
1. Download a zip file to your mobile device.
2. Store and download the zip file from your Cloud storage provider.
Download the Printer Emulation Zip File
To download the Printer Emulation, complete the following steps from your computer or your
mobile device.
1. Open a web browser and navigate to:
zebra.com/printer-emulations
2. Locate your printer type in the list of printers and tap Download Now, or scroll to Request Information if
support for your printer cannot be found.
3. Fill out the information on the Printer Emulation Download Request form.
4. Click Submit.
5. Read the End User License Agreement.
6. Click Accept and Begin Download Now.
Your browser prompts you to open or save the zip file containing the Printer Emulation.
7. Save and store the Printer Emulation zip file to your computer or storage location (Box, DropBox, etc.)
[or Android device if you want to use Zebra Printer Setup Utility application for installing the printer
emulation].
The zip file contains the following files:
• The Printer Emulation .
• Text files (.
• A sample test format that can be sent to the printer once the printer emulation is enabled.
txt) with the SGD commands to enable and disable the printer emulation.
NRD (or .ZPL) file to be downloaded to a Zebra printer.
Access the Printer Emulation Zip File
Copy the Printer Emulation Zip File to Your Device
Get a zip file on your mobile device using one of the following methods:
1. Drag and drop with your mobile device connected via USB cable to your computer.
See Figure 23. Be sure that your mobile device USB setting is Connected as media device. (On some
mobile devices, you can swipe down from the top of the phone (or tablet) to view notifications.) See
Drag and Drop using a USB Connection.
Figure 23 Android Notifications
2. Use the browser on your mobile device to download the zip file to your device. See Download the
Printer Emulation Zip File on page 36.
36

Device Language Selector and Printer Emulation Management
Drag and Drop using a USB Connection
To download using a USB connection:
1. Connect your smartphone to your computer using a USB cable.
2. Open two Windows Explorer windows.
i. One window should display your mobile device as a drive.
ii. The other window should display the Downloads folder on your computer.
3. Drag the zip file from the Downloads folder (computer) and drop on the mobile device window.
NOTE: Drag the entire zip file. (There is no need to extract or unzip the individual files.)
Do not change the name of the zip file.
Install the Printer Emulation
This section will disable the current device language or printer emulation, install, and enable the new
printer emulation all within this single feature. When you install a printer emulation, you are sending the
.
NRD (or .ZPL) file to the printer.
After the files are sent to the printer, the Printer Emulation appears in the Set Device Language screen.
When you install the printer emulation for the first time, a browser opens and you can select the printer
emulation zip file.
IMPORTANT: Once you have completed a firmware update, or a firmware and printer emulation update,
you may need to reconnect your mobile device to the printer. You are prompted to do so if necessary.
To install the printer emulation:
1. See Figure 24. From the Dashboard, tap Device Language (1).
2. From the Device Language screen, tap Set Device Language (2).
If this is the first time you are installing a printer emulation, it will not appear in the list.
3. Tap + Install Printer Emulation (3).
NOTE: If you are using Bluetooth LE, the option to install a Printer Emulation is disabled.
37

Device Language Selector and Printer Emulation Management
Figure 24 Dashboard and Device Languages Screens
(1) Dashboard Screen (2) Device Languages Screen (3) Set Device Language
1. Navigate to the zip file, tap it, and tap Install.
NOTE: Do not change the name of the Printer Emulation zip file.
Click
Cancel to exit and return to the Set Device Language screen.
If you already have an active printer emulation, you are prompted to disable it before proceeding.
• Tap Disable to disable the Printer Emulation.
• Tap Cancel to exit and return to the Set Device Language screen.
2. The printer device language is set to XML and ZPL in this example. Now, the printer is ready to install
a new printer emulation.
NOTE: If you are connected via USB cable and are also installing a firmware-based Printer Emulation from
either of the following:
• Virtual Device-I
• Virtual Device-D
You must perform an additional step.
• Click OK to close the dialog and to begin downloading the Printer Emulation.
• Click Cancel to close the dialog.
After installing a firmware-based Printer Emulation, you must enable the Printer Emulation.
If required, reconnect the printer and select the Printer Emulation in Set Device Language option.
NOTE: The Print Test Label option may not be available if the virtual device was not installed from the
device currently being used.
NOTE: When you return to the Device Language screen, Current Device Language displays the specific
Printer Emulation language enabled for your printer.
IMPORTANT: After enabling a printer emulation, the printer reboots, the application reconnects, and most
menu options are disabled.
38

Device Language Selector and Printer Emulation Management
Figure 25 Dashboard after Printer Emulation Installation
39
Print Templates
This section provides instructions on how to print customized templates from the Print Template feature.
Print templates are recognized by the .zpl file extension.
IMPORTANT: Depending on your printer model, this application may have limited functionality. Some
application features will not be available for the detected printer model. Features that are unavailable are
grayed out or not shown on the menus.
Figure 26 Dashboard Screen and Print Template Screen
(1) Dashboard Screen (2) Print Template Screen
40

Using a Print Template
Several sample templates are included in the application.
To use a Print Template:
1. See Figure 27. From the Dashboard, tap Print Template (1).
2. Within the Print Template Screen (2), tap a template to select it from the list.
3. Depending on the template, complete the form by tapping and filling each form field in the Template
Screen (3).
4. Tap Print to print.
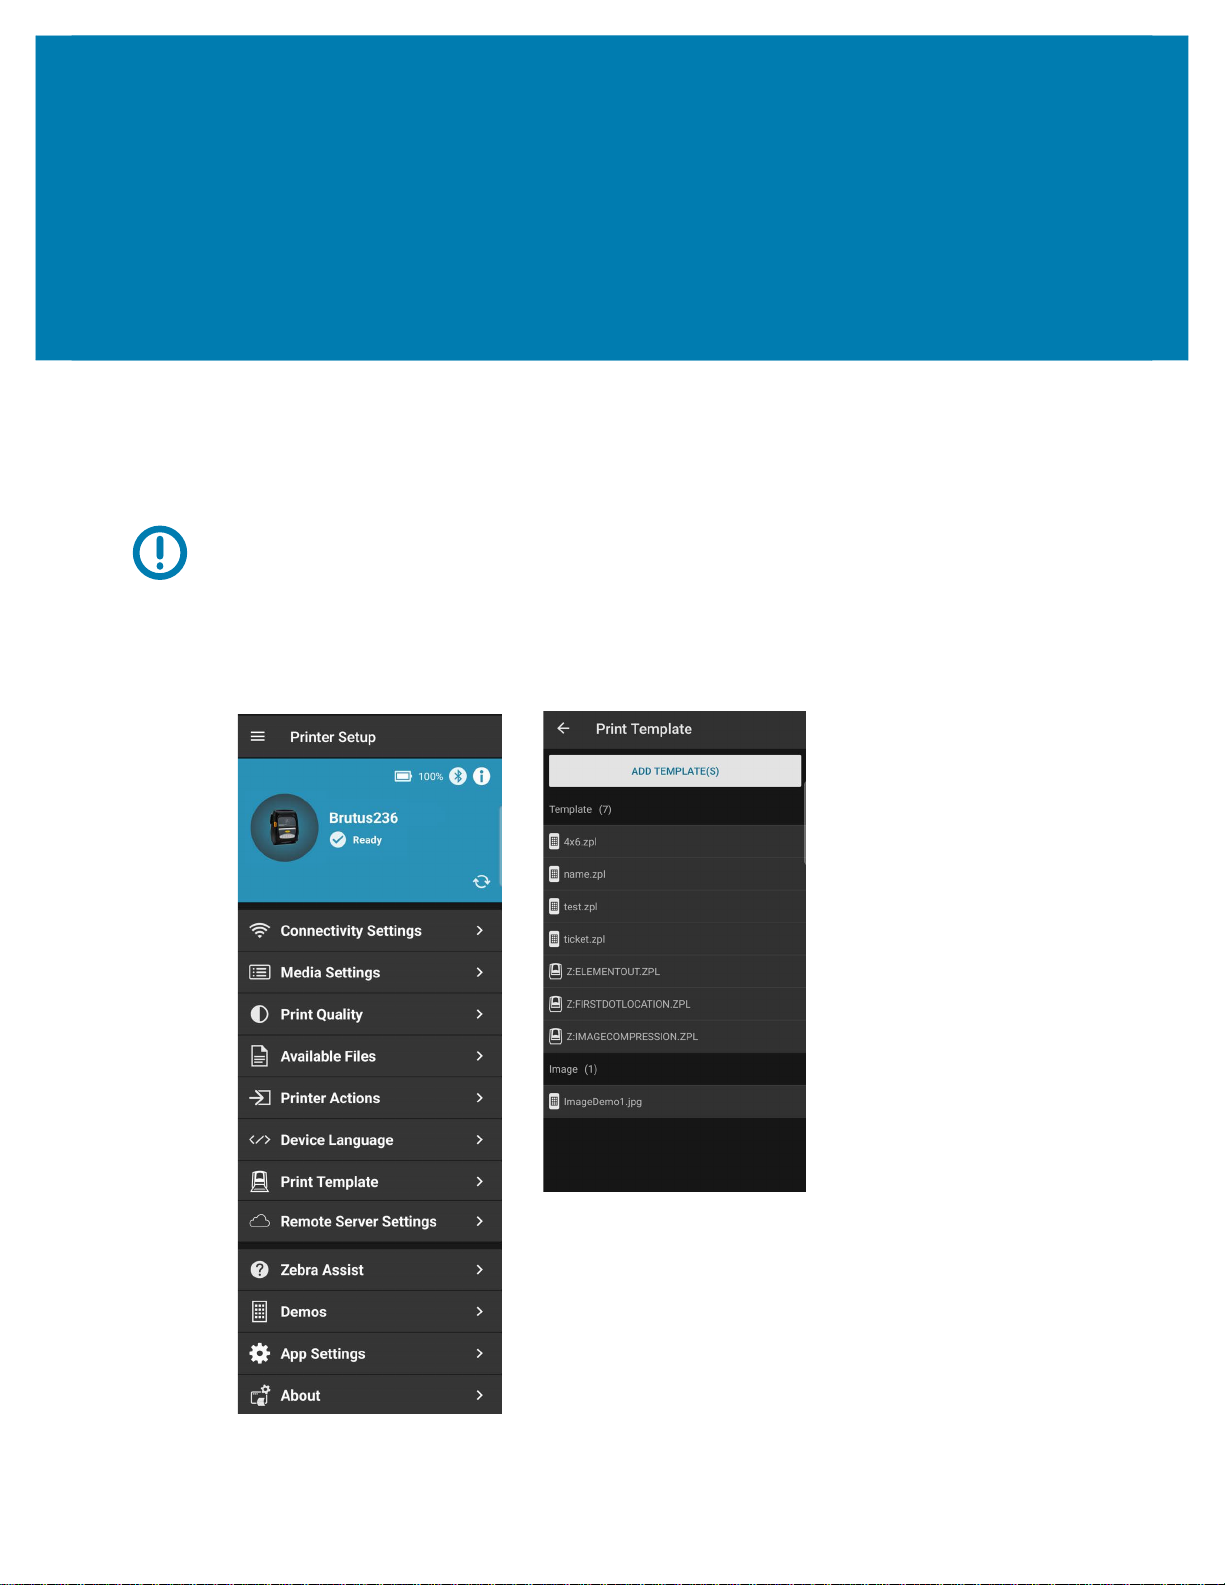
Adding a Template
Customized print templates can be added to the Print Template feature. Before templates are added,
ensure they are stored somewhere on the device, for example, within a Documents folder. Templates can
also be added from Cloud storage providers if accounts are set up on the device.
To add a template to Print Template:
Print Templates
1. See Figure 27. From the Dashboard, tap Print Template (1).
2. Tap Add Template(s) from the Print Template Screen (2).
• Interactive and fillable templates use a .zpl file extension.
• Images can also be used as templates. The maximum allowable image size is 2MB.
Your template is added to the Template list and shows an icon.
3. Locate the file within the device and select it.
• Tap to select a template stored on the printer.
• Tap to select a built-in sample template.
• Tap to select a template stored on the device.
41

Print Templates
Figure 27 Dashboard and Print Template Screens
(1) Dashboard Screen (2) Print Template Screen (3) Template Screen
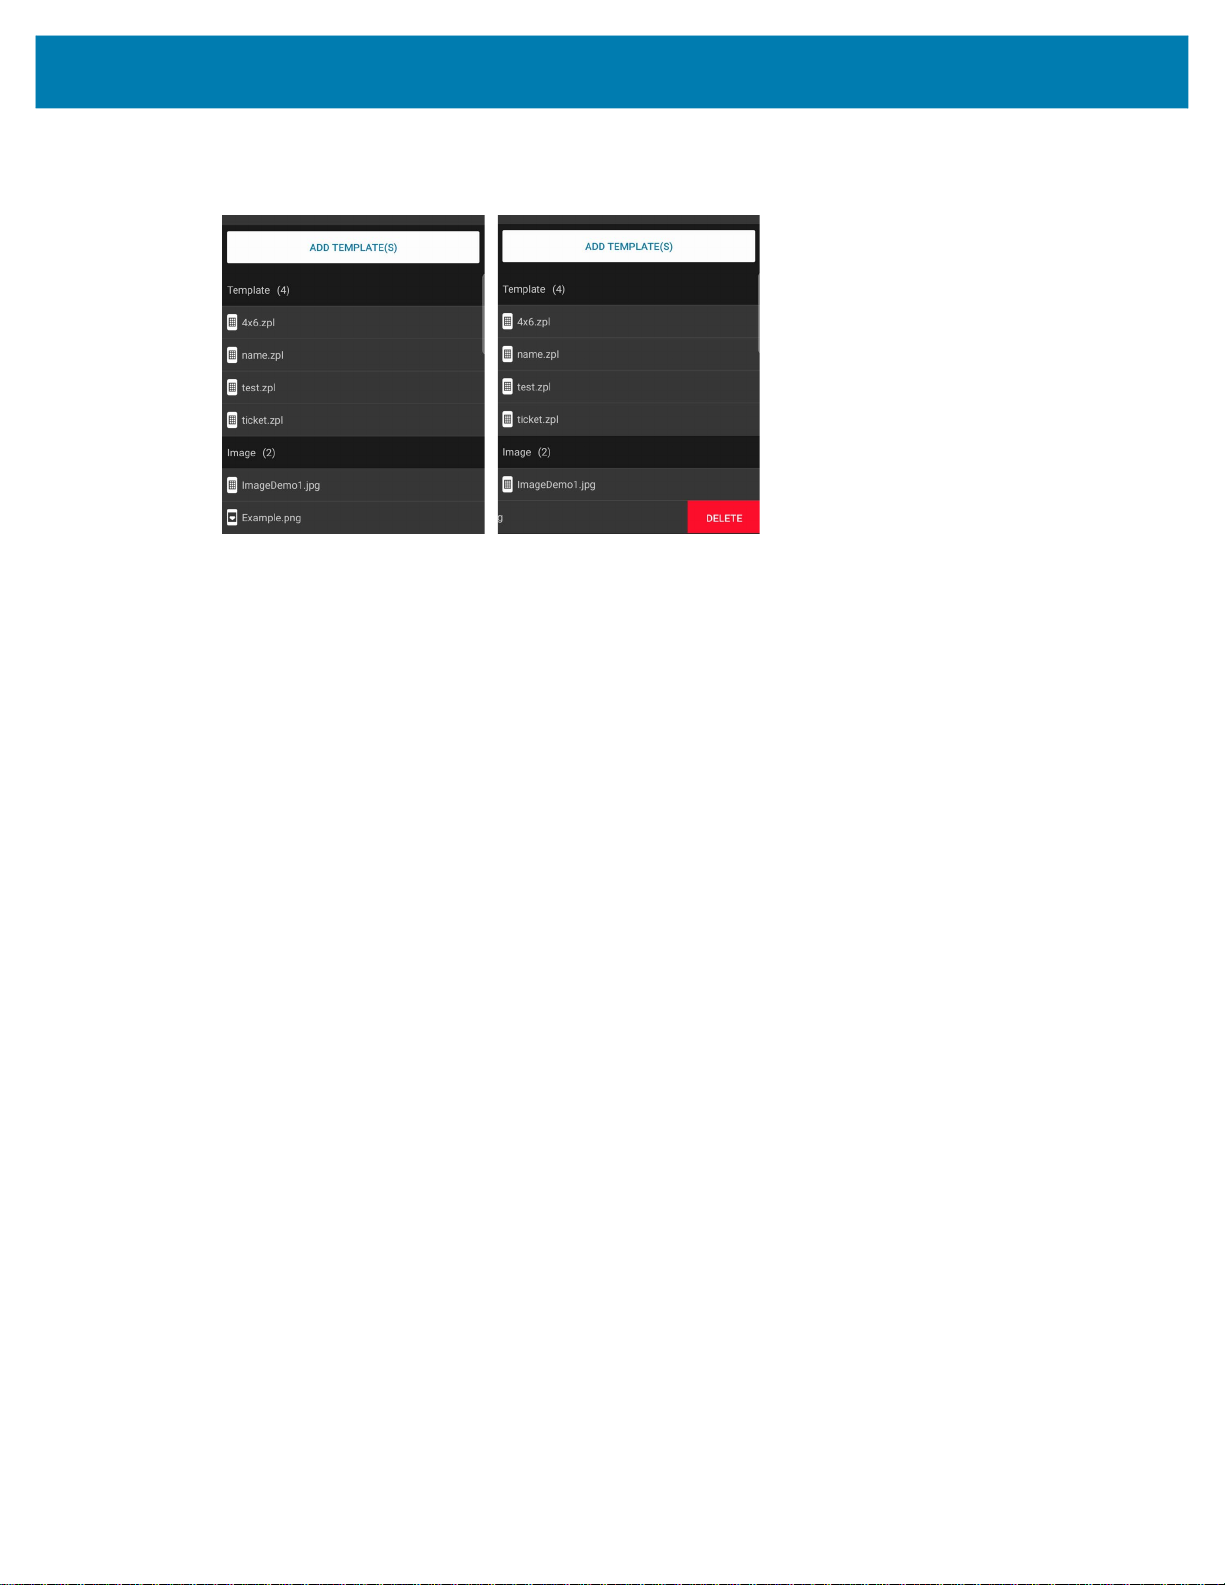
Removing a Template
This section describes how to remove a template from Printer Template. Before removing a template, note
that:
• Only a template that has been added can be deleted.
• You cannot delete a built-in template.
• You cannot delete a template that is stored on the printer from the app.
To remove a template from Print Template, follow these steps.
1. See Figure 28. From the Print Template Screen (2), locate the template you want to remove. The
image template Example.png is used in this example.
2. Swipe left to reveal Delete (3).
3. Tap Delete to remove the template.
42
Print Templates
Figure 28 Removing a Template
(2) Print Template Screen (3) Template Screen
43

Remote Server Settings
This section provides information about updating Remote Server Settings.
IMPORTANT: Depending on your printer model, this application may have limited functionality. Some
application features will not be available for the detected printer model. Features that are unavailable are
grayed out or not shown on the menus.
Figure 29 Remote Server Settings
(1) Dashboard Screen (2) Remote Server Settings
Screen
Introduction
The Zebra Printer Setup Utility provides users the ability to configure printers to connect to applications
using Weblink or MQTT type connections. Example applications that use Weblink and MQTT include:
• Printer Profile Manager Enterprise
• SOTI
• AirWatch Connector
®
MobiControl Connector
44
Remote Server Settings
NOTE: The Remote Server Settings menu item is not shown when connected to a printer that doesn’t
support Weblink or MQTT. The Remote Server Settings menu item will appear gray and disabled when a
Printer Emulation is active.
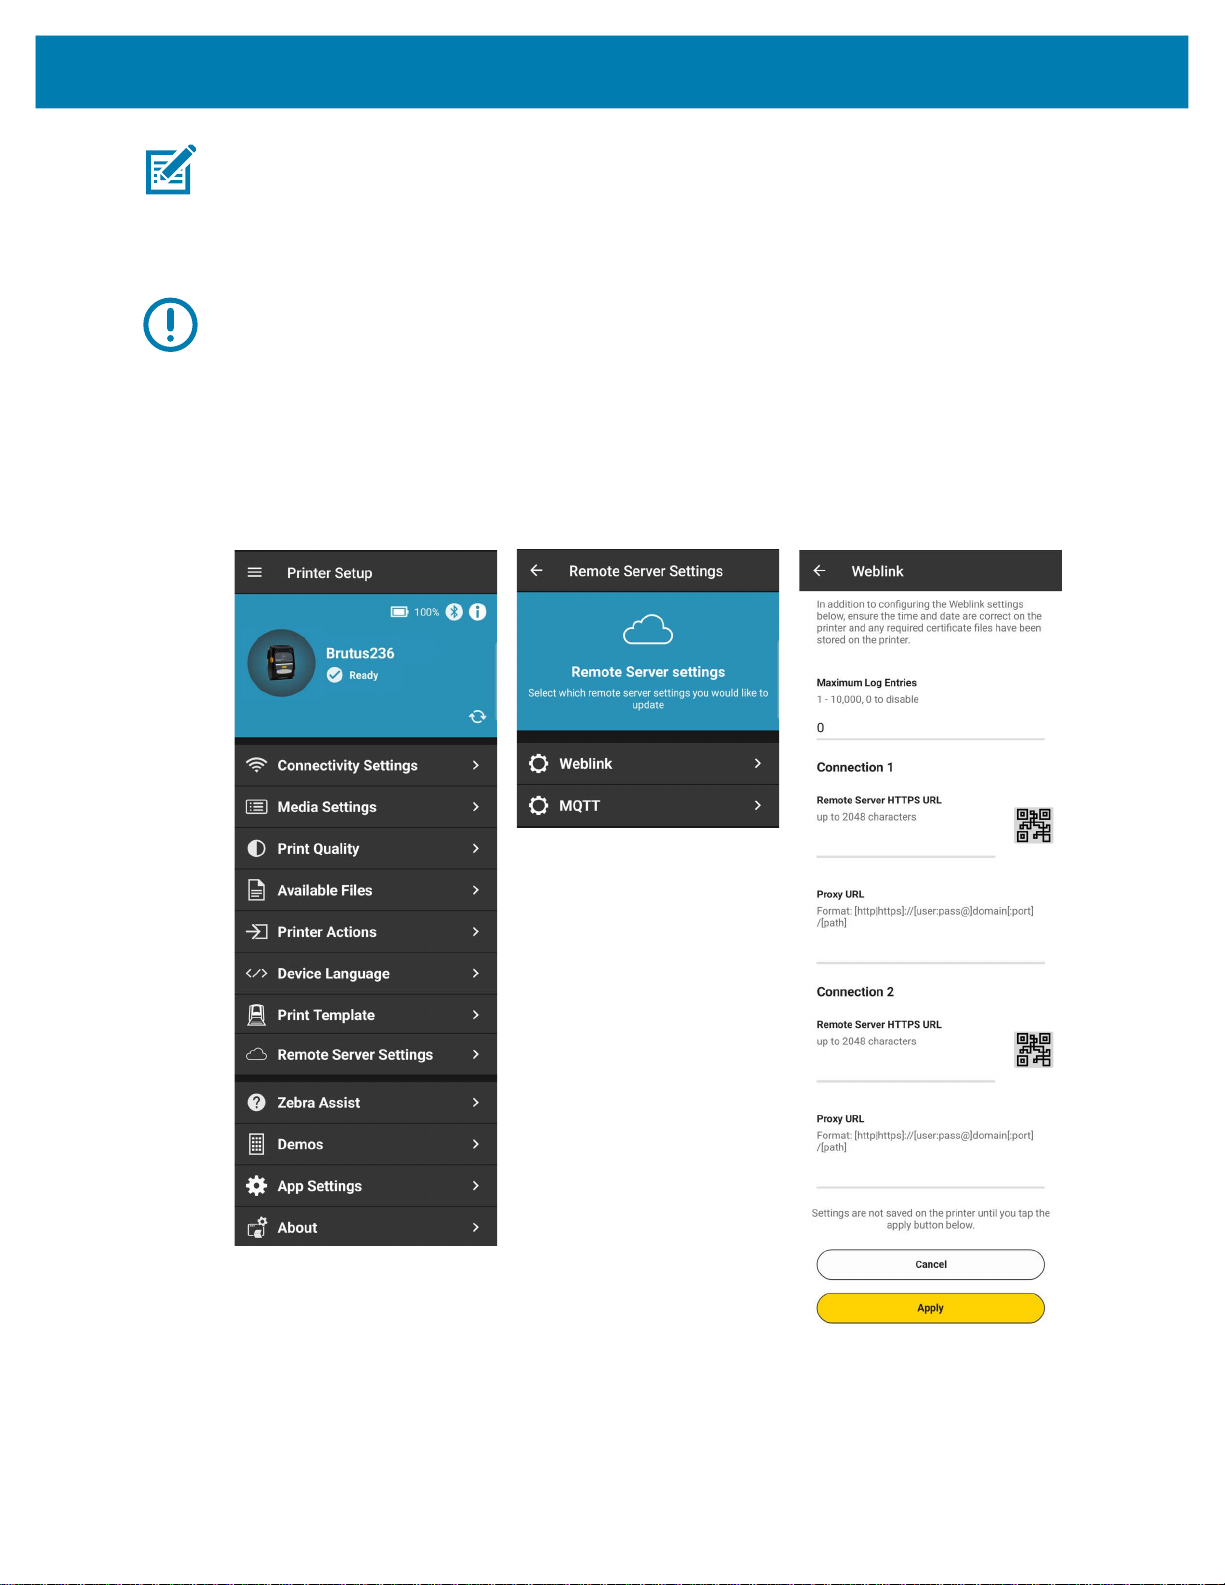
Accessing the Weblink Server Settings
IMPORTANT: The Weblink option will only be visible for printer models that support Weblink.
To access Weblink Server Settings:
1. From the Dashboard, tap Remote Server Settings (1).
2. Tap Weblink (2).
Figure 30 Dashboard, Remote Server Settings, and Weblink Screens
(1) Dashboard Screen (2) Remote Server Settings
Screen
(3) Weblink Settings Screen
Configuring the Weblink Server Settings
The Weblink settings screen provides configuration options allowing you to adjust the remote settings to
your exact needs:
• Maximum Log Entries allows you to enter log entries.
45

Remote Server Settings
• You also have the ability to configure two Weblink connections.
NOTE: In addition to configuring the Weblink settings, ensure the time and date are correct on the printer
and any required certificate files have been stored on the printer.
Maximum Log Entries
Within the Maximum Log Entries field, tap to enter a value:
• The number can range from 1 - 10,000.
• To disable the log entry, enter 0.
Configuring the Weblink Connections
In the Connection 1 section and within the Remote Server HTTPS URL, tap to enter the URL:
• Manually enter up to 2048 characters.
• You may scan a QR code containing a URL into the Remote Server field.
Within the Proxy URL field:
• Manually enter the proxy URL.
• The proxy URL must follow the format: [http|https]://[user:pass@]domain[:port]/[path]
Repeat the steps for Connection 2.
3. Tap Apply to apply the changes. When prompted, tap Restart to restart the printer.
Accessing the MQTT Server Settings
IMPORTANT: The MQTT option will only be visible for printer models that support MQTT.
The MQTT menu option will only be visible if the connected printer is running Link-OS 6.7 or later.
To access MQTT Server Settings:
1. From the Dashboard, tap Remote Server Settings (1).
46

Remote Server Settings
2. Tap MQTT (2).
3. Ensure MQTT Enable is checked (3).
Figure 31 MQTT Server Settings Screens
(1) Dashboard Screen (2) Remote Server Settings
Screen
(3) MQTT Settings Screen (4) MQTT Settings Screen
Continued
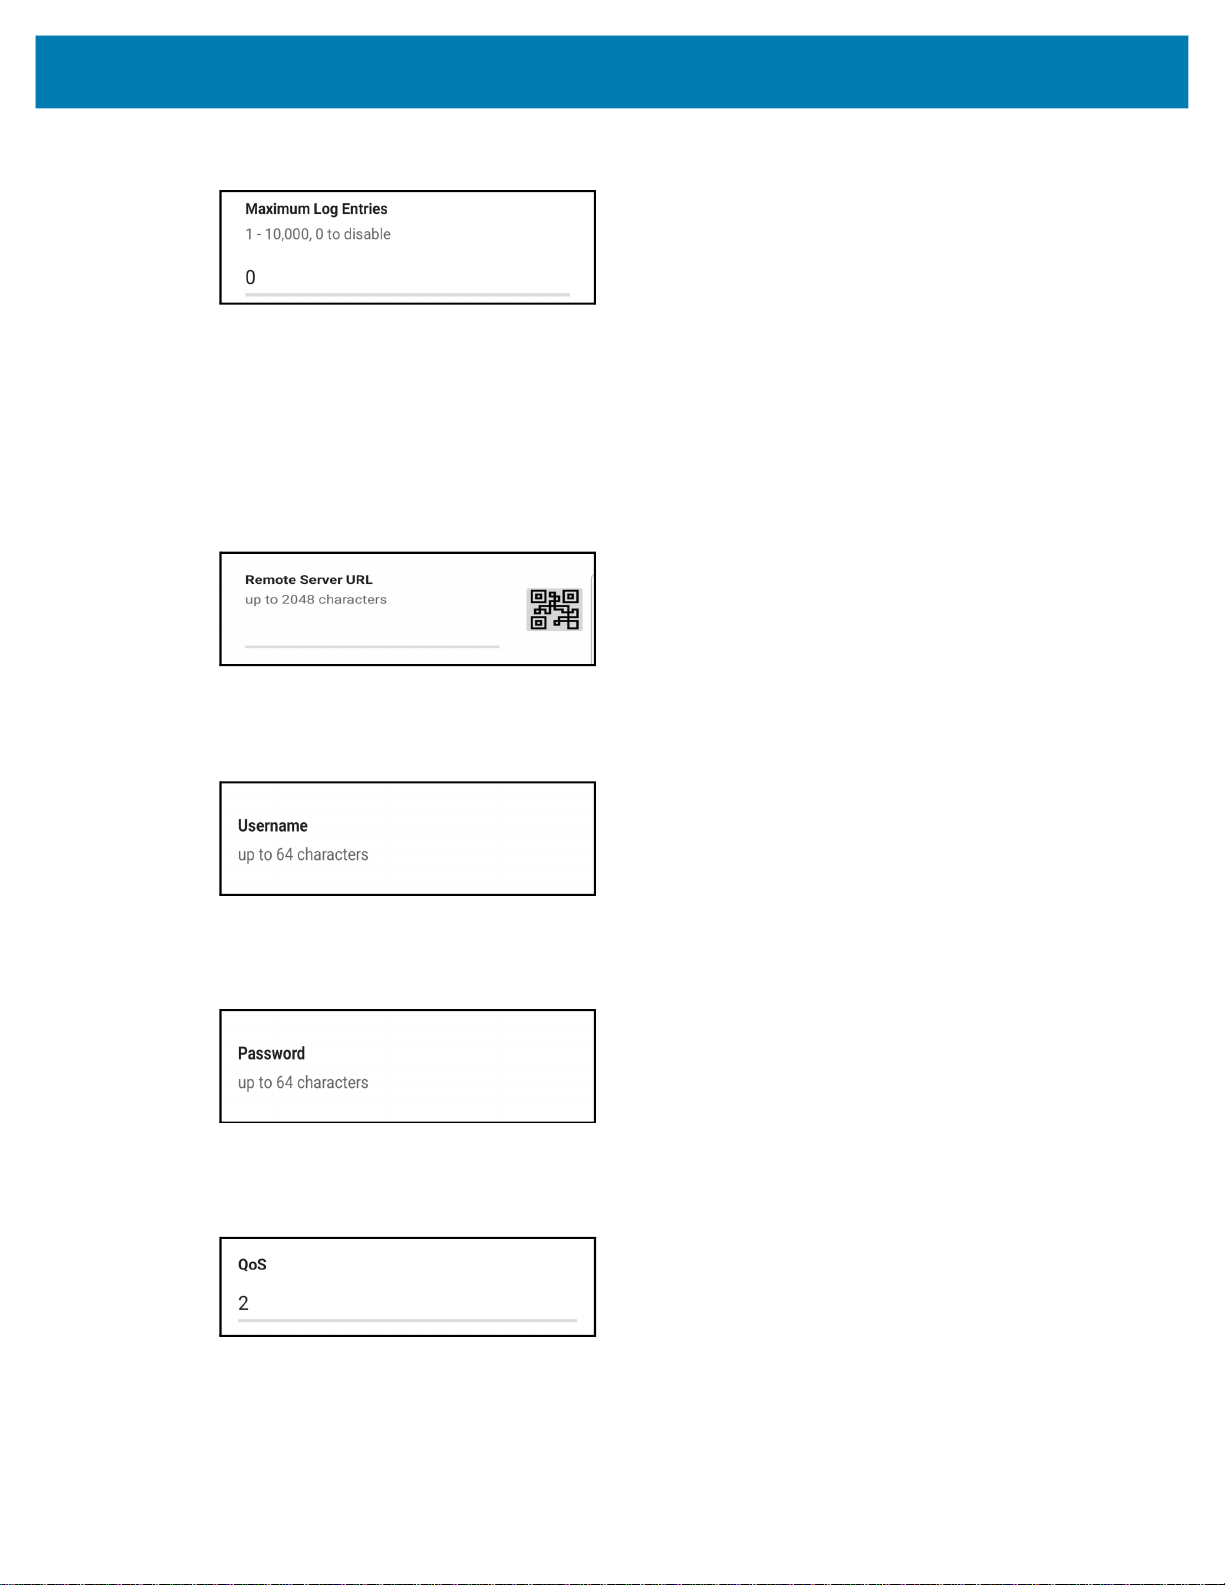
Configuring the MQTT Server Settings
The MQTT settings screen provides configuration options allowing you to adjust the remote settings to
your exact needs:
• Maximum Log Entries allows you to enter log entries.
• You also have the ability to configure two MQTT connections.
NOTE: In addition to configuring the MQTT settings, ensure the time and date are correct on the printer
and any required certificate files have been stored on the printer.
Maximum Log Entries
Within the Maximum Log Entries field, tap to enter a value.
• The number can range from 1 - 10,000.
47
Remote Server Settings
• To disable the log entry, enter 0.
Configuring the MQTT Connections
Remote Server URL
In the Connection 1 section and within the Remote Server HTTPS URL, tap to enter the URL.
• Manually enter up to 2048 characters.
• You may scan a QR code containing a URL into the Remote Server field.
Username
Enter a username up to 64 characters.
Password
Enter a password up to 64 characters.
QoS (Quality of Service)
Enter a number in the QoS field. The number represents the level of support for the MQTT connection.
48

Remote Server Settings
Tenant ID
Enter a Tenant ID up to 64 characters. The number represents the top level of the Topic the printer will
subscribe and publish to.
Repeat the steps for Connection 2.
3. Tap Apply to apply the changes. When prompted, tap Restart to restart the printer.
49
Printer Information
This section describes the printer and Zebra Printer Setup Utility application screen information available.
IMPORTANT: Depending on your printer model, this application may have limited functionality. Some
application features will not be available for the detected printer model. Features that are unavailable are
grayed out or not shown on the menus.
Zebra Printer Setup Utility Application Screens
This section details the Zebra Printer Setup Utility application screens. Additional items include Deselect
Printer, Zebra Assist, Settings, and About. You may manage your printers via smartphone or tablet. You
may view Zebra Printer Setup Utility screens in either portrait or landscape orientation on your tablet only.
(Your smartphone displays screens in portrait only.)
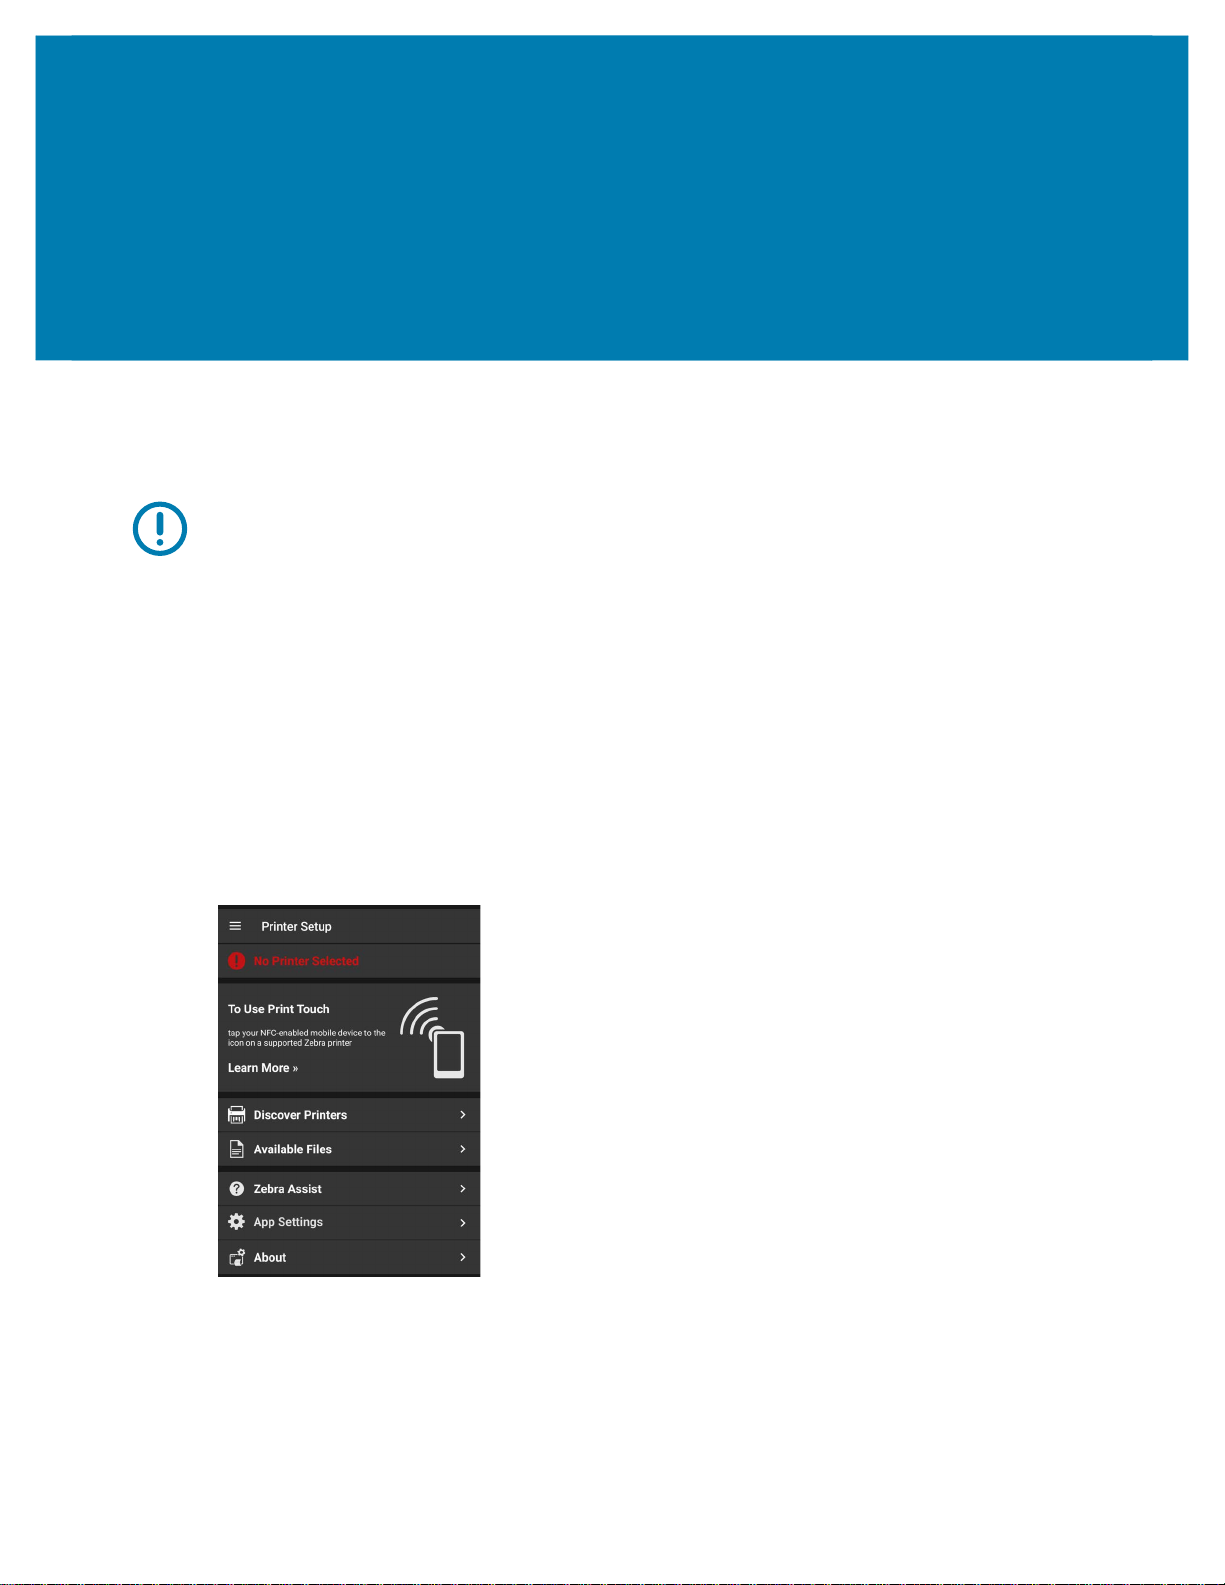
Once the application is downloaded, the application opens to the Dashboard screen. As this is the first
time you have used the application, there is no printer selected. See Printer Discovery Methods on
page 11 to establish a printer connection.
Figure 32 Dashboard (First Time Use)
50

Printer Information
Printer Information
Specific printer information is available by touching the photo of the printer or (1) on the Dashboard.
There are three tabs providing information about the printer and are listed in Figure 33.
• General tab (2): Displays the model, serial number, firmware version of the printer, battery status, and
Advanced Information.
• Printing tab (3): Displays the print status, mode, speed, darkness, media type and dimensions,
odometer information, and battery information. You may need to scroll down to see the lower section of
the screen.
• Connectivity tab (4): Displays information about the connectivity method (for example, Bluetooth,
Wireless, Wired/Ethernet, USB), MAC Address, IP Address, and Region. You may need to scroll down
to see the lower section of the screen. Only information applicable to the current connectivity method is
shown. In the examples below, the printer is connected via Bluetooth.
• Advanced Information (5): Displays additional printer and battery information.
Figure 33 Printer Information Menus and Tabs
(1) Information Icon (2) General Tab (3) Printing Tab (4) Connectivity Tab
(5) Advanced Info /
Battery Tab
51

Other Dashboard Menu Items
At the bottom of the Dashboard are three miscellaneous items. These include:
• Zebra Assist
• App Settings
• About
Zebra Assist
Zebra Assist automates the process of collecting your printer's configuration and attaching it to an email
ready to send to Zebra Support to assist with troubleshooting.
From this screen, tap to:
• Visit zebra.com
• Send an email to Zebra Support. (For more details, see Send a Settings File to Zebra Assist on
page 55.)
• Review a list of previous emails sent to Zebra Support.
Printer Information
Figure 34 Zebra Assist Screen
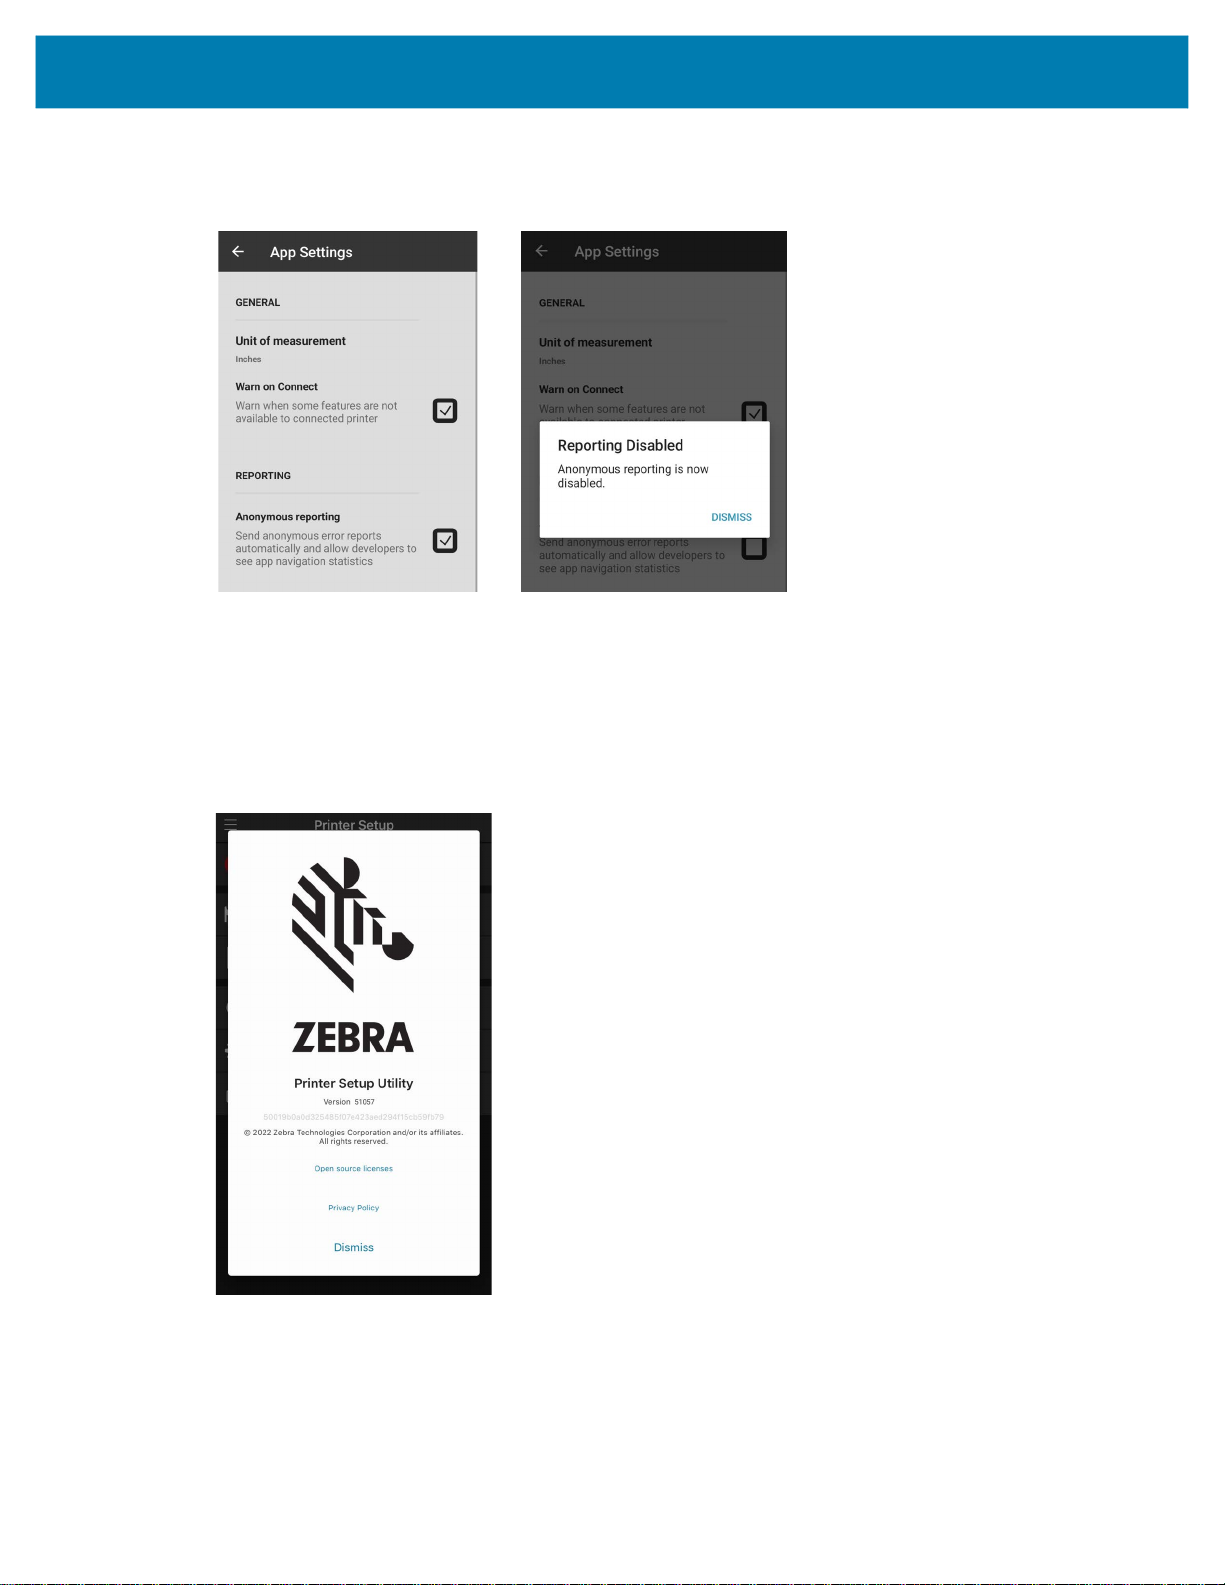
App Settings
See Figure 35. From the Settings page (1), you can change various items such as:
•
Unit of measurement: set up inches, centimeters, and millimeters
• Warn on Connect: set notifications for when some features are not available to connected printer.
•
Anonymous error reporting: select to send, or not send, error reports to Zebra, and to allow
developers to see app navigation statistics. The default is checked/enabled; meaning error reports and
app navigation statistics will automatically be sent. To opt out of sending the reports, uncheck the box
(2).
NOTE: Zebra recognizes that the security of your personal information is an important part of our
partnership and we are not in the business of selling or making it available to others. Zebra maintains its
commitment to safeguard and protect the confidentiality, integrity, and availability of information, which is
stored, processed, and/or transacted through our products. We also collect data in a form that does not, on
its own, permit direct association with specific customers or corporations. We may collect, use, transfer,
and disclose non-personal information for any purpose. We conduct our business in compliance with
applicable laws on data privacy protection and data security.
52
Printer Information
Figure 35 Settings and Error Reporting
(1) Settings (2) Disable Reporting
About
1
The About screen provides various information about the application version, copyright information, open
source licensing, and Zebra’s privacy policy.
Figure 36 About Screen
1
53

Capture and Send a Settings File
This section describes how to capture and send a settings file.
IMPORTANT: Depending on your printer model, this application may have limited functionality. Some
application features will not be available for the detected printer model. Features that are unavailable are
grayed out or not shown on the menus.
Capture or Save Settings to a File
With Zebra Printer Setup Utility, you can save the printer settings to a file. There are three menus where
you can save your settings to a file:
• Connectivity Settings
• Media Settings
• Print Quality
To change your Media Settings, see Media Settings on page 22. To save your settings:
1. From the Dashboard, tap Media Settings.
2. Tap Next until you get to the Apply Settings Screen (1).
3. Tap the checkbox Save settings to file (2), and then tap Apply.
Figure 37 Media Settings Screens
(1) Apply Settings Screen (2) Save Settings Checkbox
54

Capture and Send a Settings File
4. Follow the prompts to set up your Saved file location.
5. Tap Apply to apply your settings to the printer.
• Tap
• Tap
Cancel to quit without saving your settings.
Back to return to the previous menu screen.
Send Settings File to a Printer
Once you have saved your settings to a file, send your settings file to your printer.
NOTES:
• Sending files over a Bluetooth LE connection is limited to file sizes of 1MB or less.
• The settings files are named by appending a number to the end of the file name.
(Default increment is 1; the range is 1-9999.)
To send the settings file to a printer:
1. From the Dashboard, tap Available Files.
2. Tap the file you wish to send.
3. Tap Send To Printer to send the file or Close to quit.
When the file has been successfully sent, an acknowledgment displays.
Send a Settings File to Zebra Assist
At times, you may want to send your settings file to Zebra Assist. They can help troubleshoot issues with a
printer.
To send a settings file to Zebra Assist, complete these steps.
1. From the Dashboard, tap Zebra Assist.
2. Tap Email Zebra Support on the next screen.
3. To select your issue, tap in the issue field to show all of the choices (2). Select the issue you wish to
share.
4. Add a Description, if desired.
5. To add an attachment:
• Tap to add a file.
• Tap to add a picture.
• Tap add a printer configuration file.
IMPORTANT: When sending file attachments to Zebra Assist, file sizes should not exceed 25MB due to
email server limits. 10MB or less is recommended. If necessary, share files using a Cloud storage service
and include the link in your message.
55

Capture and Send a Settings File
Figure 38 Zebra Assist Screens
(1) Contact Support (2) Issue Selector
6. Once you have added all information you have to share, tap Create Email.
NOTE: Attachments to emails are compressed, so the size of attachments will change from the original
stored size.
7. If prompted, select the Share with method and Just Once or Always.
An email opens with your selected settings file attached.
NOTE: The default email application for your mobile device is used to send the report.
8. Tap the Send icon the same as any email.
9. Tap Done.
Figure 39 Support Email Screen
After you tap
Done, the Zebra Assist main screen appears.
56

Demos
This section features the Asset Tag, Traffic Ticket, and Photo Badge demos. The intent of these demos is
to show different types of applications where printing from a mobile device is required. Printing support for
Zebra printers can be easily added using our MultiPlatform SDK available at zebra.com/sdk
IMPORTANT: Depending on your printer model, this application may have limited functionality. Some
application features will not be available for the detected printer model. Features that are unavailable are
grayed out or not shown on the menus.
Figure 40 Dashboard and Demos Screens
Dashboard Screen Demos Screen
.
57

Demos
Using the Asset Tag Demo
The Asset Tag demo is included to demonstrate how unique asset tags may be printed.
NOTE: The demo will not work when mobile printers are set to Line Print. Use the Device Language option
in the app to change the language from Line Print.
To use the Asset Tag demo:
1. See Figure 41. From the Dashboard, tap Demos (1).
2. Tap Asset Tag (2).
Figure 41 Dashboard, Demos, and Asset Tag Demo Screens
(1) Dashboard Screen (2) Demos Screen (3) Assets Menu Screen (4) Asset Screen
3. Within the Assets Menu (3) screen, tap to select from the following assets:
• Screwdriver
• Wrench
• Needle Nose Pliers
58

• Crimping Pliers
• Wire Cutters
4. Within the Asset (4) screen, tap Print to print out the asset.
Using the Traffic Ticket Demo
The Traffic Ticket demo is included to demonstrate how traffic tickets may be printed.
NOTE: The demo will not work when mobile printers are set to Line Print. Use the Device Language option
in the app to change the language from Line Print.
To use the Traffic Ticket demo:
1. See Figure 42. From the Dashboard, tap Demos (1).
2. Tap Traffic Ticket (2).
Figure 42 Dashboard, Demos, and Traffic Ticket Demo Screens
(1) Dashboard Screen (2) Demos Screen (3) Traffic Ticket Screen
Demos
59

3. Within the Traffic Ticket (3) screen, complete the form by tapping and filling each form field.
• In the Plate Number field, use the device’s keyboard to enter a plate number up to 10 characters
long.
• In the Violation and Violator fields, select a predefined option from the drop-down menu.
• In the Signature panel, use a finger or touch screen pen (stylus) to write a signature.
4. Once complete, tap Print to print out the traffic ticket.
Using the Photo Badge Demo
The Photo Badge demo feature is included to demonstrate how users can print out a photo badge using
their device’s camera or photo gallery.
NOTE: The Demo will not work when Mobile printers are set to Line Print. Use the Device Language option
in the app to change the language from Line Print.
To use the Photo Badge demo:
1. See Figure 43. From the Dashboard, tap Demos (1).
2. Tap Photo Badge (2).
Demos
Figure 43 Dashboard, Demos, and Photo Badge Demo Screens
(1) Dashboard Screen (2) Demos Screen (3) Photo Badge Screen
60

Demos
3. Within the Photo Badge (3) screen, tap the form fields to enter a first and last name using the device’s
keyboard.
NOTE: All fields must be entered in order to print.
4. There are two ways to add a photo to a badge:
a. Photo from Camera
i. Tap Photo From Camera to open the device’s camera.
ii. Tap the camera’s shutter button to take a picture. The printer immediately prints the photo
badge.
b. Photo from Gallery
i. Tap Photo From Gallery to open the device’s photo gallery.
ii. Select a photo. The printer immediately prints the photo badge.
61

ZEBRA and the stylized Zebra head are trademarks of Zebra Technologies Corporation, registered in many jurisdictions worldwide. All other trademarks are the property of
their respective owners. © 2022 Zebra Technologies Corporation and/or its affiliates. All rights reserved.
 Loading...