

Zebra Zebra MotionWorks Enterprise Platform Software MotionWorks Enterprise User Guide v2.0

MotionWorks
Enterprise
2.0
User Guide
P1123395-03EN

ZEBRA and the stylized Zebra head are trademarks of Zebra Technologies Corporation, registered in
many jurisdictions worldwide. All other trademarks are the property of their respective owners.
© 2022 Zebra Technologies Corporation and/or its affiliates. All rights reserved.
Information in this document is subject to change without notice. The software described in this document
is furnished under a license agreement or nondisclosure agreement. The software may be used or copied
only in accordance with the terms of those agreements.
For further information regarding legal and proprietary statements, please go to:
SOFTWARE:zebra.com/linkoslegal
COPYRIGHTS:zebra.com/copyright
WARRANTY:zebra.com/warranty
END USER LICENSE AGREEMENT: zebra.com/eula
Terms of Use
Proprietary Statement
This manual contains proprietary information of Zebra Technologies Corporation and its subsidiaries
(“Zebra Technologies”). It is intended solely for the information and use of parties operating and
maintaining the equipment described herein. Such proprietary information may not be used, reproduced,
or disclosed to any other parties for any other purpose without the express, written permission of Zebra
Technologies.
Product Improvements
Continuous improvement of products is a policy of Zebra Technologies. All specifications and designs are
subject to change without notice.
Liability Disclaimer
Zebra Technologies takes steps to ensure that its published Engineering specifications and manuals are
correct; however, errors do occur. Zebra Technologies reserves the right to correct any such errors and
disclaims liability resulting therefrom.
Limitation of Liability
In no event shall Zebra Technologies or anyone else involved in the creation, production, or delivery of the
accompanying product (including hardware and software) be liable for any damages whatsoever
(including, without limitation, consequential damages including loss of business profits, business
interruption, or loss of business information) arising out of the use of, the results of use of, or inability to
use such product, even if Zebra Technologies has been advised of the possibility of such damages. Some
jurisdictions do not allow the exclusion or limitation of incidental or consequential damages, so the above
limitation or exclusion may not apply to you.
Publication Date
November 2021
2

Contents
Term List .......................................................................................................................... 3
Launching the MWE Web Client ..................................................................................... 4
UI Basics......................................................................................................................... 6
Menu Items and Reports .......................................................................................... 6
Report Interface...................................................................................................... 10
Dashboard .............................................................................................................. 12
Users ...................................................................................................................... 13
Login Account Menu............................................................................................... 14
Prerequisites .................................................................................................................. 15
Web Client Common Tasks .......................................................................................... 16
Viewing Sites and Site Maps......................................................................................... 17
Managing ZLA Appliances ............................................................................................. 19
Viewing Tag Status and Location.................................................................................. 20
Open The Tags Report........................................................................................... 20
Select a View.......................................................................................................... 21
View Tag Data ........................................................................................................ 22
The Details Column ................................................................................................ 23
Map Window .................................................................................................................. 24
Report Filters.................................................................................................................. 25
Customizing a Report.................................................................................................... 27
Saving a Custom Report................................................................................................ 31
Exporting a Report.................................................................................................. 32
Data Import .................................................................................................................... 33
Report Auto-refresh ................................................................................................ 34
Live Data Streaming....................................................................................................... 35
Map Autozoom............................................................................................................... 35
Map Data Clustering ..................................................................................................... 39
Defining a Resource Type............................................................................................. 40
Associating a Tag ID with a Resource ID...................................................................... 44
Resource Type Filters................................................................................................... 49
Tag Offset Filter...................................................................................................... 49
1

Contents
Median Filter........................................................................................................... 49
Zone Lockdown Filter ............................................................................................. 53
Rate Filter ............................................................................................................... 54
Keeping Location History ............................................................................................... 55
Viewing and Replaying Location History....................................................................... 57
Viewing Zones............................................................................................................... 59
Business Rules Alerts ................................................................................................... 61
Resource Alerts ...................................................................................................... 62
Pickup/Dropoff ........................................................................................................ 65
Resource Parent-Child Grouping.................................................................................. 67
Child Resources with No Tags ............................................................................... 67
Child Resources with Tags..................................................................................... 69
Releasing Child Resources .................................................................................... 71
Dynamic Locate Fusion.................................................................................................. 72
System Device Alerts.................................................................................................... 75
Contacts......................................................................................................................... 76
Alert Notification............................................................................................................. 77
MWE Health.................................................................................................................. 79
Device Manager............................................................................................................ 81
2

MotionWorks Enterprise
2.0
This user guide focuses on the features and functionality of the MotionWorks Enterprise 2.0 web client, the
main tool for users to view and interact with the data provided by the real-time asset tracking MotionWorks
Enterprise (MWE) system from Zebra Technologies Corporation.
Zebra Technologies offers world-class real-time asset tracking and management software solutions to
optimize the flow of goods in complex logistical operations, increasing productivity, lowering operational
costs, and improving safety and security. Zebra Technologies uses a wide range of scalable RTLS (Real
Time Locating Systems) technologies to generate accurate, on-demand information about the physical
location and status of assets.
MWE is a software suite that provides tools for designing, configuring, operating, and troubleshooting
RTLS solutions. MWE serves as the central repository for all the real-time location and communication
data captured by the RTLS-tracking infrastructure. MWE also provides tools for integrating RTLS data with
customers and third-party applications.
Some of the location and telemetry RFID technologies supported by MWE include:
• Passive RFID
• UWB
• Bluetooth Low-Energy
• WiFi
• ISO 24730
• GPS
The diagram below provides an overview of some of the RTLS system components and data flow. The
over-the-air RF transmissions from tags (RF transmitters) are detected by sensors connected to a network.
This connection can be wired or wireless. The data generated by the sensors flow across the network to a
Zebra Location Appliance (ZLA) and then to a MWE server. Multiple sites are supported, each with its own
ZLA.
1

MotionWorks Enterprise 2.0
A ZLA can collect, process, and filter location and telemetry data from multiple sensing devices and can
also run a variety of location algorithms. A ZLA can be a virtual appliance or physical appliance. A physical
ZLA is 1U rackmount box installed on-site feeding tag blink and location data to MWE server installed on
site or remotely at a data centre.
MWE 2.0 also supports direct communication from passive RFID readers to MWE running locally or in the
cloud. No ZLA appliance is required in this case
.
The MWE software is installed on a Linux server (Red Hat or CentOS). The diagram below illustrates the
various MWE software components hosted on the MWE Linux server and their relation within the MWE
software.
This guide assumes that the MWE software is previously installed and properly configured. Consult the
following documents for details on MWE installation and configuration:
• MWE 2.0 Installation Guide
• MWE 2.0 Configuration Guide
2
Term List
MotionWorks Enterprise 2.0
The table below provides a brief overview of the terms used in the MWE documentation:
Table 1 MWE Definitions
Term Definition
Tag An active or passive RFID transmitter. It can be a WhereNet tag, DART (UWB) tag,
GPS tag, EPC (passive RFID) tag, BLE tag.
Resource An object, equipment, vehicle, etc. whose location and status is to be tracked.
Asset Synonym with Resource.
Tag ID A unique tag identifier that is included in every tag transmission.
Resource ID A unique identifier that identifies the resource being tracked.
Asset ID Same as Resource ID.
Resource Type A type or category of resources as defined within the MWE software. Examples of
resource types are printer, trailer, container, truck, airplane, etc. Every resource
within the MWE software belongs to a resource type.
Tagged
Resource
Unassigned Tag A tag whose Tag ID is not associated with a Resource ID within the MWE software.
Tag Blink A tag transmission (one or multiple bursts of electromagnetic waves in the RFID
Location Sensor A device that captures tag blinks and forwards them across the network to a server
ZLA Zebra Location Appliance. A physical or virtual appliance that receives data from a
A resource whose Resource ID is associated with a Tag ID in the MWE software.
part of the spectrum).
or ZLA.
variety of sensors and runs location algorithms. The resulting coordinates x,y or
latitude/longitude are forwarded to the MWE server.
3

MotionWorks Enterprise 2.0
Launching the MWE Web Client
To launch the client, open a web browser (Chrome, Edge, Firefox) on a client machine or server on the
network, and point it to http://MWE_Server_Name or https://MWE_Server_Name, where
MWE_Server_Name is the Linux (Red Hat) server name or IP address.
The login page is displays:
Next, enter the login credentials. This could be a local account created and stored in the local MWE SQL
database, or it could be a domain account authenticated by an OpenLDAP, Active Directory, or ADFS
server. See the MWE Configuration Guide on how to configure authentication modes and login accounts.
NOTE: Depending on the MWE version, you may see some differences between the screens depicted in
this document and the screens in your MWE version.
Enter your login credentials. This could be a local account created and stored in the local MWE SQL
database, or it could be a domain account authenticated by an OpenLDAP, Active Directory, OIDC, or
ADFS server. Please see the MWE Configuration Guide on how to configure authentication modes and
login accounts.
Note that the browser may display a not secure or certificate error or similar warning in the URL bar when
using https. This is because the MWE installation script installs a default self-signed certificate on the
MWE Linux server. Refer to the MWE Configuration Guide for instructions on installing your own valid
certificate on the MWE Linux server.
4

MotionWorks Enterprise 2.0
After logging in, view the landing page with a menu bar at the top of the page containing several items:
Dashboard, Reports, History, Alerts, Infrastructure, Configuration, Users, and admin (the name of the
account currently logged in).
The menu items that are visible on menu bar depend on the access level granted to your login account. If
you have full access, you should see the 8 menu items listed above.
To sign out, click the down arrow in the rightmost (account name) menu item and select Sign Out.
5

UI Basics
This section provides an overview of the MWE web client user interface. Note that depending on
your MWE version, you may see some differences between the screens and menus depicted in this
document and those in your MWE version.
Menu Items and Reports
Hovering the mouse over a menu item on the menu bar displays a list of available reports under that menu
item in alphabetical order, as in the following figure.
MotionWorks Enterprise 2.0
6
MotionWorks Enterprise 2.0
The following table lists the reports under each menu item and a brief explanation for each report. These
reports will be explained in greater detail later in this guide.
Table 2 Menu Items
Menu Item Report Description
Dashboard This tab includes reports that present summary information in
graphical form.
Resources Graphical summary of number of tracked resources, listed by
type, site, zone, and custom properties.
System Health Graphical summary of open system alerts per site, including ZLA,
sensor, tag, and other alerts.
Alert Manager Tool for configuring alerts related to the health of the MWE Linux
server. It is meant only for advanced users and system
administrators.
Grafana System Health
Kibana Application
History Data
Kibana Application
Logs
Prometheus Tool for building queries on the MWE Linux server health. It is
Reports Includes reports (in table form) with status information on tags
Import Includes the import data entry form and shows a history of import
Resources Displays status information about each resource being tracked at
Tags Displays status information about each resource or asset being
History Reports that provide historical data on tags, resources, locations,
Call History Shows shows every blink from any WhereNet Call Tag. These
Resource
Event History
Resource
Zone
Correlation
History
This tool presents pre-defined dashboards showing health and
status of the MWE Linux server.
While the MWE web client offers out-of-the box reports that
display application historical data, this tool allows direct access to
the application historical data in the MWE Elastic Search
database.
This page allows access to the different logs generated by MWE
microservices. It is typically used for diagnostics and
troubleshooting.
meant only for advanced users and system administrators.
and resources being tracked at a site. It also includes a report on
import data entry operations.
transactions done via the MWE web client
a site.
tracked at a site, regardless of tag association.
events, system alerts, and more. Each report has purging and/or
archiving settings that are discussed later in this document.
blinks have TagStatus=2 in the blink packet (as opposed to
TagStatus=0 for blinks from regular WhereNet tags).
Displays all events generated by the MWE system related to
resources being located and tracked, including Zone Change,
Resource Alert, Pickup, Dropoff, Shipped, Received.
Displays a history report that shows when 2 different resources
were in the same zone over a specified time window. The report
will show every occurrence and dwell time over that time window.
7

MotionWorks Enterprise 2.0
Table 2 (Continued)Menu Items
Menu Item Report Description
System Alert
History
Tag Blink
History
Alerts This tab includes a single report.
Alert
Notifications
Configuration
Open System
Alerts
Infrastructure The reports under this tab allow users to monitor and manage
Appliances Allows users to monitor and manage location appliances.
Devices
(Device
Manager)
Hardware
Devices
Site Manager This is where users define sites and site groups, and upload site
WherePorts Lists all WherePorts defined in System Builder. WherePorts are
Configuration This tab lists reports that are used to configure different aspects of
Keeps a record of every system alert that has been opened and
closed.
Keeps track of every single tag blink processed by the system.
Data is only kept for the most recent 7 days.
This report lists the people (from the Contacts report) that will be
notified via email when a specified alert is triggered.
Lists all system alerts that are currently open.
location appliances, define sites and site groups, and upload site
maps.
Allows adding, configuring, and managing devices directly from
this page. No ZLA appliance is required for devices added in this
page. In MWE 2.0, only passive RFID readers (FX7500, FX9600,
ATR) are supported; must be running firmware v.3.7.26 or higher,
and must have the R2C (Reader to Cloud) application installed.
Lists all of the hardware installed at a site as part of the location
infrastructure. This report gets populated when System Builder (a
MWE system design tool) performs a publish operation. Refer to
the MWE Configuration Guide for more details.
maps.
also listed in the Hardware Devices report, however, this report
provides additional information about the configuration of each
WherePort.
the MWE software. Entries in these reports can be created,
modified, or deleted using data entry.
8

MotionWorks Enterprise 2.0
Table 2 (Continued)Menu Items
Menu Item Report Description
Contacts Users can manage the list of contacts to be used in emailing
alerts and scheduled reports.
Resource
Alert Settings
Resource
Type Settings
System Alert
Settings
Virtual Tag
Settings
WherePort
Dissociate
Zone Group
Settings
Zone Settings Displays Zones published by Zone Builder tool and provides data
Users
(logged in
account)
This menu item opens a web page where one can define resource
alerts (business rules).
This is where resource types are defined. Examples include car,
trailer, printer, or any other resource type. Each resource type has
a set of properties and filters that are specified in this report.
Individual resource/asset of this resource type can then be
entered into the system with unique resource ID and associated
with a tag ID. This can be done using data entry in the Resources
report (under Reports tab), data import, or via the API.
Lists all available system alerts. This report allows customization
of alert messages and the specification of email distribution list for
each alert.
Define virtual tags using this setting. Several real tags can be
associated with a virtual tag (in the Virtual Tag Assignment
Settings report). The tag blink data reported by MWE for a virtual
tag is a configurable combination of the data from the real tags
associated to that virtual tag.
Associating or dissociating tag ID’s to or from asset ID’s are done
using data entry, data import, or the API. Tag dissociation can be
done automatically when a tagged asset crosses the field of a
WherePort device (a magnetic exciter). In this report, enter the
WhererPort ID’s that being used to perform this task.
Displays Zone Groups published by Zone Builder tool and
provides data entry to change some zone group parameters.
entry to change some zone parameters.
This tab includes two sub-tabs or pages, namely, USER
GROUPS and USERS. The USER GROUPS page is the place
where to add User Groups and specify the permissions for each
group. If using a domain server for authentication, the name of
domain groups can be added here. The USERS page is where
one can create local user accounts (stored in a local MWE
database) and assign them to User Groups. Domain login
accounts do not need to be added here.
The last tab shows the name of the account currently logged in to
the web client, and includes items to change user settings and to
sign out. A local account can also change password here.
9

Report Interface
All reports under the Reports, History, Alerts, and Configuration menu items have a similar user
interface. In addition to the main menu bar, there is a report tool bar in lighter gray color, a report/map
window, and a filter’s column. The following figure shows the Reports > Tags report.
NOTE: Depending on what version of MWE you are running, the name and order of menu items shown in
the figures below may differ slightly from your version.
MotionWorks Enterprise 2.0
10

MotionWorks Enterprise 2.0
The following figure provides additional details on the filter’s column.
NOTE: Not every column in a report has a filter associated with it.
11

Dashboard
The Dashboard > System Health page presents a graphical summary of the health of the system,
including servers, appliances, sensors, and tags.
MotionWorks Enterprise 2.0
NOTE: Depending on your MWE version, you may see a different version of this dashboard where the
graphs have been replaced by tables, but the meaning of the panels is still the same.
12

MotionWorks Enterprise 2.0
The Dashboard > Resources page provides several counters related to the location and status of
resources being tracked across multiple sites.
Users
The Users page includes two tabs, namely, User Groups and Users.
The USER GROUPS tab is the place where to add User Groups and specify the permissions for each group.
Only the administrator user group is created at installation time. If using LDAP/ADFS/OIDC authentication,
the name of groups on the LDAP/ADFS/OIDC server can be added here. If using MWE database
authentication, newly added groups will exist only on the local MWE SQL database.
13

MotionWorks Enterprise 2.0
The USERS tab is where a user can create local user accounts (stored in the MWE database) and assign
them to User Groups. Domain login accounts do not need to be added here.
It is possible to configure the system to do only LDAP or ADFS or OIDC user authentication, or only MWE
local account (in MWE SQL database) authentication, or a mixed mode allowing both MWE local
authentication and one of the LDAP/ADFS/OIDC authentication methods. This configuration is done in the
.env configuration file on the MWE Linux server. Refer to the MWE 2.0 Configuration Guide for details.
Login Account Menu
The last item on the menu bar has the name of the login account currently logged into the web client. In the
example below, it is admin:
In this example, a local user (a login account stored in the local MWE database) can change their
password. The Change Password menu item is not enabled for domain accounts, which are controlled by
a domain controller on the network.
14

The User Settings item provides web client settings that are applied only to the account currently logged
in. Lastly, the Sign Out item allows a user to sign out.
Prerequisites
The MWE Installation Guide and MWE Configuration Guide explain the MWE software installation and
configuration steps that must be completed before a user launches and uses the MWE web client.
The main installation and configuration procedures are listed below:
MWE Installation Procedures
1. Install MWE software on Windows server.
2. If deployment includes ZLA appliances:
a. Register ZLA appliances with MWE Linux server.
b. Upgrade ZLA appliance firmware.
3. Upgrade sensor (if any) firmware.
4. Upgrade MWE software.
MotionWorks Enterprise 2.0
MWE Configuration Procedures
1. Add Site Groups, Sites, and load site maps in the Infrastructure > Site Manager report.
2. Calibrate maps (define x,y coordinate system) in the Site Manager report.
3. If deployment includes ZLA appliances:
a. Register ZLA appliances with MWE Linux server, if not done at installation time.
b. Associate each ZLA appliance with a site.
c. Use System Builder tool to add location sensor devices and define location algorithms.
4. Define zones on top of each map. This is done in the Configure Zones tab in the Site Manager report.
5. Configure authentication mode: local MWE database, LDAP, ADFS, OIDC, or a combination of these.
This is done in the .env configuration file on the MWE Linux server.
6. Add LDAP/ADFS/OIDC User Groups to MWE for LDAP/ADFS/OIDC authentication
7. Create local User Groups and Users, and define permissions
Once the above steps are complete, a user can use the MWE web client to view and enter data about tags
and resources being tracked by the RTLS (Real Time Location System) and perform many other tasks as
listed in the following section.
15

MotionWorks Enterprise 2.0
Web Client Common Tasks
This document explains the most common tasks performed with the web client. The tasks listed below are
explained in various sections of this guide.
• Launch MWE web client
• Navigate the MWE web client UI
• View sites on a world map where tags and assets are being tracked
• View site maps
• View appliances installed at each site, and their status
• Define location filters (rate filter, median filter, …) per appliance
• View tags status and current location
• View tag blink history
• View tag data in reports and on maps
• Define resource types
• Define location filters (rate filters, median filter, ….) per resource type
• Associate resource ID’s to tag ID’s
• View resource status, current location, and location history in reports and on maps
• Customize reports (columns displayed, column names, column order, filter data)
• Customize report filters (filters displayed, filter names, filter order)
• Save customized reports
• Export reports (CSV and HTML formats)
• Import data
• Define business rules alerts (resource alerts, pick-up/drop-off alerts)
• Configure automatic email notification or resource alerts
• Check system health
• Configure automatic email notification of system alerts
• Configure tag low battery alert
• View alert history and alert notification history
• Enable/disable system alerts
• View available system events (zone change, object association, alerts, etc)
• Specify system events to be stored
16

MotionWorks Enterprise 2.0
• View history of system events
Viewing Sites and Site Maps
The sites and site maps where asset locations are being tracked can be viewed in the Infrastructure >
Site Manager report, as shown in the following figure. After installing the MWE software, only the Default
site group will be present. Refer to the MWE Configuration Guide for additional information on how to add
site groups, sites, and upload site maps.
Clicking on a site group in the tree-view, such as Company Sites in the example below, displays a map in
the map window containing all the sites under that site group. In our example the sites under the Company
Sites group are Detroit, Los Angeles, and San Jose.
NOTE: Depending on your MWE version, you may see a different color scheme than the figures below
show, but the meaning of the items is still the same.
17

MotionWorks Enterprise 2.0
Hovering over a site name in the tree view using the mouse causes the corresponding blue pin on the map
to be highlighted by increasing in size:
Clicking on a map name in the tree view displays the corresponding site map in the map window:
18

Managing ZLA Appliances
The status of the ZLA (Zebra Location Appliance) device deployed at multiple sites can be seen in the
Infrastructure > Appliances report. This report also makes several tasks available for managing
ZLAs.
MotionWorks Enterprise 2.0
Refer to the MWE Installation Guide and MWE Configuration Guide for additional details on this report.
19

MotionWorks Enterprise 2.0
Viewing Tag Status and Location
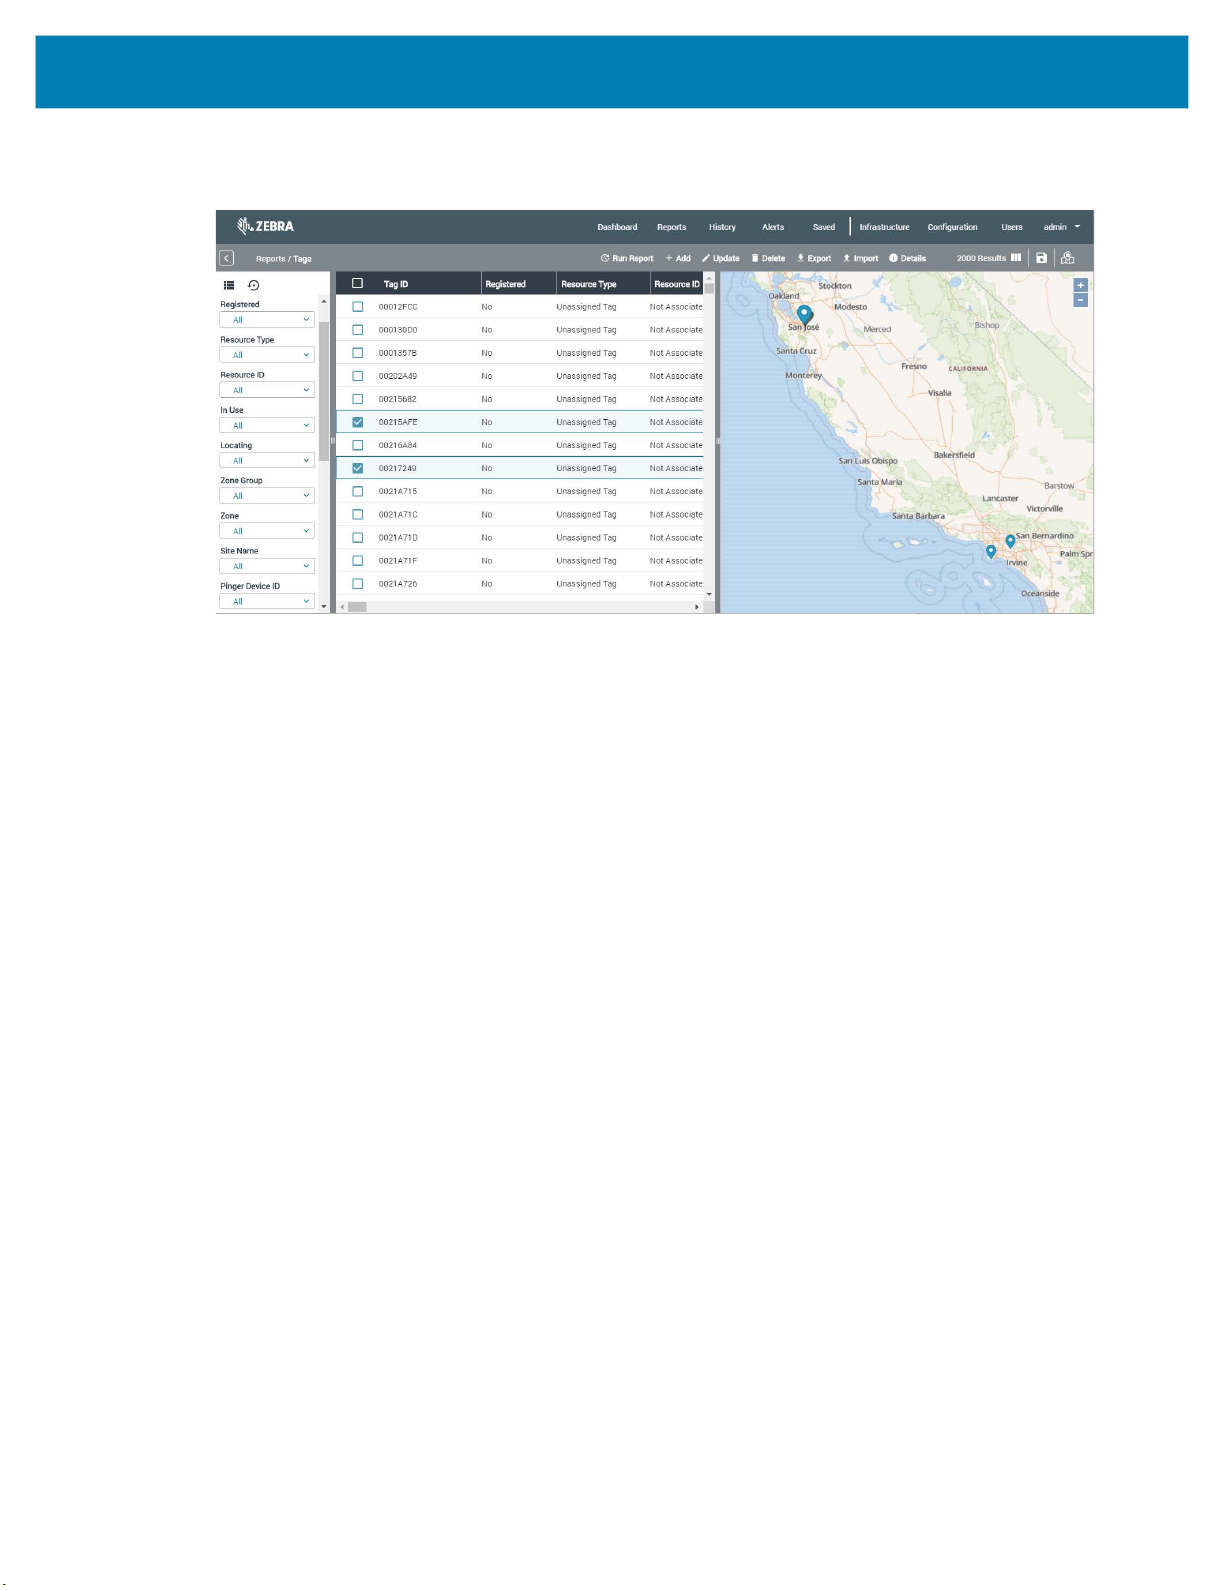
The status and location of tags blinking across multiple sites can be viewed in the Reports > Tags report.
The data is displayed in table form on a map, and can be filtered, sorted, exported, and more. All
supported tag types are seen here, regardless of technology, such as WhereNet tag, DART (UWB) tags,
passive RFID (EPC) tags, GPS tags, and BLE receivers.
The information displayed for each tag ID may include x and y coordinates, latitude and longitude, zone
and site where the tag is currently located, battery status, last time the tag blinked and last time it located,
resource ID (if any) associated with the tag, telemetry data included in the tag transmission (temperature,
speed, etc), and more.
Any tag blink (transmission) captured by a sensor feeding data to the MWE software causes the tag ID to
be displayed in the Tags report. It is also possible to manually add a tag to this report before that tag has
blinked; when the tag blinks, the data in the Tags report is automatically updated.
Open The Tags Report
Open the report by selecting Tags in the Reports tab:
See UI Basics on page 6 for the meaning of each tool button on the report toolbar.
NOTE: Depending on your MWE version, you may see slight differences in the report menu bar and filter
column between what the figures show and your MWE version.
20

Select a View
Select different views, such as Report View, Report & Map Vertical, and Report & Map Horizontal
by using the column filter. The column filter can be hidden, as shown in the following figures.
MotionWorks Enterprise 2.0
21

View Tag Data
When the Tags report is initially opened, the report window, the map window, and the filter column are
displayed.
MotionWorks Enterprise 2.0
Scroll right and left in the report windows to view all the report columns, including the site and zone where
each tag is being located.
The map window displays a wide area map, each blue pin corresponds to a site where tags are being
located.
When one or more tags are selected in the report window, the following occurs:
• A checkmark appears in the square checkbox in the first column for each selected tag.
• Each selected line is highlighted with a light blue background.
• If map autozoom is enabled, the map window automatically zooms into a smaller area containing
the selected tags. See Map Autozoom for additional details.
• If map autozoom is not enabled, the map window does not show the full map for the site
containing the selected tags, and the map window does not automatically zoom in. See Map
Autozoom for details.
22

The Details Column
If one or more tags or resources are selected in a report window or in the map window, click Details on
the report toolbar, to view a column on the right side of the web client window displaying information for the
selected items.
MotionWorks Enterprise 2.0
The information displayed in the Details column is the same as in the lines in the report displayed in
vertical form. The right and left arrows at the top right corner of the Details column allow the user to
toggle between the selected items. The Details column can be closed by clicking the x at the top left
corner of the column, or by deselecting the items previously selected in the report or on the map.
23

Map Window
The following figure lists the features and buttons on the map window.
MotionWorks Enterprise 2.0
24

Report Filters
The reports under the Reports, History, Alerts, and Configuration items on the main menu bar
include a filter column that allows filtering data in the report based on multiple columns or fields. Not every
column in a report has a filter associated with it.
MotionWorks Enterprise 2.0
When a value is selected or typed in a filter box, the content of the report is automatically updated to match
the filter value.
25

MotionWorks Enterprise 2.0
The filter column can be customized to show a subset of available filters and change the order of the list in
the filter column, as shown in the following figure.
26

Customizing a Report
A report under the Reports, History, Alerts, and Configuration menu items can be customized in
several ways. Users can choose to display the data only in table form (report window), or to display both
the report window and the map window horizontally or vertically, and one may choose to show or hide the
filter column.
MotionWorks Enterprise 2.0
27

MotionWorks Enterprise 2.0
Additionally, select which columns to show in a report and the order in which these columns are displayed.
To sort the report records by a column, click the column header; an arrow displays showing the sort order
(ascending or descending). To change the sorting order, click the column header again.
28

MotionWorks Enterprise 2.0
The Details tool-button allows displaying the horizontal records/lines in the report in a vertical format, as
shown in the figure below.
The figures below show some other examples of possible report customization.
The figures below show some other examples of possible report customization.
29

MotionWorks Enterprise 2.0
Use the browser zoom level to adjust the font size and number of records displayed in the report window.
30

Saving a Custom Report
Once a customized report with a set of filters and filter values, a set of columns and column order, sorting
column and sorting order is generated, it can be saved and named as illustrated below.
MotionWorks Enterprise 2.0
Click the Save button, to view a new menu item named Saved on the main menu bar. All saved reports are
placed under the Saved menu item.
NOTE: In the Details column, the items selected in the report (the check marks in squares in the first
column), and the view mode (report only, report and map vertical, etc.) are not saved as part of a saved
report.
31

To delete a saved report, open the report and click the trashcan icon on the report toolbar, as shown
below.
NOTE: Depending on your MWE version, you may see some differences between the screens depicted in
this document and the screens in your MWE version.
Exporting a Report
To export the content of a report, click the Export tool-button on the report tool bar:
MotionWorks Enterprise 2.0
The data can be exported in CSV format or HTML format. A file is downloaded to the Downloads folder on
the computer hosting the web client. The file name maintains the format reportName_date_time.
The report filter values are included at the top of the exported file to inform the user opening the file of the
filter values that were applied when generating the report data.
32

Data Import
When in need to enter large amounts of data into MWE, rather than entering one item at a time using data
entry, you can use data import transactions. Data Import is available via the Import report. To open this
report, select Reports > Import from the MWE web client menu bar:
This report, shown in the figure below, both allows several different data import operations and shows a
history of data import operations.
MotionWorks Enterprise 2.0
From the Report dropdown list, select a report to import data into. Available reports are: Resource Type
Settings, Resources, and Tags.
The Action dropdown list shows the types of data entry operations available for this report. Data entry
operations include adding new resources to the report, modifying existing resources, or deleting resources
from the report.
33

Once an action or data entry operation has been selected, use the Select File field to browse to and
select a properly formatted file. Clicking the Sample File button will download a sample file that can be
used as a template to build a properly formatted import file for the selected data entry operation.
Report Auto-refresh
The data in a report is automatically refreshed every time the report is opened. Once the report is open,
the data can be manually refreshed by clicking the Run Report tool button.
MotionWorks Enterprise 2.0
Users can also enable auto-refresh. This feature is disabled by default, as frequent auto-refresh queries by
multiple clients can place an unnecessary load on the MWE database.
To enable report auto-refresh, select User Settings under the last menu item on the main menu bar (the
menu showing the name of the account currently logged into the web client) and set Auto-Refresh to
Enabled. Enter a refresh interval in seconds. Try to make this interval as large as the scenario allows. The
minimum value supported by MWE is 5 seconds.
34

Live Data Streaming
The report auto-refresh feature can be set to a minimum refresh interval of 1 second. Each refresh
performs a full query database tables to update all of the fields in the report. Therefore, having many web
clients performing frequent queries can place an unnecessary load on the system.
An alternative is to enable live data streaming. This opens a web socket connection between the web
client and the MWE server allowing tag blink (x, y, z) coordinates to be forwarded immediately from the
server to the client in real time. In this case, the web client refreshes the display every second, without the
database load generated by auto-refresh.
MotionWorks Enterprise 2.0
NOTE: Live data streaming updates the x, y, z coordinates of tags in the report and on the map, however,
it does not update any other fields in the report. The next manual or automatic report refresh updates all
fields in the report.
To enable live data streaming, click the Real Time button on the map’s toolbar. The button changes color
from light gray to dark gray. To disable live data streaming, click the button again.
Map Autozoom
When map autozoom is enabled, selecting one or more tags in the Tags report causes the map to
automatically zoom in or zoom out to display an area that includes all of the selected tags. This area is
typically a small part of the whole map, large enough to include the selected tags and neighboring area.
The same is true for other reports that include the map window, such as the Resources report.
35

MotionWorks Enterprise 2.0
Map autozoom is enabled by default. To disable it, select User Settings under the item on the menu bar
(the item showing the name of the account currently logged into the web client) and set the Map Zoom
switch to no/yes.
When a user selects one or more tags in the Tags report, or one or more resources in the Resources
report, the map window responds in one of two ways:
• If Map Zoom is set to Yes, the map window automatically zooms into an area containing the selected
tags or resources.
• If Map Zoom is set to No, the full map for the site containing the selected tags or resources displays in
the map window. The map window does not automatically zoom in.
Upon initially launching the Tags report, observe a wide area map showing all of the sites that contain tags
listed in the report.
36

MotionWorks Enterprise 2.0
If map autozoom is enabled and two tags are selected in the report window, the map automatically zooms
into an area including the two selected tags, as shown in the following figure.
If map autozoom is disabled, then the full map for the site containing the selected tags is displayed in the
map window. The map window does not automatically zoom in:
37
MotionWorks Enterprise 2.0
In either case, if the Site Name filter is set to All, the map window displays a wide area map with all of the
sites:
Each site on this map is represented by a blue pin. The site containing the selected tags is highlighted with
a larger sized blue pin. Clicking on a blue pin on the map sets the Site Name filter and the map window
only displays the maps for that specific site.
38

Map Data Clustering
A tag or resource is represented on the map window by a yellow dot with a red border. This dot turns red
when the tag or resource is selected on the map or in the report.
When two or more tags are physically in close proximity, they are clustered and represented by a larger
blue circle as shown in the following figure. The number on the circle corresponds to the number of tags in
that cluster.
MotionWorks Enterprise 2.0
Zooming in shows the individual tags in a cluster.
39

Defining a Resource Type
The main purpose of the MWE software and the underlying RTLS system is to track the location and status
of assets/resources. Tags (active/passive RFID transmitters) tracked by the RTLS system are physically
attached to resources. Therefore, each tag ID must be associated with a unique resource ID within the
MWE software.
MWE offers multiple ways of associating/dissociating tags with/from resources, including data entry, API
calls, scanners, applications installed on top of MWE, and mobile applications. In the following sections
outline the data entry operations available in the MWE web client to associate/dissociate tags with
resources.
Create a Resource Type, which represents a category or type of resources. For example, a Resource
Type could be printer, trailer, or container.
To create a Resource Type:
1. Go to the Configuration > Resource Type Settings report, click the +Add tool button and select
+Add Resource Type.
MotionWorks Enterprise 2.0
2. Enter the necessary information in the Add Resource Type data entry window:
40

MotionWorks Enterprise 2.0
The meaning of the various fields in the Add Resource Type data entry form is given in the table below.
Fields with an asterisk (*) next to its name are mandatory.
Table 3 Add Resource Type Field Definitions
Section Field Name Description
Identity Name The name of the field using internally by the
application. Also used in Data Import
operations.
Display Name Field name shown in report columns, filters,
and data entry operations. By default,
Display Name is set equal to Name, and it is
recommended to leave it this way.
Description Optional description field.
Expiration Time If a tag of this resource type does not blink in
the specified period, MWE will trigger a Tag
No Blink alert.
Auto Dissociation
If set to No, you will not allow to associate a
resource ID with a tag ID that is already
associated with another resource ID.
If set to Yes, the tag will be automatically
dissociated from its current resource ID when
you attempt to associate it with a new
resource ID.
Enable Auto Dissociation
in Dissociation Zone
Filters TagOffset Click on the information icon next to the filter
Move/Median Click on the information icon next to the filter
Rate Click on the information icon next to the filter
ZoneLockDown Click on the information icon next to the filter
ZoneChange Click on the information icon next to the filter
If this checkbox is checked, it is possible to
automatically dissociate the tag when it
blinks in a zone defined as a dissociation
zone in the Site Manager à Configure Zones
page.
name to see a brief description. See more
details in the Resource Type Filters section
later in this document.
name to see a brief description. See more
details in the Resource Type Filters section
later in this document.
name to see a brief description. See more
details in the Resource Type Filters section
later in this document.
name to see a brief description. See more
details in the Resource Type Filters section
later in this document.
name to see a brief description. See more
details in the Resource Type Filters section
later in this document.
41

MotionWorks Enterprise 2.0
Table 3 Add Resource Type Field Definitions
Section Field Name Description
Attributes Attribute names defined
by user
Icon Configuration
Parent Children
Attributes can be of two types: Free Text and
Lookup. Free Text fields allow a user to type
any string. For Lookup fields the user must
select from a dropdown list of pre-defined
values.
When selecting a resource type in the
Resource Type filter in the Resources report,
you will see that a set of additional attribute
columns and filters is displayed in the report.
Load and select an icon or figure to represent
this resource type on maps displayed by
MWE.
Here one can associate the resource type
with a parent resource type such that the
children resource types will inherit the same
x,y reported by MWE for the parent resource
type.
See more details in the section Resource
Parent-Child Grouping later in this document.
Once the Add User Resource data is added to the entry form, click the Save button to save the
1.
information and create the resource type.
The following figure shows a newly added resource type named Printer.
42

MotionWorks Enterprise 2.0
If you would like to make changes to the resource type definition, select the resource type in the report,
2.
click the Edit tool button, and select Edit Resource Type to open the Edit Resource Type data entry
form:
3. After making the desired changes, click Save to save your changes.
The next step after defining a resource type is to associate a resource having a unique resource ID with a
tag ID being tracked by the system.
43

MotionWorks Enterprise 2.0
Associating a Tag ID with a Resource ID
To associate a tag ID with a particular resource/asset, open the Reports > Resources report, click + Add
on the report menu bar as shown in the figure below:
The Add Resource data entry form opens:
The meaning of the various fields in the Add Resource data entry form is given in the table below. Fields
with an asterisk (*) next to its name are mandatory.
Table 4
Section Field Name Description
Identity
Resource ID A unique alphanumeric
resource ID
Resource Type Select from the list of previously
defined resource types
Comment Optional comment field
Tags
44

Table 4
Zone
Attributes
MotionWorks Enterprise 2.0
Section Field Name Description
Tag ID
Tag Source
A unique tag ID value. It can be
an integer or an alphanumeric
string depending on the type of
tag technology selected in the
Tag Source dropdown list.
The type of tag technology.
Options include WhereNet,
Dart (UWB), EPC, MPACT
(BLE), MSE, and Unknown
When a tag blinks, its location
(x,y coordinates and zone) will
be automatically updated by the
system. But here you can
specify an initial zone before
the tag is heard by the system.
If attributes have been defined
for the resource type selected
in the Resource Type list, then
a set of corresponding fields
will be displayed here. For free
text attributes, you can type any
string. For lookup attributes,
you can select a value from a
list of predefined values.
Click Save to save the information. The newly created record will be shown in the report:
Several fields in this report, such as Zone, x, y, latitude, longitude, etc, will be automatically updated
whenever the tag blinks.
To change/update the tag ID, resource ID, or resource type, select the item in the report and click the Edit
tool button.
45

Resource Type Filters
Different tag blink data filters are available within MWE. Specifically, it is possible to define filters per
resource type, by defining a set of filters that apply only to tags associated with a particular resource type,
and defining another set of filters that is only applicable to tags associated with another resource type.
These filters include median filters, zone lockdown filters, time based rate filters, and distance based time
filters. Configuration of these filters is done via the MWE web client.
Within MWE, these filters are applied to incoming tag blinks in the following order: Median filter > Zone
Lockdown filter > Rate filters. All filters are disabled by default.
To configure filters for a resource type, open the Resource Type Settings report:
MotionWorks Enterprise 2.0
Select the resource type and click Edit on the menu bar:
In the Edit Resource Type data entry form, scroll down to the Filters section:
46

Tag Offset Filter
Filtered, Tag x392
0.0
10.0
20.0
30.0
40.0
50.0
60.0
70.0
020406080
Time
Error (fe et)
Unfiltered
Median Filtered
The tag location reported by sensors/readers is shifted by this filter by the specified x,y,z offset values.
This is useful when tags sit close to the boundary of two zones and it is desirable to report tags in the
center of a zone.
Median Filter
The location of tags (assets) in a facility measured or calculated by an RFID RTLS system is subject to
occasional movement caused, for example, by the reflection of the radio signal transmitted by the tag.
Depending on the density of the RF obstructions in the environment, this movement, called jitter, may
become objectionable. A median filter is available in MWE to reduce or eliminate this jitter.
When enabled, the median filter reports the median X, Y, and Z values of the last Median Count tag
locations. Thus, if a location is received that is significantly different from previous locations, the median
filter will ignore that value and report the median value from history. The table below provides an example
of a median filter applied to the Y dimension; note how the occasional jitter is eliminated from the reported
value.
Comparison of Location Error, Unfiltered and Median
MotionWorks Enterprise 2.0
The following table shows filter examples with three different values of a median filter parameter named
Median Count.
Table 5 Median Count Variables
Tag Blink
1
Dependent on previous location.
2
Position change caused by location jitter.
1 (25, 93) ?
2 (25,93) (25, 93) ?
3 (25,93) (25, 93) (25, 93) ?
4 (25,93) (25, 93) (25, 93) ?
5 (20, 85)
Asset Location
(X,Y)
2
Reported
Location “Median
Count”=3
1
Reported
Location “Median
Count”=5
1
?
1
Location “Median
(25, 93) (25, 93) (25, 93)
47
Reported
Count”=7
1
?
1
?
1
1

MotionWorks Enterprise 2.0
Table 5 Median Count Variables
Tag Blink
Asset Location
6 (20, 85)
(X,Y)
2
Location “Median
7 (25, 93) (20, 85)
Reported
Count”=3
(20, 85)
2
2
Reported
Location “Median
Location “Median
Count”=5
(25, 93) (25, 93)
(25, 93) (25, 93)
Reported
Count”=7
8 (25, 93) (25, 93) (25, 93) (25, 93)
1
Dependent on previous location.
2
Position change caused by location jitter.
NOTE: Observe that wo successive occurrences of location jitter were successfully filtered by the Median
Count=5 and Median Count=7 filter settings, but not the Median Count=3 setting.
A potential drawback of filtering is that the reported tag location lags the actual tag location when the tag
(asset) is moving. The amount of latency is the number of extra tag blinks required at the new location
before the median filter outputs the updated position; it is dependent on the filtering parameter Median
Count chosen. For this median filter more than ½ of the Median Count samples must represent the actual
location. Therefore, the actual location of a moving tag will be reported integer (Median Count/2)+1
samples after movement has stopped. This latency is of no consequence when the assets are stationary;
however it is of concern when assets are repositioned. The median count for the (X, Y) values can be
specified independently from the Z value.
The level of filtering for different values of Median Count is shown in the following table.
Table 6 Filtering Levels for Median Count Values
Filter Value Median Count
Latency (Number of extra
blinks before accurate
report)
Number of Jitter Blinks
Ignored
3 1 1
5 2 2
7 3 3
9 4 4
To reduce the latency in tracking moving assets, a second filter is invoked when the asset is measured to
be moving. The moving filter value Move Count is specified to be less than the value of the stationary
parameter Median Count in order to provide faster response time.
48
MotionWorks Enterprise 2.0
Tag Blink 1
Report st abl e
media n posi t ion t o
RM
Wi t hi n
"mov e r adi us" of
prev medi an?
Y
N
Tag Bli nk 2
Wi t hi n
"mov e r adi us" of
prev medi an?
Tag Bli nk 3
St art
DA Locat i on f i l ter ing f l owcha rt :
2 st age -st abl e & mov ing
Y
Report st abl e
medi an posi t ion t o
RM
N
Wi t hi n
"mov e r adi us" of
prev medi an?
Where "mov e
count" (=3 in this
exampl e) i s #
consec uti ve
l ocat es out si de
"mov e r adi us"
req 'd to i nvok e
movi ng medi an
filter
Y
Report st abl e
medi an posi t ion t o
RM
N
Report mov ing medi an
(of "move count " most
rec ent l ocat ions)
position to RM
Report stabl e
medi an posi t ion t o
RM
Report stabl e
medi an posi t ion t o
RM
When tag is st able f or
more th an " med ian
count" blinks revert
back t o st able f i lt eri ng
Tag Bli nk N
Note: stabl e "median
count" filter value >=
"mov e c ount" medi an
f i lt er val ue
.
Report medi an of
"N" most r ecent
l ocat e posi t ions
Invoke moving
medi an f i lt er
The tag (asset) is declared to be moving if the average of the most recent Move Count consecutive blinks
is located at least Move Radius (ft) distance away from the current median. The moving filter is invoked for
a tag that moved to a new position, but not if only the jitter has increased. The tag location will be filtered
using value Move Median until Median Count values are found within Move Radius of the median. When
the moving filter is initially invoked, it is loaded with the most recent Move Count values from the history
table see below.
49

MotionWorks Enterprise 2.0
Table 7 Median and Move Type Definitions
Variable Description
Median Count The number of recent blinks used to compute the median for the X and Y
coordinates. This value must be an odd integer between 1 and 21.
Median Count Z The number of recent blinks used to compute the median for the Z coordinate. This
value must be an odd integer between 1 and 21.
Move Radius (ft) The minimum distance from the latest blink to the current median. This can be from
0 to 50,000 ft.
Move Count The number of consecutive blinks that must be outside the Move Radius. This can
be between 1 and 5.
Move Median The new median count to use once a move is detected. All but the last Move
Median history samples are thrown out when a move is detected. The samples
then accumulate until there are Median Count samples. The Move Median value
should be less than the Median Count and must be an odd integer between 1 and
21.
Enable Filters When set to Y, the median and move filters will be applied to the (X,Y,Z) from the
locate packet. When set to N, the raw (X,Y,Z) are used.
The recommended configuration of the median filter is dependent on the RF obstructions at site. Higher
levels of obstructions will produce more jitter and require heavier filtering. The recommended filtering
levels are provided below:
Table 8 Obstruction Classifications
Obstruction
Classification
Unobstructed
Minimally
Stable filter N Moving filter M Moving radius R
1
3
3, 5
1
N/A N/A N/A
1
3
20 ft (6.1 m) 2
Consecutive
blinks C
Obstructed
Significantly
5, 7
, 9
1
3, 5
1
45 ft (13.7 m) 2, 3
1
1
Obstructed
1
Optional value indicated for additional filtering if desired.
Every time the locate system computes the location of a tag it will arrive at a slightly different result. The
median filters described above do a good job at removed infrequent pops in the location. The tag location
will still vary slightly even if the actual asset is not moving at all.
50

Zone Lockdown Filter
In some applications it is known that once an asset enters a zone it does not move at all. For these special
cases, the reported (X,Y) location can be locked-down after an asset enters a zone. The zone lockdown
filter has the following configuration parameters:
Table 9 Zone Lockdown Types
Zone Lockdown Description
Zone Lockdown
Zone Lockdown Delay Count
A special case occurs for the On-Site zone. Zone Lockdown occurs for this zone.
MotionWorks Enterprise 2.0
When set to Y the zone lockdown filter is enabled.
The number of blinks to wait upon entering a zone before locking down
the (X,Y) location. All further blinks in this zone will have this same (X,Y)
until the asset exists the zone.
51

Rate Filter
The purpose of the Rate Filter is to decrease the blink rate processed by the MWE database, and
decrease the processing of redundant blinks.
The Rate Filter configuration parameters are explained in the following table. There are two types of rate
filters supported:
Table 10 TIme-based Rate Filter
Minimum Time
Threshold (sec)
MotionWorks Enterprise 2.0
• Time based rate filter, configured with the parameter Min Time Threshold.
• Distance based rate filter, configured with the parameter Report when move X feet and Max Time
Threshold (sec).
Time based rate filter
Parameter Possible Values Comments
Null, 0, or integer
larger than 0
This filter calculates the time elapsed between the incoming
blink and the most recent blink reported to the database for
each tag ID. If this time period is larger than the minimum value
specified in this parameter, the filter reports the blink to the
database. Otherwise the filter does not report the blink to the
database.
This filter is applied to both locate and no-locate (null x,y)
blinks.
If this parameter is set to Null or 0, no minimum time filtering is
applied.
52
MotionWorks Enterprise 2.0
Table 11 Distance-based Rate Filter
Distance-based rate filter
Parameter Possible Values Comments
Report when
move X feet
Maximum Time
Threshold (sec)
Null, 0, or integer
larger than 0
Null, 0, or integer
larger than 0
This filter calculates the distance between the incoming blink
and the previous blink received by the filter for each tag ID. If
this distance is larger than the minimum distance specified in
this parameter, the filter reports the blink to the database.
Otherwise the filter does not report the blink to the database.
If the incoming blink is a no-locate blink (null x,y), no distance
calculation is performed and the blink is not reported to the
database.
If the incoming blink is a locate blink (non-null x,y), the distance
is calculated using this blink and the previous locate blink
received by the filter.
If this parameter is set to Null or 0, no minimum distance
filtering is applied.
This parameter can be used to work in conjunction with the
Report when move X feet parameter.
If the filter has not reported any blinks for a given tag ID in a
period of time equal to the value specified in this parameter,
the filter reports the next blink from this tag ID even if the tag
has not moved a distance larger than the distance specified in
Report when move X feet. This allows the filter to periodically
report blinks to the database for tags that are blinking but are
not moving.
This filter reports the first blink received after Max Time
Threshold has been exceeded to the database regardless of
whether the blink is a locate or no-locate (null x,y) blink.
If this parameter is set to Null or 0, it will be disabled. That is, a
tag that is blinking but not moving is never reported to the
database.
NOTE: Rate filters are not applied to low battery blinks, that is, blinks where the low battery bit in the tag
transmission is set to 1.
53

MotionWorks Enterprise 2.0
Viewing and Replaying Location History
The blink history (every blink) of a tag can be viewed in the Tag Blink History report, and the zone history
(zone changes) of a tag can be viewed in the Resource Event History report, setting the Event filter to
Zone Change.
Additionally, the Resource Event History, Tag Blink History, Tags and Resources reports in the MWE web
client allow replay of historical data on a map window, showing a trace of the historical path. Select from
one to ten tags in the report and click the button on the map tool bar to switch to the replay window. Click
the button on the playback window to go back to the regular map window. Users are then prompted to
select a date range when the replay window opens. The date and time range, and replay speed controls
are found on the lower right corner of the playback window.
54

MotionWorks Enterprise 2.0
The figure below displays the playback window with data replayed for two selected tags:
Between one and 10 tags or resources can be selected at a time to playback their data. Additionally, a
maximum of 2000 data points can be replayed at a time. Placing the mouse over the i icon on the top right
corner of the playback window displays the number of data points being replayed
.
55

Viewing Zones
Zones and Zones Groups are defined in the Infrastructure menu > Site Manager report >
Configure Zones tab in the MWE web client. Refer to the MWE Configuration Guide for details.
Zones defined for all sites and maps can be viewed in the Configuration Zone Settings report using
the MWE web client.
MotionWorks Enterprise 2.0
The report allows filtering on Site Name and Zone Group.
56

MotionWorks Enterprise 2.0
Zones and their names can be viewed on the map by clicking the Show/Hide Zones button on the map
toolbar.
The Show/Hide Zones button on the map toolbar is available in all reports that include the map window,
such as the Tags report and the Resources report.
57

Business Rules Alerts
A business rules engine is provided in MWE 2.0, based on the wso2 Siddhi engine. The engine allows
defining conditions based on the location and status of tags and resources such that the system can
trigger alerts and take various actions when the conditions are met. These alerts are referred to as
Business Rules Alerts or Resource Alerts. To create and manage such alerts, go to the Configuration >
Resource Alert Settings link:
The login page is displayed:
MotionWorks Enterprise 2.0
The default login is
Two templates are provided: Resource Alerts and Pickup/Dropoff:
NOTE: The business rules template in MWE 2.0 are customized versions of the generic templates
provided by the underlying Siddhi rules engine. Before users reach the page shown in the following figure,
the two extra dialog windows are shown. Click Create and From Template.
admin / admin.
58

Resource Alerts
Condition definition:
A resource or resource type enters/leaves a zone or set of zones, and/or resource parameters are
equal to or different from specified values, and the condition is met for a specified length of time.
MotionWorks Enterprise 2.0
System response when condition is met:
• Triggers an alert, which can be seen in Event History report in the MWE web client
• Triggers a Resource Alert event that can be used by MWE or other applications
• Automatically changes any resource custom parameters to specified values
• Sends email notification to a specified list of email addresses
• Generated events can be seen in the Event History report in the MWE web client.
To open the Resource Alert template, click Resource Alert Configuration.
Then click on Rule Template and MWEResourceAlertTemplate.
59

MotionWorks Enterprise 2.0
The Resource Alert template opens.
When using the above template to define a Resource Alert:
• Enter a name for the resource alert in the ‘Business rule name’ field.
• Due to technical reasons underlying the generic template used in MWE 2.0, enter the same rule name
in the Rulename field. This extra field is eliminated in the next MWE release.
• In this template, for each field to be evaluated, you first need to choose an operator: equal to (==) or
different from (!=)
60
MotionWorks Enterprise 2.0
• After the operator is chose, type in the value of the field to be used in the evaluation. There is no
dropdown list of possible values in this version of the template. Users must type in the desired value.
For example, to know the possible values for the Resource Type Value field, users must look at the
Type column in the Resource Type Settings report in the web client and choose one value to be
used.
• The value N/A in a field means do not evaluate/compare this field. This is equivalent to say accept all
values.
• A single value can be typed in every field. Lists of values are not allowed.
• For each of the custom property value fields, you can specify a value to be used in the evaluation, and
also a value to be applied when the alert is triggered
• Leave the default N/A value for Third-Party Kafka Broker and Third-Party Kafka Topic fields.
• The Emails field is the only field that accepts a list of items. Enter a comma separated list of email
addresses to notify when the alert is triggered.
NOTE: For the rules engine to send email notifications, the configuration file
etc/zebra/mwe/conf/camel/general.properties on the MWE Linux server needs to be updated with
appropriate information about the email server. Refer to details in the Configuring Email Notifications
section in the MWE 2.0 Configuration Guide.
• Click Save to save the resource alert definition without deploying it. Click Save and Deploy to save it
and enable it at the same time. Users are taken to a page displaying a list of defined resource alerts,
where users can edit, delete, deploy/cancel, and view deployment status for each alert.
• Click the orange + icon to add a new alert. Logout using the icon on the top right of the window.
• Resource Alerts that have been triggered can be viewed in the History > Event History report in
the MWE web client.
61

Pickup/Dropoff
Pickup Condition definition:
Two resources from specified resource types blink within a specified time and a within a specified
distance from each other and keep doing so for a specified length of time.
System response:
• The system considers the two resources to be paired and traveling together, and generates a
Pickup event that can be used by MWE or other applications. If the pairing happens in a specified
Dock Zone, a Received event is generated.
• Generated events can be seen in the Event History report in the MWE web client.
Dropoff Condition definition:
Two resources previously paired stop blinking together (that is, within the specified time and distance
defined in the Pickup condition) for a specified length of time.
System response:
• The two resources previously paired are now considered unpaired and moving independently. The
system generates a Dropoff event that can be used by MWE or other applications. If the unpairing
happens in a specified Dock Zone, a Shipped event is generated.
MotionWorks Enterprise 2.0
• Generated events can be seen in the Event History report in the MWE web client.
To open the Pickup/Dropoff template:
1. Click Pickup Dropoff Configuration.
2. Click on Rule Template and MWEPickupDropoffTemplate:
62

MotionWorks Enterprise 2.0
The Pickup Dropoff template opens:
63

MotionWorks Enterprise 2.0
Resource Parent-Child Grouping
In use cases where pallets are being located and tracked within a warehouse or manufacturing plant by
the MWE system, each pallet has a tag physically attached to it so that MWE can locate it. The tag can be
active or passive RFID tag. A user would then place several boxes on the pallet. The boxes may have tags
attached to them so that MWE can detect their presence independently, or they may just have optical bar
code labels and therefore MWE cannot detect them directly. However, while the boxes are on the pallet,
users might want the boxes to inherit the location of the pallet so MWE can report the location of the boxes
as the same as the location of the pallet.
For similar use cases, MWE offers the Resource Parent-Child Grouping functionality, where one
parent resource ID (the pallet ID) can be associated with multiple child resource ID’s (boxes ID’s) so that
each child resource will inherit the location of the parent resource.
To enable and configure this functionality, follow the steps below. For example, there are two different
cases, when the child resources do not have tags physically attached to them (only optical bar code or
similar labels) and when they do.
NOTE: If the child resources have tags, the tag type and location technology used for locating child
resources can be the same or different from the ones used for locating parent resources. It is not relevant
to the Resource Parent-Child functionality.
Child Resources with No Tags
In the Resource Type Settings report in the MWE web client, use data entry to create a resource type
that will be a parent resource type.
Create it as you would create a regular resource type; see Defining a Resource Type on page 40 for more
information. In the example here, this would be a resource type named Pallet.
In the same report, use data entry to create a resource type that will be a child resource type.
In the example, this would be a resource type named Box. In the data entry form you must select the
parent resource type in the Parent Type field. In the example, select Pallet.
64

MotionWorks Enterprise 2.0
In this example, you should already have in the Resource Type Settings report a resource type named
Pallet and a resource type named Box with Parent Type = Pallet, as shown in the following figure.
In the Resources report, add Pallet resource ID’s and Box resource ID’s as you would normally do. See
Associating a Tag ID with a Resource ID.
• Each pallet has a tag physically attached to it, enter the tag ID for each pallet ID. Each pallet may have
some label that identifies it, and you could use the content of such label as the pallet or resource ID.
Otherwise, use the tag ID also as the pallet ID, as in the following figure.
• Boxes in this example do not have RFID tags attached to them, but only an optical bar code label. You
can enter the optical bar code as the box’s resource ID and, optionally, also as its virtual tag ID.
65

MotionWorks Enterprise 2.0
Associate a Pallet ID with one or more Box ID’s. This is done using a Zebra mobile application that runs on
TC5x mobile device. The application allows you to scan the resource ID of the parent asset ( identifying
label attached to a pallet) and then scan the resource ID’s of one or more child assets (the optical barcode
on the boxes). The mobile application also allows scanning tag ID’s instead of resource ID’s. The following
figure shows a screenshot of the mobile application.
MWE then reports the location of each child resource ID to be the same as the location of the parent
resource ID associated in the mobile app.
Child Resources with Tags
When the child resources (boxes in the example provided) have tags physically attached to them so that
MWE can detect their presence, there are two options for associating a parent resource ID with one or
more child resource ID’s:
• Option One: Follow exactly the steps listed above for child resources without tags. The parent ID – child
ID’s association is done using a mobile app as explained above. After the association is done, MWE will
ignore the tag blinks from the children tags and have the child assets inherit the location of the parent
asset.
• Option Two: Follow the steps listed above for child resources without tags, but the parent ID – child ID’s
association is done automatically when a parent resource and one or more child resources stay in the
same zone (pre-configured as ‘resource association zone’) for a configurable length of time (resource
association time). After the association is done, MWE ignores the tag blinks from the children tags and
have the child assets inherit the location of the parent asset.
The following steps explain how to make a zone into a resource association zone and how to specify the
resource association time referred to above.
1. Use the Zone Builder tool to define one or more zones in MWE that are intended to be resource
association zones. Define them similarly to any normal zone. Refer to the MWE Configuration Guide for
additional details on Zone Builder.
2. Publish the zones when complete.
NOTE: A physical zone being used as a resource association zone should have location sensors with
sensitivity adjusted to hear only tags within the zone. Alternatively, a Faraday cage can be used to block
RFID transmissions going in or out of the room. The location sensors inside the association zone can be
configured to locate tags inside the association zone using a presence algorithm or any other location
algorithm.
66

MotionWorks Enterprise 2.0
Connect a Putty or Terminal window to the MWE Linux server and use the vi or similar command to edit
3.
the autofamily.properties configuration file located in the
/etc/zebra/mwe/conf/autofamily-svc/ directory.
The contents of this file are shown below.
# REPORTSVC SETTINGS
report-service-url=http://reportsvc:8081
resources-url=/report-service/v1/resources/
tags-url=/report-service/tags?objectId=
X-Consumer-Username=admin
X-Consumer-Groups=administrator
# KAFKA SETTINGS
app-id-faraday=faradayCage
app-id-parent-child=parentChildBlink
bootstrap-server=kafka
bootstrap-server-port=9092
window-time=5000
window-type=fixed
cache-max-bytes-buffering=1000000
max-poll-records=10000
commit-interval-ms=100
auto-offset-reset=latest
faraday-zone=NEW ZONE 11,NEW ZONE 12,NEW ZONE 13,NEW ZONE 4
input-topic-faraday=mwe.resource.locate
input-topic-parent-child=mwe.resource.locate
output-topic-parent-child=tagBlink
path-logs-faraday=/log/kafka-faraday-cage.log
filename-logs-parent-child=/log/kafka-parent-child.log
Ensure that only the following lines are modified:
•
faraday-zone: enter a comma separated list of the names of the zones that you would like to be
resource association zones, as in the default list shown above (NEW ZONE 11, …).
•
window-time: the default is 5000 ms = 5 seconds. When a location sensor inside the association zones
hears the first tag blink, MWE will open a 5 second time window and group all tag blinks detected in the
association zone during that time. There should be only one parent ID tag heard in that time window,
and there can be one or multiple child ID tags. MWE will automatically associate the parent ID and all
child ID’s detected during the time window. Note that if more than one parent ID is detected during the
5 second window, MWE will not perform any parent – child association. Once a 5 second window is
closed, another 5 second window will open when the next tag blink is detected inside the association
zone. Feel free to change the default value of 5000 ms as needed.
For the changes above to take effect, run the following commands in the Putty window:
# cd /root/mwe
# docker-compose up -d mwe-rescorrelationsvc
# docker-compose up -d mwe-autofamily-svc
At this point, MWE reports the location of each child resource ID to be the same as the location of the
parent resource ID associated in the association zone.
The Resource Grouping report in the MWE web client displays all of the parent-child associations (or
groupings) that are currently active.
67

Releasing Child Resources
To release the child resources from inheriting the parent resource location, complete one of the following:
• Associate the child resources with a different parent resource, using either the mobile application or a
resource association zone. In this case, the child resources stop inheriting the location of the previous
parent resource and will start inheriting the location of the new parent resource
• In the Resources report in the web client, select a parent resource, open the Update User Resource
data entry, and set OK to Delete Relations on Type Update? to Yes as shown in the following
figure. Then click Save. This releases all child resources that are associated with this parent resource.
MotionWorks Enterprise 2.0
• In the Resources report in the web client, select a child resource, open the Update User Resource
data entry, and set OK to Delete Relations on Type Update? to Yes as shown in the following
figure. Then click Save. This releases the specified child resource from the parent resource that it had
previously been associated with.
68

Dynamic Locate Fusion
Resource Parent-Child Grouping allows assets (child assets) that only have an optical barcode label
attached to inherit the location of another asset (the parent asset) having an active RFID tag attached to it
and being located and tracked by the MWE system. The association between parent and child assets is
done manually using a mobile application or automatically in a specially configured resource association
zone. Dissociating child and parent assets requires the usage of a mobile application or data entry form in
the web client.
Similar to Resource Parent-Child functionality, Dynamic Locate Fusion functionality allows a set of items to
inherit the location of another item that is being located and tracked by the MWE system, however, the
association and dissociation happens anywhere automatically when specified conditions are met. In this
case, the set of items inheriting the location must have some type of low-cost RFID tag attached to them,
such as a passive RFID tags or BLE beacons.
For example, a forklift at a manufacturing plant is constantly moving pallets loaded with boxes around the
site. The forklift is fitted with an active RFID tag, such as a WhereNet tag or a Dart tag, that allows MWE to
locate the forklift anywhere within the site using WhereLAN or Dart sensors installed across the site. The
manager at the plant would also like to be able to locate the boxes being moved around, but it is either too
expensive or impractical to attach a WhereNet tag or Dart tag to each box.
The Dynamic Fusion functionality offers a solution for this use case. Attach a low-cost tag such as a
passive RFID tag to each box and install a tag scanner such as a passive RFID reader on the forklift.
When the forklift gets close enough to a box or to a pallet loaded with boxes, the passive RFID reader will
scan all the tags on the boxes and wirelessly send this information to the MWE system. The MWE system
knows what RFID reader is sending the information and what forklift it is attached to, and therefore can
assign to the boxes the location of the forklift. If the RFID reader keeps detecting a tag (indicating proximity
to that tag), the MWE system will assign to that tag the same location as the forklift.
MotionWorks Enterprise 2.0
MWE must be configured properly so that Dynamic Fusion happens only with the intended forklifts and
RFID readers, and not randomly with any forklifts and readers. This configuration is done in the System
Builder configuration tool and is explained later in this section.
Dynamic Fusion involves the following pieces:
• A moving vehicle.
• A tag being tracked and located by MWE attached to the moving vehicle. This tag is called a locate
source in the System Builder tool.
• A tag scanner or device mounted on the moving vehicle. This is called a dynamic device in the System
Builder tool.
• Low-cost tags attached to the boxes (a tag type that can be scanned/detected by the scanner/device
mounted on the vehicle).
69

MotionWorks Enterprise 2.0
To configure Dynamic Fusion, add dynamic devices in System Builder. To add a dynamic device in
System Builder, follow the steps below:
1. Click on Dynamic Device Locates in the tree-view, then right-click in the middle pane and select Add
Dynamic Device Locate from the popup menu, as shown in the following figure.
The Dynamic Device Locate properties window displays:
2. In the Locate Source pane, select a Source Type.
This is the type of tag being attached to the moving vehicle and located by the MWE system. The
options are: Dart, (passive) RFID, WhereNet, BLE. In Source ID, enter the ID of the tag being attached
to the vehicle.
3. In the Dynamic Device pane, select a Device Type.
This is the type of scanner or device mounted on the vehicle. Options are: BLE Beacon, BLE Receiver,
RFID Reader. What you must select depends on the type of tags being affixed to the boxes. If the
boxes are being tagged with passive RFID tags, you must select Device Type=RFID Reader. If the
boxes are being tagged with BLE beacons, select Device Type = BLE Receiver. If the boxes are being
tagged with BLE Receivers, select Device Type=BLE Beacon.
70

MotionWorks Enterprise 2.0
Select the Device Number.
4.
This is an integer number assigned by System Builder to each device added in System Builder. For
example, if you have added 3 RFID readers in System Builder, they will have Device Numbers 1, 2, and
3 respectively. For any device added in System Builder, the device number is displayed near the top of
its properties window, as in the example below:
The Dynamic Device Locate properties window displays:
The options in the Update Type field depend on the Device Type selected. If you have selected Device
Type=RFID Reader, then Update Type allows you to select which particular antenna (1,2,3,4, or All)
port will be used.
5. Once you have made your selections, click OK.
6. Once you have configured your Dynamic Devices, perform a Publish operation in System Builder to
apply the configuration.
71
System Device Alerts
System alerts triggered by MWE fall into two categories:
• Device related alerts. These are alerts about the health and status of locating devices, including
sensors, readers, tags, and more. The available alerts are listed in the
Alert Set t i ngs
• MWE Server and Services. The status of the MWE server and MWE services can be viewed in the
Dashboard > Grafana – System Health page. One can also define thresholds to trigger alerts.
The table below gives meaning of various fields/columns in the System Alert Settings report.
Table 12 System Alert Types
MotionWorks Enterprise 2.0
Configuration > System
report lists all the system alerts that the MWE software can generate.
Field/
Column
Alert The name of the alert condition.
Time
Updated
Type This column will show System for alert conditions defined by the MWE module, and
Category Provides a way to filter the alert conditions based on more specific criteria. For example,
Severity High indicates a condition that will severely affect system operation and performance and
Enabled Yes indicates the alert is enabled, so that it will be set to Open when the system detects
Auto Close Y indicates that the Status of an alert will be automatically changed by the system from
Subject This is the content of the subject line of email notification messages sent out when an alert
Message This is a brief description of the error condition.
Action Explains the necessary steps to correct the error condition. To see the full text of the
Recipients List of email addresses to be notified when the alert is triggered.
This is time the alert condition occurred or was resolved.
‘Application’ for alert conditions defined by applications installed on top of MWE.
the value will be Infrastructure for alerts related to Location Sensors and other
infrastructure devices, Tag for alerts related to tags, Software for alerts affecting the MWE
software, and so on.
needs immediate attention.
Medium refers to a condition that will affect system performance and should be addressed
soon.
Low indicates a condition that should be corrected, but it will not affect overall system
operation and performance, and does not require immediate attention.
this condition, and an alert notification will be displayed or sent.
No indicates the alert is disabled; even if the system internally detects this condition, the
Status field will not be set to
Open and no alert notification will be displayed or sent.Note that several alerts are
installed disabled (Enabled=No). This is by design.
A regular user will not be able to enable or disable a system alert. This currently can be
done only by Zebra Product Support engineers.
Open to Close when the alert condition does not exist anymore.
N indicates that the alert condition can be closed manually only.
condition is raised.
Corrective Action, select (left-click on) a line, right-click and select View Detailed
Information from the popup menu.
Description
72

MotionWorks Enterprise 2.0
To view the system alerts that are currently open, you can do one of the following:
Contacts
• Open the
• Open the Alerts
To view a history of system alerts, including when and what system alerts were open and closed, see the
History
You can configure each system alert to be automatically emailed to a specified list of contacts whenever
the alert is open or closed. First, enter contact information.
To add a contact:
1. Open the Configuration > Contacts report.
2. Click the + Add tool button.
3. Select + Add Contact.
Dashboard page in the web client
> Open System Alerts report
> System Alert History report.
4. Enter the contact information and click OK to save the information. Mandatory fields are indicated by an
asterisk.
5. To modify or delete a contact, select the contact in the report and then click the Edit or Delete buttons
on the report’s toolbar.
73

Alert Notification
Each system alert can be configured to be automatically emailed to a specified list of contacts whenever
the alert is open or closed.
To configure alert notifications:
1. Open the Configuration > System Alert Settings report
2. Select an alert in the report (click square checkbox in first column), and then select Update > Update
Email Notification
MotionWorks Enterprise 2.0
NOTE: Currently only one alert can be selected and configured at a time.
3. The Update Email Notification data entry form opens:
4. Clicking on Add/Update Recipients opens the Select Site Recipients window:
74

MotionWorks Enterprise 2.0
If the MWE deployment includes more than one site, select the site that the alert is being configured for. If
you would like the alert to be sent periodically while the alert is open, set Recurring = Yes and specify a
notification or Repeat Interval (in hours). Select the contacts that will receive email notification and click
Save.
For emails to go out you need to provide information on the email server. For additional information, refer
to the MWE Configuration Guide.
75

MWE Health
The health and status of the MWE server and services can be monitored in the Dashboard > Grafana –
System Health page.
The login page is shown below.
MotionWorks Enterprise 2.0
The default login is mwe-monitor / monitor!
The home dashboard page opens:
76

MotionWorks Enterprise 2.0
In Grafana, users can configure the dashboard. MWE includes some pre-built dashboards. To access
them click on the Home dropdown list on the top left of the screen:
In the example above, the pre-built dashboards are:
• MWE Services
• MWE Monitor Services
• MWE Host Server
Depending on the MWE version, a different set of pre-built dashboards could display.
77

MotionWorks Enterprise 2.0
The following figure shows the MWE Services dashboard:
78

Device Manager
Locating devices such and sensors and readers can be added to MWE using the System Builder tool or
using the Device Manager report in the MWE web client. Refer to the MWE Configuration Guide for details
on adding devices via System Builder.
In Device Manager, directly add configure, and manage devices in a MWE deployment. Only passive RFID
readers (FX7500, FX9600, ATR) can be added via this report in MWE 2.0. The RFID readers must have
firmware version 3.9.16 or higher. Support for other device types will be added in future MWE releases.
MotionWorks Enterprise 2.0
RFID readers deployed via the Devices page send data directly to the MWE server. They do not send
data to a ZLA appliance and therefore a ZLA is not required, and their operation can be configured by
selecting one of 4 pre-defined operation modes. Nevertheless, you can still deploy RFID readers via the
System Builder tool to send data to a ZLA using the more configurable LLRP protocol, as explained in the
MWE Configuration Guide.
For more details on Device Manager, please see the MWE Device Manager User Guide.
Additional MWE documentation includes:
• MWE Installation Guide
• MWE Configuration Guide
• MWE REST API
• MWE Camel Interface
• MWE Device Manager
79

www.zebra.com
 Loading...