


MPACT
Bluetooth Smart Beacon
Hardware Installation
Guide
‘MN-002606-05EN

ZEBRA and the stylized Zebra head are trademarks of Zebra Technologies Corporation, registered in
many jurisdictions worldwide. All other trademarks are the property of their respective owners.
© 2022 Zebra Technologies Corporation and/or its affiliates. All rights reserved.
Information in this document is subject to change without notice. The software described in this document
is furnished under a license agreement or nondisclosure agreement. The software may be used or copied
only in accordance with the terms of those agreements.
For further information regarding legal and proprietary statements, please go to:
SOFTWARE:http://www.zebra.com/linkoslegal
COPYRIGHTS:http://www.zebra.com/copyright
WARRANTY:http://www.zebra.com/warranty
END USER LICENSE AGREEMENT: http://www.zebra.com/eula
Terms of Use
Proprietary Statement
This manual contains proprietary information of Zebra Technologies Corporation and its subsidiaries
(“Zebra Technologies”). It is intended solely for the information and use of parties operating and
maintaining the equipment described herein. Such proprietary information may not be used, reproduced,
or disclosed to any other parties for any other purpose without the express, written permission of Zebra
Technologies.
Product Improvements
Continuous improvement of products is a policy of Zebra Technologies. All specifications and designs are
subject to change without notice.
Liability Disclaimer
Zebra Technologies takes steps to ensure that its published Engineering specifications and manuals are
correct; however, errors do occur. Zebra Technologies reserves the right to correct any such errors and
disclaims liability resulting therefrom.
Limitation of Liability
In no event shall Zebra Technologies or anyone else involved in the creation, production, or delivery of the
accompanying product (including hardware and software) be liable for any damages whatsoever
(including, without limitation, consequential damages including loss of business profits, business
interruption, or loss of business information) arising out of the use of, the results of use of, or inability to
use such product, even if Zebra Technologies has been advised of the possibility of such damages. Some
jurisdictions do not allow the exclusion or limitation of incidental or consequential damages, so the above
limitation or exclusion may not apply to you.
Apple iBeacon
Use of the Works with Apple iBeacon badge means that a product has been designed and certified by the
manufacturer to meet Apple performance standards. Apple is not responsible for the operation of this
device or its compliance with safety and regulatory standards. Please note that the use of this product with
iPod, iPhone, or iPad may affect wireless performance.
i

Zebra Technologies Corporation ("Zebra") End-User Software
License Agreement
BY INSTALLING AND/OR USING THIS PRODUCT, YOU ACKNOWLEDGE THAT YOU HAVE
READ THIS AGREEMENT, UNDERSTAND IT AND AGREE TO BE BOUND ITS TERMS. IF YOU
DO NOT AGREE TO THE TERMS OF THIS AGREEMENT, ZEBRA IS NOT WILLING TO
LICENSE THE PRODUCT TO YOU, AND YOU MUST NOT INSTALL OR USE THIS PRODUCT.
Definitions
Grant of License
Zebra Technologies Corporation ("Zebra") grants you ("Licensee" or "you") a personal,
nonexclusive, nontransferable, revocable, nonassignable, limited license to use the software and
documentation ("Product(s)") subject to the terms and conditions of this Agreement. You shall use
the Products only for your internal business purposes, exclusively to support Zebra devices. Any
use of the Products outside of the conditions set forth herein is strictly prohibited and will be deemed
a breach of this Agreement resulting in immediate termination of your License. In the event of a
breach of this Agreement, Zebra will be entitled to all available remedies at law or in equity
(including immediate termination of the license without notice, immediate injunctive relief and
repossession of all Products unless Licensee is a Federal agency of the United States
Government).
You shall not distribute, sublicense, rent, loan, lease, export, re-export, resell, ship or divert or
cause to be exported, re-exported, resold, shipped or diverted, directly or indirectly, the Products
under this Agreement. You shall not, and shall not permit others to: (i) modify, translate, decompile,
bootleg, reverse engineer, disassemble, or extract the inner workings of the Products, (ii) copy the
look-and-feel or functionality of the Products; (iii) remove any proprietary notices, marks, labels, or
logos from the Products; (iv) rent or transfer all or some of the Products to any other party without
Zebra's prior written consent; or (v) utilize any computer software or hardware which is designed to
defeat any copy protection device, should the Products be equipped with such a protection device.
Title to all copies of Products will not pass to Licensee at any time and remains vested exclusively
in Zebra. All intellectual property developed, originated, or prepared by Zebra in connection with the
Products remain vested exclusively in Zebra, and this Agreement does not grant to Licensee any
intellectual property rights.
Portions of the Products are protected by United States patent and copyright laws, international
treaty provisions, and other applicable laws. Therefore, you must treat the Products like any other
copyrighted material (e.g., a book or musical recording) except that you may make one copy of the
Product solely for back-up purposes. Unauthorized duplication of the Products constitutes copyright
infringement, and in the United States is punishable in federal court by fine and imprisonment.
ii

Limited Warranty
Zebra warrants for a period of ninety (90) days from your receipt of the Products to you that the
Software, under normal use, will perform substantially in accordance with Zebra's published
specifications for that release level of the Software. The written materials are provided "AS IS" and
without warranty of any kind. Zebra's entire liability and your sole and exclusive remedy for any
breach of the foregoing limited warranty will be, at Zebra's option, the provision of a downloadable
patch or replacement code, or a refund of the unused portion of your bargained for contractual
benefit up to the amount paid for the Products.
Disclaimer
THIS LIMITED WARRANTY IS THE ONLY WARRANTY PROVIDED BY ZEBRA, AND ZEBRA
MAKES, AND YOU RECEIVE, NO OTHER WARRANTIES OF ANY KIND, WHETHER EXPRESS,
IMPLIED, STATUTORY, OR IN ANY COMMUNICATION WITH YOU. ZEBRA SPECIFICALLY
DISCLAIMS ANY WARRANTY INCLUDING THE IMPLIED WARRANTIES OF
MERCHANTABILTY, NONINFRINGEMENT, OR FITNESS FOR A PARTICULAR PURPOSE.
ZEBRA DOES NOT WARRANT THAT THE PRODUCTS WILL MEET YOUR REQUIREMENTS,
OR THAT THE OPERATION OF THE PRODUCTS WILL BE UNINTERRUPTED OR ERROR
FREE, OR THAT DEFECTS IN THE PRODUCTS WILL BE CORRECTED. ZEBRA MAKES NO
WARRANTY WITH RESPECT TO THE CORRECTNESS, ACCURACY, OR RELIABILITY OF THE
PRODUCTS. Some jurisdictions do not allow the exclusion of implied warranties, so the above
exclusion may not apply to you.
Limitation of Liability
THE TOTAL LIABILITY OF ZEBRA UNDER THIS AGREEMENT FOR DAMAGES SHALL NOT
EXCEED THE FAIR MARKET VALUE OF THE PRODUCTS LICENSED UNDER THIS
AGREEMENT. IN NO EVENT WILL ZEBRA BE LIABLE IN ANY WAY FOR INCIDENTAL,
CONSEQUENTIAL, INDIRECT, SPECIAL OR PUNITIVE DAMAGES OF ANY NATURE,
INCLUDING WITHOUT LIMITATION, LOST BUSINESS PROFITS, OR LIABILITY OR INJURY TO
THIRD PERSONS, WHETHER FORESEEABLE OR NOT, REGARDLESS OF WHETHER ZEBRA
HAS BEEN ADVISED OF THE POSSIBILITY OF SUCH DAMAGES. Some jurisdictions do not
permit limitations of liability for incidental or consequential damages, so the above exclusions may
not apply to you. This Limitation of Liability provision survives the termination of this Agreement and
applies notwithstanding any contrary provision in this Agreement. Licensee must bring any action
under this Agreement within one (1) year after the cause of action arises.
iii

Maintenance
Unless provided for in a separate agreement, Zebra shall not be responsible for maintenance or
field service of the Products.
High Risk Activities
The Products are not fault-tolerant and are not designed, manufactured or intended for use or
resale as on-line control software in hazardous environments requiring fail-safe performance, such
as in the operation of nuclear facilities, aircraft navigation or communication systems, air traffic
control, direct life support machines, or weapons systems, in which the failure of the Products could
lead directly to death, personal injury, or severe physical or environmental damage ("High Risk
Activities"). Zebra and its suppliers specifically disclaim any express or implied warranty of fitness
for High Risk Activities, and if you elect to use the Products in any High Risk Activities, you agree
to indemnify, defend, and hold Zebra harmless from and against any and all costs, damages, and
losses related to that use.
U.S. Government
If you are acquiring the Products on behalf of any unit or agency of the U.S. Government, the
following shall apply. Use, duplication, or disclosure of the Products is subject to the restrictions set
forth in subparagraphs (c) (1) and (2) of the Commercial Computer Software - Restricted Rights
clause at FAR 52.227-19 (JUNE 1987), if applicable, unless being provided to the Department of
Defense. If being provided to the Department of Defense, use, duplication, or disclosure of the
Products is subject to the restricted rights set forth in subparagraph (c) (1) (ii) of the Rights in
Technical Data and Computer Software clause at DFARS 252.227-7013 (OCT 1988), if applicable.
Products may or may not include a Restricted Rights notice, or other notice referring specifically to
the terms and conditions of this Agreement. The terms and conditions of this Agreement shall each
continue to apply, but only to the extent that such terms and conditions are not inconsistent with the
rights provided to you under the aforementioned provisions of the FAR and DFARS, as applicable
to the particular procuring agency and procurement transaction.
Assignment
Except as otherwise provided in this section, neither party may assign this Agreement, or any of its
rights or obligations under this Agreement, without the prior written approval of the other party,
which will not be unreasonably withheld. Any attempted assignment, delegation, or transfer without
the necessary approval will be void. Notwithstanding the foregoing, for any Zebra acquisition,
merger, consolidation, reorganization, or similar transaction, or any spin-off, divestiture, or other
separation of a Zebra business, Zebra may, without the prior written consent of the other party: (i)
assign its rights and obligations under this Agreement, in whole or in part, or (ii) split and assign its
rights and obligations under this Agreement so as to retain the benefits of this Agreement for both
Zebra and the assignee entity(ies) (and their respective Affiliates) following the split.
iv

Governing Law
This Agreement shall be governed by the laws of the United States of America to the extent that
they apply and otherwise by the laws of the State of New York without regard to its conflict of laws
provisions or by the internal substantive laws of the country to which the Products is shipped if end-
user customer is a sovereign governmental entity. The terms of the U.N. Convention on Contracts
for the International Sale of Goods do not apply. In the event that the Uniform Computer information
Transaction Act, any version of this Act, or a substantially similar law (collectively "UCITA")
becomes applicable to a Party's performance under this Agreement, UCITA does not govern any
aspect of this End User License Agreement or any license granted under this End-User License
Agreement, or any of the parties' rights or obligations under this End User License Agreement. The
governing law will be that in effect prior to the applicability of UCITA.
Compliance with Laws
Licensee will comply with all applicable laws and regulations, including export laws and regulations
of the United States. Licensee will not, without the prior authorization of Zebra and the appropriate
governmental authority of the United States, in any form export or re-export, sell or resell, ship or
reship, or divert, through direct or indirect means, any item or technical data or direct or indirect
products sold or otherwise furnished to any person within any territory for which the United States
Government or any of its agencies at the time of the action, requires an export license or other
governmental approval. Violation of this provision will be a material breach of this Agreement,
permitting immediate termination by Zebra.
Third-Party Software
The Products may contain one or more items of Third-Party Software. The terms of this Agreement
govern your use of any Third-Party Software UNLESS A SEPARATE THIRD-PARTY SOFTWARE
LICENSE IS INCLUDED, IN WHICH CASE YOUR USE OF THE THIRD-PARTY SOFTWARE
WILL THEN BE GOVERNED BY THE SEPARATE THIRD-PARTY LICENSE.
Open Source Software
The Products may contain one or more items of Open Source Software. Open Source Software is
software covered by a publicly available license governed solely under Copyright law, whereas the
complete terms and obligations of such license attach to a licensee solely through the act of
copying, using and/or distribution of the licensed software, such obligations often include one or
more of attribution obligations, distribution obligations, copyleft obligations, and intellectual property
encumbrances. The use of any Open Source Software is subject to the terms and conditions of this
Agreement as well as the terms and conditions of the corresponding license of each Open Source
Software package. If there is a conflict between the terms and conditions of this Agreement and the
v

terms and conditions of the Open Source Software license, the applicable Open Source Software
license will take precedence. Copies of the licenses for the included Open Source Software, if any,
as well as their attributions, acknowledgments, and software information details, are provided in the
electronic copy of this Agreement, which is available in the Legal Notices or README file
associated with the Product. Zebra is required to reproduce the software licenses,
acknowledgments and copyright notices as provided by the authors and owners, thus, all such
information is provided in its native language form, without modification or translation. Depending
on the license terms of the specific Open Source Software, source code may not be provided.
Please reference and review the entire Open Source Software information to identify which Open
Source Software packages have source code provided or available. For instructions on how to
obtain a copy of any source code made publicly available by Zebra related to Open Source
Software distributed by Zebra, you may send your request (including the Zebra Product name and
version, along with the Open Source Software specifics) in writing to: Zebra Technologies
Corporation, Open Source Software Director, Legal Department, 3 Overlook Point, Lincolnshire, IL
60069 USA.
vi

Contents
About This Document ....................................................................................................................... 1
Introduction ..................................................................................................................... 1
Icon Conventions ............................................................................................................ 2
Related Documents ......................................................................................................... 2
Service Information ......................................................................................................... 2
Feedback ........................................................................................................................ 2
Hardware Specifications and Installation ........................................................................................ 3
Lozier® Shelves .............................................................................................................. 3
MB1000 Beacon: MPACT-T1B20-000-WR ..................................................................... 3
MB1000 Beacon: MPACT-T1B10-000-WR ..................................................................... 4
Replacing MB1000 Battery ............................................................................... 6
MPACT-MB2000-01-WR, MPACT-MB1000-01-WR, MPACT-MB2001-01-WR,
MPACT-SB2000-01-WR, MPACT-SB2100-01-WR ........................................................ 8
USB Beacon: MPACT-MB3000-01-WR ........................................................................ 13
Beacon Part Numbers: MPACT-MB4000-01-WR and MPACT-MB4001-01-WR ......... 14
Mounting using Tape ....................................................................................... 15
Mounting using Screws ................................................................................... 15
Beacon: MPACT-MB1000-01-WR and MPACT-SB1100-01-WR ................................ 17
Mounting using Tape ....................................................................................... 19
Mounting using a Beacon Accessory .............................................................. 20
Fixed IoT Bridge (hub): MPACT-MB5000-01-WR, MPACT-SB5200-01-WR................. 22
Mobile IoT Bridge (badge): MPACT-MB6000-01-WR ................................................... 25
Usage .............................................................................................................. 29
Charging .......................................................................................................... 30
Disposing ........................................................................................................ 30
Cradle Charger: MPACT-MB6000-CHRGR ................................................................. 31
Cleaning the Badge Contacts ......................................................................... 34
Cleaning the Cradle Connectors .................................................................... 34
Troubleshooting ............................................................................................................ 35
1

About This Document
Introduction
MPact utilizes Bluetooth Smart beacons in various modes to unify Wi-Fi and Bluetooth Smart Technology
to capture analytics, accuracy and insight.
Beacon placements can be adjusted within a deployment floor plan, and depending on the mode selected,
their battery life can be tracked over time. Administrators can cursor over a beacon on a site’s floor plan to
assess the beacon’s remaining battery life. This guide covers a variety of indoor, outdoor and USB type
beacons, mounting options, and operational instructions for each beacon type.
This guide supports the following product families, parts, and regulatory models:
PRODUCT FAMILY PART NAME REGULATORY MODEL
MB 1000 MPACT-T1B10-000-WR ALTS-T1B
MB 1000 MPACT-T1B20-000-WR ALTS-T1B
MB 1000 MPACT-MB1000-01-WR MPACT-INDR2
MB 1000 MPACT-SB1100-01-WR MPACT-INDR3
MB 1000 MPACT-MB1000-01-ACC Lanyard mounting plate
MB 1000 MPACT-MB1001-01-ACC Wrist mounting plate
MB 2000 MPACT-MB2000-01-WR MPACT-INDR1
MB 2000 MPACT-MB2001-01-WR MPACT-INDR1
MB 2000 MPACT-MB2001-01-KIT MPACT-INDR1
MB 2000 MPACT-MB2001-01-ACC MPACT-INDR1
MB 2000 MPACT-SB2000-01-WR MPACT-INDR1
SB 2100 MPACT-SB2100-01-WR MPACT-INDR1
MB 2000 MPACT-MB2002-01-ACC RF enhancement plate
MB 3000 MPACT-MB3000-01-WR MPACT-USB1
MB 4000 MPACT-MB4000-01-WR MPACT-OUTR1
MB 4000 MPACT-MB4001-01-WR MPACT-OUTR1
MB 5000 MPACT-MB5000-01-WR MPACT-HUBFXD
SB 5200 MPACT-SB5200-01-WR MPACT-HUBFXD
MB 6000 MPACT-MB6000-01-WR MPACT-BRDGM
MB 6000 MPACT-MB6000-CHRGR MPACT-CRDLE
MB 6000 MB6000-01-ACC Replacement clip
MB 6000 MB6000CABLE-US Power cable
MB 6000 MB6000CABLE-EU Power cable
MB 6000 MB6000CABLE-UK Power cable
1

Icon Conventions
The following graphic icons are used throughout the documentation set; these icons and their associated
meanings are described below:
NOTE: The text here indicates information that is supplemental for the user to know and that is not
required to complete a task.
IMPORTANT: The text here indicates information that is important for the user to know.
Related Documents
• MPACT Hardware Installation Guide
• IOT Bridge CLI Document
• JSON Schema for Receiver Operations
• Wi-Fi Connectivity Settings
• Integration with Receivers
• Receiver Indicators, Actions, and Details
About This Document
• Hostname Support
• Beacon Toolbox User Guide
• Superbeacon Toolbox User Guide
These and other guides are available at: www.zebra.com/support
management.
Service Information
If you have a problem with your equipment, contact Zebra Global Customer Support for your region.
Contact information is available at www.zebra.com/support
When contacting support, please have the following information available:
• Serial number of the unit
• Model number or product name
• Software/firmware type or version number
Zebra responds to calls by email, telephone or fax within the time limits set forth in support agreements.
If your problem cannot be solved by Zebra Customer Support, you may need to return your equipment for
servicing and will be given specific directions. Zebra is not responsible for any damages incurred during
shipment if the approved shipping container is not used. Shipping the units improperly can possibly void
the warranty.
or contact Zebra’s product line
Feedback
If you purchased your Zebra business product from a Zebra business partner, contact that business
partner for support.
If you have comments, questions, or suggestions about this guide, send an email to
EVM-techdocs@zebra.com
.
2

Hardware Specifications and Installation
Bluetooth Low Energy beacons from Zebra can be used with Zebra Location Solutions (MotionWorks and
MPact) or other third-party solutions.
Lozier® Shelves
Beacon brackets for the MPACT-T1B20-000-WR and MPACT-T1B10-000-WR are used with the following
Lozier products:
• TL Shelf
• DL Shelf
• HL Shelf
• Standard Base Deck
MB1000 Beacon: MPACT-T1B20-000-WR
As a prerequisite, the following hardware items are required to mount the tie-wrap style beacon housing to
a pole or similar structure:
• Beacon (tie-wrap style housing) part number MPACT-T1B20-000-WR
• Plastic tie wraps for attaching each beacon housing to the shelf
Mounting and Installing
Tie-wrap beacon housings are designed to attach to vertical or horizontal poles or similar mounting
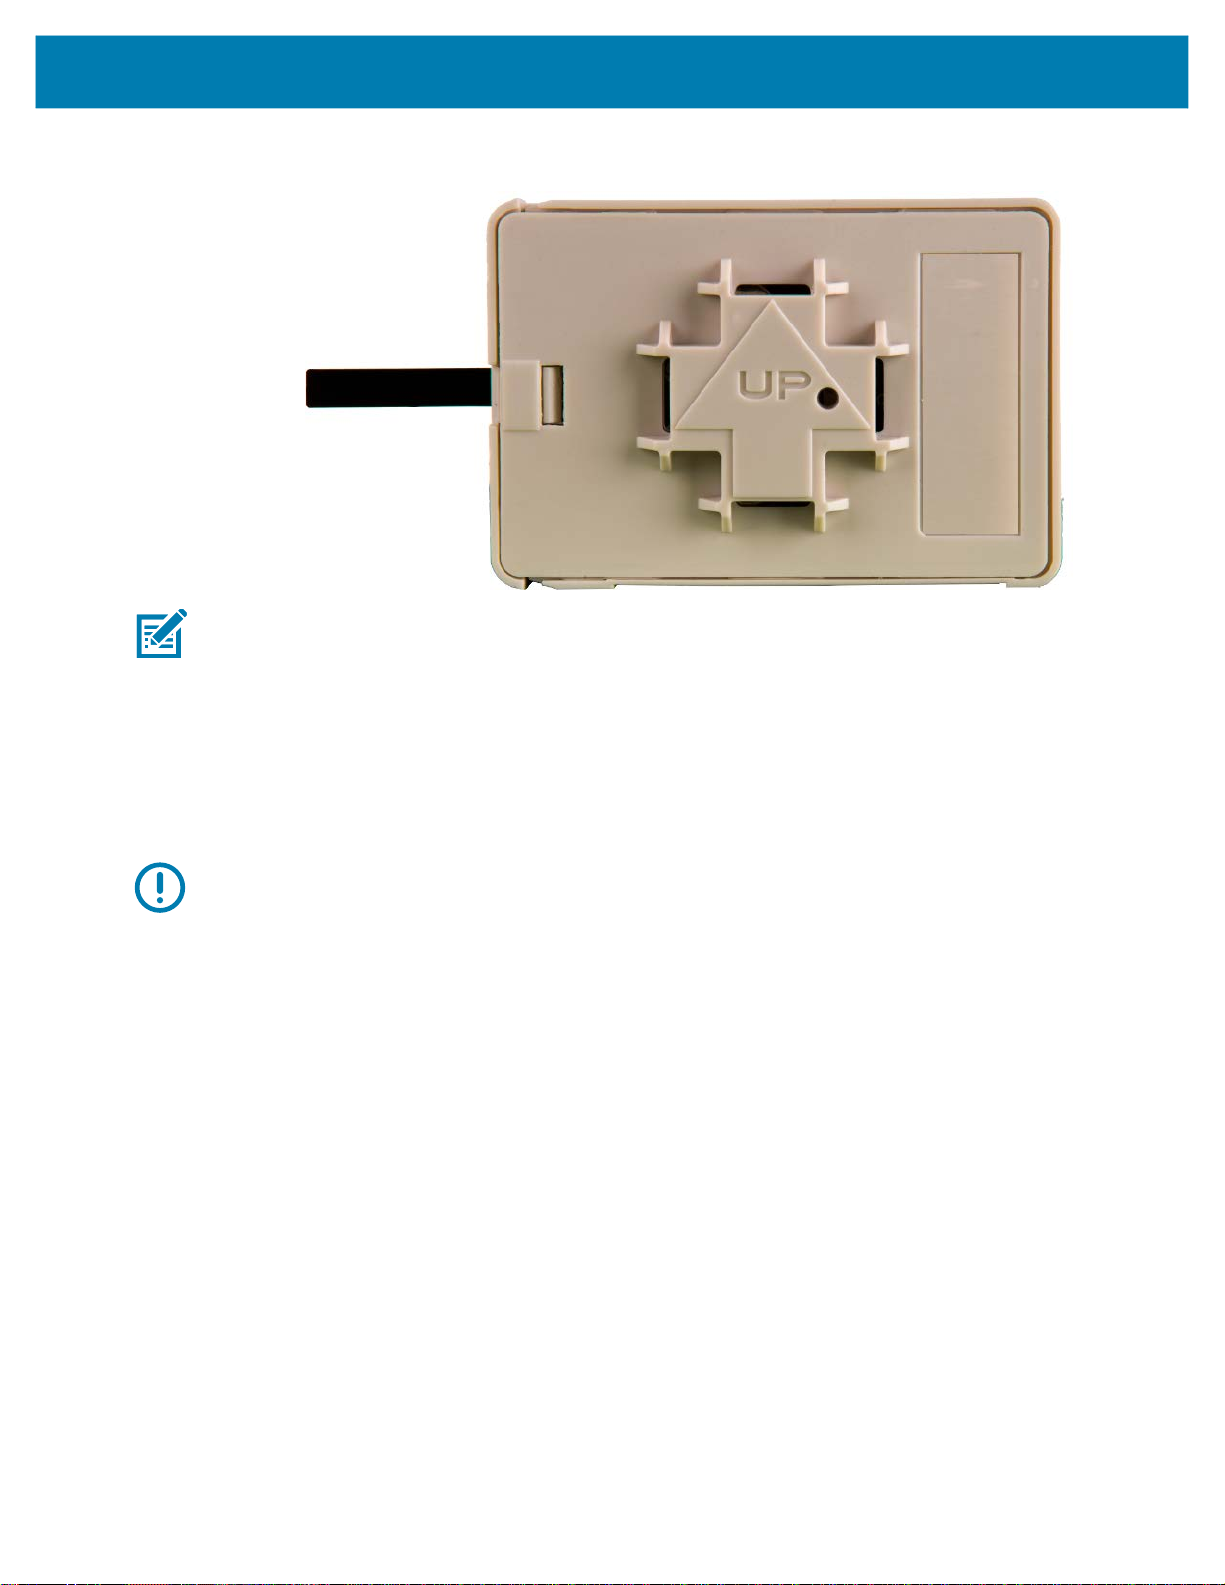
surfaces. As shown in Figure 1, there are openings on the back of the beacon housing allowing a tie wrap
through the openings and wrapped around a pole or similar structure.
Notice the up arrow located on the middle of the beacon housing, this arrow indicates the optimal
orientation for the beacon to function properly. Additionally, the smooth front of the beacon should face
outward toward the aisle.
Figure 1 shows a beacon with the mylar strip attached to the left-hand side of the housing.
3
Hardware Specifications and Installation
Figure 1 Tie Wrap Style Beacon
NOTE: When installing numerous beacons, group beacons by category and activate them prior to
scanning the barcodes and associating them with positions in the Toolbox.
From the MPact Toolbox, select a site floor plan and an unassigned position for the beacon. Refer to the
MPact Location & Analytics Deployment Guide for information on how to install and deploy the beacon
from the Toolbox.
Mount the beacon to a pole or similar structure using the plastic tie wrap. Tie can be placed vertically or
horizontally but the arrow should still point up.
To activate a beacon part number MPACT-T1B20-000-WR, pull the mylar strip off the beacon housing.
IMPORTANT: After pulling off the last mylar strip, you have 20 seconds to associate the beacon in either
off-line or on-line mode using the Toolbox application.
MB1000 Beacon: MPACT-T1B10-000-WR
As a prerequisite, the following hardware items are required to mount beacon brackets to a Lozier style
shelf:
• Lozier Shelves
• Beacon part number MPACT-T1B10-000-WR
• Bracket mount (one of either):
• MPACT Metal Lozier Bracket: MPACT-A1O10-004-WR
• MPACT Plastic Lozier Bracket: MPACT-A1O10-001-WR
• Phillips screwdriver
Mounting and Installing
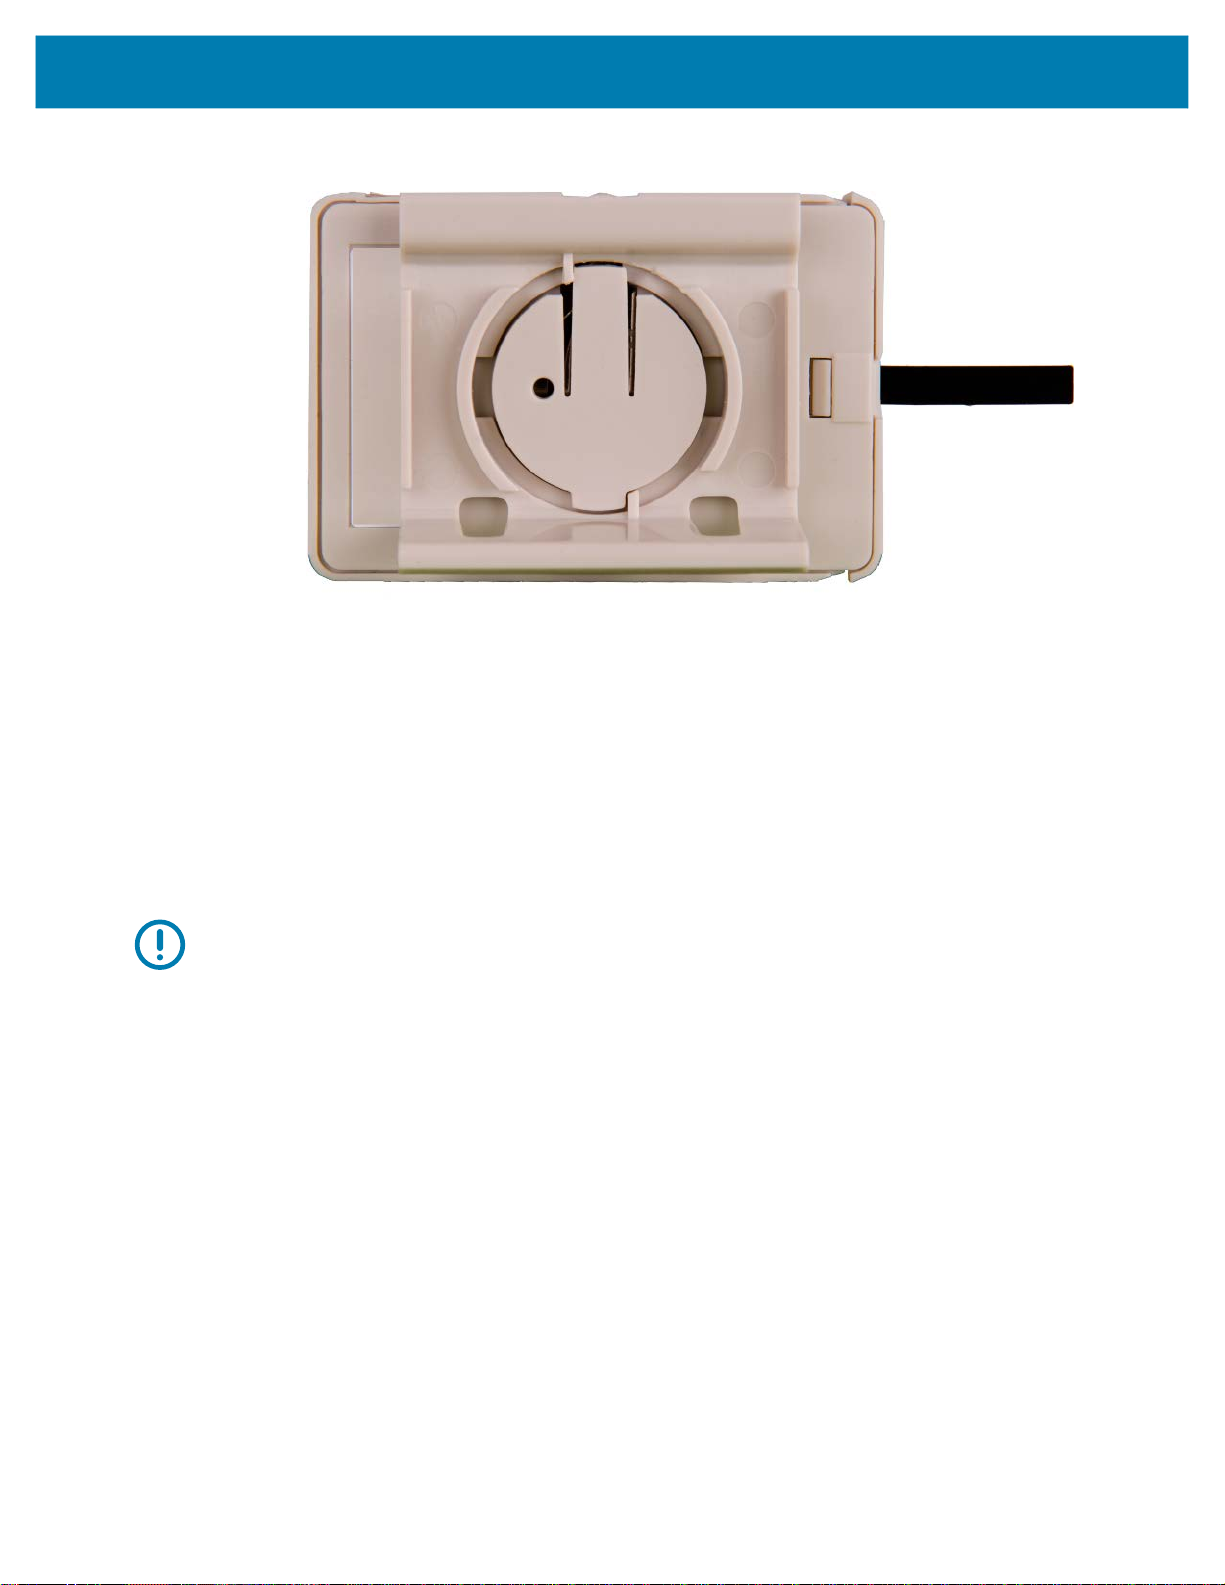
Figure 2 shows a universal style beacon. While there is no up arrow on this beacon’s housing, the beacon
should be oriented similar to the tie wrap style of beacon housing (see MB1000 Beacon:
MPACT-T1B20-000-WR on page 3).
4

Hardware Specifications and Installation
Notice the up arrow located on the middle of the beacon housing. This arrow indicates the optimal
orientation for the beacon to function properly. Additionally, the smooth front of the beacon should face
outward toward the aisle.
Figure 2 Universal Style Beacon
NOTE: When installing numerous beacons, group beacons by category and activate them prior to
scanning the barcodes and associating them with positions in the Toolbox.
From the MPact Toolbox, select a site floor plan and an unassigned position for the beacon. Refer to the
MPact Location & Analytics Deployment Guide for information on how to install and deploy the beacon
from the Toolbox.
There are two styles of bracket mounts:
• Universal Style Metal Bracket: MPACT-A1O10-004-WR
Figure 3 Universal Style Metal Bracket
• Universal Style Plastic Bracket: MPACT-A1O10-001-WR
5
Hardware Specifications and Installation
Figure 4 Universal Style Plastic Bracket
To mount the universal style beacon to Lozier shelves:
1. Place the universal beacon shelf-bracket on the shelf:
• Metal brackets: Fit in place and tighten onto the shelving unit using a Phillips screwdriver.
• Plastic brackets: Fit in place and snap onto the shelving unit.
2. Fit the beacon’s universal style housing into the bracket (mylar strip pointing up) and turn the beacon
housing clockwise 90 degrees.
The barcode label should face up toward the ceiling and the smooth front of the beacon should face out
toward the aisle.
Activate one or MPACT-T1B10-000-WR model beacons by pulling the mylar strip off the beacon housing.
IMPORTANT: After pulling off the last mylar strip, you have 20 seconds to associate the beacon in either
off-line or on-line mode using the Toolbox application.
Battery Replacement
When a the battery life is less than 20%, the beacon should be prioritized for immediate replacement.
This section includes procedures for replacing batteries for the following part numbers:
• MPACT-T1B20-000-WR
• MPACT-T1B10-000-WR
Replacing MB1000 Battery
The battery is located within a tray in the beacon housing.
1. Remove the beacon from the shelving unit.
2. With the bottom of the beacon facing up, gently lift each corner of the beacon’s battery tray.
Figure 5 shows the beacon battery housing for part number MPACT-T1B20-000-WR,
MPACT-T1B10-000-WR, and MPACT-T1B10-000-WR. In this example, the battery tray is on the right
and the corners of the battery tray are marked in red. When gently lifting each tray corner, slightly push
the each corner out to dislodge corners of the tray.
6
 Loading...