


ZE511/ZE521
Industrial Print Engine
Quick Reference Guide
P1126553-01EN

ZEBRA and the stylized Zebra head are trademarks of Zebra Technologies Corporation, registered in
many jurisdictions worldwide. All other trademarks are the property of their respective owners.
© 2021 Zebra Technologies Corporation and/or its affiliates. All rights reserved.
Information in this document is subject to change without notice. The software described in this document
is furnished under a license agreement or nondisclosure agreement. The software may be used or copied
only in accordance with the terms of those agreements.
For further information regarding legal and proprietary statements, please go to:
SOFTWARE:zebra.com/informationpolicy
COPYRIGHTS:zebra.com/copyright
WARRANTY:zebra.com/warranty
END USER LICENSE AGREEMENT: zebra.com/eula
Terms of Use
Proprietary Statement
This manual contains proprietary information of Zebra Technologies Corporation and its subsidiaries
(“Zebra Technologies”). It is intended solely for the information and use of parties operating and
maintaining the equipment described herein. Such proprietary information may not be used, reproduced,
or disclosed to any other parties for any other purpose without the express, written permission of Zebra
Technologies.
Product Improvements
Continuous improvement of products is a policy of Zebra Technologies. All specifications and designs are
subject to change without notice.
Liability Disclaimer
Zebra Technologies takes steps to ensure that its published Engineering specifications and manuals are
correct; however, errors do occur. Zebra Technologies reserves the right to correct any such errors and
disclaims liability resulting therefrom.
Limitation of Liability
In no event shall Zebra Technologies or anyone else involved in the creation, production, or delivery of the
accompanying product (including hardware and software) be liable for any damages whatsoever
(including, without limitation, consequential damages including loss of business profits, business
interruption, or loss of business information) arising out of the use of, the results of use of, or inability to
use such product, even if Zebra Technologies has been advised of the possibility of such damages. Some
jurisdictions do not allow the exclusion or limitation of incidental or consequential damages, so the above
limitation or exclusion may not apply to you.
Publication Date
November 4, 2021
2

Print Engine Orientation
The ZE511 and ZE521 print engines are available in a left-hand configuration (the print mechanism is on
the left) and a right-hand configuration (the print mechanism is on the right).
Left-hand (LH) print engine
ZE511/ZE521 Quick Reference Guide
1
2
3
1
Power switch location
2
Control panel
3
Media cover
Right-hand (RH) print engine
1
2
3
3

ZE511/ZE521 Quick Reference Guide
Print Engine Components
The following shows the components inside the media compartment of a right-hand (RH) print engine. A
left-hand (LH) unit contains a mirror image of these components. Familiarize yourself with these
components before continuing.
1
2
12
11
1
Ribbon take-up spindle
2
Ribbon supply spindle
3
Printhead-release latch
4
Printhead assembly (shown open)
5
Peel bar
6
Platen roller
910 7
8
6
7
Peel roller assembly (hidden when closed)
8
Peel roller latch
9
Media guide
10
Pinch roller assembly
11
Lower guide post
12
Upper guide post
3
4
5
4

Control Panel
All controls and indicators for the print engine are located on the control panel.
ZE511/ZE521 Quick Reference Guide
1 2 4
5
6
7
1
Power switch Toggles the print engine on/off.
2
Display Shows the print engine’s operating status and allows the user to navigate
3
8
the menu system.
3
NFC logo Used for the Print Touch feature.
4
USB host ports Allows you to connect USB devices such as memory sticks, keyboards, or
handheld scanners to the printer.
5
PAUSE button Starts or stops print engine operation when pressed.
6
FEED button Forces the print engine to feed one blank label each time the button is
pressed.
7
CANCEL button Cancels print jobs when the print engine is paused.
8
Indicator lights Communicate the printer’s status. For more information, see Indicator
Lights on page 20.
5

ZE511/ZE521 Quick Reference Guide
MEDIA SUPPLY
MEDIA BACKING
OPEN
SUPPLIES LOADING
PRESS
TO OPEN
WHEN OPEN
MEDIA BACKING
WHEN CLOSED
DETAIL VIEW
LABEL
www.zebra.com/ze511-info
Ribbon and Media Loading
Use the instructions in this section to load ribbon (if used) and media in a ZE511/ZE521 print engine.
NOTE: The majority of the graphics in this section show a right-hand (RH) unit with ribbon that is coated
with ink on the outside. Graphics for other options are included in some places for clarity.
Loading Ribbon
Do I need to use ribbon? The media itself determines if you need to use ribbon. Thermal Transfer media
requires ribbon while Direct Thermal media does not.
How can I tell if media is Direct Thermal or Thermal Transfer? The easiest way is to scratch the surface
of the media rapidly with your fingernail. If a black mark appears where you scratched, the media is Direct
Thermal, and you do not need to use ribbon.
What kind of ribbon can I use? Ribbon can be wound with the coated side on the inside or outside. This
print engine can use either type. Contact your authorized Zebra reseller for ordering information.
How can I tell which side of the ribbon is coated? Press a corner of the sticky side of a label to the outer
surface of the roll of ribbon, and then peel the label off of the ribbon. If ink particles adhere to the label, the
outer side of the roll is coated. Repeat this test with the inner surface if necessary to confirm the coated
surface.
Ink on the Outside Ink on the Inside
An alternate method is to unroll a short length of ribbon, place the outer surface against a piece of paper,
and scratch the inner surface of the ribbon with your fingernail. Lift the ribbon and check for marks on the
paper. If the ribbon left a mark, the outer side is coated.
6

ZE511/ZE521 Quick Reference Guide
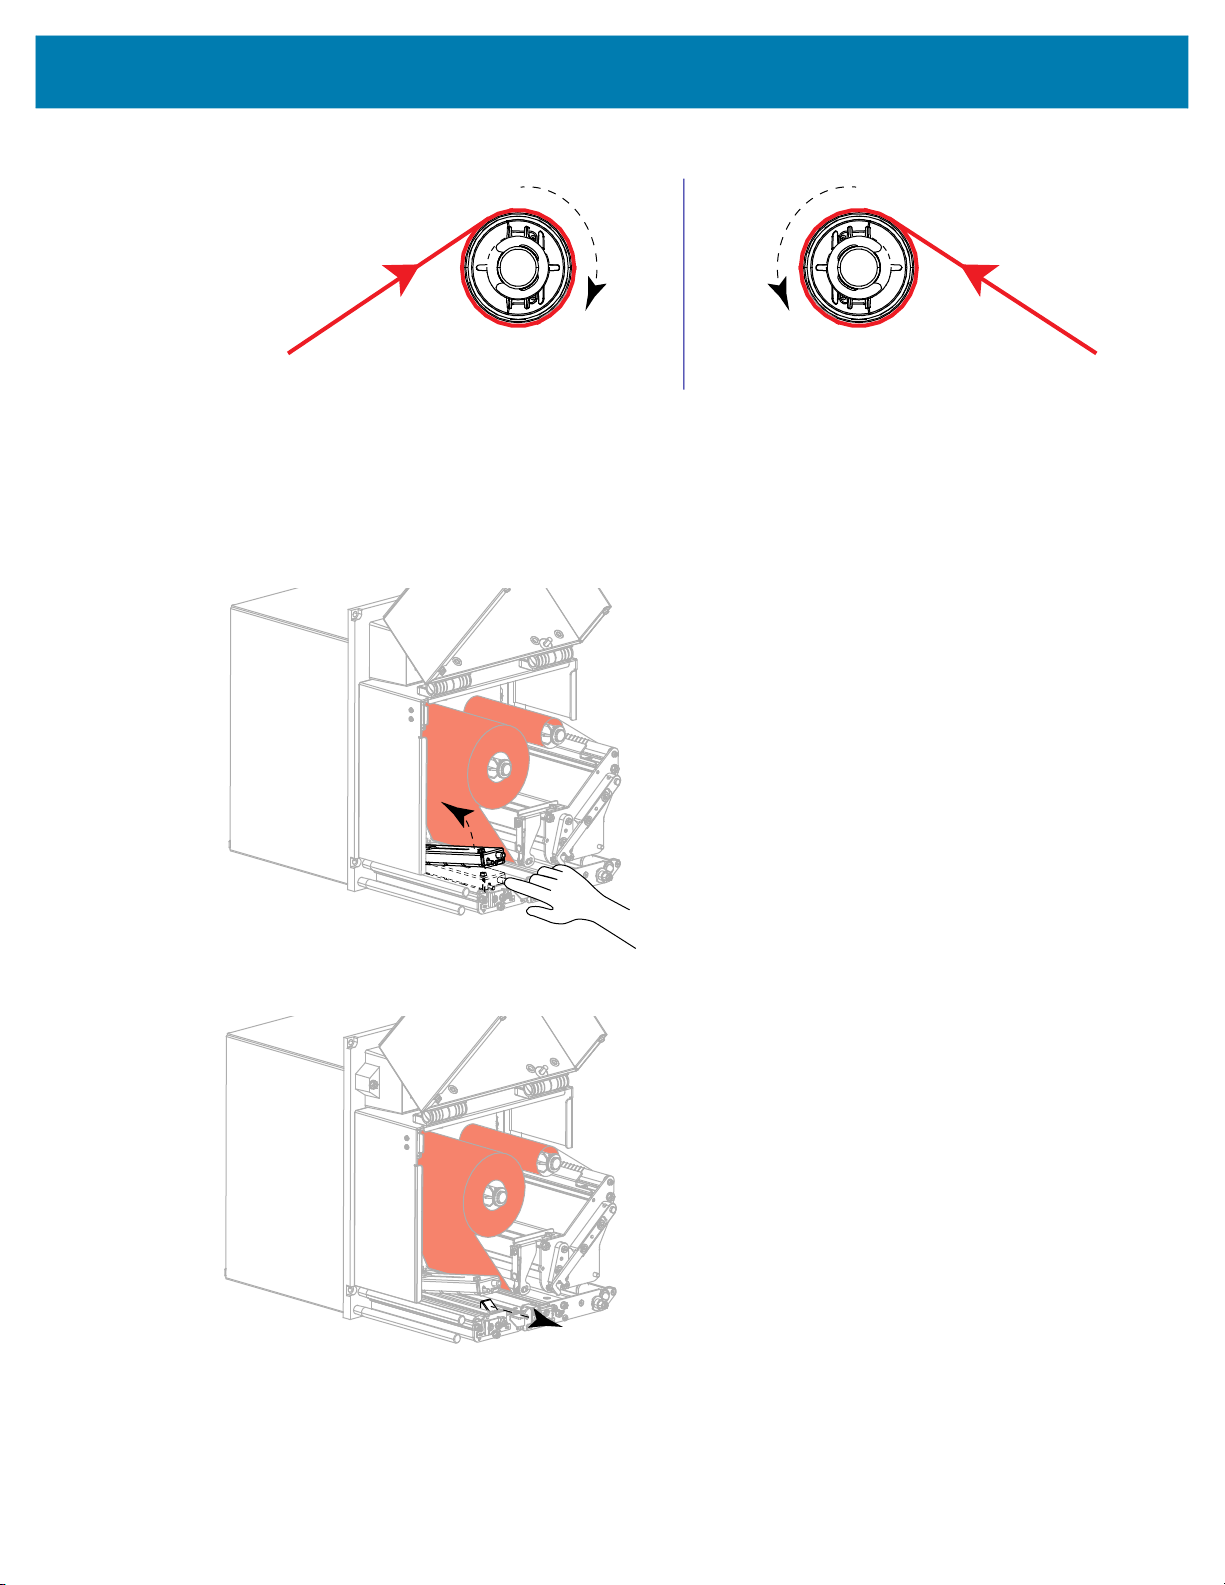
Determine which side of the ribbon is coated with ink, and then position the ribbon roll with the loose
1.
end unrolling in the direction shown.
LH (ink side out)
RH (ink side in)
2.
If necessary, update the ribbon ink side setting (touch Print > Print Quality > Ribbon Tension).
3.
Open the media cover.
RH (ink side out)
LH (ink side in)
4.
Release the printhead assembly.
7

ZE511/ZE521 Quick Reference Guide
Place the roll of ribbon on the ribbon supply spindle. Push the roll back as far as it will go.
5.
LH (ink side out) RH (ink side out)
LH (ink side in) RH (ink side in)
6.
Place an empty ribbon core on the ribbon take-up spindle. Push the core back as far as it will go.
8

ZE511/ZE521 Quick Reference Guide
CAUTION—HOT SURFACE: The printhead may be hot and could cause severe burns. Allow the
printhead to cool.
7.
Thread the ribbon under the lower ribbon guide roller (1), under the printhead assembly (2), and then
over the upper ribbon guide roller (3).
3
1
2
LH (ink side out)
3
1
RH (ink side out)
1
1
3
2
3
2
LH (ink side in) RH (ink side in)
9
2
Wind the ribbon around the core on the ribbon take-up spindle in the direction shown.
8.
Loading Media
1.
Load media on the media supply reel of the applicator (refer to the applicator’s documentation for more
information).
2.
Press the release button on the pinch roller assembly. Allow the assembly to pivot upward.
ZE511/ZE521 Quick Reference Guide
RHLH
3.
Slide the media guide all the way out.
10

ZE511/ZE521 Quick Reference Guide
Thread the media under the upper guide post (1), below the pinch roller assembly (2), and under the
4.
printhead assembly (3).
2
1
3
LH RH
5.
Extend approximately 30 in. (75 cm) of media past the peel bar. Remove and discard the labels from
2
1
the liner on this exposed media.
3
6.
Slide in the media guide until it just touches the edge of the media.
11

ZE511/ZE521 Quick Reference Guide
Press down on the pinch roller assembly until it locks closed.
7.
8.
Raise the peel roller latch so that the peel roller assembly pivots downward.
LH RH
9.
Thread the liner around the peel bar (1) and through the peel roller assembly (2).
IMPORTANT: If the applicator has an air tube, route the liner between the air tube and the peel bar. Do not
thread the liner over the air tube.
LH RH
121 2
12

ZE511/ZE521 Quick Reference Guide
Lock the printhead assembly.
10.
.
11.
Rotate the peel roller assembly up until it locks into the closed position.
LH RH
12.
Thread the liner around the take-up spindle of the applicator (refer to the applicator’s documentation for
more information).
13.
Close the media cover.
13

Removing Used Ribbon
Remove used ribbon from the ribbon take-up spindle each time you change the roll of ribbon.
1.
Has the ribbon run out?
• Yes—Continue with step 2.
• No—Cut or break the ribbon before the ribbon take-up spindle.
ZE511/ZE521 Quick Reference Guide
LH RH
2.
Slide the core with the used ribbon off of the ribbon take-up spindle.
LH RH
3.
Discard the used ribbon. Reuse the empty core from the ribbon supply spindle by moving it to the
ribbon take-up spindle.
14

Alert and Error States
If the background color of the Home screen changes, you may need to take an action to restore the printer
to a Ready status. Red and yellow backgrounds typically halt printing until the issue is resolved.
Informational messages with a green background usually disappear without user intervention, and printing
continues as normal.
Diagnostics and Troubleshooting
Touch the icons in the bar at the top of the Home screen to view the error, alert, or informational message.
See Alerts and Error Messages on page 16 for recommended actions.
15

Diagnostics and Troubleshooting
Alerts and Error Messages
Display/Indicator Lights Possible Causes Recommended Solutions
The printhead is not fully closed. Close the printhead completely.
Head Open
Printhead is open.
Close the printhead.
The printhead open sensor is not
working properly.
Call a service technician to replace the
sensor.
Media Out
Media is out.
Load additional media.
Paper Jam
Media jammed.
Check the media.
The media is not loaded or is loaded
incorrectly.
Load media correctly. See Ribbon and
Media Loading on page 6.
Misaligned media sensor. Check the position of the media
sensor.
The print engine is set for
noncontinuous media, but continuous
media is loaded.
1. Install the proper media type, or
reset print engine for the current
media type.
2. Calibrate the printer. On the control
panel, touch Print > Sensors >
Manual Calibration to initiate
calibration.
There is an issue with the media in the
media path.
1. Check for media that is loaded
incorrectly or stuck to components
in the media path.
2. Check if media is wrapped around
the platen roller. Carefully remove
any labels.
3. If necessary, clean the platen roller
to remove adhesive. See Cleaning
the Printhead and Rollers on
page 23.
16

Diagnostics and Troubleshooting
Display/Indicator Lights Possible Causes Recommended Solutions
1. Load ribbon correctly. See Ribbon
and Media Loading on page 6.
2. Calibrate the printer. On the control
panel, touch Print > Sensors >
Manual Calibration to initiate
calibration.
1. Touch Print > Sensors > Print:
Sensor Profile to print a sensor
profile image (which extends
across several actual labels or
tags).The ribbon out threshold (1)
is likely too high, above the line
that indicates where the ribbon is
detected (2).
Ribbon Out
Ribbon is out.
Replace the ribbon.
In thermal transfer mode:
• ribbon is not loaded
• ribbon is loaded incorrectly
• the ribbon sensor is not detecting
ribbon
• media is blocking the ribbon sensor
In thermal transfer mode, the print
engine did not detect the ribbon even
though it is loaded correctly.
2
1
If you are using direct thermal media,
the print engine is waiting for ribbon to
be loaded because it is incorrectly set
for thermal transfer mode.
2. Calibrate the printer or load print
engine defaults. On the control
panel, touch Print > Sensors >
Manual Calibration to initiate
calibration, or touch System >
Settings > Restore Defaults >
Restore Printer to load print engine
defaults
Set the print engine for Direct Thermal
mode. Touch Print > Print Quality >
Print Type > Direct Thermal.
17

Diagnostics and Troubleshooting
Display/Indicator Lights Possible Causes Recommended Solutions
Ribbon In
Ribbon was detected in
Direct Thermal mode.
Remove the ribbon.
Head Identification Failed
Printhead is not a Zebra
Certified Product
Replace the Printhead
Ribbon is loaded, but the print engine
is set for direct thermal mode.
The printhead was replaced with one
that is not a genuine Zebra printhead.
Ribbon is not required with direct
thermal media. If you are using direct
thermal media, remove the ribbon.
This error message will not affect
printing.
If the message persists with no ribbon
in the printer, calibrate the printer. On
the control panel, touch Print >
Sensors > Manual Calibration to
initiate calibration.
If you are using thermal transfer
media, which requires ribbon, set the
print engine for Thermal Transfer
mode. Touch Print > Print Quality >
Print Type > Thermal Transfer.
Install a genuine Zebra printhead.
Head Element Out
A printhead element failed.
The printhead may need to be replaced.
Replace Printhead
Replace the printhead.
Head Maintenance Needed
Clean the printhead.
A printhead element is no longer
working.
The printhead is nearing the end of its
If the location of the failed element
affects printing, replace the printhead.
Replace the printhead.
life and should be replaced.
The printhead needs to be cleaned. Clean the printhead. See Cleaning the
Printhead and Rollers on page 23.
18

Diagnostics and Troubleshooting
Display/Indicator Lights Possible Causes Recommended Solutions
CAUTION—HOT SURFACE: The printhead may be hot enough to
Head Over Temp
Printhead is too hot.
All printing is halted.
Head Under Temp
Printhead is too cold.
All printing is halted.
Head Thermistor Fault
Faulty thermistor detected.
Replace the printhead.
The printhead is over temperature. Allow the print engine to cool. Printing
The printhead data cable is not
properly connected.
The printhead has a faulty thermistor. Replace the printhead.
cause severe burns. Allow the printhead to cool.
automatically resumes when the
printhead elements cool to an
acceptable operating temperature.
If this error persists, consider
changing where the printer is located
or using a slower print speed.
CAUTION—HOT SURFACE: An improperly connected printhead data
or power cable can cause these error messages. The printhead may be
hot enough to cause severe burns. Allow the printhead to cool.
Make sure that the printhead is fully
seated. If necessary, call a service
technician to check the cable.
The print engine shows one of these
messages or cycles between them.
Head Under Temp
Printhead is too cold.
All printing is halted.
Out of Memory Storing XXX
XXX not stored.
Out of memory.
CAUTION—HOT SURFACE: An improperly connected printhead data
or power cable can cause this error message. The printhead may be hot
enough to cause severe burns. Allow the printhead to cool.
The printhead temperature is
approaching its lower operating limit.
Continue printing while the printhead
reaches the correct operating
temperature. If the error remains, the
environment may be too cold for
proper printing. Relocate the print
engine to a warmer area.
The printhead data cable is not
properly connected.
Make sure that the printhead is fully
seated. If necessary, call a service
technician to check the cable.
The printhead has a faulty thermistor. Replace the printhead.
There is not enough memory to
perform the function specified.
Free up some of the print engine’s
memory by adjusting the label format
or print engine parameters. One way
to free up memory is to adjust the print
width to the actual width of the label
instead of leaving the print width set to
the default.
Ensure that the data is not directed to
a device that is not installed or is
unavailable.
If the problem persists, call a service
technician.
19

Indicator Lights
The indicator lights communicate the printer’s status.
Diagnostics and Troubleshooting
STATUS light
PAUSE light
DATA light
SUPPLIES light
NETWORK light
Table 1 Status of Printer As Shown by Indicator Lights
• STATUS light steady green (other lights steady yellow for 2 seconds
during printer power-up)
The printer is ready.
• PAUSE light steady yellow.
The printer is paused.
• STATUS light steady red
• SUPPLIES light steady red
The media supply is out. The printer needs attention and cannot
continue without user intervention.
• STATUS light steady red
• SUPPLIES light flashing red
The ribbon supply is out. The printer needs attention and cannot
continue without user intervention.
20

Diagnostics and Troubleshooting
Table 1 Status of Printer As Shown by Indicator Lights (Continued)
• STATUS light steady yellow
• SUPPLIES light flashing yellow
The printer is in Direct Thermal mode, which does not require ribbon;
however, ribbon is installed in the printer.
• STATUS light steady red
• PAUSE light steady yellow
The printhead is open. The printer needs attention and cannot continue
without user intervention.
• STATUS light steady yellow
The printhead is over temperature.
CAUTION—HOT SURFACE: The printhead may be hot and could
cause severe burns. Allow the printhead to cool.
• STATUS light flashing yellow
One of the following:
• The printhead is under temperature.
• The power supply is over temperature.
• The main logic board (MLB) is over temperature.
• STATUS light steady red
• PAUSE light steady red
• DATA light steady red
The printhead was replaced with one that is not a genuine Zebra ™
printhead. Install a genuine Zebra ™ printhead to continue.
• STATUS light flashing red
The print engine is unable to read the dpi setting of the printhead.
Printers with a ZebraNet wired Ethernet option
• NETWORK light off
No Ethernet link is available.
• NETWORK light steady green
A 100 Base-T link was found.
• NETWORK light steady yellow
A 10 Base-T link was found.
• NETWORK light steady red
An Ethernet error condition exists. The printer is not connected to your
network.
21

Diagnostics and Troubleshooting
Table 1 Status of Printer As Shown by Indicator Lights (Continued)
Printers with a ZebraNet wireless option
• NETWORK light off
A radio was found during power-up. The printer is attempting to
associate with the network. The light flashes red while the printer
associates with the network. The light then flashes yellow while the
printer is authenticating with the network.
• NETWORK light steady green
The radio is associated with your network and authenticated, and the
WLAN signal is strong.
• NETWORK light flashing green
The radio is associated with your network and authenticated, but the
WLAN signal is weak.
• NETWORK light steady red
A WLAN error condition exists. The printer is not connected to your
network.
22

Diagnostics and Troubleshooting
Cleaning the Printhead and Rollers
Inconsistent print quality, such as voids in the barcode or graphics, may indicate a dirty printhead. Clean
the printhead and rollers at these intervals:
• Direct Thermal Mode: After every roll of media (or 500 feet of fanfold media).
• Thermal Transfer Mode: After every roll of ribbon.
CAUTION—ESD: Before touching the printhead assembly, discharge any built-up static electricity by
touching the metal printer frame or by using an anti-static wriststrap and mat.
1.
Turn Off (O) the print engine.
2.
Open the media cover.
3.
Remove the media and ribbon.
4.
Release the printhead assembly.
23

Diagnostics and Troubleshooting
Press the release button on the upper pinch roller assembly, and allow the assembly to pivot upward.
5.
CAUTION—HOT SURFACE: The printhead may be hot and could cause severe burns. Allow the
printhead to cool.
6.
Clean the printhead.
a.
Using the swab from the Preventive Maintenance Kit (p/n 47362 or p/n 105950-035 for a multipack),
wipe the print elements (gray strip) from end to end. In place of this kit, use a lint-free cloth dipped in
99.7% isopropyl alcohol.
b.
Allow the solvent to evaporate.
24

Diagnostics and Troubleshooting
Clean the rollers.
7.
a.
Use the swab or the lint-free cloth to clean the pinch roller (1), peel roller (2), and platen roller (3).
Rotate the rollers while cleaning them.
b.
Allow the solvent to evaporate.
1 2 3
NOTE: If print quality does not improve after you perform this procedure, clean the printhead with Zebra’s
Save-a-Printhead cleaning film. Call your authorized Zebra distributor for more information.
8.
Reload the ribbon and media (if used).
9.
Close the upper pinch roller assembly.
10.
Lock the printhead assembly.
.
25

Close the media cover.
11.
Diagnostics and Troubleshooting
26

zebra.com
 Loading...