

Zebra WT41N0 Integrator Manual
WT41N0
WEARABLE TERMINAL
INTEGRATOR GUIDE


WT41N0
INTERGRATOR GUIDE
72E-160600-04
Rev. A
December 2016

ii WT41N0 Integrator Guide
No part of this publication may be reproduced or used in any form, or by any electrical or mechanical means,
without permission in writing from Zebra. This includes electronic or mechanical means, such as photo copying,
recording, or information storage and retrieval systems. The material in this manual is subject to change
without notice.
The software is provided strictly on an “as is” basis. All software, including firmware, furnished to the user is on
a licensed basis. Zebra grants to the user a non-transferable and non-exclusive license to use each software
or firmware program delivered hereunder (licensed program) . Except as n oted below, such licen se may n ot be
assigned, sublicensed, or otherwise tran sfe rr e d by th e user without prior written consent of Zebra. No right to
copy a licensed program in whole or in part is granted, except as permitted under copyright law. The user shall
not modify , merge, or incorporate any for m or portion of a licensed program with other pro gram material, create
a derivative work from a licensed program , or us e a li censed program in a network without written permission
from Zebra. The user agrees to maintain Zebra’s copyright notice on the licensed programs delivered
hereunder , and to include the same on any au thorized copies it m akes, in whole or in part. The user agree s not
to decompile, disassemble, decode, or reverse engineer any licensed program delivered to the user or any
portion thereof.
Zebra reserves the right to make changes to any software or product to improve reliability, function, or design.
Zebra does not assume any product liability arising out of, or in connection with, the application or use of any
product, circuit, or application described herein.
No license is granted, either expressly or by implication, estoppel, or otherwise under any Zebra Technologies
Corporation, intellectual property rights. An implied license only exists for equipment, circuits, and su bsystems
contained in Zebra products.

Revision History
Changes to the original manual are listed below:
Change Date Description
-01 Rev. A 12/01/2012 Initial release.
-02 Rev. A 12/1 1/2014 Zebra rebranding
-02 Rev. B 03/2015 Zebra rebranding
-02 Rev. C 05/2016 Remove references to Device Configuration Package, which is not supported in CE 7.0.
-03 Rev. A 11/2016 Add support for RS5000.
-04 Rev. A 12/2016 Provide special instructions for RS5000.
iii

iv WT41N0 Integrator Guide

TABLE OF CONTENTS
Revision History.............................................................................................................................. iii
About This Guide
Introduction..................................................................................................................................... xi
Documentation Set ................................................................................................................... xi
Configurations................................................................................................................................. xii
Software Versions..................................................................................................................... xii
Chapter Descriptions ...................................................................................................................... xiii
Notational Conventions................................................................................................................... xiii
Related Documents and Software.................................................................................................. xiv
Service Information......................................................................................................................... xv
Chapter 1: Getting Started
Introduction .................................................................................................................................... 1-1
Unpacking the Wearable Terminal ................................................................................................. 1-1
Features ......................................................................................................................................... 1-1
Getting Started ............................................................................................................................... 1-3
Installing and Removing the Main Battery ..................................................................................... 1-3
Installing the Main Battery ........................................................................................................ 1-3
Charging the Battery ...................................................................................................................... 1-4
Charging the Main Battery and Backup Battery ....................................................................... 1-4
Charging Spare Batteries ......................................................................................................... 1-5
Removing the Main Battery ...................................................................................................... 1-5
Starting the Wearable Terminal ..................................................................................................... 1-6
WT41N0 Boot Up ..................................................................................................................... 1-6
Voice Only WT41N0 Boot Up .................................................................................................. 1-6
Checking Battery Status ................................................................................................................ 1-7
Configuring the Wearable Terminal ............................................................................................... 1-8
Resetting the Wearable Terminal .................................................................................................. 1-8
Performing a Warm Boot ......................................................................................................... 1-8
Performing a Cold Boot ............................................................................................................ 1-8
Battery Management ...................................................................................................................... 1-8
Battery Saving Tips .................................................................................................................. 1-8

vi WT41N0 Integrator Guide
Changing the Power Settings .................................................................................................. 1-9
Changing the Display Backlight Settings ................................................................................. 1-9
Changing the Keypad Backlight Settings ................................................................................. 1-9
Turning the WLAN Radios Off ................................................................................................. 1-10
Long Term Storage ........................................................................................................................ 1-10
Chapter 2: Accessories
Introduction .................................................................................................................................... 2-1
Single Slot USB Cradle .................................................................................................................. 2-3
Battery Charging Indicators ..................................................................................................... 2-4
Communication Setup .............................................................................................................. 2-5
Four Slot Ethernet Cradle .............................................................................................................. 2-6
CRD4000-4000ER Setup ......................................................................................................... 2-6
Daisychaining CRD4000-4000ER Cradles .............................................................................. 2-7
LED Indicators (CRD4000-4000ER) ........................................................................................ 2-8
CRD4001-4000ER Setup ......................................................................................................... 2-8
Daisy-chaining CRD4001-4000ER Cradles ............................................................................. 2-9
LED Indicators (CRD4001-4000ER) ........................................................................................ 2-10
Ethernet Cradle Drivers ........................................................................................................... 2-10
Charging and Communication ................................................................................................. 2-12
Battery Charging Indicators ..................................................................................................... 2-12
Four Slot Spare Battery Charger ................................................................................................... 2-13
Spare Battery Charging ........................................................................................................... 2-13
Battery Charging Indicators ..................................................................................................... 2-14
Wall Mount Bracket ........................................................................................................................ 2-15
Power Supply Installation ......................................................................................................... 2-16
Four Slot Ethernet Cradle Installation ...................................................................................... 2-17
Four Slot Battery Charger Installation ...................................................................................... 2-19
Wiring ....................................................................................................................................... 2-19
Placing a Battery in the Charger .............................................................................................. 2-21
Mounting Multiple Brackets ...................................................................................................... 2-21
Navigating the Wearable Terminal with an External Input Device ................................................. 2-23
USB Device .............................................................................................................................. 2-23
Connector Shroud .......................................................................................................................... 2-25
Assembly ................................................................................................................................. 2-25
Disconnecting the Cable from the Wearable Terminal ............................................................ 2-25
Chapter 3: Synchronization
Introduction .................................................................................................................................... 3-1
Installing the Sync Software ..................................................................................................... 3-1
WT41N0 Setup ........................................................................................................................ 3-1
Setting Up a Sync Connection ....................................................................................................... 3-2
ActiveSync (Windows XP) ....................................................................................................... 3-2
Windows Mobile Device Center (Windows 7) .......................................................................... 3-3
Setting up a Partnership .......................................................................................................... 3-4
Chapter 4: Voice Only WT41N0 Remote Control
Introduction .................................................................................................................................... 4-1

Table of Contents vii
MotoRC Software ..................................................................................................................... 4-1
Microsoft ActiveSync Remote Display Software ...................................................................... 4-1
Connection to Host Computer ........................................................................................................ 4-1
MotoRC Connection ................................................................................................................. 4-2
Microsoft ActiveSync Remote Display Connection .................................................................. 4-3
Chapter 5: Wireless Applications
Introduction .................................................................................................................................... 5-1
Signal Strength Icon ....................................................................................................................... 5-2
Turning the Radio On and Off ........................................................................................................ 5-3
On a WT41N0 with Touch Screen ........................................................................................... 5-3
On a WT41N0 with Non-touch Screen ..................................................................................... 5-3
Minimum Setup .............................................................................................................................. 5-4
Chapter 6: Bluetooth
Introduction .................................................................................................................................... 6-1
Adaptive Frequency Hopping ......................................................................................................... 6-1
Security .......................................................................................................................................... 6-2
Security Mode 3 (Link Level Encryption) ................................................................................. 6-2
Microsoft Bluetooth Stack .................................................................................................. 6-2
StoneStreet One Bluetooth Stack ...................................................................................... 6-2
FIPS 140-2 ............................................................................................................................... 6-3
Bluetooth Configuration ................................................................................................................. 6-3
Bluetooth Power States ................................................................................................................. 6-4
Cold Boot ................................................................................................................................. 6-4
Warm Boot ............................................................................................................................... 6-4
Suspend ................................................................................................................................... 6-4
Resume .................................................................................................................................... 6-4
MotoBTUI Application .................................................................................................................... 6-4
Device Information ................................................................................................................... 6-5
FIPS Configuration ................................................................................................................... 6-5
Device Status ........................................................................................................................... 6-6
Using the StoneStreet One Bluetooth Stack .................................................................................. 6-7
Turning the Bluetooth Radio Mode On and Off ........................................................................ 6-7
Disabling Bluetooth ............................................................................................................ 6-7
Enabling Bluetooth ............................................................................................................. 6-7
Using App Launcher ................................................................................................................ 6-8
Using Key Combination ........................................................................................................... 6-8
Using Screen Touch ................................................................................................................ 6-8
BTExplorer Non-touch Display Navigation ............................................................................... 6-8
Key Combinations .................................................................................................................... 6-8
Discovering Bluetooth Device(s) .............................................................................................. 6-9
Available Services .............................................................................................................. 6-12
File Transfer Services ........................................................................................................ 6-12
Connect to Internet Using Access Point ............................................................................. 6-15
OBEX Object Push Services .............................................................................................. 6-16
Headset Services ............................................................................................................... 6-17
Serial Port Services ............................................................................................................ 6-17
Personal Area Network Services ....................................................................................... 6-18

viii WT41N0 Integrator Guide
HID Services ...................................................................................................................... 6-18
Bonding with Discovered Device(s) ......................................................................................... 6-18
Connecting to a Favorite Service ............................................................................................. 6-21
Delete all Favorite Services ............................................................................................... 6-22
Delete a Favorite Service ................................................................................................... 6-22
Rename a Favorite Service ............................................................................................... 6-22
Change the Display View ................................................................................................... 6-23
View Active Connections ................................................................................................... 6-23
View Properties .................................................................................................................. 6-23
Bluetooth Settings .................................................................................................................... 6-23
Device Info Tab .................................................................................................................. 6-23
Services Tab ...................................................................................................................... 6-24
Security .............................................................................................................................. 6-27
Discovery Tab .................................................................................................................... 6-27
Virtual COM Port Tab ......................................................................................................... 6-28
HID Tab .............................................................................................................................. 6-28
Profiles ............................................................................................................................... 6-29
System Parameters ........................................................................................................... 6-29
Miscellaneous Tab ............................................................................................................. 6-29
Using the Microsoft Bluetooth Stack .............................................................................................. 6-30
Power Modes ........................................................................................................................... 6-30
Turning the Bluetooth Radio Mode On and Off ........................................................................ 6-30
Disabling Bluetooth ............................................................................................................ 6-30
Enabling Bluetooth ............................................................................................................. 6-30
Discovering Bluetooth Device(s) .............................................................................................. 6-31
Available Services .................................................................................................................... 6-32
Bluetooth Printing ............................................................................................................... 6-33
Headset Services ............................................................................................................... 6-34
Chapter 7: Application Development
Introduction .................................................................................................................................... 7-1
Software Installation on Development PC ..................................................................................... 7-1
Platform SDK ................................................................................... ........... .......... ................... 7-1
EMDK for C .............................................................................................................................. 7-2
Installing Other Development Software ................................................................................... 7-2
Software Updates .................................................................................................................... 7-2
Windows CE Flash Storage ........................................................................................................... 7-2
FFS Partitions .......................................................................................................................... 7-3
Working with FFS Partitions ..................................................................................................... 7-3
RegMerge.dll ............................................................................................................................ 7-3
CopyFiles ................................................................................................................................. 7-4
Non-FFS Partitions .................................................................................................................. 7-4
Downloading Partitions to the WT41N0 ................................................................................... 7-4
Bootloader ................................................................................................................................ 7-4
Partition Update vs. File Update ........................................................................................ 7-5
Upgrade Requirements ...................................................................................................... 7-5
Deployment .................................................................................................................................... 7-5
Copying Files from a Host Computer ....................................................................................... 7-5
ActiveSync ......................................................................................................................... 7-5
Mass Storage ..................................................................................................................... 7-7

Table of Contents ix
Updating Images ...................................................................................................................... 7-8
OSUpdate Loader .............................................................................................................. 7-8
Bootloader .......................................................................................................................... 7-9
Bootloader Error Detection ................................................................................................. 7-13
Mobility Services Platform ........................................................................................................ 7-15
Creating a Splash Screen .............................................................................................................. 7-15
Chapter 8: Special Considerations
Introduction .................................................................................................................................... 8-1
Touch Panel User Interface Considerations .................................................................................. 8-1
Tips for Improving Battery Life ....................................................................................................... 8-1
Display Backlight ...................................................................................................................... 8-1
Keypad Light ............................................................................................................................ 8-2
Power ....................................................................................................................................... 8-2
Wireless LAN ........................................................................................................................... 8-3
Voice Only WT41N0 LED Considerations ..................................................................................... 8-3
RS5000 Low Charge Considerations ............................................................................................. 8-3
Chapter 9: Maintenance & Troubleshooting
Introduction .................................................................................................................................... 9-1
Maintaining the Wearable Terminal ............................................................................................... 9-1
Wrist Mount Cleaning Instructions ........................................................................................... 9-2
Arm Sleeve Cleaning Instructions ............................................................................................ 9-2
Removing the Screen Protector ............................................................................................... 9-2
Battery Safety Guidelines .............................................................................................................. 9-3
Cleaning ......................................................................................................................................... 9-4
Materials Required ................................................................................................................... 9-4
Cleaning the Wearable Terminal ............................................................................................. 9-4
Housing .............................................................................................................................. 9-4
Display ............................................................................................................................... 9-4
Connectors ......................................................................................................................... 9-4
Cleaning the RS309, RS409, RS419, RS507 and RS5000 ..................................................... 9-5
Housing .............................................................................................................................. 9-5
Scanner Exit Window ......................................................................................................... 9-5
Connectors ......................................................................................................................... 9-5
Cleaning Cradle Connectors .................................................................................................... 9-5
Cleaning Frequency ................................................................................................................. 9-6
Troubleshooting ............................................................................................................................. 9-6
Wearable Terminal ................................................................................................................... 9-6
Four Slot Spare Battery Charger ............................................................................................. 9-10
Four Slot Ethernet Cradle ........................................................................................................ 9-10
Single Slot USB Cradle ............................................................................................................ 9-11
Appendix A: Technical Specifications
Technical Specifications ................................................................................................................ A-1
Wearable Terminal ................................................................................................................... A-1
RS309 Scanner ........................................................................................................................ A-3
RS409 Scanner ........................................................................................................................ A-4

x WT41N0 Integrator Guide
RS419 Scanner ........................................................................................................................ A-5
RS507 Scanner ........................................................................................................................ A-6
RS5000 Scanner ...................................................................................................................... A-8
Accessories .............................................................................................................................. A-9
Decode Zones ............................................................................................................................... A-13
RS309 ...................................................................................................................................... A-13
RS409 ...................................................................................................................................... A-16
RS419 ...................................................................................................................................... A-19
Appendix B: Software Setup
Bluetooth Configuration Setting ..................................................................................................... B-1
Glossary
Index

ABOUT THIS GUIDE
Introduction
This guide provides information about using the WT41 N0 family of mobile terminals and acce ssories. The WT41N0
has three versions:
•
Touch display
•
Non-touch display
•
Voice-only version without a display.
Throughout this guide Voice Only WT41N0 refers to the version without the display and WT41N0 refers to the
version with a display. Wearable terminal refers to all versions.
NOTE Screens and windows pictured in this guide are samples and can differ from actual screens.
Documentation Set
The documentation set for the WT41N0 is divided into guides that provide information for specific user needs.
•
WT41N0 Quick Start Guide - provides information for using the WT41N0 wearable terminal.
•
Voice Only WT41N0 Quick Start Guide - provides information for using the Voice Only WT41N0 wearable
terminal.
•
WT41N0 User Guide - describes how to operate the wearable terminal.
•
WT41N0 Integrator Guide - describes how to set up the wearable terminal and the accessories.
•
EMDK Help File - provides API information for writing applications.

xii WT41N0 Integrator Guide
ZEBRA WT41N0
Configurations
This guide covers the following configurations:
Configuration Radios Display Memory
WT41N0 WLAN:
Voice Only
WT41N0
802.11a/b/g/n
WPAN: Bluetooth
WLAN:
802.11a/b/g/n
WPAN: Bluetooth
2.8” QVGA
Color;
non-touch
2.8” QVGA
Color;
touch
None 2 GB Flash/
2 GB Flash/
512 MB RAM
2 GB Flash/
512 MB RAM
512 MB RAM
Data
Capture
Optional
accessory
Optional
accessory
Optional
accessory
Operating
System
Windows
CE 7.0
Professional
Windows
CE 7.0
Professional
Windows
CE 7.0
Professional
Keypads
Alphanumeric
Keypad
Alphanumeric
Keypad
Three keys
Software Versions
NOTE To view the software versions on the Voice Only WT41N0, the Voice Only WT41N0 must be
connected to a host computer running remote desktop software. See Chapter 4, Voice Only
WT41N0 Remote Control for more information.
This guide covers various software configurations and references are made to operating system or software
versions for:
•
OEM version
•
Fusion version.
OEM Software
To determine the OEM software version:
1. Press CTRL and then ESC to open the Start menu.
2. Using the navigation keys, select Settings.
3. Press the Blue key and the down arrow to open the Control Panel sub-menu.
4. Press ENTER key to launch Control Panel.
5. Using the navigation keys, select the System Information icon.
6. Press ENTER key to launch System Information applet.
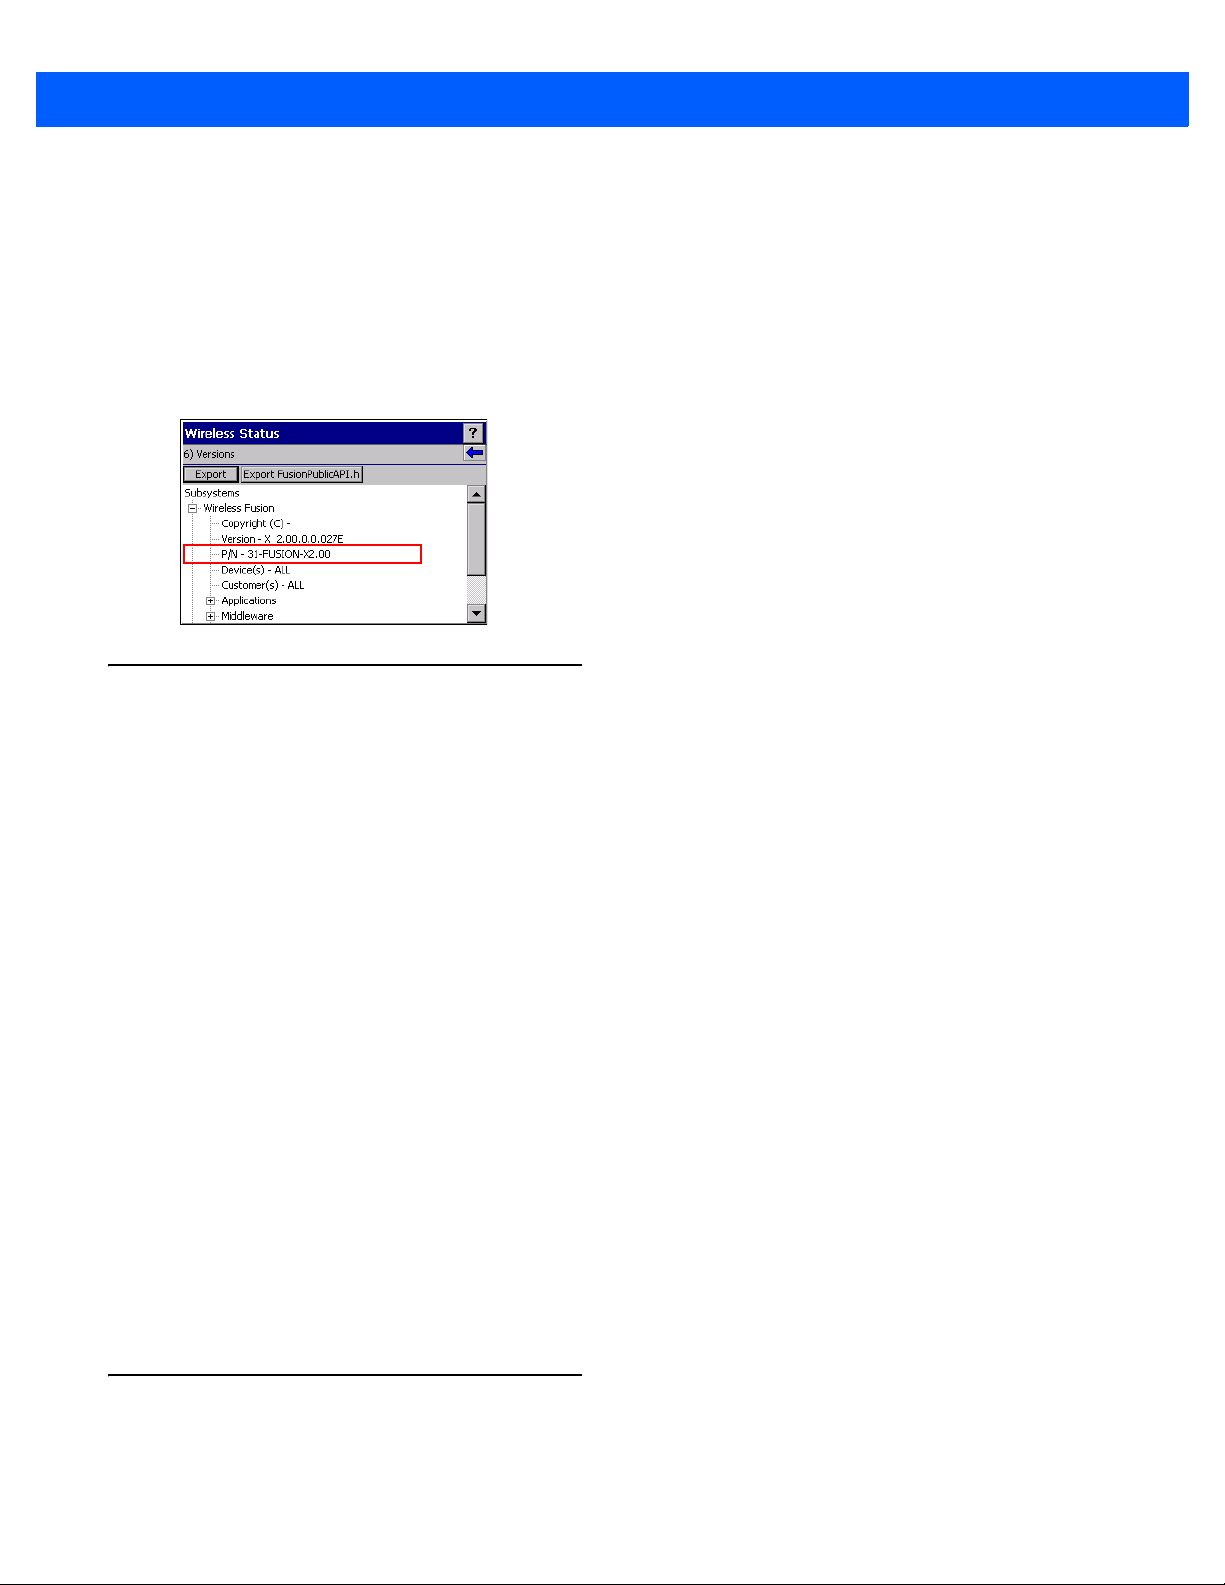
Fusion Software
2015 Symbol Technologies, Inc.
To determine the Fusion software version:
1. Press AL T - w. The Wireless menu appears.
2. Using the navigation keys, select Wireless Status.
3. Press ENTER. The Wireless Status window displays.
4. Press 6. The Versions screen appears.
About This Guide xiii
Chapter Descriptions
Topics covered in this guide are as follows:
•
Chapter 1, Getting Started, lists the accessories for the wearable terminal and explains how to install and
charge the batteries and start the wearable terminal for the first time.
•
Chapter 2, Accessories, describes the accessories available for the wearable terminal.
•
Chapter 3, Synchronization, provides instructions on installing ActiveSync and setting up a partnership
between the wearable terminal and a host comp u te r.
•
Chapter 4, Voice Only WT41N0 Remote Control, provides instructions for using remote control software
with the Voice Only WT41N0.
•
Chapter 5, Wireless Applications, provides instructions on using and configuring the wearable terminal
on a wireless network.
•
Chapter 6, Bluetooth, explains Bluetooth functionality on the wearable terminal.
•
Chapter 7, Application Development, describes features in Windows CE 7.0 including how to package
applications, and procedures for deploying applications onto the wearable terminal.
•
Chapter 8, Special Considerations, provides special instructions for the wearable terminal.
•
Chapter 9, Maintenance & Troubleshooting, includes instructions on cleaning and storing the wearable
terminal, and provides troubleshooting solutions for potential problems during wearable terminal
operation.
•
Appendix A, T echnical Specifications, includes a table listing the technical specifications for the wearable
terminal and accessories.
Notational Conventions
The following conventions are used in this document:
•
“Wearable terminal” refers to the WT41N0 series of wearable terminals.

xiv WT41N0 Integrator Guide
•
Italics are used to highlight the following:
• Chapters and sections in this guide
• Related documents
•
Bold text is used to highlight the following:
• Dialog box, window and screen names
• Drop-down list and list box names
• Check box and radio button names
• Icons on a screen
• Key names on a keypad
• Button names on a screen.
•
Bullets (•) indicate:
• Action items
• Lists of alternatives
• Lists of required steps that are not necessarily seq ue nt ial.
•
Sequential lists (e.g., those that describe step-by-step procedures) appear as numbered lists.
•
Key sequences. When multiple key presses are required, follow the following
• Key - key: Press and release the first key and then press and release the second key.
Related Documents and Software
The following documents provide more information about the WT41N0 wearable terminals.
•
WT41N0 Quick Start Guide, p/n 72-157178-xx
•
Voice Only WT41N0 Quick Start Guide, p/n 72-162043-xx
•
WT41N0 Regulatory Guide, p/n 72-159559-xx
•
WT41N0 User Guide, p/n 72E-159561-xx
•
RS309 Scanner Quick Reference Guide, p/n 72-86011-xx
•
RS409 Scanner Quick Reference Guide, p/n 72-86010-xx
•
RS419 Scanner Quick Reference Guide, p/n 72-158357-xx
•
RS507 Hands-free Imager Quick Reference Guide, p/n 72-115987-xx
•
RS507 Hands-free Imager Product Reference Guide, p/n 72E-120802-xx
•
RS5000 Scanner Quick Reference Guide, p/n MN-002933-xx
•
Wireless Fusion Enterprise Mobility Suite User Guide for Version 2.XX, p/n 72E-xxxxxx-xx
•
Enterprise Mobility Developer Kits, available at: http://www.zebra.com/support.
•
Platform SDK (PSDK41N0c70) for WT41N0 with Windows CE 7.0, available at:
http://www.zebra.com/support
•
ActiveSync software, available at: http://www.microsoft.com.
For the latest version of this guide and all guides, go to: http://www.zebra.com/support
.
.

Service Information
If you have a problem with your equipment, contact Zebra Global Customer Support for your region. Contact
information is available at: http://www.zebra.com/support
When contacting Zebra Global Customer Support, please have the following information available:
•
Serial number of the unit
•
Model number or product name
•
Software type and version number
Zebra responds to calls by email, telephone or fax within the time limits set forth in support agreements.
If your problem cannot be solved by Zebra Global Customer Support, you may need to return the equ ipment
for servicing and will be given specific directions. Zebra is not responsible for any damages incurred during
shipment if the approved shipping container is not used. Shipping the units improperly can possibly void the
warranty.
If you purchased your Zebra business product from a Zebra business partner, contact that business partner for
support.
About This Guide xv
.

xvi WT41N0 Integrator Guide

CHAPTER 1 GETTING STARTED
Introduction
This chapter lists the accessories for the wearable terminal and exp lains how to install and charge the batteries
and start the wearable terminal for the first time.
Unpacking the Wearable Terminal
Carefully remove all protective material from around the wearable terminal and save the shipping container for
later storage and shipping.
Verify that you received all equipment listed below:
•
Wearable terminal
•
Lithium-ion battery
•
Regulatory Guide
Inspect the equipment for damage. If you are missing any equipment or if you find any damaged equipment,
contact Zebra Global Customer Support immediately. See Service Information on page xv for contact
information.
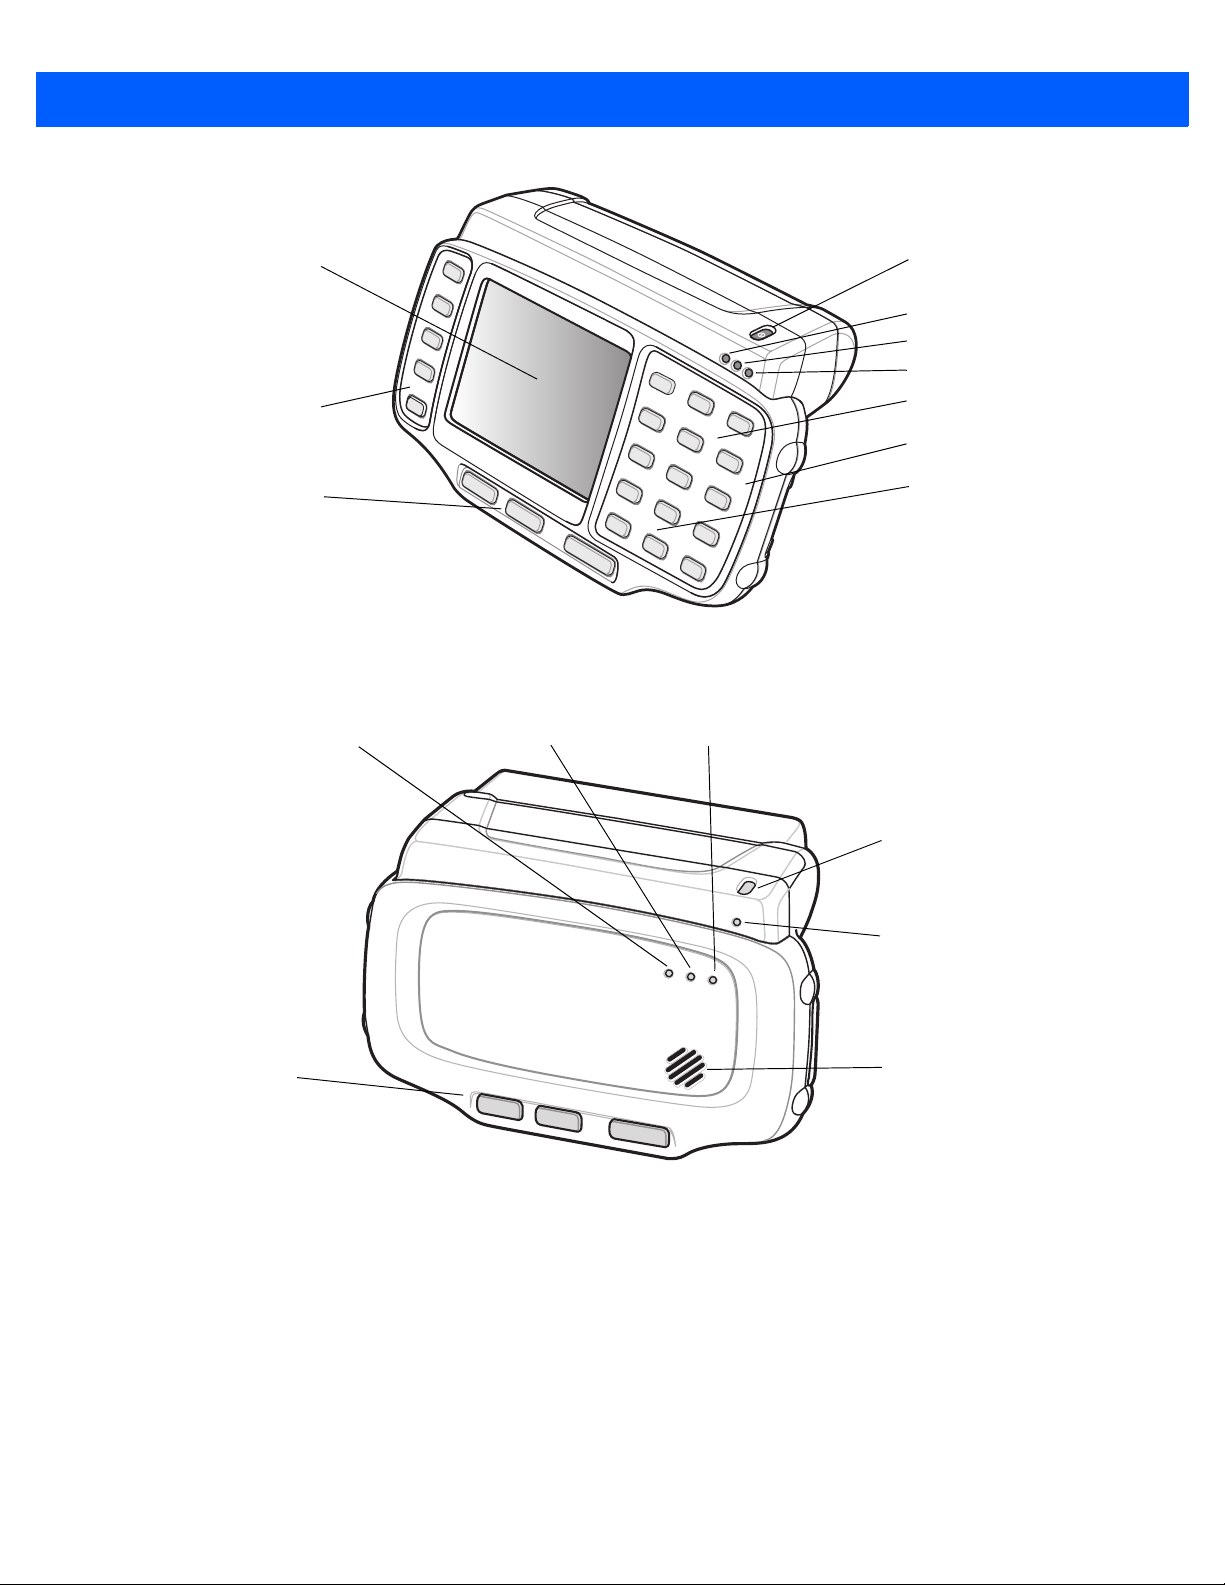
Features
Figure Figure 1-1 and Figure 1-2 indicate the features of the WT41N0 and Voice Only WT41N0 wearable
terminals.
•
Quick Start Guide.
1 - 2 WT41N0 Integrator Guide
Application
Keypad
Display
Programmable LED 2
Data Entry Keypad
Power Button
Action Keypad
Speaker
Microphone
Charge Status LED
Programmable LED 1
Charge Status LED
WLAN Status LED
Power Button
Action Keypad
Speaker
Application
Controlled LED
Battery Status LED
Figure 1-1
Figure 1-2
WT41N0 Wearable Terminal Front View
Voice Only WT41N0 W earable Terminal Front View

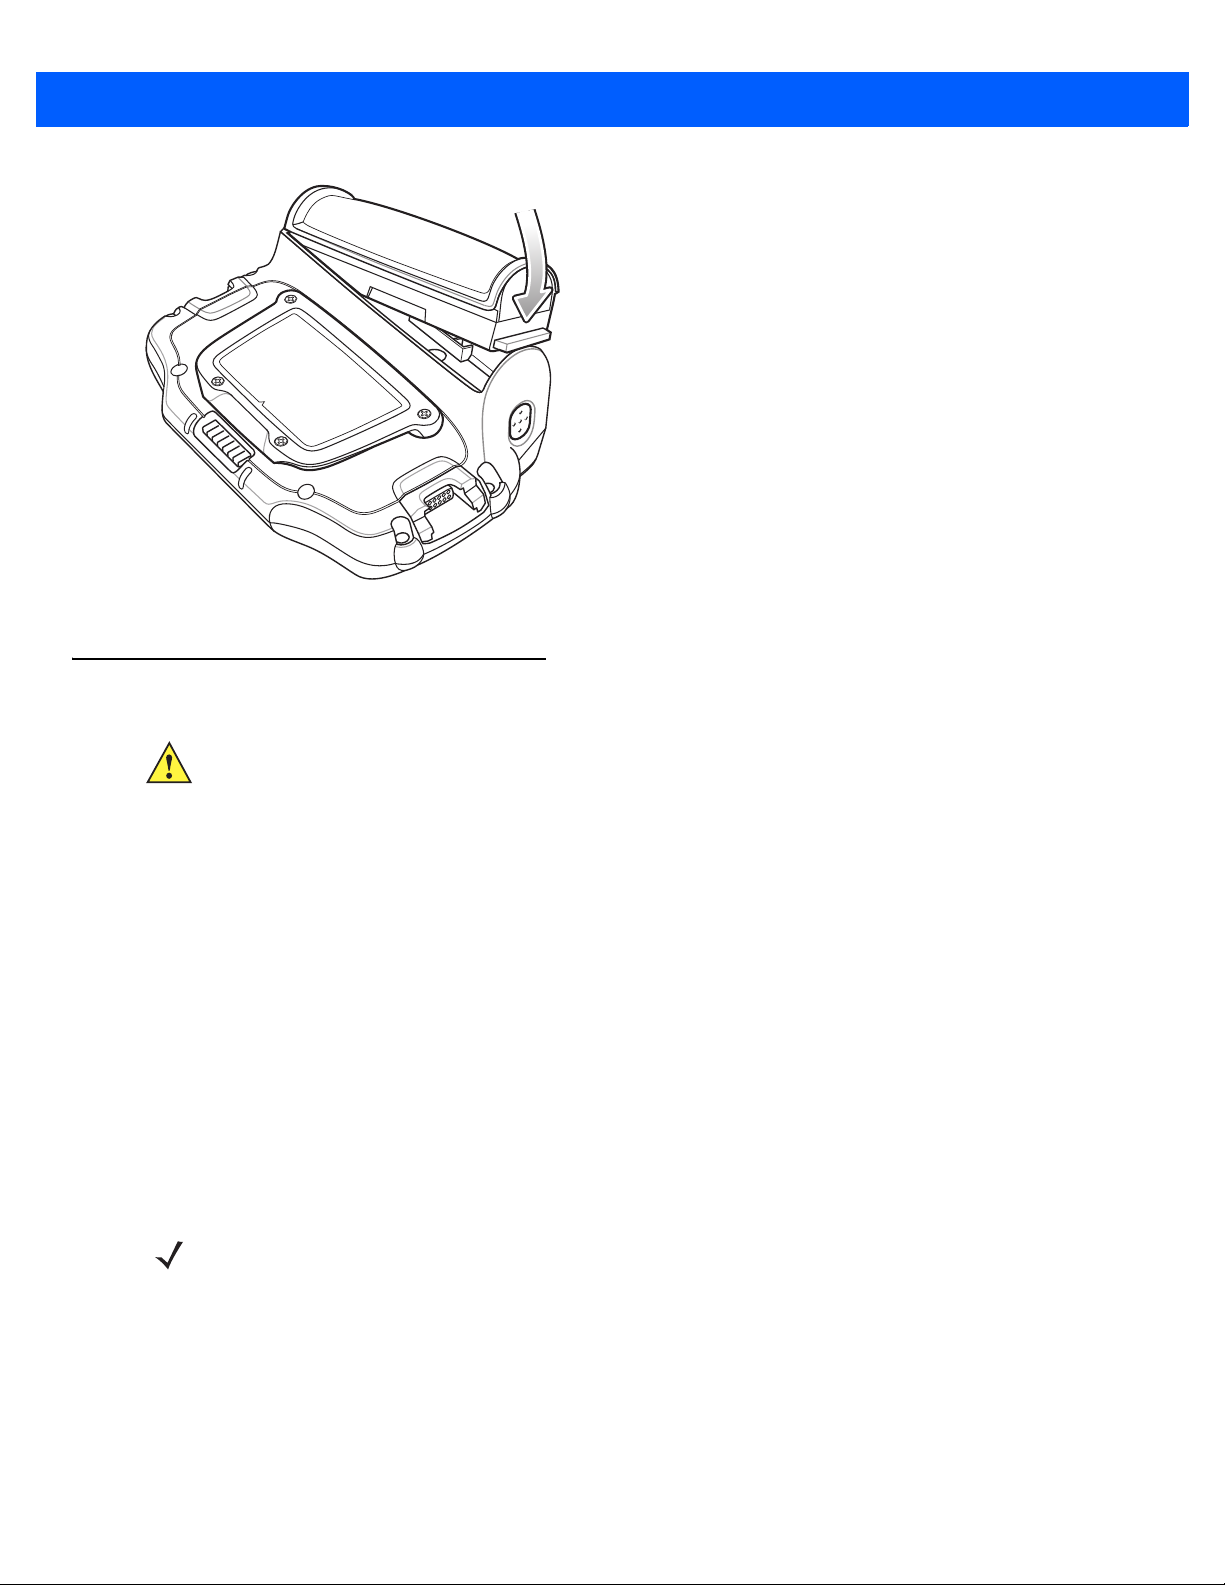
Getting Started 1 - 3
Battery
Interface Connector
Rubber Plug
Interface Connector
(shown without Rubber Plug)
Cradle Connector
Cleat
Battery Release
Getting Started
Installing and Removing the Main Battery
Installing the Main Battery
Figure 1-3
In order to start using the wearable terminal for the first time:
•
•
•
Before using the wearable terminal, install a lithium-ion battery by placing the battery into the wearable terminal
as shown in Figure 1-4.
Wearable Terminal Back View
Install the main battery
Charge the main battery and backup battery
Start the wearable terminal.
NOTE The main battery can be charged before or after installation into the wearable terminal. Use the Single
Slot USB cradle or Four Slot Spare Battery Charger to charge the main battery before installation, or the
Single Slot USB cradle or Four Slot Ethernet cradle to charge the main battery after installation.
NOTE Ensure the battery is fully inserted. An audible click can be heard as the battery is fully inserted. A
partially inserted battery may result in unintentional data loss.
When a battery is fully inserted in a wearable terminal for the first time, upon the wearable terminal’s first power
up, the device boots and powers on automatically.
1 - 4 WT41N0 Integrator Guide
Figure 1-4
Installing the Main Battery
Charging the Battery
CAUTION Ensure that you follow the guidelines for battery safety described in Battery Safety Guidelines on page
9-3.
Charging the Main Battery and Backup Battery
Before using the wearable terminal for the first time, charge the main battery until the amber Charge Status
LED remains lit (see Table 1-1 on page 1-5 for charge status indications).
The wearable terminal is equipped with a backup battery which automatically charges from the main battery
whether or not the wearable terminal is operating or is in suspend mode. The backup battery retains data in
memory for at least 15 minutes when the wearable terminal's main battery is removed or fully discharged.
When the wearable terminal is used for the first time or after the backup battery has fully discharged, the
backup battery requires approximately 15 hours to fully charge. Do not remove the main battery from the
wearable terminal for 16 hours to ensure that the ba cku p battery fully charges. If the main battery is removed
from the wearable terminal or the main battery is fully discharged, the memory backup battery completely
discharges in several hours.
When the wearable terminal reaches a very low battery state, the combination of main battery and backup
battery retains data in memory for at least 24 hours.
NOTE Do not remove the main battery within the first 15 hours of use. If the main battery is removed before the
backup battery is fully charged, data may be lost.
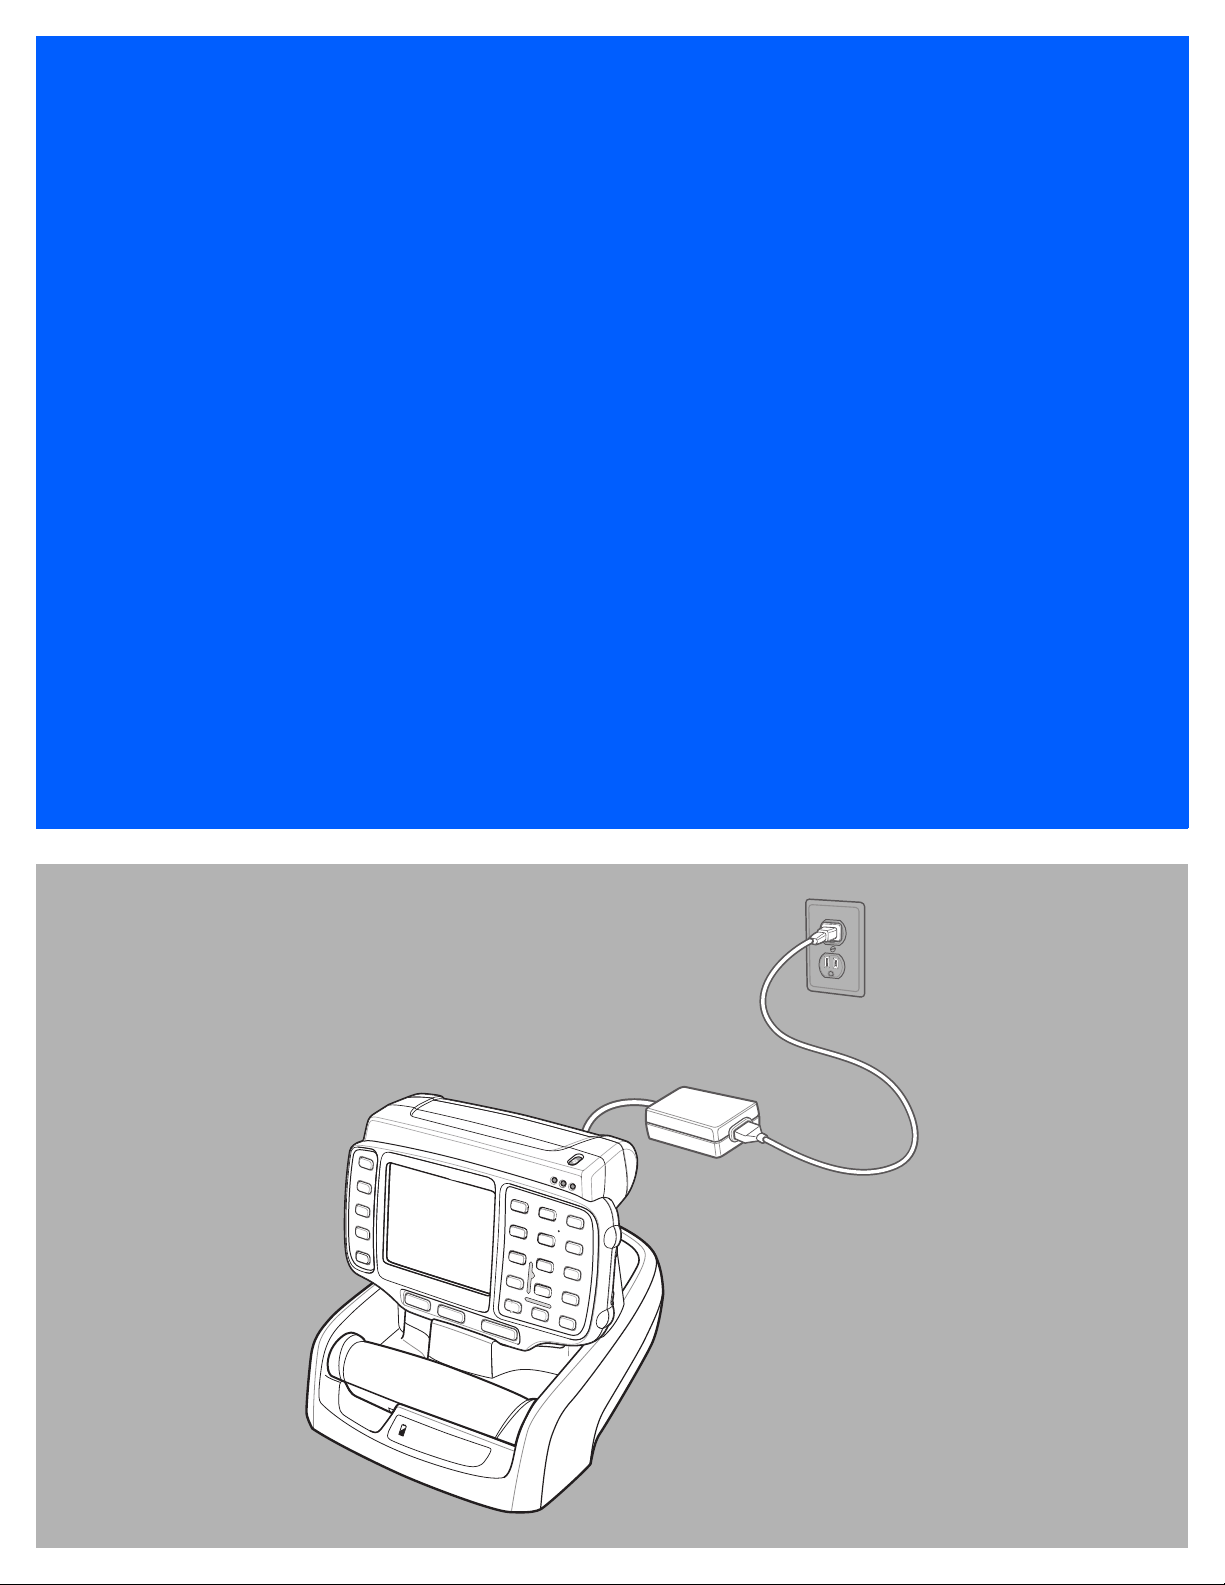
Charge the wearable terminal with an installed main batter y using either the Sin gle Slot USB cradle or the Four
Slot Ethernet cradle.
To charge the main battery:
1. Ensure the cradle used to charge the main battery is connected to the appropriate power source.
2. Insert the wearable terminal into a cradle.

Getting Started 1 - 5
3. The wearable terminal starts to charge automatically. The amber Charge Status LED lights to indicate the
charge status. See Table 1-1 for charging indications.
Table 1-1
Off Wearable terminal is not in cradle. Wearable terminal not placed correctly. Charger is
Fast Blinking Amber Charging error:
Slow Blinking Amber
Solid Amber Charging complete.
Wearable Terminal LED Charge Indicators
LED Indication
not powered.
•
Temperature is too low or too high.
•
Charging has gone on too long without completing (typically eight hours).
Wearable terminal
Note: When the battery is initially inserted in the
flashes once if the battery power is low or the battery is not fully inserted.
is charging.
wearable terminal
, the amber LED
Charging Spare Batteries
Use the following accessories to charge spare batteries:
•
Single Slot USB cradle
•
Four Slot Spare Battery charger.
To charge a spare battery:
1. Ensure the accessory used to charge the spare battery is connected to the appropriate power source.
2. Insert the spare battery into the accessory ’s spare battery ch ar gin g slo t with th e ch ar gin g co nt ac ts fac i ng
down (over the charging pins) and gently press down on the battery to ensure proper contact.
3. The battery starts to charge automatically. The amber charge LED on the accessory lights to show the
charge status. See Chapter 2, Accessories for accessory charge LED indicator definitions.
Removing the Main Battery
To remove the main battery:
1. Prior to removing the battery, ensure that the wearable terminal is in suspend mode. If the wearable
terminal is not in suspend mode, press the Power button to place the wearable terminal in suspend mode.
2. Press the battery release button. The battery partially ejects from the wearable terminal.
3. Remove the battery from the wearable terminal.
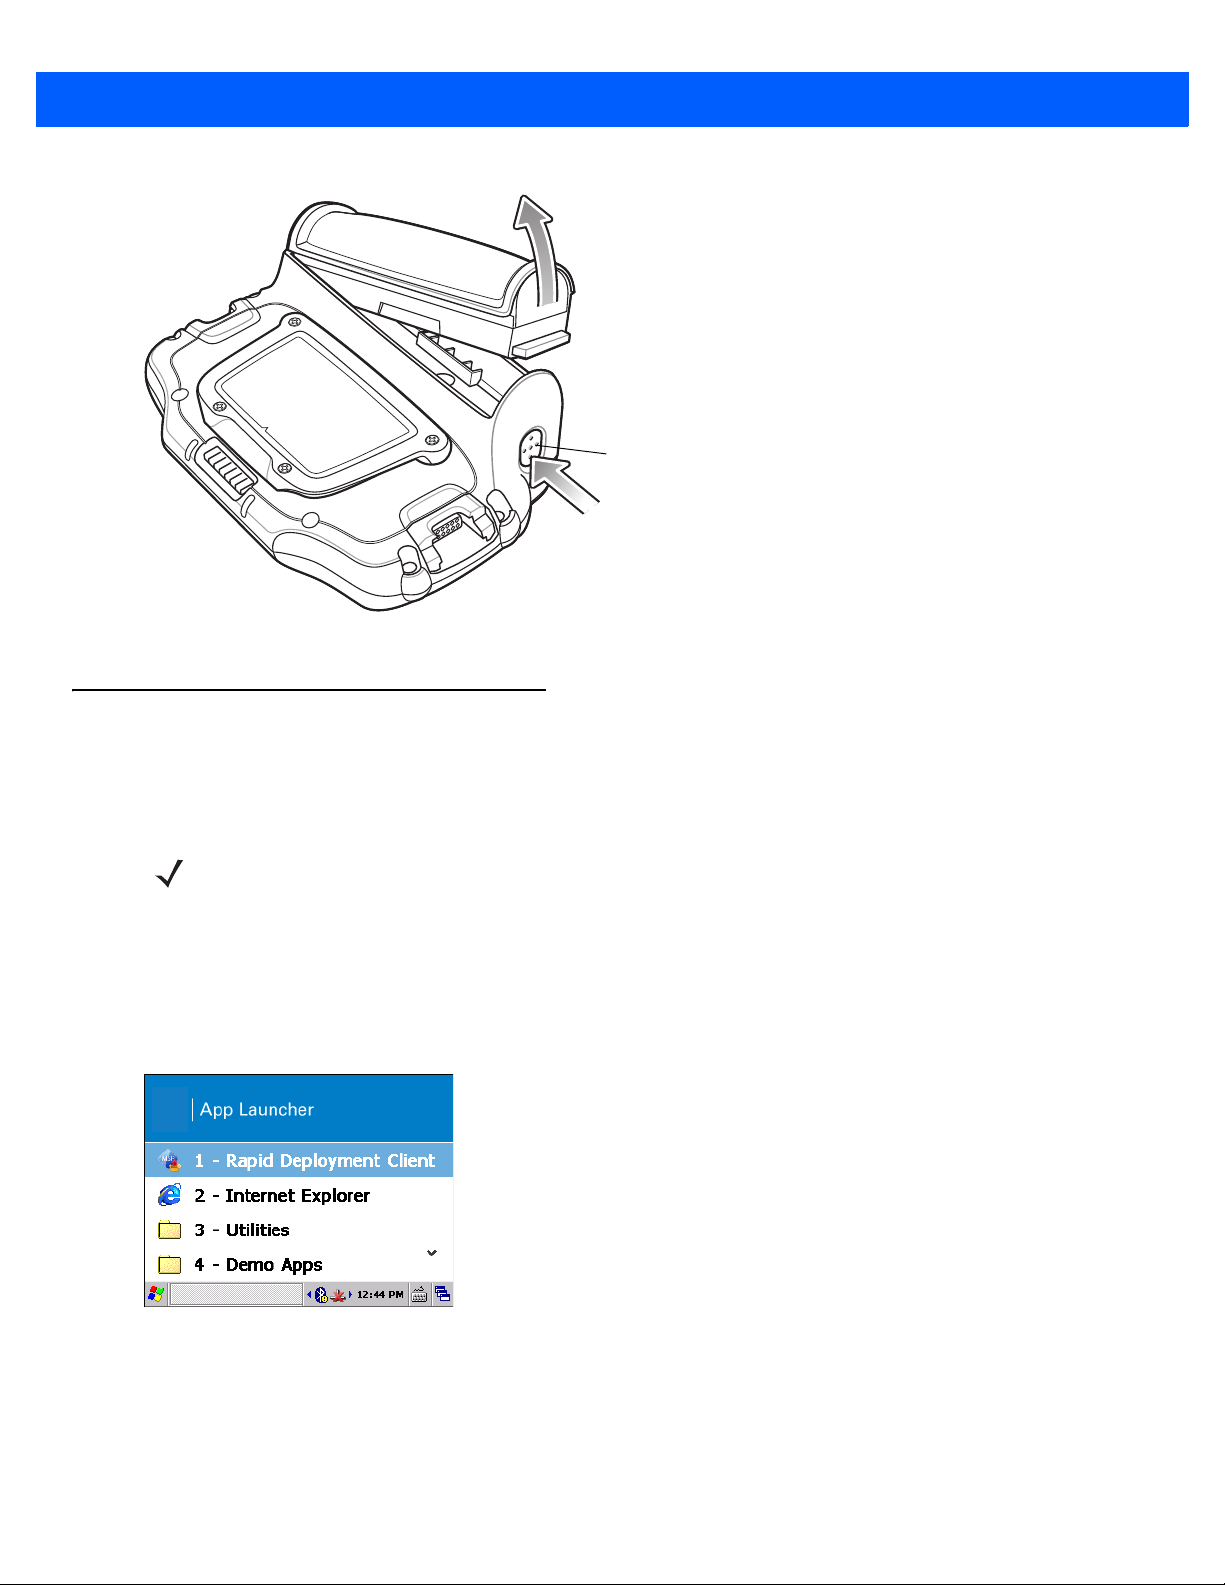
1 - 6 WT41N0 Integrator Guide
Battery Release
Figure 1-5
Removing the Main Battery
Starting the Wearable Terminal
Press the Power button to turn on the wearable terminal. If the wearable terminal does not power on, perform
a cold boot. See Performing a Cold Boot on page 1-8.
NOTE When a battery is fully inserted in a wearable terminal for the first time, upon the wearable terminal’s first
power up, the device boots and powers on automatically.
WT41N0 Boot Up
When the WT41N0 is powered on for the first time the splash screen appears for a short period of time
followed by the Start Up window on non-touch configurations and the calibration screen on touch enabled
configurations.
Figure 1-6
Start Up Window App Launcher
Voice Only WT41N0 Boot Up
When the Voice Only WT 41N0 is powered on the three LEDs on the front housin g light in the sequence sho wn
in Table 1-2.
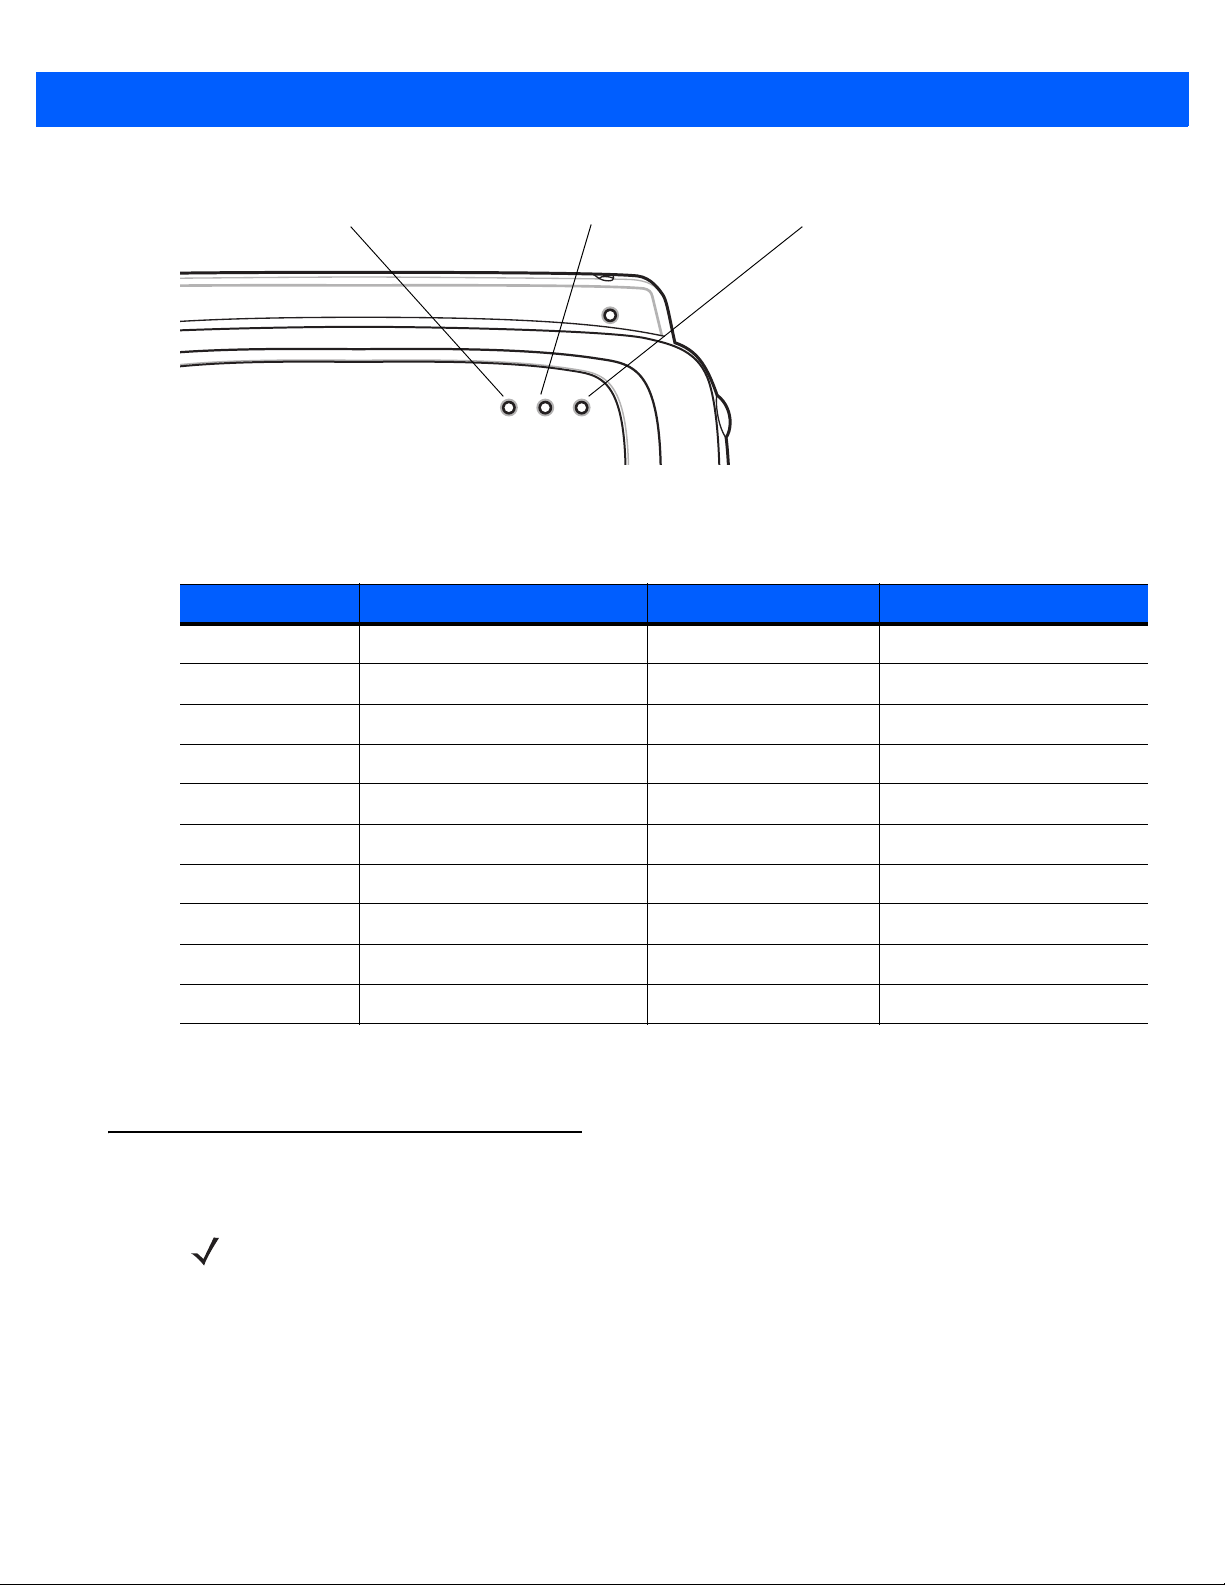
Getting Started 1 - 7
Application Controlled LED Battery Charge LED WLAN Status LED
Figure 1-7
Table 1-2
The WLAN Status LED blinks indicating that the wireless connection is not connected or is solid indicating that
the wireless connection is connected.
Voice Only WT41N0 LEDs
Voice Only WT41N0 Start Up LED Sequence
Sequence Application Controlled LED Battery Charge LED WLAN Status LED
1On On On
2On On Off
3 Off Off Off
4On Off Off
5On On Off
6On On On
7On On Off
8On Off Off
9 Off Off Off
10 Off Off On/Blinking
Checking Battery Status
NOTE To navigate using the keypad refer to the WT41N0 Wearable Terminal User Guide.
To check whether the main battery or backup battery in the wearable terminal is charged:
1. Select Start > Settings > Control Panel > Power icon to display the Battery Status window.
2. Press ENTER.
To save battery power, set the wearable terminal to turn off after a specified number of minutes.

1 - 8 WT41N0 Integrator Guide
Configuring the Wearable Terminal
•
To set up ActiveSync to synchronize the wearable terminal with the host computer, see Chapter 3,
Synchronization.
•
To configure the wearable terminal for wireless LAN network, see Chapter 5, Wireless Applications.
•
To deploy software on the wearable terminal, see Chapter 7, Application Development.
Resetting the Wearable Terminal
There are two reset functions, warm boot and cold b oot. A warm boot restarts the wearable terminal by closing
all running programs.
A cold boot a lso restarts the wearable terminal, b ut erases all stored records and entries in RAM. Data save d in
flash memory is not lost. In addition it returns formats, preferences and other settings to the factory default
settings.
Perform a warm boot first. This restarts the wearable terminal and saves all stored records and entries. If the
wearable terminal still does not respond, perform a cold boot.
Performing a Warm Boot
Hold down the Power button for approximately five seconds. As soon as the wearable terminal starts to
perform a warm boot release the Power button.
Performing a Cold Boot
A cold boot resta rts the wearable terminal and erases all user stored records and entries that are not saved in
flash memory (Application and Platform folders). Never perform a cold boot unless a warm boot does not solve
the problem.
NOTE Any data previously synchronized with a computer can be restored during the next ActiveSync operation.
To perform a cold boot on a WT41N0 press and simultaneously hold the Power button and the 1 and 9 keys.
Do not hold down any other keys or buttons. The wearable terminal initializes.
To perform a cold boot on a Voice Only WT41N0 press and simultaneously hold the P1 and P2 keys, and the
Power button. The Voice Only WT41N0 initializes.
Battery Management
Battery Saving Tips
•
Place the wearable terminal in a cradle connected to AC power at all times when not in use.
•
Set the wearable terminal to turn off after a short period of non-use.
•
Set the display and keypad backlight to turn off after a short period of non-use.
•
Turn on the keypad backlight only if needed.

Getting Started 1 - 9
•
Turn off all wireless radio activity when not in use.
Changing the Power Settings
NOTE To navigate using the keypad refer to the WT41N0 User Guide.
To set the wearable terminal to turn off after a short period of non-use:
1. Select Start > Settings > Control Panel > Power icon > Advanced tab.
2. Press ENTER.
3. Select the On battery power: Turn off device if not used for: check box and select a value from the
drop-down list box.
4. Press ENTER.
Changing the Display Backlight Settings
NOTE To navigate using the keypad refer to the WT41N0 User Guide.
Not applicable on the Voice Only WT41N0.
Changing the Backlight setting on the Voice Only WT41N0 will change the brightness of the Application
Controlled LED. Refer to the EMDK Help file WT41N0-VOW Programming page for more information.
To change the display backlight settings in order to conserve more battery power:
1. Select Start > Settings > Control Panel > Backlight icon > Battery Power tab.
2. Press ENTER.
3. Select the On battery power: Disable backlight if not used for: check box and select a value from the
drop-down list box.
4. Select the Brightness tab.
5. Select the Disable backlight check box to completely turn off the display backlight.
6. Use the slider to set the brightness of the backlight. Set it to a low value to save battery power.
7. Press ENTER.
Changing the Keypad Backlight Settings
NOTE To navigate using the keypad refer to the WT41N0 User Guide.
Not applicable on the Voice Only WT41N0.
Changing the Keypad Backlight setting on the Voice Only WT41N0 will change the brightness of the
WLAN Status LED. Refer to the EMDK Help file WT41N0-VOW Programming page for more information.
To change the keypad backlight settings in order to conserve more battery power:
1. Select Start > Settings > Control Panel > Keylight icon > Battery Power tab.
2. Press ENTER.

1 - 10 WT41N0 Integrator Guide
3. Select the On battery power: Disable keylight if not used for: check box and select a value from the
drop-down list box.
4. Select the Advanced tab.
5. Select the Disable keylight check box to completely turn off the keypad backlight.
6. Press ENTER.
Turning the WLAN Radios Off
NOTE To navigate using the keypad refer to the WT41N0 User Guide.
To turn off the WLAN radio:
1. Press ALT - w. The Wireless menu appears.
2. Select Disable Radio.
3. Press ENTER.
To turn on the radio:
1. Press ALT - w. The Wireless menu appears.
2. Select Enable Radio.
3. Press ENTER.
Long Term Storage
When storing the wearable terminal for a long period of time it is recommended to place the we arabl e terminal
in storage mode.
1. Remove the main battery.
2. On the WT41N0, press and simultaneously hold the 1, 9 keys and Power button (cold boot).
or
On the Voice Only WT41N0, press and sim ultaneously hold the P1 and P2 keys and the Power button
(cold boot).
3. Release the keys and Power button.
When returning the wearable terminal to everyday operation, install a fully charged main battery.

CHAPTER 2 ACCESSORIES
Introduction
Wearable terminal accessories provide a wide variety of product support capabilities. Accessories include
cradles, a battery charger, scanners and headsets. Table 2-1 lists the accessories available for the WT41N0.
Table 2-1
Single Slot USB Cradle Charges the
Four Slot Ethernet Cradle Charges up to four
Four Slot Spare Battery
Charger
RS409 Scanner Provides 1D scanning capability.
RS419 Scanner Provides 1D scanning capability.
RS309 Scanner Provides 1D scanning capability.
RS507 Scanner Provides wired or wireless imaging capability.
RS5000 Scanner Provides wired imaging capability.
Wrist Mount Provides a means for wearing the wearable terminal on the arm for hands-free
Hip Mount Provides a means for wearing the wearable terminal on a belt for hands-free
Wearable Terminal Accessories
Accessory Description
wearable terminal
synchronizes the
connection.
communication through an Ethernet connection.
Charges up to four spare batteries.
applications.
applications.
wearable terminal
wearable terminals
main battery and a spare battery. It also
with a host computer through a USB
(with main battery installed) and provides
Headset For audio playback/recording during voice-enabled applications.
Headset Adapters Connect an optional headset to the wearable terminal.

2 - 2 WT41N0 Integrator Guide
Table 2-1
Replacement Batteries Standard Capacity Battery: 2330 mAh (minimum)
Standard Capacity Battery
Freezer Pouch
Extended Capacity Battery
Freezer Pouch
USB Adapter Connects the Single-slot cradle to USB hubs, mice, keyboards and memory. The
Connector Shroud Protects the connector of an accessory that connects to the wearable computer.
Screen Protectors Package of 3 screen protectors.
Arm Sleeve Extra layer sleeve to wear under wrist mount for extra comfort and hygiene.
RCH51 Rugged Cabled
Headset
Wearable Terminal Accessories (Continued)
Accessory Description
Extended Capacity Battery: 4600 mAh (minimum)
Allows the user to use the wearable terminal with standard capacity battery in a
freezer environment on the hip or wrist for use in voice picking applications.
Allows the user to use the wearable terminal with extended capacity battery in a
freezer environment on the hip or wrist for use in voice picking applications.
adapter has a USB mini-A connector on the cradle side and a USB A Female
connector on the other side.
Enables hands-free voice-directed mobility communication. An audible mono
headset with noise cancelling boom microphone helps survive harsh
environments.
 Loading...