

Zebra RFD2000 User Manual
RFD2000
RFID SLED
User Guide
MN-003128-01 Rev. A

Copyright
© 2017 ZIH Corp. and/or its affiliates. All rights reserved. ZEBRA and the stylized Zebra head are trademarks of
ZIH Corp., registered in many jurisdictions worldwide. All other trademarks are the property of their respective
owners.
COPYRIGHTS & TRADEMARKS: For complete copyright and trademark information, go to www.zebra.com/
copyright.
WARRANTY: For complete warranty information, go to www.zebra.com/warranty
END USER LICENSE AGREEMENT: For complete EULA information, go to www.zebra.com/eula.
For Australia Only
For Australia Only. This warranty is given by Zebra Technologies Asia Pacific Pte. Ltd., 71 Robinson Road, #0502/03, Singapore 068895, Singapore. Our goods come with guarantees that cannot be excluded under the
Australia Consumer Law. You are entitled to a replacement or refund for a major failure and compensation for any
other reasonably foreseeable loss or damage. You are also entitled to have the goods repaired or replaced if the
goods fail to be of acceptable quality and the failure does not amount to a major failure.
Zebra Technologies Corporation Australia’s limited warranty above is in addition to any rights and remedies you
may have under the Australian Consumer Law. If you have any queries, please call Zebra Technologies
Corporation at +65 6858 0722. You may also visit our website: www.zebra.com
terms.
Terms of Use
•
Proprietary Statement
This manual contains proprietary information of Zebra Technologies Corporation and its subsidiaries
(“Zebra Technologies”). It is intended solely for the information and use of parties operating and
maintaining the equipment described herein. Such proprietary information may not be used, reproduced,
or disclosed to any other parties for any other purpose without the express, written permission of Zebra
Technologies.
•
Product Improvements
Continuous improvement of products is a policy of Zebra Technologies. All specifications and designs are
subject to change without notice.
•
Liability Disclaimer
Zebra Technologies takes steps to ensure that its published Engineering specifications and manuals are
correct; however, errors do occur. Zebra Technologies reserves the right to correct any such errors and
disclaims liability resulting therefrom.
•
Limitation of Liability
.
for the most updated warranty
In no event shall Zebra Technologies or anyone else involved in the creation, production, or delivery of the
accompanying product (including hardware and software) be liable for any damages whatsoever
(including, without limitation, consequential damages including loss of business profits, business
interruption, or loss of business information) arising out of the use of, the results of use of, or inability to
use such product, even if Zebra Technologies has been advised of the possibility of such damages. Some
jurisdictions do not allow the exclusion or limitation of incidental or consequential damages, so the above
limitation or exclusion may not apply to you.
2

Revision History
Changes to the original manual are listed below:
Change Date Description
-01 Rev A 12/2017 Initial release
3

Table of Contents
Copyright ........................................................................................................................................... 2
For Australia Only ....................................................................................................................... 2
Terms of Use .................................................................................................................................... 2
Revision History ................................................................................................................................ 3
About This Guide
Introduction ....................................................................................................................................... 7
Configurations ................................................................................................................................... 7
Chapter Descriptions ........................................................................................................................ 8
Notational Conventions ..................................................................................................................... 8
Related Documents and Software .................................................................................................... 9
Service Information ........................................................................................................................... 9
Getting Started
Introduction ..................................................................................................................................... 10
Unpacking ....................................................................................................................................... 10
RFID Sled Features ........................................................................................................................ 11
LED Definitions ............................................................................................................................... 12
RFD2000 LED Definitions While Charging ............................................................................... 12
RFD2000 LED Definitions When Not Charging ........................................................................ 12
LED Indications ......................................................................................................................... 13
RFID Sled Battery Replacement ..................................................................................................... 14
Removing Battery ...................................................................................................................... 14
Installing Battery ........................................................................................................................ 15
Attach/Remove Mobile Computer to RFID Sled ............................................................................. 16
Attaching Mobile Computer to RFID Sled ................................................................................. 16
Removing Mobile Computer to RFID Sled ................................................................................ 16
Installing the Lanyard ...................................................................................................................... 17
Charging ........................................................................................................................................ 18
Battery Management ....................................................................................................................... 19
Low Battery Notification ............................................................................................................ 19
Battery Optimization .................................................................................................................. 19
Mobile Device ................................................................................................................................. 19
4

Table of Contents
Zebra RFID Mobile Application for Android
Introduction ..................................................................................................................................... 20
Requirements .................................................................................................................................. 20
Installing Zebra RFID Mobile Application for Android ..................................................................... 20
Zebra RFID Mobile Application for Android .................................................................................... 21
Using the Zebra RFID Mobile Application for Android .............................................................. 21
Connecting TC20 to the RFD2000 ............................................................................................ 22
Disconnecting the RFD2000 ..................................................................................................... 22
Demo Application Screens ........................................................................................................ 23
Rapid Read ............................................................................................................................... 24
Inventory ................................................................................................................................... 25
Locate Tag ................................................................................................................................ 27
Settings ..................................................................................................................................... 28
Access Control .......................................................................................................................... 40
Pre Filters .................................................................................................................................. 41
About ......................................................................................................................................... 42
RFID Manager
Introduction ..................................................................................................................................... 43
Setting Up the RFD2000 ................................................................................................................. 44
Installing RFID Manager for Android ............................................................................................... 44
Requirements ............................................................................................................................ 44
Installation ................................................................................................................................. 44
Using the RFID Manager for Android .............................................................................................. 44
Connection Status ..................................................................................................................... 45
RFID Regulatory ....................................................................................................................... 47
Settings ..................................................................................................................................... 48
Firmware Update ....................................................................................................................... 50
Recovery Mode ......................................................................................................................... 52
RFID Manager Log .................................................................................................................... 53
Beeper Indications .................................................................................................................... 54
About ......................................................................................................................................... 54
Introduction ..................................................................................................................................... 55
Application Usage and Screens ...................................................................................................... 55
RFID Scan-Scan-Write
Settings ..................................................................................................................................... 59
StageNow
StageNow Staging Solution ............................................................................................................ 60
Import RFID Manager Into StageNow
Introduction ..................................................................................................................................... 61
Importing RFID Manager CSP Plug-in ........................................................................................... 61
Creating Firmware Update Profile using Stage Now ...................................................................... 63
5

Table of Contents
Maintenance and Troubleshooting
Introduction ..................................................................................................................................... 69
Cleaning .......................................................................................................................................... 69
Approved Cleanser Active Ingredients ...................................................................................... 69
Harmful Ingredients ................................................................................................................... 69
Cleaning Instructions ................................................................................................................. 69
Special Cleaning Notes ............................................................................................................. 70
Materials Required .................................................................................................................... 70
Cleaning Cradle Connectors ..................................................................................................... 70
Cleaning Frequency .................................................................................................................. 70
Maintenance ................................................................................................................................... 70
RFD2000 ................................................................................................................................... 71
Battery ....................................................................................................................................... 71
Troubleshooting .............................................................................................................................. 71
Troubleshooting RFD2000 RFID Sled with Default LED .................................................................. 71
Troubleshooting RFD2000 RFID Sled with LED Mode 2 .......................................................... 73
Data Dictionary
Introduction ..................................................................................................................................... 74
RFD2000 Attributes ........................................................................................................................ 74
Attribute Definitions ................................................................................................................... 74
Inventory Command Configurations .......................................................................................... 75
Tag Select Configurations ......................................................................................................... 78
Tag Query Configurations ......................................................................................................... 82
Tag Access Configurations ....................................................................................................... 83
Region Configurations ............................................................................................................... 85
Peripheral Configurations .......................................................................................................... 88
Trigger Configurations ............................................................................................................... 88
ASCII Configurations ................................................................................................................. 89
Tag Access Criteria Configurations ........................................................................................... 91
Locate Tag Configurations ........................................................................................................ 93
Dynamic Power Configurations ................................................................................................. 93
Duty Cycle Configurations ......................................................................................................... 93
Power Mode Configurations ...................................................................................................... 94
Unique Tag Report Configurations ............................................................................................ 95
Other RFID Configurations ........................................................................................................ 95
System Configurations .............................................................................................................. 95
Action Values ............................................................................................................................ 96
Index
6
ABOUT THIS GUIDE
Introduction
The RFD2000 RFID Sled User Guide provides general instructions for using the RFID Sled.
Configurations
Table 1 RFD2000 Configurations
Configuration Description
RFD2000-1000100-US RFID Sled; United States
RFD2000-1000100-EU RFID Sled; Europe
RFD2000-1000100-JP RFID Sled; Japan
RFD2000-1000100-IN RFID Sled; India
RFD2000-1000100-KR RFID Sled; Korea
RFD2000-1000200-US RFID Sled; Inditex; United States
RFD2000-1000200-EU RFID Sled; Inditex; Europe
RFD2000-1000200-IN RFID Sled; Inditex; India
RFD2000-1000200JP RFID Sled; Inditex; Japan
Table 2 RFD2000 Accessories
Configuration Description
CRD1S-RFD2000-1R Single Slot Charging Cradle
CRD5S-RFD2000-1R Five Slot Charging Cradle
BTRY-RF20GAB0E-00 Spare Battery
BTRY-RF20GAB0E-00K Spare Battery; India and Korea
7

Chapter Descriptions
Topics covered in this guide are as follows:
• Getting Started provides information on RFD2000 RFID Sled parts, battery installation, mobile device
attachment, LED indications, and charging.
• Zebra RFID Mobile Application for Android describes the Zebra RFID Mobile Application for Android which
demonstrates RFD2000 capability and tag operation functionality.
• RFID Manager describes how to install and configure the Zebra RFID Manager Application for the TC20
Android mobile device used with the RFD2000.
• RFID Scan-Scan-Write demonstrates the use case of using the Android Mobile Device to program tags
using the RFD2000.
• Maintenance and Troubleshooting describes cleaning, maintenance, and troubleshooting procedures.
• StageNow provides a reference to access this easy Wizard-based tool that allows even complex Staging
profiles to become simple to create.
• Import RFID Manager Into StageNow provides instruction necessary to generate a RFID Firmware update
profile and import RFID CSP plug-in into the StageNow application.
• Data Dictionary includes RFD2000 attribute information (configuration parameters, monitored data, and
born on information about the device).
About This Guide
Notational Conventions
The following conventions are used in this document:
• “RFID Sled” refers to the RFD2000 RFID Sled.
• Bold text is used to highlight the following:
• Dialog box, window and screen names
• Drop-down list and list box names
• Check box and radio button names
• Icons on a screen
• Key names on a keypad
• Button names on a screen.
• Bullets (•) indicate:
• Action items
• Lists of alternatives
• Lists of required steps that are not necessarily sequential
• Sequential lists (e.g., those that describe step-by-step procedures) appear as numbered lists.
8

About This Guide
Related Documents and Software
The following documents provide more information about the reader.
• RFD2000 Quick Start Guide, p/n MN-003129-xx.
• CRD1S-RFD2000 and SHARECRADLE-MC Cradle Regulatory Guide, p/n MN-003127-xx.
• RFD2000 Developer Guide, p/n MN-003158-xx.
• TC20 Quick Start Guide, p/n MN-003018-xx.
• TC20 User Guide, p/n MN-003020-xx.
For the latest version of this guide and all guides, go to: www.zebra.com/support
Service Information
If you have a problem using the equipment, contact your facility's technical or systems support. If there is a
problem with the equipment, they will contact the Zebra Global Customer Support Center at:
www.zebra.com/support
When contacting Zebra support, please have the following information available:
• Serial number of the unit
• Model number or product name
• Software type and version number.
Zebra responds to calls by e-mail, telephone or fax within the time limits set forth in support agreements.
If your problem cannot be solved by Zebra support, you may need to return your equipment for servicing and will
be given specific directions. Zebra is not responsible for any damages incurred during shipment if the approved
shipping container is not used. Shipping the units improperly can possibly void the warranty.
If you purchased your business product from a Zebra business partner, contact that business partner for support.
.
.
9

Getting Started
Introduction
This chapter provides information on RFD2000 RFID Sled parts, battery installation, mobile device attachment,
LED indications, and charging.
Unpacking
Carefully remove all protective material from the RFD2000 RFID Sled and save the shipping container for later
storage and shipping. Verify the following items are in the box:
• RFD2000
• Battery
• Lanyard
• Quick Start Guide
Inspect the equipment for damage. If any equipment is missing or damaged, contact the Zebra Support Center
immediately. See Service Information on page 9 for contact information.
10
RFID Sled Features
1
5
4
2
3
6
7
8
9
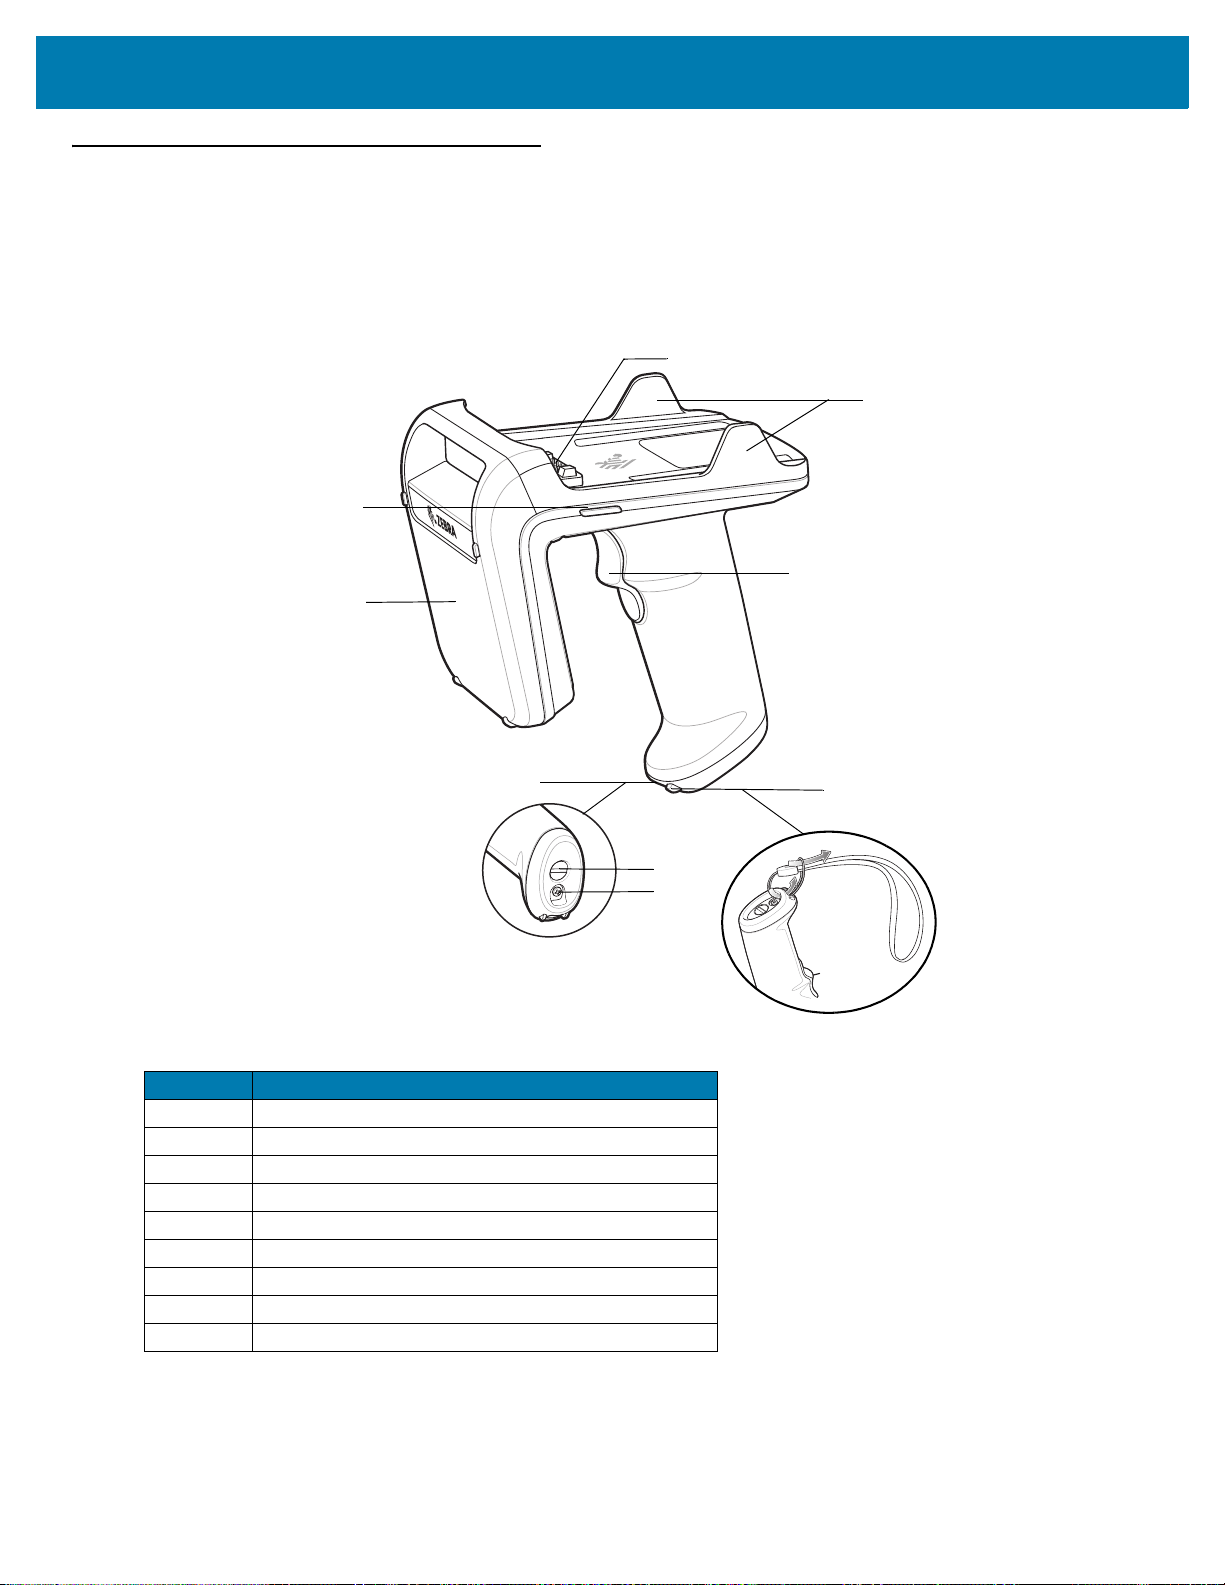
The RFD2000 RFID Sled adds a RFID gun-style handle with a scanning trigger to the TC20 mobile computer.
Used for all RFID operations, the RFD2000 increases comfort when using the mobile computer in scan-intensive
applications for extended periods of time.
Figure 1 RFD2000 RFID Sled Features
Getting Started
Table 3 RFD2000 Parts
Number Item
1 LED Indicator (2)
2 Antenna
3 Battery Compartment
4 Battery Compartment Latch
5 Battery Compartment Screw
6 Lanyard Hook
7 Trigger
8 Retention Clip (2)
9 Connector for TC20
11
Getting Started
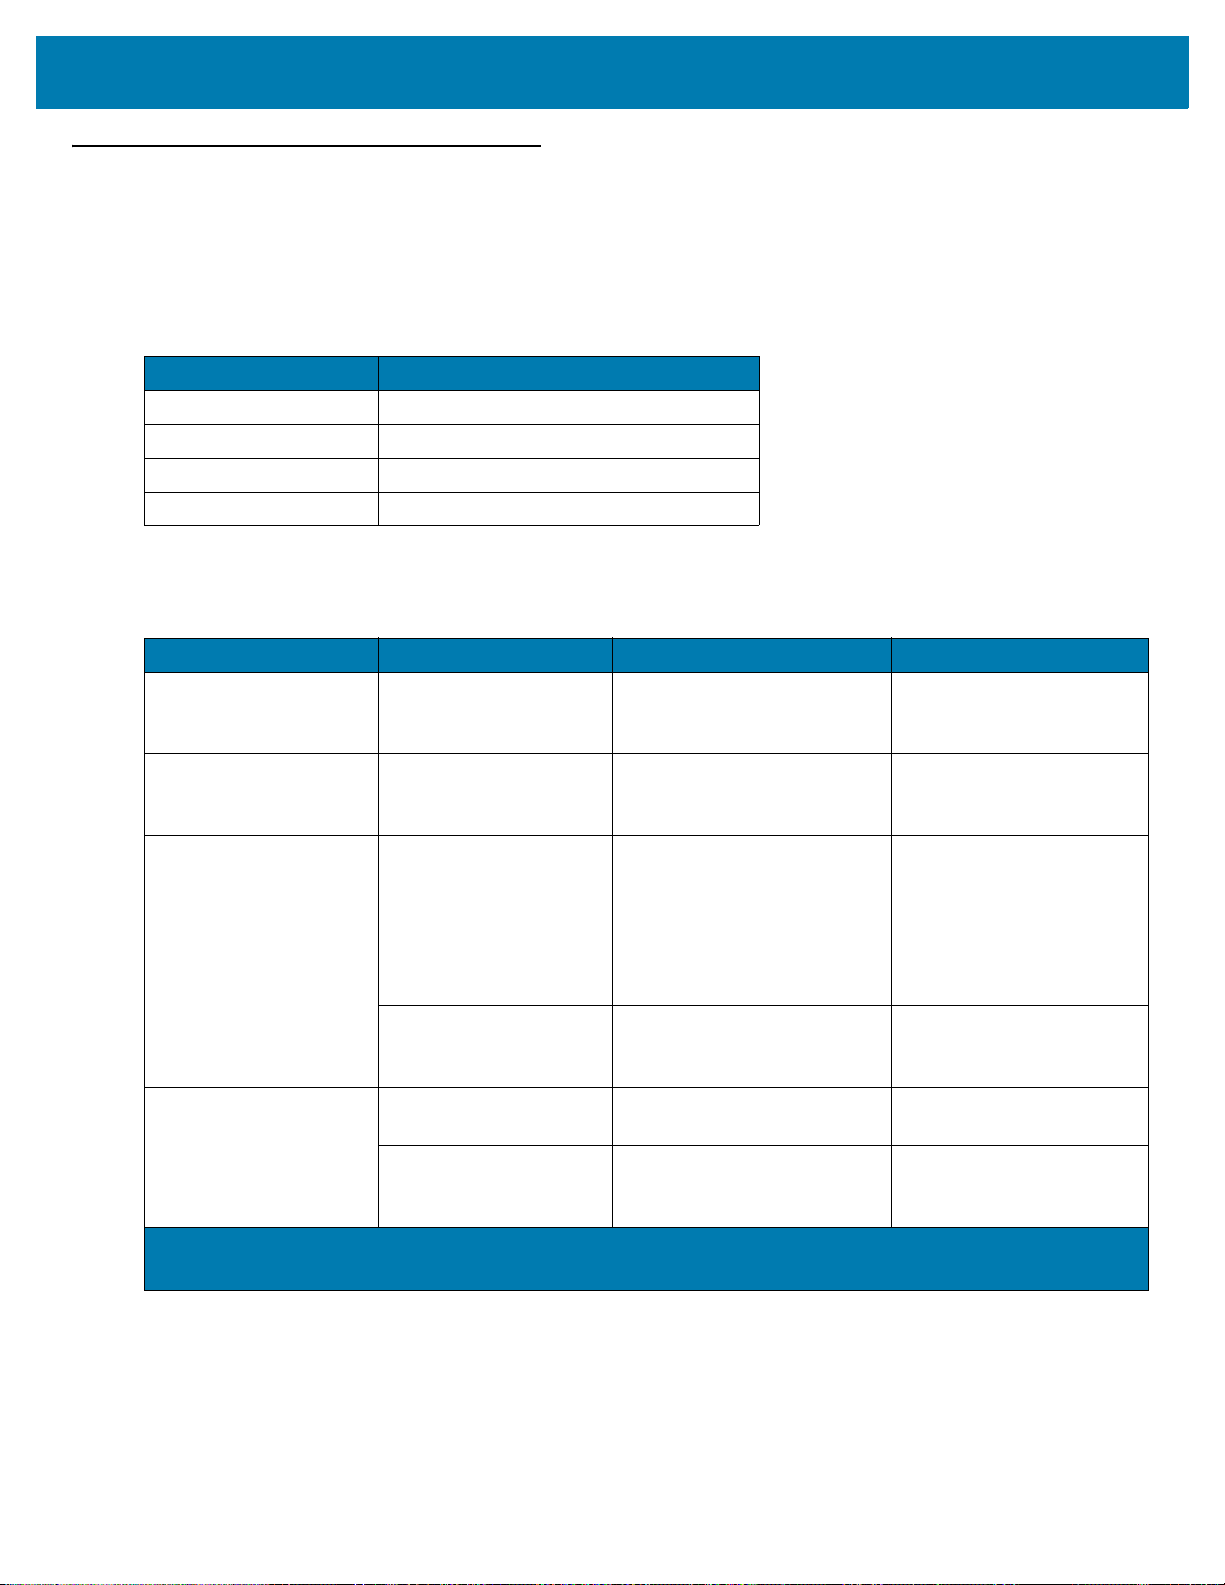
LED Definitions
RFD2000 LED Definitions While Charging
The RFD2000 RFID Sled uses a two-color LED to indicate status.
Table 4 RFD2000 LED Definitions While Charging
Condition RFD2000 Power LED
Pre-charging Amber (Fast, Fast, Slow)
Charging Amber (Blinking)
Fully Charged Green (Stays On)
Charging Error Amber (Fast Blinking)
RFD2000 LED Definitions When Not Charging
Table 5 RFD2000 LED Definitions When Not Charging
Mode Condition RFD2000 Power LED TC20
LED Mode 0 - All LED
Feedback Disabled
LED Mode 1 - Tag Read
Indication Enabled
LED Mode 2 - Battery
Indication Enabled
LED Mode 3 - Low
Battery Indication
Enabled
1
The battery charge status LED Indicator stays On for four seconds when the RFD2000 RFID Sled is removed
from the charging cradle.
Tag Read Indications
and Battery Indication
Off
Tag Read Indication
Enabled (Default)
Battery Charge Status
Low Battery Charge Sta-
1
tus
No LED for Normal
Charge Status
Low Battery Charge Sta-
1
tus
1
Off Four Short Beeps when the
Green LED Blinks Four Short Beeps when the
Green when remaining
charge is 99%-51%
Amber when remaining
charge is 21%-50%
Red when remaining charge
is 0%-20%
Red when remaining charge
is 0%-10%
No LEDs if Charge Status is
more than 10%
Red when remaining charge
is 0%-10%
battery SOC (State of
Charge) is below 10%
battery SOC (State of
Charge) is below 10%
Four Short Beeps when the
battery SOC (State of
Charge) is below 10%
Four Short Beeps when the
battery SOC (State of
Charge) is below 10%
12

Getting Started
LED Indications
Power Up
To power up the RFD2000 RFID Sled when it is powered off, press the trigger continuously for 1.3 seconds. The
LED blinks amber once when RFD2000 RFID Sled begins to boot up.
Recovery Mode
To place the RFD2000 RFID Sled in Recovery Mode, press the trigger continuously for 20 seconds when it is
powered off. The LED remains solid red to indicate the RFD2000 RFID Sled is in Recover Mode.
Firmware Update
When the RFD2000 RFID Sled firmware update is in progress, the LED blinks green.
Battery Error
When an invalid battery is used with the RFD2000 RFID Sled, the LED blinks red. Ensure to only use the battery
manufactured for use with the RFD2000.
Battery End of Life
The Battery End of Life indication is disabled by default. When enabled the LED indication for battery health
percentage is as follows:
• Green/Red alternate blinking when end of life percentage is 99%-51%
• Amber/Red alternate blinking when end of life percentage is 21%-50%
• Red blinking when remaining end of life percentage is 0%-20%.
If the battery health percentage falls below the configurable threshold (default is 60%), the battery end of life
indication replaces the battery charge status.
13
Getting Started
RFID Sled Battery Replacement
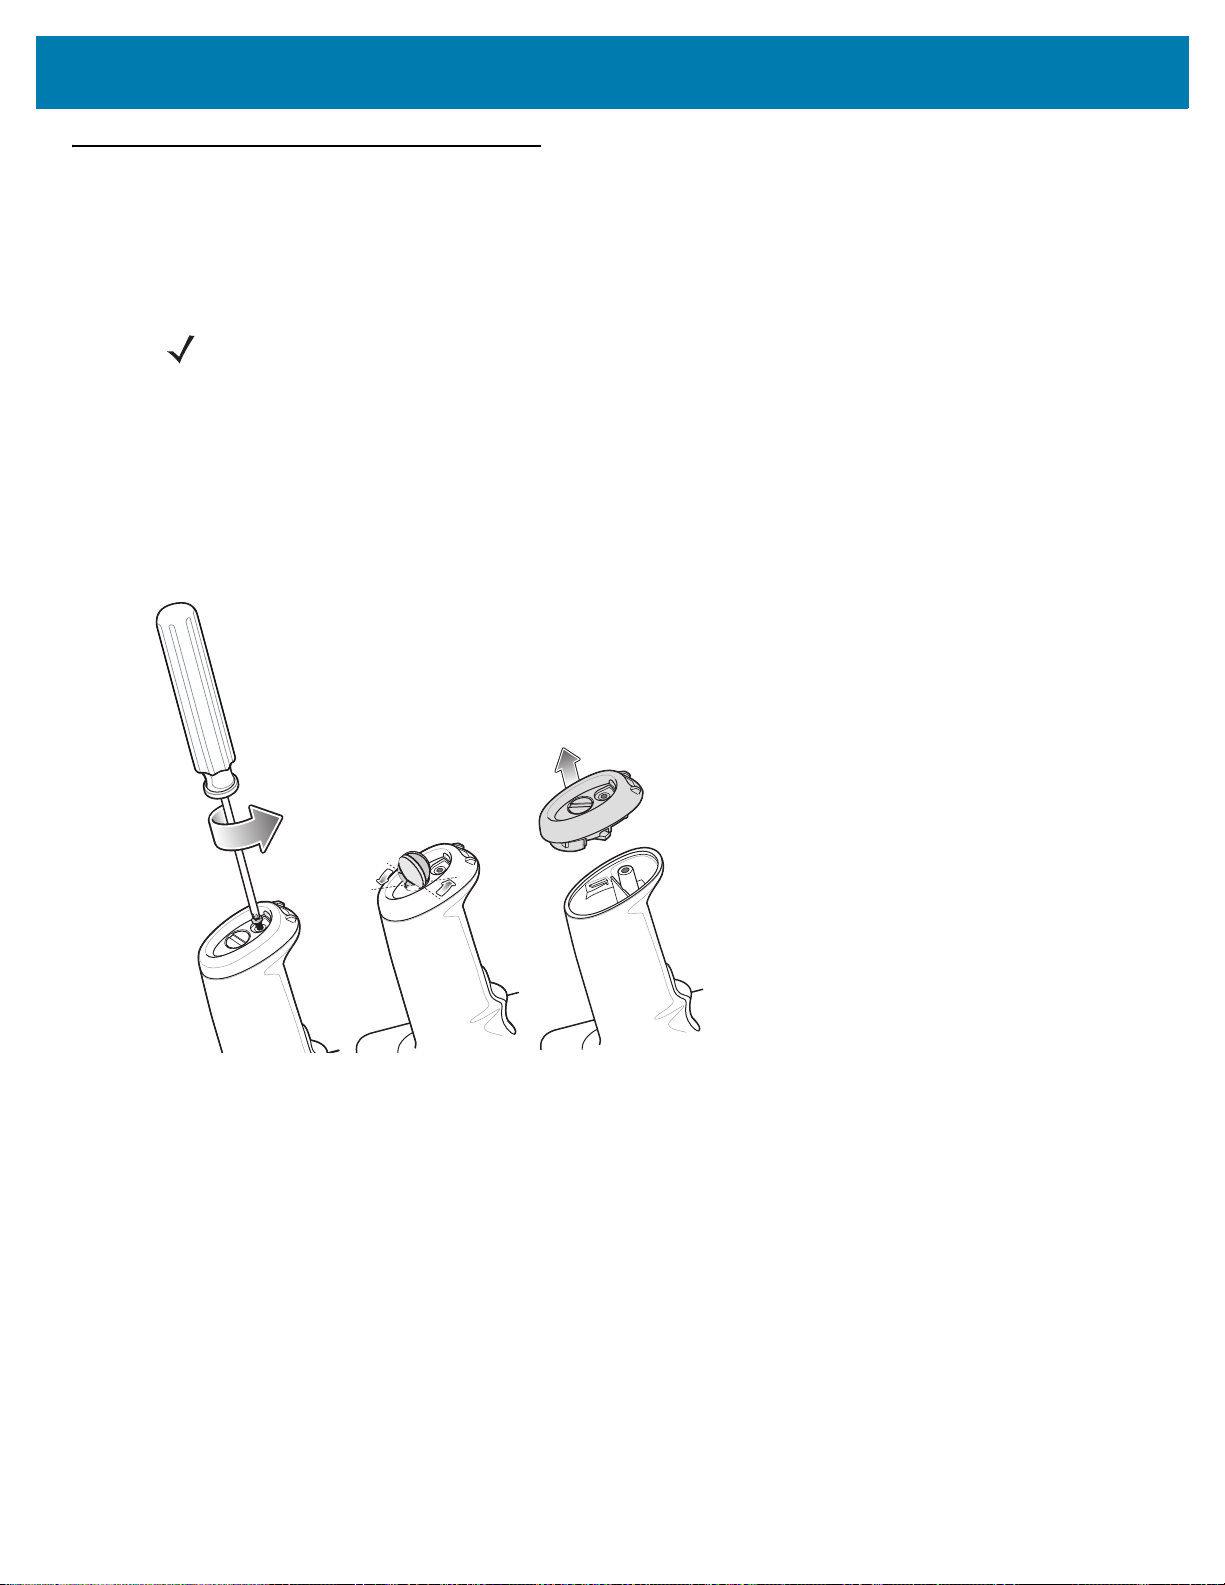
Removing Battery
To remove the battery:
NOTE: Fully charge the RFD2000 RFID Sled before initial use.
1. Remove the Battery Compartment Screw using a Phillips head screw driver.
2. Turn the Battery Compartment Latch counter clockwise approximately 30º using a flat head screw driver or
coin.
3. Remove the Battery Compartment Cap.
4. Remove the battery.
Figure 2 RFID Sled Battery Removal
14
Getting Started
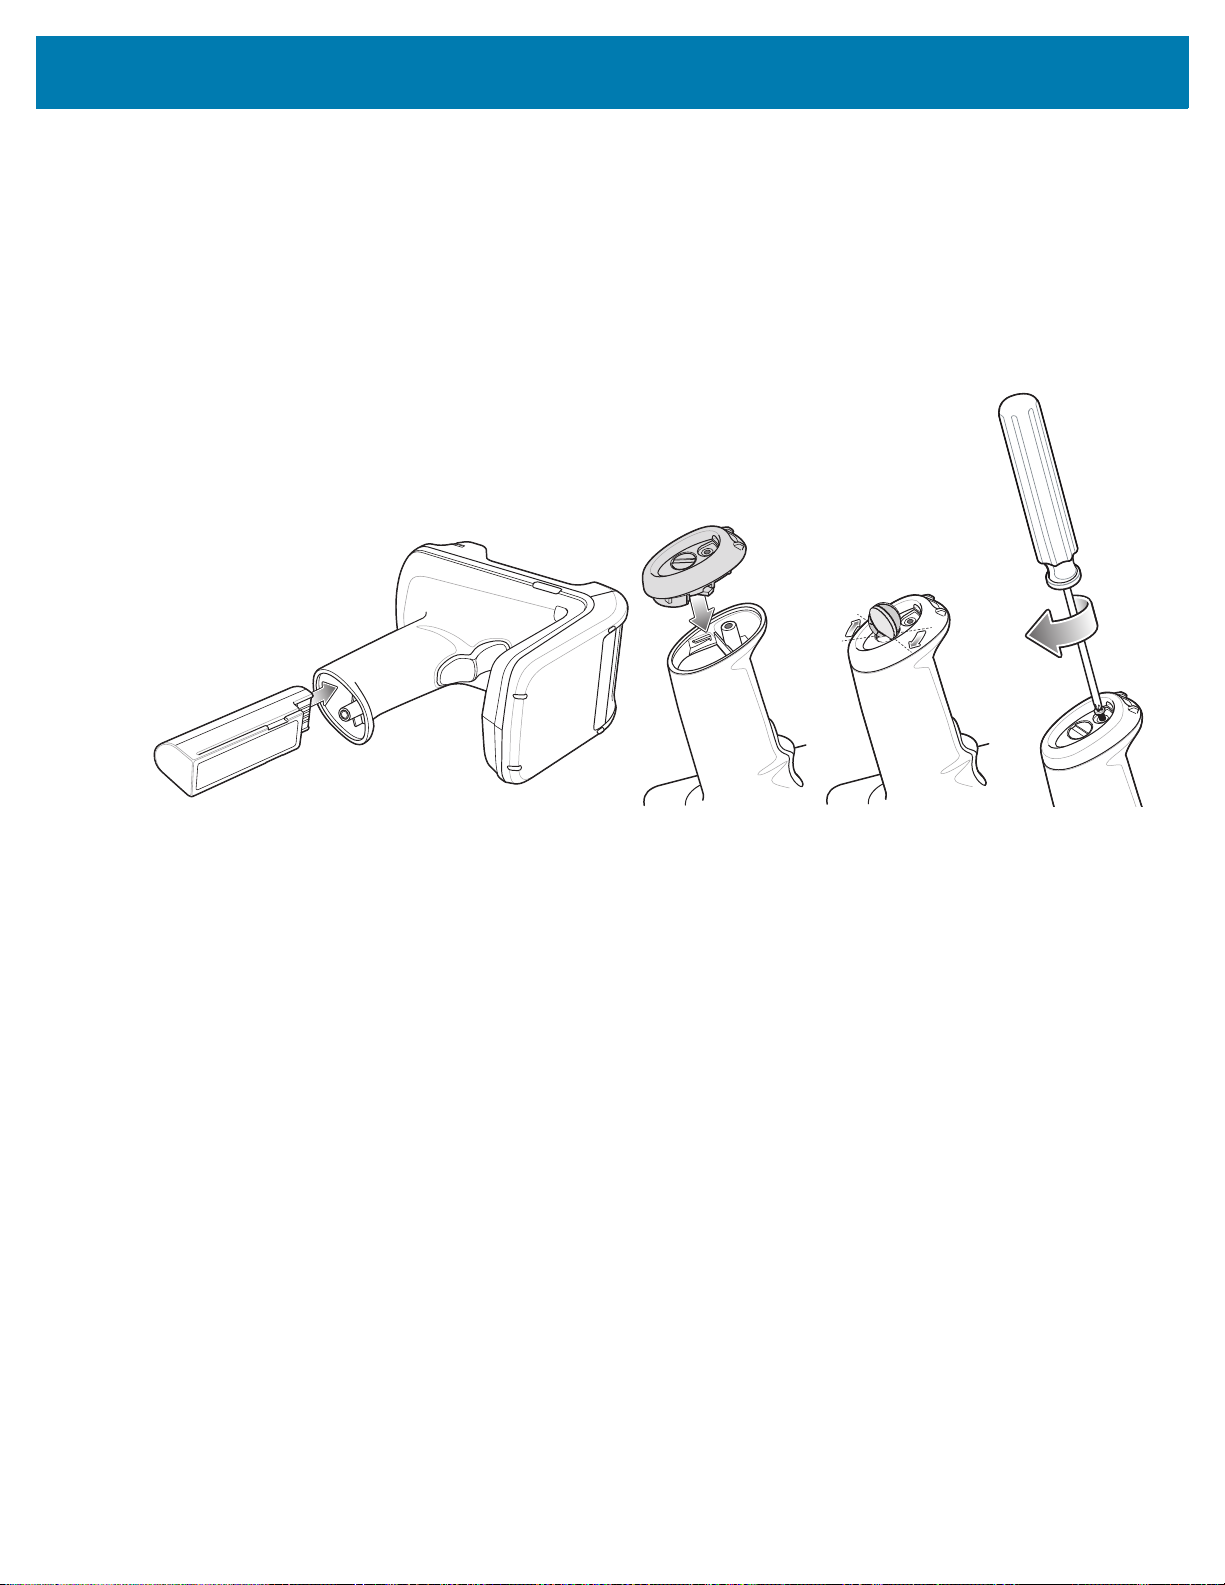
Installing Battery
To install the battery:
1. Insert the battery, connector end first, contacts facing toward the trigger, into the Battery Compartment.
2. Place the Battery Compartment Cap on.
3. Turn the Battery Compartment Latch clockwise using a flat head screw driver or coin.
4. Insert the Battery Compartment Screw and tighten using a Phillips head screw driver.
Figure 3 RFID Sled Battery Insertion
15
Getting Started
Attach/Remove Mobile Computer to RFID Sled
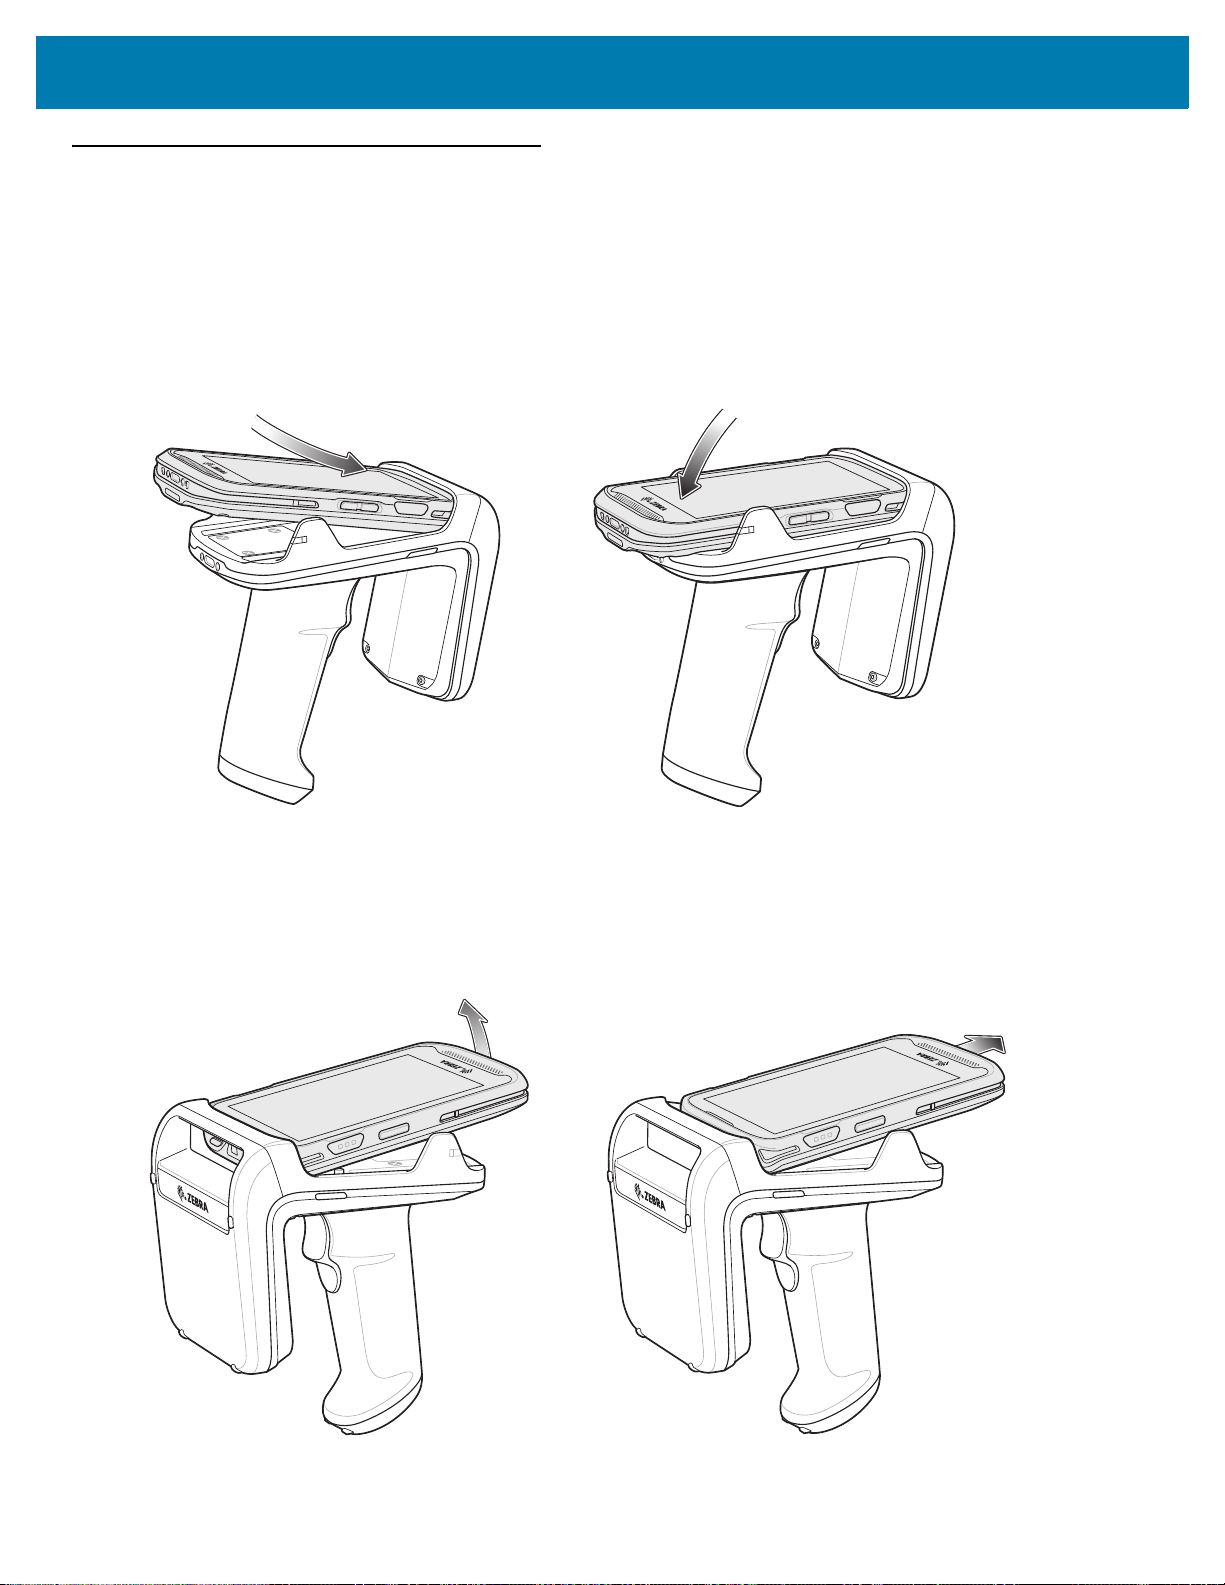
Attaching Mobile Computer to RFID Sled
To secure the TC20 Mobile Computer to the RFD2000 RFID Sled, place the TC20 fully forward on the Sled base
and push the TC20 down into the Retention Clips.
Figure 4 Attach Mobile Computer to RFID Sled
Removing Mobile Computer to RFID Sled
To remove the TC20 Mobile Computer from the RFD2000 RFID Sled, firmly hold the Sled handle, and lift the TC20
off of the Sled base.
Figure 5 Remove Mobile Computer from RFID Sled
\
16
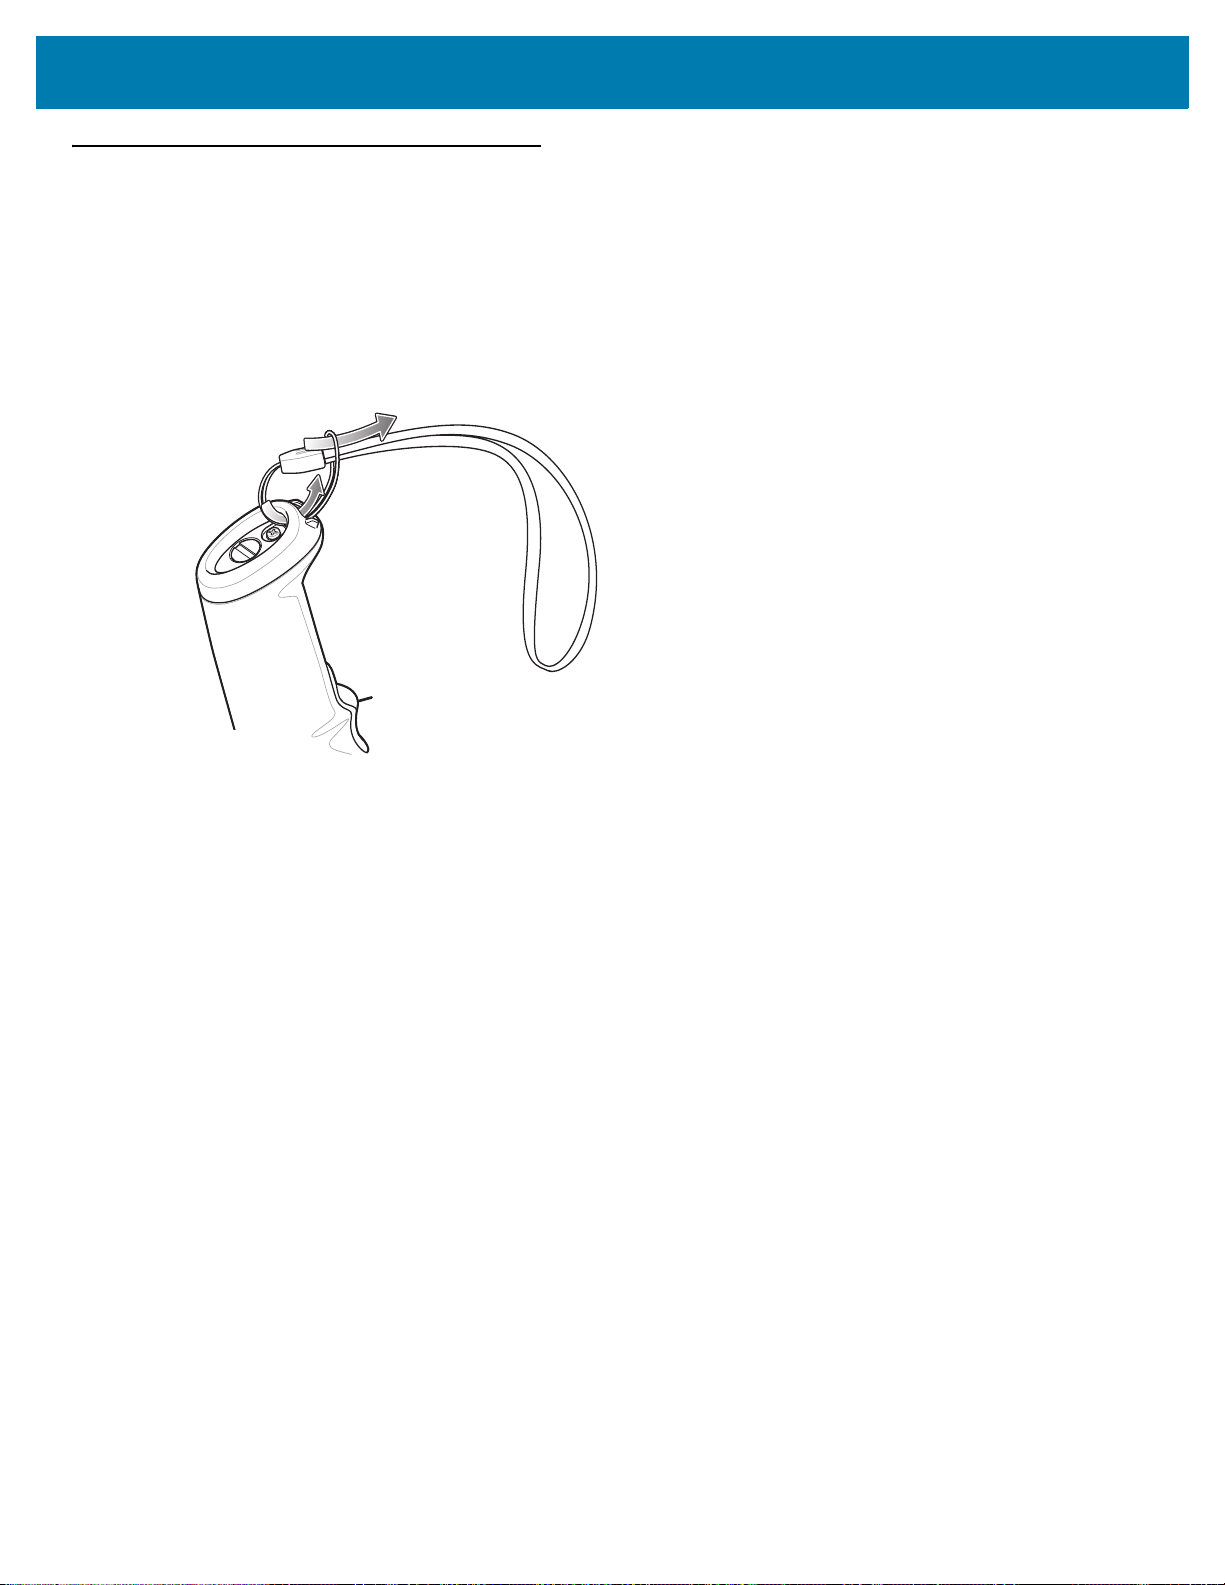
Installing the Lanyard
To install the optional lanyard:
1. Insert the loop on the lanyard into the lanyard hook located at the bottom of the RFD2000 handle.
2. Thread the upper portion of the lanyard into the loop.
3. Pull the clip through the loop over the tether point and tighten into place.
Figure 6 Installing the Lanyard
Getting Started
17
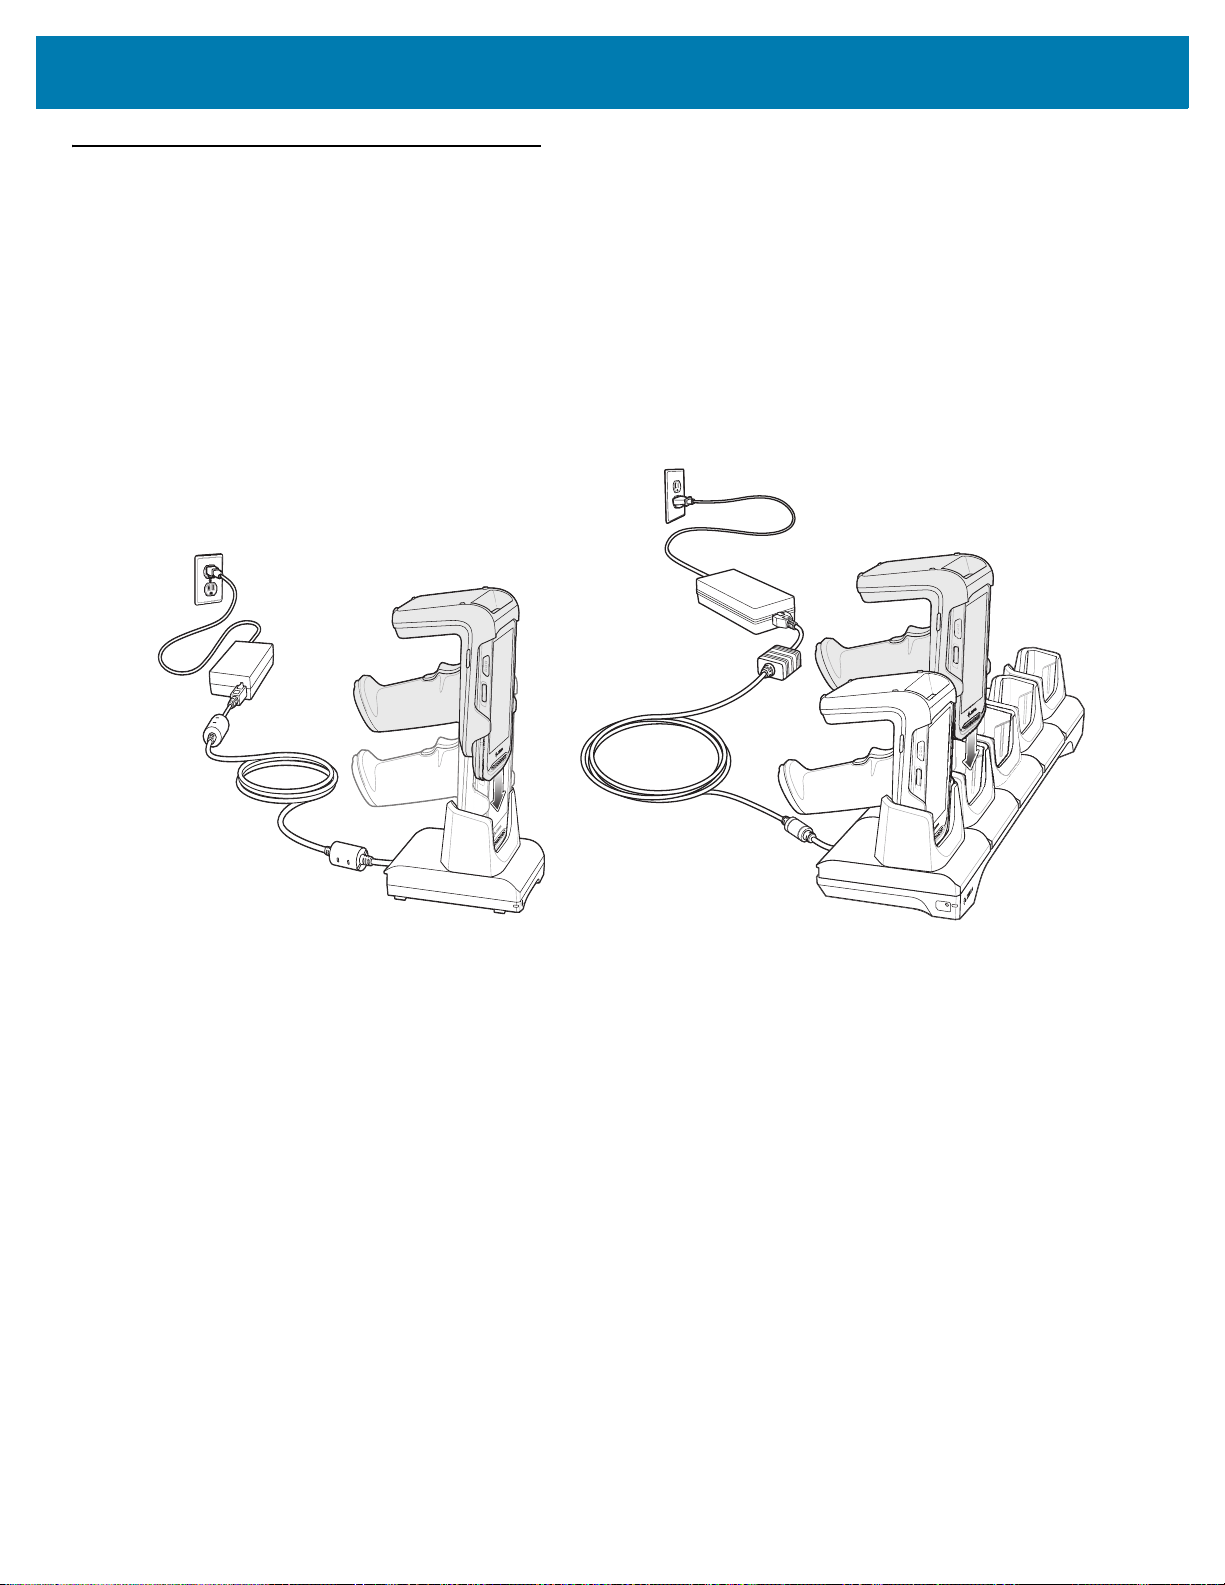
Charging
Single Slot Charging Cradle
Five Slot Charging Cradle
Before using the RFD2000 for the first time, fully charge the battery by placing it in the charging cradle until the
LED Power/Charging Indicator turns solid green (see LED Definitions on page 12 for charge status indications).
The RFD2000 RFID Sled and TC20 Mobile Computer may be charged in the charging cradle individually or
attached together.
When a RFD2000 RFID Sled is removed from a charging cradle, it is automatically powered On. If a reader is not
used for a duration of thirty minutes, the reader enters Off mode. Pressing the handle trigger for 1.3 seconds turns
the reader back On.
Figure 7 Charging Cradles
Getting Started
18

Battery Management
To check the charge status of the main battery, run the appropriate Zebra RFID Mobile application and select
Settings > Battery. To check the battery status on the LEDs, remove the RFD2000 RFID Sled from the cradle. The
battery charge status is displayed for 4 seconds.
In the Zebra RFID Mobile application, battery status indicates that the battery is either charging or discharging and
the battery level indicates the battery charge (as a percentage of fully charged). If using the partner application.
Refer to the partner application documentation.
Low Battery Notification
By default, the LED battery charge status indication lasts 4 seconds when the RFD2000 RFID Sled is removed
from the cradle. The indication is amber when the battery state of charge is in the range of 21-50%. The indication
is red when the battery state of charge is in the range 0-20%.
The TC20 mobile device sounds four short beeps when the battery charge status is below 10%.
Battery Optimization
The RFD2000 supports intelligent performance and battery optimizations for your application needs. An API is
available to enable this setting. Refer to the RFD2000 RFID Developer Guide (p/n MN-003158-xx) for more
information.
Getting Started
Mobile Device
For detailed information regarding the TC20 Mobile Computer, refer to the TC20 User Guide,
p/n MN-003020-xx at: www.zebra.com/support
.
19

Zebra RFID Mobile Application for Android
Introduction
This chapter describes the Zebra RFID Mobile Application for Android which demonstrates RFD2000 capability
and tag operation functionality.
Requirements
Requirements for the Zebra RFID Mobile Application for Android are as follows:
• The recommended Android version on the mobile computer is Nougat version 7.1.x
• Zebra Enterprise mobile computer - TC20
• Zebra RFID Manager APK
• Zebra RFID Mobile Application APK.
Installing Zebra RFID Mobile Application for Android
NOTE: The Zebra RFID Manager APK must be installed first before installing the Zebra RFID Mobile
Applications.
Install the Zebra RFID Mobile Application for Android (or partner application) on the mobile computer from
www.zebra.com/support.
version.
To install the software:
1. Connect the Android device to your computer. It should be connected as MTP Device and show as a drive on
your computer. For information on transferring files using Media Transfer Protocol, refer to the TC20 Mobile
Computer Integrator guide at: www.zebra.com/support
2. Go to Device Settings > Security and check Unknown Sources to allow installation of applications from
unknown sources.
3. Copy the Zebra_RFID_Mobile_API-1.0.5.xx.apk file to the mobile device.
4. Go to Settings > Security and select Unknown sources.
5. Use File Manager to locate Zebra_RFID_Mobile_API-1.0.5.xx.apk file in the folder to which its copied in
Step 3., and select it.
6. In the pop-up window, select the Android App installer to begin installation.
The procedure to install the software in an Android device depends on the Android
.
20

Zebra RFID Mobile Application for Android
Zebra RFID Mobile Application for Android
This application runs on Android mobile devices and demonstrates RFD2000 capability and tag operation
functionality.
The application allows for navigating to all screens whether or not the device is connected to the RFD2000 reader.
The Settings screens display the application defaults when there is no connection to the reader. When not
connected, an attempt to perform any operation (Rapid Read, Inventory, Locate tag, Access Operations, Save
Configuration, Battery Status) displays No Active Connection with Reader.
Navigate to all screens when the inventory/locate operation is in progress. When the operation is in progress, the
device displays Operation in Progress if additional operations are initiated.
Using the Zebra RFID Mobile Application for Android
To use this application for RFID operations:
1. Ensure the Zebra RFID Mobile Application for Android is installed on the Android mobile device.
2. Launch the Zebra RFID Mobile Application for Android on the mobile device.
3. Return to the Home screen and select Settings > Antenna. Power Level is set to 27.0 dBm by default. Japan
units are set to a different default power level depending on the SKU type.
4. Before using the device and if the region is not set, set the region in which the device is operating. To set the
region, open the application and select Settings > Regulatory (see Regulatory on page 35).
21

Zebra RFID Mobile Application for Android
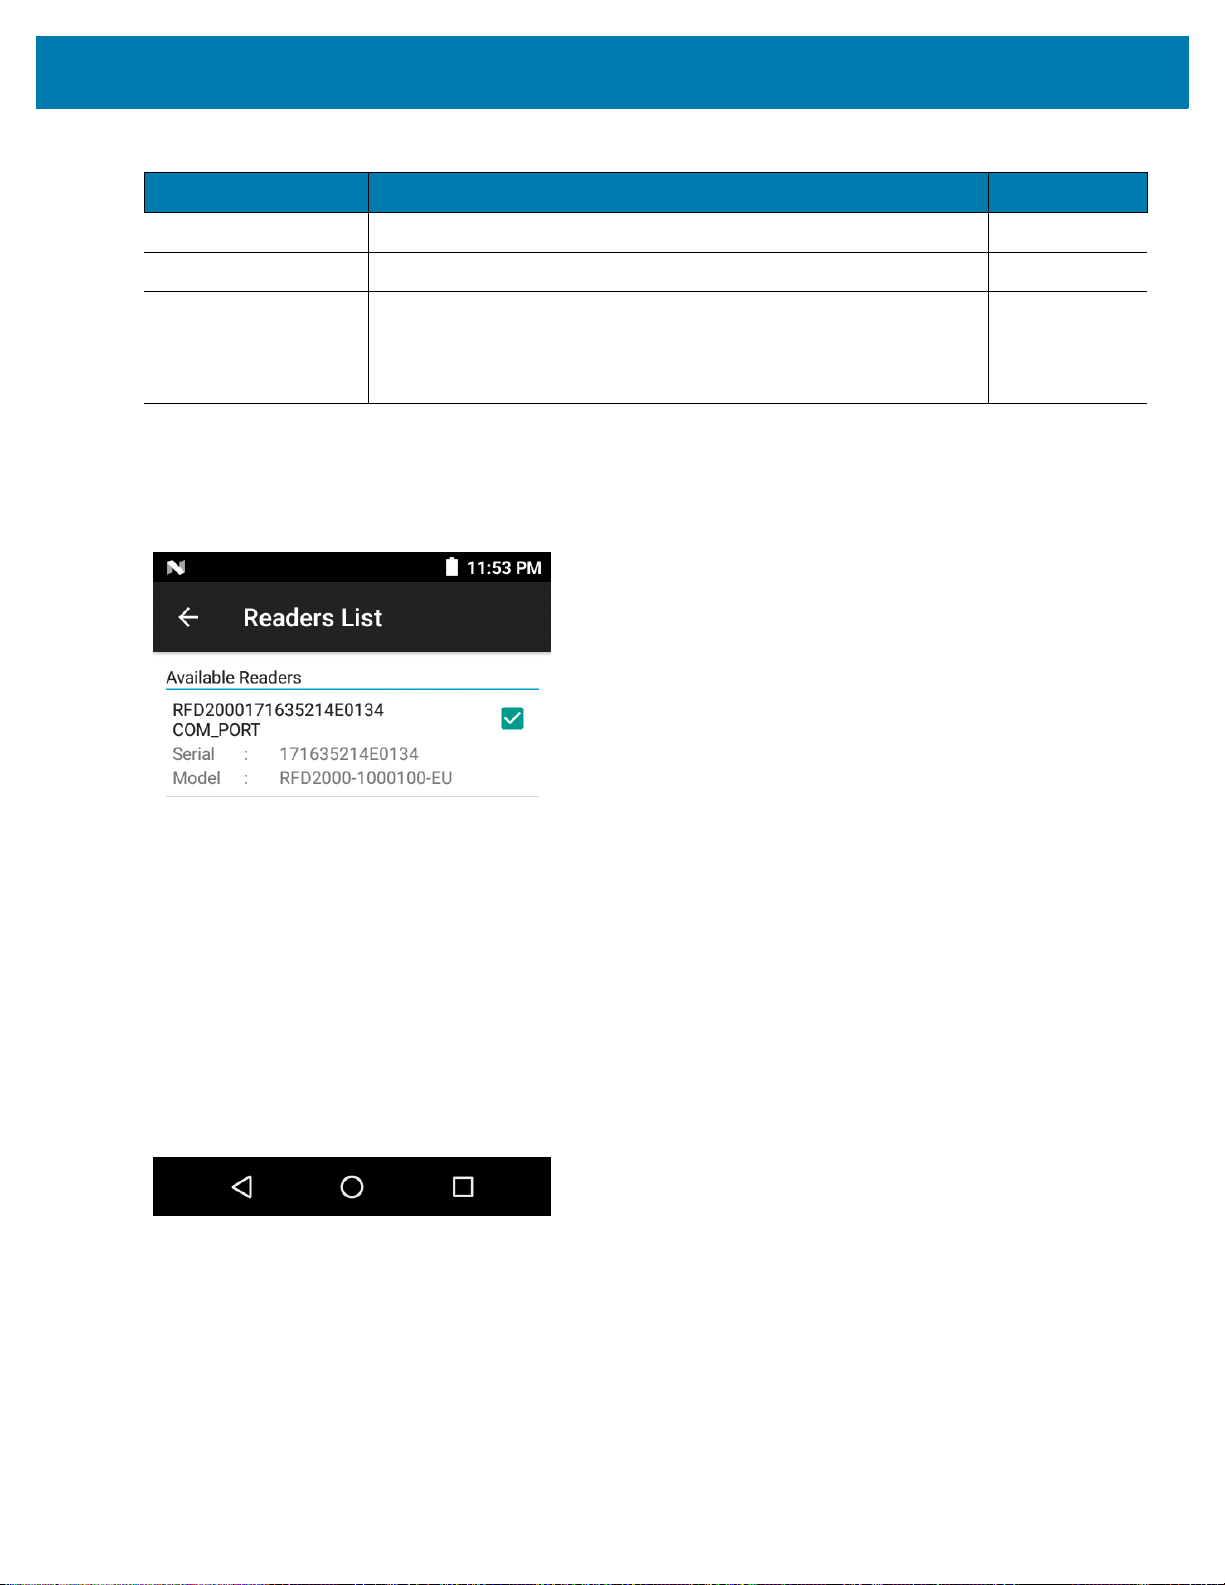
Connecting TC20 to the RFD2000
1. Launch the demo application manually.
2. Select the RFD2000 check box from the Readers List in Settings. The application automatically connects with
the device.
When the connection is successful, the current screen populates with the values from the RFD2000.
Figure 8 Settings - Reader List / Connection Screen
Disconnecting the RFD2000
When the RFD2000 is removed from the TC20, the application disconnects. Another option to disconnect, go to
the reader list page and disconnect by unchecking the check box next to the reader.
22

Zebra RFID Mobile Application for Android
Demo Application Screens
Home Screen
To access the Zebra RFID Mobile Application for Android, touch the RFID Reader icon on the mobile device to
display the Home screen. Tap the RFID Reader icon again to display the RFID Reader Menu. Tap any menu item
to access its screen.
Figure 9 Home and Menu Screens
23
Zebra RFID Mobile Application for Android
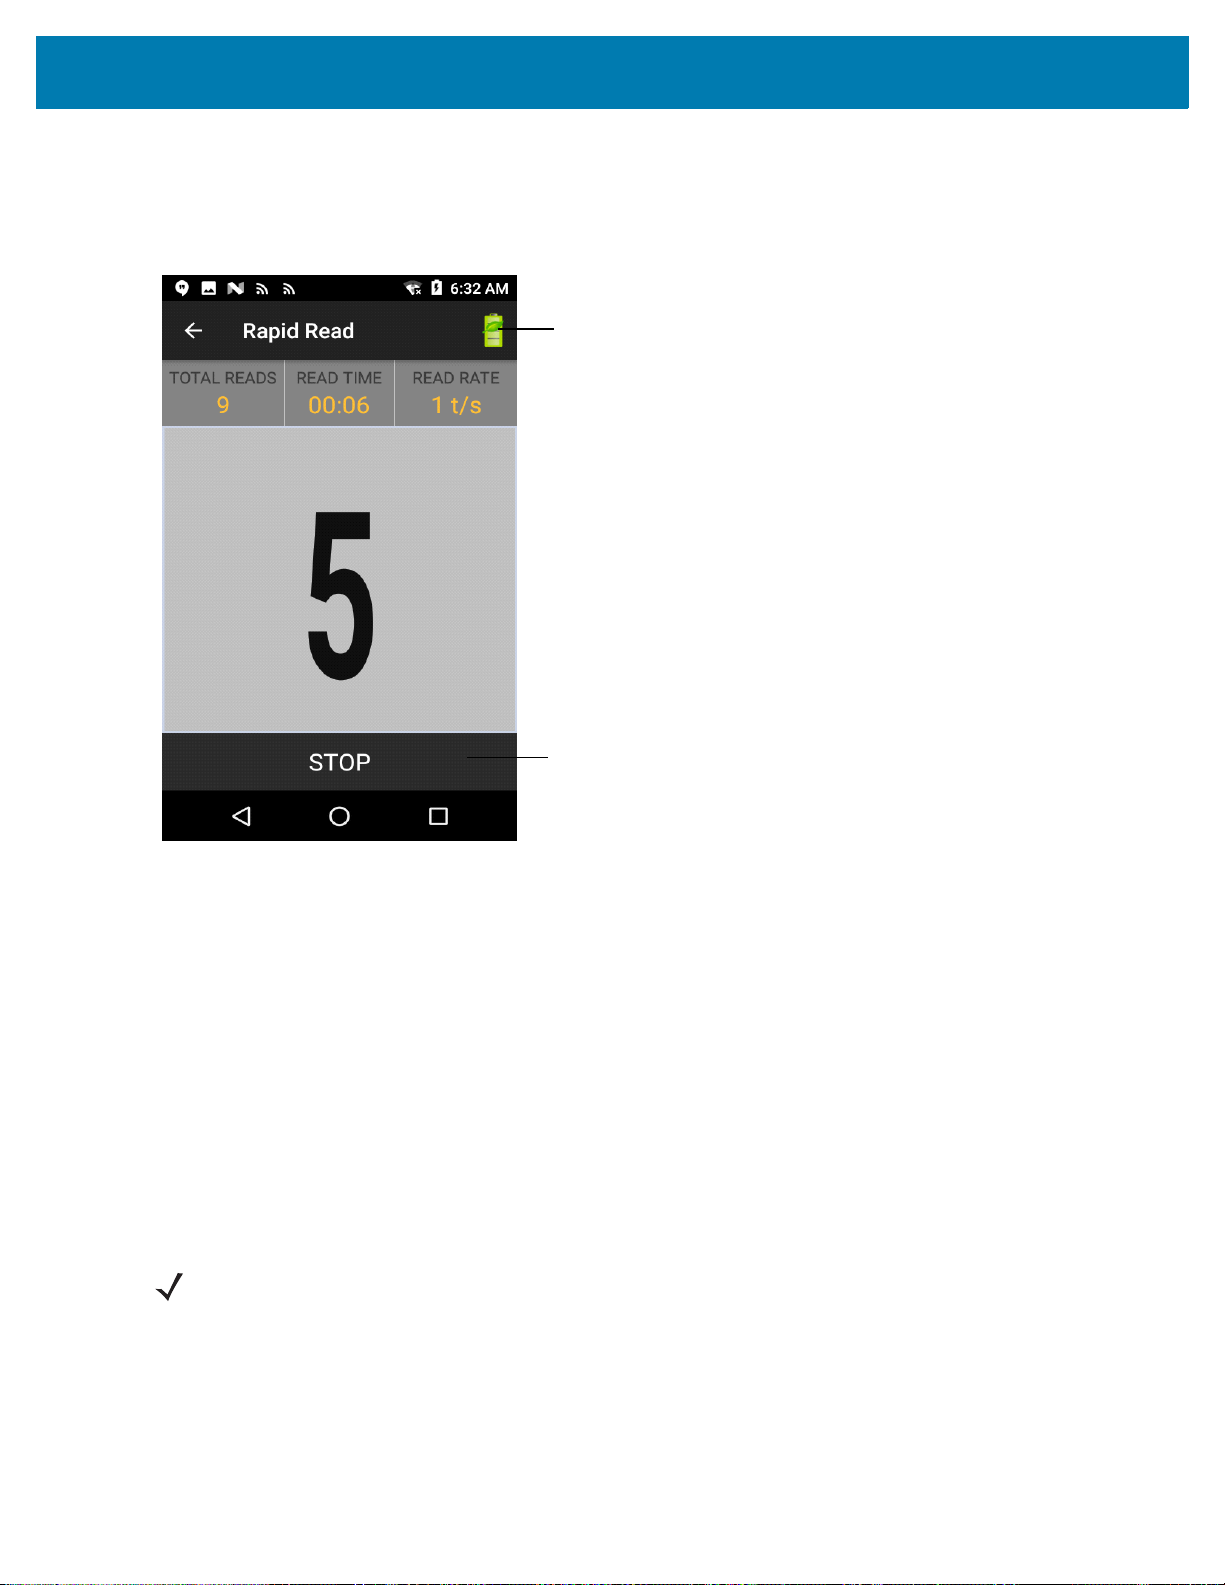
Start/Stop Toggle
Power Management Icon
Rapid Read
Tap Rapid Read from the Home or Menu screen.
Figure 10 Rapid Read Screen
The Rapid Read and Inventory screens display the following data (see Inventory on page 25).
• Total tag count
• Read time (mm:ss)
• Tag read rate (tags/sec)
• Unique tag count (displays in the center of screen).
Rapid Read and Inventory screens are two different views of the inventory operation on the reader. The Start/Stop
functionality can be used interchangeably on both screens. For example, when operation starts on the Rapid Read
screen and you navigate to the Inventory screen, the button available on the Inventory screen is Stop. The same
is true when the operation starts on the Inventory screen. During the rapid read process, you can navigate to the
Inventory screen to view tag details along with tag counts for each tag. The statistics displayed are maintained on
the Rapid Read and Inventory screens regardless of the screen used to start the process.
Select Start to start the rapid read inventory operation. Select Stop to stop inventory operation.
NOTE: The scan trigger on the RFD2000 can also start and stop the inventory operation. Press the trigger to
start, and press again to stop.
Moving to another screen does not halt the operation. However, attempting to make changes or perform another
operation while rapid read is in process results in an error.
24

Zebra RFID Mobile Application for Android
Power Management Icon
Content Area
Start/Stop Toggle
Memory
Bank
Search Icon
Inventory
Select Inventory from the Home or Menu screen.
Figure 11 Inventory Screen
Tag reading is started and stopped on this screen as well as on the Rapid Read screen (see Rapid Read on page
24). When the process starts, tag information displays on the screen.
Select Start to start the rapid read inventory operation. The Start button changes to Stop. Tap Stop to stop the
read inventory operation.
NOTE: The scan trigger on the RFD2000 can also start and stop the inventory operation. Press the trigger to
start, and press again to stop.
The tag ID selected displays on the Locate Tag screen when navigating to that screen (see Locate Tag on page
27).
25

Zebra RFID Mobile Application for Android
Inventory Screen Features
Table 6 Inventory Screen Features
Item Description
Action Bar
Tags Tap Memory Bank to select one of the following memory bank options from the
drop-down menu:
• None - Defaults to EPC.
• User - Allows reading user memory bank data when the tag is inventoried.
• Reserved - Allows reading reserved memory bank data when the tag is inventoried.
• TID - Allows reading TID memory bank data when the tag is inventoried.
• EPC - Allows reading EPC memory bank data when the tag is inventoried.
When the next inventory operation starts, the details from the selected memory bank
displays. This menu is inactive if there is an ongoing operation on the connected
reader.
• Default Display - None.
Search Tap the Search icon and enter a tag ID. Tags that match the entry display in the content
area.
Power Management Icon indicates if Dynamic Power is on. See Power Management on page 37.
Tap the Power Management icon to open the Battery Status screen.
Content Area
(select a tag)
Content Area
(select a tag)
Tapping a Tag ID highlights the tag. The highlighted Tag ID is populated on the Tag
Location text area as well as the Tag Pattern area in the Access Control screen. Tap
Start to start searching for the tag. See Locate Tag on page 27 for more details. From
this screen, return to the Menu or go to the Home screen and select Locate Tag.
The tags displayed in this area are based on the option selected from the memory bank.
Tap the tag ID to expand details about the tag. Tap the tag ID again to collapse details.
Example Default Tag Display:
Tag IDTag Count
AD99 15404190725965400404
Example Expanded Tag Display:
Note: Expanded tag detail can only display when the inventory operation is stopped.
Memory bank data is shown only when inventory is complete.
Tag IDTag Count
AD99 15404190725965400404
EPC MEMORY3000
RSSI
-50
Phase
1800
USER
1122334455667788AABBCCDDEEFF
1122334455667788AABBCCDDEEFF
1122334455667788AABBCCDDEEFF
26
Zebra RFID Mobile Application for Android
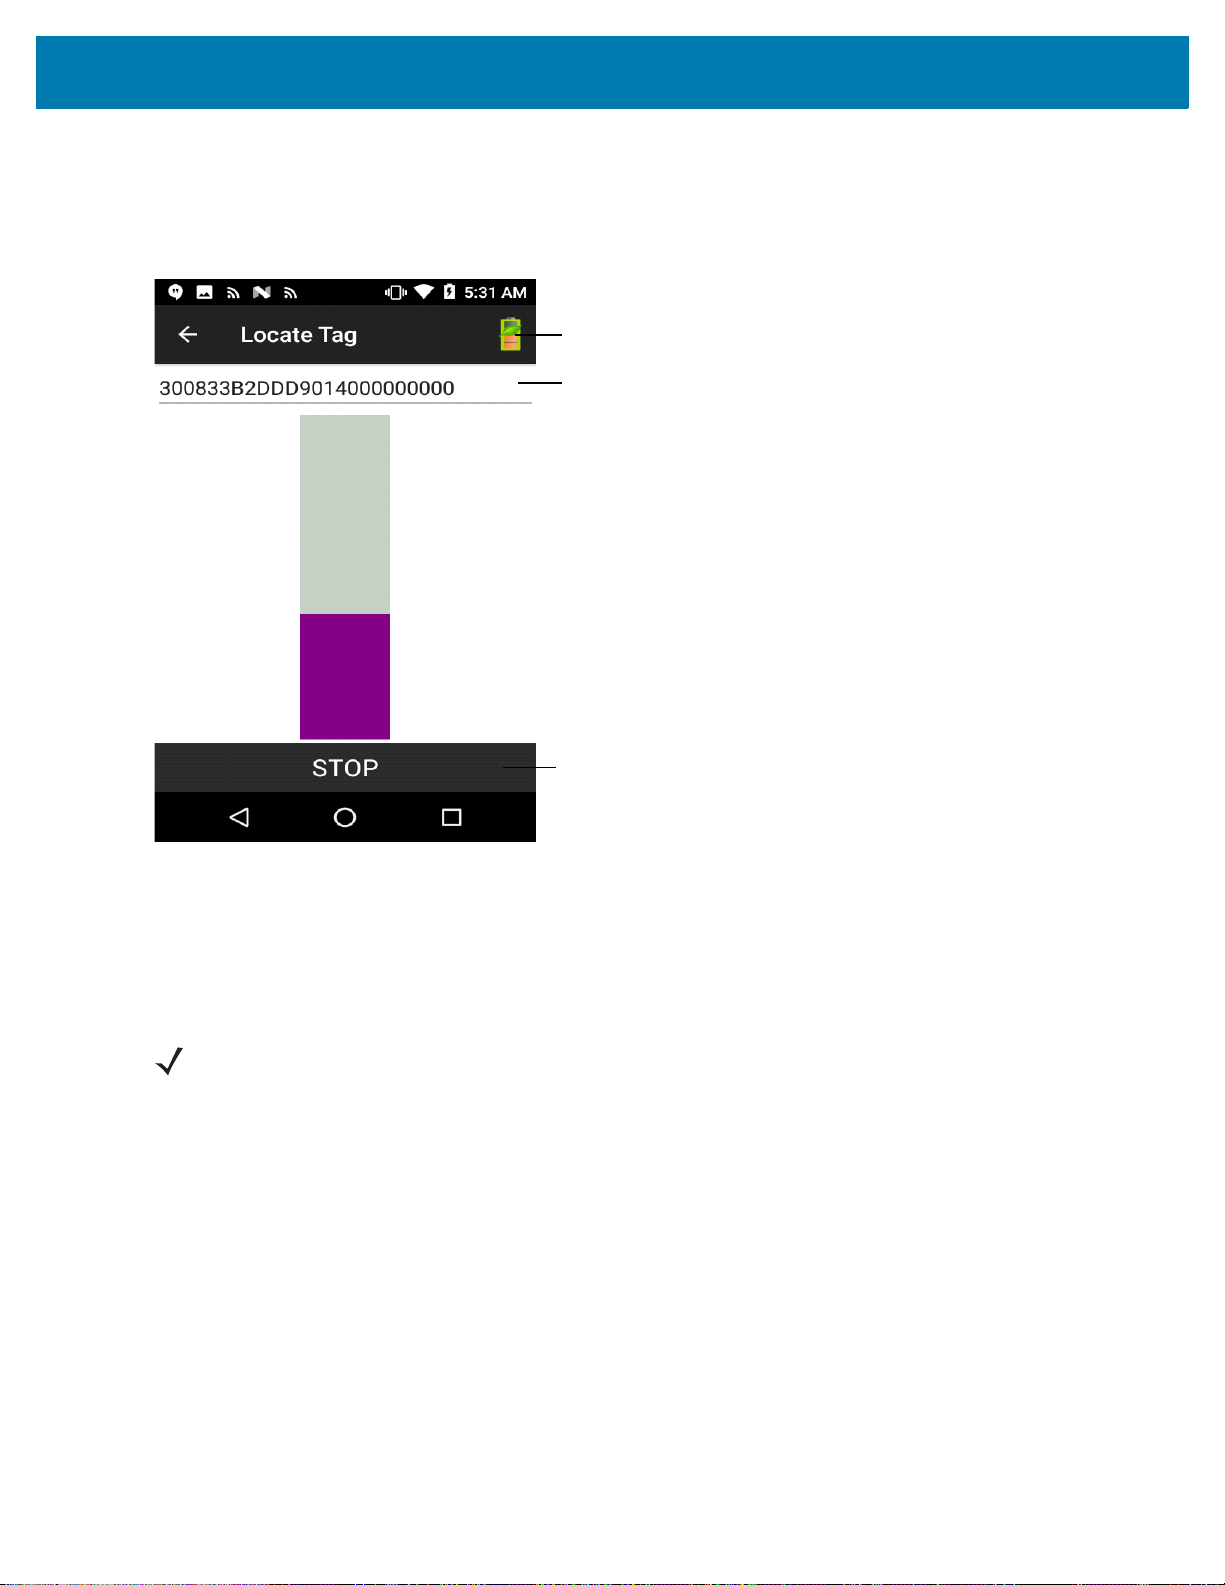
Start/Stop Toggle
Text Area
Power Management Icon
Locate Tag
Tap Locate Tag from the Home or Menu screen.
Figure 12 Locate Tag Screen
On this screen, enter the Tag ID in the text area or select a tag from the Inventory screen to pre-populate the Tag
ID to search.
Tap Start to start the locate tag operation. Tap STOP to stop. The RFD2000 trigger can also be used to start and
stop the operation.
NOTE: The scan trigger on the RFD2000 can also start and stop the inventory operation. Press the trigger to
start, and press again to stop.
The color bar on the display shows the relative distance of the tag.
When the locate tag operation starts, moving to another screen does not stop the operation until Stop is selected.
27
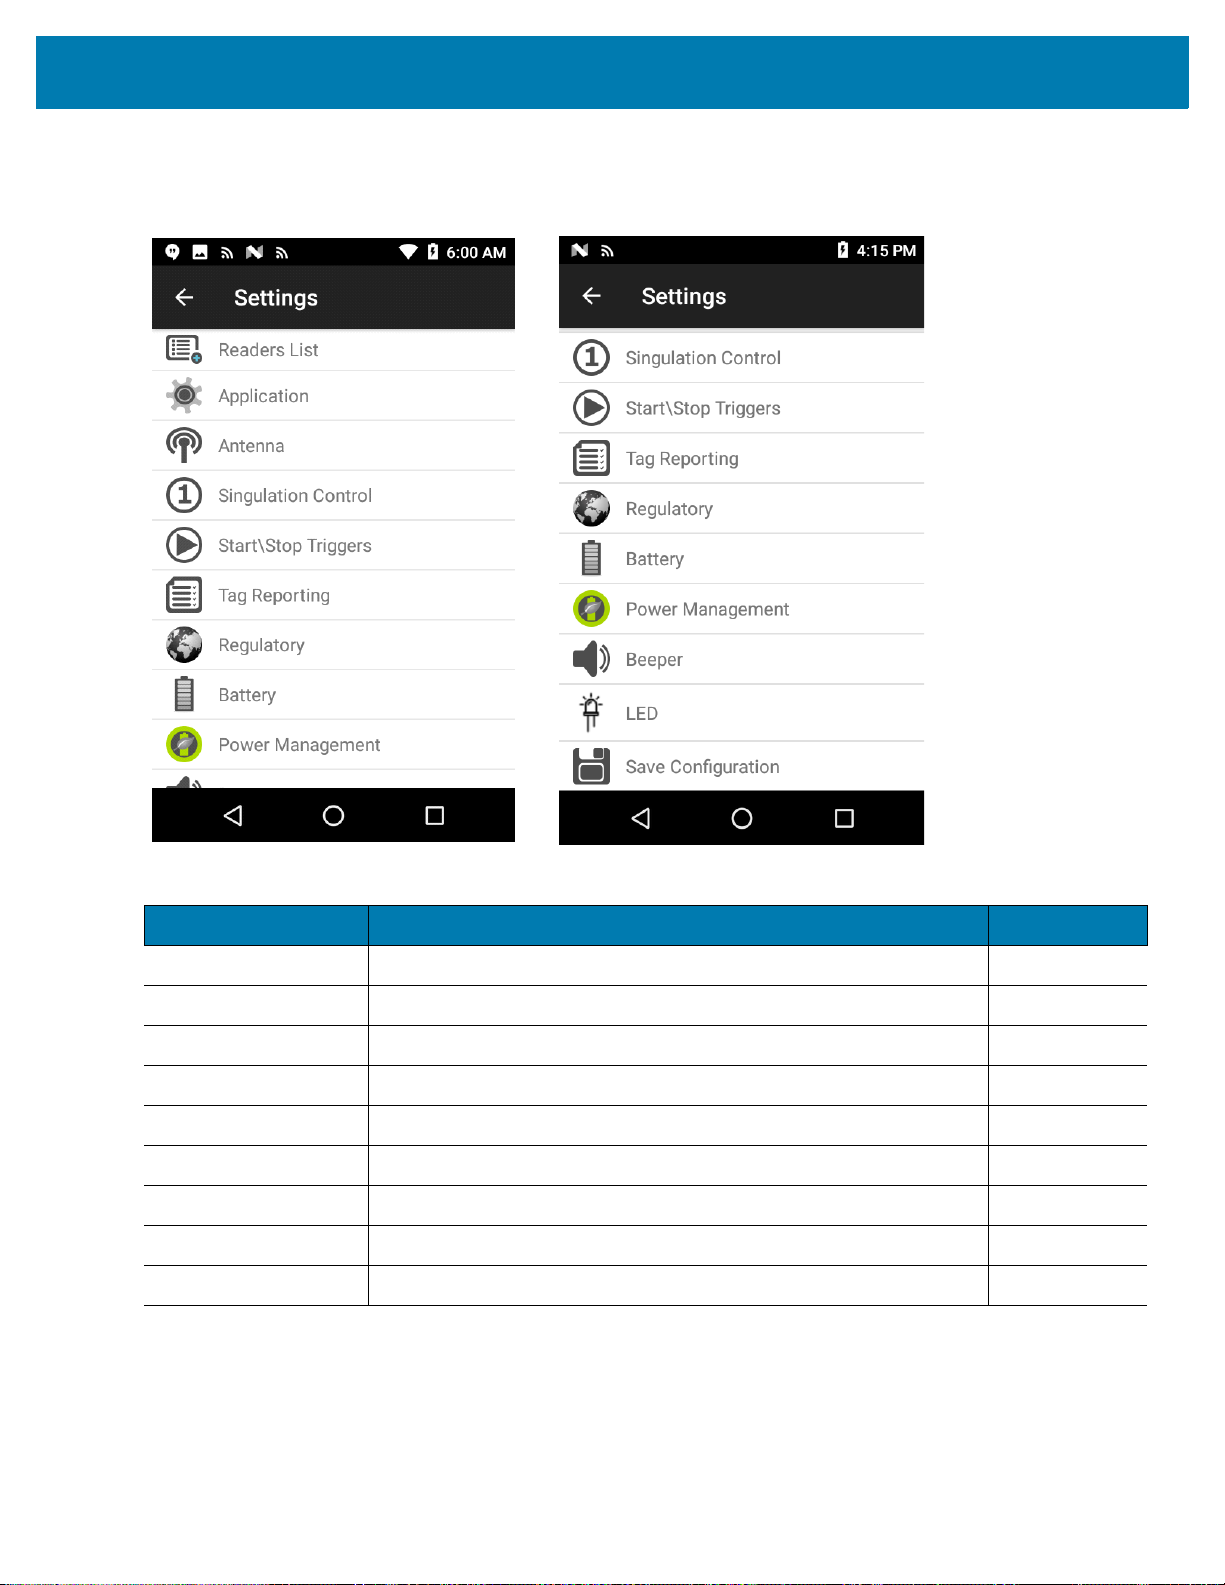
Settings
Figure 13 Settings Screen
Zebra RFID Mobile Application for Android
Table 7 Settings Screen Options
Settings Option Description Page
Readers List Displays connected RFD2000 RFID.
Application Displays reader connection, notification, and data export settings.
Antenna Displays antenna power lever and link profile.
Singulation Control Displays Session, Tag Population, Inventory State and SL Flag.
Start\Stop Triggers Allows Start and Stop button control.
Tag Reporting Support for reporting unique tags as part of tag reporting options.
Regulatory Allows region and channel selections.
Battery Displays the RFD2000 battery status.
Power Management Turns Dynamic Power Optimization on and off.
5-29
5-30
5-31
5-32
5-33
5-34
5-35
5-36
5-37
28
Zebra RFID Mobile Application for Android
Table 7 Settings Screen Options (Continued)
Settings Option Description Page
Beeper Use to turn the beeper on/off, and set volume.
LED Enables/Disables TC20 tag read LED indicator.
Save Configuration Ability to save all settings: Antenna, Singulation, Tag Reporting,
Start/Stop trigger, Beeper Volume, and Regulatory.
Note: The settings are also automatically saved when changes are
made.
Readers List
From the Settings screen, select Readers List.
Figure 14 Settings - Readers List Screen
5-38
5-38
5-39
Tap a reader name from the Readers List to establish a session with the selected reader. Tap again to terminate
the session.
29
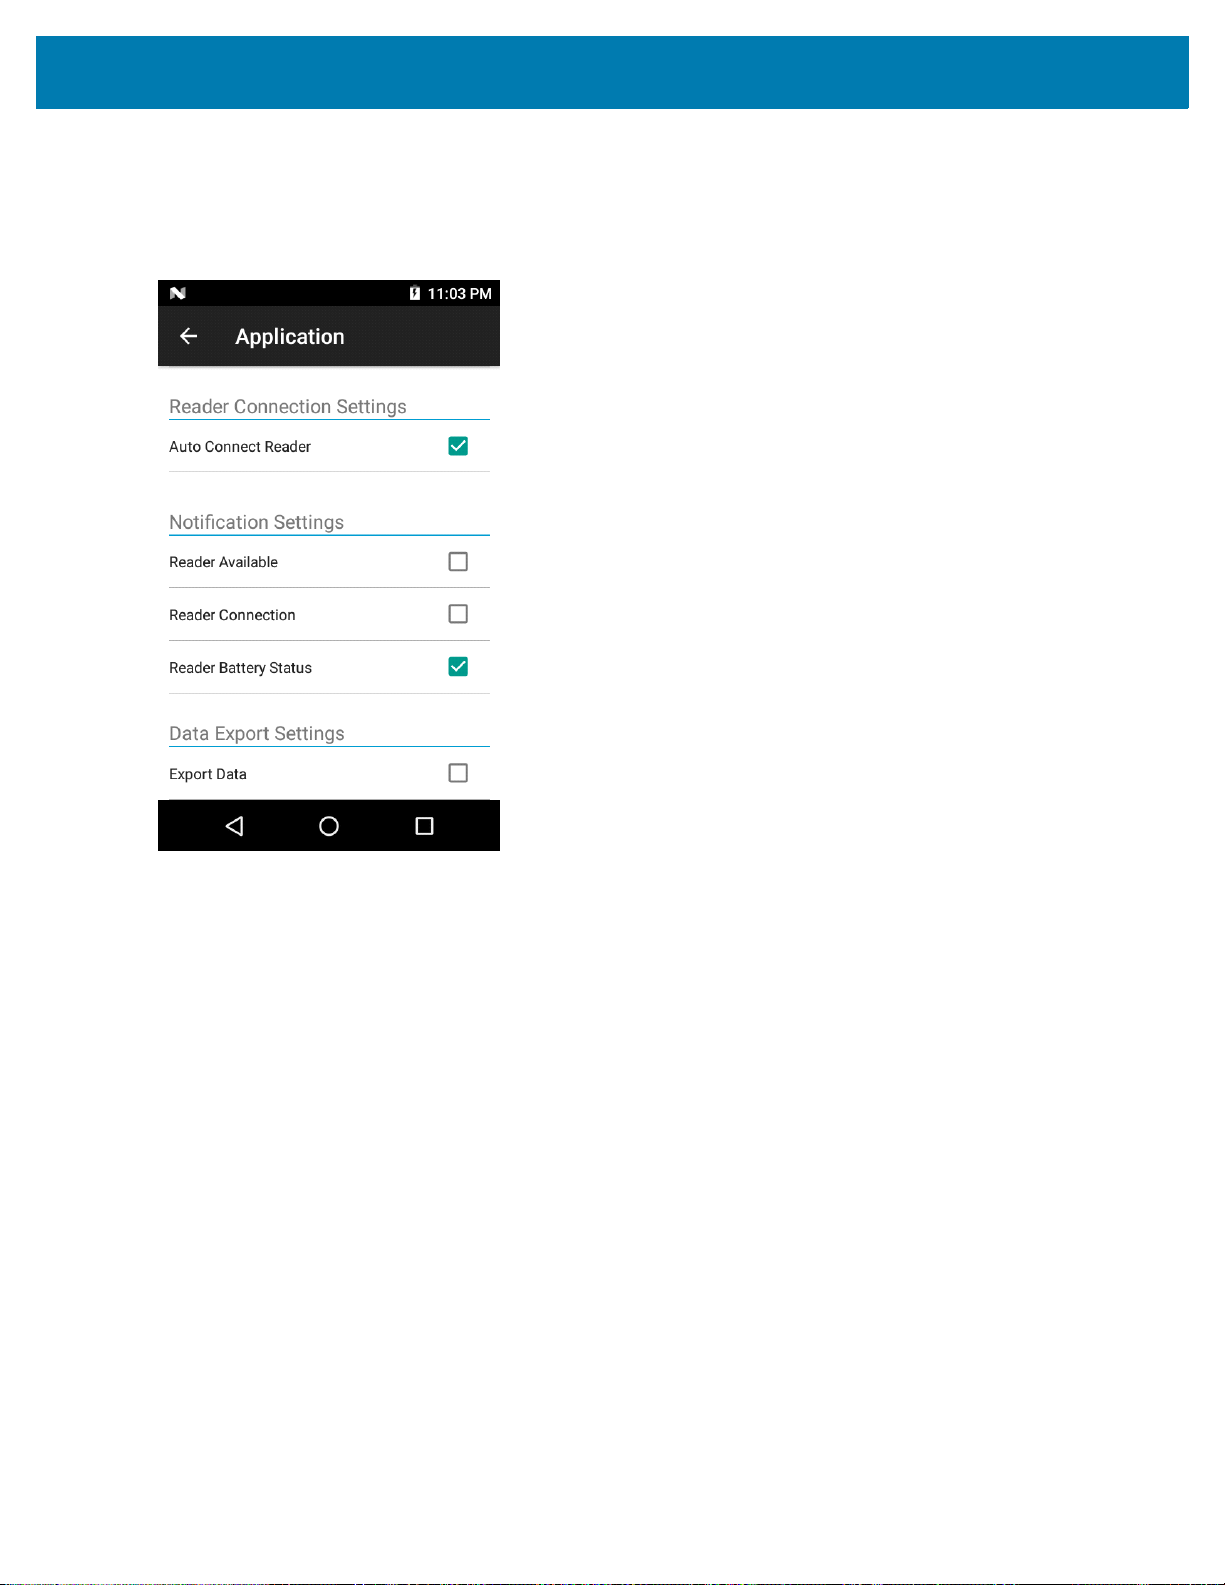
Application
Zebra RFID Mobile Application for Android
From the Settings screen, select Application
Figure 15 Settings - Application Screen
.
The application always detects the RFD2000 reader that is attached to the TC20 Mobile Computer.
• Auto Reconnect Reader - When checked, the application attempts to reconnect to the reader.
• Export Data - When checked, the application writes the inventoried RFID data to a file when the inventory
operation stops. On Android platforms the file is saved in a fixed directory. Check the files in file browsing
in the Inventory directory (Sdcard/inventory/<files>). The files may be copied to a PC.
30
 Loading...