

Page 1

Z4Mplus/Z6Mplus/R4Mplus
Quick Reference Guide
Use this guide to operate your printer on a daily basis. For more detailed information, refer to
the User Guide.
External View
Figure 1 • Exterior of Printer
Front
1
2
3
4
Control panel
1
Media door
2
Power switch (O = Off, I = On)
3
AC power connector
4
Rear
© 2007 ZIH Corp. All product names and numbers are Zebra
trademarks, and Zebra and the Zebra logo are registered
trademarks of ZIH Corp. All rights reserved.
14022L-002 Rev. A
7/6/07
Page 2
Control Panel
PAUSE
2
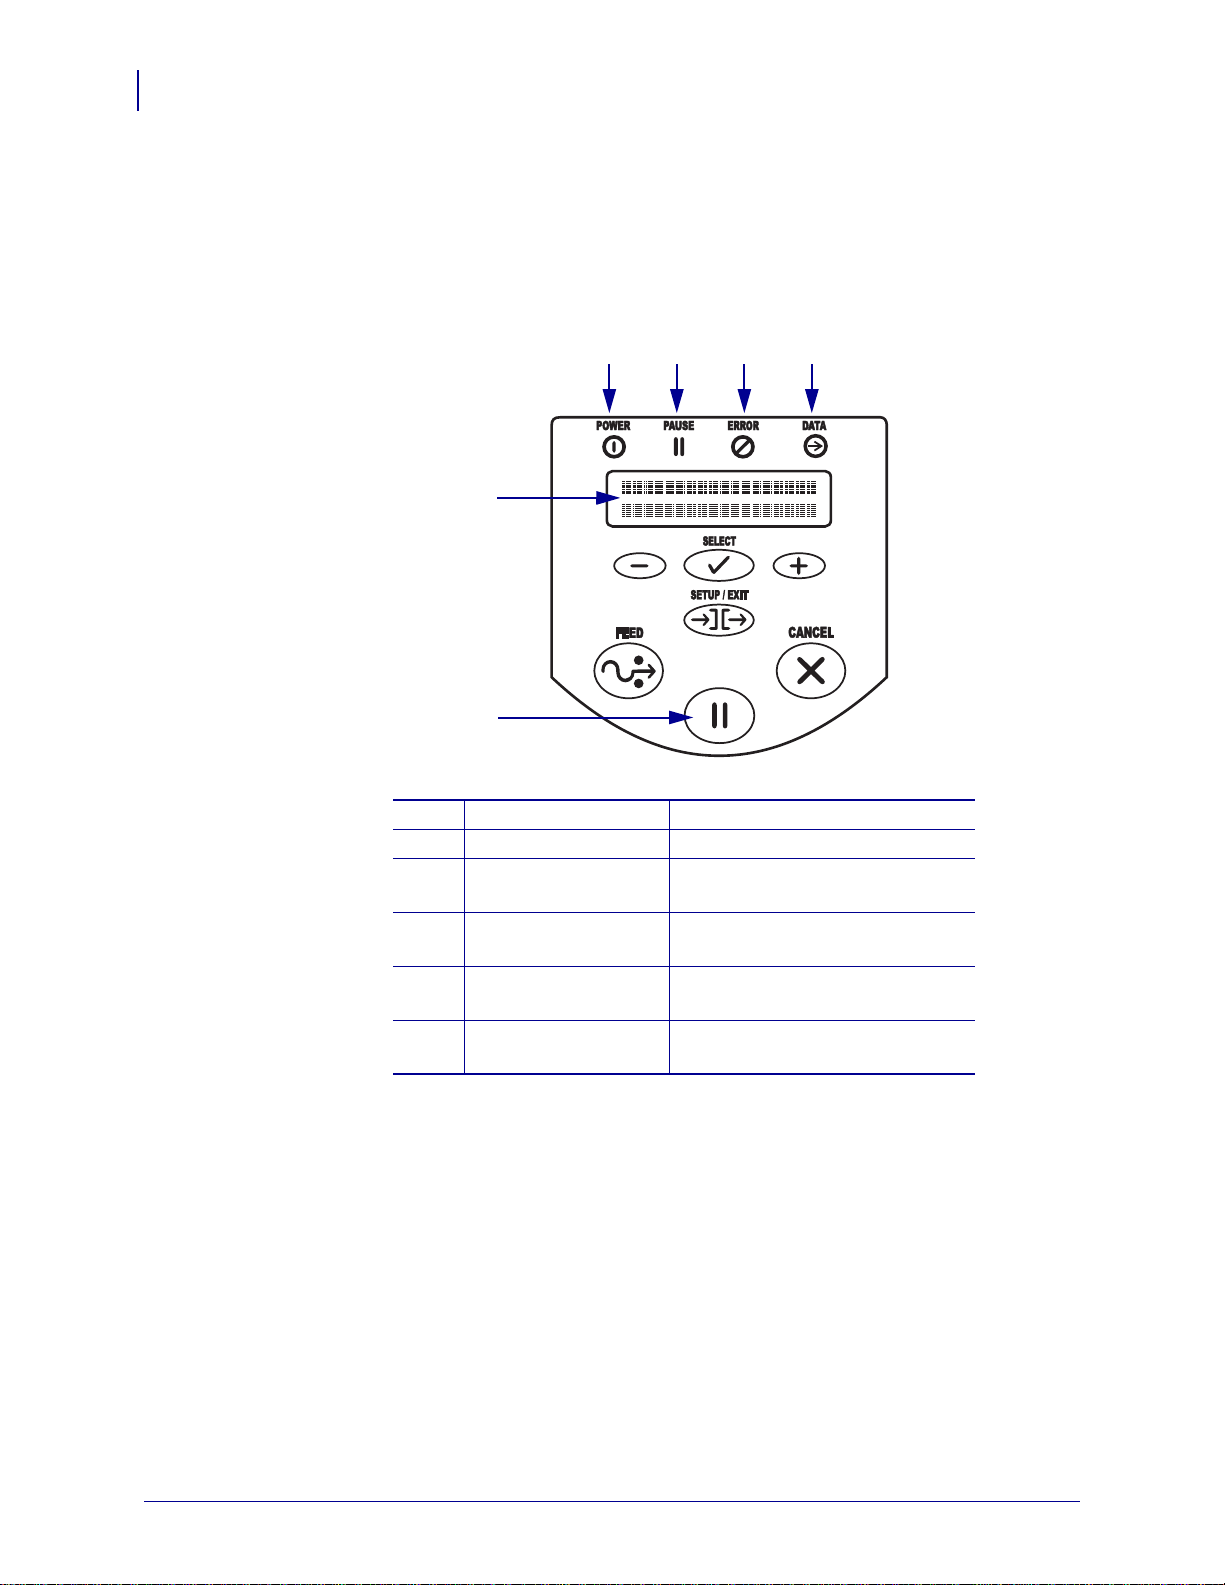
Control Panel
The control panel (Figure 2) indicates the printer’s operating status and controls basic printer
operation.
Figure 2 • Control Panel
1 2 3 4
5
6
Power light On when the printer is on.
1
PAUSE light On when the printer is paused.
2
Error light Blinks or remains on when the
3
printer needs attention.
Data light Blinks quickly when the printer is
4
receiving data.
LCD Shows the printer’s operating
5
status.
PAUSE button Starts or stops printer operation
6
when pressed.
14022L-002 Rev. A Z4Mplus/Z6Mplus/R4Mplus Quick Reference Guide 7/6/07
Page 3
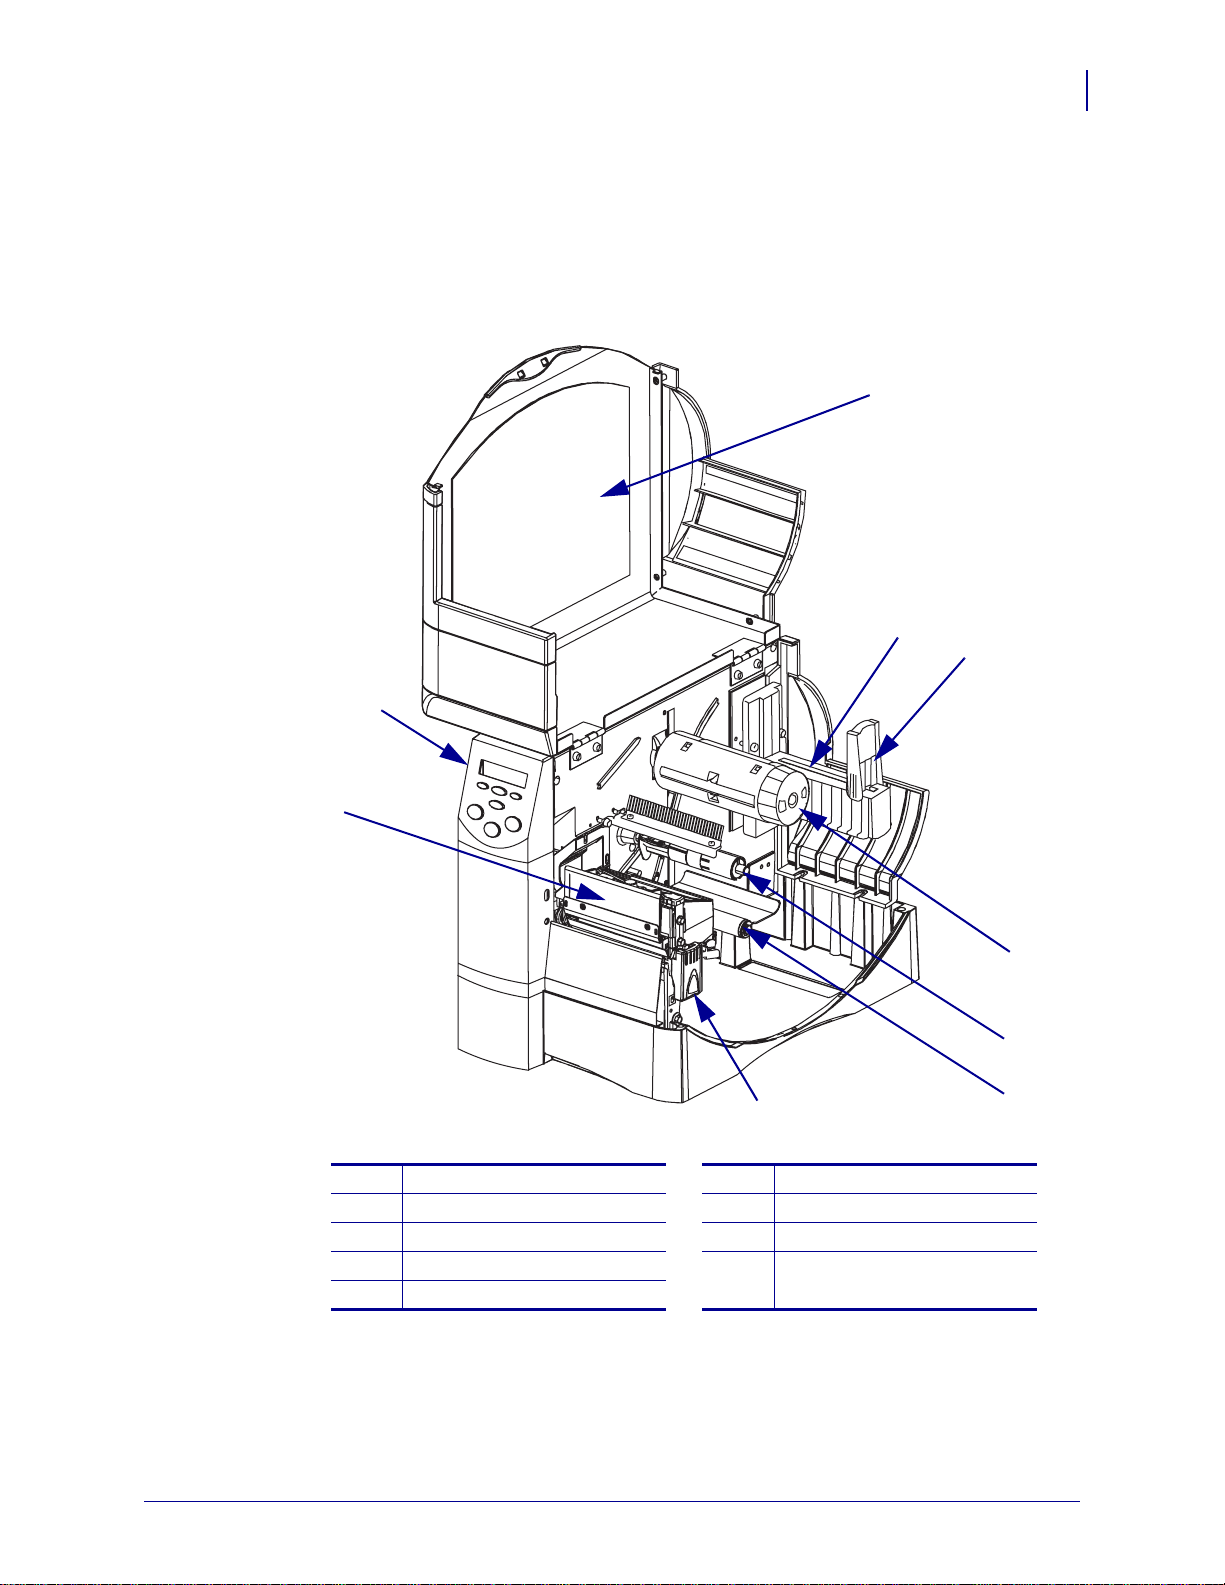
Printer Components
Figure 3 shows the components inside the media compartment of your printer. Depending on
installed options, your printer may look slig htly different.
Figure 3 • Printer Components
Printer Components
3
4
5
3
1
2
Printhead assembly
1
Control panel
2
Media door
3
Media supply hanger
4
Media supply guide
5
9
Ribbon take-up spindle
6
Ribbon supply spindle
7
Dancer assembly
8
Printhead release latch
9
6
7
8
7/6/07 Z4Mplus/Z6Mplus/R4Mplus Quick Reference Guide 14022L-002 Rev. A
Page 4

Load Media
4
Load Media
Use the instructions in this section to load roll media in Tear-Off mode (Figure 4). For
instructions for loading fanfold media or for loading in different print modes, refer to the
User Guide.
Figure 4 • Tear-Off Mode Media Path
Caution • When you are loading media or ribbon, remove all jewelry that could come into
contact with the printhead or other printer parts.
To Load Roll Media in Tear-Off Mode, complete these steps:
1. Remove and discard any tags or labels that are dirty or that are held by adhesives or tape.
Tag Stock Labels
2. Flip down the medi a supply guide.
14022L-002 Rev. A Z4Mplus/Z6Mplus/R4Mplus Quick Reference Guide 7/6/07
Page 5

Load Media
5
3. Place the roll of media on the media supply hanger. Push the roll as far back as it will go.
4. Flip up the media supply guide, and then slide it in until it touches the edge of the roll.
5. Press the printhead release latch to open the printhead assembly. Lift the print hea d u nt il it
latches open.
7/6/07 Z4Mplus/Z6Mplus/R4Mplus Quick Reference Guide 14022L-002 Rev. A
Page 6
Load Media
3 2 1
6
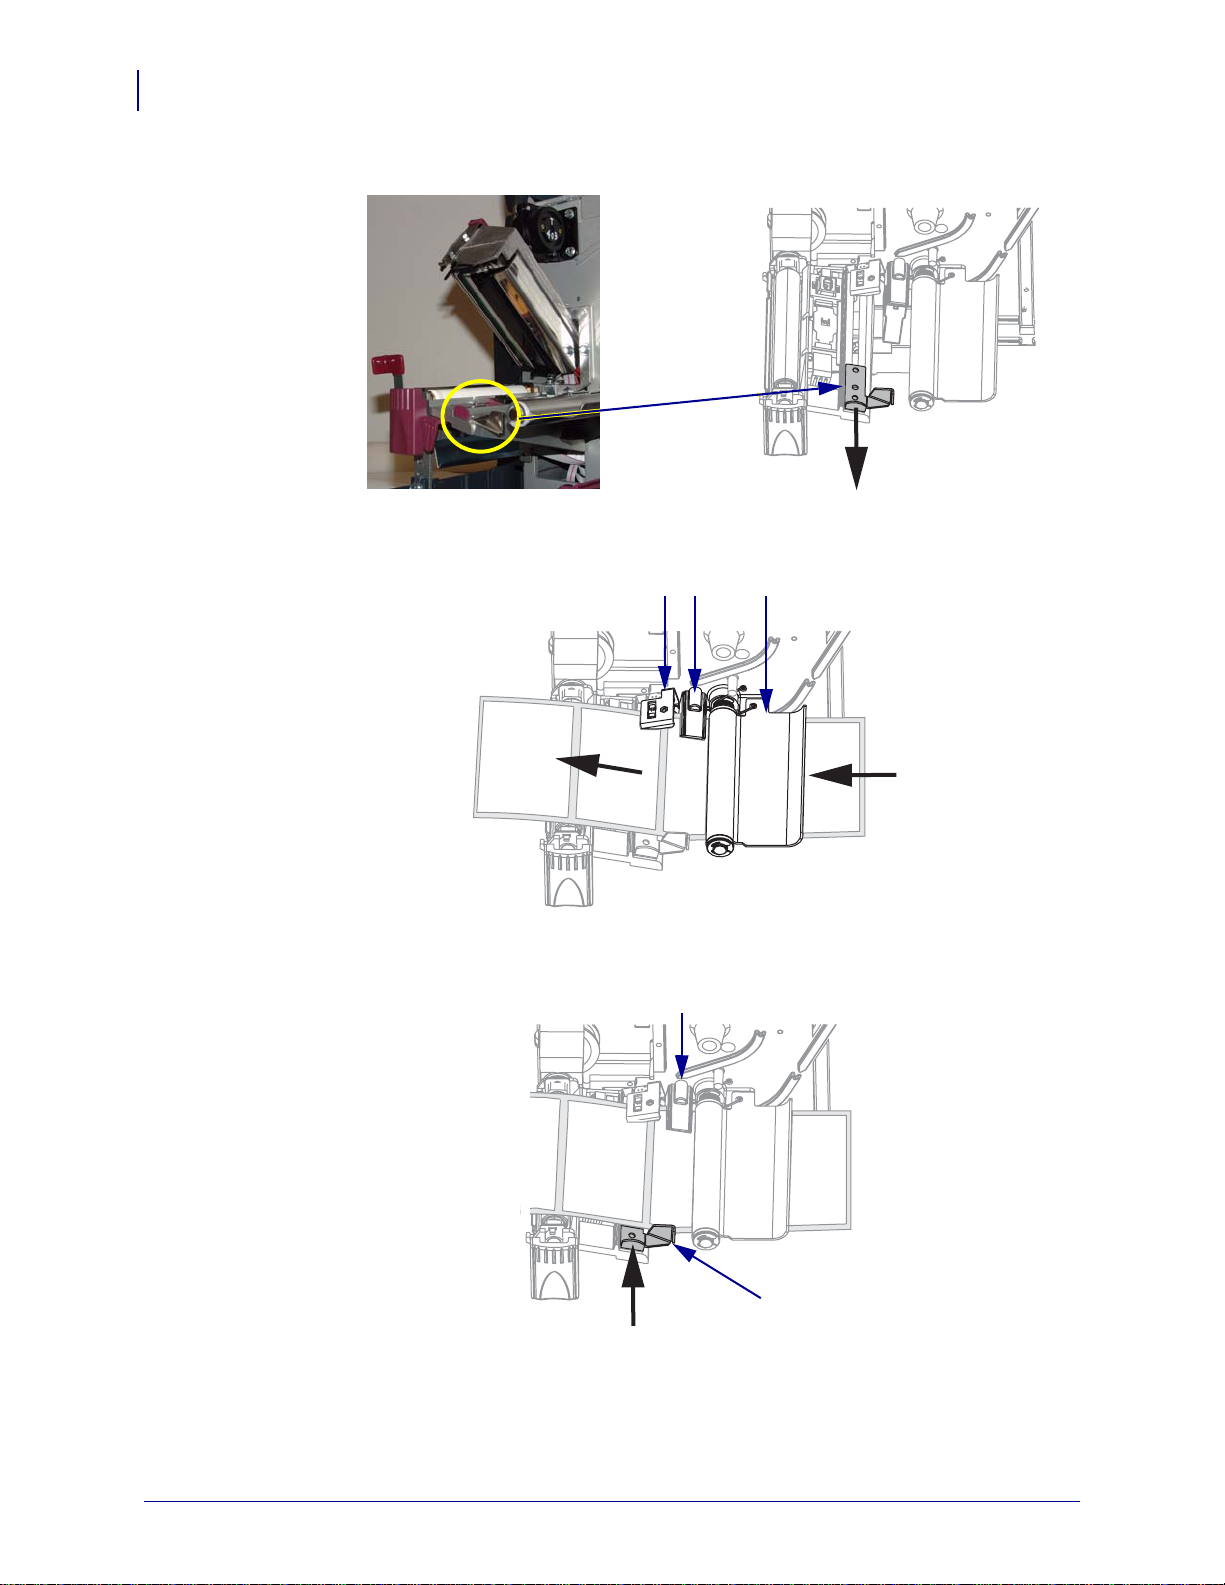
6. Slide out the media guide.
7. Feed the media under the dancer assembly (1), through the slot in the transmissive
sensor (
2—standard transmissive sensor shown), and under the ribbon sensor (3).
8. Push the media to the back of the transmissive sensor (1). Slide in the media guide (2)
until it touches the edge of the media.
1
2
14022L-002 Rev. A Z4Mplus/Z6Mplus/R4Mplus Quick Reference Guide 7/6/07
Page 7

Load Media
7
9. Close the printhead assembly.
10. If the printer is paused (the Pause light is blinking), press PAUSE to enable printing.
Load Ribbon
Always use ribbon that is wider than the media to protect the printhead from wear. For direct
thermal printing, do not load ribbon in the printer.
1
Figure 5 • Ribbon Path
Printhead assembly
1
Ribbon supply spindle
2
Ribbon take-up spindle
3
Tension blades
4
2
3
4
7/6/07 Z4Mplus/Z6Mplus/R4Mplus Quick Reference Guide 14022L-002 Rev. A
Page 8

Load Media
8
Caution • When you are loading media or ribbon, remove all jewelry that could come into
contact with the printhead or other printer parts.
To load ribbon, complete these steps:
1. Press the printhead release latch to open the printhead assembly. Lift the print hea d u nt il it
latches open.
2. Orient the ribbon with the loose end unrolling clockwise.
3. Place the roll of ribbon on the ribbon supply spindle (1) and push it all the way back.
1
14022L-002 Rev. A Z4Mplus/Z6Mplus/R4Mplus Quick Reference Guide 7/6/07
Page 9

Load Media
4. Pull the end of the ribbon under the printhead assembly ( 1) and out the front of the printer.
1
5. Close the printhead assembly.
9
6. Wind the ribbon clockwise onto the ribbon take-up spindle (1).
1
7/6/07 Z4Mplus/Z6Mplus/R4Mplus Quick Reference Guide 14022L-002 Rev. A
Page 10

10
Load Media
Remove Used Ribbon
To remove used ribbon, complete these steps:
1.
Caution • Do not cut the ribbon directly on the ribbon take-up spindle. Doing so may
damage the spindle.
If the ribbon has not run out, cut or break it before the ribbon take-up spindle (1).
2.
To loosen the ribbon, squeeze it against the ribbon take-up spindle tensi on blades (1). At
the same time, turn the ribbon take-up spindle release knob counterclockwise (
1
2).
The tension blades collapse into the ribbon take-up spindle, loosening the ribbon.
1
2
3. Slide the used ribbon off of the ribbon take-up spindle and d iscard.
14022L-002 Rev. A Z4Mplus/Z6Mplus/R4Mplus Quick Reference Guide 7/6/07
 Loading...