

Page 1
MC33XX
Mobile Computer
User Guide
for Android ™ 8.1 Oreo
MN-003228-03 Rev A
Page 2

Copyright
ZEBRA and the stylized Zebra head are trademarks of Zebra Technologies Corporation, registered in many
jurisdictions worldwide. Google, Android, Google Play and other marks are trademarks of Google LLC; Oreo is a
trademark of Mondelez International, Inc. group. All other trademarks are the property of their respective owners.
©2019 Zebra Technologies Corporation and/or its affiliates. All rights reserved.
COPYRIGHTS & TRADEMARKS: For complete copyright and trademark information, go to www.zebra.com/
copyright.
WARRANTY: For complete warranty information, go to www.zebra.com/warranty
END USER LICENSE AGREEMENT: For complete EULA information, go to www.zebra.com/eula
Terms of Use
• Proprietary Statement
This manual contains proprietary information of Zebra Technologies Corporation and its subsidiaries (“Zebra
Technologies”). It is intended solely for the information and use of parties operating and maintaining the
equipment described herein. Such proprietary information may not be used, reproduced, or disclosed to any
other parties for any other purpose without the express, written permission of Zebra Technologies.
• Product Improvements
Continuous improvement of products is a policy of Zebra Technologies. All specifications and designs are
subject to change without notice.
• Liability Disclaimer
Zebra Technologies takes steps to ensure that its published Engineering specifications and manuals are
correct; however, errors do occur. Zebra Technologies reserves the right to correct any such errors and
disclaims liability resulting therefrom.
• Limitation of Liability
In no event shall Zebra Technologies or anyone else involved in the creation, production, or delivery of the
accompanying product (including hardware and software) be liable for any damages whatsoever (including,
without limitation, consequential damages including loss of business profits, business interruption, or loss of
business information) arising out of the use of, the results of use of, or inability to use such product, even if
Zebra Technologies has been advised of the possibility of such damages. Some jurisdictions do not allow the
exclusion or limitation of incidental or consequential damages, so the above limitation or exclusion may not
apply to you.
.
.
Revision History
Changes to the original guide are listed below:
Change Date Description
-01 Rev A 12/2018 Initial release.
2
Page 3

Change Date Description
-02 Rev A 05/2019 Updated the Features section in the Getting Started chapter to include the
Application Notification LED and updated the Accessories chapter note to indicate
that to function properly, remove the entire rubber boot from the device before
placing the device in a charging cradle.
-03 Rev A 09/2019 Updated to indicate the lanyard is compatible only with the MC33XX-R and
MC33XX-S configurations, remove screws on the forklift mount, and replace the
Screen Protector Mode screen.
3
Page 4

Table of Contents
Copyright ......................................................................................................................... 2
Terms of Use ..................................................................................................................2
Revision History ..............................................................................................................2
About This Guide........................................................................................................ 13
Introduction ................................................................................................................... 13
Configurations ............................................................................................................... 13
Software Versions ......................................................................................................... 16
Chapter Descriptions .................................................................................................... 16
Notational Conventions ................................................................................................. 17
Related Documents ...................................................................................................... 17
Service Information ....................................................................................................... 17
Provide Documentation Feedback ................................................................................ 18
Getting Started............................................................................................................ 19
Introduction ................................................................................................................... 19
MC33XX-G Features .................................................................................................... 19
MC33XX-R Features ..................................................................................................... 22
Rotating Scan Turret ............................................................................................. 24
MC33XX-S Features ..................................................................................................... 25
Unpacking .....................................................................................................................27
Setup ............................................................................................................................. 27
Installing a microSD Card ...................................................................................... 27
Installing the MC33XX-G Battery .......................................................................... 30
Installing the MC33XX-R/S Battery ....................................................................... 31
Charging the Battery ............................................................................................. 32
Backup Power ................................................................................................. 34
Charging Temperature .................................................................................... 34
Charging Spare Batteries ................................................................................ 35
Hot Swap Mode .............................................................................................. 35
Google Account Setup .......................................................................................... 35
4
Page 5

Table of Contents
Zebra Visibility Services ................................................................................................ 35
Replacing the Battery in the MC33XX-G ...................................................................... 36
Replacing the Battery in the MC33XX-R/S ................................................................... 38
Accessing Device Settings ............................................................................................ 40
Battery Management ..................................................................................................... 40
Monitoring Battery Usage ...................................................................................... 40
Low Battery Notification ......................................................................................... 41
Battery Optimization .............................................................................................. 41
Turning Off the Radios .......................................................................................... 42
Connecting a Wired Headset .......................................................................... 42
Real-Time Clock Backup .............................................................................................. 42
Setting the Date and Time ............................................................................................ 42
Display Settings ............................................................................................................ 43
Setting the Screen Brightness ............................................................................... 43
Setting Screen Timeout ......................................................................................... 43
Setting Screen Rotation ........................................................................................ 44
Setting Font Size ................................................................................................... 44
Setting Display Size .............................................................................................. 45
Ambient Display .................................................................................................... 45
Touch Panel Mode ................................................................................................ 45
General Sound Setting .......................................................................................... 46
Setting Device Advertisement ....................................................................................... 48
Wake-Up Sources ......................................................................................................... 48
Using the Device ......................................................................................................... 49
Introduction ................................................................................................................... 49
Google Mobile Services ................................................................................................ 49
Home Screen ................................................................................................................ 49
Setting Home Screen Rotation .............................................................................. 51
Status Bar .............................................................................................................. 51
Status Icons .................................................................................................... 52
Notification Icons ................................................................................................... 53
Managing Notifications .................................................................................... 53
Setting App Notifications ................................................................................. 54
Viewing Notification Settings for All Apps ....................................................... 55
Controlling Lock Screen Notifications ............................................................. 55
Blink Light ....................................................................................................... 55
Quick Access Panel .............................................................................................. 55
Editing Icons on Quick Settings ............................................................................. 56
App Shortcuts and Widgets ................................................................................... 57
Adding an App Shortcut to the Home Screen ....................................................... 57
Adding a Widget to the Home Screen ............................................................. 57
5
Page 6

Table of Contents
Moving Items on the Home Screen ................................................................. 58
Removing an App Shortcut or Widget from the Home Screen ....................... 58
Folders .................................................................................................................. 58
Creating a Folder ............................................................................................ 58
Naming Folders ............................................................................................... 58
Removing a Folder .......................................................................................... 59
Home Screen Wallpaper ....................................................................................... 59
Using the Touchscreen ................................................................................................. 59
Keyboards .....................................................................................................................60
Keyboard Configuration ................................................................................................ 60
Enabling Keyboards ........................................................................................ 60
Switching Between Keyboards ....................................................................... 60
Using the Enterprise Keyboard ............................................................................. 60
Numeric Tab ................................................................................................... 61
Alpha Tab ........................................................................................................ 61
Additional Character Tab ................................................................................ 61
Scan Tab ......................................................................................................... 62
Using the Android and Gboard Keyboards ..................................................... 62
Editing Text ..................................................................................................... 62
Entering Numbers, Symbols, and Special Characters .................................... 62
Hiding On-Screen Keyboard ........................................................................... 63
Switching Language Keyboards ..................................................................... 63
Do Not Disturb Feature ......................................................................................... 63
Limit Sounds and Vibrations .................................................................................. 64
Total Silence ................................................................................................... 64
Alarms Only ........................................................................................................... 64
Priority Notifications Only ................................................................................ 65
Silence Sounds During Certain Times .................................................................. 65
Silence Sounds During Events and Meetings ................................................. 66
Turn Sounds Back On ..................................................................................... 66
Override Do Not Disturb for Specific Apps ............................................................ 66
Apps .............................................................................................................................. 66
Accessing Apps ............................................................................................................ 70
Switching Between Recent Apps .......................................................................... 70
Un-Locking the Screen ................................................................................................. 71
Interactive Sensor Technology ..................................................................................... 73
Resetting the Device ..................................................................................................... 74
Performing a Soft Reset ........................................................................................ 74
Performing a Hard Reset ....................................................................................... 74
Suspend Mode ...................................................................................................... 74
Transferring Files with a Host Computer via USB ........................................................ 74
Transferring Files .................................................................................................. 75
Transferring Photos ............................................................................................... 75
Disconnect from the Host Computer ............................................................................. 76
6
Page 7

Table of Contents
Applications ................................................................................................................ 77
Introduction ................................................................................................................... 77
Battery Manager ........................................................................................................... 77
Files ............................................................................................................................. 80
Contacts ....................................................................................................................... 81
Adding a Contact ................................................................................................... 81
Editing Contacts .................................................................................................... 81
Deleting Contacts .................................................................................................. 81
Camera ........................................................................................................................ 82
Taking Photos ....................................................................................................... 82
Taking a Panoramic Photo .................................................................................... 83
Recording Videos .................................................................................................. 84
Photo Settings ....................................................................................................... 85
Rear Camera .................................................................................................. 85
Video Settings ................................................................................................. 85
Rear Camera .................................................................................................. 85
Gallery .......................................................................................................................... 87
Working with Albums ............................................................................................. 88
Sharing an Album ........................................................................................... 89
Getting Album Information .............................................................................. 89
Deleting an Album ........................................................................................... 89
Working with Photos .............................................................................................. 90
Viewing and Browsing Photos ........................................................................ 90
Cropping a Photo ............................................................................................ 90
Setting a Photo as a Contact Icon .................................................................. 91
Sharing a Photo .............................................................................................. 91
Deleting a Photo ............................................................................................. 92
Working with Videos .............................................................................................. 92
Watching Videos ............................................................................................. 92
Sharing a Video .............................................................................................. 92
Deleting a Video .............................................................................................. 92
Photos .......................................................................................................................... 93
Working with Albums ............................................................................................. 94
Sharing an Album ........................................................................................... 95
Deleting an Album ........................................................................................... 95
Working with Photos .............................................................................................. 96
Viewing and Browsing Photos ........................................................................ 96
Cropping a Photo ............................................................................................ 96
Setting a Photo as a Contact Icon .................................................................. 97
Sharing a Photo .............................................................................................. 97
Deleting a Photo ............................................................................................. 98
Working with Videos .............................................................................................. 98
Watching a Video ............................................................................................ 98
Sharing a Video .............................................................................................. 98
7
Page 8

Table of Contents
Deleting a Video .............................................................................................. 98
DataWedge Demonstration ............................................................................. 98
Scanner Selection ............................................................................................... 100
Sound Recorder .......................................................................................................... 100
PTT Express Voice Client .......................................................................................... 101
PTT Audible Indicators ........................................................................................ 101
PTT Notification Icons ......................................................................................... 101
Enabling PTT Communication ............................................................................. 102
Selecting a Talk Group ........................................................................................ 102
PTT Communication ............................................................................................ 102
Creating a Group Call ................................................................................... 102
Responding with a Private Response ................................................................. 102
Disabling PTT Express Voice Client Communication .......................................... 103
RxLogger ................................................................................................................... 104
RxLogger Utility .......................................................................................................... 105
Diagnostic Tool .......................................................................................................... 106
Settings ............................................................................................................... 109
Battery Test Information ...................................................................................... 109
GPS Test Information .......................................................................................... 110
System Test Information ..................................................................................... 110
WLAN Test Information ....................................................................................... 110
WWAN Test Information ...................................................................................... 110
Bluetooth Test Information .................................................................................. 110
Device Central ........................................................................................................... 111
Paging an RS6000 Ring Scanner ....................................................................... 111
SimulScan Demo ....................................................................................................... 113
Printing the Sample Forms ........................................................................................ 114
Using the Postal, Transportation and Logistics Example .................................... 115
Using the Manufacturing Example ...................................................................... 117
Settings ............................................................................................................... 118
Advanced Settings .............................................................................................. 119
Creating a Demo Customization ......................................................................... 119
Default Templates ............................................................................................... 121
Data Capture.............................................................................................................. 122
Introduction ................................................................................................................. 122
Integrated Imager ........................................................................................................ 122
Operational Modes .............................................................................................. 122
Laser Scanner ............................................................................................................. 123
RS507/RS507X Hands-Free Imager ................................................................... 123
RS6000 Bluetooth Ring Scanner ................................................................................ 123
8
Page 9

Table of Contents
DS3678 Digital Scanner .............................................................................................. 124
Scanning Considerations ............................................................................................ 124
Barcode Capture with Imager ..................................................................................... 124
Barcode Capture with Laser Scanner ......................................................................... 126
Scanning with RS507/RS507X Hands-Free Imager ................................................... 126
Scanning with RS6000 Bluetooth Ring Scanner ......................................................... 128
Scanning with the DS3608 USB Scanner or DS3678 Bluetooth Scanner .................. 129
Pairing the RS507/RS507X/RS6000 Hands-Free Imager .......................................... 130
Pairing Using Near Field Communication ................................................................... 130
Pairing in HID Mode Using Near Field Communication ...................................... 131
Pairing Using Simple Serial Interface .................................................................. 132
Pairing Using Bluetooth Human Interface Device ............................................... 133
Pairing a Bluetooth Scanner ................................................................................ 134
Pairing Using Bluetooth Human Interface Device ............................................... 134
DataWedge ................................................................................................................. 135
Enabling DataWedge .......................................................................................... 135
Disabling DataWedge .......................................................................................... 135
Wireless ..................................................................................................................... 136
Introduction ................................................................................................................. 136
Wireless Local Area Networks .................................................................................... 136
Connecting to a Wi-Fi Network ................................................................................... 137
Removing a Wi-Fi Network .................................................................................. 138
Bluetooth .....................................................................................................................138
Adaptive Frequency Hopping .............................................................................. 138
Security ............................................................................................................... 139
Bluetooth Profiles ................................................................................................ 139
Bluetooth Power States ....................................................................................... 140
Bluetooth Radio Power ........................................................................................ 140
Enabling Bluetooth ........................................................................................ 140
Disabling Bluetooth ....................................................................................... 140
Discovering Bluetooth Device(s) ......................................................................... 141
Changing the Bluetooth Name ............................................................................ 141
Connecting to a Bluetooth Device ....................................................................... 141
Selecting Profiles on the Bluetooth Device ......................................................... 142
Unpairing a Bluetooth Device .............................................................................. 142
Using a Bluetooth Headset ......................................................................................... 142
Near Field Communications ................................................................................ 142
Reading NFC Cards ............................................................................................ 143
Sharing Information Using NFC .......................................................................... 144
Cast ............................................................................................................................. 144
9
Page 10

Table of Contents
Accessories............................................................................................................... 145
Introduction ................................................................................................................. 145
MC33XX Accessories ................................................................................................. 145
Compatibility ............................................................................................................... 149
Battery Comparison ............................................................................................. 150
Battery Compatibility ........................................................................................... 150
1-Slot USB Charge Cradle .......................................................................................... 150
Charging the MC33XX Battery ............................................................................ 151
Charging an MC33XX Spare Battery .................................................................. 151
Battery Charging in 1- Slot USB Charge Cradle ................................................. 152
Charging Temperature .................................................................................. 153
5-Slot Charge Only ShareCradle ................................................................................ 153
Charging the MC33XX Battery ............................................................................ 154
Battery Charging in the 5-Slot Charge Only ShareCradle ................................... 154
Charging Temperature .................................................................................. 155
5-Slot Ethernet ShareCradle ....................................................................................... 155
Charging the MC33XX Battery ............................................................................ 156
Battery Charging in the 5-Slot Ethernet ShareCradle ......................................... 156
Charging Temperature .................................................................................. 157
5-Slot ShareCradle with 4-Slot Battery Charger ......................................................... 157
Charging the MC33XX Battery ............................................................................ 158
Charging Spare Batteries .................................................................................... 158
Battery Charging in the 5-Slot ShareCradle with 4-Slot Battery Charger ............ 158
Charging Temperature .................................................................................. 159
5-Slot Ethernet ShareCradle with 4-Slot Battery Charger ........................................... 159
Charging the MC33XX Battery ............................................................................ 160
Charging Spare Batteries .................................................................................... 160
Battery Charging in the 5-Slot Ethernet ShareCradle with 4-Slot Battery Charger 160
Charging Temperature .................................................................................. 161
4-Slot Spare Battery Charger ...................................................................................... 161
Charging Spare Batteries .................................................................................... 161
Battery Charging ................................................................................................. 162
Spare Battery Charging ................................................................................ 162
Charging Temperature .................................................................................. 163
20-Slot Spare Battery Charger .................................................................................... 163
Charging Spare Batteries .................................................................................... 163
Battery Charging ................................................................................................. 164
Spare Battery Charging ................................................................................ 164
Charging Temperature .................................................................................. 165
USB Charge Cable ..................................................................................................... 165
Connecting the USB Charge Cable to Device ..................................................... 166
Connecting the USB Charge Cable to Host Computer ....................................... 166
Main Battery Charging .................................................................................. 167
10
Page 11

Table of Contents
Charging the Device ............................................................................................ 167
Main Battery Charging .................................................................................. 168
Disconnecting the USB Charge Cable ................................................................ 168
MC33XX Charge Only Adapter ................................................................................... 169
Adapter Installation .............................................................................................. 169
Charging Temperature .................................................................................. 171
MC33XX-G Rubber Boot ............................................................................................ 171
MC33XX-R Rubber Boot ............................................................................................. 172
MC33XX-S Rubber Boot ............................................................................................. 174
Rigid Holster ............................................................................................................... 174
MC33XX-G Fabric Holster .......................................................................................... 176
Belt Strap ............................................................................................................. 176
Shoulder Strap .................................................................................................... 177
Using the Belt Strap ............................................................................................ 178
Using the Shoulder Strap .................................................................................... 180
MC33XX-R/S Fabric Holster ....................................................................................... 181
Belt Clip ............................................................................................................... 181
Shoulder Strap .................................................................................................... 182
Using the Belt Clip ............................................................................................... 183
Using the Shoulder Strap .................................................................................... 184
Un-powered Forklift Mount .......................................................................................... 185
Replacement Hand Strap for MC33XX-G ................................................................... 187
Replacement Hand Strap for MC33XX-R/S ................................................................ 188
Lanyard .......................................................................................................................190
Install Lanyard on MC33XX ................................................................................. 191
Using the Cross-body Strap ................................................................................ 192
Using the Belt Clip ............................................................................................... 193
Charging the MC33XX with the Lanyard ............................................................. 194
Maintenance and Troubleshooting ......................................................................... 195
Introduction ................................................................................................................. 195
Maintaining the Device ................................................................................................ 195
Battery Safety Guidelines ........................................................................................... 196
Cleaning Instructions .................................................................................................. 196
Approved Cleanser Active Ingredients ................................................................ 196
Harmful Ingredients ............................................................................................. 197
Cleaning Materials Required ............................................................................... 197
Device Cleaning Instructions ............................................................................... 197
Special Cleaning Notes ....................................................................................... 197
Cleaning Frequency ............................................................................................ 198
Cleaning the Device ............................................................................................ 198
11
Page 12

Table of Contents
Housing ......................................................................................................... 198
Display .......................................................................................................... 198
Camera and Exit Window ............................................................................. 198
Cleaning Battery Connectors .............................................................................. 198
Cleaning Cradle Connectors ............................................................................... 198
Troubleshooting the MC33XX ..................................................................................... 199
Specifications............................................................................................................ 202
Introduction ................................................................................................................. 202
MC33XX Technical Specifications .............................................................................. 202
Keypads..................................................................................................................... 207
Introduction ................................................................................................................. 207
MC33XX 29-Key Keypad ............................................................................................ 207
MC33XX 38-Key Keypad ............................................................................................ 210
MC33XX 47-Key Keypad ............................................................................................ 213
Index
12
Page 13

About This Guide
Introduction
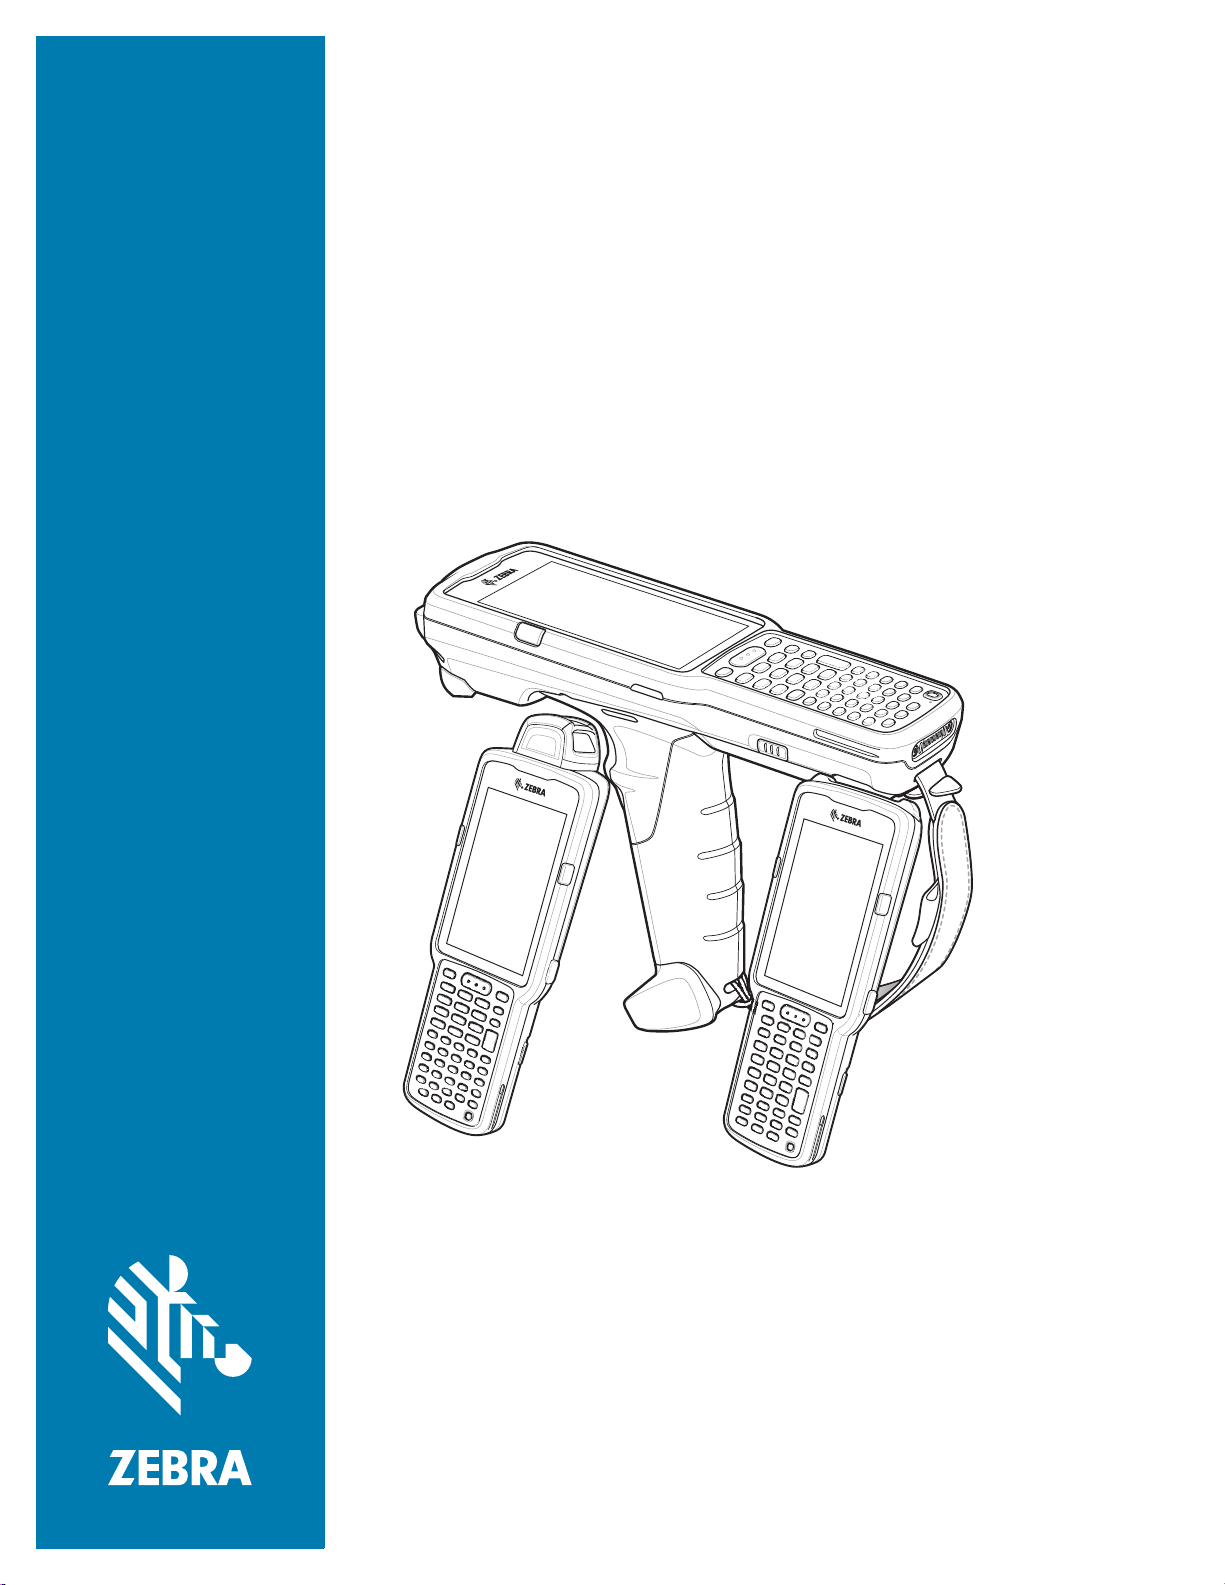
This guide provides information about using the MC33XX mobile computer and accessories.
NOTE: Screens and windows pictured in this guide are samples and can differ from actual screens.
Configurations
MC33XX used in this guide refers to all configurations, except where noted. MC33XX-G refers to the
Trigger configuration. MC33XX-R refers to the Rotate configuration. MC33XX-S refers to the Straight
configuration. MC33XX-S45 refers to the 45 degree angle Straight configuration.
13
Page 14

This guide covers the following configurations:
Table 1 Configurations
About This Guide
Configuration Radios Display Memory
MC33XX–G
Standard
WLAN: IEEE
®
802.11a/b/g/n/ac/d
4.0” color 2 GB RAM /
16 GB Flash
/h/i/k/r/w
WPAN: Bluetooth
V4.1, V2.1 + EDR
w/ Bluetooth Low
Energy (BLE)
MC33XX–G
Premium
WLAN: IEEE
802.11a/b/g/n/ac/d
®
4.0” color 4 GB RAM /
16 GB Flash
/h/i/k/r/w
WPAN: Bluetooth
V4.1, V2.1 + EDR
w/ Bluetooth Low
Energy (BLE)
NFC
MC33XX–G
Premium +
WLAN: IEEE
802.11a/b/g/n/ac/d
®
4.0” color 4 GB RAM /
32 GB Flash
/h/i/k/r/w
WPAN: Bluetooth
V4.1, V2.1 + EDR
w/ Bluetooth Low
Energy (BLE)
NFC
MC33XX–R
Standard
WLAN: IEEE
802.11a/b/g/n/ac/d
®
4.0” color 2 GB RAM /
16 GB Flash
/h/i/k/r/w
WPAN: Bluetooth
V4.1, V2.1 + EDR
w/ Bluetooth Low
Energy (BLE)
MC33XX–R
Premium
WLAN: IEEE
802.11a/b/g/n/ac/d
®
4.0” color 4 GB RAM /
16 GB Flash
/h/i/k/r/w
WPAN: Bluetooth
V4.1, V2.1 + EDR
w/ Bluetooth Low
Energy (BLE)
NFC
Data Capture
Options
SE965 1D,
SE4750-SR 2D
SE965 1D,
SE4750-SR 2D,
Operating
System
Android-based
AOSP/GMS 8.1
Android-based
AOSP/GMS 8.1
SE4850-ER 2D
SE965 1D,
SE4750-SR 2D,
Android-based
AOSP/GMS 8.1
SE4850-ER 2D
SE965 1D Android-based
AOSP/GMS 8.1
SE965 1D Android-based
AOSP/GMS 8.1
14
Page 15

Table 1 Configurations (Continued)
About This Guide
Configuration Radios Display Memory
MC33XX–R
Premium +
WLAN: IEEE
®
802.11a/b/g/n/ac/d
4.0” color 4 GB RAM /
32 GB Flash
/h/i/k/r/w
WPAN: Bluetooth
V4.1, V2.1 + EDR
w/ Bluetooth Low
Energy (BLE)
NFC
MC33XX–S
Standard
WLAN: IEEE
802.11a/b/g/n/ac/d
®
4.0” color 2 GB RAM /
16 GB Flash
/h/i/k/r/w
WPAN: Bluetooth
V4.1, V2.1 + EDR
w/ Bluetooth Low
Energy (BLE)
MC33XX–S
Premium
WLAN: IEEE
802.11a/b/g/n/ac/d
®
4.0” color 4 GB RAM /
16 GB Flash
/h/i/k/r/w
WPAN: Bluetooth
V4.1, V2.1 + EDR
w/ Bluetooth Low
Energy (BLE)
NFC
MC33XX–S
Premium +
WLAN: IEEE
802.11a/b/g/n/ac/d
®
4.0” color 4 GB RAM /
32 GB Flash
/h/i/k/r/w
WPAN: Bluetooth
V4.1, V2.1 + EDR
w/ Bluetooth Low
Energy (BLE)
NFC
Data Capture
Options
SE965 1D
Color Camera
SE965 1D,
SE4750-SR 2D,
SE4850-ER 2D
SE965 1D,
SE4750-SR 2D,
SE4850-ER 2D
SE4750-SR 2D,
SE4850-ER 2D
Color Camera
Operating
System
Android-based
AOSP/GMS 8.1
Android-based
AOSP/GMS 8.1
Android-based
AOSP/GMS 8.1
Android-based
AOSP/GMS 8.1
15
Page 16

Table 1 Configurations (Continued)
About This Guide
Configuration Radios Display Memory
MC33XX–S45
Standard
MC33XX–S45
Premium
MC33XX–S45
Premium +
WLAN: IEEE
802.11a/b/g/n/ac/d
/h/i/k/r/w
WPAN: Bluetooth
V4.1, V2.1 + EDR
w/ Bluetooth Low
Energy (BLE)
WLAN: IEEE
802.11a/b/g/n/ac/d
/h/i/k/r/w
WPAN: Bluetooth
V4.1, V2.1 + EDR
w/ Bluetooth Low
Energy (BLE)
NFC
WLAN: IEEE
802.11a/b/g/n/ac/d
/h/i/k/r/w
WPAN: Bluetooth
V4.1, V2.1 + EDR
w/ Bluetooth Low
Energy (BLE)
NFC
®
®
®
4.0” color 2 GB RAM /
16 GB Flash
4.0” color 4 GB RAM /
16 GB Flash
4.0” color 4 GB RAM /
32 GB Flash
Data Capture
Options
SE4750-SR 2D Android-based
SE4750-SR 2D Android-based
SE4750-SR 2D
Color Camera
Operating
System
AOSP/GMS 8.1
AOSP/GMS 8.1
Android-based
AOSP/GMS 8.1
Software Versions
To determine the current software versions:
1. Swipe down from the Status bar to open the Quick Settings bar.
2. Touch > System.
3. Touch About phone.
4. Scroll to view the following information:
•Model
• Android version
•Kernel version
• Build number.
To determine the device serial number, touch About phone > Status.
• Serial number
Chapter Descriptions
Topics covered in this guide are as follows:
16
Page 17

• Getting Started provides information on getting the device up and running for the first time.
• Using the Device provides basic instructions for using the device with Android OS, including powering on
and resetting the device.
• Applications describes the applications installed on the device.
• Data Capture provides information for capturing barcode data using the internal scanner and optional scan
modules and Bluetooth scanner.
• Wireless provides information on the various wireless options.
• Accessories describes the available accessories and how to use them with the device.
• Maintenance and Troubleshooting includes instructions on cleaning and storing the device, and provides
troubleshooting solutions for potential problems during device operation.
• Specifications provides the technical specifications for the device.
• Keypads provides keypad descriptions and special character generation tables.
Notational Conventions
The following conventions are used in this document:
• Bold text is used to highlight the following:
• Dialog box, window and screen names
• Drop-down list and list box names
• Check box and radio button names
• Icons on a screen
• Key names on a keypad
• Button names on a screen.
• Bullets (•) indicate:
• Action items
• Lists of alternatives
• Lists of required steps that are not necessarily sequential.
• Sequential lists (for example, those that describe step-by-step procedures) appear as numbered lists.
About This Guide
Related Documents
• MC33XX Mobile Computer Quick Start Guide, p/n MN-003143-XX
• MC33XX Regulatory Guide, p/n MN-003144-XX
• MC33XX Mobile Computer Integrator Guide for Android 8.1 Oreo, p/n MN-003229-XX
For the latest version of this guide and all guides, go to: http://www.zebra.com/support
Service Information
If you have a problem with your equipment, contact Customer Support for your region. Contact information is
available at: www.zebra.com/support
When contacting support, please have the following information available:
• Serial number of the unit (found on manufacturing label)
• Model number or product name (found on manufacturing label)
.
.
17
Page 18
About This Guide
Manufacturing Label
MC33XX-G
MC33XX-R/S
• Software type and version number
Customer Support responds to calls by email or telephone within the time limits set forth in support
agreements.
If the problem cannot be solved by Customer Support, you may need to return the equipment for servicing and
will be given specific directions. We are not responsible for any damages incurred during shipment if the
approved shipping container is not used. Shipping the units improperly can possibly void the warranty.
Remove the microSD card from the device before shipping for service.
If the device was purchased from a business partner, contact that business partner for support.
Figure 1 Manufacturing Label Location
Provide Documentation Feedback
If you have comments, questions, or suggestions about this guide, send an email to
EVM-Techdocs@zebra.com
.
18
Page 19
Getting Started
1
2
9
8
7
5
3
6
4
Introduction
This chapter provides the features of the device and explains how to set it up for the first time.
MC33XX-G Features
Figure 2 MC33XX-G Front View
19
Page 20

Getting Started
Table 2 MC33XX-G Features - Front View
Number Item Function
1 Display Displays all information needed to operate the device.
2 Charge
/Application
Notification LED
or Scan/Decode
Status
3 Trigger Initiates data capture when a scan application is enabled.
Indicates the battery charge state while charging, an application
notification was received, or the scan/decode status.
4 Battery Release
Latch
5 Hand Strap Use for securely holding the device.
6 Microphone Use for communications in Handset mode.
7 Power Button Press and hold to turn on the device. Press to turn on or off the screen.
8 Keypad Use to enter data and navigate on screen functions.
9 Scan Button Initiates data capture when a scan application is enabled.
Release the battery from the device.
Press and hold to select one of these options:
Power off - Turn off the device.
Reboot - Reboot the device when software stops responding.
Airplane mode - Disable all wireless connections.
Silent mode - All notifications are disabled except for alarms.
20
Page 21
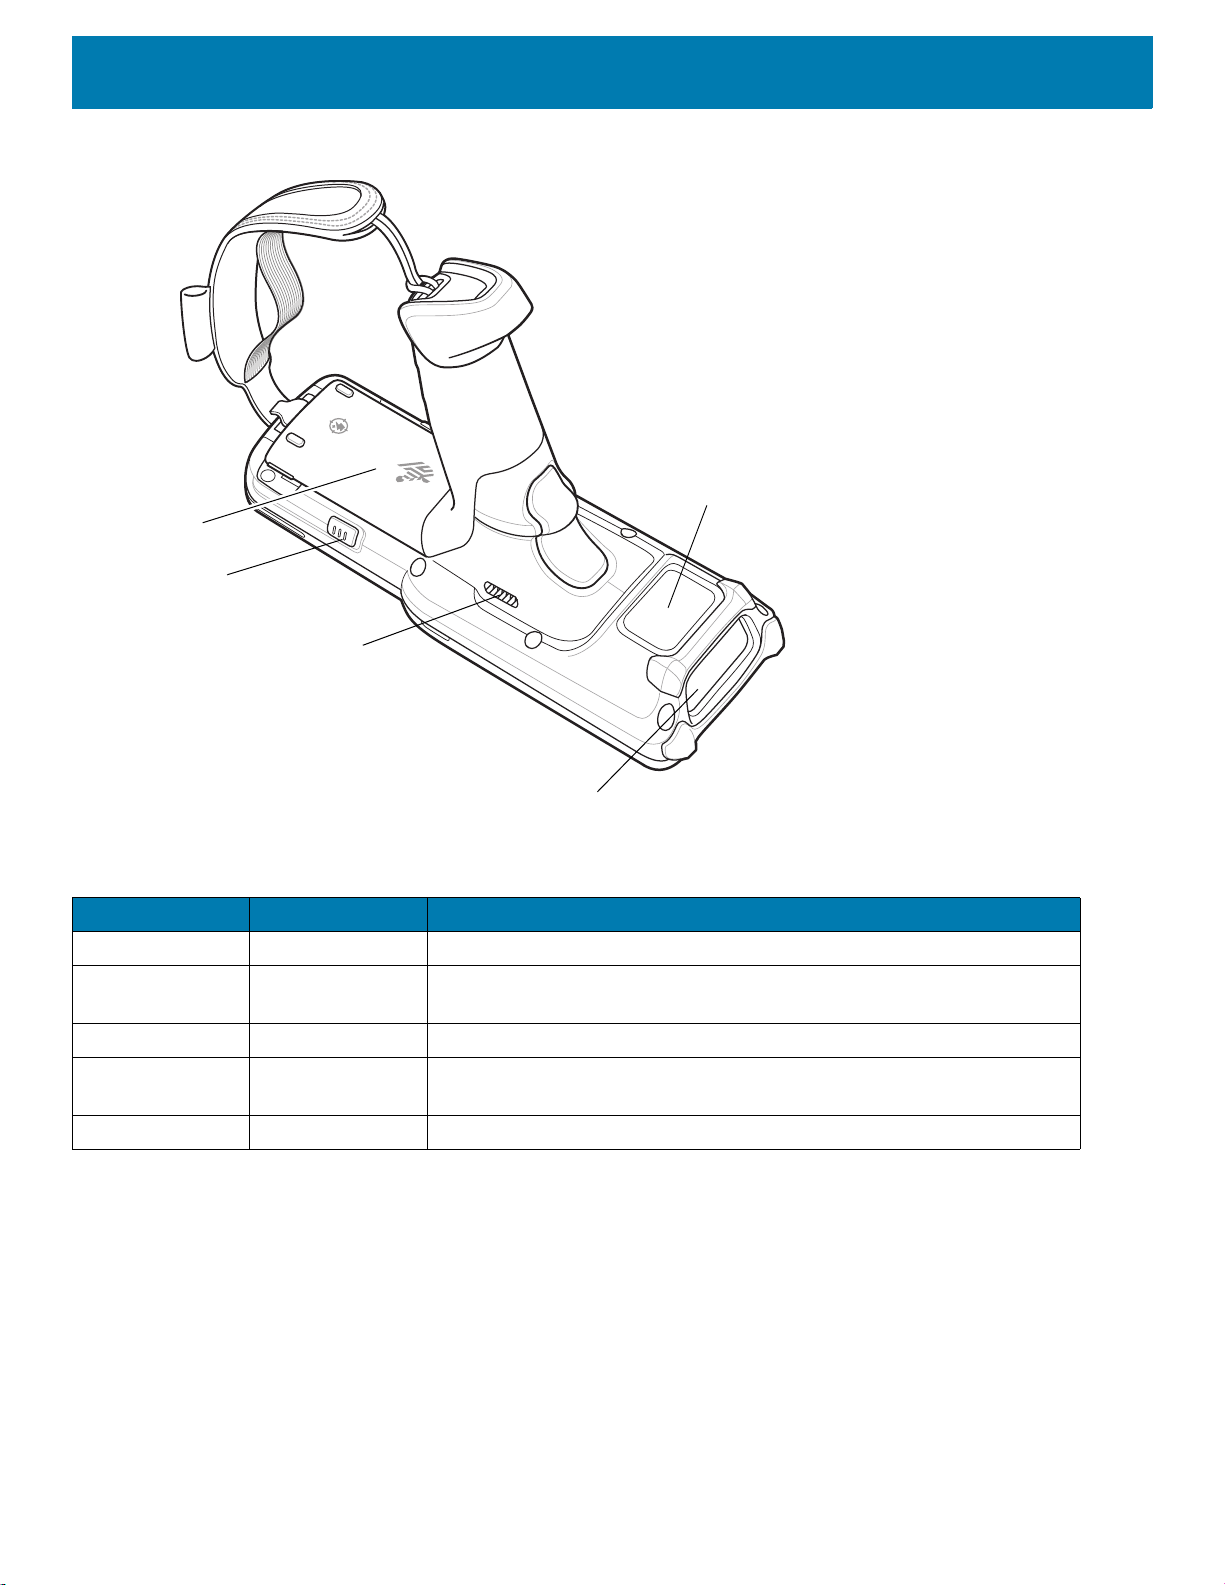
Figure 3 MC33XX-G Back View
11
10
12
13
14
Getting Started
Table 3 MC33XX-G Features - Back View
Number Item Function
10 Battery Provides power for operating the device.
11 Battery Release
Release the battery from the device.
Latch
12 Speaker Provides audio output for video and music playback.
13 Scanner Exit
Provides data capture using the scanner.
Window
14 NFC Antenna Provides communication with other NFC-enabled devices.
21
Page 22

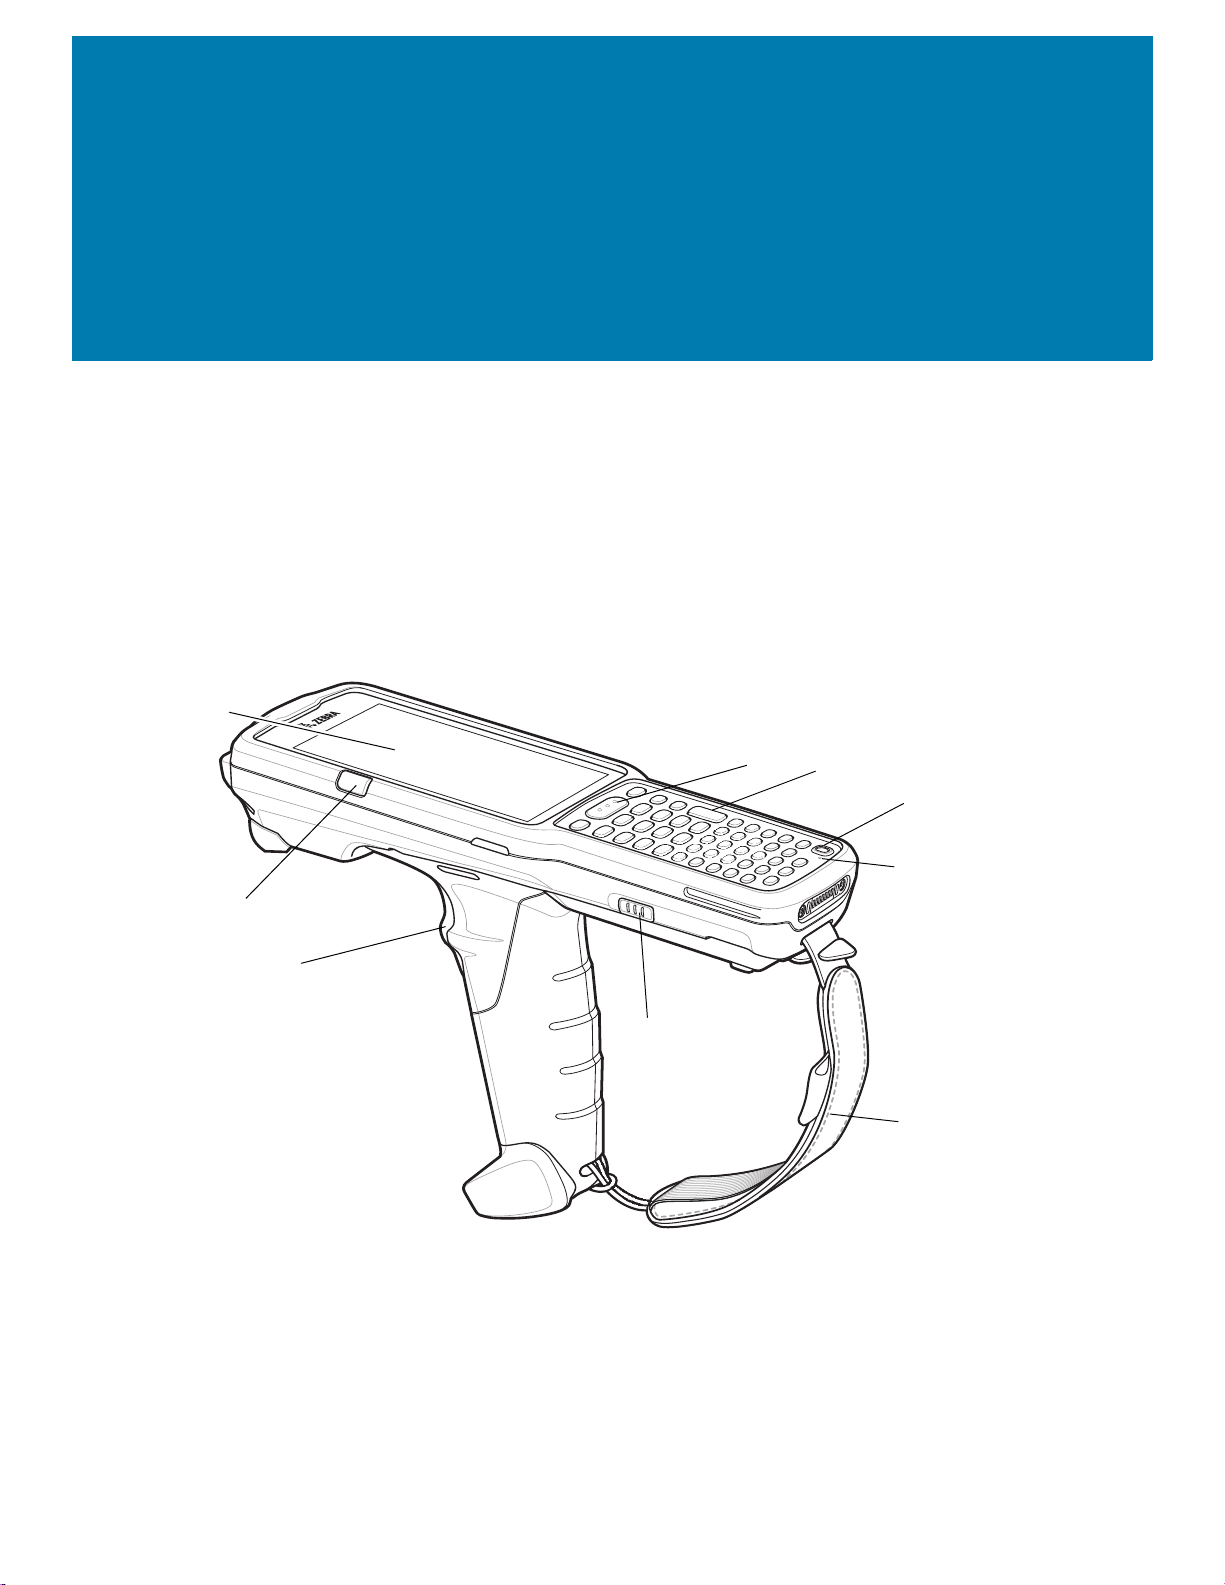
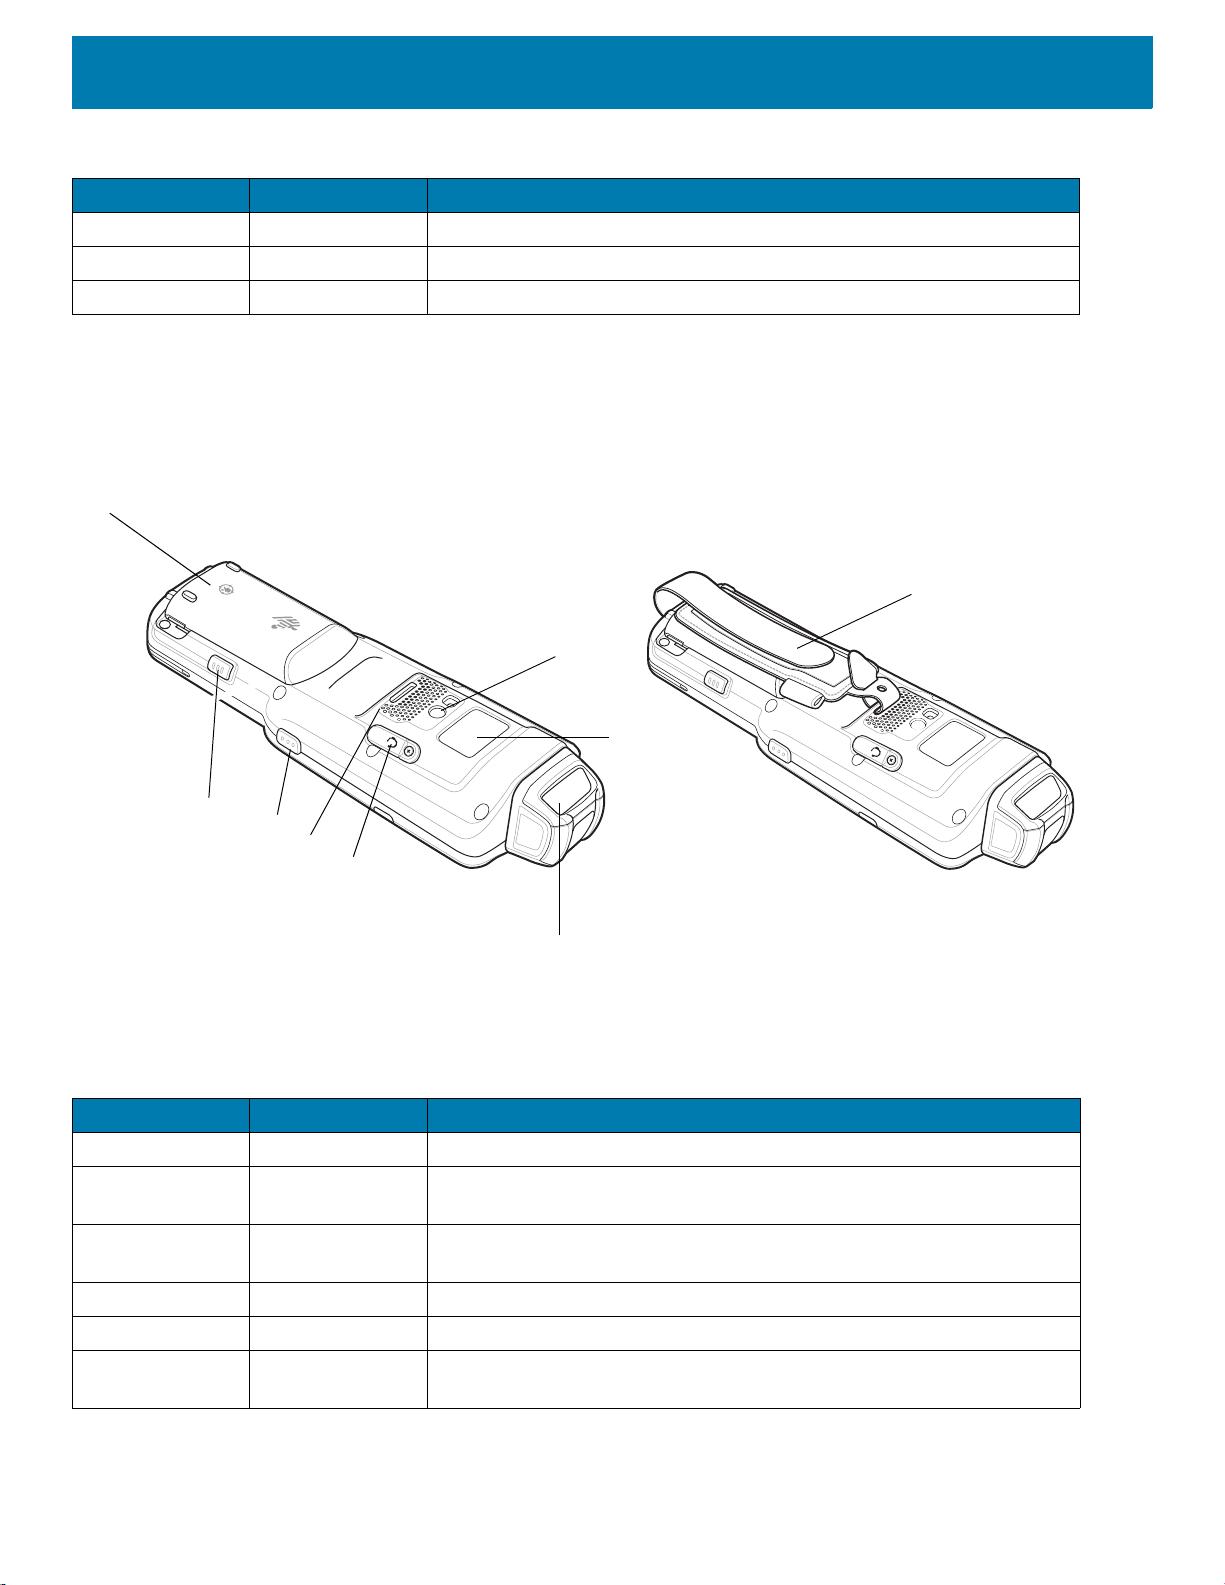
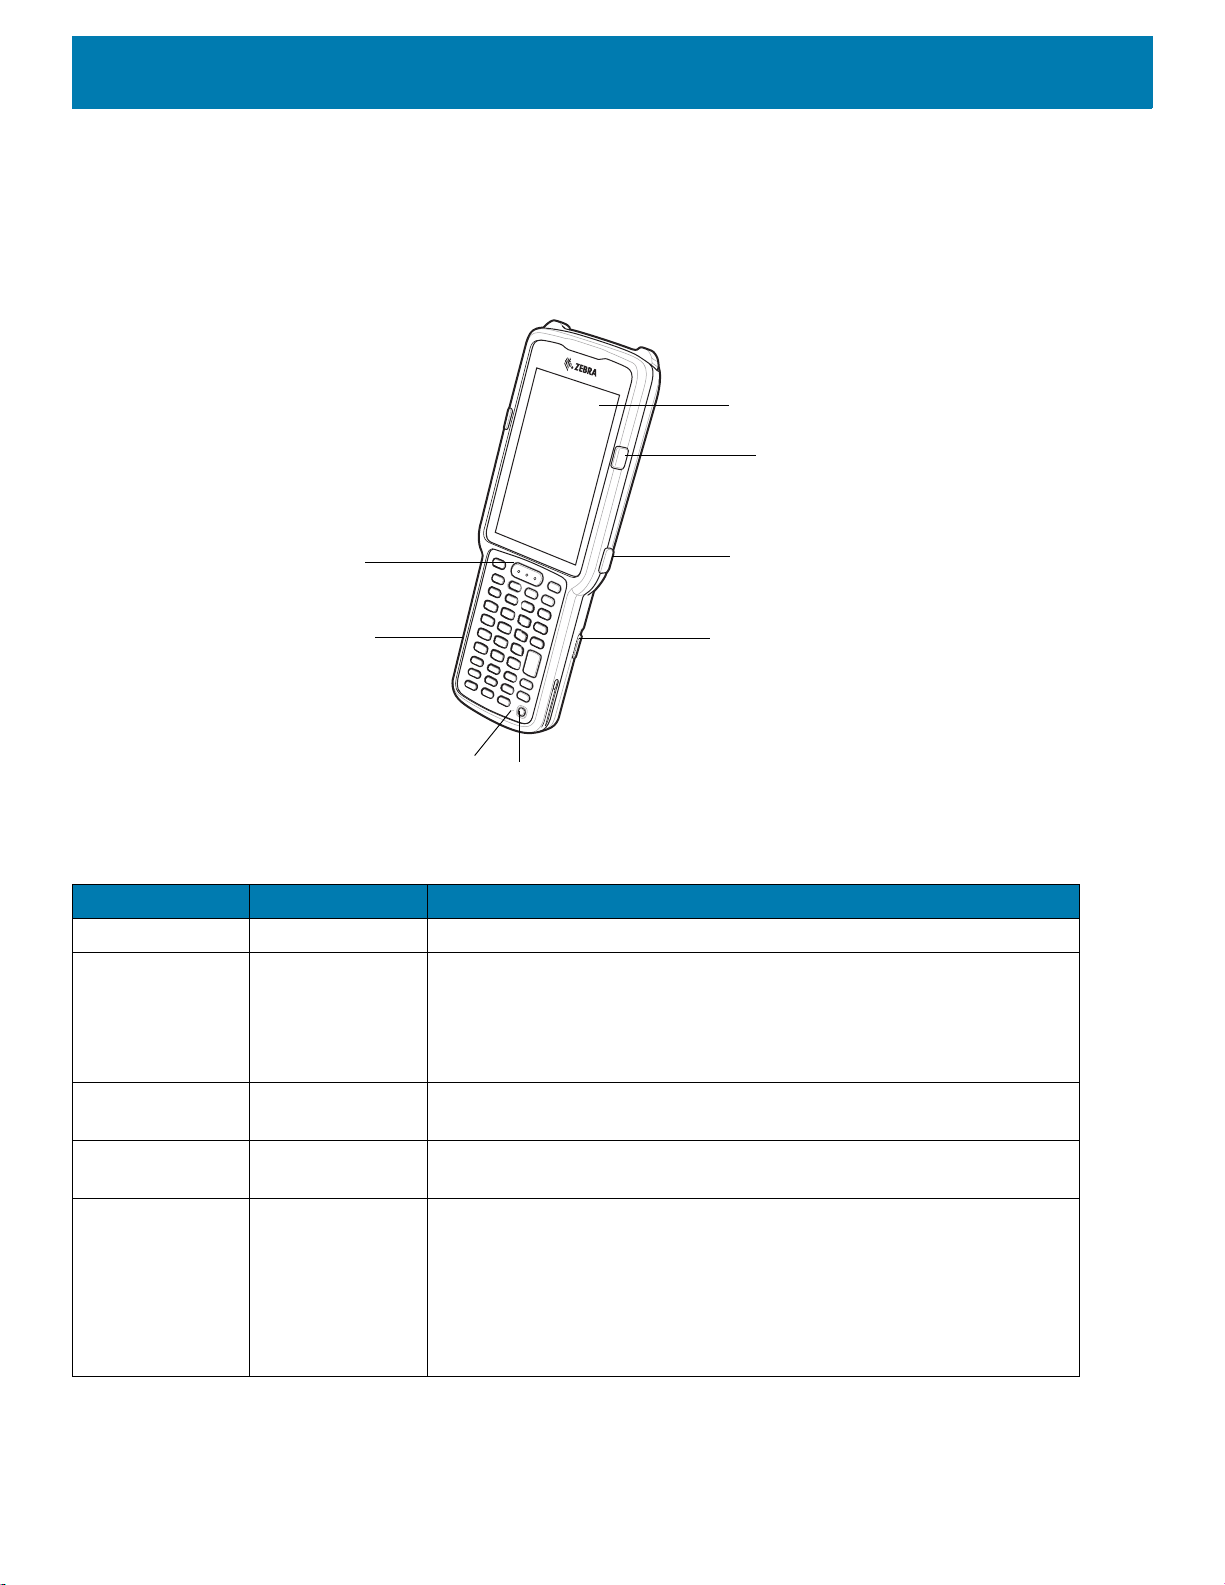
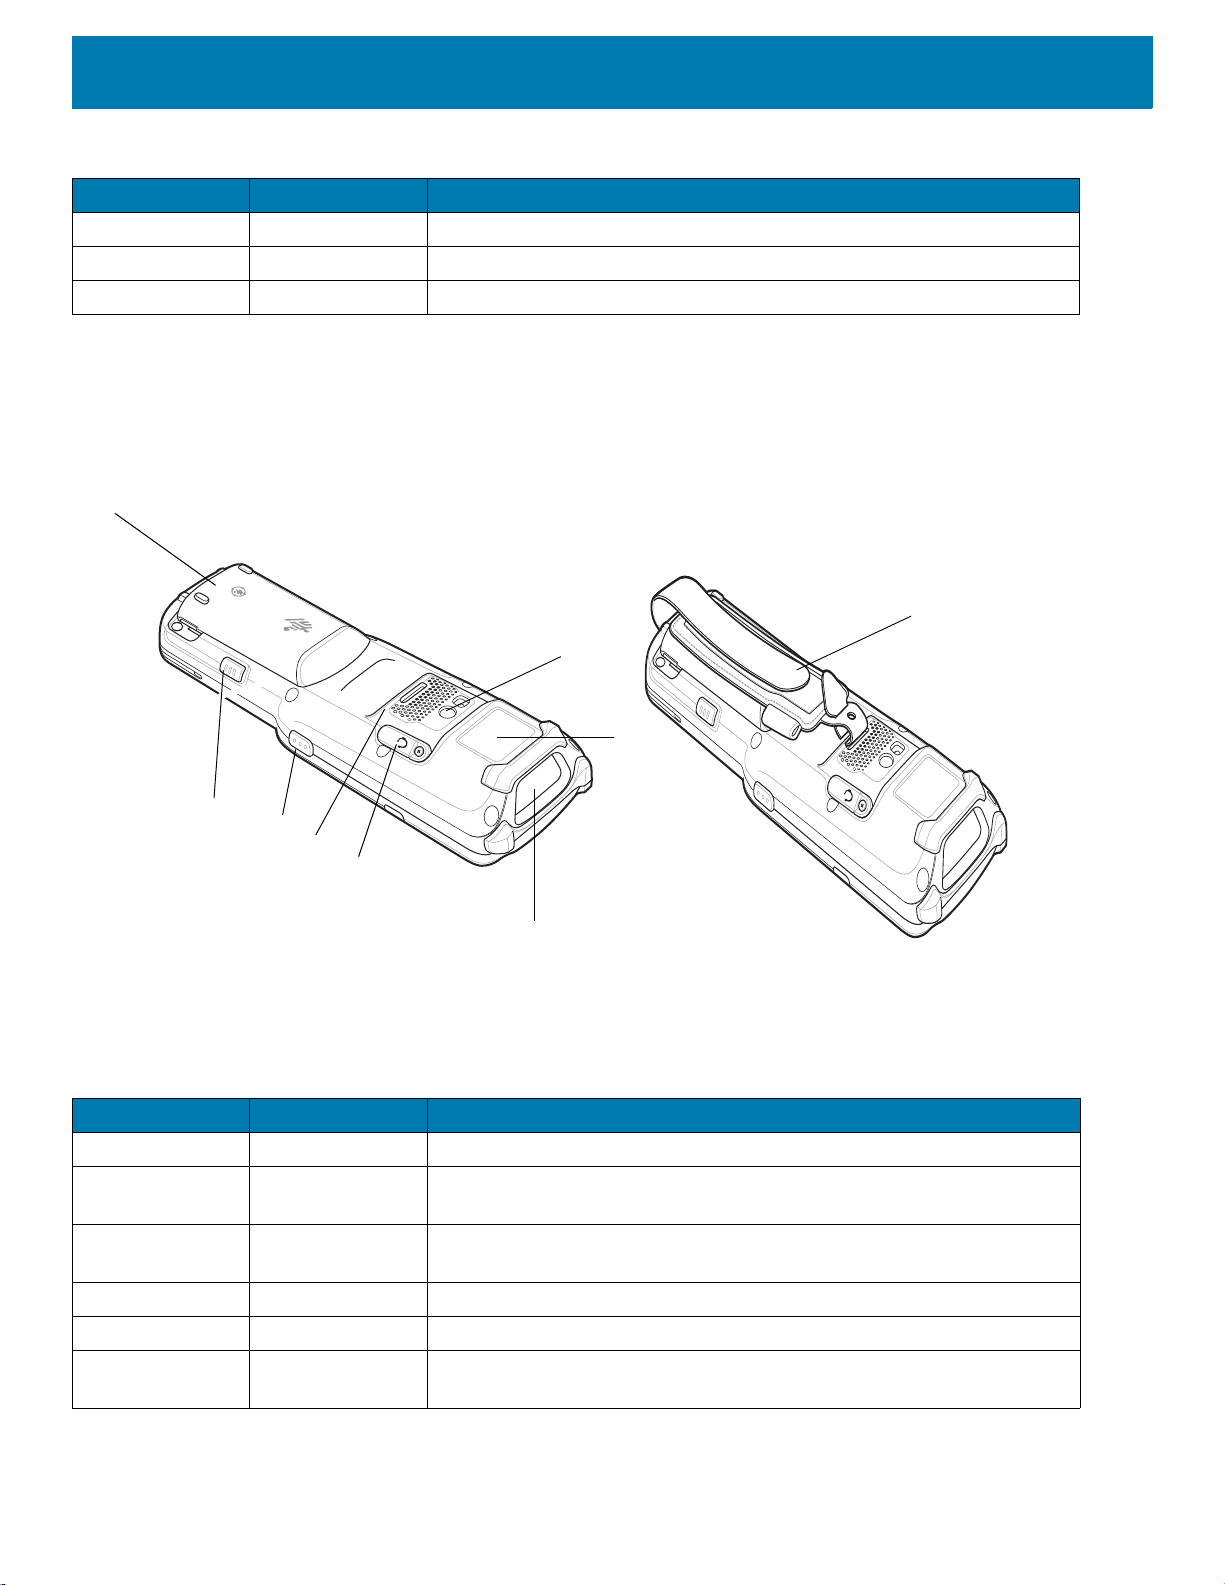
MC33XX-R Features
1
2
3
4
5
6
7
8
9
Figure 4 MC33XX-R Front View
Getting Started
Table 4 MC33XX-R Features - Front View
Number Item Function
1 Rotating Turret Rotates for easy scanning positions.
2 Display Displays all information needed to operate the device.
3 Charge
/Application
Notification LED
or Scan/Decode
Status
4 Side Key Scan
Button
5 Battery Release
Latch
6 Power Button Press and hold to turn on the device. Press to turn on or off the screen.
Indicates the battery charge state while charging, an application
notification was received, or the scan/decode status.
Initiates data capture when a scan application is enabled.
Release the battery from the device.
Press and hold to select one of these options:
Power off - Turn off the device.
Reboot - Reboot the device when software stops responding.
Airplane mode - Disable all wireless connections.
Silent mode - All notifications are disabled except for alarms.
22
Page 23
Getting Started
10
11
12
13
14
15
16
17
18
Table 4 MC33XX-R Features - Front View (Continued)
Number Item Function
7 Microphone Use for communications in Handset mode.
8 Keypad Use to enter data and navigate on screen functions.
9 Scan Button Initiates data capture when a scan application is enabled.
Figure 5 MC33XX-R Back View
Table 5 MC33XX-R Features - Back View
Number Item Function
10 Battery Provides power for operating the device.
11 Battery Release
Latch
12 Side Key Scan
Button
13 Speaker Provides audio output for video and music playback.
14 Audio Jack Connects to headsets (2.5 mm jack).
15 Scanner Exit
Window
Release the battery from the device.
Initiates data capture when a scan application is enabled.
Provides data capture using the scanner.
23
Page 24
Getting Started
Position Stop
Position Stop
Position Stop
Table 5 MC33XX-R Features - Back View (Continued)
Number Item Function
16 NFC Antenna Provides communication with other NFC-enabled devices.
17 Camera/Flash Provides illumination for the camera.
18 Hand Strap Use for securely holding the device.
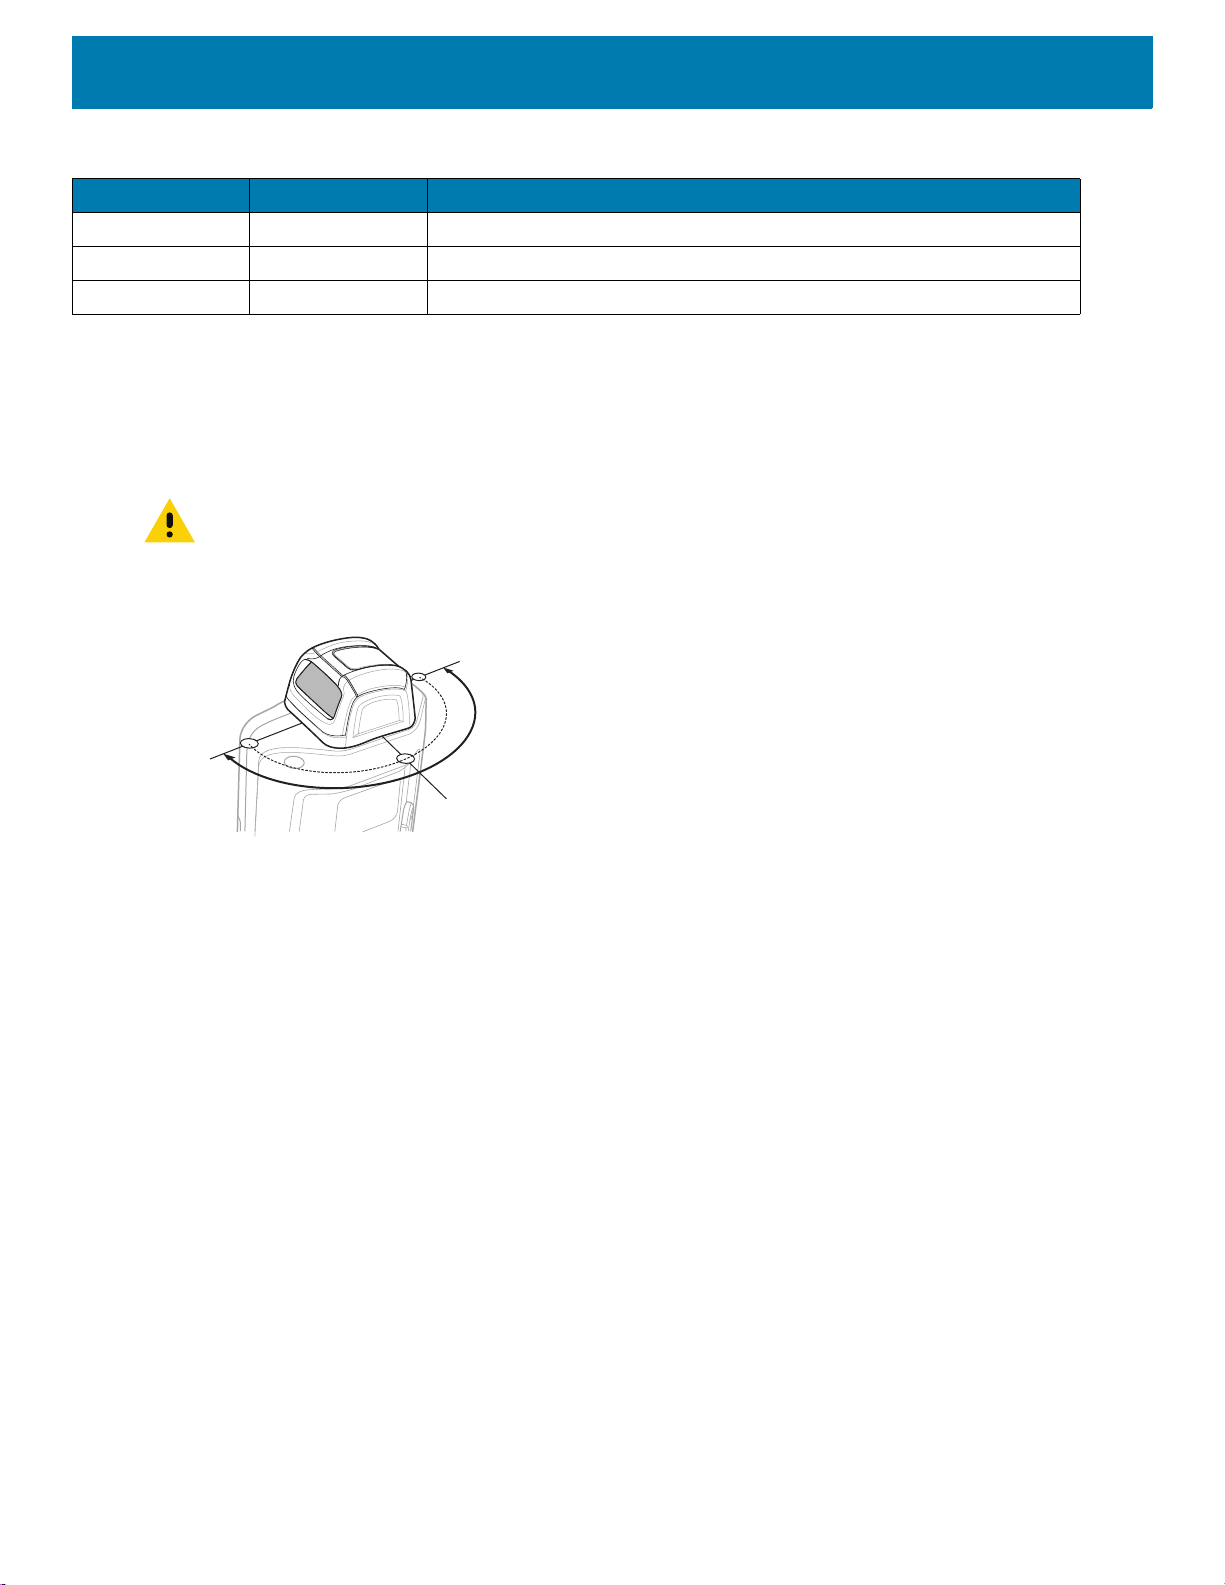
Rotating Scan Turret
The MC33XX-R features a Rotating Turret with three position stops. This feature offers greater scanning
flexibility.
CAUTION: Do not try to rotate the turret past the side position stops. Damage to device may occur.
Figure 6 MC33XX-R Rotating Turret
24
Page 25
MC33XX-S Features
1
2
3
4
5
6
7
8
Figure 7 MC33XX-S Front View
Getting Started
Table 6 MC33XX-S Features - Front View
Number Item Function
1 Display Displays all information needed to operate the device.
2 Charge
/Application
Notification LED
or Scan/Decode
Status
3 Side Key Scan
Button
4 Battery Release
Latch
5 Power Button Press and hold to turn on the device. Press to turn on or off the screen.
Indicates the battery charge state while charging, an application
notification was received, or the scan/decode status.
Initiates data capture when a scan application is enabled.
Release the battery from the device.
Press and hold to select one of these options:
Power off - Turn off the device.
Reboot - Reboot the device when software stops responding.
Airplane mode - Disable all wireless connections.
Silent mode - All notifications are disabled except for alarms.
25
Page 26
Getting Started
9
10
11
12
13
14
15
16
17
Table 6 MC33XX-S Features - Front View (Continued)
Number Item Function
6 Microphone Use for communications in Handset mode.
7 Keypad Use to enter data and navigate on screen functions.
8 Scan Button Initiates data capture when a scan application is enabled.
Figure 8 MC33XX-S Back View
Table 7 MC33XX-S Features - Back View
Number Item Function
9 Battery Provides power for operating the device.
10 Battery Release
Latch
11 Side Key Scan
Release the battery from the device.
Initiates data capture when a scan application is enabled.
Button
12 Speaker Provides audio output for video and music playback.
13 Audio Jack Connects to headsets (2.5 mm jack).
14 Scanner Exit
Window
Provides data capture using the scanner.
26
Page 27

Getting Started
Table 7 MC33XX-S Features - Back View (Continued)
Number Item Function
15 NFC Antenna Provides communication with other NFC-enabled devices.
16 Camera/Flash Provides illumination for the camera.
17 Hand Strap Use for securely holding the device.
Unpacking
Carefully remove all protective material from the MC33XX and save the shipping container for later storage
and shipping.
Verify the following items are in the box:
•MC33XX
• Lithium-ion battery
• Regulatory Guide.
Inspect the equipment for damage. If any equipment is missing or damaged, contact the Zebra Support Center
immediately. See Service Information on page 17 for contact information.
Setup
To start using the MC33XX for the first time:
• Install a microSD card (optional)
• Install the battery
• Charge the MC33XX
• Power on the MC33XX.
Installing a microSD Card
The microSD card slot provides secondary non-volatile storage. The slot is located under the battery pack. Refer to
the documentation provided with the card for more information, and follow the manufacturer’s recommendations for
use.
CAUTION: Follow proper electrostatic discharge (ESD) precautions to avoid damaging the microSD card.
Proper ESD precautions include, but are not limited to, working on an ESD mat and ensuring that the operator
is properly grounded.
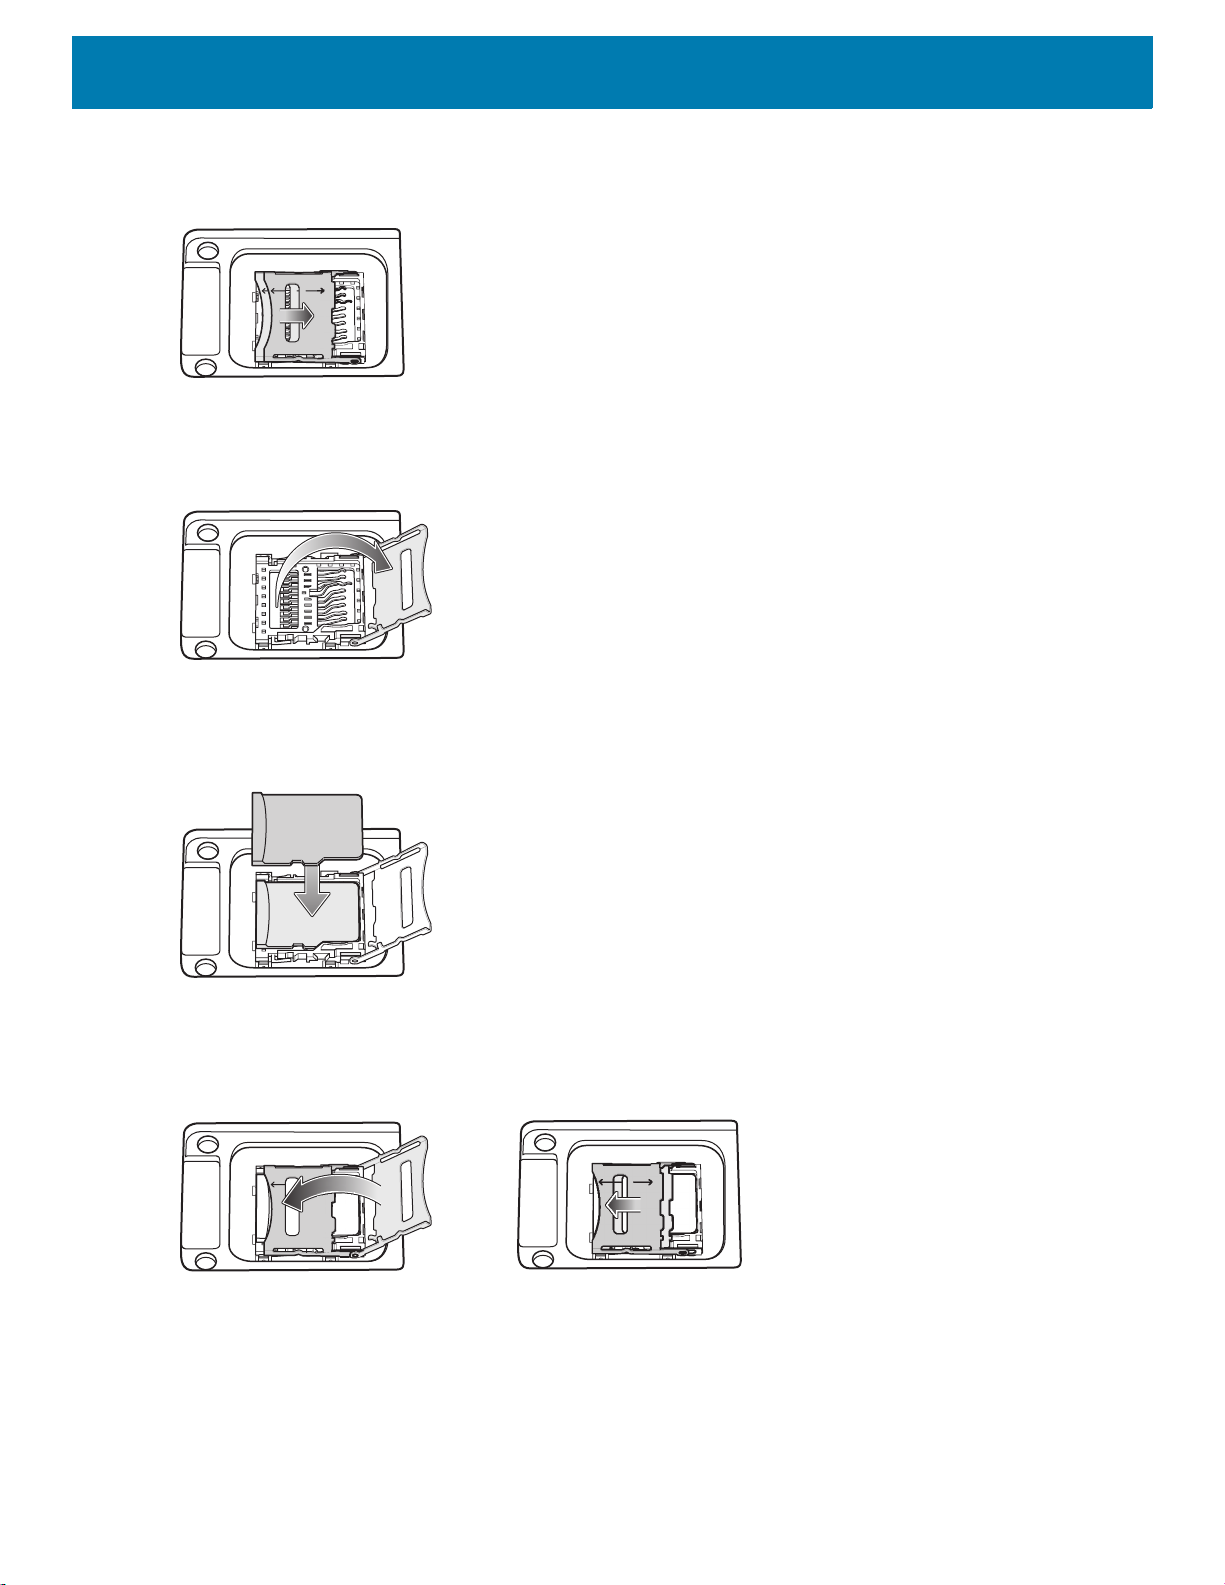
1. Using a coin or finger, remove the microSD card cover.
Figure 9 Remove microSD Card Cover
27
Page 28
Getting Started
2. Slide the microSD card holder to the Open position.
Figure 10 Unlock microSD Card Holder
3. Lift the microSD card holder.
Figure 11 Lift microSD Card Holder
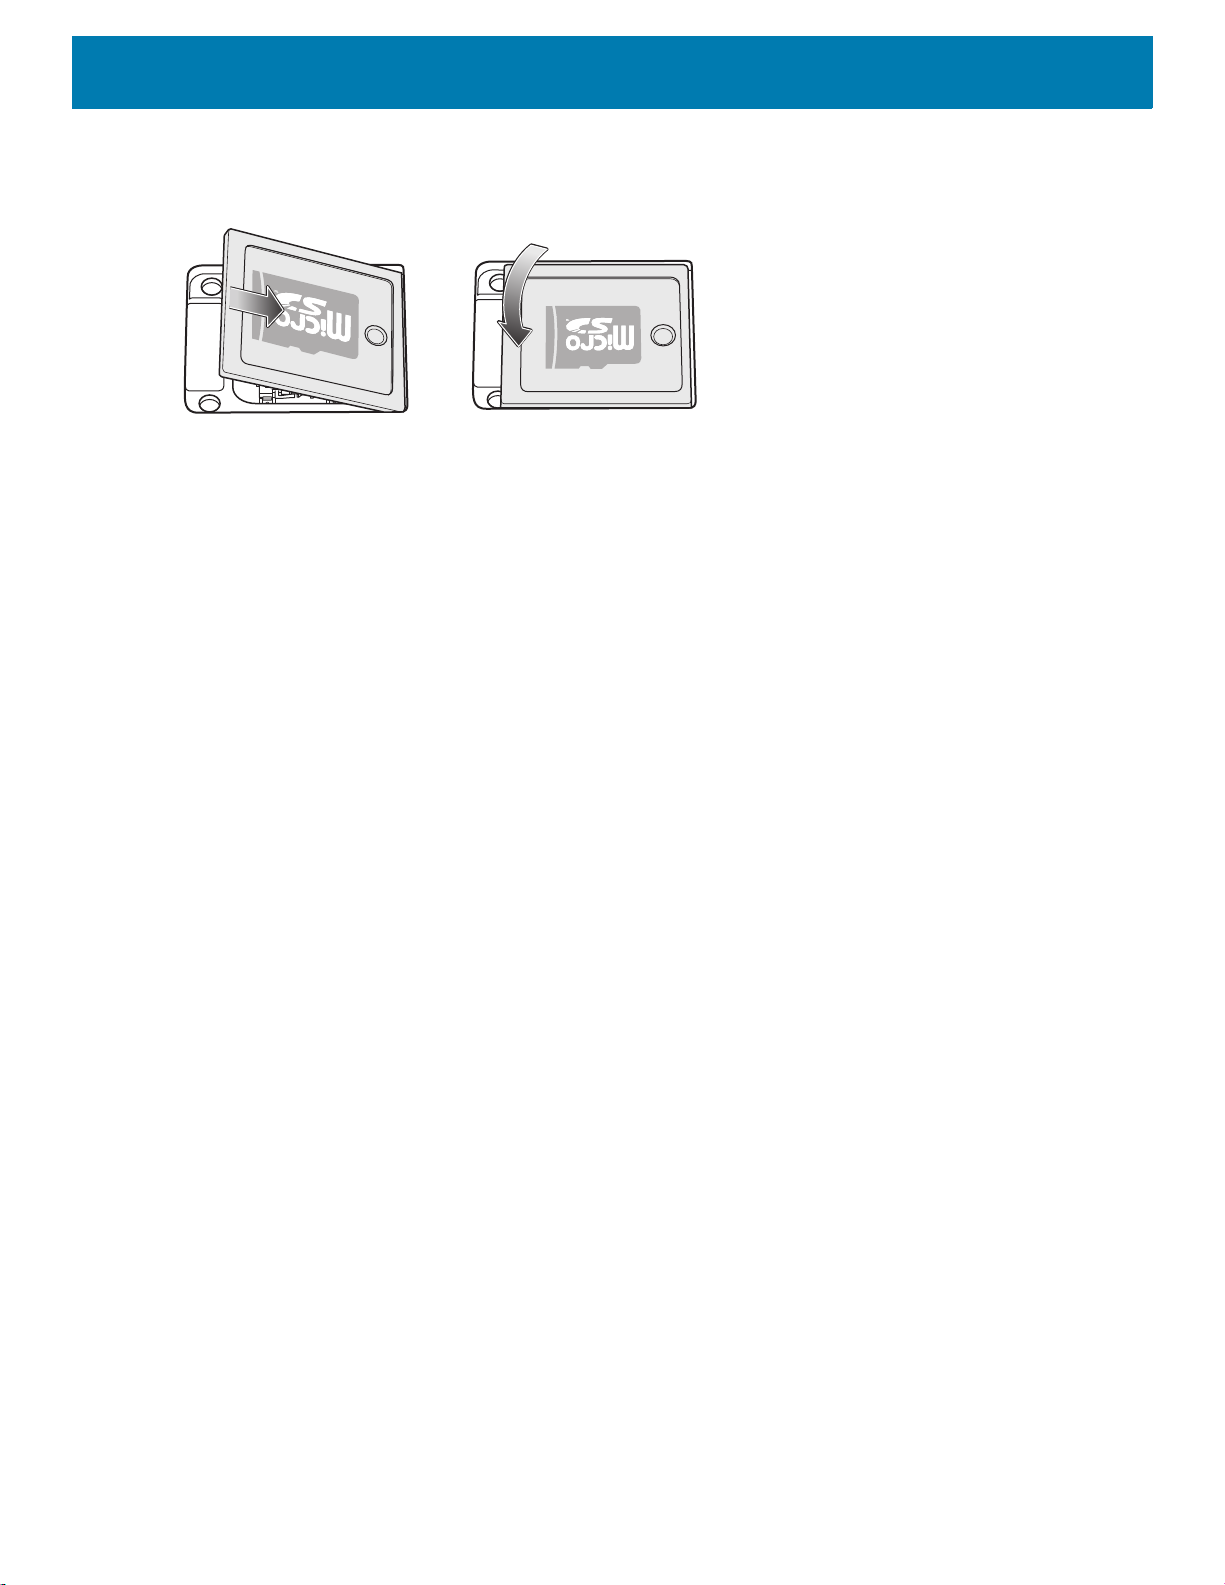
4. Place the microSD card into the contact area with the contacts facing down.
Figure 12 Install microSD Card
5. Close the microSD card holder and slide the microSD card holder to the Lock position.
Figure 13 Lock microSD Card Holder
28
Page 29
Getting Started
6. Replace the microSD card cover and ensure that it is installed properly.
Figure 14 Replace Cover
29
Page 30
Installing the MC33XX-G Battery
The MC33XX-G is compatible with the following batteries:
• MC33XX 5200 mAh PowerPrecision+ extended battery.
• MC32N0 5200 mAh PowerPrecision extended battery.
To install the battery:
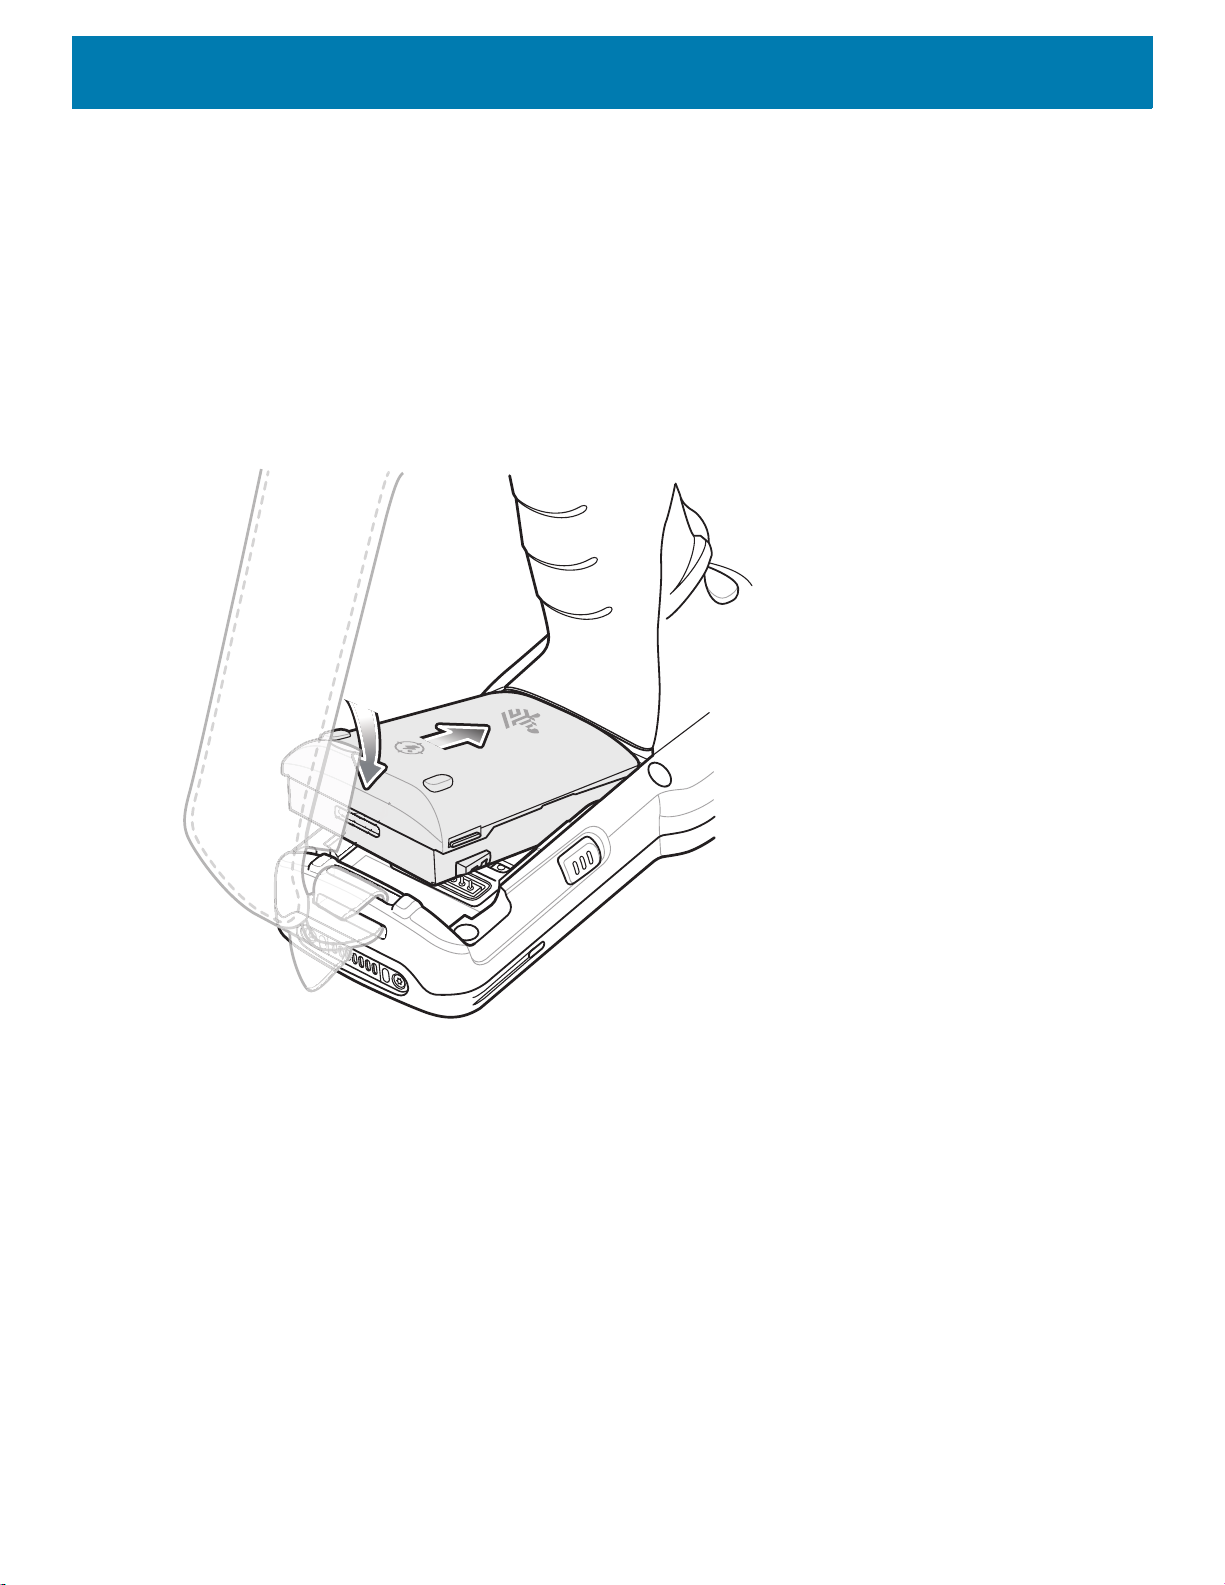
1. Loosen the hand strap, if needed.
2. Align the battery into the battery compartment.
Figure 15 Inserting the Battery
Getting Started
3. Rotate the bottom of the battery into the battery compartment.
30
Page 31

Getting Started
4. Press battery down firmly. Ensure that both battery release buttons on the sides of the MC33XX-G return to
the home position.
Figure 16 Press Battery Down
5. Tighten the hand strap, if needed.
6. Press the Power button to turn on the device.
Installing the MC33XX-R/S Battery
The MC33XX-R/S is compatible with the following batteries:
• MC33XX 2740 mAh PowerPrecision+ standard battery.
• MC33XX 5200 mAh PowerPrecision+ extended battery.
• MC32N0 2740 mAh PowerPrecision standard battery.
• MC32N0 5200 mAh PowerPrecision extended battery.
To install the battery:
1. Loosen the hand strap, if needed.
31
Page 32

Getting Started
2. Align the top of the battery into the battery compartment.
Figure 17 Inserting the Battery
3. Rotate the bottom of the battery into the battery compartment.
4. Press battery down firmly. Ensure that both battery release buttons on the sides of the MC33XX-R/S return
to the home position.
Figure 18 Press Battery Down
5. Tighten the hand strap, if needed.
6. Press the Power button to turn on the device.
Charging the Battery
CAUTION: Ensure that you follow the guidelines for battery safety described in Battery Safety Guidelines on
page 196.
Use the mobile computer cradles, cables and spare battery chargers to charge the mobile computer main
battery.
32
Page 33

Getting Started
The main battery can be charged before insertion into the mobile computer or after it is installed. There are two
main batteries for the MC33XX, the 2740 mAh PowerPrecision+ standard battery (1X) and the 5200 mAh
PowerPrecision+ extended battery (2X). The MC33XX-G is compatible with the 5200 mAh PowerPrecision+
extended battery. The MC33XX-R/S are compatible with both the 2740 mAh PowerPrecision+ standard battery
and the 5200 mAh PowerPrecision+ extended battery. Use one of the spare battery chargers to charge the
main battery (out of the mobile computer) or one of the cradles to charge the main battery while it is installed in
the mobile computer.
Before using the mobile computer for the first time, fully charge the main battery until the green Charge LED
indicator remains lit and charge the battery using a cable or a cradle with the appropriate power supply. For
information about the accessories available for the MC33XX, see Accessories. The 2740 mAh
PowerPrecision+ standard battery fully charges (0% to 90% capacity) in less than 2.2 hours and the 5200 mAh
PowerPrecision+ extended battery fully charges (0% to 90% capacity) in less than 3.8 hours.
The MC33XX retains data in memory for at least five minutes when the mobile computer’s main battery is
removed.
When the main battery reaches a very low battery state, the battery retains data in memory for at least 15
hours.
Batteries must be charged within the 0° to +40° C (32° to 104° F) ambient temperature range.
The following accessories can be used to charge batteries:
• Cradles (and a power supply):
• 1-Slot USB Charge Cradle
• 5-Slot Charge Only ShareCradle
• 5-Slot Ethernet ShareCradle
• 5-Slot Charge ShareCradle + 4-Slot Spare Battery Charger
• 5-Slot Ethernet ShareCradle + 4-Slot Spare Battery Charger.
• Cables (and a power supply):
• USB Charge Cable.
• Spare Battery Chargers (and a power supply):
• 4-Slot Spare Battery Charger
• 20-Slot Spare Battery Charger.
To charge the mobile computer using the cradles:
1. Insert the mobile computer into a cradle. See Accessories for accessory setup.
2. The mobile computer starts to charge automatically. The Charge LED Indicator indicates the charge status.
See the table below for charging indications.
To charge the mobile computer using the cables:
1. Connect the MC33XX Communication/Charge Cable to the appropriate power source and connect to the
mobile computer. See Accessories for accessory setup.
2. The mobile computer starts to charge automatically. The Charge LED Indicator indicates the charge status.
33
Page 34

Getting Started
Table 8 LED Charge Indicators
Status Indications
Off • The battery is not charging.
• The battery is not inserted correctly in the cradle or connected to a
power source.
• Cradle is not powered.
Slow Blinking Amber
Every 3 seconds
Solid Amber • Battery is charging.
Solid Green • Battery charging is complete.
Fast Blinking Red
2 blinks/second
Solid Red • Spare battery is charging and battery is at the end of useful life.
• Battery is charging, but the battery is fully depleted and does not yet
have sufficient charge to power the device.
Charging error, e.g.:
• Temperature is too low or too high.
• Charging has gone on too long without completion (typically eight
hours).
• Charging complete and battery is at the end of useful life.
The MC33XX 2740 mAh PowerPrecision+ standard battery charges from 0% to 90% in less than 2.2 hours at
room temperature.
The MC33XX 5200 mAh PowerPrecision+ extended battery charges from 0% to 90% in less than 3.8 hours at
room temperature.
The MC32N0 2740 mAh PowerPrecision standard battery charges from 0% to 90% in less than 3 hours at
room temperature.
The MC32N0 5200 mAh PowerPrecision extended battery charges from 0% to 90% in less than 5.5 hours at
room temperature.
Backup Power
The device is equipped with a supercapcitator (supercap) to provide backup power to the device when the
main battery is removed. The supercap will retain random access memory (RAM) data in memory for
approximately five minutes after the main battery is removed during Hot Swap.
IMPORTANT: The supercap is automatically charged from the main battery and requires approximately
ten minutes to fully charge.
Charging Temperature
Charge batteries in ambient temperatures from 0°C to 40°C (32°F to 104°F) or up to 45°C (113°F) as reported
by the battery. To view battery temperature, swipe up from the bottom of the Home screen and touch Settings
> System > About phone > Battery information.
The device or cradle always performs battery charging in a safe and intelligent manner. At higher temperatures
(for example, approximately +37°C (+98°F)) the device or cradle may for small periods of time alternately
enable and disable battery charging to keep the battery at acceptable temperatures. The device and cradle
indicates when charging is disabled due to abnormal temperatures via its LED.
34
Page 35

Charging Spare Batteries
See the Accessories section for information on using accessories to charge spare batteries.
Hot Swap Mode
The device provides a Hot Swap mode where the user can replace the battery without powering off the device.
When the user removes the battery, the display turns off and the device enters a low power state while in Hot
Swap mode. In Hot Swap mode, the device retains RAM data for approximately 5 minutes. Replace the battery
within 5 minutes to preserve memory persistence. If the user does not install a charged battery within 5
minutes, data in RAM will be lost. During Hot Swap mode, Wi-Fi and Bluetooth remain connected for 30
seconds. If the battery is not inserted within 30 seconds, Wi-Fi is disabled and then re-enabled when the
device comes out of Hot Swap mode and Bluetooth is reset when the device comes out of Hot Swap mode.
IMPORTANT: The supercap requires time to recharge after performing a Hot Swap or after the main
battery is fully depleted. Hot Swap mode will not retain data unless the supercap is fully charged.
Google Account Setup
Getting Started
NOTE: The device has to be connected to the internet in order to set up a Google™ account.
A Google account is only required on devices with GMS software.
The first time the device starts, the Setup Wizard displays. Follow the on-screen instructions to set up a Google
account, configure Google Pay
information, and enable backup/restore features.
Zebra Visibility Services
The device captures and provides device analytics to a system administrator. The first time the device boots
(or after a Factory reset), the Zebra Services agreement screen displays.
Figure 19 Zebra Services
™ for purchasing items from the Google Play ™ store, to enter your personal
Touch the Device Data switch to disable the device from sending analytics data.
35
Page 36

Getting Started
Replacing the Battery in the MC33XX-G
To replace the battery:
1. Push in the two Battery Release buttons.
The battery ejects slightly. With Hot Swap mode, when the user removes the battery, the display turns off
and the device enters a low power state. The MC33XX-G retains RAM data for approximately five minutes.
Replace the battery within five minutes to preserve memory persistence.
Figure 20 Release Battery
36
Page 37

Getting Started
2. Remove the battery from the battery compartment.
Figure 21 Remove Battery
3. Align the battery into the battery compartment.
Figure 22 Inserting the Battery
37
Page 38

Getting Started
4. Rotate the bottom of the battery into the battery compartment.
5. Press battery down firmly. Ensure that both battery release buttons on the sides of the MC33XX-G return to
the home position.
Figure 23 Press Battery Down
6. Press the Power button to turn on the device.
Replacing the Battery in the MC33XX-R/S
To replace the battery:
1. Push in the two Battery Release buttons.
The battery ejects slightly. With Hot Swap mode, when the user removes the battery, the display turns off
and the device enters a low power state. The MC33XX-R/S retains RAM data for approximately five
minutes. Replace the battery within five minutes to preserve memory persistence.
Figure 24 Release Battery
38
Page 39

Getting Started
2. Remove the battery from the battery compartment.
Figure 25 Remove Battery
3. Align the battery into the battery compartment.
Figure 26 Inserting the Battery
4. Rotate the bottom of the battery into the battery compartment.
39
Page 40

5. Press battery down firmly. Ensure that both battery release buttons on the sides of the MC33XX-R/S return
to the home position.
Figure 27 Press Battery Down
6. Press the Power button to turn on the device.
Accessing Device Settings
Getting Started
To access device settings:
1. Swipe down from the Status bar to open the Quick Settings bar and then touch .
2. On the Home screen, swipe up from the bottom of the screen and touch .
Battery Management
NOTE: Prior to checking the battery charge level, remove the device from any AC power source (cradle or cable).
To check the charge status of the main battery, open Settings and touch System > About phone > Battery
Information.
IMPORTANT: At temperatures below 0°C, the Battery level may report a reduced value. This is normal due to temperature
compensation.
Battery present status indicates if the battery is present and Battery level lists the battery charge (as a
percentage of fully charged). The battery percentage can also be viewed next to the battery icon in the quick
access panel. Swipe down with two fingers from the status bar to open the quick access panel.
Monitoring Battery Usage
The Battery screen provides battery charge details, power management options, and a list of apps that
consume the most battery power.
Use the power management options to extend battery life, or touch an app to display details about its power
consumption. Different apps display different information. Some apps include buttons that open screens with
settings to adjust power use. Use the DISABLE or FORCE CLOSE buttons to turn off apps that consume too
much power.
1. Swipe down from the Status bar to open the Quick Settings bar and then touch .
40
Page 41

2. Touch Battery.
Figure 28 Battery Screen
Getting Started
Low Battery Notification
When the battery charge drops below 23% (MC33XX 2740 mAh PowerPrecision+ standard battery) or 15%
(MC33XX 5200 mAh PowerPrecision+ extended battery) to a low level, the MC33XX displays a notice to
connect the MC33XX to power. The user should charge the battery using one of the charging accessories.
When the battery charge drops below 15% (MC33XX 2740 mAh PowerPrecision+ standard battery) or 8%
(MC33XX 5200 mAh PowerPrecision+ extended battery) to a very low level, the MC33XX displays a notice to
connect the MC33XX to power. The user should charge the battery using one of the charging accessories.
When the battery charge drops below 8% (MC33XX 2740 mAh PowerPrecision+ standard battery) or 4%
(MC33XX 5200 mAh PowerPrecision+ extended battery), the MC33XX goes into critical suspend mode to
save data. The screen turns off.
The user must replace the battery or charge the MC33XX using one of the charging accessories to retain data.
Battery Optimization
Observe the following battery saving tips:
• Set the screen to turn off after a short period of non-use.
• Reduce screen brightness.
• Turn off all wireless radios when not in use.
• Turn off automatic syncing for Email, Calendar, Contacts, and other apps.
• Minimize use of apps that keep the device from suspending, for example, music and video apps.
41
Page 42

Turning Off the Radios
To turn off all the radios:
1. Swipe down from the Status bar to open the Quick Settings panel.
2. Touch Airplane mode. The airplane icon appears in the Status bar indicating that all the radios are off.
Connecting a Wired Headset
To connect a wired headset to the MC33XX-R/S:
Figure 29 Connect Headset to MC33XX–R/S
Getting Started
Real-Time Clock Backup
The device provides a Real-time Clock (RTC) backup feature. After boot-up, the device saves the system time
in a file in persistent storage. When the device re-boots, it compares the system time to the time saved in a file.
If the system time in not the latest, it restores the time from the file.
Setting the Date and Time
You are only required to set the time zone or set the date and time if the wireless LAN does not support
Network Time Protocol (NTP).
To set the date and time:
1. Swipe down from the Status bar to open the Quick Settings bar and then touch .
2. Touch System > Date & time.
3. Touch Automatic date & time to disable automatic date and time synchronization.
4. Touch Set date.
5. In the calendar, set today’s date.
6. Touch OK.
7. Touch Set time.
8. Touch the green circle, drag to the current hour and then release.
9. Touch the green circle, drag to the current minute and then release.
10.Touch AM or PM.
42
Page 43

11.Touch OK.
12.Touch Use 24-hour format.
13.Touch .
Display Settings
Use Display settings to change the screen brightness, enable night light, change the background image,
enable screen rotation, set sleep time, and change font size.
Setting the Screen Brightness
To manually set the screen brightness using the touchscreen:
1. Swipe down with two fingers from the Status bar to open the Quick Access panel.
2. Slide the icon to adjust the screen brightness level.
Figure 30 Brightness Slider
Getting Started
To let the device automatically adjust the screen brightness using the built-in light sensor:
1. Swipe down from the status bar to open the quick settings bar and then touch .
2. Touch Display.
3. If disabled, touch Adaptive brightness to automatically adjust the brightness.
By default, Adaptive brightness is enabled. Toggle the switch to disable.
4. Touch .
Setting Screen Timeout
To set the screen sleep time:
1. Swipe down from the Status bar to open the Quick Settings bar and then touch .
2. Touch Display > Advanced > Sleep.
3. Select one of the sleep values.
• 15 seconds
• 30 seconds
• 1 minute (default)
• 2 minutes
• 5 minutes
•10 minutes
•30 minutes (default).
4. Touch .
43
Page 44
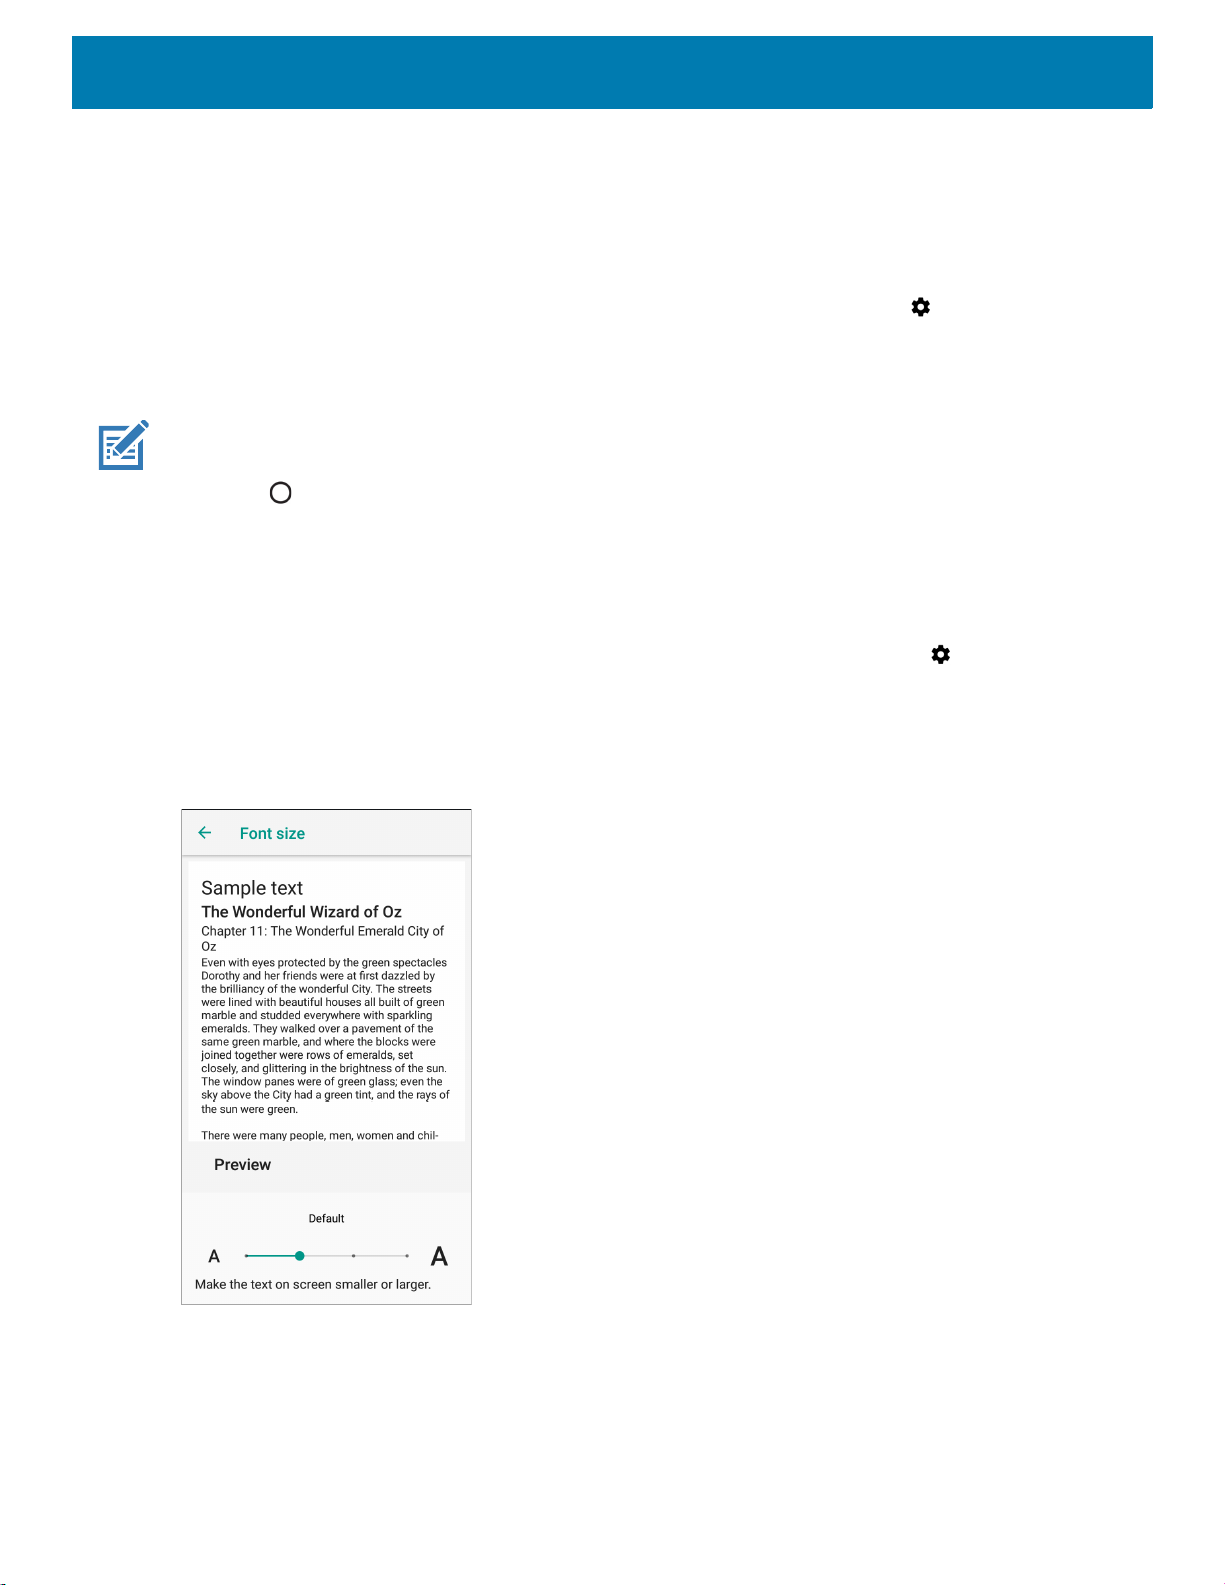
Setting Screen Rotation
By default, screen rotation is enabled.
To disable screen rotation:
1. Swipe down from the Status bar to open the Quick Settings bar and then touch .
2. Touch Display > Advanced.
3. Touch Auto-rotate screen.
NOTE: To change the Home screen rotation, see Setting Home Screen Rotation.
4. Touch .
Setting Font Size
To set the size of the font in system apps:
Getting Started
1. Swipe down from the Status bar to open the Quick Settings panel and then touch .
2. Touch Display > Advanced.
3. Touch Font size.
Figure 31 Font Settings
4. Select one of the font size values.
•Small
• Default
•Large
• Largest.
44
Page 45

5. Touch .
Setting Display Size
By default, display size is set to default.
To change the display size:
1. Swipe down from the Status bar to open the Quick Settings bar and then touch .
2. Touch Display > Advanced.
3. Touch Display size.
4. Touch - and + to change the display size.
•Small
• Default
•Large.
5. Touch .
Getting Started
Ambient Display
The Ambient display setting wakes the screen when notifications are received.
To disable ambient display:
1. Swipe down from the Status bar to open the Quick Settings bar and then touch .
2. Touch Display > Advanced.
3. Touch Ambient display.
4. In the When to show section, enable or disable an option using the switch.
5. Touch .
Touch Panel Mode
The device display is able to detect touches using a finger, a conductive-tip stylus, or gloved finger.
NOTE: A glove can be made of medical latex, leather, cotton, or wool.
For optimal performance use a Zebra certified stylus.
1. Swipe down from the Status bar to open the Quick Settings bar and then touch .
2. Touch Display > Advanced.
3. Touch Touch panel mode.
45
Page 46

Figure 32 Screen Protector Mode Dialog Box
4. Select:
a. Glove and Finger to use a finger or a gloved finger on the screen.
b. Stylus and Finger to use a finger or a stylus on the screen.
5. Touch .
General Sound Setting
Getting Started
Use the Sound settings to configure media and alarm volumes.
To access sound settings:
1. Swipe down from the Status bar to open the Quick Settings bar and then touch .
2. Touch Sound.
3. Touch an option to set sounds.
Figure 33 Sound Screen
46
Page 47

Getting Started
• Zebra volume controls
• Ring volume - Controls the ringtone volume.
• Media volume - Controls the music, games, and media volume.
• Alarm volume - Controls the alarm clock volume.
• Notifications volume - Controls the notification volume.
• Scanner volume - Controls the scanner volume.
• Volume presets
• - Mutes the ring, notifications, and scanner so that the device does not make sounds or vibrate.
• - All sounds except media and alarms are silenced and vibrate mode is active.
• - Enables all sounds at the user defined levels.
• Also vibrate for calls - Switch on or off.
• Do Not Disturb preferences - Mutes some or all sounds and vibrations.
• Priority only allows - Use to set the priorities for the following:
• Reminders - Switch on or off.
• Events - Switch on or off.
• Alarms - This is always enabled.
• Messages - Choose to allow messages from anyone, starred contacts, any contact, or none. To star
contacts, use the Contacts app.
• Calls - Choose to allow calls from anyone, starred contacts, any contact, or none. To star contacts,
use the Contacts app.
• Repeat callers - Choose whether or not the phone rings if the same person calls again within 15
minutes.
• Block visual disturbances
• Block when screen is on - This option prevents notifications from displaying over the screen
(peeking) while you are actively using the device.
• Block when screen is off - This option prevents notifications from turning on the screen or pulsing
the LED light when a new notification is received while you are not using the device.
• Automatic rules - Choose when to automatically silence the device. Touch a default rule, such as
Weekend or Weeknight, or create your own rule. To create your own rule, tap Add more and then Time
rule.
• Advanced - Touch to display advanced sound options.
• Default notification sound - Touch to select a sound to play for all system notifications.
•
Default alarm sound - Touch to select a sound to play for alarms.
• Other sounds and vibrations
• Screen locking sounds - Play a sound when locking and unlocking the screen (default – enabled).
• Charging sounds - Not applicable.
• Touch sounds - Play a sound when making screen selections (default – enabled).
• Vibrate on tap - Vibrate the device when making screen selections (default – disabled).
• Emergency alerts - Touch to configure emergency broadcast settings and notifications.
47
Page 48

Setting Device Advertisement
Device Advertisement consists of Inactivity notification and Device paging functionalities. Inactivity
notification is based on the device sensor support (accelerometer). If the device doesn’t have an
accelerometer sensor, only the Device paging option is available.
To access Device Advertisement settings:
1. Swipe down from the Status bar to open the Quick Settings bar and then touch .
2. Touch Device Advertisement.
3. Select from the following options:
• Inactivity notification - Enable to have the device notify the user with audible and/or LED notifications.
The notification starts once the device battery level goes below the Battery warning level and the
Inactivity timeout criteria is met (Default - disabled).
• Device paging - The device must be connected to WLAN and be MDM managed. The MDM sends the
device notification intent to the necessary device which has to be paged. This option is configurable
through an MDM (StageNow, SOTI, or AirWatch) (Default - disabled).
Configurations
• Battery warning level - Enable Inactivity notification to activate this option. Set by the user. (Default -
20%).
• Inactivity timeout - Enable Inactivity notification to activate this option. Once the device is in an idle
state (not in motion) and not charging or in a cradle, this is the time period after which the device will
start sending notifications. Set between 1 - 60 minutes. (Default - 30).
• LED notification - Enable or disable this option to receive an LED notification.
• Audible notification - Enable or disable this option to receive an audible notification.
• Audible timeout - Enable this option to set the Timeout of audible notification option.
• Timeout of audible notification - Enable Audible timeout to activate this option. This is the time
period for which the notification is played continuously. If the Audible timeout is disabled and Audible
notification is enabled, then the audio notification will keep playing without a timeout period. Set
between 1-30 minutes (Default - 3
• Audible type - valid options: Ring, Notification, and Alarm.
• Audible file - The user can select from various pre-defined files, based on the audible type, or add a
custom ringtone.
Getting Started
).
4. Touch .
Wake-Up Sources
By default, the device wakes from suspend mode when the user presses the power button. The device can be
configured to wake when the user presses the Trigger or the Scan button.
1. Swipe up from the bottom of the Home screen and touch Settings > Wake-Up Sources.
2. Touch a checkbox. A check appears in the checkbox.
3. Touch .
48
Page 49

Using the Device
Introduction
This chapter describes the screens, status and notification icons, and controls on the device, and
provides basic instructions for using the device.
Google Mobile Services
NOTE: This section applies to Google Mobile Services (GMS) devices only.
Devices with GMS contain apps and services that provide additional functionality.
GMS includes:
• Apps - GMS adds a variety of Google apps and associated widgets including Chrome, Gmail,
Drive, and Maps.
• Services:
• Speech to Text - Allows for free format speech to text in many languages for both connected
and disconnected network. Launch by touching the microphone icon on the keyboard.
• TalkBack Service - Provides spoken feedback on various parts of the user interface. To enable,
go to Settings > Accessibility.
• Network Location Provider - Adds a location provider which uses mobile network tower
information and Wi-Fi access point information to provide a location without using GPS. To
enable, go to Settings > Security & location > Location.
• Widevine DRM - Enables Digital Rights Management (DRM) so that protected streaming video
content can be played. Enable DRM Info from the Google Play
• Google Cloud Messaging - Allows the device to receive data from the server and other devices
on the same connection.
• Backup and Restore - Allows the users settings and apps to be backed up to a Google server
and subsequently restored from that server after a factory reset.
• Google Accounts - Create and use a Google account to synchronize mail, files, music, photos,
contacts and calendar events.
™ store.
Home Screen
Turn on the device to display the Home screen. Depending on the configuration, the Home screen may
appear different. Contact your system administrator for more information.
49
Page 50

Using the Device
1
2
3
4
5
6
7
8
9
GMS
AOSP
After a suspend or screen time-out, the Home screen displays with the lock slider. Touch the screen and slide
up to unlock. For screen locking information, see Un-Locking the Screen.
The Home screen provides additional screens for placement of widgets and shortcuts. Swipe the screen left or
right to view the additional screens.
NOTE:
By default, non-GMS devices do not have the same icons on the Home screen as GMS. Icons are shown below for
example only.
Home screen icons can be configured by the user and may look different than shown.
The Home screen consists of the following:
Table 9 Home Screen Items
Item Description
1 — Status Bar Displays the time, status icons (right side), and notification icons (left side). For more
information see Status Bar on page 51 and Managing Notifications on page 53.
2 — Widgets Launches stand-alone applications that run on the Home screen. See App Shortcuts and
3 — Shortcut
Icons
Widgets on page 57 for more information.
Opens applications installed on the MC33XX. See App Shortcuts and Widgets on page 57
for more information.
4 — Folder Contains apps.
5 — Settings Icon Opens the Settings window.
6 — Back Displays the previous screen.
7 — Home Displays the Home screen.
8 — Recent
Button
Displays recently used applications.
9 — All Apps Icon Opens the APPS window.
50
Page 51

Setting Home Screen Rotation
Notification Icons
Status Icons
By default the Home screen rotation is disabled.
To enable Home screen rotation:
1. Touch and hold anywhere on the Home screen until the options appear.
2. Touch HOME SETTINGS.
3. Touch the Allow Home screen rotation switch.
4. Touch .
5. Rotate the device.
Figure 34 Rotated Home Screen
Using the Device
Status Bar
The Status bar displays the time, notification icons (left side), and status icons (right side).
NOTE: Some Status icons may not appear in the Status bar if there are too many icons to display.
Figure 35 Notification and Status Icons
If there are more notifications than can fit in the Status bar, two dots display indicating that more notifications
exist. Swipe down from the Status bar to open the Notification panel and view all notifications and status.
51
Page 52

Using the Device
Status Icons
Table 10 Status Icons
Icon Description
Alarm is active.
Main battery is fully charged.
Main battery is partially drained.
Main battery charge is low.
Main battery charge is very low.
Main battery is charging.
All sounds, except media and alarms, are silenced and vibrate mode is active.
Do Not Disturb mode active.
Airplane Mode is active. All radios are turned off.
Bluetooth is on.
The device is connected to a Bluetooth device.
Connected to a Wi-Fi network.
Not connected to a Wi-Fi network or no Wi-Fi signal.
Connected to an Ethernet network.
Speakerphone enabled.
Indicates that all sounds except media and alarms are silenced.
Indicates that the Orange key is locked.
Indicates that the Blue key is pressed.
Indicates that the ALT key is pressed.
Indicates that the CTRL key is pressed.
Indicates that the Shift key is pressed.
Indicates that the Shift key is locked.
Indicates that a BT headset is connected to the MC33XX.
52
Page 53

Notification Icons
Table 11 Notification Icons
Icon Description
Main battery is low.
More notifications are available for viewing.
Data is syncing.
Indicates an upcoming event. Non-GMS devices only.
Indicates an upcoming event. GMS devices only.
Open Wi-Fi network is available.
Song is playing.
Problem with sign-in or sync has occurred.
Using the Device
Device is uploading data.
Device is downloading data when animated and download is complete when static.
Device is connected to or disconnected from virtual private network (VPN).
Preparing internal storage by checking it for errors.
USB debugging is enabled on the device.
Headset is connected to the device.
PTT Express Voice client status. See the PTT Express PTT Notification Icons for a complete list.
Indicates that RxLogger app is running.
Indicates the RS6000 is connected to the device.
Indicates the RS507 or RS6000 is connected to the device in HID mode.
Managing Notifications
Notification icons report the arrival of new messages, calendar events, alarms, and ongoing events. When a
notification occurs, an icon appears in the Status bar with a brief description. See Notification Icons for a list of
possible notification icons and their description. Open the Notification panel to view a list of all the notifications.
53
Page 54

Using the Device
To open the Notification panel, drag the Status bar down from the top of the screen.
Figure 36 Notification Panel
To respond to a notification, open the Notification panel and then touch a notification. The Notification panel
closes and the corresponding app opens.
To clear all notifications, open the Notification panel and then touch CLEAR ALL. All event-based notifications
are removed. Ongoing notifications remain in the list.
To close the Notification panel, swipe the Notification panel up.
Setting App Notifications
To set notification settings for a specific app:
1. Swipe down from the Status bar to open the Quick Settings bar and then touch .
2. Touch Apps & notifications > Notifications > App notifications.
3. Select an app.
4. Select an available option:
• On / Off - Select to turn all notifications from this app On (default) or Off.
• Allow notification dot - Do not allow this app to add a notification dot to the app icon.
• Allow interruptions - Do not allow notifications from this app to make sound, vibrate, or pop
notifications on the screen.
• Override Do Not Disturb - Allow these notifications to interrupt when Do Not Disturb is set to Priority
Only.
• Categories - Do not allow specific types of notifications from this app.
• Additional settings in the app - Open the app settings.
NOTE: To change the notification settings for an app, slide the notification slightly left or right and touch .
54
Page 55

Using the Device
Viewing Notification Settings for All Apps
To view the notification settings for all apps:
1. Swipe down from the Status bar to open the Quick Settings bar and then touch .
2. Touch Apps & Notifications.
3. Scroll down to Notifications to view how many apps have notifications turned off.
4. To set or view notifications settings for a specific app, see Setting App Notifications.
Controlling Lock Screen Notifications
To control whether notifications can be seen when the device is locked:
1. Swipe down from the Status bar to open the Quick Settings bar and then touch .
2. Touch Apps & notifications > Notifications.
3. Touch On the lock screen and select one of the following:
• Show all notification content (default)
• Don’t show notifications at all.
Blink Light
The Notification LED lights blue when an app, such as email and VoIP, generates a programmable notification
or to indicate when the device is connected to a Bluetooth device. By default, LED notifications are enabled.
To change the notification setting:
1. Swipe down from the Status bar to open the Quick Settings bar and then touch .
2. Touch Apps & notifications > Notifications.
3. Touch Blink light to toggle the notification on or off.
Quick Access Panel
Use the Quick Access panel to access frequently used settings (for example, Airplane mode).
Figure 37 Quick Settings Bar
To see the full Quick Access panel:
• If the device is locked, swipe down once.
• If the device is unlocked, swipe down once with two fingers, or twice with one finger.
55
Page 56

Using the Device
• If the Quick Settings bar is open, touch the Down arrow.
Figure 38 Quick Access Panel
NOTE: Not all icons are pictured. Icons may vary.
To change a setting, touch the icon:
• Display brightness - Use the slider to decrease or increase the brightness of the screen.
• Wi-Fi network - Turn Wi-Fi on or off. To open Wi-Fi settings, touch the Wi-Fi network name.
• Bluetooth settings - Turn Bluetooth on or off. To open Bluetooth settings, touch Bluetooth.
• Battery power - Indicates percentage of battery power remaining. Touch to view battery usage.
• Do not disturb - Control how and when to receive notifications.
• Airplane mode - Turn Airplane mode on or off. When Airplane mode is on the device does not connect to
Wi-Fi or Bluetooth.
• Auto-rotate - Lock the device’s orientation in portrait or landscape mode or set to automatically rotate.
• Flashlight - Turn flashlight on or off. Turn camera flash on or off.
The thermal protection safety feature for the camera provides the following behavior if the temperature
range is 40°C or above:
• If the flashlight is kept on for a certain period of time, it is automatically turned off and cannot be turned
back on for a period of time until it has cooled off.
• During the cooling off period, the camera cannot be turned on. If you attempt to use the camera, a
message displays indicating to try again after a period of time.
• Cast - Share phone content on Chromecast or a television with Google Cast built-in. Touch cast screen to
display a list of devices, then touch a device to begin casting.
Editing Icons on Quick Settings
The first several setting tiles from the Quick Access panel become the Quick Settings bar.
To move a setting tile:
1. Open the Quick Access panel.
2. Touch .
56
Page 57

Using the Device
3. Touch and drag a setting tile to another location.
4. Release the tile.
5. Touch to save tiles and return to the Quick Access panel.
To add a setting tile:
1. Open the Quick Access panel.
2. Touch .
3. Slide the Quick Settings panel up to reveal additional tiles.
4. Touch and drag a setting tile from the Drag to add tiles area to the main area.
5. Release the tile.
6. Touch to save tiles and return to Quick Access panel.
To remove a setting tile:
1. Open the Quick Access panel.
2. Touch .
3. Touch and drag a setting tile to the Drag here to remove area.
4. Release the tile.
5. Touch to save tiles and return to Quick Access panel.
App Shortcuts and Widgets
App shortcuts placed on the Home screen allow quick and easy access to apps. Widgets are self-contained
apps placed on the Home screen to access frequently used features.
Adding an App Shortcut to the Home Screen
To add an app shortcut to the Home screen:
1. Go to the desired Home screen.
2. Swipe up from the bottom of the screen.
3. Scroll through the list to find the app icon.
4. Touch and hold the icon until the Home screen appears.
5. Position the icon on the screen and then release.
Adding a Widget to the Home Screen
To add a widget to the Home screen:
1. Go to the desired Home screen.
2. Touch and hold until the menu appears.
3. Touch WIDGETS.
57
Page 58

Using the Device
4. Scroll through the list to find the widget.
5. Touch and hold the widget until the Home screen appears.
6. Position the widget on the screen and then release.
Moving Items on the Home Screen
To move app shortcuts or widgets on the Home screen:
1. Touch and hold the item until it floats on the screen.
2. Drag the item to a new location. Pause at the edge of the screen to drag the item onto an adjacent Home
screen.
3. Lift finger to place the item on the Home screen.
Removing an App Shortcut or Widget from the Home Screen
To remove an app shortcut or widget from the Home screen:
1. Go to the desired Home screen.
2. Touch and hold the app shortcut or widget icon until it floats on the screen.
3. Drag the icon to X Remove at the top of the screen and then release.
Folders
Use Folders to organize similar applications together. Tap the folder to open and display items in the folder.
Creating a Folder
There must be at least two app icons on the Home screen.
To create a folder:
1. Go to the desired Home screen.
2. Touch and hold one app icon.
3. Drag the icon and stack on top of another icon.
4. Lift and release.
Naming Folders
To name a folder:
58
Page 59

Using the Device
Title Area
1. Touch the folder.
Figure 39 Open Folder
2. Touch the title area and enter a folder name using the keyboard.
3. Touch on the keyboard.
4. Touch anywhere on the Home screen to close the folder. The folder name appears under the folder.
Removing a Folder
To remove a folder:
1. Touch and hold the folder icon until it enlarges.
X
2. Drag the folder to
Remove and release.
Home Screen Wallpaper
To change the Home screen wallpaper:
1. Touch and hold the screen until the menu appears.
2. Touch WALLPAPERS.
3. Touch Photos or Gallery to select a photo or select one of the pre-installed wallpapers.
4. Touch Set wallpaper.
Using the Touchscreen
Use the multi-tap sensitive screen to operate the device.
• Tap - Tap to:
• Select items on the screen.
• Type letters and symbols using the on-screen keyboard.
• Press on-screen buttons.
• Tap and Hold - Tap and hold:
• An item on the Home screen to move it to a new location or to the trash.
• An item in Apps to create a shortcut on the Home screen.
• The Home screen to open a menu for customizing the Home screen.
• An empty area on the Home screen until the menu appears.
59
Page 60

• Drag - Tap and hold an item for a moment and then move finger on the screen until reaching the new
position.
• Swipe - Move finger up and down or left and right on the screen to:
• Unlock the screen.
• View additional Home screens.
• View additional app icons in the Launcher window.
• View more information on an app’s screen.
• Double-tap - Tap twice on a web page, map, or other screen to zoom in and out.
• Pinch - In some apps, zoom in and out by placing two fingers on the screen and pinching them together (to
zoom out) or spreading them apart (to zoom in).
Keyboards
The device provides the following types of keyboards:
• Android Keyboard - Non-GMS devices only.
• Gboard - GMS devices only
• Enterprise Keyboard
Using the Device
NOTE: By default the Enterprise and Virtual Keyboards are disabled.
Keyboard Configuration
Enabling Keyboards
To enable keyboards:
1. Swipe down from the Status bar to open the Quick Settings bar and then touch .
2. Touch System > Languages & input > Virtual keyboard > Manage keyboards.
3. Touch a keyboard to enable.
Switching Between Keyboards
To switch between keyboards, touch in a text box to display the current keyboard.
• On the Android or Gboard keyboards, touch and hold .
• On the Enterprise keyboard, touch .
Using the Enterprise Keyboard
The Enterprise Keyboard contains the following keyboards:
• Numeric
•Alpha
• Special characters
• Data capture.
60
Page 61
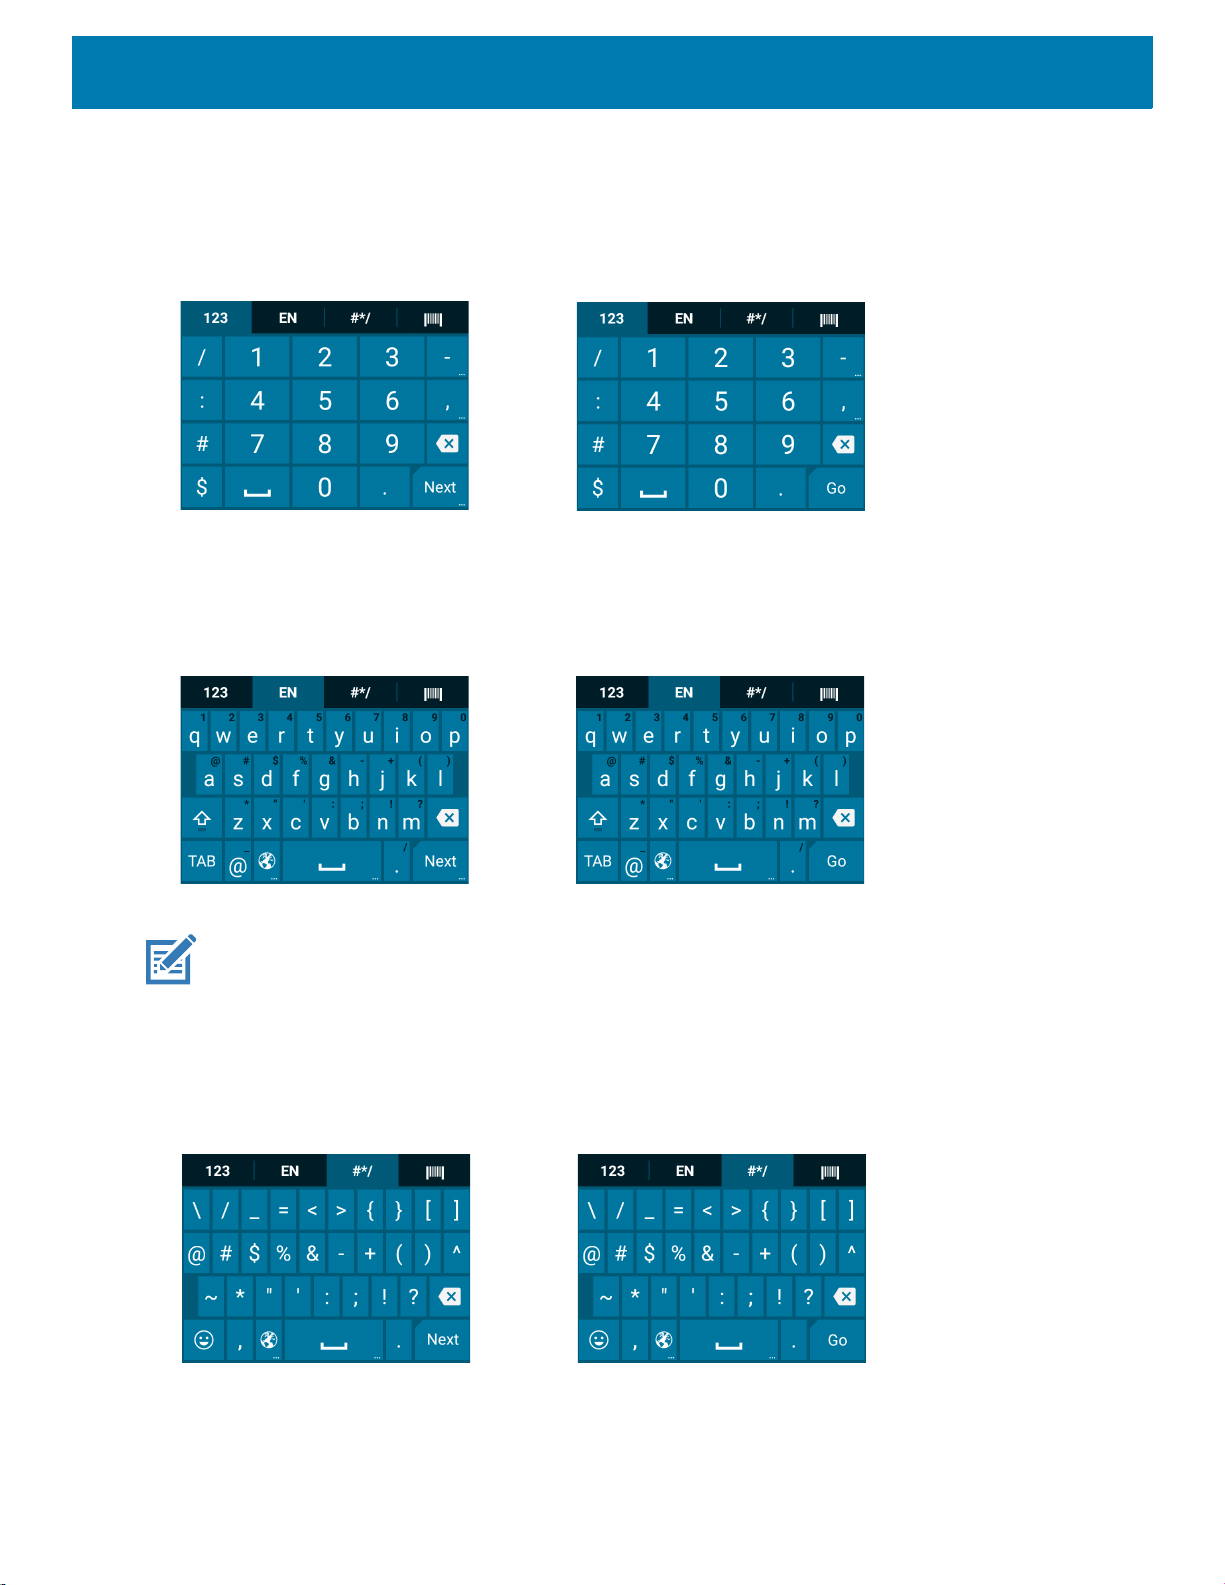
Using the Device
Numeric Tab
To access the numeric keyboard, touch the 123 tab. The keys displayed vary on the app being used. For
example, an arrow displays in Contacts, however Done displays in Email account setup.
Figure 40 Numeric Keyboard
Alpha Tab
To access the alpha keyboard, touch the EN tab.
Figure 41 Alpha Keyboard
NOTE: The Enterprise keyboard supports English (US), English (UK), French, German, Spanish and Italian. When
a keyboard language is selected in Settings, the corresponding keyboard language displays.
Additional Character Tab
To access additional characters, touch the #*/ tab.
Figure 42 Symbols Keyboard
61
Page 62

Using the Device
Touch to enter emoji icons in a text message.
Figure 43 Emoji Keyboard
Touch ABC to return to the Symbols keyboard.
Scan Tab
The Scan tab provides an easy data capture feature for scanning barcodes.
Figure 44 Scan Keyboard
Using the Android and Gboard Keyboards
Use the Android or Gboard keyboards to enter text in a text field. To configure the keyboard settings, touch and
hold
, (comma) and then select Android keyboard settings.
Editing Text
Edit entered text and use menu commands to cut, copy, and paste text within or across apps. Some apps do
not support editing some or all of the text they display; others may offer their own way to select text.
Entering Numbers, Symbols, and Special Characters
To enter numbers and symbols:
• Touch and hold one of the top-row keys until a menu appears then select a number or special character.
• Touch the Shift key once for a single capital letter. Touch the Shift key twice to lock in uppercase. Touch the
Shift key a third time to unlock Capslock.
• Touch
• Touch the
To enter special characters, touch and hold a number or symbol key to open a menu of additional symbols. A
larger version of the key displays briefly over the keyboard.
?123 to switch to the numbers and symbols keyboard.
=\< key on the numbers and symbols keyboard to view additional symbols.
62
Page 63

Using the Device
Hiding On-Screen Keyboard
On devices with keypads, the user can hide the on-screen keyboard.
Touch in a text field to display the on-screen keyboard. Touch at the bottom right corner of the screen.
Figure 45 Hide Keyboard Option
Touch the Show virtual keyboard switch to off. The on-screen keyboard automatically disappears.
To show the on-screen keyboard, Touch in a text field. Touch at the bottom right corner of the screen.
Touch the Show virtual keyboard switch to on. The keyboard re-appears.
Switching Language Keyboards
The user can enable multiple language keyboards.
Figure 46 Keyboard with Multiple Languages
To switch between language keyboard, touch at the bottom right corner of the screen.
Figure 47 Change Keyboard Option
Select one of the keyboard languages. The keyboard automatically changes to the selected language.
Do Not Disturb Feature
This mode mutes the device so that it does not make sounds or vibrate.
For example, use Do Not Disturb to:
63
Page 64

• Automatically limit sounds at night or during events
• Mute interruptions other than alarms
• Get alerted to messages only from favorite contacts.
Limit Sounds and Vibrations
Mute the device completely, or let through the important alarms or important calls.
Total Silence
To completely mute the device so that it does not make a sound or vibrate, choose Total silence.
In Total silence mode:
• Alarms do not make noise.
• Device does not vibrate or make sounds when receiving a message, or notification.
• Sounds from music, videos, games, and other media are muted.
NOTE: All alarms are silenced in Total silence mode.
Using the Device
1. Swipe down with two fingers from the Status bar to open the Quick Access panel.
2. Touch Do not disturb > Total silence.
3. Choose Until you turn it off or select a time period.
4. Touch Done.
When Total Silence is on, appears in the quick access panel and the Status bar.
To turn off Total Silence, open quick access panel and touch Total silence.
Alarms Only
To mute the device so that you hear alarms, choose Alarms only. This option does not mute sounds from
music, videos, games, or other media.
1. Swipe down with two fingers from the status bar to open the quick access panel.
2. Touch Do not disturb > Alarms only.
3. Choose Until you turn it off or select a time period.
4. Touch Done.
When Alarms Only is on, appears in the quick access panel and the Status Bar.
To turn off Alarms Only, open the Quick Access panel and touch Alarms only.
NOTE: To quickly turn on Alarms Only, with the screen on, press and hold the Volume Down button until the volume is all
the way down. Then, press Volume Down again to turn on Alarms Only.
To turn off Alarms Only, press either the Volume Up or Volume Down button and the touch END NOW in the
alert message.
64
Page 65

Using the Device
Priority Notifications Only
To only be interrupted by important notifications, choose Priority only. This option does not mute sounds from
music, videos, games, or other media.
Before turning on Priority Only mode, set the notification priorities:
1. Swipe down from the status bar to open the quick settings bar and then touch .
2. Touch Sound > Do not disturb > Priority only allows.
3. Set priorities.
• Alarms: Disabled by default.
• Reminders and Events: Switch on or off.
• Messages and Calls: Choose From anyone, From contacts only, From starred contacts only, or
none. To star contacts, use the Contacts applications.
• Repeat callers: Choose whether to let the device ring if the same person calls again within 15 minutes.
After setting notification priorities, turn on Priority Only mode to limit interruptions. The priority notifications
make a sound or vibrate based on the current ringer volume, but other notifications will be silenced.
1. Swipe down with two fingers from the status bar to open the quick access panel.
2. Touch Do not disturb > Priority only.
3. Choose Until you turn it off or select a time period.
4. Tap Done.
When Priority Only is on, appears in the quick access panel and the Status Bar.
To turn off Priority Only, open quick access panel and touch Priority only.
Silence Sounds During Certain Times
To automatically silence the device during certain times, like at night or on weekends:
1. Swipe down from the Status bar to open the Quick Settings bar and then touch .
2. Touch Sound > Do Not Disturb preferences.
3. Touch a default Weekend or Weeknight. Or, to make a new rule, touch Add more > Time rule.
4. Enter a rule name.
5. Touch OK.
6. Edit the new rule:
• Rule name - Rename the rule.
• Days, Start time, and End time - Set the rule's schedule.
• Do Not Disturb preferences - Choose whether the rule uses Alarms only, Priority only, or Total
silence.
• Alarm can override end time - Allow the alarm to continue to make sound until the next alarm begins.
7. Touch the On/Off switch at the top to turn on the rule.
65
Page 66

Using the Device
Silence Sounds During Events and Meetings
To automatically silence the device during events or meetings, set an event rules.
1. Swipe down from the Status bar to open the Quick Settings bar and then touch .
2. Touch Sound > Do Not Disturb preferences.
3. To edit the default rule, touch Event. Or, to create a new rule, touch Add rule > Event rule.
4. Edit the rule settings.
• Rule name - Rename the rule.
• During events for - Select which Google Calendar events the rule uses.
• Where reply is - Set to: Yes, Maybe, or Not replied, Yes or Maybe, or Yes.
• Do Not Disturb preferences - Choose whether the rule uses Priority only, Alarms only, or Total
silence.
5. Touch the On/Off switch at the top to turn on the rule.
Turn Sounds Back On
When the device is in Do Not Disturb mode, Alarms only or Priority only display as , or Total silence displays
as .
To turn off Do Not Disturb, either:
• In the Quick Access panel, touch Alarms only, Priority only, or Total silence.
• Press the Volume Down button and touch End Now.
Override Do Not Disturb for Specific Apps
To let through notifications from specific apps:
1. Swipe down from the Status bar to open the Quick Settings bar and then touch .
2. Touch Apps & notifications > Notifications > App notifications.
3. Touch an app.
4. Touch Override Do Not Disturb.
Apps
The APPS screen displays icons for all installed apps. The table below lists the apps installed on the device.
Refer to the device Integrator Guide for Android Version 8.1 for information on installing and uninstalling apps.
66
Page 67

Using the Device
Table 12 Apps
Icon Description
Battery Manager - Displays battery information, including charge level, status, health and wear
level.
Bluetooth Pairing Utility – Use to pair the RS507 Hands-free Imager with the device by
scanning a barcode.
Calculator - Provides the basic and scientific arithmetic functions.
Calendar - Use to manage events and appointments. GMS devices only
Calendar - Use to manage events and appointments. Non-GMS devices only.
Camera - Take photos or record videos. For more information see Camera.
Chrome - Use to access the Internet or intranet. GMS devices only
Chromium - Use to access the Internet or intranet. Non-GMS devices only.
Clock - Use to schedule alarms for appointments or as a wake-up.
Contacts - Use to manage contact information. See Contacts for more information.
DataWedge - Enables data capture using the imager.
Device Central - Use to display detailed information about the device and connected
peripherals. See Device Central for more information.
Diagnostic Tool - Use to diagnose the device.
Drive - Upload photos, videos, documents, and other files to personal storage site. GMS
devices only
67
Page 68

Using the Device
Table 12 Apps (Continued)
Icon Description
DWDemo - Provides a way to demonstrate the data capture features using the imager. See
DataWedge Demonstration for more information.
Email - Use to send and receive email. Non-GMS devices only.
Files - Organize and manage files on the device. See Files for more information.
Gallery - Use to view photos stored on the microSD card. For more information, see Gallery for
more information. Non-GMS devices only.
Gmail - Use to send and receive email using a Google email account. GMS devices only
Google - Launches Google ™ search app. GMS devices only
Hangouts - Use to communicate with friends using text messages and photos. GMS devices
only
Keep- Use to create, edit, and share notes. GMS devices only
License Manager - Use to manage software licenses on the device.
Maps - Use to see your location on a map (with public transit, traffic, or satellite overlays).
Search for any business or place of interest. Provides turn-by-turn navigation with voice
guidance, traffic-avoidance, and alternate routes, for drivers, cyclists, walkers, and users of
public transportation. GMS devices only
MC33XX User Guide - Opens the on-device User Guide for the device.
Music - Play music stored on the microSD card. Non-GMS devices only.
Notes - Use to take and save notes.Non-GMS devices only
Photos - Use to sync photos with Google account. For more information, see Photo Settings.
GMS devices only
68
Page 69

Using the Device
Table 12 Apps (Continued)
Icon Description
Play Movies & TV - View movies and video on your device. GMS devices only
Play Music - Use to listen to music. GMS devices only
Play Store - Download music, movies, books, and Android apps and games from the Google
Play Store. GMS devices only
PTT Express - Use to launch PTT Express client for VoIP communication.
RxLogger - Use to diagnose device and app issues. See the device Integrator Guide for
Android Version 8.1 for more information.
RxLogger Utility - Use to view, backup, and archive RxLogger data.
Search - Use to search the Web. Requires an Internet connection. Non-GMS devices only.
Settings - Use to configure the device.
SimulScan Demo - Use to demonstrate the document capture feature of the device.
SMARTMU - A diagnostic intelligent app. Use to diagnose surrounding area and display
network stats, such as coverage hole detection, or AP in vicinity.
Sound Recorder - Use to record audio.
StageNow - Allows the device to stage a device for initial use by initiating the deployment of
settings, firmware, and software.
Velocity - Opens the Ivanti (formerly Wavelink) terminal emulation app.
Videos - Use to view videos on the device. Non-GMS devices only.
69
Page 70

Using the Device
Table 12 Apps (Continued)
Icon Description
Voice Search - Use to perform searches by asking questions. GMS devices only
Worry Free Wifi Analyzer - A diagnostic intelligent app. Use to diagnose surrounding area and
display network stats, such as coverage hole detection, or AP in vicinity. Refer to the Worry Free
Wi-Fi Analyzer Administrator Guide for Android.
YouTube - Use to view videos on the YouTube
Zebra Bluetooth - Use to configure Bluetooth logging.
Accessing Apps
All apps installed on the device are accessed using the APPS window.
1. On the Home screen, swipe up from the bottom of the screen.
Figure 48 APPS Window Example
™ web site. GMS devices only
Slide the APPS window up or down to view more app icons. Touch an icon to open the app.
Switching Between Recent Apps
To switch between recent apps:
70
Page 71

Using the Device
1. Touch . A window appears on the screen with icons of recently used apps.
Figure 49 Recently Used Apps
1
2. Slide the apps displayed up and down to view all recently used apps.
3. Swipe left or right to remove app from the list and force close the app.
4. Touch an icon to open an app or touch to return to the current screen.
Un-Locking the Screen
Use the Lock screen to protect access to data on the device. Some email accounts require locking the screen.
Refer to the device Integrator Guide for information on setting up the locking feature.
When locked, a pattern, PIN, or password is required to unlock the device. Press the Power button to lock the
screen. The device also locks after a pre-defined time-out.
71
Page 72

Using the Device
Press and release the Power button to wake the device. The Lock screen displays. Swipe the screen up to
unlock. If the Pattern screen unlock feature is enabled, the Pattern screen appears instead of the Lock screen.
If the PIN or Password screen unlock feature is enabled, enter the PIN or password after unlocking the screen.
Figure 50 Lock Screen
Figure 51 PIN Screen
72
Page 73

Figure 52 Pattern Screen
Using the Device
Figure 53 Password Screen
Interactive Sensor Technology
The MC3300 contains sensors that monitor movement and orientation:
• Gyroscope - Measures angular rotational velocity to detect rotation of the device.
73
Page 74

• Accelerometer - Measures the linear acceleration of movement to detect the orientation of the device.
In order to take advantage of these sensors, applications use API commands. Refer to the Zebra Android
EMDK for more information.
Resetting the Device
The reset functions include the following:
• Soft reset
• Hard reset
• Enterprise reset
Performing a Soft Reset
Perform a soft reset if applications stop working.
1. Press and hold the Power button until the menu appears.
2. Touch Restart.
The device reboots.
Using the Device
Performing a Hard Reset
CAUTION: Performing a hard reset with a microSD card installed in the device may cause damage or data corruption to the
microSD card. All un-saved data is lost after performing a hard reset.
Perform a hard reset if the device stops responding.
1. Simultaneously press and hold the Power button, 1 and 9 keys for five seconds.
2. When the screen turns off, release the buttons.
The device reboots.
Suspend Mode
The device goes into suspend mode when you press the Power button or after a period of inactivity (set in the
Display settings window).
To wake the device from Suspend mode, press the Power button. The Lock screen displays. Swipe the screen
up to unlock. If the Pattern screen unlock feature is enabled, the Pattern screen appears instead of the Lock
screen. If the PIN or Password screen unlock feature is enabled, enter the PIN or password after unlocking the
screen. See Un-Locking the Screen.
NOTE: If you enter the PIN, password, or pattern incorrectly five times, you must wait 30 seconds before trying again.
If you forget the PIN, password, or pattern contact your system administrator.
Transferring Files with a Host Computer via USB
Connect the device to a host computer using a USB cable or a USB cradle to transfer files between the device
and the host computer.
74
Page 75

When connecting the device to a host computer, follow the host computer’s instructions for connecting and
disconnecting USB devices, to avoid damaging or corrupting files.
Transferring Files
NOTE: Use Transfer files to copy files between the device (internal memory or microSD card) and the host computer.
1. Connect a USB cable to the device or place the device into a USB cradle.
2. Pull down the Notification panel and touch USB charging this device.
By default, Charge this device is selected.
Figure 54 Use USB to Dialog Box
Using the Device
3. Touch Transfer files.
4. On the host computer, open a file explorer application.
5. Locate the device as a portable device.
6. Open the SD card or the Internal storage folder.
7. Copy files to and from the device or delete files as required.
Transferring Photos
To transfer photos using Photo Transfer Protocol:
NOTE: Use Photo Transfer Protocol (PTP) to copy photos from either the microSD card or internal memory to the host com-
puter.
1. Connect USB cable to the device or place the device into a USB cradle. See Accessories for setup
information.
2. Pull down the Notification panel and touch USB charging this device.
3. Touch Transfer photos (PTP).
4. On the host computer, open a file explorer application.
5. Open the SD card or the Internal storage folder.
6. Copy or delete photos as required.
75
Page 76

Using the Device
Disconnect from the Host Computer
To disconnect the device from the host computer:
CAUTION: Carefully follow the host computer’s instructions to unmount the microSD card and disconnect USB devices cor-
rectly to avoid losing information.
1. On the host computer, unmount the device.
2. Remove the USB from the device or remove the device from the cradle.
76
Page 77

Applications
Introduction
This section describes the applications installed on the device.
Battery Manager
The Battery Manager provides detailed information about the battery.
To open Battery Manager, swipe up from the bottom of the Home screen and touch .
Figure 55 Battery Manager Screen
77
Page 78

Table 13 Battery Icon Description
Applications
Battery
Icon
Battery charge level.
Battery charging.
Battery charge level is below 20%.
• Battery level - The current battery charge level as a percentage. Displays -% when level is unknown.
• Time until full - The amount of time until the battery is fully charged.
• Time since charging - The amount of time since the device began charging.
• Time until empty - The amount of time until the battery is empty.
• Battery status
• Not charging - The device is not connected to AC power.
• Charging over AC - The device is connected to AC power and charging.
• Charging over USB - The device is connected to a host computer with a USB cable and charging.
• Discharging - That the battery is discharging.
• Full - That the battery is fully charged.
• Unknown - The battery status is unknown.
Description
• Battery health - The health of the battery. If a critical error occurs, appears. Touch to view the error
description.
• Decommission - The battery is past its useful life and should be replaced. See system administrator.
• Good - The battery is good.
• Charge error - An error occurred while charging. See system administrator.
• Over Current - An over-current condition occurred. See system administrator.
• Dead - The battery has no charge. Replace the battery.
• Over Voltage - An over-voltage condition occurred. See system administrator.
• Below Temperature - The battery temperature is below the operating temperature. See system
administrator.
• Failure Detected - A failure has been detected in the battery. See system administrator.
• Unknown - See system administrator.
• Wear level - The health of the battery in graphical form. When the wear level exceeds 80%, the bar color
changes to red.
78
Page 79

Applications
• Advanced info - Touch to view additional battery information.
• Battery present status - Indicates that the battery is present.
• Battery level - The battery charge level as a percentage of scale.
• Battery scale - The battery scale level used to determine battery level (100).
• Battery voltage - The current battery voltage in millivolts.
• Battery temperature - The current battery temperature in degrees Centigrade.
• Battery technology - The type of battery.
• Battery current - The average current into or out of the battery over the last second in mAh.
• Battery manufacture date - The date of manufacture.
• Battery serial number - The battery serial number. The number matches the serial number printed on
the battery label.
• Battery part number - The battery part number.
• Battery rated capacity - Lists the rated capacity of the backup battery in mAh.
• Battery decommission status - Indicates if the battery is past its life span.
• Battery Good - The battery is in good health.
• Decommissioned Battery - The battery is past its useful life and should be replaced.
• Base cumulative charge - Cumulative charge using Zebra charging equipment only.
• Battery present capacity - Maximum amount of charge that could be pulled from the battery under the
present discharge conditions if the battery were fully charged.
• Battery health percentage - With a range from 0 to 100, this is the ratio of “present_capacity” to
“design_capacity” at a discharge rate of “design_capacity”.
• % decommission threshold - The default % decommission threshold for a gifted battery as 80%.
• Battery present charge - Amount of usable charge remaining in the battery at present under the
current discharge conditions.
• Battery total cumulative charge - The total accumulated charge in all chargers.
• Battery time since first use - The time passed since the battery was placed in a Zebra termina
first time.
• Battery error status - The error status of the battery.
• App version - The application version number.
l for the
79
Page 80

Files
Sort
Applications
Use the Files app to view and manage files on the device.
To open Files, swipe up from the bottom of the screen and touch .
Figure 56 Files Screen
• Touch and hold an item to open the File Operations menu. Select an option:
• - Share the file with other devices.
• - Delete the file.
• - View additional options.
• Open with - Select which app is used to open the file.
• Select all - Select all folders and files.
• Copy to... - Copy the file.
• Move to... - Move the file or folder to a new location.
• Compress - Compress the selected file(s) into a ZIP file.
• Rename - Rename the file.
• Touch the Sort drop-down to sort files by name, type, size, or date.
• - View all file locations.
• - Search for a specific file on the device.
• / - Change the folder to display items as a list / grid.
• - Open the options menu.
• New Window - Create a new Files window.
• New Folder - Create a new folder.
• Select all - Select all folders and files.
• Show/Hide internal storage - Show or hide internal storage.
80
Page 81

Contacts
Use the Contacts app to manage contacts.
From a Home or Apps screen, touch Contacts to open to the main list of contacts. Contacts are listed in
alphabetical order. Swipe up or down to scroll through the list.
Adding a Contact
1. In the Contacts app, touch .
2. If there is more than one account with contacts, touch the one you want to use.
3. Type the contact’s name and other information. Touch a field to start typing, and swipe down to view all
categories.
4. To open a menu with preset labels, such as Home or Work for an email address, touch the label to the right
of the item of contact information. Or, to create your own label, touch Custom in the menu.
5. Touch the check mark next to Add New Contact.
Applications
Editing Contacts
1. In the Contacts app, touch a contact name to edit.
2. Touch .
3. Edit the contact information.
4. Touch SAVE.
Deleting Contacts
1. In the Contacts app, touch a contact name to delete.
2. Touch .
3. Touch Delete.
4. Touch DELETE to confirm.
81
Page 82

Camera
Camera Mode
Settings
High Dynamic Range
Camera Switch (Available on devices
with a rear camera and front camera)
Scene Mode
Shutter Button
Gallery
This section provides information for taking photos and recording videos using the integrated digital cameras.
The device saves photos and videos on the microSD card, if installed and the storage path is changed manually. By
default, or if a microSD card is not installed, the device saves photos and videos on the internal storage.
Taking Photos
NOTE: See Photo Settings for camera setting descriptions.
1. Swipe up from the bottom of the Home screen and touch Camera.
Figure 57 Camera Mode
Applications
2. If necessary, touch the Camera Mode icon and touch .
3. To switch between the rear camera and front camera (if available), touch .
4. Frame the subject on the screen.
82
Page 83

5. To zoom in or out, press two fingers on the display and pinch or expand fingers. The zoom controls appear
on the screen.
6. Touch an area on the screen to focus. The focus circle appears. The two bars turn green when in focus.
7. Touch .
The camera takes a photo and a shutter sound plays.
The photo momentarily displays as a thumbnail in the lower left corner.
Taking a Panoramic Photo
Panorama mode creates a single wide image by panning slowly across a scene.
1. Swipe up from the bottom of the Home screen and touch Camera.
Figure 58 Panoramic Mode
Applications
2. Touch the Camera Mode icon and touch .
3. Frame one side of the scene to capture.
4. Touch and slowly pan across the area to capture. A small white square appears inside the button
indicating the capture is in progress.
If you are panning too quickly, the message Too fast appears.
5. Touch to end the shot. The panorama appears immediately and a progress indicator displays while it
saves the image.
83
Page 84

Recording Videos
Camera Mode
Settings
Audio
Camera Switch (Available on devices
with a rear camera and front camera)
Shutter Button
Gallery
1. Swipe up from the bottom of the Home screen and touch Camera.
2. Touch the camera mode menu and touch .
Figure 59 Video Mode
Applications
3. To switch between the rear camera and front camera (if available), touch .
4. Point the camera and frame the scene.
5. To zoom in or out, press two fingers on the display and pinch or expand fingers. The zoom controls appear
on the screen.
6. Touch to start recording.
The video time remaining appears in the top left of the screen.
7. Touch to the end recording.
The video momentarily displays as a thumbnail in the lower left corner.
84
Page 85

Photo Settings
In Photo mode, photo settings appear on screen. Touch to display the photo settings options.
Rear Camera
• Flash - Select whether the camera relies on its light meter to decide whether a flash is necessary, or to turn
it on or off for all shots.
• Off - Disable flash.
• Auto - Adjust flash automatically depending upon light meter (default).
• On - Enable flash upon taking a photo.
• Torch - Turn flash on continuously.
• Picture size - The size (in pixels) of the photo to: 13M pixels (default), 8M pixels, 5M pixels, 3M pixels,
HD 1080, 2M pixels, 1.3M pixels, HD720, 1M pixels, WVGA, VGA, or QVGA.
• Picture quality - Set the picture quality setting to: Low, Standard (default) or High.
• Countdown timer - Select Off (default), 2 seconds, 5 seconds or 10 seconds.
• Storage – Set the location to store the photo to: Phone or SD Card.
• Face Detection - Select to turn face detection Off (default) or On.
• ISO - Set camera sensitivity to light to: Auto (default), ISO Auto (HJR), ISO100, ISO200, ISO400, ISO800
or ISO1600
• Exposure - Set the exposure settings to: +2, +1, 0(default), -1 or -2.
• White balance - Select how the camera adjusts colors in different kinds of light, to achieve the most
natural-looking colors:
Applications
.
• Incandescent - Adjust the white balance for incandescent lighting.
• Fluorescent - Adjust the white balance for florescent lighting.
• Auto - Adjust the white balance automatically (default).
• Daylight - Adjust the white balance for daylight.
• Cloudy - Adjust the white balance for a cloudy environment.
• Focus mode - Set the camera focus to CAF (Continuous Auto Focus).
• ZSL - Set the camera to immediately take a picture when the button is pressed (default – enabled).
Video Settings
In Video mode, video settings appear on screen. Touch to display the video settings options.
Rear Camera
• Flash - Select whether Rear-facing Camera relies on its light meter to decide whether a flash is necessary,
or to turn it on or off for all shots.
• Off - Disable flash (default).
• Torch - Turn flash on continuously.
85
Page 86

Applications
• Video quality - Set video quality to: HD 1080p (default), HD 720p, SD 480p.
• Video duration - Set to: 30 seconds (MMS), or 30 minutes (default).
• Storage – Set the location to store the photo to: Phone (default) or SD Card.
• White balance - Select how the camera adjusts colors in different kinds of light, to achieve the most
natural-looking colors.
• Incandescent - Adjust the white balance for incandescent lighting.
• Fluorescent - Adjust the white balance for florescent lighting.
• Auto - Adjust the white balance automatically (default).
• Daylight - Adjust the white balance for daylight.
• Cloudy - Adjust the white balance for a cloudy environment.
86
Page 87

Gallery
Applications
NOTE: The device supports the following image formats: jpeg, gif, png and bmp.
The device supports the following video formats: H.263, H.264 and MPEG4 Simple Profile.
Available on device with AOSP only.
Use Gallery to:
• View photos
• Play videos
• Perform basic editing of photos
• Set photos as wallpaper
• Set photos as a contact photo
• Share photos and videos.
Gallery presents all photos and videos stored on the microSD card and internal memory.
To open Gallery, swipe up from the bottom of the Home screen and touch Gallery, or in the camera app touch
the thumbnail image at the bottom left.
By default, Gallery opens to the Timeline view.
Figure 60 Gallery - Timeline View
Touch > Albums to view photos sorted by albums or > Videos to view only videos.
87
Page 88

Figure 61 Gallery — Albums View
Applications
• Touch an album to open it and view its contents. The photos and videos in the album are displayed in
chronological order.
• Touch a photo or video in an album to view it.
•Touch > Timeline to return to the default Gallery screen.
Working with Albums
Albums are groups of images and videos in folders. Touch an album to open it. The photos and videos are
listed in a chronologically ordered grid. The name of the album displays at the top of the screen.
88
Page 89

Figure 62 Photos Inside an Album
Applications
Swipe up or down to scroll through the images.
Sharing an Album
1. Swipe up from the bottom of the Home screen and touch Gallery.
2. Touch and hold an album to highlight it.
3. Touch other albums as required.
4. Touch . The Share menu opens.
5. Touch the app to use to share the selected albums.
6. Follow the instructions within the selected app.
Getting Album Information
1. Swipe up from the bottom of the Home screen and touch Gallery.
2. Touch and hold an album to highlight it.
3. Touch .
4. Touch Details.
Deleting an Album
To delete an album and its contents:
1. Swipe up from the bottom of the Home screen and touch Gallery.
2. Touch and hold an album to highlight it.
3. Check other albums to delete.
89
Page 90

4. Touch .
5. In the Delete selected item? menu, touch OK to delete the album.
Working with Photos
Use Gallery to view photos on the device and edit and share photos.
Viewing and Browsing Photos
To view a photo:
1. Swipe up from the bottom of the Home screen and touch Gallery.
2. Touch an album to open it.
3. Touch a photo.
Figure 63 Photo Example
Applications
4. Swipe left or right to view the next or previous photo in the album.
5. Turn the device to view the photo in upright (portrait) or sideways (landscape) orientation. The photo is
displayed (but not saved) in the new orientation.
6. Touch the photo to view the controls.
7. Double-tap the screen to zoom in or pinch two fingers together or spread them apart to zoom in or out.
8. Drag the photo to view parts that are not in view.
Cropping a Photo
1. In Gallery, touch a photo to view the controls.
90
Page 91

Applications
2. Touch > > . The cropping tool appears.
3. Use the cropping tool to select the portion of the photo to crop.
• Drag from the inside of the cropping tool to move it.
• Drag an edge of the cropping tool to resize it to any proportion.
Figure 64 Cropping Tool
4. Touch > SAVE to save a copy of the cropped photo. The original version is retained.
Setting a Photo as a Contact Icon
1. Swipe up from the bottom of the Home screen and touch Gallery.
2. Touch an album to open it.
3. Touch a photo to open it.
4. Touch .
5. Touch Set picture as.
6. Touch Contact photo.
7. In Contacts, touch a contact.
8. Touch the white box and crop the photo accordingly.
9. Touch SAVE.
Sharing a Photo
1. Swipe up from the bottom of the Home screen and touch Gallery.
2. Touch an album to open it.
91
Page 92

3. Touch a photo to open it.
4. Touch .
5. Touch the app to use to share the selected photo.
6. Follow the instructions within the selected app.
Deleting a Photo
1. Swipe up from the bottom of the Home screen and touch Gallery.
2. Touch an album to open it.
3. Touch a photo to open it.
4. Touch .
5. Touch OK to delete the photo.
Working with Videos
Use Gallery to view and share videos.
Applications
Watching Videos
1. Swipe up from the bottom of the Home screen and touch Gallery.
2. Touch an album to open it.
3. Touch a video.
4. Touch to play.
5. Touch the screen to view the playback controls.
Sharing a Video
1. Swipe up from the bottom of the Home screen and touch Gallery.
2. Touch an album to open it.
3. Touch a video to open it.
4. Touch . The Share menu appears.
5. Touch the app to use to share the selected video.
6. Follow the instructions within the selected app.
Deleting a Video
1. Swipe up from the bottom of the Home screen and touch Gallery.
2. Touch an album to open it.
3. Touch a video to open it.
4. Touch .
5. Touch OK.
92
Page 93

Photos
Applications
NOTE: The device supports the following image formats: jpeg, gif, png, and bmp.
The device supports the following video formats: H.263, H.264, and MPEG4 Simple Profile.
Available on device with GMS only.
Use Photos to:
• View photos
• Play videos
• Perform basic editing of photos
• Set photos as wallpaper
• Set photos as a contact photo
• Share photos and videos.
Photos presents all photos and videos stored on the microSD card and internal memory.
To open Photos, swipe up from the bottom of the Home screen and touch Photos.
By default, Photos opens to the photos view.
Figure 65 Photos View
Touch Albums to view photos sorted by albums.
93
Page 94

Figure 66 Albums View
Applications
• Touch an album to view its contents. The photos and videos in the album appear in chronological order.
• Touch a photo or video in an album to view it.
• Touch to return to the main screen.
Working with Albums
Albums are groups of images and videos in folders. Touch an album to open it. The photos and videos are
listed in a chronologically ordered grid. The name of the album displays at the top of the screen.
94
Page 95

Figure 67 Photos Inside an Album
Applications
Swipe up to scroll through the images.
Sharing an Album
1. Swipe up from the bottom of the Home screen and touch Photos.
2. Touch Albums.
3. Touch an album.
4. Touch > Select.
5. Select all photos in the album.
6. Touch . The Share menu opens.
7. Touch an app to share the selected albums.
8. Follow the instructions within the selected app.
Deleting an Album
To delete an album and its contents:
1. Swipe up from the bottom of the Home screen and touch Photos.
2. Touch Albums.
3. Touch an album.
4. Touch > Select.
5. Select all photos in the album.
6. Touch .
95
Page 96

7. Touch Move to trash to delete the album.
Working with Photos
Use Photos to view photos on the internal memory and the microSD card.
Viewing and Browsing Photos
1. Swipe up from the bottom of the Home screen and touch Photos.
2. Touch a photo.
Figure 68 Photo Example
Applications
3. Swipe left or right to view the next or previous photo in the album.
4. Turn the device to view the photo in upright (portrait) or sideways (landscape) orientation. The photo is
displayed (but not saved) in the new orientation.
5. Touch the photo to view the controls.
6. Double-tap the screen to zoom in, or pinch two fingers together or spread them apart to zoom in or out.
7. Drag the photo to view parts that are not in view.
Cropping a Photo
1. Swipe up from the bottom of the Home screen and touch Photos.
2. Touch a photo to view the controls.
3. Touch > . The cropping tool appears.
96
Page 97

Figure 69 Cropping Tool
Applications
4. Use the cropping tool to select the portion of the photo to crop.
• Drag from the inside of the cropping area to move it.
• Drag an edge of the cropping area to resize it to any proportion.
5. Touch DONE.
6. Touch SAVE to save a copy of the cropped photo. The original version is retained.
Setting a Photo as a Contact Icon
1. Swipe up from the bottom of the Home screen and touch Photos.
2. Touch the photo to open it.
3. Touch > Use as.
4. Touch Contact photo.
5. In the Contacts app, touch a contact.
6. Touch the white box and crop the photo accordingly.
7. Touch Done.
Sharing a Photo
1. Swipe up from the bottom of the Home screen and touch Photos.
2. Touch an album to open it.
3. Touch a photo to open it.
4. Touch .
97
Page 98

5. Touch the app to use to share the selected photo.
6. Follow the instructions within the selected app.
Deleting a Photo
1. Swipe up from the bottom of the Home screen and touch Photos.
2. Touch a photo to open it.
3. Touch .
4. Touch MOVE TO TRASH.
Working with Videos
Use Photos to view and share videos.
Watching a Video
1. Swipe up from the bottom of the Home screen and touch Photos.
Applications
2. Touch a video to play.
3. Touch the screen to view the playback controls.
Sharing a Video
1. Swipe up from the bottom of the Home screen and touch Photos.
2. Touch a video to open it.
3. Touch . The Share menu appears.
4. Touch the app to use to share the selected video.
5. Follow the instructions within the selected app.
Deleting a Video
1. Swipe up from the bottom of the Home screen and touch Photos.
2. Touch a video to open it.
3. Touch .
4. Touch MOVE TO TRASH to delete the video.
DataWedge Demonstration
NOTE: DataWedge is enabled on the Home screen.To disable this feature, go to the DataWedge settings and disable the
Launcher profile.
Use DataWedge Demonstration to demonstrate data capture functionality.
98
Page 99

Applications
Figure 70 DataWedge Demonstration Window
Table 14 DataWedge Demonstration Icons
Icon Description
Illumination Imager illumination is on. Touch to turn illumination off.
Imager illumination is off. Touch to turn illumination on.
Data Capture The data capture function is through the internal imager.
AnRS507 or RS6000 Bluetooth imager is connected.
AnRS507 or RS6000 Bluetooth imager is not connected.
Scan Mode Imager is in picklist mode. Touch to change to normal scan mode.
Imager is in normal scan mode. Touch to change to picklist mode.
Opens a menu to view the application information or to set the
application DataWedge profile.
NOTE: See the device Integrator Guide for Android Version 8.1 for information on DataWedge configuration.
99
Page 100

Scanner Selection
To select a scanner, touch > Settings > Scanner selection.
See Data Capture for more information.
Either press the programmable button or touch the yellow scan button to capture data. The data appears in the
text field below the yellow button.
Sound Recorder
Use Sound Recorder to record audio messages.
Recordings are saved on the microSD card (if installed) or the internal storage and are available in the Music
application (non-GMS devices) or the Play Music application (GMS devices).
Figure 71 Sound Recorder Application
Applications
100
 Loading...