

Page 1

MC3390R
RFID Handheld
Quick Reference
Guide
for Android™ 7.1.2 Nougat
Page 2

2 MC3390R
Warranty
For the complete Zebra hardware product warranty statement, go to:
www.zebra.com/warranty.
Service Information
If you have a problem using the equipment, contact your facility’s Technical or
Systems Support. If there is a problem with the equipment, they will contact the
Zebra Support at: www.zebra.com/support.
For the latest version of this guide go to: www.zebra.com/support.
Software Support
Zebra wants to ensure that customers have the latest release of entitled software
at the time of product purchase.
To confirm that your Zebra device shipped with the latest release of entitled
software, visit: www.zebra.com/support. Check for the latest software from:
Software Downloads > Product Line/Product > Go.
If your device does not have the latest entitled software release as of your product
purchase date, please e-mail a request to Zebra at:
entitlementservices@zebra.com.
You must include the following essential device information with your request:
• Model number
• Serial number
• Proof of purchase
• Title of the software download you are requesting.
If it is determined by Zebra that your device is entitled to the latest software
release, you will receive an e-mail containing a link directing you to a Zebra web
site to download the appropriate software.
Page 3

Quick Reference Guide 3
1
3
4
2
5
8
7
6
9
10
Related Information
The following documents provide more information about the RFID reader:
• MC3300R Integration Guide Supplement (p/n MN-003180-xx)
• Zebra RFID SDK for Android Developer Guide (p/n MN-003158-xx)
For the latest version of this guide and all guides, go to: www.zebra.com/support.
MC3390R Features
Item Description
1 Display - Displays all information needed to operate the MC3390R.
2 Charge LED Scan/Decode Status - Indicates the battery charge state
while charging or the scan/decode status.
3 Trigger - Initiates data capture when a scan application is enabled.
4 Battery Release Latch - Release the battery from the device.
Page 4

4 MC3390R
11
14
12
13
Item Description
5 Hand Strap - Use for securely holding the device.
6 Microphone - Use for communications in Handset mode.
7 Power Button - Press and hold to turn on the MC3390R. Press to turn
on or off the screen. Press and hold to select an option:
Power off
Reboot
Airplane mode
Silent mode
8 Keypad - Use to enter data and navigate on screen functions.
- Turn off the MC3390R.
- When software stops responding, reboot the device.
- Disable all wireless connections.
- All notifications are disabled except for alarms.
9 Scan Button - Initiates data capture when a scan application is
enabled.
10 RFID Module.
Page 5

Quick Reference Guide 5
Item Description
11 Battery - Provides power for operating the device.
12 Battery Release Latch - Release the battery from the device.
13 Speaker - Provides audio output for video and music playback.
14 Scanner Exit Window - Provides data capture using the scanner.
Setup
To start using the MC3390R for the first time:
• Install a microSD card (optional)
• Install the battery
• Charge the MC3390R
• Power on the MC3390R.
Installing a microSD Card
The microSD card slot provides secondary non-volatile storage. The slot is
located under the battery pack. Refer to the documentation provided with the card
for more information, and follow the manufacturer’s recommendations for use.
CAUTION Follow proper electrostatic discharge (ESD) precautions to
avoid damaging the microSD card. Proper ESD
precautions include, but are not limited to, working on an
ESD mat and ensuring that the operator is properly
grounded.
1. Using a coin or finger, remove the microSD card cover.
Page 6

6 MC3390R
2. Slide the microSD card holder to the Open position.
3. Lift the microSD card holder.
4. Place the microSD card into the contact area with the contacts facing down.
5. Close the microSD card holder and slide the microSD card holder to the Lock
position.
Page 7

Quick Reference Guide 7
6. Replace the microSD card cover and ensure that it is installed properly.
Installing the MC3390R Battery
To install the battery:
1. Align the battery into the battery compartment.
2. Rotate the bottom of the battery into the battery compartment.
3. Press battery down firmly. Ensure that both battery release buttons on the
sides of the MC3390R return to the home position.
4. Press the Power button to turn on the device.
Page 8

8 MC3390R
Replacing the Battery
1. Push in the two Battery Release buttons.
The battery ejects slightly. With Hot Swap mode, when the user removes the
battery, the display turns off and the device enters a low power state. The
MC3390R retains RAM data for approximately five minutes. Replace the
battery within five minutes to preserve memory persistence.
2. Remove the battery from the battery compartment.
3. Align the battery into the battery compartment.
Page 9

Quick Reference Guide 9
4. Rotate the bottom of the battery into the battery compartment.
5. Press battery down firmly. Ensure that both battery release buttons on the
sides of the MC3390R return to the home position.
6. Press the Power button to turn on the device.
Page 10

10 MC3390R
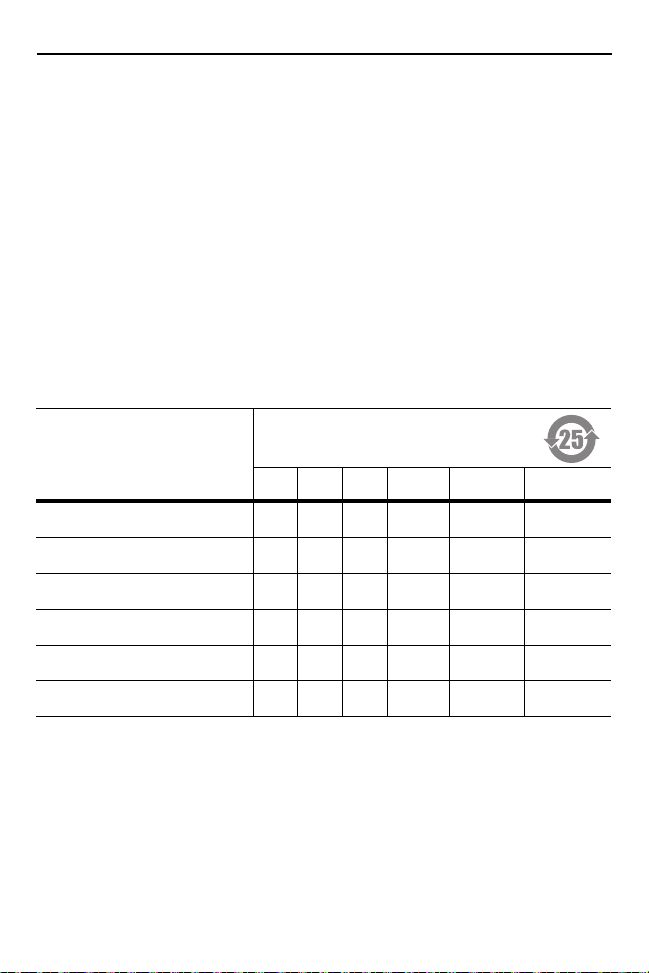
Compatibility
The table below displays compatibility between MC3390R and MC32N0 mobile
computers and accessories.
MC3390R
Mobile
Computer
MC32N0
Mobile
Computer
MC3390R
PP+
Battery
MC32N0
PP Battery
MC3390R
PP+
Batteries
Yes Yes Yes Yes
No Yes No Yes N/A N/A
N/A N/A Yes No Yes No
N/A N/A Yes Yes Yes Yes
MC32N0
PP
Batteries
MC3390R
Cradles
MC32N0
Cradles
w/Adapter
MC3390R
Battery
Charger
N/A N/A
MC32N0
Battery
Charger
• MC3390R mobile computers are compatible with all batteries (MC3390R
PowerPrecision+ and MC32N0 PowerPrecision).
• MC3390R mobile computer is compatible with all cradles.
• An additional adapter is needed to use any MC32N0 cradle slot, which
provides charge only, no communication.
• MC3390R battery charger slots are compatible with all batteries (MC3390R
PowerPrecision+ and MC32N0 PowerPrecision).
• MC32N0 mobile computers are not compatible with MC3300R cradles.
Page 11

Quick Reference Guide 11
Battery Comparison
The table below displays a comparison of the MC3390R batteries with the
MC32N0 batteries.
Feature MC32N0 MC3390R
Battery Type PowerPrecision PowerPrecision+
Includes Zebra and PowerPrecision+
recessed logos
Back Label Grey Blue
No Yes
Battery Compatibility
• MC3390R PowerPrecision+ batteries are compatible with all MC3300R mobile
computers and accessories.
• MC3390R PowerPrecision+ batteries are not compatible with MC32N0 mobile
computers and accessories.
• MC32N0 PowerPrecision batteries are compatible with all MC32N0 mobile
computers and accessories.
• MC32N0 PowerPrecision batteries are compatible with all MC3300R mobile
computers and accessories.
Page 12

12 MC3390R
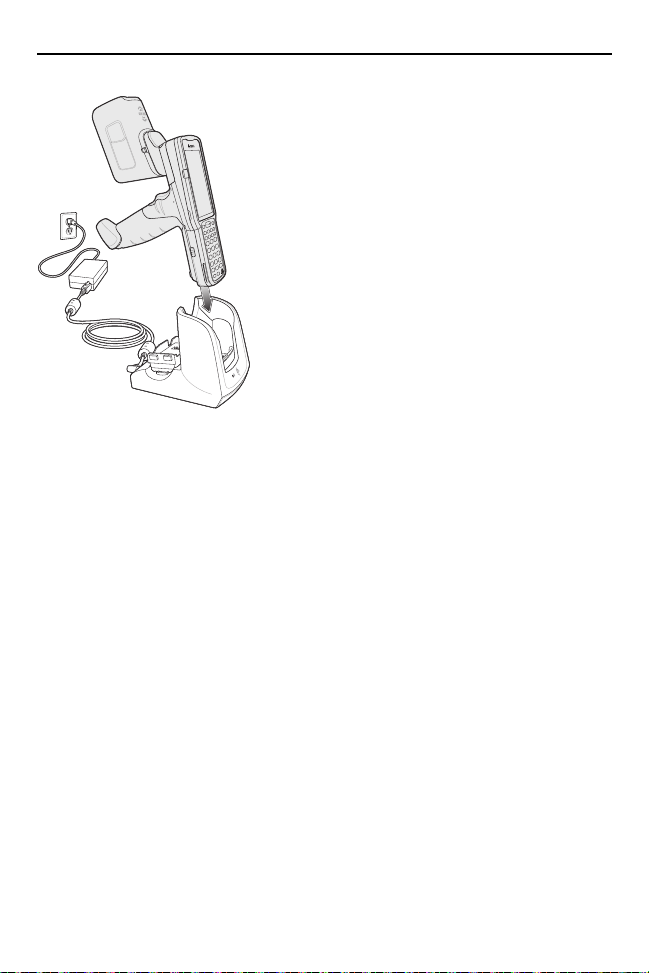
Charging the MC3390R
Use one of the following accessories to charge the MC3390R and/or spare
battery.
Charging Communication
Description Part Number
1-Slot USB Charge
Cradle with Spare
Battery Charger
5-Slot Charge Only
ShareCradle
5-Slot Ethernet
ShareCradle
4-Slot Charge
ShareCradle with 4-Slot
Battery Charger
4-Slot Ethernet
ShareCradle with 4-Slot
Battery Charger
4-Slot Spare Battery
Charger
20-Slot Spare Battery
Charger
USB Charge Cable CBL-MC33-USBCHG-01 Yes No Yes No
MC32N0 1-Slot Cradle
with MC33XX Cradle
Adapter
CRD-MC33-2SUCHG-01 Yes Yes Yes No
CRD-MC33-5SCHG-01 Yes No No No
CRD-MC33-5SETH-01 Yes No No Yes
CRD-MC33-4SC4BC-01 Yes Yes No No
CRD-MC33-4SE4BC-01 Yes Yes No Yes
SAC-MC33-4SCHG-01 No Yes No No
SAC-MC33-20SCHG-01 No Yes No No
CRD3000-1001RR
ADP-MC33-CRDCUP-01
Battery
(In
Device)
Yes Yes
(Only
charges
MC32N0
batteries in
the spare
battery slot)
Spare
Battery
USB Ethernet
Yes No
To charge the main battery:
1. connect the charging accessory to the appropriate power source.
2. Insert the MC3390R into a cradle or attach to a cable. The MC3390R turns on
and begins charging. The Charging/Notification LED remains amber while
charging, then turns solid green when fully charged.
Page 13

Quick Reference Guide 13
Charging Temperature
Charge batteries in temperatures from 0°C to 40°C (32°F to 104°F). The device or
cradle always performs battery charging in a safe and intelligent manner. At
higher temperatures (e.g. approximately +37°C (+98°F)) the device or cradle may
for small periods of time alternately enable and disable battery charging to keep
the battery at acceptable temperatures. The device and cradle indicates when
charging is disabled due to abnormal temperatures via its LED.
Charging the Spare Battery
1. Insert a spare battery into the spare battery slot.
2. Ensure the battery is seated properly.
3. The Spare Battery Charging LED blinks indicating charging as follows:
State Indication
Off The battery is not charging.
Slow Blinking Amber
Every 3 seconds
Solid Amber Battery is charging.
Solid Green Battery charging is complete.
Fast Blinking Red
2 blinks/second
Solid Red Spare battery is charging and the battery is at the end
The battery is not inserted correctly in the cradle or
connected to a power source.
Cradle is not powered.
Battery is charging, but the battery is fully depleted and
does not yet have sufficient charge to power the device.
Charging error, for example:
Temperature is too low or too high.
Charging has gone on too long without completion
(typically eight hours).
of useful life.
Charging is complete and the battery is at the end of
useful life.
Page 14

14 MC3390R
1-Slot USB Charge Cradle
The 1-Slot USB charge cradle:
• Provides 9 VDC power for charging the mobile computer and charging the
battery.
• Provides 4.2 VDC power to charge the spare battery.
• Provides a USB port for data communication between the mobile computer
and a host computer or other USB devices (for example, a printer).
• Synchronizes information between the mobile computer and a host computer.
With customized or third party software, it can also synchronize the mobile
computer with corporate databases.
• Compatible with the following batteries:
• MC3390R 5200 mAh PowerPrecision+ extended battery.
• MC32N0 5200 mAh PowerPrecision extended battery.
Page 15

Quick Reference Guide 15
Power LED
5-Slot Charge Only ShareCradle
The 5-Slot Charge Only ShareCradle:
• Provides 9 VDC power for operating the mobile computer and charging the
battery.
• Simultaneously charges up to five mobile computers.
• Compatible with devices using the following batteries:
• MC3390R 5200 mAh PowerPrecision+ extended battery.
• MC32N0 5200 mAh PowerPrecision extended battery.
5-Slot Ethernet ShareCradle
The 5-Slot Ethernet ShareCradle:
• Provides 9 VDC power for operating the mobile computer and charging the
battery.
• Simultaneously charges up to five mobile computers.
• Compatible with devices using the following batteries:
• MC3390R 5200 mAh PowerPrecision+ extended battery.
• MC32N0 5200 mAh PowerPrecision extended battery.
Page 16

16 MC3390R
1000 LED
100/10 LED
4-Slot ShareCradle with 4-Slot Battery Charger
The 4-Slot ShareCradle with 4-Slot Battery Charger:
• Provides 9 VDC power for operating the device and charging the battery.
• Provides 4.2 VDC power for charging spare batteries.
• Simultaneously charges up to four mobile computers and four spare batteries.
• Compatible with the following batteries:
• MC3390R 5200 mAh PowerPrecision+ extended battery.
• MC32N0 5200 mAh PowerPrecision extended battery.
Page 17

Quick Reference Guide 17
Power LED
Spare Battery
Charging LED
Spare Battery Slot
MC3390R Charging Slot
4-Slot Ethernet ShareCradle with 4-Slot Battery Charger
The 4-Slot Ethernet ShareCradle with 4-Slot Battery Charger:
• Provides 9 VDC power for operating the mobile computer and charging the
battery.
• Provides 4.2 VDC power for charging spare batteries.
• Simultaneously charges up to four mobile computers and four spare batteries.
• Compatible with the following batteries:
• MC3390R 5200 mAh PowerPrecision+ extended battery.
• MC32N0 5200 mAh PowerPrecision extended battery.
Page 18

18 MC3390R
1000 LED
100/10 LED
Spare Battery
Charging LED
Spare
Battery Slot
MC3390R
Charging Slot
Power LED
Spare Battery
Charging LED
4-Slot Spare Battery Charger
The 4-Slot Battery Charger:
• Charges up to four MC3390R spare batteries.
• Provides 4.2 VDC power to charge the spare battery.
• Compatible with the following batteries:
• MC3390R 5200 mAh PowerPrecision+ extended battery.
• MC32N0 5200 mAh PowerPrecision extended battery.
Page 19

Quick Reference Guide 19
Power LED
Spare Battery
Charging LED
20-Slot Spare Battery Charger
The 20-Slot Battery Charger:
• Charges up to twenty MC3390R spare batteries.
• Provides 4.2 VDC power to charge the spare battery.
• Compatible with the following batteries:
• MC3390R 5200 mAh PowerPrecision+ extended battery.
• MC32N0 5200 mAh PowerPrecision extended battery.
USB Charge Cable
The USB Charge Cable:
• Provides 5 VDC power to charge the battery.
• Provides power and/or communication with the host computer over USB to the
device.
• Compatible with devices using the following batteries:
• MC3390R 5200 mAh PowerPrecision+ extended battery.
• MC32N0 5200 mAh PowerPrecision extended battery.
Page 20

20 MC3390R
MC33XX Charge Only Adapter
Use the MC33XX Charge Only Adapter for backwards compatibility with the
MC32N0 cradles and the MC3390R mobile computer.
• MC33XX Charge Only Adapter supports the MC32N0 1-Slot USB Cradle,
MC32N0 4-Slot Charge Only Cradle, and MC32N0 4-Slot Ethernet Cradle.
• MC33XX Charge Only Adapter provides charge only; no communication when
used with the MC32N0 cradles.
• MC32N0 1-Slot USB Cradle provides 5.4 VDC to charge the device.
• MC32N0 1-Slot USB Cradle (with the MC33XX Charge Only Adapter) is
compatible with an MC3390R mobile computer charging either an MC3390R
PowerPrecision+ extended battery or an MC32N0 PowerPrecision extended
battery, but the MC32N0 1-Slot USB Cradle spare battery slot is only
compatible with the MC32N0 PowerPrecision batteries.
Page 21

Quick Reference Guide 21
MC33XX Charge Only Adapter Installation
To install the MC33XX Charge Only Adapter:
1. Clean the MC32N0 cradle and contacts with an alcohol wipe, using a back
and forth motion with your finger.
For more information about cleaning, refer to the Maintenance and
Troubleshooting chapter of the MC33XX Mobile Computer User Guide.
2. Peel and remove the adhesive from the back of the adapter.
3. Insert the adapter into the MC32N0 cradle and adhere it to the bottom of the
cradle.
4. Insert the MC3390R device into the MC32N0 cradle.
Page 22
22 MC3390R
Scanning
The MC3390R offers the following data capture options:
Imager
• SE4750-MR 2D
• SE4850 2D Extended Range.
Barcode Capture with Imager
To capture barcode data:
1. Ensure that an application is open on the device and a text field is in focus
(text cursor in text field).
2. Point the top of the device at a barcode.
3. Press and hold the Scan button or Trigger. The red laser aiming pattern turns
on to assist in aiming.
4. Ensure the barcode is within the area formed by the cross-hairs in the aiming
pattern. The aiming dot is used for increased visibility in bright lighting
conditions.
Page 23

Quick Reference Guide 23
The Scan LEDs light green and a beep sounds, by default, to indicate the
barcode decoded successfully.
NOTE When the device is in Pick List Mode, the device does not decode
the barcode until the center of the crosshair touches the barcode.
Scan aiming pattern may look different depending on the scanner
configuration.
5. Release the scan button or Trigger.
6. The barcode content data appears in the text field.
Optimum RFID Tag Decoding
To read RFID tags:
1. Use an RFID reader application to enable tag reading. For a sample
application, tap on the RFID Reader icon.
Page 24
24 MC3390R
2. Point the device at the tag, oriented horizontally or vertically depending on the
tag orientation. The distance between the tag and the antenna is the
approximate read range.
3. Press the trigger or tap the on-screen Read command within the application
to interrogate all RFID tags within the radio frequency (RF) field of view and
capture data from each new tag found.
4. Release the trigger or tap the Stop Read command to stop interrogating tags.
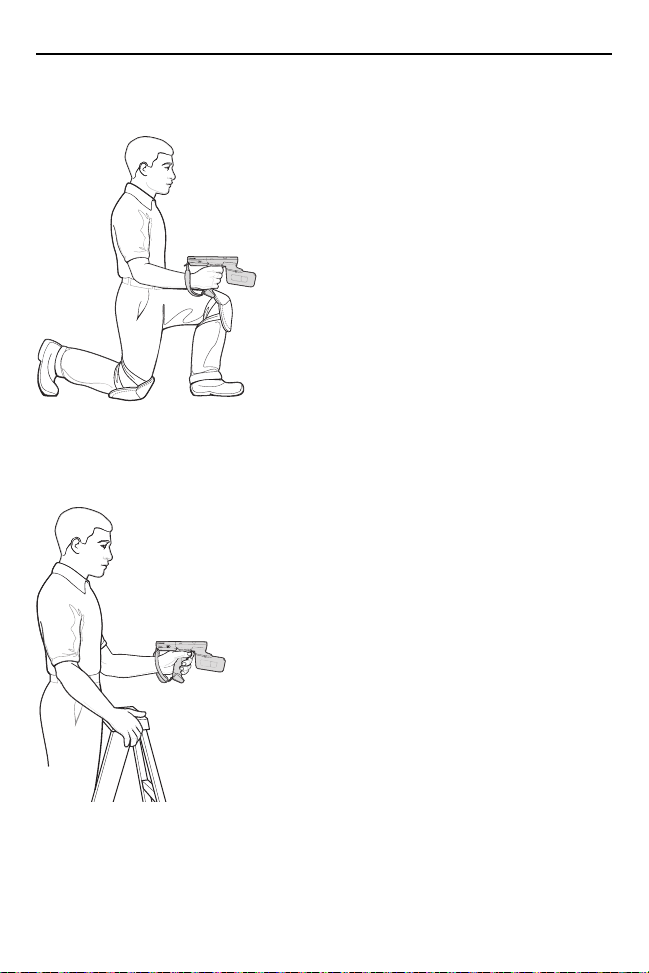
Ergonomic Considerations
Taking breaks and task rotation is recommended.
Optimize Body Posture for Upright Scanning
Page 25
Quick Reference Guide 25
Optimize Body Posture for Low Scanning
Alternate left and right knees.
Optimize Body Posture for High Scanning
Alternate left and right hand.
Page 26

26 MC3390R
Avoid Bending
Avoid Reaching
Avoid Extreme Wrist Angles
Page 27

Quick Reference Guide 27
Regulatory Information
This device is approved under Zebra Technologies Corporation.
This guide applies to Model Number MC3300R.
All Zebra devices are designed to be compliant with the rules and regulations in
the locations they are sold and will be labeled as required.
Local language translations are available at the following website:
www.zebra.com/support.
Any changes or modifications to Zebra equipment not expressly approved by
Zebra could void the user's authority to operate the equipment.
Declared maximum operating temperature: 50°C.
CAUTION Only use approved and UL Listed accessories, battery
packs and battery chargers.
Do NOT attempt to charge damp/wet mobile computers or
batteries. All components must be dry before connecting
to an external power source.
Bluetooth® Wireless Technology
This is an approved Bluetooth® product. For more information or to view the End
Product Listing, please visit www.bluetooth.org/tpg/listings.cfm.
Wireless Devices Country Approvals
Regulatory markings subject to certification are applied to the device signifying
the radio(s) is/are approved for use in the following countries and continents:
United States, Canada, Japan, China, South Korea, Australia, and Europe
Please refer to the Zebra Declaration of Conformity (DoC) for details of other
country markings. This is available at www.zebra.com/doc.
1
Note
: Europe includes: Austria, Belgium, Bulgaria, Croatia, Czech Republic,
Cyprus, Denmark, Estonia, Finland, France, Germany, Greece, Hungary, Iceland,
Ireland, Italy, Latvia, Liechtenstein, Lithuania, Luxembourg, Malta, Netherlands,
Norway, Poland, Portugal, Romania, Slovak Republic, Slovenia, Spain, Sweden,
Switzerland, and the United Kingdom.
1
.
Page 28

28 MC3390R
CAUTION Operation of the device without regulatory approval is illegal.
Country Roaming
This device incorporates the International Roaming feature (IEEE802.11d) which
will ensure the product operates on the correct channels for the particular country
of use.
Wi-Fi Direct
Operation is limited to the following channels/bands as supported in the country of
use:
• Channels 1-11 (2412 - 2462 MHz)
• Channels 36-48 (5150 - 5250 MHz)
• Channels 149-165 (5745 - 5825 MHz)
Frequency of Operation – FCC and IC
5 GHz Only
Industry Canada Statement:
Caution: The device for the band 5150-5250 MHz is only for indoor usage to
reduce potential for harmful interference to co-Channel mobile satellite systems.
High power radars are allocated as primary users (meaning they have priority) of
5250-5350 MHz and 5650-5850 MHz and these radars could cause interference
and/or damage to LE-LAN devices.
Avertissement: Le dispositive fonctionnant dans la bande 5150-5250 MHz est
réservé uniquement pour une utilisation à l'intérieur afin de réduire les risques de
brouillage préjudiciable aux systèmes de satellites mobiles utilisant les mêmes
canaux. Les utilisateurs de radars de haute puissance sont désignés utilisateurs
principaux (c.-à-d., qu'ils ont la priorité) pour les bands 5250-5350 MHz et
5650-5850 MHz et que ces radars pourraient causer du brouillage et/ou des
dommages aux dispositifs LAN-EL.
2.4 GHz Only
The available channels for 802.11 operation in the US are channels 1 to 11. The
range of channels is limited by firmware.
Page 29

Quick Reference Guide 29
Health and Safety Recommendations
Ergonomic Recommendations
CAUTION In order to avoid or minimize the potential risk of ergonomic
injury, follow the recommendations below. Consult with your
local Health & Safety Manager to ensure that you are adhering
to your company’s safety programs to prevent employee injury.
• Reduce or eliminate repetitive motion
• Maintain a natural position
• Reduce or eliminate excessive force
• Keep objects that are used frequently within easy reach
• Perform tasks at correct heights
• Reduce or eliminate vibration
• Reduce or eliminate direct pressure
• Provide adjustable workstations
• Provide adequate clearance
• Provide a suitable working environment
• Improve work procedures
Vehicle Installation
RF signals may affect improperly installed or inadequately shielded electronic
systems in motor vehicles (including safety systems). Check with the
manufacturer or its representative regarding your vehicle. You should also consult
the manufacturer about any equipment that has been added to your vehicle.
An air bag inflates with great force. DO NOT place objects, including either
installed or portable wireless equipment, in the area over the air bag or in the air
bag deployment area. If in-vehicle wireless equipment is improperly installed and
the air bag inflates, serious injury could result.
Position the device within easy reach to be able to access the device without
removing your eyes from the road.
Note: Connection to an alert device that will cause a vehicle horn to sound or
lights to flash on receipt of a call on public roads is not permitted.
IMPORTANT Before installing or using, check state and local laws
regarding windshield mounting and use of
equipment.
Page 30

30 MC3390R
For Safe installation
• Do not put your phone in a location that obstructs the drivers vision or
interferes with the operation of the vehicle.
• Do not cover an airbag.
Safety on the Road
Do not take notes or use the device while driving. Jotting down a 'to do' list or
flipping through your address book takes attention away from your primary
responsibility; driving safely.
When driving a car, driving is your first responsibility. Give your full attention to
driving. Check the laws and regulations on the use of wireless devices in the
areas where you drive. Always obey them.
When using a wireless device behind the wheel of a car, practice good common
sense and remember the following tips:
1. Get to know your wireless device and any features such as speed dial and
redial. If available, these features help you to place your call without taking
your attention off the road.
2. When available, use a hands-free device.
3. Let the person you are speaking with know you are driving; if necessary,
suspend the call in heavy traffic or hazardous weather conditions. Rain, sleet,
snow, ice, and even heavy traffic can be hazardous.
4. Dial sensibly and assess the traffic; if possible, place calls when you are not
moving or before pulling into traffic. Try to plan calls when your car will be
stationary. If you need to make a call while moving, dial only a few numbers,
check the road and your mirrors, then continue.
5. Do not engage in stressful or emotional conversations that may be distracting.
Make people you are talking with aware you are driving and suspend
conversations that have the potential to divert your attention from the road.
6. Use your wireless phone to call for help. Dial the Emergency services (9-1-1
in the US, and 1-1-2 in Europe) or other local emergency number in the case
of fire, traffic accident, or medical emergencies. Remember, it is a free call on
your wireless phone. The call can be made regardless of any security codes
and depending on a network; with or without a SIM card inserted.
7. Use your wireless phone to help others in emergencies. If you see an auto
accident, crime in progress, or other serious emergency where lives are in
Page 31

Quick Reference Guide 31
danger, call the Emergency Services (9-1-1 in the US, and 1-1-2 in Europe) or
other local emergency number as you would want others to do for you.
8. Call roadside assistance or a special non-emergency wireless assistance
number when necessary. If you see a broken-down vehicle posing no serious
hazard, a broken traffic signal, a minor traffic accident where no one appears
injured, or a vehicle you know to be stolen, call roadside assistance or other
special non-emergency wireless number.
The wireless industry reminds you to use your device/phone safely when driving.
Warnings for Use of Wireless Devices
Please observe all
warning notices with regard to the usage of wireless devices.
Potentially Hazardous Atmospheres – Vehicles Use
You are reminded of the need to observe restrictions on the use of radio devices
in fuel depots, chemical plants, etc., and areas where the air contains chemicals
or particles such as grain, dust, or metal powders and any other area where you
would normally be advised to turn off your vehicle engine.
Safety in Aircraft
Switch off your wireless device whenever you are instructed to do so by airport or
airline staff. If your device offers a 'flight mode' or similar feature, consult airline
staff as to its use in flight.
Safety in Hospitals
Wireless devices transmit radio frequency energy and may affect medical
electrical equipment.
Wireless devices should be switched off wherever you are requested to do so in
hospitals, clinics or healthcare facilities. These requests are designed to prevent
possible interference with sensitive medical equipment.
Pacemakers
Pacemaker manufacturers recommended that a minimum of 15 cm (6 inches) be
maintained between a handheld wireless device and a pacemaker to avoid
potential interference with the pacemaker. These recommendations are
consistent with independent research and recommendations by Wireless
Technology Research.
Page 32

32 MC3390R
Persons with pacemakers:
• Should ALWAYS keep the device more than 15cm (6 inches) from their
pacemaker when turned ON.
• Should not carry the device in a breast pocket.
• Should use the ear furthest from the pacemaker to minimize the potential for
interference.
• If you have any reason to suspect that interference is taking place, turn OFF
your device.
Other Medical Devices
Please consult your physician or the manufacturer of the medical device, to
determine if the operation of your wireless product may interfere with the medical
device.
RF Exposure Guidelines
Safety Information
Reducing RF Exposure – Use Properly
Only operate the device in accordance with the instructions supplied.
International
The device complies with internationally recognized standards covering human
exposure to electromagnetic fields from radio devices. For information on
“International” human exposure to electromagnetic fields refer to the Zebra
Declaration of Conformity (DoC) at www.zebra.com/doc.
For further information on the safety of RF energy from wireless devices, see
www.zebra.com/responsibility located under Corporate Responsibility
Europe
Handheld Devices
This device was tested for typical body-worn operation. Use only Zebra tested and
approved belt-clips, holsters, and similar accessories to ensure EU Compliance.
US
Co-located Statement
To comply with FCC RF exposure compliance requirement, the antenna used for
this transmitter must not be co-located or operating in conjunction with any other
transmitter/antenna except those already approved in this filling.
Page 33

Quick Reference Guide 33
Handheld Devices
This device was tested for typical body-worn operation. Use only Zebra tested and
approved belt-clips, holsters, and similar accessories to ensure FCC Compliance.
The use of third-party belt-clips, holsters, and similar accessories may not comply
with FCC RF exposure compliance requirements, and should be avoided.
This device was tested for typical handheld operation. The FCC has granted an
Equipment Authorization for these model phones with all reported SAR levels
evaluated as in compliance with the FCC RF exposure guidelines. SAR
information on these model phones is on file with the FCC and can be found
under the Display Grant section of http://www.fcc.gov/oet/ea/fccid.
The use of third-party accessories may not ensure compliance with FCC RF
exposure requirements, and should be avoided.
Canada
This device was tested for typical handheld operation. The ISED has approved
these model phones with all reported SAR levels evaluated as in compliance with
the ISED RF exposure guidelines. SAR information on these model phones is on
file with the ISED and can be found under the SAR Results section of
https://sms-sgs.ic.gc.ca/equipmentSearch/searchRadioEquipments.
The use of third-party accessories may not ensure compliance with ISED RF
exposure requirements, and should be avoided.
Cet appareil a été testé pour une opération manuelle typique. L'ISED a approuvé
ces modèles de téléphones avec tous les niveaux SAR déclarés évalués
conformément aux directives d'exposition RF ISED. L'information SAR sur ces
modèles de téléphones est en mémoire avec l'ISED et peut être trouvée dans la
section Résultats SAR de
https://sms-sgs.ic.gc.ca/equipmentSearch/searchRadioEquipements.
L'utilisation d'accessoires tiers peut ne pas garantir la conformité aux exigences
d'exposition RF ISED, et devrait être évitée.
To ensure compliance with ISED RF exposure requirement, the user shall keep
the front of the RFID Device transmitting antenna at least 55 mm away from any
bystander.
Page 34

34 MC3390R
MODELරMC3300R
5V 1.8A
ZEBRA TECHNOLOGIES CORP.
HOLTSVILLE, NY 11742
◰
ݹ䗀ሴⴤ㿶ݹᶏ2㊫
◰
ݹӗ૱
LASERLIGHT-DONOTSTAREINTOBEAM. CLASS 2
LASERPRODUCT.LASERLICHT-NICHTINDENSTRAHL
BLICKEN.LASERKLASSE2.LUMIÉRELASER-NEPAS
REGARDERDANSLEFAISCEAU.APPAREILÀLASERDE
CLASSE 2. 630-680nm, 1mW
1
3
2
Laser Devices
Class 2 laser scanners use a low power, visible light diode. As with any very bright
light source such as the sun, the user should avoid staring directly into the light
beam. Momentary exposure to a Class 2 laser is not known to be harmful.
CAUTION Use of controls, adjustments, or the performance of
procedures other than those specified herein may result in
hazardous laser light exposure.
Scanner Labeling
Labels Read:
1. LASER LIGHT - DO NOT STARE INTO BEAM.
2. CAUTION - CLASS 2 LASER LIGHT WHEN OPEN. DO NOT STARE INTO
THE BEAM.
3. COMPLIES WITH 21CFR1040.10 and 1040.11 EXCEPT FOR DEVIATIONS
PURSUANT TO LASER NOTICE NO. 50, DATED JUNE 24, 2007 and
IEC/EN 60825-1:2014.
LED Devices
Classified as “EXEMPT RISK GROUP” according to IEC 62471:2006 and EN
62471:2008
Pulse duration: 1.7 ms for MC3300R with SE4750
Pulse duration: Continuous Wave for MC3300R with SE4850
Page 35

Quick Reference Guide 35
Power Supply
Use ONLY a Zebra approved Nationally Recognized Test Laboratory (NRTL)
Certified ITE (LPS/SELV) power supply with electrical ratings: Output 5 VDC, min
2.5 A, with a maximum ambient temperature of at least 50° C. Use of alternative
power supply will invalidate any approvals given to this unit and may be
dangerous.
Batteries
Taiwan - Recycling
EPA (Environmental Protection Administration) requires dry
battery producing or importing firms in accordance with Article
15 of the Waste Disposal Act are required to indicate the
recycling marks on the batteries used in sales, giveaway or
promotion. Contact a qualified Taiwanese recycler for proper battery disposal.
Battery Information
CAUTION Risk of explosion if battery is replaced by an incorrect type.
Dispose of batteries according to instructions.
Use only approved batteries. Accessories which have battery charging capability
are approved for use with the following battery models:
• Model BT-000337 (3.7 Vdc, 5200 mAh)
Zebra approved rechargeable battery packs are designed and constructed to the
highest standards within the industry.
However, there are limitations as to how long a battery can operate or be stored
before needing replacement. Many factors affect the actual life cycle of a battery
pack such as heat, cold, harsh environmental conditions, and severe drops.
When batteries are stored over six months, some irreversible deterioration in
overall battery quality may occur. Store batteries at half of full charge in a dry, cool
place, removed from the equipment to prevent loss of capacity, rusting of metallic
parts, and electrolyte leakage. When storing batteries for one year or longer, the
charge level should be verified at least once a year and charged to half of full
charge.
Replace the battery when a significant loss of run time is detected.
Page 36

36 MC3390R
Standard warranty period for all Zebra batteries is one year, regardless if the
battery was purchased separately or included as part of the mobile computer or
bar code scanner. For more information on Zebra batteries, please visit:
www.zebra.com/batterybasics.
Battery Safety Guidelines
• The area in which the units are charged should be clear of debris and
combustible materials or chemicals. Particular care should be taken where the
device is charged in a non commercial environment.
• Follow battery usage, storage, and charging guidelines found in the user's
guide.
• Improper battery use may result in a fire, explosion, or other hazard.
• To charge the mobile device battery, the battery and charger temperatures
must be between +32 ºF and +104ºF (0ºC and +40ºC).
• Do not use incompatible batteries and chargers. Use of an incompatible
battery or charger may present a risk of fire, explosion, leakage, or other
hazard. If you have any questions about the compatibility of a battery or a
charger, contact Zebra support.
• For devices that utilize a USB port as a charging source, the device shall only
be connected to products that bear the USB-IF logo or have completed the
USB-IF compliance program.
• Do not disassemble or open, crush, bend or deform, puncture, or shred.
• Severe impact from dropping any battery-operated device on a hard surface
could cause the battery to overheat.
• Do not short circuit a battery or allow metallic or conductive objects to contact
the battery terminals.
• Do not modify or remanufacture, attempt to insert foreign objects into the
battery, immerse or expose to water or other liquids, or expose to fire,
explosion, or other hazard.
• Do not leave or store the equipment in or near areas that might get very hot,
such as in a parked vehicle or near a radiator or other heat source. Do not
place battery into a microwave oven or dryer.
• Battery usage by children should be supervised.
• Please follow local regulations to promptly dispose of used re-chargeable
batteries.
• Do not dispose of batteries in fire.
• Seek medical advice immediately if a battery has been swallowed.
• In the event of a battery leak, do not allow the liquid to come in contact with the
skin or eyes. If contact has been made, wash the affected area with large
amounts of water and seek medical advice.
• If you suspect damage to your equipment or battery, contact Zebra support to
arrange for inspection.
Page 37

Quick Reference Guide 37
Radio Frequency Interference Requirements - FCC
Note: This equipment has been tested and found to comply with the limits for a
Class B digital device, pursuant to Part 15 of the FCC rules. These limits are
designed to provide reasonable protection against harmful interference in a
residential installation. This equipment generates, uses and can radiate radio
frequency energy and, if not installed and used in accordance with the
instructions, may cause harmful interference to radio communications. However
there is no guarantee that interference will not occur in a particular installation. If
this equipment does cause harmful interference to radio or television reception,
which can be determined by turning the equipment off and on, the user is
encouraged to try to correct the interference by one or more of the following
measures:
• Reorient or relocate the receiving antenna
• Increase the separation between the equipment and receiver
• Connect the equipment into an outlet on a circuit different from that to which
the receiver is connected
• Consult the dealer or an experienced radio/TV technician for help.
Radio Transmitters (Part 15)
This device complies with Part 15 of the FCC Rules. Operation is subject to the
following two conditions: (1) this device may not cause harmful interference, and
(2) this device must accept any interference received, including interference that
may cause undesired operation.
Radio Frequency Interference Requirements - Canada
Innovation, Science and Economic Development Canada ICES-003 Compliance
Label: CAN ICES-3 (B)/NMB-3(B).
Radio Transmitters
This device complies with Industry Canada's licence-exempt RSSs. Operation is
subject to the following two conditions: (1) This device may not cause
interference; and (2) This device must accept any interference, including
interference that may cause undesired operation of the device.
Le présent appareil est conforme aux CNR d'Industrie Canada applicables aux
appareils radio exempts de licence. L'exploitation est autorisée aux deux
conditions suivantes: (1) l'appareil ne doit pas produire de brouillage, et (2)
Page 38

38 MC3390R
l'utilisateur de l'appareil doit accepter tout brouillage radio électrique subi même si
le brouillage est susceptible d'en compromettre le fonctionnement.
Label Marking: The Term “IC:” before the radio certification only signifies that
Industry Canada technical specifications were met.
Etiquette de marquage: Le terme "IC" avant la certification radio signifie que le
produit est compatible avec le spécification Industrie Canada.
CE Marking and European Economic Area (EEA)
The use of 5GHz RLAN throughout the EEA has the following restriction:
• 5.15 - 5.35 GHz is restricted to indoor use only
Statement of Compliance
Zebra hereby declares that this radio equipment is in compliance with Directives
2014/53/EU and 2011/65/EU. The full text of the EU Declaration of Conformity
may be obtained from www.zebra.com/doc.
Korea Warning Statement for Class B ITE
기 종 별 사 용 자 안 내 문
B급 기기
(가정용 방송통신기자재)
이 기기는 가정용 (B 급 ) 전자파적합기기로서 주로 가정에서
사용하는 것을 목적으로 하며 , 모든 지역에서 사용할 수
있습니다 .
Other Countries
Australia
Use of 5 GHz RLAN in Australia is restricted in the following band 5.60–5.65 GHz.
Brazil
Declarações Regulamentares para MC3300R - Brasil
Nota: A marca de certificação se aplica ao Transceptor, mod MC3300R. Este
equipamento não tem direito à proteção contra interferência prejudicial e não
pode causar interferência em Sistemas devidamente autorizados.
Para maiores informações sobre ANATEL consulte o site: www.anatel.gov.br.
Este produto está homologado pela Anatel, de acordo com os procedimentos
regulamentados pela Resolução n°242/2000 e atende aos requisitos técnicos
Page 39

Quick Reference Guide 39
aplicados, incluindo os limites de exposição da Taxa de Absorção Específica
referente a campos elétricos, magnéticos e eletromagnéticos de radiofrequência,
de acordo com as Resoluções n° 303/2002 e 533/2009.
Chile
Conforme a Resolución 755 parte j.1), se ajustará el dispositivo a operar en
interiores en las siguientes bandas con una potencia máxima radiada no superior
a 150mW:
2.400 a 2.483,5MHz
5.150 a 5.250MHz
5.250 a 5.350MHz
5.470 a 5.725MHz
5.725 a 5.850MHz
Además, de acuerdo con Resolución 755, para la banda 5.150 a 5.250 MHz la
operación del equipo estará restringida al interior de inmuebles y la densidad de
potencia radiada máxima no excederá 7,5mW/MHz en cualquier banda de 1MHz
o su valor equivalente de 0,1875mW/25 kHz en cualquier banda de 25 kHz.
Para la función UHF RFID, se ajustará el dispositivo a operar en el interior de
inmuebles en la banda de 915 a 928 MHz con una potencia máxima radiada no
superior a 100 mW, conforme a Resolución 755 parte Art 1. j3).
China
通过访问以下网址可下载当地语言支持的产品说明书
www.zebra.com/support
锂电池安全警示语 :
警告:请勿拆装,短路,撞击,挤压或者投入火中
注意:如果电池被不正确型号替换,或出现鼓胀,会存在爆炸及其他危险
请按说明处置使用过的电池
电池浸水后严禁使用
合格证:
Eurasian Customs Union
Евразийский Таможенный Союз
Данный продукт соответствует требованиям знака EAC.
Page 40

40 MC3390R
Hong Kong
In accordance with HKTA1039, the band 5.15 GHz - 5.35 GHz is for indoor
operation only.
Mexico
La operación de este equipo está sujeta a las siguientes dos condiciones: (1) es
posible que este equipo o dispositivo no cause interferencia perjudicial y (2) este
equipo o dispositivo debe aceptar cualquier interferencia, incluyendo la que
pueda causar su operación no deseada.
South Korea
해당 무선설비는 운용 중 전파혼신 가능성이 있음
해당 무선설비는 전파혼신 가능성이 있으므로 인명안전과 관련된 서비스는 할 수
없습니다
Taiwan
臺灣
低功率電波輻射性電機管理辦法
第十二條
經型式認證合格之低功率射頻電機,非經許可,公司、商號或使用者均不得擅自變
更頻率、加大功率或變更原設計之特性及功能。
第十四條
低功率射頻電機之使用不得影響飛航安全及干擾合法通信;經發現有干擾現象時,
應立即停用,並改善至無干擾時方得繼續使用。
前項合法通信,指依電信法規定作業之無線電通信。
低功率射頻電機須忍受合法通信或工業、科學及醫療用電波輻射性電機設備之干
擾。
應避免影響附近雷達系統之操作
公司資訊
台灣斑馬科技股份有限公司 / 台北市信義區松高路 9 號 13 樓
Ukraine
Дане обладнання відповідає вимогам технічного регламенту №1057, № 2008
на обмеження щодо використання деяких небезпечних речовин в
електричних та електронних пристроях.
Thailand
เครื่ องโทรคมนาคมและอุปกรณ นี้ มีความสอดคล องตามข อกําหนดของ กทช .
Page 41

Quick Reference Guide 41
Waste Electrical and Electronic Equipment (WEEE)
English: For EU Customers: All products at the end of their life must be returned to Zebra for
recycling. For information on how to return product, please go to: www.zebra.com/weee.
Français: Clients de l'Union Européenne: Tous les produits en fin de cycle de vie doivent être
retournés à Zebra pour recyclage. Pour de plus amples informations sur le retour de produits,
consultez : www.zebra.com/weee.
Español: Para clientes en la Unión Europea: todos los productos deberán entregarse a Zebra al final
de su ciclo de vida para que sean reciclados. Si desea más información sobre cómo devolver un
producto, visite: www.zebra.com/weee.
Български: За клиенти от ЕС: След края на полезния им живот всички продукти трябва да се
връщат на Zebra за рециклиране. За информация относно връщането на продукти, моля
отидете на адрес: www.zebra.com/weee.
Deutsch: Für Kunden innerhalb der EU: Alle Produkte müssen am Ende ihrer Lebensdauer zum
Recycling an Zebra zurückgesandt werden. Informationen zur Rücksendung von Produkten finden
Sie unter www.zebra.com/weee.
Italiano: per i clienti dell'UE: tutti i prodotti che sono giunti al termine del rispettivo ciclo di vita devono
essere restituiti a Zebra al fine di consentirne il riciclaggio. Per informazioni sulle modalità di
restituzione, visitare il seguente sito Web: www.zebra.com/weee.
Português: Para clientes da UE: todos os produtos no fim de vida devem ser devolvidos à Zebra
para reciclagem. Para obter informações sobre como devolver o produto, visite:
www.zebra.com/weee.
Nederlands: Voor klanten in de EU: alle producten dienen aan het einde van hun levensduur naar
Zebra te worden teruggezonden voor recycling. Raadpleeg www.zebra.com/weee voor meer
informatie over het terugzenden van producten.
Polski: Klienci z obszaru Unii Europejskiej: Produkty wycofane z eksploatacji naleźy zwrócić do firmy
Zebra w celu ich utylizacji. Informacje na temat zwrotu produktów znajdują się na stronie internetowej
www.zebra.com/weee.
Čeština: Pro zákazníky z EU: Všechny produkty je nutné po skonèení jejich životnosti vrátit
spoleènosti Zebra k recyklaci. Informace o zpùsobu vrácení produktu najdete na webové stránce:
www.zebra.com/weee.
Eesti: EL klientidele: kõik tooted tuleb nende eluea lõppedes tagastada taaskasutamise eesmärgil
Zebra'ile. Lisainformatsiooni saamiseks toote tagastamise kohta külastage palun aadressi:
www.zebra.com/weee.
Magyar: Az EU-ban vásárlóknak: Minden tönkrement terméket a Zebra vállalathoz kell eljuttatni
újrahasznosítás céljából. A termék visszajuttatásának módjával kapcsolatos tudnivalókért látogasson
el a www.zebra.com/weee weboldalra.
Svenska: För kunder inom EU: Alla produkter som uppnått sin livslängd måste returneras till Zebra
för återvinning. Information om hur du returnerar produkten finns på www.zebra.com/weee.
Suomi: Asiakkaat Euroopan unionin alueella: Kaikki tuotteet on palautettava kierrätettäväksi
Zebra-yhtiöön, kun tuotetta ei enää käytetä. Lisätietoja tuotteen palauttamisesta on osoitteessa
www.zebra.com/weee.
Dansk: Til kunder i EU: Alle produkter skal returneres til Zebra til recirkulering, når de er udtjent. Læs
oplysningerne om returnering af produkter på: www.zebra.com/weee.
Ελληνικά:
επιστρέφονται στην Zebra για ανακύκλωση. Για περισσότερες πληροφορίες σχετικά με την επιστροφή ενός
προϊόντος, επισκεφθείτε τη διεύθυνση www.zebra.com/weee στο Διαδίκτυο.
Malti: Għal klijenti fl-UE: il-prodotti kollha li jkunu waslu fl-aħħar tal-ħajja ta' l-użu tagħhom, iridu jiġu
rritornati għand Zebra għar-riċiklaġġ. Għal aktar tagħrif dwar kif għandek tirritorna l-prodott, jekk
jogħġbok żur: www.zebra.com/weee.
Românesc: Pentru clienţii din UE: Toate produsele, la sfârşitul duratei lor de funcţionare, trebuie
returnate la Zebra pentru reciclare. Pentru informaţii despre returnarea produsului, accesaţi:
www.zebra.com/weee.
Για πελάτες στην Ε.Ε.: Όλα τα προϊόντα, στο τέλος της διάρκειας ζωής τους, πρέπει να
Page 42
42 MC3390R
Slovenski: Za kupce v EU: vsi izdelki se morajo po poteku življenjske dobe vrniti podjetju Zebra za
reciklažo. Za informacije o vračilu izdelka obiščite: www.zebra.com/weee.
Slovenčina: Pre zákazníkov z krajín EU: Všetky výrobky musia byť po uplynutí doby ich životnosti
vrátené spoločnosti Zebra na recykláciu. Bližšie informácie o vrátení výrobkov nájdete na:
www.zebra.com/weee.
Lietuvių: ES vartotojams: visi gaminiai, pasibaigus jų eksploatacijos laikui, turi būti grąžinti utilizuoti į
kompaniją „Zebra“. Daugiau informacijos, kaip grąžinti gaminį, rasite: www.zebra.com/weee.
Latviešu: ES klientiem: visi produkti pēc to kalpošanas mūža beigām ir jānogādā atpakaļ Zebra
otrreizējai pārstrādei. Lai iegūtu informāciju par produktu nogādāšanu Zebra, lūdzu, skatiet:
www.zebra.com/weee.
Türkçe: AB Müşterileri için: Kullanım süresi dolan tüm ürünler geri dönüştürme için Zebra'ya iade
edilmelidir. Ürünlerin nasıl iade edileceği hakkında bilgi için lütfen şu adresi ziyaret edin:
www.zebra.com/weee.
TURKISH WEEE Statement of Compliance
EEE Yönetmeliğine Uygundur
CMM Disclosure
This table was created to comply with China RoHS requirements.
部件名称
(Parts)
金属部件
(Metal Parts)
电路模块
(Circuit Modules)
电缆及电缆组件
(Cables and Cable Assemblies)
塑料和聚合物部件
(Plastic and Polymeric Parts)
光学和光学组件
(Optics and Optical Components)
电池
(Batteries)
本表格依据SJ/T 11364 的规定编制。
O: 表示该有害物质在该部件所有均质材料中的含量均在 GB/T 26572 规定的限量要求以下。
X: 表示该有害物质至少在该部件的某一均质材料中的含量超出GB/T 26572 规定的限量要求。
(企业可在此处,根据实际情况对上表中打“×”的技术原因进行进一步说明。)
铅
(Pb)汞(Hg)镉(Cd)
XOO O O O
XOO O O O
OOO O O O
OOO O O O
XOO O O O
XOO O O O
有害物质
六价铬
(Cr(VI))
多溴联苯
(PBB)
多溴二苯醚
(PBDE)
Page 43

Quick Reference Guide 43
限用物質含有情況標示聲明書
設備名稱: 移動式電腦
Equipment name
單元
Unit
印刷電路板及電子組件
金屬零件
電纜及電纜組件
塑料和聚合物零件
光學與光學元件
備考1.〝超出0.1 wt %〞及〝超出0.01 wt %〞係指限用物質之百分比含量超出百分比含量基準
值。
Note 1: “Exceeding 0.1 wt%” and “exceeding 0.01 wt%” indicate that the percentage content
of the restricted substance exceeds the reference percentage value of presence condition.
備考2.〝O〞係指該項限用物質之百分比含量未超出百分比含量基準值。
Note 2: “O” indicates that the percentage content of the restricted substance does not exceed
the percentage of reference value of presence.
備考3.〝−〞係指該項限用物質為排除項目。
Note 3: The “−” indicates that the restricted substance corresponds to the exemption.
Restricted substances and its chemical symbols
鉛
(Pb)汞(Hg)鎘(Cd)
-OO O O O
-OO O O O
OOO O O O
OOO O O O
-OO O O O
型號 (型式): MC3300R
Type designation (Type)
限用物質及其化學符號
(Cr
多溴聯苯
+6
)
(PBB)
六價鉻
多溴二苯醚
(PBDE)
Page 44

© 2018 ZIH Corp and/or its affiliates. All rights
reserved. Zebra and the stylized Zebra head are
trademarks of ZIH Corp., registered in many
jurisdictions worldwide. All other trademarks are
the property of their respective owners.
www.zebra.com
MN-003207-01 Rev. B - 9/18
 Loading...