

Zebra MC3300 Mobile Computer MC33XX Mobile Computer User Guide for Android 7.1.2 Nougat (en)
MC33XX
Mobile Computer
User Guide
for Android ™ 7.1.2 Nougat
MN-003131-04 Rev A

Copyright
ZEBRA and the stylized Zebra head are trademarks of Zebra Technologies Corporation, registered in many
jurisdictions worldwide. Google, Android, Google Play and other marks are trademarks of Google LLC.All other
trademarks are the property of their respective owners. ©2019 Zebra Technologies Corporation and/or its affiliates.
All rights reserved.
COPYRIGHTS & TRADEMARKS: For complete copyright and trademark information, go to www.zebra.com/
copyright.
WARRANTY: For complete warranty information, go to www.zebra.com/warranty
END USER LICENSE AGREEMENT: For complete EULA information, go to www.zebra.com/eula
Terms of Use
• Proprietary Statement
This manual contains proprietary information of Zebra Technologies Corporation and its subsidiaries
(“Zebra Technologies”). It is intended solely for the information and use of parties operating and
maintaining the equipment described herein. Such proprietary information may not be used, reproduced,
or disclosed to any other parties for any other purpose without the express, written permission of Zebra
Technologies.
• Product Improvements
Continuous improvement of products is a policy of Zebra Technologies. All specifications and designs are
subject to change without notice.
• Liability Disclaimer
Zebra Technologies takes steps to ensure that its published Engineering specifications and manuals are
correct; however, errors do occur. Zebra Technologies reserves the right to correct any such errors and
disclaims liability resulting therefrom.
• Limitation of Liability
In no event shall Zebra Technologies or anyone else involved in the creation, production, or delivery of the
accompanying product (including hardware and software) be liable for any damages whatsoever
(including, without limitation, consequential damages including loss of business profits, business
interruption, or loss of business information) arising out of the use of, the results of use of, or inability to
use such product, even if Zebra Technologies has been advised of the possibility of such damages. Some
jurisdictions do not allow the exclusion or limitation of incidental or consequential damages, so the above
limitation or exclusion may not apply to you.
.
.
Revision History
Changes to the original guide are listed below:
Change Date Description
-01 Rev A 12/2017 Initial release.
-02 Rev A 03/2018 Updated to include MC33XX-R and MC33XX-S Configurations.
2

Change Date Description
-03 Rev A 06/2019 Updated to include the Application Notification LED in the Features section and add
the topics Pulse Notification Light and Interactive Sensor Technology.
-04 Rev A 09/2019 Updated to indicate the lanyard is compatible only with the MC33XX-R and
MC33XX-S configurations, remove screws on the forklift mount, and replace the
Screen Protector Mode screen.
3

Table of Contents
Copyright ........................................................................................................................................... 2
Terms of Use .................................................................................................................................... 2
Revision History ................................................................................................................................ 2
About This Guide
Introduction ..................................................................................................................................... 12
Configurations ................................................................................................................................. 12
Software Versions ........................................................................................................................... 15
Chapter Descriptions ...................................................................................................................... 15
Notational Conventions ................................................................................................................... 15
Icon Conventions ............................................................................................................................ 16
Related Documents ........................................................................................................................ 16
Service Information ......................................................................................................................... 16
Provide Documentation Feedback .................................................................................................. 17
Getting Started
Introduction ..................................................................................................................................... 18
MC33XX-G Features ...................................................................................................................... 18
MC33XX-R Features ....................................................................................................................... 21
Rotating Scan Turret ................................................................................................................. 23
MC33XX-S Features ....................................................................................................................... 24
Unpacking ....................................................................................................................................... 26
Setup ............................................................................................................................................... 26
Installing a microSD Card ......................................................................................................... 26
Installing the MC33XX-G Battery .............................................................................................. 29
Installing the MC33XX-R/S Battery ........................................................................................... 30
Charging the Battery ................................................................................................................. 31
Backup Power ..................................................................................................................... 33
Charging Temperature ........................................................................................................ 33
Charging Spare Batteries .................................................................................................... 33
Hot Swap Mode ......................................................................................................................... 33
Google Account Setup .............................................................................................................. 33
Replacing the Battery in the MC33XX-G ........................................................................................ 34
Replacing the Battery in the MC33XX-R/S ..................................................................................... 36
Accessing Device Settings .............................................................................................................. 38
Battery Management ....................................................................................................................... 38
4

Table of Contents
Monitor Battery Usage .............................................................................................................. 38
Low Battery Notification ............................................................................................................ 39
Battery Optimization .................................................................................................................. 39
Turning Off the Radios ........................................................................................................ 40
Connecting a Wired Headset .......................................................................................................... 40
Real-Time Clock Backup ................................................................................................................ 40
Setting the Date and Time .............................................................................................................. 40
Display Setting ................................................................................................................................ 41
Setting the Screen Brightness ................................................................................................... 41
Changing the Screen Timeout Setting ...................................................................................... 41
Setting Font Size ....................................................................................................................... 41
Setting Screen Rotation ............................................................................................................ 42
Touch Panel Mode .................................................................................................................... 42
General Sound Setting .................................................................................................................... 43
Wake-Up Sources ........................................................................................................................... 44
Using the MC33XX
Introduction ..................................................................................................................................... 46
Google Mobile Services .................................................................................................................. 46
Home Screen .................................................................................................................................. 47
Setting Home Screen Rotation .................................................................................................. 48
Status Bar ................................................................................................................................. 48
Status Icons ........................................................................................................................ 49
Notification Icons ................................................................................................................. 50
Managing Notifications .............................................................................................................. 51
Setting Application Notifications .......................................................................................... 51
Viewing Notification Settings for All Apps ........................................................................... 51
Controlling Lock Screen Notifications ................................................................................. 51
Pulse Notification Light ........................................................................................................ 52
Quick Access Panel .................................................................................................................. 52
Edit Icons on Quick Settings ............................................................................................... 53
Application Shortcuts and Widgets ........................................................................................... 54
Adding an Application to the Home Screen ........................................................................ 54
Adding a Widget to the Home Screen ................................................................................. 54
Moving Items on the Home Screen ..................................................................................... 54
Removing an Application Shortcut or Widget from the Home Screen ................................ 54
Folders ............................................................................................................................................ 54
Creating Folders ........................................................................................................................ 54
Naming Folders ......................................................................................................................... 55
Removing Folders ..................................................................................................................... 55
Home Screen Wallpaper ................................................................................................................. 55
Using the Touchscreen ................................................................................................................... 55
Keyboards ....................................................................................................................................... 56
Keyboard Configuration ............................................................................................................ 56
Using the Enterprise Keyboard ................................................................................................. 56
Numberic Tab ...................................................................................................................... 57
Alpha Tab ............................................................................................................................ 57
Additional Character Tab .................................................................................................... 58
Scan Tab ............................................................................................................................. 58
Using the Android Keyboard ..................................................................................................... 58
5

Table of Contents
Editing Text ......................................................................................................................... 59
Entering Numbers, Symbols and Special Characters ......................................................... 59
Hiding On-Screen Keyboard ............................................................................................... 59
Switching Language Keyboards .......................................................................................... 59
Do Not Disturb Feature ................................................................................................................... 60
Limit Sounds and Vibrations ..................................................................................................... 60
Total Silence ....................................................................................................................... 60
Alarms Only ......................................................................................................................... 60
Priority Notifications Only .................................................................................................... 61
Automatically Block Sounds and Vibrations .................................................................................... 61
Silence Sounds During Certain Times ...................................................................................... 61
Silence Sounds During Events and Meetings ........................................................................... 62
Turn Sounds Back On ............................................................................................................... 62
Override Do Not Disturb for Specific Apps ................................................................................ 62
Applications ..................................................................................................................................... 62
Accessing Applications ............................................................................................................. 67
Switching Between Recent Applications ................................................................................... 68
Un-Locking the Screen ................................................................................................................... 68
Resetting the Device ....................................................................................................................... 70
Performing a Soft Reset ............................................................................................................ 71
Performing a Hard Reset .......................................................................................................... 71
Suspend Mode ................................................................................................................................ 71
Transferring Files with a Host Computer via USB .......................................................................... 71
Transferring Files using Media Transfer Protocol ..................................................................... 71
Transferring Files using Photo Transfer Protocol ...................................................................... 72
Disconnect from the Host Computer ......................................................................................... 73
Applications
Introduction ..................................................................................................................................... 74
Battery Manager ............................................................................................................................. 74
File Browser .................................................................................................................................... 76
Contacts .......................................................................................................................................... 78
Adding Contacts ........................................................................................................................ 78
Editing Contacts ........................................................................................................................ 78
Deleting Contacts ...................................................................................................................... 78
Camera ........................................................................................................................................... 79
Taking Photos ........................................................................................................................... 79
Taking a Panoramic Photo .....................................................................................................
Recording Videos ...................................................................................................................... 81
Photo Settings ........................................................................................................................... 81
Video Settings ........................................................................................................................... 82
Gallery ............................................................................................................................................. 83
Working with Albums ................................................................................................................. 85
Share an Album .................................................................................................................. 86
Get Album Information ........................................................................................................ 86
Deleting an Album ............................................................................................................... 87
Working with Photos ................................................................................................................. 87
Viewing and Browsing Photos ............................................................................................. 87
Cropping a Photo ................................................................................................................ 88
Setting a Photo as a Contact Icon ....................................................................................... 88
... 80
6

Table of Contents
Share a Photo ..................................................................................................................... 89
Deleting a Photo .................................................................................................................. 89
Working with Videos .................................................................................................................. 89
Watching Videos ................................................................................................................. 89
Sharing a Video ................................................................................................................... 89
Deleting a Video .................................................................................................................. 90
Photos ............................................................................................................................................. 90
Working with Albums ................................................................................................................. 90
Deleting an Album ............................................................................................................... 91
Working with Photos ................................................................................................................. 91
Viewing and Browsing Photos ............................................................................................. 91
Cropping a Photo ................................................................................................................ 91
Setting a Photo as a Contact Icon ....................................................................................... 92
Share a Photo ..................................................................................................................... 92
Deleting a Photo .................................................................................................................. 92
Working with Videos .................................................................................................................. 93
Watching Videos ................................................................................................................. 93
Sharing a Video ................................................................................................................... 93
Deleting a Video .................................................................................................................. 93
DataWedge Demonstration ............................................................................................................. 94
Sound Recorder .............................................................................................................................. 95
PTT Express Voice Client ............................................................................................................... 96
PTT Audible Indicators .............................................................................................................. 96
Notification Icons ....................................................................................................................... 97
Enabling PTT Communication .................................................................................................. 97
Selecting a Talk Group .............................................................................................................. 98
PTT Communication ................................................................................................................. 98
Creating a Group Call ......................................................................................................... 98
Responding with a Private Response ................................................................................. 98
Disabling PTT Express Voice Client Communication ......................................................... 98
RxLogger ........................................................................................................................................ 99
Enabling Logging ...................................................................................................................... 99
Disabling Logging ...................................................................................................................... 99
RxLogger Utility ............................................................................................................................. 100
Diagnostic Tool ..............................................................................................................
Settings ............................................................................................................................. 103
Battery Test Information .................................................................................................... 103
GPS Test Information ........................................................................................................ 103
System Test Information ................................................................................................... 103
WLAN Test Information ..................................................................................................... 104
WWAN Test Information ................................................................................................... 104
Bluetooth Test Information ................................................................................................ 104
Device Central .............................................................................................................................. 105
Device Central Tabs ................................................................................................................ 105
Paging an RS6000 Ring Scanner ........................................................................................... 106
SimulScan Demo .......................................................................................................................... 107
Exporting Sample Forms ......................................................................................................... 108
Postal, Transportation and Logistics Example ........................................................................ 108
Manufacturing Example .......................................................................................................... 110
Settings ................................................................................................................................... 112
Advanced Settings .................................................................................................................. 113
............... 101
7

Table of Contents
Demo Customization ............................................................................................................... 114
Default Templates ............................................................................................................. 115
Data Capture
Introduction ................................................................................................................................... 116
Imager ........................................................................................................................................... 116
Operational Modes .................................................................................................................. 116
Laser Scanner ............................................................................................................................... 117
RS507/RS507X Hands-Free Imager ............................................................................................ 117
RS6000 Bluetooth Ring Scanner .................................................................................................. 117
DS3678 Digital Scanner ................................................................................................................ 118
Scanning Considerations .............................................................................................................. 118
Barcode Capture with Imager ....................................................................................................... 119
Barcode Capture with Laser Scanner ........................................................................................... 120
Barcode Capture with RS507/RS507X Hands-Free Imager ......................................................... 121
Barcode Capture with RS6000 Bluetooth Ring Scanner .............................................................. 122
Barcode Capture with DS3678 Bluetooth Scanner ....................................................................... 123
Pairing the RS507/RS507X/RS6000/DS3578 .............................................................................. 124
Pairing Using Near Field Communication ............................................................................... 124
Pairing in HID Mode Using Near Field Communication .......................................................... 125
Pairing the RS507/RS507X/RS6000/DS3678 Using SSI ........................................................ 126
Pairing the RS507/RS507X/RS6000 Hands-Free Imager Bluetooth HID ............................... 127
Pairing the DS3678 Digital Scanner ............................................................................................. 128
Pairing the DS3678 Using Bluetooth HID ............................................................................... 128
DataWedge ................................................................................................................................... 128
Enabling DataWedge .............................................................................................................. 128
Disabling DataWedge ............................................................................................................. 129
Wireless
Introduction ................................................................................................................................... 130
Wireless Local Area Networks ...................................................................................................... 130
Scan and Connect to a Wi-Fi Network .................................................................................... 131
Advanced Wi-Fi Settings ......................................................................................................... 131
Wi-Fi Direct ....................................................................................................................... 132
WPS Pin Entry .................................................................................................................. 132
Additional Wi-Fi Settings ......................................................................................................... 133
Remove a Wi-Fi Network ........................................................................................................ 134
Bluetooth ....................................................................................................................................... 135
Adaptive Frequency Hopping .................................................................................................. 135
Security ................................................................................................................................... 135
Bluetooth Profiles ............................................
Bluetooth Power States ........................................................................................................... 136
Bluetooth Radio Power ........................................................................................................... 137
Enabling Bluetooth ............................................................................................................ 137
Disabling Bluetooth ........................................................................................................... 137
Discovering Bluetooth Device(s) ............................................................................................. 137
Changing the Bluetooth Name ................................................................................................ 138
Connecting to a Bluetooth Device ........................................................................................... 138
Selecting Profiles on the Bluetooth Device ............................................................................. 138
........................................................................ 136
8

Table of Contents
Unpairing a Bluetooth Device .................................................................................................. 139
Using a Bluetooth Headset ..................................................................................................... 139
Near Field Communications .......................................................................................................... 139
Reading NFC Cards ................................................................................................................ 140
Sharing Information Using NFC .............................................................................................. 140
Accessories
Introduction ................................................................................................................................... 142
MC33XX Accessories ................................................................................................................... 142
Compatibility ................................................................................................................................. 147
Battery Comparison ................................................................................................................ 147
Battery Compatibility ............................................................................................................... 147
1-Slot USB Charge Cradle ............................................................................................................ 149
Charging the MC33XX Battery ................................................................................................ 149
Charging an MC33XX Spare Battery ...................................................................................... 150
Battery Charging in 1- Slot USB Charge Cradle ..................................................................... 151
Charging Temperature ...................................................................................................... 151
5-Slot Charge Only ShareCradle .................................................................................................. 153
Charging the MC33XX Battery ................................................................................................ 153
Battery Charging in the 5-Slot Charge Only ShareCradle ....................................................... 154
Charging Temperature ...................................................................................................... 154
5-Slot Ethernet ShareCradle ......................................................................................................... 155
Charging the MC33XX Battery ................................................................................................ 155
Battery Charging in the 5-Slot Ethernet ShareCradle ............................................................. 156
Charging Temperature ...................................................................................................... 156
5-Slot ShareCradle with 4-Slot Battery Charger ........................................................................... 157
Charging the MC33XX Battery ................................................................................................ 157
Charging Spare Batteries ........................................................................................................ 158
Battery Charging in the 5-Slot ShareCradle with 4-Slot Battery Charger ................................ 158
Charging Temperature ...................................................................................................... 158
5-Slot Ethernet ShareCradle with 4-Slot Battery Charger ............................................................. 159
Charging the MC33XX Battery ................................................................................................ 159
Charging Spare Batteries ........................................................................................................ 160
Battery Charging in the 5-Slot Ethernet ShareCradle with 4-Slot Battery Charger ................. 160
Charging Temperature ...................................................................................................... 160
4-Slot Spare Battery Charger ........................................................................................................ 160
Charging Spare Batteries ........................................................................................................ 161
Battery Charging ..................................................................................................................... 161
Spare Battery Charging ..................................................................................................... 161
Charging Temperature ...................................................................................................... 162
20-Slot Spare Battery Charger ...................................................................................................... 162
Charging Spare Batteries ........................................................................................................ 163
Battery Charging ..................................................................................................................... 163
Spare Battery Charging ..................................................................................................... 163
Charging Temperature ...................................................................................................... 164
USB Charge Cable ....................................................................................................................... 165
Connecting the USB Charge Cable to Device ........................................................................ 165
Connecting the USB Charge Cable to Host Computer ........................................................... 166
Main Battery Charging ...................................................................................................... 166
Charging the Device ................................................................................................................ 167
9

Table of Contents
Main Battery Charging ...................................................................................................... 167
Disconnecting the USB Charge Cable .................................................................................... 168
MC33XX Charge Only Adapter ..................................................................................................... 169
Adapter Installation ................................................................................................................. 169
Charging Temperature ...................................................................................................... 171
MC33XX-G Rubber Boot .............................................................................................................. 172
MC33XX-R Rubber Boot ............................................................................................................... 173
MC33XX-S Rubber Boot ............................................................................................................... 175
Rigid Holster ................................................................................................................................. 176
MC33XX-G Fabric Holster ............................................................................................................ 178
Belt Strap ................................................................................................................................ 178
Shoulder Strap ........................................................................................................................ 178
Using the Belt Strap ................................................................................................................ 179
Using the Shoulder Strap ........................................................................................................ 181
MC33XX-R/S Fabric Holster ......................................................................................................... 183
Belt Clip ................................................................................................................................... 183
Shoulder Strap ........................................................................................................................ 183
Using the Belt Clip ................................................................................................................... 184
Using the Shoulder Strap ........................................................................................................ 186
Un-powered Forklift Mount ............................................................................................................ 188
Replacement Hand Strap for MC33XX-G ..................................................................................... 190
Replacement Hand Strap for MC33XX-R/S .................................................................................. 192
Lanyard ......................................................................................................................................... 194
Install Lanyard on MC33XX .................................................................................................... 194
Using the Cross-body Strap .................................................................................................... 195
Using the Belt Clip ................................................................................................................... 196
Charging the MC33XX with the Lanyard ................................................................................. 197
Maintenance and Troubleshooting
Introduction ................................................................................................................................... 198
Maintaining the MC33XX .............................................................................................................. 198
Battery Safety Guidelines ............................................................................................................. 199
Cleaning Instructions .................................................................................................................... 199
Approved Cleanser Active Ingredients .................................................................................... 200
Harmful Ingredients ................................................................................................................. 200
Cleaning Instructions ............................................................................................................... 200
Special Cleaning Notes ........................................................................................................... 200
Cleaning Materials Required ................................................................................................... 200
Cleaning Frequency ................................................................................................................ 200
Cleaning the MC33XX .................................................................................................................. 201
Housing ................................................................................................................................... 201
Display .................................................................................................................................... 201
Exit Window ............................................................................................................................ 201
Connector Cleaning ................................................................................................................ 201
Cleaning Cradle Connectors ......................................................................................................... 201
Troubleshooting the MC33XX ....................................................................................................... 202
Technical Specifications
Introduction ................................................................................................................................... 205
10

Table of Contents
MC33XX Technical Specifications ................................................................................................ 205
MC33XX Keypads
Introduction ................................................................................................................................... 210
MC33XX 29-Key Keypad .............................................................................................................. 210
MC33XX 38-Key Keypad .............................................................................................................. 213
MC33XX 47-Key Keypad .............................................................................................................. 217
Index
11
About This Guide
Introduction
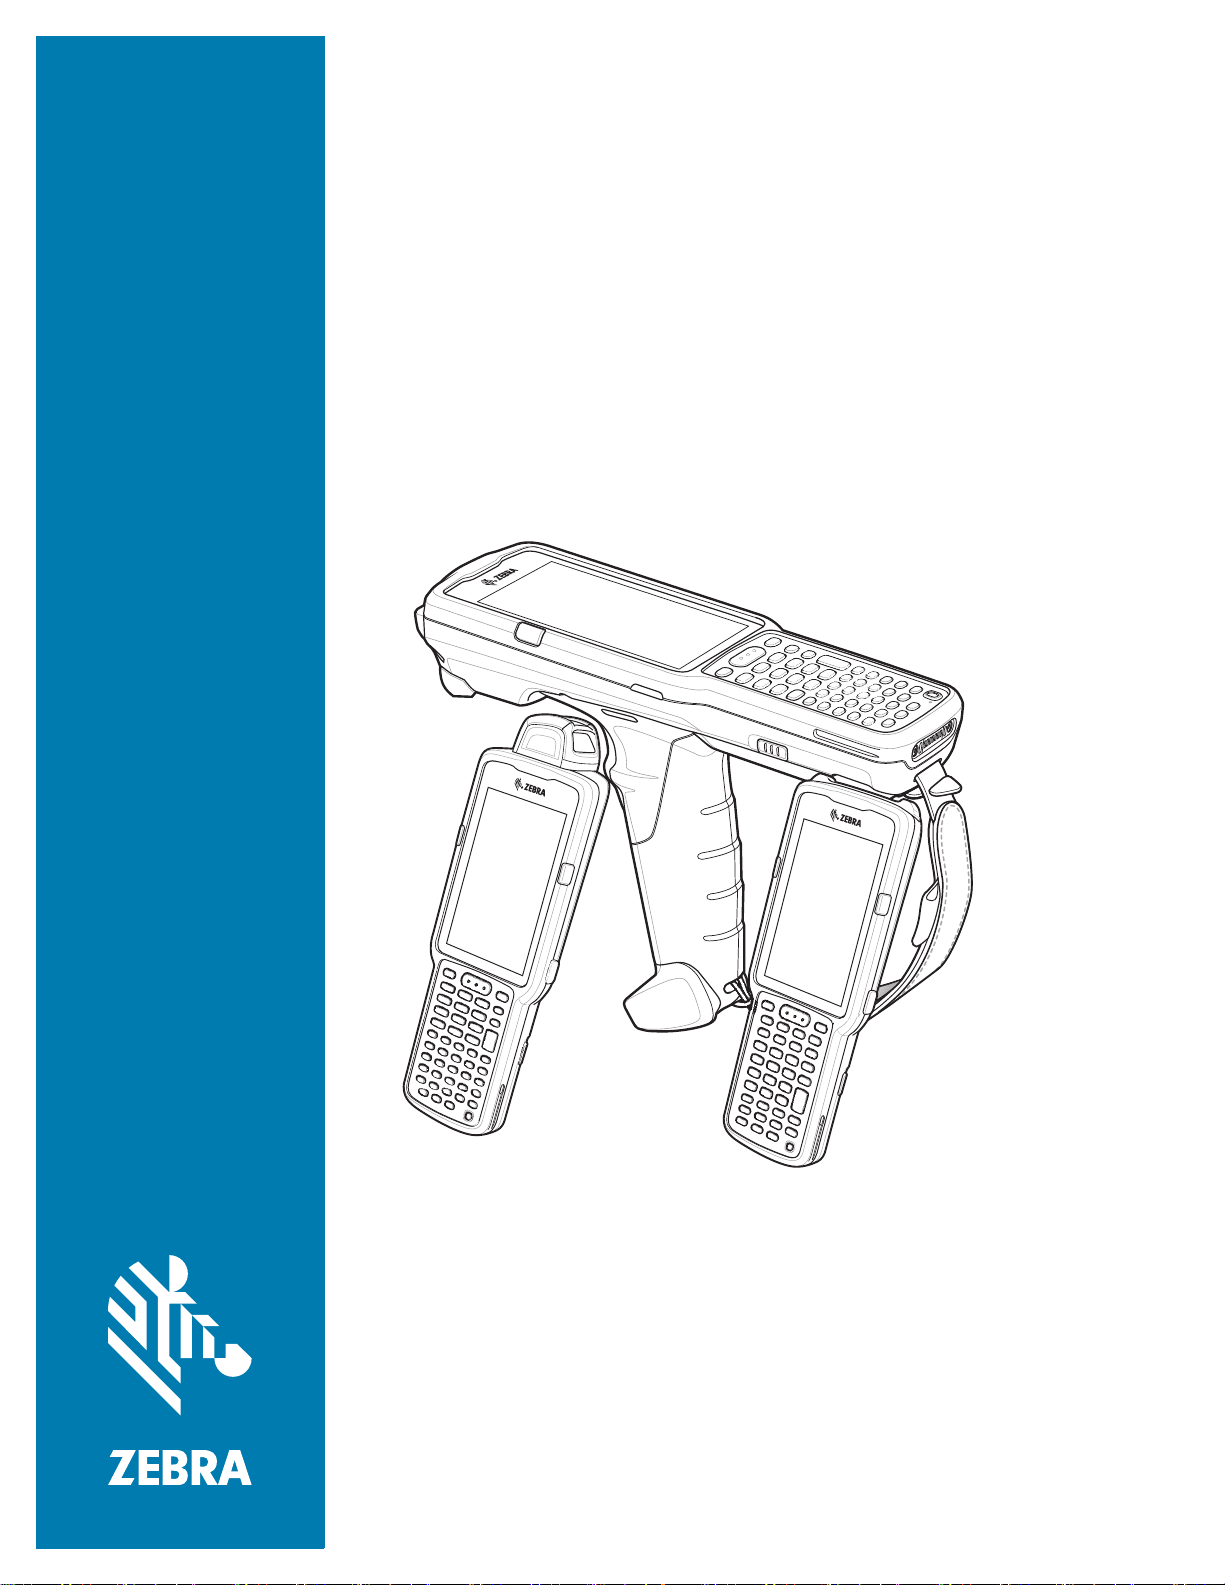
This guide provides information about using the MC33XX mobile computer and accessories.
NOTE: Screens and windows pictured in this guide are samples and can differ from actual screens.
Configurations
MC33XX used in this guide refers to all configurations, except where noted. MC33XX-G refers to the Trigger
configuration. MC33XX-R refers to the Rotate configuration. MC33XX-S refers to the Straight configuration.
MC33XX-S45 refers to the 45 degree angle Straight configuration.
This guide covers the following configurations:
Table 1 Configurations
Configuration Radios Display Memory
MC33XX–G
Standard
MC33XX–G
Premium
WLAN: IEEE
802.11a/b/g/n/ac/d
/h/i/k/r/w
WPAN: Bluetooth
V4.1, V2.1 + EDR
w/ Bluetooth Low
Energy (BLE)
WLAN: IEEE
802.11a/b/g/n/ac/d
/h/i/k/r/w
WPAN: Bluetooth
V4.1, V2.1 + EDR
w/ Bluetooth Low
Energy (BLE)
NFC
®
®
4.0” color 2 GB RAM /
16 GB Flash
4.0” color 4 GB RAM /
16 GB Flash
Data Capture
Options
SE965 1D,
SE4750-SR 2D
SE965 1D,
SE4750-SR 2D,
SE4850-ER 2D
Operating
System
Android-based
AOSP/GMS 7.1.2
Android-based
AOSP/GMS 7.1.2
12

Table 1 Configurations (Continued)
About This Guide
Configuration Radios Display Memory
MC33XX–G
Premium +
WLAN: IEEE
®
802.11a/b/g/n/ac/d
4.0” color 4 GB RAM /
32 GB Flash
/h/i/k/r/w
WPAN: Bluetooth
V4.1, V2.1 + EDR
w/ Bluetooth Low
Energy (BLE)
NFC
MC33XX–R
Standard
WLAN: IEEE
802.11a/b/g/n/ac/d
®
4.0” color 2 GB RAM /
16 GB Flash
/h/i/k/r/w
WPAN: Bluetooth
V4.1, V2.1 + EDR
w/ Bluetooth Low
Energy (BLE)
MC33XX–R
Premium
WLAN: IEEE
®
802.11a/b/g/n/ac/d
4.0” color 4 GB RAM /
16 GB Flash
/h/i/k/r/w
WPAN: Bluetooth
V4.1, V2.1 + EDR
w/ Bluetooth Low
Energy (BLE)
NFC
Data Capture
Options
SE965 1D,
SE4750-SR 2D,
Operating
System
Android-based
AOSP/GMS 7.1.2
SE4850-ER 2D
SE965 1D Android-based
AOSP/GMS 7.1.2
SE965 1D Android-based
AOSP/GMS 7.1.2
MC33XX–R
Premium +
MC33XX–S
Standard
WLAN: IEEE
®
802.11a/b/g/n/ac/d
/h/i/k/r/w
WPAN: Bluetooth
V4.1, V2.1 + EDR
w/ Bluetooth Low
Energy (BLE)
NFC
WLAN: IEEE
®
802.11a/b/g/n/ac/d
/h/i/k/r/w
WPAN: Bluetooth
V4.1, V2.1 + EDR
w/ Bluetooth Low
Energy (BLE)
4.0” color 4 GB RAM /
32 GB Flash
4.0” color 2 GB RAM /
16 GB Flash
SE965 1D Android-based
AOSP/GMS 7.1.2
SE965 1D,
SE4750-SR 2D,
Android-based
AOSP/GMS 7.1.2
SE4850-ER 2D
13

Table 1 Configurations (Continued)
About This Guide
Configuration Radios Display Memory
MC33XX–S
Premium
WLAN: IEEE
®
802.11a/b/g/n/ac/d
4.0” color 4 GB RAM /
16 GB Flash
/h/i/k/r/w
WPAN: Bluetooth
V4.1, V2.1 + EDR
w/ Bluetooth Low
Energy (BLE)
NFC
MC33XX–S
Premium +
WLAN: IEEE
802.11a/b/g/n/ac/d
®
4.0” color 4 GB RAM /
32 GB Flash
/h/i/k/r/w
WPAN: Bluetooth
V4.1, V2.1 + EDR
w/ Bluetooth Low
Energy (BLE)
NFC
MC33XX–S45
Standard
WLAN: IEEE
802.11a/b/g/n/ac/d
®
4.0” color 2 GB RAM /
16 GB Flash
/h/i/k/r/w
WPAN: Bluetooth
V4.1, V2.1 + EDR
w/ Bluetooth Low
Energy (BLE)
Data Capture
Options
SE965 1D,
SE4750-SR 2D,
Operating
System
Android-based
AOSP/GMS 7.1.2
SE4850-ER 2D
SE4750-SR 2D,
SE4850-ER 2D
Android-based
AOSP/GMS 7.1.2
SE4750-SR 2D Android-based
AOSP/GMS 7.1.2
MC33XX–S45
Premium
MC33XX–S45
Premium +
WLAN: IEEE
®
802.11a/b/g/n/ac/d
/h/i/k/r/w
WPAN: Bluetooth
V4.1, V2.1 + EDR
w/ Bluetooth Low
Energy (BLE)
NFC
WLAN: IEEE
®
802.11a/b/g/n/ac/d
/h/i/k/r/w
WPAN: Bluetooth
V4.1, V2.1 + EDR
w/ Bluetooth Low
Energy (BLE)
NFC
4.0” color 4 GB RAM /
16 GB Flash
4.0” color 4 GB RAM /
32 GB Flash
SE4750-SR 2D Android-based
AOSP/GMS 7.1.2
SE4750-SR 2D Android-based
AOSP/GMS 7.1.2
14

Software Versions
To determine the current software versions touch > About phone.
• Model – Displays the model number.
• Android version – Displays the operating system version.
• Kernel version – Displays the kernel version number.
• Build number – Displays the software build number.
To determine the device serial number touch > About phone > Status.
• Serial number - Displays the serial number.
Chapter Descriptions
Topics covered in this guide are as follows:
• Getting Started provides information on getting the MC33XX up and running for the first time.
• Using the MC33XX provides basic instructions for using the MC33XX with Android OS, including powering
on and resetting the MC33XX.
• Applications describes the applications installed on the device.
• Data Capture provides information for capturing barcode data using the internal scanner and optional scan
modules and Bluetooth scanner.
• Wireless provides information on the various wireless options.
• Accessories describes the available accessories and how to use them with the MC33XX.
• Maintenance and Troubleshooting includes instructions on cleaning and storing the MC33XX, and
provides troubleshooting solutions for potential problems during MC33XX operation.
• Technical Specifications provides the technical specifications for the MC33XX.
• MC33XX Keypads provides keypad descriptions and special character generation tables.
About This Guide
Notational Conventions
The following conventions are used in this document:
• Bold text is used to highlight the following:
• Dialog box, window and screen names
• Drop-down list and list box names
• Check box and radio button names
• Icons on a screen
• Key names on a keypad
• Button names on a screen.
15
• Bullets (•) indicate:
• Action items
• Lists of alternatives
• Lists of required steps that are not necessarily sequential.
• Sequential lists (e.g., those that describe step-by-step procedures) appear as numbered lists.
Icon Conventions
The documentation set is designed to give the reader more visual clues. The following graphic icons are used
throughout the documentation set. These icons and their associated meanings are described below.
NOTE: NOTE contains information more important than the surrounding text, such as exceptions or
preconditions. They also refer the reader elsewhere for additional information, remind the reader how to
complete an action (when it is not part of the current procedure, for instance), or tell the reader where
something is located on the screen. There is no warning level associated with a note.
CAUTION: The word CAUTION with the associated safety icon implies information that, if disregarded, may
About This Guide
result in minor or moderate injury, or serious product damage.
WARNING: The word WARNING with the associated safety icon implies information that, if disregarded,
Related Documents
• MC33XX Mobile Computer Quick Start Guide for Android 7.1.2 Nougat, p/n MN-003143-XX
• MC33XX Regulatory Guide, p/n MN-003144-XX
• MC33XX Mobile Computer Integrator Guide for Android 7.1.2 Nougat, p/n MN-003136-XX
For the latest version of this guide and all guides, go to: http://www.zebra.com/support
Service Information
If you have a problem with your equipment, contact Zebra Support Center for your region. Contact information is
available at: http://www.zebra.com/support
When contacting the Zebra Support Center, please have the following information available:
• Serial number of the unit (found on manufacturing label)
• Model number or product name (found on manufacturing label)
• Software type and version number
could result in death or serious injury, or serious product damage.
.
.
16

Figure 1 Manufacturing Label Location
Manufacturing Label
MC33XX-G
MC33XX-R/S
About This Guide
Zebra responds to calls by email or telephone within the time limits set forth in support agreements.
If your problem cannot be solved by the Zebra Support Center, you may need to return your equipment for
servicing and will be given specific directions. Zebra is not responsible for any damages incurred during shipment if
the approved shipping container is not used. Shipping the units improperly can possibly void the warranty.
Remove the microSD card from the device before shipping for service.
If you purchased your product from a Zebra business partner, contact that business partner for support.
Provide Documentation Feedback
If you have comments, questions, or suggestions about this guide, send an email to EVM-Techdocs@zebra.com.
17
Getting Started
1
2
9
8
7
5
3
6
4
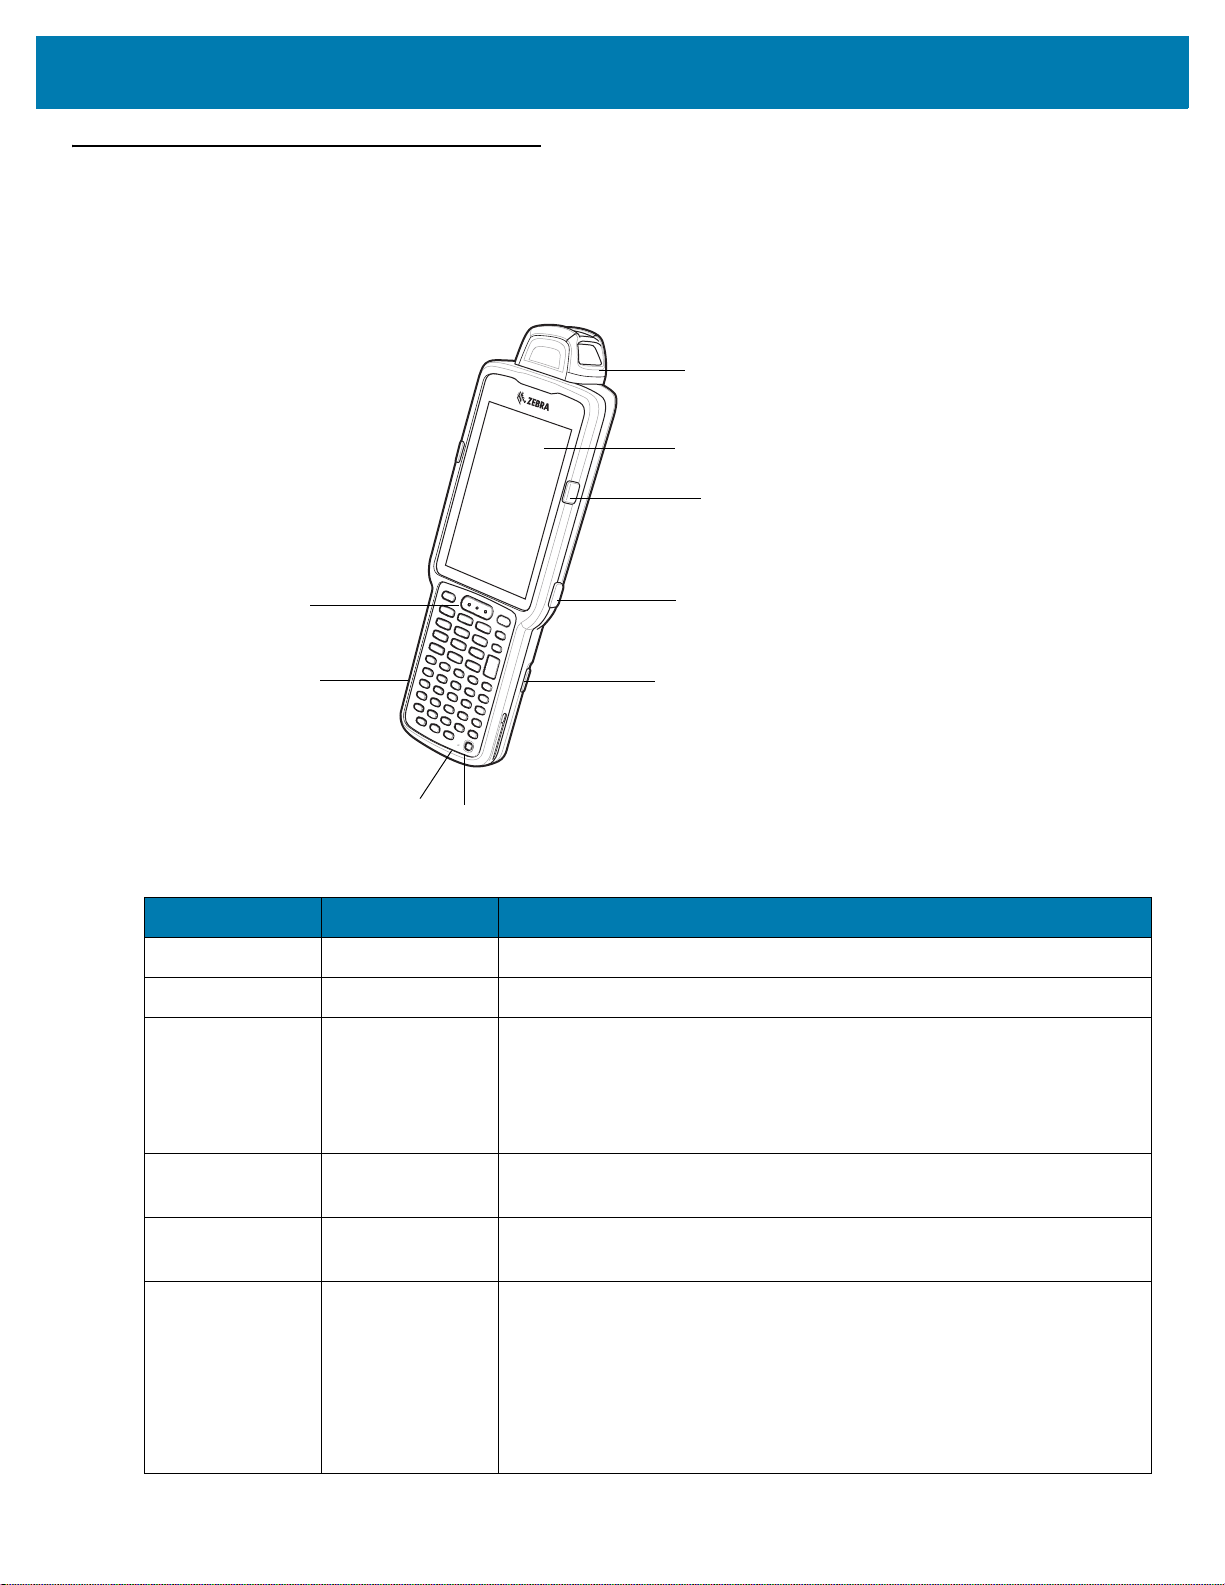
Introduction
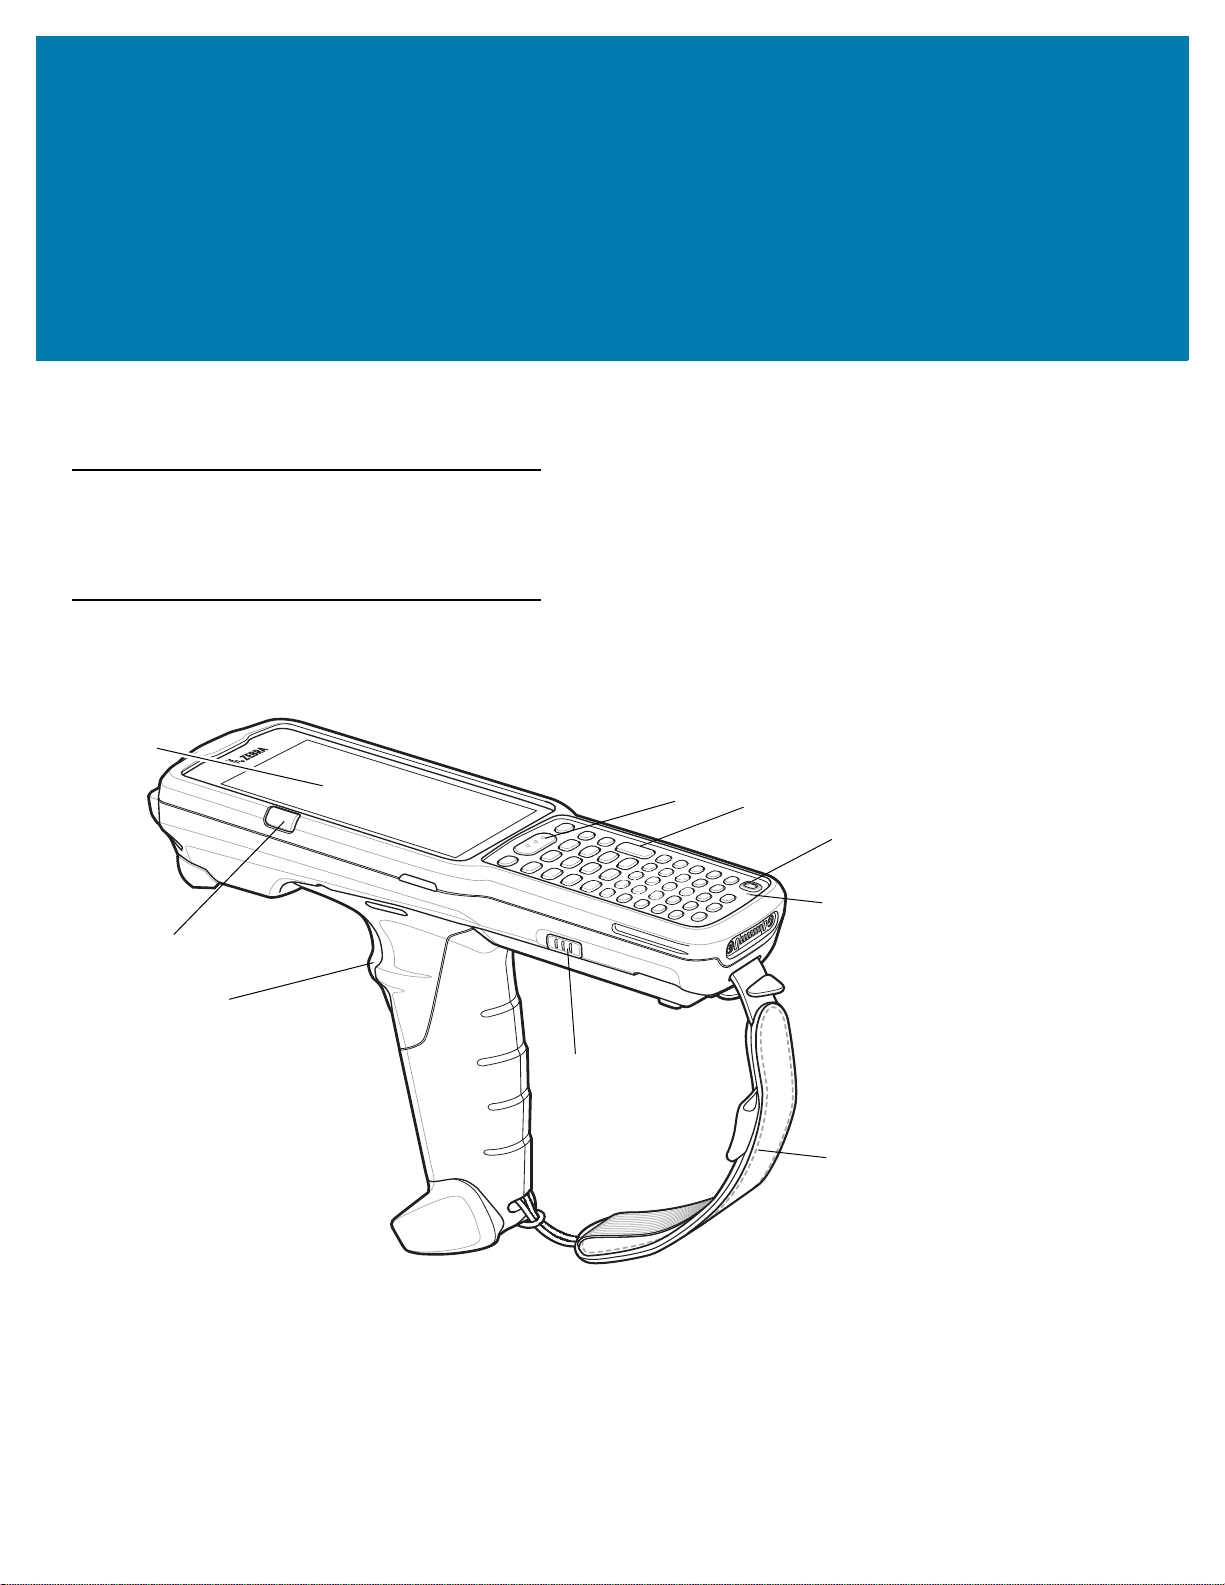
This chapter provides the features of the MC33XX and explains how to set it up for the first time.
MC33XX-G Features
Figure 2 MC33XX-G Front View
18

Getting Started
Table 2 MC33XX-G Features - Front View
Number Item Function
1 Display Displays all information needed to operate the MC33XX.
2 Charge
/Application
Notification LED
or Scan/Decode
Status
3 Trigger Initiates data capture when a scan application is enabled.
4 Battery Release
Latch
5 Hand Strap Use for securely holding the device.
6 Microphone Use for communications in Handset mode.
7 Power Button Press and hold to turn on the MC33XX. Press to turn on or off the
8 Keypad Use to enter data and navigate on screen functions.
9 Scan Button Initiates data capture when a scan application is enabled.
Indicates the battery charge state while charging, an application
notification was received, or the scan/decode status.
Release the battery from the device.
screen. Press and hold to select one of these options:
Power off - Turn off the MC33XX.
Reboot - Reboot the MC33XX when software stops responding.
Airplane mode - Disable all wireless connections.
Silent mode - All notifications are disabled except for alarms.
19

Figure 3 MC33XX-G Back View
11
10
12
13
14
Getting Started
Table 3 MC33XX-G Features - Back View
Number Item Function
10 Battery Provides power for operating the device.
11 Battery Release
Release the battery from the device.
Latch
12 Speaker Provides audio output for video and music playback.
13 Scanner Exit
Provides data capture using the scanner.
Window
14 NFC Antenna Provides communication with other NFC-enabled devices.
20
MC33XX-R Features
1
2
3
4
5
6
7
8
9
Figure 4 MC33XX-R Front View
Getting Started
Table 4 MC33XX-R Features - Front View
Number Item Function
1 Rotating Turret Rotates for easy scanning positions.
2 Display Displays all information needed to operate the MC33XX-R.
3 Charge
/Application
Notification LED
or Scan/Decode
Status
4 Side Key Scan
Button
5 Battery Release
Latch
6 Power Button Press and hold to turn on the MC33XX-R. Press to turn on or off the
Indicates the battery charge state while charging, an application
notification was received, or the scan/decode status.
Initiates data capture when a scan application is enabled.
Release the battery from the device.
screen. Press and hold to select one of these options:
Power off - Turn off the MC33XX-R.
Reboot - Reboot the MC33XX-R when software stops responding.
Airplane mode - Disable all wireless connections.
Silent mode - All notifications are disabled except for alarms.
21

Getting Started
10
11
12
13
14
15
16
17
18
Table 4 MC33XX-R Features - Front View (Continued)
Number Item Function
7 Microphone Use for communications in Handset mode.
8 Keypad Use to enter data and navigate on screen functions.
9 Scan Button Initiates data capture when a scan application is enabled.
Figure 5 MC33XX-R Back View
Table 5 MC33XX-R Features - Back View
Number Item Function
10 Battery Provides power for operating the device.
11 Battery Release
Release the battery from the device.
Latch
12 Side Key Scan
Button
Initiates data capture when a scan application is enabled.
13 Speaker Provides audio output for video and music playback.
14 Audio Jack Connects to headsets (2.5 mm jack).
15 Scanner Exit
Provides data capture using the scanner.
Window
22
Getting Started
Position Stop
Position Stop
Position Stop
Table 5 MC33XX-R Features - Back View (Continued)
Number Item Function
16 NFC Antenna Provides communication with other NFC-enabled devices.
17 Camera/Flash Provides illumination for the camera.
18 Hand Strap Use for securely holding the device.
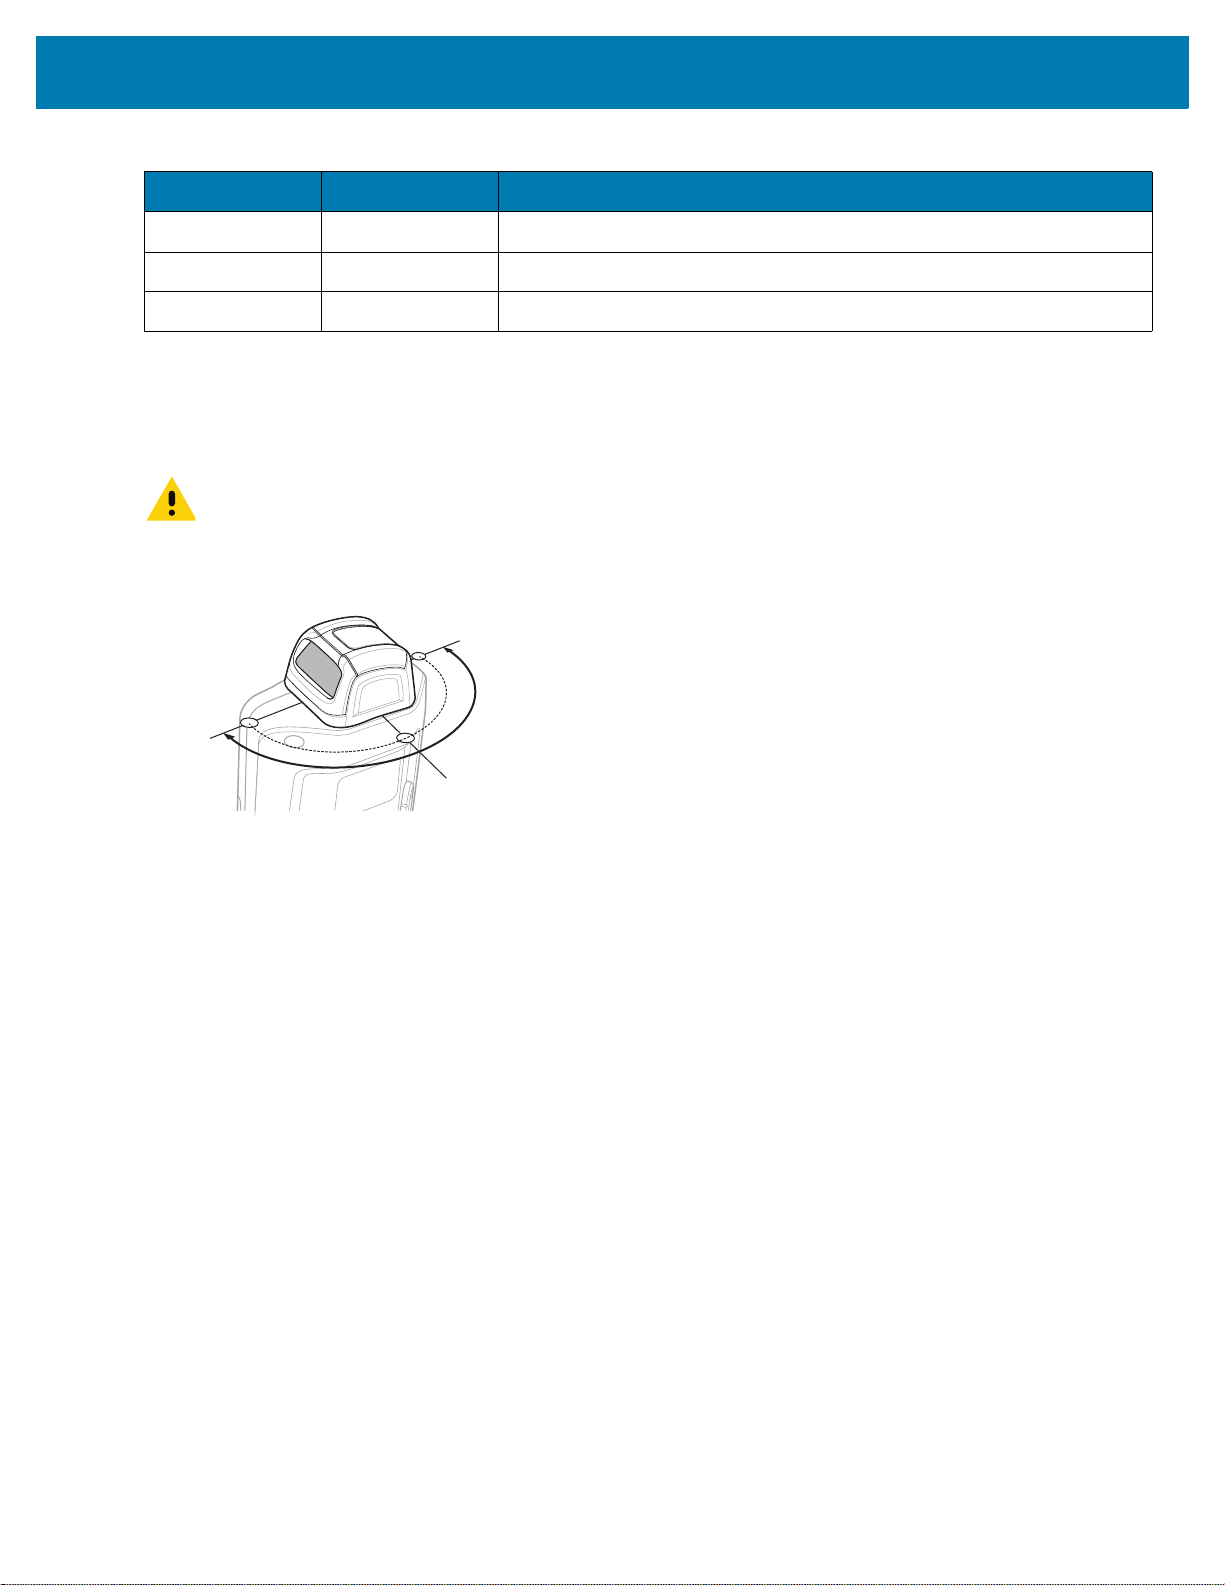
Rotating Scan Turret
The MC33XX-R features a Rotating Turret with three position stops. This feature offers greater scanning flexibility.
CAUTION Do not try to rotate the turret past the side position stops. Damage to device may occur.
Figure 6 MC33XX-R Rotating Turret
23
MC33XX-S Features
1
2
3
4
5
6
7
8
Figure 7 MC33XX-S Front View
Getting Started
Table 6 MC33XX-S Features - Front View
Number Item Function
1 Display Displays all information needed to operate the MC33XX-S.
2 Charge
/Application
Notification LED
or Scan/Decode
Status
3 Side Key Scan
Button
4 Battery Release
Latch
5 Power Button Press and hold to turn on the MC33XX-S. Press to turn on or off the
6 Microphone Use for communications in Handset mode.
Indicates the battery charge state while charging, an application
notification was received, or the scan/decode status.
Initiates data capture when a scan application is enabled.
Release the battery from the device.
screen. Press and hold to select one of these options:
Power off - Turn off the MC33XX-S.
Reboot - Reboot the MC33XX-S when software stops responding.
Airplane mode - Disable all wireless connections.
Silent mode - All notifications are disabled except for alarms.
24

Getting Started
9
10
11
12
13
14
15
16
17
Table 6 MC33XX-S Features - Front View (Continued)
Number Item Function
7 Keypad Use to enter data and navigate on screen functions.
8 Scan Button Initiates data capture when a scan application is enabled.
Figure 8 MC33XX-S Back View
Number Item Function
9 Battery Provides power for operating the device.
Table 7 MC33XX-S Features - Back View
10 Battery Release
Latch
11 Side Key Scan
Release the battery from the device.
Initiates data capture when a scan application is enabled.
Button
12 Speaker Provides audio output for video and music playback.
13 Audio Jack Connects to headsets (2.5 mm jack).
14 Scanner Exit
Window
Provides data capture using the scanner.
15 NFC Antenna Provides communication with other NFC-enabled devices.
25
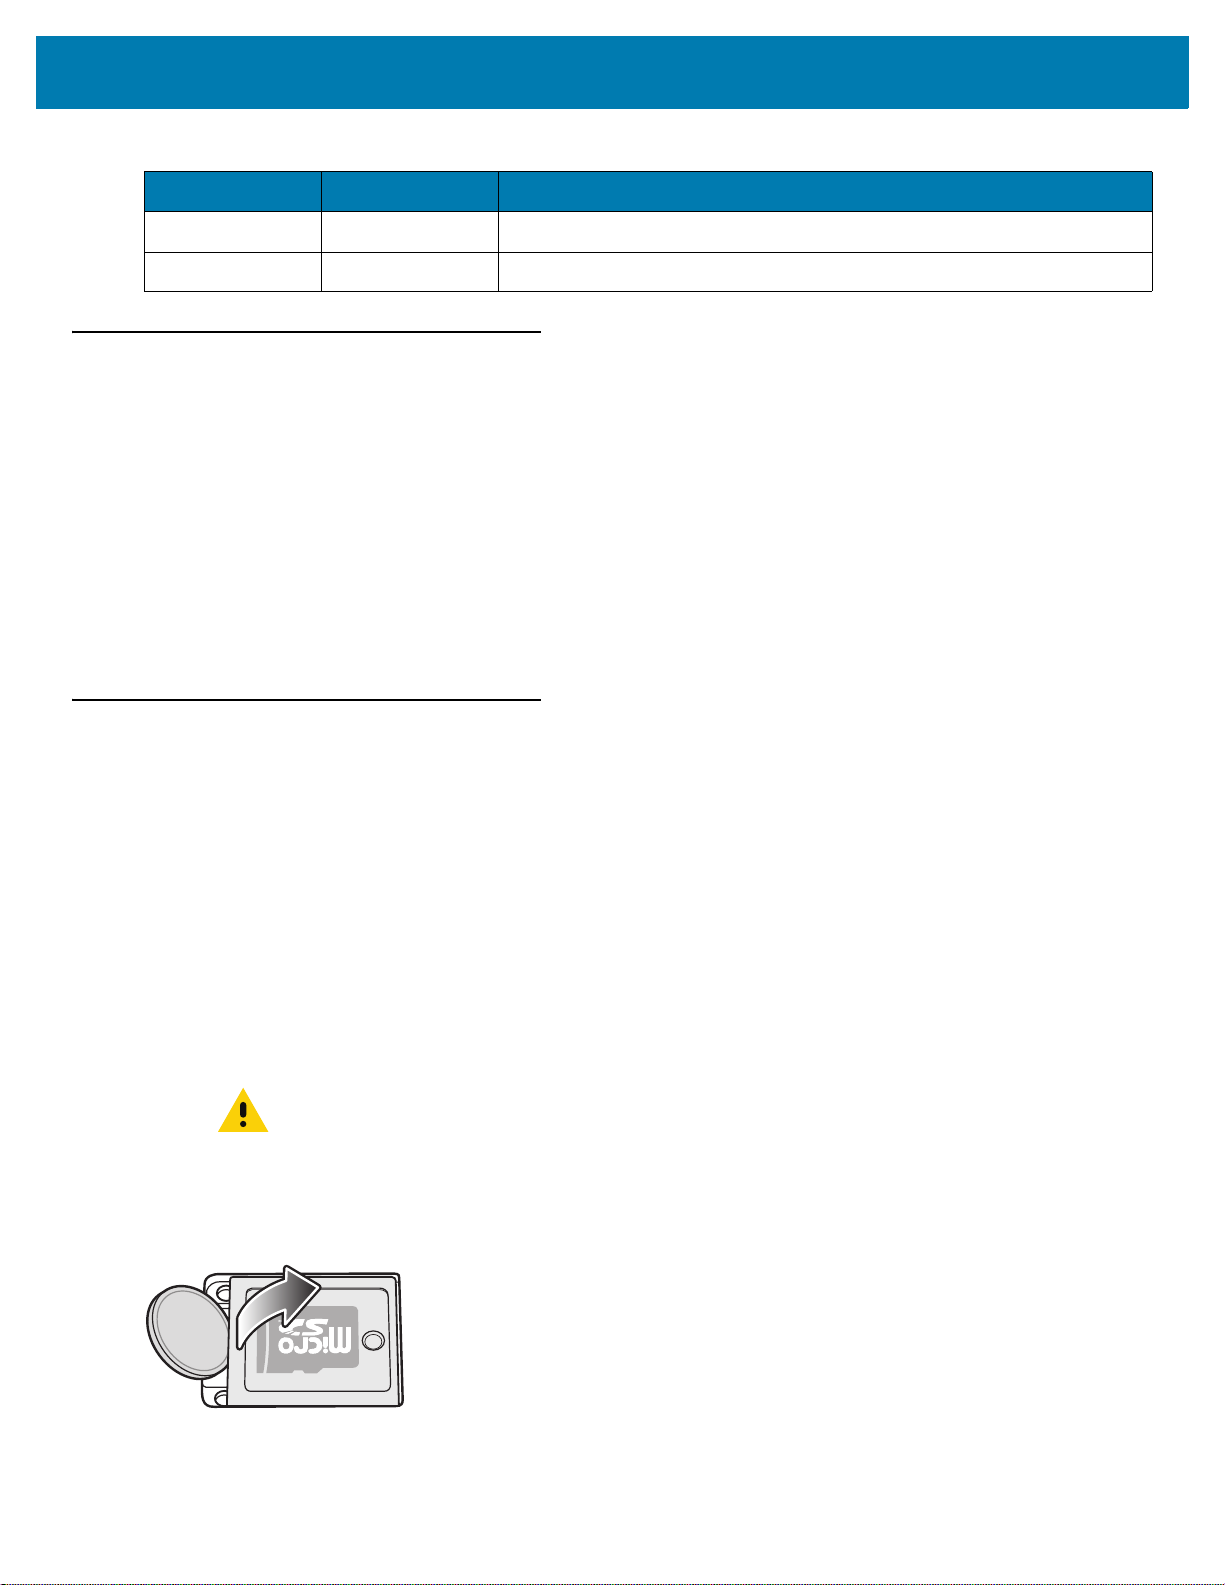
Table 7 MC33XX-S Features - Back View (Continued)
Number Item Function
16 Camera/Flash Provides illumination for the camera.
17 Hand Strap Use for securely holding the device.
Unpacking
Carefully remove all protective material from the MC33XX and save the shipping container for later storage and
shipping.
Verify the following items are in the box:
• MC33XX
• Lithium-ion battery
• Regulatory Guide.
Inspect the equipment for damage. If any equipment is missing or damaged, contact the Zebra Support Center
immediately. See Service Information on page 16 for contact information.
Getting Started
Setup
To start using the MC33XX for the first time:
• Install a microSD card (optional)
• Install the battery
• Charge the MC33XX
• Power on the MC33XX.
Installing a microSD Card
The microSD card slot provides secondary non-volatile storage. The slot is located under the battery pack. Refer to the
documentation provided with the card for more information, and follow the manufacturer’s recommendations for use.
CAUTION: Follow proper electrostatic discharge (ESD) precautions to avoid damaging the microSD card.
1. Using a coin or finger, remove the microSD card cover.
Figure 9 Remove microSD Card Cover
Proper ESD precautions include, but are not limited to, working on an ESD mat and ensuring that
the operator is properly grounded.
26

Getting Started
2. Slide the microSD card holder to the Open position.
Figure 10 Unlock microSD Card Holder
3. Lift the microSD card holder.
Figure 11 Lift microSD Card Holder
4. Place the microSD card into the contact area with the contacts facing down.
Figure 12 Install microSD Card
5. Close the microSD card holder and slide the microSD card holder to the Lock position.
Figure 13 Lock microSD Card Holder
6. Replace the microSD card cover and ensure that it is installed properly.
27

Figure 14 Replace Cover
Getting Started
28
Getting Started
Installing the MC33XX-G Battery
The MC33XX-G is compatible with the following batteries:
• MC33XX 5200 mAh PowerPrecision+ extended battery.
• MC32N0 5200 mAh PowerPrecision extended battery.
To install the battery:
1. Loosen the hand strap, if needed.
2. Align the battery into the battery compartment.
Figure 15 Inserting the Battery
3. Rotate the bottom of the battery into the battery compartment.
4. Press battery down firmly. Ensure that both battery release buttons on the sides of the MC33XX-G return to the
home position.
29

Getting Started
Figure 16 Press Battery Down
5. Tighten the hand strap, if needed.
6. Press the Power button to turn on the device.
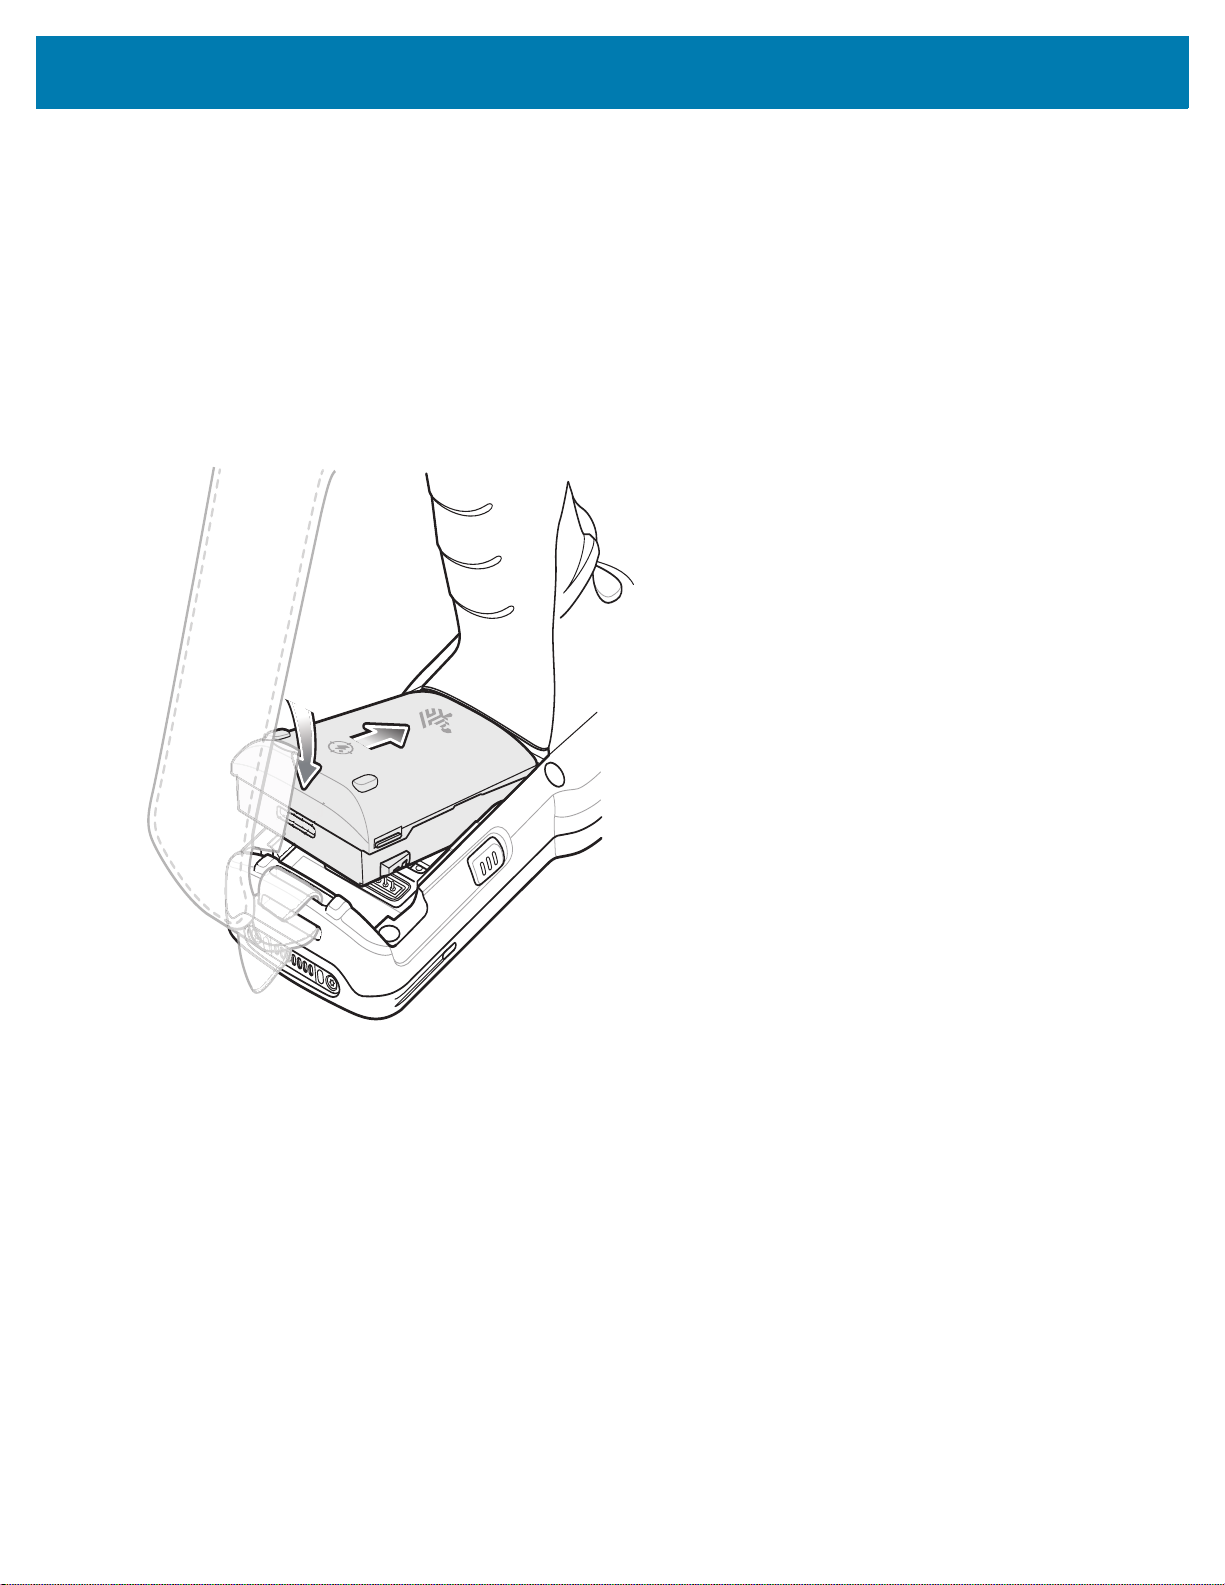
Installing the MC33XX-R/S Battery
The MC33XX-R/S is compatible with the following batteries:
• MC33XX 2740 mAh PowerPrecision+ standard battery.
• MC33XX 5200 mAh PowerPrecision+ extended battery.
• MC32N0 2740 mAh PowerPrecision standard battery.
• MC32N0 5200 mAh PowerPrecision extended battery.
To install the battery:
1. Loosen the hand strap, if needed.
2. Align the top of the battery into the battery compartment.
Figure 17 Inserting the Battery
30
 Loading...