

Quick Start Guide
www.zebra.com/imz-info
iMZ™Series
Introduction
iMZ Series Overview
Introduction
Getting Started
Using the
Printer
Thank you for choosing one of our Zebra
iMZ™Series Mobile Printers. These rugged
printers will become productive and efficient additions to
your workplace thanks to their innovative design. Because
they are made by Zebra Technologies you can be assured
of world-class support for all of your bar code printers, software, and supplies.
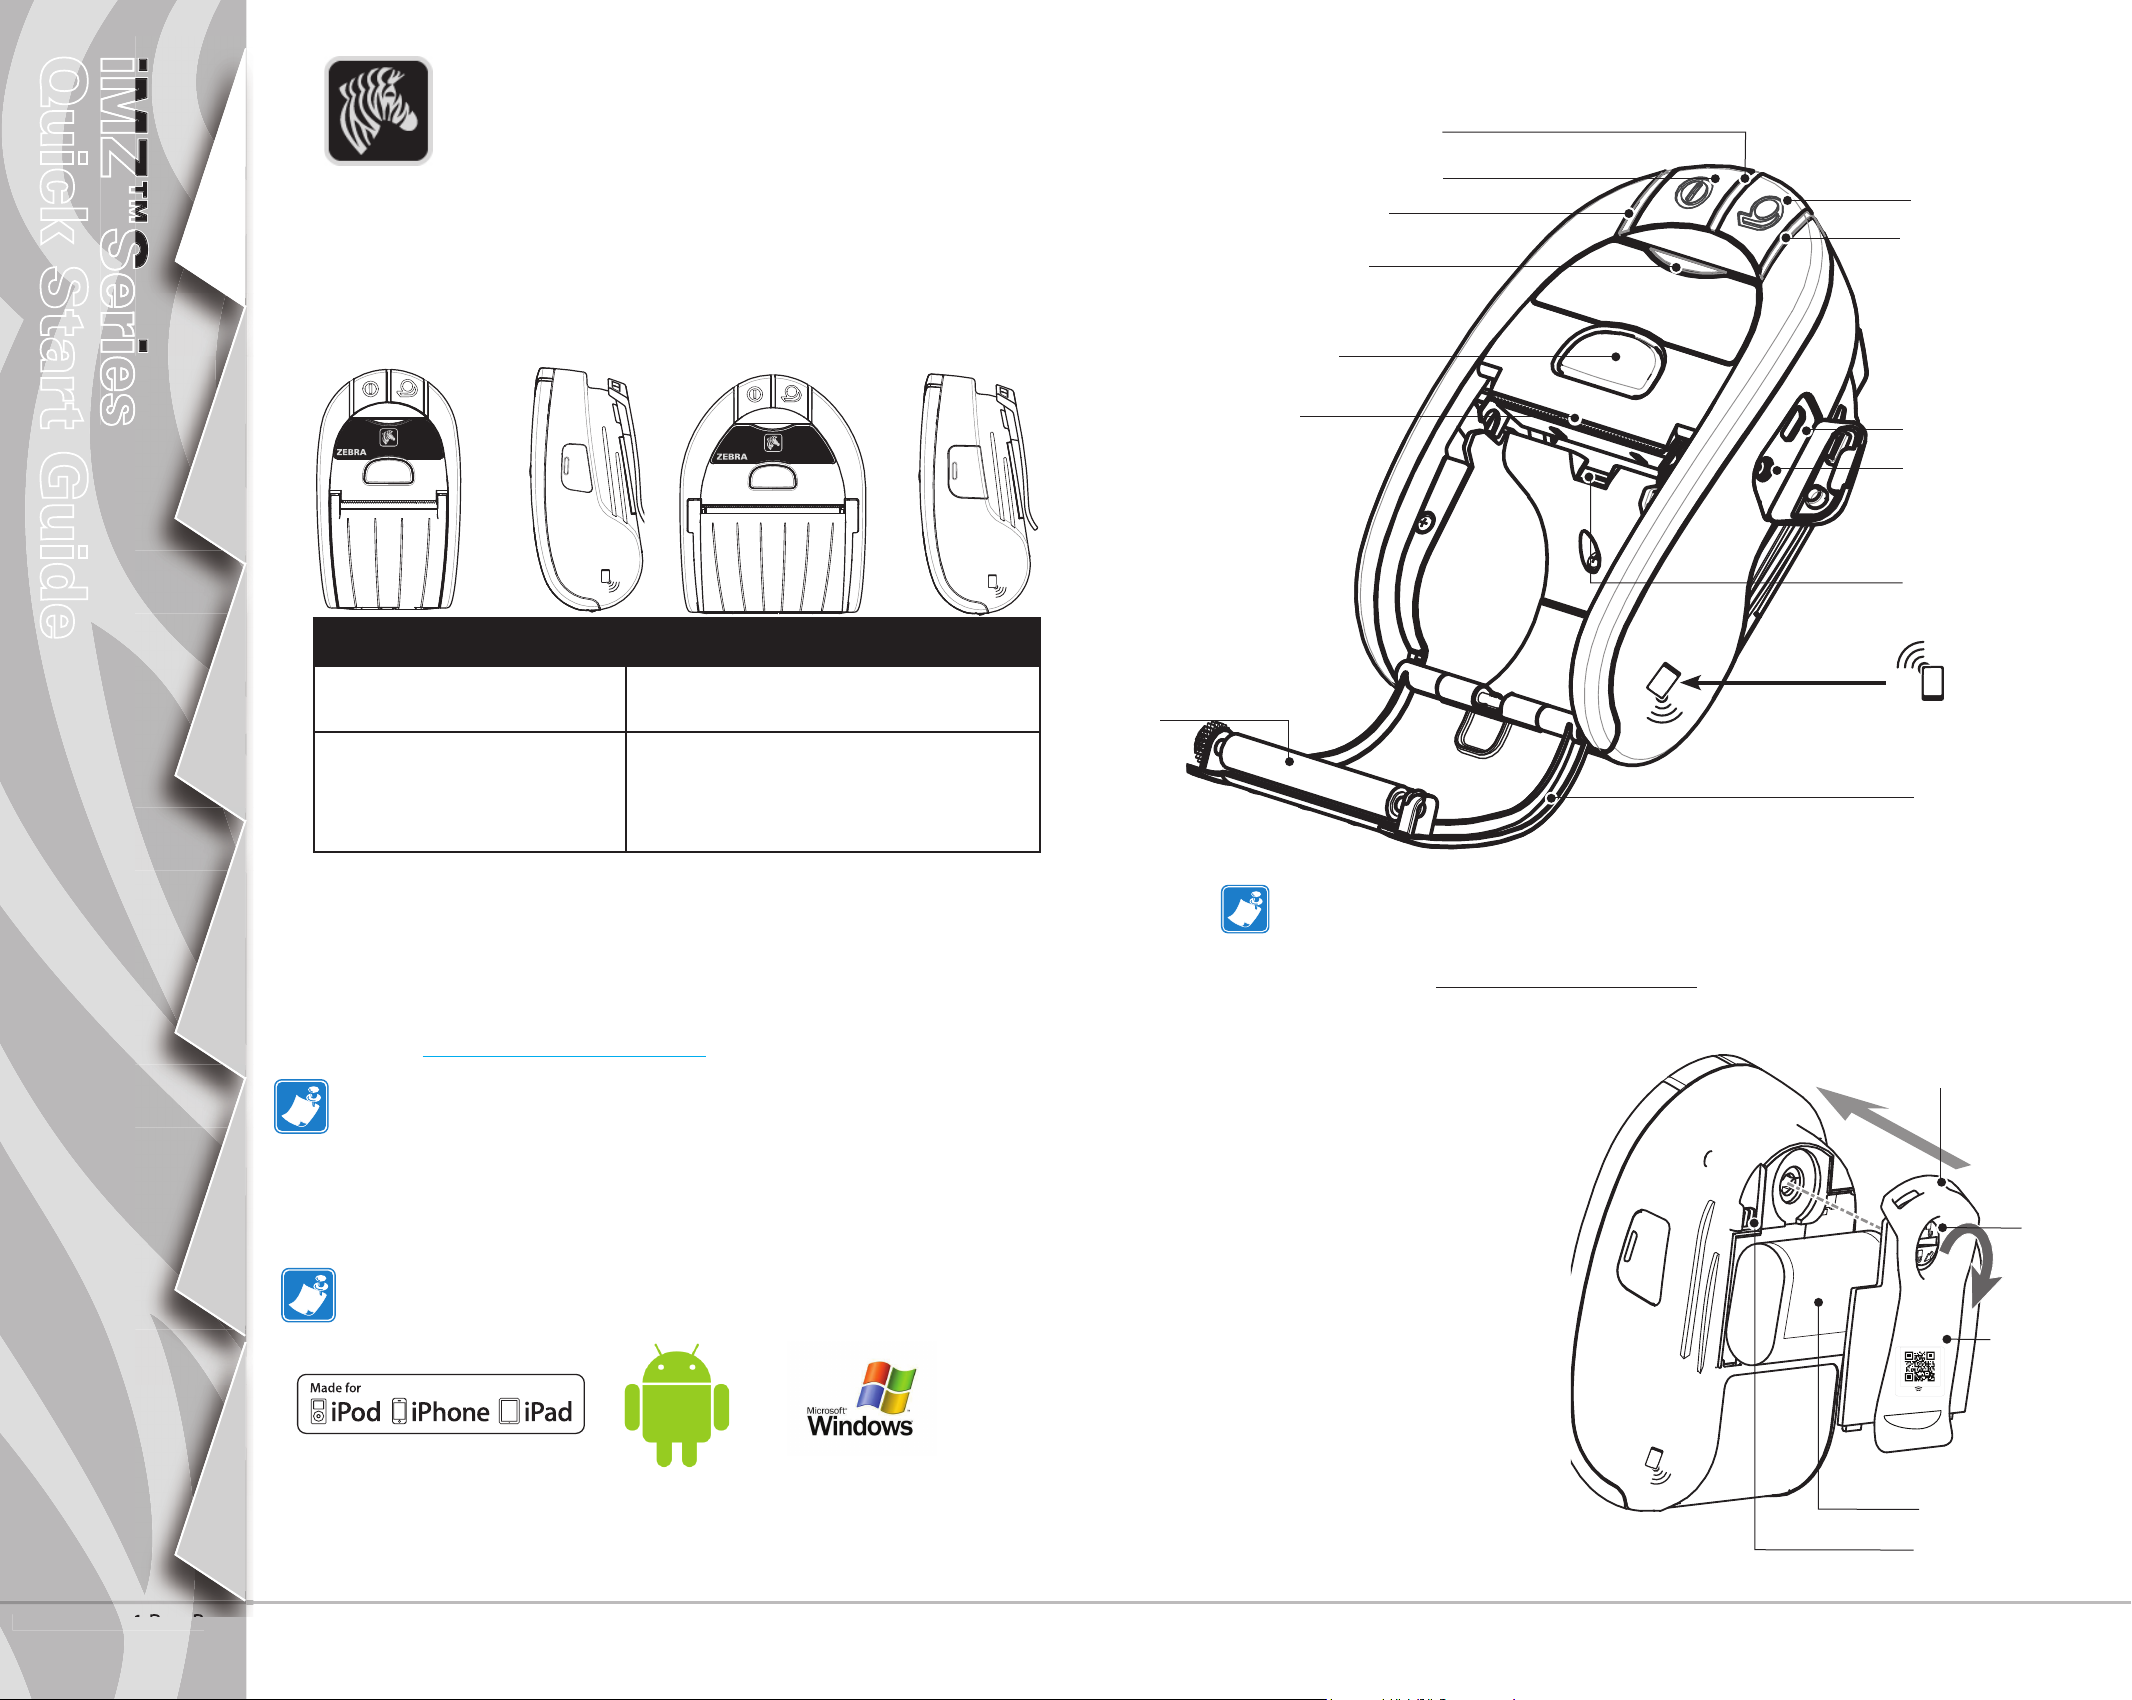
iMZ220
iMZ220 iMZ320
Media width:
2.0 in. (50.8 mm)
L: 5.34 in. [135,6 mm]
W: 3.18 in. [80,7 mm]
H:2.26 in. [57,4 mm]*
*w/out belt clip
Media width:
3.0 in. (76.2 mm
L: 5.34 in. [135,6 mm]
W: 4.11 in.[104,4 mm]
H: 2.26 in. [57,4 mm]*
*w/out belt clip
iMZ320
(iMZ220 Illustrated)
8
7
13
12
11
10
9
1
2
3
4
5
http:\\www.zebra.com/nfc
6
Troubleshooting
Accessories
Contact Us
This document provides an easy reference for operating and
maintaining the iMZ Series of Mobile Printers.
Complete and current documentation for each model printer
is provided by the iMZ Series User Guide available on the
Internet at:
Always refer to the Important Safety Information data sheet
shipped with each printer and the Technical Bulletin shipped
with each battery pack. These documents detail procedures
to ensure maximum reliability and safety while using this
printer.
Works with:
www.zebra.com/manuals.
Note: Tapping the Zebra Print Touch
Communication (NFC) enabled smartphone will provide instant access to
printer-speci c information. For more information about NFC and Zebra
products, go to http://www.zebra.com/nfc. Bluetooth pairing applications
via NFC is also possible. Please see Zebra Multi-platform SDK for more
information.
1. Feed Switch
2. Media Status Light
3. USB Port
4. Battery Charging Receptacle
5. Media/Black Bar Sensor
6. Media Cover
7. Platen
8. Printhead
9. Latch Release Button
10. Communications Status Indicator
11. Charge Status Indicator
12. Power Switch
13. Power Indicator
14. Belt Clip
15. Battery Door Latch
16. Battery Compartment Cover
17. Battery Pack
18. External Charge Contacts
TM
icon with a Near Field
14
15
16
17
18
P1057173-001 Rev. B
© ZIH Corp 2013
1
Quick Start Guide
iMZ™iMZ™
Series
Series
Series
Quick Start Guide
Quick Start GuideQuick Start Guide
www.zebra.com/imz-info
www.zebra.com/imz-info
www.zebra.com/imz-info
iMZ™ Series
Introduction
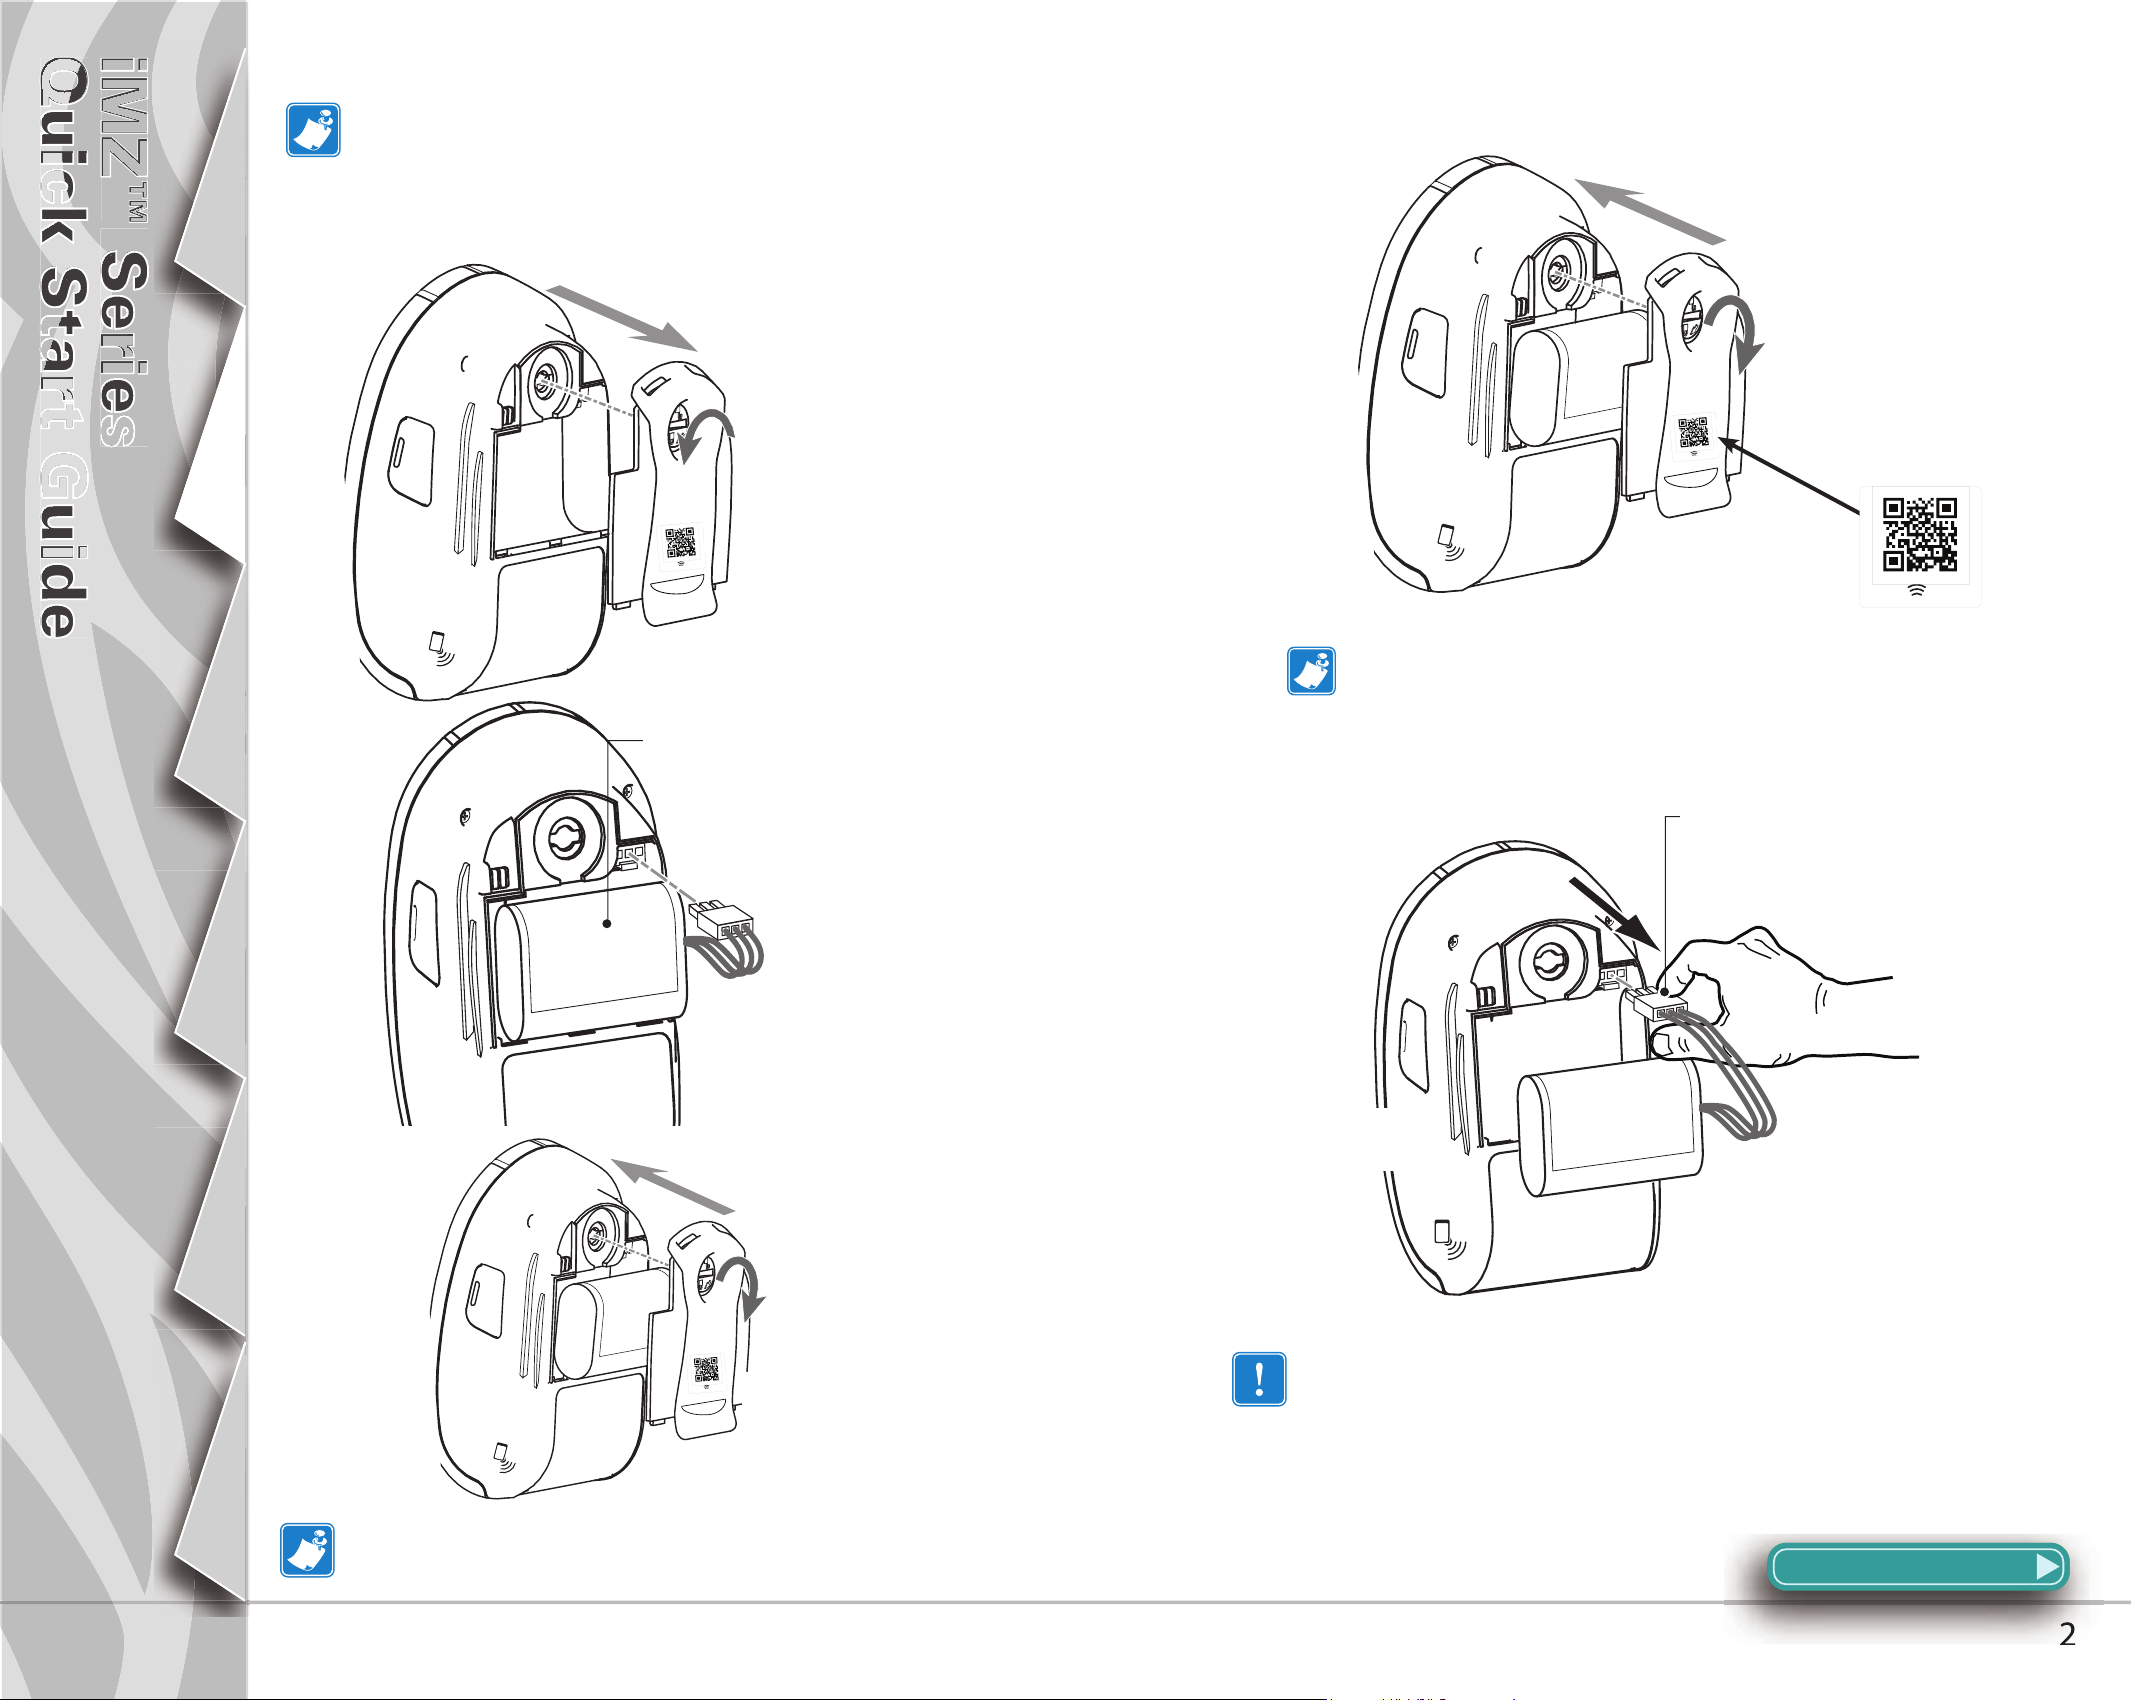
Installing the Battery
Batteries are shipped uncharged. Remove any
protective packaging from a new battery pack, install it
in the printer and charge completely prior to initial use.
1. Use a coin to
rotate the Battery
Compartment lock 1/4
turn as shown.
Removing the Battery
1. Use a coin to
rotate the Battery
Compartment lock 1/4
turn as shown.
2. Remove the Battery
Compartment Cover
Getting Started
Using the
Printer
Troubleshooting
2. Remove the Battery
Compartment Cover
www.zebra.com/imz-info
Note: Scanning the QR code with a smartphone will provide
printer-speci c information at www.zebra.com/imz-info.
Battery Pack
Note location of label
Battery Pack Connector
Squeeze lock to release.
3. Plug the Battery
Pack connector into
the Printer.
Accessories
Contact Us
4. Re-install the Battery Compartment Cover and rotate
the lock back 1/4 turn to lock it
in place .
Ensure battery leads are not pinched prior to replacing
battery cover.
Allow old battery pack to
drop out of the printer
Always release the locking barb before unplugging the
battery connector. Do not attempt to remove the connector
by force, or by using pliers, etc. as this could cause damage
to the printer’s CPU assembly.
Section Continues
2
Quick Start Guide
iMZ™iMZ™
Series
Series
Series
Quick Start Guide
Quick Start GuideQuick Start Guide
iMZ™ Series
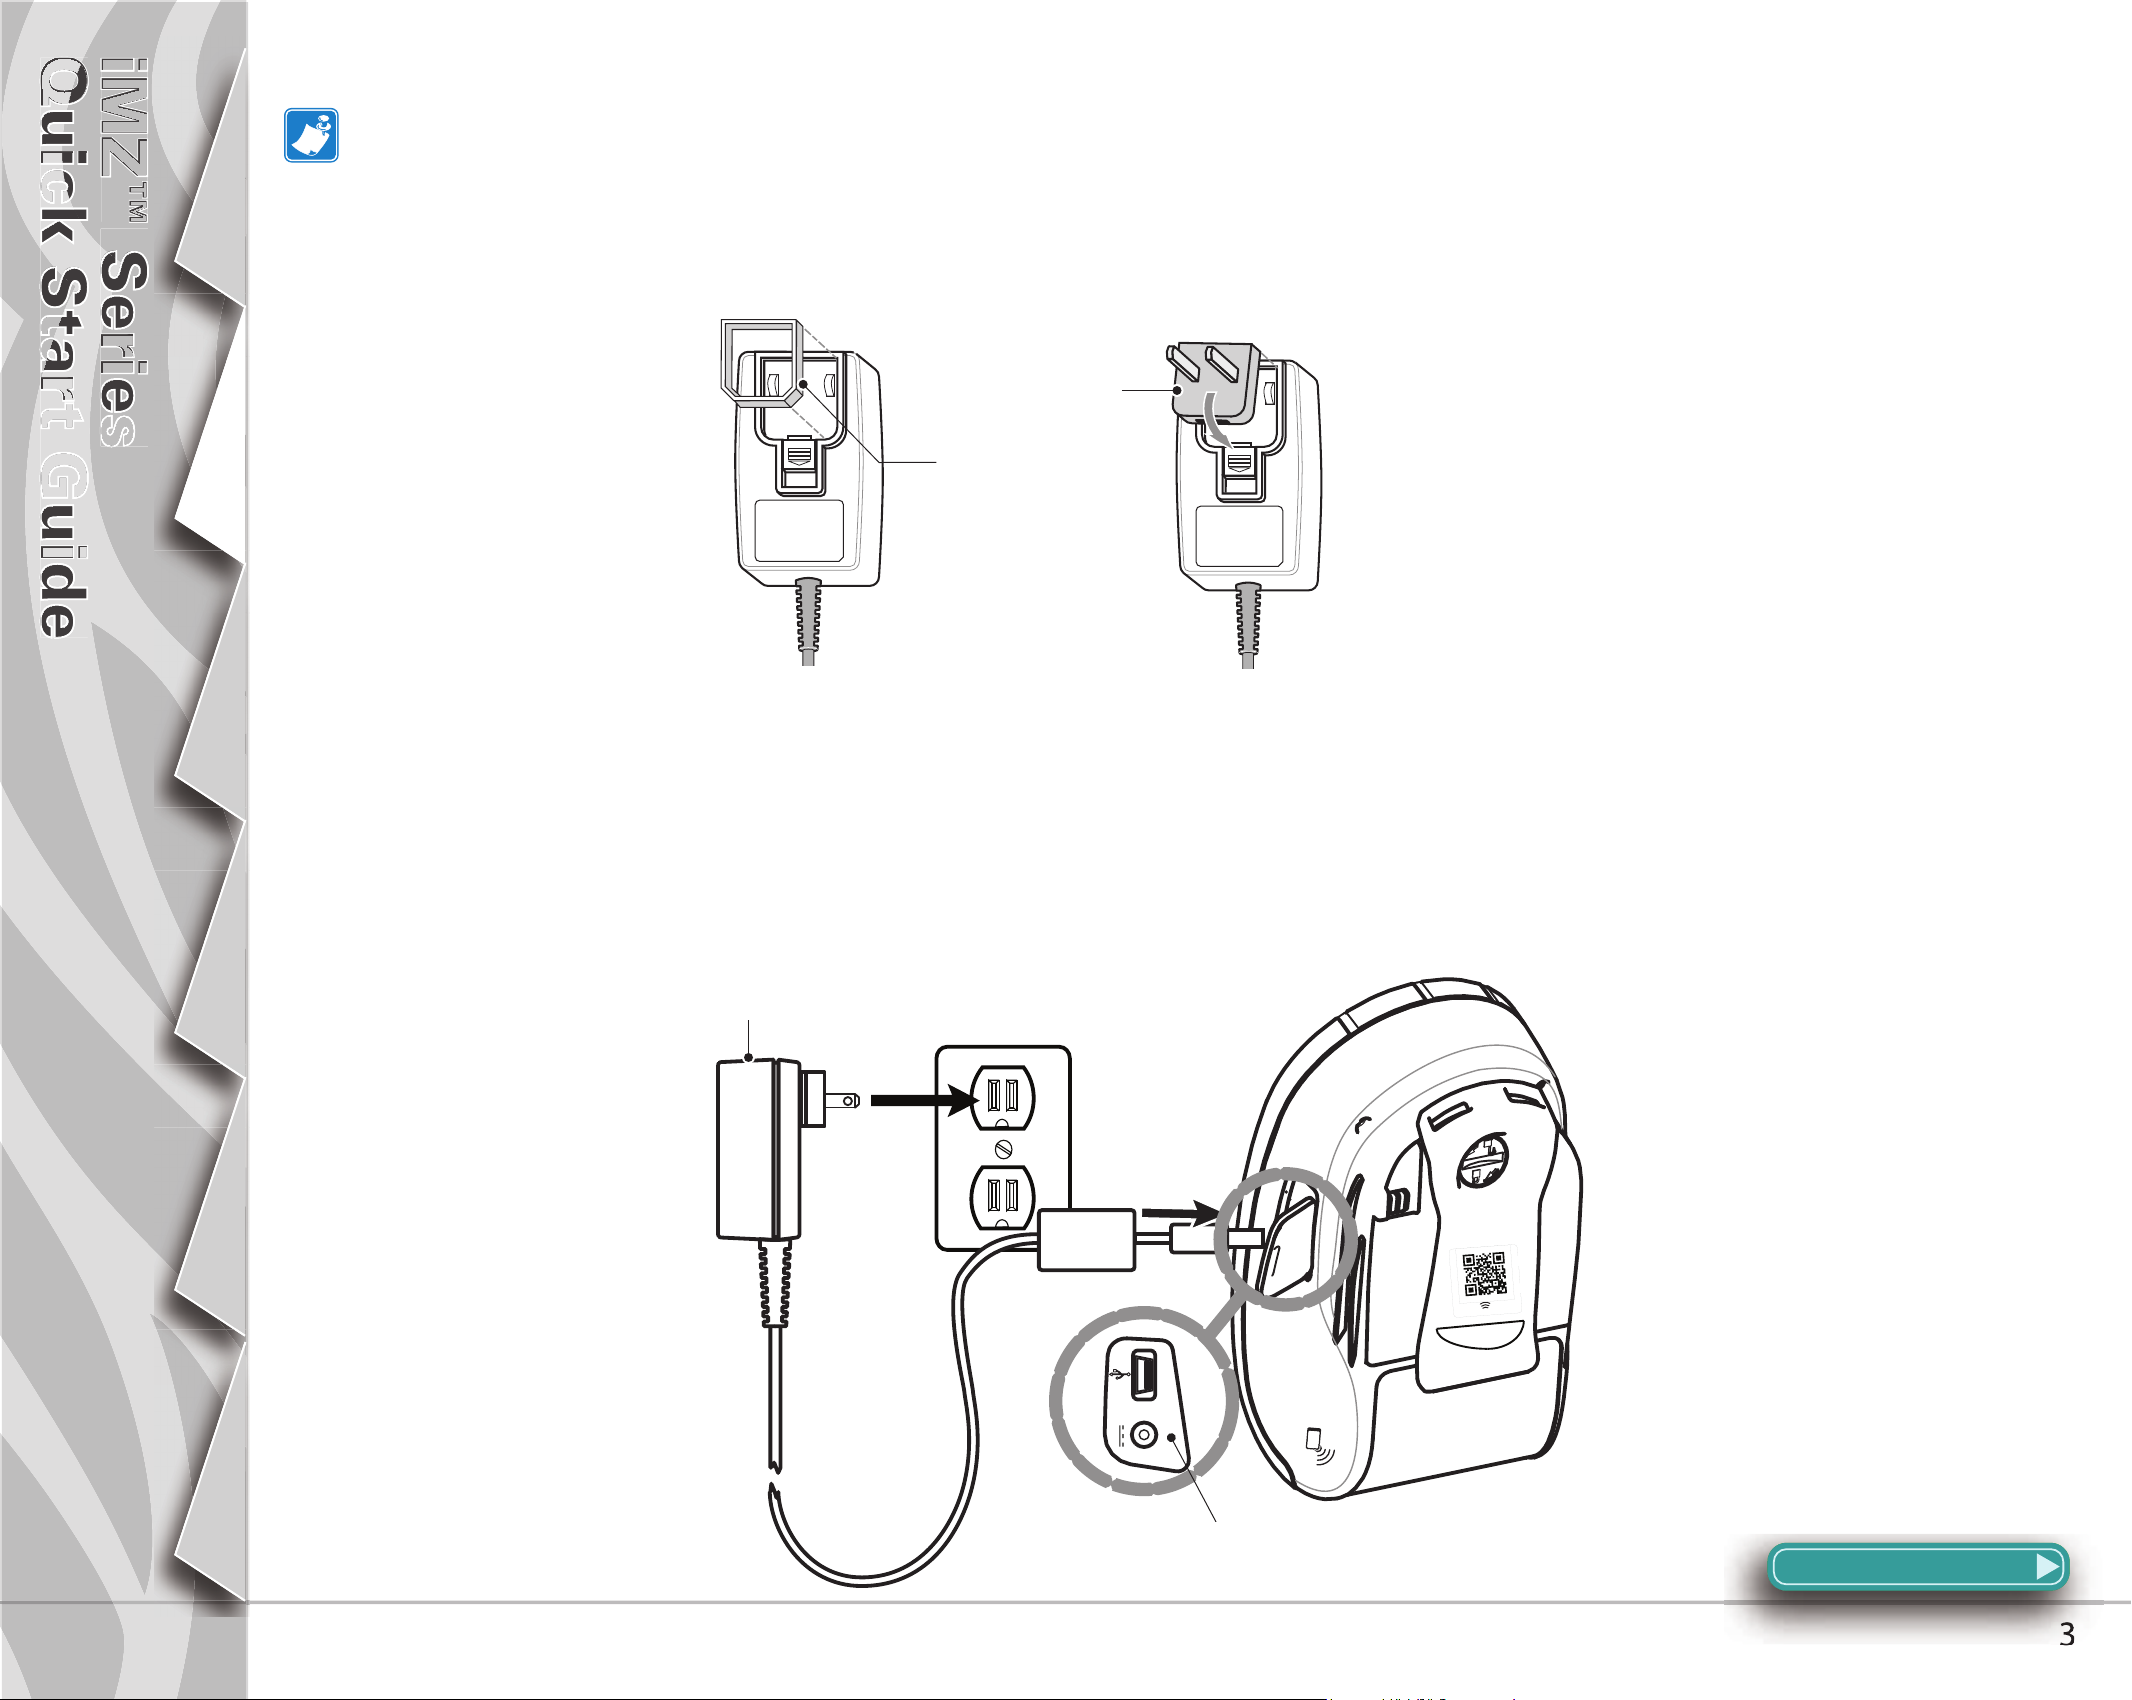
Charging the Battery
The printer may be used while charging the battery. However, prolonged use of the printer while charging will greatly increase charge
times.
Introduction
Getting Started
Using the
Printer
Preparing the Charger Power Supply
Mains Adapter
Shipping Ring
Remove and discard
Remove the power supply from its box. Remove and discard the shipping ring
from the mains receptacle cavity.
Verify that the mains adapter shipped with your Printer is the correct one for
your region.
Install the mains adapter into the Power Supply by hooking the top edge into the
mains receptacle cavity, and rotating it until it snaps into place.
Using the Charger Power Supply
iMZ Series Charger Power Supply p/n AT17947-2
110-240 VAC 50-60 Hz 0.6A Input;
12 VDC 1.25 A output
Plug into appropriate AC receptacle.
Troubleshooting
Accessories
www.zebra.com/imz-info
Contact Us
Plug into printer
Charger Jack
Section Continues
3
Quick Start Guide
iMZ™iMZ™
Series
Series
Series
Quick Start Guide
Quick Start GuideQuick Start Guide
iMZ™ Series
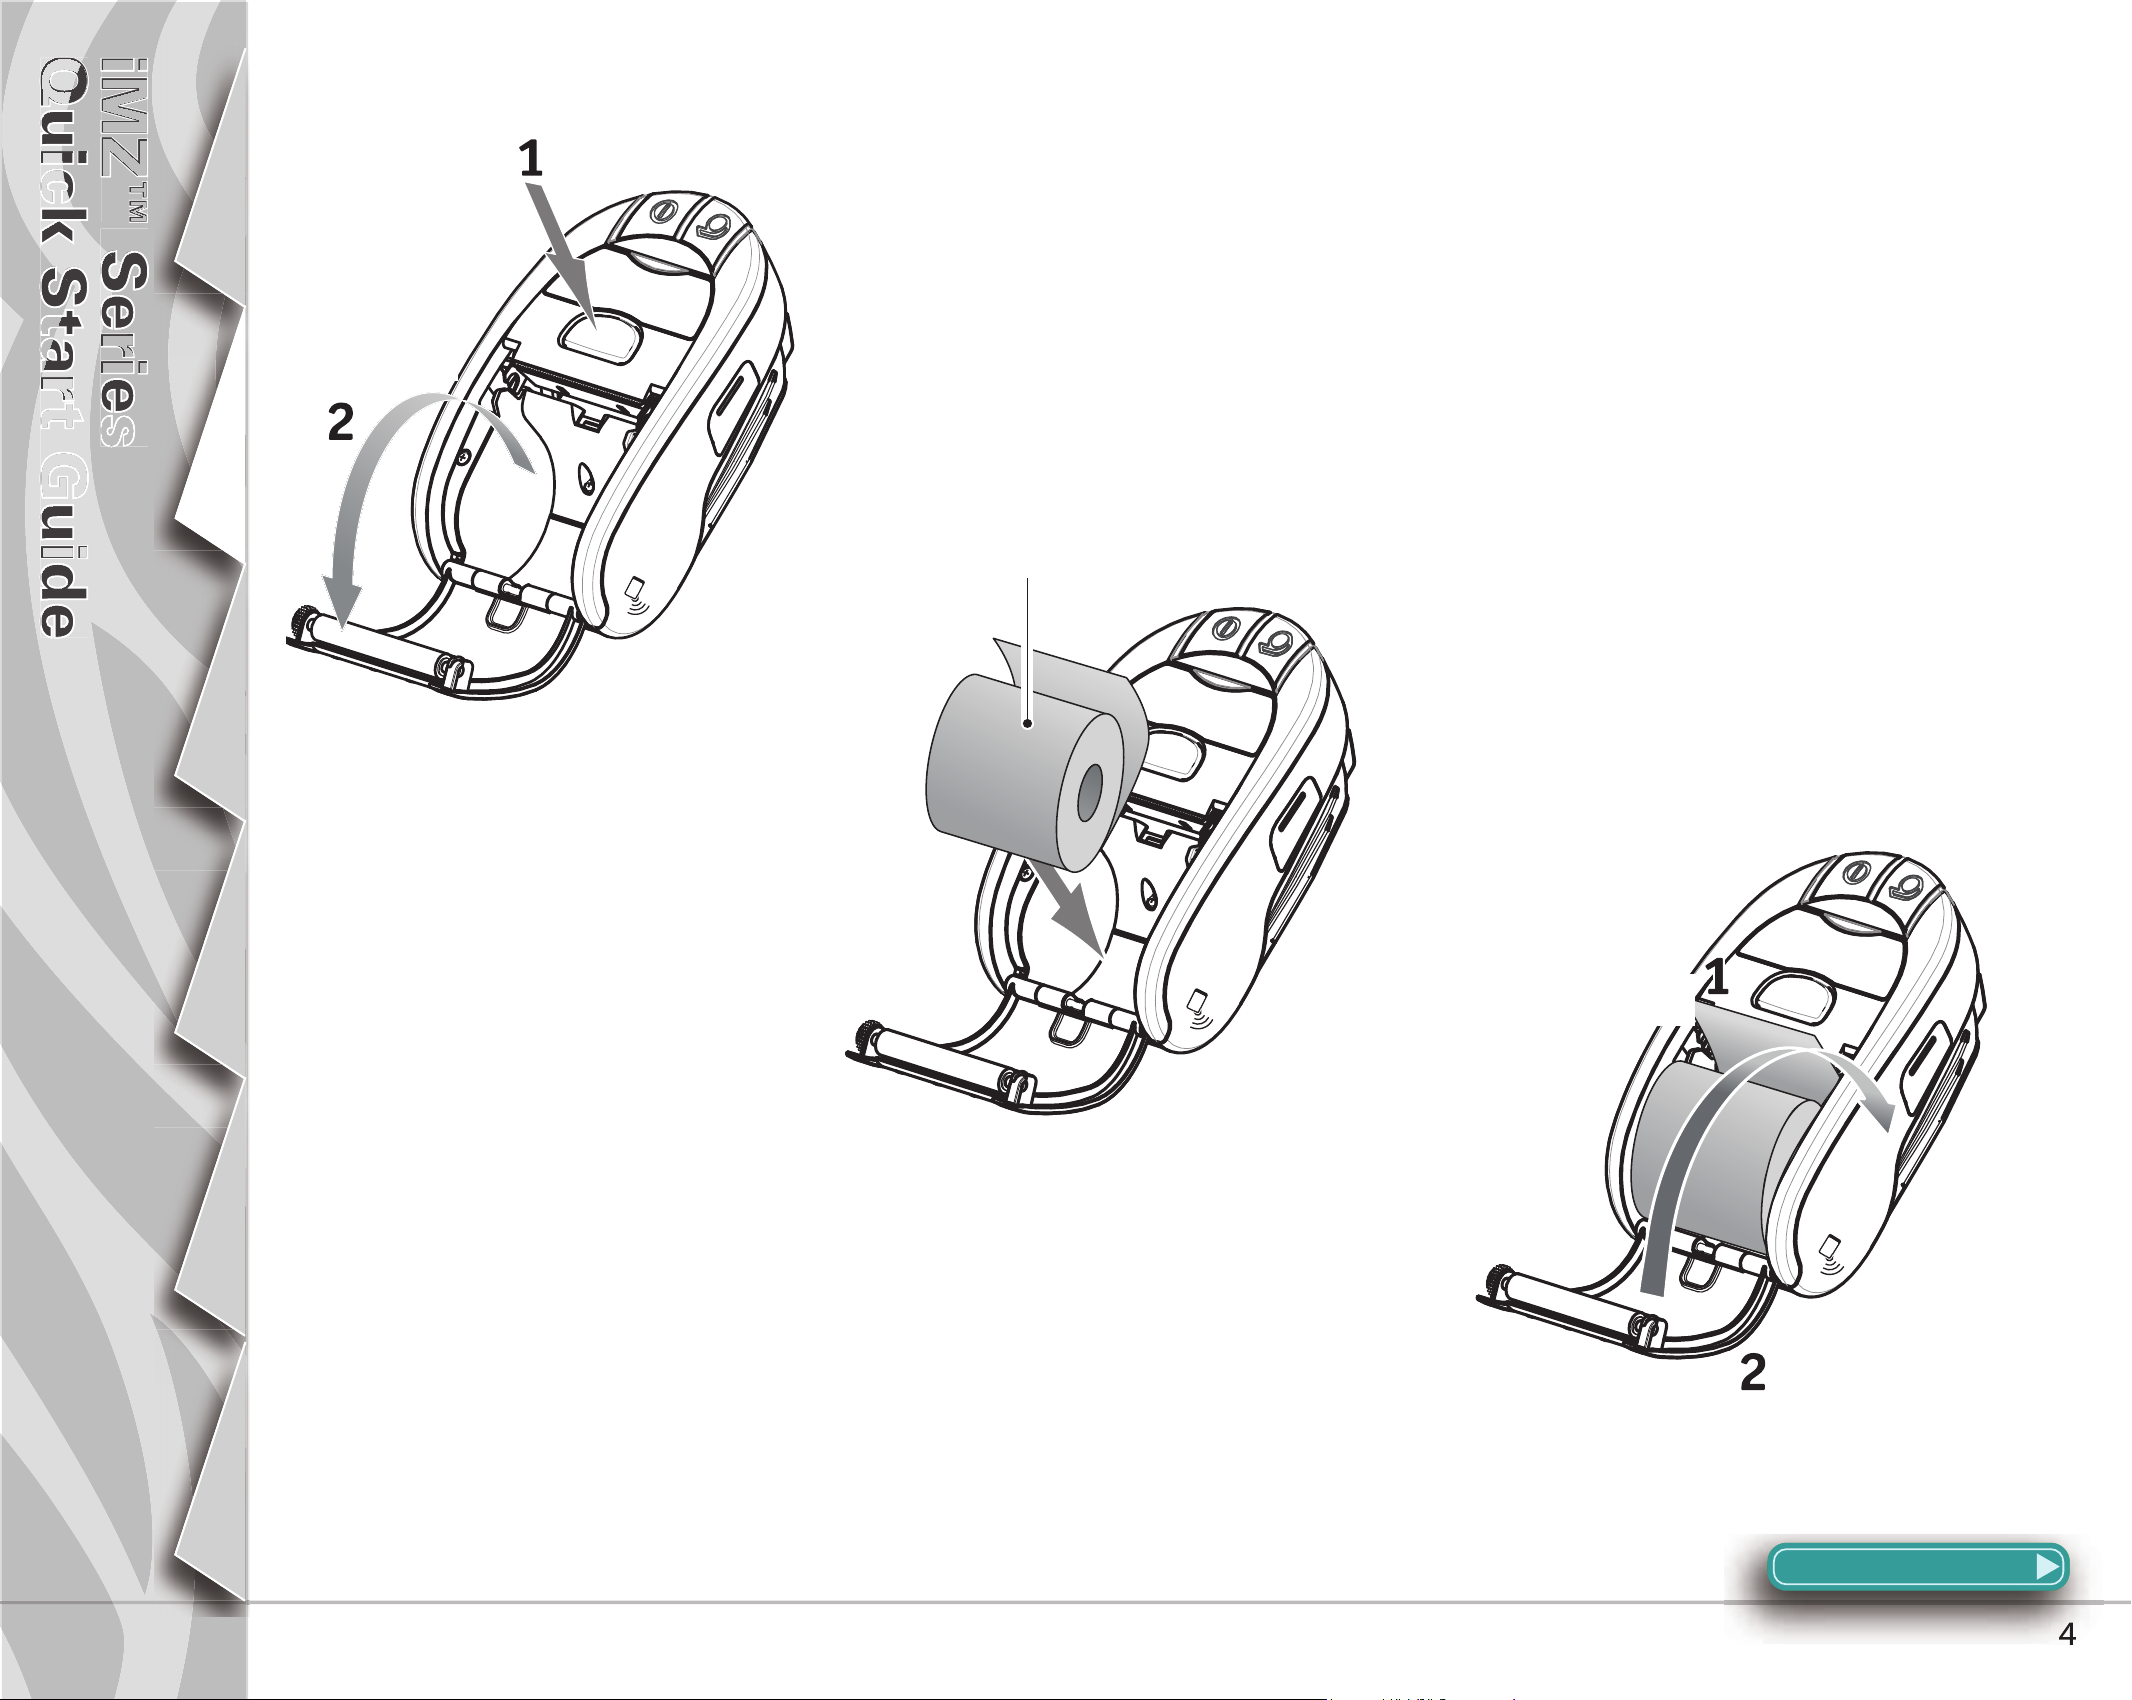
Loading Media
Press Latch
Button
Introduction
Media Cover
Opens
Getting Started
Using the
Printer
Troubleshooting
Media Roll
Note direction media
pulls o the roll.
Open the Media Cover
Pull a short length of
Media out of the Printer
Load the Media Roll
Accessories
Close Media
Cover
Close the Cover
Contact Us
Section Continues
4

Quick Start Guide
iMZ™iMZ™
Series
Series
Series
Quick Start Guide
Quick Start GuideQuick Start Guide
www.zebra.com/imz-info
iMZ™ Series
Introduction
Getting Started
Connecting the Printer
The printer must establish communications with a host terminal which sends the data to be printed. Communications occur in four
basic ways:
• Via a cable using the USB 2.0 protocol. Windows drivers are available through Zebra Designer Driver. Zebra Setup Utilities can be
used to configure the printer settings using a USB cable.
• By means of a wireless LAN (Local Area Network) using an optional radio per 802.11n specifications.
• By means of a Bluetooth short range radio link.
• WinMobile, Blackberry, and Android devices use standard Bluetooth protocol.
• iMZ Series printers are compatible with iOS devices, therefore printing via Bluetooth to an Apple device is possible. (Please see
the iMZ Series User Guide for more detailed information.
Connect With a Cable
Terminal
Using the
Printer
Troubleshooting
CONNECTING TO A TERMINAL
Connect via Bluetooth from a handheld device
that supports Near Field Communication (NFC)
technology
Communications
Cable to Terminal
USB Port
iMZ320
USB Communications
Cable to Computer
Accessories
Contact Us
CONNECTING TO A PC
www.zebra.com/imz-info
http://www.zebra.com/nfc
USB Port
5

Quick Start Guide
iMZ™iMZ™
Series
Series
Series
Quick Start Guide
Quick Start GuideQuick Start Guide
6
iMZ™Series
Printer Controls
Introduction
Getting Started
Using the
Printer
Power Button
Press until Power Light turns on, then
release. Press again to turn unit o
Charge Light (Green/Amber)
Green indicates the battery
fully charged. Amber indicates
the battery is less than 90%
charged.
Power Light (Green)
Indicates power status and battery condition. A steadily
lit indicator means the battery has more than a 30%
charge remaining. A blinking indicator means the
battery has less than a 30% charge remaining.
Feed Button
Press to advance the media.
Release to stop.
Media Status Light (Amber)
When o Indicates normal operation,
blinking indicates either no media or
that the media compartment is open
Communication Light (Blue)
WLAN: 1) Slow blink = searching for AP; 2) Solid
blue = communication with AP established; 3) Fast
blink = data transmission in progress.
Bluetooth: 1) LED o until communication with
other BT device is established; 2) Once paired,
LED is solid blue; Fast blink = data transmission in
progress.
Troubleshooting
iMZ220
Note: iMZ Series printers support Dual Radio. Both WLAN
(802.11n) and Bluetooth work simultaneously in this
scenario. By default, the printer comes with 802.11n
enabled. To enable dual radio functionality, please
refer to the iMZ Series User’s Manual.
Accessories
Contact Us
Section Continues
6

Quick Start Guide
iMZ™iMZ™
Series
Series
Series
Quick Start Guide
Quick Start GuideQuick Start Guide
iMZ™Series
Introduction
Getting Started
Using the
Printer
Cleaning the Printer
Printhead
Elements
Media
Sensors
Media
Compartment
Tear Bar
Caution • To avoid possible personal injury or damage to the Printer, never
insert any pointed or sharp objects into the Printer.
Note • Only use a Zebra cleaning pen or a cotton swab saturated with
alcohol for cleaning the printhead.
Area Method Interval
Use a Zebra cleaning pen or a 70% isopropyl alcohol
Printhead
Platen
solution on a cotton swab to clean the print elements
from end to end (the print elements are located in the
thin gray line on the printhead).
Use a soft lint-free cloth to wipe the platen roller when
dirty.
Avoid using alcohol or solvents on the surface of linerless
platens as they will damage the platen roller.
After every ve rolls
of media (or more
often, if needed)
Linerless media
requires more
frequent cleaning.
Troubleshooting
Accessories
Platen Surface
Tear bar
Exterior
Media
Compartment
Interior & Media
Sensors
Clean thoroughly with a Zebra cleaning pen or a 70%
isopropyl alcohol solution and a cotton swab.
Water dampened cloth As needed
Brush/air blow. Units with linerless platens: Clean inside
surfaces with a Zebra cleaning pen or 70% Isopropyl
alcohol on cotton swab.
After every ve rolls
of media (or more
often, if needed)
Contact Us
7

Quick Start Guide
8
iMZ™Series
Troubleshooting
Interpreting Indicators
The printer’s indicators display various printer functions and their status. Check the indicator status, then refer to the Troubleshooting
topic referenced in the chart.
Introduction
Getting Started
Using the
Printer
Function
Power Green
Charger Amber/Green
Error Amber O indicates no error condition
Communications Blue
Indicator
Color
Troubleshooting Topics
Indicator Status: Steady Indicator Status: Blinking
Indicates printer is on and battery
condition is OK to use.
O indicates battery is not charging. Amber
indicates battery is charging. Green indicates
battery is charged.
Bluetooth: Printer has paired with another
Bluetooth device.
802.11a/b/g/n: Radio is associated with a
WLAN
Blinking signi es Low Battery 3
N/A 1,6,10
No media or media door is open.
Application may be missing or
corrupted
Data is being received 5,8
Radio is trying to associate with a
WLAN.
Troubleshooting
Topic
2,4,7,9
5,8
Troubleshooting
Accessories
1. No power:
• Ensure you press and hold the Power switch until the Power light comes on.
• Check that battery is installed properly.
• Recharge or replace battery as necessary.
2. Media does not feed:
• Be sure Media Cover is closed and latched.
• Check media compartment. Ensure media is not binding on the sides of the compartment.
3. Poor or faded print
• Clean printhead.
• Check battery for possible damage. Recharge or replace as necessary.
Always dispose of batteries properly. Refer to Appendix D of the iMZ Series User Guide for more information.
• Check quality of media.
4. Partial or missing print:
• Check media alignment.
• Clean printhead.
• Ensure Media Cover is properly closed and latched.
Contact Us
Section Continues
8

Quick Start Guide
iMZ™Series
Troubleshooting Topics
5. No print:
• Replace battery.
• Check cable to terminal.
Introduction
Getting Started
Using the
Printer
• (Wireless units only) Restore wireless connection.
6. Reduced battery life:
• Check battery date code — if battery is one to two years old, short life may be due to normal aging.
• Recharge or replace battery.
7. Flashing Amber indicator:
• Check that media is loaded and that printhead is closed and securely latched.
• If media is present and latch is closed, indicates that no application is present or application is corrupted. Program must be re-loaded.
8. Communication Error:
• (Wireless units only) Check that media is loaded, head is closed and blue communication link light is on.
• Replace cable to terminal.
9. Label Jam:
• Open media cover.
• Generously apply alcohol to Printer in area of jammed label.
Caution- Never use sharp or pointed objects when attempting to remove a label jam.
Troubleshooting
Accessories
10. Battery Pack Is Hard to Install
• Do not force the battery into place. Verify you have not pinched any wires between the battery and the printer.
• Verify you are plugging the battery connector into the printer correctly.
Contact Us
Section Continues
9

Quick Start Guide
iMZ™Series
Resetting an iMZ Series Printer
If the printer has locked up and is not responding to any operator inputs or
external commands, either from a connected terminal or from a linked LAN, you
can perform a forced reset as follows:
Using The Serial Number Label To Determine Your Printer
Version
The printer serial number label is located on the bottom of the printer.
(iMZ320 serial number label illustrated)
Introduction
Getting Started
Using the
Printer
Units with an S/N with a Year and Week Built code earlier than “08-25” are reset using the
following procedure:
1. Open the media compartment and remove any media.
2. Press the Feed button and hold it approximately ten seconds until the Power,
Communications and Error indicators turn o and stay o .
3. After the three indicators turn o , reload the media and close the media
compartment cover.
4. Wait at least ten more seconds and press the Power button. The Printer will
restart and normal operation can resume.
1. Press and hold the power button for 5 seconds and then release. The printer will
power down.
2. Re-start the Printer as usual. Any pending data in the printer will have been
deleted and must be re-sent.
1 Digit
Site
Serial Number
encoded in
128 symbology
Product Configuration
Code (PCC)
encoded in
128 symbology
2 Digit
Customer Code
2 Digit
Product Code
PLACE BAR CODE HERE
XXXXSYYWWNNNNNS/N:
PLACE BAR CODE HERE
XXX-XXXXXXXX-XXPCC:
ZBR4
Contains FCC ID: I28MD-ZB R4WA; IC ID:3798B -ZBR4WA
UID#
Last two digits
of year (00-99)
Date Code
UID Number
encoded in
Datamatrix
ECC 200
symbology
Week (01-52)
YYWWNNNNN
Sequential number
(00001-99999),resets
each week
Troubleshooting
Accessories
Contact Us
10

Quick Start Guide
iMZ™Series
Accessories
Introduction
Getting Started
Belt Clip
(Standard on all printers)
To use: hook the clip over your belt and ensure that the clip is
securely attached to the belt. The belt clip will pivot to allow
you to move freely while wearing the Printer.
Clip Printer to
belt
Adjustable Shoulder Strap
(Available as an Accessory Kit)
Refer to figure below. Secure each end of the shoulder strap by
looping through the slots on the belt clip and securing with the
buckle.
Thread the free end of the shoulder
strap through one of the slots on
the belt clip
Thread the free end of the shoulder
strap through the buckle and pull
tight to adjust.
Do the same procedure on the
other end of the strap in the
remaining slot on the belt clip.
Using the
Printer
Troubleshooting
Accessories
Once the shoulder strap is secured, hold the buckle and adjust the
strap as shown until you achieve the desired length.
Pull Strap here
Pull Strap here
to shorten
Hold Buckle
to lengthen
Contact Us
www.zebra.com/imz-info
11

Quick Start Guide
iMZ™Series
Product Support
Introduction
For product support, and the latest versions of all customer documentation, contact
Zebra Technologies at: www.zebra.com
Refer to Appendix D in the iMZ series User Guide for more detailed contact information
IN THE AMERICAS CONTACT:
Getting Started
Using the
Printer
Troubleshooting
Zebra Technologies International, LLC
475 Half Day Road, Suite 500
Lincolnshire, Illinois 60069 USA
Phone: +1.847.634.6700 or +1.866.230.9494
Fax: +1.847.913.8766
IN EUROPE, AFRICA, THE MIDDLE EAST, AND INDIA CONTACT:
Zebra Technologies Europe Limited
Dukes Meadow
Millboard Road
Bourne End
Buckinghamshire SL8 5XF, UK
T: +44 (0)1628 556000
F: +44 (0)1628 556001
IN THE ASIA PACIFIC REGION CONTACT:
Zebra Technologies Asia Paci c, Pte. Ltd.
120 Robinson Road
#06-01 Parakou Building
Singapore 068913
Phone: +65 6858 0722
Fax: +65 6885 0838
Accessories
Contact Us
Zebra Technologies Corporation
475 Half Day Road, Suite 500
Lincolnshire, IL 60069 USA
T: +1 847.634.6700 or +1 800.423.0442
12
 Loading...