

Page 1

Zebra FX Series Embedded Java SDK User Guide
Zebra FX Series Embedded Java SDK User Guide
Zebra FX Series Embedded Java SDK User Guide Zebra FX Series Embedded Java SDK User Guide
Windows
Windows
WindowsWindows
Version 1.0.1
Version 1.0.1
Version 1.0.1Version 1.0.1
ZEBRA TECHNOLOGIES 1
Page 2

ABOUT THIS GUIDE
Table of Content
1.0 Introduction ................................................................................................................................ 3
2.0 Revision History .......................................................................................................................... 4
3.0 Pre- Requisites ............................................................................................................................ 5
4.0 SDK Install ................................................................................................................................... 6
4.1 Install SDK zip file .......................................................................................................................... 6
4.2 Setup System Variable – User Path ............................................................................................... 8
5.0 Starting SDK............................................................................................................................... 11
6.0 Setup Remote Connection for Remote Debugging ................................................................... 13
7.0 Java Sample Application Build and Debug ................................................................................ 21
7.1 Import RFID3 API Java Library to Embedded Java Project. ................................................... 22
7.2 Building Java Executable Class File(s).................................................................................... 25
7.3 Setup Java Remote Debug Configuration. ............................................................................ 27
7.3.1 Setup Java Remote Build Path. ..................................................................................... 27
7.4 Debug Embedded Java Application ....................................................................................... 34
7.4.1 Remote SSH Terminal Setup ......................................................................................... 37
8.0 Embedded Java Application ...................................................................................................... 43
8.1 Creating an Embedded Java Project ........................................................................................... 43
8.2 Adding Source File to Embedded Java Project ............................................................................ 45
8.3 Import RFID3 API Java Library to Embedded Java Project. ................................................... 47
8.4 Building Java Executable Class File(s).................................................................................... 49
8.5 Setup Java Remote Debug Configuration. ............................................................................ 51
8.5.1 Setup Java Remote Build Path. ..................................................................................... 51
8.6 Debug Embedded Java Application ....................................................................................... 59
8.6.1 Remote SSH Terminal Setup ......................................................................................... 62
8.7 Create Java JAR Executable ................................................................................................... 67
8.7.1 Create the Manifest file of the project. ........................................................................ 67
8.7.2 Create and export the JAR executable: ......................................................................... 70
9.0 Embedded Application Installation Package Creation .............................................................. 76
ZEBRA TECHNOLOGIES 2
8.8 Create Start and Stop Scripts of Java Installation Package ................................................... 75
9.1 Creating an FX RFID Reader Embedded Application Installation Package ............................ 76
9.2 Install and Uninstall Application Package on Zebra RFID Reader ......................................... 78
Page 3

Introduction
1.0 Introduction
The Zebra FX Series Embedded Java SDK User Guide for Windows describes the detailed steps about
how to use the FX Series Embedded Java SDK to develop, debug and package Embedded application
using fixed RFID reader FX9600 and FX7500 on Windows.
This user guide covers the following topics
• Zebra Java SDK describes how to create, build, and debug an embedded Java application,
and how to create Start and Stop script files for the deployment packages used to install the
application onto the FX RFID Readers on Windows 10 and windows 7 OS.
• Embedded Sample RFID Java Application from scratch, create, build and debug
• JAR File creation using Manifest file
• Sample Hello world Example from scratch, create, build and debug
Note: Uninstall any older Zebra SDK if installed on Windows host machine.
ZEBRA TECHNOLOGIES 3
Page 4

Execution steps on sample app.
REVISION
HISTORY
2.0 Revision History
REV DESCRIPTION DATE AUTHOR
1.0 Steps and procedure to develop,
debug and package embedded
application for Zebra sample
application
1.1 Updated the SDK file names in
new format
Java 8 installation added in
prerequisites
1.2 ‘dos2unix’ tool information
added for script file format
conversion.
At reader after installation.
19-June-2019
24 June 2019
30 April 2020
ZEBRA TECHNOLOGIES 4
Page 5

PRE
-
REQUISITE
3.0 Pre- Requisites
• Host Machine running with Windows 10 Pro or Windows 7.
• Host Machine with 16GB Ram preferred with 40GB free space, Intel Core I7 CPU.
• Zebra-FXSeries-Embedded-SDK-Java-Windows_V1.0.1.zip file provided by Zebra.
• Install 7-Zip in the host machine. This is required to unzip file.
• RFID Reader FX Series Firmware Version 3.x.x or higher
• Ensure latest Java (Java 8) is installed in the host machine
ZEBRA TECHNOLOGIES 5
Page 6
JAVA SDK INSTALL
4.0 SDK Install
This section describes the steps involved for installing Zebra Java SDK on Windows host machine.
4.1 Install SDK zip file
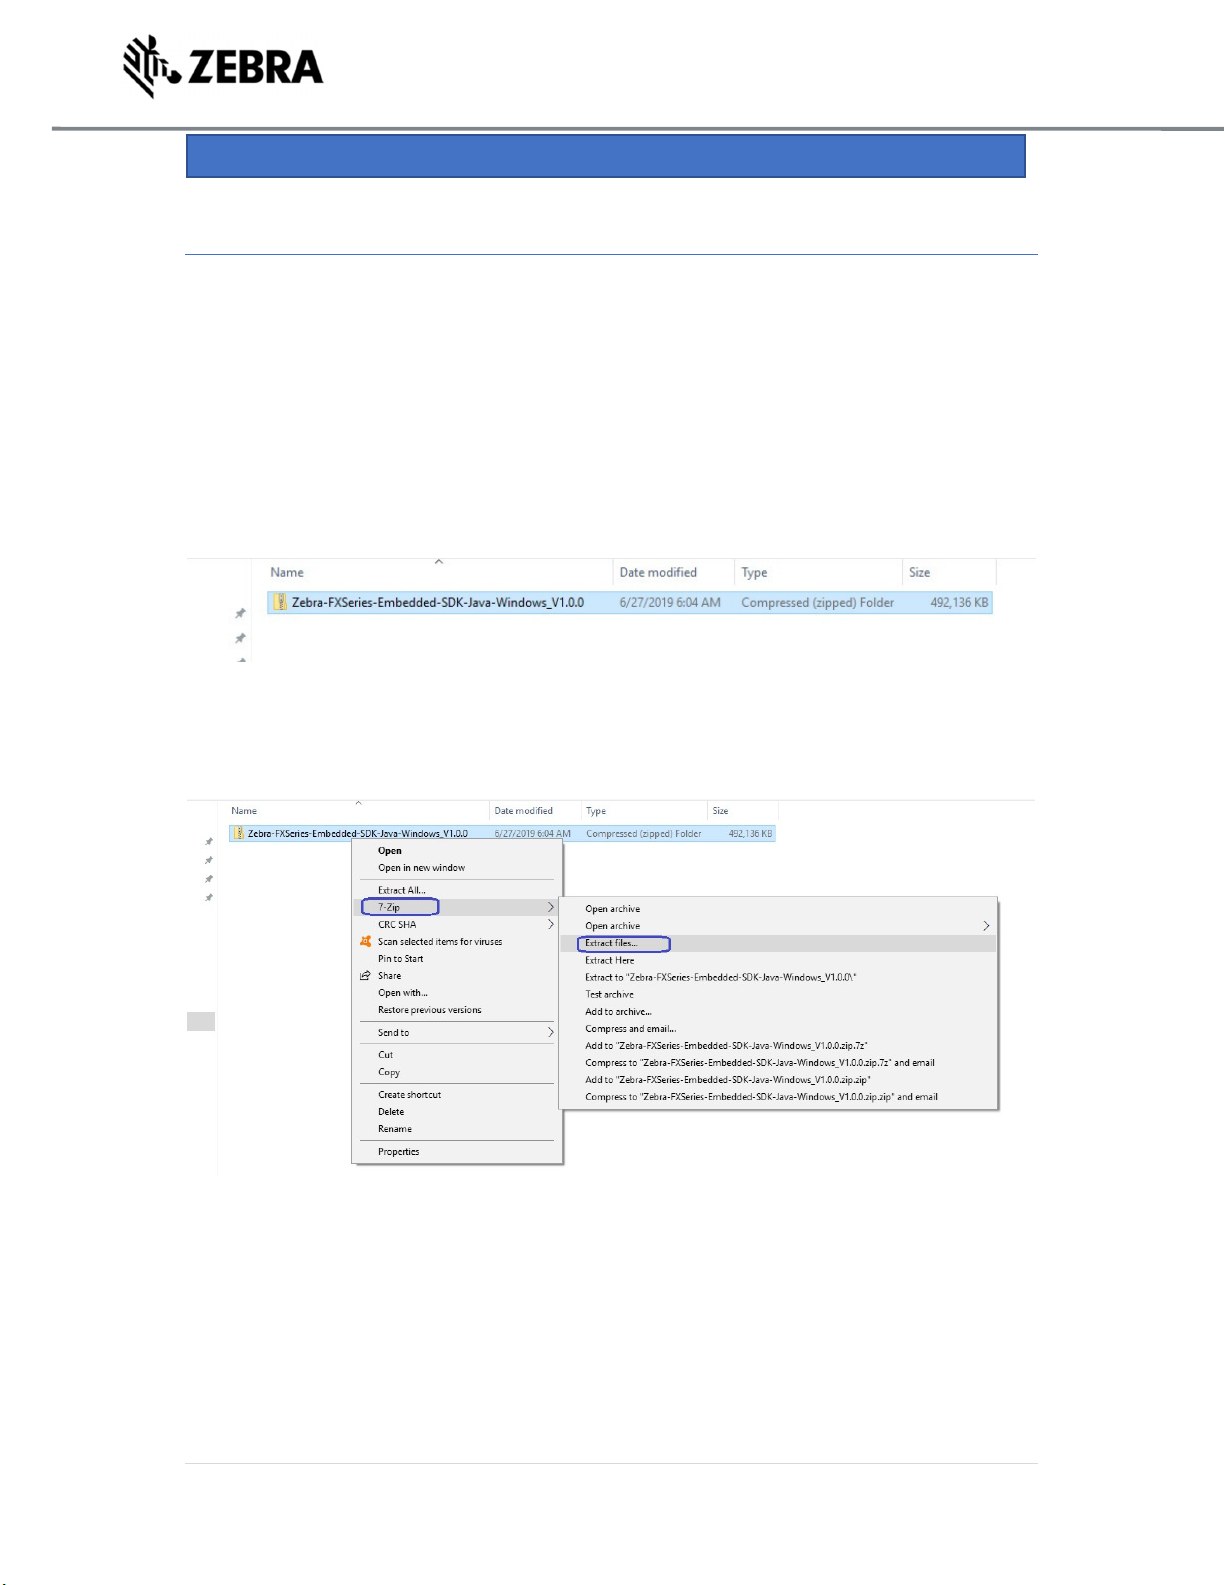
Copy the Zebra-FXSeries-Embedded-SDK-Java-Windows_V1.0.0.zip file provided by Zebra in any of
the drives folder.
Figure 1 : Zipped File
Right Click on the zip file, select 7-zip and select Extract files.
Figure 2 : 7-Zip
ZEBRA TECHNOLOGIES 6
Page 7
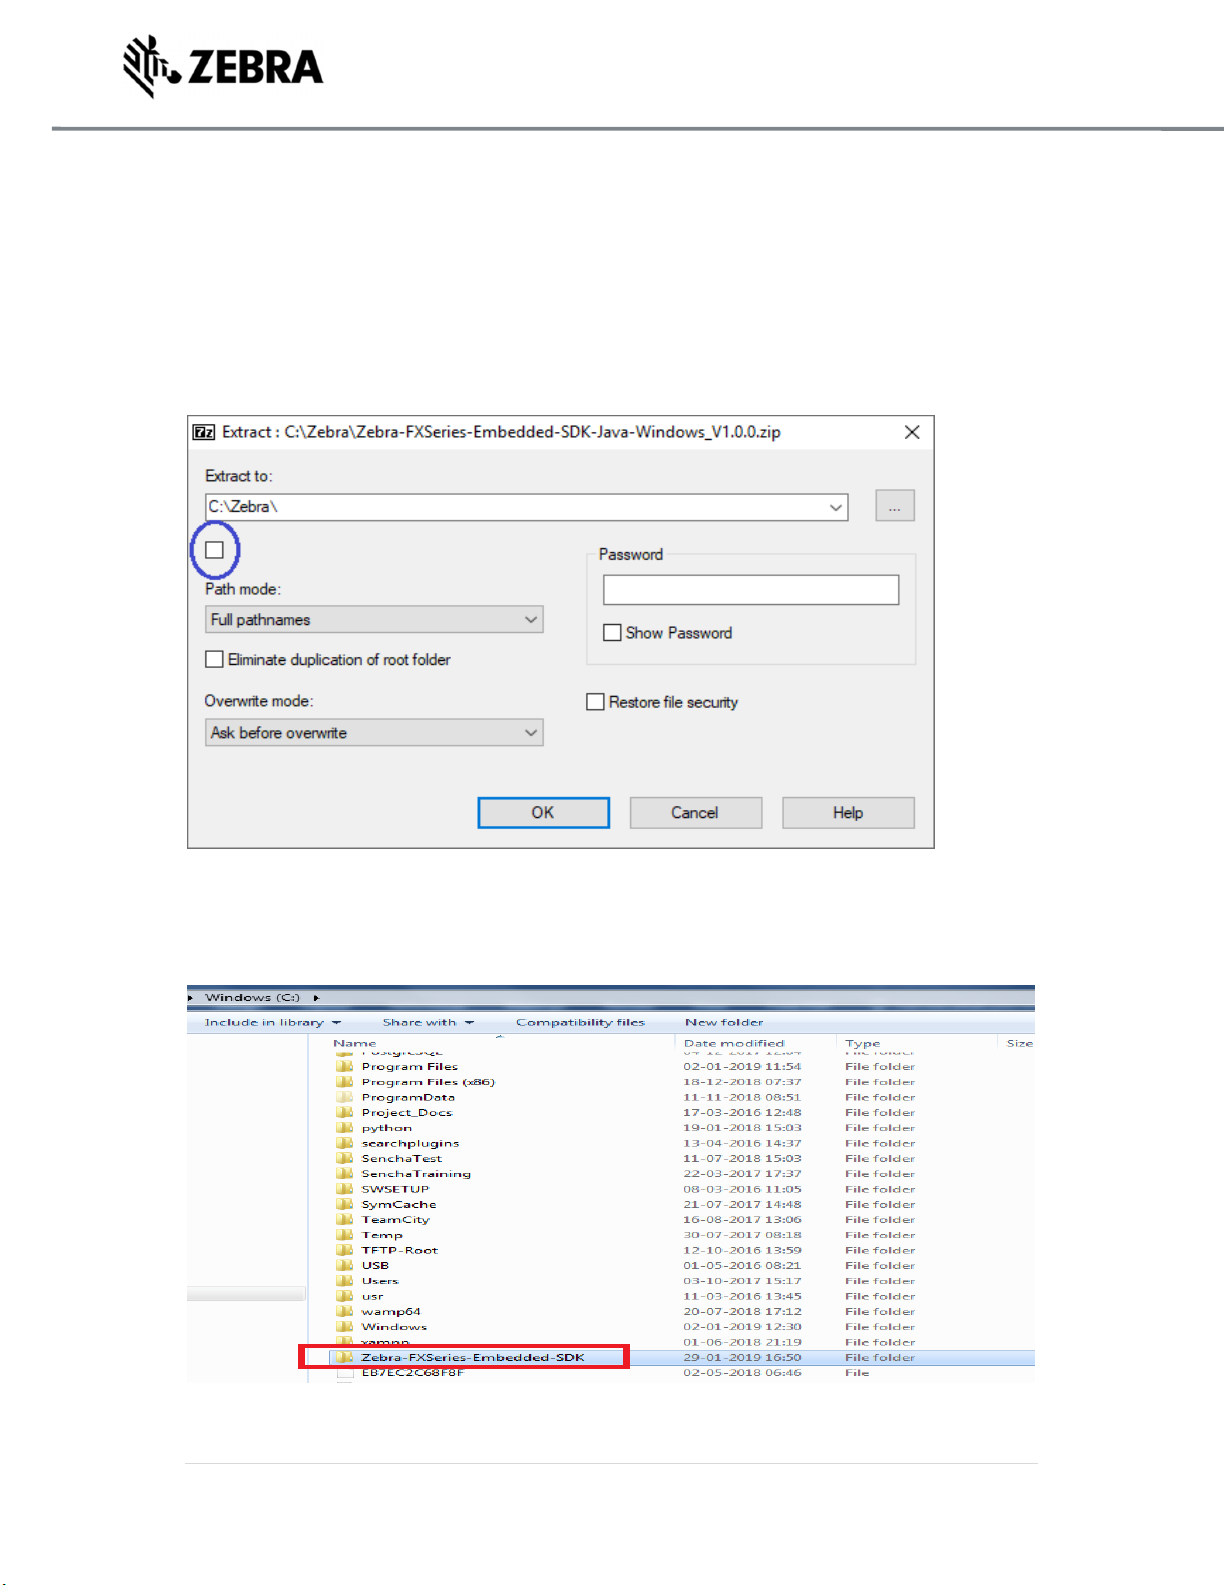
Select the folder where the zip file needs to be extracted to, for example, the following screenshot
shows the zip file being extracted to C:\ drive user path.
Note : Please make sure the checkbox under “Extract to” is unchecked. Also, in Windows 7, there is
no text box beside the highlighted checkbox below, please proceed further and click OK.
Figure 3 : 7-Zip extraction
Click on the unzipped folder of Zebra-FXSeries-Embedded-SDK.
Figure 4 : Unzipped Folder
ZEBRA TECHNOLOGIES 7
Page 8
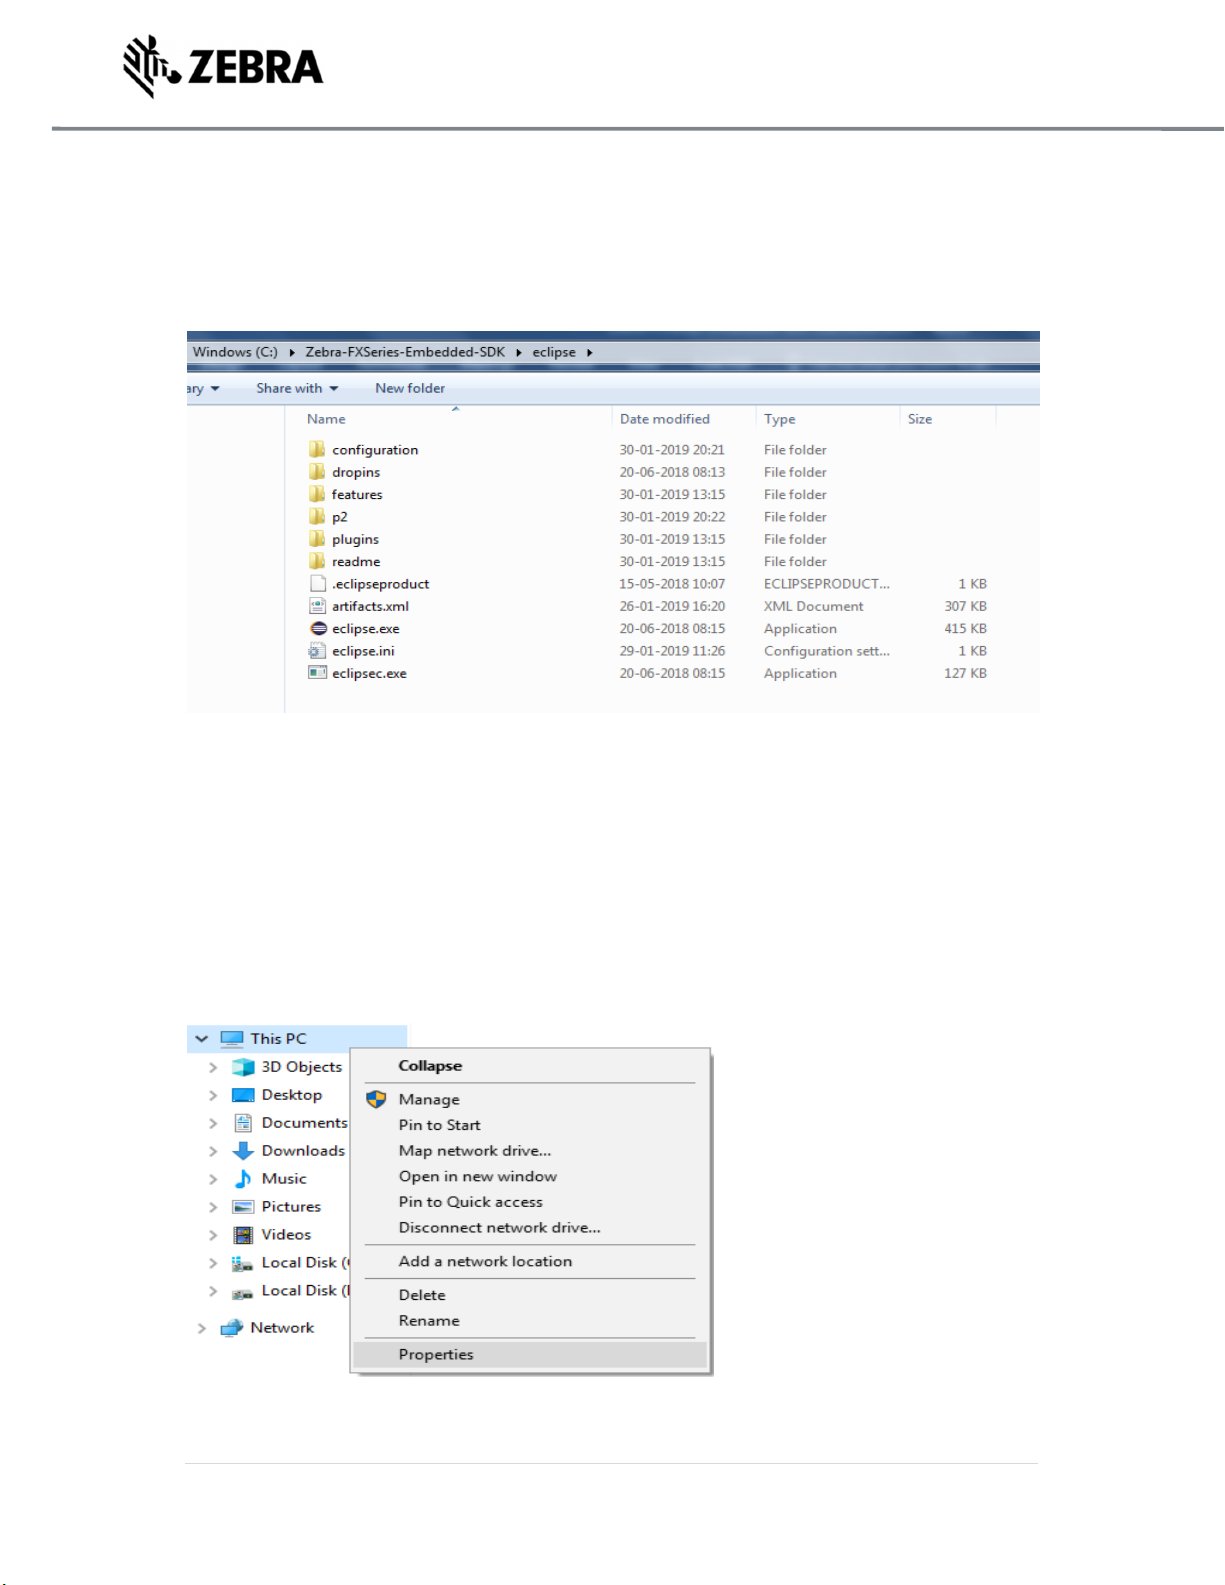
Navigate to Zebra-FXSeries-Embedded-SDK-> eclipse folder to verify that required files are available
as per following screenshot.
Figure 5 : Eclipse Folder
4.2 Setup System Variable – User Path
Set up system variable on the host machine.
The following screenshots will help in setting up the variable path.
Right Click on This PC (Windows 10) or Computer (Windows 7) and click on properties.
Figure 6 : System Properties
ZEBRA TECHNOLOGIES 8
Page 9
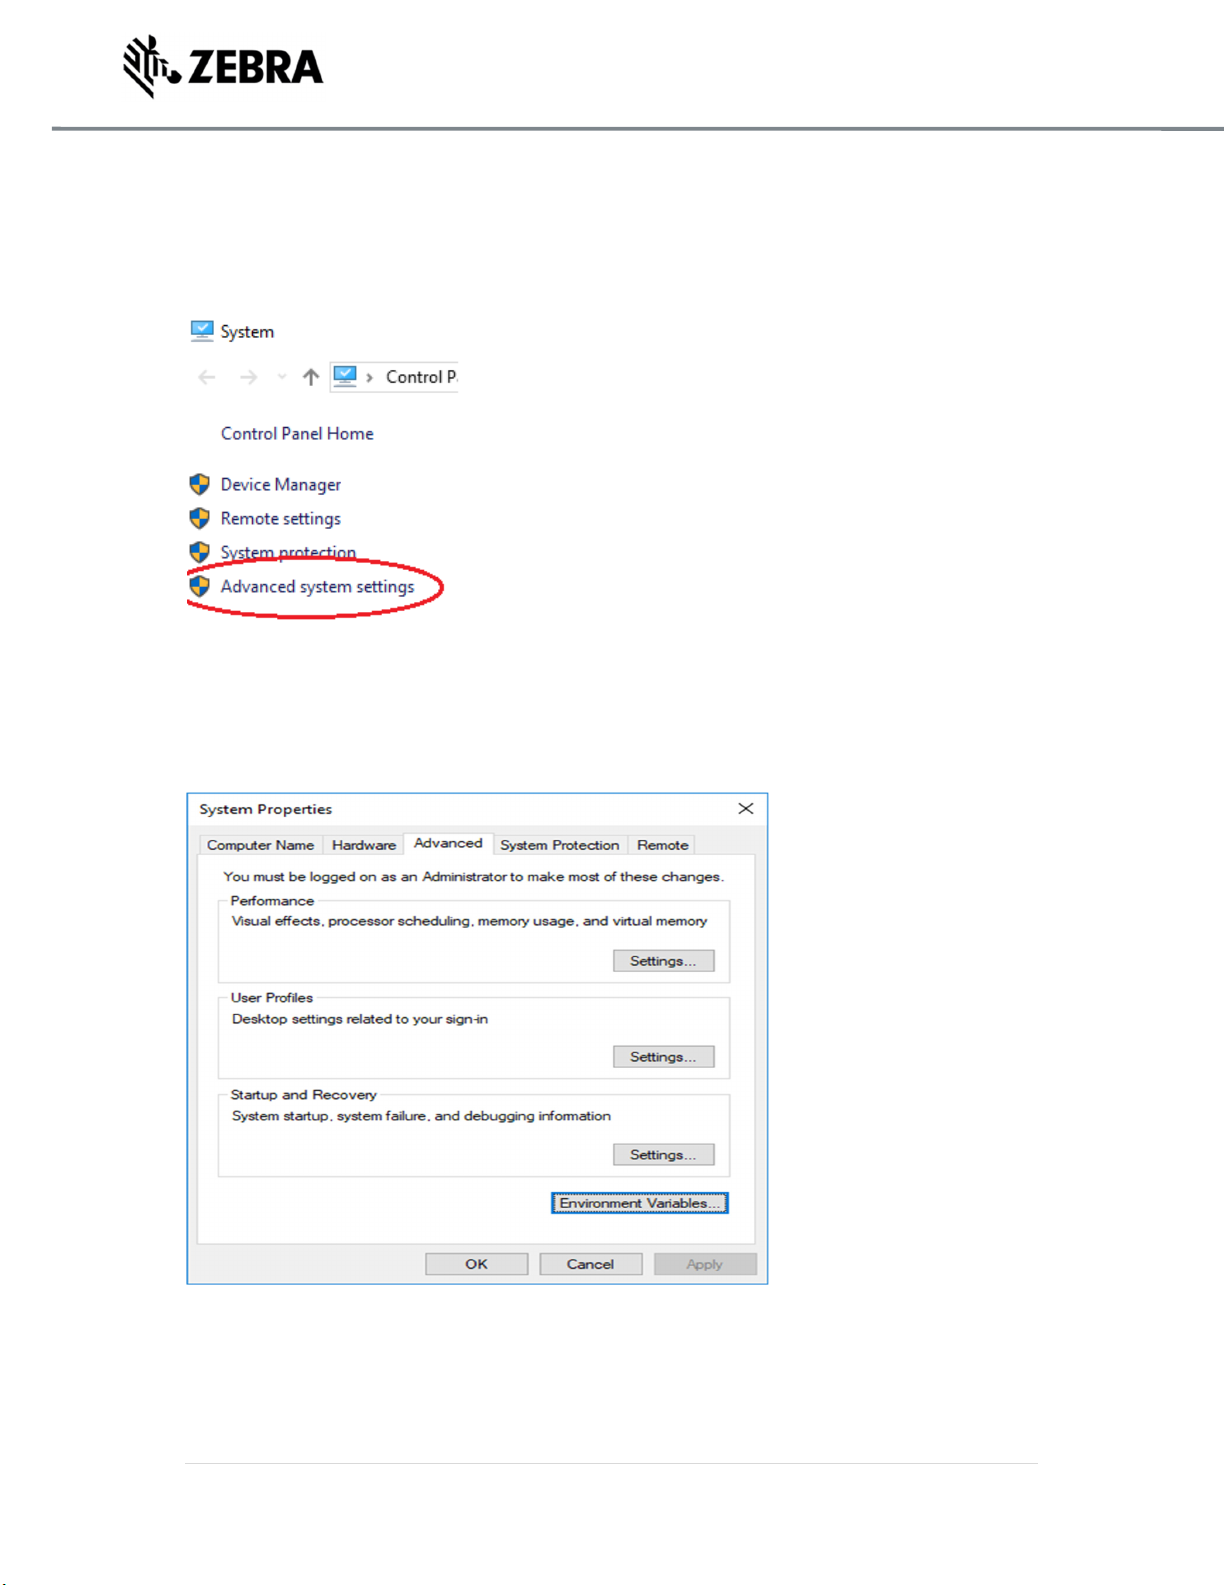
Click on Advanced properties
Figure 7 : Advanced System Settings
Click on Environment Variables
Figure 8 : Environment Variables
ZEBRA TECHNOLOGIES 9
Page 10
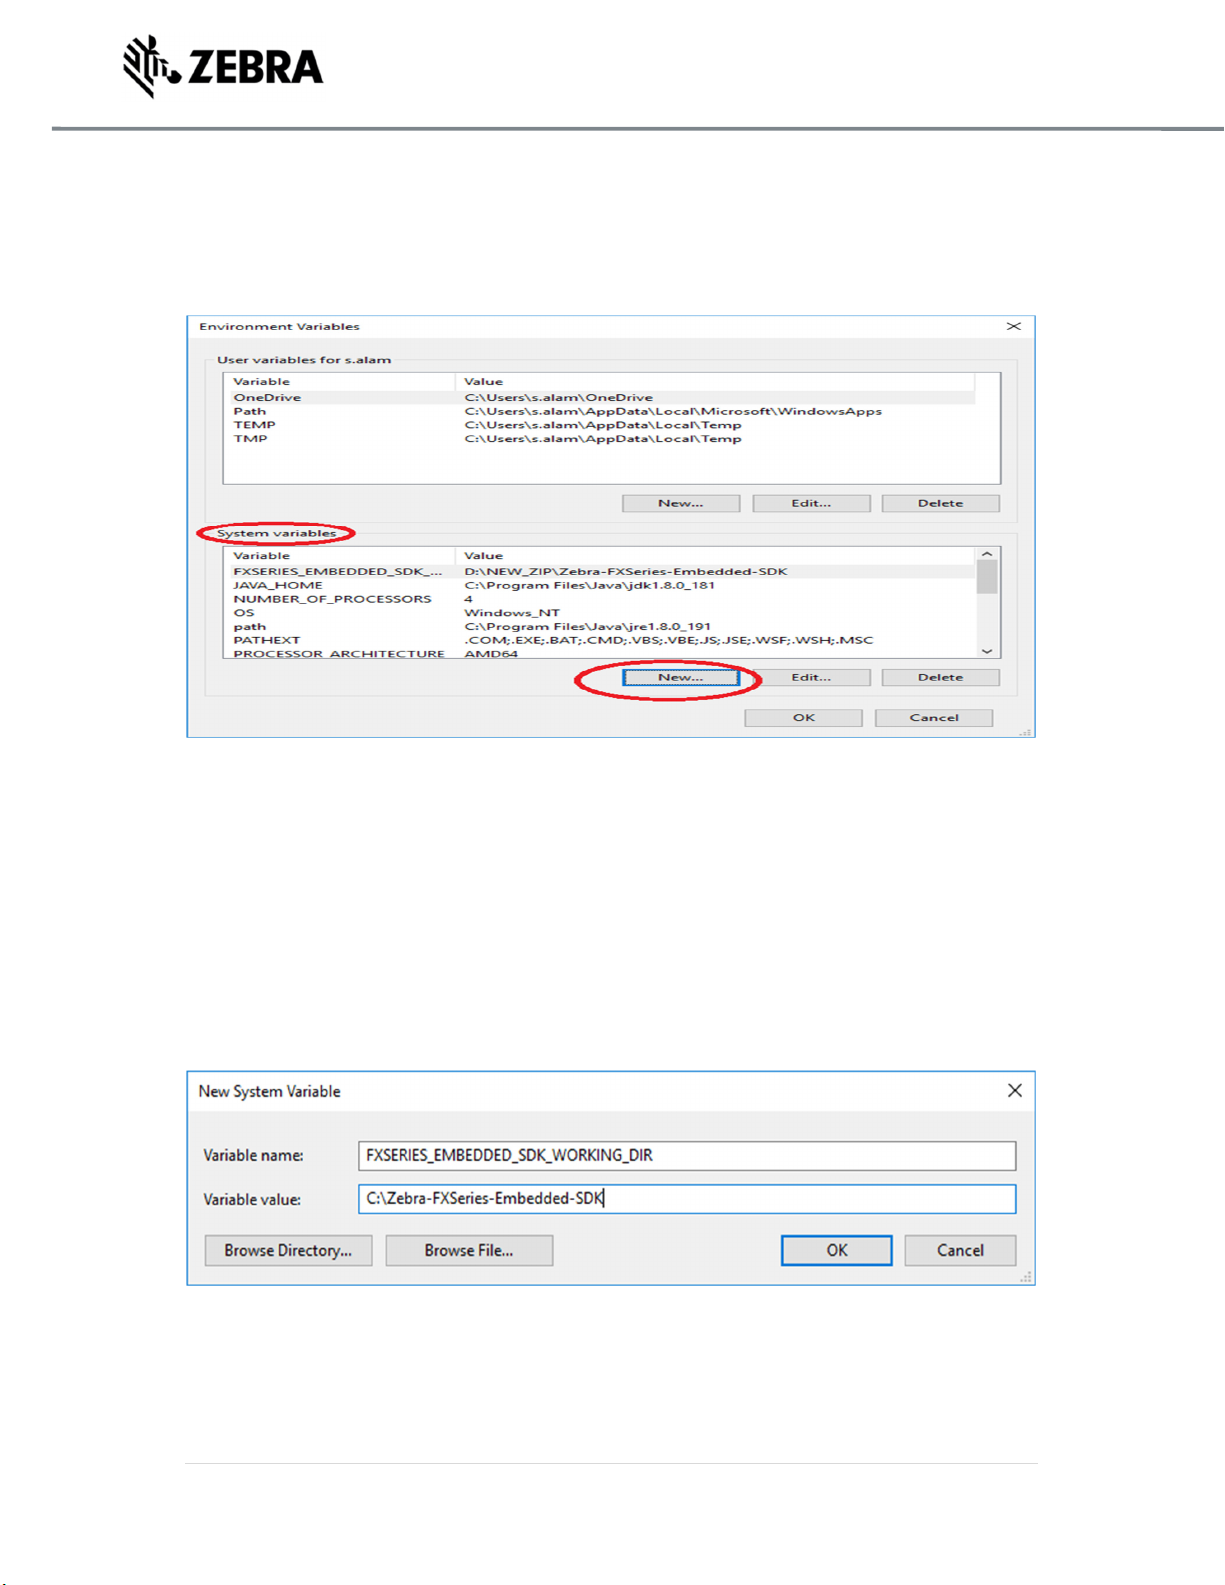
Click On New
Figure 9 : System Variable
Enter Variable name as “FXSERIES_EMBEDDED_SDK_WORKING_DIR”
Enter Variable value as the path of the extracted zip, for example
Variable value as “C:\Zebra-FXSeries-Embedded-SDK”
Note : There should not be any spaces in Variable name and Variable value fields.
Figure 10 : System Variable Pop up
Next, click on OK for 3 times and close the system properties window.
ZEBRA TECHNOLOGIES 10
Page 11
STARTING SDK
5.0 Starting SDK
To start the SDK
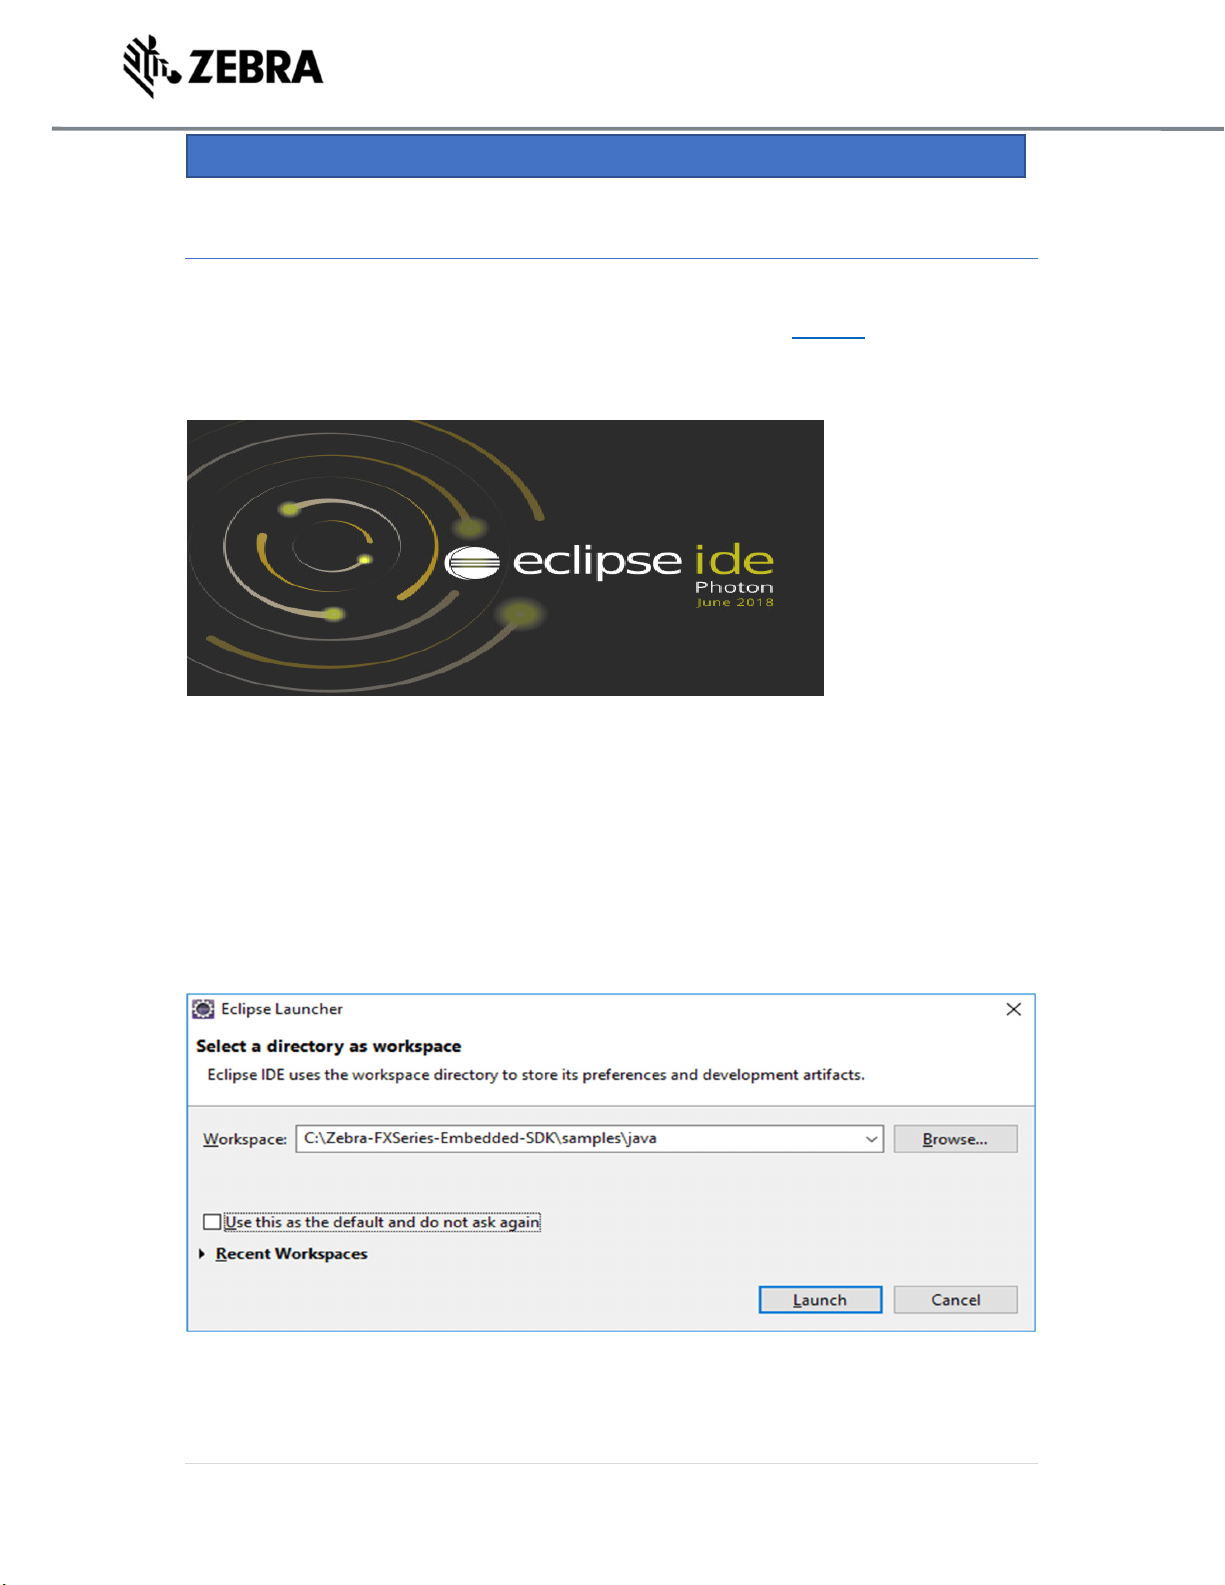
Double click on the eclipse.exe file inside eclipse folder as mentioned in Figure 5.
Figure 11 : Eclipse Screen
In the Workspace field, select the folder for project settings and project file storage.
For Ex: ‘[install-path]’\samples\java and click on select.
Click on Launch button. In the following example, the path has been set to “C:\ Zebra-FXSeries-
Embedded-SDK\samples\java” folder based on current installation path in the host.
Figure 12 : Workspace Popup
ZEBRA TECHNOLOGIES 11
Page 12
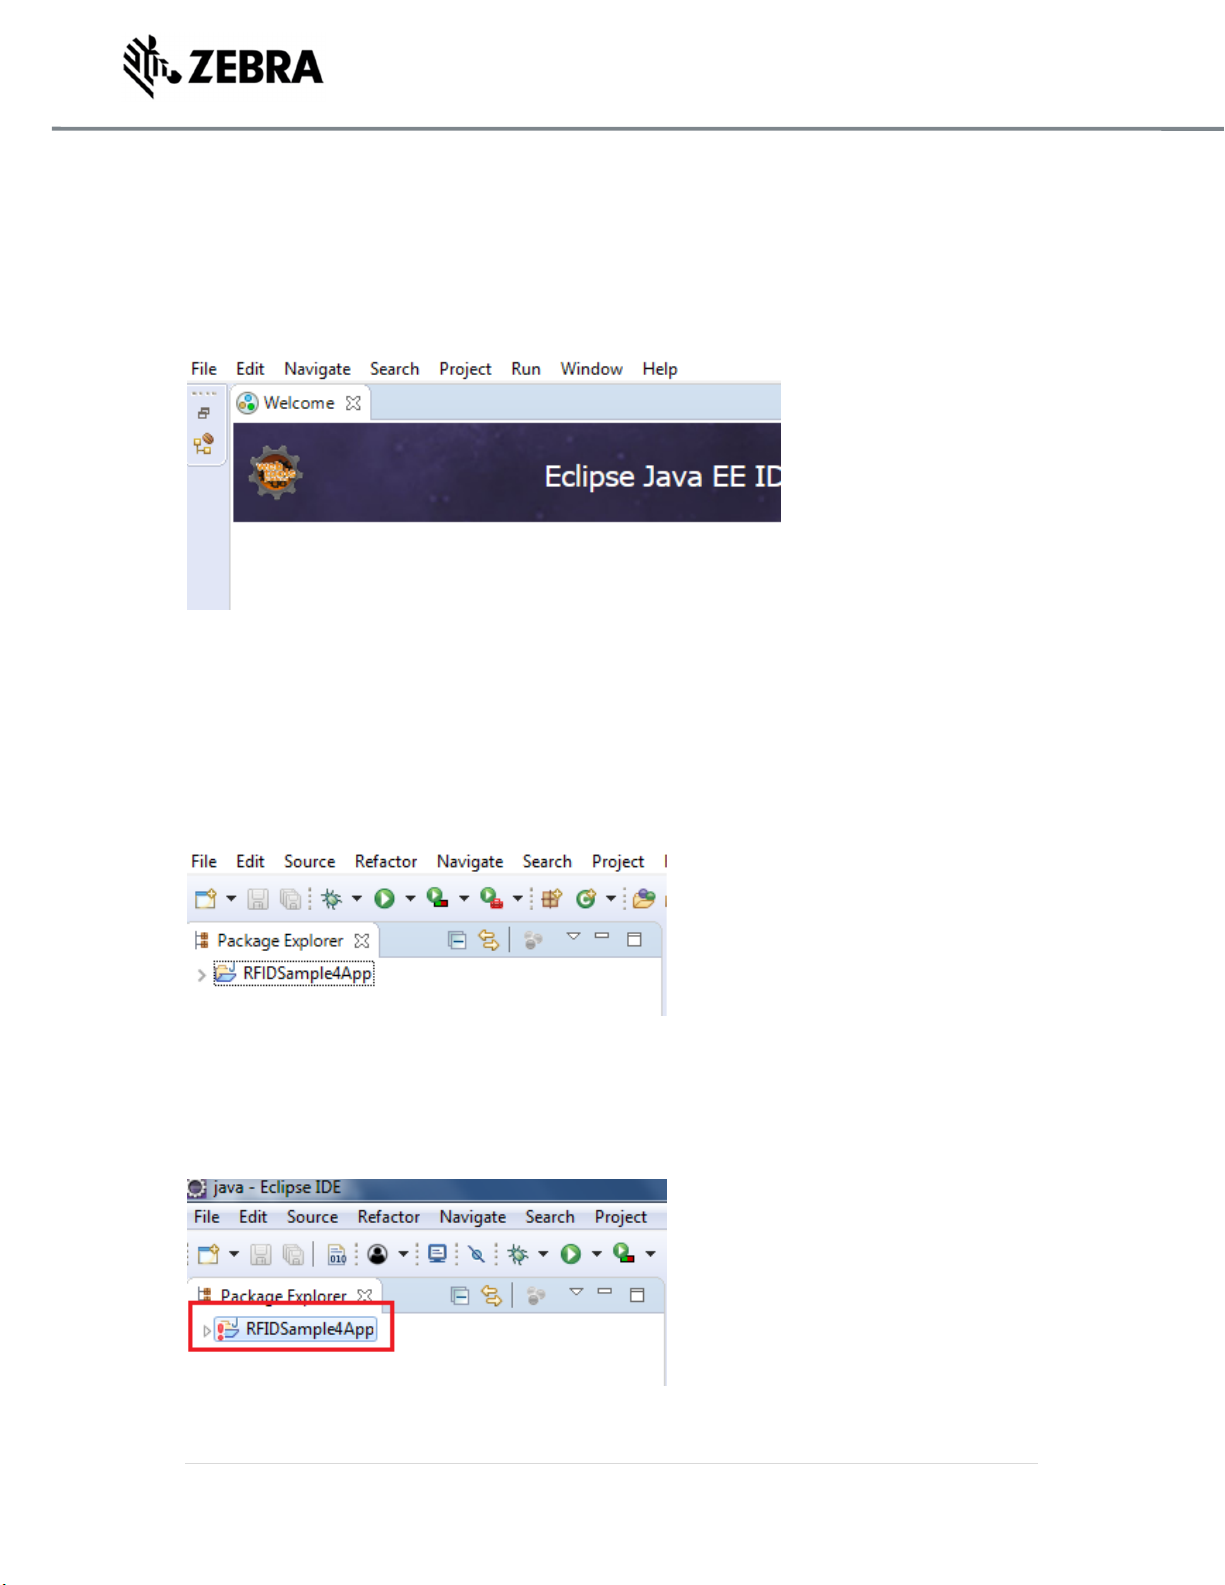
Close the welcome window if it appears.
Figure 13 : Eclipse Welcome Screen
Note: The following instructions shows Microsoft Windows 10 Pro screens.
RFIDSample4App can be found on the Package Explorer view.
Figure 14 : RFIDSample4App Package
Note : If there is an exclamation sign against RFIDSample4App just like the following screenshot,
then there is a mismatch in API library. This can be rectified by removing the API3 jar, this has been
explained down in section 7.1.
ZEBRA TECHNOLOGIES 12
Page 13
SETUP REMOTE CONNECTION FOR REMOTE DEBUGGING
6.0 Setup Remote Connection for Remote Debugging
The following steps describes how to setup a remote connection to a device in order to run a debug
session of the embedded application for JAVA or access a terminal session on the device to execute
the Linux commands or any applications.
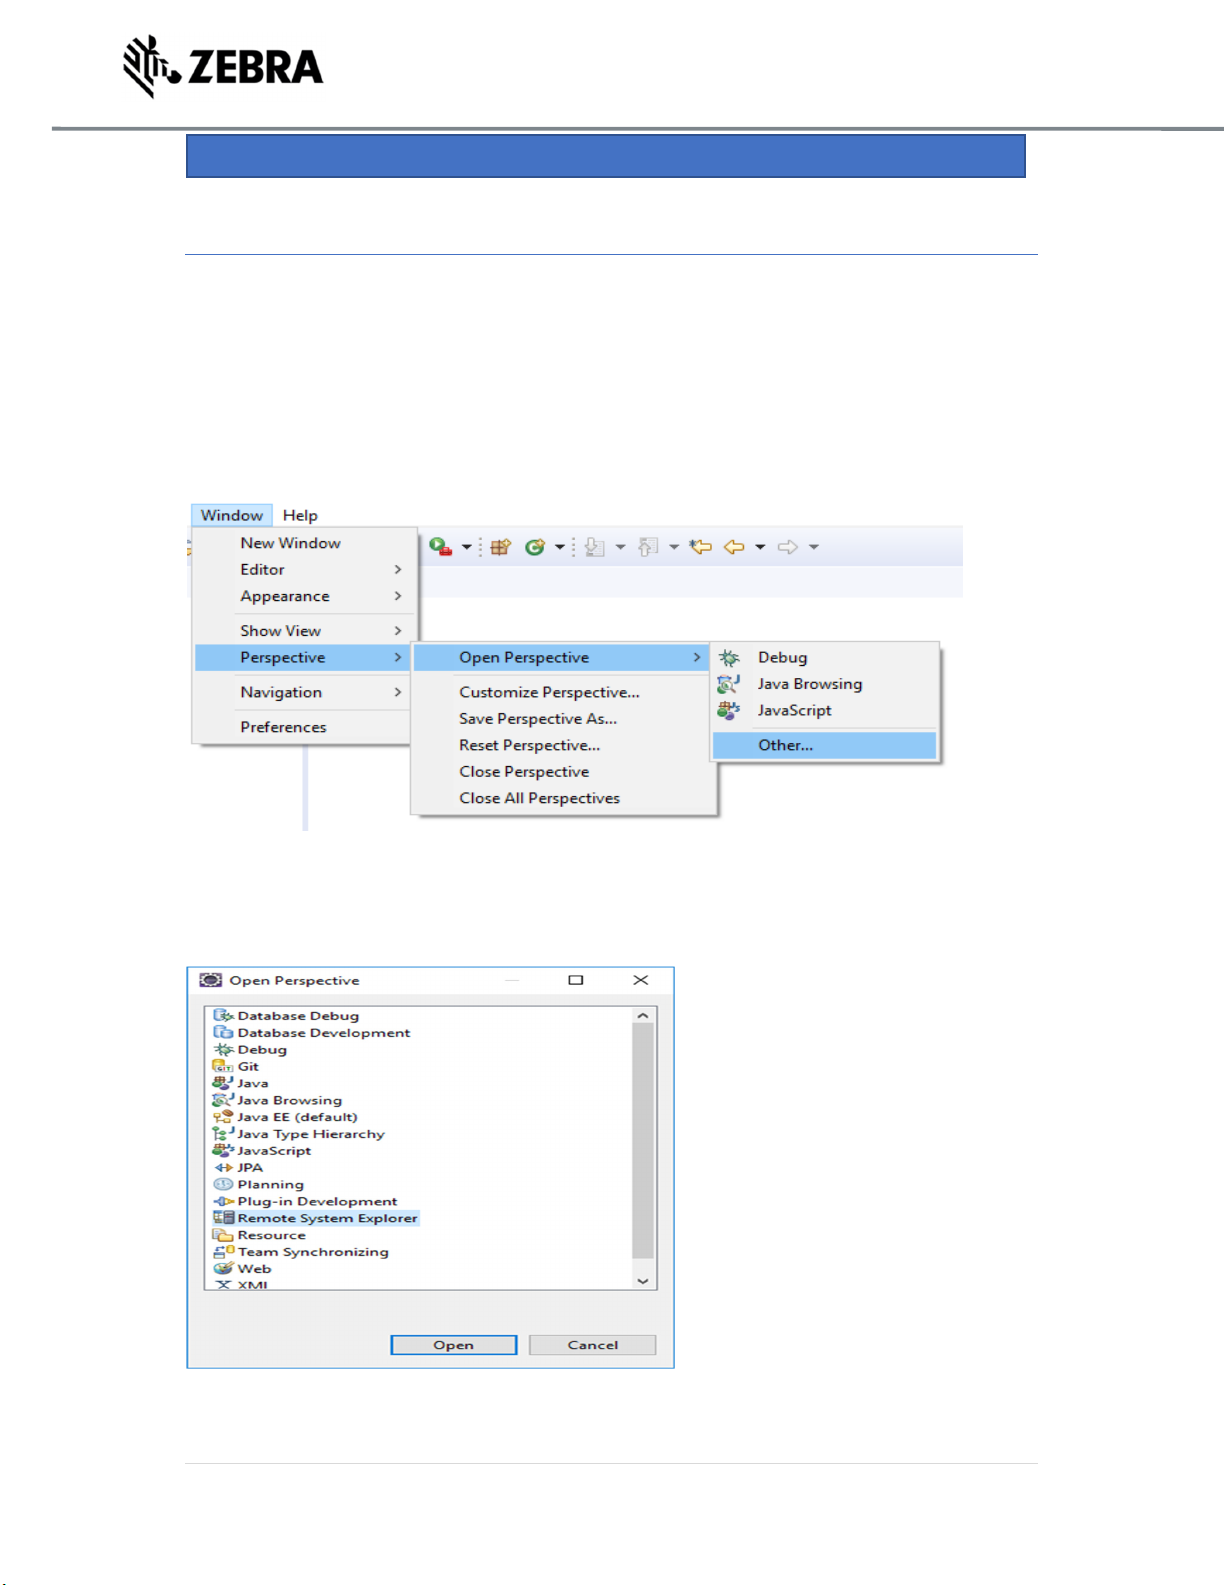
On eclipse tool bar menu, please Select window-> perspective ->open perspective-> other
Figure 15 : Java Perspective
Select Remote System Explorer, Select open
Figure 16 : Package Explorer View
ZEBRA TECHNOLOGIES 13
Page 14
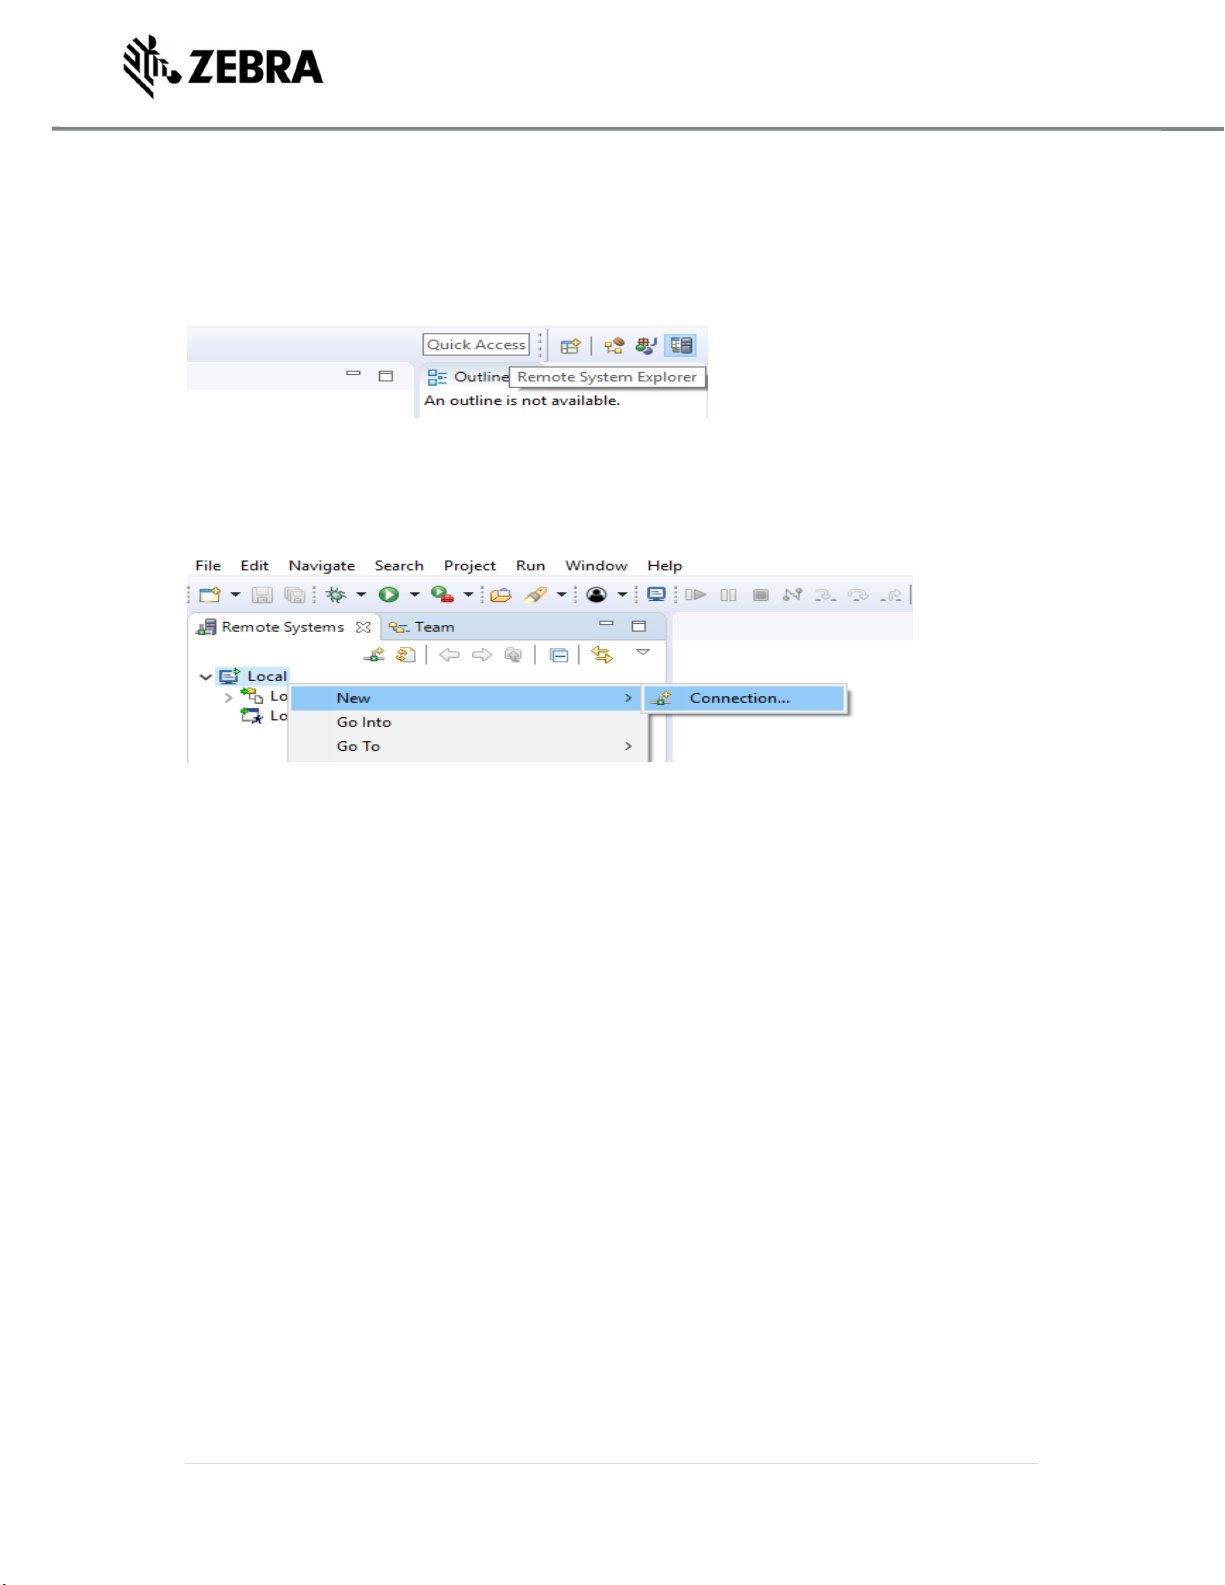
Select the remote system explorer button if available
Figure 17 : Remote System Explorer View
Right click on Local in the remote system view and select new-> Connection.
Figure 18 : Connection View
Select Linux in the New Connection and click on Next.
Figure 19 : Remote System View
ZEBRA TECHNOLOGIES 14
Page 15

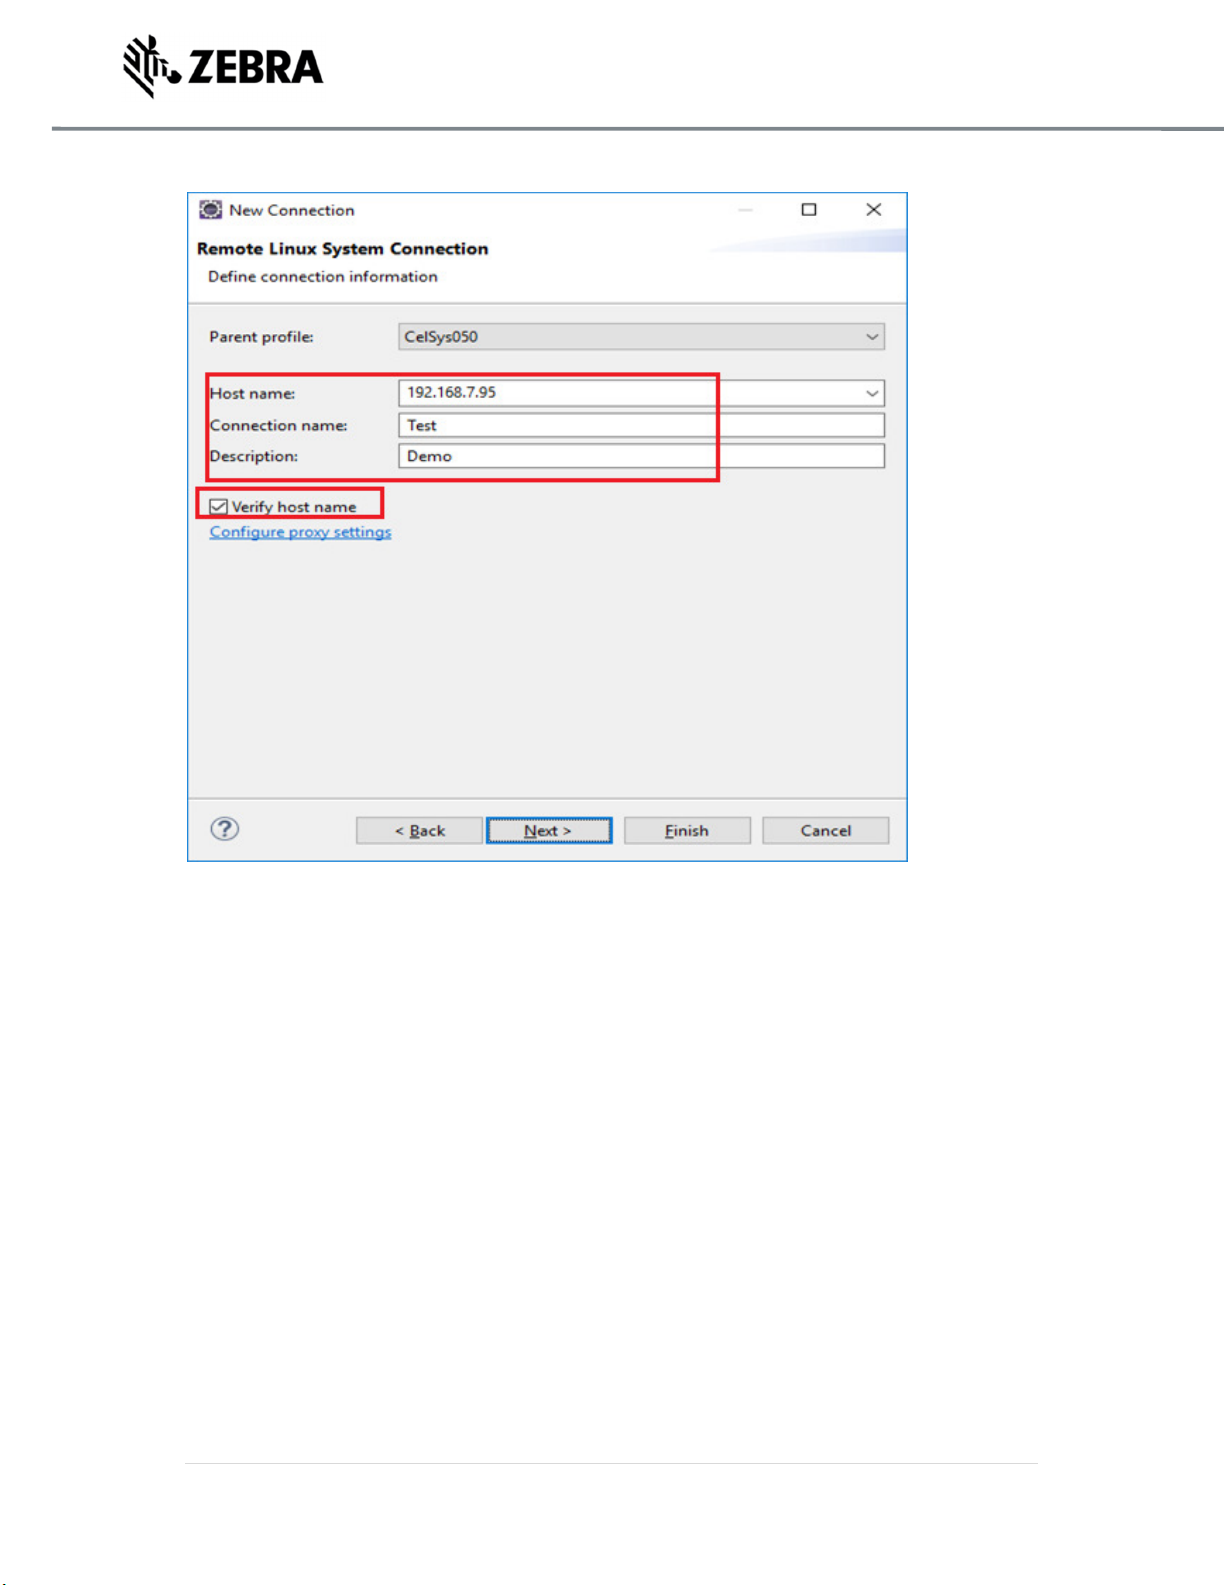
In the New Connection or Remote Linux System Connection,
In the Host field, enter the host (the device IP address or network name).
Connection name as ‘Test’, Description as ‘Demo’’ and select Next.
Note: Deselect Verify host name if the device is not accessible during setup.
Figure 20 : Remote Linux System Connection View
ZEBRA TECHNOLOGIES 15
Page 16
Note: Display over parent profile may change. Still provide connection information.
In the New Connection or Files window, select ssh.files in the configuration section and select Next.
ZEBRA TECHNOLOGIES 16
Page 17
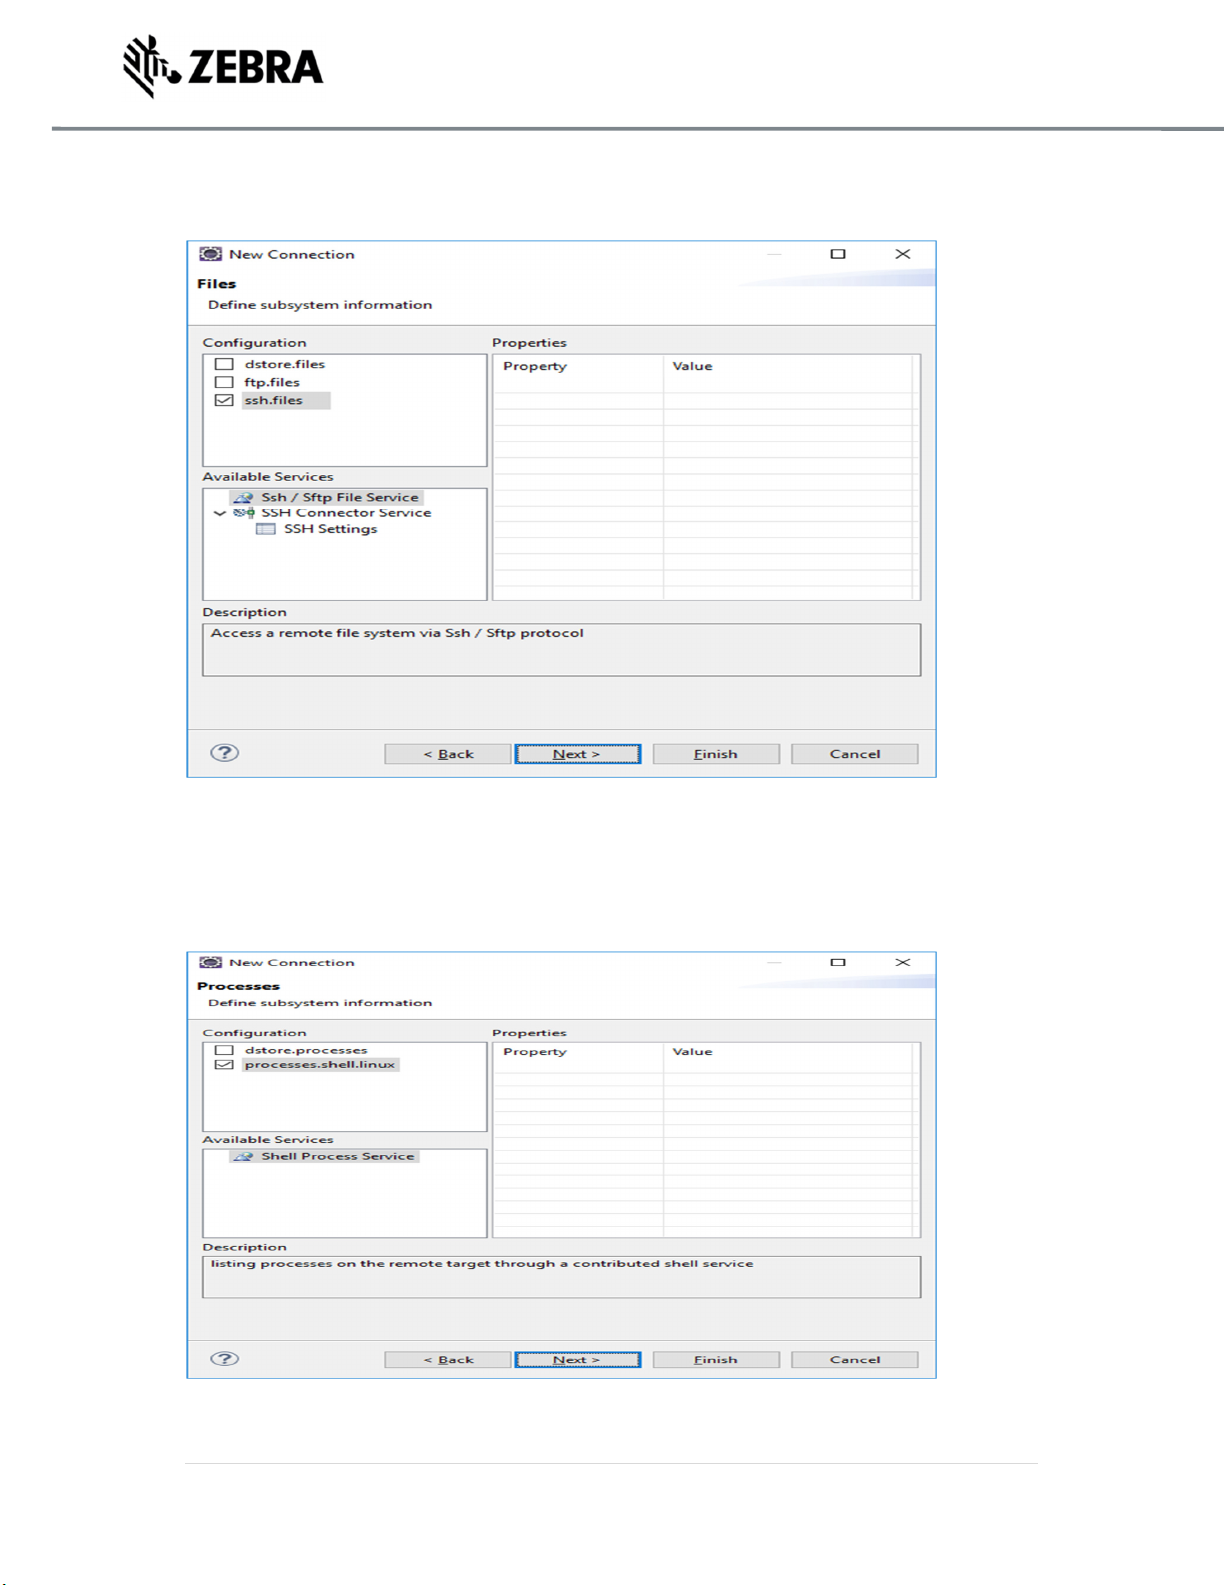
Figure 21 : ssh Files View
In the New Connection or Processes window select processes.shell.linux in the configuration section
and select Next.
Figure 22 : Process Shell Linux View
ZEBRA TECHNOLOGIES 17
Page 18
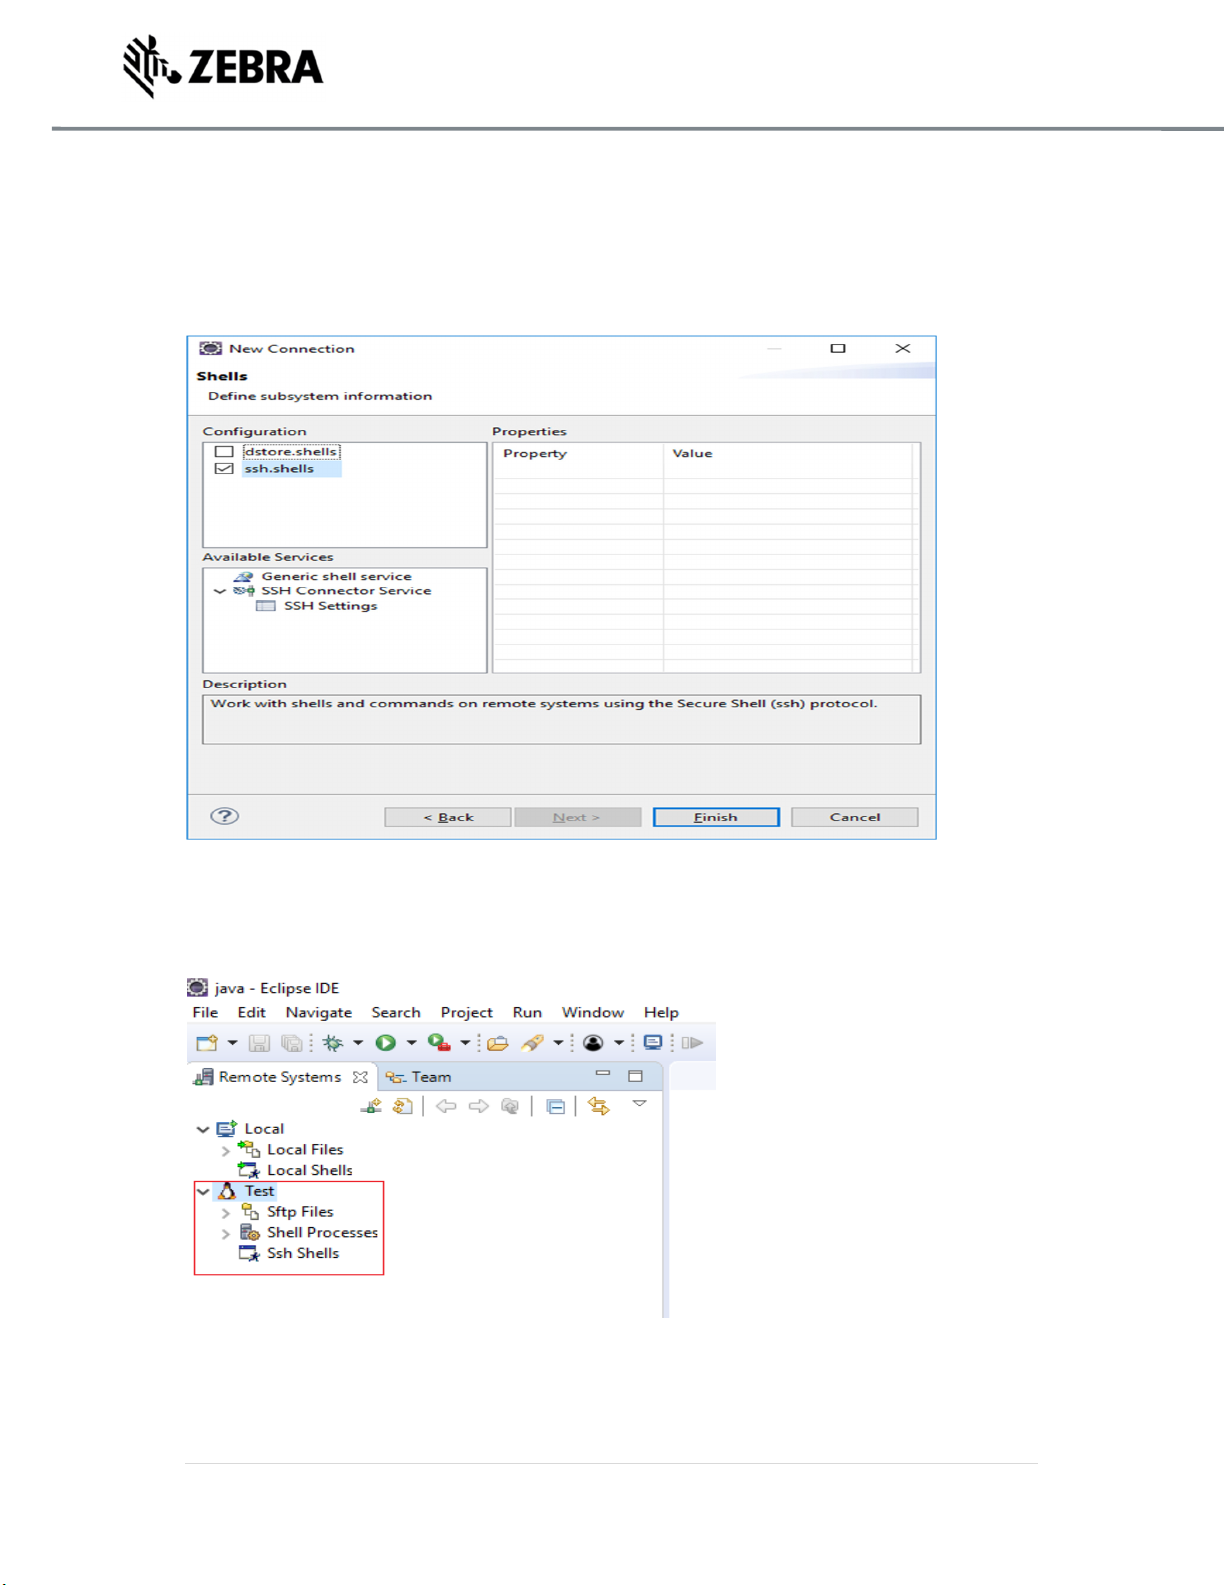
In the New Connection or Shells window select ssh.shells in the configuration section and Select
Finish.
Figure 23 : ssh shells View
The new entry appears in the Remote System view.
Figure 24 : Test Connection View
ZEBRA TECHNOLOGIES 18
Page 19
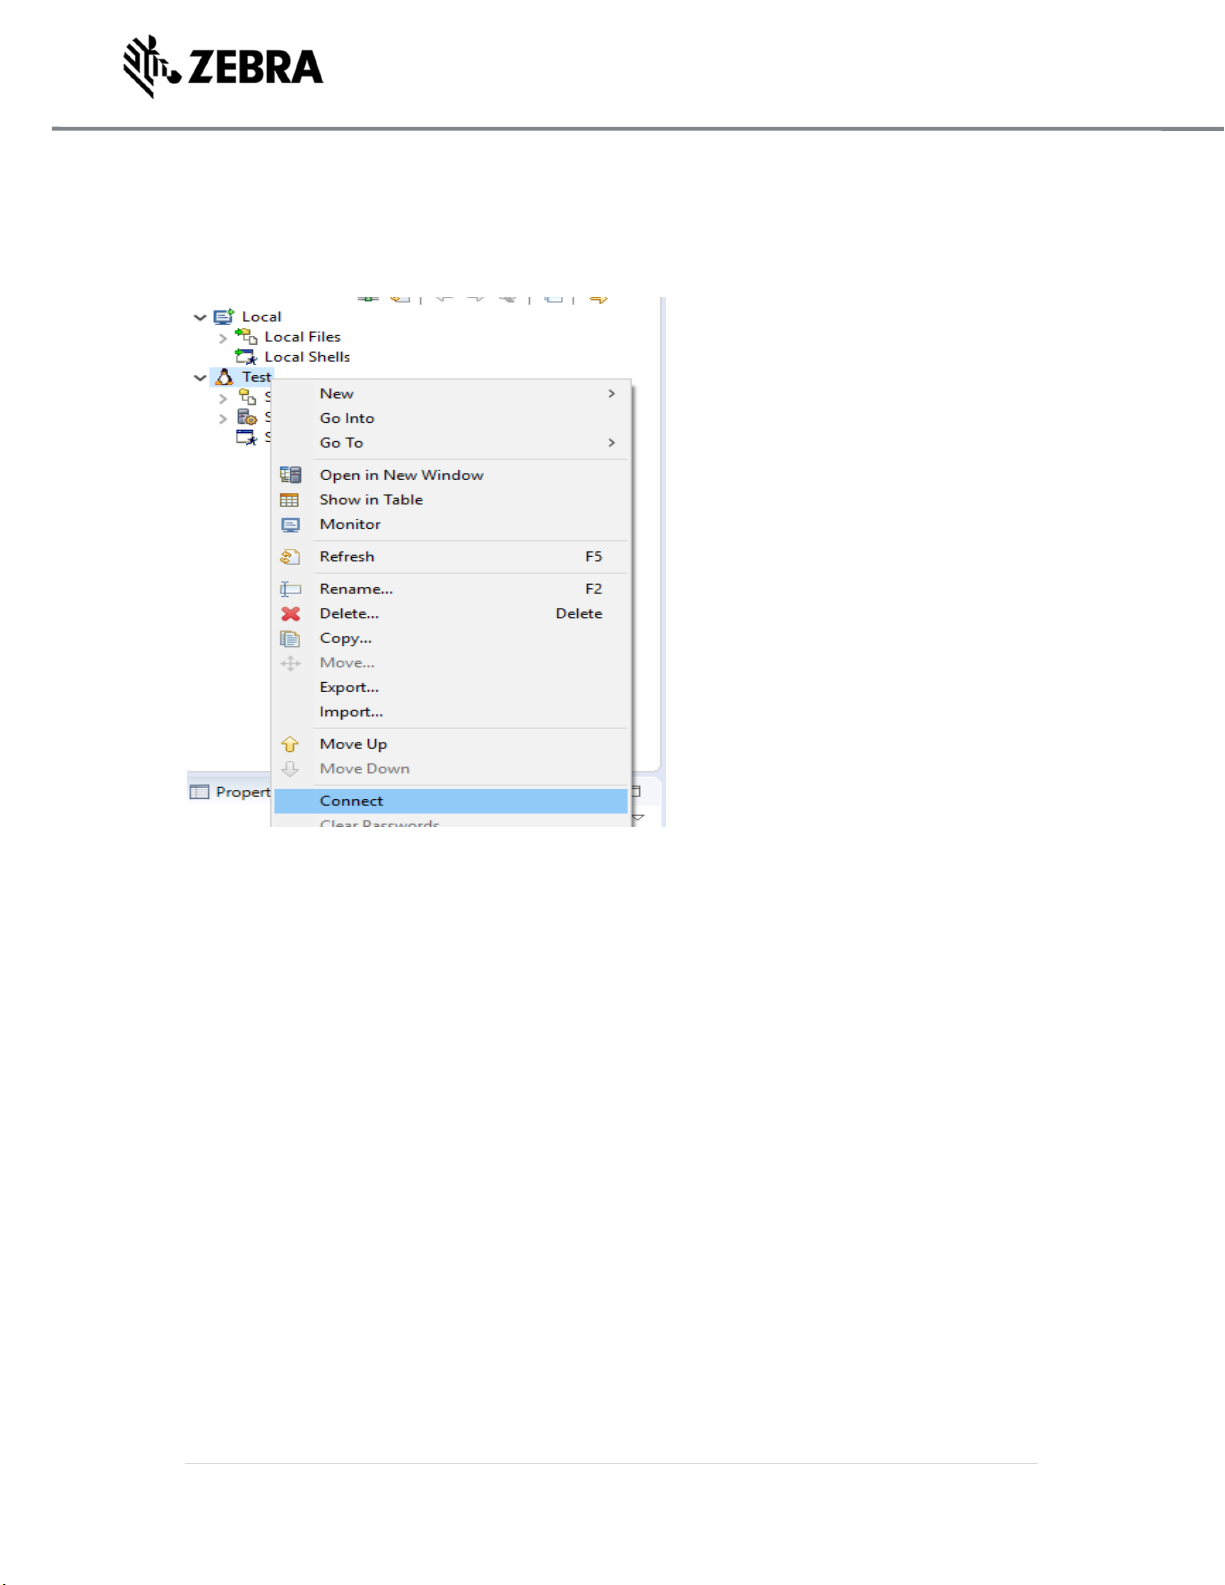
To connect to the device, Right click on the remote connection (Test) and select Connect.
Figure 25 : Test Connection Connect
ZEBRA TECHNOLOGIES 19
Page 20

In the Enter Password window:
In the User ID field, Enter User ID as “rfidadm”
Leave the Password (optional ) field blank.
Select Save User ID and Save Password checkboxes.
Select OK.
Figure 26 : Password Popup View
Note: Select Yes or OK for any warning messages regarding authentication and missing folders for
SSH Handling.
If Password Security Hint warning window appears, select No
ZEBRA TECHNOLOGIES 20
Page 21
JAVA SAMPLE APPLICATION BUILD AND DEBUG
7.0 Java Sample Application Build and Debug
This section describes the build and debug steps for the RFIDSample4App which is given as part of
the zip package. This helps in understanding the steps and procedure to debug the given sample
application.
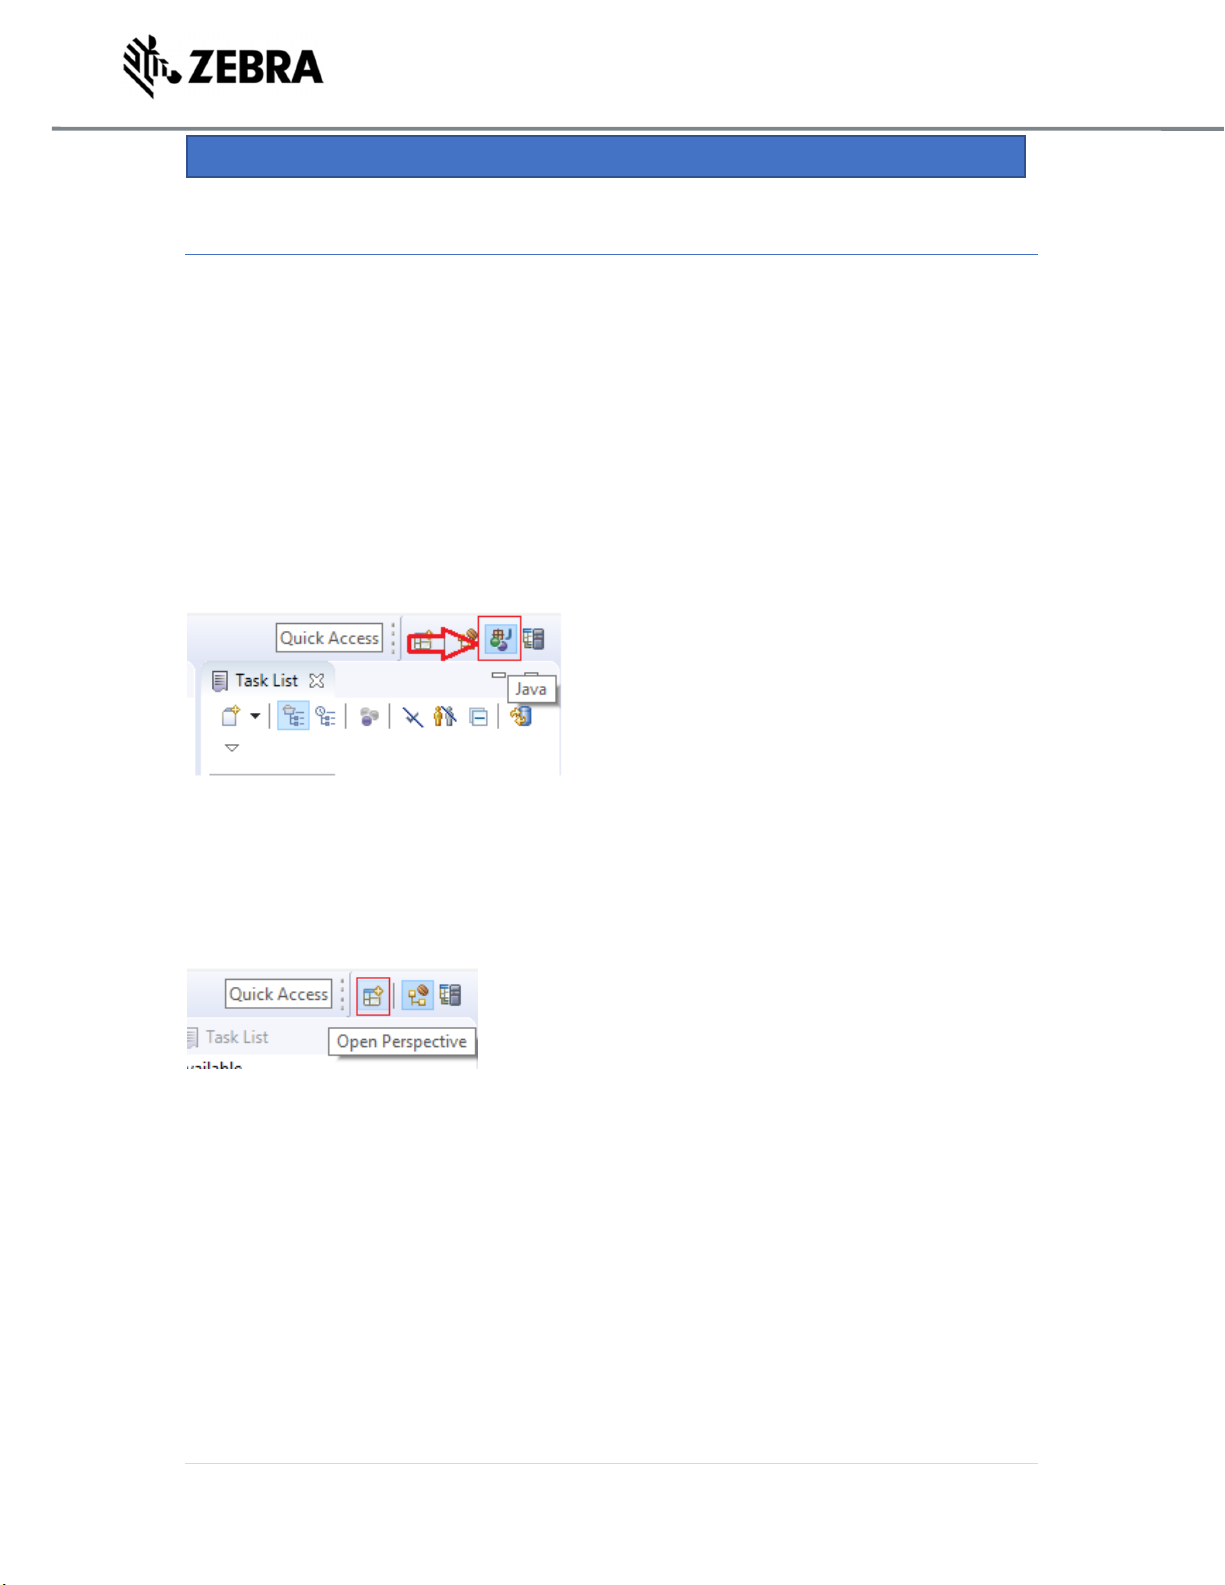
Note : If default perspective is not java in eclipse, then we can enable by 2 methods
Method 1 :
Click on the following icon in eclipse.
Figure 27 : Java Perspective Icon
Method 2 :
Click on open perspective.
Figure 28 : Open Perspective Icon
ZEBRA TECHNOLOGIES 21
Page 22
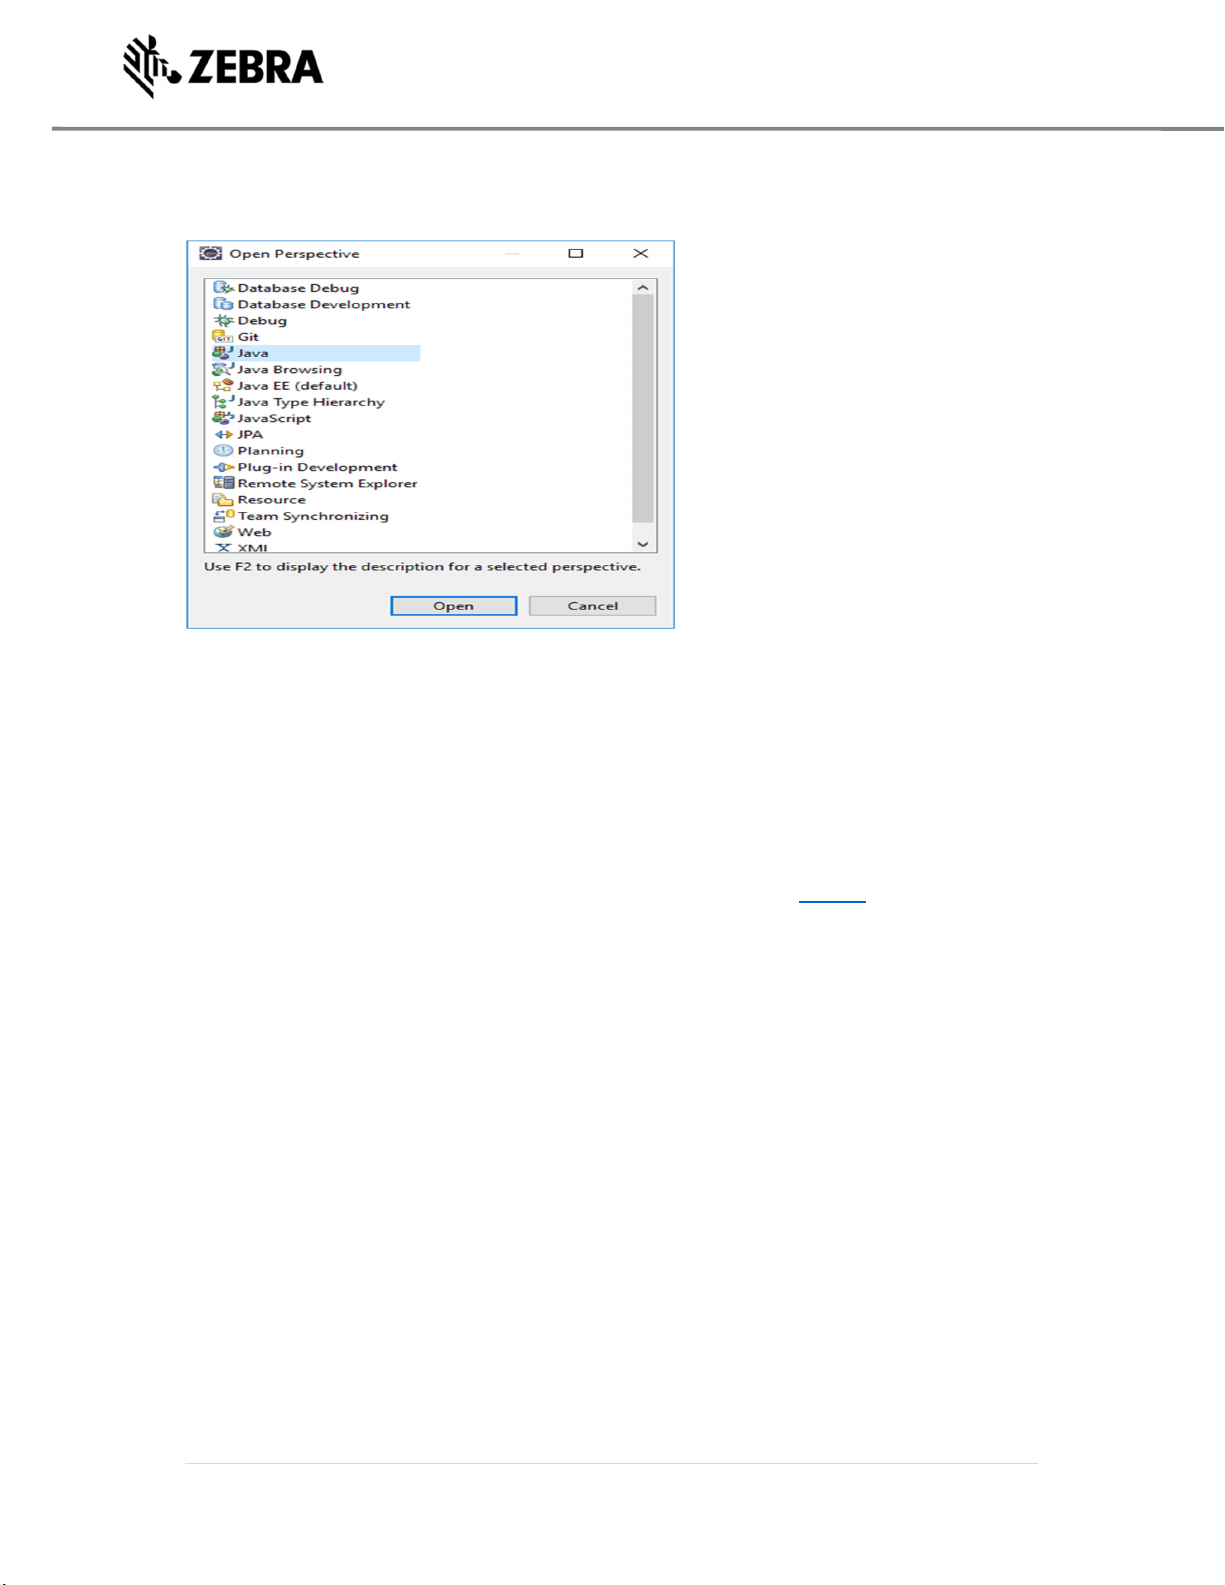
Select java and click Open.
Figure 29 : Java Selection View
7.1 Import RFID3 API Java Library to Embedded Java Project.
This section describes the steps on how to import RFID Symbol library for embedded java RFID
application.
Note : In case if the zip file was unzipped to “C:\” folder as mentioned in Figure 3 above and if there
is no exclamation mark on RFIDSample4App project, skip this 7.1 section.
In the Package Explorer view, Right click on the Project and select Properties.
ZEBRA TECHNOLOGIES 22
Page 23
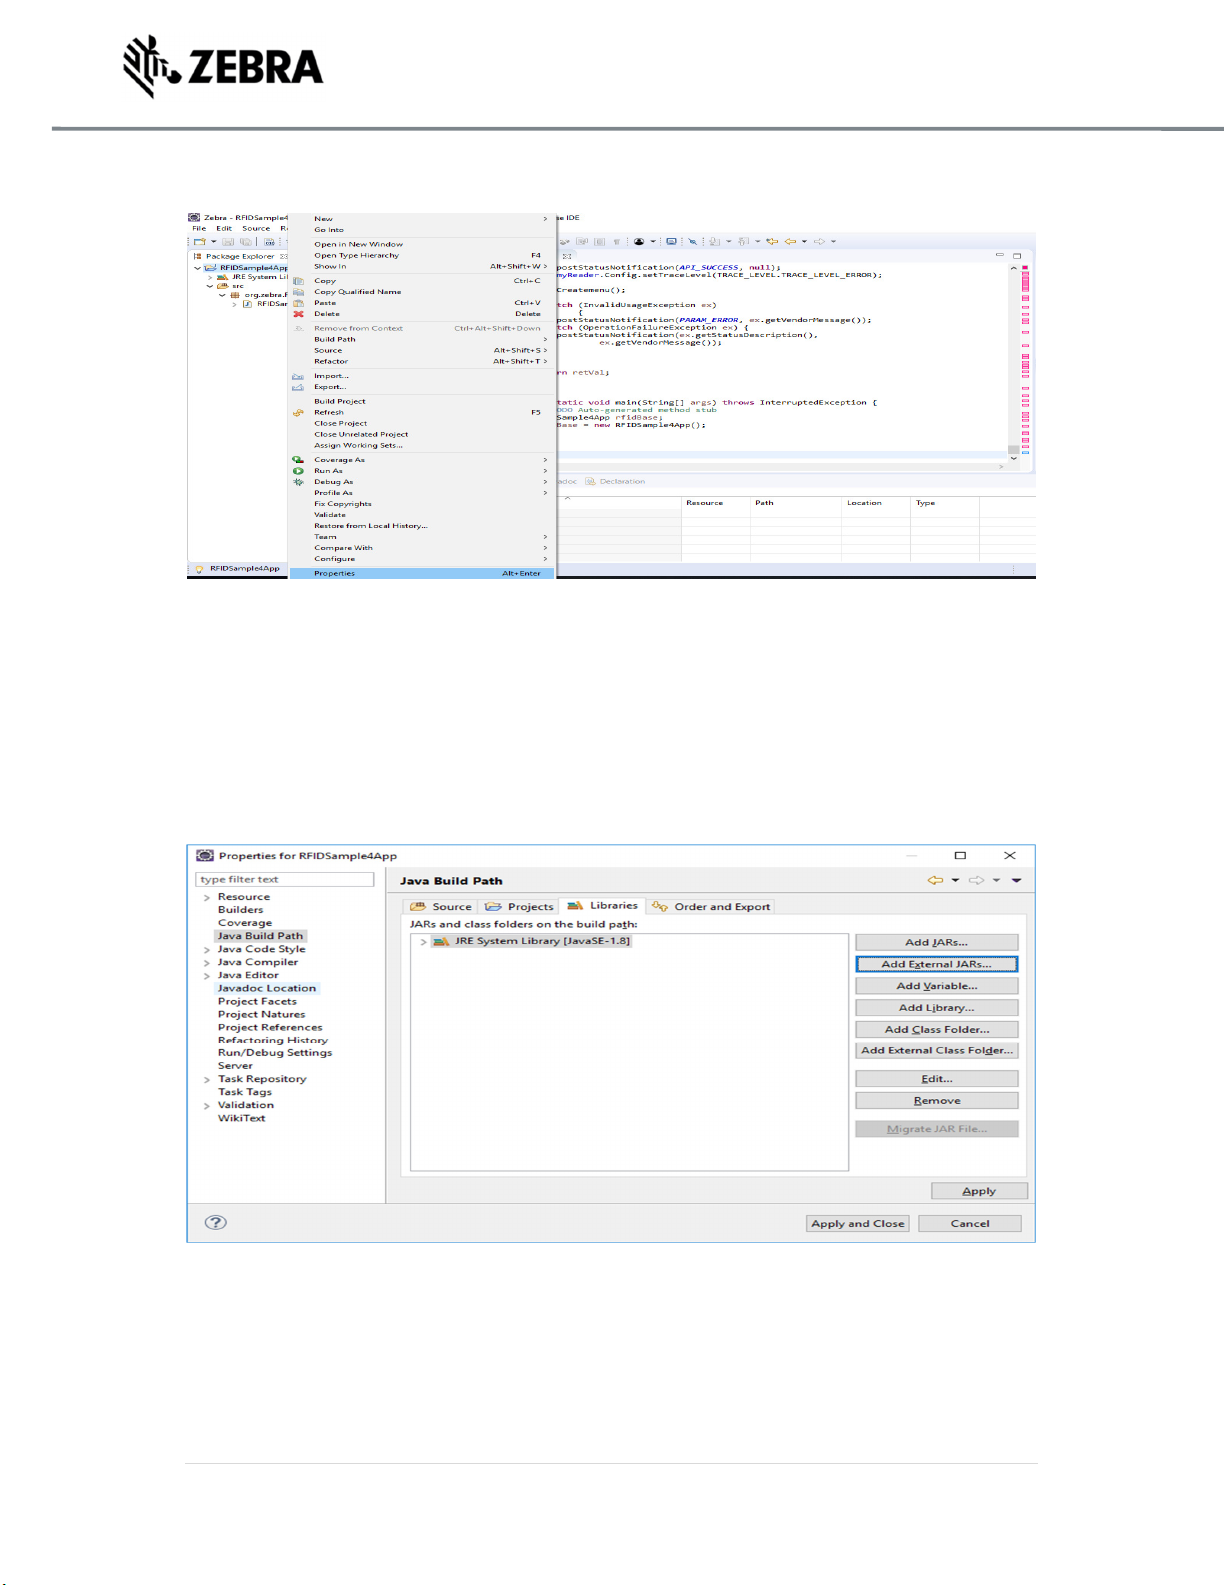
Figure 30 : RFID Sample Properties
Select Java Build Path. Click on Libraries Tab.
Note : If Symbol.RFID.API3.jar shows an error message saying missing or If Symbol.RFID.API3.jar is
not pointing to the selected workspace, then please remove it clicking Remove button, click on Add
External JARs and continue further.
Figure 31 : Java Build Path Selection
ZEBRA TECHNOLOGIES 23
Page 24
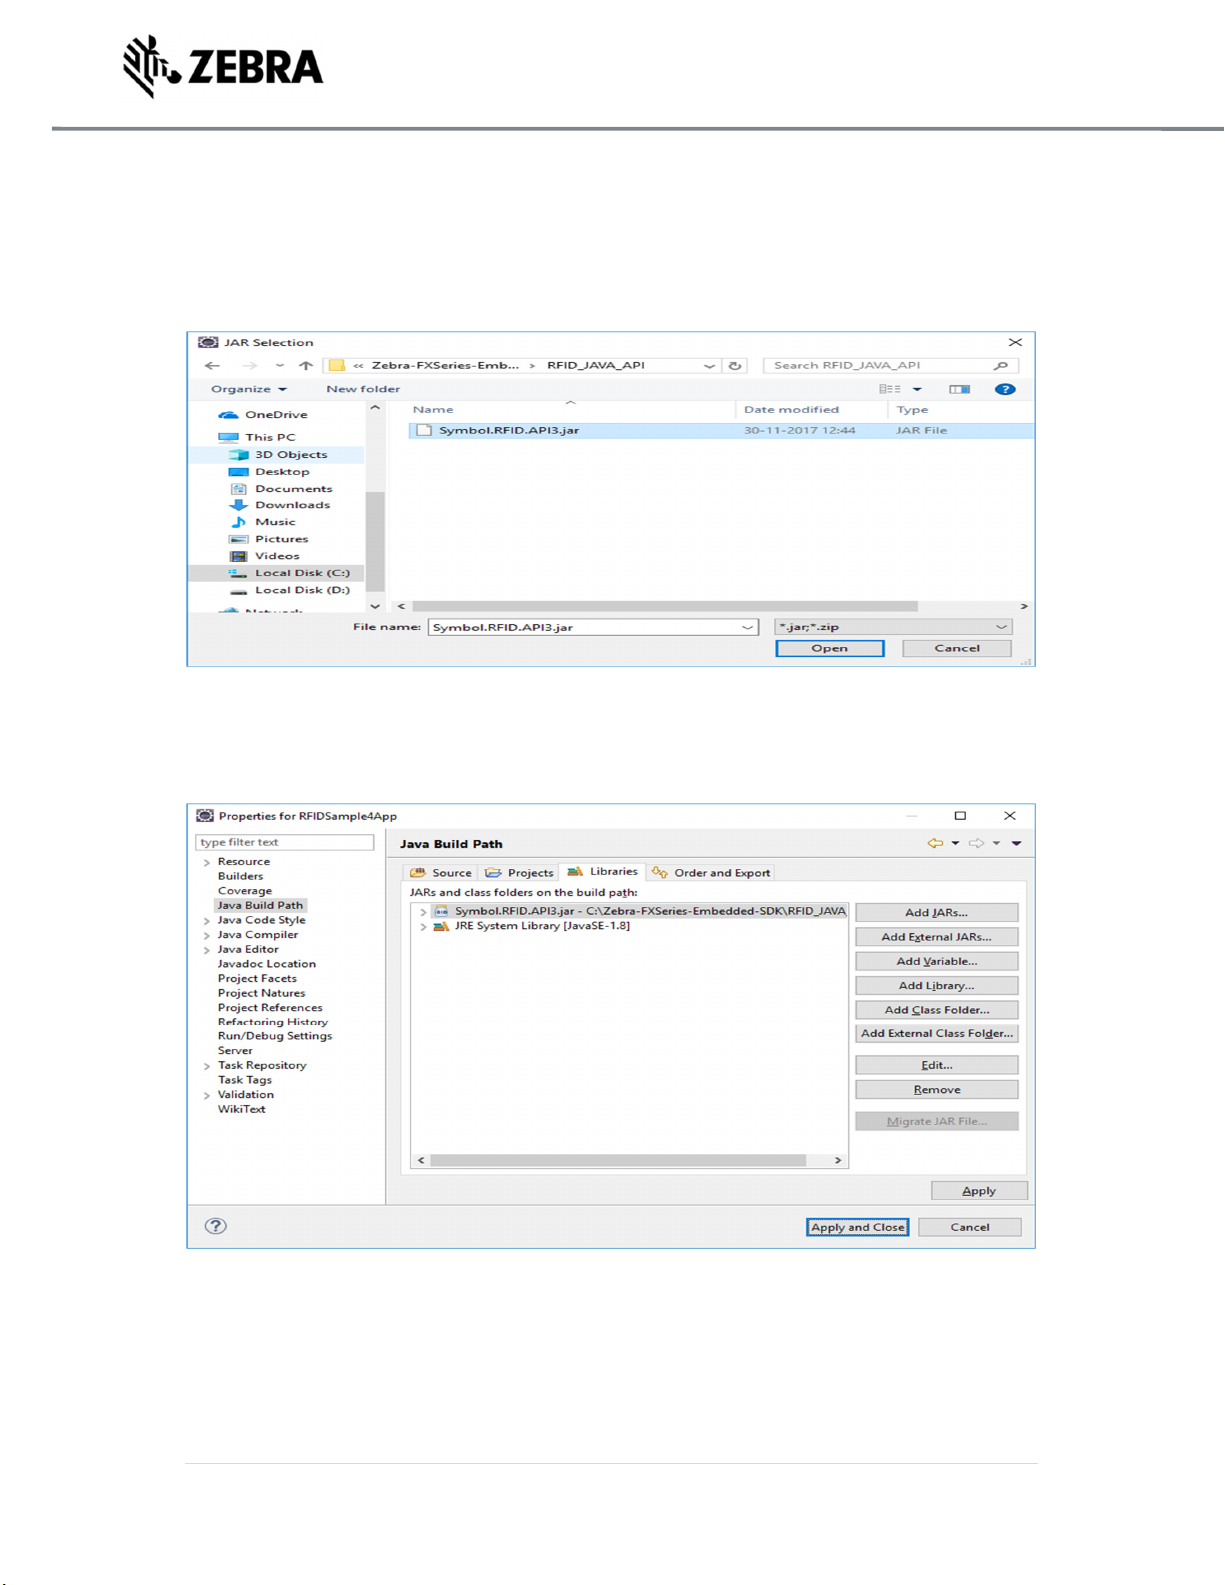
In the Jar selection window, Browse UP/Back the folder to >>Zebra-FXSeries-Embedded-SDK,
then browse down to >>RFID_JAVA_API of the SDK Installation and select Symbol.RFID.API3.jar
Click Open.
Figure 32 : JAR Selection
Click on Apply and Close.
Figure 33 : Java Build Path Select wiion
ZEBRA TECHNOLOGIES 24
Page 25

The Symbol.RFID.API3.jar class library appears in the Referenced Libraries section of the project
entry in package explorer view.
Figure 34 : Class Library View
7.2 Building Java Executable Class File(s)
This section explains the steps on how to clean and build the RFIDSample4App java class.
Select the project name (RFIDSample4App) and go to Project menu item and select Clean.
Figure 35 : Project Clean View
ZEBRA TECHNOLOGIES 25
Page 26

Note: Disable Start a build immediately checkbox.
Click on Clean button in Clean popup which appears after the above window.
Figure 36 : Project Clean Popup View
Select Project (RFIDSample4App) and go to project menu and select Build Project.
Figure 37 : Build Project View
ZEBRA TECHNOLOGIES 26
Page 27

After build the results are shown in the Problems tab.
Figure 38 : Project Details Window View
7.3 Setup Java Remote Debug Configuration.
This section explains the steps on how to setup remote debug configuration for Zebra RFID readers
FX9600 or FX7500.
Class file built on windows host machine from eclipse will be transferred to the RFID reader.
7.3.1 Setup Java Remote Build Path.
The build path specifies the destination folder of the successfully build executable. Setting the build
path as a folder on the remote device ensures the executable is deployed on device as the last step
of a successful build.
ZEBRA TECHNOLOGIES 27
Page 28

In the Package Explorer view, Right click on the project (RFIDSample4App) and select Properties to
open the project properties window.
Figure 39 : Project Details Window View
Select Java Build Path and then select the Source tab, select project (RFIDSample4App/src).
Click on Browse to Folder Selection window.
Figure 40 : Browse bin File View
Select the Folder level in the which the remote folder is to be linked. (see below fig)
ZEBRA TECHNOLOGIES 28
Page 29

Select Create New Folder to open the New Folder window.
Figure 41 : RFID Folder Selection View
Select Advanced to expand the window to the advanced version.
Figure 42 : New Folder Popup View
ZEBRA TECHNOLOGIES 29
Page 30

Select Link to folder in the file system checkbox.
Select RSE in the choose file system drop down menu.
Select Browse to open the browse for file window.
Figure 43 : Browse Advanced View
Select the Connection (Test) in the Connection drop down menu, which was created in setting up a
remote connection for remote debugging as mentioned in section 6.
Expand My Home entry, select the directory on the device where the executable has to be created
and deployed as the final step of the build.
Select OK.
Figure 44 : RFID Sample Selection in Test Connection
ZEBRA TECHNOLOGIES 30
Page 31

If org file is missing or Empty list appeared while connection to reader, follow the below steps.
Switch back to RSE perspective, expand Test and right click on My Home Directory, select New and
click on Folder.
Enter New Folder Name as org and click on the Finish button.
ZEBRA TECHNOLOGIES 31
Page 32

In the same way create zebra and RFIDSample4App folder i.e Right click on org folder, select New
and Click on Folder and enter New Folder Name as zebra and click Finish button.
Again Right click on the zebra folder, select New and click on the folder and enter New Folder Name
as RFIDSample4App and click Finish button.
After this the folder structure should be appeared as per following screenshot.
In the New Folder popup, make sure folder name should be changed as shown in the below
screenshot and click OK.
Replace the character “?” with “_” (underscore) , otherwise it will throw error as “?” is not a valid
character.
Figure 45 : Folder Rename View
ZEBRA TECHNOLOGIES 32
Page 33

Make sure that the new folder (RFIDSample4App_Test) appears in the Folder Selection window and
select OK.
Figure 46 : Folder Selection View
Select Apply and Close to complete the Java Build Setup
Figure 47 : Properties for RFIDSample4App View.
ZEBRA TECHNOLOGIES 33
Page 34

Select No to keep local build folder.
Figure 48 : Setting Build Path View
7.4 Debug Embedded Java Application
This section explains detailed steps on debugging RFID sample application.
In the Package Explorer view, Right Click on the Project and click on Debug As -> Debug
Configuration.
Figure 49 : Debug Configuration View
ZEBRA TECHNOLOGIES 34
Page 35

In the Debug Configurations window, right click on Remote Java Application and then click on New
Configuration.
Figure 50 : Debug New Configuration View
ZEBRA TECHNOLOGIES 35
Page 36
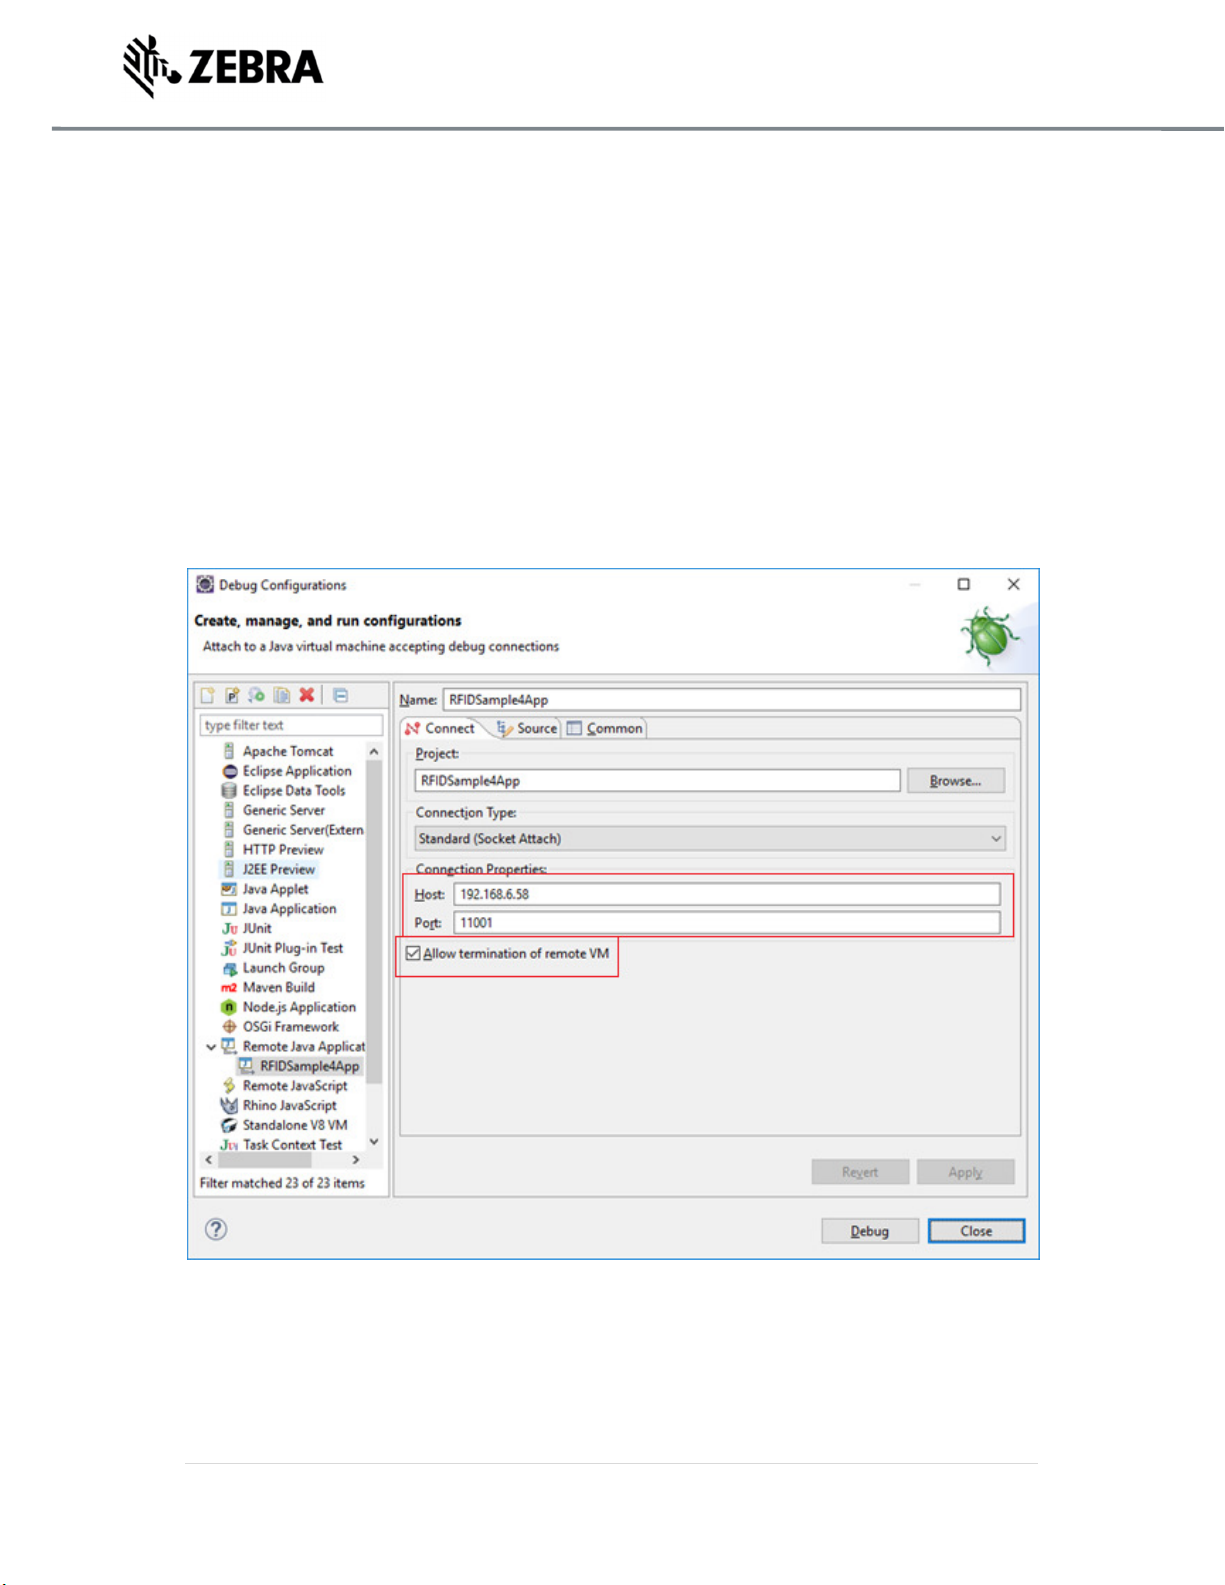
In the Host field, enter the host (the device IP address or network name).
In the Port field, enter the port available on the host system for remote debugging (for example
11001).
Make sure the above-mentioned port is not blocked by firewall.
Select the Allow Termination of remote VM checkbox.
Select Apply.
Select close to complete the remote configuration setup.
Figure 51 : Debug Configuration Properties View
ZEBRA TECHNOLOGIES 36
Page 37

7.4.1 Remote SSH Terminal Setup
Open the Terminal view to access the device to start debug session and view application output.
Click on Terminal icon in the eclipse toolbar.
Figure 52 : Open Terminal View
In the Launch Terminal window…
Select SSH Terminal from the Choose terminal drop down.
In the Host field, enter the host (the device IP address or network name).
For User field enter “rfidadm”.
For Password field, leave it blank.
Check Save user and Save password checkboxes.
Click on OK.
Figure 53 : SSH Terminal View
ZEBRA TECHNOLOGIES 37
Page 38

Terminal will open up as shown below
Figure 54 : Terminal View
Change the folder path
Command enter “cd org/zebra/RFIDSample4App” on the terminal to change the build path folder
Figure 55 : cd Command View
Execute the following command to start the debug session on device.
export LD_LIBRARY_PATH=/platform/lib/;java -agentlib:jdwp=transport=dt_socket,server=y,suspend=y,address=11001 -
Djava.library.path=/platform/lib/ -cp .:/platform/lib/Symbol.RFID.API3.jar org.zebra.RFIDSample4App.RFIDSample4App
Figure 56 : Export Command View
ZEBRA TECHNOLOGIES 38
Page 39

Start the debugging application in the eclipse environment
Click on the debug icon in the eclipse photon window.
Figure 57 : Open Debug View
Select Debug Configurations.
Figure 58 : Open Debug Configuration View
ZEBRA TECHNOLOGIES 39
Page 40

Select the created debug configuration and select Debug to start the remote application debugging.
Figure 59 : Create Manage Run Configuration View
Click on Switch.
Figure 60 : Switch View
ZEBRA TECHNOLOGIES 40
Page 41

Note : By default breakpoint is enabled in the zip provided. Hence, please resume so that the RFID
application comes out of the breakpoint.
Click on Resume icon as shown below.
Figure 61 : Resume Manage View
Note : On Photon eclipse , remote system explorer does not support SSH terminal. Hence, we need
to switch to Java perspective to visualise the output of RFID application on terminal window.
Select java Perspective on the eclipse window as shown below.
Figure 62 : Java Perspective View
ZEBRA TECHNOLOGIES 41
Page 42
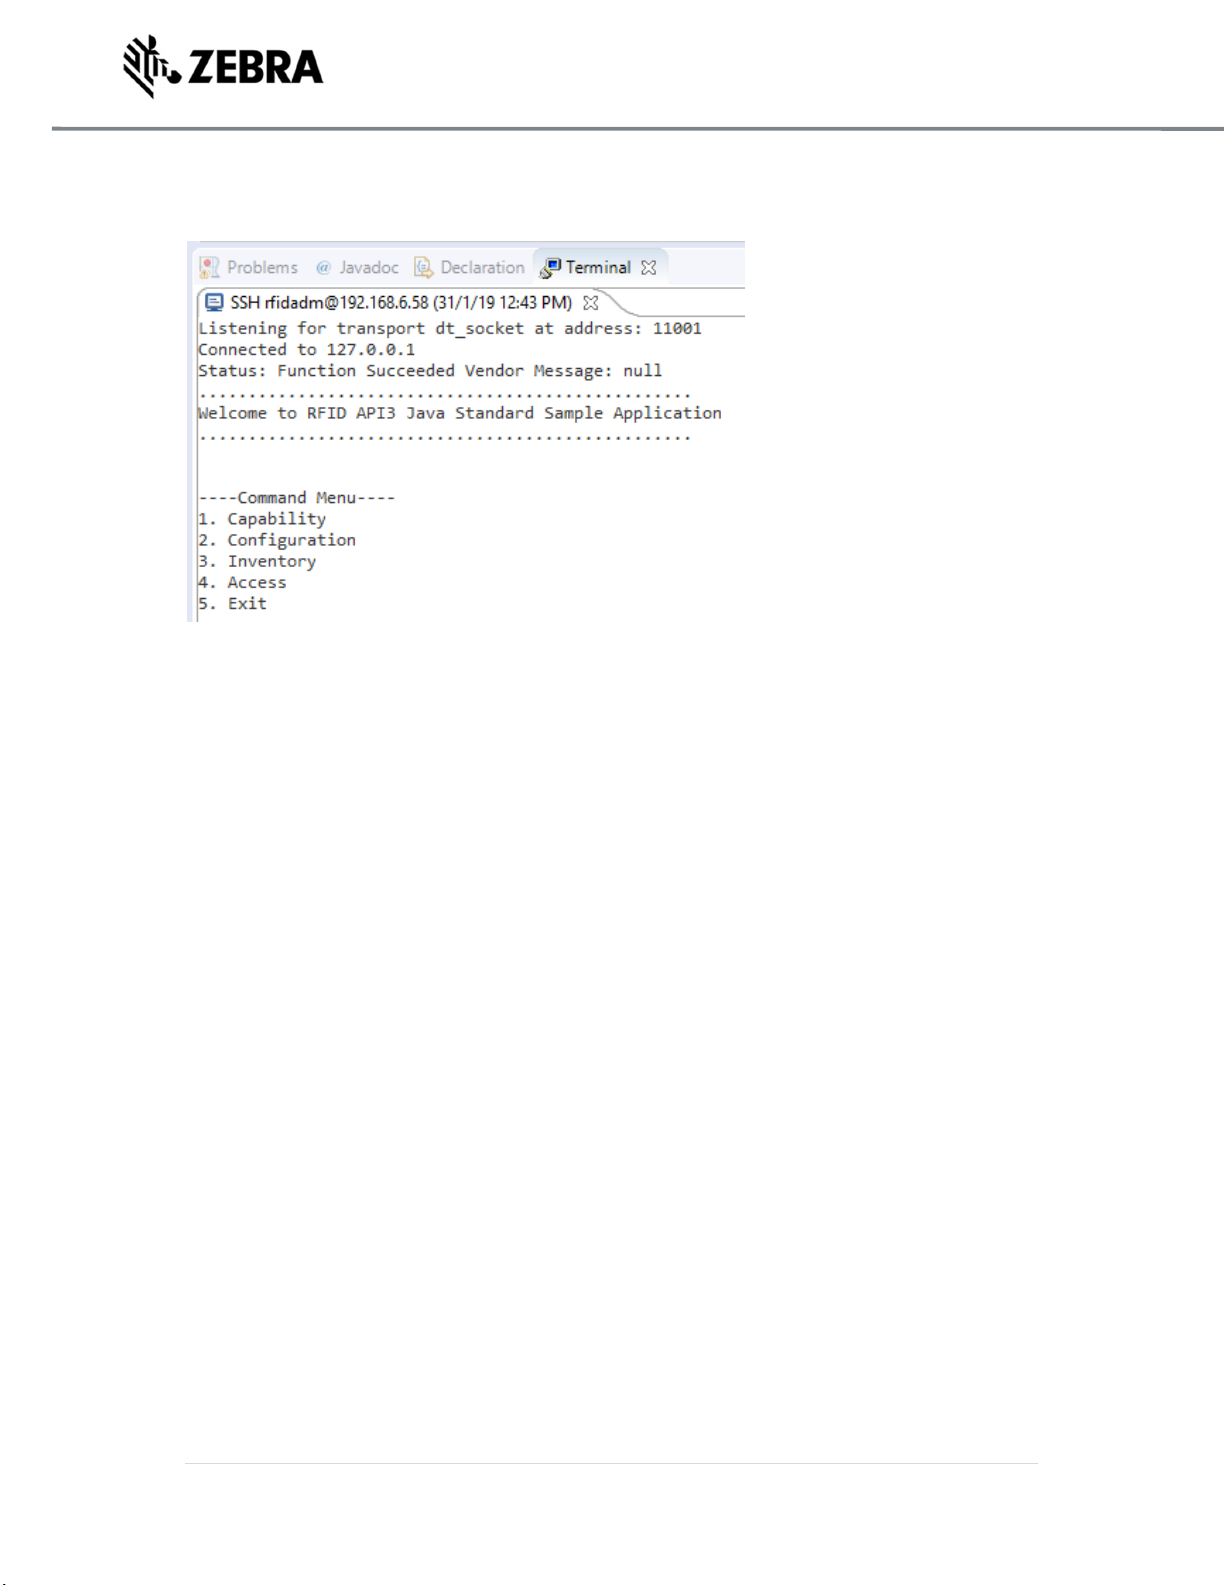
The application runs and displays the terminal output in the terminal view.
Figure 63 : Terminal Output View
Note : Changing Reader IP
In case if user wants to change the reader IP, please follow the below steps
Step 1: Under Section 6, goto Figure 25, right click Test connection -> Click on Disconnect -> right
click on Test Connection -> Click on Properties -> Click on Host -> In the Host name dropdown enter
the new IP which user wants to change to.
Step 2 : Select Verify Host Name checkbox -> Click on Apply and Close
Step 3 : Follow Section “7.4 Debug Embedded Java Application” again , follow Figure 51 : Debug
Configuration Properties View, change the IP which user wants to change to.
Step 4 : Follow Section “7.4.1 Remote SSH Terminal Setup” again , follow Figure 53 : SSH Terminal
View, change the IP which user wants to change to.
ZEBRA TECHNOLOGIES 42
Page 43

EMBEDDED JAVA APPLICATION
8.0 Embedded Java Application
This section describes the detailed steps to create embedded Java RFIDSample4App from scratch.
The steps involved are
• Create Project
• Add sources
• Import RFID system library
• Clean and build steps
• Setting up of Java remote debug config
• Set up Remote build path
• Debug embedded java RFID application
• Creation of Jar executable
• Creation of start and stop script for java installation package
8.1 Creating an Embedded Java Project
Note : If Remote connection for debugging is not created,
Please refer section 6.0 for remote connection steps
Note: If default perspective is not java in eclipse, then we can enable it in 2 methods.
Please refer section 7.0 of enabling Java perspective.
Once done with above mentioned step, please create a new Java project as mentioned below.
Select File->New->Java Project
Figure 64 : Java Eclipse IDE View
ZEBRA TECHNOLOGIES 43
Page 44

In the New Java Project/Create a Java Project window, enter the Project name “RFIDSample4App”
and select Finish.
Figure 65 : Create Java Project View
The new project appears in the Package Explorer section.
Figure 66 : RFID Sample View
ZEBRA TECHNOLOGIES 44
Page 45

8.2 Adding Source File to Embedded Java Project
In the package explorer view, expand the project, right-click on src, and select New-> Class.
Figure 67 : Create Class View
In the New Java Class Window, enter the Package “org.zebra.RFIDSample4App” and Name
“RFIDSample4App”.
Select Finish.
Figure 68 : Create Class View
ZEBRA TECHNOLOGIES 45
Page 46

The source file appears in the window.
Figure 69 : RFID Package View
Copy the java source code from “RFIDSample4App.java” file which is part of the java sample folder
at “Zebra-FXSeries-Embedded-SDK\samples\java\RFIDSample4App\src\org\zebra\RFIDSample4App”
Overwrite the file with contents of file which was copied above.
Figure 70 : RFID Code View
ZEBRA TECHNOLOGIES 46
Page 47

Add the break point and Save the file.
Note : Add the breakpoint by double clicking the respective line number.
Figure 71 : RFID Breakpoint View
8.3 Import RFID3 API Java Library to Embedded Java Project.
This section describes the steps on how to import RFID Symbol library for embedded java RFID
application.
In the Package Explorer view, Right click on the Project and select Properties.
Figure 72 : RFID Sample Properties
ZEBRA TECHNOLOGIES 47
Page 48

Select Java Build Path. Click on Libraries Tab. Select Add External Jars
Figure 73 : Java Build Path Selection
In the Jar selection window, Browse In the folder, RFID_JAVA_API of the SDK Installation and select
Symbol.RFID.API3.jar
Click Open.
Figure 74 : JAR Selection
ZEBRA TECHNOLOGIES 48
Page 49

Click on Apply and Close.
Figure 75 : Java Build Path Selection
The Symbol.RFID.API3.jar class library appears in the Referenced Libraries section of the project
entry in package explorer view.
Figure 76 : Class Library View
8.4 Building Java Executable Class File(s)
This section explains the steps on how to clean and build the RFIDSample4App java class.
ZEBRA TECHNOLOGIES 49
Page 50

Select the project name (RFIDSample4App) and go to Project menu item and select Clean.
Figure 77 : Project Clean View
Click on Clean button in Clean popup which appears after the above window.
Note: Disable Start a build immediately checkbox.
Figure 78 : Project Clean Popup View
ZEBRA TECHNOLOGIES 50
Page 51

Select Project (RFIDSample4App) and go to project menu and select Build Project.
Figure 79 : Build Project View
After build the results are shown in the Problems tab.
Figure 80 : Project Details Window View
8.5 Setup Java Remote Debug Configuration.
This section explains the steps on how to setup remote debug configuration for Zebra RFID readers
FX9600 or FX7500.
Class file built on windows host machine from eclipse will be transferred to the RFID reader.
8.5.1 Setup Java Remote Build Path.
The build path specifies the destination folder of the successfully build executable. Setting the build
path as a folder on the remote device ensures the executable is deployed on device as the last step
of a successful build.
ZEBRA TECHNOLOGIES 51
Page 52

In the Package Explorer view, Right click on the project (RFIDSample4App) and select Properties to
open the project properties window.
Figure 81 : Project Details Window View
Select Java Build Path and then select the Source tab, select project (RFIDSample4App/src).
Click on Browse to Folder Selection window.
Figure 82 : Browse bin File View
ZEBRA TECHNOLOGIES 52
Page 53

Select the Folder level in the which the remote folder is to be linked. (see below fig)
Select Create New Folder to open the New Folder window.
Figure 83 : RFID Folder Selection View
ZEBRA TECHNOLOGIES 53
Page 54

Select Advanced to expand the window to the advanced version.
Figure 84 : New Folder Popup View
Select Link to folder in the file system checkbox.
Select RSE in the choose file system drop down menu.
Select Browse to open the browse for file window.
Figure 85 : Browse Advanced View
ZEBRA TECHNOLOGIES 54
Page 55

Select the Connection (Test) in the Connection drop down menu, which was created in setting up a
remote connection for remote debugging as mentioned in section 6.
Expand My Home entry, select the directory on the device where the executable has to be created
and deployed as the final step of the build.
If Org folder is missing , please refer to page 29 under Setup Java Remote Build Path.
ZEBRA TECHNOLOGIES 55
Page 56

Select OK.
Figure 86 : RFID Sample Selection in Test Connection
Note : In case of if Enter Password window pops up, enter the User ID as “rfidadm”,
In password field, leave it blank.
Enable Save Password and Save user ID check boxes.
Figure 87 : Password Popup View
In the New Folder popup, make sure folder name should be changed as shown in the below
screenshot and click OK.
Replace the character “?” with “_” (underscore)
Figure 88 : Folder Rename View
ZEBRA TECHNOLOGIES 56
Page 57

Make sure that the new folder (RFIDSample4App_Test) appears in the Folder Selection window and
select OK.
Figure 89 : Folder Selection View
Select Apply and Close to complete the Java Build Setup
Figure 90 : Properties for RFIDSample4App View.
ZEBRA TECHNOLOGIES 57
Page 58

Select No to keep local build folder.
Figure 91 : Setting Build Path View
ZEBRA TECHNOLOGIES 58
Page 59

8.6 Debug Embedded Java Application
This section explains detailed steps on debugging RFID sample application.
In the Package Explorer view, Right Click on the Project and click on Debug As -> Debug
Configuration.
Figure 92 : Debug Configuration View
ZEBRA TECHNOLOGIES 59
Page 60

In the Debug Configurations window, right click on Remote Java Application and then click on New
Configuration.
Figure 93 : Debug New Configuration View
In the Host field, enter the host (the device IP address or network name).
ZEBRA TECHNOLOGIES 60
Page 61

In the Port field, enter the port available on the host system for remote debugging (for example
11001).
Make sure the above-mentioned port is not blocked by firewall.
Select the Allow Termination of remote VM checkbox.
Select Apply.
Select close to complete the remote configuration setup.
Figure 94 : Debug Configuration Properties View
ZEBRA TECHNOLOGIES 61
Page 62

8.6.1 Remote SSH Terminal Setup
Open the Terminal view to access the device to start debug session and view application output.
Click on Terminal icon in the eclipse toolbar.
Figure 95 : Open Terminal View
In the Launch Terminal window…
Select SSH Terminal from the Choose terminal drop down.
In the Host field, enter the host (the device IP address or network name).
For User field enter “rfidadm”.
For Password field, leave it blank.
Check Save user and Save password checkboxes.
Click on OK.
Figure 96 : SSH Terminal View
Terminal will open up as shown below
ZEBRA TECHNOLOGIES 62
Page 63

Figure 97 : Terminal View
Change the folder path
Command enter “cd org/zebra/RFIDSample4App” on the terminal to change the build path folder
Figure 98 : cd Command View
Execute the following command to start the debug session on device.
export LD_LIBRARY_PATH=/platform/lib/;java -agentlib:jdwp=transport=dt_socket,server=y,suspend=y,address=11001 -
Djava.library.path=/platform/lib/ -cp .:/platform/lib/Symbol.RFID.API3.jar org.zebra.RFIDSample4App.RFIDSample4App
Figure 99 : Export Command View
Start the debugging application in the eclipse environment
ZEBRA TECHNOLOGIES 63
Page 64

Click on the debug icon in the eclipse photon window.
Figure 100 : Open Debug View
Select Debug Configurations.
Figure 101 : Open Debug Configuration View
Select the created debug configuration and select Debug to start the remote application debugging.
ZEBRA TECHNOLOGIES 64
Page 65

Figure 102 : Create Manage Run Configuration View
Click on Switch.
Figure 103 : Switch View
ZEBRA TECHNOLOGIES 65
Page 66

Note : By default breakpoint is enabled in the zip provided. Hence, please resume so that the RFID
application comes out of the breakpoint.
Click on Resume icon as shown below.
Figure 104 : Resume Manage View
Note : On Photon eclipse , remote system explorer does not support SSH terminal. Hence, we need
to switch to Java perspective to visualise the output of RFID application on terminal window.
Select java Perspective on the eclipse window as shown below.
Figure 105 : Java Perspective View
ZEBRA TECHNOLOGIES 66
Page 67

The application runs and displays the terminal output in the terminal view.
Figure 106 : Terminal Output View
8.7 Create Java JAR Executable
This section details the steps of JAR creation of RFIDSample4App using manifest file
8.7.1 Create the Manifest file of the project.
Right Click on project in the package explorer view and select New and click on Folder.
Figure 107 : RFID Sample New Folder View
ZEBRA TECHNOLOGIES 67
Page 68

Enter Folder name as “META-INF” and click on Finish.
Figure 108 : RFID Sample New Folder Name View
Right click on META-INF in the package explorer view and select New and click on File.
Figure 109 : RFID Sample New File View
ZEBRA TECHNOLOGIES 68
Page 69

Expand the Project Name (RFIDSample4App), Select META-INF folder and enter File name as
MANIFEST.MF and click on Finish.
Figure 110 : RFID Sample New File Creation View
Open the MANIFEST.MF file under META-INF folder in the package explorer view, add the following
3 lines with the valid-main-package and main-class-name, hit enter and save the file.
Manifest-Version: 1.0
Class-Path: . /platform/lib/Symbol.RFID.API3.jar
Main-Class: [main-package-name].[main-class-name]
Figure 111 : RFID Manifest Name View
ZEBRA TECHNOLOGIES 69
Page 70

8.7.2 Create and export the JAR executable:
Right click on the project name and select export.
Figure 112 : RFID JAR Export View
In the Export select window, Expand Java and select JAR file.
Click Next.
Figure 113 : RFID JAR Export Resource Selection View
ZEBRA TECHNOLOGIES 70
Page 71

Select the desired folder where the JAR file needs to be exported.
build\ (application_name).jar
For example :
“C:\Zebra-FXSeries-Embedded-SDK\samples\java\build\RFIDSample4App.jar”
Note: In the select the resources to export section, only select src and META-INF folder. Also, make
sure .classpath and .project checkboxes are enabled as per the screenshot below.
Click Next
Figure 114 : RFID JAR Export Destination View
ZEBRA TECHNOLOGIES 71
Page 72

In the JAR Packing option window, select Next.
Figure 115 : RFID JAR Export Packaging View
Select the Use existing manifest from workspace radio button and select Browse to browse for the
MANIFEST.MF file.
Figure 116 : RFID JAR Export Manifest Specification View
ZEBRA TECHNOLOGIES 72
Page 73

Expand the both project name followed by META-INF folder and select MANIFEST.MF file.
Select OK.
Figure 117 : RFID Manifest Selection View
Select Finish to invoke the build process.
Figure 118 : RFID Manifest Specification View
Note: Select Yes if required to create the build folder and continue.
ZEBRA TECHNOLOGIES 73
Page 74

Note : If there is a Confirm Create popup for JAR file, please click on Yes button.
If compile warning appears (as during the build), Select OK to continue if the warnings are
acceptable.
Note: click on Details to know more on warnings.
Figure 119 : RFID JAR Export Warning View
ZEBRA TECHNOLOGIES 74
Page 75

EMBEDDED JAVA INSTALLATION PACKAGE SCRIPT
8.8 Create Start and Stop Scripts of Java Installation Package
This section details the steps to create script as a placeholder to enable user to create application
package. There are 2 scripts
1. Start_appname.sh : This script starts the executable once the application deb package is
installed on the RFID reader using web browser application console. The creation of deb
package is mentioned in section 9
2. Stop_appname.sh : This script stops the executable once the application deb package is
removed using the web browser application console.
Note: Execute ‘dos2unix’ tool for converting to unix text file format on scripts file. (For
Windows,
it is downloaded from https://sourceforge.net/projects/dos2unix/)
To create start and stop scripts:
1. Navigate to [Embedded SDK Install folder]\samples\java\build folder
2. Rename the script files to start_appname.sh and stop_appname.sh with the JAR file name
appname.jar.
3. In start_appname.sh, replace the line:
java -jar /apps/%sampleapp%.jar &
with:
java -jar /apps/appname.jar &
4. In stop_appname.sh, replace the line:
EXECUTABLE_NAME=%sampleapp%.jar
with:
EXECUTABLE_NAME=appname.jar
ZEBRA TECHNOLOGIES 75
Page 76

EMBEDDED APPLICATION INSTALLATION PACKAGE CREATION
9.0 Embedded Application Installation Package Creation
This section describes how to create an FX Series RFID Reader embedded application installation
package, and includes instructions on installing a package on a windows OS-based host system.
9.1 Creating an FX RFID Reader Embedded Application Installation Package
1. In eclipse Select Tools > FXSeries Application Package Builder > Execute.
Figure 120 : FXSeries Tools Selection
2. Enter appname as the Package Name.
3. In the Maintainer (user name) field, enter the user ID of a reference person (no spaces).
4. Enter the Version (x.x.x).
5. Enter a short description of the application in the Description field.
6. In the Files(s) directory enter the [workspace]\build path (this must include start and stop
script files) and hit enter.
Figure 121 : Application Package CMD Window View
ZEBRA TECHNOLOGIES 76
Page 77

7. Enter any Package Dependencies (up to 10) if this applies. After entering the last dependency the
install package is built.
Figure 122 : Application Package CMD Result Window View
If there is no dependency , please press ‘n’ and hit enter.
The following screenshot depicts successful package creation.
Figure 123 : Application Package Creation CMD Window View
After successful creation the package install file with the name [appname]_[version].deb is copied
into the folder [Embedded SDK Install folder]\buildPackages\all_build.
ZEBRA TECHNOLOGIES 77
Page 78
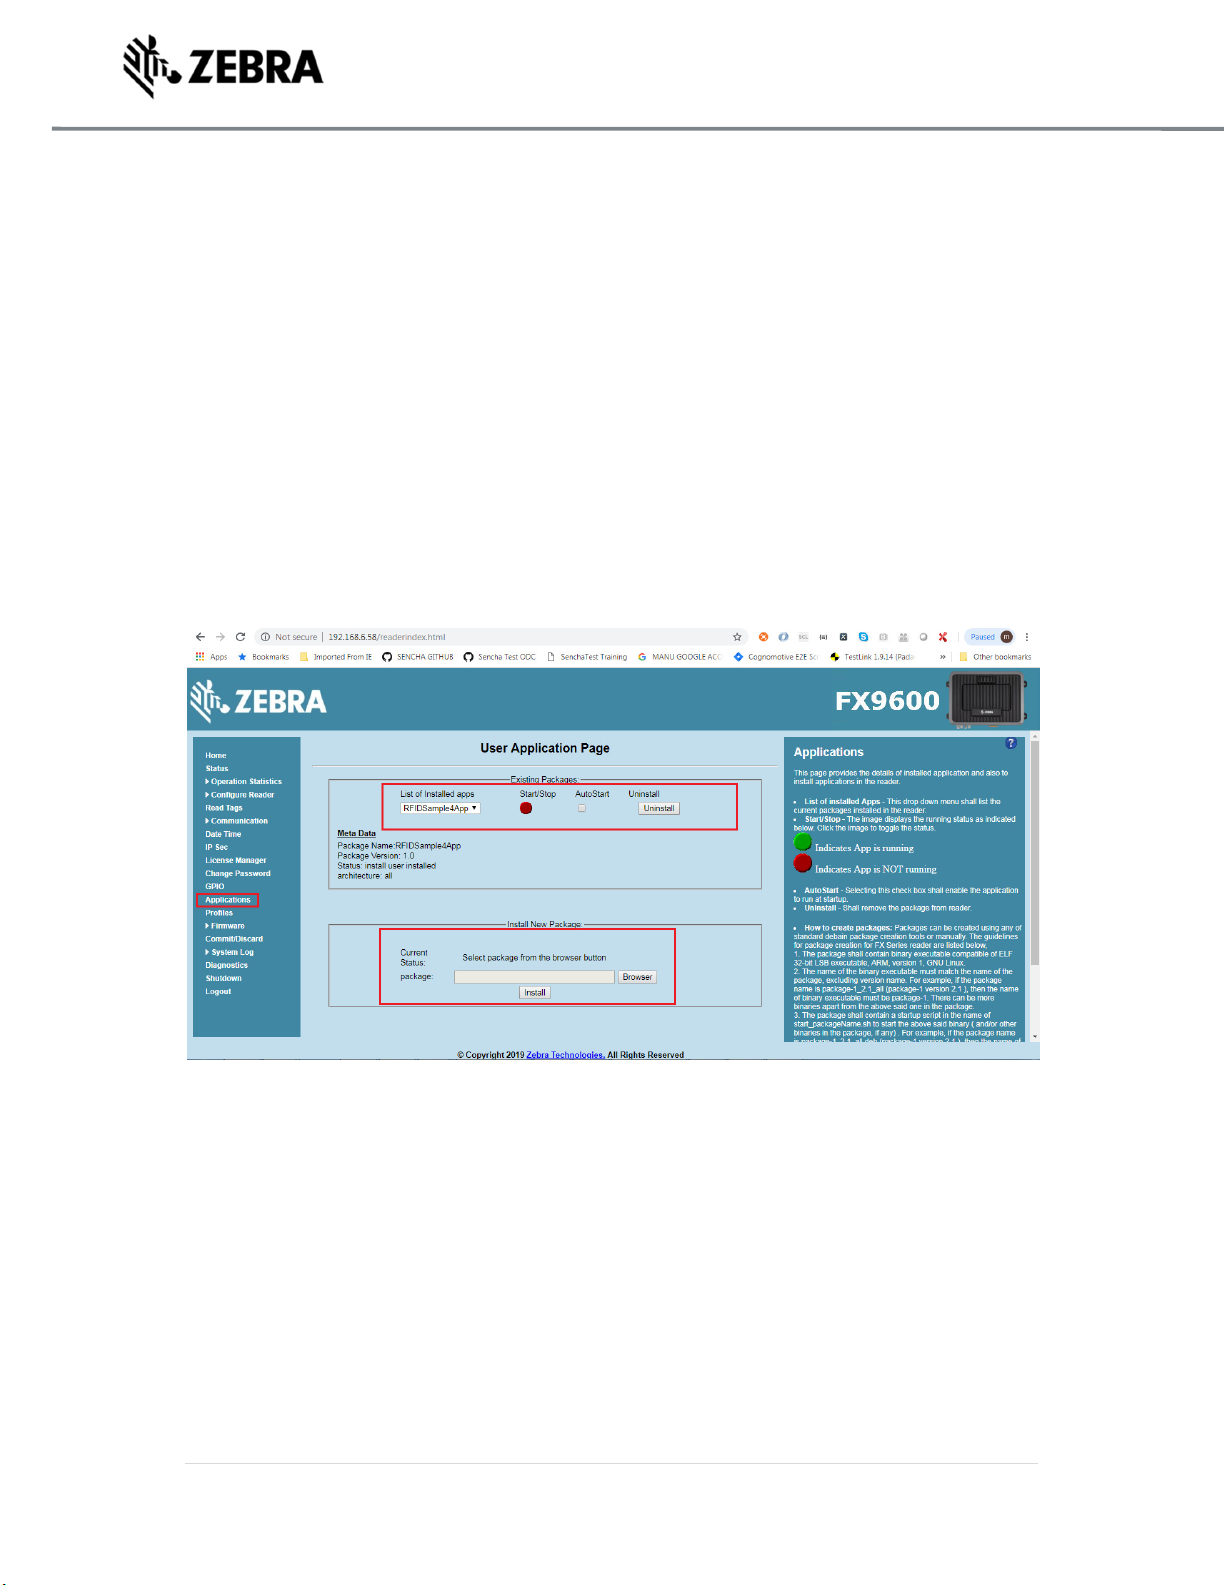
9.2 Install and Uninstall Application Package on Zebra RFID Reader
Below listed steps will help in installing and uninstalling application package on RFID reader
Once login to web console of RFID reader
Step 1 : Application -> Install New Package -> Browse (Select the created deb package) .
Step 2 : Application package should be listed in List of installed apps as shown in figure below.
Step 3 : Click on Start or Stop circular button to Start or Stop the application executable.
Step 4 : To Uninstall or remove application package, click on uninstall button in the figure below.
Figure 124 : RFID Reader Web Application Console
From Reader login as ‘rfidadm’ and execute installed RFID sample application as ‘java -jar
/apps/RFIDSample4App.jar’.
Note: Start and stop circular button/auto start of RFID sample application ‘RFIDSample4App.jar’ is
not applicable from RFID web consle, since application need user input from console.
ZEBRA TECHNOLOGIES 78
 Loading...