


ET80/ET85
Rugged 2-in-1 Tablet
Product Reference Guide
®
for Microsoft
Windows® 10
MN-004138-03EN Rev A

ZEBRA and the stylized Zebra head are trademarks of Zebra Technologies Corporation, registered in
many jurisdictions worldwide. All other trademarks are the property of their respective owners.
© 2021 Zebra Technologies Corporation and/or its affiliates. All rights reserved.
Information in this document is subject to change without notice. The software described in this document
is furnished under a license agreement or nondisclosure agreement. The software may be used or copied
only in accordance with the terms of those agreements.
For further information regarding legal and proprietary statements, please go to:
SOFTWARE:zebra.com/linkoslegal
COPYRIGHTS:zebra.com/copyright
WARRANTY:zebra.com/warranty
END USER LICENSE AGREEMENT: zebra.com/eula
Terms of Use
Proprietary Statement
This manual contains proprietary information of Zebra Technologies Corporation and its subsidiaries
(“Zebra Technologies”). It is intended solely for the information and use of parties operating and
maintaining the equipment described herein. Such proprietary information may not be used, reproduced,
or disclosed to any other parties for any other purpose without the express, written permission of Zebra
Technologies.
Product Improvements
Continuous improvement of products is a policy of Zebra Technologies. All specifications and designs are
subject to change without notice.
Liability Disclaimer
Zebra Technologies takes steps to ensure that its published Engineering specifications and manuals are
correct; however, errors do occur. Zebra Technologies reserves the right to correct any such errors and
disclaims liability resulting therefrom.
Limitation of Liability
In no event shall Zebra Technologies or anyone else involved in the creation, production, or delivery of the
accompanying product (including hardware and software) be liable for any damages whatsoever
(including, without limitation, consequential damages including loss of business profits, business
interruption, or loss of business information) arising out of the use of, the results of use of, or inability to
use such product, even if Zebra Technologies has been advised of the possibility of such damages. Some
jurisdictions do not allow the exclusion or limitation of incidental or consequential damages, so the above
limitation or exclusion may not apply to you.
Publication Date
January 10, 2022
2

Contents
About This Document ........................................................................................................................ 7
Introduction ...................................................................................................................... 7
Configurations.................................................................................................................. 7
Energy Star ...................................................................................................................... 9
Notational Conventions.................................................................................................... 9
Icon Conventions ............................................................................................................. 9
Service Information ........................................................................................................ 10
Software Release Information....................................................................................... 11
Getting Started.................................................................................................................................. 12
Unpacking ...................................................................................................................... 12
Features........................................................................................................................ 13
Setting Up the Device .................................................................................................... 15
Installing a nano SIM Card ..................................................................................... 15
Using the Tablet................................................................................................................................ 19
Start Screen ................................................................................................................... 19
Know Your Tablet........................................................................................................... 20
Tablet Information................................................................................................... 20
Support ................................................................................................................... 20
Battery Management...................................................................................................... 20
Optimizing Battery Life or Performance.................................................................. 21
Changing the Power Settings ................................................................................. 21
Manually Changing the Display Brightness ............................................................ 21
Automatically Changing the Display Brightness ..................................................... 21
Manually Activate Sleep Mode .............................................................................. 21
Battery Health Monitor............................................................................................ 22
Viewing Battery Health..................................................................................... 22
Tablet Mode ................................................................................................................... 22
Configuring Tablet Mode ........................................................................................ 22
3

Contents
Tablet Mode Start Screen....................................................................................... 23
Multi-Touch Gestures ............................................................................................. 25
Configuring Touch Settings.............................................................................. 25
Changing Touch Mode ........................................................................................... 25
On-Screen Keyboard.............................................................................................. 26
Opening the On-Screen Keyboard................................................................... 26
Opening the Keyboard and Handwriting Panel ................................................ 26
Active Stylus ........................................................................................................... 27
Using the Camera .......................................................................................................... 27
Fingerprint Reader ........................................................................................................ 28
Setting Up a PIN..................................................................................................... 28
Setting Up the Fingerprint Reader.......................................................................... 28
Logging In with Your Fingerprint............................................................................. 29
Fingerprint Reader Tips ...................................................................................... 29
Windows Hello Face ..................................................................................................... 30
Setting Up Windows Hello Face ............................................................................. 30
Logging In with Windows Hello Face...................................................................... 30
Software............................................................................................................................................. 31
Initial Windows Setup..................................................................................................... 31
Factory Reset................................................................................................................. 31
Reinstall Windows......................................................................................................... 32
Creating an Installation USB Flash Drive ............................................................... 32
Reinstalling Windows ............................................................................................. 33
Checking BIOS Version.......................................................................................... 34
Checking Operating System Version...................................................................... 34
Enter the BIOS............................................................................................................... 34
Entering the BIOS with a Keyboard........................................................................ 34
Entering the BIOS without a Keyboard................................................................... 34
Entering the BIOS without a Keyboard from Windows ........................................... 34
Zebra Barcode Scanning Resources ............................................................................. 35
Application Installation ................................................................................................... 35
Getting Apps from the Windows Store ................................................................... 35
Data Capture ..................................................................................................................................... 36
Imaging .......................................................................................................................... 36
Digital Camera ............................................................................................................... 36
Scanning Considerations ............................................................................................... 36
Scanning with Internal Imager........................................................................................ 37
4

Contents
Wireless............................................................................................................................................. 39
Wireless Local Area Networks ....................................................................................... 39
Connecting to a Wi-Fi Network............................................................................... 40
Viewing Network Information.................................................................................. 41
Configuring Proxy Settings ..................................................................................... 41
Adding a Wi-Fi Network.......................................................................................... 41
Wireless Wide Area Networks....................................................................................... 42
Connecting to a Cellular Data Network .................................................................. 42
Adding an Internet APN.......................................................................................... 42
Setting Up a SIM PIN ............................................................................................. 43
Removing a SIM PIN .............................................................................................. 43
Changing a SIM PIN............................................................................................... 43
Unblocking a SIM PIN ............................................................................................ 43
Bluetooth....................................................................................................................... 45
Adaptive Frequency Hopping ................................................................................. 45
Security................................................................................................................... 45
Bluetooth Profiles ................................................................................................... 46
Pairing with a Bluetooth Device.............................................................................. 47
Unpairing a Bluetooth Device ................................................................................. 47
Turning on Airplane Mode.............................................................................................. 47
Near Field Communications.......................................................................................... 48
Enabling NFC ......................................................................................................... 48
Reading NFC Cards ............................................................................................... 48
Accessories....................................................................................................................................... 49
Device Charging............................................................................................................. 52
Charging Indicators ................................................................................................ 52
Charging Temperatures.......................................................................................... 52
Charging Using the Dock........................................................................................ 52
Removing the Tablet ........................................................................................ 54
Charging Using the USB-C to AC Adapter ............................................................. 55
Power Only Dock .......................................................................................................... 56
Vehicle Dock ................................................................................................................. 57
Office Dock.................................................................................................................... 58
Expansion Backs........................................................................................................... 59
Installing the Expansion Backs............................................................................... 59
Power Pack................................................................................................................... 61
Installing the Power Pack ....................................................................................... 61
Power Pack Charging............................................................................................. 62
Charging the Power Pack Using a Dock .......................................................... 62
Charging the Power Pack Using the 4-Slot Battery Charger ........................... 62
5

Contents
Viewing the Power Pack Charge Level .................................................................. 63
Checking Power Pack Status ................................................................................. 64
Keyboard....................................................................................................................... 65
Attaching the Keyboard .......................................................................................... 66
Removing the Keyboard ......................................................................................... 67
Setting the Backlight Color ..................................................................................... 68
Configuring the Programmable Keys...................................................................... 68
Maintenance and Troubleshooting ................................................................................................. 69
Maintaining the Device................................................................................................... 69
Preventing Image Persistence ....................................................................................... 69
Maintaining the Stylus.................................................................................................... 70
Battery Safety Guidelines............................................................................................... 70
Best Practices for Enterprise Mobile Computing Devices Operating in Hot Environments
and Direct Sunlight......................................................................................................... 71
Cleaning Instructions...................................................................................................... 71
Approved Cleanser Active Ingredients ................................................................... 71
Harmful Ingredients ................................................................................................ 71
Device Cleaning Instructions .................................................................................. 72
Special Cleaning Notes .......................................................................................... 72
Cleaning Materials Recommended ........................................................................ 72
Cleaning Frequency ............................................................................................... 72
Cleaning the Fingerprint Reader ............................................................................ 72
Traveling with Your Tablet ............................................................................................. 73
Troubleshooting ............................................................................................................. 73
Restarting the Device ............................................................................................. 73
Performing a Cold Boot .......................................................................................... 73
Troubleshooting the Tablet..................................................................................... 74
Troubleshooting the Dock....................................................................................... 75
Troubleshooting the 4-Slot Battery Charger ........................................................... 75
Specifications ................................................................................................................................... 76
Data Capture Supported Symbologies........................................................................... 76
Decode Distances.......................................................................................................... 76
Dock Specifications........................................................................................................ 77
6

About This Document
Introduction
This guide provides information about using the device and accessories.
NOTE: Screens and windows pictured in this guide are samples and can differ from actual screens.
Configurations
This guide covers the following configurations of the tablet:
Configuration Processor Memory Display Radios
ET80 TGL i5 Core
w/Vpro WLAN
ET85 TGL i5 Core
w/Vpro WAN
ET85 TGL i5 Core
w/Vpro WAN
TGL U42
4 +2 Core
I5-1140G7
8MB LLC
Gen12 GFX
TGL U42
4 +2 Core
I5-1140G7
8MB LLC
Gen12 GFX
TGL U42
4 +2 Core
I5-1140G7
8MB LLC
Gen12 GFX
16 GB RAM/
128 GB or
256 GB or
512 GB
PCIe SSD
16GB RAM/
128 GB or
256 GB or
512 GB
PCIe SSD
16GB RAM/
128 GB or
256 GB or
512 GB
PCIe SSD
3:2 Aspect
Ratio
12.0 inch 800
Nits
3:2 Aspect
Ratio
12.0 inch 800
Nits
3:2 Aspect
Ratio
12.0 inch 800
Nits
WLAN: Intel Typhoon
Peak 2 WIFI6E 802.11ax
2x2 MIMO
WPAN: Bluetooth v5.2 Low
Energy
WLAN: Intel Typhoon
Peak 2 802.11 ax - WIFI6E
Quectel RM505Q 4x4
MIMO
WPAN: Bluetooth v5.2 Low
Energy
WWAN: 5G
WLAN: Intel Typhoon
Peak 2 802.11 ax - WIFI6E
Quectel EM121 Cat 12 2x2
MIMO
WPAN: Bluetooth v5.2 Low
Energy
WWAN: LTE
7

About This Document
Configuration Processor Memory Display Radios
ET80 TGL i5 Core
WLAN
TGL U42
4 +2 Core
i5-1130G7 8MB
LLC Gen12
GFX
8 GB or 16GB
RAM/
128 GB or
256 GB or
512 GB
PCIe SSD
3:2 Aspect
Ratio
12.0 inch 800
Nits
WLAN: Intel Typhoon Peak
2 WIFI6E 802.11ax 2X2
MIMO
WPAN: Bluetooth v5.2 Low
Energy
ET85 TGL i5 Core
WAN
ET85 TGL i5 Core
WAN
ET80 TGL i7 Core
w/Vpro WLAN
ET85 TGL i7 Core
w/Vpro WAN
ET85 TGL i7 Core
w/Vpro WAN
TGL U42
4 +2 Core
i5-1130G7 8MB
LLC Gen12
GFX
TGL U42
4 +2 Core
i5-1130G7 8MB
LLC Gen12
GFX
TGL U42
4 +2 Core
I7-1180G7
12MB LLC
Gen12 GFX
TGL U42
4 +2 Core
I7-1180G7
12MB LLC
Gen12 GFX
TGL U42
4 +2 Core
I7-1180G7
12MB LLC
Gen12 GFX
8 GB or 16GB
RAM/
128 GB or
256 GB or
512 GB
PCIe SSD
8 GB or 16GB
RAM/
128 GB or
256 GB or
512 GB
PCIe SSD
16GB RAM/
128 GB or
256 GB or
512 GB
PCIe SSD
16GB RAM/
128 GB or
256 GB or
512 GB
PCIe SSD
16GB RAM/
128 GB or
256 GB or
512 GB
PCIe SSD
3:2 Aspect
Ratio
12.0 inch 800
Nits
3:2 Aspect
Ratio
12.0 inch 800
Nits
3:2 Aspect
Ratio
12.0 inch 800
Nits
3:2 Aspect
Ratio
12.0 inch 800
Nits
3:2 Aspect
Ratio
12.0 inch 800
Nits
WLAN: Intel Typhoon
Peak 2 802.11 ax - WIFI6E
Quectel RM505Q 4x4
MIMO
WPAN: Bluetooth v5.2 Low
Energy
WWAN: 5G
WLAN: Intel Typhoon Peak
2 802.11 ax - WIFI6E
Quectel EM121 Cat12 2X2
MIMO
WPAN: Bluetooth v5.2 Low
Energy
WWAN: LTE
WLAN: Intel Typhoon
Peak 2 WIFI6E 802.11ax
2X2 MIMO
WPAN: Bluetooth v5.2 Low
Energy
WLAN: Intel Typhoon
Peak 2 802.11 ax - WIFI6E
Quectel RM505Q 4x4
MIMO
WPAN: Bluetooth v5.2 Low
Energy
WWAN: 5G
WLAN: Intel Typhoon Peak
2 802.11 ax - WIFI6E
Quectel EM121 Cat12 2X2
MIMO
WPAN: Bluetooth v5.2 Low
Energy
WWAN: LTE
8

Energy Star
decisions. Thousands of industrial and commercial products deliver cost-saving energy solutions that
improve air quality and protect the climate. ENERGY STAR and its partners have helped save families and
businesses trillions of kilowatt-hours of electricity and reduced greenhouse gases every year.
About This Document
Zebra products that are Energy Star qualified help you save money while improving the
quality of the environment. The sleep mode of your tablet is especially adept at saving
energy, often up to 80% or more.
ENERGY STAR
simple, credible, and unbiased information that you can rely on to make well-informed
®
is the government-backed symbol for energy efficiency, providing
You can see more information about Energy Star features at: energystar.gov
This PC is ENERGY STAR® compliant. The power management settings enabled by default on this PC
have been selected for compliance with the current ENERGY STAR® Requirements. For optimal energy
savings, ENERGY STAR® recommends that sleep mode is entered within 30 minutes of user inactivity
and the display is turned off within 15 minutes of user inactivity.
The default power management settings on this PC are as follows.
Power Settings On Battery On AC
Turn off the display 5 minutes 20 minutes
Computer to sleep 5 minutes 20 minutes
Notational Conventions
The following conventions are used in this document:
• Tablet refers to the Zebra ET80/ET85 tablet.
• Bold text is used to highlight the following:
• Dialog box, window and screen names
• Drop-down list and list box names
• Check box and radio button names
• Icons on a screen
• Key names on a keypad
• Button names on a screen.
• Bullets (•) indicate:
• Action items
• Lists of alternatives
• Lists of required steps that are not necessarily sequential.
• Sequential lists (such as those that describe step-by-step procedures) appear as numbered lists.
Icon Conventions
The documentation set is designed to give the reader more visual clues. The following graphic icons are
used throughout the documentation set. These icons and their associated meanings are described below.
9

About This Document
NOTE: The text here indicates information that is supplemental for the user to know and that is not
required to complete a task.
IMPORTANT: The text here indicates information that is important for the user to know.
CAUTION—EYE INJURY: Wear protective eyewear when performing certain tasks.
CAUTION—PRODUCT DAMAGE: If the precaution is not taken, the product could be damaged.
CAUTION: If the precaution is not heeded, the user could receive minor or moderate injury.
CAUTION—HOT SURFACE: Touching this area could result in burns.
CAUTION—ESD: Observe proper electrostatic safety precautions.
CAUTION—ELECTRIC SHOCK: Disconnect the printer power before performing certain procedures to
avoid the risk of electric shock.
WARNING: If danger is not avoided, the user CAN be seriously injured or killed.
DANGER! If danger is not avoided, the user WILL be seriously injured or killed.
NOTE: This is an icon for wired networking notes.
NOTE: This is an icon for wireless networking notes.
Service Information
If you have a problem with your equipment, contact Zebra Global Customer Support for your region.
Contact information is available at zebra.com/support
When contacting support, please have the following information available:
• Serial number of the unit
• Model number or product name
.
• Software type and version number
Zebra responds to calls by email, telephone or fax within the time limits set forth in support agreements.
If your problem cannot be solved by Zebra Customer Support, you may need to return your equipment for
servicing and will be given specific directions. Zebra is not responsible for any damages incurred during
shipment if the approved shipping container is not used. Shipping the units improperly can possibly void
the warranty.
If you purchased your Zebra business product from a Zebra business partner, contact that business
partner for support.
10

About This Document
Software Release Information
To check the software release information:
1. Touch the Start icon .
2. Select Settings > System > About.
• Device Specifications - Displays the device model number followed by the software release date
and serial number.
• Windows Specifications - Displays the OS version.
11

Getting Started
This section explains how to set up the device for the first time.
Unpacking
1. Carefully remove all protective material from the device and save the shipping container for later
storage and shipping.
2. Verify that the following were received:
• Rugged 2-in-1 tablet
• Regulatory guide
• SIM lock plate with screw (may be available on some ET85 models)
3. Inspect the equipment for damage. If any equipment is missing or damaged, contact the Global
Customer Support center immediately.
4. Prior to using the device for the first time, remove the protective shipping film that covers the scan
window and display.
12

Features
1
2
3
4
5
2
6
7
8
9
10
11
13
14
16
20
21
22
19
17
17
19
18
18
15
12
Getting Started
NOTE: Some features may not be available on all configurations.
Figure 1 Front View
1 Light sensor Determines ambient light for controlling display backlight
intensity.
2 Front microphones Use for voice communications or audio recordings.
3 Windows Hello Infrared
Illuminator
Illuminates your face with infrared (IR) light during Windows
Hello face authentication.
4 Front camera Use for video conferencing.
5 Camera indicator LED Illuminates when the camera is activated. Momentarily lights
white when the device boots.
6 Touch screen Displays all information needed to operate the device.
7 Stylus tether mount Use to attach a stylus tether mount.
8 Volume up/down
Increases and decreases audio volume.
button
9 Power button Turns the display on and off. Press and release to power on the
10 Charging indicator LED Indicates power state and battery charging status while
11 USB-A port Provides USB host and client communications.
12 Threaded Insert Use to restrict access to the USB ports in hazardous locations
device. Press and hold to reset the device or power off.
charging and application generated notifications.
(requires boot).
13

Getting Started
3
6
7
8
9
10
11
12
13
4
2
1
1
2
5
13 USB-A port Provides USB host and client communications.
14 USB-C port Provides USB host and client communications, and device
charging via cables and accessories.
15 Scanner window Provides data capture using the imager.
16 Dock interface connector Provides communication to the device from the dock.
17 Speakers Provides audio output.
18 Keyboard latch slot Attaches the keyboard to the tablet.
19 Keyboard alignment slot Assists in aligning the tablet with the keyboard.
20 Keyboard interface connector Provides power and communication with the keyboard
21 Kensington security slot Use with a security cable to lock the tablet to the keyboard.
22 Power interface connector Provides power to the device through the dock.
Figure 2 Back View
1 Rear microphones Use for audio recordings.
2 Dock alignment slot Assists in aligning the tablet with the dock.
3
4 Front camera privacy cover
Pass-through antenna
Use to connect to an external antenna.
Use to cover the front camera when not in use.
switch
5 Rear camera privacy cover Use to cover the rear camera when not in use.
6 Rear camera LED flash Provides illumination for the camera.
7 Scan button Initiates barcode data capture when a scan-enabled application
8 Fingerprint sensor Provides biometric authentication.
9 Rear camera Autofocus camera that takes photos.
is active (programmable).
14

Getting Started
10 Communication expansion
port
11 NFC antenna position Use to read NFC cards.
12 Battery cover Provides access to the replaceable battery.
13 Solid State Drive Cover Provides access to the solid state drive.
Setting Up the Device
To start using the device for the first time:
1. Install a nano SIM card (optional for ET85 only).
2. Charge the device.
3. Power on the device.
Installing a nano SIM Card
1. Ensure the tablet is powered off.
2. Lift the notched corner of the battery cover and carefully lift the battery cover off the device.
For Ethernet and serial communication through the expansion
adapter.
3. Slide the battery lock switch to the unlock position.
15

Getting Started
Using index fingers, life the battery up.
4.
5. Insert the nano SIM card with the contacts facing up.
6. Push the SIM card in and ensure that it locks into place.
7. If required, install the SIM lock plate and secure with the M1.4 x 2 mm screw using a Phillips #0
screwdriver. The maximum torque for the screw is 1 kg/m (7 lb/ft).
8. Replace the battery, ensuring it is seated properly.
16
Getting Started
Slide the battery lock switch to the lock position.
9.
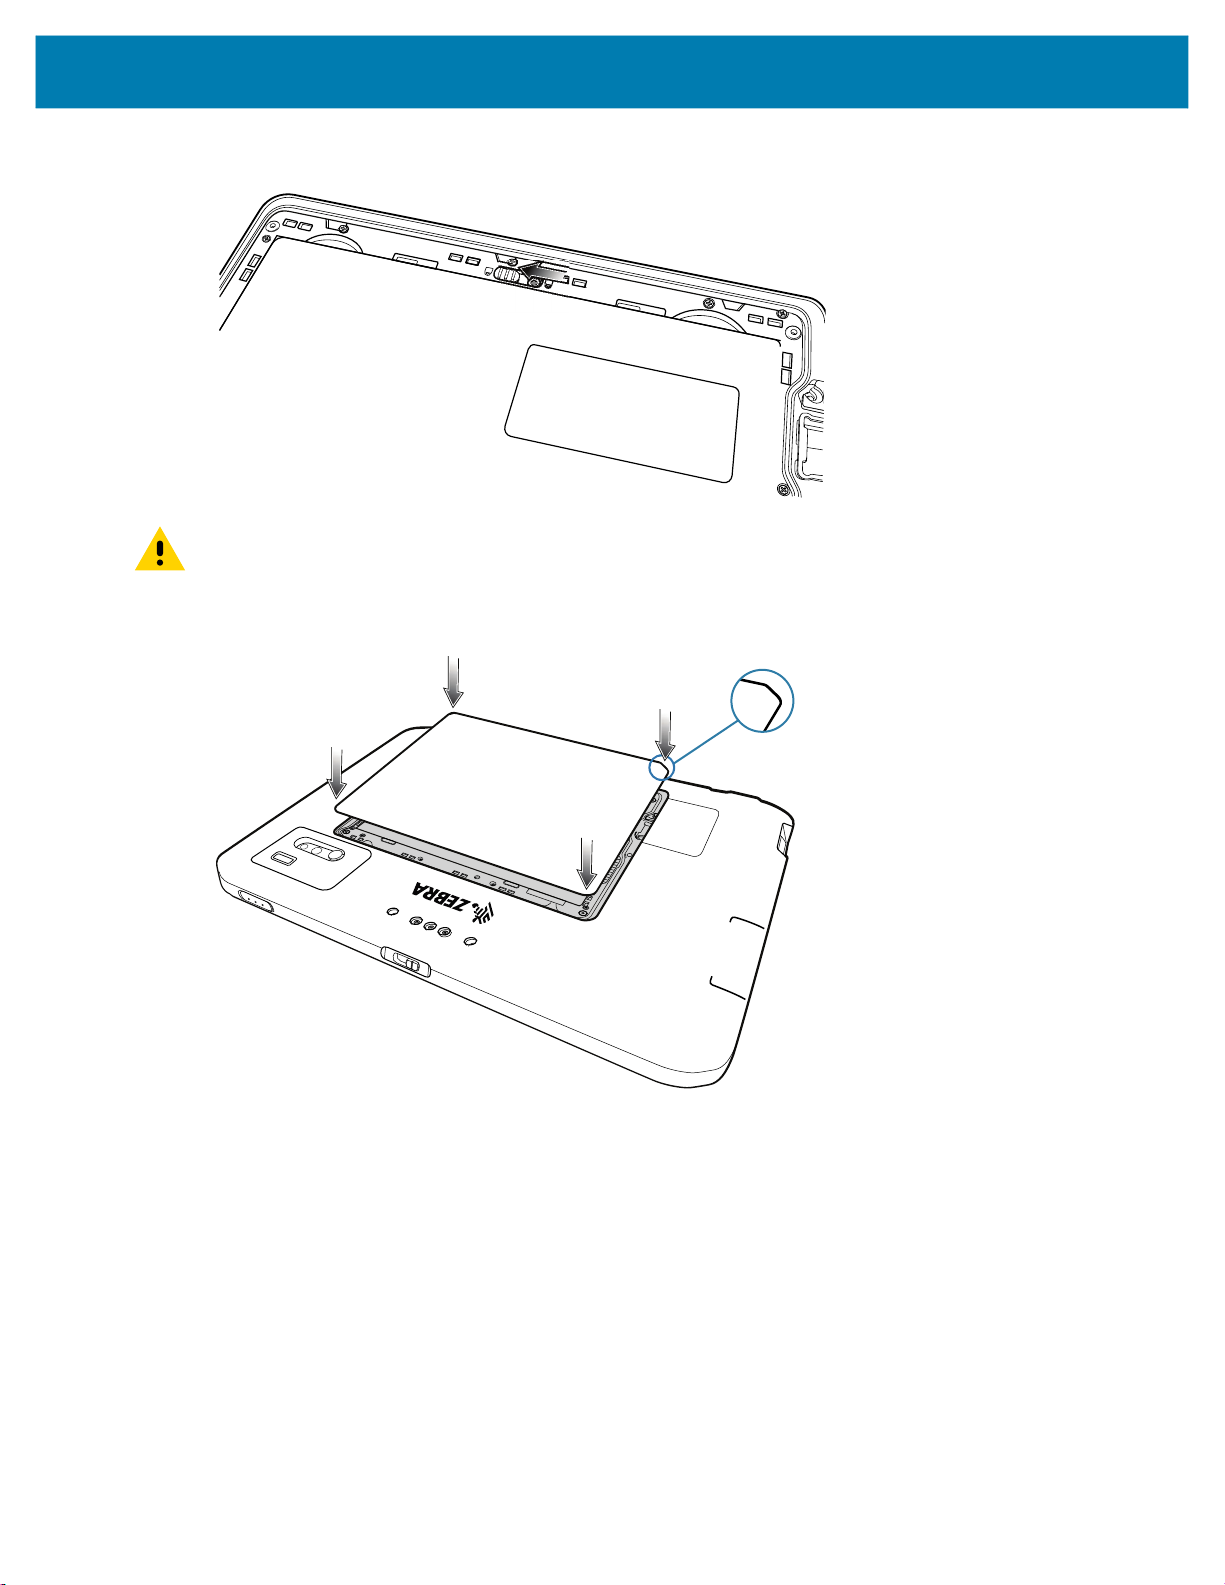
CAUTION: Be aware of the orientation of the battery cover. Failure to replace the battery cover properly
may cause damage.
10. Align the tabs on the underside of the cover with the slot around the battery well.
11. Ensure that the chamfer on the battery cover is at the bottom left corner of the device.
17

Getting Started
Carefully press down around the edges of the cover. Make sure that the cover is seated properly.
12.
18
Using the Tablet
This chapter provides instructions on how to use some basic applications and key features.
Start Screen
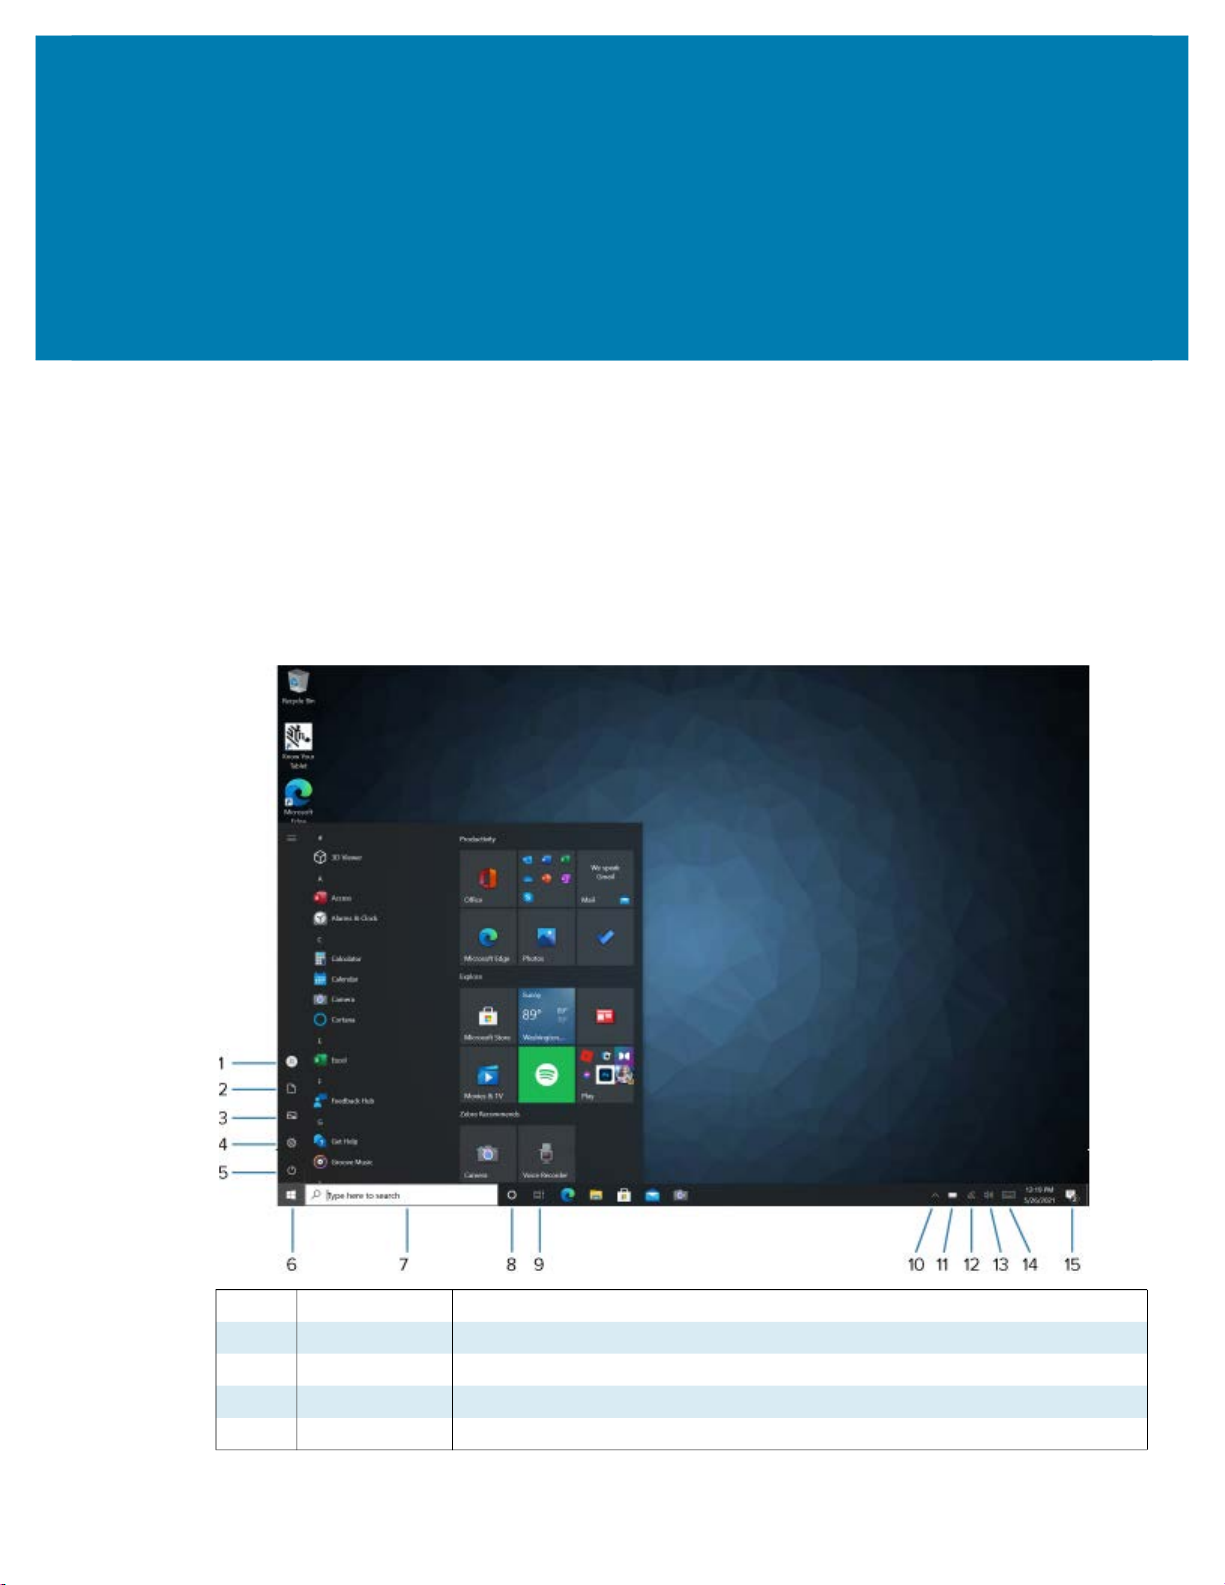
By default, the Start screen displays in Desktop mode.
Figure 3 Start Screen in Desktop Mode
1 Users Opens user account window, locks screen or logs user off the device.
2 Documents Opens documents folder.
3 Pictures Opens pictures folder.
4 Settings Opens the Settings window.
5 Power Touch to place the device in sleep mode, shutdown or restart.
19
6 Start Access the Home screen from any window.
7 Search Search apps, settings, and files on your tablet or perform a web search.
8 Cortana Opens voice activated search window.
9 Recent
Applications
10 More Settings Includes Bluetooth, Intel Graphics, and Windows Defender.
11 Battery Displays current battery status.
12 Network Opens network settings.
13 Sound Use to control audio volume level.
14 Keyboard Opens the virtual keyboard.
15 Action Center Provides easy access to some frequently used settings and notifications.
Know Your Tablet
Using the Tablet
Displays all open applications.
Touch the icon to open the Action Center. The first row of setting option
boxes display and any notifications. Touch Expand to view all setting option
boxes.
You can access information about your tablet by touching Know Your Tablet on the desktop.
This app has icons that provide access to PC information and Support. The Support page includes
information about drivers, BIOS, accessories, and documentation.
Tablet Information
The System Information window displays information about the BIOS, the battery, the network adapters,
the hard disk. This information is stored on the solid-state drive (SSD) in your tablet.
Support
Select Support to open the Zebra web site, where you can access these sites and pages:
• Product support
• User documentation
• Software, Firmware/BIOS, and driver downloads
• Knowledge base articles
• Repair request and status and RMA status
• Warranty information
• Registration
• TPM notification for security advisory
Battery Management
Follow these tips to optimize battery life.
• Set the device to turn off after a short period of non-use.
• Set the display to turn off or dim backlight.
20

Using the Tablet
• Turn off all wireless radio activity when not in use.
Optimizing Battery Life or Performance
Optimize the battery life when running the tablet on battery power, or optimize performance when the
tablet is connected to a power source.
1. In the taskbar, touch the battery icon and use the slider to adjust for battery life or performance.
2. Touch Battery settings to display battery saver options.
Changing the Power Settings
To set the device or display to turn off after a short period of non-use:
1. In the taskbar, touch the Action Center icon .
2. Touch All Settings > System > Power and sleep.
3. Under Sleep, choose when you want the device/screen to go to sleep (on battery power and when
plugged in).
Manually Changing the Display Brightness
To manually change the display brightness:
1. In the taskbar, touch Action Center icon .
2. Touch All Settings > System > Display.
3. Under Change brightness, move the slider to adjust the brightness.
Automatically Changing the Display Brightness
To toggle automatic brightness:
1. In the taskbar, Action Center icon .
2. Touch All Settings > System > Display.
3. Check the box to enable Change brightness automatically when lighting changes.
Manually Activate Sleep Mode
Manually activate sleep mode to conserve battery power when you are not actively using the tablet.
1. It is recommended to first save your files.
2. Touch the Start icon and then the Power icon just above it.
A small menu pops up.
3. Touch Sleep.
The screen goes dark and the computer enters sleep mode.
4. You can wake up the tablet by pressing the Power button
21

Battery Health Monitor
Use the Battery Health Monitor app to view battery health and information.
• Battery Health - The health of the battery.
• Manufacture Date - The date of manufacture.
• Serial Number - Serial number of the device.
A warning message appears if the battery is past its useful life and should be replaced.
Viewing Battery Health
1. In the taskbar, select .
2. Select .
Tablet Mode
This section describes how to configure and use tablet mode.
Using the Tablet
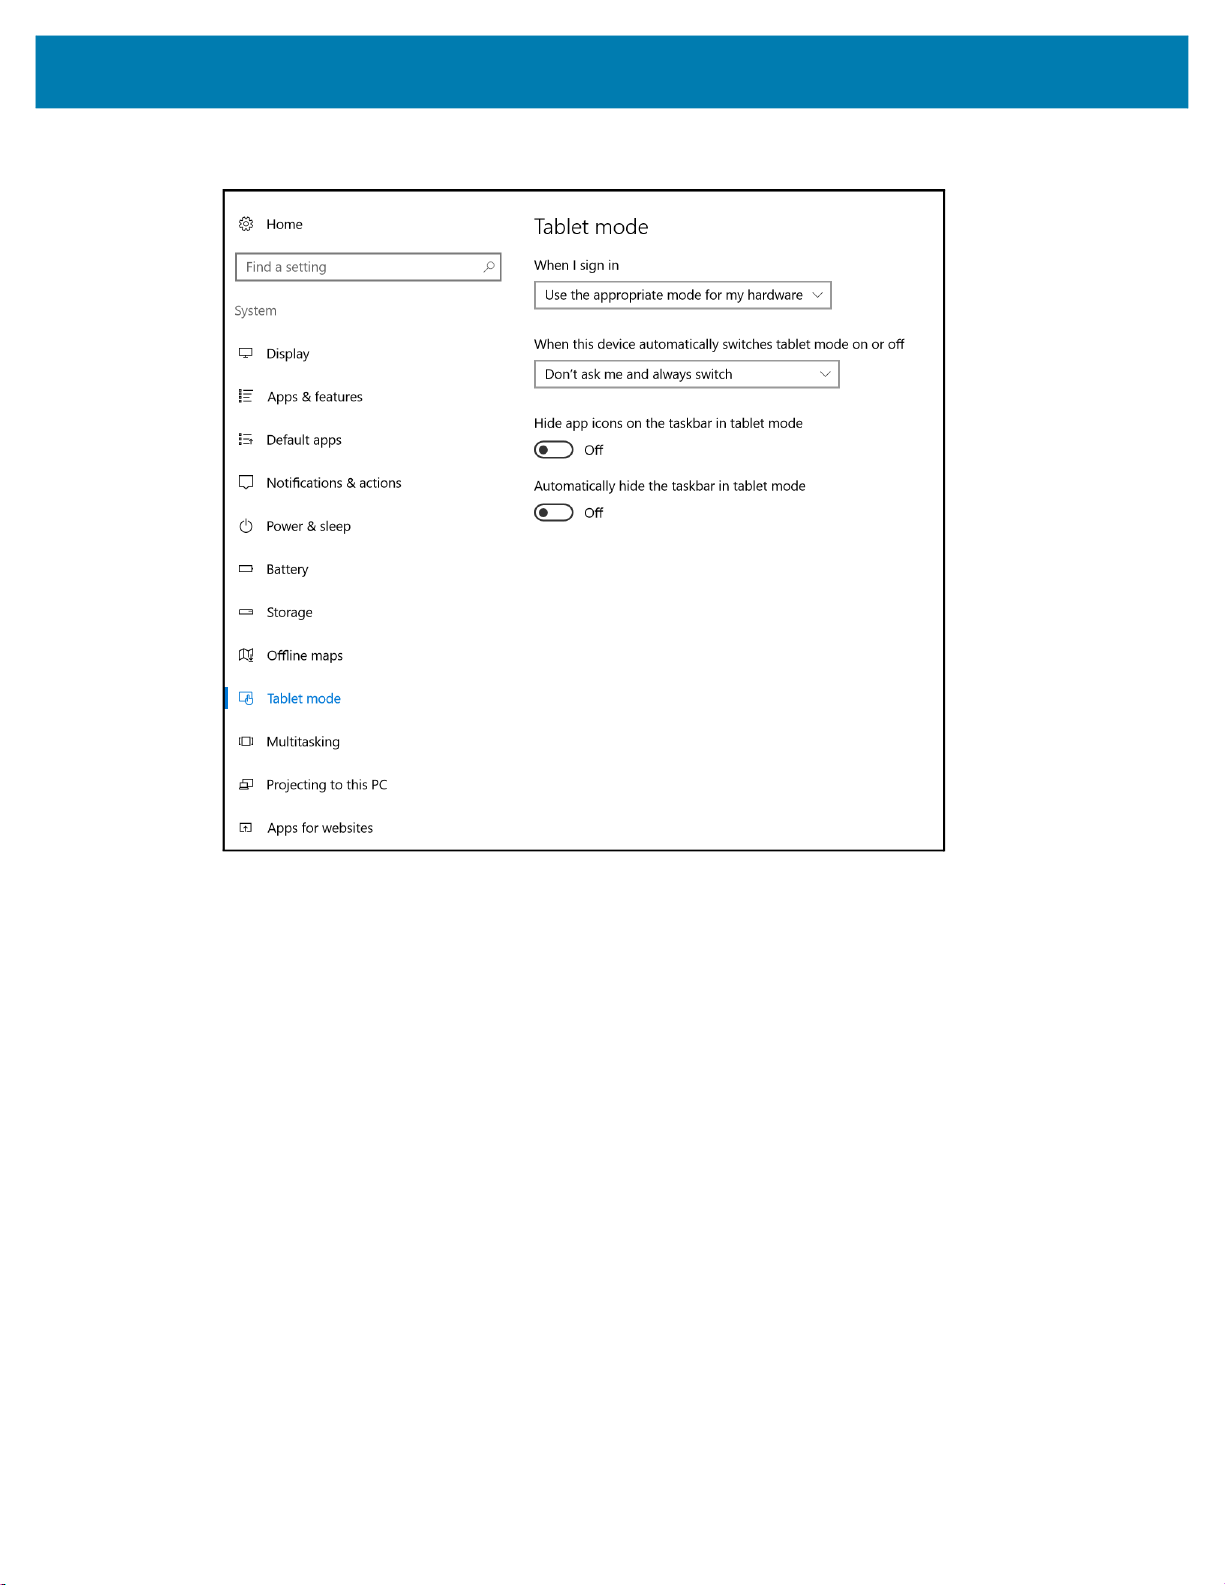
Configuring Tablet Mode
You may configure how the tablet Start screen displays depending upon if it is being used as a tablet or
docked in a cradle.
22
Using the Tablet
Touch All Settings > System > Tablet mode.
1.
• When I sign in:
• Use tablet mode - set to tablet mode after signing in.
• Use desktop mode - set to desktop mode after signing in.
• Use the appropriate mode for my hardware - let the tablet determine if it is.
• When this device automatically switches tablet mode on or off
• Don’t ask me and don’t switch
• Always ask me before switching
• Don’t ask me and always switch
• Hide app icons on the taskbar in tablet mode - enable to hide application icons in the taskbar.
• Automatically hide the taskbar in tablet mode - enable to hide the taskbar when in tablet mode.
Tablet Mode Start Screen
The tile-based interface allows direct access to recently used applications, emails, photos, contacts, and
frequently viewed websites. You may pin favorite apps as tiles to customize the Start screen. See Know
Your Tablet for information.
Live Tiles, such as news, sports, weather, social-networking sites, etc. update in real time.
23
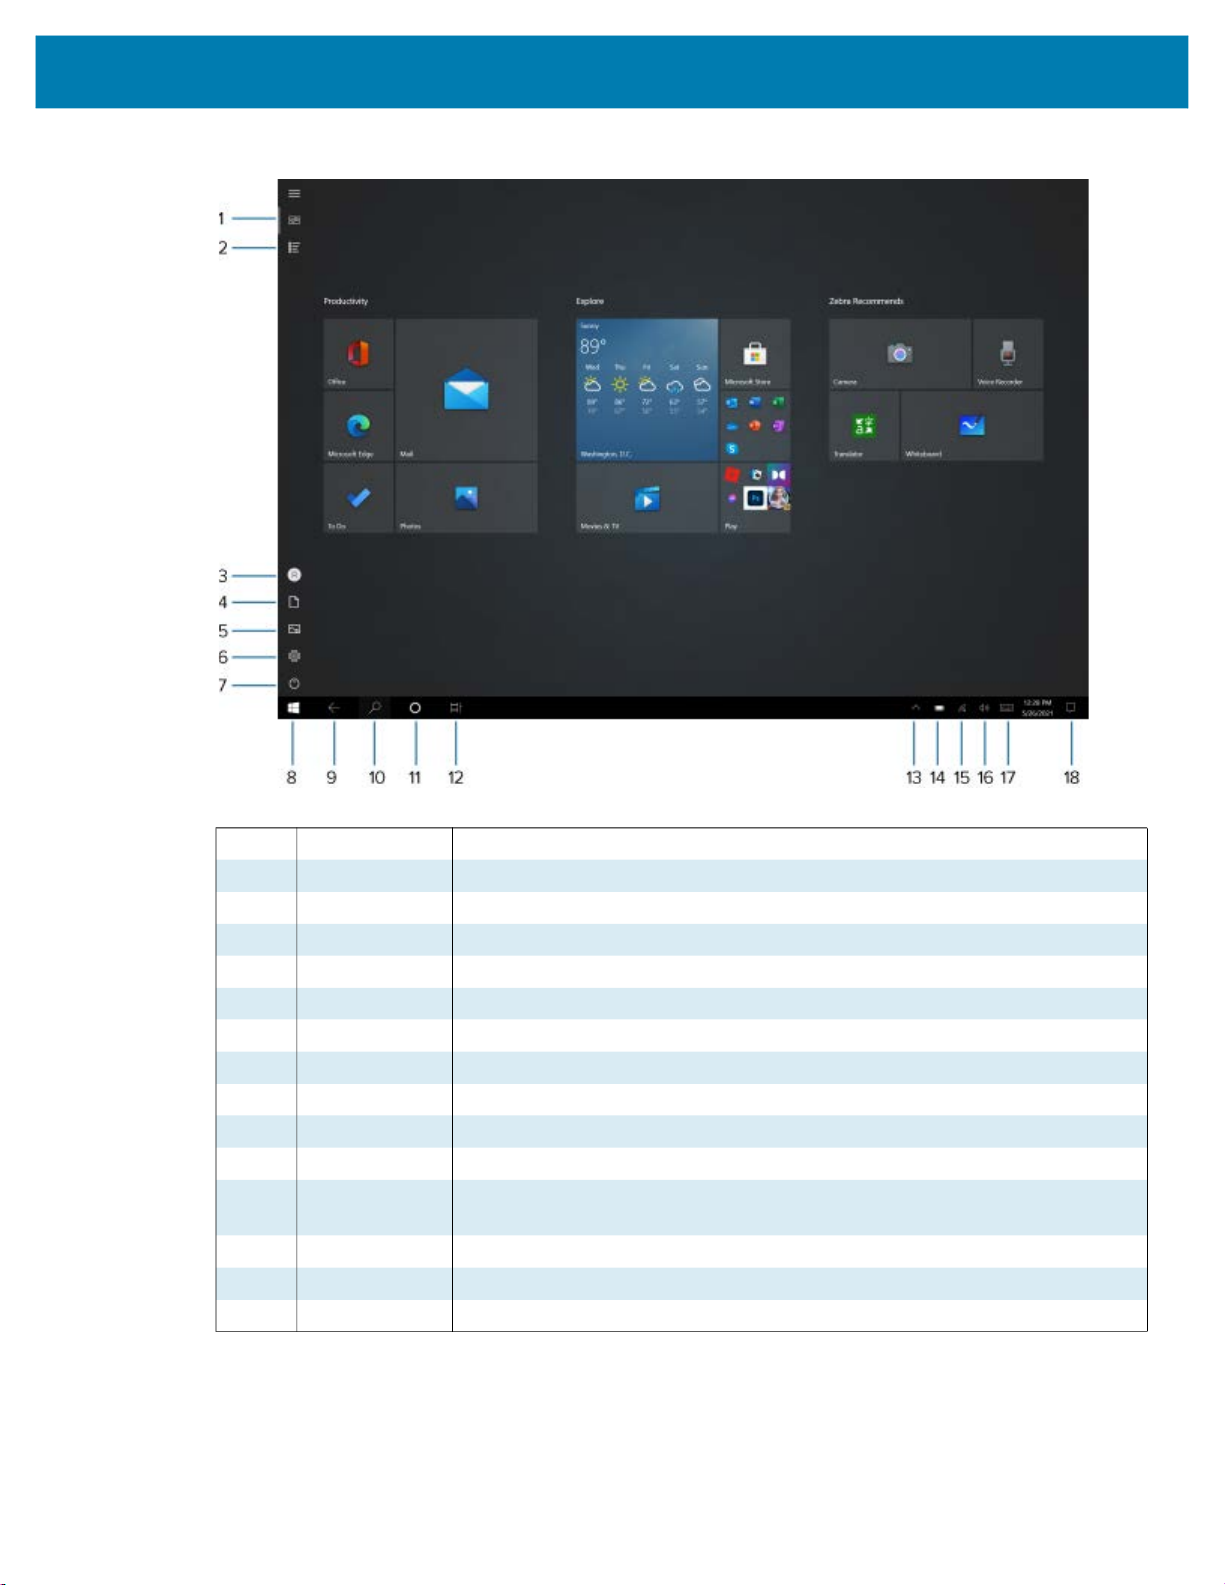
Using the Tablet
Figure 4 Start Screen in Tablet Mode
1 Pinned tiles Places the Home screen in Tile view.
2 All apps Lists all applications alphabetically.
3 Users Opens user account window, locks screen or logs user off the device.
4 Documents Opens documents folder.
5 Pictures Opens pictures folder.
6 Settings Opens the Settings window.
7 Power Touch to place the device in sleep mode, shutdown or restart.
8 Start Access the Home screen from any window.
9 Back Displays the previous screen.
10 Search Search apps, settings, and files on your tablet or perform a web search.
11 Cortana Opens voice activated search window.
12 Recent
Applications
13 More Settings Includes Bluetooth, Intel Graphics, and Windows Defender.
14 Battery Displays current battery status.
15 Network Opens network settings.
Displays all open applications.
24
 Loading...