

Page 1

ET5X
Enterprise Tablet
Quick Reference Guide
Page 2

2 ET5X Enterprise Tablet
Zebra reserves the right to make changes to any product to improve reliability, function, or design.
Zebra does not assume any product liability arising out of, or in connection with, the application or use of any
product, circuit, or application described herein.
No license is granted, either expressly or by implication, estoppel, or otherwise under any patent right or
patent, covering or relating to any combination, system, apparatus, machine, material, method, or process in
which Zebra products might be used. An implied license exists only for equipment, circuits, and subsystems
contained in Zebra products.
Warranty
For the complete Zebra hardware product warranty statement, go to: http://www.zebra.com/warranty.
Service Information
If you have a problem using the equipment, contact your facility’s Technical or Systems Support. If there is a
problem with the equipment, they will contact the Zebra Support at: http:www.zebra.com/support.
For the latest version of this guide go to: http://www.zebra.com/support.
Software Support
Zebra wants to ensure that customers have the latest release of entitled software at the time of product
purchase.
To confirm that your Zebra device shipped with the latest release of entitled software, visit:
www.zebra.com/support. Check for the latest software from Software Downloads > Product Line/Product >
Go.
If your device does not have the latest entitled software release as of your product purchase date, please
e-mail a request to Zebra at: entitlementservices@zebra.com.
You must include the following essential device information with your request:
• Model number
• Serial number
• Proof of purchase
• Title of the software download you are requesting.
If it is determined by Zebra that your device is entitled to the latest software release, you will receive an e-mail
containing a link directing you to a Zebra web site to download the appropriate software.
Page 3

Quick Reference Guide 3
134
6 - Windows only
2 5
5
8” Windows Version
10” Android Version
1342
Introduction
The ET5X are Windows® and Android™ based tablets that come in 8” and 10” configurations.
•ET50: WLAN only
• ET55: WLAN and WWAN.
Features
NOTE
Windows button only available on Windows tablets.
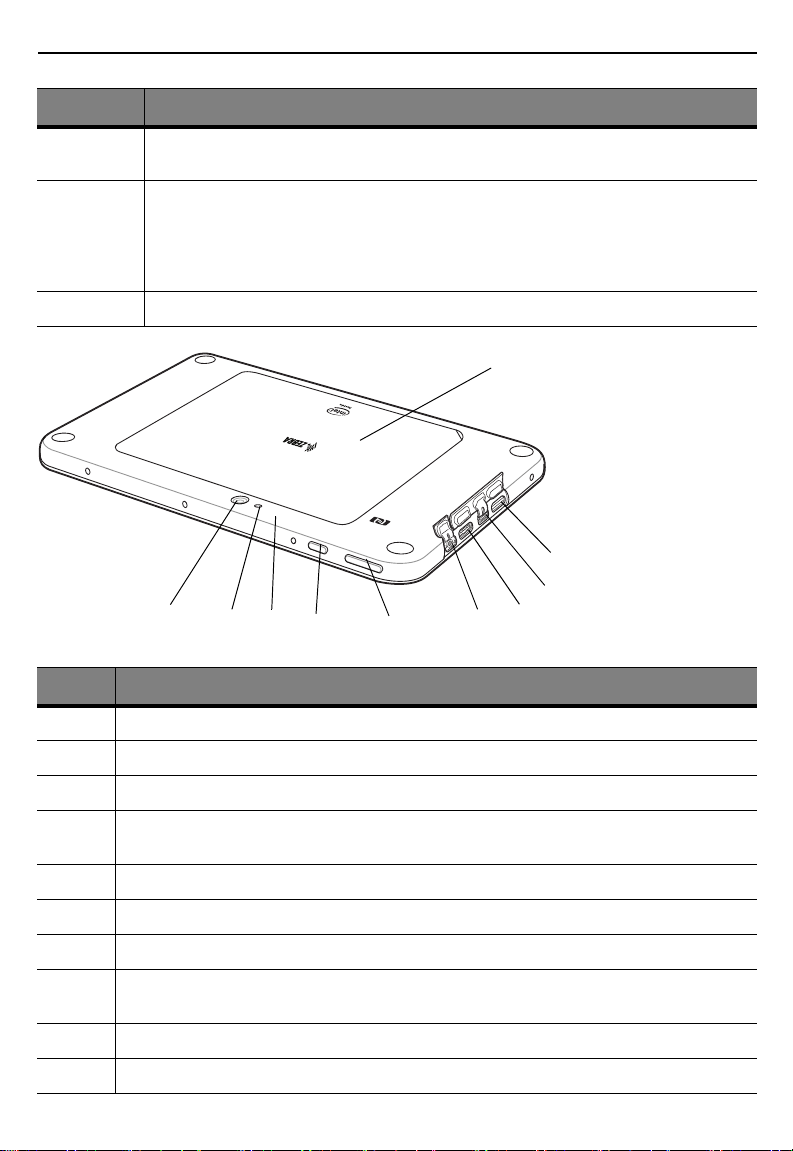
Item Description
1 Ambient Light Sensor - Recognizes the ambient light and adjusts the display brightness (if
2 Front Microphone - Use for voice communications (Windows Tablets only) or audio
3 Front Facing Camera - Use for video conferencing (Windows Tablets only) or capturing
enabled).
recordings.
images and video.
Page 4
4 ET5X Enterprise Tablet
11108712
14
9
16
13
15
Item Description
4 Camera Indicator LED - Lights red when the camera is activate. Momentarily lights red when
5 Charging Indicator LED - Indicates charging status.
6 Windows Button - Press to launch the Windows Home screen (Windows Tablets only).
the device boots and shuts down.
• OFF - device is not connected to charger.
• ORANGE - device is charging.
• GREEN - device is connected and fully charged.
• RED - charge error.
Item Description
7 Rear Camera - 8MP auto-focus camera for high resolution images and video.
8 Camera LED Flash - Provides illumination for the camera.
9 Rear Microphone - Use during video recordings.
10 Power Button - Push once to start the ET5X; push it again to enable sleep mode. Push and hold
11 Volume Key - Push the left side to reduce the volume. Press the right side to increase the volume.
12 3.5 mm Audio Jack - Use to connect to headset with microphone.
13 MicroSD Card Slot - Provides storage for microSD Card (up to 2 TB).
14 Micro USB Interface (charging only) - Provides for charging the ET5X using USB cable and
15 USB 2.0 Port - Provides input for USB devices.
16 Back Cover - Covers the service replaceable battery.
it to shut down the ET5X.
power supply. On Android devices, provides communication with host computer.
Page 5
Quick Reference Guide 5
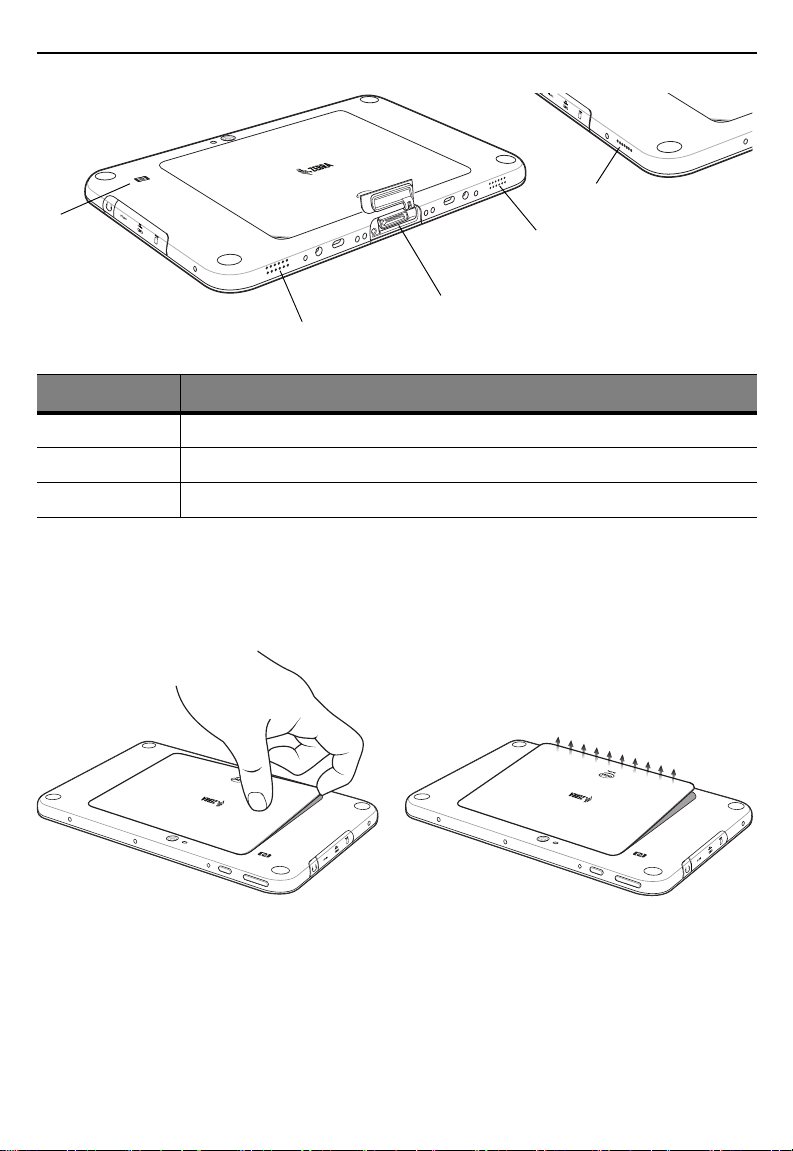
18
19
18
17
8” Version
18
10” Version
Item Description
17 NFC Antenna Position - Use to read NFC cards and RFID tags.
18 Stereo Speakers - Provides audio playback.
19 Docking Connector - Interfaces with the cradle.
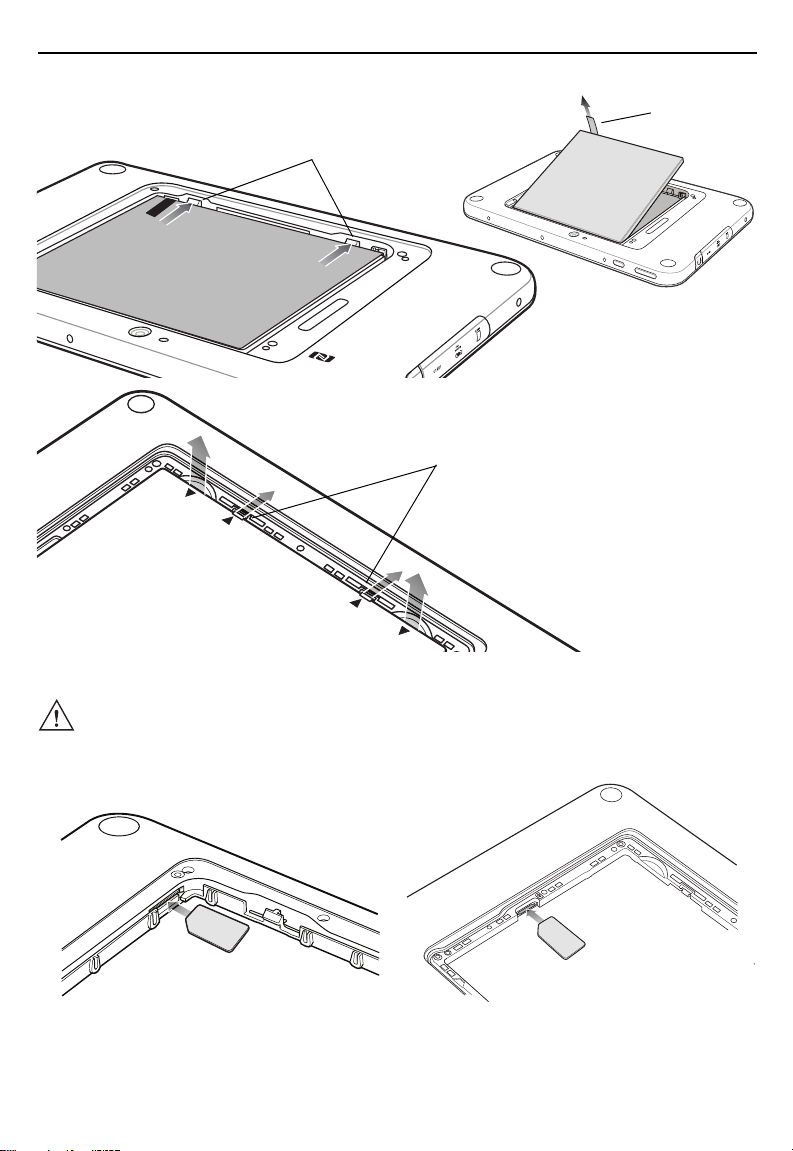
Installing a micro SIM Card (ET55 Only)
To install a micro SIM card:
1. Press the Power button to turn off the ET55.
2. Lift the notched corner of the battery cover.
3. Carefully lift the battery cover off the ET55.
4. On the 8” version, push the two locking tabs up, then pull up on the tab to remove battery.
On the 10” version, push the two locking tabs up (1), then, using index fingers, lift the battery up (2).
Page 6
6 ET5X Enterprise Tablet
Pull Tab
8” Version
Locking Tabs
2.LIFT
UP
2.LI
FT
U
P
1.RELEAS
E LO
C
KING
1
.
R
E
LEA
S
E
L
OC
K
ING
10” Version
Locking Tabs
8” Version 10” Version
5. Insert the micro SIM card with contacts facing down.
CAUTION
Do not use nano to micro SIM card adapters. Only use micro SIM cards.
6. Push the micro SIM card in and ensure that it locks into place.
7. Replace the battery.
On the 10” version, ensure that the two battery latches engage.
Page 7
Quick Reference Guide 7
CAUTION
properly may damage the battery cover.
8. Align the tabs on the underside of the cover with the slot around the battery well. Make sure that the notch
on the battery cover is at the bottom left cover of the ET5X.
9. Carefully press down around the edge of the cover. Make sure that the cover is seated properly.
Be aware of the orientation of the battery cover. Failure to replace the battery cover
10.Press Power button to turn on the ET55.
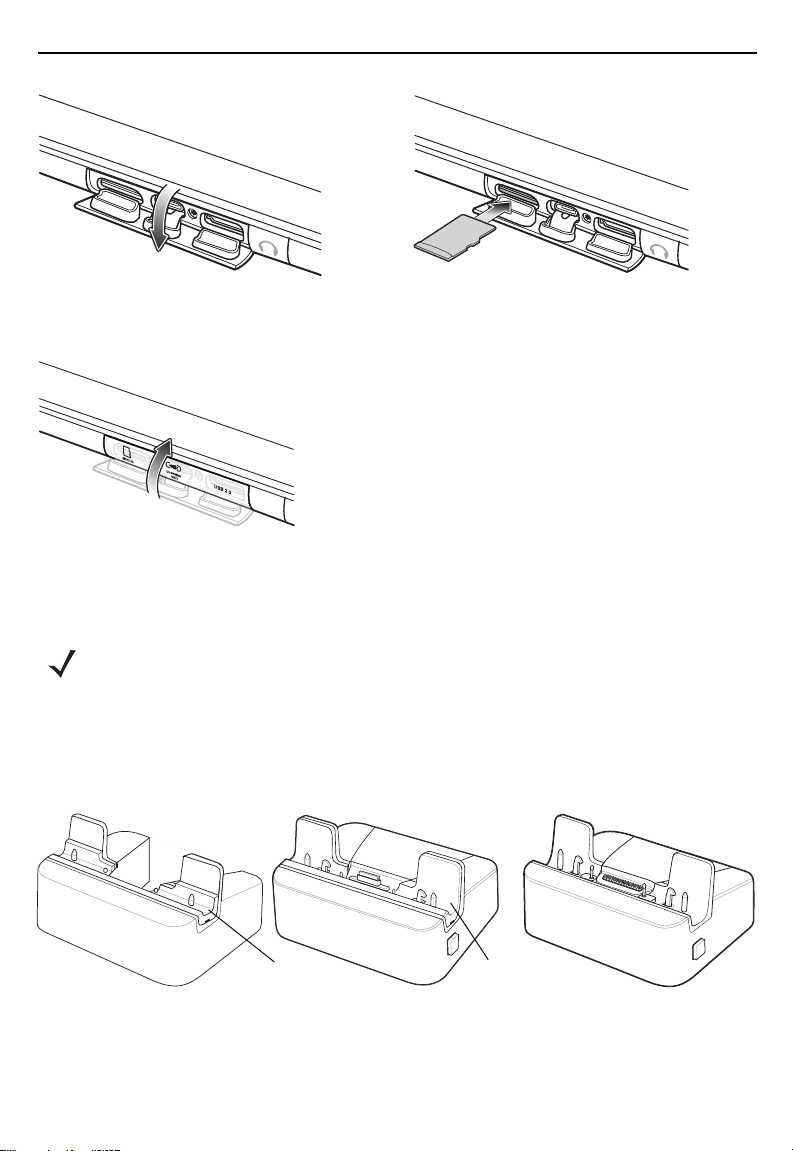
Install a micro SD Card
To install a microSD card:
1. Open access door.
Page 8
8 ET5X Enterprise Tablet
Communication CradleCharge Only Cradle
Short Insert
Rugged Communication Cradle
Tall I n se r t
2. Insert microSD card into slot with contacts facing down.
3. Press the card in to ensure that it is seated properly.
4. Close access door.
Charging the ET5X
Use the Communication and Charging Cradle, Rugged Communication and Charging Cradle or Charge Only
Cradle to charge the ET5X.
NOTE
The Charge Only Cradle (CRD-ET5X-1SCG1) and the Communication and Charge
Cradle (CRD-ET5X-1SCOM1) come with two inserts; tall insert and short insert. Install the tall
insert when using an ET5X without a Rugged Frame and Expansion Back. Install the small insert
when using an ET5X with an Expansion Back and without a Rugged Frame. Do not install either
insert when using the ET5X with the Rugged Frame.
The Rugged Communication and Charge Cradle (CRD-ET5X-1SCOM1R) does not come with
inserts. Use with ET5X and Rugged Frame with IO Adapter.
Setup the Charge Only Cradle or Communication Cradle, power supply, PWR-BGA12V50W0WW,
DC Line Cord CBL-DC-388A1-01 and country-specific AC line cord, sold separately.
Page 9

Quick Reference Guide 9
Communication and Charging Cradle Charge Only Cradle
Cradle Insert
Required
Cradle Insert
Not Required
1. If using the Communication and Charging Cradle, open the bottom access door and hold it to the back of
the tablet.
2. Align the ET5X with the alignment pins on the cradle.
3. Insert the ET5X into the cradle. Note that the Communication Cradle contains a locking mechanism that
locks the ET5X to the cradle.
Page 10

10 ET5X Enterprise Tablet
Rugged Communication and Charging Cradle
Cradle Insert
Not Required
4. The ET5X Charging LED indicates charging.
5. To remove the ET5X from the Charge Only cradle, hold the cradle down with one hand and lift the ET5X.
To remove the ET5X from either Communication Cradle, press the release button on the right side of the
cradle and lift the ET5X. Use thumb to hold down the cradle.
The 8” tablet main battery charges from fully depleted to 90% in approximately 2.5 hours and from fully
depleted to 100% in approximately 3.5 hours.
The 10” tablet main battery charges from fully depleted to 90% in approximately three hours and from fully
depleted to 100% in approximately four hours.
Page 11

Quick Reference Guide 11
NFC Antenna
Location
Using the Camera
To take photos or videos:
1. Open the Camera application. The Camera Indicator LED lights red.
2. Point the ET5X camera at an object.
3. Touch the on-screen shutter button to take a photo or record a video.
Reading NFC Cards And RFID Tags
The ET5X supports reading NFC cards and RFID tags. The NFC antenna is located on the back of the device
under the NFC logo.
With an NFC enabled application open, bring the NFC card toward the antenna. Depending upon the
application, an audio or visual indication indicates successful reading of the card.
Regulatory Information
This device is approved under Zebra Technologies Corporation.
This guide applies to the following Model Numbers: ET50NE, ET50NT, ET50PE, ET50PT, ET55AE, ET55AT,
ET55BE, ET55BT, ET55EE, ET55ET, ET55GE, ET55GT, ET55RE, ET55RT, ET55TE and ET55TT.
All Zebra devices are designed to be compliant with rules and regulations in locations they are sold and will
be labeled as required.
Local language translations are available at the following website: http://www.zebra.com/support.
Any changes or modifications to Zebra equipment, not expressly approved by Zebra, could void the user's
authority to operate the equipment.
Page 12

12 ET5X Enterprise Tablet
CAUTION
chargers.
Do NOT attempt to charge damp/wet mobile computers or batteries. All components must be dry
before connecting to an external power source.
Declared maximum operating temperature: +50°C.
Only use Zebra approved and UL Listed accessories, battery packs and battery
UL Listed Products with GPS
Underwriters Laboratories Inc. (UL) has not tested the performance or reliability of the Global Positioning
System (GPS) hardware, operating software or other aspects of this product. UL has only tested for fire,
shock or casualties as outlined in UL's Standard(s) for Safety for Information Technology Equipment,
UL60950-1. UL Certification does not cover the performance or reliability of the GPS hardware and GPS
operating software. UL makes no representations, warranties or certifications whatsoever regarding the
performance or reliability of any GPS related functions of this product.
Radio Modules
The device contain approved radio module(s). These module(s) are identified below.
For models:
• ET55Ax and ET55Bx: Radio card, Type(s): EM7355: Sierra Wireless PCI Express (LTE, HSPA+.
GSM/GPRS/EDGE, CDMA).
• ET55Rx and ET55Tx: Radio card, Type(s): ME936: Huawei Wireless module (LTE, HSPA+.
GSM/GPRS/EDGE).
• ET55Ex and ET55Gx: Radio card, Type(s): EM7455: Sierra Wireless PCI Express (LTE, HSPA+).
Bluetooth® Wireless Technology
This is an approved Bluetooth product. For more information or to view the End Product Listing, please visit
http://www.bluetooth.org/tpg/listings.cfm.
Wireless Devices Country Approvals
Regulatory markings, subject to certification, are applied to the device signifying the radio(s) are approved for
use in the following countries: United States, Canada, Australia, and Europe1.
Please refer to the Zebra Declaration of Conformity (DoC) for details of other country markings. This is
available at http://www.zebra.com/doc.
Note1: Europe includes: Austria, Belgium, Bulgaria, Croatia, Czech Republic, Cyprus, Denmark, Estonia,
Finland, France, Germany, Greece, Hungary, Iceland, Ireland, Italy, Latvia, Liechtenstein, Lithuania,
Luxembourg, Malta, Netherlands, Norway, Poland, Portugal, Romania, Slovak Republic, Slovenia, Spain,
Sweden, Switzerland and the United Kingdom.
CAUTION
Country Roaming
This device incorporates the International Roaming feature (IEEE802.11d) which will ensure the product
operates on the correct channels for the particular country of use.
Ad-Hoc Operation (2.4 GHz Band)
Ad-Hoc operation is limited to Channels 1-11 (2412 - 2462 MHz).
Operation of the device without regulatory approval is illegal.
Page 13

Quick Reference Guide 13
Wi-Fi Direct/ Hot Spot Mode
Operation is limited to the following channels/bands as supported in the country of use:
• Channels 1-11 (2412-2462 MHz)
• Channels 36-48 (5150-5250 MHz)
• Channels 149-165 (5745-5825 MHz)
Frequency of Operation FCC and IC
5 GHz Only:
Industry Canada Statement:
CAUTION
for harmful interference to co-Channel mobile satellite systems. High power radars are allocated
as primary users (meaning they have priority) of 5250-5350 MHz and 5650-5850 MHz and these
radars could cause interference and/or damage to LE-LAN devices.
A
VERTISSEMENT
uniquement pour une utilisation à l'intérieur afin de réduire les risques de brouillage
préjudiciable aux systèmes de satellites mobiles utilisant les mêmes canaux.
Les utilisateurs de radars de haute puissance sont désignés utilisateurs principaux (c.-à-d.,
qu'ils ont la priorité) pour les bands 5250-5350 MHz et 5650-5850 MHz et que ces radars
pourraient causer du brouillage et/ou des dommages aux dispositifs LAN-EL.
The device for the band 5150-5250 MHz is only for indoor usage to reduce potential
Le dispositive fonctionnant dans la bande 5150-5250 MHz est réservé
2.4 GHz Only:
The available channels for 802.11 b/g operation in the US are Channels 1 to 11. The range of channels is
limited by firmware.
Health and Safety Recommendations
Ergonomic Recommendations
CAUTION
recommendations below. Consult with your local Health & Safety Manager to ensure that you
are adhering to your company’s safety programs to prevent employee injury.
• Reduce or eliminate repetitive motion
• Maintain a neutral postures
• Reduce or eliminate excessive force
• Keep objects that are used frequently within easy reach
• Perform tasks at correct heights
• Reduce or eliminate vibration
• Reduce or eliminate direct pressure
• Provide adjustable workstations
• Provide adequate clearance
• Provide a suitable working environment
• Improve work procedures
• Alternate hands whenever possible when performing a repetitive task.
In order to avoid or minimize the potential risk of ergonomic injury follow the
Warnings for Use of Wireless Devices
Please observe all warning notices with regard to the usage of wireless devices.
Page 14

14 ET5X Enterprise Tablet
Safety in Aircraft
Switch off your wireless device whenever you are instructed to do so by airport or airline staff. If your device
offers a 'flight mode' or similar feature, consult airline staff as to its use in flight.
Safety in Hospitals
Wireless devices transmit radio frequency energy and may affect medical electrical equipment.
Wireless devices should be switched off wherever you are requested to do so in hospitals, clinics or
healthcare facilities. These requests are designed to prevent possible interference with sensitive medical
equipment.
Pacemakers
Pacemaker manufacturers recommended that a minimum of 15 cm (6 inches) be maintained between a
handheld wireless device and a pacemaker to avoid potential interference with the pacemaker. These
recommendations are consistent with independent research and recommendations by Wireless Technology
Research.
Persons with pacemakers:
• Should ALWAYS keep the device more than 15cm (6 inches) from their pacemaker when turned ON.
• Should not carry the device in a breast pocket.
• Should use the ear furthest from the pacemaker to minimize the potential for interference.
• If you have any reason to suspect that interference is taking place, turn OFF your device.
Other Medical Devices
Please consult your physician or the manufacturer of the medical device, to determine if the operation of your
wireless product may interfere with the medical device.
RF Exposure Guidelines
Safety Information
Reducing RF Exposure - Use Properly
Only operate the device in accordance with the instructions supplied.
International
The device complies with internationally recognized standards covering human exposure to electromagnetic
fields from radio devices. For information on “International” human exposure to electromagnetic fields refer to
the Zebra Declaration of Conformity (DoC) at http://www.zebra.com/doc.
For further information on the safety of RF energy from wireless devices, see
https://www.zebra.com/us/en/about-zebra/company-information/corporate-responsibility.html located under
Corporate Responsibility.
Europe
Handheld Devices
This device was tested for typical body-worn operation. Use only Zebra tested and approved belt-clips,
holsters, and similar accessories to ensure EU Compliance.
Page 15

Quick Reference Guide 15
US and Canada
Co-located Statement
To comply with FCC RF exposure compliance requirement, the antenna used for this transmitter must not be
co-located or operating in conjunction with any other transmitter/antenna except those already approved in
this filing.
Handheld Devices
This device was tested for typical body-worn operation. Use only Zebra tested and approved belt-clips,
holsters, and similar accessories to ensure FCC Compliance. The use of third-party belt-clips, holsters, and
similar accessories may not comply with FCC RF exposure compliance requirements, and should be
avoided.
To satisfy US and Canadian RF exposure requirements, a transmitting device must operate with a minimum
separation distance of 5 mm or more from a person's body.
Pour satisfaire aux exigences Américaines et Canadiennes d'exposition aux radio fréquences, un dispositif
de transmission doit fonctionner avec une distance de séparation minimale de 5 mm ou plus de corps d'une
personne.
LED Devices
LED Compliance Statement:
Classified as “EXEMPT RISK GROUP” according to IEC 62471:2006 and EN 62471:2008
Pulse duration: 1024 ms
Power Supply
Use ONLY a Zebra approved UL LISTED ITE (IEC/EN 60950-1, LPS) Class 2 power supply with electrical
ratings: Output 12.0 VDC, 5.0 A, with maximum ambient temperature of at least 40°C. Use of alternative
power supply will invalidate any approvals given to this unit and may be dangerous.
Batteries
Taiwan - Recycling
EPA (Environmental Protection Administration) requires dry battery producing or
importing firms in accordance with Article 15 of the Waste Disposal Act are required to
indicate the recycling marks on the batteries used in sales, giveaway or promotion.
Contact a qualified Taiwanese recycler for proper battery disposal.
Battery Information
CAUTION
Dispose of batteries according to instructions.
Use only approved batteries. Accessories which have battery charging capability are approved for use with
the following battery models:
• AMME2360 (3.8 VDC, 5,900 mAh) for the 8" tablet (ET50NE, ET50PE, ET55AE, ET55BE, ET55EE,
ET55GE, ET55RE, ET55TE)
• AMME2415 (3.8 VDC, 8,700 mAh) for the 10" tablet (ET50NT, ET50PT, ET55AT, ET55BT, ET55ET,
ET55GT, ET55RT, ET55TT)
Zebra approved rechargeable battery packs are designed and constructed to the highest standards within the
industry.
Risk of explosion if battery is replaced by an incorrect type.
Page 16

16 ET5X Enterprise Tablet
However, there are limitations as to how long a battery can operate or be stored before needing replacement.
Many factors affect the actual life cycle of a battery pack such as heat, cold, harsh environmental conditions,
and severe drops.
When batteries are stored over six months, some irreversible deterioration in overall battery quality may
occur. Store batteries at half of full charge in a dry, cool place, removed from the equipment to prevent loss of
capacity, rusting of metallic parts, and electrolyte leakage. When storing batteries for one year or longer, the
charge level should be verified at least once a year and charged to half of full charge.
Replace the battery when a significant loss of run time is detected.
Standard warranty period for all Zebra batteries is one year, regardless if the battery was purchased
separately or included as part of the mobile computer or bar code scanner. For more information on Zebra
batteries, please visit: http://www.zebra.com/batterybasics.
Battery Safety Guidelines
• The area in which the units are charged should be clear of debris and combustible materials or chemicals.
Particular care should be taken where the device is charged in a non commercial environment.
• Follow battery usage, storage, and charging guidelines found in the user's guide.
• Improper battery use may result in a fire, explosion, or other hazard.
• To charge the mobile device battery, the battery and charger temperatures must be between +32°F and
+104°F (0ºC and +40°C)
• Do not use incompatible batteries and chargers. Use of an incompatible battery or charger may present a
risk of fire, explosion, leakage, or other hazard. If you have any questions about the compatibility of a
battery or a charger, contact Zebra support.
• For devices that utilize a USB port as a charging source, the device shall only be connected to products
that bear the USB-IF logo or have completed the USB-IF compliance program.
• Do not disassemble or open, crush, bend or deform, puncture, or shred.
• Severe impact from dropping any battery-operated device on a hard surface could cause the battery to
overheat.
• Do not short circuit a battery or allow metallic or conductive objects to contact the battery terminals.
• Do not modify or remanufacture, attempt to insert foreign objects into the battery, immerse or expose to
water or other liquids, or expose to fire, explosion, or other hazard.
• Do not leave or store the equipment in or near areas that might get very hot, such as in a parked vehicle or
near a radiator or other heat source. Do not place battery into a microwave oven or dryer.
• Battery usage by children should be supervised.
• Please follow local regulations to promptly dispose of used re-chargeable batteries.
• Do not dispose of batteries in fire.
• Seek medical advice immediately if a battery has been swallowed.
• In the event of a battery leak, do not allow the liquid to come in contact with the skin or eyes. If contact has
been made, wash the affected area with large amounts of water and seek medical advice.
• If you suspect damage to your equipment or battery, contact Zebra support to arrange for inspection.
Removing the Battery
1. Lift the notched corner of the battery cover.
Page 17

Quick Reference Guide 17
Pull Tab
8” Version
Locking Tabs
2.LIFT UP
2.LI
FT
U
P
1.RELEAS
E LO
C
KING
1
.
R
E
LEA
S
E
L
OC
K
ING
10” Version
2. Carefully lift the battery cover off the ET5X.
3. On the 8” version, push the two locking tabs up, then pull up on the tab to remove battery.
On the 10” version, push the two locking tabs up (1), then, using index fingers, lift the battery up (2).
Radio Frequency Interference Requirements-FCC
Note: This equipment has been tested and found to comply with the limits for a Class B
digital device, pursuant to Part 15 of the FCC rules. These limits are designed to provide
reasonable protection against harmful interference in a residential installation. This
equipment generates, uses and can radiate radio frequency energy and, if not installed and
used in accordance with the instructions, may cause harmful interference to radio communications. However
there is no guarantee that interference will not occur in a particular installation. If this equipment does cause
harmful interference to radio or television reception, which can be determined by turning the equipment off
and on, the user is encouraged to try to correct the interference by one or more of the following measures:
• Reorient or relocate the receiving antenna
• Increase the separation between the equipment and receiver
• Connect the equipment into an outlet on a circuit different from that to which the receiver is connected
• Consult the dealer or an experienced radio/TV technician for help.
Radio Transmitters (Part 15)
This device complies with Part 15 of the FCC Rules. Operation is subject to the following two conditions: (1)
this device may not cause harmful interference, and (2) this device must accept any interference received,
including interference that may cause undesired operation.
Radio Frequency Interference Requirements - Canada
CAN ICES-3 (B)/NMB-3(B)
Page 18

18 ET5X Enterprise Tablet
Radio Transmitters
This device complies with Industry Canada's licence-exempt RSSs. Operation is subject to the following two
conditions: (1) This device may not cause interference; and (2) This device must accept any interference,
including interference that may cause undesired operation of the device.
Le présent appareil est conforme aux CNR d'Industrie Canada applicables aux appareils radio exempts de
licence. L'exploitation est autorisée aux deux conditions suivantes: (1) l'appareil ne doit pas produire de
brouillage, et (2) l'utilisateur de l'appareil doit accepter tout brouillage radio électrique subi même si le
brouillage est susceptible d'en compromettre le fonctionnement.
For RLAN Devices:
The use of 5 GHz RLAN's, for use in Canada, have the following restrictions:
• Restricted Band 5.60 - 5.65 GHz
Pour les équipements RLAN:
L'utilisation de la bande RLAN 5 GHz au Canada présente les limitations suivantes :
• Bande restreinte 5.60 - 5.65 GHz
Label Marking: The Term 'IC:' before the radio certification only signifies that Industry Canada technical
specifications were met.
Etiquette de marquage: Le terme "IC" avant la certification radio signifie que le produit est compatible avec le
spécification Industrie Canada.
Marking and European Economic Area (EEA)
The use of RLAN's, for use throughout the EEA, have the following restrictions:
• 5.15 - 5.35 GHz is restricted to indoor use only
Statement of Compliance
Zebra hereby declares that this radio equipment is in compliance with Directive 2011/65/EU and 2014/53/EU.
The full text of the EU Declaration of Conformity is available at the following internet address:
http://www.zebra.com/doc.
Other Countries
Japan (VCCI) - Voluntary Control Council for Interference
Class B ITE
この装置は、クラス B 情報技術装置です。この装置は、家庭環境で使用することを目的としてい
ますが、この装置がラジオやテレビジョン受信機に近接して使用されると、受信障害を引き起こ
すことがあります。 取扱説明書に従って正しい取り扱いをして下さい。 VCCI-B
Korea Warning Statement for Class B ITE
기 종 별 사 용 자 안 내 문
B급 기기
( 가정용 방송통신기자재 )
가정에서 사용하는 것을 목적으로 하며, 모든 지역에서 사용할 수 있습니다 .
이 기기는 가정용 (B 급 ) 전자파적합기기로서 주로
Australia
Use of 5 GHz RLAN's in Australia is restricted in the following band 5.50 - 5.65GHz.
Page 19

Quick Reference Guide 19
合 格 证
Brazil (UNWANTED EMISSIONS - ALL PRODUCTS)
Declarações Regulamentares para ET50NE, ET50NT, ET50PE, ET50PT, ET55EE, ET55ET, ET55GE,
ET55GT - Brasil
Nota: “A marca de certificação se aplica ao Transceptor, modelo ET50NE, ET50NT, ET50PE, ET50PT,
ET55EE, ET55ET, ET55GE, and ET55GT. Este equipamento opera em caráter secundário, isto é, não tem
direito a proteção contra interferência prejudicial, mesmo de estações do mesmo tipo, e não pode causar
interferência a sistemas operando em caráter primário.”
Para maiores informações sobre ANATEL consulte o site: www.anatel.gov.br
Este produto está homologado pela Anatel, de acordo com os procedimentos regulamentados pela
Resolução n°242/2000 e atende aos requisitos técnicos aplicados, incluindo os limites de exposição da Taxa
de Absorção Específica referente a campos elétricos, magnéticos e eletromagnéticos de radiofrequência, de
acordo com as Resoluções n° 303/2002 e 533/2009.
Este dispositivo está em conformidade com as diretrizes de exposição à radiofrequência quando posicionado
pelo menos 0 centímetros de distância do corpo. Para maiores informações, consulte o site da Anatel.
Chile
Este equipo cumple con la Resolución No 403 de 2008, de la Subsecretaria de telecomunicaciones, relativa
a radiaciones electromagnéticas.
Conforme a Resolución 755 parte j.1), se ajustará el dispositivo a operar en interiores en las siguientes
bandas con una potencia máxima radiada no superior a 150 mW:
• 2.400 hasta 2.483,5 MHz
• 5.150 hasta 5.250 MHz
• 5.250 hasta 5.350 MHz
• 5.725 hasta 5.850 MHz
Además, de acuerdo con Resolución 755, para la banda 5150 - 5250MHz la operación del equipo estará
restringida al interior de inmuebles y la densidad de potencia radiada máxima no supera 7,5 mW/MHz en
cualquier banda de 1 MHz y 0.1875 mW/25kHz en cualquier banda de 25 kHz.
China
通过访问以下网址可下载当地语言支持的产品说明书
www.zebra.com/support
警告:请勿拆装,短路,撞击,挤压或者投入火中及水中;
注意:如果电池被不正确型号替换,或出现鼓胀,会存在爆炸及其他危险
请按说明处置使用过的电池
合格证:
Eurasian Customs Union
Евразийский Таможенный Союз
Данный продукт соответствует требованиям знака EAC.
Page 20

20 ET5X Enterprise Tablet
Hong Kong
In accordance with HKTA1039, the band 5.15GHz - 5.35GHz is for indoor operation only.
Mexico
Restrict Frequency Range to: 2.450 - 2.4835 GHz.
La operación de este equipo está sujeta a las siguientes dos condiciones: (1) es posible que este equipo o
dispositivo no cause interferencia perjudicial y (2) este equipo o dispositivo debe aceptar cualquier
interferencia, incluyendo la que pueda causar su operación no deseada.
S. Korea
당해 무선설비는 운용 중 전파혼신 가능성이 있음
당해 무선설비 는전파혼 신 가능성이 있으므로 인명안전과 관련된 서비스는 할 수 없습니다 .
Taiwan
臺灣
低功率電波輻射性電機管理辦法
第十二條
經型式認證合格之低功率射頻電機,非經許可,公司、商號或使用者均不得擅自變更頻率、加大功率或變更原
設計之特性及功能。
第十四條
低功率射頻電機之使用不得影響飛航安全及干擾合法通信;經發現有干擾現象時,應立即停用,並改善至無干
擾時方得繼續使用。
前項合法通信,指依電信規定作業之無線電通信。
低功率射頻電機須忍受合法通信或工業、科學及醫療用電波輻射性電機設備之干擾。
在 5.25-5.35 秭赫頻帶內操作之無線資訊傳輸設備,限於室內使用。
Ukraine
Дане обладнання відповідає вимогам технічного регламенту № 1057, 2008 на обмеження щодо
використання деяких небезпечних речовин в електричних та електронних пристроях.
Thailand
เครื่ องโทรคมนาคมและอุ ปกรณ นี้ มี ความสอดคล องตามข อกําหนดของ กทช .
Waste Electrical and Electronic Equipment
(WEEE)
English: For EU Customers: All products at the end of their life must be returned to Zebra for recycling. For
information on how to return product, please go to: http://www.zebra.com/weee.
Français: Clients de l'Union Européenne: Tous les produits en fin de cycle de vie doivent être retournés à Zebra pour
recyclage. Pour de plus amples informations sur le retour de produits, consultez : http://www.zebra.com/weee.
Español: Para clientes en la Unión Europea: todos los productos deberán entregarse a Zebra al final de su ciclo de
vida para que sean reciclados. Si desea más información sobre cómo devolver un producto, visite:
http://www.zebra.com/weee.
Български: За клиенти от ЕС: След края на полезния им живот всички продукти трябва да се връщат на
Zebra за рециклиране. За информация относно връщането на продукти, моля отидете на адрес:
http://www.zebra.com/weee.
Deutsch: Für Kunden innerhalb der EU: Alle Produkte müssen am Ende ihrer Lebensdauer zum Recycling an Zebra
zurückgesandt werden. Informationen zur Rücksendung von Produkten finden Sie unter http://www.zebra.com/weee.
Hrvatski: Za kupce u Europskoj uniji: Svi se proizvodi po isteku vijeka trajanja moraju vratiti tvrtki Zebra na
recikliranje. Informacije o načinu vraćanja proizvoda potražite na web-stranici: www.zebra.com/weee.
Page 21

Quick Reference Guide 21
Italiano: per i clienti dell'UE: tutti i prodotti che sono giunti al termine del rispettivo ciclo di vita devono essere restituiti
a Zebra al fine di consentirne il riciclaggio. Per informazioni sulle modalità di restituzione, visitare il seguente sito
Web: http://www.zebra.com/weee.
Português: Para clientes da UE: todos os produtos no fim de vida devem ser devolvidos à Zebra para reciclagem.
Para obter informações sobre como devolver o produto, visite: http://www.zebra.com/weee.
Nederlands: Voor klanten in de EU: alle producten dienen aan het einde van hun levensduur naar Zebra te worden
teruggezonden voor recycling. Raadpleeg http://www.zebra.com/weee voor meer informatie over het terugzenden
van producten.
Polski: Klienci z obszaru Unii Europejskiej: Produkty wycofane z eksploatacji naleźy zwrócić do firmy Zebra w celu
ich utylizacji. Informacje na temat zwrotu produktów znajdują się na stronie internetowej http://www.zebra.com/weee.
Čeština: Pro zákazníky z EU: Všechny produkty je nutné po skonèení jejich životnosti vrátit spoleènosti Zebra
k recyklaci. Informace o zpùsobu vrácení produktu najdete na webové stránce: http://www.zebra.com/weee.
Eesti: EL klientidele: kõik tooted tuleb nende eluea lõppedes tagastada taaskasutamise eesmärgil Zebra'ile.
Lisainformatsiooni saamiseks toote tagastamise kohta külastage palun aadressi: http://www.zebra.com/weee.
Magyar: Az EU-ban vásárlóknak: Minden tönkrement terméket a Zebra vállalathoz kell eljuttatni újrahasznosítás
céljából. A termék visszajuttatásának módjával kapcsolatos tudnivalókért látogasson el a http://www.zebra.com/weee
weboldalra.
Svenska: För kunder inom EU: Alla produkter som uppnått sin livslängd måste returneras till Zebra för återvinning.
Information om hur du returnerar produkten finns på http://www.zebra.com/weee.
Suomi: Asiakkaat Euroopan unionin alueella: Kaikki tuotteet on palautettava kierrätettäväksi Zebra-yhtiöön, kun
tuotetta ei enää käytetä. Lisätietoja tuotteen palauttamisesta on osoitteessa http://www.zebra.com/weee.
Dansk: Til kunder i EU: Alle produkter skal returneres til Zebra til recirkulering, når de er udtjent. Læs oplysningerne
om returnering af produkter på: http://www.zebra.com/weee.
Ελληνικά: Για πελάτες στην Ε.Ε.: Όλα τα προϊόντα, στο τέλος της διάρκειας ζωής τους, πρέπει να επιστρέφονται στην
Zebra για ανακύκλωση. Για περισσότερες πληροφορίες σχετικά με την επιστροφή ενός προϊόντος, επισκεφθείτε τη
διεύθυνση http://www.zebra.com/weee στο Διαδίκτυο.
Malti: Għal klijenti fl-UE: il-prodotti kollha li jkunu waslu fl-aħħar tal-ħajja ta' l-użu tagħhom, iridu jiġu rritornati għand
Zebra għar-riċiklaġġ. Għal aktar tagħrif dwar kif għandek tirritorna l-prodott, jekk jogħġbok żur:
http://www.zebra.com/weee.
Românesc: Pentru clienţii din UE: Toate produsele, la sfârşitul duratei lor de funcţionare, trebuie returnate la Zebra
pentru reciclare. Pentru informaţii despre returnarea produsului, accesaţi: http://www.zebra.com/weee.
Slovenski: Za kupce v EU: vsi izdelki se morajo po poteku življenjske dobe vrniti podjetju Zebra za reciklažo. Za
informacije o vračilu izdelka obiščite: http://www.zebra.com/weee.
Slovenčina: Pre zákazníkov z krajín EU: Všetky výrobky musia byť po uplynutí doby ich životnosti vrátené
spoločnosti Zebra na recykláciu. Bližšie informácie o vrátení výrobkov nájdete na: http://www.zebra.com/weee.
Lietuvių: ES vartotojams: visi gaminiai, pasibaigus jų eksploatacijos laikui, turi būti grąžinti utilizuoti į kompaniją
„Zebra“. Daugiau informacijos, kaip grąžinti gaminį, rasite: http://www.zebra.com/weee.
Latviešu: ES klientiem: visi produkti pēc to kalpošanas mūža beigām ir jā
Lai iegūtu informāciju par produktu nogādāšanu Zebra, lūdzu, skatiet: http://www.zebra.com/weee.
Türkçe: AB Müşterileri için: Kullanım süresi dolan tüm ürünler geri dönüştürme için Zebra'ya iade edilmelidir.
Ürünlerin nasıl iade edileceği hakkında bilgi için lütfen şu adresi ziyaret edin: http://www.zebra.com/weee.
Hrvatski: Za kupce u Europskoj uniji: Svi se proizvodi po isteku vijeka trajanja moraju vratiti tvrtki Zebra na
recikliranje. Informacije o načinu vraćanja proizvoda potražite na web-stranici: http://www.zebra.com/weee.
nogādā atpakaļ Zebra otrreizējai pārstrādei.
TURKISH WEEE Statement of Compliance
EEE Yönetmeliğine Uygundur
End User License Agreement
IMPORTANT PLEASE READ CAREFULLY: This End User License Agreement (“EULA”) is a legal agreement between you
(either an individual or a single entity) (“Licensee”) and Zebra International Holdings Corporation (“Zebra”) for software, owned
by Zebra and its affiliated companies and its third party suppliers and licensors, that accompanies this EULA, which includes
machine-readable instructions used by a processor to perform specific operations other than machine-readable instructions
used for the sole purpose of booting hardware during a startup sequence (“Software”). BY USING THE SOFTWARE, YOU
ACKNOWLEDGE ACCEPTANCE OF THE TERMS OF THIS EULA. IF YOU DO NOT ACCEPT THESE TERMS, DO NOT
USE THE SOFTWARE.
1. GRANT OF LICENSE. Zebra grants you, End-User Customer, the following rights provided that you comply with all terms
and conditions of this EULA: For Software associated with Zebra hardware, Zebra hereby grants you a limited, personal,
non-exclusive license during the term of this Agreement to use the Software solely and exclusively for your internal use in
support of the operation of your associated Zebra hardware and for no other purpose. To the extent that any portion of the
Software is provided to you in a manner that is designed to be installed by you, you may install one copy of the installable
Page 22

22 ET5X Enterprise Tablet
Software on one hard disk or other device storage for one printer, computer, workstation, terminal, controller, access point or
other digital electronic device, as applicable (an “Electronic Device”), and you may access and use that Software as installed
on that Electronic Device so long as only one copy of such Software is in operation. For a standalone Software application,
you may install, use, access, display and run only the number of copies of the Software to which you are entitled. You may
make one copy of the Software in machine readable form for backup purposes only, provided that the backup copy must
include all copyright or other proprietary notices contained on the original. In the absence of a support contract, you are
entitled, for a period of ninety (90) days from when the instance of Software (or hardware including the Software) are first
shipped by Zebra or downloaded by End-User Customer, to obtain, if available, updates, from Zebra and operational technical
support, not including implementation, integration or deployment support (“Entitlement Period”). You may not obtain updates
from Zebra after the Entitlement Period, unless covered by a Zebra support contract or other written agreement with Zebra.
Certain items of the Software may be subject to open source licenses. The open source license provisions may override some
of the terms of this EULA. Zebra makes the applicable open source licenses available to you on a Legal Notices readme file
available on your device and/or in System Reference guides or in Command Line Interface (CLI) Reference guides associated
with certain Zebra products.
1.1 Authorized Users. For a standalone Software application, the licenses granted are subject to the condition that you ensure
the maximum number of authorized users accessing and using the Software either alone or concurrently is equal to the
number of user licenses for which you are entitled to use either through a Zebra channel partner member or Zebra. You may
purchase additional user licenses at any time upon payment of the appropriate fees to the Zebra channel partner member or
Zebra.
1.2 Software Transfer. You may only transfer this EULA and the rights to the Software or updates granted herein to a third party
in connection with the support or sale of a device which the Software accompanied or in connection with a standalone
Software application during the Entitlement Period or as covered by a Zebra support contract. In such event, the transfer must
include all of the Software (including all component parts, the media and printed materials, any upgrades, and this EULA) and
you may not retain any copies of the Software. The transfer may not be an indirect transfer, such as a consignment. Prior to
the transfer, the end user receiving the Software must agree to all the EULA terms. If Licensee is purchasing Zebra Products
and licensing Software for end use by a U.S. Government end user, Licensee may transfer such Software license, but only if:
(i) Licensee transfers all copies of such Software to the U.S. Government end user or to an interim transferee, and (ii) Licensee
has first obtained from the transferee (if applicable) and ultimate end user an enforceable end user license agreement
containing restrictions substantially identical to the ones contained in this Agreement. Except as stated in the foregoing,
Licensee and any transferee(s) authorized by this provision may not otherwise use or transfer or make available any Zebra
software to any third party nor permit any party to do so.
2. RESERVATION OF RIGHTS AND OWNERSHIP. Zebra reserves all rights not expressly granted to you in this EULA. The
Software is protected by copyright and other intellectual property laws and treaties. Zebra or its suppliers own the title,
copyright and other intellectual property rights in the Software. The Software is licensed, not sold.
3. LIMITATIONS ON END USER RIGHTS. You may not reverse engineer, decompile, disassemble, or otherwise attempt to
discover the source code or algorithms of, the Software (except and only to the extent that such activity is expressly permitted
by applicable law not withstanding this limitation), or modify, or disable any features of, the Software, or create derivative works
based on the Software. You may not rent, lease, lend, sublicense or provide commercial hosting services with the Software.
4. CONSENT TO USE OF DATA. You agree that Zebra and its affiliates may collect and use technical information gathered as
part of the product support services related to the Software provided to you that does not personally identify you. Zebra and its
affiliates may use this information solely to improve their products or to provide customized services or technologies to you. At
all times your information will be treated in accordance with Zebra's Privacy Policy, which can be viewed at:
http://www.zebra.com.
5. LOCATION INFORMATION. The Software may enable you to collect location-based data from one or more client devices
which may allow you to track the actual location of those client devices. Zebra specifically disclaims any liability for your use or
misuse of the location-based data. You agree to pay all reasonable costs and expenses of Zebra arising from or related to third
party claims resulting from your use of the location-based data.
6. SOFTWARE RELEASES. During the Entitlement Period, Zebra or Zebra's channel partner members may make available
to you software releases as they become available after the date you obtain your initial copy of the Software. This EULA
applies to all and any component of the release that Zebra may make available to you after the date you obtain your initial copy
of the Software, unless Zebra provides other license terms along with such release. To receive Software provided through the
release, you must first be licensed for the Software identified by Zebra as entitled to the release. We recommend that you
periodically check availability of a Zebra support contract to ensure that you are entitled to receive any available Software
releases. Some features of the Software may require you to have access to the internet and may be subject to restrictions
imposed by your network or internet provider.
7. EXPORT RESTRICTIONS. You acknowledge that the Software is subject to export restrictions of various countries. You
agree to comply with all applicable international and national laws that apply to the Software, including all the applicable export
restriction laws and regulations.
8. ASSIGNMENT. You may not assign this Agreement or any of your rights or obligations hereunder (by operation of law or
otherwise) without the prior written consent of Zebra. Zebra may assign this Agreement and its rights and obligations without
your consent. Subject to the foregoing, this Agreement shall be binding upon and inure to the benefit of the parties to it and
their respective legal representatives, successors and permitted assigns.
9. TERMINATION. This EULA is effective until terminated. Your rights under this License will terminate automatically without
notice from Zebra if you fail to comply with any of the terms and conditions of this EULA. Zebra may terminate this Agreement
by offering you a superseding Agreement for the Software or for any new release of the Software and conditioning your
Page 23

Quick Reference Guide 23
continued use of the Software or such new release on your acceptance of such superseding Agreement. Upon termination of
this EULA, you must cease all use of the Software and destroy all copies, full or partial, of the Software.
10. DISCLAIMER OF WARRANTY. UNLESS SEPARATELY STATED IN A WRITTEN EXPRESS LIMITED WARRANTY, ALL
SOFTWARE PROVIDED BY ZEBRA IS PROVIDED “AS IS” AND ON AN “AS AVAILABLE” BASIS, WITHOUT WARRANTIES
OF ANY KIND FROM ZEBRA, EITHER EXPRESS OR IMPLIED. TO THE FULLEST EXTENT POSSIBLE PURSUANT TO
APPLICABLE LAW, ZEBRA DISCLAIMS ALL WARRANTIES EXPRESS, IMPLIED, OR STATUTORY, INCLUDING, BUT NOT
LIMITED TO, IMPLIED WARRANTIES OF MERCHANTABILITY, SATISFACTORY QUALITY OR WORKMANLIKE EFFORT,
FITNESS FOR A PARTICULAR PURPOSE, RELIABILITY OR AVAILABILITY, ACCURACY, LACK OF VIRUSES, NON
INFRINGEMENT OF THIRD PARTY RIGHTS OR OTHER VIOLATION OF RIGHTS. ZEBRA DOES NOT WARRANT THAT
THE OPERATION OF THE SOFTWARE WILL BE UNINTERRUPTED OR ERROR FREE. TO THE EXTENT THAT THE
SOFTWARE COVERED BY THIS EULA INCLUDES EMULATION LIBRARIES, SUCH EMULATION LIBRARIES DO NOT
WORK 100% CORRECTLY OR COVER 100% OF THE FUNCTIONALITY BEING EMULATED, ARE OFFERED “AS IS” AND
WITH ALL FAULTS, AND ALL THE DISCLAIMERS AND LIMITATIONS CONTAINED IN THIS PARAGRAPH AND THIS
AGREEMENT APPLY TO SUCH EMULATION LIBRARIES. SOME JURISDICTIONS DO NOT ALLOW EXCLUSIONS OR
LIMITATIONS OF IMPLIED WARRANTIES, SO THE ABOVE EXCLUSIONS OR LIMITATIONS MAY NOT APPLY TO YOU.
NO ADVICE OR INFORMATION, WHETHER ORAL OR WRITTEN, OBTAINED BY YOU FROM ZEBRA OR ITS AFFILIATES
SHALL BE DEEMED TO ALTER THIS DISCLAIMER BY ZEBRA OF WARRANTY REGARDING THE SOFTWARE, OR TO
CREATE ANY WARRANTY OF ANY SORT FROM ZEBRA.
11. THIRD-PARTY APPLICATIONS. Certain third party applications may be included with, or downloaded with this Software.
Zebra makes no representations whatsoever about any of these applications. Since Zebra has no control over such
applications, you acknowledge and agree that Zebra is not responsible for such applications. You expressly acknowledge and
agree that use of third party applications is at your sole risk and that the entire risk of unsatisfactory quality, performance,
accuracy and effort is with you. You agree that Zebra shall not be responsible or liable, directly or indirectly, for any damage or
loss, including but not limited to any damage to or loss of data, caused or alleged to be caused by, or in connection with, use of
or reliance on any such third party content, products, or services available on or through any such application. You
acknowledge and agree that the use of any third-party application is governed by such third party application provider's Terms
of Use, License Agreement, Privacy Policy, or other such agreement and that any information or personal data you provide,
whether knowingly or unknowingly, to such third-party application provider, will be subject to such third party application
provider's privacy policy, if such a policy exists. ZEBRA DISCLAIMS ANY RESPONSIBILITY FOR ANY DISCLOSURE OF
INFORMATION OR ANY OTHER PRACTICES OF ANY THIRD PARTY APPLICATION PROVIDER. ZEBRA EXPRESSLY
DISCLAIMS ANY WARRANTY REGARDING WHETHER YOUR PERSONAL INFORMATION IS CAPTURED BY ANY THIRD
PARTY APPLICATION PROVIDER OR THE USE TO WHICH SUCH PERSONAL INFORMATION MAY BE PUT BY SUCH
THIRD PARTY APPLICATION PROVIDER.
12. LIMITATION OF LIABILITY. ZEBRA WILL NOT BE LIABLE FOR ANY DAMAGES OF ANY KIND ARISING OUT OF OR
RELATING TO THE USE OR THE INABILITY TO USE THE SOFTWARE OR ANY THIRD PARTY APPLICATION, ITS
CONTENT OR FUNCTIONALITY, INCLUDING BUT NOT LIMITED TO DAMAGES CAUSED BY OR RELATED TO ERRORS,
OMISSIONS, INTERRUPTIONS, DEFECTS, DELAY IN OPERATION OR TRANSMISSION, COMPUTER VIRUS, FAILURE
TO CONNECT, NETWORK CHARGES, IN-APP PURCHASES, AND ALL OTHER DIRECT, INDIRECT, SPECIAL,
INCIDENTAL, EXEMPLARY, OR CONSEQUENTIAL DAMAGES EVEN IF ZEBRA HAS BEEN ADVISED OF THE
POSSIBILITY OF SUCH DAMAGES. SOME JURISDICTIONS DO NOT ALLOW THE EXCLUSION OR LIMITATION OF
INCIDENTAL OR CONSEQUENTIAL DAMAGES, SO THE ABOVE EXCLUSIONS OR LIMITATIONS MAY NOT APPLY TO
YOU. NOTWITHSTANDING THE FOREGOING, ZEBRA'S TOTAL LIABILITY TO YOU FOR ALL LOSSES, DAMAGES,
CAUSES OF ACTION, INCLUDING BUT NOT LIMITED TO THOSE BASED ON CONTRACT, TORT, OR OTHERWISE,
ARISING OUT OF YOUR USE OF THE SOFTWARE OR THIRD PARTY APPLICATIONS, OR ANY OTHER PROVISION OF
THIS EULA, SHALL NOT EXCEED THE FAIR MARKET VALUE OF THE SOFTWARE OR AMOUNT PURCHASER PAID
SPECIFICALLY FOR THE SOFTWARE. THE FOREGOING LIMITATIONS, EXCLUSIONS, AND DISCLAIMERS (INCLUDING
SECTIONS 10, 11, 12, AND 15) SHALL APPLY TO THE MAXIMUM EXTENT PERMITTED BY APPLICABLE LAW, EVEN IF
ANY REMEDY FAILS ITS ESSENTIAL PURPOSE.
13. INJUNCTIVE RELIEF. You acknowledge that, in the event you breach any provision of this Agreement, Zebra will not have
an adequate remedy in money or damages. Zebra shall therefore be entitled to obtain an injunction against such breach from
any court of competent jurisdiction immediately upon request without posting bond. Zebra's right to obtain injunctive relief shall
not limit its right to seek further remedies.
14. MODIFICATION. No modification of this Agreement shall be binding unless it is in writing and is signed by an authorized
representative of the party against whom enforcement of the modification is sought.
15. U.S. GOVERNMENT END USERS RESTRICTED RIGHTS. This provision only applies to U.S. Government end users.
The Software is a “commercial item” as that term is defined at 48 C.F.R. Part 2.101, consisting of “commercial computer
software” and “computer software documentation” as such terms are defined in 48 C.F.R. Part 252.227-7014(a)(1) and 48
C.F.R. Part 252.227-7014(a)(5), and used in 48 C.F.R. Part 12.212 and 48 C.F.R. Part 227.7202, as applicable. Consistent
with 48 C.F.R. Part 12.212, 48 C.F.R. Part 252.227-7015, 48 C.F.R. Part 227.7202-1 through 227.7202-4, 48 C.F.R. Part
52.227-19, and other relevant sections of the Code of Federal Regulations, as applicable, the Software is distributed and
licensed to U.S. Government end users (a) only as a commercial item, and (b) with only those rights as are granted to all other
end users pursuant to the terms and conditions contained herein.
16. APPLICABLE LAW. This EULA is governed by the laws of the state of Illinois, without regard to its conflict of law
provisions. This EULA shall not be governed by the UN Convention on Contracts for the International Sale of Goods, the
application of which is expressly excluded.
Page 24

CMM Disclosure
部件名称
(Parts)
金属部件
(Metal Parts)
电路模块
(Circuit Modules)
电缆及电缆组件
(Cables and Cable Assemblies)
塑料和聚合物部件
(Plastic and Polymeric Parts)
光学和光学组件
(Optics and Optical Components)
电池
(Batteries)
有害物质
铅
(Pb)汞(Hg)镉(Cd)
XOX O O O
XOO O O O
OOO O O O
OOO O O O
OOO O O O
XOO O O O
六价铬
(Cr(VI))
多溴联苯
(PBB)
多溴二苯醚
(PBDE)
本表格依据 SJ/T 11364 的规定编制。
O: 表示该有害物质在该部件所有均质材料中的含量均在 GB/T 26572 规定的限量要求以下。
X: 表示该有害物质至少在该部件的某一均质材料中的含量超出 GB/T 26572 规定的限量要求。( 企业可在此
处,根据实际情况对上表中打 “×” 的技术原因进行进一步说明。)
This table was created to comply with China RoHS requirements.
Zebra Technologies Corporation
3 Overlook Point
Lincolnshire, Illinois 60069 USA
http://www.zebra.com
© 2018 ZIH Corp and/or its affiliates. All rights reserved. ZEBRA and the stylized Zebra head
are trademarks of ZIH Corp, registered in many jurisdictions worldwide. All other trademarks
are the property of their respective owners.
MN001844A09 Rev. A - May 2018
 Loading...