

Page 1

ET40/45
Enterprise Tablet
Quick Start Guide
MN-004345-01EN Rev A
Page 2

ZEBRA and the stylized Zebra head are trademarks of Zebra Technologies Corporation, registered in many
jurisdictions worldwide. All other trademarks are the property of their respective owners. ©2022 Zebra
Technologies Corporation and/or its affiliates. All rights reserved.
Information in this document is subject to change without notice. The software described in this document
is furnished under a license agreement or nondisclosure agreement. The software may be used or copied
only in accordance with the terms of those agreements.
For further information regarding legal and proprietary statements, please go to:
SOFTWARE: zebra.com/linkoslegal.
COPYRIGHTS: zebra.com/copyright.
WARRANTY: zebra.com/warranty.
END USER LICENSE AGREEMENT: zebra.com/eula.
Terms of Use
Proprietary Statement
This manual contains proprietary information of Zebra Technologies Corporation and its subsidiaries
(“Zebra Technologies”). It is intended solely for the information and use of parties operating and
maintaining the equipment described herein. Such proprietary information may not be used, reproduced,
or disclosed to any other parties for any other purpose without the express, written permission of Zebra
Technologies.
Copyright
Product Improvements
Continuous improvement of products is a policy of Zebra Technologies. All specifications and designs are
subject to change without notice.
Liability Disclaimer
Zebra Technologies takes steps to ensure that its published Engineering specifications and manuals are
correct; however, errors do occur. Zebra Technologies reserves the right to correct any such errors and
disclaims liability resulting therefrom.
Limitation of Liability
In no event shall Zebra Technologies or anyone else involved in the creation, production, or delivery of the
accompanying product (including hardware and software) be liable for any damages whatsoever (including,
without limitation, consequential damages including loss of business profits, business interruption, or loss
of business information) arising out of the use of, the results of use of, or inability to use such product, even
if Zebra Technologies has been advised of the possibility of such damages. Some jurisdictions do not allow
the exclusion or limitation of incidental or consequential damages, so the above limitation or exclusion may
not apply to you.
Page 3

Unpacking the Device
1. Carefully remove all protective material from the device and save the shipping container for later
storage and shipping.
2. Verify the following items are in the box:
• Tablet
• Regulatory Guide
3. Inspect the equipment for damage. If any equipment is missing or damaged, contact the
GlobalCustomer Support Center immediately.
4. Before using the device for the first time, remove the protective shipping film that covers the scan
window, display, and camera window.
Device Features
Figure 1Front View
ET40/45 Quick Start Guide
Table 1Device Front View
Number Item Description
1 Front scan button Initiates barcode data capture when a scan-enabled application is
active.
2 Touch screen Displays all information needed to operate the device.
3 Light sensor Determines ambient light for controlling display back light intensity.
3
Page 4

ET40/45 Quick Start Guide
Table 1Device Front View(Continued)
Number Item Description
4 Front camera Use for video conferencing.
5 Power button Turns the display on and off. Press and release to power on the
device. Press and hold to reset the device or power off.
6 Data capture LED Illuminates during data capture.
7 Charging indicator
LED
8 Scan window Provides data capture using the imager.
9 USB-C port Provides USB host and client communications.
10 Right speaker Provides audio output.
11 Interface connector Provides communication to the device from the dock.
12 Cradle alignment
indicator
13 Left speaker Provides audio output.
14 USB port cover Use to seal the USB port. Available on healthcare devices only.
Figure 2Rear View
Indicates power state and battery charging status while charging and
application generated notifications.
Use to assist in aligning the tablet with a cradle.
Table 2Device Rear View
Number Item Description
1 Cradle latching slot Used by cradles to secure the tablet.
2 Battery cover Provides access to the replaceable battery.
3 NFC antenna
position
Use to read NFC cards.
4
Page 5

ET40/45 Quick Start Guide
Table 2Device Rear View(Continued)
Number Item Description
4 Rear Microphone Use for audio recordings.
5 Rear camera Autofocus camera that takes photos.
6 Rear camera LED
flash
7 Battery cover notch Lift the notched section of the battery cover to remove the battery
8 Top scan button Initiates barcode data capture when a scan-enabled application is
9 Top Microphone Use for voice communications or audio recordings.
10 Programmable
button
11 PTT button Typically used forPush-to-Talkcommunications. Where regulatory
12 Volume up button Increases audio volume.
13 Volume down button Decreases audio volume.
Setting Up the Device
Set up the device before using it for the first time.
1. Install the nano SIM Card. (ET45 only)
2. Charge the device.
Provides illumination for the camera.
cover from the tablet.
active (programmable).
Button that is configurable for use with applications.
restrictions exist, button is configurable for use with other
applications.
3. Power on the device.
Installing the nano SIM Card
A nano-SIM card slot is available only on ET45 devices.The following steps only apply when installing or
replacing a nano SIM card.
1. Ensure the tablet is powered off.
CAUTION: Do not attempt to remove the battery while the tablet is powered on.
a) Press and hold the Power button until the menu appears.
b) Touch Power off.
5
Page 6

ET40/45 Quick Start Guide
2
3
1
2. Lift the corner of the battery cover up (1) from the notched area and carefully remove the battery cover
from the device (2) as shown.
CAUTION: Do not use any tool for battery cover or battery removal. Puncturing the battery
or seal may cause a hazardous condition and a potential risk of injury.
3. Using your fingernail, slide and hold the battery lock switch in the unlock position (1).
4. While the switch is in the unlock position, lift the battery from the notched area(2), rotate the battery
up and then remove it from the battery well (3).
5. After removing the battery from the tablet, release the battery lock switch.
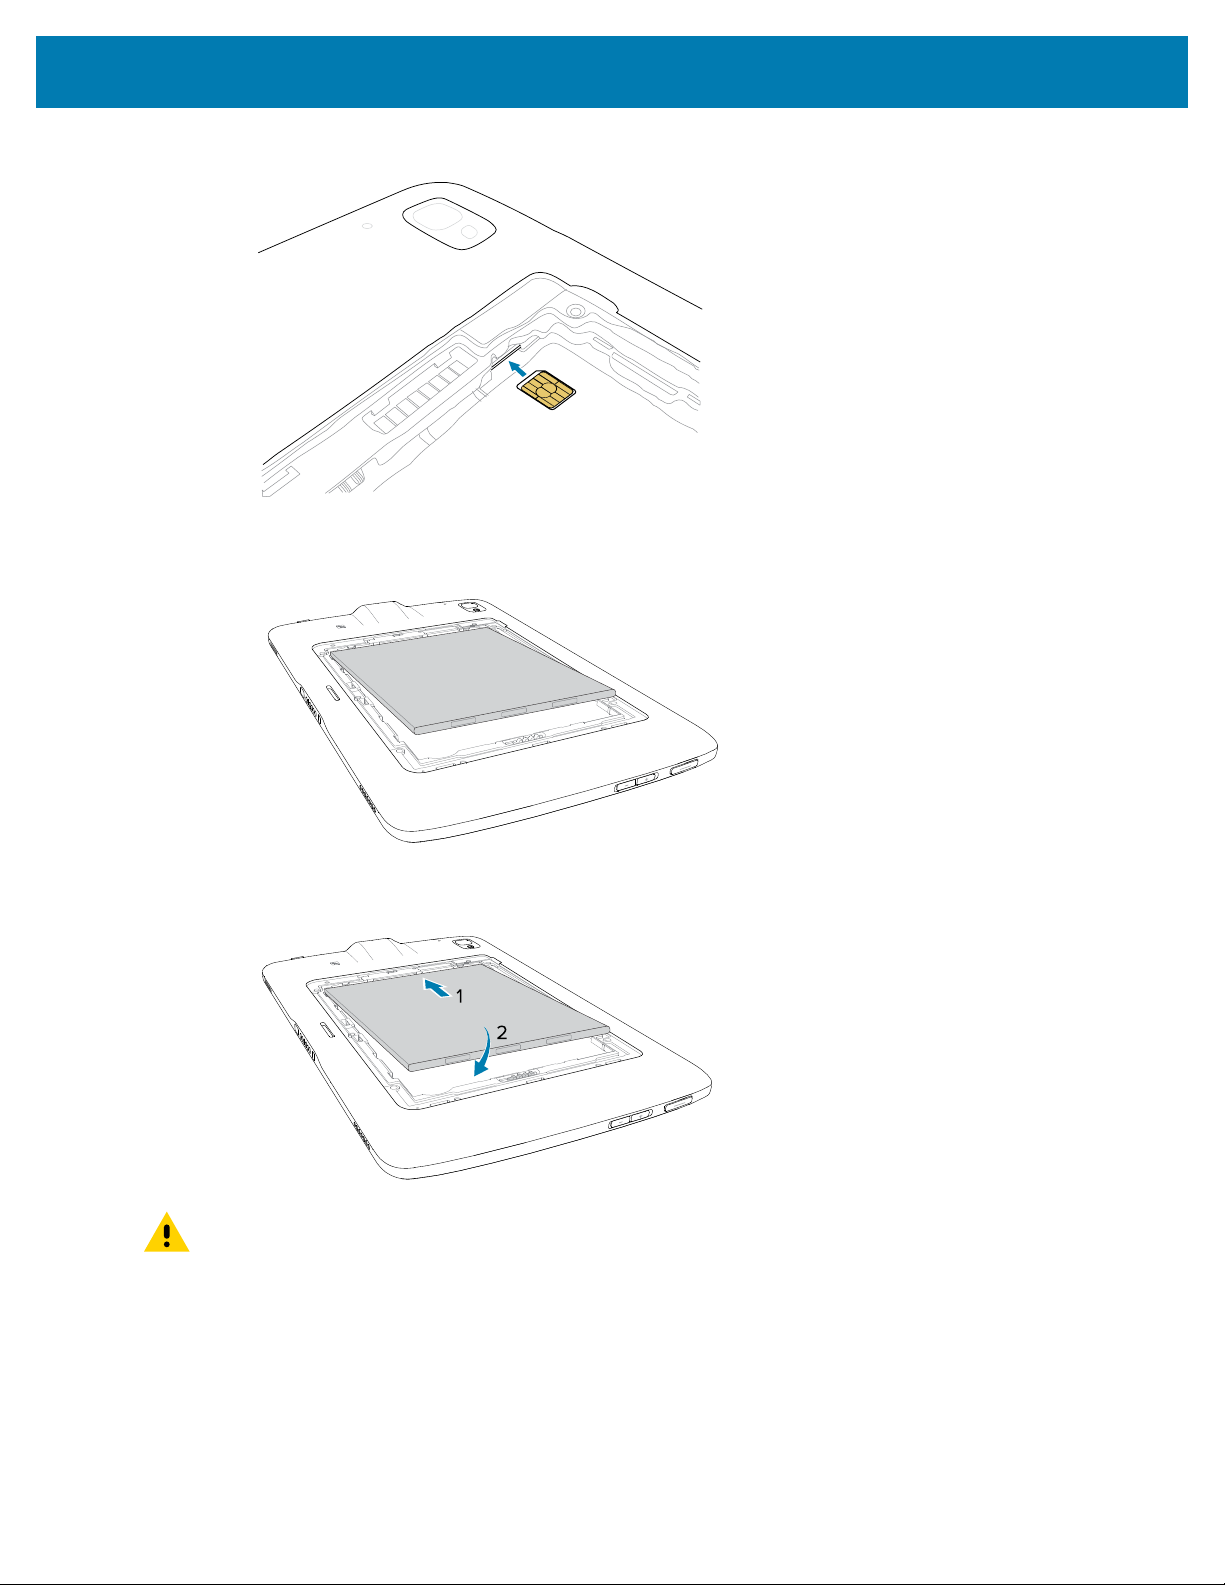
6. If replacing the nano SIM card,remove the existing card.
a) Push in the installed SIM card and release.
b) The card ejects slightly so that you can remove it.
c) Remove the SIM card from the card slot. The card should easily slide out. If not, the SIM card was
not ejected correctly. Repeat step A.
6
Page 7
ET40/45 Quick Start Guide
7. Insert the nano SIM card with the contacts facing up.
8. Push the SIM card in and ensure that it locks into place.
9. Replace the battery, contacts side first.
10. Gently push the battery towards the contacts (1) while rotating the battery down into the battery well
(2),ensuring it is seated properly.
CAUTION: Be aware of the orientation of the battery cover. Failure to replace the battery
cover properly may cause damage.
11. Insert the tabbed end of the battery cover into the slots in the battery well (1).
7
Page 8

ET40/45 Quick Start Guide
2
1
12. Rotate the cover down (2).
13. Carefully press down around the edges of the cover. Make sure that the cover is seated properly.
Device Charging
Before using the tablet for the first time, connect it to an external power source. Keep the tablet connected
to the external power source until fully charged. The Charging Indicator LED turns green when the tablet is
fully charged. You may use the tablet while it is charging.
Charging Accessories
For theoptimumcharging experience, use a Zebra approved charging accessory.
Charging accessories for the ET40/ET45 include:
• 1-Slot Charge Only Cradle(CRD-ET4X-1SCHRG1-01)
• 4-Slot Charge Only Cradle(CRD-ET4X-4SCHRG1-01)
• USB-CCharging Cable (CBL-TC5X-USBC2A-01)
Charging Indicators
Charge the tablet's battery before using the tablet.
The 8 in. tablet battery charges from fully depleted to 80% in approximately 3 hours.
The 10 in. tablet battery charges from fully depleted to 80% in approximately 4 hours.
NOTE: The Charging indicator only illuminates when the device is connected to a power source.
8
Page 9

ET40/45 Quick Start Guide
Table 3Charging Indicators
LED Indication
Off Device is not in cradle; not seated properly; or cradle is not powered.
Slow blinking orange
(1 blink every 4 seconds)
Slow blinking red
(1 blink every 4 seconds)
Fast blinking orange
(2 blinks/second)
Fast blinking red
(2 blinks/second)
Solid Green Charging complete.
Solid Red Charging completebut the battery is at end of useful life.
Charging Temperature
Charge batteries in ambient temperatures from 0°C to +40°C (32°F to 104°F) as reported by the battery.
Charging is intelligently controlled by the charger. To accomplish this, for small periods of time, the charger
alternately enables and disables battery charging to keep the battery at acceptable temperatures.
Device is charging.
Device is charging but the battery is at end of useful life.
Charging error. Possible charging errors include:
• Temperature is too low or too high.
• Charging has gone on too long without completion (typically eight
hours).
Charging error and the battery is at end of useful life.Possible
charging errors include:
• Temperature is too low or too high.
• Charging has gone on too long without completion (typically eight
hours).
9
Page 10
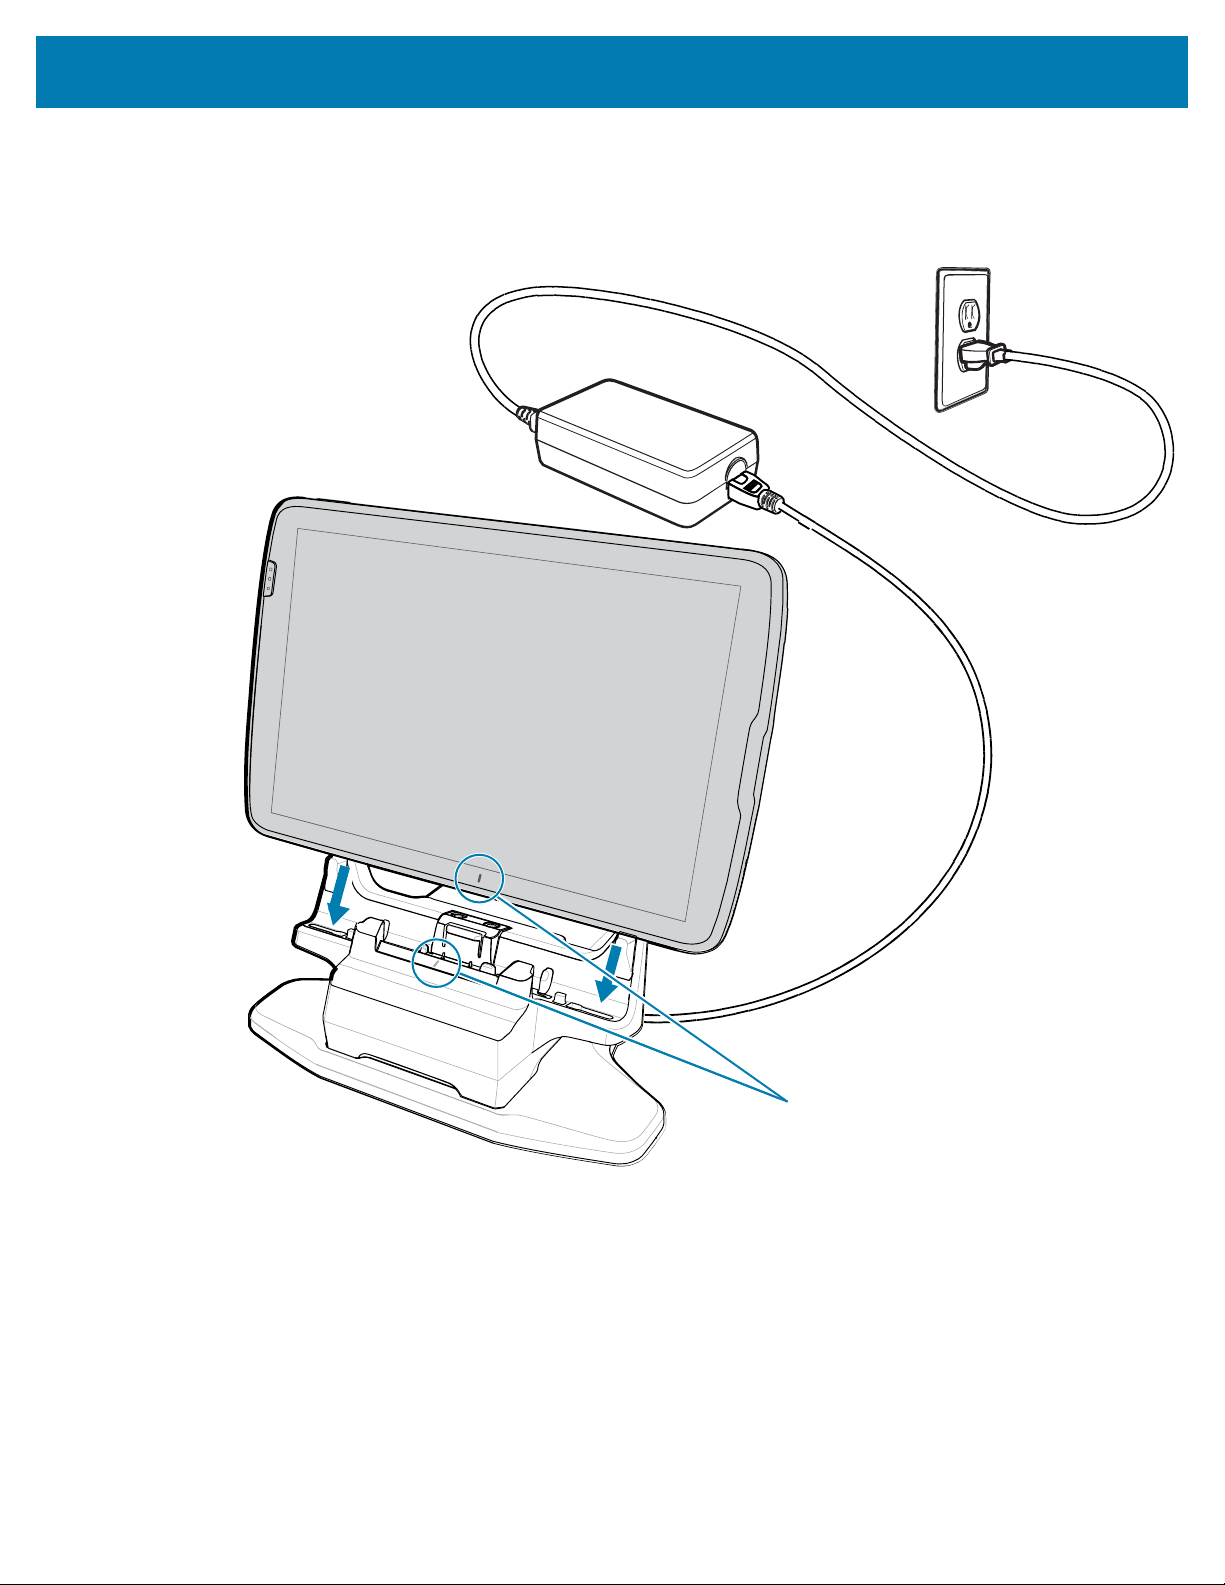
Charging Using a 1-Slot Cradle
1
This section describes how to charge the device using an ET40/ET45 1-Slot Cradle.
1. Align the device with the alignment marks (1) on the cradle.
ET40/45 Quick Start Guide
10
Page 11

ET40/45 Quick Start Guide
2. Insert the device into the cradle (1) and rotate it backwards (2) until it clicks.
The device is locked in the cradle and the deviceCharging LED indicates charging.
11
Page 12
ET40/45 Quick Start Guide
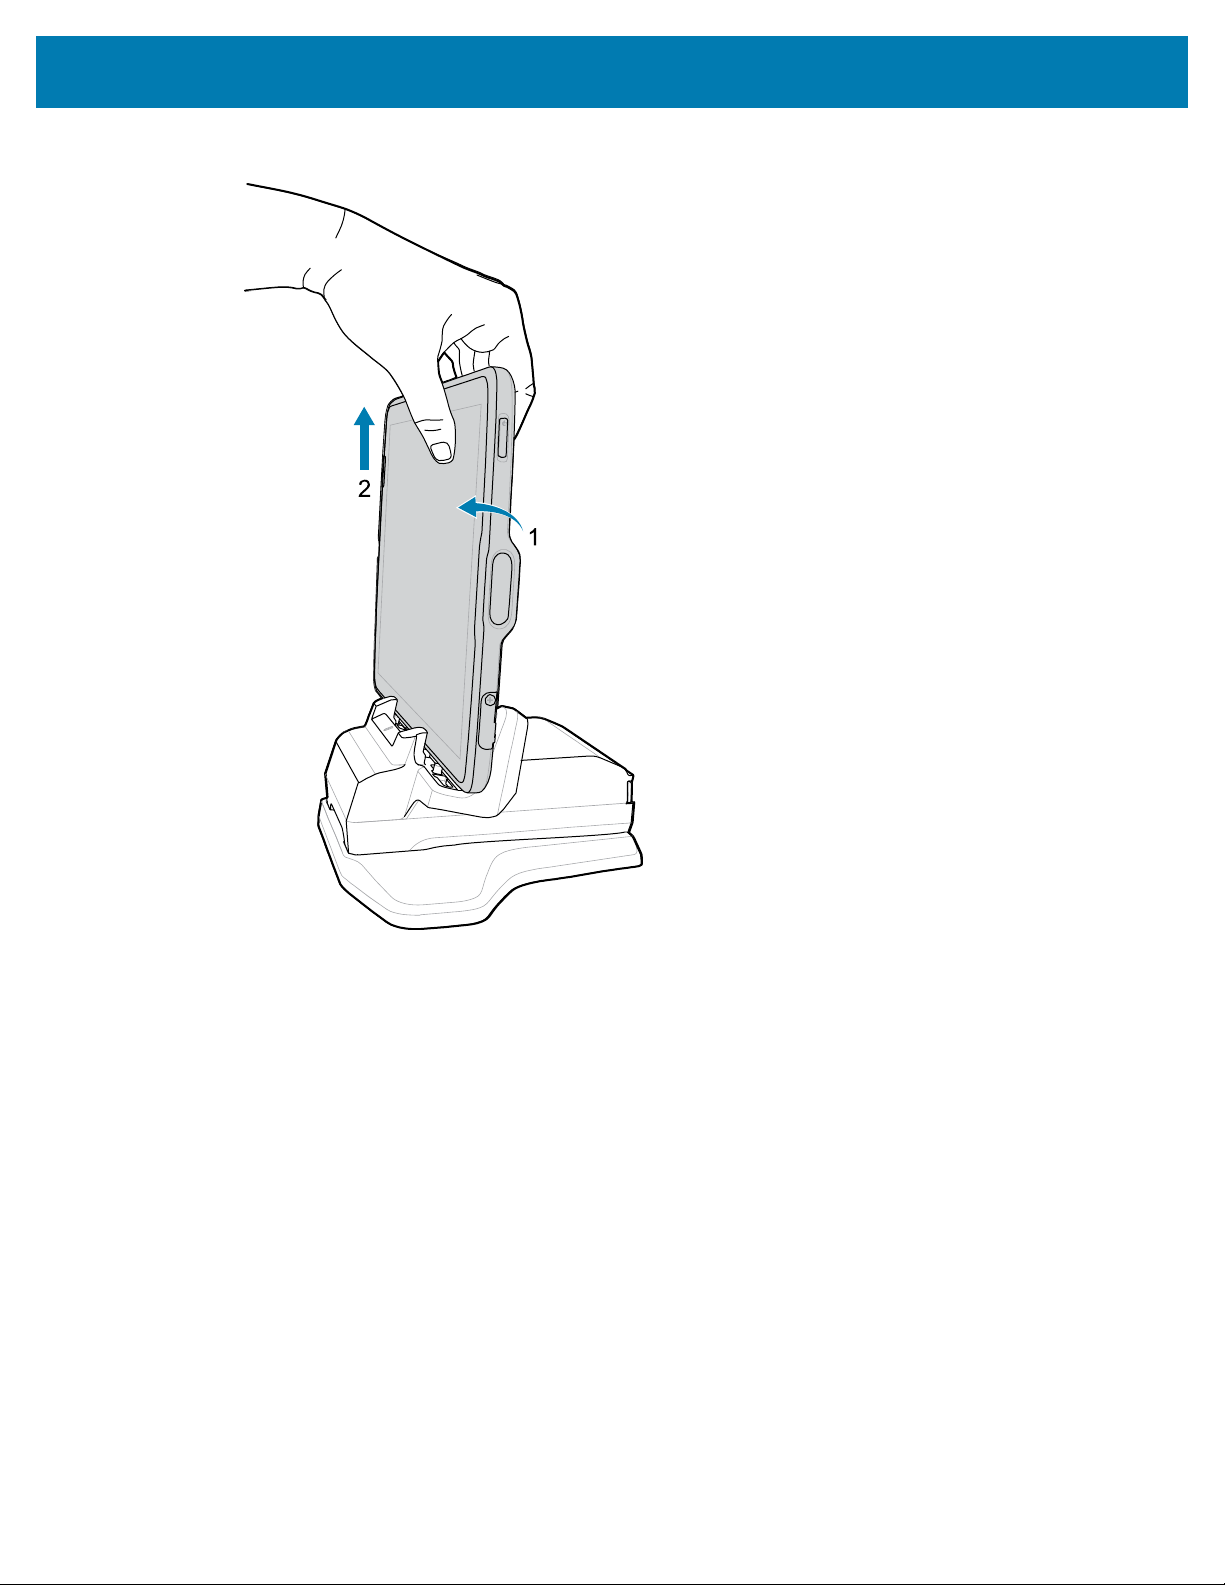
3. To remove the device from thecradle, rotate the device forward slightly (1) and lift it out of the cradle (2).
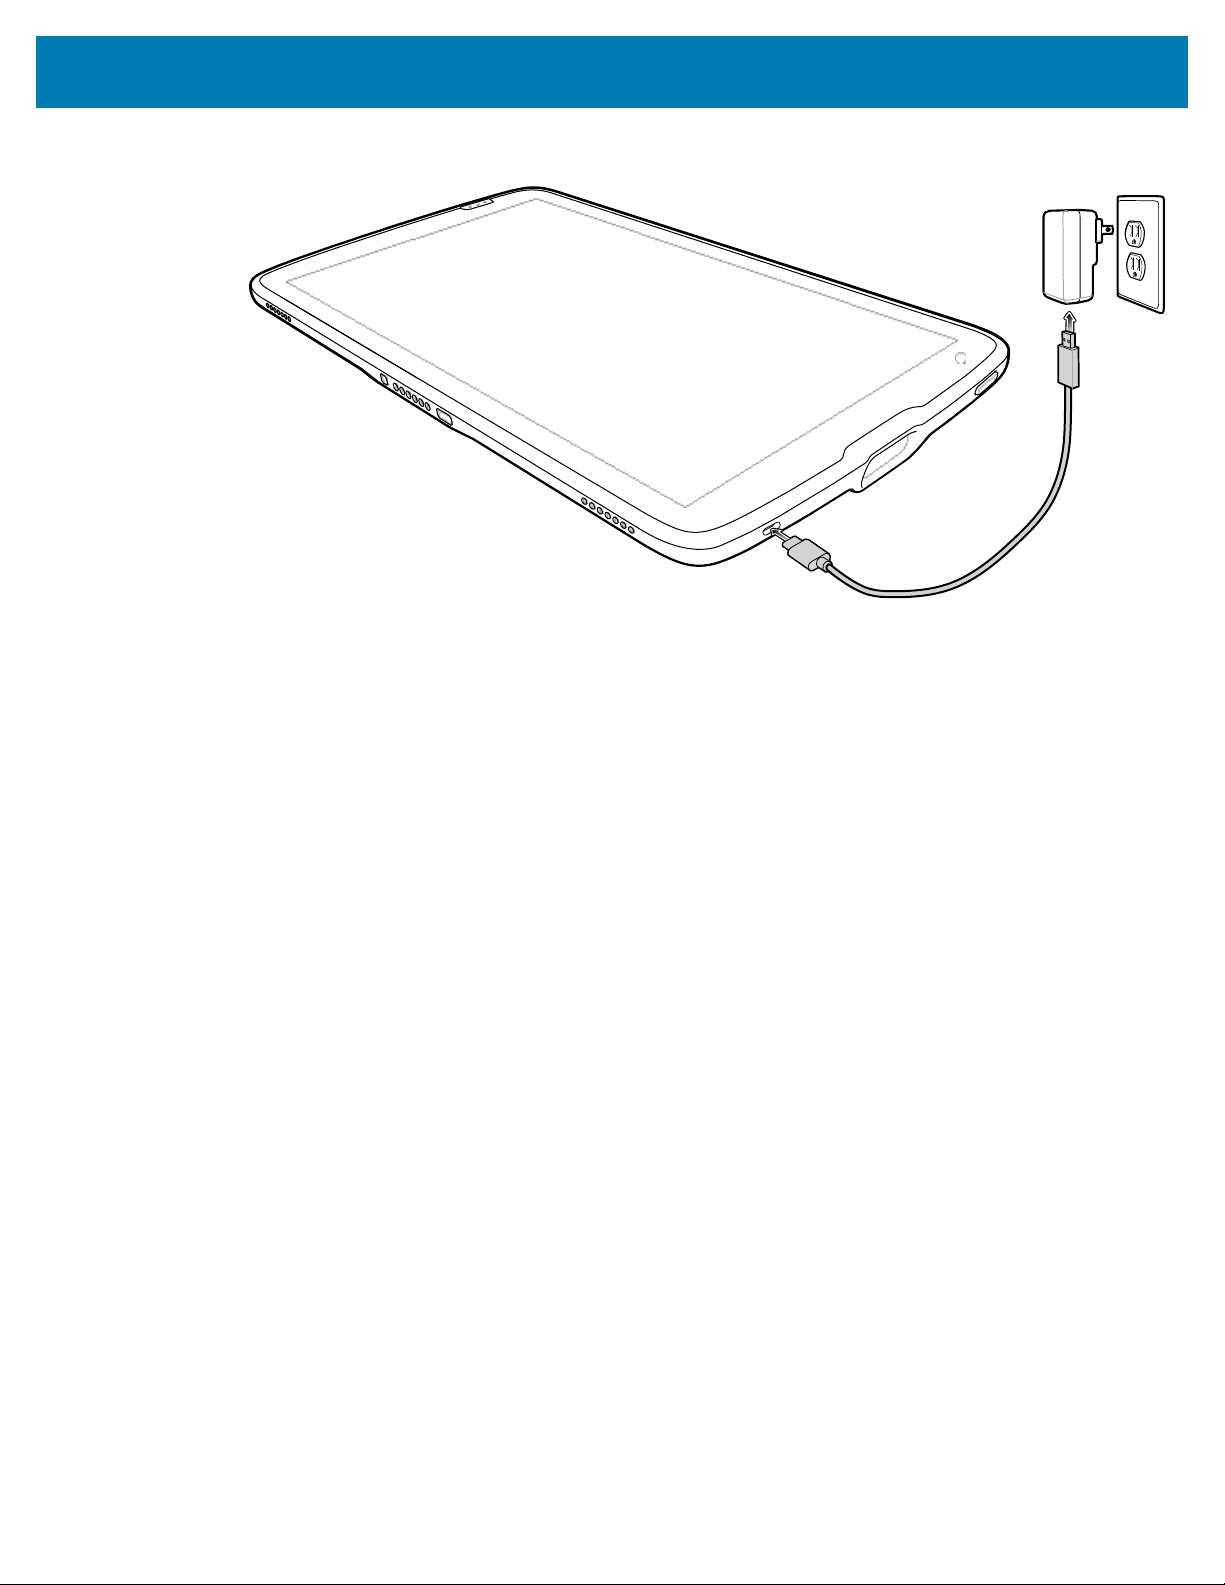
Charging Using the USB Cable
The USB cable plugs into the bottom of the device. When attached to the device the cable allows charging,
transferring data to a host computer, and connecting USB peripherals.
1. Connect the USB cable to the device.
2. Connect the USB connector of the power supply.
12
Page 13
ET40/45 Quick Start Guide
3. Plug to power supply into an power outlet.
Powering on the Device
Press and hold thePowerbutton until the menu appears.
13
Page 14

1-Slot Charge Only Cradle
1
Use a 1-Slot Charge Only cradle to charge one 8" or 10" tablet.
CAUTION: Ensure that you follow the guidelines for battery safety described in the ET40/ET45
Product Reference Guide.
The1-SlotCharge Only Cradle:
• Provides power for operating the device.
• Charges the device’s battery and optional Power Pack installed in an Expansion Back.
Figure 31-SlotCharge Only Cradle - Front View
ET40/45 Quick Start Guide
Number Item Description
1 Cradle alignment
indicator
Use to assist in aligning the cradle with the tablet.
14
Page 15

ET40/45 Quick Start Guide
1
Figure 41-SlotCharge Only Cradle - Rear View
Number Item Description
1 AC power input Use to connect AC power to the cradle.
15
Page 16

4-Slot Charge Only Cradle
Use the 4-Slot Charge Only Cradle to charge up to four 8" or 10" tablets and up to four Power Packs.
CAUTION: Ensure that you follow the guidelines for battery safety described in the ET40/ET45
Product Reference Guide.
The 4-Slot Charge Only Cradle:
• Provides power for operating the device.
• Simultaneously charges up to four devices and up to four Power Packs using the optional Battery
Charger Adapter.
Figure 54-Slot Charge Only Cradle- Front View
ET40/45 Quick Start Guide
16
Page 17

ET40/45 Quick Start Guide
1
Figure 64-Slot Charge Only Cradle - Rear View
Number Item Description
1 Power input Use to connect power to the cradle.
17
Page 18
ET40/45 Quick Start Guide
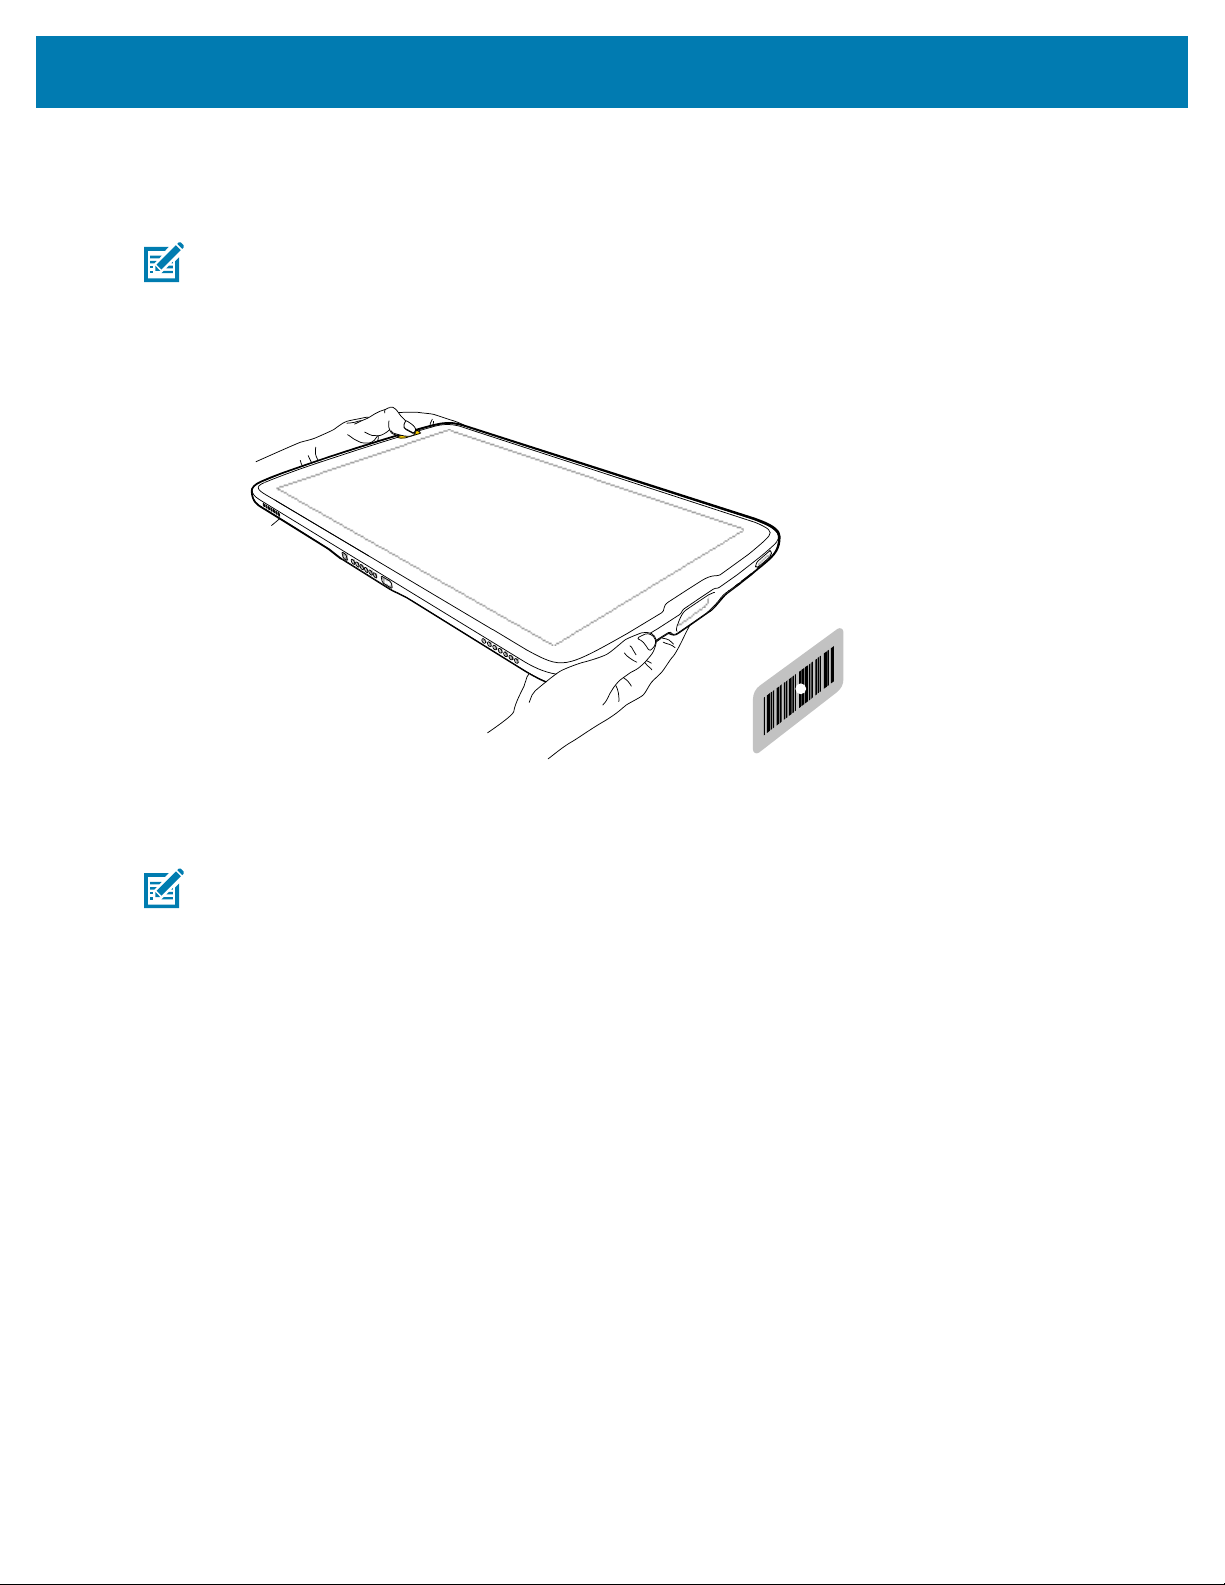
Scanning with an Internal Scanner
Use the internal scanner to capture barcode data.
NOTE: To read a barcode, a scan-enabled app is required.The device contains the DataWedge
app that allows the user to enable the scanner to decode barcode data and display the barcode
content.
1. Ensure that an app is open on the device and a text field is in focus (text cursor in the text field).
2. Point the exit window of the device at a barcode.
3. Press and hold one of the scan buttons.
The aiming dot with illumination turns on to assist in aiming.
NOTE: When the device is in Pick List Mode, the device does not decode the barcode until
the center of the aiming dot touches the barcode.
4. Ensure the barcode is within the area formed by the aiming pattern.The aiming dot is used for
increased visibility in bright lighting conditions.
The Data Capture LED lights green and a beep sounds, by default, to indicate the barcode was
decoded successfully.
18
Page 19

Reading NFC Cards
1
Read contactless cards using NFC.
1. Launch an NFC enabled application.
2. Hold device as shown.
3. Align the card with the NFC antenna (1) on the back of the device.
ET40/45 Quick Start Guide
The tablet can read NFC cards from the front or back of the device.
4. Hold the card steadily until the transaction is complete (usually indicated by the application).
19
Page 20

www.zebra.com
 Loading...