

ES400
USER GUIDE


ES400
USER GUIDE
72E-136310-03
Rev. A
April 2015

ii ES400 User Guide
No part of this publication may be reproduced or used in any form, or by any electrical or mechanical means,
without permission in writing from Zebra. This includes electronic or mechanical means, such as photocopying,
recording, or information storage and retrieval systems. The material in this manual is subject to change
without notice.
The software is provided strictly on an “as is” basis. All software, including firmware, furnished to the user is on
a licensed basis. Zebra grants to the user a non-transferable and non-exclusive license to use each software
or firmware program delivered hereunder (licensed program). Except as noted below, such license may not be
assigned, sublicensed, or otherwise transferred by the user without prior written consent of Zebra. No right to
copy a licensed program in whole or in part is granted, except as permitted under copyright law. The user shall
not modify, merge, or incorporate any form or portion of a licensed program with other program material, create
a derivative work from a licensed program, or use a licensed program in a network without written permission
from Zebra. The user agrees to maintain Zebra’s copyright notice on the licensed programs delivered
hereunder, and to include the same on any authorized copies it makes, in whole or in part. The user agrees not
to decompile, disassemble, decode, or reverse engineer any licensed program delivered to the user or any
portion thereof.
Zebra reserves the right to make changes to any software or product to improve reliability, function, or design.
Zebra does not assume any product liability arising out of, or in connection with, the application or use of any
product, circuit, or application described herein.
No license is granted, either expressly or by implication, estoppel, or otherwise under any Zebra, intellectual
property rights. An implied license only exists for equipment, circuits, and subsystems contained in Zebra
products.

Revision History
Changes to the original manual are listed below:
Change Date Description
-01 Rev. A 08/2010 Initial release.
-01 Rev. B 03/2011 Remove unsupported Voice Commander features. Add Speed Dialing setup
-02 Rev. A 10/2011 Software updates.
-02 Rev. B 2/10/12 Remove Note on page 7-2. User does not have to disable DataWedge to use
-03 Rev. A 3/2015 Zebra Rebranding
iii
instructions.
camera.

iv ES400 User Guide

TABLE OF CONTENTS
About This Guide
Introduction ..................................................................................................................................... xv
Documentation Set ................................................................................................................... xv
Configurations................................................................................................................................. xv
Software Versions..................................................................................................................... xvi
Chapter Descriptions ...................................................................................................................... xvi
Notational Conventions................................................................................................................... xvii
Related Documents ........................................................................................................................ xvii
Service Information ......................................................................................................................... xviii
Chapter 1: Getting Started
Unpacking ...................................................................................................................................... 1-1
Setting Up the ES400 .................................................................................................................... 1-2
Remove the Battery Cover ....................................................................................................... 1-2
Installing a microSD Card ........................................................................................................ 1-2
Installing the SIM Card (GSM Only) ......................................................................................... 1-4
Installing the Battery ................................................................................................................ 1-5
Powering On the ES400 for the First Time .............................................................................. 1-6
Network Activation ............................................................................................................. 1-7
Power Off the ES400 ......................................................................................................... 1-8
Suspend ............................................................................................................................. 1-8
Removing the microSD Card ......................................................................................................... 1-9
Removing the SIM Card ................................................................................................................. 1-9
Installing the Tether ....................................................................................................................... 1-10
Chapter 2: Using the ES400
Introduction .................................................................................................................................... 2-1
Features ......................................................................................................................................... 2-1
Keypads ......................................................................................................................................... 2-2
Special Characters ................................................................................................................... 2-2
Keypad Remapping ................................................................................................................. 2-2
Entering Data ........................................................................................................................... 2-2
Screen Navigation .......................................................................................................................... 2-3

vi ES400 User Guide
Finger Scrolling ........................................................................................................................ 2-4
Zebra Home Screen ...................................................................................................................... 2-5
Status Bar ................................................................................................................................ 2-5
Cards ....................................................................................................................................... 2-7
Simple Home Card ............................................................................................................. 2-7
Full Home Card .................................................................................................................. 2-7
Weather Card ..................................................................................................................... 2-8
Time Tracker Card ............................................................................................................. 2-9
Program Shortcuts ................................................................................................................... 2-9
My Apps Window ..................................................................................................................... 2-10
Tile Bar ..................................................................................................................................... 2-10
Device Management ................................................................................................................ 2-13
Programs ........................................................................................................................... 2-13
Memory Manager ............................................................................................................... 2-14
Sound Profiles .................................................................................................................... 2-14
Power & Radio ......................................................................................................................... 2-15
Alarms ................................................................................................................................ 2-17
Fusion ................................................................................................................................ 2-17
Status ................................................................................................................................. 2-18
Settings .............................................................................................................................. 2-18
Adjusting Volume ........................................................................................................................... 2-19
Charging the ES400 ...................................................................................................................... 2-19
Charging Temperature ............................................................................................................. 2-20
Battery Status Indications ........................................................................................................ 2-20
Printing ........................................................................................................................................... 2-20
Resetting the ES400 ...................................................................................................................... 2-21
Locking the ES400 ......................................................................................................................... 2-21
Password Unlocking ................................................................................................................ 2-21
Finger Swipe Un-locking .......................................................................................................... 2-22
Notifications When ES400 is Locked ....................................................................................... 2-22
Chapter 3: Making Calls
Introduction .................................................................................................................................... 3-1
Making a Call ................................................................................................................................. 3-1
Using the Phone Keypad ......................................................................................................... 3-1
Smart Dialing ........................................................................................................................... 3-2
Using Contacts ......................................................................................................................... 3-3
Using Call Log .......................................................................................................................... 3-4
Using Speed Dialing ................................................................................................................ 3-4
Last Call Dialing ....................................................................................................................... 3-5
Answering a Call ............................................................................................................................ 3-5
Incoming Call Features ............................................................................................................ 3-5
Missed Call Notification ................................................................................................................. 3-5
Emergency Calling ......................................................................................................................... 3-5
Audio Modes .................................................................................................................................. 3-6
Using a Bluetooth Headset ...................................................................................................... 3-6
Adjusting Audio Volume ........................................................................................................... 3-6
Muting a Call .................................................................................................................................. 3-6
Using Call Log ............................................................................................................................... 3-6
Managing Call Log ................................................................................................................... 3-7

Table of Contents vii
Using the Call Log Menu .................................................................................................... 3-7
Conference Calling ........................................................................................................................ 3-8
Making a 3-Way Call ...................................................................................................................... 3-11
Speed Dial Setup ........................................................................................................................... 3-11
Adding a Speed Dial Entry ....................................................................................................... 3-11
Editing a Speed Dial Entry ....................................................................................................... 3-11
Deleting a Speed Dial Entry ..................................................................................................... 3-12
Voice Commander ......................................................................................................................... 3-12
Call ........................................................................................................................................... 3-13
Find .......................................................................................................................................... 3-13
Redial ....................................................................................................................................... 3-14
Callback ................................................................................................................................... 3-14
Start ......................................................................................................................................... 3-14
Appointments ........................................................................................................................... 3-14
Read ........................................................................................................................................ 3-15
What time is it .......................................................................................................................... 3-15
Call History ............................................................................................................................... 3-15
Voice Play Music ...................................................................................................................... 3-15
What can I say ......................................................................................................................... 3-16
Goodbye .................................................................................................................................. 3-16
Chapter 4: Phone Network Setup
Introduction .................................................................................................................................... 4-1
Automatic Network Setup ........................................................................................................ 4-1
Manual Network Setup ............................................................................................................. 4-1
CDMA Network Setup ........................................................................................................ 4-1
GSM Network Setup .......................................................................................................... 4-2
Dual Network Usage ...................................................................................................................... 4-3
Switching Between CDMA Networks ............................................................................................. 4-3
Global Usage ................................................................................................................................. 4-3
Configuring a GSM Data Connection ............................................................................................. 4-4
Phone Settings ............................................................................................................................... 4-4
Sounds ..................................................................................................................................... 4-5
Security .................................................................................................................................... 4-5
Enabling a PIN ................................................................................................................... 4-5
Changing a PIN .................................................................................................................. 4-5
Disabling a PIN .................................................................................................................. 4-6
GSM Services .......................................................................................................................... 4-6
Call Barring (Call Blocking) ................................................................................................ 4-6
Caller ID ............................................................................................................................. 4-6
Call Forwarding .................................................................................................................. 4-6
Call Waiting ........................................................................................................................ 4-7
Voice Mail and Text Messages .......................................................................................... 4-7
Fixed Dialing ...................................................................................................................... 4-7
Internet ..................................................................................................................................... 4-7
Services ................................................................................................................................... 4-7
Broadcast Channels ........................................................................................................... 4-7
GPS Privacy ....................................................................................................................... 4-7
Hearing .................................................................................................................................... 4-7
TTY .................................................................................................................................... 4-8

viii ES400 User Guide
HAC ................................................................................................................................... 4-8
Chapter 5: Using WLAN
Introduction .................................................................................................................................... 5-1
Fusion Overview ............................................................................................................................ 5-1
Wireless Zero Config Overview ..................................................................................................... 5-2
Switching Between Fusion and WZC ............................................................................................ 5-2
Supported Applications .................................................................................................................. 5-3
Fusion Setup .................................................................................................................................. 5-3
Connecting to the Internet ........................................................................................................ 5-6
Wireless Zero Config Setup ........................................................................................................... 5-6
More Information on WZC ........................................................................................................ 5-8
Chapter 6: Messaging
Introduction .................................................................................................................................... 6-1
Email .............................................................................................................................................. 6-1
Creating an Email Message ..................................................................................................... 6-1
Viewing an Email Message ...................................................................................................... 6-1
Replying to or Forwarding a Message ..................................................................................... 6-2
SMS Messaging ............................................................................................................................. 6-2
Sending a Text Message ......................................................................................................... 6-2
Viewing Text Messages ........................................................................................................... 6-2
Replying to an SMS Message .................................................................................................. 6-3
MMS Messaging ............................................................................................................................ 6-4
Creating and Sending MMS Messages ................................................................................... 6-4
Viewing an MMS Message ...................................................................................................... 6-5
Replying to an MMS Message ................................................................................................. 6-5
Blocking Incoming MMS Messages ......................................................................................... 6-5
Chapter 7: Data Capture
Introduction .................................................................................................................................... 7-1
Digital Camera Scanning ............................................................................................................... 7-1
Data Wedge ................................................................................................................................... 7-2
Chapter 8: Using the Camera
Introduction .................................................................................................................................... 8-1
Taking Pictures .............................................................................................................................. 8-1
Camera Settings ............................................................................................................................ 8-3
Camera Menu Options ............................................................................................................. 8-3
Size/Quality Settings .......................................................................................................... 8-3
Panorama .......................................................................................................................... 8-4
Timer .................................................................................................................................. 8-4
Advanced ........................................................................................................................... 8-4
About ........................................................................................................................................ 8-5
Recording Video ............................................................................................................................ 8-5
Video Settings ................................................................................................................................ 8-5
Video Menu Options ................................................................................................................ 8-6

Table of Contents ix
Quality ................................................................................................................................ 8-6
Format ................................................................................................................................ 8-6
Time/Date stamp ................................................................................................................ 8-6
Storage ............................................................................................................................... 8-6
About .................................................................................................................................. 8-6
Viewing Pictures and Video ........................................................................................................... 8-7
Albums ..................................................................................................................................... 8-7
Select Mode ............................................................................................................................. 8-8
Thumbnail Menu ................................................................................................................ 8-8
Gallery Menu ............................................................................................................................ 8-8
Image Viewer ........................................................................................................................... 8-8
Annotating Images ............................................................................................................. 8-9
Audio Commenting ............................................................................................................. 8-10
View or Edit Image Information .......................................................................................... 8-10
Image Menu ....................................................................................................................... 8-10
Video Viewer ............................................................................................................................ 8-10
View or Edit Video Information ........................................................................................... 8-11
Video Menu ........................................................................................................................ 8-11
Chapter 9: Bluetooth
Introduction .................................................................................................................................... 9-1
Adaptive Frequency Hopping ......................................................................................................... 9-1
Security .......................................................................................................................................... 9-2
Bluetooth Configuration ................................................................................................................. 9-2
Bluetooth Power States ................................................................................................................. 9-3
Suspend ............................................................................................................................. 9-3
Resume .............................................................................................................................. 9-3
Turning Bluetooth On and Off ........................................................................................................ 9-3
Enabling Bluetooth ................................................................................................................... 9-3
Disabling Bluetooth .................................................................................................................. 9-4
Discovering Bluetooth Device(s) .................................................................................................... 9-4
Available Services .......................................................................................................................... 9-5
Object Push Services via Beam ............................................................................................... 9-5
Internet Sharing ....................................................................................................................... 9-6
Hands-free Services ................................................................................................................ 9-7
Serial Port Services ................................................................................................................. 9-7
ActiveSync Using Bluetooth ..................................................................................................... 9-8
Phone Book Access Profile Services ....................................................................................... 9-10
Dial-Up Networking Services ................................................................................................... 9-10
Connect to a HID Device ......................................................................................................... 9-10
A2DP/AVRCP Services ........................................................................................................... 9-11
Chapter 10: Using GPS Navigation
Introduction .................................................................................................................................... 10-1
Software Installation ....................................................................................................................... 10-1
ES400 GPS Setup ......................................................................................................................... 10-1
Operation ....................................................................................................................................... 10-2
GPS Maps on microSD Cards ................................................................................................. 10-2
Answering a Phone Call While Using GPS .............................................................................. 10-2

x ES400 User Guide
Losing the GPS Signal While in a Vehicle ............................................................................... 10-2
Assisted GPS ................................................................................................................................. 10-2
Chapter 11: Settings
Introduction .................................................................................................................................... 11-1
Settings Folder ............................................................................................................................... 11-1
Locking the ES400 ......................................................................................................................... 11-3
Switching Between Microsoft Lock and Lock Plus ................................................................... 11-3
Lock Plus Setup ....................................................................................................................... 11-3
Password Locking .............................................................................................................. 11-4
Finger Swipe Locking ......................................................................................................... 11-4
Editing Fingerprint Swipes ................................................................................................. 11-5
Edit Lock Screen Display ................................................................................................... 11-6
Audio Feedback ................................................................................................................. 11-6
Microsoft Locking ..................................................................................................................... 11-6
Password Locking Setup ......................................................................................................... 11-7
Switching the Dialer ....................................................................................................................... 11-8
Device Management Window ........................................................................................................ 11-8
Sound Profiles .......................................................................................................................... 11-8
Power Profiles .......................................................................................................................... 11-9
Alarms ...................................................................................................................................... 11-10
Backlight and Keylight Settings ..................................................................................................... 11-10
Accelerometer ................................................................................................................................ 11-11
Display Tab .............................................................................................................................. 11-11
About Tab ................................................................................................................................ 11-11
Optical Nav Pad ............................................................................................................................. 11-11
Key Remapping ............................................................................................................................. 11-12
Remap a Key to a Program ..................................................................................................... 11-12
Remap a Key to a Character ................................................................................................... 11-12
Remap a Key to a Function ..................................................................................................... 11-13
Remap a Key to a Character Using the Soft Keypad ............................................................... 11-13
Remap Simultaneous Keys ...................................................................................................... 11-14
Editing a Remap Key ............................................................................................................... 11-14
Master Reset ................................................................................................................................. 11-15
Program Shortcuts Setup .............................................................................................................. 11-16
My Apps Window Setup ................................................................................................................. 11-17
Card Setup ..................................................................................................................................... 11-18
Re-Order Cards ....................................................................................................................... 11-18
Configure Cards ....................................................................................................................... 11-18
Weather Card Setup ................................................................................................................ 11-19
Add a New Location ........................................................................................................... 11-19
Change Location ................................................................................................................ 11-19
Delete a Location ............................................................................................................... 11-19
Time Tracker Setup ................................................................................................................. 11-20
Email Setup ................................................................................................................................... 11-21
Setting Up an IMAP or POP Account ....................................................................................... 11-21
Automatic Email Setup ....................................................................................................... 11-21
Manual Email Setup ........................................................................................................... 11-22
Entering Email Settings Manually ...................................................................................... 11-22
Editing an Email Account ......................................................................................................... 11-24

Table of Contents xi
Setting Email Signatures .......................................................................................................... 11-25
Using Microsoft ActiveSync With a Corporate Outlook Account .............................................. 11-25
MMS Messaging ............................................................................................................................ 11-26
Voice Commander ......................................................................................................................... 11-27
Contacts Settings ..................................................................................................................... 11-27
Play .................................................................................................................................... 11-27
Application Settings ................................................................................................................. 11-27
Play .................................................................................................................................... 11-28
Music Settings .......................................................................................................................... 11-28
Play .................................................................................................................................... 11-28
Digit Trainer Settings ............................................................................................................... 11-28
Digit Setting Settings ................................................................................................................ 11-28
Advanced Settings ................................................................................................................... 11-28
Chapter 12: Accessories
Introduction .................................................................................................................................... 12-1
USB Rapid Charge Cable .............................................................................................................. 12-2
Single Slot USB Cradle .................................................................................................................. 12-3
Charging the ES400 Battery .................................................................................................... 12-3
Communication with Host Computer ....................................................................................... 12-3
Vehicle Holder ................................................................................................................................ 12-5
Windshield Installation ............................................................................................................. 12-5
Install the ES400 ...................................................................................................................... 12-6
Connect Power ........................................................................................................................ 12-7
Remove the ES400 .................................................................................................................. 12-8
Host Adapter .................................................................................................................................. 12-9
Holster ............................................................................................................................................ 12-10
ActiveSync ..................................................................................................................................... 12-11
Installing ActiveSync ................................................................................................................ 12-11
ES400 Setup ............................................................................................................................ 12-11
Setting Up an ActiveSync Connection on the Host Computer ................................................. 12-11
Synchronization with the ES400 .............................................................................................. 12-12
Chapter 13: Maintenance & Troubleshooting
Introduction .................................................................................................................................... 13-1
Maintaining the ES400 ................................................................................................................... 13-1
Battery Safety Guidelines .............................................................................................................. 13-1
Cleaning ......................................................................................................................................... 13-2
Materials Required ................................................................................................................... 13-2
Cleaning the ES400 ................................................................................................................. 13-3
Housing .............................................................................................................................. 13-3
Display ............................................................................................................................... 13-3
Camera Window ................................................................................................................. 13-3
Interface Connector ............................................................................................................ 13-3
Battery Contacts ................................................................................................................. 13-3
Cleaning Cradle Connectors .................................................................................................... 13-4
Cleaning Frequency ................................................................................................................. 13-4
Troubleshooting ............................................................................................................................. 13-5
ES400 ...................................................................................................................................... 13-5

xii ES400 User Guide
Bluetooth Connection ............................................................................................................... 13-7
Single Slot USB Cradle ........................................................................................................... 13-7
Vehicle Holder .......................................................................................................................... 13-8
Appendix A: Technical Specifications
ES400 Technical Specifications .................................................................................................... A-1
ES400 ...................................................................................................................................... A-1
Headset .................................................................................................................................... A-4
ES400 Accessory Specifications ................................................................................................... A-5
Single Slot USB Cradle ............................................................................................................ A-5
Appendix B: Keypads
Introduction .................................................................................................................................... B-1
Special Character Key ................................................................................................................... B-4
Appendix C: Windows Mobile Home Screen and Dialer
Introduction .................................................................................................................................... C-1
Windows Mobile Home Screen ...................................................................................................... C-1
Classic Today Screen ........................................................................................................ C-3
Start Screen ............................................................................................................................. C-4
Windows Mobile Dialer .................................................................................................................. C-4
Making a Call ................................................................................................................................. C-4
Using the Phone Keypad ......................................................................................................... C-4
Smart Dialing ........................................................................................................................... C-5
Using Contacts ......................................................................................................................... C-6
Using Call History .................................................................................................................... C-6
Making a Speed Dial Call ......................................................................................................... C-7
Answering a Call ............................................................................................................................ C-7
Incoming Call Features ............................................................................................................ C-8
Missed Call Notification ................................................................................................................. C-8
Emergency Calling ......................................................................................................................... C-8
Muting a Call .................................................................................................................................. C-9
Using Speed Dial ........................................................................................................................... C-9
Adding a Speed Dial Entry ....................................................................................................... C-9
Editing a Speed Dial Entry ....................................................................................................... C-10
Deleting a Speed Dial Entry ..................................................................................................... C-10
Using Call History .......................................................................................................................... C-11
Managing Call History .............................................................................................................. C-11
Changing the Call History View ......................................................................................... C-11
Resetting the Recent Calls Counter ................................................................................... C-11
Deleting All Call History Items ............................................................................................ C-12
Viewing Call Status ............................................................................................................ C-12
Using the Call History Menu .............................................................................................. C-13
Swapping Calls (GSM) .................................................................................................................. C-13
Swapping Calls (CDMA) ................................................................................................................ C-14
Conference Calling (GSM) ............................................................................................................. C-15
Three-way Calling (CDMA) ............................................................................................................ C-16

Table of Contents xiii
Appendix D: Software
Software Installation ....................................................................................................................... D-1
Installation Using ActiveSync ................................................................................................... D-1
Installation Using Storage Card ............................................................................................... D-1
Installation Using AirBEAM ...................................................................................................... D-2
MSP ......................................................................................................................................... D-2
Update Loader Image .............................................................................................................. D-2
Download Update Loader Package ................................................................................... D-2
ActiveSync ......................................................................................................................... D-2
microSD Card ..................................................................................................................... D-3
SMS8 Configuration ....................................................................................................................... D-4
Cache Disk Configuration .............................................................................................................. D-4
Glossary
Index

xiv ES400 User Guide

ABOUT THIS GUIDE
Introduction
This guide provides information about using the ES400 Enterprise Digital Assistant (EDA) and accessories.
NOTE Screens and windows pictured in this guide are samples and can differ from actual screens.
Documentation Set
The documentation set for the ES400 provides information for specific user needs, and includes:
•
ES400 Quick Start Guide - describes how to get the ES400 up and running.
•
ES400 User Guide - describes how to use the ES400.
•
Enterprise Mobility Developer Kit (EMDK) Help File - provides API information for writing applications.
Configurations
This guide covers the following configurations:
Configuration Radios Display Memory
ES400 WLAN: 802.11a/b/g
WPAN: Bluetooth
v2.0
WWAN: CDMA or
GSM/UMTS
GPS: Standalone
GPS or A-GPS
3.0” VGA
Color
256 MB RAM/
1 GB Flash
Data Capture
Options
3.2 MegaPixel
color camera
Operating
System
Windows
®
Mobile
Professional
6.5
Keypads
Alphanumeric
keypads

xvi ES400 User Guide
Software Versions
This guide covers various software configurations and references are made to operating system or software
versions for:
•
Adaptation Kit Update (AKU) version
•
OEM version
•
Fusion software
•
Phone software.
AKU Version
To determine the Adaptation Kit Update (AKU) version tap Start > Settings > System > About > Version.
The second line lists the operating system version and the build number. The last part of the build number
represents the AKU number. For example, Build 23103.5.3.6 indicates that the device is running AKU version
5.3.6.
OEM Version
To determine the OEM software version tap Start > Settings > System > System Info > System.
Platform Version
To determine the virtual platform version tap Start > Settings > System > System Info > Package.
Fusion Software
To determine the Fusion software version tap Start > Wireless Companion > Wireless Status > Versions.
Phone Software
To determine the Phone software version press > > Phone information.
Chapter Descriptions
Topics covered in this guide are as follows:
•
Chapter 1, Getting Started provides information on getting the ES400 up and running for the first time.
•
Chapter 2, Using the ES400 provides information on using the ES400.
•
Chapter 3, Making Calls provides basic instructions for using the ES400 phone.
•
Chapter 4, Phone Network Setup provides information for setting up the ES400 on a network.
•
Chapter 5, Using WLAN provides information for configuring the ES400 on a wireless network.
•
Chapter 6, Messaging provides instructions for sending text and MMS messages.
•
Chapter 7, Data Capture provides instructions for using the ES400 to capture data using the laser
er, imager and camera.
scann
•
Chapter 8, Using the Camera provides instructions on taking photos and videos.
•
Chapter 9, Bluetooth explains Bluetooth functionality on the ES400.

•
Chapter 10, Using GPS Navigation provides information about GPS navigation with the ES400.
•
Chapter 11, Settings provides information for configuring the ES400.
•
Chapter 12, Accessories describes the available accessories and how to use them with the ES400.
•
Chapter 13, Maintenance & Troubleshooting includes instructions on cleaning and storing the ES400,
nd provides troubleshooting solutions for potential problems during ES400 operation.
a
•
Appendix A, Technical Specifications provides the technical specifications for the ES400.
•
Appendix B, Keypads provides keypad layouts and operation.
•
Appendix C, Windows Mobile Home Screen and Dialer provides information for using the Windows
bile Home screen and dialer.
Mo
•
Appendix D, Software provides information for installing applications and operating system updates.
Notational Conventions
The following conventions are used in this document:
•
“Enterprise Digital Assistant” refers to the Zebra ES400.
About This Guide xvii
•
Italics are used to highlight the following:
• Chapters and sections in this and related documents
• Icons on a screen.
•
Bold text is used to highlight the following:
• Dialog box, window, and screen names
• Drop-down list and list box names
• Check box and radio button names
• Key names on a keypad
• Button names on a screen.
•
Bullets (•) indicate:
• Action items
• Lists of alternatives
• Lists of required steps that are not necessarily sequential
•
Sequential lists (e.g., those that describe step-by-step procedures) appear as numbered lists.
Related Documents
•
ES400 Quick Start Guide, p/n 72-134310-xx.
•
ES400 Regulatory Guide, p/n 72-134312-xx.
•
Mobility Services Platform User Guide, p/n 72E-100158-xx.
•
Wireless Fusion Enterprise Mobility Suite User Guide for Version 3.20, p/n 72E-135868-xx.
•
AirBEAMSmart Windows CE Client Product Reference Guide, p/n 72-63060-xx.
•
MSP Software User Guide, p/n 72E-100158-xx.
xviii ES400 User Guide
Manufacturing Label
•
Enterprise Mobility Developer Kits (EMDKs), available at: http://www.zebra.com/support.
•
Latest ActiveSync software, available at: http://www.microsoft.com.
For the latest version of this guide and all guides, go to: http://www.zebra.com/support
Service Information
If you have a problem with your equipment, contact Zebra support for your region. Contact information is
available at: http://www.zebra.com/support.
When contacting support, please have the following information available:
•
Serial number of the unit (found on manufacturing label)
•
Model number or product name (found on manufacturing label)
•
Software type and version number.
.
Zebra responds to calls by email, telephone or fax within the time limits set forth in support agreements.
If your problem cannot be solved by Zebra Support, you may need to return your equipment for servicing and
will be given specific directions. Zebra is not responsible for any damages incurred during shipment if the
approved shipping container is not used. Shipping the units improperly can possibly void the warranty. Remove
microSD card or SIM card prior to shipping.
If you purchased your business product from a Zebra business partner, c
for support.
ontact that business partner

CHAPTER 1 GETTING STARTED
Unpacking
Carefully remove all protective material from the ES400 and save the shipping container for later storage and
shipping.
Verify that the following were received:
•
ES400 Enterprise Digital Assistant with battery cover and stylus
•
Lithium-ion battery (1540 mAh or 3080 mAh)
•
USB Rapid Charge Cable
•
Power Supply
•
Country-specific plugs
•
Te th e r
•
Regulatory Guide
•
Quick Start Guide.
Inspect the equipment for damage. If any equipment is missing or damaged, contact the Zebra Support center
immediately. See page xviii for contact information.
Prior to using the ES400 for the first time, remove the protective shipping film that covers the display and
camera window.
1 - 2 ES400 User Guide
1
2
Setting Up the ES400
To start using the ES400 for the first time:
•
Remove the battery cover
•
Install a microSD card (optional)
•
Install a SIM card (GSM only)
•
Install the battery.
•
Powering on the ES400 for the First Time
•
Charge the ES400.
Remove the Battery Cover
To remove the battery cover:
1. Hold the ES400 firmly in two hands as shown.
2. With thumbs, push the battery cover toward the bottom of ES400.
3. Lift the battery cover off the ES400.
Figure 1-1
Battery Cover Removal
Installing a microSD Card
The microSD card slot, located under the battery, provides secondary non-volatile storage. Refer to the
documentation provided with the card for more information, and follow the manufacturer’s recommendations
for use.
CAUTION Follow proper ESD precautions to avoid damaging the microSD card. Proper ESD precautions
include, but are not limited to, working on an ESD mat and ensuring that the operator is properly
grounded.
To install the microSD card:
SIM Card Holder
microSD Card Holder
1. Slide the SIM card holder up to unlock.
2. Lift the SIM card holder.
Getting Started 1 - 3
Figure 1-2
3. Slide the microSD card holder to the right to unlock.
4. Lift the microSD card holder.
Figure 1-3
5. Insert the microSD card into the holder.
Open SIM Holder
Open microSD Card Holder
Figure 1-4
6. Close the microSD card holder.
Insert microSD Card
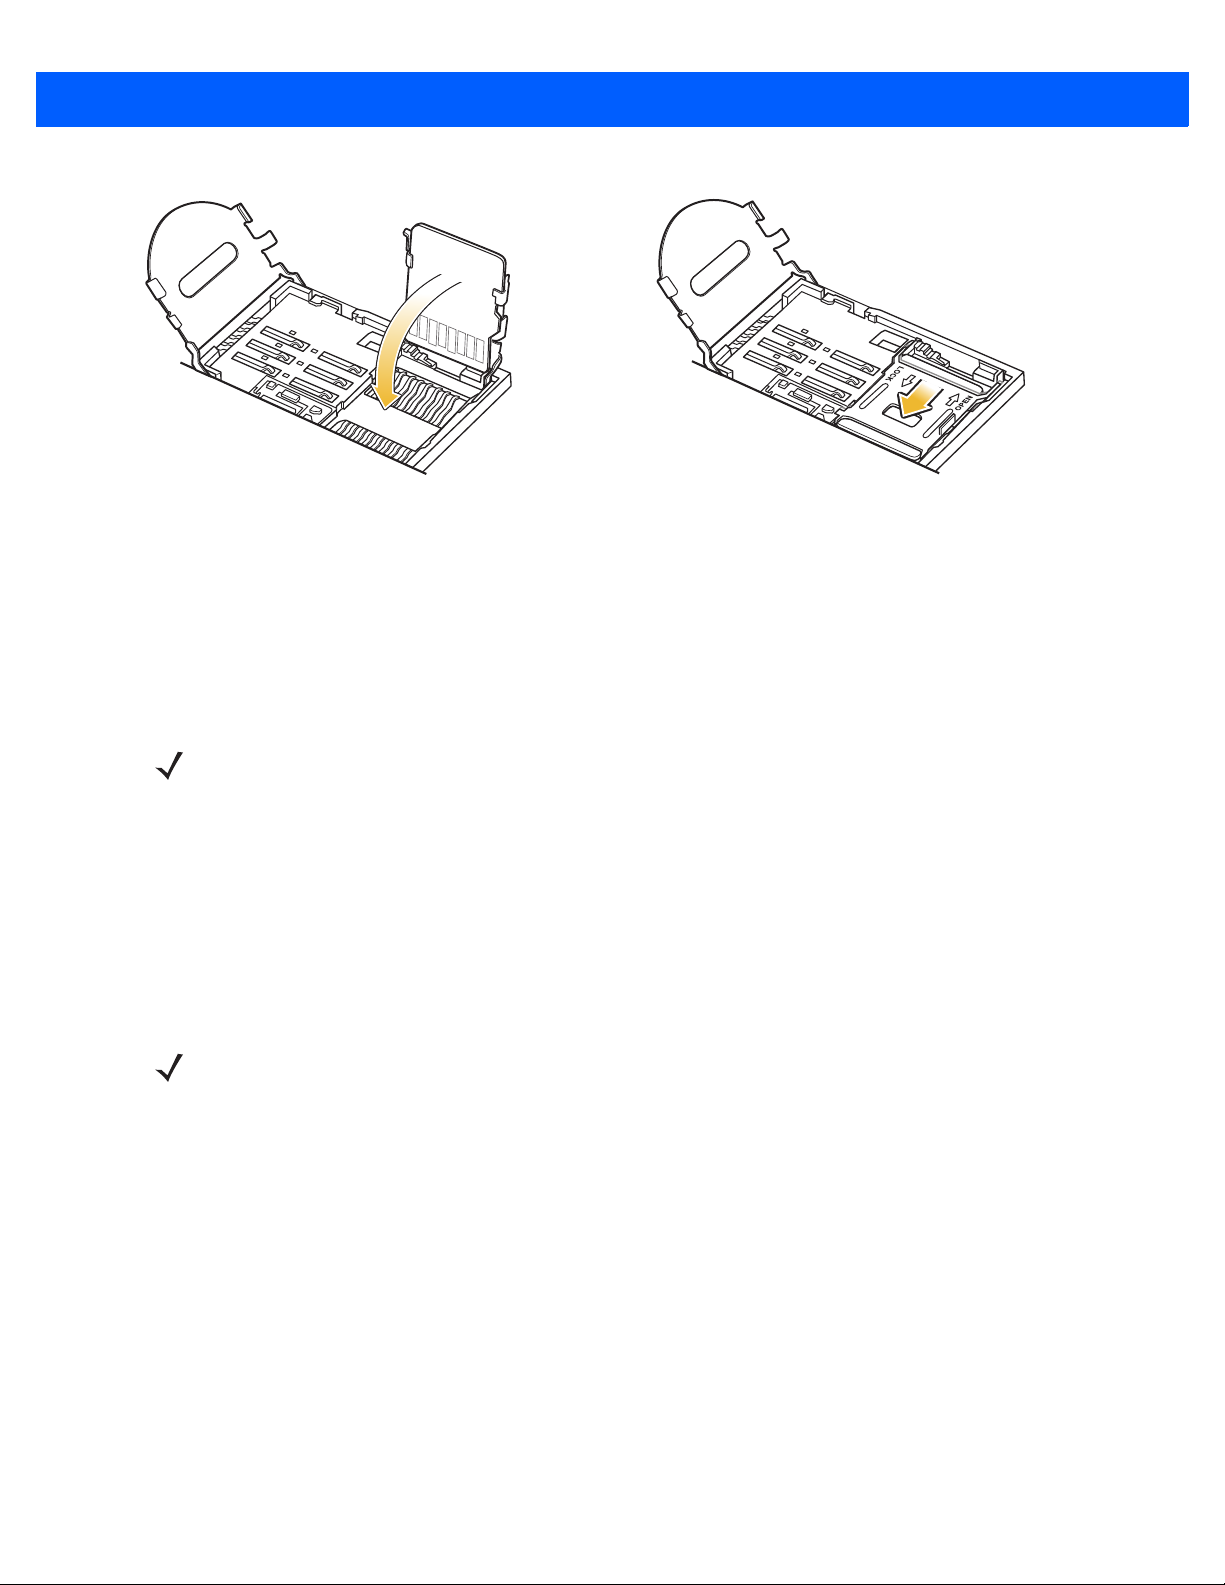
1 - 4 ES400 User Guide
Figure 1-5
7. Slide the microSD card holder to the left to lock.
8. If installing a SIM card, follow instructions in the next section.
9. If not installing a SIM card, close the SIM holder and slide down to lock into place and then install the
battery.
Close and Lock microSD Card Holder
Installing the SIM Card (GSM Only)
NOTE The ES400 does not support copying multiple contacts to some SIM cards. If an error message
appears, see Chapter 13, Maintenance & Troubleshooting for more information.
GSM phone service requires a Subscriber Identification Module (SIM) card. Obtain the card from the service
provider. The card can contain the following information:
•
Mobile phone service provider account details.
•
Information regarding service access and preferences.
•
Contact information, which can be moved to Contacts on the ES400.
•
Any additional subscribed services.
NOTE For more information about SIM cards, refer to the service provider's documentation.
To install the SIM card:
1. Insert the SIM card into the SIM card holder with the contacts facing out and the card notch facing up.
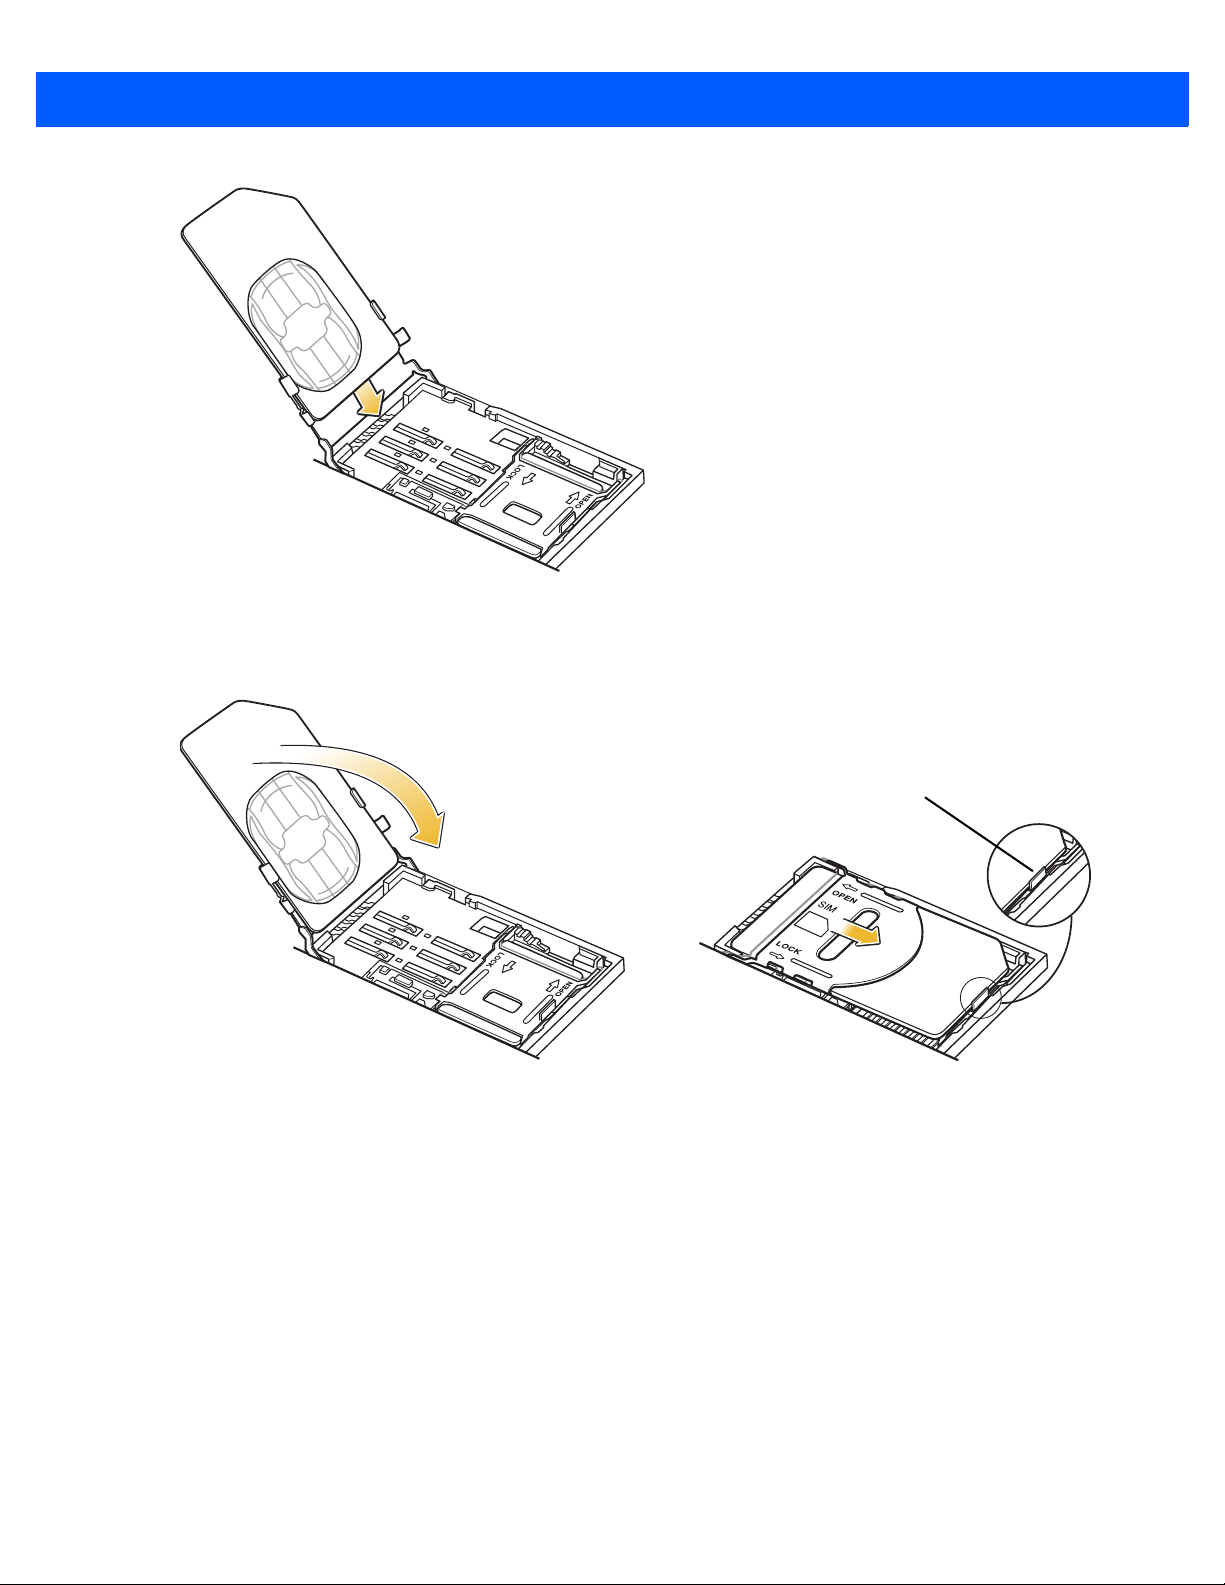
Getting Started 1 - 5
SIM Card Tab
Figure 1-6
2. Close the SIM card holder and slide down to lock into place. Ensure that the SIM card is fully inserted and
Insert SIM Card
lying flat. Ensure that the end of the card is not laying on top of the SIM Card tab.
Figure 1-7
Close and Lock SIM Card Holder
Installing the Battery
To install the battery:
1. Locate the battery contacts.
2. Insert the battery, bottom first, into the battery compartment.
3. Press the battery down into the battery compartment.
4. Slide the battery lock latch down to secure the battery in place.

1 - 6 ES400 User Guide
Battery Lock Latch
Figure 1-8
5. Align the battery cover with device.
Inserting the Battery
Figure 1-9
6. Slide the battery cover up to lock into place.
Replacing the Battery Cover
Powering On the ES400 for the First Time
Press the Power button to turn on the ES400. The splash screen displays as the ES400 boots then the
calibration window appears.
NOTE The Calibration screen can be accessed by tapping Start > Settings > System > Screen > Align Screen
button.
1. Remove the stylus from the back of the ES400.
2. Tap the screen to begin calibration.
3. Carefully press and briefly hold the tip of stylus on the center of each target that appears on the screen.

Getting Started 1 - 7
4. Repeat as the target moves around the screen.
5. Follow the on-screen instructions to set the date and time, and then email and password. Once completed
ES400 displays the Home screen.
Network Activation
To activate on a GSM/UMTS network:
1. If an active SIM card was installed in the ES400, the ES400 performs the activation process.
2. The Phone Network - GSM/UMTS Setup dialog box displays.
3. Ta p Yes and then OK. For some carriers, the ES400 resets.
4. If during start-up, no update connection settings message appears, tap Start > Settings > Connection >
Phone Network Setup and tap Update Connection Settings button.
5. If the network is unsupported, a message appears with links for manually setting the data connection and
MMS settings.
To activate on a CDMA network:
1. Create an account with the CDMA carrier. Provide the MEID number (located on the back of the ES400 or
tap Start > Settings > System Display Info) to the customer service representative.
2. If a SIM card was not installed, a No SIM card found dialog box displays.
3. Ta p OK. The Phone Network - CDMA Activation dialog box displays.
4. Ta p Yes to activate on a CDMA network.
5. On the CDMA Setup tab, tap the Preferred network option and select a network.
6. Ta p Yes.
7. Tap the Start Activation button.
8. Ta p Yes to activate.
9. Press Activate Now button.
For detailed information for configuring the phone and activating on a different network, see Chapter 4, Phone
Network Setup.
1 - 8 ES400 User Guide
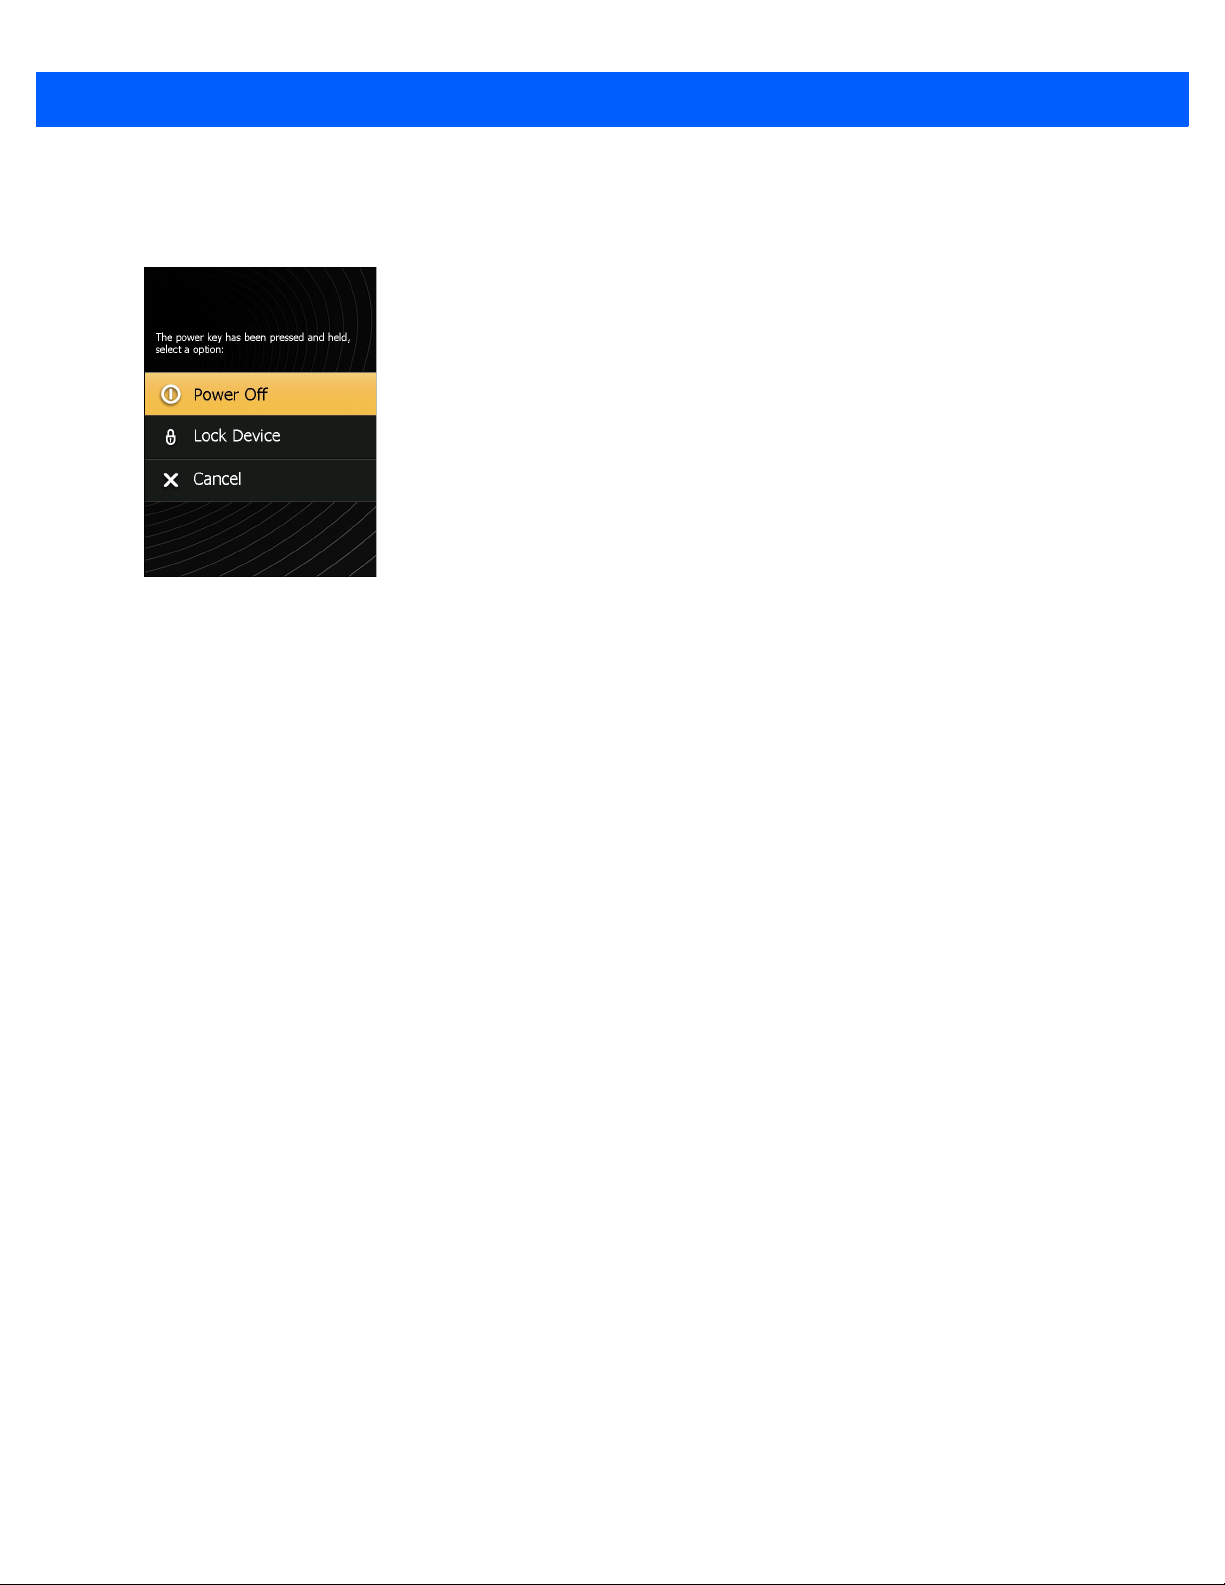
Power Off the ES400
To power off the ES400, press and hold the Power button for at least five seconds.
Figure 1-10
Select Power Off to shutdown the ES400.
Shutdown Window
Suspend
ES400 goes into suspend mode when any of the following occur:
•
User presses and releases the Power button
•
User places the ES400 into the optional holster
•
Power timeout
•
Battery reaching a critical low value.
ES400 wakes from suspend when one of the following occurs:
•
User presses the Power button
•
ES400 receives an incoming call or data
•
Bluetooth event occurs
•
User inserts a USB device into the microUSB port
•
User places the ES400 in the cradle
•
User connects or removes a headset to or from the audio port.
•
User removes the ES400 from the optional holster.

Removing the microSD Card
To remove an microSD card:
CAUTION Save all data before removing the battery. Failure to do so may cause potential loss of data.
1. Press the Power button to suspend the ES400.
2. Slide the battery cover toward the bottom of the device.
3. Remove the battery cover.
4. Slide the battery lock latch up.
5. Lift the battery out of the ES400.
6. Slide the SIM card holder up to unlock.
7. Lift the SIM card holder.
8. Slide the microSD card holder to the right to unlock.
Getting Started 1 - 9
9. Lift the microSD card holder.
10. Remove microSD card from holder.
11. Close the microSD card holder.
12. Slide the microSD card holder door to the left to lock.
13. Close the SIM card holder.
14. Slide the SIM card holder down to lock.
15. Replace the battery.
16. Slide the battery lock latch down to lock the battery in place.
17. Replace the battery cover.
Removing the SIM Card
To remove an SIM card:
CAUTION Save all data before removing the battery. Failure to do so may cause potential loss of data.
1. Press the Power button to suspend the ES400.
2. Slide the battery cover toward the bottom of the device.
3. Lift the battery cover.
4. Slide the battery lock latch up.
5. Lift the battery out of the ES400.
6. Slide the SIM card holder up to unlock.
1 - 10 ES400 User Guide
7. Lift the SIM card holder.
8. Remove the SIM card from holder.
9. Close the SIM card holder.
10. Slide the SIM card holder to the down to lock into place.
11. Slide the battery lock latch down to lock the battery in place.
12. Replace the battery cover.
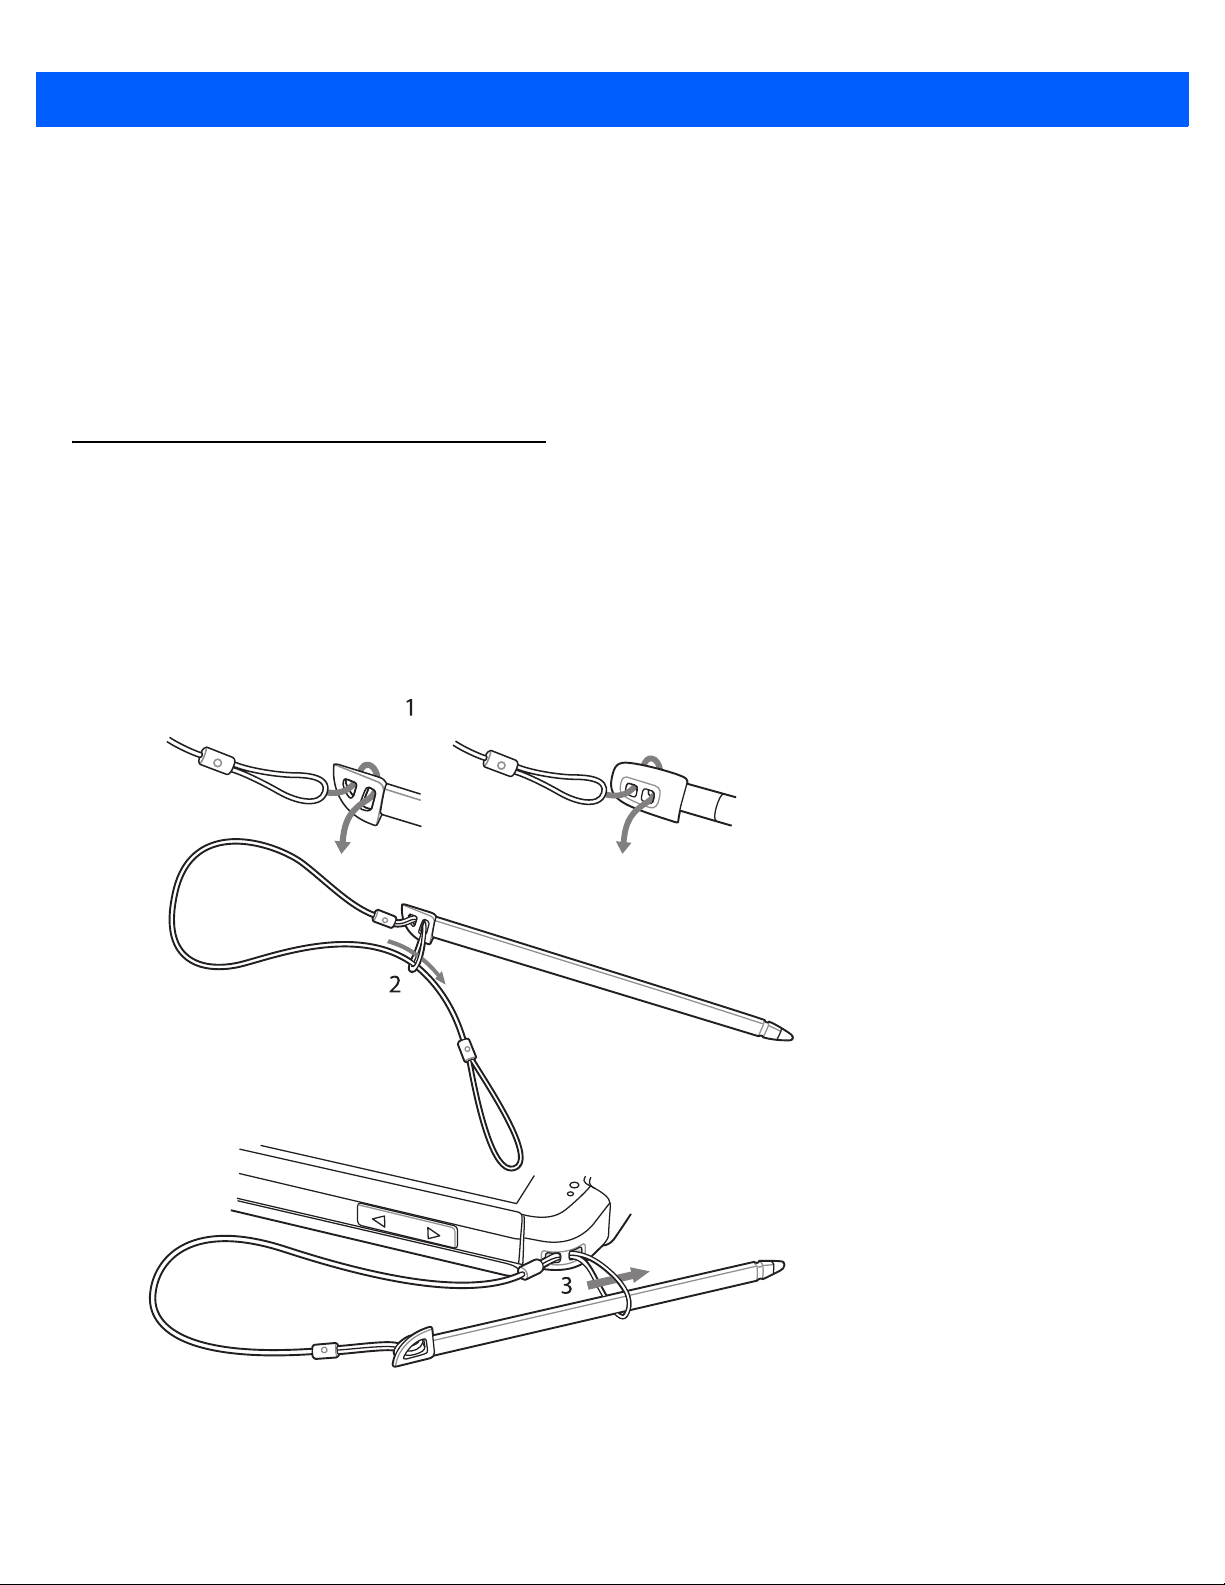
Installing the Tether
The ES400 comes with an optional tether to secure the stylus to the ES400.
1. Remove the stylus from the back of the device.
2. Feed one loop of the tether through the stylus (1), and pass the other loop through the first (2).
3. With the stylus secured to the tether, feed the free loop through the tether anchor and pass the stylus
through the loop (3) to secure it.
Figure 1-11
Install Tether onto Stylus and ES400

CHAPTER 2 USING THE ES400
Power Button
Receiver
Touch Screen
Volume Buttons
Scan
Button
Programmable
Button
Headset
Port
microUSB
Port
Camera Button
LED
Indicator
Illumination
Light
Camera Lens
Charging/Communication
Contacts
Ambient Light/Proximity
Sensor
Finger Print Reader
Battery
Cover
LED Aimer
Primary Microphone
(Handset Mode)
Secondary Microphone
(Speakerphone Mode)
Speaker
Speaker
Optical Nav Pad
Keypad
Stylus
Introduction
This chapter explains the indicators, buttons, status icons, and controls on the ES400, and provides basic
instructions for using the device.
Features
Figure 2-1
ES400 Features

2 - 2 ES400 User Guide
Keypads
The ES400 comes in three keypad configurations; QWERTY, QWERTZ and AZERTY. Refer to Appendix B,
Keypads for detailed information on the keypad configurations.
Figure 2-2
QWERTY Keypad
Special Characters
To add special characters, press and hold a key until the available special characters appear on the display.
Tap the special character. Table B-2 on page B-4 lists the available special characters.
Figure 2-3
Also press + to display additional characters. Tap the special character to select.
Special Character Display
Keypad Remapping
The user has the ability to remap the keypad keys to characters or applications. Refer to Chapter 11, Settings
for detailed information on remap keypad keys.
Entering Data
When entering data on the keypad, use either the single-hand method or the two-hand method as shown in
Figure 2-4.

Using the ES400 2 - 3
Single-hand Method Two-hand Method
Figure 2-4
Entering Data on the Keypad
Screen Navigation
NOTE To change the default Optical Nav Pad settings and sensitivity tap Start > Settings > Personal > Nav
pad.
The optical nav pad on the keypad provides the ability to navigate on the screen using either 4-way navigation
or a mouse cursor.
To switch between the 4-way navigation and the mouse cursor, press + or hold the for three
seconds.
appears briefly when the 4-way navigation is enabled and
enabled.
With 4-way navigation, the user moves their thumb across the optical nav pad and moves the highlight object
on the screen.
With the mouse cursor, the user moves the cursor around the screen like on a PC.
Press the optical nav pad to select items on the screen, similar to a mouse click.
appears briefly when mouse cursor is

2 - 4 ES400 User Guide
Optical Nav Pad
Figure 2-5
Using the Optical Nav Pad
Finger Scrolling
Finger scrolling can be used to scroll up and down web pages, documents, and lists such as the contacts list,
file list, message list, calendar appointments list, etc.
When finger scrolling, swipe or flick your finger on the screen.
To scroll down, swipe your finger upward on the screen. To scroll up, swipe your finger downward on the
screen.

Zebra Home Screen
Tap to Open Programs
Tap to Lock the Device
Tap to Open the Contacts
Status Bar
Cards
Program Shortcuts
Tile Bar
Tap to Open Start Window
Battery
Audio
Connectivity
Notifications
Signal Strength
Battery
Clock
The customizable Zebra Home screen provides faster and easier access to features and applications, and
allows users to tailor the interface to improve their unique workflow and maximize on-the-job efficiency.
Using the ES400 2 - 5
Figure 2-6
Status Bar
The Status Bar at the top of the screen displays the status icons listed in Table 2-1. Tap anywhere on the
Status Bar to open the Device Management window. Refer to Device Management on page 2-13 for more
information.
Figure 2-7
To view notifications, tap the Status Bar and select . See Status on page 2-18 for more information.
Zebra Home Screen
Status Bar Icons

2 - 6 ES400 User Guide
Table 2-1
Icon Description Icon Description
Notifications
Status Bar Icons
Reminder of an upcoming calendar event. One or more instant messages were received.
One or more text messages were received. One or more voice messages were received.
There are more notification icons than can be
displayed.
One or more Email messages were received. Receiving MMS message.
Sending MMS message. MMS message sent successfully.
MMS message received successfully. TTY Headset enabled.
TTY HCO enabled. TTY VCO enabled.
Microsoft customer feedback alert.
Bluetooth is on.
Connectivity
Connection is active. Connection is not active.
Synchronization is occurring. Wi-Fi available.
Wi-Fi in use. HSDPA available. (GSM only)
3G available. (GSM only) GPRS available. (GSM only)
EGPRS available. (GSM only) 1xRTT available. (CDMA only)
EVDO Rev. 0 available. (CDMA only) Roaming
WAN
Call missed. Dialing while no SIM card is installed.
Voice call in progress. Calls are forwarded.
Call on hold. Speakerphone is on.
Wan on/good signal. Phone is off.
No WAN service. Searching for WAN service.
HSDPA in use. (GSM only) HSDPA connecting. (GSM only)
3G in use. (GSM only) 3G connecting. (GSM only)
GPRS in use. (GSM only) GPRS connecting. (GSM only)
EGPRS in use. (GSM only) EGPRS connecting. (GSM only)
EVDO in use. (CDMA only) EVDO connecting. (CDMA only)

Using the ES400 2 - 7
Owner’s Company Name
Tap to Open Date and Time
Owner’s Name
Tap to Configure
Active Card
Carrier Name
Table 2-1
Icon Description Icon Description
Audio
Battery
Status Bar Icons (Continued)
SIM Card not installed. (GSM only)
All sounds are on. All sounds are off.
Vibrate is on.
Battery is charging. Battery has a full charge.
Battery has a high charge. Battery has a medium charge.
Battery has a low charge. Battery has a very low charge.
Cards
Cards provide quick access to completing common tasks. The number and type of cards available to an end
user are configurable by the system administrator or the end user. By default, the ES400 ships with four cards.
Swipe finger left or right on the screen to view adjacent cards.
Cards can be rearranged, deleted or added to the Home screen. See Chapter 11, Settings for more
information.
Simple Home Card
The Simple Home card displays the current date and time and notifications.
Figure 2-8
Simple Home Card
Full Home Card
The Full Home card displays the current date and time and notifications with expanded information.

2 - 8 ES400 User Guide
Tap to Configure Cards
Owner’s Company Name
Carrier Name
Owner’s Name
Tap to Open Date and Time
Tap to Configure
Active Card
Figure 2-9
Full Home Card
Table 2-2 lists the Home card shortcut icons.
Table 2-2
Home Card Icons
Icon Description
Calendar: Indicates the next appointment in the calendar. Tap to open the
Calendar application.
Corp Email: Indicates the number of unread emails in Outlook email. Tap to
open the Outlook application.
Tasks: Indicates the number of unfinished tasks. Tap to open the Task
application.
Messages: Indicates the number of unread SMS and MMS messages. Tap to
open the Messaging application.
Voicemail: Indicates the number of voice messages in the voicemail box.
Missed Calls: Indicates the number of missed call.
Home Email: Indicates the number of unread emails in a personal email
account. Tap to open the Messaging application.
In Call Status: Indicates call status. Tap to open the Phone dialer.
Weather Card
The Weather card display the weather for a selected city.

Using the ES400 2 - 9
Program Shortcut Buttons
Figure 2-10
See to Weather Card Setup on page 11-19 for information on configuring the Weather card.
Weather Card
Time Tracker Card
The Time Tracker card provide a easy way for a worker to log hours spend at a job and output this information
in a easy to use format.
Figure 2-11
See to Time Tracker Setup on page 11-20 for information on configuring the Weather card.
Time Tracker Card
Program Shortcuts
The Program Shortcut buttons provides easy access for four often used applications. Just tap the icon to
launch the application. To configure the Program Shortcuts refer to Program Shortcuts Setup on page 11-16.
Figure 2-12
My Apps Window

2 - 10 ES400 User Guide
My Apps Window
The My Apps window provides access to all the applications on the ES400. The window is configurable so that
it can display favorite applications. To configure the My Apps window refer to My Apps Window Setup on page
11-17.
Figure 2-13
My Apps screen is configurable. See My Apps Window Setup on page 11-17 for more information.
My Apps Window
Tile Bar
The Tile Bar, located at the bottom of the screen, contains the Start tile to open the Start Menu. It also
displays tiles that vary depending upon the open application.
Figure 2-14
Table 2-3
Icon Description Icon Description
Tile Bar Examples
Programs Available on the Start Menu
ActiveSync
between the ES400 and a host computer or
the Exchange Server.
Alarms
of your locale. Alarms can also be set at
specified days and times of a week.
- Synchronize information
- Set the clock to the date and time
AirBEAM Client
to deploy AirBEAM Smart™ packages to
devices.
Bing
- Search the internet.
- Allows legacy customers
Calculator
calculations, such as addition, subtraction,
multiplication, and division.
Contacts
colleagues.
File Explorer
on the device.
- Perform basic arithmetic and
- Keep track of friends and
- Organize and manage files
Calendar
create meeting requests.
E-mail
Games
- Keep track of appointments and
- Send an Email.
- Play games.

Using the ES400 2 - 11
Table 2-3
Programs Available on the Start Menu
Icon Description Icon Description
Getting Started
- Launch the Getting
Help
- Access on-line Help topics.
Started application.
Home:
Display the Home screen.
Internet Explorer
- Browse Web and WAP
sites as well as download new programs and
files from the Internet.
Internet Sharing
computer to the Internet using the ES400's
- Connect a notebook
Marketplace
- Purchase applications from
the Marketplace.
data connection.
Messenger
Windows Live Messenger.
- Use the mobile version of
Microsoft My Phone
ES400’s contacts, calendar, tasks, text
messages, music, photos videos and
documents with a Microsoft My Phone
account.
MSN Money
MSP Agent
ES400 from an MSP Server. Requires the
- Keep track of finances.
- Enables management of the
MSN Weather
Notes
- Create handwritten or typed notes,
- Check the local weather.
drawings, and voice recordings.
purchase of an appropriate MSP client
license per device to suit the level of
management functionality required.
- Synchronizes the
Office Mobile 2010
- Provides access to
Excel Mobile, PowerPoint Mobile, OneNote
Mobile, SharePoint WorkSpace Mobile and
Word Mobile applications.
Pictures & Videos
- View and manage
pictures, animated GIFs, and video files.
Remote Desktop Mobile
- Log onto
Windows NT server type computers and use
all of the programs that are available on that
computer from the ES400.
Settings
Settings Folder on page 11-1
- Opens the Settings folder. See
for more
information.
Task Manager
- Enables viewing of memory
and CPU allocations and stops running
processes.
Phone
- Make calls.
Rapid Deployment Client
- Allows the
ES400 user to stage a device for initial use
by initiating the deployment of settings,
firmware, and software. Requires the
purchase of an MSP client license per
device.
Search Phone
- Search contacts, data, and
other information on the ES400. Refer to the
Microsoft Applications for Windows Mobile 6
User Guide for more information.
SMS Staging
-
Receives and processes SMS
messages from an MSP Server and allows
the user to stage an ES400 based on them.
Requires the purchase of an MSP client
license per device.
Tasks
- Keep track of tasks.

2 - 12 ES400 User Guide
Table 2-3
Icon Description Icon Description
Programs Available on the Start Menu
Text
- Send an SMS or MMS message.
Wireless Companion
Companion folder.
Windows Media
video files.
Debug
- Contains
RTLogExport
instructed to by Zebra support personnel.
applications. Use when
- Opens the Wireless
- Play back audio and
RIL Logger
and
Toolbox
StreamingPlayer
applications.
Windows Live
Windows Live™ to find information on the
web.
DEMO - Provides a link to Zebra’s featured
demos.
- Contains the
and
- Use the mobile version of
Adobe Reader,
Voice Co m m a nde r

Using the ES400 2 - 13
Device Management
The Device Management window provides quick access to information and settings for the ES400.
Tap anywhere on the Status Bar to open the Device Management window.
Figure 2-15
The navigation bar consists of eight tabs:
•
•
•
•
•
•
•
•
Tap an icon to open the associated tab. Scroll left or right to view more icons.
Device Management Window
Programs
Memory Manager
Sound Profiles
Power & Radio
Alarms
Fusion
Status
Settings .
Programs
The Programs tab lists the programs that are currently running on the ES400 and allows for easy program
switching, and a quick way to end processes.

2 - 14 ES400 User Guide
Figure 2-16
•
•
•
•
Programs Tab
To switch to a program, tap the name of the program.
To end a running program, tap the X next to the program name.
To close all running programs, tap Close All.
To go to the Task Manag e r application, tap Task Manager.
Memory Manager
The Memory Manager tab displays an overview of memory utilization, and a quick way to free up space.
Figure 2-17
•
•
•
Ta p View Large Files to display files on the ES400 that are above a specific byte size.
Memory Manager Tab
Device Storage - Lists the total available Flash and the amount of Flash that is currently being used.
SD Card - Lists the total available memory and the amount of memory that is currently being used.
RAM - Lists the total available RAM and the amount of RAM that is currently being used.
Sound Profiles
The Sound Profiles tab provides direct access to sound-related profiles.

Using the ES400 2 - 15
Figure 2-18
To select a profile, tap the profile name.
•
•
•
•
•
•
The Temporary profile is created when changes are made by the system, for example: the user adjust the
volume using the volume buttons.
Refer to Sound Profiles on page 11-8 for information on creating new sound profiles.
Sound Profiles Tab
Vibrate - Ring type, reminder and notifications are set to vibrate. Ring and system volumes are set to 0
(off).
Silent - Ring type, reminder and notifications are set to None. Ring and system volumes are set to 0 (off).
Schedule - Ring type, reminder and notifications are set to vibrate when Calendar meeting is in session.
Normal - Ring type is set to Ring, Reminder is set to Vibrate & Sound, Notification is set to Play Sound.
Ring and system volumes are set to level 4.
Loud - Ring type is set to Vibrate & Ring, Reminder is set to Vibrate & Sound, Notification is set to
Vibrate & Sound. Ring and system volumes are set to level 5.
Ambient - Profile settings are set based on the surrounding environment’s sound level.
Power & Radio
The Power & Radio tab displays the current battery status and direct access to power profiles and
power/radio-related options.
Figure 2-19
Power & Radio Tab

2 - 16 ES400 User Guide
The Battery remaining graphic displays the amount of battery power remaining in the form of a bar graph and
also as a percentage.
The Profile row displays the current profile that is being used. To set a defined profile, tap Profile. A list of
profiles appear. Select a profile from the list. A radio button appears next to the selected profile. To view the
properties of a profile in the list, tap next to the profile.
Figure 2-20
Ta p Back to return to the Profiles tab.
The user can manually change the following settings (slide the display up to view more options).
•
•
•
•
•
•
•
•
Refer to Power Profiles on page 11-9 for information on creating new profiles.
Power Profiles Page
Phone radio - Turns the phone radio on or off.
Wi-Fi - Turns the Wi-Fi radio on or off.
Bluetooth - Turns the Bluetooth radio on or off.
Device timeout - Sets the amount of time after inactivity that the ES400 goes into suspend mode.
Backlight - Sets the amount of time after inactivity that the ES400 backlight turns off.
Brightness - Sets the display brightness.
ActiveSync Peak time - Sets the interval between which the ES400 checks for email and calendar
events during peak time.
ActiveSync Off-peak time - Sets the interval between which the ES400 checks for email and calendar
events during off-peak time.

Alarms
The Alarms tab controls the Windows Mobile enabled alarms.
Tap Status Bar > .
Using the ES400 2 - 17
Figure 2-21
To turn an alarm on or off tap the alarm name.
To change an alarm setting, tap Edit Alarm.
Refer to Alarms on page 11-10 for information on configuring the alarms.
Alarms Tab
Fusion
The Fusion tab provides access to the Fusion interface.
Figure 2-22
Refer to Chapter 5, Using WLAN for information on using and setting up a WLAN.
Fusion Tab

2 - 18 ES400 User Guide
Status
The Status tab displays all system notifications. The ES400 notifies the user of system information by
displaying icons on the Status bar, see Notification icon list in Table 2-1 on page 2-6. Tap the Status bar and
select .
Figure 2-23
Tap a notification to read the associated information.
Status Tab
Settings
The Settings tab lists the settings applications on the ES400. Tap an item in the list to open the associated
setting application or folder. Slide the list up to view more settings icons.
Figure 2-24
Settings Tab
Refer to Table 11-1 on page 11-1 for a list of setting application icons and their descriptions.

Adjusting Volume
To adjust the system volume:
1. Press the volume buttons on the right side of the ES400 to increase and decrease the system volume. The
Volume dialog box appears.
2. As you increase or decrease the volume, the slider moves accordingly. You can also move the slider to
adjust the volume.
3. Select the Vibrate radio button to turn off the system audio and enable the ES400 to vibrate upon system
notifications.
4. Select Off radio button to turn off all system audio notifications.
Charging the ES400
CAUTION Ensure that you follow the guidelines for battery safety described in Battery Safety Guidelines on page
13-1.
Using the ES400 2 - 19
Before using the ES400 for the first time, charge the battery using the provided USB Rapid Charge Cable
(25-128458-01R) or the optional One Slot USB Charge cradle. For cable and cradle setup and charging
procedures see Chapter 12, Accessories.
Place the ES400 into the cradle or connect the cable. The battery automatically begins charging. See Tab le
2-4 for charging indications. The 1540 mAh battery fully charges in less than three hours and the 3080 mAh
battery fully charges in less than six hours.
Figure 2-25
Charging ES400 with Power Supply

2 - 20 ES400 User Guide
LED Indicator
Figure 2-26
Table 2-4
Off Indicates that the:
Slow Blinking Green
(1 blink every 2 seconds)
Solid Green Indicates that the battery is fully charged.
Fast Blinking Red
(2 blinks/second)
LED Indicator
Charge Indication
LED Indication Description
•
not connected to power
•
battery is not charging.
Indicates that the battery is charging.
Indicates a charging error, e.g.:
•
temperature is too low or too high.
•
charging has gone on too long without completion.
Charging Temperature
Charge batteries in temperatures from 0°C to 40°C (32°F to 104°F). Note that charging is intelligently
controlled by the ES400.
To accomplish this, for small periods of time, the ES400 alternately enables and disables battery charging to
keep the battery at acceptable temperatures. The ES400 indicates when charging is disabled due to abnormal
temperatures via its LED. See Table 2-4.
Battery Status Indications
Battery icons appear on the Status Bar indicating the battery power level. When the battery power falls below
a predetermined level the icon indicates the status and a battery dialog box appears indicating the status of the
battery.
The message displays until the user taps Dismiss. Alternately tap the Status Bar to display the Device
Management window. Tap .
Printing
The ES400 supports printing to third-party printers. The Zebra Print Manager, available from the Support
Central web site http://www.zebra.com/support
ES400 also supports printing using the USB Host Adapter and a USB cable. See Chapter 12, Accessories for
more information.
, provides support for printing to Bluetooth enabled printers. The

Resetting the ES400
Indicates PIN Password Enabled
Indicates Fingerprint Enrolled
To perform a reboot, simultaneously press the Power button and the 1 and 9 keys.
Locking the ES400
The user can lock the ES400 to disable key presses and screen tap or by requiring a password or finger swipe
to keep your data secure. Refer to Locking the ES400 on page 11-3 for information on setting up device
locking.
NOTE The user can make emergency calls even when the ES400 is locked.
The lock screen displays whenever the ES400 is locked. When the ES400 is locked, you still receive
notifications of new messages, missed calls and upcoming appointments. You can also receive a call when the
ES400 is locked. The ES400 locks when a time out has occurred or you lock the ES400 manually.
To manually lock the ES400 tap the lock icon in the center of the Home screen Tile bar.
Using the ES400 2 - 21
Password Unlocking
When the ES400 is not used for a period of time and the user tries to access the device, the Lock screen
appears.
Figure 2-27
1. Select one of the item icon to open when the ES400 is unlocked.
Lock Window
2. Touch gray bar and pull down to login.

2 - 22 ES400 User Guide
Figure 2-28
3. In the text field enter your pin and then tap the unlock icon.
Enter Password Window
Finger Swipe Un-locking
When the ES400 is not used for a period of time and the user tries to access the device, the Lock screen
appears. Swipe your finger across the fingerprint reader in the direction used during enrollment. If the
fingerprint sensor does not read the fingerprint properly, enter a PIN to un-lock the ES400. See Locking the
ES400 on page 11-3 for information on setting up fingerprint reading.
Figure 2-29
Swipe Finger Across Fingerprint Reader
Notifications When ES400 is Locked
The Lock screen displays the following notifications:

Using the ES400 2 - 23
Voice messages
Missed calls
Unread Emails
Text messages
Figure 2-30
Lock Screen Notifications

2 - 24 ES400 User Guide

CHAPTER 3 MAKING CALLS
Introduction
NOTE If using the Windows Mobile Dialer, refer to Windows Mobile Dialer on page C-4 for information on using
the dialer.
Use the ES400 to make phone calls, keep track of calls, and send text messages. Your wireless service
provider may also provide other services such as voice mail, call forwarding, and caller ID.
Also use the phone to connect to an ISP or work network in order to browse the Web and read email over
High-Speed Packet Access (HSPA) or Evolution Data-Optimized (EvDO) using Cellular Line.
Making a Call
NOTE The user can make emergency calls even when the ES400 is locked or when it is not activated. See
Emergency Calling on page 3-5 for more information.
With the ES400, the user can make a call from the phone, contacts, and Call Log.
Using the Phone Keypad
To make a call:
1. Press .

3 - 2 ES400 User Guide
Call Line
CDMAGSM/UMTS
Figure 3-1
2. Enter the phone number on the dialer or keypad. The number appears in the Call Line.
3. Tap the green Call Line or press .
4. Ta p Cancel to cancel the call or tap Speaker to place the ES400 in speakerphone mode.
5. When the call connects, the name or number appears in the Call Line. To place the call on hold
Enterprise Dialer
NOTE If the user taps a wrong number, tap the Delete key to erase each subsequent digit. To erase the entire
number, tap and hold the Delete key.
(GSM/UMTS only), press . To return to the call press again.
NOTE Placing a call on hold using the Call Line can be enabled. To enable, press > > Enable
Hold. The toggle icon changes to On.
6. Tap or press to end the call.
Table 3-1 lists the Phone dialer icons that appear below the Status bar and above the Call Line. Icons vary
depending upon carrier and network.
Table 3-1
Phone Dialer Status Icons
Icon Description Icon Description
Bluetooth headset connected. Location disabled.
Call Forwarding enabled. Phone unlocked.
Phone audio muted.
Smart Dialing
Smart Dialing makes it easy to dial a phone number. When the user starts entering numbers or characters,
Smart Dialing automatically searches and sorts the contact entries on the SIM card, in Contacts, and the phone

Making Calls 3 - 3
numbers in Call Log (including incoming, outgoing, and missed calls). You can then select the desired number
or contact from the filtered list to dial.
Press the keys on the ES400 keypad that correspond to the phone number or contact to call. The contact panel
lists contacts that match the sequence entered.
Smart Dialing starts looking for numbers or contacts that match the sequence entered.
To find a phone number:
•
Enter the first one or two digits to find a phone number in Call History.
•
Enter the first three digits or more to find a phone number from the saved Contacts and SIM card.
To find a contact name:
• Enter the first letter of a contact’s first name or last name. Smart Dialing searches for the letter starting
from the first character of a contact name as well as from any character that appears after a space,
dash, or underscore in a contact name.
• If the matching list is long, narrow down the search further by entering another letter.
Figure 3-2
To make a call or send a message using Smart Dialing:
1. Begin entering the first few numbers or characters.
2. In the Smart Dialing panel, touch the screen or use the Optical Nav Pad on the keypad to navigate to the
desired contact or phone number.
3. When the correct contact is selected, press to make a voice call.
4. To send a message to the selected contact, tap > Send Text Message to send a text message or >
Send MMS to send an MMS message.
5. To call a different phone number associated with the selected contact, tap the contact name and select the
phone number to call.
Finding a Contact
Using Contacts
Use Contacts to make a call without looking up or entering the phone number.
To make a call from Contacts:
1. Press .

3 - 4 ES400 User Guide
2. From the Phone shortcut, tap .
3. From the contact list, tap and hold the contact name.
4. Ta p Call Work, Call Home or Call Mobile.
Using Call Log
To make a call using Call Log:
1. Press .
2. From the Phone shortcut, tap .
3. Tap the contact or phone number.
4. Ta p SEND or press .
5. Ta p Cancel or press to stop dialing or end the call.
Using Speed Dialing
To make a call using Speed Dialing:
NOTE To set up speed dialing see Speed Dial Setup on page 3-11.
1. Press .
2. On the dialpad, press and hold a number associated with the speed dial number set up in Contacts.
3. Ta p Cancel or press to stop dialing or end the call.

Last Call Dialing
To call the last received or sent phone number, press twice.
NOTE To disable last call dialing press > > Last call dialing. The toggle icon changes to Off.
Answering a Call
When the ES400 receives an incoming call a dialog box appears. If the phone is set to ring, a ring tone sounds.
Answer or ignore the incoming call.
To answer an incoming call tap Answer or press .
To ignore the incoming call, tap Ignore. This sends the caller to voice mail, depending on the service provider.
Otherwise, this presents a busy signal to the calling party.
Tap or press to end the call.
Incoming Call Features
Making Calls 3 - 5
•
The user can use other programs on the ES400 during a call. To switch back to the phone, press .
Press to end the call.
•
To hold the current call and answer a waiting call, tap Answer to place the current call on hold and
answer the incoming call.
•
On GSM/UMTS, tap the Call Line or press to put a call on hold to call another number.
•
On CDMA, enter a phone number and then press to put a call on hold to call another number.
•
To move from one call to another, tap the Call Line or press .
Missed Call Notification
When the user does not answer an incoming call, the Home screen displays a Missed Call indication.
To view a missed call entry, tap the on the Home screen.
Emergency Calling
The service provider programs one or more emergency phone numbers, such as 911 or 999, that the user can
call under any circumstances, even when the phone is locked, a SIM card is not inserted or the phone is not
activated. Your service provider can program additional emergency numbers into the SIM card. However, the
SIM card must be inserted in the ES400 in order to use the numbers stored on it. See the service provider for
additional information.
When the keypad is locked, press the orange fn key twice to set the keypad to numeric mode and then enter
the emergency number.

3 - 6 ES400 User Guide
Audio Modes
The ES400 offers three audio modes for use during phone calls:
•
Handset Mode: Switches audio to the receiver at the top front of the ES400, so the user can use the
ES400 as a handset. This is the default mode.
•
Speaker Mode: Use the ES400 as if on speaker phone. Tap Speaker to activate this mode. Tap
Speaker again to switch back to handset mode.
•
Headset Mode: Connect a Bluetooth headset or a wired headset to automatically switch audio to the
headset.
The ES400 defaults to handset mode. When a wired headset is plugged into the ES400 headset port or a
Bluetooth headset is configured for use with the ES400, the earpiece and speakerphone are muted and audio
is heard through the headset.
Using a Bluetooth Headset
You can use a Bluetooth headset for audio communication when using an audio-enabled application. See
Chapter 9, Bluetooth for information on connecting a Bluetooth headset to the ES400. Set the ES400’s volume
appropriately before putting the headset on. When a Bluetooth headset is connected the speakerphone is
muted.
Adjusting Audio Volume
Use the Volume buttons to adjust the volume of the ringer when not in a call and the audio volume when in a
call.
NOTE Adjust the conversation phone volume during a call. Adjusting the volume while not in a call affects the
ring and notification sound levels.
Muting a Call
During a call, the caller can mute the microphone so they can hear the person on the line but he or she cannot
hear the caller. This is useful when there is conversation or background noise.
To mute or unmute a call tap Mute on the dialer to mute the audio. The Mute button becomes yellow.
Using Call Log
Use Call Log to call someone who was recently called, or recently called in. The Call Log provides the time of
all incoming, outgoing, and missed calls. Table 4-1 lists the call Log icons that appear in the Call Log window.
Press and then tap to open the Call Log window.

Making Calls 3 - 7
Figure 3-3
Table 3-2
Call Log Window
Call Log Icons
Icon Description
This icon appears next to the contact information for all outgoing calls.
This icon appears next to the contact information for all incoming calls.
This icon appears next to the contact information for all unconnected outgoing
calls.
This icon appears next to the contact information for all missed incoming calls.
Managing Call Log
Change views, reset the call timer, and delete calls to manage the calls stored in Call Log.
Using the Call Log Menu
se the Call Log menu to make a call, send an SMS and remove item from the log.
1. Press and then tap .
2. Tap an item to call the number or tap to open the Options window for that item.

3 - 8 ES400 User Guide
Figure 3-4
3. Select an applicable option from the list.
4. Depending on the option selected, the appropriate window displays. For example, select SMS to display
Call Log Options
the Text Messages window.
5. Tap to close the Options window.
Conference Calling
NOTE For use on GSM/UMTS networks.
Conference Calling and the number of conference calls allowed may not be available on all services.
Please check with the service provider for Conference Calling availability.
To create a conference phone session with multiple people:
1. Press to display the dialer.
2. Enter the first phone number and tap the Call Line area. When the call connects, the name or number
appears in the Call Line.
3. Tap .
4. Tap . The dialer re-appears.
5. Enter the second number and tap Send.
6. When the call connects, the first call is placed on hold and the second call is active.

Making Calls 3 - 9
Figure 3-5
7. Tap the Call Line 1 to make that call active. The second call go on hold.
8. Tap to create a conference call (three callers).
Figure 3-6
9. To add a third caller tap . The dialer appears. When the call connects the new call is active and the
Two Calls
Two Merged Calls
conference is on hold.
Figure 3-7
Adding a Third Call

3 - 10 ES400 User Guide
10. To add the new caller to the conference tap .
Figure 3-8
Three Merged Calls
11. Tap to view all callers.
Figure 3-9
Un-Merge Calls
12. To remove a caller from the conference, tap the caller and then tap next to the caller or press .
13. To end the conference call, tap next to the Call Line or press .
Call Completed screen appears and then the dialer displays.
.
NOTE To speak privately with one party during a conference call, tap and then tap next to the
caller
. To include all parties again, tap .

Making a 3-Way Call
NOTE For use on CDMA networks.
3-way Calling may not be available on all services. Please check with the service provider for availability.
With 3-Way Calling, you can talk to two people at the same time. When using this feature, the normal airtime
rates will be charged for each of the two calls.
1. Enter a number and press .
2. Once you have established the connection, enter or select a number and tap Flash.
3. When you’re connected to the second party, tap Flash to begin your 3-way call.
If one of the people you called hangs up during your call, you and the remaining caller stay connected. If you
initiated the call and are the first to hang up, all callers are disconnected.
Speed Dial Setup
Making Calls 3 - 11
Create speed dial numbers to dial frequently called numbers with a single tap. Before creating a speed dial
entry, ensure the phone number exists in Contacts.
Adding a Speed Dial Entry
To add a speed dial entry from the phone keypad:
1. Ensure the contact and phone number are in Contacts.
2. Press > .
3. Tap the desired contact name in the list.
4. Tap > Add to Speed Dial.
5. In the Location drop-down list, select an available location to assign as the new speed dial entry. The first
speed dial location is reserved for voice mail.
6. Ta p OK to add the contact to the speed dial list.
7. Ta p OK to exit the Edit Contacts window.
8. Ta p OK to exit the Contacts window.
Editing a Speed Dial Entry
To change a speed dial entry:
1. Press > .
2. Tap the desired contact name in the list.
3. Tap > Edit Speed Dial.

3 - 12 ES400 User Guide
4. In the Location drop-down list, select a different available location to assign as the new speed dial entry.
The first speed dial location is reserved for voice mail.
5. Ta p OK to change the speed dial list.
6. Ta p OK to exit the Edit Contacts window.
7. Ta p OK to exit the Contacts window.
Deleting a Speed Dial Entry
To delete a speed dial entry:
1. Press > .
2. Tap the desired contact name in the list.
3. Tap > Edit Speed Dial.
4. Tap .
5. Ta p Yes to confirm permanently deleting the speed dial entry.
NOTE Deleting names and phone numbers in Speed Dial does not delete the contact information in Contacts
Start > Contacts).
(
6. Ta p OK to exit the Edit Contacts window.
7. Ta p OK to exit the Contacts window.
Voice Commander
Voice Commander is a speech dialog system that provides natural human interface for users to communicate
seamlessly with the ES400. Users can make phone calls, look up contact information, launch programs or
check calendars. Voice Commander contains the following features:
•
Eyes-free and hands-free voice command and control.
•
Speaker-independent speech recognition technology, no training is required.
•
Ease of use conversational user interface.
•
Personal Voice Tag and Digit Model Adaptation to enhance the usability.
To initiate Voice Commander tap Start > Toolbox > Voice Commander or press the call button on a Bluetooth
headset. The system says, “Say a Command.” The user says one of the following commands:
•
Call
•
Find
•
Redial/Callback
•
Play Music
•
Play
•
Next/Previous

•
Start
•
Appointments
•
Read/Call History
•
What time is it?
•
What can I say?
•
Goodbye
Call
To call a person by name:
1. Initiate Voice Commander. The ES400 responds with “Say command.”
2. Say “Call Michael Archer.” System responds with “Call Michael Archer work, is it correct?”
3. Say “Yes.” ES400 responds with “Dialing.”
To call a person at a location:
Making Calls 3 - 13
1. Initiate Voice Commander. The ES400 responds with “Say command.”
2. Say “Call Mary Smith at home.” The ES400 responds with “Call Mary Smith home, is it correct?”
3. Say “Yes.” The ES400 responds with “Dialing.”
To call a person with more that one phone number:
1. Initiate Voice Commander. The ES400 responds with “Say command.”
2. Say “Call Alex Jordan.” The ES400 responds with “Call Alex Jordan, home, work, mobile or cancel?”
3. Say “Home.” The ES400 responds with “Dialing.”
If two people have similar names:
1. Initiate Voice Commander. The ES400 responds with “Say command.”
2. Say “Call Halley Johnson.” The ES400 responds with “More than one Halley Johnson, please select.”
3. Select the contact intended to call.
NOTE Voice Commander automatically maintains a maximum of 2000 contacts in the recognition database. To
change this setting, see Contacts Settings on page 11-27.
If the command can not be recognized, Voice Commander prompts “Please say again.” This situation
could happen under the noisy environment, or when user says command before Voice Commander
starts recording. After hearing the prompt “Say Command”, user should wait one to two seconds to speak
the command.
The recognizable contact length is 48 characters. Contacts exceeding 48 characters will be ignored.
Find
To look up contact information:
1. Initiate Voice Commander. The ES400 responds with “Say command.”

3 - 14 ES400 User Guide
2. Say “Find Mary Smith.” System responds with “Mary Smith home 5555551212."
To look up a specific number:
1. Initiate Voice Commander. The ES400 responds with “Say command.”
2. Say “Find Michael Archer at work.” The ES400 responds with “Michael Archer, work, 5555551212."
If two contacts have similar names:
1. Initiate Voice Commander. The ES400 responds with “Say command.”
2. Say “Find John Smith at work.” The ES400 responds with “More than one John Smith, please select.”
Voice Commander displays a window with the two contacts. (System will show both Halley Johnson and
Haley Johnson for user to select.)
If a contact is not found:
1. Initiate Voice Commander. The ES400 responds with “Say command.”
2. Say “Find Michael Archer at home.”
3. ES400 responds with “Michael Archer has no home number.”
Redial
To re-dial a previous number:
1. Initiate Voice Commander. The ES400 responds with “Say command.”
2. Say “Redial.” The ES400 responds with “Call Mary Smith at home, is it correct?”
3. Say “Yes.” The ES400 responds with “Dialing.”
Callback
1. Initiate Voice Commander. The ES400 responds with “Say command.”
2. Say “Callback.” The ES400 responds with “Call Mary Smith at home, is it correct?”
3. Say “Yes.” The ES400 responds with “Dialing.”
Start
To launch an application:
1. Initiate Voice Commander. The ES400 responds with “Say command.”
2. Say “Start calendar.” The ES400 responds with “Go to Calendar.” The Calendar application launches.
Appointments
To read today’s, tomorrow’s or this week’s appointments:
1. Initiate Voice Commander. The ES400 responds with “Say command.”
2. Say “Today's appointment.” The ES400 responds with “You have 3 appointments.”
3. If you remapped the programmable button to Voice Commander, press the programmable button during
calendar reading. The ES400 responds with “Please say Previous, Next, Repeat, or Abort.”

Making Calls 3 - 15
4. Say “Next.” The ES400 reads the next appointment.
Read
To read a text message or an email message:
1. Initiate Voice Commander. The ES400 responds with “Say command.”
2. Say “Read SMS.” The ES400 responds with “You have 3 SMS.”
3. If you remapped the programmable button to Voice Commander, press the programmable button during
SMS reading. The ES400 responds with “Please say Previous, Next, Repeat or Abort.”
4. Say “Next.” The ES400 reads the next SMS message.
NOTE User can say Previous, Next, Repeat, or Abort to control SMS reading.
What time is it
To find out the time of day:
1. Initiate Voice Commander. The ES400 responds with “Say command.”
2. Say “What time is it?” The ES400 responds with “The time is 3 p.m.”
Call History
To view the call history window:
1. Initiate Voice Commander. The ES400 responds with “Say command.”
2. Say “Call History.”The ES400 responds with “Call history.”
3. The Call history page displays.
Voice Play Music
To play a specific music file:
1. Initiate Voice Commander. The ES400 responds with “Say command.”
2. Say “Play The Moment.” The ES400 responds with “The Moment.”
3. Windows Media starts to play “The Moment.”
To play all music files:
1. Initiate Voice Commander. The ES400 responds with “Say command.”
2. Say “Play music.” The ES400 responds with “Play music.”
3. Windows Media starts to play all music files.
To play a different music file during playing of another:
1. Initiate Voice Commander. The ES400 responds with “Say command.”
2. Say “Next.” The ES400 responds with “Next.”

3 - 16 ES400 User Guide
3. Windows Media starts to play next music file.
To pause or resume a playing music file:
1. Initiate Voice Commander. The ES400 responds with “Say command.”
2. Say “Pause” or “Resume.” The ES4000 pauses or resumes the playing music.
NOTE User can say “Pause” or “Resume” to control music playing. The command “Resume” only works when
Windows Media is running. The commands “Previous” and “Next” only work when playing all music files.
Voice Commander only supports media files with .mp3 and .wma format. Voice Commander supports
the music files in Playlists or Media files synced by Active Sync, in My Documents and its subfolder or on
the microSD card and its subfolders.
What can I say
To view the help information:
1. Initiate Voice Commander. The ES400 responds with “Say command.”
2. Say “What can I say.” The help file displays.
Alternately tap Menu > Help to open the help file.
Goodbye
To exit the Voice Commander application, Say “Goodbye.” The ES400 responds with “Goodbye” and the
application terminates.
Voice Commander can be also terminated manually by tapping Menu > Exit. Note that goodbye will not be
accepted during voice digit dialing operation.
NOTE Voice Commander automatically terminates after 10 seconds of silence.

CHAPTER 4 PHONE NETWORK SETUP
Introduction
If the cellular service is with AT&T, Telcel, Bell Mobility, Telstra, or any other operator that supplies a SIM card,
install the SIM card into the ES400. Refer to Installing the SIM Card (GSM Only) on page 1-4 for more
information. Note that first-time power-up may take up to five minutes, as the ES400 automatically configures
itself for the carrier.
If the cellular service is with a carrier that requires calling-in for activation, such as Verizon or Sprint, activate using the Phone Network Setup application. It may take 10 to 15 minutes to complete the activation the first time. Note that another phone needs to be available, for calling your wireless operator’s customer service department. Also, the ES400 needs to be in-coverage, i.e. in the service area, of your wireless operator, for it’s activation process to complete.
If the user has a Global Phone service with Verizon or Sprint, and has a SIM card as part of the service,
power-up the ES400 and complete activation, without inserting the SIM card. Insert the SIM card afterwards.
The Phone Network Setup application provides the ability to change networks when detected: by the ES400
or manually: when the user decides to change networks.
Automatic Network Setup
See Network Activation on page 1-7 for information on activating the ES400 upon startup.
Manual Network Setup
NOTE On OEM version 01.19.00XX, when an AT&T SIM card is installed in the ES400, the user interface for the
CDMA settings is hidden. To restore access to these settings, please contact Zebra Support.
CDMA Network Setup
NOTE Upon a Master Reset or a software upgrade, CDMA users must restore data services and MMS settings.
Tap Start > Setting > Connections > Phone Network Setup. On the Band tab, tap Network Type and
select either CDMA Only or CDMA First.
To manually configure the ES400 for a CDMA network:
1. Ta p Start > Setting > Connections > Phone Network Setup.

4 - 2 ES400 User Guide
2. On the Band tab, select the Network Type:
•
CDMA Only - Searches for only CDMA networks. GSM/UMTS networks are ignored.
•
CDMA First - Searches first for CDMA networks and then for GSM/UMTS networks if CDMA networks
are not found.
3. On the CDMA Setup tab, tap Preferred network and select your carrier.
4. Ta p Start Activation button.
5. On the Phone Network - CDMA Activation dialog box, tap Yes.
6. On an active phone line, call your carrier to active the ES400. Provide the MEID number on the screen to
the customer representative.
7. When requested, tap Activate Now to activate the ES400.
GSM Network Setup
To manually configure the ES400 for a GSM/UMTS network:
1. Install an active SIM card into the ES400. Refer to Setting Up the ES400 on page 1-2.
2. Ta p Start > Setting > Connections > Phone Network Setup.
3. On the Band tab, select the Network Type:
•
GSM/UMTS Only - Searches for only GSM/UMTS networks. CDMA networks are ignored.
•
GSM/UMTS First - Searches first for GSM/UMTS networks and then for CDMA networks if GSM/UMTS
networks are not found.
4. Select GSM/UMTS Preferred and select:
•
Auto (GSM & UMTS) - Searches for either GSM or UMTS networks.
•
GSM Only - Searches for only GSM networks.
•
UMTS Only - Searches for only UMTS networks.
5. Ta p Band. Select:
•
All - Configures the ES400 to use all bands.
•
NA & CA - Configures the ES400 to use bands used in North America and Canada.
•
EMEA/APAC - Configures the ES400 to use bands used in the Europe, Middle East, Africa (EMEA)
region and Asia Pacific (APAC) region.
•
Brazil - Configures the ES400 to use bands used in the Brazil region.
6. On the GSM/UMTS tab, tap Preferred network and select your carrier.
7. Tap the Update Connection Settings button.
NOTE SIM cards of supported carriers automatically configure the data connection and MMS settings upon
activation. Data connection and MMS settings for non-supported carriers must be manually configured.
See Configuring a GSM Data Connection on page 4-4 and MMS Messaging on page 11-26 for set up
information.
The Public Land Mobile Network (PLMN) tab displays only when Network Type is set to GSM/UMTS Only.
Ta p Show List to display the PLMN list.

Dual Network Usage
The ES400 can be set up to be used on both a CDMA and GSM/UMTS networks and the user can switch
between them.
NOTE Each active network account uses its own phone number.
On OEM version 01.19.00XX, when an AT&T SIM card is installed in the ES400, the user interface for the
CDMA settings is hidden. To restore access to these settings, please contact Zebra Support.
1. Obtain an active GSM/UMTS SIM card.
2. Activate the ES400 on a CMDA network. See CDMA Network Setup on page 4-1.
3. Install the SIM card. See Installing the SIM Card (GSM Only) on page 1-4.
To set the ES400 to use the CDMA network:
1. Tap > Start > Setting > Connections > Phone network Setup.
2. On the Band tab, tap Network type and select CDMA First or CDMA Only.
Phone Network Setup 4 - 3
3. Ta p OK.
To set the ES400 to use the GSM/UMTS network:
1. Tap > Start > Setting > Connections > Phone network Setup.
2. On the Band tab, tap Network type and select GSM/UMTS First.
3. On the GSM/UMTS tab, tap the Update Connection Settings button.
4. Ta p OK.
Switching Between CDMA Networks
If the ES400 was initially provisioned on the Verizon network it can be switched to another CDMA network. If
the ES400 is to be provisioned back to the Verizon network, additional carrier support is required. Contact the
Zebra support for detailed information. See Service Information on page xviii.
Global Usage
ES400 devices provisioned to a CDMA network can be used internationally with the use of a Global SIM card
provided by the CDMA carrier. After arriving, install the global SIM card into the ES400. See Installing the SIM
Card (GSM Only) on page 1-4.
To set the ES400 to use the global SIM card:
1. Tap > Start > Setting > Connections > Phone network Setup.
2. On the Band tab, tap Network type and select GSM/UMTS First.
3. Ta p GSM/UMTS Preferred and select Auto (GSM & UMTS), GSM Only or UMTS Only.
4. Ta p Band and select All, NA & CA, EMEA/APAC or Brazil.

4 - 4 ES400 User Guide
5. On the GSM/UMTS tab, tap the Update Connection Settings button.
NOTE If using an unsupported network, data connection and MMS settings must be manually configured. See
Configuring a GSM Data Connection on page 4-4 and MMS Messaging on page 11-26 for set up
information.
6. Ta p OK.
7. Upon return, remove the global SIM card.
8. Tap > Start > Setting > Connections > Phone network Setup.
9. On the Band tab, tap Network type and select CDMA First or CDMA Only.
10. Ta p OK.
Configuring a GSM Data Connection
NOTE SIM cards of supported carriers automatically configure the data connection upon activation. Data
connections for non-supported carriers must be manually configured.
A data connection allows Internet access across a wireless network.
To set up a new data connection:
1. Acquire an Access Point Name (APN) from the service provider.
2. Ta p Start > Settings > Connections > Connections > Tasks.
3. Under My ISP select Add a new modem connection.
4. Enter a connection name in the Enter a name for the connection text box.
5. Select Cellular Line (GPRS) from the Select a modem: drop-down list.
6. Ta p Next.
7. Enter the APN from the service provider in the Access point name text box.
8. Ta p Next.
9. Enter a username in the User name text box, if required by the service provider.
10. Enter a password in the Password text box, if required by the service provider.
11. Enter a domain name in the Domain text box, if required by the service provider.
12. Ta p Finish.
13. Ta p OK to exit Connections.
Phone Settings
Use the Phone Settings window to customize settings, such as the ring type and ring tone for incoming calls,
security options, and other options depending on the type of service.

Phone Network Setup 4 - 5
Sounds
Use the Sounds tab to customize ring type, ring tone, keypad tone.
Ta p Start > Settings > Personal > Phone > Sounds.
1. Select a ring type from the Ring type: drop-down list. The ring type changes the way the ES400 rings
when it receives an incoming call. Regardless of the ring type selected, a dialog box appears on the
ES400’s display for incoming calls.
2. Select a ring tone for incoming calls from the Ring tone: drop-down list. To hear a sample of the selected
ring tone, tap . Tap to end the ring tone.
NOTE To use custom .wav, .mid, or .wma files as ring tones, use ActiveSync on the host computer to copy the
file to the /Windows/Rings folder on the ES400. Then select the sound from the ring tone list
3. Select a keypad tone from the Keypad: drop-down list. This selection determines the tone that sounds
when entering a phone number on the keypad.
Select Short tones or Long tones to specify the duration of the sound when you press a number on the
keypad. Select Off to disable tones.
NOTE Turning off sounds saves power and prolongs battery life.
.
Security
Enabling a PIN
Ta p Start > Settings > Personal > Phone > Security.
NOTE Place emergency calls at any time, without requiring a PIN or a SIM card.
To require a PIN when using the phone:
1. Select the Require PIN when phone is used check box.
2. Use the dialer keypad to enter a four to eight digit PIN.
3. Ta p Enter to enable the PIN and return to the Security tab.
Changing a PIN
CAUTION If the user enters an incorrect PIN, the message “SIM PIN incorrect: Try again” appears. After three
consecutive incorrect attempts, the SIM card is blocked. The phone does not allow entering a PIN
again and the user must obtain a PIN Unblock Key from the service provider.
1. Ta p Change PIN.
2. Use the dialer keypad to enter the current PIN.
3. Ta p Enter.
4. Use the dialer keypad to enter a new four to eight digit PIN.
5. Ta p Enter.
6. Reenter the new PIN for confirmation and tap Enter.

4 - 6 ES400 User Guide
7. Ta p OK to confirm the change.
Disabling a PIN
1. Deselect the Require PIN when phone is used check box.
2. Use the dialer keypad to enter the current PIN.
3. Ta p Enter.
4. Ta p OK to confirm the change and exit settings.
GSM Services
Use the GSM Services tab to configure settings for subscribed phone services. For example, block certain
types of incoming and/or outgoing calls (page 4-6), disclose the caller’s identity when making outgoing calls
(page 4-6), forward incoming calls to a different phone number (page 4-6), receive notification of incoming calls
when a phone session is in use (page 4-7), and set up voice mail and short message service (page 4-7).
1. Ta p Start > Settings > Personal > Phone> GSM Services.
2. Select a service from the list and tap Get Settings .
3. Change services settings as follows.
Call Barring (Call Blocking)
Use call barring to block certain types of incoming and/or outgoing calls. Select the type of incoming and/or
outgoing calls to block.
Caller ID
Enable caller ID to reveal the identity of the person making an outgoing call. Select the Everyone radio button
to always display the caller ID. Select the No one radio button to prevent the caller’s identity from appearing to
others.
Call Forwarding
NOTE Call Forwarding may not be available on all networks. Check with the service provider for availability.
Use call forwarding to forward incoming calls to a different phone number.
•
To forward all calls to a different phone number:
• select the Forward all incoming phone calls check box.
• enter the phone number to receive forwarded calls in the To : text box.
•
To forward incoming calls to a different phone number based on a specific situation, select one or more
of the check boxes under Forward phone calls only if:.
• No answer: enter the phone number to receive forwarded calls only when the phone cannot be
answered. Then select a time period from the Forward after: drop-down list. Options are 5, 10, 15,
20, 25, and 30 seconds.
• Unavailable: enter the phone number to receive forwarded calls only when the phone is turned off or
the user is unreachable.
•Busy: enter the phone number to receive forwarded calls only when the line is busy.

Phone Network Setup 4 - 7
Call Waiting
NOTE Call Waiting may not be available on all networks. Check with your service provider for availability.
Call waiting notifies the user of an incoming call when the phone is in a phone session. Select the Notify me
radio button to enable call waiting. Select the Do not notify me radio button to disable call waiting.
Voice Mail and Text Messages
To use voice mail and send short messages, enter the voice mail and/or text message phone number in the
appropriate text boxes.
Fixed Dialing
Use Fixed Dialing to restrict the phone to dial only the phone number(s) or area code(s) specified in a Fixed
Dialing list.
1. Select Fixed Dialing and tap Get Settings.
2. Select the Enable fixed dialing check box.
3. To add a number to the list, tap Menu > Add.
4. Enter the phone number or area code to restrict and tap Done.
5. Repeat steps 3 and 4 to add more numbers, and tap Done twice when complete.
6. Enter PIN2 and tap Done.
NOTE PIN2 is buffered in the ES400 indefinitely after entry and will not be requested again until a reboot of the
ES400 has been performed. Should PIN2 be required, then the user must perform a reboot of the ES400.
Internet
Use the Internet tab to configure Internet calling.
Select an option from the down-down list.
Ta p OK.
Services
Use the Services tab to set Broadcast Channels and GPDS Privacy features.
Broadcast Channels
Enable broadcast messages from local cell sites. These messages include emergency directions and
information services.
GPS Privacy
Allows internet applications to use current location.
Hearing
Use the Hearing tab to set TTY and HAC features.

4 - 8 ES400 User Guide
TTY
Use an optional TTY device with the ES400 to send and receive calls. Plug the TTY device into the ES400’s
headset jack and set the ES400 to operate in 1 of 3 TTY modes.
NOTE Use a TSB-121 compliant cable (provided by the TTY manufacturer) to connect the TTY device to the ES400.
Set the ES400 volume to a middle level setting for proper operation. If you experience a high number of
incorrect characters, adjust the volume as needed to minimize the error rate.
For optimal performance, the ES400 should be at least 12 inches (30 centimeters) from the TTY device.
Placing the ES400 too close to the TTY device may cause high error rates.
When you set the ES400 to a TTY mode, it operates in that mode whenever the TTY device is connected.
•
Headset - Transmit and receive TTY characters using a headset.
•
VCO - Receive TTY characters but transmit by speaking into microphone.
•
HCO - Transmit TTY characters but receive by listening to earpiece.
•
Off - Disable TTY functionality.
HAC
Turn Hearing Aide Compatibility (HAC) on and off.

CHAPTER 5 USING WLAN
Introduction
WLANs allow the ES400 to communicate wirelessly inside a building. Before using the ES400 on a WLAN, the
facility must be set up with the required hardware to run the WLAN (sometimes known as infrastructure). The
infrastructure and the ES400 must both be properly configured to enable this communication.
Refer to the documentation provided with the infrastructure (access points (APs), access ports, switches,
Radius servers, etc.) for instructions on how to set up the infrastructure.
Once you have set up the infrastructure to enforce your chosen WLAN security scheme, use the Fusion or
Wireless Zero Config (WZC) software to configure the ES400 to match.
Fusion Overview
The Fusion software contains applications with which to create wireless profiles. Each profile specifies the
security parameters to use for connecting to a particular WLAN as identified by its ESSID. The Fusion software
also allows the user to control which profile out of a set of profiles is used to connect. Other Fusion applications
allow the user to monitor the status of the current WLAN connection and to invoke diagnostic tools for
troubleshooting.
To access Fusion, tap the Status Bar > .

5 - 2 ES400 User Guide
Figure 5-1
Refer to the Wireless Fusion Enterprise Mobility Suite User Guide for Version 3.20 for detailed information on
using and configuring Fusion.
To access the on-device Fusion Help tap Status Bar > > Help.
Status - Fusion Tab
Wireless Zero Config Overview
WZC is a Microsoft wireless connection management utility that dynamically selects a wireless network to
connect to based on a user's preferences and various default settings.
Switching Between Fusion and WZC
To switch from Fusion to WZC:
1. Tap the Status Bar > > Options.
2. Select WLAN Management from the drop-down list.
3. Select Windows Manages WLAN radio button.
4. Ta p Save.
5. Ta p OK.
6. Perform a reboot.
To switch from WZC to Fusion:
1. Tap the Status Bar > > Options.
2. Select WLAN Management from the drop-down list.
3. Select Fusion Manages WLAN radio button.
4. Ta p Save and then tap OK.
5. Perform a reboot.

Supported Applications
The Fusion menu items and their corresponding applications are summarized in Table 5-1.
Using WLAN 5 - 3
Table 5-1
Wireless Manager Opens the Wireless Manager application. Yes Yes
Find WLANs Invokes the Find WLANs application which
Manage Profiles Invokes the Manage Profiles application
Wireless Zero Config Invokes the Wireless Zero Config
Manage Certs Invokes the Certificate Manager application
Manage PACs Invokes the PAC Manager application which
Options Invokes the Options application which allows
Supported Applications
Application Description
displays a list of the WLANs active in your
area.
(which includes the Profile Editor Wizard) to
manage and edit your list of WLAN profiles.
application to configure the WLAN.
which allows you to manage certificates used
for authentication.
helps you manage the list of Protected Access
Credentials used with EAP-FAST
authentication.
you to configure the Fusion option settings.
Fusion
Support
Yes N o
Yes N o
No Yes
Yes Yes
Yes N o
Yes Yes
WZC Support
Wireless Status Invokes the Wireless Status application
Wireless Diagnostics Invokes the Wireless Diagnostics
Log On/Off Invokes the Network Login dialog which
Fusion Setup
For detailed setup WLAN using Fusion refer to the Wireless Fusion Enterprise Mobility Suite User Guide for
Version 3.20 for detailed information on using and configuring Fusion.
Yes Yes
which allows you to view the status of the
current wireless connection.
Yes Yes
application which provides tools with which to
diagnose problems with the wireless
connection.
Yes N o
allows you to log on to a particular profile or to
log off from the currently active profile.

5 - 4 ES400 User Guide
To setup WLAN using Fusion:
NOTE Obtain the proper WLAN configuration information from your system administrator prior to performing the
Fusion setup procedures.
The following setup procedure example shows setup of a WLAN using WEP encryption.
1. Tap the Status Bar > > Manage Profiles. The Manage Profiles window appears.
2. Tap and hold in the window and select Add from the pop-up menu. The Wireless LAN Profile Entry
window appears.
3. In the Profile Name text box enter a name for the profile.
4. In the ESSID text box enter the ESSID.
Figure 5-2
5. Ta p Next. The Operating Mode dialog box displays.
6. In the Operating Mode drop-down list, select Infrastructure or Ad-hoc.
Figure 5-3
7. Ta p Next. The Security Mode dialog box displays.
8. In the Security Mode drop-down list, select Legacy (Pre-WPA).
Profile ID Dialog Box
Operating Mode Dialog Box
Figure 5-4
9. In the Authentication drop-down list, select None.
Security/Authentication Dialog Box

10. Ta p Next. The Encryption dialog box displays.
11. In the Encryption Type drop-down list, select WEP-40 (40/24).
Using WLAN 5 - 5
Figure 5-5
12. Select the Pass-phrase or Hexadecimal Keys radio button to indicate whether a pass-phrase or
Encryption Dialog Box
hexadecimal keys will be entered on the next page.
13. Select the For added security - Mask characters entered check box to hide characters entered.
Deselect this to show characters entered.
14. Ta p Next.
Figure 5-6
15. In the Edit Key drop-down list, select the key to enter.
16. In the Key field, enter 10 hexadecimal characters.
17. In the Confirm field, re-enter the key. When the keys match, a message appears indicating that the keys
WEP-40 WEP Keys Dialog Box
match.
18. Repeat for each WEP key.
19. In the Transmit Key drop-down list, select the key to transmit.
20. Ta p Next. The IPv4 Address Entry dialog box displays.
Figure 5-7
21. Ensure that all three check boxes are selected.
IP Address Entry Dialog Box

5 - 6 ES400 User Guide
22. Ta p Next. The Battery Usage dialog box appears.
23. In the Battery Usage Mode dialog box select a power consumption option.
Figure 5-8
24. Ta p Save.
Battery Usage Dialog Box
Connecting to the Internet
To connect to the Internet on a WLAN when using Fusion, ensure that the network card settings is set to
Internet:
1. Ensure Fusion is enabled and a profile is configured.
2. Ta p Start > Settings > Connections > Wi-Fi.
3. In the My network card Connects to drop-down list, select The Internet.
4. Ta p OK.
Wireless Zero Config Setup
To setup WLAN using WZC:
NOTE Obtain the proper WLAN configuration information from your system administrator prior to performing the
WZC setup procedures.
The following setup procedure example shows setup of a WLAN using WEP encryption.
1. Ta p Status Bar > > Wireless Zero Config.
Figure 5-9
Wireless Zero Config Window

Using WLAN 5 - 7
2. The ES400 searches for wireless networks in the area and displays them in the window.
3. Tap a network name.
Figure 5-10
4. In the Connects to drop-own list, select either The Internet or Work.
5. Check the This is a hidden network checkbox if the network is a hidden network.
6. Ta p Next.
Figure 5-11
7. In the Authentication drop-down list, select the authentication type.
8. In the Data Encryption drop-down list, select the data encryption type.
Configure Wireless Network Window
Configure Network Authentication Window
9. If WEP encryption is selected, enter an encryption key in the Network key text box.
10. Ta p Next.

5 - 8 ES400 User Guide
Figure 5-12
11. If required, select Use IEEE 802.1x network access control check box.
12. In the EAP type drop-down list box, select the EAP type.
13. Ta p Finish.
Configure Network Authentication Window
More Information on WZC
For more information on Microsoft Wireless Zero Config, see the Microsoft Software Developer Network
(MSDN) at http://msdn.microsoft.com.

CHAPTER 6 MESSAGING
Introduction
This chapter describes how to use and setup Email, SMS Messaging and MMS Messaging.
Use Messaging to send and receive Email.
Creating an Email Message
To create an email message:
1. Press .
2. Select an email account.
3. Tap > New.
4. To add recipients, enter their email addresses, separating them with a semicolon ( ; ). Tap To to add email
addresses stored in Contacts.
5. Enter a subject and compose the message.
6. To add an attachment to the message, tap > Insert and tap the item you want to attach: Picture, Voi c e
Note, or File.
7. Tap .
Viewing an Email Message
To view an email message:
1. On the Home screen, tap for an Outlook email or for a personal email account.

6 - 2 ES400 User Guide
2. Tap an email to open it.
Replying to or Forwarding a Message
1. On the Home screen, tap for an Outlook email or for a personal email account.
2. Tap an email to open it.
3. Tap .
4. Enter your reply message, and then tap .
SMS Messaging
Text messages allow the user to send and receive short text messages (SMS) to and from other mobile
devices. The text can contain words, numbers, or an alphanumeric combination no longer than 160 characters.
Sending a Text Message
To send a text message:
1. Press > Text Messages.
2. Tap > New > SMS.
3. Ta p To to select a recipient from Contacts.
4. Compose a message.
• The auto-correct feature automatically fixes common spelling errors as the user types so that
messages are more accurate.
• The character counter, in the Status Bar, indicates the size of the message being composed.
• Tap > Message Options, then select the Request message delivery notification check box to
request notification when the text messages is received.
5. Tap to send the message.
If the ES400 phone feature is on, the text message is sent. If it’s off, a prompt displays to turn on the phone
feature. The message is saved in the Drafts folder and sent when the ES400 phone feature is turned on.
When outside of coverage area, the message is saved in the Drafts folder and sent when back in a
coverage area.
Viewing Text Messages
When an incoming text message arrives, the text notification icon appears in the Status Bar and the dialog box
displays.

Messaging 6 - 3
Text Message Notification Icon
Figure 6-1
New Text Message Notification
The Caller Identification feature matches incoming text message numbers with those stored in Contacts
indicating who is sending the message. Tap to reply to the message. Tap to call the sender, or save,
dismiss or delete the message.
To view a text message:
1. Press > Text Messages.
2. In the message list, tap a text message. The window displays previous text conversations.
Replying to an SMS Message
To reply to a text message:
1. Tap .
2. In the message list, tap a text message. The window displays previous text conversations.
3. Enter text in the reply field.
4. Tap .

6 - 4 ES400 User Guide
MMS Messaging
MMS Messaging allows the user to send a pictures, videos, audio files and other file types to another phone.
Creating and Sending MMS Messages
To send an MMS message:
1. Press > Text Messages.
2. Tap > New > MMS.
Figure 6-2
3. To add a contact, tap . A window appears with a list of contacts. Select one or more contacts and then
MMS Window
tap Done.
4. Tap to add a subject for the message. Enter the subject text in the window and then tap Done.
5. Tap in the text window to enter a text message. A window appears allowing you to add a text message plus
emoticons, favorite web addresses, pre-defined text, contact information and calendar information. Tap
Done after adding information.
6. Tap to attach a picture or video stored on the ES400 to the message.
7. Tap to attach a sound file stored on the ES400 to the message.
8. Tap to take a picture and attach it to the message.
9. Tap to capture video and attach it to the message.
10. Tap to record a message and attach it to the message.
11. Tap to add a file stored on the ES400 to the message.
12. After all of the items are attached to the message, tap Send.

Viewing an MMS Message
To view an MMS message:
1. Press > Text Messages.
2. Tap the MMS message.
3. In the threaded message, tap the MMS icon to view the message.
4. Ta p Contents to view a list of files included in the message.
On the Message Contents screen:
1. Ta p Menu > Save to save a file.
2. Ta p Menu > Save into My Text to save the contents of a text file to the My Text list.
3. Ta p Menu > Assign to Contact to associate a photo to a contact.
4. Ta p Menu > Set as Ringtone to associate a audio file as a ringtone.
Messaging 6 - 5
Replying to an MMS Message
To reply to an MMS message
1. Press > Text Messages.
2. Tap the MMS message.
3. In the threaded message, tap the MMS message to open and view an MMS message.
4. After viewing the MMS message, tap Menu > Reply > via MMS to reply with an MMS message or tap
Menu > Reply > via SMS to reply with a text message.
Blocking Incoming MMS Messages
To block incoming MMS messages from a specific sender:
1. Open and view the MMS message.
2. Tap Menu > Show > Contact Details.
3. Tap Menu > Save to Blacklist.
4. Tap Done.
To unblock a sender:
1. Ta p My Apps > Tex t .
2. Ta p Menu > MMS Options > Blacklist.
3. Tap and hold the phone number.
4. Select Delete from the pop up menu.
5. Ta p OK.

6 - 6 ES400 User Guide

CHAPTER 7 DATA CAPTURE
Introduction
The ES400 offers data capture using the color digital camera.
Digital Camera Scanning
The camera uses digital camera technology to take a digital picture of a bar code, stores the resulting image in
its memory, and executes state-of-the-art software decoding algorithms to extract the data from the image.
To read a bar code, a scan-enabled application is required. The ES400 contains the DataWedge application
that allows the user to enable the camera, decode the bar code data and display the bar code content.
1. Enable DataWedge. See Data Wedge on page 7-2.
2. Launch an application that supports text inputs, such as Word Mobile 2010 or Excel Mobile 2010.
3. Point the camera lens on the back of the ES400 at a bar code.
4. Press and hold . A preview window appears on the display window and a red aiming line emits from
the ES400. The LED lights red indicating that the data capture is in process.
5. Move the ES400 until the red aiming line is across the bar code.
Figure 7-1
6. The LED lights green and a beep sounds, by default, to indicate the bar code was decoded successfully.
7. The bar code content data displays in the text field.
Sample Bar Code

7 - 2 ES400 User Guide
Data Wedge
DataWedge allows the user to input captured bar code data into a text field of an application.
To enable DataWedge:
1. Ta p Start > Settings > System > DataWedge.
2. Tap the Running option to start the DataWedge process. The DataWedge Status changes to Ready.
3. Ta p OK.
To disable DataWedge:
1. Ta p Start > Settings > System > DataWedge.
2. Tap the Running option to end the DataWedge process. The DataWedge Status changes to Stopped.
3. Ta p OK.

CHAPTER 8 USING THE CAMERA
Introduction
Use the Camera application to take pictures and record videos. The pictures and videos are automatically
saved in the Gallery application, where the user can view and edit them. By default, captured pictures or
videos are saved as JPEG or 3GP file.
Taking Pictures
Press the Camera button located on the lower-right side of the ES400.
The Camera screen displays the view finder. Depending upon what mode was last used, either Camera mode
or Video mode is enabled. The icon in the top right corner indicates the mode. If video mode is enabled, tap
anywhere on the screen to display the Status bar and then tap Camera icon.
Figure 8-1
To take a picture:
1. Point the ES400 at the subject.
2. Press the Camera button on the side of the ES400 or the Optical Nav Pad. The ES400 takes the picture
and stores it in memory.
Camera View Finder

8 - 2 ES400 User Guide
To take a panorama picture:
NOTE Panorama picture quality is better outdoors.
1. Ta p Menu > Panorama and select either Horizontal or Vertical and then tap Close.
2. Point the ES400 at the subject.
3. Press the Camera button on the side of the ES400 or the Optical Nav Pad. The ES400 takes the picture
and displays two alignment targets on the screen.
Figure 8-2
4. Slowly move the ES400 to the right until the two alignment targets overlap and turn green. When they turn
Panorama Alignment Targets
green, the ES400 takes another picture.
Figure 8-3
5. Continue until five pictures are taken. The ES400 stitches the five pictures together and stores a panorama
Successful Alignment
picture in memory.
Tap the icon at the bottom of the screen to stop stitching before taking five pictures or if stitching quality not
favorable.

Camera Settings
Image Quality
Focus Setting
Time Stamp Enabled
Close the Camera Application
Opens the Photo Menu
Toggles the Close-up Light On and Off (Off shown)
Toggle between Photo or Video Mode (Photo Mode shown)
Opens the Gallery Application
Image Size
Location Enabled
Timer
Tap anywhere on the screen to display the camera Status bar and Control bar. The Status bar at the top of the
screen provides camera setting information. The Control bar at the bottom of the screen provides function
buttons to control the camera.
Using the Camera 8 - 3
Figure 8-4
Camera Menu Options
Use the Camera Menu to configure the camera settings.
Size/Quality Settings
Use the Size/Quality settings to set the size and quality of the image. Tap the Size/Quality option to open the
Size/Quality window.
Select one of the three yellow Size boxes to set the size of the image. The image can be set to three sizes:
•
•
•
Select one of the three yellow Quality boxes to set the quality of the image. The image can be set to three
quality settings; Low, Medium and High.
Increasing the size and quality of the picture increases the size of the file saved on the ES400. The size of the
file displays below the Quality boxes. Also listed is the number of pictures that can be stored on the ES400.
Camera Settings View
1.3 Megapixels (1280 pixels x 1024 pixels)
2 Megapixels (1600 pixels x 1200 pixels)
3.2 Megapixels (2048 pixels x 1536 pixels).

8 - 4 ES400 User Guide
Panorama
Use the Panorama option to enable the camera to take panorama pictures. The Panorama feature allows the
user to stitch multiple pictures together to form one wider picture. The stitching is done on the camera at the
time of capture.
Tap the Panorama option to open the Panorama options window. Select one of the following:
Off - Disable Panorama feature.
Horizontal - Create a panorama picture by moving the ES400 to the right.
Vertical - Create a panorama picture by moving the ES400 down.
When in Panorama mode, the center cross-hairs become wider in proportion with the wider image that will
result from the capture session.
Timer
Use the Timer option to control the delay between the shutter press and the image capture. Options are Off, 5
Sec., 10 Sec., 15 Sec. and 20 Sec.
Advanced
Use the Advanced option to set additional camera options.
•
Workflow - Use the Workflow option to customize the camera’s behavior when taking pictures.
• Continuous - The user does not view the picture just taken.
• Preview - After the user takes a picture, it is briefly displayed on the screen before returning to
camera mode. During the preview, tap the image to enter the image viewer mode.
•Edit - After the user takes a picture, the user is brought to the image viewer mode to edit the picture.
NOTE In both Preview mode and Edit mode the user can press the Camera button to return to Image Capture
mode.
•
Comment prompt - Turns on reminders that comments have not been added to a particular picture or
group of pictures.
If After each photo is enabled, in the Quick Review and the Image Viewer an Edit icon displays in the
Status bar. Tap the Edit icon to open the Photo Info window.
If When exiting is enabled, a dialogue box appears prompting the user to add comments before exiting.
•
GPS location - GPS coordinates can be used to tag pictures with coordinates for latitude and longitude.
The camera application uses both GPS and WAN triagulation to acquire these coordinates.
If this feature is enabled but the ES400 cannot acquire coordinates from either GPS or WAN triagulation
then the GPS no-signal icon displays in the Status bar. Also, if the user has not enabled Comment
Prompts > After Each Photo then a location prompt displays in the Status bar during the quick review
stage informing the user that no coordinate data was attached saved.
The user can enable and disable the GPS coordinates feature by clicking on the GPS coordinates
element in the advanced menu.
•
Storage - Allows the user to either save the pictures to the ES400’s built in memory or to a microSD
card. Tap the Storage option to select either Device or SD Card. Note that the same feature exists in the
Video Capture menu. These are intended to be independent settings. So, it is possible that a user could
have pictures saved to the ES400’s memory and videos stored on the microSD card.

•
Image Format
Time Stamp Enabled
Close the Camera Application
Opens the Video Menu
Toggles Flash On and Off (Flash off shown)
Select Photo or Video Mode (Video Mode shown)
Opens Gallery Application
Image Size
Time/date stamp - Allows the user to permanently place the time and date stamp onto the lower right
corner of the picture. This is separate from the Time and Date as it appears in the metadata. Tap
time/date stamp to toggle this feature on and off.
About
Displays the software version and end user license agreement.
Recording Video
Depending upon what mode was last used, either Camera mode or Video mode is enabled. The icon in the top
right corner indicates the mode. If camera mode is enabled, tap anywhere on the screen to display the Status
bar and then tap Video icon.
To record a video:
1. Point the ES400 at the subject.
2. Press the Camera button on the side of the ES400 or the Optical Nav Pad. The ES400 begins recording. A
timer appears at the top of the screen indicating the running time of the video.
Using the Camera 8 - 5
3. Press the Camera button or the Optical Nav Pad to end the recording and store it in memory.
Video Settings
The Status bar at the top of the screen provides video setting information. The Control bar at the bottom of the
screen provides function buttons to control the video.
Figure 8-5
Video Settings

8 - 6 ES400 User Guide
Video Menu Options
Use the Video Menu to configure the video settings.
Quality
Use the Quality option to set the resolution of the video capture:
•
QCIF - Quarter Common Intermediate Format is a video format that has a data rate of 30 frames per
second with each of those frames containing 144 lines and 176 pixels per line.
•
QVGA - Quarter-VGA (QVGA) has an image resolution of 320 x 240 pixels or 240 x 320. QVGA is the
common resolution for most phone video captures.
•
VGA - Video Graphics Array (VGA) has an image resolution of either 640 x 480 (with 16 colors) or 320 x
200 (with 256 colors). The total palette of colors is 262,144.
Format
Use the Format option to set the format that the video is recorded in. Options: MP4 or 3GP.
Time/Date stamp
Use the Time/Date stamp option to add a time and date stamp to the video file.
Storage
Allows the user to either have the video saved to the ES400’s built in memory or to a microSD card. Important
to note is that the same feature exists in the Photo menu. These are intended to be independent settings. So,
it is possible that a user could have images saved to the ES400’s memory and videos stored on the microSD
card.
About
Displays the software version and end user license agreement.
 Loading...