

Page 1

DS9908R
Hands-Free Imaging Scanner
Product Reference
Guide Supplement
MN-003377-01
Page 2

Copyright
ZEBRA and the stylized Zebra head are trademarks of Zebra Technologies Corporation, registered in many
jurisdictions worldwide. All other trademarks are the property of their respective owners. ©2019 Zebra
Technologies Corporation and/or its affiliates. All rights reserved.
COPYRIGHTS & TRADEMARKS: For complete copyright and trademark information, go to
www.zebra.com/copyright
.
WARRANTY: For complete warranty information, go to www.zebra.com/warranty
END USER LICENSE AGREEMENT: For complete EULA information, go to www.zebra.com/eula
For Australia Only
For Australia Only. This warranty is given by Zebra Technologies Asia Pacific Pte. Ltd., 71 Robinson Road, #0502/03, Singapore 068895, Singapore. Our goods come with guarantees that cannot be excluded under the
Australia Consumer Law. You are entitled to a replacement or refund for a major failure and compensation for any
other reasonably foreseeable loss or damage. You are also entitled to have the goods repaired or replaced if the
goods fail to be of acceptable quality and the failure does not amount to a major failure.
Zebra Technologies Corporation Australia’s limited warranty above is in addition to any rights and remedies you
may have under the Australian Consumer Law. If you have any queries, please call Zebra Technologies
Corporation at +65 6858 0722. You may also visit our website: www.zebra.com
terms.
Terms of Use
• Proprietary Statement
This manual contains proprietary information of Zebra Technologies Corporation and its subsidiaries
(“Zebra Technologies”). It is intended solely for the information and use of parties operating and
maintaining the equipment described herein. Such proprietary information may not be used, reproduced,
or disclosed to any other parties for any other purpose without the express, written permission of Zebra
Technologies.
• Product Improvements
Continuous improvement of products is a policy of Zebra Technologies. All specifications and designs are
subject to change without notice.
• Liability Disclaimer
Zebra Technologies takes steps to ensure that its published Engineering specifications and manuals are
correct; however, errors do occur. Zebra Technologies reserves the right to correct any such errors and
disclaims liability resulting therefrom.
• Limitation of Liability
In no event shall Zebra Technologies or anyone else involved in the creation, production, or delivery of the
accompanying product (including hardware and software) be liable for any damages whatsoever
(including, without limitation, consequential damages including loss of business profits, business
interruption, or loss of business information) arising out of the use of, the results of use of, or inability to
use such product, even if Zebra Technologies has been advised of the possibility of such damages. Some
jurisdictions do not allow the exclusion or limitation of incidental or consequential damages, so the above
limitation or exclusion may not apply to you.
.
.
for the most updated warranty
2
Page 3

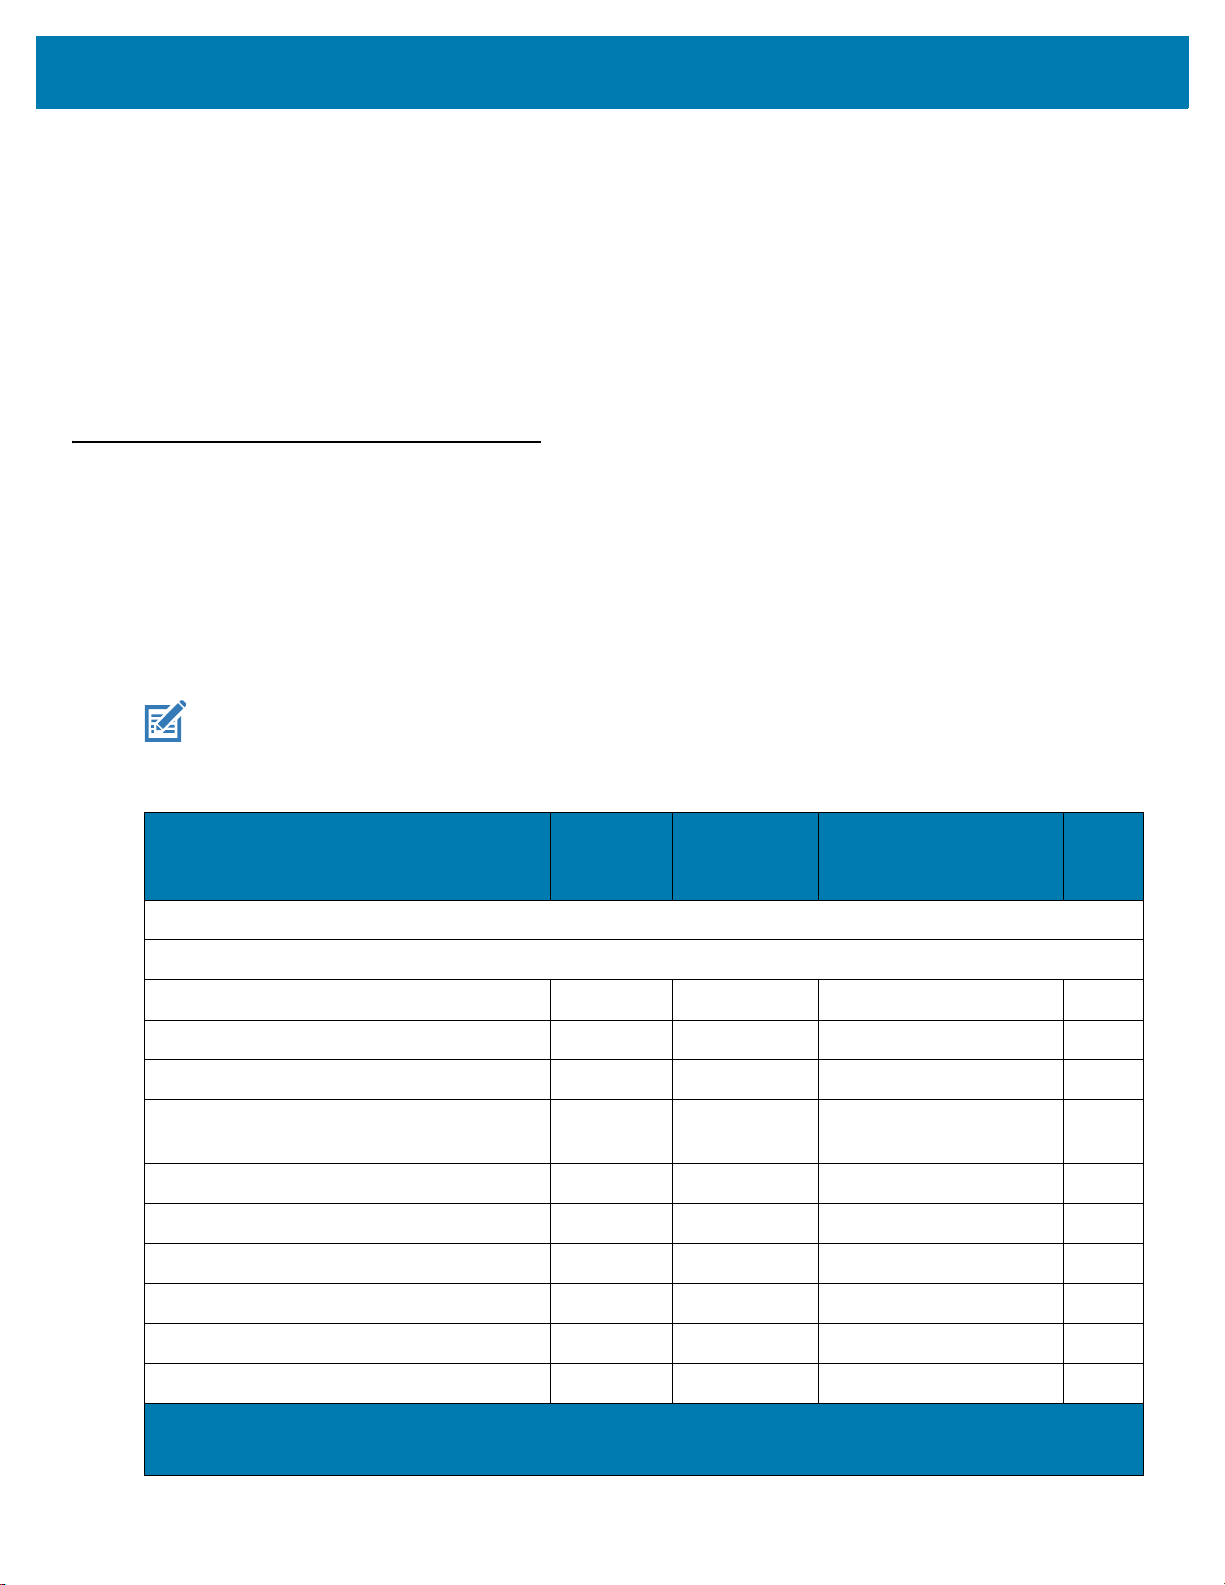
Revision History
Changes to the original guide are listed below:
Change Date Description
-01 Rev A 5/2019 Initial Release
3
Page 4

Table of Contents
Copyright ........................................................................................................................................... 2
For Australia Only ....................................................................................................................... 2
Terms of Use .................................................................................................................................... 2
Revision History ................................................................................................................................ 3
About This Guide
Introduction ....................................................................................................................................... 9
Configurations ................................................................................................................................... 9
Accessories ..................................................................................................................................... 10
Chapter Descriptions ...................................................................................................................... 11
Notational Conventions ................................................................................................................... 11
Related Documents and Software .................................................................................................. 12
Service Information ......................................................................................................................... 12
Getting Started
Introduction ..................................................................................................................................... 13
DS9908R for Retail ................................................................................................................... 13
DS9908R for Labs ..................................................................................................................... 13
Unpacking ....................................................................................................................................... 13
Interfaces ........................................................................................................................................ 14
Features .......................................................................................................................................... 14
Setting Up the Imager ..................................................................................................................... 15
Inserting the Interface Cable ..................................................................................................... 15
Removing the Interface Cable ................................................................................................... 16
Data Capture
Introduction ..................................................................................................................................... 17
Reading RFID Tags ........................................................................................................................ 17
Hands-Free RFID ...................................................................................................................... 17
Hand-Held RFID ........................................................................................................................ 18
RFID Reading Recommendations ............................................................................................ 18
Speaker and LED Indicators ........................................................................................................... 19
RFID Read Ranges ......................................................................................................................... 19
4
Page 5

Table of Contents
RFID User Preferences
Introduction ..................................................................................................................................... 20
Setting Parameters ......................................................................................................................... 20
Scanning Sequence Examples ................................................................................................. 21
Errors While Scanning .............................................................................................................. 21
RFID User Preferences Parameter Defaults ................................................................................... 21
RFID User Preferences ................................................................................................................... 22
Multifunction Mode Triggering ................................................................................................... 22
Trigger A ............................................................................................................................. 23
Trigger B ............................................................................................................................. 23
Host Triggering .......................................................................................................................... 24
RFID Beeper Tone .................................................................................................................... 24
Standard Beep Tones ......................................................................................................... 25
Special Tones ..................................................................................................................... 26
RFID Same Tag Timeout .......................................................................................................... 27
RFID Automatic Presentation Mode .......................................................................................... 29
RFID Trigger Mode ................................................................................................................... 30
RFID Cache Management ........................................................................................................ 31
RFID Data Transmission Format .............................................................................................. 31
Examples ............................................................................................................................ 33
RFID Transmit Raw with PC Bytes ........................................................................................... 36
RFID Transmit Unknown Tag Data ........................................................................................... 37
RFID Antenna Selection ............................................................................................................ 37
RFID Antenna Power in Hand-Held Mode ................................................................................ 38
RFID Antenna Power in Hands-Free Mode .............................................................................. 40
RFID Hands-Free Idle Timeout ................................................................................................. 42
RFID Country of Operation ....................................................................................................... 44
Maintenance, Technical Specifications, Troubleshooting
Introduction ..................................................................................................................................... 64
Maintenance ................................................................................................................................... 64
Known Harmful Ingredients ....................................................................................................... 64
Approved Cleaners for the Scanner .......................................................................................... 64
Cleaning the Scanner ................................................................................................................ 65
Troubleshooting .............................................................................................................................. 65
Technical Specifications for the DS9908R ...................................................................................... 66
5
Page 6

Table of Contents
RFID Non-Parameter Attributes
Introduction ..................................................................................................................................... 68
Attributes ......................................................................................................................................... 68
RFID LAST TAG ID ................................................................................................................... 68
RFID TAG ID ............................................................................................................................. 68
RFID BANK ............................................................................................................................... 69
RFID DATA ............................................................................................................................... 69
RFID OFFSET ........................................................................................................................... 69
RFID LENGTH .......................................................................................................................... 69
RFID PASSWORD .................................................................................................................... 70
RFID COMMAND ...................................................................................................................... 70
RFID CMD STATUS ................................................................................................................. 70
Index
6
Page 7

List of Figures
Figure 1. Parts of the Imager. . . . . . . . . . . . . . . . . . . . . . . . . . . . . . . . . . . . . . . . . . . . . . . . . . . . . . . . . . . . . . . . . . 14
Figure 2. Inserting the Cable . . . . . . . . . . . . . . . . . . . . . . . . . . . . . . . . . . . . . . . . . . . . . . . . . . . . . . . . . . . . . . . . . .15
Figure 3. Removing the Cable. . . . . . . . . . . . . . . . . . . . . . . . . . . . . . . . . . . . . . . . . . . . . . . . . . . . . . . . . . . . . . . . . 16
Figure 4. RFID in Hands-Free Mode . . . . . . . . . . . . . . . . . . . . . . . . . . . . . . . . . . . . . . . . . . . . . . . . . . . . . . . . . . . .17
Figure 5. RFID in Hand-Held Mode . . . . . . . . . . . . . . . . . . . . . . . . . . . . . . . . . . . . . . . . . . . . . . . . . . . . . . . . . . . . . 18
Figure 6. Trigger Locations . . . . . . . . . . . . . . . . . . . . . . . . . . . . . . . . . . . . . . . . . . . . . . . . . . . . . . . . . . . . . . . . . . . 22
7
Page 8

List of Tables
Table 1. DS9908R Configurations for Retail . . . . . . . . . . . . . . . . . . . . . . . . . . . . . . . . . . . . . . . . . . . . . . . . . . . . . . . 9
Table 2. DS9908R Configurations for Labs. . . . . . . . . . . . . . . . . . . . . . . . . . . . . . . . . . . . . . . . . . . . . . . . . . . . . . .10
Table 3. DS9908R Accessories. . . . . . . . . . . . . . . . . . . . . . . . . . . . . . . . . . . . . . . . . . . . . . . . . . . . . . . . . . . . . . . . 10
Table 4. Imager Speaker and LED Indications . . . . . . . . . . . . . . . . . . . . . . . . . . . . . . . . . . . . . . . . . . . . . . . . . . . .19
Table 5. RFID User Preferences Parameter Defaults . . . . . . . . . . . . . . . . . . . . . . . . . . . . . . . . . . . . . . . . . . . . . . . 21
Table 6. GS1-128 Transmission Details by EPC Tag Type . . . . . . . . . . . . . . . . . . . . . . . . . . . . . . . . . . . . . . . . . . 32
Table 7. EPC-URI Transmission Details by EPC Tag Type . . . . . . . . . . . . . . . . . . . . . . . . . . . . . . . . . . . . . . . . . .33
Table 8. Transmission Format Examples . . . . . . . . . . . . . . . . . . . . . . . . . . . . . . . . . . . . . . . . . . . . . . . . . . . . . . . .33
Table 9. Antenna Power (dBM) in Hand-Held Mode - EU . . . . . . . . . . . . . . . . . . . . . . . . . . . . . . . . . . . . . . . . . . . .38
Table 10. Antenna Power (dBM) in Hand-Held Mode - NA . . . . . . . . . . . . . . . . . . . . . . . . . . . . . . . . . . . . . . . . . . .38
Table 11. Antenna Power (dBM) in Hands-Free Mode - EU . . . . . . . . . . . . . . . . . . . . . . . . . . . . . . . . . . . . . . . . . .40
Table 12. Antenna Power (dBM) in Hands-Free Mode - NA . . . . . . . . . . . . . . . . . . . . . . . . . . . . . . . . . . . . . . . . . .40
Table 13. Region Support . . . . . . . . . . . . . . . . . . . . . . . . . . . . . . . . . . . . . . . . . . . . . . . . . . . . . . . . . . . . . . . . . . . .60
Table 14. Troubleshooting. . . . . . . . . . . . . . . . . . . . . . . . . . . . . . . . . . . . . . . . . . . . . . . . . . . . . . . . . . . . . . . . . . . .65
Table 15. Technical Specifications . . . . . . . . . . . . . . . . . . . . . . . . . . . . . . . . . . . . . . . . . . . . . . . . . . . . . . . . . . . . . 66
Table 16. RFIDCmdStatus Definitions. . . . . . . . . . . . . . . . . . . . . . . . . . . . . . . . . . . . . . . . . . . . . . . . . . . . . . . . . . . 70
8
Page 9
About This Guide
Introduction
The DS9908R Hands-Free Imaging Scanner Product Reference Guide Supplement provides the unique reading
and programming procedures for the DS9908R (DS9908 with RFID) imager. This guide is intended as an
addendum to the DS9908 Hands-Free Imaging Scanner Product Reference Guide, p/n MN-003185-xx. Refer to
the Product Reference Guide for information and procedures common to the DS9900 Series of imagers.
IMPORTANT: RFID CANNOT operate until you scan an RFID Country of Operation on page 44. This is the
country in which the product is used.
Configurations
This guide covers the configurations listed in Tab le 1 and Table 2.
NOTE: The DS9908R is not available in all countries. Contact your local Zebra representative regarding availability
in your region.
Table 1 DS9908R Configurations for Retail
Configuration Description
DS9908-DLR0004ZCUS Presentation Area Imager, Standard Range with DL Parsing,
Corded, RFID, Midnight Black, Checkpoint EAS, 902-928 MHZ
DS9908-DLR0004ZZUS Presentation Area Imager, Standard Range with DL Parsing,
Corded, RFID, Midnight Black, 902-928 MHZ
DS9908-SRR0004ZCUS Presentation Area Imager, Standard Range, Corded, RFID,
Midnight Black, Checkpoint EAS, 902-928 MHZ
DS9908-SRR0004ZZIN Presentation Area Imager, Standard Range, Corded, RFID,
Midnight Black, India Only
DS9908-SRR0004ZZEU
DS9908-SRR0004ZZIL
Presentation Area Imager, Standard Range, Corded, RFID,
Midnight Black, 865 – 868 MHZ
Presentation Area Imager, Standard Range, Corded, RFID,
Midnight Black, Israel Only
TAA
Compliant
No
No
No
No
No
No
9
Page 10
About This Guide
Table 1 DS9908R Configurations for Retail (Continued)
Configuration Description
DS9908-SRR0004ZZJP
DS9908-SRR0004ZZUS Presentation Area Imager, Standard Range, Corded, RFID,
DS9908-TTR0004ZZJP
DS9908-SRR0004ZTUS Presentation Area Imager, Standard Range, Corded, RFID,
Table 2 DS9908R Configurations for Labs
Configuration Description
DS9908-HD5000WZTUS Presentation Area Imager, High Density, Corded, RFID, White
DS9908-HD5000WZZUS Presentation Area Imager, High Density, Corded, RFID, White
DS9908-HL5000WZZUS Presentation Area Imager, High Density with DL Parsing, Corded,
Presentation Area Imager, Standard Range, Corded, RFID,
Midnight Black, Japan Only
Midnight Black, 902-928 MHZ
Presentation Area Imager, Standard Range With Toshiba TEC,
Corded, RFID, Midnight Black, Japan Only
Midnight Black, 902-928 MHZ
Illumination, Alpine White, 902-928 MHZ
Illumination, Alpine White, 902-928 MHZ
RFID, White Illumination, Alpine White, 902-928 MHZ
TAA
Compliant
No
No
No
Yes
TAA
Compliant
Yes
No
No
Accessories
NOTE: Check Solution Builder for additional information regarding all available accessories, and the latest available
The imager ships with the DS9908R Quick Start Guide. The following required accessories must be ordered:
• Interface cable for the appropriate interface. For example, a shielded connector cable when connecting via
USB.
• Universal power supply, if the interface requires this.
The product configurations related to the DS9908R imager are listed in Table 3.
Table 3 DS9908R Accessories
Product Type Part Number Description
Cables For information about cables, cable compatibility, and the full list of supported cables go to the
configurations.
IMPORTANT: If you already have existing non shielded cables from legacy products they can be reused.
However, be aware that the shielded cables provide improved ESD performance.
Zebra Partner Portal at:
https://partnerportal.zebra.com/PartnerPortal/product_services/downloads_z/barcode_scann
ers/Universal-Cable-Guide-Bar-Code-Scanners.xlsx.
10
Page 11

Table 3 DS9908R Accessories (Continued)
Product Type Part Number Description
Power Supplies
(if required)
PWR-WUA5V4W0US Power Supply, 5VDC, 100 - 240VAC, US/CA/MX/JP/TW
PWR-WUA5V4W0BR Power Supply, 5VDC, 100 - 240VAC, KR (Korea)
PWR-WUA5V4W0EU Power Supply, 5VDC, 100 - 240VAC, EU/UK
PWR-WUA5V4W0CN Power Supply, 5VDC, 100 - 240VAC, CN
PWR-WUA5V4W0AU Power Supply, 5VDC, 100 - 240VAC, HK/AU
Chapter Descriptions
Topics covered in this guide are as follows:
• Getting Started provides a product overview, unpacking instructions, and cable connection information.
• Data Capture describes parts of the RFID imager, beeper and LED definitions, and how to use the imager
to read tags.
• RFID User Preferences describes RFID preference features and provides programming barcodes for
selecting these features.
• Maintenance, Technical Specifications, Troubleshooting provides information on how to care for the RFID
imager, troubleshooting, and technical specifications.
• RFID Non-Parameter Attributes defines non-parameter attributes and how to use them for DS9908R
readers.
• Numeric Barcodes includes the numeric barcodes to scan for parameters requiring specific numeric
values.
• Parameter Defaults includes the defaults for all RFID parameters.
About This Guide
Notational Conventions
The following conventions are used in this document:
• ‘DS9908R’ refers to the DS9908 imager with RFID reading capability.
• Bold text is used to highlight the following:
• Dialog box, window and screen names
• Drop-down list and list box names
• Check box and radio button names
• Icons on a screen
• Key names on a keypad
• Button names on a screen.
• Bullets (•) indicate:
• Action items
• Lists of alternatives
• Lists of required steps that are not necessarily sequential.
• Sequential lists (e.g., those that describe step-by-step procedures) appear as numbered lists.
11
Page 12

About This Guide
Related Documents and Software
The following documents provide more information about the DS9900 Series imager.
• DS9908 Hands-Free Imaging Scanner Product Reference Guide, p/n MN-003185-xx - provides detailed
setup and programming information for the DS9908 imager.
• DS9908 Quick Start Guide, p/n MN-003189-xx, provides general information for getting started with the
DS9908 imager, and includes basic set up and operation instructions.
• DS9908R Quick Start Guide, p/n MN-003342-xx - provides general information for getting started with the
DS9908R imager, and includes basic set up and operation instructions.
• Advanced Data Formatting Programmer Guide, p/n 72E-69680-xx - provides information on ADF, a means
of customizing data before transmission to a host.
• Multicode Data Formatting and Preferred Symbol (MDF) User Guide, p/n MN-002895-xx, provides
programming instructions for using MDF and Preferred Symbol on the DS9908 and DS9908R imagers.
• Plural Stage Programmer’s Guide, p/n 72E-67113-xx, provides the barcodes necessary to program the
DS9908 and DS9908R imagers to decode Plural Stage barcodes and enable Supplemental Recognition
Characters.
• Toshiba TEC Programmer’s Guide, p/n MN-002707-xx, provides the barcodes necessary to program the
DS9908 and DS9908R imagers for the Toshiba TEC host.
For the latest version of this guide and all guides, go to: zebra.com/support
Service Information
If you have a problem with your equipment, contact Zebra Global Customer Support for your region. Contact
information is available at: zebra.com/support
When contacting support, please have the following information available:
• Serial number of the unit
• Model number or product name
• Software type and version number.
Zebra responds to calls by email, telephone or fax within the time limits set forth in support agreements.
If your problem cannot be solved by Zebra Customer Support, you may need to return your equipment for servicing
and will be given specific directions. Zebra is not responsible for any damages incurred during shipment if the
approved shipping container is not used. Shipping the units improperly can possibly void the warranty.
If you purchased your Zebra business product from a Zebra business partner, contact that business partner for
support.
.
.
Provide Documentation Feedback
If you have comments, questions, or suggestions about this guide, send an email to EVM-Techdocs@zebra.com.
12
Page 13

Getting Started
Introduction
The DS9908R builds off the DS9908 with the addition of an integrated UHF RFID reader/writer.
The DS9908R combines superior 1D and 2D barcode scanning, advanced imaging applications and superior RFID
tag reading and transfer in a light-weight, hands-free/hand-held design. Its unique design offers the performance of
a hands-free presentation imager and the flexibility of a hand-held. The DS9808R automatically switches between
hands-free and hand-held modes seamlessly accommodating both presentation and hand-held triggered
operation.
DS9908R for Retail
If you are already benefiting from RFID in your supply chain, you can close the RFID loop by capturing
RFID-tagged merchandise at the POS with the RFID model. Checkouts are easier than ever, since associates can
scan multiple items at once without line of sight. Capturing RFID tags provides the real-time inventory visibility
needed for timely re-ordering and trending analysis.
In addition to reading RFID tags to complete a purchase, the DS9908R is capable of writing data to RFID tags enabling staff to quickly commission tags on new inventory items and returned goods for faster processing.
DS9908R for Labs
Keep patients safe and avoid rising costs through effective lab management.
• Enhance productivity and work flow efficiency by enabling staff to spend more time on analysis and less
time on capturing data.
• Improve patient safety by reducing the risk of misidentifying a sample.
• Improve traceability on time-sensitive blood samples by knowing when a sample was taken and when it is
no longer usable.
Unpacking
Remove the imager from its packing and inspect it for damage. If the imager was damaged in transit, contact the
Zebra Global Customer Support Center. See Service Information on page 12 for contact information. KEEP THE
PACKING. It is the approved shipping container; use this to return the equipment for servicing.
13
Page 14
Interfaces
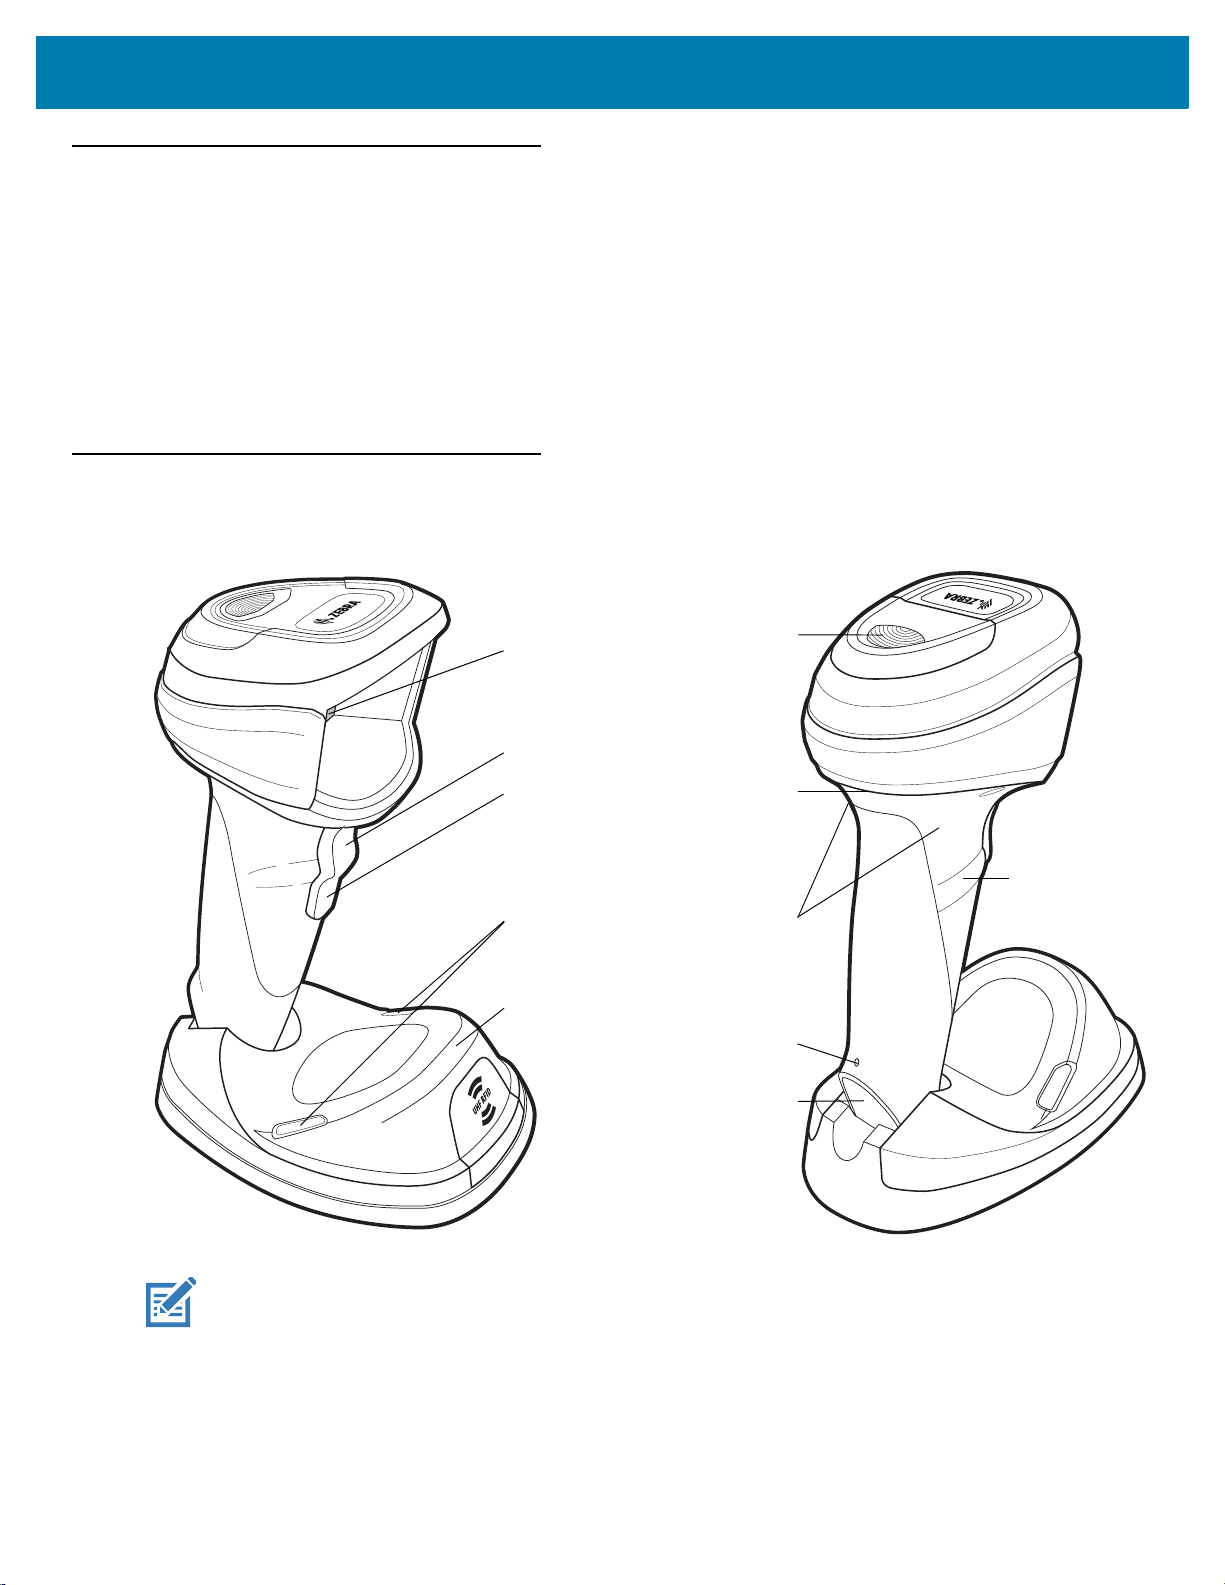
Scan
Window
Trigger
A
Trigger
B
Speaker
Interface Cable
Port
Hand-held Touch
Zones
(Toggle Between
Hand-held and
Hands-free Modes)
Cable release
opening
(pinhole)
Finger Ridge
RFID LEDs
RFID
Antenna
Scan LED
The DS9908R imager supports the following host interfaces. Refer to the DS9908 Hands-Free Imaging Scanner
Product Reference Guide (p/n MN-003185-xx) for information about connecting host interfaces.
• USB
• Standard RS-232
• IBM 468X/469X
• Keyboard Wedge
• Simple Serial Interface (SSI) (RFID configuration only)
Features
Figure 1 Parts of the Imager
Getting Started
NOTE: The hand-held touch zones are touch sensitive areas that enable the imager to determine if it is sitting on the
counter or picked up by the user. To activate the touch zones, fingers must be placed in the zone above the
finger ridges on both sides of the imager. See Figure 5 on page 18 for proper finger placement.
14
Page 15
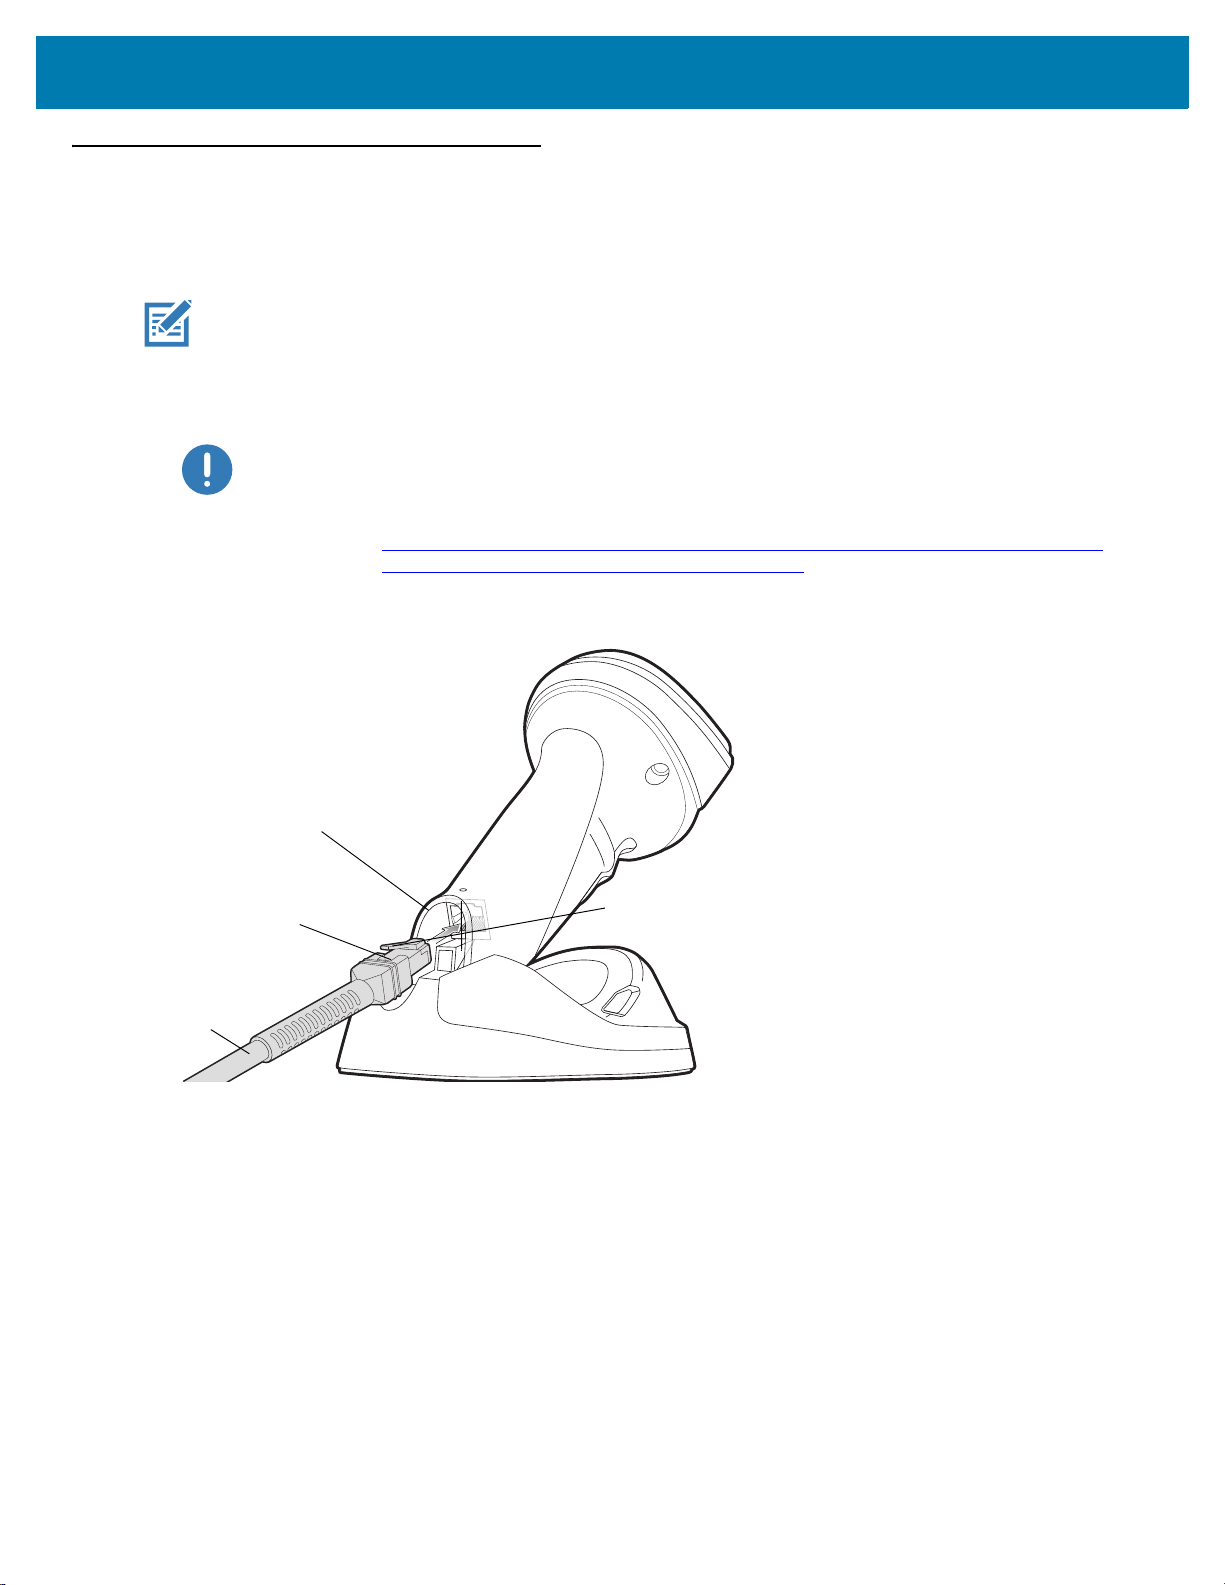
Setting Up the Imager
To host
Interface cable port
Interface cable
modular connector
Clip
Inserting the Interface Cable
NOTE: Different hosts require different cables. The connectors illustrated in each host chapter are examples only.
Connectors vary from those illustrated, but the steps to connect the imager are the same.
1. Plug the interface cable modular connector into the cable interface port on the bottom of the imager handle
(see Figure 2). It is recommended to rotate/ratchet the imager all the way forward and then insert the cable.
IMPORTANT: If you already have existing non shielded cables from legacy products (such as the DS9808)
they can be reused. However, be aware that the shielded cables provide improved ESD
performance. For information about cables and cable compatibility, go to the Zebra Partner
Portal at:
https://partnerportal.zebra.com/PartnerPortal/product_services/downloads_z/barcode_scan
ners/Universal-Cable-Guide-Bar-Code-Scanners.xlsx.
Figure 2 Inserting the Cable
Getting Started
2. Gently tug the cable to ensure the connector is secure.
3. Connect the other end of the interface cable to the host (see the specific host chapter for information on host
connections).
15
Page 16
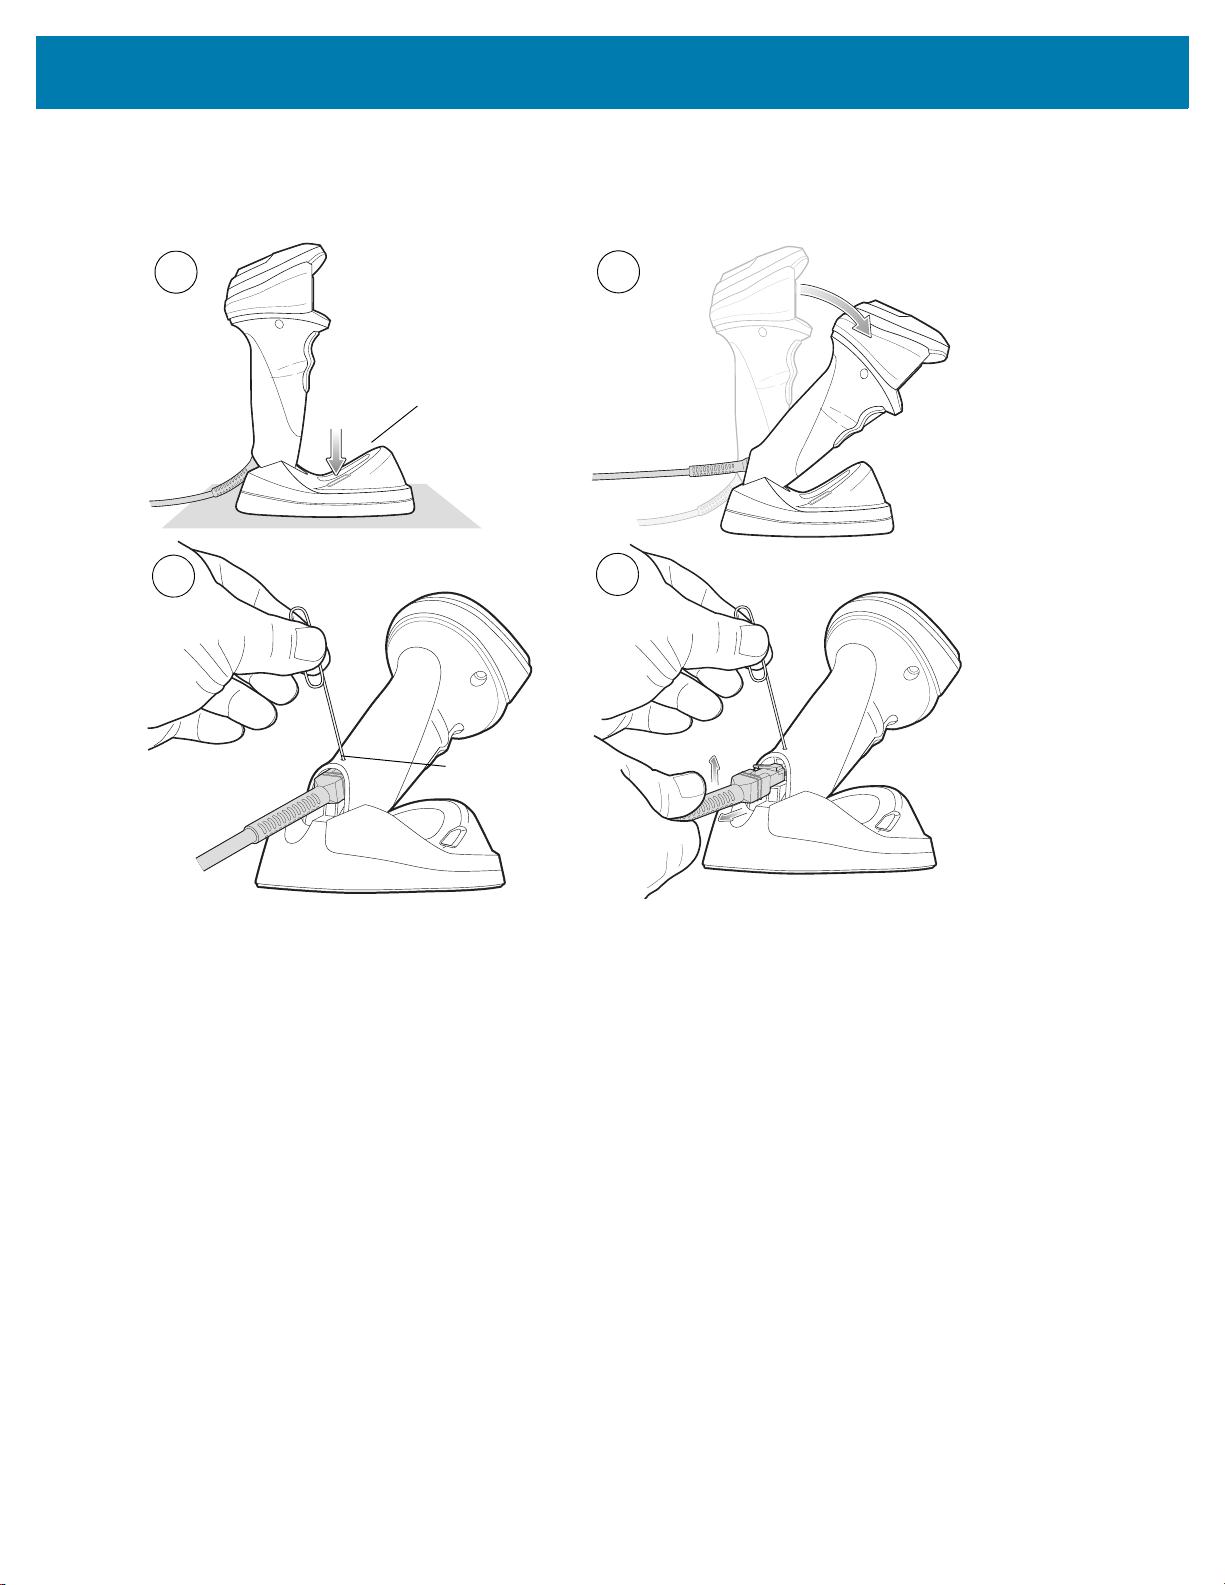
Removing the Interface Cable
1
2
4
3
Flat surface
Cable release
opening (pinhole)
Figure 3 Removing the Cable
Getting Started
1. Place the imager on a flat surface.
2. Ratchet the imager all the way forward.
3. Insert a paper clip into the circular cable release opening (pinhole) to compress the modular connector clip.
4. Pull the cable/connector UP and OUT of the connection and carefully slide out the cable.
5. Follow the steps for Inserting the Interface Cable
to connect a new cable.
16
Page 17
Data Capture
Introduction
This chapter provides beeper and LED definitions, and techniques involved in reading RFID tags.
Reading RFID Tags
NOTE: The top surface of the imager base may feel slightly warm. This is normal and does not indicate a
problem.
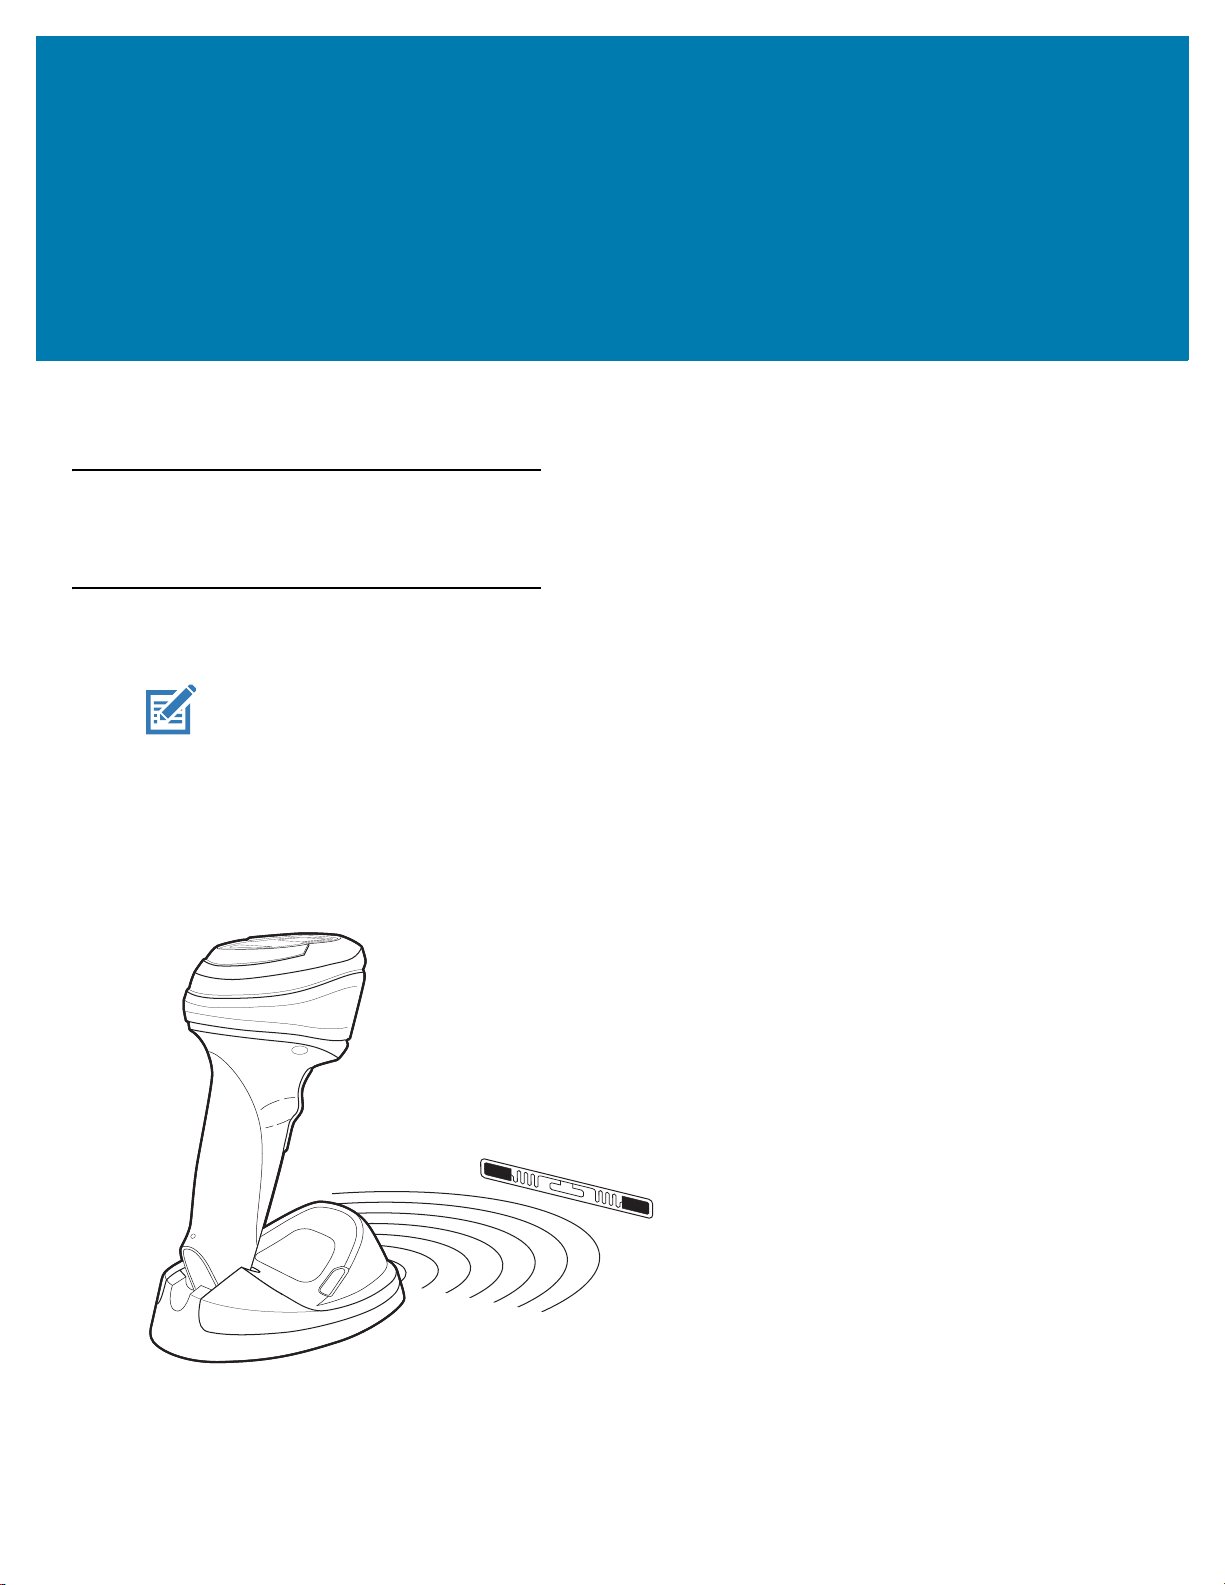
Hands-Free RFID
The imager is in
(constant-on) mode by default, where it automatically reads RFID tags within the radio frequency (RF) field of view.
Figure 4 RFID in Hands-Free Mode
The imager beeps and the RFID LED momentarily turns off upon a tag read.
hands-free mode
when it sits on a counter-top. In this mode, the imager operates in continuous
If the imager does not observe any new RFID tags within the RFID Hands-Free Idle Timeout on page 42, it reduces
power consumption by polling for tags once a second.
17
Page 18
Data Capture
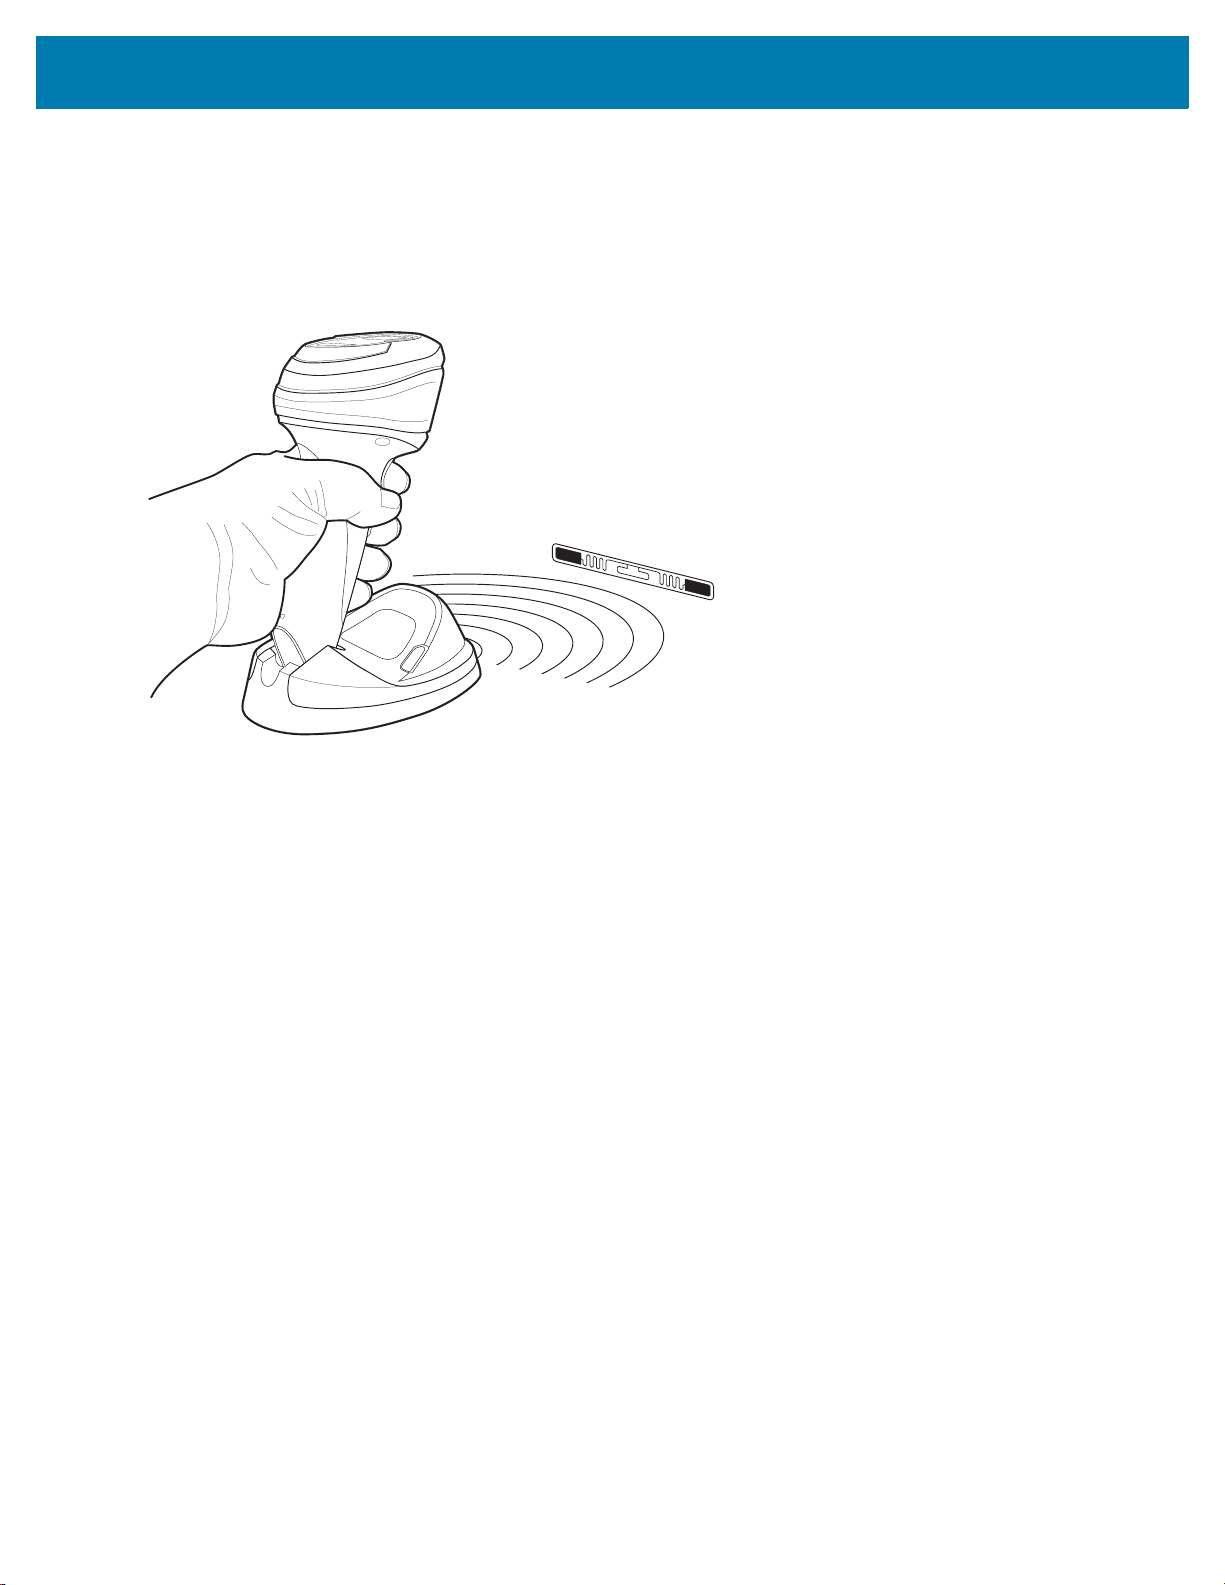
Hand-Held RFID
In hand-held mode, there are two trigger switches for multifunction triggering. Scan the appropriate barcode to set
the trigger mode (see Multifunction Mode Triggering on page 22). Press the appropriate trigger to scan a barcode
or to read all RFID tags within the RF field of view. Release the trigger to stop reading tags.
Figure 5 RFID in Hand-Held Mode
The imager beeps and the RFID LED momentarily turns off upon a tag read.
RFID Reading Recommendations
• When holding the imager, don’t allow your fingers to get any closer to the antenna structure (in the base)
than necessary. This can shield the tag from the RFID reader and reduce performance.
• When reading multiple items, it is highly recommended to pass one item at a time past the imager. While
you can pass many items at a time by the imager, it can be difficult to correlate multiple beeps to multiple
items at once and errors can occur.
• Use care when reading metal items. The metals can reduce tag read range or in some cases shield the tag
from the reader. Always correlate the read beep with the item the imager is reading (as with barcode
scanning).
• Never hold the RFID tag of the item the imager is reading. Instead, hold the item and let the tag hang free.
• Orient the tag toward the imager if it has difficulty reading the tag. Waving often helps.
• If all else fails, scan the item’s barcode.
18
Page 19
Speaker and LED Indicators
NOTE: Refer to the DS9908 Hands-Free Imaging Scanner Product Reference Guide, p/n MN-003185-xx, for
the complete imager speaker and LED indications table that includes beeper and LED indications for
standard use, image capture, parameter programming, host specific, and more.
In addition to beep sequences, the DS9908R uses a two-color LED in the head of the imager for barcode decode
indications and two additional two-color LEDs in the base for the tag reading (RFID) indications. The LEDs in the
base are synchronized and show the same information at the same time.
The imager uses a two-color LED to indicate status. One LED indicator is for system/decode indications and one is
for RFID indications.
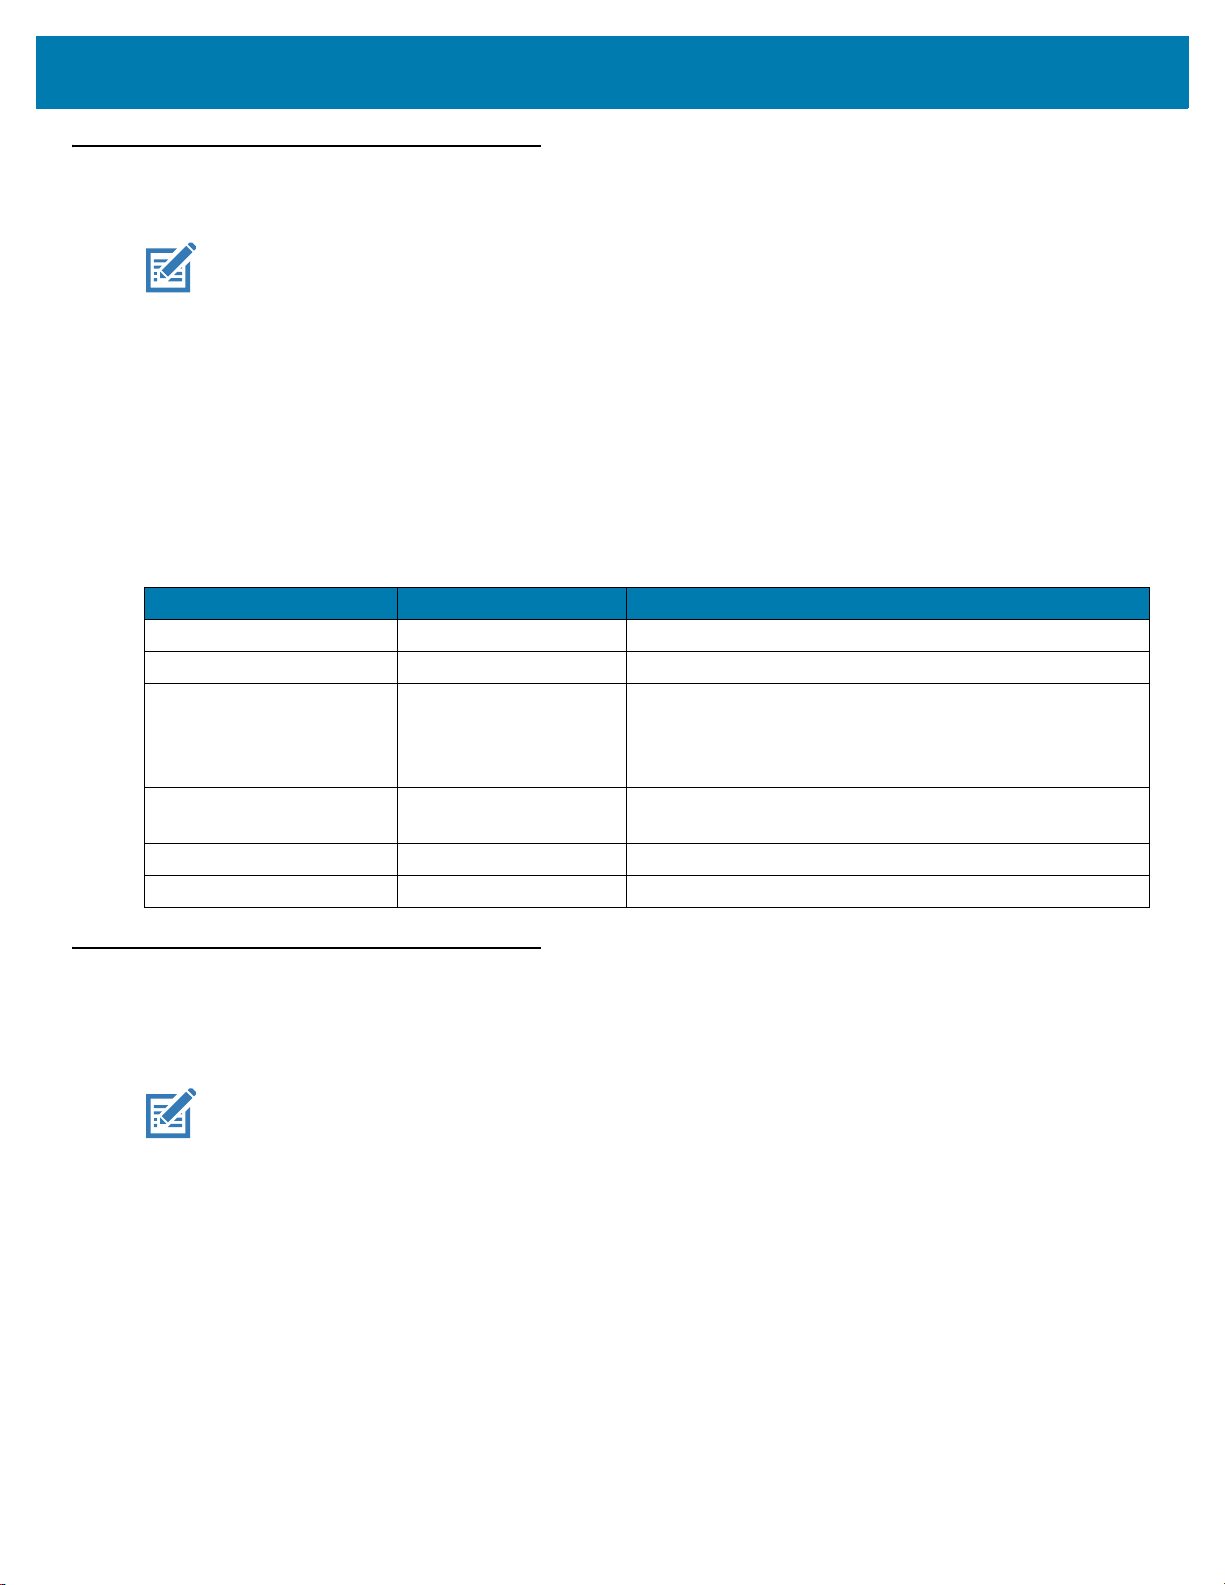
Table 4 defines the beep sequences and LED indicators for the DS9908R.
Table 4 Imager Speaker and LED Indications
Speaker Sequence RFID LED Indication
None Green (solid) LED on when RFID is active.
None Green (slow blinking) The reader is polling for new tags.
Medium/high (two tone)
beeps
High/medium/low/low
beeps
None Short red blink RFID module is not ready.
None Solid red RFID Country of Operation is not configured.
The Green LED flashes
off momentarily when
an RFID tag is
read/reported.
Long red blink Unexpected RFID indication or RFID error.
Data Capture
An RFID tag was read/reported (if RFID read speaker is
enabled).
RFID Read Ranges
For all configurations of the DS9908R device the nominal read range is programmable up to ~18 in / ~45.7 cm.
NOTE: Several factors affect the read range of a passive ultrahigh-frequency (UHF) RFID system including the
tag antenna's size and design, the amount of cable loss (a long cable between a reader and an antenna
causes a loss of transmission energy) and environmental conditions, such as the presence of water or
metal.
19
Page 20

RFID User Preferences
*Enable Parameter
(1)
Feature/option
* Indicates default
Option value
Introduction
You can program the RFID reader to perform various functions, or activate different features. This chapter
describes user preference features and provides programming barcodes for selecting these features for RFID
models.
The reader ships with the settings shown in Table 5 on page 21 (also see Parameter Defaults for all defaults). If the
default values suit requirements, programming is not necessary.
Setting Parameters
To set feature values, scan a single barcode or a short barcode sequence. The settings are stored in non-volatile
memory and are preserved even when the imager powers down.
NOTE: Most computer monitors allow scanning barcodes directly on the screen. When scanning from the screen,
be sure to set the document magnification to a level where you can see the barcode clearly, and bars and/or
spaces do not merge.
If not using the default host, select the host type from the DS9908 Hands-Free Imaging Scanner Product
Reference Guide (p/n MN-003185-xx) after the power-up beeps sound. This is only necessary upon the first
power-up when connected to a new host.
To return all features to default values, see Parameter Defaults. Throughout the programming barcode menus,
asterisks indicate (
*) default values.
20
Page 21
RFID User Preferences
Scanning Sequence Examples
In most cases, scanning one barcode sets the parameter value. For example, to set the RFID beeper tone to high,
scan the High Tone (beeper tone) barcode listed under RFID Beeper Tone on page 24. The reader issues a fast
warble beep and the LED turns green, signifying a successful parameter entry.
Other parameters require scanning several barcodes. See the parameter descriptions for this procedure.
Errors While Scanning
Unless otherwise specified, to correct an error during a scanning sequence, just re-scan the correct parameter.
RFID User Preferences Parameter Defaults
Table 5 lists defaults for RFID user preferences parameters. Change these values in one of two ways:
• Scan the appropriate barcodes in this chapter. The new value replaces the standard default value in
memory. To recall default parameter values, see Parameter Defaults.
• Configure the imager using the 123Scan
Scanner Product Reference Guide (p/n MN-003185-xx) for 123Scan information.
configuration program. Refer to the DS9908 Hands-Free Imaging
NOTE: See Parameter Defaults for all user preference, host, symbology, and miscellaneous default parameters.
Table 5 RFID User Preferences Parameter Defaults
Parameter
RFID User Preferences
Multifunction Triggering
Trigger A 631 F1h 77h Imager Decoding 23
Trigger B 632 F1h 78h RFID Reading 23
Host Triggering 636 F1h 7Ch Imager Decoding 24
RFID Beep Tone 639 F1h 7Fh Medium to High Tone
RFID Same Tag Timeout 640 F1h 80h 2 Seconds 27
RFID Automatic Presentation Mode 641 F1h 81h Hands-Free Only 29
RFID Trigger Mode 642 F1h 82h Continuous Re-Report 30
Parameter
Number
1
SSI
Number
2
Default
(2-Tone)
Page
Numb
er
24
RFID Cache Management 1965 F8h 07h ADh Flush by Group 31
RFID Data Transmission Format 643 F1h 83h Raw 31
RFID Transmit Raw with PC Bytes 714 F1h CAh Disable 36
1. Parameter number decimal values are used for programming via RSM commands.
2. SSI number hex values are used for programming via SSI commands.
21
Page 22

RFID User Preferences
Trigger A
Trigger B
Table 5 RFID User Preferences Parameter Defaults (Continued)
Parameter
RFID Transmit Unknown Tag Data 709 F1h C5h Transmit 37
RFID Antenna Selection 710 F1h C6h Both 37
RFID Antenna Power in Hand-Held Mode 711 F1h C7h Level 7 38
RFID Antenna Power in Hands-Free Mode 712 F1h C8h Level 4 40
RFID Hands-Free Idle Timeout 713 F1h C9h 5 Minutes 42
RFID Country of Operation 1583 F8h 06h 2Fh No Region Set 44
1. Parameter number decimal values are used for programming via RSM commands.
2. SSI number hex values are used for programming via SSI commands.
RFID User Preferences
Multifunction Mode Triggering
You can set trigger options for each of the imager's trigger positions. For example, set Trigger A to imager
decoding and set Trigger B to RFID reading.
Parameter
Number
1
SSI
Number
Page
2
Default
Numb
er
The default setting for Trigger A is imager decoding; the default for Trigger B is RFID reading.
Select one of the following functions for each trigger (A and B) using the barcodes on the next few pages:
• Imager Decoding - Programs the trigger to decode using the imager engine.
• RFID Reading - Programs the trigger to read RFID tags with the RFID engine.
• Imager Plus RFID - Programs the trigger to decode using the imager engine and read RFID tags with the
RFID engine.
Figure 6 Trigger Locations
22
Page 23
Trigger A
Parameter # 631
SSI # F1h 77h
*Imager Decoding
RFID User Preferences
(1)
RFID Reading
(2)
Imager Plus RFID
Trigger B
Parameter # 632
SSI # F1h 78h
Imager Decoding
(3)
(1)
*RFID Reading
(2)
Imager Plus RFID
(3)
23
Page 24

Host Triggering
Parameter # 636
SSI # F1h 7Ch
Set an option for host-initiated triggering:
• Imager Decoding - Programs the trigger for decoding using the imager engine.
• RFID Reading - Programs the trigger for reading RFID tags.
• Imager Plus RFID - A trigger pull attempts decode using the imager engine, and turns on the RFID reader
to read RFID tags.
RFID User Preferences
*Imager Decoding
(1)
RFID Reading
(2)
Imager Plus RFID
(3)
RFID Beeper Tone
Parameter # 639
SSI # F1h 7Fh
Scan one of the following barcodes to select a beep tone for audible feedback indicating a good decode. Select
from the Standard Beep Tones below or from the Special Tones on page 26.
Scan Disable Beep Tone below to disable all tones.
Disable Beep Tone
(3)
24
Page 25

Standard Beep Tones
Medium Tone
(1)
RFID User Preferences
Low Tone
(2)
*Medium to High Tone (2-Tone)
(4)
High Tone
(0)
25
Page 26

Special Tones
Wood Block / Tone 1
Chime / Tone 3
RFID User Preferences
(6)
Pulse / Tone 2
(7)
(8)
Triple Beep / Tone 5
(10)
Zap / Tone 4
(9)
User Programmable / Tone 6
(11)
Note: Refer to the DS9908 Hands-Free Imaging Scanner
Product Reference Guide to download a custom tone.
26
Page 27

RFID User Preferences
RFID Same Tag Timeout
Parameter # 640
SSI # F1h 80h
If the imager does not observe a group of tags within this timeout period, it removes the tags in the group from the
tag cache. If the imager later reads one of these tags, it reports this as a new tag.
Disable this timeout to report a tag every time the imager sees it. This option is typically used for testing, and
disables the tag cache, affecting both presentation and triggered operation.
Disable
(00h)
10 Seconds
(0Ah)
30 Seconds
(0Dh)
*2 Seconds
(02h)
15 Seconds
(0Bh)
27
1 Minute
(11h)
Page 28

RFID User Preferences
RFID Same Tag Timeout (continued)
5 Minutes
(15h)
15 Minutes
(1Bh)
1 Hour
(21h)
28
Page 29

RFID User Preferences
RFID Automatic Presentation Mode
Parameter # 641
SSI # F1h 81h
Select one of the following options to configure the imager to continuously read tags (presentation mode) when you
place the imager on the counter-top (hands-free), when you lift it (hand-held), or in both or neither situation. Note
that triggered operation always overrides presentation mode.
Disable
(00h)
Hand-Held Only
(02h)
*Hands-Free Only
(01h)
Always
(03h)
29
Page 30

RFID User Preferences
RFID Trigger Mode
Parameter # 642
SSI # F1h 82h
NOTE: To program the trigger for various functions, including RFID, see Multifunction Mode Triggering on page
22 and Host Triggering on page 24.
In hand-held operation, this parameter controls the behavior of a trigger programmed for RFID reading. When the
trigger is pulled, the tag cache is maintained so that the tags are not re-reported during presentation mode (if
enabled) after releasing the trigger. Each tag is reported once during a trigger session (while the trigger is pulled).
Key:
• Reading a tag - A tag is detected by the RFID antenna.
• Tag Cache - Scanner memory where tag data is temporarily stored after being read.
• Reporting a tag - The tag data is transmitted to the host.
Read types:
• Continuous - When the trigger is pulled the reader reads all tags within range and does not report tags
already read.
• Continuous Re-Report - When the trigger is pulled the reader reads all tags within range and reports each
tag once within this trigger session, regardless of whether it already reported it during a previous session.
• Continuous Flush - When the trigger is pulled the reader flushes the tag cache, reads all tags within range,
and reports them as new tags.
• Single Tag Read - When the trigger is pulled the reader reads and reports only one tag and reports this tag
once within this trigger session, regardless of whether it already reported it during a previous session.
Once a single tag is read, the trigger session is terminated. Only one tag is expected to be seen. If more
than one tag is present, an RFID error indication is given instead.
Continuous
(0)
Continuous Flush
(3)
*Continuous Re-Report
(2)
Single Tag
(1)
30
Page 31

RFID User Preferences
RFID Cache Management
Parameter #1965
SSI # F8h 07h ADh
When configured for Flush by Group, the cache is cleared after all the tags in the group leave the reading range
for the duration of the RFID Same Tag Timeout. When configured for Flush by Individual, the cache is cleared
after a single tag leaves the reading range for the duration for the RFID Same Tag Timeout.
* Flush by Group
(1)
Flush by Individual
(0)
RFID Data Transmission Format
Parameter # 643
SSI # F1h 83h
This parameter controls the format of the tag's EPC data sent after reading a new tag.
• Raw - the EPC buffer transmits as a hexadecimal string. This format can include the protocol control bytes.
• GS1-128 - for GS1 encoded tags, this option converts EPC data to a GS1-128 barcode (as per the GS1
EPC Tag Data Standard version 1.11 available at
www.gs1.org/standards/epcrfid-epcis-id-keys/epc-rfid-tds/1-11
www.gs1.org/sites/default/files/docs/epc/GS1_EPC_TDS_i1_11.pdf). Otherwise, the tag optionally
transmits in raw format or is ignored.
• EPC URI - the EPC data is represented as a Universal Resource Identifier (URI) as defined in the EPC
Tag Data Standard version 1.11.
See Table 6, Table 7, and Table 8 for transmission format details for the various tag types, and samples for each.
For more information, refer to EPC Tag Data Standard version 1.11.
or
31
Page 32

RFID User Preferences
RFID Data Transmission Format (continued)
*Raw
(00h)
GS1-128
(01h)
EPC URI
(02h)
Table 6 GS1-128 Transmission Details by EPC Tag Type
EPC Tag Type Transmission Format
GID N/A
SGTIN (01) GTIN (21) Serial Number
SSCC (00) SSCC
SGLN (414) GLN (254) GLN-Extension
GRAI (8003) GRAI Serial Number
GIAI (8004) GIAI Serial Number
GSRN (8018) GSRN - Recipient
GSNRP (8018) GSRN – Service Provider
GDTI (253) GDTI
CPI (8010) Company + Part (8011) Serial Number
SGCN (255) GCN Serial Number
ITIP (8006) GTIN Piece Total (21) Serial Number
US DoD N/A
ADI N/A
Unknown N/A
32
Page 33

RFID User Preferences
Table 7 EPC-URI Transmission Details by EPC Tag Type
EPC Tag Type Transmission Format
GID urn:epc:tag:gid-96:<generalMngr>.<objectClass>.<serno>
SGTIN-96 urn:epc:tag:sgtin-96:<filter>.<company>.<itemRef>.<serialNumber>
SGTIN-198 urn:epc:tag:sgtin-198:<filter>.<company>.<itemRef>.<serialNumber>
SSCC urn:epc:tag:sscc-96:<filter>.<companyPrefix>.<serialReference>
SGLN-96 urn:epc:tag:sgln-96:<filter>.<companyPrefix>.<locationReference>.<extention>
SGLN-195 urn:epc:tag:sgln-195:<filter>.<companyPrefix>.<locationReference>.<extention>
GRAI-96 urn:epc:tag:grai-96:<filter>.<companyPrefix>.<assetType>.<serialNumber>
GRAI-170 urn:epc:tag:grai-170:<filter>.<companyPrefix>.<assetType>.<serialNumber>
GIAI-96 urn:epc:tag:giai-96:<filter>.<companyPrefix>.<individulAssetReference>
GIAI-202 urn:epc:tag:giai-202:<filter>.<companyPrefix>.<individulAssetReference>
GSRN urn:epc:tag:gsrn-96:<filter>.<companyPrefix>.<serviceReference>
GSRNP urn:epc:tag:gsrnp-96:<filter>.<companyPrefix>.<serviceReference>
GDTI-96 urn:epc:tag:gdti-96:<filter>.<companyPrefix>.<documentType>.<serialNumber>
GDTI-174 urn:epc:tag:gdti-174:<filter>.<companyPrefix>.<documentType>.<serialNumber>
CPI-96 urn:epc:tag:cpi-96:<filter>.<companyPrefix>.<partReference>.<serialNumber>
CPI-VAR urn:epc:tag:cpi-var:<filter>.<companyPrefix>.<partReference>.<serialNumber>
SGCN-96 urn:epc:tag:sgcn-96:<filter>.<companyPrefix>.<coupontReference>.<serialNumber>
US DoD urn:epc:tag:usdod-96:<filter>.<govManagedID>.<serialNumber>
ADI-VAR urn:epc:tag:adi-var:<filter>.<govManagedID>.<partNumber>.<serialNumber>
ITIP-110
ITIP-212
Unknown urn:epc:tag:raw:BitLength.Value
Unknown (non-EPC) urn:epc:raw:BitLength.AFI.Value
urn:epc:tag:itip-110:<filter>.<companyPrefix>.<itemRef>.<piece>.<total>.<serialNumber>
urn:epc:tag:itip-212:<filter>.<companyPrefix>.<itemRef>.<piece>.<total>.<serialNumber>
Examples
Table 8 Transmission Format Examples
EPC Tag Type Format Example
GID Raw 3500004D20004D20000004D2
GS1-128 N/A
EPC-URI urn:epc:tag:gid-96:1234.1234.1234
Note: Parentheses appear in examples only for readability.
33
Page 34

RFID User Preferences
Table 8 Transmission Format Examples (Continued)
EPC Tag Type Format Example
SGTIN-96 Raw 3018789004B5A1C0499602D2
GS1-128 (01)11234562345675(21)1234567890
EPC-URI urn:epc:tag:sgtin-96:0.123456.1234567.1234567890
SGTIN-198 Raw 3674257BF6B7A659B2C2BF100000000000000000000000000000
GS1-128 (01) 70614141123451 (21) 32a/b
EPC-URI urn:epc:tag:sgtin-198:3.0614141.712345.32a%2Fb
SSCC Raw 310C75BCD150BC614E000000
GS1-128 (00)112345678923456787
EPC-URI urn:epc:tag:sscc-96:0.123456789.12345678
SGLN-96 Raw 320C0BC614E0180000003039
GS1-128 (414)0123456780125(254)12345
EPC-URI urn:epc:tag:sgln-96:0.012345678.012.12345
SGLN-195 Raw 3974257BF46072CD9615F8800000000000000000000000000
GS1-128 (414) 0614141123452 (254) 32a/b
EPC-URI urn:epc:tag:sgln-195:3.0614141.12345.32a%2Fb
GRAI-96 Raw 33180C0E400C0E4000003039
GS1-128 (8003)0012345012345412345
EPC-URI urn:epc:tag:grai-96:0.012345.012345.12345
GRAI-170 Raw 3774257BF40C0E59B2C2BF100000000000000000000
GS1-128 (8003) 0061414112345232a/b
EPC-URI urn:epc:tag:grai-170:3.0614141.12345.32a%2Fb
GIAI-96 Raw 3400001D6F345400075BCD15
GS1-128 (8004)000123456789123456789
EPC-URI urn:epc:tag:giai-96:0.000123456789.123456789
GIAI-202 Raw 3874257BF59B2C2BF10000000000000000000000000000000000
GS1-128 (8004) 061414132a/b
EPC-URI urn:epc:tag:giai-202:3.0614141.32a%2Fb
GSRN Raw 2D00001D6F345404D2000000
GS1-128 (8018)000123456789012343
EPC-URI urn:epc:tag:gsrn-96:0.000123456789.01234
Note: Parentheses appear in examples only for readability.
34
Page 35

RFID User Preferences
Table 8 Transmission Format Examples (Continued)
EPC Tag Type Format Example
GDTI-96 Raw 2C180C0E4060720000003039
GS1-128 (253)012345012345412345
EPC-URI urn:epc:tag:gdti-96:0.012345.012345.12345
GDTI-174 Raw 3E74F4E4E7039B061438997367D0C18B266D1AB66EE0
GS1-128 (253) 4012345987652ABCDefgh012345678
EPC-URI urn:epc:tag:gdti-174:3.4012345.98765.ABCDefgh012345678
CPI-96 Raw 3C74257BF400C0E680003039
GS1-128 (8010) 061414198765 (8011) 12345
EPC-URI urn:epc:tag:cpi-96:3.0614141.98765.12345
CPI-VAR Raw 3D74257BF75411DEF6B4CC00000003039
GS1-128 (8010) 06141415PQ7/Z43 (8011) 12345
EPC-URI urn:epc:tag:cpi-var:3.0614141.5PQ7%2FZ43.12345
SGCN-96 Raw 3F74F4E4E612640000019907
GS1-128 (255) 401234567890104711
EPC-URI urn:epc:tag:sgcn-96:3.4012345.67890.04711
US DoD Raw 2F0414243313233000003039
GS1-128 N/A
EPC-URI urn:epc:tag:usdod-96:0.ABC123.12345
ADI-VAR Raw 3B0E0CF5E76C9047759AD00373DC7602E7200
GS1-128 N/A
EPC-URI urn:epc:tag:adi-var:3.35962.PQ7VZ4.M37GXB92
ITIP-110 Raw 4074F4E4E40C0E40820000000F6C
GS1-128 (8006) 040123451234560102 (21) 987
EPC-URI urn:epc:tag:itip-110:3.4012345.012345.01.02.987
ITIP-212 Raw 4174F4E4E40C0E4082DBDD8B36600000000000000000000000000000
GS1-128 (8006) 040123451234560102 (21) mw133
EPC-URI urn:epc:tag:itip-212:3.4012345.012345.01.02.mw133
Unknown Raw 1234567890ABCDEF01234567
GS1-128 N/A
EPC-URI urn:epc:raw:96.x1234567890ABCDEF01234567
Note: Parentheses appear in examples only for readability.
35
Page 36

RFID User Preferences
Table 8 Transmission Format Examples (Continued)
EPC Tag Type Format Example
Unknown
(non-EPC)
Note: Parentheses appear in examples only for readability.
Raw with
PC Bytes
EPC-URI urn:epc:raw:96.x23.x1234567890ABCDEF00000002
31231234567890ABCDEF00000002
RFID Transmit Raw with PC Bytes
Parameter # 714
SSI # F1h CAh
When transmitting RFID tags in raw format, this parameter determines whether to include the Protocol Control
(PC) bytes of the EPC data. This is useful when reading non-EPC encoded tags. Refer to EPCglobal Tag Data
Standards Version 1.11 available at: www.gs1.org/standards/epcrfid-epcis-id-keys/epc-rfid-tds/1-11
www.gs1.org/sites/default/files/docs/epc/GS1_EPC_TDS_i1_11.pdf
, section 9.1 Gen 2 Tag Memory Map.
or
Enable
(01h)
*Disable
(00h)
36
Page 37

RFID User Preferences
RFID Transmit Unknown Tag Data
Parameter # 709
SSI # F1h C5h
When transmitting RFID tags in GS1-128 format, if the imager can not translate the tag (i.e., it is not GS1
encoded), it can either report the tag in raw format or ignore it.
Ignore
(0)
*Transmit in Raw Format
(1)
RFID Antenna Selection
Parameter # 710
SSI # F1h C6h
Use this parameter to select reading RFID tags using the horizontally oriented antenna, the vertically oriented
antenna, or both.
*Both
(0)
Horizontal
(1)
Vertical
(2)
37
Page 38

RFID User Preferences
RFID Antenna Power in Hand-Held Mode
Parameter # 711
SSI # F1h C7h
This parameter controls the antenna RF power when operated in hand-held mode. Table 9 and Table 10 list the
levels and the associated range as a percent of the baseline range. The baseline range is the range that results
when the power level is set to the maximum level of 7, and can vary depending on the environment, tag sensitivity,
and orientation.
v
Table 9 Antenna Power (dBM) in Hand-Held Mode - EU
Level Range (% of Baseline) Horizontal Power (dBm) Vertical Power (dBm)
113% 4 5
225% 6 7
338% 8 9
4 50% 11 11
5 63% 13 13
6 75% 15 16
*7 88% 18 18
8100% 21 21
* Hand-Held Default
Table 10 Antenna Power (dBM) in Hand-Held Mode - NA
Level Range (% of Baseline) Horizontal Power (dBm) Vertical Power (dBm)
1 13% 3 4
2 25% 5 6
3 38% 7 8
4 50% 10 10
5 63% 13 12
6 75% 15 14
*7 88% 17 16
8100% 22 21
* Hand-Held Default
NOTE: Baseline can vary depending on environment, tag sensitivity, and orientation.
38
Page 39

RFID User Preferences
RFID Antenna Power in Hand-Held Mode (continued)
Level 1
(1)
Level 3
(3)
Level 2
(2)
Level 5
(5)
*Level 7
(7)
Level 4
(4)
Level 6
(6)
39
Level 8
(8)
Page 40

RFID User Preferences
RFID Antenna Power in Hands-Free Mode
Parameter # 712
SSI # F1h C8h
This parameter controls the antenna RF power when operated in hands-free mode. Table 11 and Table 12 list the
levels and the associated range as a percent of the baseline range. The baseline range is the range that results
when the power level is set to the maximum level of 7, and can vary depending on the environment, tag sensitivity,
and orientation.
v
Table 11 Antenna Power (dBM) in Hands-Free Mode - EU
Level Range (% of Baseline) Horizontal Power (dBm) Vertical Power (dBm)
1 13% 4 5
2 25% 6 7
3 38% 8 9
*4 50% 11 11
5 63% 13 13
6 75% 15 16
7 88% 18 18
8100% 21 21
* Hands-Free Default
Table 12 Antenna Power (dBM) in Hands-Free Mode - NA
Level Range (% of Baseline) Horizontal Power (dBm) Vertical Power (dBm)
1 13% 3 4
2 25% 5 6
3 38% 7 8
*4 50% 10 10
5 63% 13 12
6 75% 15 14
7 88% 17 16
8100% 22 21
* Hands-Free Default
NOTE: Baseline can vary depending on environment, tag sensitivity, and orientation.
40
Page 41

RFID User Preferences
RFID Antenna Power in Hands-Free Mode (continued)
Level 1
(1)
Level 3
(3)
Level 2
(2)
Level 5
(5)
Level 7
(7)
*Level 4
(4)
Level 6
(6)
41
Level 8
(8)
Page 42

RFID User Preferences
RFID Hands-Free Idle Timeout
Parameter # 713
SSI # F1h C9h
This parameter sets the idle timeout in hands-free mode. If the imager does not observe any new RFID tags within
this timeout, it reduces power consumption by polling for tags once a second.
Disable
(0)
10 Seconds
(10)
30 Seconds
(13)
2 Seconds
(2)
15 Seconds
(11)
42
1 Minute
(17)
Page 43

RFID User Preferences
RFID Hands-Free Idle Timeout (continued)
*5 Minutes
(21)
15 Minutes
(27)
1 Hour
(33)
43
Page 44

RFID User Preferences
RFID Country of Operation
Parameter # 1583
SSI # F8h 06h 2Fh
IMPORTANT: RFID CANNOT operate until you scan a country of operation below. This is the country in
which the product is used.
For special fixed configuration, such as India, Japan, and Israel, this option does not need
to be configured (changes will be ignored).
The RFID reader could be configured to operate in various countries using the options below. By default, the
Country of Operation is set to No Region Set (0).
See Table 13 for the regions supported by each DS9908R configuration.
*No Region Set
(0)
Anguilla
(108)
American Virgin Islands
(56)
44
Argentina
(3)
Page 45

RFID User Preferences
RFID Country of Operation (Continued)
Australia
(4)
Austria
(62)
Bangladesh
(5)
Belarus
(105)
Barbados
(109)
Belgium
(65)
45
Page 46

RFID User Preferences
RFID Country of Operation (Continued)
Bosnia and Herzegovina
(8)
Bolivia
(7)
British Virgin Islands
(107)
Canada
(10)
Brazil
(9)
Bulgaria
(66)
46
Page 47

RFID User Preferences
RFID Country of Operation (Continued)
Cambodia
(11)
Cayman Islands
(110)
Chile
(12)
Christmas Island
(111)
China
(13)
Colombia
(14)
Costa Rica
(67)
47
Page 48

RFID User Preferences
RFID Country of Operation (Continued)
Croatia
(68)
Cyprus
(69)
Czech Republic
(70)
Dominican Republic
(15)
Denmark
(71)
Ecuador
(16)
Egypt
(72)
48
Page 49

RFID User Preferences
RFID Country of Operation (Continued)
Estonia
(73)
El Salvador
(17)
Falklands Islands
(112)
Great Britain (UK)
(18)
ETSI 302.208 Compliant Generic
(57)
French Guiana
(113)
49
FCC Part-16 Compliant Generic
(58)
Page 50

RFID User Preferences
RFID Country of Operation (Continued)
Finland
(74)
France
(75)
Germany
(77)
Guadeloupe
(114)
Greece
(78)
Guam
(20)
50
Page 51

RFID User Preferences
RFID Country of Operation (Continued)
Guatemala
(19)
Honduras
(115)
Hong Kong
(21)
Iceland
(80)
Hungary
(79)
Indonesia
(23)
Ireland
(81)
51
Page 52

RFID User Preferences
RFID Country of Operation (Continued)
Jamaica
(116)
Italy
(82)
Kazakhstan
(84)
Lebanon
(117)
Japan
(24)
Latvia
(86)
52
Liechtenstein
(106)
Page 53

RFID User Preferences
RFID Country of Operation (Continued)
Lithuania
(87)
Luxembourg
(88)
Macedonia
(29)
Malta
(89)
Macau
(28)
Malaysia
(30)
Mariana Islands
(118)
53
Page 54

RFID User Preferences
RFID Country of Operation (Continued)
Mexico
(31)
Martinique
(119)
Netherlands
(90)
New Zealand FCC
(34)
Montenegro
(33)
New Zealand EU
(35)
54
Nicaragua
(120)
Page 55

RFID User Preferences
RFID Country of Operation (Continued)
Niue Islands US
(121)
Niue Islands EU
(122)
Norway
(91)
Panama
(37)
Norfolk Islands
(123)
Pakistan
(36)
55
Paraguay
(38)
Page 56

RFID User Preferences
RFID Country of Operation (Continued)
Philippines
(40)
Peru
(39)
Portugal
(94)
Romania
(96)
Poland
(93)
Puerto Rico
(41)
56
Page 57

RFID User Preferences
RFID Country of Operation (Continued)
Russia
(42)
Saudi Arabia
(43)
Serbia
(97)
Slovakia
(98)
Singapore
(44)
Slovenia
(99)
57
Page 58

RFID User Preferences
RFID Country of Operation (Continued)
South Korea
(46)
South Africa
(45)
Sweden
(101)
Taiwan
(48)
Spain
(100)
Switzerland
(102)
58
Page 59

RFID User Preferences
RFID Country of Operation (Continued)
Trinidad and Tobago
(124)
Thailand
(49)
UAE
(51)
United States
(52)
Turkey
(50)
Ukraine
(104)
59
Page 60

RFID User Preferences
RFID Country of Operation (Continued)
Venezuela
(54)
Uruguay
(53)
Vietnam
(55)
Table 13 Region Support
Region Parameter Value Europe United States
No Region 0 No No
Argentina 3 No Yes
Australia 4 No Yes
Bangladesh 5 No Yes
Bhutan 6 Yes No
Bolivia 7 No Yes
Bosnia and Herzegovina 8 Yes No
Brazil 9 No Yes
Canada 10 No Yes
Cambodia 11 Yes No
Chile 12 No Yes
China 13 No Yes
Colombia 14 No Yes
Dominican Republic 15 No Yes
Ecuador 16 No Yes
60
Page 61

RFID User Preferences
Table 13 Region Support (Continued)
Region Parameter Value Europe United States
El Salvador 17 No Yes
Great Britain (UK) 18 Yes No
Guatemala 19 No Yes
Guam 20 No Yes
Hong Kong 21 No Yes
Indonesia 23 No Yes
Japan 24 No No
Macau 28 No Yes
Macedonia 29 Yes No
Malaysia 30 No Yes
Mexico 31 No Yes
Montenegro 33 Yes No
New Zealand FCC 34 No Yes
New Zealand EU 35 Yes No
Pakistan 36 Yes No
Panama 37 No Yes
Paraguay 38 No Yes
Peru 39 No Yes
Philippines 40 No Yes
Puerto Rico 41 No Yes
Russia 42 Yes No
Saudi Arabia 43 Yes No
Singapore 44 No Yes
South Africa 45 Yes No
South Korea 46 No Yes
Taiwan 48 No Yes
Thailand 49 No Yes
Turkey 50 Yes No
UAE 51 Yes No
United States 52 No Yes
Uruguay 53 No Yes
61
Page 62

RFID User Preferences
Table 13 Region Support (Continued)
Region Parameter Value Europe United States
Venezuela 54 No Yes
Vietnam 55 No Yes
American Virgin Islands 56 No Yes
ETSI (302.208 compliant generic) 57 Yes No
FCC Part-16 compliant generic 58 No Yes
Israel 59 No No
Austria 62 Yes No
Belgium 65 Yes No
Bulgaria 66 Yes No
Costa Rica 67 No Yes
Croatia 68 Yes No
Cyprus 69 Yes No
Czech Republic 70 Yes No
Denmark 71 Yes No
Egypt 72 Yes No
Estonia 73 Yes No
Finland 74 Yes No
France 75 Yes No
Germany 77 Yes No
Greece 78 Yes No
Hungary 79 Yes No
Iceland 80 Yes No
Ireland 81 Yes No
Italy 82 Yes No
Kazakhstan 84 Yes No
Latvia 86 Yes No
Lithuania 87 Yes No
Luxembourg 88 Yes No
Malta 89 Yes No
Netherlands 90 Yes No
Norway 91 Yes No
62
Page 63

RFID User Preferences
Table 13 Region Support (Continued)
Region Parameter Value Europe United States
Poland 93 Yes No
Portugal 94 Yes No
Romania 96 Yes No
Serbia 97 Yes No
Slovakia 98 Yes No
Slovenia 99 Yes No
Spain 100 Yes No
Sweden 101 Yes No
Switzerland 102 Yes No
Ukraine 104 Yes No
Belarus 105 Yes No
Liechtenstein 106 Yes No
British Virgin Islands 107 Yes No
Anguilla 108 No Yes
Barbados 109 No Yes
Cayman Islands 110 No Yes
Christmas Island 111 No Yes
Falklands Islands 112 Yes No
French Guiana 113 Yes No
Guadeloupe 114 Yes No
Honduras 115 No Yes
Jamaica 116 No Yes
Lebanon 117 Yes No
Mariana Islands 118 No Yes
Martinique 119 Yes No
Nicaragua 120 No Yes
Niue Islands US 121 No Yes
Niue Islands EU 122 Yes No
Norfolk Islands 123 No Yes
Trinidad and Tobago 124 No Yes
63
Page 64

Maintenance, Technical Specifications, Troubleshooting
Introduction
This chapter provides suggested RFID imager maintenance, troubleshooting, and technical specifications.
Maintenance
Known Harmful Ingredients
The following chemicals are known to damage the plastics on Zebra scanners and should not come in contact with
the device:
• Acetone
• Ammonia solutions
• Aqueous or alcoholic alkaline solutions
• Aromatic and chlorinated hydrocarbons
• Benzene
• Carbolic acid
• Compounds of amines or ammonia
• Ethanolamine
• Ethers
• Ketones
• TB-lysoform
• Toluene
• Trichloroethylene.
Approved Cleaners for the Scanner
• Isopropyl alcohol 70% (including pre-moistened wipes).
64
Page 65

Maintenance, Technical Specifications, Troubleshooting
Cleaning the Scanner
• Routinely cleaning the exit window is required. A dirty window may affect scanning accuracy. Do not allow
any abrasive material to touch the window.
To clean the scanner:
1. Dampen a soft cloth with one of the approved cleaning agents listed above or use pre-moistened wipes.
2. Gently wipe all surfaces, including the front, back, sides, top and bottom. Never apply liquid directly to the
scanner. Be careful not to let liquid pool around the scanner window, trigger, cable connector or any other area
on the device.
3. Be sure to clean the trigger and in between the trigger and the housing (use a cotton-tipped applicator to reach
tight or inaccessible areas).
4. Do not spray water or other cleaning liquids directly into the exit window.
5. Wipe the scanner exit window with a lens tissue or other material suitable for cleaning optical material such as
eyeglasses.
6. Immediately dry the scanner window after cleaning with a soft non-abrasive cloth to prevent streaking.
7. Allow the unit to air dry before use.
8. Scanner connectors:
a. Dip the cotton portion of a cotton-tipped applicator in isopropyl alcohol.
b. Rub the cotton portion of the cotton-tipped applicator back-and-forth across the connector on the Zebra
scanner at least 3 times. Do not leave any cotton residue on the connector.
c. Use the cotton-tipped applicator dipped in alcohol to remove any grease and dirt near the connector area.
d. Use a dry cotton tipped applicator and rub the cotton portion of the cotton-tipped applicator back-and-forth
across the connectors at least 3 times. Do not leave any cotton residue on the connectors.
Troubleshooting
NOTE: If after performing these checks the imager still experiences problems, contact the distributor or call
Zebra support.
Table 14 Troubleshooting
Problem Possible Causes Possible Solutions
Imager emits 4 short high beeps
during read attempt.
Imager reads the tag, but does
not transmit the data to the host.
Imager has not completed USB
initialization.
Imager is not programmed for the
correct host type.
Interface cable is loose. Re-connect the cable.
If the imager emits 4 long low
beeps, a transmission error
occurred.
Wait several seconds and read again.
Scan the appropriate host type
programming barcode. Refer to the
DS9908 Hands-Free Imaging Scanner
Product Reference Guide, p/n
MN-003185-xx
Set the imager's communication
parameters to match the host's setting.
65
Page 66

Maintenance, Technical Specifications, Troubleshooting
Table 14 Troubleshooting (Continued)
Problem Possible Causes Possible Solutions
Host displays tag data
incorrectly.
Imager is not programmed to work
with the host.
Technical Specifications for the DS9908R
For a complete list of specifications, refer to the DS9908 Hands-Free Imaging Scanner Product Reference Guide,
p/n MN-003185-xx.
Table 15 Technical Specifications
Item Description
Physical Characteristics
Dimensions 8.0 in. H x 3.9 in. W x 5.75 in. D
20.3 cm H x 9.9 cm W x 14.6 cm D
Scan the appropriate host type
programming barcode.
For RS-232, set the imager's
communication parameters to match
the host's settings.
For a keyboard wedge configuration,
program the system for the correct
keyboard type, and turn off the CAPS
LOCK key.
Weight 14.8 oz./420.0 g
Input Voltage Range 4.5 to 5.5 VDC Host Powered; 4.5 to 5.5 VDC
External Power Supply
Operating current at nominal
voltage (5.0V):
Standby current (idle) at
nominal voltage (5.0V)
Data Capture Options 1D and 2D barcodes, RFID tags
Color Midnight Black
Supported Host Interfaces RS232, Keyboard Wedge, TGCS (IBM), 46XX over RS485
Keyboard Support Supports over 90 international keyboards
Electronic Article Surveillance Compatible with Checkpoint EAS deactivation system
User Indicators Direct Decode Indicator, Good Decode LEDs, Speaker (adjustable tone and
RFID Performance Characteristics
RFID Engine Zebra Proprietary Radio Technology
400 mA (typical)
135 mA (typical)
volume)
66
Page 67

Maintenance, Technical Specifications, Troubleshooting
Table 15 Technical Specifications (Continued)
Item Description
Nominal Read Range ~18 in. / ~45.7 cm
Frequency Range US 902 - 928 MHz
Frequency Range EU 865 - 868 MHz
Frequency Range JA 916 - 923 MHz
Standards Supported (Tag
Type)
RFID Power Output 3 dBm to 22 dBm
Environmental
Operating Temperature 32º F to 122º F / 0º C to 50º C
Storage Temperature -40.0° to 158.0° F / -40.0° to 70.0° C
Drop Specification Designed to withstand multiple drops at 4.0 ft./1.2 m to concrete
Tumble Specification Designed to withstand 2,000 tumbles in 1.5 ft. /0.5 m tumbler
Environmental Sealing IP42
Humidity 5% to 95%, non-condensing
Ambient Light Immunity 0 to 10,000 Foot Candles / 0 to 107,600 Lux
EPC Class 1 Gen2; EPC Gen2 V2; ISO-18000-63
Note: 1 tumble = 0.5 cycles
67
Page 68

RFID Non-Parameter Attributes
Introduction
This chapter defines non-parameter attributes and how to use them for DS9908R readers.
Attributes
RFID LAST TAG ID
Attribute #35001
The EPC tag ID of the last tag reported (size-encoded binary).
Type A
Size (Bytes) 34
User Mode Access R
Val ues Variable
RFID TAG ID
Attribute #35002
The EPC tag ID of the tag to be operated upon (size-encoded binary).
Type A
Size (Bytes) 34
User Mode Access W
Val ues Variable
68
Page 69

RFID Non-Parameter Attributes
RFID BANK
Attribute #35003
The desired tag bank.
Type B
Size (Bytes) 1
User Mode Access W
Val ues 0 = reserved
1 = EPC
2 = TID
3 = User
RFID DATA
Attribute #35004
Buffer for read, write, and lock (size-encoded binary).
Type A
Size (Bytes) 66
User Mode Access RW
Val ues Variable
RFID OFFSET
Attribute #35005
Word offset into tag buffer.
Type W
Size (Bytes) 2
User Mode Access W
Val ues Variable
RFID LENGTH
Attribute #35006
Words of data to read from tag buffer.
Type W
Size (Bytes) 2
User Mode Access W
Val ues Variable
69
Page 70

RFID PASSWORD
Attribute #35007
Binary password for privileged operations.
Type A
Size (Bytes) 4
User Mode Access W
Val ues Variable
RFID COMMAND
Attribute #35008
Execute command.
Type B
Size (Bytes) 1
User Mode Access W
Val ues 1 = Read
2 = Write
3 = Lock
4 = Kill
RFID Non-Parameter Attributes
RFID CMD STATUS
Attribute #35009
Resulting status from executing a command.
Type W
Size (Bytes) 2
User Mode Access R
Val ues Variable
RFIDCmdStatus is two bytes defined in Table 16.
Table 16 RFIDCmdStatus Definitions
Bytes Definition
0x0000 Success
0x0001 No RFID module
0x0002 Tag not found
0x0003 Timeout
0x0004 Tag CRC error
0x01xx Tag backscatter error. LSB indicates the error code as per EPC protocol.
70
Page 71

RFID Non-Parameter Attributes
Table 16 RFIDCmdStatus Definitions (Continued)
Bytes Definition
0x02xx Tag access error. LSB indicates the error code.
0x03xx Bad parameter. The LSB indicates which parameter:
1 = Command
2 = TagID
3 = Bank
4 = Data
5 = Offset
6 = Password
7 = Length
71
Page 72

Index
A
accessories
cables . . . . . . . . . . . . . . . . . . . . . . . . . . . . . . . . . . 10
interface cable . . . . . . . . . . . . . . . . . . . . . . . . . . . . 10
partner portal . . . . . . . . . . . . . . . . . . . . . . . . . . . . . 10
power supplies . . . . . . . . . . . . . . . . . . . . . . . . . . . 11
B
bar codes
host triggering . . . . . . . . . . . . . . . . . . . . . . . . . . . . 24
multifunction triggering . . . . . . . . . . . . . . . . . . . . . 22
RFID
antenna power in hand-held . . . . . . . . . . . . . . 38
antenna power in hands-free . . . . . . . . . . . . . 40
antenna selection . . . . . . . . . . . . . . . . . . . . . . 37
auto presentation mode . . . . . . . . . . . . . . . . . 29
beeper tone . . . . . . . . . . . . . . . . . . . . . . . . . .24
data transmission format . . . . . . . . . . . . . . . . 31
hands-free idle timeout . . . . . . . . . . . . . . . . . . 42
same tag timeout . . . . . . . . . . . . . . . . . . . . . . 27
transmit raw with PC bytes . . . . . . . . . . . . . . . 36
transmit unknown tag data . . . . . . . . . . . . . . . 37
trigger mode . . . . . . . . . . . . . . . . . . . . . . . . . .30
barcodes
beep tones
special beep tones . . . . . . . . . . . . . . . . . . . . . 26
standard tones . . . . . . . . . . . . . . . . . . . . . . . . 25
RFID user preferences
default table . . . . . . . . . . . . . . . . . . . . . . . . . . 21
beep tone adjustment
special beep tones . . . . . . . . . . . . . . . . . . . . . . . . 26
standard beep tones . . . . . . . . . . . . . . . . . . . . . . . 25
beeper
RFID tone . . . . . . . . . . . . . . . . . . . . . . . . . . . . . . . 24
bullets . . . . . . . . . . . . . . . . . . . . . . . . . . . . . . . . . . . . . 11
C
interface . . . . . . . . . . . . . . . . . . . . . . . . . . . . . . . . 10
removing . . . . . . . . . . . . . . . . . . . . . . . . . . . . . . . . 16
cache . . . . . . . . . . . . . . . . . . . . . . . . . . . . . . . . . . . 27, 31
cache, tag . . . . . . . . . . . . . . . . . . . . . . . . . . . . . . . . . . 30
configurations
cables . . . . . . . . . . . . . . . . . . . . . . . . . . . . . . . . . . 10
connecting
interface cable . . . . . . . . . . . . . . . . . . . . . . . . . . . 15
conventions
notational . . . . . . . . . . . . . . . . . . . . . . . . . . . . . . . 11
country of operation . . . . . . . . . . . . . . . . . . . . . . . . 9, 44
D
default parameters . . . . . . . . . . . . . . . . . . . . . . . . . . . 21
RFID user preferences . . . . . . . . . . . . . . . . . . . . . 21
F
features, imager
cable release opening . . . . . . . . . . . . . . . . . . . . . 14
hand-held touch zones . . . . . . . . . . . . . . . . . . . . . 14
interface cable port . . . . . . . . . . . . . . . . . . . . . . . . 14
LED . . . . . . . . . . . . . . . . . . . . . . . . . . . . . . . . . . . . 14
RFID antenna . . . . . . . . . . . . . . . . . . . . . . . . . . . . 14
RFID LED . . . . . . . . . . . . . . . . . . . . . . . . . . . . . . . 14
scan window . . . . . . . . . . . . . . . . . . . . . . . . . . . . . 14
speaker . . . . . . . . . . . . . . . . . . . . . . . . . . . . . . . . . 14
trigger . . . . . . . . . . . . . . . . . . . . . . . . . . . . . . . . . . 14
H
hand-held touch zones . . . . . . . . . . . . . . . . . . . . . . . . 14
I
information, service . . . . . . . . . . . . . . . . . . . . . . . . . . . 12
interface
cables . . . . . . . . . . . . . . . . . . . . . . . . . . . . . . . 10, 11
cables
inserting . . . . . . . . . . . . . . . . . . . . . . . . . . . . . . . . 15
72
Page 73

M
maintenance . . . . . . . . . . . . . . . . . . . . . . . . . . . . . . . . 64
P
partner portal . . . . . . . . . . . . . . . . . . . . . . . . . . . . . . . . 10
power supplies configurations
power supplies . . . . . . . . . . . . . . . . . . . . . . . . . . . 11
R
ranges, RFID read . . . . . . . . . . . . . . . . . . . . . . . . . . . . 19
read ranges . . . . . . . . . . . . . . . . . . . . . . . . . . . . . . . . . 19
reading a tag . . . . . . . . . . . . . . . . . . . . . . . . . . . . . . . . 30
related documents . . . . . . . . . . . . . . . . . . . . . . . . . . . . 12
related software . . . . . . . . . . . . . . . . . . . . . . . . . . . . . . 12
reporting a tag . . . . . . . . . . . . . . . . . . . . . . . . . . . . . . . 30
S
setup
inserting interface cable . . . . . . . . . . . . . . . . . . . . 15
unpacking . . . . . . . . . . . . . . . . . . . . . . . . . . . . . . . 13
speaker and LED indicators . . . . . . . . . . . . . . . . . . . . 19
specifications . . . . . . . . . . . . . . . . . . . . . . . . . . . . . . . . 66
Index
T
tag
reading . . . . . . . . . . . . . . . . . . . . . . . . . . . . . . . . . 30
reporting . . . . . . . . . . . . . . . . . . . . . . . . . . . . . . . . 30
tag cache . . . . . . . . . . . . . . . . . . . . . . . . . . . . . . . . . . . 30
technical specifications . . . . . . . . . . . . . . . . . . . . . . . . 66
trigger
programming . . . . . . . . . . . . . . . . . . . . . . . . . . . . . 22
programming via host . . . . . . . . . . . . . . . . . . . . . .24
RFID . . . . . . . . . . . . . . . . . . . . . . . . . . . . . . . . . . . 30
troubleshooting . . . . . . . . . . . . . . . . . . . . . . . . . . . . . . 65
U
unpacking . . . . . . . . . . . . . . . . . . . . . . . . . . . . . . . . . . 13
73
Page 74

www.zebra.com
 Loading...