

Page 1
Unpacking: see page 5
Desembalaje: ver página 17
INSTRUCTION BOOKLET
INSTRUCCIONES PARA EL USO
E
GB
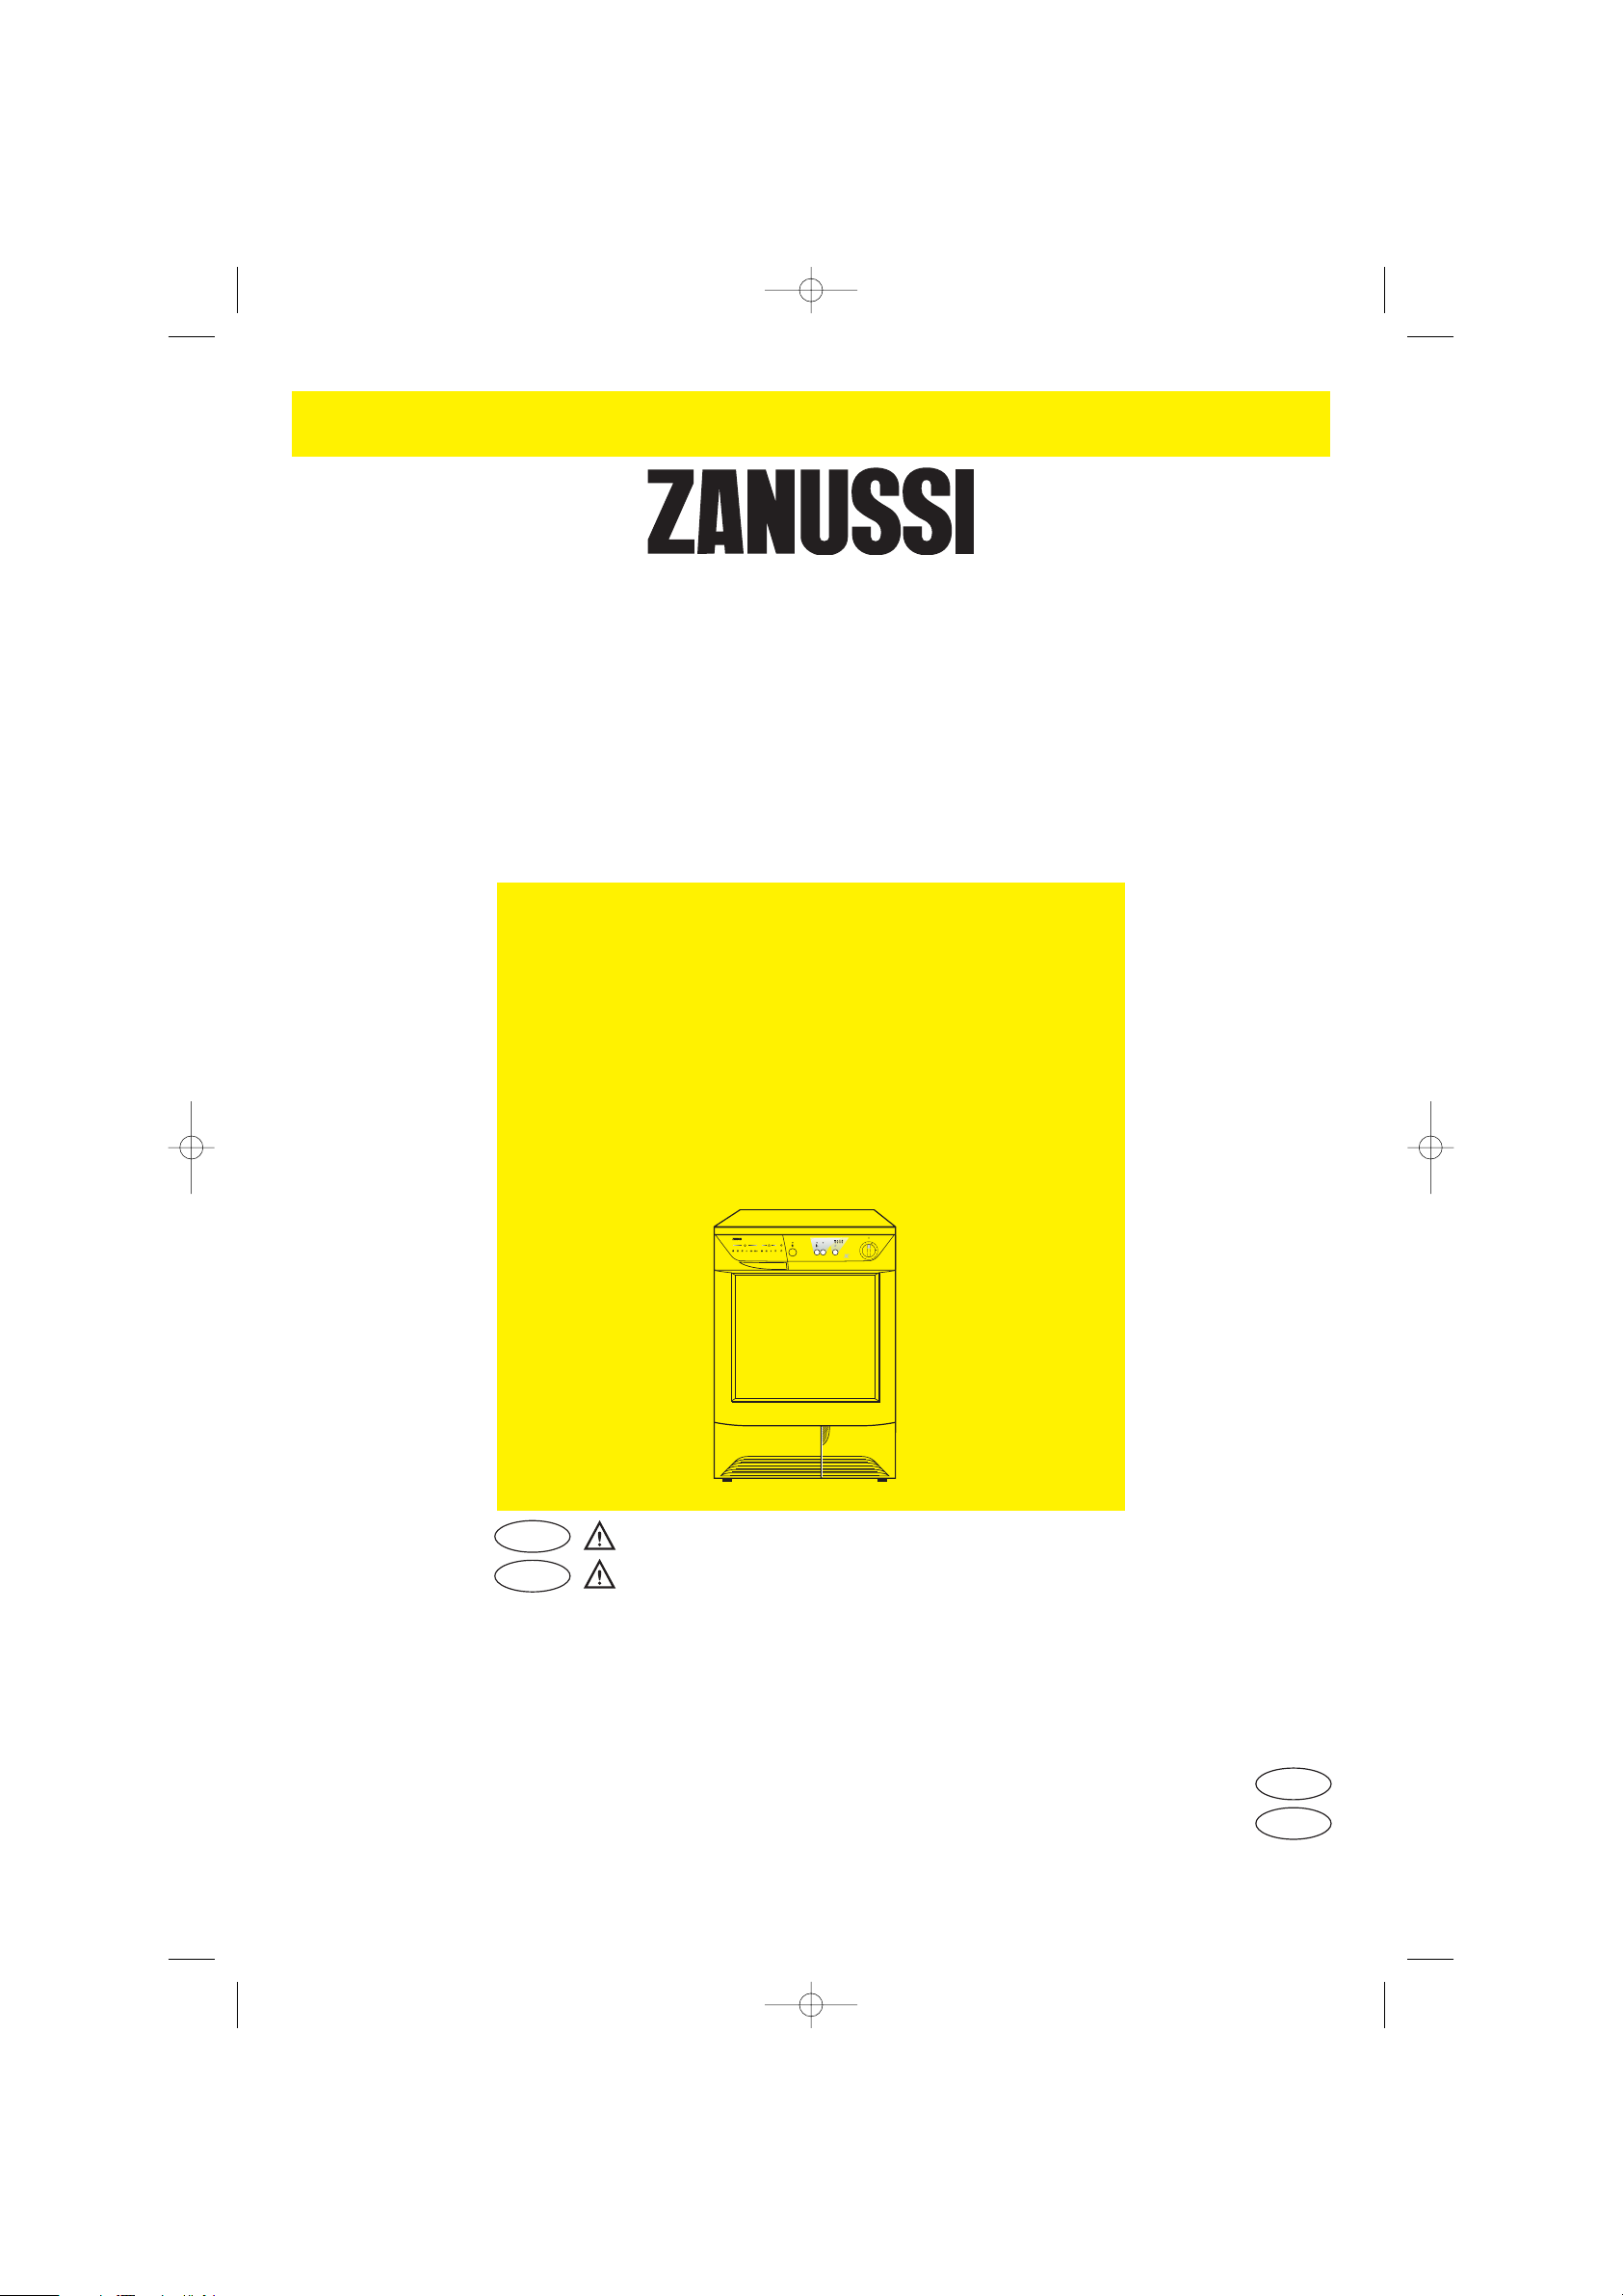
TUMBLE DRYER
SECADORA
ZTE 220
XTRACAPACITY
A BCDEF
AUTOREVERSE
GHJK L
CONDENSER DRYER
ELECTRONIC SENSOR
Z
T
E
2
2
0
0
A
B
C
D
E
F
G
H
J
K
90
60
3
0
L
125980900
E
GB
125980900.qxp 2005-01-05 15:18 Page 1
Page 2
2
Contents
Important safety information ......................3
Disposal ..............................................................3
Tips for environmental protection ............4
Technical specifications................................4
Description of the appliance ......................4
Installation ..........................................................5
• Unpacking ............................................................5
• Positioning ............................................................5
• Electrical connection ............................................5
• Stacking kit............................................................5
• Door reversal ........................................................5
Use ........................................................................6
• The control panel ..............................................6-7
• Programme chart ..................................................8
• Operating sequence..............................................9
• Useful hints ........................................................10
Maintenance and Cleaning ........................11
• External cleaning ................................................11
• Cleaning the door................................................11
• Cleaning the filters ..............................................11
• Cleaning the condenser unit ..............................11
• Emptying the water reservoir ..............................12
• Cleaning the air intake grille................................12
• Cleaning the drum ..............................................12
Something not working? ............................13
Dear customer,
Please read these operating instructions carefully and pay particular attention to the safety notes indicated in
the first pages.
We recommend that you keep this instruction booklet for future reference and pass it on to any future owners.
Transport damages
After unpacking the machine please check it is not damaged. If in doubt, do not start it but contact your local
Service Centre.
The symbols you will see on some paragraphs of this booklet have the following meaning:
The warning triangle emphasize information that is particularly important for your safety or correct
functioning of the appliance.
The information marked with this symbol provides additional instructions and practical tips on the use of
the appliance.
Tips and information about economical and ecological use of the machine are marked with this symbol.
Our contribution to the protection of the
environment: we use recycled paper.
125980900.qxp 2005-01-05 15:18 Page 2
Page 3
ENGLISH
3
Important safety information
Installation
• Any electrical work required to install this appliance
should be carried out by a qualified electrician or
competent person.
• Care must be taken to ensure that the appliance
does not stand on the electrical supply cable.
• If the machine is situated on a carpeted floor,
please adjust the feet in order to allow air to
circulate freely.
Use
• This appliance is designed for domestic use only. If
the machine is used for any other purposes or is
not used correctly, the manufacturer accepts no
responsibility for any damage that might occur.
• Always unplug the appliance after use.
• Clothes which are dripping wet should not be
placed in the dryer.
• Danger of explosion: Never tumble dry items that
have been in contact with inflammable solvents
(petrol, methylated spirits, dry cleaning fluid and
the like). As these substances are volatile, they
could cause an explosion. Tumble dry only items
washed with water.
Risk of fire: items that have been spotted or
soaked with vegetable or cooking oil constitute a
fire hazard and should not be placed on the tumble
dryer,
• If you have washed your laundry with stain
remover you must execute an extra rinse cycle
before loading your tumble dryer.
• Please make sure that no gas lighters have
accidentally been left in pockets of garments to be
loaded into appliance.
• Do not dry canvas shoes or sports shoes, as they
could get stuck between the door and the drum,
thus blocking this latter.
• Leave the door slightly ajar when the appliance is
not being used. This will allow the seal to be
preserved.
• Clean fluff filters after using the tumble dryer. To
prevent fire risks, do not use the appliance if the
fluff filters are damaged or without filters.
• Do not allow fluff to accumulate around the dryer.
General safety
• It is dangerous to alter the specifications or attempt
to modify this product in any way.
• Under no circumstances should you attempt to
repair the machine yourself. Repairs carried out by
inexperienced persons may cause injury or serious
malfunctioning. Contact your local Service Centre.
Always insist on genuine spare parts.
Child safety
• Children are often not aware of how dangerous
electrical appliances can be. When the machine is
working, children should be carefully supervised
and not be allowed to play with the appliance.
• The packaging components (e.g. plastic film,
polystyrene) can be dangerous to children - danger
of suffocation! Keep them out of children’s reach.
• Make sure that children or pets do not climb into
the drum.
• When the appliance is to be scrapped, cut off the
electrical supply cable and destroy the plug with
the remaining cable. Disable the door catch in
order to prevent children from becoming trapped
inside while playing.
These warnings have been provided in the interest of safety. You MUST read them carefully before installing or
using the appliance.
• Packaging materials
The materials marked with the symbol are
recyclable.
This means that they can be recycled by disposing of
them properly in appropriate collection containers.
• Machine
Use authorised disposal sites for your old appliance.
Help to keep your country tidy!
Disposal
125980900.qxp 2005-01-05 15:18 Page 3
Page 4
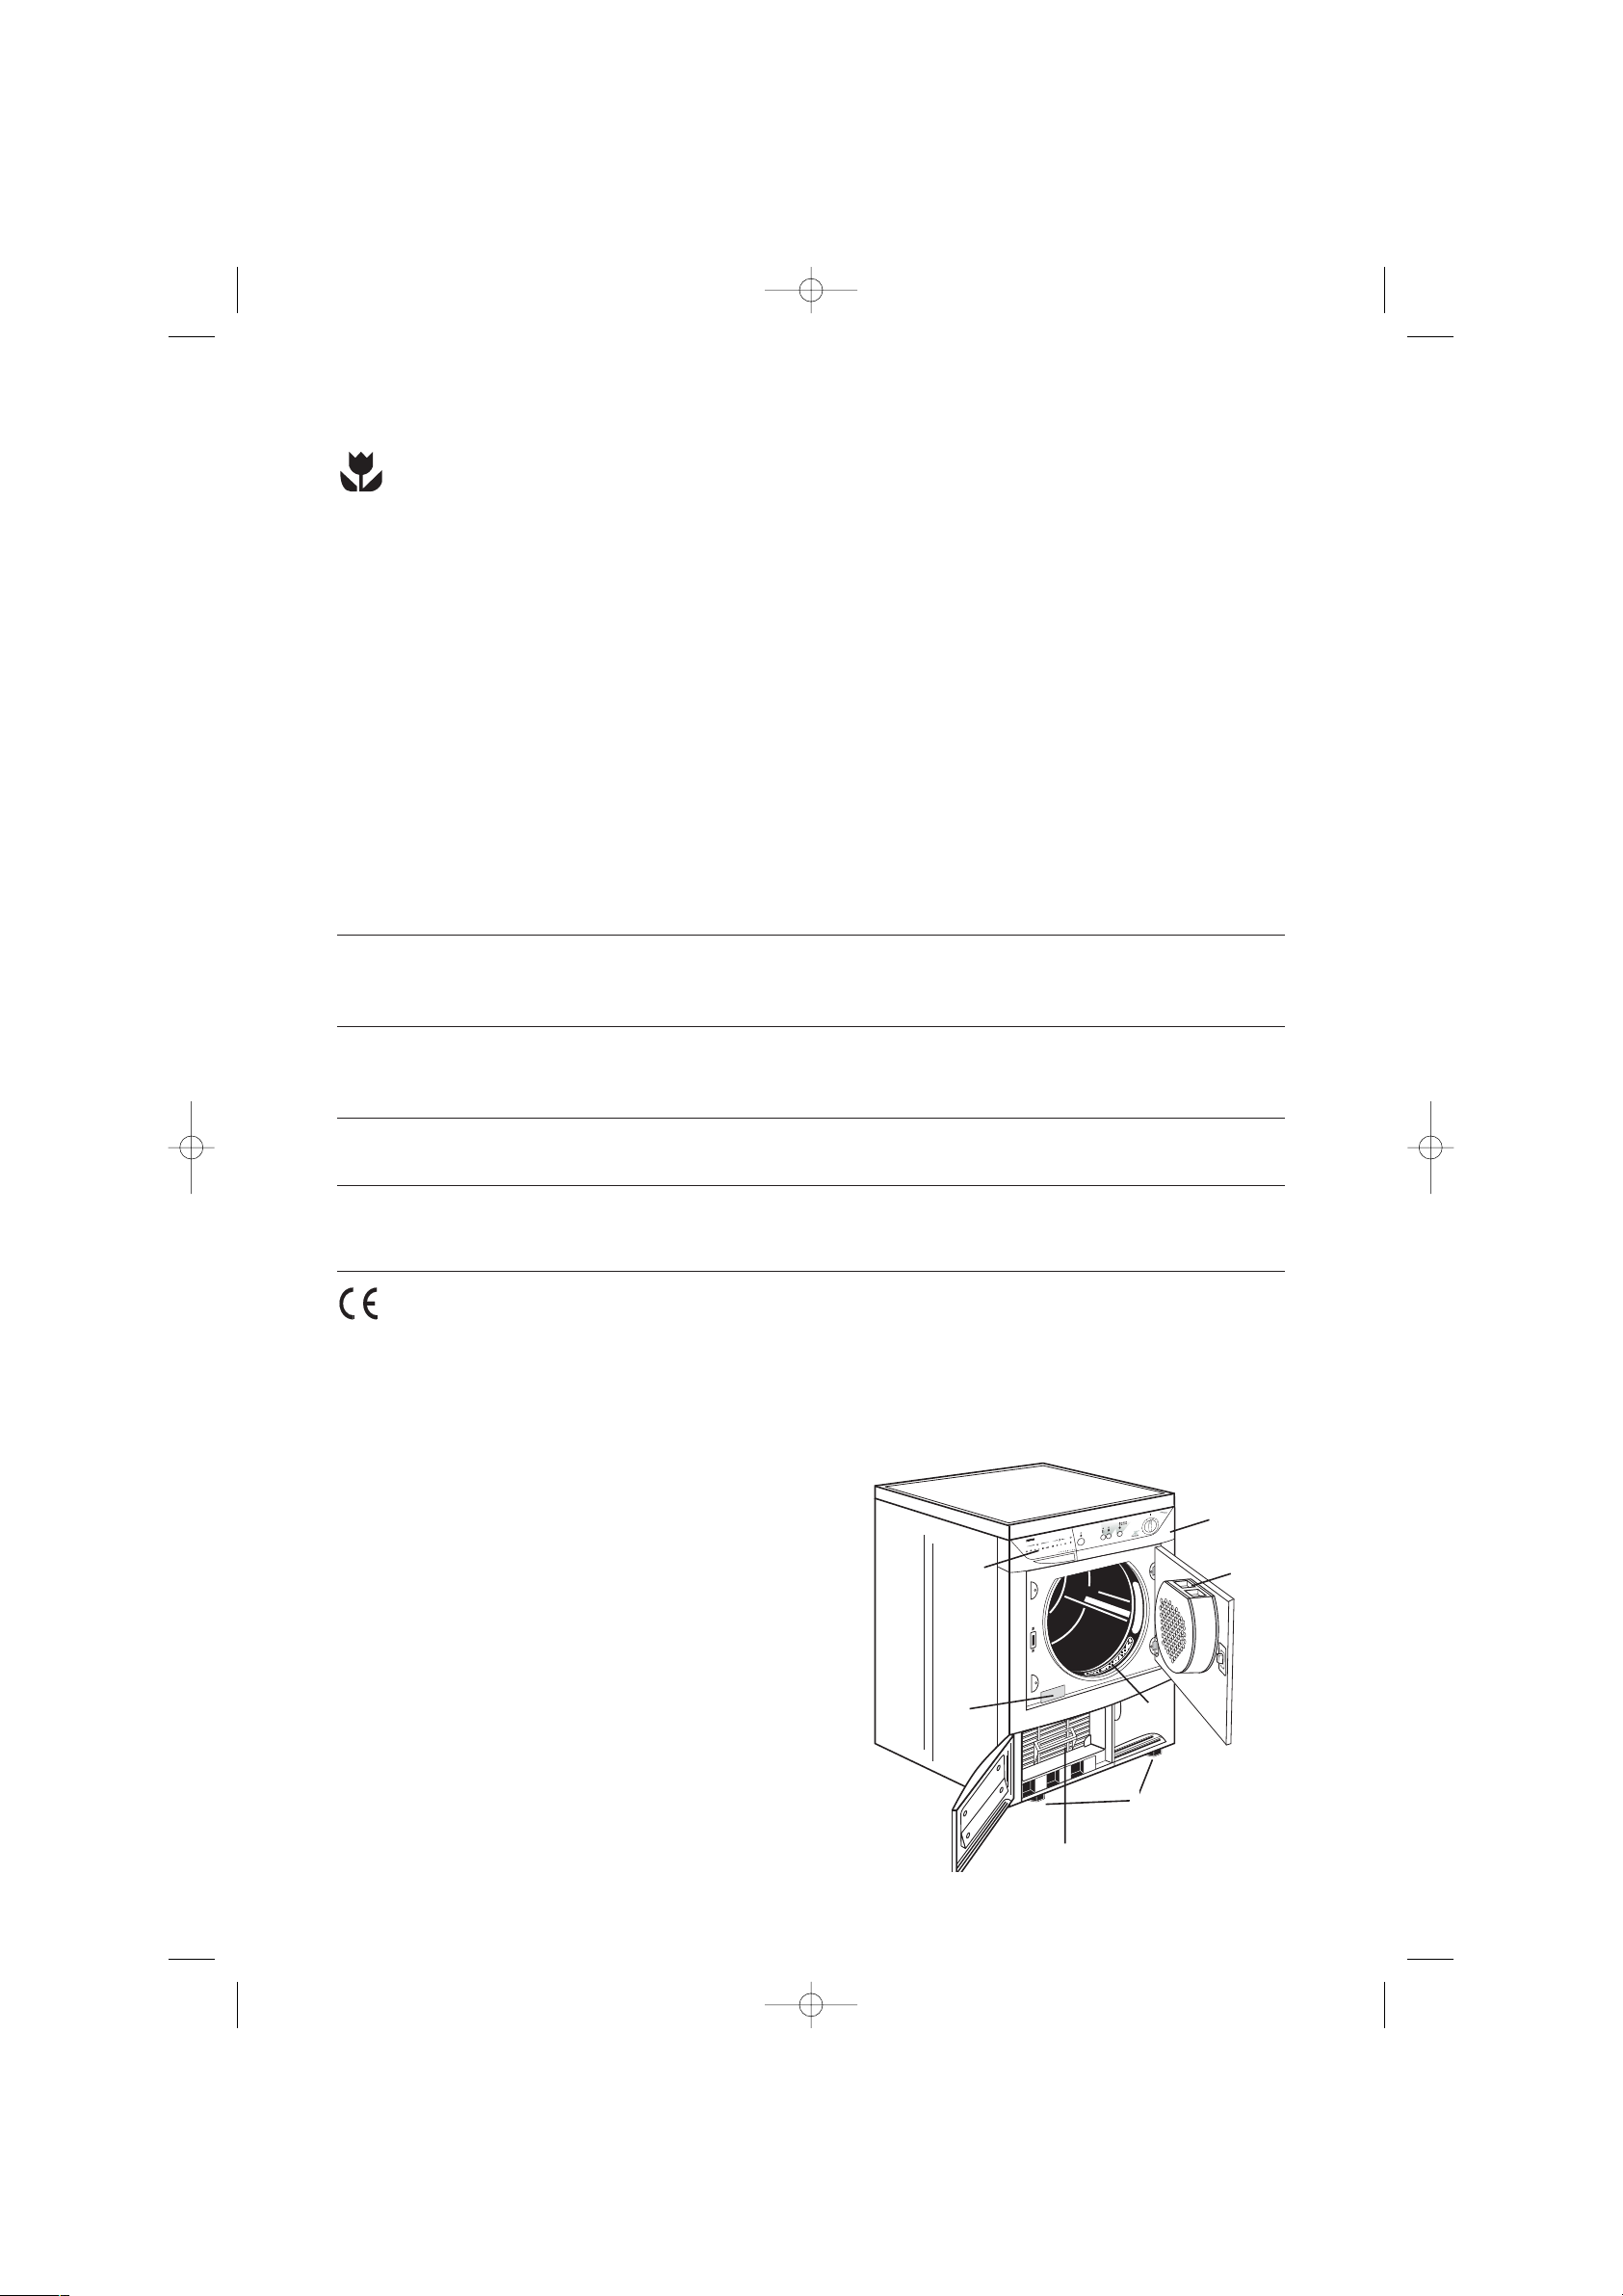
Description of the appliance
01 Control panel
02 Water reservoir
03 Fluff filters
04 Rating Plate
05 Consenser Unit
06 Adjustable feet
1
2
5
6
3
4
3
GHJ
K
L
C
O
N
D
E
N
S
E
R
D
R
Y
E
R
EL
E
CT
R
ON
I
C
SE
N
S
O
R
A
B
C
D
EF
0
A
B
C
D
E
F
G
H
J
K
9
0
60
30
L
4
To save energy and to help protect the environment,
we recommend that you follow these hints:
• Try to load the maximum capacity of the machine
as small loads are uneconomical.
• Always load well spun laundry. The higher the spin
speed, the lower the electricity consumption and
the shorter the drying times.
• Do not over-dry laundry, this avoids creasing and
saves energy.
Select the drying programme according to the type
of laundry and the required degree of dryness.
• To utilize the maximum load, laundry which is to be
dried ready to put away (store dry) can be dried
together with items to be ironed. To do this, select
the programme for iron-dry, remove the iron-dry
items at the end of the programme and then finishdry the rest of the load.
• Clean the filters regularly to avoid excessive drying
times and high electricity consumption.
• Ventilate the room well. The room temperature
should not exceed +35°C during drying.
Tips for environmental protection
Technical specifications
DIMENSIONS: Height 85 cm
Width 60 cm
Depth 58 cm
ELECTRICAL CONNECTION: 220/230 V/50 Hz
MAX. POWER ABSORBED: 2200 W
MIN. FUSE RATING: 10 A
MAX. DRYING CAPACITY: Cotton, linen 6 kg
Synthetics 2.5 kg
CONSUMPTION: Cotton, linen 4,37 kWh (6.5 kg store dry)
Cotton, linen 3,64 kWh (6.5 kg iron dry)
Synthetics 1.40 kWh (2.5 kg store dry)
This appliance complies with the following E.E.C. Directives:
- 73/23 EEC of 19.2.73 (Low Voltage Directive) and subsequent modifications;
- 89/336 EEC of 3.5.89 (Electromagnetic Compatibility Directive) and subsequent modifications.
125980900.qxp 2005-01-05 15:19 Page 4
Page 5
ENGLISH
5
Installation
Warning!
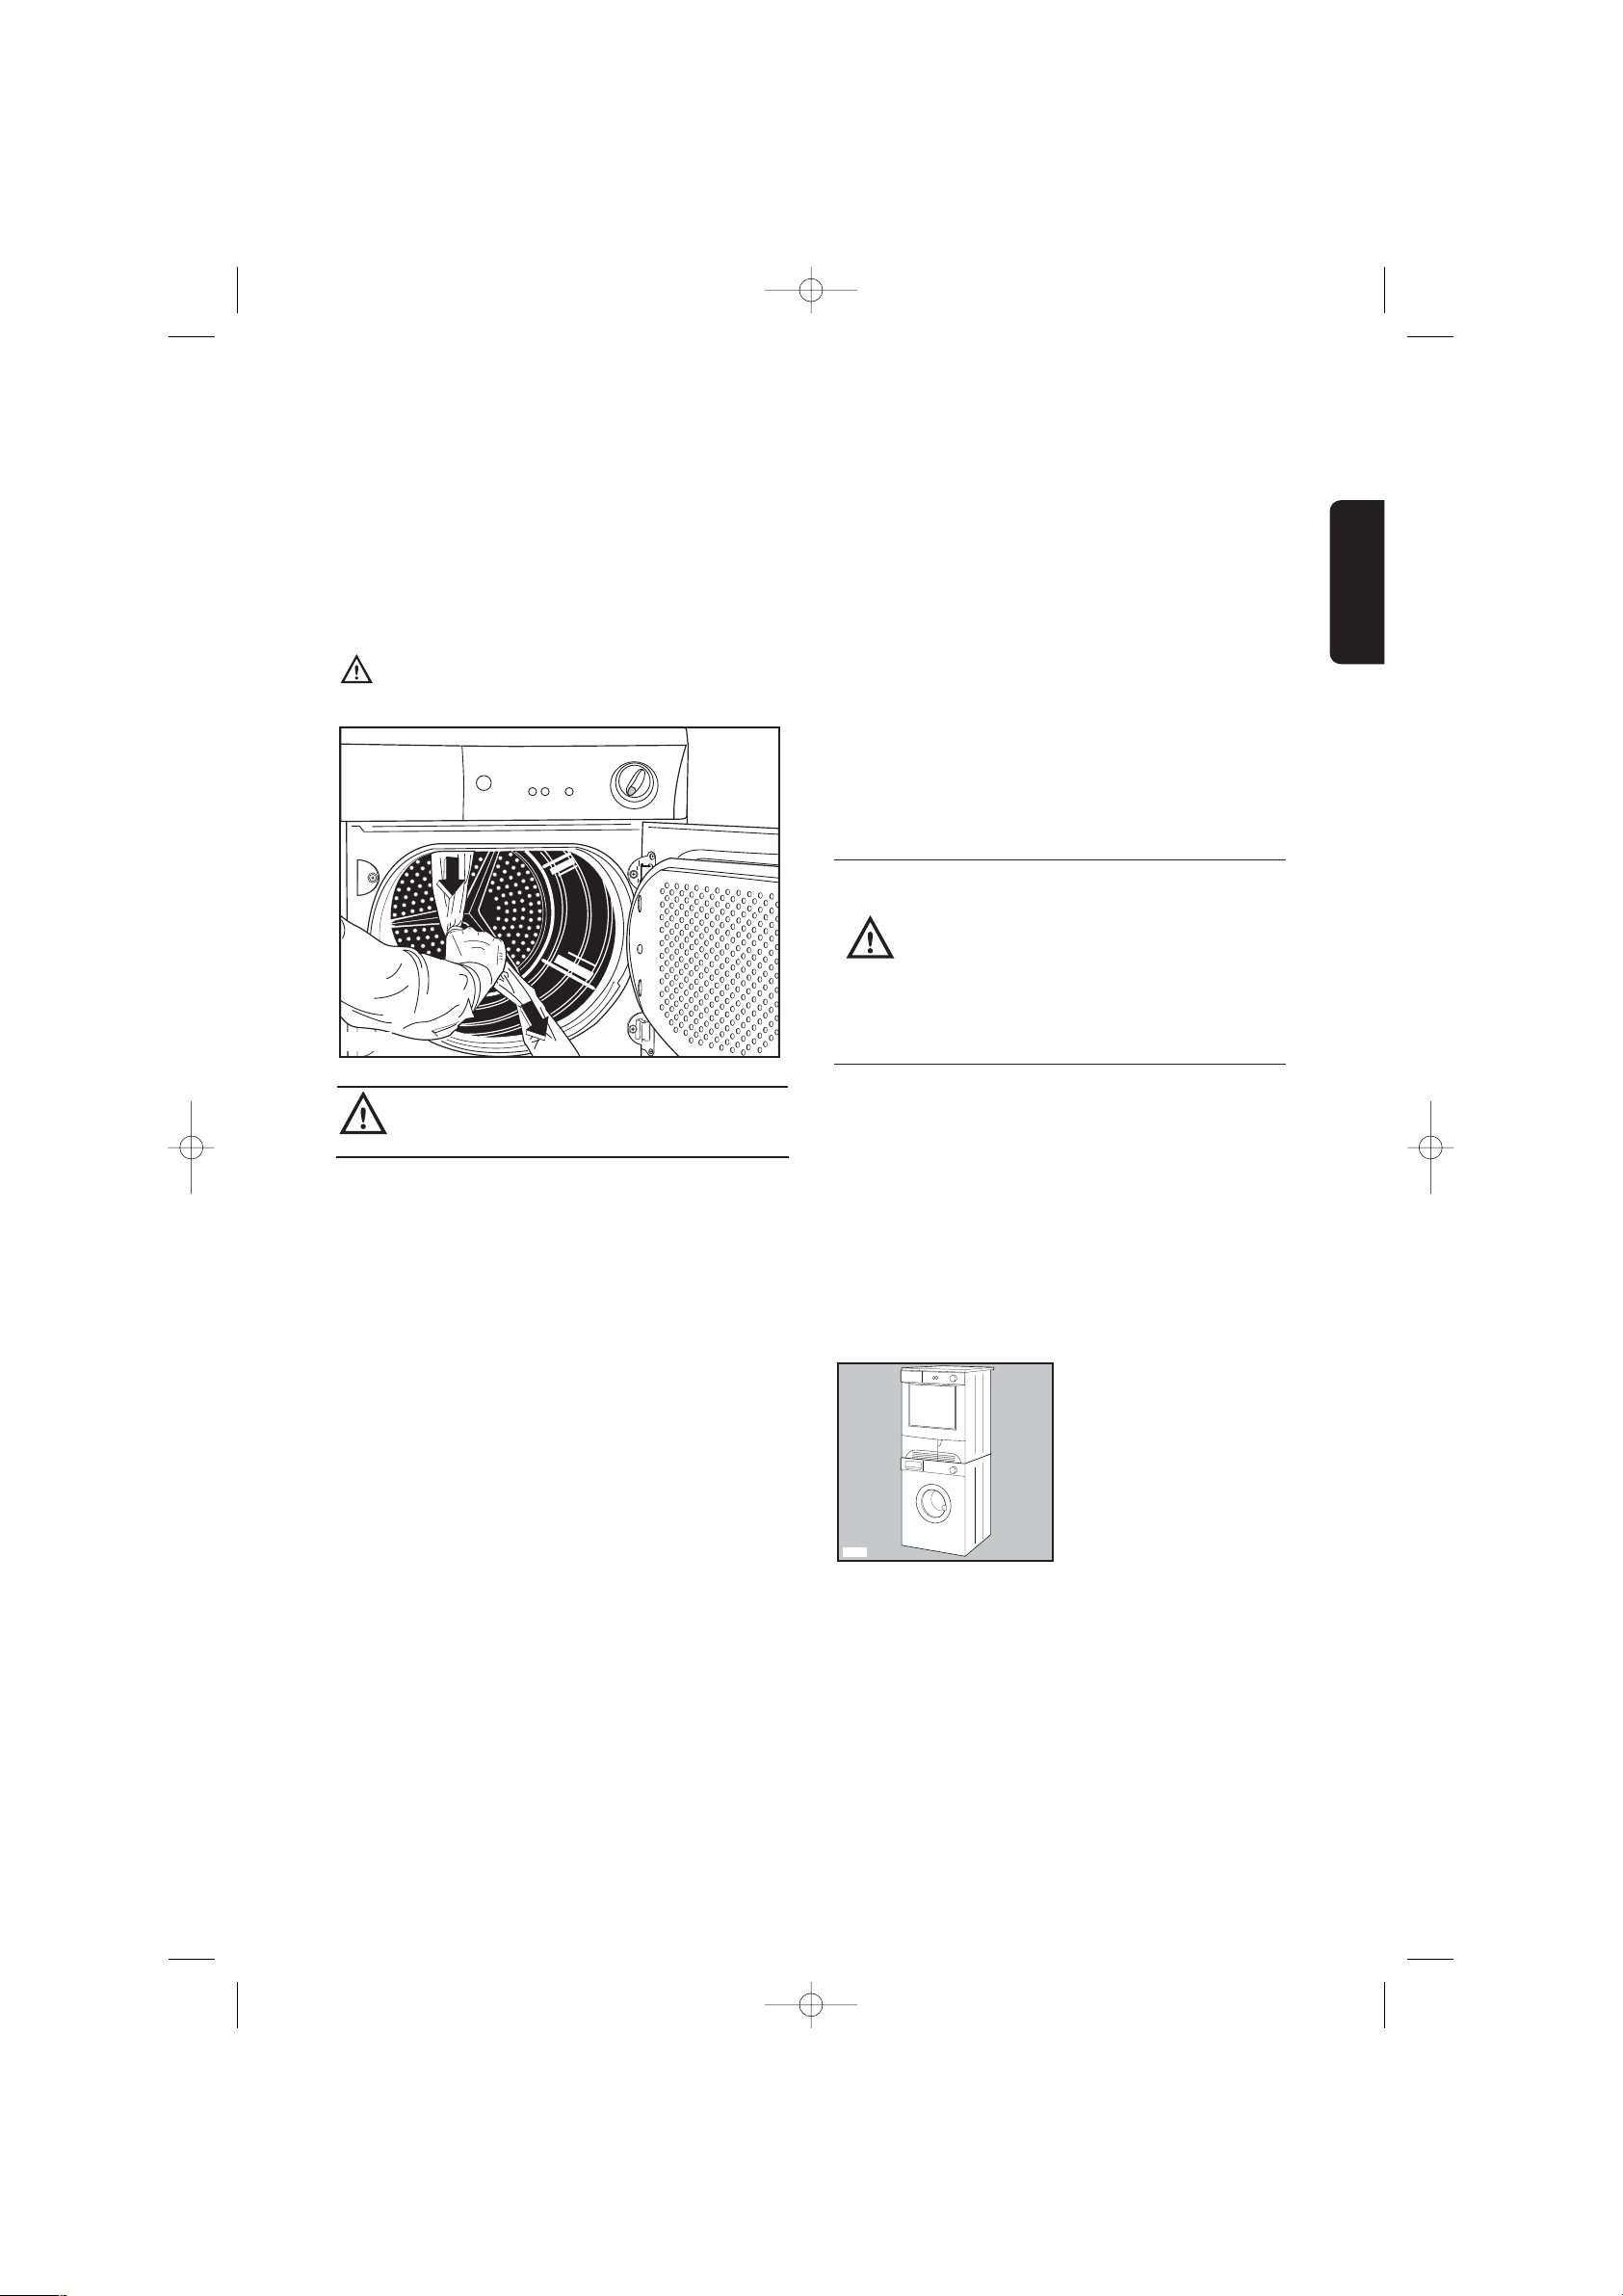
Unpacking
Slide out the polythene bag with the
polystyrene stuffing before using the appliance.
Pull off adhesive strips from inside machine on
top of drum.
Should the appliance be moved, it must be
transported vertically.
Positioning
It is recommended that, for your convenience, the
machine is positioned close to your washing
machine.
The tumble dryer must be installed in a clean place,
where dirt does not build up.
Air must be able to circulate freely all round the
appliance. Do not obstruct the front ventilation grille
or the air intake grilles at the back of the machine.
To keep vibration and noise to a minimum when the
dryer is in use, it should be placed on a firm, level
surface.
Once in its permanent operating position, check that
the dryer is absolutely level with the aid of a spirit
level. If it is not, raise or lower the feet until it is.
The feet must never be removed.
Do not restrict the floor clearance through deep-
pile carpets, strips of wood or similar. This might
cause heat build-up which would interfere with
the operation of the appliance.
Important
The hot air emitted by the tumble dryer can reach
temperatures of up to 60°C. The appliance must
therefore not be installed on floors which are not
resistant to high temperatures.
When operating the tumble dryer, the room
temperature must not be lower than +5°C and higher
P1106
than +35°C, as it may affect the performance of the
appliance.
Electrical connection
This machine is designed to operate on a 220-230 V,
single-phase, 50 Hz supply.
Check that your domestic electrical installation can
take the maximum load required (2.2 kW), also
taking into account any other appliances in use.
Connect the machine to an earthed socket, in
accordance with current wiring regulations.
The manufacturer declines any
responsibility for damage or injury
through failure to comply with the
above safety precaution.
Should the appliance power supply
cable need to be replaced, this must
be carried out by our Service
Centre.
Important!
The power supply cable must be accessible after
installing the machine.
Stacking kit
A special stacking kit is available through your
dealer, to enable the mounting of the dryer on top of
a front loading washing machine with cover’s depth
between 48 und 60 cm.
Read carefully the instructions supplied with the kit
before installing the dryer.
Door reversal
To make it easier to load or unload the laundry the
door can be reversed.
This operation must be carried out by qualified
personnel.
Please contact the nearest Service Centre.
P1148
125980900.qxp 2005-01-05 15:19 Page 5
Page 6
6
Use
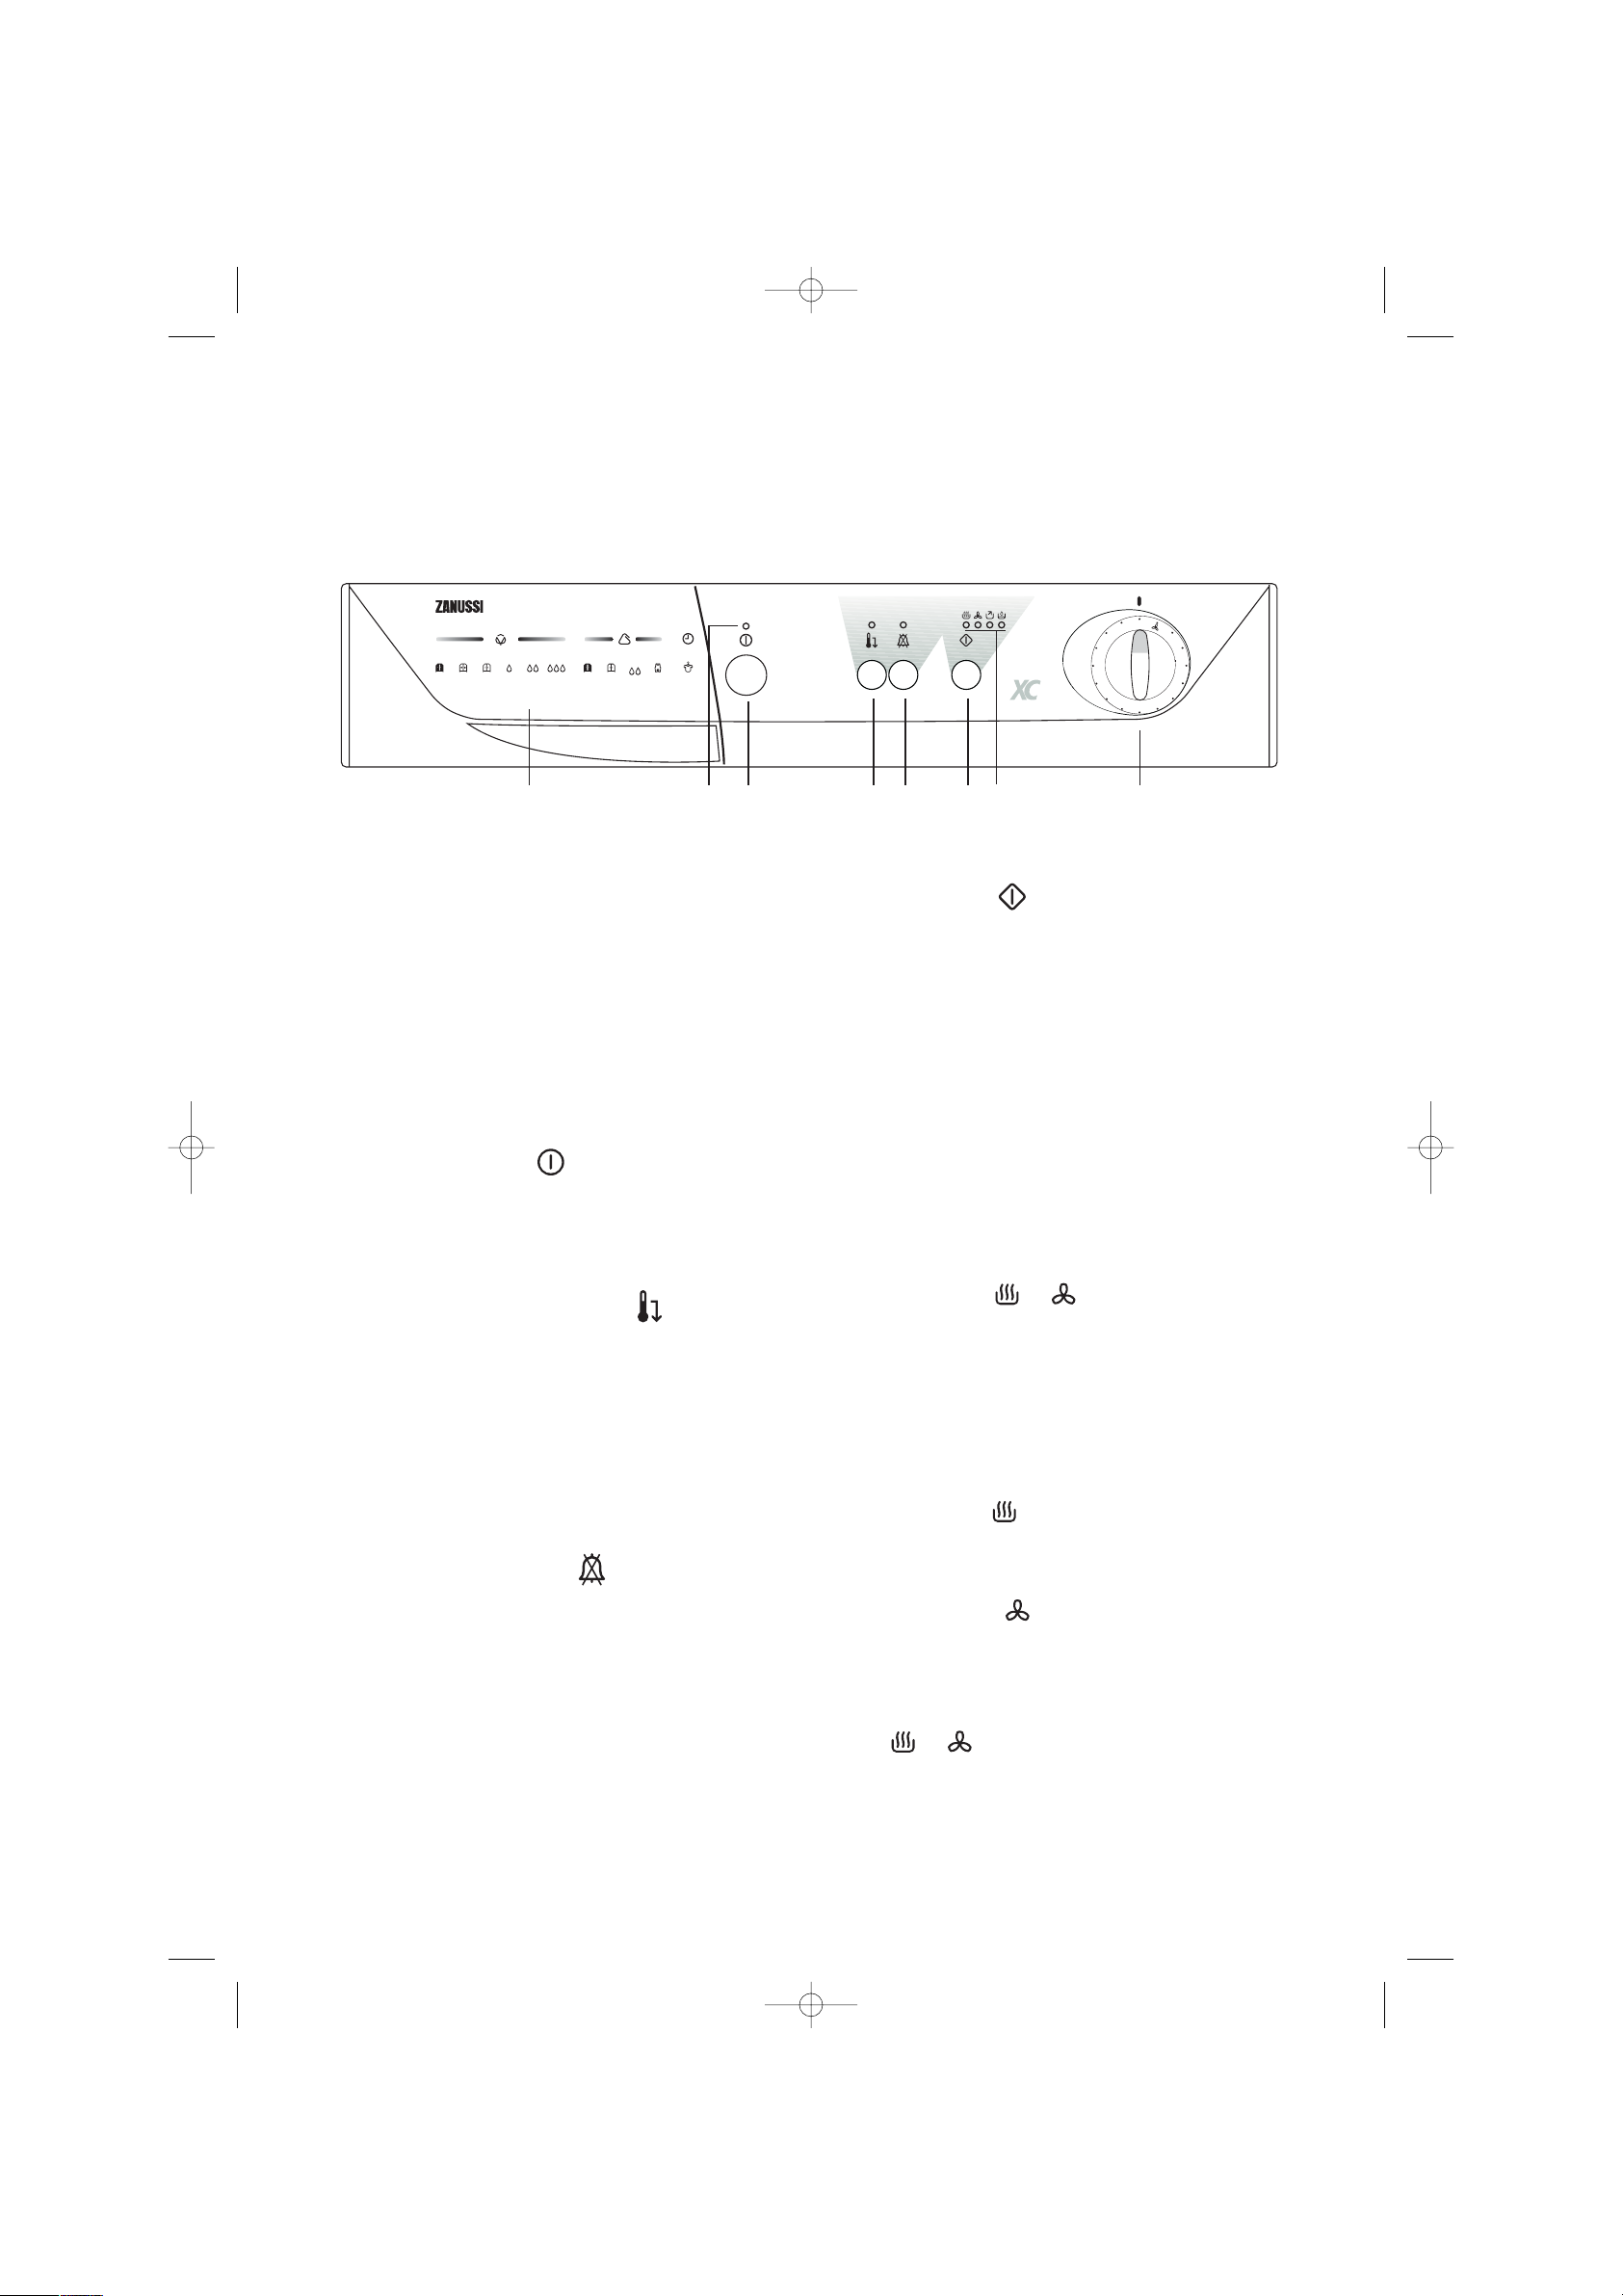
The control panel
L
CONDENSER DRYER
ELECTRONIC
12345678
GH JK
A
BCDEF
ZTE 220
0
A
B
C
D
E
F
G
H
J
K
90
60
30
L
6
AUTOREVERSE
1 Programme guide
This will help you to select the correct programme for
drying.
2 Mains-ON light
Comes on when the appliance is switched on
(ON/OFF button pressed down) and goes out when
this button is released.
3 ON/OFF button
This button is used to switch the dryer on. At the end
of the programme, release this button by pressing it
again to switch the dryer off.
4 Low temperature button
Pressing this button allows drying to be performed at
a lower temperature, for delicate items.
The corresponding pilot light comes on.
This option can also be used for time controlled
drying.
The dryer heats at 1400 W instead of 2000 W.
If the button is not pressed, drying is performed at
full power (2000 W).
5 Buzzer OFF button
A buzzer sounds by depressing the pushbuttons,
during the anti-creasing phase, at the end of
programme and when the water reservoir is full.
Press this button when selecting the programme if
you wish to switch the buzzer off during the anticreasing phase. The corresponding light illuminates.
6 Start button
Press this button for about 2 seconds to start the
dryer after having selected the programme.
If the door of the appliance or the small door
covering the condenser is opened while the
programme is running, this button must be
pressed again after closing the door in order to
restart the programme from the point at which it
was interrupted.
This button must be depressed also after a power
failure and after having re-inserted the water
reservoir, if it has been emptied in the middle of a
programme.
In both cases light or (depending on the
phase in progress) flashes to remind you that the
start button needs to be pressed again.
7 Programme phase indicator lights
These lights indicate the various phases of the
programme as they are being performed.
“Drying” light
This light indicates that the appliance is in the drying
phase.
“Cooling” light
This light indicates that the appliance is in the
cooling phase. At the end of drying, there is a 10
minute cooling phase to cool the laundry.
If light or is flashing, this means that the Start
button needs to be pressed again for the programme
to resume.
125980900.qxp 2005-01-05 15:19 Page 6
Page 7
7
ENGLISH
“End of programme” light
This light flashes at the end of the cooling phase and
during the anti-creasing phase.
“Water reservoir full” light
This light flashes when the reservoir is full.
8 Programme/Time selector dial
Allows you to select electronically controlled or time
controlled drying.
Turn the dial to the required programme or time.
Electronically controlled drying
(automatic)
The appliance runs these programmes with the help
of probes which detect the degree of dampness of
the laundry.
Simply select the programme according to the type
of laundry and degree of drying required.
Time controlled drying
Can be used to finish off drying if necessary.
Select the 90 or 60 minute programme for cottons or
the 30 minute programme for synthetics.
To cancel a programme which is running, turn the
programme selector dial to “0”.
At the end of drying, turn the selector dial to “0”
before removing the laundry.
125980900.qxp 2005-01-05 15:19 Page 7
Page 8
8
Programme chart
Automatic drying (electronic programmes)
(*) According to CEI 1121 Standards.
Type of laundry
Degree of drying
required
Max-load
(1)
Programme
Cotton & linen
extra dry
ready to wear
store dry
slightly damp
iron dry
machine iron dry
6 kg
6 kg
6 kg
6 kg
6 kg
6 kg
A
B
C(*)
D
E(*)
F
Time controlled drying
(1) Never overfill the drum (do not load large quilts, for example).
Drying times vary according to:
• The type of laundry
• The size of the load
• The degree of spinning prior to drying.
Fresh & Cool
This position on programme selector dial can be used to freshen the laundry (e.g. to remove a persistent odour
of moth-balls).
Load
It is often difficult to estimate the weight of items to be dried. We therefore recommend that you adopt the
following guidelines:
• cotton, linen: drum full but not too tightly packed;
• synthetics: drum no more than half full;
• delicate fabrics: drum no more than one third full.
Type of laundry Drying time Max-load
(1)
Programme
selector dial position
Cotton
Cotton
Synthetics
90 min
60 min
30 min
6 kg
6 kg
2.5 kg
90’
60’
30’
Synthetics
extra dry
store dry
iron dry
2.5 kg
2.5 kg
2.5 kg
G
H(*)
J
Jumpers
Baby cycle
1 kg
(10 jumpers)
K
Jackets, trousers,
dresses, skirts.
Dry fresh
1 - 4 garments
L
• Baby cycle “K” is a special programme for jumpers to be dried “ready to wear”.
• Dry fresh “L” is not a drying programme but it is designed to clean and freshen garments labelled “dry clean
only” and “hand wash” at home, in your tumble dryer, using the special product available on the market.
125980900.qxp 2005-01-05 15:20 Page 8
Page 9

ENGLISH
9
Operating sequence
Before using your tumble dryer for the first time, we
recommend to place a few damp cloths inside the
appliance and dry for 30 minutes.
There may be dust inside a brand new tumble dryer.
Drying
1. Connect the appliance.
2. Open the door.
3. Load the items one at a time, shaking them out
loosely.
4. Close the door. Please check the laundry does
not get caught between the door and filter.
5. Press the ON/OFF button : the mains-ON light
comes on.
6. Select the drying programme or time.
7. If required, press the low temperature button
and/or the buzzer OFF button .
8. Press the Start button for 2 seconds: light
comes on and drying starts.
The drum turns alternately in both directions
during drying.
All drying programmes end with a 10 minute
cooling phase (light is on).
You may remove the laundry after this phase.
9. If the laundry is not removed at the end of the
cycle, the dryer performs an anti-creasing phase
(duration: 30 minutes maximum).
The buzzer sounds every 10 seconds (if the
button has not been pressed).
Lights and flash alternately.
If you do not remove the laundry, the dryer will
stop automatically at the end of the anti-creasing
phase.
P1108
P1149
Lights and flash and the mains-ON light
stays on.
Turn the programme selector dial to “0”; lights
and go out.
Release the ON/OFF button (the mains-ON light
goes out) and immediately remove the laundry.
After each use
• Turn the programme selector dial to “0”.
• Switch the appliance off by releasing the ON/OFF
button . The mains-ON light goes out.
• Clean the filters (see page 11).
• Empty the water reservoir (see page 12).
Important!
If the drying programme has to be stopped before it
reaches the end, we recommend that you turn the
programme selector dial to position (cooling) and
wait until the end of this phase before removing the
laundry. This will avoid a build-up of heat inside the
appliance.To do this first turn the dial to “0” and then
to and depress Start button
.
Modifying the programme
To change a programme which is running, first
cancel it by turning the programme selector dial to
“0”. Select the new programme and press the Start
button .
125980900.qxp 2005-01-05 15:20 Page 9
Page 10

10
Useful hints
• Try to load to the maximum capacity of the
machine as small loads are uneconomical.
For information, here is a list of the average
weights of some common laundry items.
Sheet 700 - 1000 g
Tablecloth 400 - 500 g
Kitchen towel 70 - 120 g
Table napkin 50 - 100 g
Towelling hand towel 150 - 250 g
Bathrobe 1000 - 1500 g
Man’s shirt 200 - 300 g
Pillowcase 100 - 200 g
Man’s pyjamas 400 - 500 g
Ladies’ nightdress 200 - 250 g
• Never tumble dry the following:
Particularly delicate items such as net curtains,
woollen, silk, fabrics with metal trim, nylon tights,
bulky materials such as anoraks, blankets,
eiderdowns, sleeping bags, feather quilts and any
items containing rubber foam or materials similar
to rubber foam.
• Always follow the instructions on garment labels:
may be tumble dried
normal drying (high temperature)
delicate drying (low temperature)
do not tumble dry
• Close pillowcases and covers with fasteners to
prevent small laundry items getting tangled inside
them. Close press studs, zips and hooks and tie
belts and apron strings.
• Sort laundry according to type and degree of
drying required.
• Do not over-dry laundry, this avoids creasing and
saves energy.
• Avoid drying dark clothes with light coloured fluffy
items such as towels as they could attract the fluff.
• The laundry must be thoroughly spun before
tumble drying.
• Easy-care items, too, e.g. shirts, should be briefly
pre-spun before drying (depending on crease
resistance approx. 30 seconds or using the special
brief spin programme of your washing machine).
• Knitted textiles (knitted underwear) may shrink a
little during drying. Please do not overdry items of
this type. It is advisable to allow for shrinkage
when choosing the size of new purchases.
• You can also put starched items into your dryer.
However, to achieve the desired starched effect,
choose the programme “iron dry”. To remove any
starch residues, wipe out the internal drum after
drying with a moist cloth and then rub it dry.
• To avoid a static charge when drying is completed,
use either a fabric softener when you are washing
the laundry or a fabric conditioner specifically for
tumble dryers.
• Remove the laundry when the dryer has finished
drying.
• If individual items are still damp after drying, set a
brief post-drying time, but at least 30 minutes.
This will be necessary particularly for multilayered
items (e.g. collars, pockets, etc.).
125980900.qxp 2005-01-05 15:20 Page 10
Page 11

ENGLISH
11
Maintenance and Cleaning
You must disconnect the appliance from the
electricity supply, before you can carry out any
cleaning or maintenance work.
External cleaning
Use only soap and water and then dry thoroughly.
Important: do not use methylated spirit, diluents or
similar products.
Cleaning the door
Clean periodically the interior part of the door to
remove any fluff from the seals around the filter.
Accurate cleaning ensures correct drying.
Cleaning the filters
Your dryer will only function well if the filters are
clean.
The filters collect all the fluff which accumulates
during drying and they must therefore be cleaned at
the end of each programme, before removing the
laundry, with a damp cloth.
The filter in the inner door must be removed for
cleaning.
Do not be alarmed by the amount of fluff. It is not
due to excessive wear caused by the dryer. All fabric
loses fluff when drying but it goes un-noticed in the
air. In a tumble dryer it simply collects in the filter.
A
UT
OREVE
RSE
k
g
5
k
g
2
,
5
800 / 90
0
7
0
'
-
9
0
'
3
5
'
-
5
0
'
10
00 / 1200
6
5
'
-
8
5
'
3
0
'
-
4
5
'
8
00 / 900
8
0
'
-
1
0
0
'
5
5
'
-
7
0
'
10
00
/ 1200
7
5
'
-
9
5
'
5
0
'
-
6
5
'
650
5
0
'
-
6
0
'
3
0
'
-
3
5
'
k
g
2
,
5
k
g
1
P1151
P1110
AU
TO
R
EV
ER
SE
k
g
5
k
g
2
,
5
8
00
/
90
0
7
0
'
-
9
0
'
3
5
'
-
5
0
'
10
0
0
/
12
00
6
5
'
-
8
5
'
3
0
'
-
4
5
'
80
0 /
9
00
8
0
'
-
10
0
'
5
5
'
-
7
0
'
100
0
/
12
00
7
5
'
-
9
5
'
5
0
'
-
6
5
'
6
5
0
5
0
'
-
6
0
'
3
0
'
-
3
5
'
k
g
2
,
5
k
g
1
P1150
After a while, a withish patina due to detergent
residue on laundry forms on the filters. When this
occurs, clean the filters with warm water using a
brush. Remove the filter in the door opening as per
picture (it can be positioned with the tooth facing to
the left or to the right).
Do not use the appliance without filters.
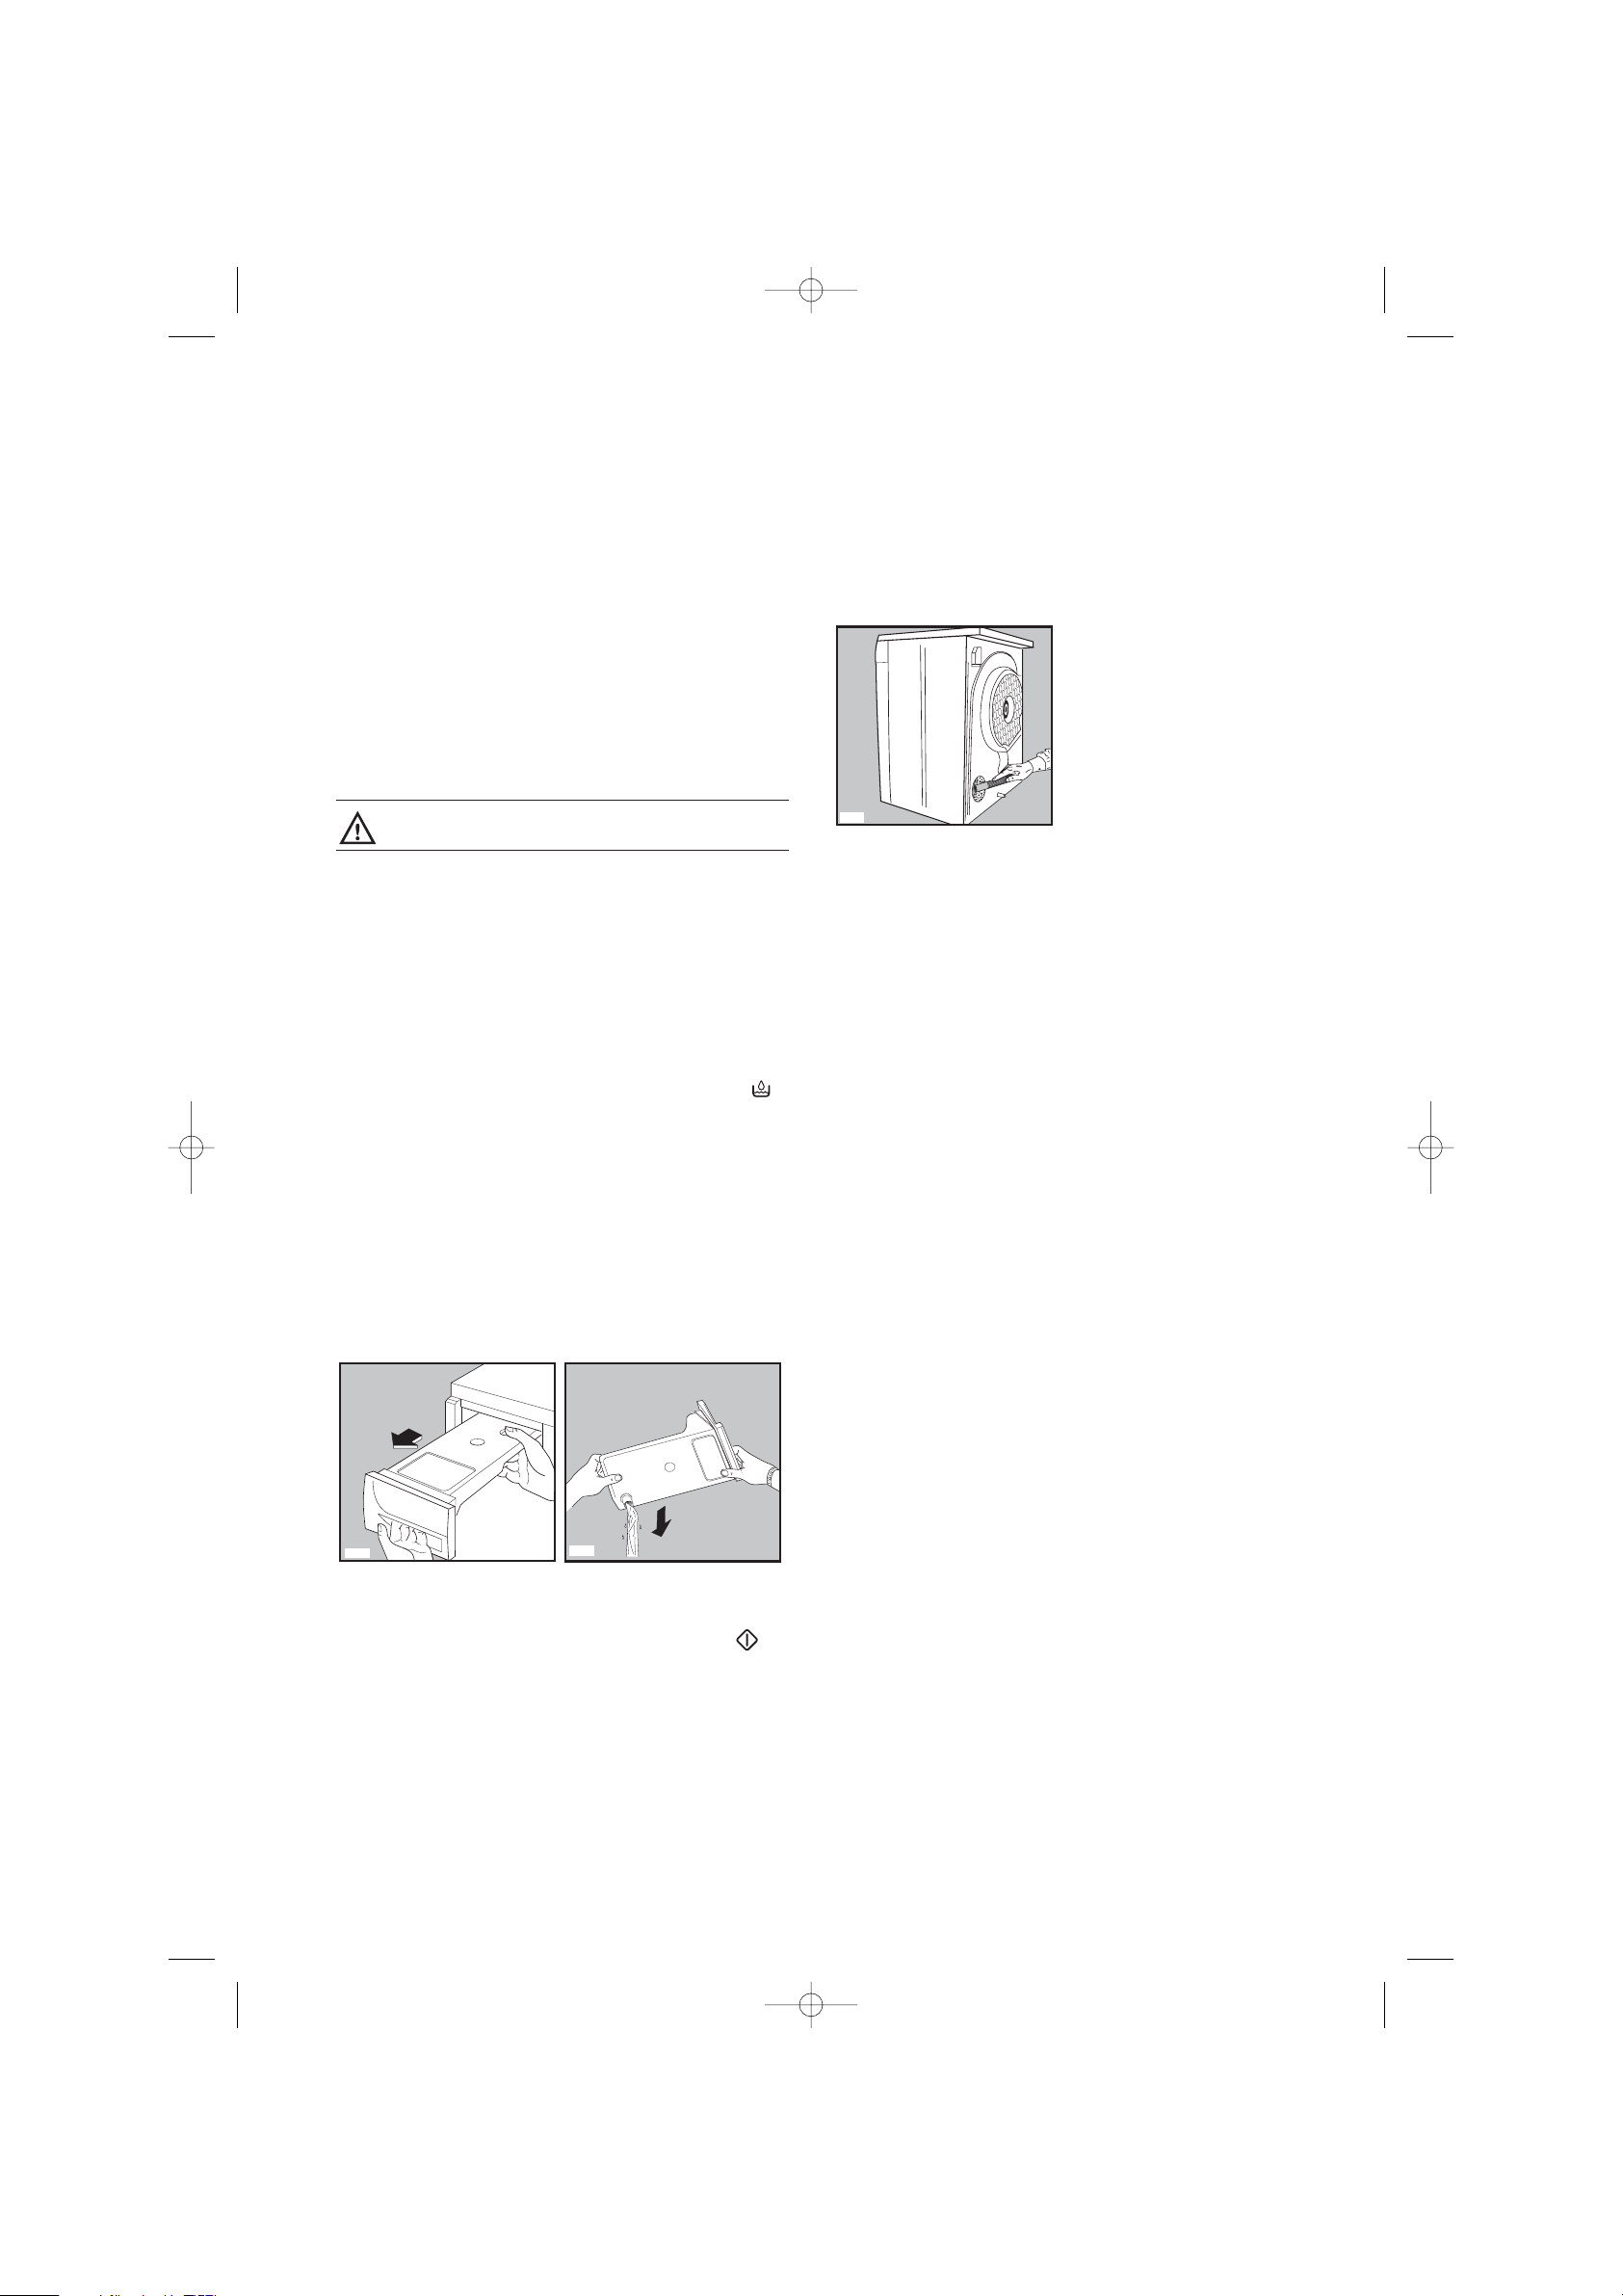
Cleaning the condenser unit
Clean the air condenser periodically, 3 or 4 times a
year depending on how frequently the dryer is used.
The condenser is situated at the lower part of the
cabinet behind a small door. To open the door, push
the catch as per picture.
To pull out the condenser, first turn the two red stops
downwards and then remove the condenser unit
holding it at the handle.
Clean it with a brush and rinse it under the shower if
necessary.
P0639
P1155
P1154
P1177
A
UT
OR
E
VER
S
E
k
g
5
k
g
2
,
5
80
0
/ 9
00
7
0
'
-
9
0
'
3
5
'
-
5
0
'
1
00
0
/ 12
00
6
5
'
-
8
5
'
3
0
'
-
4
5
'
8
00
/
900
8
0
'
-
1
0
0
'
5
5
'
-
7
0
'
1
0
00
/
1
200
7
5
'
-
9
5
'
5
0
'
-
6
5
'
6
5
0
5
0
'
-
6
0
'
3
0
'
-
3
5
'
k
g
2
,
5
k
g
1
P1152
125980900.qxp 2005-01-05 15:20 Page 11
Page 12
12
Also clean the outside, removing all fluff.
Clean the rubber seal round the condenser cabinet
and in the inner part of the small door with a damp
cloth.
Re-fit the condenser, turn the red stops upwards and
close the door.
Important! Do not use pointed objects or utensils to
clean the spaces between the plates, as this could
damage the condenser and make it permeable.
Do not use this appliance if the condenser
has not been fitted.
Emptying the water reservoir
Water extracted from the laundry condenses inside
the machine and is collected in a reservoir.
The reservoir must be emptied after each drying
cycle to ensure efficient operation when the machine
is next used.
If this is not done a safety device trips: pilot light
on the control panel comes on and the programme
stops, leaving the laundry damp. The buzzer will
sound for 1 minute.
The reservoir can be emptied even in the middle of a
programme.
Proceed as follows:
• Pull out the reservoir
• Turn it upside down and let water flow down
•
Re-fit the reservoir
The reservoir must be re-inserted correctly.
After inserting the reservoir the START-button
has to be depressed again to allow the programme
to continue.
Handy tip: The condensed water may be used in a
steam iron or to top up a battery, etc. In this case it
must be filtered (e.g. through a coffee filter).
P1157
P1156
Cleaning the air intake grille
Using a vacuum cleaner remove the fluff from the air
intake grille at the back of the appliance.
Cleaning the drum
When your laundry does not reach the desired
degree of dryness, in other words, when it turns out
either too dry or too damp, we advise you to clean
the inside of the drum with a cloth soaked with
vinegar.
This will eliminate the slight patina that has formed in
the drum (due to residues of detergent and softeners
used in the washing, and to the lime contained in the
water), which prevents the probes from detecting the
correct degree of dryness.
125980900.qxp 2005-01-05 15:20 Page 12
P1162
Page 13

ENGLISH
13
Something not working?
If, after the above checks, there is still a fault, call
your local Service Centre.
Please make sure you give the model and serial
Before contacting your local Service Centre, please make the following checks:
Problem Possible cause
• The dryer does not work:
• The door(s) is(have) open.
• The plug is not fitted into the wall socket.
• There is no electricity supply from the wall socket.
• The selector dial is not set correctly.
• The water reservoir is full or not correctly inserted.
• The start button has not been depressed.
• The dryer does not dry properly:
• The filters are clogged.
• The condenser is clogged.
• The water reservoir is full.
• The selected cycle is not suitable for the laundry.
• Insufficient drying time.
• The laundry has not been spun properly.
• The low temperature function has been
selected.
• Excessive laundry load.
• The dryer is not correctly installed.
number of the appliance.
This information can be found on the rating plate
(see picture on page 4 ).
125980900.qxp 2005-01-05 15:20 Page 13
Page 14

14
Estimado cliente,
Le rogamos leer atentamente estas instrucciones de uso y prestar particular atención a las normas de
seguridad escritas en las primeras páginas. Le aconsejamos conservar estas instrucciones para consultas
futuras y darlas al nuevo usuario en caso de venta del aparato.
Daños de transporte
Una vez desembalada la máquina, asegúrese de que no esté dañada. En caso de duda, evite ponerla en
función y diríjase al Centro de Asistencia local.
El triángulo de advertencia subraya instrucciones muy importantes para Su seguridad o para el buen
funcionamiento del aparato. Le rogamos respetarlas.
Las informaciones precedidas por este símbolo completan las instrucciones de uso y de utilización
práctica del aparato.
Este símbolo indica consejos e instrucciones para un empleo económico del aparato que respete el
ambiente.
Nuestra contribución al ambiente: utilizamos
papel reciclado.
Algunos párrafos de este libro de instrucciones han sido identificados con símbolos que tienen el siguiente
significado:
Indice
Advertencias....................................................15
Eliminación ............................................15
Consejos para la protección del
ambiente
............................................................16
Características técnicas ............................16
Descripción del aparato..............................16
Instalación........................................................17
• Desembalaje ......................................................17
• Colocación..........................................................17
• Conexión eléctrica..............................................17
• Kit de montaje sobre la lavadora........................17
• Reversibilidad de la puerta ................................17
Uso......................................................................18
• Cuadro de mandos........................................18-19
• Programas de secado ........................................20
• Secuencia de las operaciones............................21
• Consejos útiles ..................................................22
Mantenimiento................................................23
• Limpieza externa ................................................23
• Limpieza de la puerta ........................................23
• Limpieza de los filtros ........................................23
• Limpieza del condensador..................................23
• Vaciado del contenedor de agua........................24
• Limpieza del tambor ..........................................24
• Limpieza de la rejilla de aspiración ....................24
Anomalías de funcionamiento ................25
125980900.qxp 2005-01-05 15:21 Page 14
Page 15

15
ESPAÑOL
Advertencias
Instalación
• Cualquier intervención eléctrica necesaria para la
instalación de este aparato debe ser efectuada por
personal especializado.
• Controle que el aparato no esté apoyado sobre el
cable de alimentación.
• Si el aparato está colocado sobre un piso cubierto
de moqueta, controle que entre las patas de apoyo
y el piso haya circulación de aire.
Uso
• El aparato ha sido proyectado para un uso
doméstico. El fabricante no asume responsabilidad
alguna por los daños provocados por un uso
impropio del aparato o por la inobservancia de las
instrucciones de uso.
• Desenchufe siempre el aparato después del uso.
• No debe poner ropa que gotea dentro de la
secadora.
• No introduzca en la secadora ropa que haya
estado en contacto con sustancias químicas, como
solventes para la limpieza a seco, pues son
sustancias volátiles y podrían provocar una
explosión. Seque solamente prendas lavadas en
agua.
• Riesgo de incendio: los tejidos que se han
impregnado o empapado con aceites de cocina
constituye un peligro de incendio y no debería
introducirse en la secadora para realizar un
proceso de secado.
• Si usted ha lavado su ropa con el producto
quitamanchas deberá realizar un aclarado extra en
el programa de lavado antes de introducir la ropa
la secadora
• Controle siempre que en los bolsillos no se hayan
olvidado encendedores.
• No seque zapatos de lona ni zapatos deportivos
ya que podrían detenerse entre la puerta y el
tambor bloqueando el tambor.
• Deje la puerta entreabierta cuando no se usa el
aparato; esto permite una mejor conservación de
la junta de la puerta.
• Debe limpiar los filtros de la pelusa después de
cada ciclo.
• No use el aparato con los filtros dañados o sin
filtros ya que existe el riesgo de incendio.
• Verifique que no se acumule pelusa alrededor de
la secadora.
Seguridad en general
• Es peligroso modificar o tratar de modificar las
características técnicas de este aparato.
• No trate de reparar el aparato sin la ayuda de un
técnico. Las reparaciones efectuadas por personal
no especializado pueden provocar daños a
personas o averías. Póngase en contacto con el
Centro de Asistencia y solicite las piezas de
repuesto originales.
Seguridad para los niños
• Los niños no se dan cuenta de los peligros de los
aparatos eléctricos. Cuando el aparato está
funcionando vigile atentamente a los niños y no
los deje jugar con el aparato.
• Las piezas de embalaje (por ej. películas,
poliestireno), pueden ser peligrosas para los
niños. ¡Peligro de sofocación! Tenga las piezas
fuera del alcance de los niños.
• Asegúrese de que los niños o los pequeños
animales domésticos no entren en el tambor de la
secadora.
• Cuando quiera destruir el aparato, desenchúfelo,
corte el cable de alimentación y elimine el enchufe
con el cable restante. Inutilice el cierre de la
puerta: de esta manera los niños que están
jugando no se quedarán atrapados en el aparato.
Estas advertencias han sido previstas para vuestra seguridad. Por lo tanto es necesario leerlas atentamente
antes de instalar y utilizar el aparato.
Eliminación
• Materiales de embalaje
Los materiales que incluyen el símbolo pueden
ser reciclados.
Para poder recuperarlos se deben depositar en los
espacios apropiados (o contenedores).
• Aparato
Para una correcta eliminación de su viejo aparato, Le
aconsejamos utilizar las escombreras autorizadas.
¡Ayúdenos a mantener limpia Su ciudad!
125980900.qxp 2005-01-05 15:21 Page 15
Page 16

16
Para ahorrar energía y contribuir a la protección del
ambiente, aconsejamos atenerse a lo siguiente:
• El aparato trabaja en economía si se cargan las
cantidades máximas de ropa indicadas.
• Introduzca siempre ropa bien centrifugada. Cuanto
mayor es la velocidad de centrifugado, menor es el
gasto de electricidad y el tiempo de secado.
• No seque la ropa excesivamente, de esta manera
se evita la formación de pliegues y se ahorra
energía.
Seleccione el programa de secado en función del
tipo de ropa y del nivel de secado deseado.
• Para utilizar la carga máxima, la ropa que se debe
secar y guardar (secado para guardar) puede ser
secada junto con las prendas a planchar. A tal fin,
seleccione el programa para el secado de prendas
a planchar, saque estas últimas al final del
programa y luego finalice el secado de lo que
queda de la carga.
• Limpie regularmente los filtros para evitar tiempos
de secado excesivos y un gasto elevado de
electricidad.
• Ventile el local de manera adecuada. La
temperatura ambiente no debe superar +35 °C
durante el secado.
Consejos para la protección del ambiente
Características técnicas
DIMENSIONES: Altura 85 cm
Anchura 60 cm
Profundidad 58 cm
CONEXION ELECTRICA: 220/230 V/50 Hz
POTENCIA MAXIMA ABSORBIDA: 2200 W
POTENCIA MINIMA DEL FUSIBLE: 10 A
CAPACIDAD DE CARGA MAXIMA: Algodón, lino 6 kg
Sintéticos 2.5 kg
CONSUMOS: Algodón, lino 4.37 kWh (6 kg seco para guardar)
Algodón, lino 3,60. kWh (6 kg húmedo para planchar)
Sintéticos 1.40 kWh (2.5 kg seco para guardar)
Este aparato es conforme a las siguientes normas CEE:
- 73/23/CEE del 19/02/73 (norma sobre la baja tensión) y sucesivas modificaciones;
- 89/336/CEE del 03/05/89 (norma sobre la compatibilidad electromagnética) y sucesivas
modificaciones.
1 Cuadro de mandos
02 Contenedor de agua
03 Filtros
04 Tarjeta matrícula
05 Condensador
06 Patas regulables
Descripción del aparato
1
2
5
6
3
4
3
G
HJ
K
L
C
O
N
D
E
N
SE
R
D
RY
E
R
EL
E
C
T
R
O
N
I
C
S
EN
S
O
R
A
BCD
EF
0
A
B
C
D
E
F
G
H
J
K
90
60
3
0
L
125980900.qxp 2005-01-05 15:21 Page 16
Page 17

ESPAÑOL
17
Instalación
Advertencia
Desembalaje
Antes de usar el aparato extraiga la bolsa de
politeno con el relleno de poliestireno.
Retire cinta adhesiva en el interior en el lado
superior del tambor,
En caso de que, en futuro, se precise
desplazar el aparato, se deberá
transportarlo en sentido vertical.
Colocación
La secadora debe ser instalada en un ambiente muy
bien ventilado.
Para un correcto funcionamiento debe ubicar el
aparato en posición perfectamente horizontal.
Asegúrese de esto con la ayuda de un nivel de aire.
Regulando las patas es posible compensar los
desniveles e inclinaciones del piso.
El ambiente en donde se instala la secadora tiene
que estar limpio, sin acumulaciones de polvo y la
rejilla de ventilación anterior no debe estar atascada.
Las patas no se deben quitar nunca.
No reduzca la distancia de la secadora desde el
piso con moqueta o alfombras de pelo alto. Esto
podría provocar una acumulación de calor que
perjudicaría el buen funcionamiento de la
máquina.
¡Importante!
El aire caliente que la secadora emite puede llegar a
alcanzar una temperatura de 60°C. Por lo tanto el
aparato no debe ser instalado sobre pisos que no
sean resistentes a las temperaturas elevadas.
Mientras la secadora está funcionando, la
temperatura del cuarto en que se encuentra no debe
ser inferior a +5°C y superior a +35°C, ya que podría
afectar el funcionamiento del aparato.
El aire debe circular libremente alrededor del
aparato, por lo tanto no obstruya las rejillas de
aspiración posteriores.
P1106
Conexión eléctrica
El aparato funciona con una tensión de 220-230 V,
monofásica, 50 Hz.
Controle que el equipo eléctrico doméstico pueda
sostener la carga máxima requerida (2.2 kW)
considerando también los otros eventuales
electrodomésticos en funcionamiento.
Conecte el aparato a una toma de tierra, en
conformidad con las normas en vigor.
El fabricante declina cualquier
responsabilidad por los daños o las lesiones
provocadas por el incumplimiento de las
normas de seguridad antedichas.
Si se debe sustituir el cable de alimentación,
diríjase a nuestro Centro de Asistencia
técnica.
Una vez que se haya instalado la máquina,
asegurarse de que se pueda acceder fácilmente
al cable de alimentación.
Kit de montaje sobre la lavadora
En las tiendas de los revendedores autorizados hay
a disposición un kit para poder instalar la secadora
sobre una lavadora con carga frontal y una
profundidad do plano de trabajo entre 48 y 60 cm.
Las instrucciones de instalación se suministran con
el kit. Le rogamos las lea atentamente antes de
instalar el aparato.
Reversibilidad de la puerta
Para facilitar la carga o la descarga de la ropa, se
puede modificar el sentido de abertura de la puerta.
Esta operación debe ser efectuada por personal
especializado.
Diríjase al centro de asistencia técnica más cercano
a su domicilio.
P1107
125980900.qxp 2005-01-05 15:21 Page 17
Page 18

18
L
CONDENSER DRYER
ELECTRONIC
12345678
GH JK
A
BCDEF
ZTE 220
0
A
B
C
D
E
F
G
H
J
K
90
60
30
L
6
AUTOREVERSE
1 Ficha programas
Ayuda a seleccionar el programa de secado
adecuado.
2 Luz piloto de funcionamiento
Se enciende pulsando la tecla “marcha/parada” y se
apaga pulsando nuevamente esta tecla.
3 Tecla marcha/parada
Pulse esta tecla para encender el aparato.
Pulsándola nuevamente el aparato se apaga.
4 Tecla reducción temperatura
Si se pulsa esta tecla, el aparato efectuará un ciclo
de secado a una temperatura inferior. La luz piloto
correspondiente se enciende.
Se aconseja esta opción para ropa delicada.
Esta tecla puede ser utilizada también para el
secado a tiempo.
La secadora calienta a 1400 W en lugar de 2000 W.
Si no se pulsa esta tecla, el secado se realiza con la
potencia máxima (2000 W).
5 T ecla de p arada señal acústica
Una señal acústica suena pulsando las teclas,
durante la fase “anti-pliegues”, al final del programa
y cuando el contenedor de água está lleno.
Pulse esta tecla para suprimir la señal acústica
durante la fase “anti-pliegues”.
La luz piloto correspondiente se enciende.
6 Tecla de arranque
Después que el programa o tiempo de secado ha
sido seleccionado, pulse esta tecla dos segundos
para arrancar el aparato.
Si se abre la puerta del aparato o la tapa inferior
mientras el aparato está secando la ropa, la tecla
de arranque debe ser pulsada nuevamente
después de haber cerrado la puerta para que el
programa pueda continuar.
Esta tecla debe ser pulsada también después de un
apagón y después que se ha reinsertado el
contenedor de agua, si éste ha sido vaciado durante
el programa de secado.
En ambos casos la luz o (según la fase en
curso) parpadea para avisar que se debe pulsar otra
vez la tecla de arranque.
7 Display fases programa
Después de haber arrancado el programa, la luz
piloto correspondiente a la fase en curso se
enciende.
Luz “secado”
Esta luz señala que el aparato está efectuando la
fase de secado.
Luz “enfriamiento”
Esta luz se enciende cuando el aparato efectúa la
fase de enfriamiento. Esta fase dura 10 minutos y
empieza después de la fase de secado y antes que
empiece la fase anti-pliegues.
Uso
Cuadro de mandos
125980900.qxp 2005-01-05 15:21 Page 18
Page 19

ESPAÑOL
19
Si la luz o parpadea, significa que se debe
pulsar otra vez la tecla de arranque para reanudar el
programa.
Luz “fin de programa”
Esta luz parpadea cuando termina el programa
(después de la fase de enfriamiento) y sigue
parpadeando durante la fase anti-pliegues.
Luz “contenedor de agua lleno”
Esta luz parpadea cuando el contenedor de agua
está lleno.
8 Mando selector de programas
El mando selector le permite seleccionar un secado
electrónico (graduación en letras) o a tiempo
(graduación en minutos).
Secado automático (programas
electrónicos)
Con estos programas el aparato funciona mediante
sensores de humedad. Lo único que usted tiene que
hacer es colocar el mando selector en el programa
requerido según el tipo de ropa y el grado de secado
deseado (véase el cuadro programas).
Secado a tiempo
Usted puede seleccionar un tiempo de secado de
90, 60 minutos para el algodón y de 30 minutos para
los sintéticos para completar el secado, si es
necesario.
Para anular un programa en curso gire el mando
selector en “0”.
Cuando termina el secado gire el mando selector en
“0” antes de abrir la puerta.
125980900.qxp 2005-01-05 15:21 Page 19
Page 20

(*) Conforme a las normas CEI 1121
Tipo de ropa
Grado de secado
requerido
Carga máxima
kg
Programa
Algodón, lino
extra seco
seco
seco para guardar
ligeramente húmedo
húmedo para planchar
húmedo para
cilindro planchador
6 kg
6 kg
6 kg
6 kg
6 kg
6 kg
A
B
C(*)
D
E(*)
F
Secado a tiempo
Tipo de ropa Tiempo de secado Carga máxima
Posición
mando selector
Algodón, lino
Algodón, lino
Sintéticos
90 min
60 min
30 min
6 kg
6 kg
2.5 kg
90’
60’
30’
Sintéticos
extra seco
seco para guardar
húmedo para planchar
2.5 kg
2.5 kg
2.5 kg
G
H(*)
J
Monos para neonatos
Ciclo “Baby”
1 kg
(10 monos)
K
Trajes para hombres,
pantalones, trajes para
mujeres, faldas
Programa
“Limpieza en seco”
de 1 a 4 prendas
L
• El ciclo Baby "K" es un programa especial para secar los monos "listos para ser llevados".
• El programa "L" no es un programa específico de secado, sino que permite limpiar y refrescar prendas en
cuya etiqueta se lee "limpiar en seco" o "lavar a mano". A tal fin, utilice los productos específicos que se
encuentran en el comercio.
Cuadro programas
Secado automático (programas electrónicos)
Los tiempos de secado varían según :
• el tipo de ropa
• la cantidad de ropa
• el grado de centrifugado antes del secado
Ventilación con aire fresco
Esta posición en el mando selector puede ser utilizada para refrescar la ropa (p.ej. para eliminar un
persistente olor de naftalina).
Carga
Como es difícil calcular el peso de la ropa, se aconseja de cargar el tambor:
• completamente, pero sin comprimir, de algodón y lino;
• a la mitad, de sintéticos;
• a un tercio, de tejidos muy delicados.
20
125980900.qxp 2005-01-05 15:22 Page 20
Page 21

ESPAÑOL
21
Secuencia de las
operaciones
Antes de hacer funcionar el aparato la primera vez,
introduzca algunos trapos limpios, húmedos y
seleccione un tiempo de secado de 30 minutos. Así
estará seguro de que no habrá polvo o suciedad en
el tambor.
Secado
1. Enchufe el aparato.
2. Abra la puerta.
3. Introduzca las prendas en el tambor de una en
una, desplegándolas.
4. Cierre la puerta.
Asegúrese de que las prendas no queden
atascadas entre la puerta y el filtro.
5. Pulse la tecla marcha/parada :
la luz piloto de funcionamiento se enciende.
6. Seleccione el tiempo o el programa de secado.
7. Si necesario pulse la tecla y/o .
8. Pulse la tecla de arranque dos segundos: la
luz se enciende y el programa de secado
inicia.
El tambor gira en los dos sentidos durante el
secado.
Antes que se acabe el ciclo, una fase de
enfriamiento de 10 minutos empieza para enfriar
la ropa (la luz de control está encendida).
Al final de esta fase se puede sacar la ropa.
9. Si usted no saca la ropa, el aparato efectuará la
fase anti-pliegues por unos 30 minutos.
La señal acústica sonará cada 10 segundos (si no
se ha pulsado la tecla ).
Las luces y parpadean alternativamente.
P1108
P1149
Si usted no saca la ropa durante la fase antipliegues, el aparato se parará automáticamente al
final de esta fase: la luz piloto de funcionamiento
permanecerá encendida y las luces y
continuaran parpadeando.
Si se coloca el mando selector en “0”, las luces
y se apagan.
Pulse nuevamente la tecla para apagar el
aparato (la luz piloto de funcionamiento se apaga)
y saque la ropa del tambor.
Después de cada ciclo de secado
• Coloque el mando selector de programas en “0”.
• Apague el aparato pulsando la tecla . La luz
piloto de funcionamiento se apaga.
• Limpie los filtros (ver página 23).
• Vacie el contenedor de agua (ver página 24).
¡Importante!
Si el programa de secado debe ser parado antes de
que finalice su ciclo, le recomendamos que gire el
mando selector en la posición “0” y luego en la
posición y pulse la tecla de arranque .
Espere hasta el final de la fase de enfriamiento
antes de sacar la ropa. De este modo se evitará que
la temperatura aumente de manera excesiva en el
aparato.
Modificación del programa
Para cambiar un programa que está ejecutándose,
antes de todo se debe cancelarlo colocando el
mando selector en “0”. Seleccione el nuevo
programa y pulse la tecla de arranque .
125980900.qxp 2005-01-05 15:22 Page 21
Page 22

22
Consejos útiles
• Trate de usar la secadora a plena carga, las
cargas pequeñas son antieconómicas.
La siguiente es una lista indicativa del peso
promedio de las prendas más comunes.
Sábana 700 - 1000 g
Manteles 400 - 500 g
Paños de cocina 70 - 120 g
Servilletas 50 - 100 g
Toallas pequeñas 150 - 250 g
Albornoces 1000 - 1500 g
Camisas de hombre 200 - 300 g
Fundas 100 - 200 g
Pijamas de hombre 400 - 500 g
Camisones 200 - 250 g
• Nunca seque las prendas siguientes en la
secadora:
Prendas particularmente delicadas como cortinas
de encaje, lana, seda, tejidos con aplicaciones en
metal, medias de nylon, prendas voluminosas
como chaquetas de invierno, cubrecamas, mantas
acolchadas, sacos de dormir, edredones o
cualquier otra prenda que contiene gomapluma o
materiales similares.
• Siga siempre las instrucciones indicadas en las
etiquetas de los vestidos:
se puede secar en la secadora
secado normal (alta temperatura)
secado delicado (baja temperatura)
no secar en la secadora
• Abroche las fundas de los almohadones y sábanas
para evitar que la ropa más chica se envuelva en
el interior. Cierre los botones a presión, cierres y
ganchitos y anude los cinturones y tiras de
delantales.
• Seleccione la ropa según el tipo y el grado de
secado requerido.
• No seque la ropa excesivamente, de esta manera
se evita la formación de pliegues y se ahorra
energía.
• Evite introducir ropa oscura junto con las prendas
más claras como las toallas, porque la primera
podría atraer la pelusa.
• La ropa debe ser bien centrifugada antes de ser
introducida en la secadora.
• Los tejidos sintéticos deben ser centrifugados
brevemente (aprox. 30 segundos, o bien utilizando
el ciclo de centrifugado breve de vuestra
lavadora).
• Los tejidos de punto (por ejemplo la ropa interior)
pueden achicarse levemente con el calor.
Recuérdelo cuando los compren.
• Se pueden secar también las telas almidonadas.
Para mantener el efecto de almidonado, elija el
programa “húmedo para planchar”. Para remover
los residuos de almidón del tambor, límpielo con
un trapo húmedo.
• Para evitar que haya electricidad estática al final de la
fase de secado, use un suavizante para tejidos
durante el lavado o un producto especial para las
secadoras.
• Quite la ropa cuando el aparato ha completado el
ciclo de secado.
• Si alguna ropa está todavía húmeda al final del
secado, seleccione un tiempo de al menos 30
minutos. Esto podría ser necesario en el caso de
ropa multi-estrato (por ejemplo cuellos, bolsillos,
etc.).
125980900.qxp 2005-01-05 15:22 Page 22
Page 23

ESPAÑOL
23
Se debe desenchufar el aparato antes de efectuar
cualquier operación de limpieza o de mantenimiento.
Limpieza externa
Use solamente agua y jabón y luego seque
cuidadosamente.
Importante: no use alcohol, solventes o productos
similares.
Limpieza de la puerta
Limpie periódicamente la parte interna de la puerta
para eliminar la pelusa de las juntas que hay
alrededor del filtro.
Una limpieza correcta asegura un secado correcto.
Limpieza dos filtros
La secadora funcionará bien si los filtros estan
limpios.
Los filtros recogen toda la “pelusa” que se acumula
durante el secado y de consecuencia deben ser
limpiados al final de cada programa, antes de sacar
la ropa, con un paño húmedo.
El filtro que hay en la parte interna de la puerta debe
ser extraido para su limpieza.
No se alarme por la cantidad de pelusa. Esto no se
debe a un desgaste excesivo de la ropa causado por
la secadora. Todas las fibras pierden pelusa durante
el secado; pero mientras en ocasión del secado al
aire libre este fenómeno no se nota, durante el
secado en el aparato la pelusa se recoge en el filtro.
AUT
O
RE
VE
RSE
k
g
5
k
g
2
,
5
8
00 / 90
0
7
0
'
-
9
0
'
3
5
'
-
5
0
'
1
000 / 1200
6
5
'
-
8
5
'
3
0
'
-
4
5
'
8
00 /
900
8
0
'
-
1
0
0
'
5
5
'
-
7
0
'
1000 / 12
00
7
5
'
-
9
5
'
5
0
'
-
6
5
'
65
0
5
0
'
-
6
0
'
3
0
'
-
3
5
'
k
g
2
,
5
k
g
1
P1151
P1110
A
U
TO
RE
V
ERS
E
k
g
5
k
g
2
,
5
80
0
/ 9
00
7
0
'
-
9
0
'
3
5
'
-
5
0
'
100
0
/
1
20
0
6
5
'
-
8
5
'
3
0
'
-
4
5
'
8
00
/ 9
0
0
8
0
'
-
1
0
0
'
5
5
'
-
7
0
'
1
00
0
/
1
20
0
7
5
'
-
9
5
'
5
0
'
-
6
5
'
65
0
5
0
'
-
6
0
'
3
0
'
-
3
5
'
k
g
2
,
5
k
g
1
P1150
Con el paso del tiempo, en los filtros puede aparecer
una pátina blancuzca producida por los residuos de
detergente presentes en la ropa. Límpielos con agua
caliente, utilizando un cepillo. Para sacar el filtro de
la puerta, levántelo del modo indicado en la figura.
Se puede situar el filtro con la lengüeta orientada
hacia la izquierda o la derecha.
No use el aparato sin filtros.
Limpieza del condensador
Quite la pelusa del condensador regularmente según
la frecuencia de uso y el tipo de ropa que se seca.
Limpie el condensador cada vez que hay pelusa.
El condensador está situado en la parte inferior del
aparato, detrás de una tapa. Para abrirla, pulse la
tecla según se indica en figura.
Para sacar el condensador, gire los dos discos rojos
hacia abajo y luego tire del condensador hacia el
exterior, tomándolo por el asa.
P1155
P1154
P1177
AU
T
OR
EVE
R
SE
k
g
5
k
g
2
,
5
8
00
/
90
0
7
0
'
-
9
0
'
3
5
'
-
5
0
'
1
000
/
12
0
0
6
5
'
-
8
5
'
3
0
'
-
4
5
'
80
0
/ 9
00
8
0
'
-
1
0
0
'
5
5
'
-
7
0
'
10
0
0
/
1
2
00
7
5
'
-
9
5
'
5
0
'
-
6
5
'
6
50
5
0
'
-
6
0
'
3
0
'
-
3
5
'
k
g
2
,
5
k
g
1
P1152
Mantenimiento
125980900.qxp 2005-01-05 15:22 Page 23
Page 24

24
Limpielo con una ducha de mano o con un cepillo
delicado.
Limpie también la parte exterior, quitando toda la
pelusa.
Limpie las juntas alrededor del condensador y en el
interior de la trapa con un paño húmedo.
Vuelva a instalar el condensador en su alojamiento,
gire los dos discos rojos hacia arriba y cierre la tapa.
¡Importante! No utilice objetos o herramientas
puntiagudos para limpiar los espacios entre las
placas, porque se podría dañar el condensador y
hacerlo permeable.
No use este aparato si el condensador no
ha sido colocado en su lugar.
Vaciado del contenedor de agua
El agua que sale de la ropa mientras se está
secando se recoge en un contenedor especial. Este
contenedor debe ser vaciado después de cada ciclo,
pero puede ser vaciado también durante el ciclo de
secado. Si usted se olvida de vaciar el contenedor,
la luz se encenderá en el cuadro de mandos y el
ciclo de secado se parará automáticamente también
si la ropa no se ha secado todavía.
La señal acústica sonará durante un minuto.
El contenedor puede ser vaciado también durante el
programa de secado.
Proceda de la siguiente manera:
• Extraiga con mucho cuidado e el contenedor
• Vuelque el contenedor y deje correr el agua.
• Vuelva a colocar el contenedor en el panel de
mandos.
P0639
Se debe volver a introducir el contenedor,
empujándolo hasta el fondo.
Una vez introducido el contenedor, se debe pulsar
otra vez la tecla de ARRANQUE para permitir la
continuación del programa.
Importante: el agua de condensación, después de
ser filtrada (por ejemplo con un filtro de café) se
puede usar en una plancha o para rellenar una
batería.
Limpieza del tambor
Cuando la ropa no alcanza el grado de secado
deseado, y por lo tanto es demasiado seca o
demasiado húmeda, aconsejamos limpiar el interior
del tambor con un paño embebido de vinagre.
Éste eliminará la sutil pátina que se forma en el
tambor, causada por los residuos de detergente y de
eventuales suavizantes utilizados durante el lavado
y por la caliza contenida en el agua, que impide a
las sondas medir el grado correcto de secado.
Limpieza de la rejilla de aspiración
Limpie con cuidado la rejilla de aspiración trasera
con una aspiradora.
P1162
P1157
P1156
125980900.qxp 2005-01-05 15:22 Page 24
Page 25

25
ESPAÑOL
Anomalías de funcionamiento
Antes de ponerse en contacto con el Centro Asistencia Zanussi de zona, efectue los siguientes controles:
Si después de haber efectuado los controles antes
citados la avería persiste, llame el Centro de
Asistencia de zona, indicando el tipo de modelo y el
número de serie del aparato.
Problema Causa posible
• La secadora no funciona:
• La puerta o la trapa está abierta.
• No hay electricidad.
• El fusible del contador está dañado.
• No se ha seleccionado el tiempo o programa de
secado.
• La tecla de arranque no ha sido pulsada.
• El contenedor de agua está lleno o no está
introducido correctamente.
• El aparato no seca correctamente:
• Los filtros y/o el condensador estan atascados.
• El contenedor de agua está lleno.
• El programa seleccionado no es apropiado para la
ropa.
• Tiempo de secado insuficiente.
• La tecla de reducción temperatura ha sido
pulsada.
• La ropa no ha sido centrifugada de manera
adecuada.
• El tambor está sobrecargado.
• La secadora no ha sido instalada correctamente.
Estas informaciones figuran en la tarjeta matrícula
(ver página 16).
125980900.qxp 2005-01-05 15:22 Page 25
Page 26

From the Electrolux Group. The world’s No. 1 choice.
The Electrolux Group is the world's largest producer of powered appliances for kitchen, cleaning and outdoor
use. More than 55 million Electrolux Group products (such as refrigerators, cookers, washing machines,
vacuum cleaners, chain saws and lawn mowers) are sold each year to a value of approx. USD 14 billion in
more than 150 countries around the world.
125980900.qxp 2005-01-05 15:22 Page 27
 Loading...