

Page 1
TUMBLE
DRYER
KUIVAUS-
RUMPU
KÄYTTÖOHJEINSTRUCTION
BOOKLET
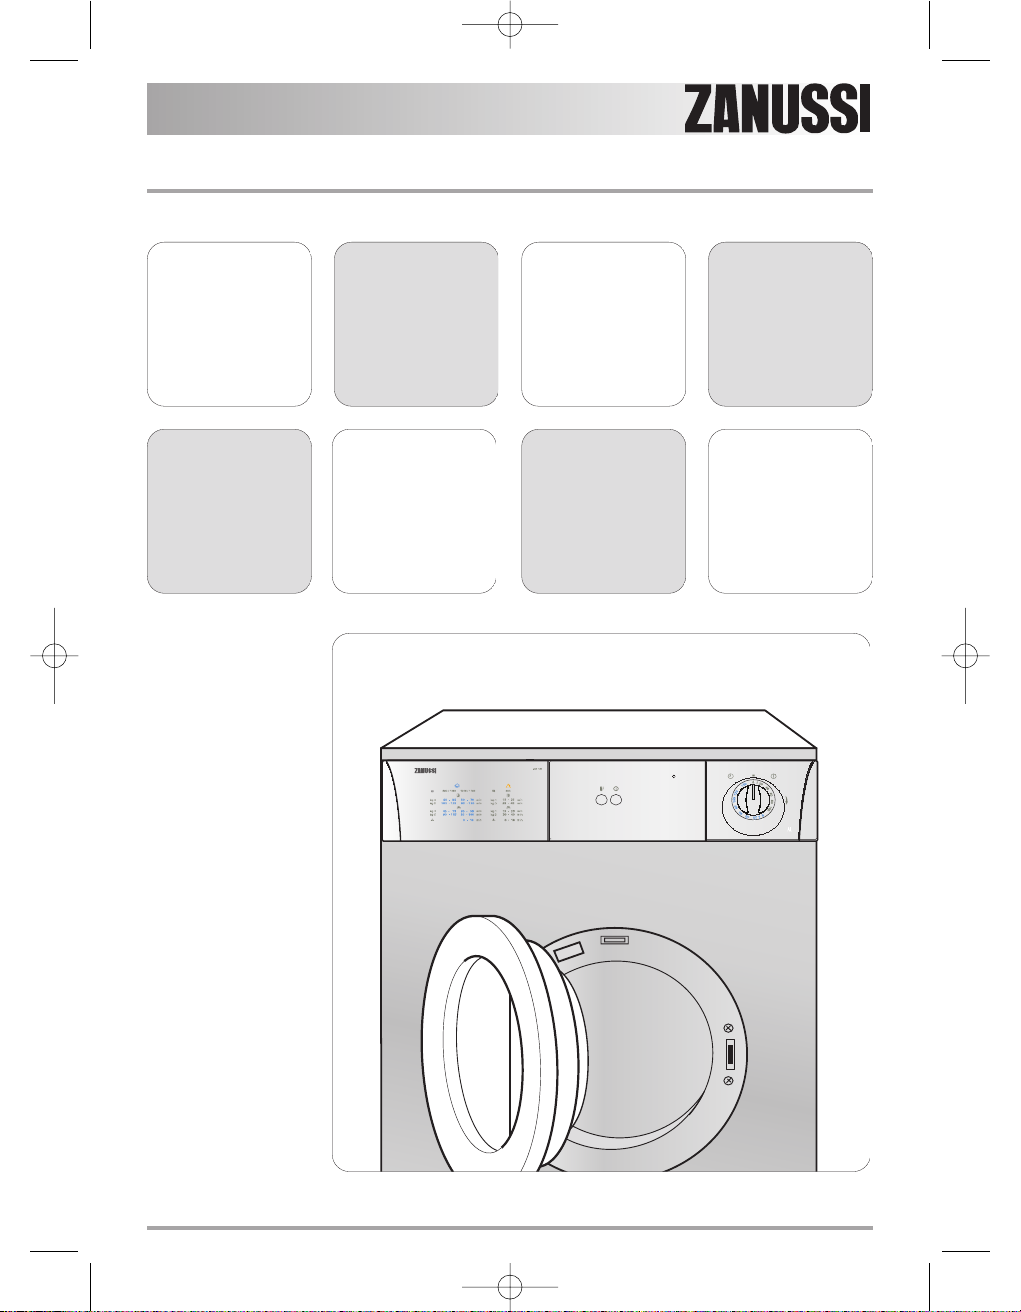
ZTB170
125989121.qxp 2007-07-06 12:00 Page 1
Page 2

2
The symbols you will see on some paragraphs of this booklet have the following meaning:
The warning triangle emphasize information that is particularly important for your safety or
correct functioning of the appliance.
The information marked with this symbol provides additional instructions and practical tips
on the use ofthe appliance.
Tips and information about economical and ecological use of the machine are marked with
this symbol.
Safety information . . . . . . . . . . . . . . . . . . 3
Description of the appliance . . . . . . . . . . 5
The control panel. . . . . . . . . . . . . . . . . . . 6
Drying programmes . . . . . . . . . . . . . . . . . 7
Before the first use . . . . . . . . . . . . . . . . . 9
Drying hints . . . . . . . . . . . . . . . . . . . . . . . 9
Daily Use . . . . . . . . . . . . . . . . . . . . . . . . 11
Care and cleaning . . . . . . . . . . . . . . . . . 13
Something not working . . . . . . . . . . . . . 15
Technical data . . . . . . . . . . . . . . . . . . . . 17
Consumption values . . . . . . . . . . . . . . . 18
Disposal. . . . . . . . . . . . . . . . . . . . . . . . . 19
Installation . . . . . . . . . . . . . . . . . . . . . . . 20
Guarantee/Customer Service . . . . . . . . 22
Contents
Thank you for selecting our appliance
We wish you lots of enjoyment with your new appliance and we hope that you will consider our
brand again when purchasing household appliances.
Please read this user manual carefully and keep it throughout the product life cycle as a reference document. The user manual should be passed on to any future owner of the appliance.
125989121.qxp 2007-07-06 12:00 Page 2
Page 3
3
Safety Information
In the interest of your safety and to ensure the correct use, before installing and first using
the appliance, read this user manual carefully, including its hints and warnings. To avoid
unnecessary mistakes and accidents, it is important to ensure that all people using the
appliance are thoroughly familiar with its operation and safety features. Save these
instructions and make sure that they remain with the appliance if it is moved or sold, so
that everyone using it through its life will be properly informed on appliance use and safety.
General safety
• It is dangerous to alter the specifications or
attempt to modify this product in any way.
• This appliance is not intended for use by
persons (including children) with reduced
physical, sensory or lack of experience and
knowledge, unless they have been given
supervision or instruction concerning use of
the appliance by a person responsible for
their safety.
• Make sure that small pets do not climb into
the drum. To avoid this, please check into
the drum before using.
• Any objects such as coins, safety pins,
nails, screws, stones or any other hard,
sharp material can cause extensive damage and must not be placed into the
machine.
• In order to avoid danger of fires caused by
excessive drying, do not use appliance to
dry the following items: Cushions, quilts and
the like (these items accumulate heat).
• Items such as foam rubber (latex foam),
shower caps, waterproof textiles, rubber
backed articles and clothes or pillows fitted
with foam rubber pads should not be dried
in the tumble dryer.
• Always unplug the appliance after use,
clean and maintenance.
• Under no circumstances should you attempt
to repair the machine yourself. Repairs car-
ried out by inexperienced persons may
cause injury or serious malfunctioning.
Contact your local Service Centre. Always
insist on genuine spare parts.
• Items that have been soiled with substances such as cooking oil acetone, petrol,
kerosene, spot removers, turpentine, waxes
and wax removers should be washed in hot
water with an extra amount of detergent
before being dried in the tumble dryer.
• Danger of explosion: Never tumble dry
items that have been in contact with inflammable solvents (petrol, methylated spirits,
dry cleaning fluid and the like). As these
substance are volatile, they could cause an
explosion. Only tumble dry items washed
with water.
• Risk of fire: items that have been spotted or
soaked with vegetable or cooking oil constitute a fire hazard and should not be placed
in the tumble dryer.
• If you have washed your laundry with stain
remover you must execute an extra rinse
cycle before loading your tumble dryer.
• Please make sure that no gas lighters or
matches have accidentally been left in
pockets of garments to be loaded into appliance.
Installation
• This appliance is heavy. Care should be
taken when moving it.
125989121.qxp 2007-07-06 12:00 Page 3
Page 4
4
• When unpacking the appliance, check that it
is not damaged. If in doubt, do not use it
and contact the Service Centre.
• All packing and transit bolts must be
removed before use. Serious damage can
occur to the product and to property if this
is not adhered to. See relevant section in
the user manual.
• The final part of a tumble dryer cycle occurs
without heat ( cool down cycle ) to ensure
that the items are left at a temperature that
ensures that items will not be damaged.
• Any electrical work required to install this
appliance should be carried out by a qualified electrician or competent person.
• Care must be taken to ensure that the appliance does not stand on the electrical supply
cable.
• If the machine is situated on a carpeted
floor, please adjust the feet in order to allow
air to circulate freely.
• After having installed the appliance, check
that it is not pressing or standing on its
electrical supply cable, inlet hose and drain
hose.
• If the tumble dryer is placed on top of a
washing machine, it is compulsory to use
the stacking kit (optional accessory).
Use
• This appliance is designed for domestic
use. It must not be used for purposes other
than those for which it was designed.
• Only wash fabrics which are designed to be
machine dried. Follow the instructions on
each garment label.
• Do not dry unwashed items in the tumble
dryer.
• Fabric softeners, or similar products, should
be used as specified by the fabric softener
instructions.
• Do not overload the appliance. See the relevant section in the user manual.
• Clothes which are dripping wet should not
be placed in the dryer.
• Garments which have been in contact with
volatile petroleum products should not be
machine dried. If volatile cleaning fluids are
used, care should be taken to ensure that
the fluid is removed from the garment
before placing in the machine.
• Never pull the power supply cable to
remove the plug from the socket; always
take hold of the plug itself.
• Never use the tumble dryer if the power
supply cable, the control panel, the working
surface or the base are damaged so that
the inside of the tumble dryer is accessible.
WARNING:
Never stop a tumble dry before the end of
the drying cycle.
Child safety
• This machine is not intended for use by
young children or infirm persons without
supervision.
• Children should be supervised to ensure
that they do not play with the appliance.
• The packaging components (e.g. plastic
film, polystyrene) can be dangerous to children - danger of suffocation! Keep them out
of children’s reach
• Keep all detergents in a safe place out of
children’s reach.
• Make sure that children or pets do not climb
into the drum.
125989121.qxp 2007-07-06 12:00 Page 4
Page 5
5
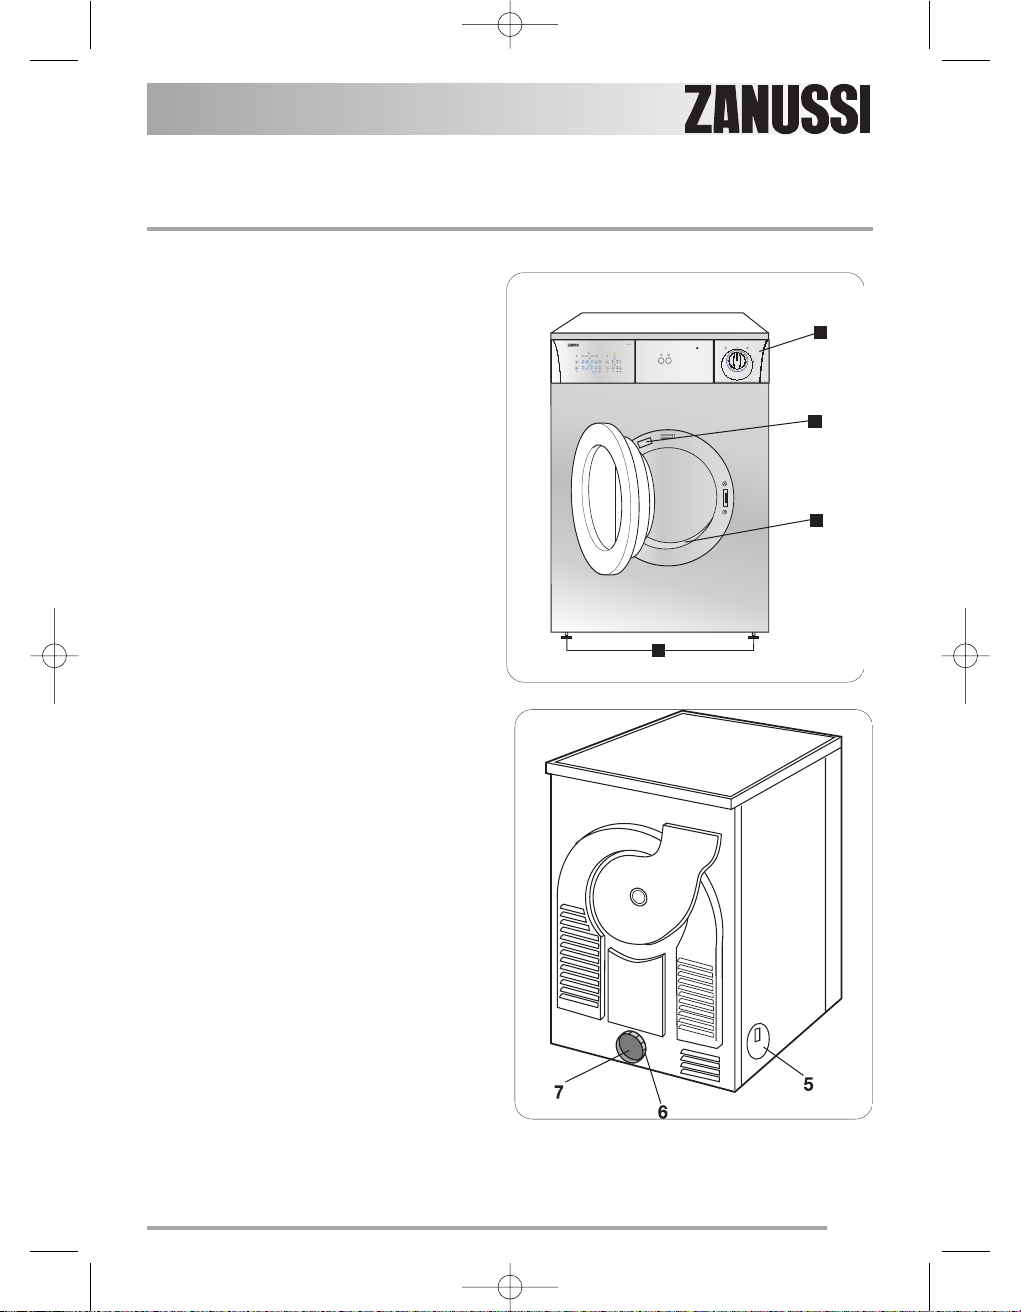
Description of the appliance
1
2
3
4
1. Control panel
2. Fluff filters
3. Rating Plate
4. Adjustable feet
5. Side vent outlets
6. Ring nut
7. Rear vent outlet
125989121.qxp 2007-07-06 12:00 Page 5
Page 6
6
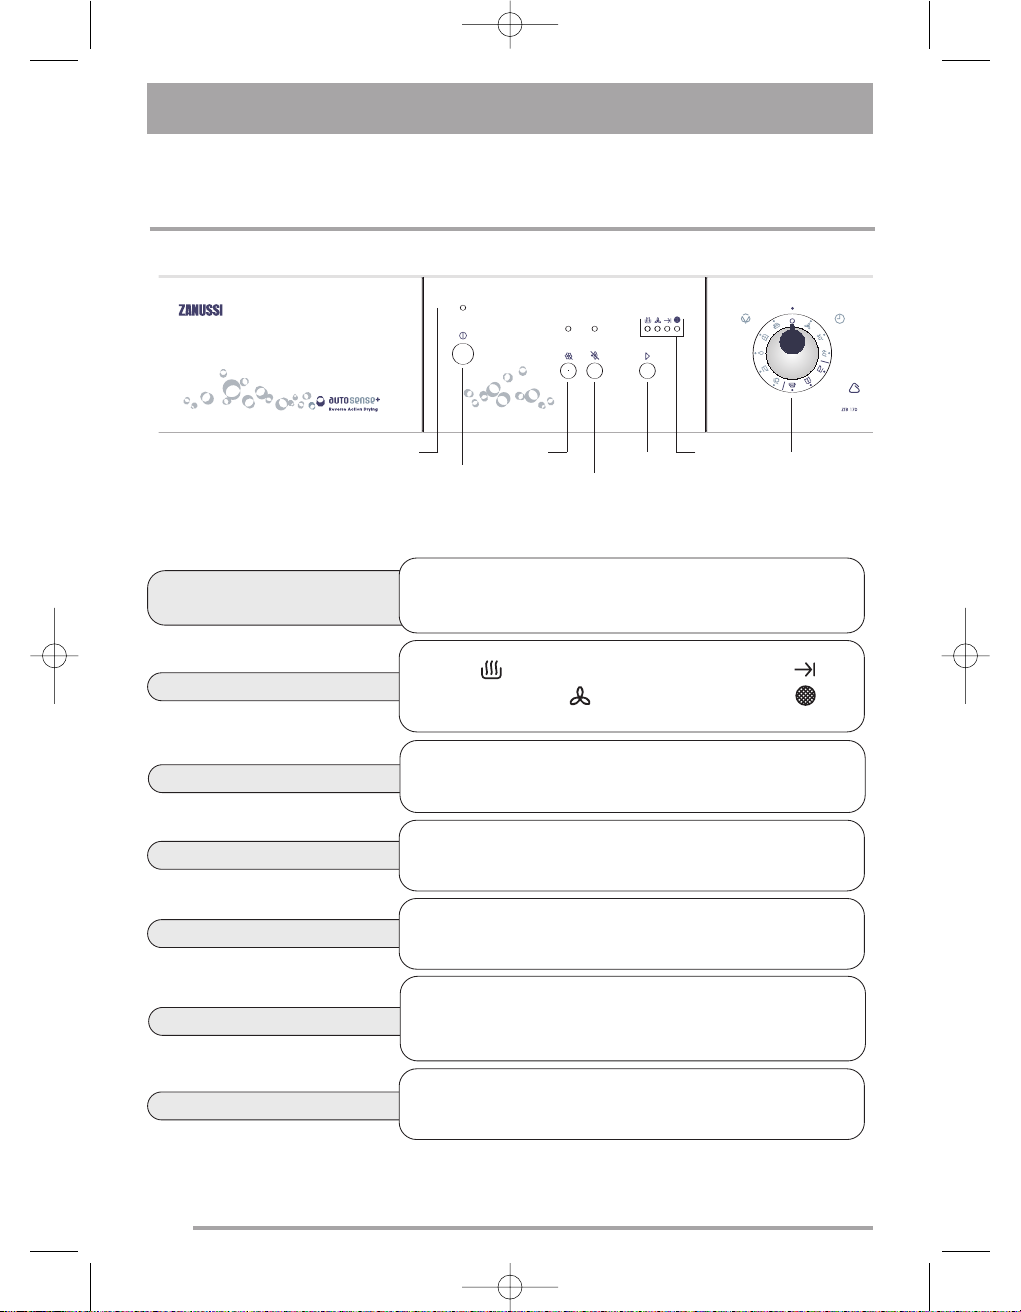
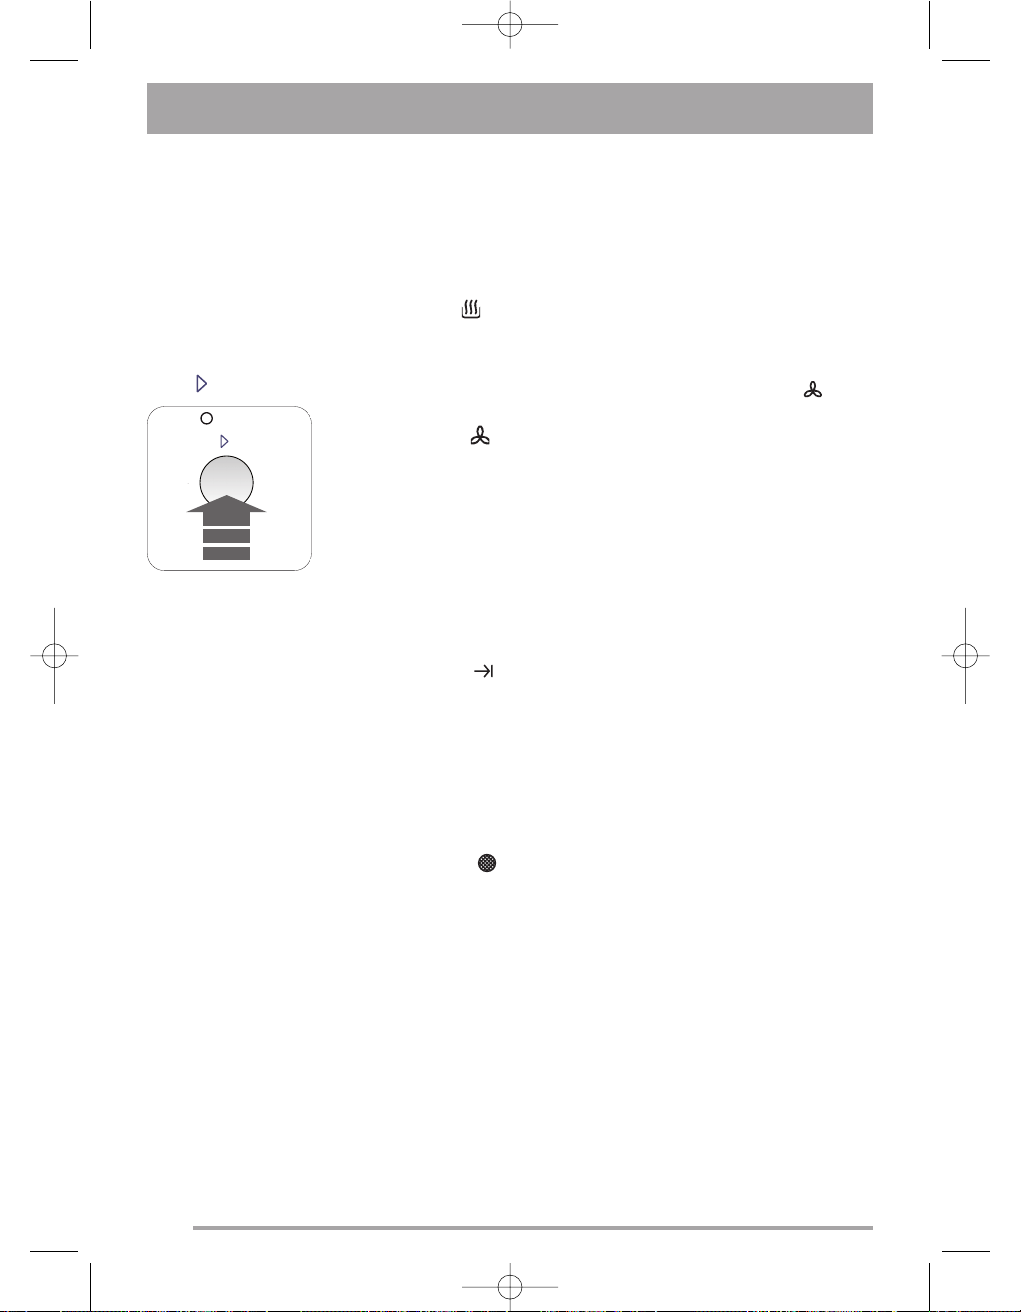
The control panel
Indicator lights
• Drying
• Cool Tumbling Light
• End of programme
• Filter cleaning light
Programme/Time
selector dial
Allows you to select electronically controlled or time controlled
drying. Turn the dial to the required programme or time.
Start button
Press this button to start the dryer after having selected the programme and the options.
ON/OFF button button
This button is used to switch the dryer on. At the end of the programme, release this button by pressing it again to switch the
dryer off.
Programme/Time
selector dial
Delicate
button
Buzzer
button
Indicator
lights
Start
button
Mains-ON light
ON/OFF
button
Buzzer button
When the drying cycle has finished, an intermittent audible
signal will sound.
Delicate button
Pressing this button allows drying to be performed at a lower
temperature, for delicate items.
Mains-ON light
Comes on when the appliance is switched on (ON/OFF button pressed down) and goes out when this button is released.
125989121.qxp 2007-07-06 12:00 Page 6
Page 7
7
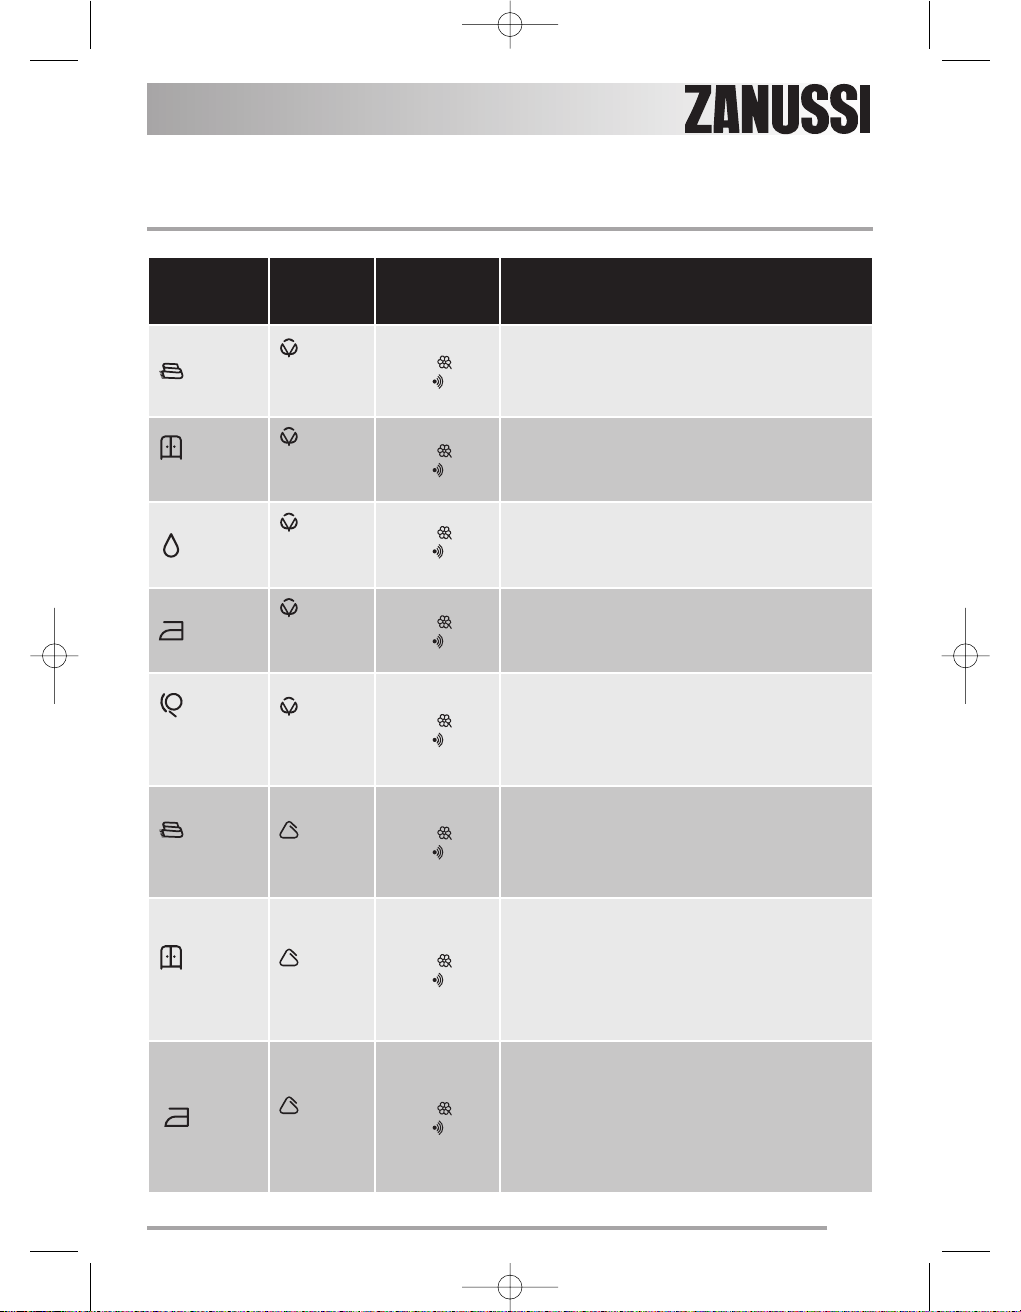
Programme
Type of
laundry
Options Description of programme
Extra
Cotton
and linen
• Delicate
• Alarme
Drying thick or multi-layered textiles, e.g. terry
towelling items
Cupboard
Cotton
and linen
• Delicate
• Alarme
Drying textiles of even thicknesses, e.g. terry
towelling items, knitted items, towels.
Damp
Cotton
and linen
• Delicate
• Alarme
For thin textiles which are still to be ironed, e.g.
knitted items, cotton shirts.
Iron
Cotton
and linen
• Delicate
• Alarme
For cotton or linen laundry which are still to be put
through a machine, e.g. bedding, table linen.
Machine
iron
Cotton
and linen
• Delicate
• Alarme
For cotton or linen laundry which are still to be put
through a machine, e.g.bedding, table linen.
Extra
Synthetics
• Delicate
• Alarme
Drying thick or multi-layered textiles, e.g.
pullovers, bedding, table linen.
Cupboard
Synthetics
• Delicate
• Alarme
For thin textiles which are not ironed, e.g. easy
care shirts, table linen, baby’s clothes, socks,
underwear.
- Iron
Synthetics
• Delicate
• Alarme
For thin textiles which are still to be ironed, e.g.
knitted items, cotton shirts.
Drying programmes
125989121.qxp 2007-07-06 12:01 Page 7
Page 8
8
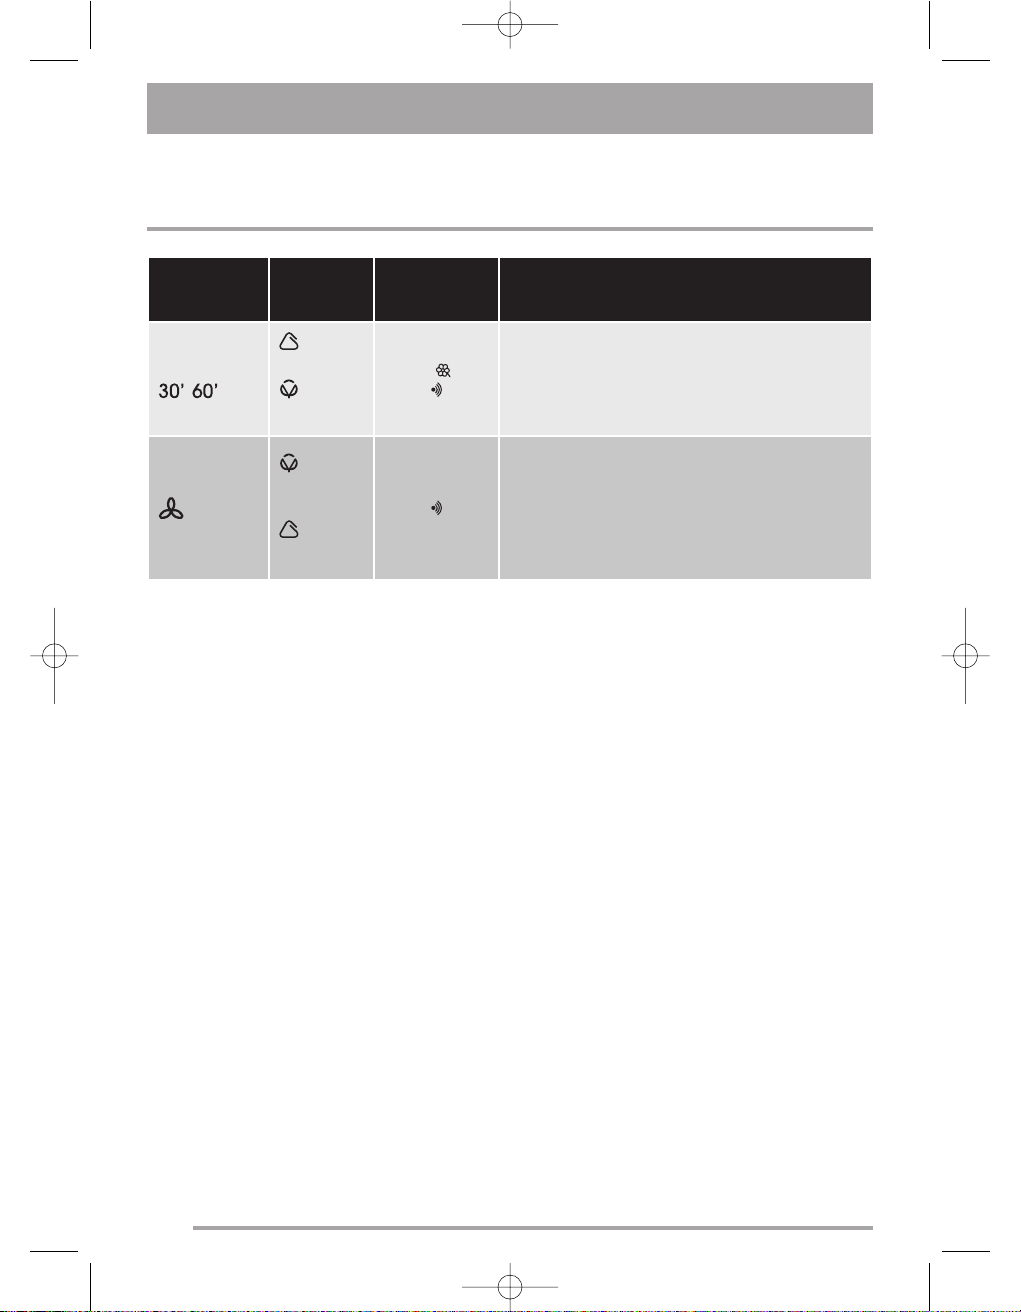
Programme
Type of
laundry
Options Description of programme
Time
Synthetics
Cotton
• Delicate
• Alarme
Drying thick or multi-layered textiles, e.g. terry
towelling items. For drying individual items of
laundry or for small volumes of less than 1kg.
Cooling
Cotton
and linen
Synthetics
• Alarme
Special programme, lasting around 10 minutes,
for refreshing or gently cleaning textiles with
commercially available dry cleaning sets. (Only
use those products which are declared as suitable
for the drier by the manufacturer; please observe
the manufacturer’s instructions for use.)
Drying programmes
125989121.qxp 2007-07-06 12:01 Page 8
Page 9

9
Before loading the laundry
Never tumble dry the following: Particularly
delicate items such as net curtains, woollen,
silk, fabrics with metal trim, nylon tights,
bulky materials such as anoraks, blankets,
eiderdowns, sleeping bags, feather quilts
and any items containing rubber foam or
materials similar to rubber foam.
• Always follow the instructions on garment
labels:
may be tumble dried
normal drying (high temperature)
delicate drying (low temperature)
do not tumble dry
• Close pillowcases and covers with fasteners
to prevent small laundry items getting tangled inside them. Close press studs, zips
and hooks and tie belts and apron strings.
• Sort laundry according to type and degree
on drying required.
• Do not over-dry laundry, this avoids creasing and saves energy.
• Avoid drying dark clothes with light coloured
fluffy items such as towels as they could
attract the fluff.
• The laundry must be thoroughly spun
before tumble drying.
• Easy-care items, too, e.g. shirts, should be
briefly pre-spun before drying (depending
on crease resistance approx. 30 seconds or
using the special brief spin programme on
your washing machine).
• Knitted textiles (knitted underwear) may
shrink a little during drying. Please do not
overdry items of this type. It is advisable to
allow for shrinkage when choosing the size
of new purchases.
• You can also put starched items into your
dryer. However, to achieve the desired
starched effect, choose the programme
“iron dry”. To remove any starch residues,
wipe out the internal drum after drying with
a moist cloth and then rub it dry.
• To avoid a static charge when drying is
completed, use either a fabric softener
when you are washing the laundry or a fabric conditioner specifically for tumble dryers.
• Remove the laundry when the dryer has finished drying.
• If individual items are still damp after drying,
set a brief post-drying time, but at least 30
minutes. This will be necessary particularly
for multilayered items (e.g. collars, pockets,
etc.).
Before the first use
• Ensure that the electrical connections comply with the installation instructions.
• Remove the polystryrene block and any material from the drum.
• Before using your tumble dryer for the first time, we recommend that you place a few damp
cloths inside the appliance and dry for 30 minutes.
There may be dust inside a brand new tumble dryer.
Drying hints
125989121.qxp 2007-07-06 12:01 Page 9
Page 10
10
Make sure that no metal objects are left in
the laundry (e.g. hair clips, safety pins,
pins).
Button up pillowcases, close zip fasteners,
hooks and poppers. Tie any belts or long
tapes.
To avoid laundry becoming tangled: close
zips, button up duvet covers and tie loose
ties or ribbons (e.g. of aprons). Turn items
with double-layered fabrics inside out (e.g.
with cotton lined anoraks, the cotton layer
should be outermost). These fabrics will
then dry better.
Maximum loads
Recommended loads are indicated in the programme charts.
General rules:
Cotton, linen: drum full but not too tightly
packed;
Synthetics: drum no more than half full;
Delicate fabrics and woollens: drum no
more than one third full.
Try to load to the maximum capacity of the
machine as small loads are uneconomical.
Laundry weights
The following weights are indicative:
bathrobe 1200 g
napkin 100 g
quilt cover 700 g
sheet 500 g
pillow case 200 g
tablecloth 250 g
towelling towel 200 g
tea cloth 100 g
night dress 200 g
ladies’ briefs 100 g
man’s work shirt 600 g
man’s shirt 200 g
man’s pyjamas 500 g
blouse 100 g
men’s underpants 100 g
125989121.qxp 2007-07-06 12:01 Page 10
Page 11
11
Load the laundry
Place the laundry in
the drum, one item at
a time, shaking them
out as much as possible. Close the door.
Please check the
laundry does not get
caught between the
door and filter.
Select the required
programme
Turn the programme
selector dial to the
required programme.
The light Start starts
to flash.
The selector dial is
divided into following
sections:
• Cottons
• Synthetics
• Special
Allows you to select
electronically controlled or time controlled drying. Turn
the dial to the
required programme
or time.
Electronically controlled drying (automatic)
The appliance runs
these programmes
with the help of
probes which detect
the degree of dampness of the laundry.
Simply select the programme according to
the type of laundry
and degree of drying
required.
The selector dial can
be turned either clockwise or anticlockwise.
The lights Drying,
Cooling and End
come on.
At the end of the
programme the
selector dial must
be turned to position O, to switch the
machine off.
Attention!
If you turn the programme selector dial
to another programme
when the machine is
working, the lights of
the programme
progress display start
to flash. The machine
will not perform the
new selected programme.
Programme
Option buttons
Depending on the
programme, different
functions can be combined. These must be
selected after choosing the desired programme and before
depressing the Start
button. When these
buttons are pressed,
the corresponding
pilot lights come on.
When they are
pressed again, the
pilot lights go out.
Delicate
Pressing this button
allows drying to be
performed at a lower
temperature, for delicate items.
The corresponding
pilot light comes on.
This option can also
be used for time controlled drying.
DELICATE is only
suitable for use with
loads of up to 3kg!
When the programme
has finished the pilot
lights End is on.
Buzzer
When the drying cycle
has finished, an intermittent audible signal
will sound.
By depressing this
button the acoustic
signal is switched off
in the following cases:
• when selecting
the programme
• when depressing
the buttons
• when the programme selector
dial is turned to
another position
during the programme or when
you depress an
0305
Daily Use
125989121.qxp 2007-07-06 12:01 Page 11
Page 12
12
option button during the cycle
• at the end of the
programme.
The corresponding
light comes on.
Start
Press this button to
start the dryer after
having selected the
programme and the
options. The relevant
light will stop flashing.
If the programme
selector dial is turned
to another position,
when the machine is
running, the buzzer
will sound and the
programme phase
indicator lights will
flash. The drum turns
alternately in both
directions during drying.
All drying programmes end with a
10 minute cooling
phase (light Cooling is
on). You may remove
the laundry after this
phase.
Indicator lights
These lights indicate
the following functions:
• Drying light
This light indicates
that the appliance
is in the drying
phase.
• Cooling light
This light indicates
that the appliance
is in the cooling
phase. At the end
of drying, there is
a 10 minute cooling phase to cool
the laundry.
• End of programme light
This light is on at
the end of the
cooling phase,
during the anticreasing phase
and at the end of
the programme.
• Filter cleaning
This light illuminates at the end
of the programme
to remind you that
the filters must be
cleaned.
Cancelling a
programme
Turn the selector dial
to “O” to cancel a programme which is running. Now you can
select a new programme.
At the end of the
programme
All drying programmes end with a
10 minute cooling
phase.
If the laundry is not
removed at the end of
the cycle, the dryer
performs an anticreasing phase (duration: 30 minutes maximum).
If you do not remove
the laundry, the dryer
will stop automatically
at the end of the anticreasing phase.
Lights end and filter
remain lit and the
buzzer sounds for 2
minutes. Turn the programme selector dial
to “0”; all the lights go
out. The appliance is
switched off.
Remove the laundry.
If you open and then
close the door before
turning the selector
dial to “0” all the indicator lights come on.
After each use
• Clean the filters.
Important!
If the drying programme has to be
stopped before it
reaches the end, we
recommend that you
turn the programme
selector dial to position Cooling and
wait until the end of
this cooling phase
before removing the
laundry. This will
avoid a build-up of
heat inside the appliance.To do this first
turn the dial to “O”
and then to Cooling
and depress Start button.
Modifying
the programme
To change a programme which is running, first cancel it by
turning the programme selector dial
to “O”. Select the new
programme and press
the Start button.
125989121.qxp 2007-07-06 12:02 Page 12
Page 13
13
Important:
You must DISCONNECT the appliance from the
electricity supply, before you can carry out any
cleaning or maintenance work.
External cleaning
Use only soap and water and then dry
thoroughly.
Important: do not use methylated spirit, diluents
or similar products.
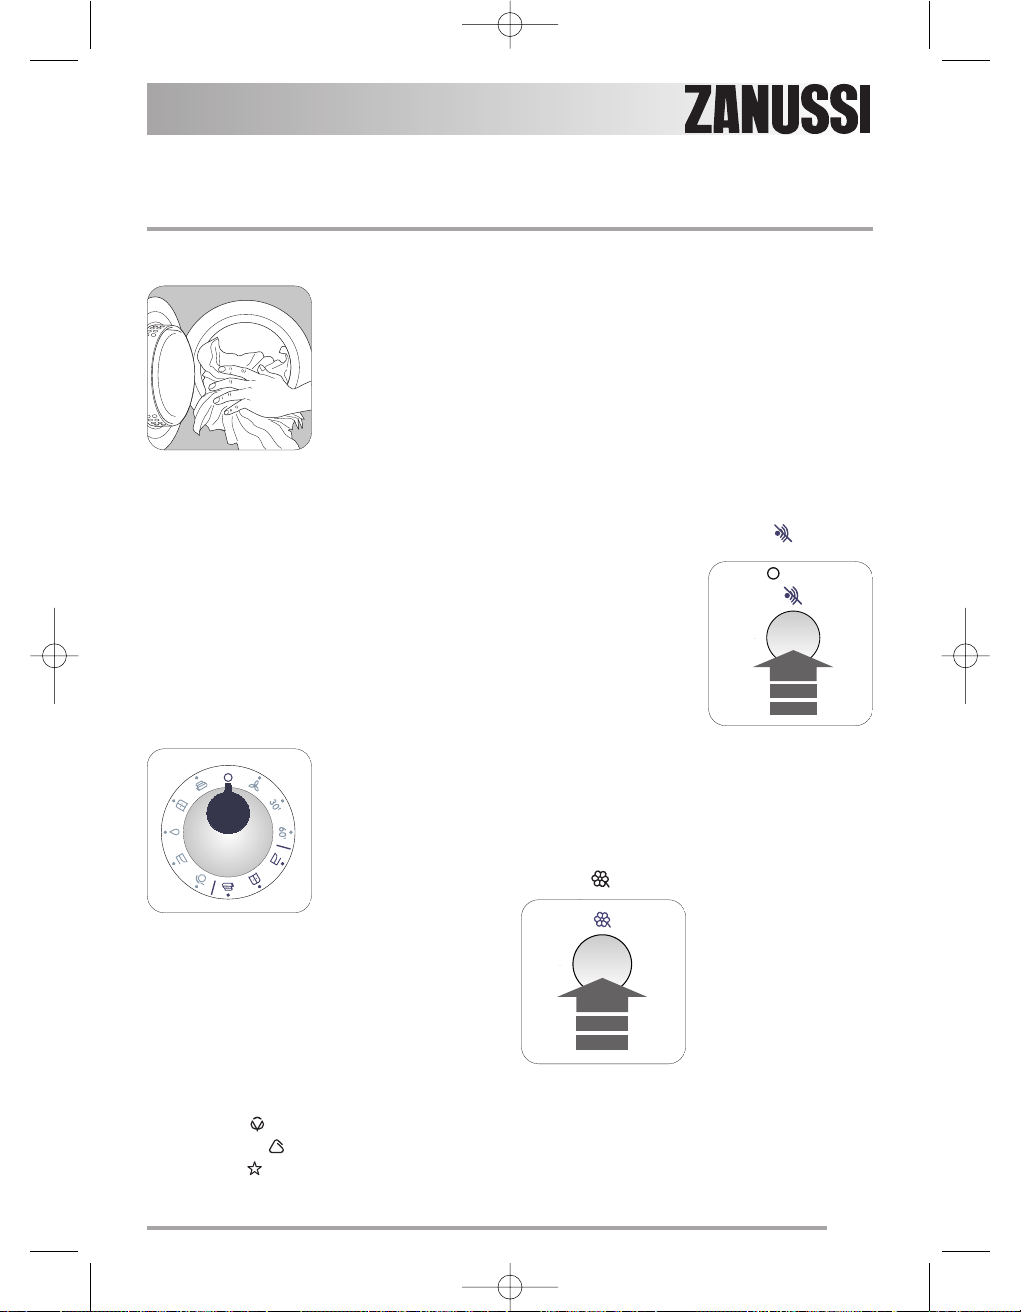
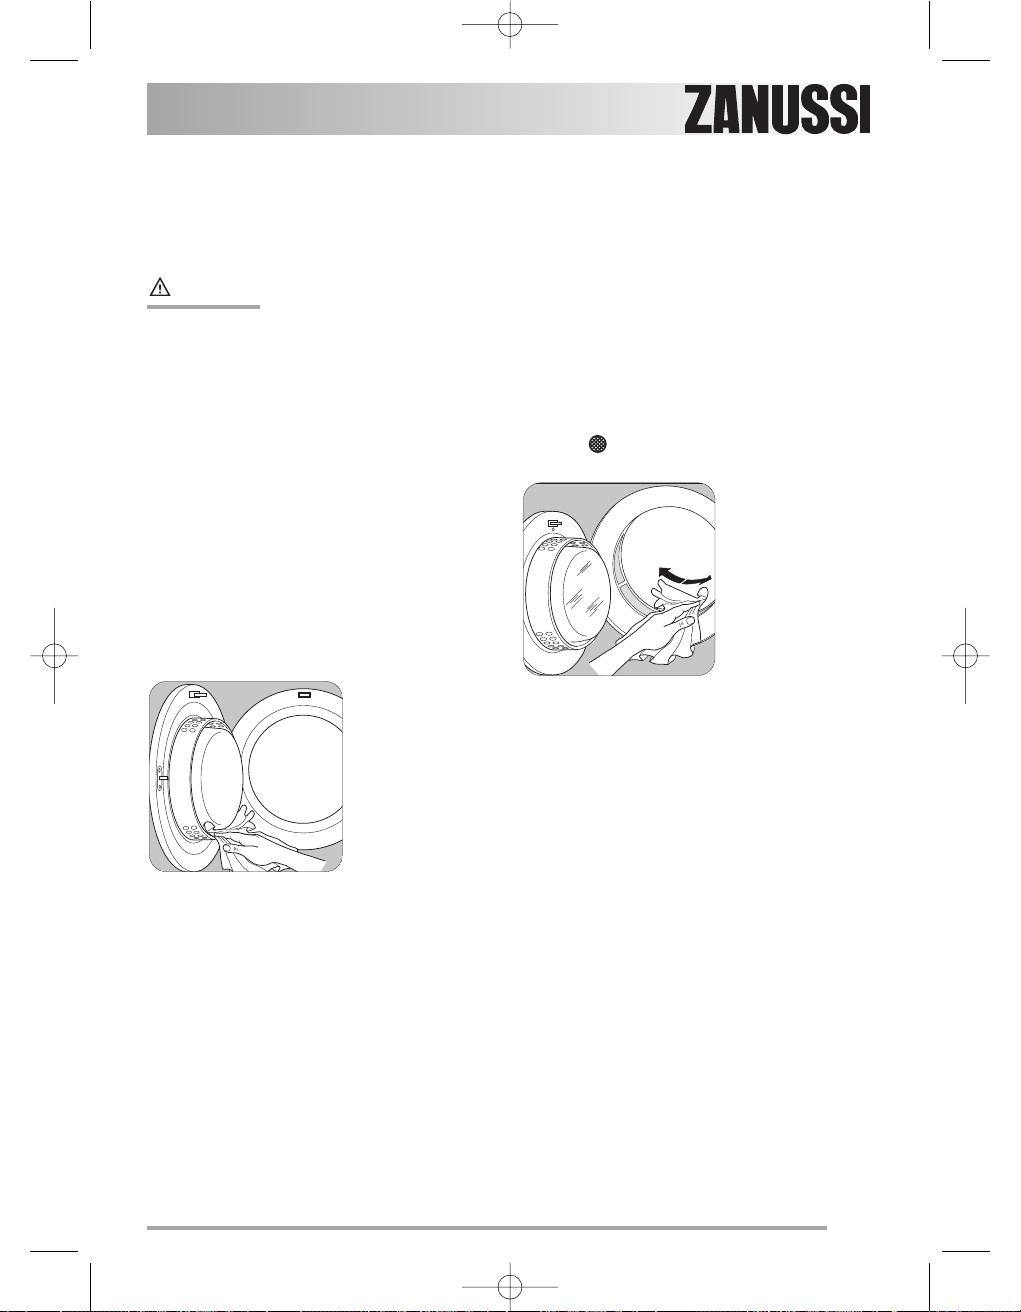
Cleaning the door
Clean periodically the interior part of the door to
remove any fluff from the seals around the filter.
Accurate cleaning ensures correct drying.
Cleaning the filters
Your dryer will only function well if the filters are
clean.
The filters collect all the fluff which accumulates
during drying and they must therefore be cleaned
at the end of each programme, before removing
the laundry, with a damp cloth.
The light is on to remind you this operation.
Care and cleaning
125989121.qxp 2007-07-06 12:02 Page 13
Page 14
14
Important:
Do not use the appliance without filters.
Cleaning the drum
When your laundry does not reach the desired
degree of dryness, in other words, when it turns
out either too dry or too damp, we advise you to
clean the inside of the drum with a cloth soaked
with vinegar.
This will eliminate the slight patina that has
formed in the drum (due to residues of detergent
and softeners used in the washing, and to the
lime contained in the water), which prevents the
probes from detecting the correct degree of
dryness.
125989121.qxp 2007-07-06 12:02 Page 14
Page 15

15
Something not working?
If a problem occurs, you can try to solve it yourself following the instructions below. If you call out an
engineer when one of the following problems occurs, or to repair a fault due to incorrect use, the
callout will be charged even if requested within the guarantee period.
Problem Possible cause Solution
The drier is not working
properly
• Mains plug disconnected Plug in mains plug
• The START button has not
been depressed.
• Press START button
• No programme selected • Select programme
• Loading door open • Close loading door
• Fuse or residual current circuit breaker in fuse box
(domestic installation) faulty
• Check fuse or residual current circuit breaker. Faults
can be eliminated by an electrical engineer
The drying results are not
satisfactory
• Wrong programme selected
• Select another (time) programme for the next drying
cycle
• Lint filter blocked • Clean lint filter
• Wrong filling quantity
• Observe recommended filling
quantity
• Laundry not sufficiently dried • Pre-dry laundry sufficiently
• Deposit on the drum inner
surfaceor on the drum ribs
• Clean drum inner surface
and drum ribs
125989121.qxp 2007-07-06 12:02 Page 15
Page 16

16
If you are unable to identify or solve the
problem, contact our service centre. Before
telephoning, make a note of the model, serial
number and purchase date of your machine: the
Service Centre will require this information.
0307
Mod. ...
Prod. No. ........
Ser. No. ............
If you call out an engineer to a fault listed below,
or to repair a fault caused by incorrect use or
installation, a charge will be made even if the
appliance is under guarantee.
Important:
125989121.qxp 2007-07-06 12:02 Page 16
Page 17

17
Technical data
This appliance conforms with the following EU Directives:
– 73/23/EEC dated 19.02.1973 Low Voltage Directive
– 89/336/EEC dated 03.05.1989 EMC Directive inclusive of Amending Directive
92/31/EEC
– 93/68/EEC dated 22.07.1993 CE Marking Directive
Technical data
Dimensions
Width
Height
Depth
60 cm
85 cm
57 cm
Electrical connection
Voltage - Overall power Fuse
Information on the electrical connection is given on the rating plate
on the inner edge of the appliance door
Maximum Load
Cotton
Synthetics
6 kg
3 kg
Use
Domestic
+ 5°C + 35°C
125989121.qxp 2007-07-06 12:02 Page 17
Page 18

18
The consumption values have been established
under standard conditions. They may deviate
when the machine is operated in domestic
circumstances.
Max load:
1)
Cottons load: 6 kg
2)
Synthetics load: 3 kg
Consumption values (*)
Programme
Programme
duration
(in minutes)
Energy
consumption
(in kWh)
Revolutions
per minute
Cottons Cupboard
1)
112 3,3 1000
Cottons Cupboard
1)
98 2,9 1400
Synthetics Cupboard
2)
52 1,1 1200
Consumption values
125989121.qxp 2007-07-06 12:02 Page 18
Page 19

19
Packaging materials
The materials marked with the symbol are
recyclable.
This means that they can be recycled by disposing of them properly in appropriate collection containers.
Machine
Use authorised disposal sites for your old appliance. Help to keep your country tidy!
Old appliance
The symbol on the product or on its
packaging indicates that this product may not be
treated as household waste. Instead it should be
taken to the appropriate collection point for the
recycling of electrical and electronic equipment.
By ensuring this product is disposed of correctly,
you will help prevent potential negative
consequences for the environment and human
health, which could otherwise be caused by in
appropriate waste handling of this product.For
more detailed information about recycling of this
product, please contact your local council, your
household waste disposal service or the shop
where you purchased the product.
Tips for environmental protection
To save energy and to help protect the
environment, we recommend that you follow
these hints:
• Try to load the maximum capacity of the
machine as small loads are uneconomical.
• Always load well spun laundry. The higher
the spin speed, the lower the electricity consumption and the shorter the drying times.
• Do not over-dry laundry, this avoids creasing and saves energy. Select the drying programme according to the type of laundry
and the required degree of dryness.
• To utilize the maximum load, laundry which
is to be dried ready to put away (store dry)
can be dried together with items to be
ironed. To do this, select the programme for
iron-dry, remove the iron-dry items at the
end of the programme and then finish-dry
the rest of the load.
• Clean the filters regularly to avoid excessive
drying times and high electricity consumption.
• Ventilate the room well. The room temperature should not exceed +35°C during drying.
Disposal
125989121.qxp 2007-07-06 12:02 Page 19
Page 20

20
Positioning
It is recommended that, for your convenience, the
machine is positioned close to your washing
machine. Whilst drying, the tumble dryer will
expel a certain amount of warm, very moist air,
and this should be removed from the room as
quickly as possible to prevent condensation. In
an extremely well ventilated room or close to an
open window, this may occur naturally. However,
in general, it is better to carry the dryer's exhaust
outside via the 100 mm diameter flexible hose
supplied with the appliance; ending either
temporarily at an open window, or permanently at
a fixed ventilation grille, fitted to an exterior wall
or window. The tumble dryer must be installed in
a clean place, where dirt does not build up. Make
sure there are no obstructing items or material
near the air-intake louvres provided at the back
(e.g. paper, rags etc.). To keep vibration and
noise to a minimum when the dryer is in use, it
should be placed on a firm, level surface. Once in
its permanent operating position, check that the
dryer is absolutely level with the aid of a spirit
level. If it is not, raise or lower the feet until it is.
The feet must never be
removed. Do not restrict
the floor clearance through
deeppile carpets, strips of
wood or similar. This might
cause heat build-up which
would interfere with the
operation of the appliance.
Important
When operating the tumble dryer, the room
temperature must not exceed 35°C, as it may
affect the performance of the appliance.
Fitting the vent hose
To simplify the installation, there is a choice of
vent outlets: one at the back, the others in the left
and right-hand side. Connect the hose to
whichever is the more convenient by pulling the
ring nut (A) from the vent outlet at the back,
screwing it on to the hose and pushing it firmly
back into place. The unused vents should now be
sealed with the special snap covers provided.
Advice: If the hose is long and the room
temperature low, the moisture might condense to
water inside the hose. This is an unavoidable
natural phenomenon. To prevent this water from
Iying in the hose or flowing back into the tumble
dryer, it is advisable to drill a small hole (dia. 3
mm) in the lowest point of the hose and to place
a small container below it.(See picture, point B).
Once connected to the
dryer, run the vent hose to
the desired outlet point,
ensuring that the run’s
overall length is less than
2 m, and that it contains
no more than two bends.
As to the outlet itself, if
you have decided on a fixed wall/window grille, a
good local builder’s merchant should be able to
supply you with the necessary fittings and
installation advice.
B
A
A
28
Installation
125989121.qxp 2007-07-06 12:02 Page 20
Page 21

21
Important:
It is important not to
connect the vent hose to,
for example, a cooker
hood, or a chimney or flue
pipe designed to carry the
exhaust from a fuel
burning appliance.
Note that to avoid condensation problems, it is
essential that the dryer be fitted with the flexible
hose to carry its “exhaust” at least beyond the
kitchen units; preferable outside the kitchen. In
order to prevent the appliance from overheating,
it is important that the steam exhaust is
unobstructed. Therefore, in case of a permanent
hose fitted to an exterior wall or ceiling, it must be
ensured an exhaust capacity of at least 150
m3/h. If the dryer is fitted next to kitchen units,
make sure that the vent hose is not squashed. If
the hose is partially squashed, drying efficiency
will be reduced, resulting in longer drying times
and higher energy consumption. If the hose is
completely squashed, the safety cut-outs with
which the machine is fitted may operate. When
operating the tumble dryer, the room temperature
must not be lower than +5°C and higher than
+35°C, as it may affect the performance of the
appliance.
Electrical connection
This machine is designed to operate on a 230 V,
single-phase, 50 Hz supply. Check that your
domestic electrical installation can take the
maximum load required (2.2 kW), also taking into
account any other appliances in use.
Connect the machine to an earthed socket, in
accordance with current wiring regulations.
Important:
The manufacturer declines any responsibility
for damage or injury through failure to
comply with the above safety precaution.
Should the appliance power supply cable
need to be replaced, this must be carried out
by our Service Centre.
Important:
The power supply cable must be accessible
after installing the machine.
Stacking kit
A special stacking kit is available through your
dealer, to enable the mounting of the dyer on top
of a front loading washing machine with cover’s
depth between 48 and 60 cm.
Read carefully the instructions supplied with the
kit.
Door reversal
To make it easier to load or unload the laundry
the door can be reversed.
280
055
125989121.qxp 2007-07-06 12:02 Page 21
Page 22

22
This appliance is guaranteed by Electrolux, in
each of the countries listed in the following page,
for the period specified in the appliance
guarantee or otherwise by law. If you move from
one of these countries to another of these
countries the appliance guarantee will move with
you subject to the following qualifications:
• The appliance guarantee starts from the
date you first purchased the appliance
which will be evidenced by production of a
valid purchase document issued by seller of
the appliance.
• The appliance guarantee is for the same
period and to the same extent for labour
and parts as exists in your country of residence for this particular model or range of
appliances.
• The appliance guarantee is personal to the
original purchaser of the appliance and cannot be transferred to another user.
• The appliance is installed and used in
accordance with instructions issued by
Electrolux and is only used within the home,
i.e. is not used for commercial purposes.
• The appliance is installed in accordance
with all relevant regulations in force within
your new country of residence.
The provisions of this European Guarantee
do not affect any of the rights granted to
you by law.
European guarantee
Albania
+35 5 4 261 450 Rr. Pjeter Bogdani Nr. 7 Tirane
Belgique/België/Belgien
+32 2 363 04 44
Bergensesteenweg 719, 1502
Lembeek
Česká republika
+420 2 61 12 61 12
Budìjovická 3, Praha 4,
140 21
Danmark
+45 70 11 74 00
Sjællandsgade 2, 7000
Fredericia
Deutschland
+49 180 32 26 622
Muggenhofer Str. 135,
90429 Nürnberg
Eesti
+37 2 66 50 030
Pärnu mnt. 153, 11624
Tallinn
España
+34 902 11 63 88
Carretera M-300, Km.
29,900 Alcalá de Henares
Madrid
France
www.electrolux.fr
Great Britain
+44 8705 929 929
Addington Way, Luton,
Bedfordshire LU4 9QQ
Hellas
+30 23 10 56 19 70
4, Limnou Str., 54627
Thessaloniki
125989121.qxp 2007-07-06 12:02 Page 22
Page 23

23
Hrvatska
+385 1 63 23 338
Slavonska avenija 3,
10000 Zagreb
Ireland
+353 1 40 90 753 Long Mile Road Dublin 12
Italia
+39 (0) 434 558500
C.so Lino Zanussi, 26 33080 Porcia (PN)
Latvija
+37 17 84 59 34
Kr. Barona iela 130/2,
LV-1012, Riga
Lietuva
+370 5 2780609
Ozo 10A, LT 08200
Vilnius
Luxembourg
+352 42 431 301
Rue de Bitbourg, 7,
L-1273 Hamm
Magyarország
+36 1 252 1773
H-1142 Budapest XIV,
Erzsébet királyné útja 87
Nederland
+31 17 24 68 300
Vennootsweg 1, 2404
CG - Alphen aan den Rijn
Norge
+47 81 5 30 222 Risløkkvn. 2 , 0508 Oslo
Österreich
+43 18 66 400
Herziggasse 9, 1230
Wien
Polska
+48 22 43 47 300
ul. Kolejowa 5/7,
Warszawa
Portugal
+35 12 14 40 39 39
Quinta da Fonte - Edificio
Gonçalves Zarco - Q 35
-2774-518 Paço de Arcos
Romania
+40 21 451 20 30
Str. Garii Progresului 2,
S4, 040671 RO
Schweiz - Suisse Svizzera
+41 62 88 99 111
Industriestrasse 10,
CH-5506 Mägenwil
Slovenija
+38 61 24 25 731
Gerbičeva ulica 98, 1000
Ljubljana
Slovensko
+421 2 43 33 43 22
Electrolux Slovakia s.r.o.,
Electrolux Domáce
spotrebiče SK,
Seberíniho 1, 821 03
Bratislava
125989121.qxp 2007-07-06 12:02 Page 23
Page 24

24
Suomi
www.electrolux.fi
Sverige
+46 (0)771 76 76 76
Electrolux Service, S:t
Göransgatan 143,S-105 45
Stockholm
Türkiye
+90 21 22 93 10 25
Россия
+7 495 937 7837
129090 Москва,
Олимпийский
проспект, 16, БЦ
"Олимпик"
125989121.qxp 2007-07-06 12:02 Page 24
Page 25

25
Käyttöohjeen sisältämät symbolit tarkoittavat seuraavaa:
Varoituskolmio korostaa tiedon erityistä tärkeyttä turvallisuutesi tai koneen oikean toiminnan
kannalta.
Tällaisen merkin kohdalla on lisäohjeita ja koneen käyttöön liittyviä käytännön vinkkejä.
Tästä merkinnästä tunnistat ohjeet ja vinkit, joiden avulla voit edistää laitteen
energiataloudellista ja ympäristöystävällistä käyttöä.
Turvallisuusohjeet . . . . . . . . . . . . . . . . . 26
Laitteen kuvaus . . . . . . . . . . . . . . . . . . . 28
Käyttöpaneeli . . . . . . . . . . . . . . . . . . . . 29
Kuivausohjelmat . . . . . . . . . . . . . . . . . . 30
Käyttöönotto. . . . . . . . . . . . . . . . . . . . . . 32
Kuivausohjeita . . . . . . . . . . . . . . . . . . . 32
Päivittäinen käyttö . . . . . . . . . . . . . . . . . 33
Huolto ja puhdistus . . . . . . . . . . . . . . . . 26
Käyttöongelmat.. . . . . . . . . . . . . . . . . . . 28
Tekniset tiedot . . . . . . . . . . . . . . . . . . . . 29
Kulutusarvot . . . . . . . . . . . . . . . . . . . . . 30
Laitteen käytöstäpoisto/
jätteiden käsittely . . . . . . . . . . . . . . . . . . 31
Asennus. . . . . . . . . . . . . . . . . . . . . . . . . 33
Takuu/Asiakaspalvelu . . . . . . . . . . . . . . 35
Sisällysluettelo
Kiitos, että olet valinnut tämän laitteen
Toivomme, että uusi laitteesi tuottaa Sinulle paljon iloa ja harkitset tuotemerkkimme laitteen
valintaa myös muiden kodinkoneidesi hankinnan yhteydessä.
Lue tämä käyttöohje huolellisesti ja pidä se tallessa koko laitteen käyttöiän ajan. Käyttöohje on
luovutettava myös laitteen mahdolliselle uudelle omistajalle.
125989121_FI.qxp 2007-07-06 12:20 Page 25
Page 26

26
Turvallisuusohjeet
Jotta osaisit käyttää laitetta turvallisesti ja oikealla tavalla, lue huolellisesti tämä käyttöohje
sekä sen sisältämät neuvot ja varoitukset ennen laitteen asentamista ja ensimmäistä käyttöä.
Turhien virheiden ja onnettomuuksien välttämiseksi on tärkeää, että kaikki laitteen käyttäjät
perehtyvät huolellisesti sen toimintaan ja turvallisuusominaisuuksiin. Pidä tämä ohje
tallessa ja varmista, että se kulkee aina laitteen mukana esimerkiksi asunnon vaihdon
yhteydessä tai luovutetaan mahdolliselle uudelle omistajalle. Näin kaikilla laitteen käyttäjillä
on asianmukaiset ohjeet turvallista käyttöä varten.
Yleiset turvallisuusmääräykset
• Laitteen teknisten ominaisuuksien
muuttaminen tai muiden muutosten
tekeminen laitteeseen on kielletty
turvallisuussyistä.
• Tämä laite ei ole tarkoitettu fyysisesti tai
sensorisesti rajoitteisten tai muulla tavalla
taitamattomien tai kokemattomien
henkilöiden (ei myöskään lasten) käyttöön,
ellei heidän turvallisuudestaan vastuussa
oleva henkilö valvo ja opasta heitä laitteen
käytössä.
• Varmista, että kotieläimet eivät pääse
kiipeämään kuivausrumpuun. Tarkista rumpu
ennen kuin aloitat koneen käytön.
• Kolikot, hakaneulat, hiuspinnit, naulat, ruuvit,
kivet tai muut kovat ja terävät esineet voivat
aiheuttaa vakavia vahinkoja eikä niitä sen
vuoksi saa joutua koneen sisälle.
• Tulipalon vaaran välttämiseksi
kuivausrummussa ei saa kuivata: tyynyjä,
peittoja tai vastaavanlaisia tekstiilejä (koska
ne keräävät lämpöä).
• Kuivausrummussa ei saa kuivata
vaahtokumista valmistettuja tuotteita
(lateksivaahto), suihkumyssyjä, vettähylkiviä
tekstiilejä, kumitettuja esineitä tai vaatteita
eikä vaahtokumilla täytettyjä tyynyjä.
• Irrota pistoke pistorasiasta aina käytön
jälkeen sekä ennen kuin aloitat puhdistus- tai
huoltotöiden suorittamisen.
• Älä missään tapauksessa yritä korjata laitetta
omatoimisesti. Asiantuntemattoman henkilön
suorittamat korjaukset voivat aiheuttaa
henkilövahinkoja tai vakavia toimintahäiriöitä.
Ota yhteys valtuutettuun huoltoliikkeeseen.
Vaadi aina alkuperäisten varaosien käyttöä.
• Tekstiilit, joissa on ruokaöljyä, asetonia,
petrolia, kerosiinia, tahranpoistoainetta,
tärpättiä, vahoja ja vahanpoistoaineita on
pestävä kuumassa vedessä käyttäen
runsaasti pesuainetta, ennen kuin ne
voidaan kuivata kuivausrummussa.
• Räjähdysvaara: Kuivausrummussa ei saa
kuivata vaatteita tai tekstiilejä, jotka on
käsitelty tulenaroilla puhdistus- ja
liuotinaineilla (pesubensiini, alkoholi,
tahranpoistoaine jne.). Tällaiset aineet ovat
haihtuvia ja voivat aiheuttaa räjähdyksen.
Kuivausrummussa saa kuivata vain vedellä
pestyjä vaatteita.
• Tulipalon vaara: kasvi- tai paistoöljyllä
kostuneet tai tahraantuneet vaatteet
aiheuttavat tulipalon vaaran eikä niitä saa
sen vuoksi kuivata kuivausrummussa.
• Jos olet käyttänyt liuotinainetta sisältävää
tahranpoistoainetta, vaate on huuhdeltava
huolellisesti ennen kuivausrumpukuivausta.
• Tarkista aina, että kuivattavan vaatteen
taskuihin ei ole jäänyt
tulitikkuja/kaasusytytintä.
125989121_FI.qxp 2007-07-06 12:20 Page 26
Page 27

27
Asennus
• Tämä laite on painava, sen siirtämisessä on
noudatettava varovaisuutta.
• Tarkista pakkauksen purkamisen yhteydessä,
ettei laite ole vaurioitunut. Jos et ole varma
asiasta, älä käytä laitetta, vaan ota yhteys
valtuutettuun huoltoliikkeeseen.
• Poista kaikki kuljetustuet ja
pakkausmateriaalit ennen laitteen käyttöä.
Muussa tapauksessa laite voi vaurioitua
vakavasti. Lue käyttöohjeen aihetta
käsittelevä kohta.
• Kuivausohjelman viimeinen vaihe on
jäähdytysvaihe, joka suojaa pyykkiä korkean
lämpötilan aiheuttamilta vahingoilta.
• Kaikki laitteen asennuksessa tarvittavat
sähkötyöt on annettava asiantuntevan
sähköasentajan tehtäväksi.
• Tarkista, ettei laite ole virtajohdon päällä.
• Jos laite sijoitetaan maton päälle, säädä
jalkoja siten, että ilma pääsee kiertämään
vapaasti.
• Kun laite on asennettu paikalleen, tarkista,
ettei se paina tai purista virtajohtoa,
vedenottoletkua tai tyhjennysletkua.
• Jos kuivausrumpu asennetaan pesukoneen
päälle, on käytettävä torniasennussarjaa
(lisävaruste).
Käyttö
• Tämä laite on tarkoitettu kotitalouskäyttöön.
Laitetta ei saa käyttää muihin kuin sille
tarkoitettuihin käyttökohteisiin.
• Kuivaa laitteessa vain tekstiilejä, joille
rumpukuivaus on sallittu. Noudata tekstiilien
hoito-ohjemerkintöjä.
• Älä kuivaa kuivausrummussa pesemättömiä
vaatteita.
• Noudata huuhteluaineiden ja vastaavien
tuotteiden käytössä tuotteen valmistajan
ohjeita.
• Älä täytä konetta liian täyteen. Lue
käyttöohjeen aihetta käsittelevä kohta.
• Kuivausrummussa ei saa koskaan kuivata
linkoamatonta pyykkiä.
• Kuivausrummussa ei saa kuivata vaatteita,
jotka ovat olleet kosketuksissa haihtuvien
petrolituotteiden kanssa. Jos käytät haihtuvia
puhdistusnesteitä, varmista, että neste on
poistettu vaatekappaleesta ennen kuin laitat
vaatteen koneeseen.
• Älä irrota verkkopistoketta johdosta vetämällä
vaan vedä aina pistokkeesta.
• Älä koskaan käytä kuivausrumpua, jos
virtajohto on vioittunut tai jos käyttöpaneeli,
kansitaso tai jalusta ovat vaurioituneet siten,
että kuivausrummun sisäosat ovat esillä.
VAROITUS:
Älä koskaan pysäytä kuivausrumpua ennen
kuivausohjelman päättymistä.
Lasten turvallisuus
• Lapset tai vammaiset henkilöt eivät saa
käyttää laitetta ilman valvontaa.
• Pikkulapsia on valvottava eikä heidän pidä
antaa leikkiä laitteella.
• Pakkaustarvikkeet (esim. muovi,
polystyreeni) saattavat olla vaarallisia lapsille
- tukehtumisvaara! Pidä ne poissa lasten
ulottuvilta
• Pidä kaikki pesuaineet turvallisessa paikassa
poissa lasten ulottuvilta.
• Varmista, että lapset tai kotieläimet eivät
pääse kiipeämään rumpuun.
125989121_FI.qxp 2007-07-06 12:20 Page 27
Page 28

28
Laitteen kuvaus
1
2
3
4
1. Käyttöpaneeli
2. Nukkasiivilät
3. Arvokilpi
4. Säädettävät jalat
5. Sivulla sijaitsevat ilmanvaihtoaukot
6. Rengasmutteri
7. Takana sijaitseva ilmanvaihtoaukko
125989121_FI.qxp 2007-07-06 12:20 Page 28
Page 29

29
Käyttöpaneeli
Merkkivalot
• Kuivaus käynnissä
• Viileä kuivaus
• Ohjelman loppu
• Puhdista nukkasiivilät
Ohjelman/ajan
valintakytkin
Käynnistä-painike
Kuivausrumpu käynnistetään tällä painikkeella ohjelman ja
lisätoimintojen valitsemisen jälkeen.
Virtapainike
Ohjelman/ajan
valintakytkin
Hellävarainen
-painike
Merkkiääni
-painike
Merkki
valot
Käynnistä
-painike
Virta päällä -merkkivalo
Virtapainike
Merkkiääni-painike
Kuivausohjelman lopussa kuuluu keskeytyvä
merkkiääni.
Hellävarainen-painike
Tällä painikkeella valitaan aroille vaatteille soveltuva kuivaus
alhaisemmassa lämpötilassa.
Virta päällä -merkkivalo
Merkkivalo syttyy, kun laite kytketään toimintaan (virtapainike
painetaan alas), ja sammuu, kun virtapainike vapautetaan.
Tällä valitsimella voit valita elektronisesti ohjatun tai ajastetun
rumpukuivauksen. Käännä valitsin haluamasi ohjelman tai ajan
kohdalle.
Tällä painikkeella kuivausrumpu kytketään toimintaan. Ohjelman
lopussa virta kytketään pois kuivausrummusta painamalla
painiketta uudelleen.
125989121_FI.qxp 2007-07-06 12:20 Page 29
Page 30

30
Ohjelma
Tekstiilien
materiaali
Lisätoiminnot Ohjelman kuvaus
Erittäin
kuiva
Puuvilla
ja pellava
• Hellävarainen
• Merkkiääni
Paksujen tai monikerroksisten tekstiilien
kuivaus, esimerkiksi froteepyyhkeet
Kaappikuiva
Puuvilla
ja pellava
• Hellävarainen
• Merkkiääni
Samanpaksuisten tekstiilien kuivaus,
esimerkiksi froteiset kylpypyyhkeet, neuleet ja
trikoovaatteet, pyyhkeet.
Kostea
Puuvilla
ja pellava
• Hellävarainen
• Merkkiääni
Ohuet silitettävät tekstiilit, esimerkiksi
trikoovaatteet, puuvillapaidat.
Silityskuiva
Puuvilla
ja pellava
• Hellävarainen
• Merkkiääni
Mankeloitavat puuvillaiset ja pellavaiset
tekstiilit, esimerkiksi vuodevaatteet,
pöytäliinat.
Mankeli
kuiva
Puuvilla
ja pellava
• Hellävarainen
• Merkkiääni
Mankeloitavat puuvillaiset ja pellavaiset
tekstiilit, esimerkiksi vuodevaatteet,
pöytäliinat.
Erittäin
kuiva
Tekokuidut
• Hellävarainen
• Merkkiääni
Paksujen tai monikerroksisten tekstiilien
kuivaus, esimerkiksi neulepuserot,
vuodevaatteet, pöytäliinat.
Kaappikuiva
Tekokuidut
• Hellävarainen
• Merkkiääni
Ohuet tekstiilit, joita ei silitetä, esimerkiksi
siliävät paidat, pöytäliinat, vauvanvaatteet,
sukat, alusasut.
Silityskuiva
Tekokuidut
• Hellävarainen
• Merkkiääni
Ohuet silitettävät tekstiilit, esimerkiksi
trikoovaatteet, puuvillapaidat.
Kuivausohjelmat
125989121_FI.qxp 2007-07-06 12:20 Page 30
Page 31

31
Ohjelma
Tekstiilien
materiaali
Lisätoiminnot Ohjelman kuvaus
Aika
Tekokuidut
Puuvilla
• Hellävarainen
• Merkkiääni
Paksujen tai monikerroksisten tekstiilien kuivaus,
esimerkiksi froteepyyhkeet. Yksittäisten
vaatekappaleiden tai alle 1 kg painavan pyykin
kuivaaminen.
Jäähdytys
Puuvilla
ja pellava
Tekokuidut
• Merkkiääni
Noin 10 minuutin pituinen erikoisohjelma tekstiilien
raikastamiseen ja hellävaraiseen puhdistamiseen
kaupasta saatavilla olevien puhdistustuotteiden
avulla. (Käsittele vain sellaisia vaatteita, jotka
valmistaja on ilmoittanut soveltuvaksi
rumpukuivaukseen. Noudata valmistajan
käyttöohjeita).
Kuivausohjelmat
125989121_FI.qxp 2007-07-06 12:20 Page 31
Page 32

32
Pyykin valmistelu
Seuraavassa mainittuja tekstiilejä ei saa
kuivata kuivausrummussa: Erityisen arat
tekstiilit, esimerkiksi tekokuituiset verhot,
villa- ja silkkivaatteet, metallikoristeiset
kankaat, nailonsukat, kookkaat ja painavat
tekstiilit, kuten anorakit, täkit, untuvapeitot,
makuupussit, sekä vaahtokumia tai
kuminkaltaisia materiaaleja sisältävät
tekstiilit.
• Noudata tekstiilien hoito-ohjemerkintöjä:
rumpukuivaus sallittu
normaali kuivaus (korkea lämpötila)
hellävarainen kuivaus
(alhainen lämpötila)
rumpukuivaus kielletty
• Solmi tai napita suljettavat pussilakanat ja
tyynyliinat, jotta pienet vaatteet eivät
keräänny niiden sisään. Sulje painonapit ja
vetoketjut ja sido irtonaiset nauhat yhteen.
• Lajittele pyykki materiaalin ja halutun
kuivausasteen mukaisesti.
• Älä kuivaa pyykkiä liian kuivaksi
välttääksesi rypistymisen ja säästääksesi
energiaa.
• Älä kuivaa tummia nukkaisia vaatteita
yhdessä vaaleiden vaatteiden kanssa, sillä
niihin voi tarttua nukkaa.
• Linkoa pyykki huolellisesti ennen
kuivaamista.
• Myös siliävät vaatteet, esimerkiksi paidat,
tulee lingota ennen kuivaamista
(rypistymisen kestävyydestä riippuen noin
30 sekuntia tai pesukoneen erikoislyhyellä
linkousohjelmalla).
• Kudotut tekstiilit (alusvaatteet) voivat
kutistua vähän kuivattaessa. Älä ylikuivaa
tällaisia vaatteita. Kutistumisen vara on
hyvä ottaa huomioon uusia vaatteita
hankittaessa.
• Tärkätyt tekstiilit voi myös kuivata
kuivausrummussa. Saadaksesi parhaan
lopputuloksen valitse kuivausohjelma
‘Silityskuiva’, jossa pyykkiin jää tietty
jäännöskosteus. Kuivausohjelman
päättymisen jälkeen kuivausrumpu on
pyyhittävä sisältä ensin kostealla ja sen
jälkeen kuivalla liinalla mahdollisten tärkin
jäämien poistamiseksi.
• Jotta vaatteisiin ei muodostu staattista
sähköä voit käyttää pesussa
huuhteluainetta tai kuivausrummuille
erityisesti tarkoitettua tekstiilien hoitoainetta.
• Ota pyykki pois koneesta kuivausohjelman
päätyttyä.
Käyttöönotto
• Tarkista, että sähköliitäntä on tehty asennusohjeita noudattaen.
• Poista polystyreenisuojus tai muu suojamateriaali rummusta.
• Laita kuivausrumpuun muutamia kosteita, puhtaita kangasriepuja ja kuivaa niitä noin 30
minuuttia.
Uudessa kuivausrummussa voi olla pölyä tai likaa.
Kuivausohjeita
125989121_FI.qxp 2007-07-06 12:20 Page 32
Page 33

33
• Jos jotkin vaatteet ovat jääneet vielä
kosteiksi, aseta lyhyt jälkikuivausaika,
kuitenkin vähintään 30 minuuttia.
Jälkikuivaus on tarpeellinen erityisesti
vaatteiden monikerroksisille osille (esim.
kaulukset, taskut jne.).
Tarkista, ettei pyykin joukkoon ole jäänyt
metalliesineitä (esim. hiuspinnejä,
hakaneuloja).
Sulje tyynyliinojen napit, vetoketjut, koukut
ja nepparit. Sido kiinni vyöt tai pitkät
nauhat.
Jotta pyykit eivät kietoudu toisiinsa: sulje
vetoketjut, napitettavat tyynyliinat ja
pussilakanat ja sido yhteen pitkät nauhat
(esim. esiliinojen nauhat). Käännä vuorilliset
vaatteet nurin (esim. puuvillavuoriset
anorakit; puuvillakerroksen on oltava
päällä). Näin vaatteet kuivuvat paremmin.
Maksimitäyttömäärät
Suositellut täyttömäärät on mainittu
ohjelmataulukossa.
Yleisohjeet:
Puuvilla, pellava: täysi rumpu, mutta ei
täyteen ahdettu;
Tekokuidut: täytä rumpu korkeintaan
puoliksi täyteen;
Arat kuidut ja villavaatteet: täytä rumpu
korkeintaan 1/3-täydeksi.
Pyri käyttämään koneen maksimitäyttömääriä,
sillä pienemmän määrän kuivaaminen on
epätaloudellista.
Pyykin paino
Alla on mainittu joitakin suuntaa-antavia arvoja:
kylpypyyhe 1200 g
lautasliina 100 g
pussilakana 700 g
lakana 500 g
tyynyliina 200 g
pöytäliina 250 g
pyyheliina 200 g
lautasliina 100 g
yöpaita 200 g
naisten pikkuhousut 100 g
miesten työpaita 600 g
miesten paita 200 g
miesten pyjama 500 g
T-paita 100 g
miesten alushousut 100 g
125989121_FI.qxp 2007-07-06 12:20 Page 33
Page 34

34
Pyykin täyttäminen
koneeseen
Ravistele vähän
vaatteita ja työnnä ne
rumpuun yksi
kerrallaan. Sulje
luukku. Tarkista, että
luukun ja siivilän väliin
ei jää vaatteita.
Ohjelman
valitseminen
Käännä
ohjelmanvalitsin
haluamasi ohjelman
kohdalle. Käynnistämerkkivalo alkaa
vilkkua.
Ohjelmanvalitsimessa
on seuraavat alueet:
• Puuvilla
• Tekokuidut
• Erikoisohjelmat
Tällä valitsimella voit
valita elektronisesti
ohjatun tai ajastetun
rumpukuivauksen.
Käännä valitsin
haluamasi ohjelman tai
ajan kohdalle.
Elektronisesti ohjattu
rumpukuivaus
(automaattinen)
Kuivausrumpu
suorittaa ohjelman
pyykin kosteustason
tunnistavien
antureiden hakemien
tietojen perusteella.
Käyttäjän tarvitsee
ainoastaan valita
ohjelma tekstiilien
materiaalin ja halutun
kuivausasteen
perusteella.
Ohjelmanvalitsinta voi
kääntää joko myötätai vastapäivään.
Merkkivalot Kuivaus
käynnissä, Jäähdytys
ja Loppu syttyvät.
Ohjelman lopussa
virta on kytkettävä
pois koneesta
kääntämällä
ohjelmanvalitsin
asentoon O.
Huomio!
Jos käännät
ohjelmanvalitsimen
jonkin toisen ohjelman
kohdalle koneen
käydessä,
ohjelmavaiheen
merkkivalo alkaa
vilkkua. Uusi valittu
ohjelma ei käynnisty.
Kuivausohjelman
lisätoimintojen
painikkeet
Ohjelmasta riippuen
siihen voidaan
yhdistää erilaisia
lisätoimintoja.
Lisätoiminnot on
valittava ohjelman
valitsemisen jälkeen
ennen Käynnistäpainikkeen painamista.
Kun lisätoiminnon
painiketta painetaan,
toimintoa vastaava
merkkivalo syttyy. Kun
painiketta painetaan
uudestaan, sen
merkkivalo sammuu.
Hellävarainen
Tällä painikkeella
valitaan aroille
vaatteille soveltuva
kuivaus
alhaisemmassa
lämpötilassa.
Vastaava merkkivalo
syttyy. Tätä toimintoa
voidaan käyttää myös
ajastetussa
kuivauksessa.
HELLÄVARAINENlisätoiminto on järkevä
vain, kun pyykin määrä
on vähintään 3 kg!
Kun ohjelma on
lopussa, merkkivalo
Loppu syttyy.
Merkkiääni
Kuivausohjelman
lopussa kuuluu
keskeytyvä merkkiääni.
Tällä painikkeella voit
poistaa merkkiäänen
käytöstä seuraavissa
tilanteissa:
• ohjelmaa valittaessa
• painikkeita
painettaessa
• kun ohjelmanvalitsin
käännetään toiseen
asentoon ohjelman
aikana tai
painettaessa
lisätoimintojen
painiketta ohjelman
Päivittäinen käyttö
125989121_FI.qxp 2007-07-06 12:21 Page 34
Page 35

35
aikana
• ohjelman lopussa.
Vastaava merkkivalo
syttyy.
Käynnistä-painike
Kuivausrumpu
käynnistetään tällä
painikkeella ohjelman
ja lisätoimintojen
valitsemisen jälkeen.
Painikkeen merkkivalo
lakkaa vilkkumasta. Jos
ohjelmanvalitsin
käännetään toiseen
asentoon koneen
käydessä, laitteesta
kuuluu merkkiääni, ja
ohjelmavaiheen
merkkivalot alkavat
vilkkua. Rumpu pyörii
vuorotellen
kumpaankin suuntaan
kuivauksen aikana.
Kaikkien
kuivausohjelmien
lopussa on 10 minuutin
jäähdytysvaihe
(Jäähdytys-merkkivalo
palaa). Voit ottaa
pyykin pois koneesta
jäähdytysvaiheen
jälkeen.
Merkkivalot
Seuraavassa on
kuvattu laitteen
merkkivalot:
• Kuivaus
käynnissä
Ilmaisee, että
kuivaus on
parhaillaan
käynnissä.
• Jäähdytys
Ilmaisee, että
jäähdytysvaihe on
parhaillaan
käynnissä.
Kuivausohjelman
lopussa pyykkiä
jäähdytetään 10
minuuttia.
• Ohjelman loppu
Merkkivalo syttyy
jäähdytysvaiheen
jälkeen,
rypistymisenestovaiheen aikana sekä
ohjelman
päättyessä.
• Puhdista siivilät
Tämä merkkivalo
syttyy ohjelman
lopussa muistuttaen,
että nukkasiivilät on
puhdistettava.
Ohjelman
peruuttaminen
Voit peruuttaa
käynnissä olevan
ohjelman kääntämällä
ohjelmanvalitsimen
asentoon O. Sen
jälkeen voit valita
uuden ohjelman.
Ohjelman lopussa
Kaikkien
kuivausohjelmien
lopussa on 10 minuutin
jäähdytysvaihe.
Jos pyykkiä ei oteta
pois ohjelman lopussa,
laite suorittaa
rypistymisenestovaiheen (kesto
enintään 30 minuuttia).
Kuivausrumpu
pysähtyy
automaattisesti
rypistymisenestovaiheen jälkeen, ellei
pyykkiä oteta koneesta.
Loppu- ja Puhdista
siivilät -merkkivalot
jäävät palamaan, ja
merkkiääni kuuluu
kahden minuutin ajan.
Käännä
ohjelmanvalitsin
asentoon 0. Kaikki
merkkivalot sammuvat.
Virta on kytketty pois
laitteesta.
Ota pyykki pois
koneesta. Jos avaat ja
suljet luukun ennen
kuin ohjelmanvalitsin
on käännetty asentoon
0, kaikki merkkivalot
syttyvät.
Jokaisen käytön
jälkeen
• Puhdista
nukkasiivilät.
Tärkeää!
Jos kuivausohjelma on
keskeytettävä ennen
sen päättymistä,
käännä
ohjelmanvalitsin
asentoon Jäähdytys
ja odota, kunnes
jäähdytysvaihe on
päättynyt, ennen kuin
otat pyykin koneesta.
Näin laitteen sisälle ei
keräänny lämpöä.
Käännä valitsin ensin
asentoon O, sen
jälkeen asentoon
Jäähdytys ja paina
käynnistyspainiketta.
Ohjelman
muuttaminen
Kun haluat muuttaa
käynnissä olevaa
ohjelmaa, peruuta
ohjelma ensin
kääntämällä
ohjelmanvalitsin
asentoon O. Valitse
uusi ohjelma ja paina
käynnistyspainiketta.
125989121_FI.qxp 2007-07-06 12:21 Page 35
Page 36

36
Tärkeää:
Kytke laite IRTI verkkovirrasta, ennen kuin aloitat
mitään puhdistus- tai huoltotöitä.
Ulkopintojen puhdistus
Käytä ulkopintojen puhdistuksessa ainoastaan
saippuaa ja vettä.
Tärkeää: Älä käytä puhdistuksessa
alkoholipohjaisia puhdistusaineita, liuotinaineita tai
vastaavia tuotteita.
Luukun puhdistaminen
Puhdista luukun sisäpuoli säännöllisesti ja poista
kaikki siivilöihin kerääntynyt nukka. Huolellinen
puhdistus varmistaa parhaan mahdollisen
kuivaustuloksen.
Nukkasiivilöiden puhdistaminen
Kuivausrumpu voi toimia asianmukaisesti vain, jos
nukkasiivilät ovat puhtaat.
Siivilät keräävät kaiken rumpukuivauksessa
syntyvän nukan, ja sen vuoksi ne on puhdistettava
kostealla liinalla jokaisen kuivausohjelman jälkeen,
ennen kuin pyykki otetaan pois koneesta.
Merkkivalo muistuttaa puhdistamisesta.
67
Huolto ja puhdistus
125989121_FI.qxp 2007-07-06 12:21 Page 36
Page 37

37
Tärkeää:
Älä käytä kuivausrumpua ilman siivilöitä.
Rummun puhdistaminen sisältä
Kun pyykistä ei tule halutun kuivausasteen
mukaista, toisin sanoen, kun pyykki ei ole niin
kuivaa tai kosteaa kuin haluat, rumpu on
suositeltavaa puhdistaa sisältä etikkaan kastetulla
liinalla.
Etikka poistaa rummun pintaan muodostuneen
ohuen kalvon (pesu- ja huuhteluaineen jäämien ja
veden sisältämän kalkin vaikutuksesta syntyneen),
joka estää kosteussensoreiden tunnistamasta
oikein kosteussensoreita.
125989121_FI.qxp 2007-07-06 12:21 Page 37
Page 38

38
Käyttöongelmat
Ongelma Mahdollinen syy Korjaustoimenpide
Kuivausrumpu ei toimi
kunnolla
• Virtajohto ei ole pistorasiassa Kytke virtajohto pistorasiaan
• KÄYNNISTÄ-painiketta ei ole
painettu.
• Paina KÄYNNISTÄ-painiketta
• Ohjelmaa ei ole valittu • Valitse ohjelma
• Luukku on auki • Sulje luukku
• Sulake on palanut tai
vikavirtakytkin on lauennut
(sulaketaulussa)
• Tarkista sulake tai
vikavirtakytkin. Sähkövikojen
korjaamisessa tarvitaan
sähköasentaja
Kuivaustulos ei ole
tyydyttävä
• On valittu väärä ohjelma
• Valitse seuraavan kerran joku
muu ohjelma (kesto)
• Nukkasiivilä on tukossa • Puhdista nukkasiivilät
• Virheellinen täyttömäärä
• Noudata suositeltuja
täyttömääriä
• Pyykki ei ole riittävän kuivaa • Esikuivaa pyykkiä riittävästi
• Rummun sisäpinnalla tai rivoissa
on kalkkikeräymiä
• Puhdista rummun sisäpinnat
ja rivat
Jos laitteen käytössä on ongelmia, voit yrittää ratkaista ongelmat itse seuraavien ohjeiden avulla. Jos
kutsut paikalle huoltomekaanikon jonkun alla olevassa taulukossa mainitun ongelman esiintyessä tai
virheellisestä käytöstä johtuvan vian korjaamiseksi, huoltokäynnistä joudutaan veloittamaan myös
takuuaikana.
125989121_FI.qxp 2007-07-06 12:21 Page 38
Page 39

39
Jos ongelmaan ei löydy ratkaisua, ota yhteys
valtuutettuun huoltoliikkeeseen. Ennen kuin soitat
huoltoon, tarkista laitteen mallinumero,
sarjanumero ja ostopäivä: Huoltoliike tarvitsee
nämä tiedot.
P0307
Mod. ...
Prod. No. ........
Ser. No. ...........
Jos kutsut paikalle huoltoteknikon jonkin edellä
kuvatun häiriön tai väärän tai virheellisen
käsittelyn aiheuttaman häiriön vuoksi,
huoltoteknikon käynnistä veloitetaan myös
laitteen takuuaikana.
Tärkeää:
125989121_FI.qxp 2007-07-06 12:21 Page 39
Page 40

40
Tekniset tiedot
Tämä laite vastaa seuraavia EU-direktiivejä:
– 73/23/ETY, 19.02.1973, Pienjännitedirektiivi
– 89/336/ETY, 03.05.1989, EMC-direktiivi sekä sen muutosdirektiivi 92/31/ETY
– 93/68/ETY, 22.07.1993, CE-merkintädirektiivi
Tekniset tiedot
Mitat
Leveys
Korkeus
Syvyys
60 cm
85 cm
57 cm
Sähköliitäntä Jännite Kokonaisteho - Sulake
Sähköliitännän tiedot on merkitty kuivausrummun luukun
sisäreunassa olevaan arvokilpeen
Maksimitäyttömäärät
Puuvilla
Tekokuidut
6 kg
3 kg
Käyttö
Kotitaloudet
+ 5 °C - +35 °C
125989121_FI.qxp 2007-07-06 12:21 Page 40
Page 41

41
Kulutusarvot on mitattu normaaliolosuhteissa.
Arvot voivat vaihdella kotitalouksien yksilöllisen
käytön mukaisesti.
Maksimitäyttömäärät:
1)
Puuvilla: 6 kg
2)
Tekokuidut: 3 kg
Kulutusarvot (*)
Ohjelma
Ohjelman kesto
(minuuttia)
Energian
kulutus
(kWh)
Kierrosta
minuutissa
Puuvilla, kaappikuiva
1)
112 3,3 1000
Puuvilla, kaappikuiva
1)
98 2,9 1400
Tekokuidut, kaappikuiva
2)
52 1,1 1200
Kulutusarvot
125989121_FI.qxp 2007-07-06 12:21 Page 41
Page 42

42
Pakkausmateriaalit
Kierrätyssymbolilla merkityt materiaalit ovat
kierrätyskelpoisia.
Tällaiset materiaalit voi kierrättää viemällä ne
asianmukaisiin keräyssäiliöihin.
Laite
Toimita käytöstäpoistettu laite asianmukaiseen
keräyspisteeseen. Huolehdi ympäristöstäsi!
Käytöstä poistettu laite
Laitteessa tai sen pakkauksessa oleva symboli
ilmaisee, että tuotetta ei voi käsitellä tavallisena
kotitalousjätteenä. Sen sijaan laite on toimitettava
sähkö- ja elektroniikkalaitteiden keräys- ja
kierrätyspisteeseen. Varmistamalla, että tuotetta
käsitellään oikealla tavalla, voit auttaa estämään
sellaisia ympäristö- ja terveyshaittoja, joita voi
aiheutua tuotteen käsittelystä tavallisena
kotitalousjätteenä. Lisätietoja jätehuollosta ja
kierrätyksestä on saatavilla paikalliselta
viranomaiselta, jätehuoltokeskuksesta tai
liikkeestä, josta laite on ostettu.
Ympäristönsuojeluohjeita
Hankkimasi kuivausrumpu toimii taloudellisesti,
kun noudatat näitä ohjeita:
• Pyri käyttämään koneen
maksimitäyttömääriä, sillä pienemmän
määrän kuivaaminen on epätaloudellista.
• Linkoa pyykki aina hyvin ennen kuivausta.
Mitä korkeampi on linkouksen kierrosluku,
sitä lyhyempi on kuivausaika ja sitä
vähemmän kuluu energiaa.
• Älä kuivaa pyykkiä liian kuivaksi välttääksesi
rypistymisen ja säästääksesi energiaa.
Valitse oikea kuivausohjelma ja haluttu
kuivausaste tekstiilien materiaalin mukaisesti.
• Koneen täyden täyttökapasiteetin
hyödyntämiseksi täysin kaappikuivaksi
haluttu pyykki voidaan kuivata yhdessä
silityskuivaksi kuivattavan pyykin kanssa.
Valitse silityskuivalle pyykille tarkoitettu
ohjelma. Kun ohjelma on lopussa, ota
silityskuiva pyykki pois koneesta ja kuivaa
loput vaatteet valmiiksi toisella ohjelmalla.
• Nukkasiivilät on puhdistettava säännöllisesti
kuivausaikojen pitenemisen ja lisääntyneen
energiankulutuksen estämiseksi.
• Huolehdi hyvästä ilmanvaihdosta. Huoneen
lämpötila ei saa olla yli +35 °C kuivauksen
aikana.
Laitteen käytöstäpoisto/jätteiden käsittely
125989121_FI.qxp 2007-07-06 12:21 Page 42
Page 43

43
Kuivausrummun sijoittaminen
Kuivausrumpu voidaan asentaa tasaiselle lattialle tai
pesukoneen päälle. Kuivausrummun on aina oltava
vaakasuorassa, tarkista se vatupassilla. Koneen
jalkoja voidaan tarvittaessa säätää. Varmista riittävä
ilmankierto kuivausrummun alaosasta. Älä tuki
ilmanottoaukkoja vaatteilla tai vastaavalla. Huolehdi
siitä, että ilmanvaihto pääsee tapahtumaan hyvin
jalustan ilmaritilän kautta. Tämän vuoksi paksu matto
ei sovi kuivausrummun alustaksi.
Huomaa:
• Kuivausrummun ulos puhaltama ilma voi olla jopa
+60°C. Älä siksi koskaan sijoita kuivausrumpua
lämpöä kestämättömälle alustalle.
• Kuivausrumpua käytettäessä huoneen lämpötilan
täytyy olla +5 …+35 ºC, koska muuten laitteen
toiminta saattaa kärsiä.
• Kuivausrumpua ympäröivän tilan on oltava
mahdollisimman pölytön.
• Säädettäviä jalkoja ei saa irrottaa. Alustan ja
kuivausrummun väliin on ehdottomasti jätettävä rako
ilmanvaihtoa varten. Tukkiutunut ilmanvaihto nostaa
kuivausrummun sisäosan lämpötilaa, mikä vaikuttaa
kuivausrummun toimintaan.
Afledning af fugtig luft
Den fugtige luft kan afledes fra maskinens bagside
eller fra højre eller venstre side. De ikke-anvendte
åbninger skal lukkes med de medfølgende dæksler
Tilslutning af udluftningsslange
Hvis maskinen ikke kan opstilles i et godt ventileret
rum, er det nødvendigt at aflede den fugtige luft via
en fleksibel udluftningsslange. Med tørretumbleren
følger en forbindelsesring (A), som ved levering er
placeret i luftudledningsåbningen bagest på
maskinen. Træk ringen ud af åbningen og skru den
fast på spiralslangen, som følger med
tørretumbleren.
Udvælg en åbning og indfør ringen.
Tryk let på ringen, indtil den går i indgreb. Sørg for, at
de åbninger, som ikke anvendes, er dækket til.
OBS!
Hvis slangen er lang og rummet koldt, kan der på
grund af fugten danne sig kondensvand i slangen.
Dette kan ikke undgås. For at forhindre vandet i at
samle sig i slangen eller løbe tilbage til
tørretumbleren kan De bore et hul (Ø 3 mm) på
slangens laveste punkt og placere en skål
nedenunder (se punkt B på billedet).
Det er vigtigt, at udluftningsslangen placeres på en
sådan måde, at den har den korteste vej til
udluftningsåbningen med kun få bøjninger. Derved
sikres det, at tørretumbleren arbejder så økonomisk
som muligt. Når slangen er monteret, må den ikke
have mere end to bøjninger.
Udluftningsslangen må aldrig tilsluttes skorstene
eller aftrækskanaler fra varmesystemer og
lignende.
B
A
A
28
Asennus
125989121_FI.qxp 2007-07-06 12:21 Page 43
Page 44

44
Via udluftningsslangen skal der mindst kunne afledes
150 m3 luft/time. Hvis der installeres et spjæld eller
et gitter i slangens udgangsende, skal det sikres, at
denne ende ikke bliver tilstoppet af rust eller smuds.
Den skal rengøres med jævne mellemrum.
Slangens udgangsende kan rettes nedad, således at
regnvand og vind ikke kan trænge ind i slangen. Hvis
rummet, hvor tørretumbleren opstilles, tilføres luft fra
en central og meget stærk ventilator, kan der opstå
tørringsproblemer. Hvis De konstaterer, at tørretiden
er for lang, skal
ventilatoren afbrydes eller ventilatorens gitter lukkes,
mens tørretumbleren er i funktion. Hvis
tørretumbleren opstilles ved siden af andre hårde
hvidevarer eller møbler, skal det kontrolleres, at\
udluftningsslangen ikke har knæk. Hvis slangen er
delvist blokeret på grund af et knæk, forringes
tørringen, tørretiden bliver længere og strømforbruget
forøges. Hvis slangen er helt blokeret på grund af et
knæk, aktiveres maskinens beskyttelsessystem. Hvis
dette er tilfældet skal De kontakte.
Sähköliitäntä
Kone liitetään 230 V sähköverkkoon 10 Asulakkeella
suojamaadoitetun pistorasian kautta.
Koneen asennuksen jälkeen pistoke on oltava
helposti saatavilla.
Liitäntäjohdon vaihto- ja asennustyöt on annettava
valtuutetun huoltoliikkeen tehtäväksi
Huomaa:
Kun kone on asetettu paikalleen, pistokkeen
tulee olla käyttäjän ulottuvilla.
Asennussarja pesukoneen päälleasentamista
varten lisävaruste
Kuivausrumpu voidaan asentaa edestä täytettävän
pesukoneen päälle, jolloin kuivausrumpu on
ruuvattava kiinni pesukoneeseen.
Tähän tarvitaan asennussarja, jonka voit hankkia
omalta jälleenmyyjältäsi.
Ennen kuivausrummun asentamista lue mukana
toimitetut ohjeet huolella.
Avautumissuunnan muuttaminen
Tarvittaessa luukun avautumissuunta voidaan
muuttaa oikealle avautuvaksi. Luukun
avautumissuuntaa ei saa vaihtaa, jos sen jälkeen
saranoita vastapäätä sijaitsee toisen laitteen samaan
suuntaan avautuva ovi, jotka avautuessaan saattavat
estää toisiaan avautumasta.
Huomaa:
Avautumissuunnan voi muuttaa vain valtuutettu
huoltoliike.
280
055
125989121_FI.qxp 2007-07-06 12:21 Page 44
Page 45

45
Huolto ja varaosat
Huollot, varaosatilaukset ja mahdolliset korjaukset
on annettava valtuutetun huoltoliikkeen
tehtäväksi. Lähimmän valtuutetun huoltoliikkeen
numeron löydät soittamalla numeroon 0200-2662
(0,16 e/min +pvm), tai katsomalla
puhelinluettelon keltaisilta sivuilta kohdasta
"kodinkoneiden huoltoa".
Varmistaaksesi laitteesi moitteettoman toiminnan,
vaadi aina käytettäväksi sopivinta, siis
alkuperäistä varaosaa.
Kuluttajaneuvonta
Tuotettasi tai sen käyttöä koskeviin kysymyksiin
saat vastauksen
kuluttajaneuvonnastamme soittamalla numeroon
0200-2662 (0,16 e/min +pvm).
Voit olla yhteydessä kuluttajaneuvontaan myös
sähköpostitse osoitteessa
carelux.fsh@electrolux.fi.
Takuu
Tuotteen takuuaika voidaan ilmoittaa erikseen.
Ellei takuuaikaa ole erikseen määritelty,
noudatetaan vallitsevaa lainsäädäntöä ja
kansallisia määräyksiä. Takuuehdot noudattavat
vallitsevan lainsäädännön mukaisia yleisiä ehtoja.
Ostokuitti säilytetään, koska takuun alkaminen
määritetään ostopäivän mukaan. Korvaus
huollosta voidaan periä myös takuuaikana:
• aiheettomasta huoltokäynnistä
• ellei valmistajan laitteen asennuksesta,
käytöstä ja hoidosta antamia ohjeita ole
noudatettu.
EU-maat
Laitteella on käyttömaan lainsäädännön
mukainen takuu.
Kuljetusvauriot
Tarkista pakkauksen purkamisen yhteydessä,
ettei laite ole vaurioitunut kuljetuksessa.
Mahdollisista kuljetusvaurioista on heti
ilmoitettava myyjäliikkeelle.
Takuu/asiakaspalvelu
125989121_FI.qxp 2007-07-06 12:21 Page 45
Page 46

46
Albania
+35 5 4 261 450 Rr. Pjeter Bogdani Nr. 7 Tirane
Belgique/België/Belgien
+32 2 363 04 44
Bergensesteenweg 719, 1502
Lembeek
Česká republika
+420 2 61 12 61 12
Budějovická 3, Praha 4,
140 21
Danmark
+45 70 11 74 00
Sjællandsgade 2, 7000
Fredericia
Deutschland
+49 180 32 26 622
Muggenhofer Str. 135,
90429 Nürnberg
Eesti
+37 2 66 50 030
Pärnu mnt. 153, 11624
Tallinn
España
+34 902 11 63 88
Carretera M-300, Km.
29,900 Alcalá de Henares
Madrid
France
www.electrolux.fr
Great Britain
+44 8705 929 929
Addington Way, Luton,
Bedfordshire LU4 9QQ
Hellas
+30 23 10 56 19 70
4, Limnou Str., 54627
Thessaloniki
Electrolux myöntää takuun tälle tuotteelle oppaan
takakannessa luetelluissa maissa tuotetakuussa
määritetyksi tai lainsäädännön mukaiseksi
ajaksi.Muuttaessasi jäljessä luetellusta maasta
toiseen tuotetakuu siirtyy mukanasi seuraavien
ehtojen mukaisesti:
• Tuotetakuu on voimassa tuotteen
ostopäivästä lukien. Tästä on osoituksena
tuotteen myyjän antama ostokuitti, joka
osoittaa tuotetakuun olevan voimassa.
• Tuotetakuu on voimassa ja korvaa tuotteen
korjauksen ja vialliset osat uuden asuinmaan
tätä tuotetta tai tuoteryhmää koskevien
takuuehtojen mukaisesti.
• Tuotetakuu koskee vain tuotteen alkuperäistä
ostajaa, eikä takuuta voi siirtää toiselle
käyttäjälle.
• Tuote on asennettava ja sitä on käytettävä
Electroluxin antamien käyttöohjeiden
mukaisesti. Tuote on tarkoitettu ainoastaan
kotitalouskäyttöön, ei kaupallisia
tarkoitusperiä varten.
• Tuote asennetaan uuden asuinmaan kaikkien
asiaa koskevien ja voimassa olevien
sääntöjen mukaisesti.
Nämä Euroopan takuun ehdot eivät vaikuta
kuluttajan lakisääteisiin oikeuksiin.
Euroopan takuu
125989121_FI.qxp 2007-07-06 12:21 Page 46
Page 47

47
Hrvatska
+385 1 63 23 338
Slavonska avenija 3,
10000 Zagreb
Ireland
+353 1 40 90 753 Long Mile Road Dublin 12
Italia
+39 (0) 434 558500
C.so Lino Zanussi, 26 33080 Porcia (PN)
Latvija
+37 17 84 59 34
Kr. Barona iela 130/2,
LV-1012, Riga
Lietuva
+370 5 2780609
Ozo 10A, LT 08200
Vilnius
Luxembourg
+352 42 431 301
Rue de Bitbourg, 7,
L-1273 Hamm
Magyarország
+36 1 252 1773
H-1142 Budapest XIV,
Erzsébet királyné útja 87
Nederland
+31 17 24 68 300
Vennootsweg 1, 2404
CG - Alphen aan den Rijn
Norge
+47 81 5 30 222 Risløkkvn. 2 , 0508 Oslo
Österreich
+43 18 66 400
Herziggasse 9, 1230
Wien
Polska
+48 22 43 47 300
ul. Kolejowa 5/7,
Warszawa
Portugal
+35 12 14 40 39 39
Quinta da Fonte - Edificio
Gonçalves Zarco - Q 35
-2774-518 Paço de Arcos
Romania
+40 21 451 20 30
Str. Garii Progresului 2,
S4, 040671 RO
Schweiz - Suisse Svizzera
+41 62 88 99 111
Industriestrasse 10,
CH-5506 Mägenwil
Slovenija
+38 61 24 25 731
Gerbičeva ulica 98, 1000
Ljubljana
Slovensko
+421 2 43 33 43 22
Electrolux Slovakia s.r.o.,
Electrolux Domáce
spotrebiče SK,
Seberíniho 1, 821 03
Bratislava
125989121_FI.qxp 2007-07-06 12:21 Page 47
Page 48

48
Suomi
www.electrolux.fi
Sverige
+46 (0)771 76 76 76
Electrolux Service,
S:t Göransgatan 143, S-105 45
Stockholm
Türkiye
+90 21 22 93 10 25
Россия
+7 495 937 7837
129090 Москва,
Олимпийский
проспект, 16, БЦ
“Олимпик”
125989121_FI.qxp 2007-07-06 12:21 Page 48
Page 49

www.electrolux.com
125989121 -00- 06072007
125989121_FI.qxp 2007-07-06 12:22 Page 49
 Loading...