


EN
User manual 2
PT
Manual de instruções 16
ES
Manual de instrucciones 30
Oven
Forno
Horno
ZOB12401

Contents
Safety information _ _ _ _ _ _ _ _ _ _ _ _ _ _ 2
Safety instructions _ _ _ _ _ _ _ _ _ _ _ _ _ _ 3
Product description _ _ _ _ _ _ _ _ _ _ _ _ _ 5
Before first use _ _ _ _ _ _ _ _ _ _ _ _ _ _ _ _ 5
Daily use _ _ _ _ _ _ _ _ _ _ _ _ _ _ _ _ _ _ _ 5
Clock functions _ _ _ _ _ _ _ _ _ _ _ _ _ _ _ _ 6
Additional functions _ _ _ _ _ _ _ _ _ _ _ _ _ 6
Helpful hints and tips _ _ _ _ _ _ _ _ _ _ _ _ _ 6
Care and cleaning _ _ _ _ _ _ _ _ _ _ _ _ _ 10
What to do if… _ _ _ _ _ _ _ _ _ _ _ _ _ _ _ 12
Installation _ _ _ _ _ _ _ _ _ _ _ _ _ _ _ _ _ _ 13
Environment concerns _ _ _ _ _ _ _ _ _ _ _ 14
Subject to change without notice.
Safety information
Before the installation and use of the appliance, carefully read the
supplied instructions. The manufacturer is not responsible if an incorrect installation and use causes injuries and damages. Always
keep the instructions with the appliance for future reference.
Children and vulnerable people safety
Warning! Risk of suffocation, injury or permanent disability.
• This appliance can be used by children aged from 8 years and
above and persons with reduced physical, sensory or mental capabilities or lack of experience and knowledge if they are supervised by an adult or a person who is responsible for their safety.
• Do not let children play with the appliance.
• Keep all packaging away from children.
• Keep children and pets away from the appliance when it operates
or when it cools down. Accessible parts are hot.
• If the appliance has a child safety device, we recommend that you
activate it.
• Cleaning and user maintenance shall not be made by children
without supervision.
General Safety
• Internally the appliance becomes hot when in operation. Do not
touch the heating elements that are in the appliance. Always use
oven gloves to remove or put in accessories or ovenware.
• Do not use a steam cleaner to clean the appliance.
2
www.zanussi.com

• Before maintenance cut the power supply.
• Do not use harsh abrasive cleaners or sharp metal scrapers to
clean the glass door since they can scratch the surface, which
may result in shattering of the glass.
• To remove the shelf supports first pull the front of the shelf support and then the rear end away from the side walls. Install the
shelf supports in the opposite sequence.
Safety instructions
Installation
Warning! Only a qualified person must
install this appliance.
• Remove all the packaging.
• Do not install or use a damaged appliance.
• Obey the installation instruction supplied
with the appliance.
• Always be careful when you move the appli-
ance because it is heavy. Always wear safety
gloves.
• Do not pull the appliance by the handle.
• Keep the minimum distance from the other
appliances and units.
• Make sure that the appliance is installed be-
low and adjacent safe structures.
• The sides of the appliance must stay adja-
cent to appliances or to units with the same
height.
Electrical connection
Warning! Risk of fire and electrical shock.
• All electrical connections should be made by
a qualified electrician.
• The appliance must be earthed.
• Make sure that the electrical information on
the rating plate agrees with the power supply. If not, contact an electrician.
• Always use a correctly installed shockproof
socket.
• Do not use multi-plug adapters and exten-
sion cables.
• Make sure not to cause damage to the mains
plug and to the mains cable. Contact the
Service or an electrician to change a damaged mains cable.
• Do not let mains cables to come in touch
with the appliance door, specially when the
door is hot.
• The shock protection of live and insulated
parts must be fastened in such a way that it
cannot be removed without tools.
• Connect the mains plug to the mains socket
only at the end of the installation. Make sure
that there is access to the mains plug after
the installation.
• If the mains socket is loose, do not connect
the mains plug.
• Do not pull the mains cable to disconnect
the appliance. Always pull the mains plug.
• Use only correct isolation devices: line protecting cut-outs, fuses (screw type fuses removed from the holder), earth leakage trips
and contactors.
• The electrical installation must have an isolation device which lets you disconnect the appliance from the mains at all poles. The isolation device must have a contact opening
width of minimum 3 mm.
Use
Warning! Risk of injury, burns or electric
shock or explosion.
• Use this appliance in a household environment.
3
www.zanussi.com

• Do not change the specification of this appliance.
• Make sure that the ventilation openings are
not blocked.
• Do not let the appliance stay unattended
during operation.
• Deactivate the appliance after each use.
• Be careful, when you open the appliance
door while the appliance is in operation. Hot
air can release.
• Do not operate the appliance with wet hands
or when it has contact with water.
• Do not apply pressure on the open door.
• Do not use the appliance as a work surface
or as a storage surface.
• Always keep the appliance door closed when
the appliance is in operation.
• Open the appliance door carefully. The use
of ingredients with alcohol can cause a mixture of alcohol and air.
• Do not let sparks or open flames to come in
contact with the appliance when you open
the door.
• Do not put flammable products or items that
are wet with flammable products in, near or
on the appliance.
Warning! Risk of damage to the
appliance.
• To prevent damage or discoloration to the
enamel:
– Do not put ovenware or other objects in
the appliance directly on the bottom.
– Do not put aluminium foil directly on the
bottom of the appliance.
– do not put water directly into the hot appliance.
– do not keep moist dishes and food in the
appliance after you finish the cooking.
– be careful when you remove or install the
accessories.
• Discoloration of the enamel has no effect on
the performance of the appliance. It is not a
defect in the sense of the warranty law.
• Use a deep pan for moist cakes. Fruit juices
cause stains that can be permanent.
Care and Cleaning
Warning! Risk of injury, fire or damage to
the appliance.
• Before maintenance, deactivate the appliance and disconnect the mains plug from the
mains socket.
• Make sure the appliance is cold. There is the
risk that the glass panels can break.
• Replace immediately the door glass panels
when they are damaged. Contact the Service.
• Be careful when you remove the door from
the appliance. The door is heavy!
• Clean regularly the appliance to prevent the
deterioration of the surface material.
• Remaining fat or food in the appliance can
cause fire.
• Clean the appliance with a moist soft cloth.
Only use neutral detergents. Do not use
abrasive products, abrasive cleaning pads,
solvents or metal objects.
• If you use an oven spray, obey the safety instructions on the packaging.
• Do not clean the catalytic enamel (if applicable) with any kind of detergent.
Internal light
• The type of light bulb or halogen lamp used
for this appliance, is only for household appliances. Do not use it for house lighting.
Warning! Risk of electrical shock.
• Before replacing the lamp, disconnect the
appliance from the power supply.
• Only use lamps with the same specifications.
Disposal
Warning! Risk of injury or suffocation.
• Disconnect the appliance from the mains
supply.
• Cut off the mains cable and discard it.
• Remove the door catch to prevent children
and pets to get closed in the appliance.
4
www.zanussi.com

Product description
6
5
10
9
7
8
5
4
1
2
3
1 42 3
1
Knob for the oven functions
2
Knob for the timer
3
Knob for the temperature
4
Temperature indicator
5
Grill
6
Oven lamp
7
Aqua cleaning container
8
Shelf support, removable
9
Rating plate
10
Shelf positions
Oven accessories
• Wire shelf
For cookware, cake tins, roasts.
• Grill- / Roasting pan
To bake and roast or as pan to collect fat.
Before first use
Warning! Refer to the Safety chapters.
Initial cleaning
• Remove all accessories and removable shelf
supports (if applicable).
• Clean the appliance before first use.
Important! Refer to the chapter "Care and
cleaning".
Preheating
Preheat the empty appliance to burn off the remaining grease.
1.
Set the function
and the maximum tem-
perature.
2. Let the appliance operate for 45 minutes.
3.
Set the function
and the maximum tem-
perature.
4. Let the appliance operate for 15 minutes.
Accessories can become hotter than usually.
The appliance can emit an odour and smoke.
This is normal. Make sure that the airflow is sufficient.
Daily use
Warning! Refer to the Safety chapters.
Activating and deactivating the appliance
1. Turn the oven functions control knob to an
oven function.
2. Turn the temperature control knob to a
temperature.
The temperature indicator comes on while
the temperature in the appliance increases.
3. To deactivate the appliance, turn the oven
functions control knob and the temperature
control knob to the Off position.
5
www.zanussi.com
Oven functions
Oven function Application
Off position The appliance is off.
Conventional Cooking / Aqua Cleaning
To bake and roast on one oven level. The top and bottom heating
elements operate at the same time.
For more information about Aqua Cleaning, refer to the chapter
"Care and cleaning".
Bottom Heat
To bake cakes with crispy or crusty bottom. Only the bottom heat-
ing element operates.
Top Heat To finish cooked dishes. Only the top heating element operates.
Grilling
To grill flat food items in small quantities in the middle of the shelf.
To make toast.
Clock functions
Minute Minder + End of Cooking
Use it to set an automatic switch-off time for an
oven function.
1. Set an oven function and the temperature.
2. Turn the knob for the timer as far as it
goes, then turn it to necessary time period.
3. After the time period is completed, an
acoustic signal sounds. The appliance deactivates.
Normal setting : Turn the knob for the timer to
. In this position you operate the appliance manually. The Minute Minder + End of
Cooking is off.
Additional functions
Cooling fan
When the appliance operates, the cooling fan
activates automatically to keep the surfaces of
the appliance cool. If you deactivate the appliance, the cooling fan continues to operate until
the temperature in the appliance cools down.
Safety thermostat
Incorrect operation of the appliance or defective components can cause dangerous over-
heating. To prevent this, the oven has a safety
thermostat which interrupts the power supply.
The oven activates again automatically when
the temperature drops.
Helpful hints and tips
• The appliance has five shelf levels. Count the
shelf levels from the bottom of the appliance
floor.
• The appliance has a special system which
circulates the air and constantly recycles the
steam. With this system you can cook in a
steamy environment and keep the food soft
6
www.zanussi.com

inside and crusty outside. It decreases the
cooking time and energy consumption to a
minimum.
• Moisture can condense in the appliance or
on the door glass panels. This is normal. Always stand back from the appliance when
you open the appliance door while cooking.
To decrease the condensation, operate the
appliance for 10 minutes before cooking.
• Clean the moisture after each use of the appliance.
• Do not put the objects directly on the appliance floor and do not put aluminium foil on
the components when you cook. This can
change the baking results and cause damage to the enamel.
Baking cakes
• Do not open the oven door before 3/4 of the
set cooking time is up.
• If you use two baking trays at the same time,
keep one empty level between them.
Cooking meat and fish
• Use a deep pan for very fatty food to prevent
the oven from stains that can be permanent.
• Leave the meat for approximately 15 minutes
before carving so that the juice does not
seep out.
• To prevent too much smoke in the oven during roasting, add some water into the deep
pan. To prevent the smoke condensation,
add water each time after it dries up.
Cooking times
Cooking times depend on the type of food, its
consistency, and volume.
Initially, monitor the performance when you
cook. Find the best settings (heat setting, cooking time, etc.) for your cookware, recipes and
quantities when you use this appliance.
Baking and roasting table
CAKES
TYPE OF DISH
Conventional Cooking
Cooking time
[min]
Notes
Shelf position Temp [°C]
Whisked recipes 2 170 45 - 60 In a cake mould
Shortbread dough 2 170 20 - 30 In a cake mould
Buttermilk cheesecake 1 170 70 - 80 In a 26 cm cake mould on a
wire shelf
Apple cake (Apple
pie)
2 170 80 - 100 In two 20 cm cake moulds
on a wire shelf
1)
Strudel 3 175 60 - 80 In a baking tray
Jam-tart 2 170 30 - 40 In a 26 cm cake mould
Sponge cake 2 170 50 - 60 In a 26 cm cake mould
Christmas cake / Rich
fruit cake
2 160 90 - 120
In a 20 cm cake mould
1)
Plum cake 1 175 50 - 60
In a bread tin
1)
Small cakes 3 170 20 - 30 In a baking tray
Biscuits / pastry strips 3 140 30 - 35 In a baking tray
Meringues 3 120 80 - 100 In a baking tray
Buns 3 190 15 - 20
In a baking tray
1)
7
www.zanussi.com

TYPE OF DISH
Conventional Cooking
Cooking time
[min]
Notes
Shelf position Temp [°C]
Eclairs 3 190 25 - 35 In a baking tray
Plate tarts 2 180 45 - 70 In a 20 cm cake mould
Rich fruit cake 1 160 110 - 120 In a 24 cm cake mould
Victoria sandwich 1 170 50 - 60
In a 20 cm cake mould
1)
1) Preheat the oven for 10 minutes.
BREAD AND PIZZA
TYPE OF DISH
Conventional Cooking
Cooking time
[min]
Notes
Shelf position Temp [°C]
White bread 1 190 60 - 70 1 - 2 pieces, 500 gr per
piece
1)
Rye bread 1 190 30 - 45 In a bread tin
Pizza 1 230 - 250 10 - 20 In a baking tray or a deep
pan
1)
Scones 3 200 10 - 20
In a baking tray
1)
1) Preheat for 10 minutes.
FLANS
TYPE OF DISH
Conventional Cooking
Cooking time
[min]
Notes
Shelf position Temp [°C]
Pasta flan 2 200 40 - 50 In a mould
Vegetable flan 2 200 45 - 60 In a mould
Quiches 1 180 50 - 60
In a mould
1)
Lasagne 2 180 - 190 25 - 40
In a mould
1)
Cannelloni 2 180 - 190 25 - 40
In a mould
1)
1) Preheat for 10 minutes.
MEAT
TYPE OF DISH
Conventional Cooking
Cooking time
[min]
Notes
Shelf position Temp [°C]
Beef 2 200 50 - 70 On a wire shelf
Pork 2 180 90 - 120 On a wire shelf
Veal 2 190 90 - 120 On a wire shelf
English roast beef,
rare
2 210 50 - 60 On a wire shelf
8
www.zanussi.com
TYPE OF DISH
Conventional Cooking
Cooking time
[min]
Notes
Shelf position Temp [°C]
English roast beef,
medium
2 210 60 - 70 On a wire shelf
English roast beef,
well done
2 210 70 - 75 On a wire shelf
Shoulder of pork 2 180 120 - 150 With rind
Shin of pork 2 180 100 - 120 Two pieces
Lamb 2 190 110 - 130 Leg
Chicken 2 220 70 - 85 Whole
Turkey 2 180 210 - 240 Whole
Duck 2 175 120 - 150 Whole
Goose 2 175 150 - 200 Whole
Rabbit 2 190 60 - 80 Cut in pieces
Hare 2 190 150 - 200 Cut in pieces
Pheasant 2 190 90 - 120 Whole
FISH
TYPE OF DISH
Conventional Cooking
Cooking time
[min]
Notes
Shelf position Temp [°C]
Trout / Sea bream 2 190 40 - 55 3 - 4 fish
Tuna fish / Salmon 2 190 35 - 60 4 - 6 fillets
Grilling
Preheat the empty oven for 10 minutes,
before cooking.
Quantity Grilling Cooking time [min]
TYPE OF DISH Pieces [g] Shelf posi-
tion
Temp [°C] 1st side 2nd side
Fillet steaks 4 800 4 max. 12 - 15 12 - 14
Beef steaks 4 600 4 max. 10 - 12 6 - 8
Sausages 8 - 4 max. 12 - 15 10 - 12
Pork chops 4 600 4 max. 12 - 16 12 - 14
Chicken (cut in 2) 2 1000 4 max. 30 - 35 25 - 30
Kebabs 4 - 4 max. 10 - 15 10 - 12
Breast of chicken 4 400 4 max. 12 - 15 12 - 14
Hamburger 6 600 4 max. 20 - 30 Fish fillet 4 400 4 max. 12 - 14 10 - 12
Toasted sandwiches 4 - 6 - 4 max. 5 - 7 -
9
www.zanussi.com
Quantity Grilling Cooking time [min]
TYPE OF DISH Pieces [g] Shelf posi-
tion
Temp [°C] 1st side 2nd side
Toast 4 - 6 - 4 max. 2 - 4 2 - 3
Preserving - Bottom Heat
Soft fruit
PRESERVE Temperature [°C]
Cooking time until
simmering [min]
Further cooking time
at 100 °C [min]
Strawberries, blueberries, raspberries, ripe
gooseberries
160 – 170 35 – 45 –
Stone fruit
PRESERVE Temperature [°C]
Cooking time until
simmering [min]
Further cooking time
at 100 °C [min]
Pears, quinces, plums 160 – 170 35 – 45 10 – 15
Vegetables
PRESERVE Temperature [°C]
Cooking time until
simmering [min]
Further cooking time
at 100 °C [min]
Carrots
1)
160 – 170 50 – 60 5 – 10
Cucumbers 160 – 170 50 – 60 –
Mixed pickles 160 – 170 50 – 60 5 – 10
Kohlrabi, peas, aspara-
gus
160 – 170 50 – 60 15 – 20
1) After you deactivate the appliance, leave the preserve in the oven.
Care and cleaning
Warning! Refer to the Safety chapters.
• Clean the front of the appliance with a soft
cloth with warm water and a cleaning agent.
• To clean metal surfaces use a usual cleaning
agent.
• Clean the oven interior after each use. Then
you can remove dirt more easily and it does
not burn on.
• Clean stubborn dirt with a special oven
cleaner.
• Clean all oven accessories after each use
and let them dry. Use a soft cloth with warm
water and a cleaning agent.
• If you have nonstick accessories, do not
clean them using aggressive agents, sharpedged objects or a dishwasher. It can destroy nonstick coating.
10
www.zanussi.com

Stainless steel or aluminium appliances:
Clean the oven door with a wet sponge only.
Dry it with a soft cloth.
Do not use steel wool, acids or abrasive materials, as they can cause damage to the oven surface. Clean the oven control panel with the
same precautions.
Cleaning the door gasket
• Regularly do a check of the door gasket. The
door gasket is around the frame of the oven
cavity. Do not use the appliance if the door
gasket is damaged. Contact the Service
Centre.
• To clean the door gasket, refer to the general
information about cleaning.
Shelf supports
You can remove the shelf supports to clean the
side walls.
Removing the shelf supports
1
Pull the front of
the shelf support
away from the side
wall.
2
1
2
Pull the rear end
of the shelf support
away from the side
wall and remove it.
Installing the shelf supports
Install the shelf supports in the opposite sequence.
The rounded ends of the shelf supports
must point to the front.
Aqua cleaning
The Aqua cleaning procedure uses steam to
help remove remaining fat and food particles
from the oven.
1. Put 300 ml of water into the Aqua cleaning
container at the bottom of the oven.
2.
Set the oven function
.
3. Set the temperature to 90 °C.
4. Let the appliance operate for 30 minutes.
5. Deactivate the appliance and let it cool
down.
6. When the appliance is cool, clean the inner
surfaces of the oven with a cloth.
Warning! Make sure that the appliance is
cool before you touch it. There is a risk of
burns.
Oven lamp
Warning! Be careful when you change
the oven lamp. There is a risk of electrical
shock.
Before you change the oven lamp:
• Deactivate the oven.
• Remove the fuses in the fuse box or deacti-
vate the circuit breaker.
Put a cloth on the bottom of the oven to
prevent damage to the oven light and
glass cover.
Always hold the halogen lamp with a cloth to
prevent grease residue from burning on the
lamp.
1. Turn the glass cover counterclockwise to
remove it.
2. Clean the glass cover.
3. Replace the oven light bulb with an appli-
cable 300 °C heat-resistant oven light
bulb.
Use the same oven lamp type.
4. Install the glass cover.
Cleaning the oven door
The oven door has two glass panels. You can
remove the oven door and the internal glass
panel to clean it.
The oven door can close if you try to re-
move the internal glass panel before you
remove the oven door.
Caution! Do not use the appliance
without the glass panels.
11
www.zanussi.com
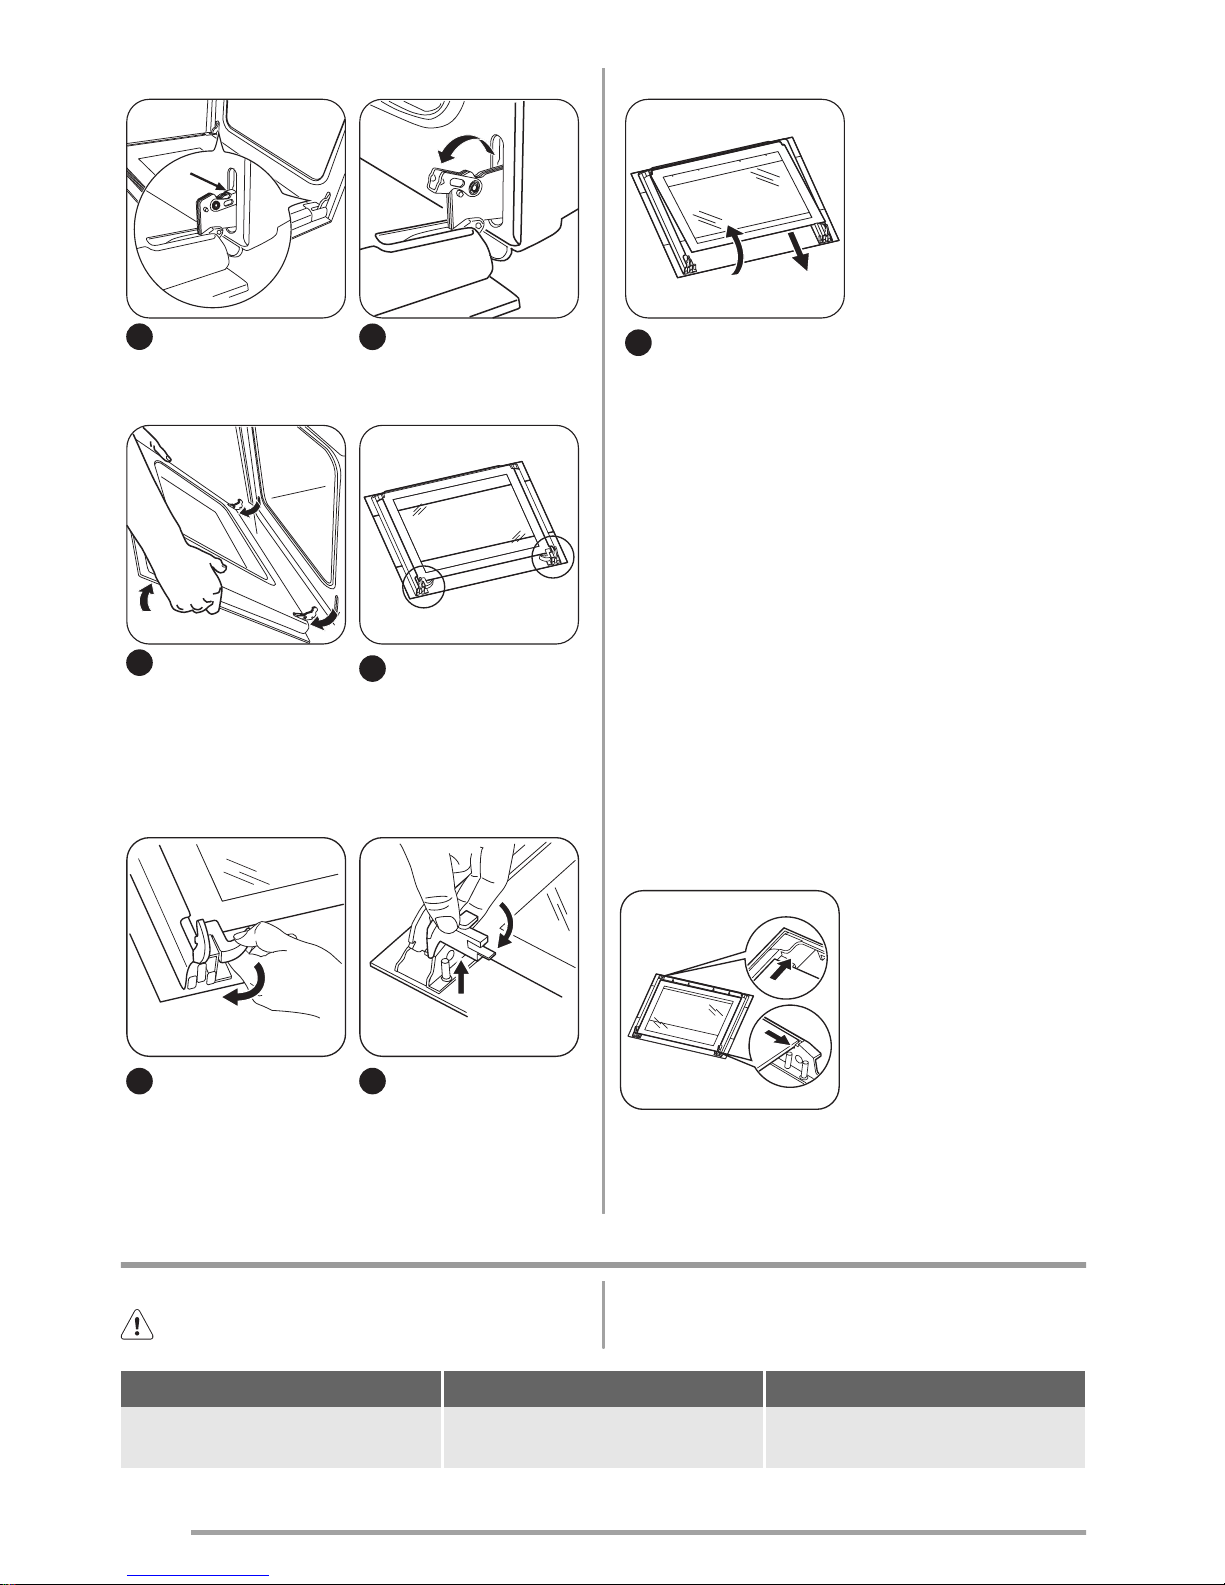
1
Open the door
fully and hold the two
door hinges.
2
Lift and turn the
levers on the two
hinges.
3
Close the oven
door to the first opening position (halfway).
Then pull forward and
remove the door from
its seat.
4
Put the door on a
soft cloth on a stable
surface.
5
Release the locking system to remove
the internal glass
panel.
90°
6
Turn the two fasteners by 90° and remove them from their
seats.
1
2
7
Carefully lift (step
1) and remove (step
2) the glass panel.
Clean the glass panel with water and soap. Dry
the glass panel carefully.
Installing the door and the glass panel
When the cleaning is completed, install the
glass panel and the oven door. Do the above
steps in the opposite sequence.
The screen-printing zone must face the inner
side of the door. Make sure that after the installation the surface of the glass panel frame on
the screen-printing zones is not rough when
you touch it.
Make sure that you install the internal glass
panel in the seats correctly. Refer to the illustration.
What to do if…
Warning! Refer to the Safety chapters.
Problem Possible cause Remedy
The appliance does not operate. The appliance is not activated. Activate the appliance. Refer to
the chapter "Daily Use".
12
www.zanussi.com

Problem Possible cause Remedy
The appliance does not operate. The Minute Minder + End of
Cooking programmer is not set.
Set the Minute Minder + End of
Cooking programmer. Refer to the
chapter "Clock functions".
The appliance does not operate. The fuse in the fuse box is re-
leased.
Do a check of the fuse. If the fuse
is released more than one time,
contact a qualified electrician.
The oven lamp does not operate. The oven lamp is defective. Replace the oven lamp.
Steam and condensation collect
on the food and in the oven.
You left the dish in the oven for
too long.
Do not keep the dishes in the
oven for longer than 15 - 20 mi-
nutes after the cooking ends.
If you cannot find a solution to the problem
yourself, contact your dealer or the service centre.
The necessary data for the service centre is on
the rating plate. The rating plate is on the front
frame of the appliance cavity.
We recommend that you write the data here:
Model (MOD.) .........................................
Product number (PNC) .........................................
Serial number (S.N.) .........................................
Installation
Warning! Refer to the Safety chapters.
Building In
573
594
5
589
558
548
20
min. 550
20
590
min. 560
13
www.zanussi.com
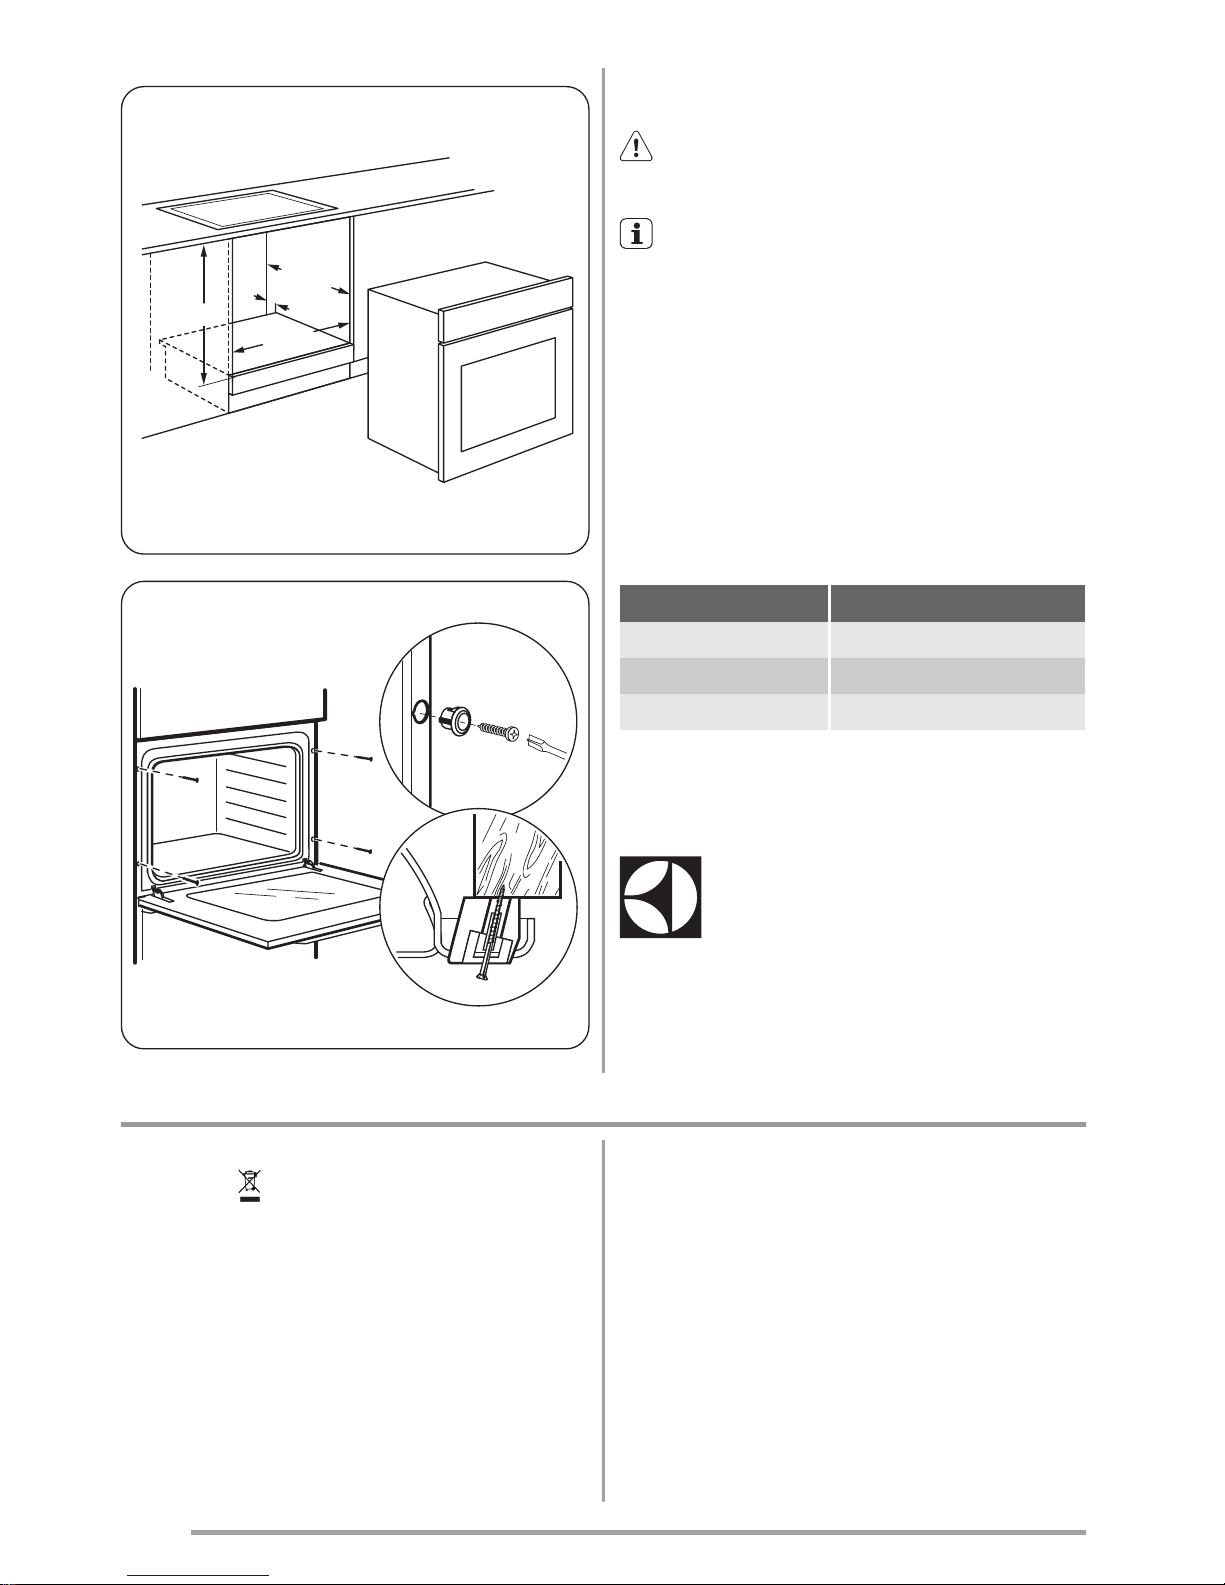
min. 550
min. 560
600
20
A
B
Electrical installation
Warning! Only a qualified person must do
the electrical installation.
The manufacturer is not responsible if you
do not follow the safety precautions from
the chapter "Safety Information".
This appliance is only supplied with a main cable.
Cable
Cable types applicable for installation or replacement: H07 RN-F, H05 RN-F, H05 RRF,
H05 VV-F, H05 V2V2-F (T90), H05 BB-F.
For the section of the cable refer to the total
power (on the rating plate) and to the table:
Total power Section of the cable
maximum 1380 W 3 x 0.75 mm²
maximum 2300 W 3 x 1 mm²
maximum 3680 W 3 x 1.5 mm²
The earth cord (green / yellow cable) must be 2
cm longer than phase and neutral cables (blue
and brown cables).
Environment concerns
The symbol on the product or on its
packaging indicates that this product may not
be treated as household waste. Instead it
should be taken to the appropriate collection
point for the recycling of electrical and
electronic equipment. By ensuring this product
is disposed of correctly, you will help prevent
potential negative consequences for the
environment and human health, which could
otherwise be caused by inappropriate waste
handling of this product. For more detailed
information about recycling of this product,
please contact your local council, your
household waste disposal service or the shop
where you purchased the product.
14
www.zanussi.com

Packaging material
The packaging material is environmentallyfriendly and recyclable. Plastic parts are marked
with international abbreviations such as PE, PS,
etc. Dispose of the packaging material in the
containers provided for this purpose at your local waste management facility.
15
www.zanussi.com

Índice
Informações de segurança _ _ _ _ _ _ _ _ _ 16
Instruções de segurança _ _ _ _ _ _ _ _ _ _ 17
Descrição do produto _ _ _ _ _ _ _ _ _ _ _ _ 19
Antes da primeira utilização _ _ _ _ _ _ _ _ 19
Utilização diária _ _ _ _ _ _ _ _ _ _ _ _ _ _ _ 20
Funções de relógio _ _ _ _ _ _ _ _ _ _ _ _ _ 20
Funções adicionais _ _ _ _ _ _ _ _ _ _ _ _ _ 21
Sugestões e conselhos úteis _ _ _ _ _ _ _ _ 21
Manutenção e limpeza _ _ _ _ _ _ _ _ _ _ _ 25
O que fazer se… _ _ _ _ _ _ _ _ _ _ _ _ _ _ 27
Instalação _ _ _ _ _ _ _ _ _ _ _ _ _ _ _ _ _ _ 28
Preocupações ambientais _ _ _ _ _ _ _ _ _ 29
Sujeito a alterações sem aviso prévio.
Informações de segurança
Leia atentamente as instruções fornecidas antes de instalar e utilizar
o aparelho. O fabricante não é responsável por lesões ou danos resultantes da instalação e utilização incorrectas. Guarde sempre as
instruções junto do aparelho para futura referência.
Segurança para crianças e pessoas vulneráveis
Advertência Risco de asfixia, ferimentos ou incapacidade
permanente.
• Este aparelho pode ser utilizado por crianças com 8 anos ou mais
e por pessoas com capacidades físicas, sensoriais ou mentais reduzidas ou com pouca experiência e conhecimento se forem supervisionadas por um adulto que seja responsável pela sua segurança.
• Não permita que as crianças brinquem com o aparelho.
• Mantenha todos os materiais de embalagem fora do alcance das
crianças.
• Mantenha as crianças e os animais domésticos afastados do aparelho quando este estiver a funcionar ou a arrefecer. As partes
acessíveis estão quentes.
• Se o aparelho tiver um dispositivo de segurança para crianças,
recomendamos que o active.
• A limpeza e a manutenção básica não devem ser efectuadas por
crianças sem supervisão.
16
www.zanussi.com

Segurança geral
• O interior do aparelho fica quente durante o funcionamento. Não
toque nos aquecimentos do aparelho. Utilize sempre luvas de forno para retirar e colocar acessórios ou recipientes de ir ao forno.
• Não use uma máquina de limpar a vapor para limpar o aparelho.
• Desligue a alimentação eléctrica antes de qualquer manutenção.
• Não utilize produtos de limpeza abrasivos ou raspadores metálicos afiados para limpar a porta de vidro porque podem riscar a
superfície e partir o vidro.
• Para remover os apoios para grelhas e tabuleiros, puxe primeiro a
parte da frente e depois a parte de trás do apoio para grelhas e
tabuleiros, para fora da parede lateral. Instale os apoios para grelhas e tabuleiros na sequência inversa.
Instruções de segurança
Instalação
Advertência A instalação deste aparelho
só deve ser efectuada por uma pessoa
qualificada.
• Remova todos os elementos da embalagem.
• Não instale nem utilize o aparelho se este es-
tiver danificado.
• Cumpra as instruções de instalação forneci-
das com o aparelho.
• Tenha sempre cuidado quando deslocar o
aparelho porque o aparelho é pesado. Use
sempre luvas de protecção.
• Não puxe o aparelho pela pega.
• Respeite as distâncias mínimas relativamente
a outros aparelhos e unidades.
• Certifique-se de que o aparelho é instalado
por baixo e ao lado de estruturas seguras.
• As partes laterais do aparelho devem ficar ao
lado de aparelhos ou unidades que tenham a
mesma altura.
Ligação eléctrica
Advertência Risco de incêndio e choque
eléctrico.
• Todas as ligações eléctricas devem ser efectuadas por um electricista qualificado.
• O aparelho tem de ficar ligado à terra.
• Certifique-se de que a informação sobre a ligação eléctrica existente na placa de características está em conformidade com a alimentação eléctrica. Se não estiver, contacte
um electricista.
• Utilize sempre uma tomada devidamente instalada e à prova de choques eléctricos.
• Não utilize adaptadores de tomadas duplas
ou triplas, nem cabos de extensão.
• Certifique-se de que não danifica a ficha e o
cabo de alimentação eléctrica. Contacte a
Assistência Técnica ou um electricista para
substituir o cabo de alimentação se estiver
danificado.
• Não permita que os cabos eléctricos toquem
na porta do aparelho, especialmente se a
porta estiver quente.
• As protecções contra choques eléctricos
das peças isoladas e não isoladas devem
17
www.zanussi.com

estar fixas de modo a não poderem ser retiradas sem ferramentas.
• Ligue a ficha de alimentação eléctrica à tomada apenas no final da instalação. Certifique-se de que a ficha fica acessível após a
instalação.
• Se a tomada eléctrica estiver solta, não ligue
a ficha.
• Não puxe o cabo de alimentação para desligar o aparelho. Puxe sempre a ficha.
• Utilize apenas dispositivos de isolamento
correctos: disjuntores de protecção, fusíveis
(os fusíveis de rosca devem ser retirados do
suporte), diferenciais e contactores.
• A instalação eléctrica deve possuir um dispositivo de isolamento que lhe permita desligar o aparelho da corrente eléctrica em todos os pólos. O dispositivo de isolamento
deve ter uma abertura de contacto com uma
largura mínima de 3 mm.
Utilização
Advertência Risco de ferimentos,
queimaduras, choque eléctrico e explosão.
• Utilize este aparelho em ambiente doméstico.
• Não altere as especificações deste aparelho.
• Certifique-se de que as aberturas de ventilação não ficam bloqueadas.
• Não deixe o aparelho a funcionar sem vigilância.
• Desactive o aparelho após cada utilização.
• Tenha cuidado sempre que abrir a porta do
aparelho com ele em funcionamento. Pode
haver libertação de ar quente.
• Não utilize o aparelho com as mãos húmidas
ou se ele estiver em contacto com água.
• Não exerça pressão sobre a porta se ela estiver aberta.
• Não utilize o aparelho como superfície de
trabalho ou armazenamento.
• Mantenha a porta do aparelho sempre fechada quando ele estiver a funcionar.
• Abra a porta do aparelho com cuidado. A utilização de ingredientes com álcool pode provocar uma mistura de álcool e ar.
• Evite que faíscas ou chamas entrem em contacto com o aparelho quando abrir a porta.
• Não coloque produtos inflamáveis, ou objectos molhados com produtos inflamáveis, no
interior, perto ou em cima do aparelho.
Advertência Risco de danos no aparelho.
• Para evitar danos ou descoloração do esmalte:
– Não coloque recipientes de ir ao forno ou
outros objectos directamente sobre o fundo
da cavidade do aparelho.
– Não coloque folha de alumínio directamente sobre o fundo da cavidade do aparelho.
– Não verta água directamente sobre o aparelho quando este estiver quente.
– Não mantenha pratos e alimentos húmidos
no aparelho após acabar de cozinhar.
– Tenha cuidado quando remover ou montar
os acessórios.
• A descoloração do esmalte não afecta o desempenho do aparelho. Não representa
qualquer defeito em termos de garantia.
• Utilize uma forma funda para bolos muito húmidos. Caso contrário, os sumos de fruta podem provocar manchas permanentes.
Manutenção e limpeza
Advertência Risco de ferimentos,
incêndio e danos no aparelho.
• Antes da manutenção, desactive o aparelho
e desligue a ficha de alimentação eléctrica
da tomada.
• Certifique-se de que o aparelho está frio.
Existe o risco de quebra dos painéis de vidro.
• Substitua imediatamente os painéis de vidro
se estiverem danificados. Contacte a Assistência Técnica.
• Tenha cuidado quando retirar a porta do
aparelho. A porta é pesada!
• Limpe o aparelho com regularidade para evitar que o material da superfície se deteriore.
• Manter gorduras ou restos de alimentos no
aparelho pode provocar incêndio.
• Limpe o aparelho com um pano macio e húmido. Utilize apenas detergentes neutros.
18
www.zanussi.com

Não utilize produtos abrasivos, esfregões,
solventes ou objectos metálicos.
• Se utilizar um spray para forno, siga as instruções de segurança da embalagem.
• Não limpe o esmalte catalítico (se aplicável)
com nenhum tipo de detergente.
Luz interior
• O tipo de lâmpada normal ou de halogénio
utilizado neste aparelho destina-se apenas a
aparelhos domésticos. Não a utilize para iluminação em casa.
Advertência Risco de choque eléctrico.
• Antes de substituir a lâmpada, desligue o
aparelho da corrente eléctrica.
• Utilize apenas lâmpadas com as mesmas especificações.
Eliminação
Advertência Risco de ferimentos e
asfixia.
• Desligue o aparelho da alimentação eléctrica.
• Corte o cabo de alimentação eléctrica e elimine-o.
• Remova o trinco da porta para evitar que crianças ou animais de estimação possam ficar
aprisionados no interior do aparelho.
Descrição do produto
6
5
10
9
7
8
5
4
1
2
3
1 42 3
1
Botão das funções do forno
2
Botão do temporizador
3
Botão da temperatura
4
Indicador de temperatura
5
Grelhador
6
Lâmpada do forno
7
Recipiente Aqua cleaning
8
Suporte para grelhas, amovível
9
Placa de características
10
Posições das grelhas
Acessórios do forno
• Prateleira em grelha
Para recipiente de ir ao forno, forma de bolo,
assados.
• Grelha/Assadeira
Para cozer e assar ou como tabuleiro para
recolher gordura.
Antes da primeira utilização
Advertência Consulte os capítulos
relativos à segurança.
Limpeza inicial
• Retire todos os acessórios e guias laterais
amovíveis (se aplicável).
• Limpe o aparelho antes da primeira utilização.
Importante Consulte o capítulo "Manutenção
e limpeza".
Pré-aquecimento
Pré-aqueça o aparelho vazio para queimar a
gordura restante.
1.
Seleccione a função
e a temperatura
máxima.
19
www.zanussi.com

2. Deixe o aparelho funcionar durante 45 minutos.
3.
Seleccione a função
e a temperatura
máxima.
4. Deixe o aparelho funcionar durante 15 minutos.
Os acessórios podem ficar mais quentes do
que o habitual. O aparelho pode emitir algum
odor e fumo. Isso é normal. Certifique-se de
que a circulação de ar é suficiente.
Utilização diária
Advertência Consulte os capítulos
relativos à segurança.
Activar e desactivar o aparelho
1. Rode o botão de controlo das funções do
forno para uma função do forno.
2. Rode o botão de comando da temperatura
para uma temperatura.
O indicador de temperatura mantém-se
aceso enquanto a temperatura do aparelho
aumenta.
3. Para desligar o aparelho, rode o botão de
controlo das funções do forno e o botão
de comando da temperatura para a posição Off (desligado).
Funções do forno
Função do forno Aplicação
Posição Off O aparelho está desligado (off).
Aquecimento Con-
vencional / Aqua
Cleaning
Para cozer e assar num nível do forno. Os aquecimentos superior e
inferior funcionam em simultâneo.
Para mais informação sobre o Aqua Cleaning, consulte o capítulo
“Manutenção e limpeza”.
Aquecimento inferior
Para cozer bolos com bases estaladiças. Apenas funciona o aque-
cimento inferior.
Aquecimento superi-orPara terminar pratos cozinhados. Apenas funciona o aquecimento
superior.
Grelhador
Para grelhar alimentos planos em pequenas quantidades no meio
da prateleira. Para tostar.
Funções de relógio
Cronómetro + Fim de cozedura
Utilize-o para definir um tempo de desactivação
para uma função do forno.
1. Seleccione uma função do forno e uma
temperatura.
2. Rode o botão do temporizador tanto quanto possível e rode-o novamente até chegar
ao tempo pretendido.
3. Quando o tempo definido terminar, é emitido um sinal sonoro. O aparelho desactiva-
-se.
Regulação normal
: Rode o botão do
temporizador para
. Nesta posição, o aparelho funciona em modo manual. A função Cronómetro + Fim de cozedura está desactivada.
20
www.zanussi.com

Funções adicionais
Ventoinha de arrefecimento
Quando o aparelho é colocado em funcionamento, a ventoinha de arrefecimento é activada
automaticamente para manter as superfícies do
aparelho frias. Se desactivar o aparelho, a ventoinha de arrefecimento continua a funcionar
até o aparelho arrefecer.
Termóstato de segurança
Se o aparelho for utilizado incorrectamente ou
tiver alguma anomalia, pode ocorrer um sobrea-
quecimento perigoso. Para evitar isso, o forno
possui um termóstato de segurança que corta
a alimentação eléctrica. O forno volta a activar-
-se automaticamente quando a temperatura
baixar.
Sugestões e conselhos úteis
• O aparelho possui cinco níveis para prateleiras. Conte os níveis para prateleiras a partir
da parte inferior do aparelho.
• O aparelho possui um sistema especial que
faz circular o ar e renova constantemente o
vapor. Este sistema permite cozinhar num
ambiente a vapor e manter os alimentos macios por dentro e estaladiços por fora. Diminui o tempo de cozedura e o consumo de
energia para valores mínimos.
• Pode ocorrer condensação de humidade no
aparelho ou nos painéis de vidro da porta. Isso é normal. Afaste-se sempre do aparelho
quando abrir a porta com o forno ligado. Para diminuir a condensação, ligue o aparelho
pelo menos 10 minutos antes de começar a
cozinhar.
• Limpe a humidade após cada utilização do
aparelho.
• Não coloque objectos directamente na parte
inferior do aparelho e não cubra os componentes com folha de alumínio para cozinhar.
Isso pode alterar os resultados da cozedura
e danificar o revestimento de esmalte.
Cozer bolos
• Não abra a porta do forno até ter decorrido
3/4 do tempo de cozedura.
• Se utilizar dois tabuleiros para assar em simultâneo, mantenha um nível vazio entre os
mesmos.
Cozinhar carne e peixe
• Utilize um tabuleiro para grelhar quando cozinhar alimentos muito gordurosos, para evitar
que o forno fique com manchas que podem
ser permanentes.
• Não corte a carne até que passem 15 minutos depois de a retirar do forno, para não
perder os sucos.
• Para evitar demasiado fumo no forno quando
assar, coloque um pouco de água no tabuleiro. Para evitar a condensação do fumo, vá
acrescentando água.
Tempos de cozedura
Os tempos de cozedura dependem do tipo de
alimento, da consistência e do volume.
No início, monitorize o desempenho quando
cozinhar. Quando utilizar este aparelho, procure
as melhores definições (nível de cozedura, tempo de cozedura, etc.) para os seus recipientes
e para as suas receitas e quantidades.
Tabela para cozer e assar
BOLOS
21
www.zanussi.com

TIPO DE PRATO
Cozedura convencional
Tempo de co-
zedura [min.]
Notas
Posição da pra-
teleira
Temp. [°C]
Receitas batidas 2 170 45-60 Em forma de bolo
Massa amanteigada 2 170 20-30 Em forma de bolo
Cheesecake 1 170 70-80 Em forma de bolo de 26 cm
ou prateleira em grelha
Bolo de maçã (tarte
de maçã)
2 170 80-100 Em duas formas de bolo de
20 cm ou numa prateleira
em grelha
1)
Strudel 3 175 60-80 Em tabuleiro para cozer
Tarte de compota 2 170 30-40 Em forma de bolo de 26 cm
Pão de ló 2 170 50-60 Em forma de bolo de 26 cm
Bolo de Natal/Bolo de
fruta
2 160 90-120 Em forma de bolo de 20
cm
1)
Bolo de ameixa 1 175 50-60
Em forma de pão
1)
Bolos pequenos 3 170 20-30 Em tabuleiro para cozer
Biscoitos/pastéis 3 140 30-35 Em tabuleiro para cozer
Merengues 3 120 80-100 Em tabuleiro para cozer
Pãezinhos 3 190 15-20
Em tabuleiro para cozer
1)
Eclairs 3 190 25-35 Em tabuleiro para cozer
Tartes 2 180 45-70 Em forma de bolo de 20 cm
Bolo de fruta 1 160 110-120 Em forma de bolo de 24 cm
Bolo de duas cama-
das
1 170 50-60 Em forma de bolo de 20
cm
1)
1) Pré-aqueça o forno durante 10 minutos.
PÃO E PIZZA
TIPO DE PRATO
Cozedura convencional
Tempo de co-
zedura [min.]
Notas
Posição da pra-
teleira
Temp. [°C]
Pão branco 1 190 60-70 1-2 peças, 500g cada pe-
ça
1)
Pão de centeio 1 190 30-45 Em forma de pão
Pizza 1 230-250 10-20 Em tabuleiro para assar ou
tabuleiro para grelhar
1)
Scones 3 200 10-20
Em tabuleiro para cozer
1)
1) Pré-aqueça durante 10 minutos.
22
www.zanussi.com

TORTAS
TIPO DE PRATO
Cozedura convencional
Tempo de co-
zedura [min.]
Notas
Posição da pra-
teleira
Temp. [°C]
Empadas 2 200 40-50 Em forma
Tortas de vegetais 2 200 45-60 Em forma
Quiches 1 180 50-60
Em forma
1)
Lasanha 2 180-190 25-40
Em forma
1)
Canelones 2 180-190 25-40
Em forma
1)
1) Pré-aqueça durante 10 minutos.
CARNE
TIPO DE PRATO
Cozedura convencional
Tempo de co-
zedura [min.]
Notas
Posição da pra-
teleira
Temp. [°C]
Carne de vaca 2 200 50-70 Numa prateleira em grelha
Porco 2 180 90-120 Numa prateleira em grelha
Vitela 2 190 90-120 Numa prateleira em grelha
Carne assada à ingle-
sa, mal passada
2 210 50-60 Numa prateleira em grelha
Carne assada à inglesa, média
2 210 60-70 Numa prateleira em grelha
Carne assada à inglesa, bem passada
2 210 70-75 Numa prateleira em grelha
Pá de porco 2 180 120-150 Com courato
Lombo de porco 2 180 100-120 Duas peças
Borrego 2 190 110-130 Perna
Frango 2 220 70-85 Inteiro
Peru 2 180 210-240 Inteiro
Pato 2 175 120-150 Inteiro
Ganso 2 175 150-200 Inteiro
Coelho 2 190 60-80 Em pedaços
Lebre 2 190 150-200 Em pedaços
Faisão 2 190 90-120 Inteiro
PEIXE
23
www.zanussi.com

TIPO DE PRATO
Cozedura convencional
Tempo de co-
zedura [min.]
Notas
Posição da pra-
teleira
Temp. [°C]
Truta/Dourada 2 190 40-55 3-4 peixes
Atum/Salmão 2 190 35-60 4-6 filetes
Grelhador
Pré-aqueça o forno vazio durante 10 minutos antes de cozinhar.
Quantidade Grelhador Tempo de cozedura
[min.]
TIPO DE PRATO Peças [g] Posição da
prateleira
Temp.
[°C]
1.º lado 2.º lado
Bifes do lombo 4 800 4 máx. 12-15 12-14
Bife de novilho 4 600 4 máx. 10-12 6-8
Salsichas 8 - 4 máx. 12-15 10-12
Costeletas de porco 4 600 4 máx. 12-16 12-14
Frango (cortado em
2)
2 1000 4 máx. 30-35 25-30
Espetadas 4 - 4 máx. 10-15 10-12
Peito de frango 4 400 4 máx. 12-15 12-14
Hambúrguer 6 600 4 máx. 20-30 Filetes de peixe 4 400 4 máx. 12-14 10-12
Sanduíches 4-6 - 4 máx. 5-7 Tostas 4-6 - 4 máx. 2-4 2-3
Conservar - Aquecimento inferior
Frutos vermelhos
CONSERVAR Temperatura [°C]
Tempo de cozedura
até começar a ferver
[min.]
Tempo de cozedura a
100 °C [min.]
Morangos, amoras, framboesas, groselhas maduras
160 – 170 35 – 45 –
Fruta com caroço
CONSERVAR Temperatura [°C]
Tempo até começar a
ferver [min.]
Tempo de cozedura a
100 °C [min.]
Pêras, marmelos, ameixas
160 – 170 35 – 45 10 – 15
24
www.zanussi.com

Legumes
CONSERVAR Temperatura [°C]
Tempo de cozedura
até começar a ferver
[min.]
Tempo de cozedura a
100 °C [min.]
Cenouras
1)
160 – 170 50 – 60 5 – 10
Pepinos 160 – 170 50 – 60 –
Picles mistos 160 – 170 50 – 60 5 – 10
Couve-rábano, ervilhas,
espargos
160 – 170 50 – 60 15 – 20
1) Deixe a conserva no forno, após desactivar o aparelho.
Manutenção e limpeza
Advertência Consulte os capítulos
relativos à segurança.
• Limpe a parte da frente do aparelho com um
pano macio, água quente e um produto de
limpeza.
• Para limpar as superfícies metálicas, utilize
um produto de limpeza habitual.
• Após cada utilização, limpe o interior do forno. Desta forma, a sujidade não ficará queimada e poderá removê-la com mais facilidade.
• Limpe a sujidade persistente com um produto de limpeza especial para forno.
• Limpe todos os acessórios do forno após
cada utilização e deixe-os secar. Utilize um
pano macio com água quente e um produto
de limpeza.
• Se tiver acessórios anti-aderentes, não os
limpe com produtos de limpeza agressivos
ou objectos afiados, nem na máquina de lavar loiça. Pode destruir a camada anti-aderente.
Aparelhos de aço inoxidável ou alumínio:
Limpe a porta do forno apenas com uma esponja molhada. Seque com um pano macio.
Não utilize esfregões de palha-de-aço, ácidos
ou materiais abrasivos, pois podem danificar a
superfície do forno. Limpe o painel de comandos do forno com as mesmas precauções.
Limpar a junta da porta
• Verifique regularmente a junta da porta. A
junta da porta encontra-se em volta da estrutura da cavidade do forno. Não utilize o aparelho se a junta da porta estiver danificada.
Contacte o Centro de Assistência Técnica.
• Para limpar a junta da porta, consulte as informações gerais sobre limpeza.
Apoios para prateleiras
Pode retirar os apoios para prateleiras para limpar as paredes laterais.
Remover os apoios para prateleiras
1
Puxe a parte da
frente do apoio para
prateleiras para fora
da parede lateral.
2
1
2
Puxe a parte de
trás do apoio para
prateleiras para fora
da parede lateral e
retire-o.
Instalar os apoios para prateleiras
Instale os apoios para prateleiras na sequência
inversa.
25
www.zanussi.com

As extremidades arredondadas dos apoios
para prateleiras têm de ficar viradas para a
frente.
Aqua cleaning
O aqua cleaning utiliza vapor para ajudar a remover gordura e resíduos de alimentos do forno.
1. Coloque 300 ml de água no recipiente
Aqua cleaning, na parte inferior do forno.
2.
Seleccione a função do forno
.
3. Regule a temperatura para 90 °C.
4. Deixe o aparelho funcionar durante 30 minutos.
5. Desligue o aparelho e deixe-o arrefecer.
6. Quando o aparelho estiver frio, limpe o interior do forno com um pano.
Advertência Certifique-se de que o
aparelho está frio antes de tocar nele.
Existe o risco de queimaduras.
Lâmpada do forno
Advertência Tenha cuidado quando
substituir a lâmpada do forno. Existe o
risco de choque eléctrico.
Antes de substituir a lâmpada do forno:
• Desactive o forno.
• Retire os fusíveis da caixa de fusíveis ou des-
ligue o disjuntor.
Coloque um pano no fundo do forno para
proteger a lâmpada do forno e a protecção de vidro.
Segure sempre a lâmpada de halogéneo com
um pano para evitar que resíduos de gordura
queimem na lâmpada.
1. Rode a protecção de vidro para a esquer-
da e retire-a.
2. Limpe a protecção de vidro.
3. Substitua a lâmpada do forno por uma lâm-
pada adequada para forno, resistente ao
calor até 300 °C.
Utilize uma lâmpada do forno do mesmo tipo.
4. Instale a protecção de vidro.
Limpeza da porta do forno
A porta do forno tem dois painéis de vidro. Pode remover a porta do forno e o painel de vidro
interior para limpar.
A porta do forno pode fechar-se se tentar
remover o painel de vidro interior antes de
remover a porta do forno.
Cuidado Não utilize o aparelho sem os
painéis de vidro.
1
Abra a porta totalmente e segure nas
duas dobradiças da
porta.
2
Levante e rode as
alavancas das duas
dobradiças.
3
Feche a porta do
forno até à primeira
posição de abertura
(meio). Em seguida,
puxe para a frente e
remova a porta do
respectivo lugar.
4
Coloque a porta
numa superfície estável protegida por um
pano macio.
26
www.zanussi.com

5
Liberte o sistema
de bloqueio para remover o painel de vidro interior.
90°
6
Rode os dois fixa-
dores 90° e remova-
-os dos respectivos
lugares.
1
2
7
Com cuidado, levante (passo 1) e remova (passo 2) o painel de vidro.
Limpe o painel de vidro com água e detergente.
Seque cuidadosamente o painel de vidro.
Instalar a porta e o painel de vidro
Quando a limpeza estiver concluída, instale o
painel de vidro e a porta do forno. Siga os passos descritos acima na sequência oposta.
A zona com a serigrafia tem de ficar voltada para o interior do forno. Certifique-se de que,
após a instalação, a superfície da moldura do
painel de vidro na zona da serigrafia não é rugosa.
Certifique-se de que instala o painel de vidro
interior correctamente nos respectivos alojamentos. Observe a ilustração.
O que fazer se…
Advertência Consulte os capítulos
relativos à segurança.
Problema Causa possível Solução
O aparelho não funciona. O aparelho não está activado. Active o aparelho. Consulte o ca-
pítulo "Utilização diária".
O aparelho não funciona. O Conta-minutos + Final de coze-
dura não está configurado.
Configure o Conta-minutos + Final de cozedura. Consulte o capítulo “Funções de relógio”.
O aparelho não funciona. O disjuntor do quadro eléctrico
está desligado.
Verifique o disjuntor. Se o disjuntor disparar mais do que uma vez,
contacte um electricista qualifica-
do.
A lâmpada do forno não acende. A lâmpada do forno está avariada. Substitua a lâmpada do forno.
Há vapor e água condensada nos
alimentos e no forno.
Deixou um prato no forno demasiado tempo.
Não deixe os pratos no forno por
mais de 15-20 minutos após a
conclusão da cozedura.
27
www.zanussi.com

Se não conseguir encontrar uma solução para
o problema, contacte o seu fornecedor ou o
Centro de Assistência Técnica.
Os dados de contacto do Centro de Assistência Técnica encontram-se na placa de caracte-
rísticas. A placa de características está na moldura frontal da cavidade do aparelho.
Recomendamos que anote os dados aqui:
Modelo (MOD.) .........................................
Número do produto (PNC) .........................................
Número de série (S.N.) .........................................
Instalação
Advertência Consulte os capítulos
relativos à segurança.
Encastre
573
594
5
589
558
548
20
min. 550
20
590
min. 560
min. 550
min. 560
600
20
28
www.zanussi.com

A
B
Instalação eléctrica
Advertência A instalação eléctrica só
deve ser efectuada por uma pessoa
qualificada.
O fabricante não é responsável pelo não
cumprimento das precauções de seguran-
ça do capítulo “Informações de segurança”.
Este aparelho é fornecido apenas com um cabo de alimentação.
Cabo
Tipos de cabos aplicáveis para instalação ou
substituição: H07 RN-F, H05 RN-F, H05 RRF,
H05 VV-F, H05 V2V2-F (T90), H05 BB-F.
Para informações sobre a secção do cabo,
consulte a potência total (na placa de características) e a tabela:
Potência total Secção do cabo
máximo de 1380 W 3 x 0,75 mm²
máximo de 2300 W 3 x 1 mm²
máximo de 3680 W 3 x 1,5 mm²
O cabo de terra (cabo verde/amarelo) tem de
ser 2 cm mais comprido do que os cabos de
fase e neutro (cabos azul e castanho).
Preocupações ambientais
O símbolo no produto ou na embalagem
indica que este produto não pode ser tratado
como lixo doméstico. Em vez disso, deve ser
entregue ao centro de recolha selectiva para a
reciclagem de equipamento eléctrico e
electrónico. Ao garantir uma eliminação
adequada deste produto, irá ajudar a evitar
eventuais consequências negativas para o meio
ambiente e para a saúde pública, que, de outra
forma, poderiam ser provocadas por um
tratamento incorrecto do produto. Para obter
informações mais pormenorizadas sobre a
reciclagem deste produto, contacte os serviços
municipalizados locais, o centro de recolha
selectiva da sua área de residência ou o
estabelecimento onde adquiriu o produto.
Material da embalagem
O material utilizado na embalagem é ecológico e reciclável. As peças de plástico estão
marcadas com abreviaturas internacionais como, por exemplo, PE, PS, etc. Coloque o material da embalagem nos contentores disponibilizados para o efeito, nos locais de eliminação
de resíduos da sua área.
29
www.zanussi.com

Índice de materias
Información sobre seguridad _ _ _ _ _ _ _ _ 30
Instrucciones de seguridad _ _ _ _ _ _ _ _ _ 31
Descripción del producto _ _ _ _ _ _ _ _ _ _ 33
Antes del primer uso _ _ _ _ _ _ _ _ _ _ _ _ 33
Uso diario _ _ _ _ _ _ _ _ _ _ _ _ _ _ _ _ _ _ 34
Funciones de reloj _ _ _ _ _ _ _ _ _ _ _ _ _ 34
Funciones adicionales _ _ _ _ _ _ _ _ _ _ _ 35
Consejos útiles _ _ _ _ _ _ _ _ _ _ _ _ _ _ _ 35
Mantenimiento y limpieza _ _ _ _ _ _ _ _ _ _ 39
Qué hacer si… _ _ _ _ _ _ _ _ _ _ _ _ _ _ _ 41
Instalación _ _ _ _ _ _ _ _ _ _ _ _ _ _ _ _ _ _ 42
Aspectos medioambientales _ _ _ _ _ _ _ _ 44
Salvo modificaciones.
Información sobre seguridad
Antes de instalar y utilizar el aparato, lea atentamente las instrucciones facilitadas. El fabricante no se hace responsable de los daños y
lesiones causados por una instalación y uso incorrectos. Guarde
siempre las instrucciones junto con el aparato para futuras consultas.
Seguridad de niños y personas vulnerables
Advertencia Existe riesgo de sufrir asfixia, lesiones o
incapacidad permanente.
• Este aparato puede ser utilizado por niños de 8 años en adelante
y por personas cuyas capacidades físicas, sensoriales o mentales
estén disminuidas o que carezcan de la experiencia y conocimientos suficientes para manejarlo, siempre que cuenten con la supervisión de una persona que se responsabilice de su seguridad.
• No deje que los niños jueguen con el aparato.
• Mantenga los materiales de embalaje alejados de los niños.
• Mantenga a los niños y mascotas alejados del aparato cuando esté funcionando o enfriándose. Las piezas de fácil acceso están
calientes.
• Si el aparato dispone de dispositivo de seguridad para niños, se
recomienda activarlo.
• Evite que un niño lleve a cabo la limpieza y el mantenimiento de
usuario sin la supervisión adecuada.
30
www.zanussi.com

Seguridad general
• El aparato se calienta cuando está en funcionamiento. No toque
las resistencias del aparato. Utilice siempre guantes de horno
cuando introduzca o retire accesorios o utensilios refractarios.
• No utilice un limpiador a vapor para limpiar el aparato.
• Antes de realizar tareas de mantenimiento, corte la corriente eléctrica.
• No utilice limpiadores abrasivos ásperos ni rascadores de metal
afilado para limpiar la puerta de cristal si no quiere arañar su superficie, lo que podría hacer que el cristal se hiciese añicos.
• Para quitar los carriles laterales, tire primero del frontal del carril y
luego separe el extremo trasero de las paredes. Instale los carriles
de apoyo en el orden inverso.
Instrucciones de seguridad
Instalación
Advertencia Sólo un técnico cualificado
puede instalar el aparato.
• Retire todo el embalaje.
• No instale ni utilice un aparato dañado.
• Siga las instrucciones de instalación sumi-
nistradas con el aparato.
• El aparato es pesado, tenga cuidado siempre
cuando lo mueva. Utilice siempre guantes de
protección.
• No tire nunca del aparato sujetando el asa.
• Respete siempre la distancia mínima entre el
aparato y los demás electrodomésticos y
mobiliario.
• Asegúrese de que el aparato se instala de-
bajo y junto a estructuras seguras.
• Los laterales del aparato deben colocarse
junto a otros aparatos o muebles de la misma altura.
Conexión eléctrica
Advertencia Riesgo de incendios y
descargas eléctricas.
• Todas las conexiones eléctricas deben realizarse por electricistas cualificados.
• El aparato debe quedar conectado a tierra.
• Asegúrese de que las especificaciones eléctricas de la placa coinciden con las del suministro eléctrico de su hogar. En caso contrario, póngase en contacto con un electricista.
• Utilice siempre una toma con aislamiento de
conexión a tierra correctamente instalada.
• No utilice adaptadores de enchufes múltiples
ni cables prolongadores.
• Asegúrese de no provocar daños en el enchufe ni en el cable de red. Póngase en contacto con un electricista o con el servicio
técnico para cambiar un cable de red dañado.
• Evite que el cable de red entre en contacto
con la puerta del aparato, especialmente si la
puerta está caliente.
• Los mecanismos de protección contra descargas eléctricas de componentes con corriente y aislados deben fijarse de forma que
no puedan aflojarse sin utilizar herramientas.
31
www.zanussi.com

• Conecte el enchufe a la toma de corriente
únicamente cuando haya terminado la instalación. Asegúrese de tener acceso al enchufe del suministro de red una vez instalado el
aparato.
• Si la toma de corriente está floja, no conecte
el enchufe.
• No desconecte el aparato tirando del cable
de conexión a la red. Tire siempre del enchufe.
• Use únicamente dispositivos de aislamiento
correctos: línea con protección contra los
cortocircuitos, fusibles (tipo tornillo que puedan retirarse del soporte), dispositivos de fuga a tierra y contactores.
• La instalación eléctrica debe tener un dispositivo de aislamiento que permita desconectar el aparato de todos los polos de la red. El
dispositivo de aislamiento debe tener una
apertura de contacto con una anchura mínima de 3 mm.
Uso
Advertencia Existe riesgo de lesiones,
quemaduras, descargas eléctricas o
explosiones.
• Utilice este aparato en entornos domésticos.
• No cambie las especificaciones de este aparato.
• Cerciórese de que los orificios de ventilación
no están obstruidos.
• No deje nunca el aparato desatendido mientras funciona.
• Desactive el aparato después de cada uso.
• Tenga cuidado al abrir la puerta del aparato
cuando éste esté en funcionamiento. Pueden
liberarse vapores calientes.
• No utilice el aparato con las manos mojadas
ni cuando entre en contacto con el agua.
• No ejerza presión sobre la puerta abierta.
• No utilice el aparato como superficie de trabajo ni de almacenamiento.
• Mantenga siempre cerrada la puerta del aparato cuando éste esté en funcionamiento.
• Abra la puerta del aparato con cuidado. El
uso de ingredientes con alcohol puede generar una mezcla de alcohol y aire.
• Procure que no haya chispas ni fuego encendido cerca cuando se abra la puerta del
aparato.
• No coloque productos inflamables ni objetos
mojados con productos inflamables dentro,
cerca o encima del aparato.
Advertencia Podría dañar el aparato.
• Para evitar daños o decoloraciones del esmalte:
– No coloque recipientes ni otros objetos directamente sobre la base del aparato.
– No coloque papel de aluminio directamente sobre la base del aparato.
– No ponga agua directamente en el aparato
caliente.
– No deje platos húmedos ni comida en el
aparato una vez finalizada la cocción.
– Tenga cuidado al retirar o instalar los accesorios.
• La pérdida de color del esmalte no afecta al
rendimiento del aparato. Por lo tanto, no representa ningún defecto en el sentido del
derecho de garantía.
• Use una bandeja honda para pasteles húmedos. Los jugos de frutas provocan manchas
que pueden ser permanentes.
Mantenimiento y limpieza
Advertencia Riesgo de lesiones, incendio
o de ocasionar daños al aparato.
• Antes de proceder con el mantenimiento,
apague el aparato y desconecte el enchufe
de la red.
• Asegúrese de que el aparato esté frío. Los
paneles de cristal pueden romperse.
• Cambie inmediatamente los paneles de cristal de la puerta que estén dañados. Póngase
en contacto con el servicio técnico.
• Tenga mucho cuidado al desmontar la puerta
del aparato. ¡La puerta es muy pesada!
• Limpie periódicamente el aparato para evitar
el deterioro del material de la superficie.
32
www.zanussi.com

• Los restos de comida o grasa en el interior
del aparato podrían provocar un incendio.
• Limpie el aparato con un paño suave humedecido. Utilice sólo detergentes neutros. No
utilice productos abrasivos, estropajos duros,
disolventes ni objetos de metal.
• Si utiliza aerosoles de limpieza para hornos,
siga las instrucciones del envase.
• No limpie el esmalte catalítico (en su caso)
con ningún tipo de detergente.
Luz interna
• El tipo de bombilla o lámpara halógena utilizada para este aparato es específica para
aparatos domésticos. No debe utilizarse para
la iluminación doméstica.
Advertencia Riesgo de descargas
eléctricas.
• Antes de cambiar la bombilla, desconecte el
aparato del suministro de red.
• Utilice sólo bombillas con las mismas especificaciones.
Desecho
Advertencia Existe riesgo de lesiones o
asfixia.
• Desconecte el aparato de la red.
• Corte el cable de conexión a la red y deséchelo.
• Retire el pestillo de la puerta para evitar que
los niños y las mascotas queden encerrados
en el aparato.
Descripción del producto
6
5
10
9
7
8
5
4
1
2
3
1 42 3
1
Mando de las funciones del horno
2
Mando del temporizador
3
Mando de temperatura
4
Indicador de temperatura
5
Grill
6
Bombilla del horno
7
Contenedor de limpieza con agua
8
Carril de apoyo, extraíble
9
Placa de características
10
Posiciones de las parrillas
Accesorios del horno
• Parrilla
Para utensilios de cocina, pasteles en molde,
asados.
• Grill / Bandeja de asar
Para hornear y asar o como grasera.
Antes del primer uso
Advertencia Consulte los capítulos sobre
seguridad.
Limpieza inicial
• Retire todos los accesorios y carriles laterales extraíbles (en su caso).
• Limpie el interior del aparato antes de utilizarlo por primera vez.
Importante Consulte el capítulo
"Mantenimiento y limpieza".
33
www.zanussi.com

Calentamiento previo
Precaliente el aparato vacío para quemar los
restos de grasa.
1.
Ajuste la función
y la temperatura máxi-
ma.
2. Deje que el aparato funcione durante 45
minutos.
3.
Ajuste la función
y la temperatura máxi-
ma.
4. Deje que el aparato funcione durante 15
minutos.
Los accesorios se pueden calentar más de lo
habitual. El aparato puede emitir olores y humos. Esto es totalmente normal. Asegúrese de
que haya una buena ventilación.
Uso diario
Advertencia Consulte los capítulos sobre
seguridad.
Encendido y apagado del aparato
1. Gire el mando del horno hasta la función
que desee.
2. Gire el mando de control de la temperatura
hasta la temperatura adecuada.
El indicador de temperatura permanece
encendido mientras el horno alcanza la
temperatura elegida.
3. Para desactivar el aparato, gire el mando
de función del horno y el mando de control
de la temperatura a la posición de desconexión.
Funciones del horno
Función del horno Aplicación
Apagado El aparato está apagado.
Calor superior + inferior / Limpieza con
agua
Para hornear y asar en un nivel del horno. Las resistencias superior
e inferior funcionan al mismo tiempo.
Para obtener más información sobre la limpieza con agua, consulte
el capítulo "Mantenimiento y limpieza".
Calor inferior
Para hornear pasteles con base crujiente. Solo funciona la resisten-
cia inferior.
Bóveda
Para terminar platos cocinados. Solo funciona la resistencia supe-
rior.
Grill
Para asar al grill pequeñas cantidades de alimentos de poco espe-
sor en el centro de la parrilla. Para hacer tostadas.
Funciones de reloj
Minutero + Final de la cocción
Úselo para programar una hora de desconexión
automática de una función del horno.
1. Ajuste una función y la temperatura.
2. Gire el mando del temporizador hasta el
máximo y a continuación al período de
tiempo necesario.
3. Transcurrido el período de tiempo, suena
una señal. El aparato se apaga.
Ajuste normal
: Gire el mando del tempo-
rizador hasta
. En esta posición, el aparato
funciona de forma manual. La función Minutero
+ Final de la cocción está desactivada.
34
www.zanussi.com

Funciones adicionales
Ventilador de enfriamiento
Cuando el aparato funciona, el ventilador de refrigeración se pone en marcha automáticamente para mantener frías las superficies del aparato. Si se desactiva el aparato, el ventilador puede seguir funcionando hasta que se enfríe el
aparato.
Termostato de seguridad
El funcionamiento incorrecto del aparato o los
componentes defectuosos pueden provocar
sobrecalentamientos peligrosos. Para evitarlo,
el horno dispone de un termostato de seguridad que interrumpe la alimentación. El horno se
vuelve a conectar automáticamente cuando
desciende la temperatura.
Consejos útiles
• El horno tiene cinco niveles o alturas. Estos
niveles se ordenan contándolos de abajo a
arriba desde la solera del aparato.
• El aparato está dotado con un sistema especial que hace circular el aire y recicla constantemente el vapor. Gracias a este sistema
puede cocinar con un entorno de vapor y
mantener los alimentos blandos en su interior
y crujientes en su exterior. Ello reduce al mínimo el tiempo de cocción y el consumo de
energía.
• La humedad puede llegar a condensarse en
el aparato o en los paneles de cristal. Esto
es totalmente normal. Manténgase alejado
del aparato siempre que abra la puerta mientras está en funcionamiento. Si desea reducir
la condensación, ponga en funcionamiento el
aparato 10 minutos antes de cocinar.
• Limpie la humedad después de cada uso del
aparato.
• No coloque objetos directamente sobre la
solera del aparato ni cubra los componentes
con papel de aluminio cuando cocine. De lo
contrario puede que se alteren los resultados
de la cocción y se dañe el esmalte.
Repostería
• No abra la puerta del horno antes de que
transcurran 3/4 partes del tiempo de cocción.
• Si utiliza dos bandejas al mismo tiempo, deje
un nivel libre entre ambas.
Carnes y pescados
• Utilice una bandeja honda con los alimentos
muy grasos para evitar que el horno quede
manchado de forma permanente.
• Antes de trinchar la carne, déjela reposar
unos 15 minutos, como mínimo, para que retenga los jugos.
• Para evitar que se forme mucho humo en el
horno, vierta un poco de agua en la bandeja
honda. Para evitar la condensación de humos, añada agua después de que se seque
cada vez.
Tiempos de cocción
Los tiempos de cocción dependen del tipo de
alimento, de su consistencia y del volumen.
Inicialmente, supervise el rendimiento cuando
cocine. Busque los mejores ajustes (de calor,
tiempo de cocción, etc.) para sus recipientes,
recetas y cantidades cuando utilice este aparato.
35
www.zanussi.com

Cuadro de especificaciones para hornear y asar
REPOSTERÍA
TIPO DE ALIMENTO
Cocción convencional
Tiempo de coc-
ción (min)
Notas
Posición de la
parrilla
Temp. (°C)
Masas batidas 2 170 45-60 En molde de repostería
Masa con mantequilla 2 170 20-30 En molde de repostería
Tarta de queso 1 170 70-80 En un molde de repostería
de 26 cm en un estante de
rejilla
Tarta o pastel de manzana
2 170 80-100 En 2 moldes de repostería
de 20 cm en un estante de
rejilla
1)
Strudel 3 175 60-80 En bandeja de repostería
Tarta de mermelada 2 170 30-40 En molde de repostería de
26 cm
Bizcocho 2 170 50-60 En molde de repostería de
26 cm
Pastel de Navidad /
Tarta de frutas
2 160 90-120 En molde de repostería de
20 cm
1)
Tarta de ciruelas 1 175 50-60
En molde de pan
1)
Pastelillos 3 170 20-30 En bandeja de repostería
Galletas / Pastas 3 140 30-35 En bandeja de repostería
Merengues 3 120 80-100 En bandeja de repostería
Bollos 3 190 15-20
En bandeja de repostería
1)
Bollos de crema 3 190 25-35 En bandeja de repostería
Tartaletas 2 180 45-70 En molde de repostería de
20 cm
Tarta de frutas 1 160 110-120 En molde de repostería de
24 cm
Tarta Victoria 1 170 50-60 En molde de repostería de
20 cm
1)
1) Precaliente el horno 10 minutos.
PAN Y PIZZA
TIPO DE ALIMENTO
Cocción convencional
Tiempo de coc-
ción (min)
Notas
Posición de la
parrilla
Temp.
(°C)
Pan blanco 1 190 60-70 1-2 piezas, 500 g cada pie-
za
1)
36
www.zanussi.com

TIPO DE ALIMENTO
Cocción convencional
Tiempo de coc-
ción (min)
Notas
Posición de la
parrilla
Temp.
(°C)
Pan de centeno 1 190 30-45 En molde de pan
Pizza 1 230-250 10-20 En una bandeja o bandeja
honda
1)
Bollitos 3 200 10-20
En bandeja de repostería
1)
1) Precalentar durante 10 minutos.
FLANES
TIPO DE ALIMENTO
Cocción convencional
Tiempo de coc-
ción (min)
Notas
Posición de la
parrilla
Temp. (°C)
Pudin de pasta 2 200 40-50 En un molde
Flan de verduras 2 200 45-60 En un molde
Quiches 1 180 50-60
En un molde
1)
Lasaña 2 180-190 25-40
En un molde
1)
Canelones 2 180-190 25-40
En un molde
1)
1) Precalentar durante 10 minutos.
CARNE
TIPO DE ALIMENTO
Cocción convencional
Tiempo de coc-
ción (min)
Notas
Posición de la
parrilla
Temp. (°C)
Carne de vacuno 2 200 50-70 En un estante de rejilla
Cerdo 2 180 90-120 En un estante de rejilla
Ternera 2 190 90-120 En un estante de rejilla
Rosbif poco hecho 2 210 50-60 En un estante de rejilla
Rosbif en su punto 2 210 60-70 En un estante de rejilla
Rosbif muy hecho 2 210 70-75 En un estante de rejilla
Paletilla de cerdo 2 180 120-150 Con piel
Morcillo de cerdo 2 180 100-120 Dos piezas
Cordero 2 190 110-130 Pata
Pollo 2 220 70-85 Entero
Pavo 2 180 210-240 Entero
Pato 2 175 120-150 Entero
Ganso 2 175 150-200 Entero
Conejo 2 190 60-80 Troceado
Liebre 2 190 150-200 Troceada
37
www.zanussi.com

TIPO DE ALIMENTO
Cocción convencional
Tiempo de coc-
ción (min)
Notas
Posición de la
parrilla
Temp. (°C)
Faisán 2 190 90-120 Entero
PESCADO
TIPO DE ALIMENTO
Cocción convencional
Tiempo de coc-
ción (min)
Notas
Posición de la
parrilla
Temp. (°C)
Trucha/Pargo 2 190 40-55 3 - 4 pescados
Atún/Salmón 2 190 35-60 4-6 filetes
Grill
Precaliente el horno vacío durante 10 minutos antes de cocinar.
Cantidad Grill Tiempo de cocción [min]
TIPO DE ALIMEN-TOPiezas [g] Posición de
la parrilla
Temp [°C] 1ª cara 2ª cara
Filetes de solomillo 4 800 4 máx. 12-15 12-14
Filetes de vacuno 4 600 4 máx. 10-12 6-8
Salchichas 8 - 4 máx. 12-15 10-12
Chuletas de cerdo 4 600 4 máx. 12-16 12-14
Pollo (cortado en
dos)
2 1000 4 máx. 30-35 25-30
Brochetas 4 - 4 máx. 10-15 10-12
Pechuga de pollo 4 400 4 máx. 12-15 12-14
Hamburguesa 6 600 4 máx. 20-30 Filete de pescado 4 400 4 máx. 12-14 10-12
Sándwiches tostados 4-6 - 4 máx. 5-7 Tostadas 4-6 - 4 máx. 2-4 2-3
Conservar - Calor inferior
Frutas silvestres
CONSERVA Temperatura (°C)
Tiempo de cocción
hasta que hierva a
fuego lento (min)
Tiempo de cocción
restante a 100 °C
(min)
Fresas, arándanos, frambuesas, grosellas maduras
160 – 170 35 – 45 –
Frutas con hueso
38
www.zanussi.com

CONSERVA Temperatura (°C)
Tiempo de cocción
hasta que hierva a
fuego lento (min)
Tiempo de cocción
restante a 100 °C
(min)
Peras, membrillos, ciruelas
160 – 170 35 – 45 10 – 15
Verduras
CONSERVA Temperatura (°C)
Tiempo de cocción
hasta que hierva a
fuego lento (min)
Tiempo de cocción
restante a 100 °C
(min)
Zanahorias
1)
160 – 170 50 – 60 5 – 10
Pepinos 160 – 170 50 – 60 –
Encurtidos variados 160 – 170 50 – 60 5 – 10
Colinabos, guisantes, es-
párragos
160 – 170 50 – 60 15 – 20
1) Después de apagar el aparato, deje la conserva en el horno.
Mantenimiento y limpieza
Advertencia Consulte los capítulos sobre
seguridad.
• Limpie la parte delantera del aparato con un
paño suave humedecido en agua templada y
jabón neutro.
• Limpie las superficies metálicas con jabón
neutro.
• Limpie el interior del horno después de cada
uso. Así podrá retirar la suciedad más fácilmente e impedirá que se queme.
• Elimine la suciedad resistente con limpiadores especiales para hornos.
• Limpie todos los accesorios del horno después de cada uso y deje que se sequen. Utilice un paño suave humedecido en agua
templada y jabón neutro.
• No trate los recipientes antiadherentes con
productos agresivos u objetos punzantes ni
los lave en el lavavajillas. Podría dañar el esmalte antiadherente.
Aparatos de acero inoxidable o aluminio:
Limpie la puerta del horno únicamente con una
esponja húmeda. Séquela con un paño suave.
No utilice productos abrasivos, ácidos ni estropajos de acero, ya que pueden dañar la superficie del horno. Limpie el panel de control del
horno teniendo en cuenta las mismas precauciones.
Limpieza de la junta de la puerta
• Verifique periódicamente la junta de la puerta. La junta de la puerta rodea el marco del
interior del horno. No utilice el aparato si la
junta de la puerta está dañada. Póngase en
contacto con el servicio técnico.
• Si desea limpiar la junta de la puerta, remítase a la información general sobre limpieza.
Carriles de apoyo
Puede extraer los carriles de apoyo para limpiar
las paredes laterales.
39
www.zanussi.com

Para retirar los carriles de apoyo
1
Tire de la parte
delantera del carril de
apoyo para separarlo
de la pared.
2
1
2
Tire del extremo
trasero del carril de
apoyo para separarlo
de la pared y extráigalo.
Instalación de los carriles de apoyo
Instale los carriles de apoyo en el orden inverso.
Los extremos redondeados de los carriles
de apoyo deben apuntar hacia la parte de-
lantera.
Limpieza con agua
El procedimiento de limpieza con agua utiliza
vapor para eliminar las partículas de grasa y los
restos de alimentos en el horno.
1. Coloque 300 ml de agua en el contenedor
de limpieza con agua en el fondo del horno.
2.
Programe la función del horno
.
3. Ajuste la temperatura a 90 °C.
4. Deje que el aparato funcione durante 30
minutos.
5. Apague el aparato y deje que se enfríe.
6. Cuando el aparato se haya enfriado, limpie
las superficies interiores del horno con un
paño.
Advertencia Asegúrese de que el
aparato se haya enfriado antes de tocarlo.
Puede quemarse.
Bombilla del horno
Advertencia Tenga cuidado al cambiar la
bombilla del horno. Existe riesgo de
descarga eléctrica.
Antes de cambiar la bombilla del horno:
• Apague el horno.
• Retire los fusibles de la caja de fusibles o
desconecte el disyuntor.
Coloque un paño en el fondo del horno
para proteger la luz y la tapa de cristal.
Coja siempre la bombilla halógena con un paño
para evitar quemar los residuos de grasa.
1. Gire la tapa de cristal hacia la izquierda pa-
ra extraerla.
2. Limpie la tapa de cristal.
3. Cambie la bombilla del horno por otra pre-
parada para soportar temperaturas de hasta 300 °C.
Utilice una bombilla de horno del mismo tipo.
4. Coloque la tapa de cristal.
Limpieza de la puerta del horno
La puerta del horno tiene dos paneles de cristal. Retire la puerta del horno y los paneles internos de cristal para limpiarlos.
La puerta del horno puede cerrarse si in-
tenta retirar los paneles de cristal antes de
quitar la puerta.
Precaución No utilice el aparato sin los
paneles de cristal.
1
Abra completamente la puerta del
horno y sujete las dos
bisagras.
2
Levante y gire las
palancas de las dos
bisagras.
40
www.zanussi.com

3
Cierre la puerta
del horno hasta la primera posición de
apertura (la mitad). A
continuación, tire de
la puerta hacia adelante para desencajarla.
4
Coloque la puerta
sobre una superficie
estable y protegida
por un paño suave.
5
Libere el sistema
de bloqueo para retirar los paneles de
cristal.
90°
6
Gire los dos pasadores en un ángulo
de 90° y extráigalos
de sus asientos.
1
2
7
Levante con cuidado (paso 1) y retire
(paso 2) los paneles
de cristal.
Limpie el panel de cristal con agua y jabón. Seque el panel de cristal con cuidado.
Instalación de la puerta y el panel de
cristal
Cuando haya terminado la limpieza, instale los
paneles de cristal y la puerta del horno. Lleve a
cabo los pasos anteriores en orden inverso.
La cara impresa debe mirar hacia el interior de
la puerta. Después de la instalación, asegúrese
de que la superficie del marco del panel de
cristal de las caras impresas no esté áspera
cuando la toque.
Asegúrese de que coloca el panel de cristal interno en los soportes correctos. Consulte la
ilustración.
Qué hacer si…
Advertencia Consulte los capítulos sobre
seguridad.
41
www.zanussi.com

Problema Posible causa Solución
El aparato no funciona. El aparato está apagado. Active el aparato. Consulte el ca-
pítulo "Uso diario".
El aparato no funciona. El programador de la función Mi-
nutero + Final de la cocción no
está configurado.
Configure el programador de la
función Minutero + Final de la
cocción. Consulte el capítulo
“Funciones de reloj”.
El aparato no funciona. Ha saltado un fusible de la caja de
fusibles.
Compruebe el fusible. Si el fusible
salta más de una vez, póngase en
contacto con un electricista cuali-
ficado.
La bombilla del horno no funciona. La bombilla es defectuosa. Cambie la bombilla del horno.
Se acumulan vapor y condensa-
ción en los alimentos y en el horno.
Los platos han permanecido en el
horno demasiado tiempo.
No deje los platos en el horno
más de 15 o 20 minutos tras fina-
lizar el proceso de cocción.
Si no lograra subsanar el problema, diríjase al
Centro de servicio técnico.
Los datos necesarios para el servicio técnico
están en la placa de características. La placa
de características se encuentra en el marco delantero de la cavidad del aparato.
Es conveniente que los anote aquí:
Modelo (MOD.) .........................................
Número de producto (PNC) .........................................
Número de serie (S.N.) .........................................
Instalación
Advertencia Consulte los capítulos sobre
seguridad.
42
www.zanussi.com

Empotrado
573
594
5
589
558
548
20
min. 550
20
590
min. 560
min. 550
min. 560
600
20
A
B
Instalación eléctrica
Advertencia Deje la instalación eléctrica
en manos de un profesional cualificado.
El fabricante declina toda responsabilidad
si la instalación no se efectúa siguiendo
las instrucciones de seguridad del capítulo “Información sobre seguridad”.
El aparato se suministra únicamente con un cable de alimentación.
43
www.zanussi.com

Cable
Tipos de cables adecuados para su instalación
o cambio: H07 RN-F, H05 RN-F, H05 RRF,
H05 VV-F, H05 V2V2-F (T90), H05 BB-F.
En lo que respecta a la sección del cable, consulte la potencia total (que figura en la placa de
características) y la tabla:
Potencia total Sección del cable
máximo de 1380 W 3 x 0,75 mm²
Potencia total Sección del cable
máximo de 2300 W 3 x 1 mm²
máximo de 3.680 W 3 x 1,5 mm²
El cable de tierra (cable verde/amarillo) debe
tener 2 cm más que los cables de fase y del
neutro (cables azul y marrón).
Aspectos medioambientales
El símbolo que aparece en el aparato o en
su embalaje, indica que este producto no se
puede tratar como un residuo normal del hogar.
Se deberá entregar, sin coste para el poseedor,
bien al distribuidor, en el acto de la compra de
un nuevo producto similar al que se deshecha,
bien a un punto municipal de recolección
selectiva de equipos eléctricos y electrónicos
para su reciclaje. Al asegurarse de que este
producto se desecha correctamente, usted
ayudará a evitar posibles consecuencias
negativas para el medio ambiente y la salud
pública, lo cual podría ocurrir si este producto
no se gestionara de forma adecuada. Para
obtener información más detallada sobre el
reciclaje de este producto, póngase en
contacto con el Ayuntamiento de su Municipio,
ó con la tienda donde lo compró.
Material de embalaje
El material de embalaje es respetuoso con
el medio ambiente y reciclable. Las piezas de
plástico están identificadas con abreviaturas internacionales, tales como PE, PS, etc. Deseche
el material de embalaje en los contenedores
destinados a tal fin por los servicios de limpieza.
44
www.zanussi.com

45
www.zanussi.com

46
www.zanussi.com

47
www.zanussi.com

www.zanussi.com/shop
397222301-G-462012
 Loading...