

Page 1
WASHING MACHINE
LAVADORA
РЛХНФЗСЙП СПХЧЩН
FE 827 G
FE 1027 G
F 827 G
USER MANUAL
MANUAL DE USO
ЕГЧЕЙСЙДЙП ЧСЗУФЗ
132979260
GR
E
GB
Page 2
2
Dear customer,
Please read these operating instructions carefully and pay particular attention to the safety notes indicated in
the first pages. We recommend that you keep this instruction booklet for future reference and pass it on to any
future owners.
Transport damages
When unpacking the appliance, check that it is not damaged. If in doubt, do not use it and contact the Service
Centre.
The symbols you will see on some paragraphs of this booklet have the following meaning:
The warning triangle and/or the key words (Warning!, Caution!) emphasize information that is particularly
important for your safety or correct functioning of the appliance.
The information marked with this symbol provides additional instructions and practical tips on the use of
the appliance.
Tips and information about economical and ecological use of the machine are marked with this symbol.
Our contribution to the protection of the
environment: we use recycled paper.
Contents
Warnings 3
Disposal 4
Tips for environmental protection 4
Technical specifications 4
Installation 5
Unpacking 5
Positioning 5
Water inlet 5-6
Water drainage 6
Electrical connection 6
Your new washing machine 7
● Door locked light 7
● Detergent dispenser drawer 7
Use 8
Control panel 8-9
Controls 10-11
Washing hints 10-11
Sorting the laundry 10
Temperatures 10
Before loading the laundry 10
Maximum loads 10
Laundry weights 10
Removing stains 10-11
Detergents and additives 11
International wash code symbols 12
Operating sequence 13-14
Programme tables 15-16
Maintenance 17
Bodywork 17
Door seal 17
Detergent dispenser drawer 17
Water inlet filter 17
Drain pump 17-18
Emergency emptying out 18
Frost precautions 18
Something not working? 19-20
Page 3

3
ENGLISH
Installation
• All internal packing must be removed before using
the appliance. Serious damage may be caused to
the machine or adjacent furniture if the protective
transit devices are not removed or are not
completely removed. Refer to the relevant
paragraph in the instruction book.
• Any electrical work required to install this
appliance must be carried out by a qualified
electrician.
• Any plumbing work required to install this
appliance must be carried out by a qualified
plumber.
• After having installed the machine, check that it is
not standing on its electrical supply cable.
• If the appliance is placed on a carpeted floor,
ensure that air can circulate freely between the
feet and the floor.
Use
• This appliance is designed for domestic use. It
must not be used for purposes other than those
for which it was designed.
• Only wash fabrics which are designed to be
machine washed. Follow the instructions on each
garment label.
• Do not overload the appliance. Follow the
instructions in the instruction book.
• Make sure that all pockets are empty. Objects
such as coins, safety pins, pins and screws can
cause extensive damage.
• Do not machine wash garments saturated with
petroleum, methylated spirits, trichlorethylene, etc.
If such fluids have been used to remove stains
prior to washing, wait until they have completely
evaporated from the fabric before placing
garments in the appliance.
• Place small items such as socks, belts, etc. in a
cloth bag or pillowcase to prevent them getting
trapped between the drum and the tub.
• Use only the recommended quantities of fabric
softener. An excessive amount could damage the
laundry.
Warnings
• Leave the porthole door slightly ajar when the
appliance is not in use. This preserves the door
seal and prevents the formation of musty smells.
• Always check that water has emptied out before
opening the door. If not, drain the water following
the instructions in the instruction book.
• Always unplug the appliance and shut the water
tap after use.
General safety
• Repairs to the machine must be carried out only
by qualified personnel. Repairs carried out by
inexperienced persons could cause serious
danger. Contact your local Service Centre.
• Never pull the power supply cable to remove the
plug from the socket; always take hold of the plug
itself.
• During high temperature wash programmes the
door glass may get hot. Do not touch it!
Child safety
• Children are often not aware of how dangerous
electrical appliances can be. When the machine is
working, children should be carefully supervised
and not be allowed to play with the appliance.
• The packaging components (e.g. plastic film,
polystyrene) can be dangerous to children danger of suffocation! Keep them out of children’s
reach.
• Keep all detergents in a safe place out of
children’s reach.
• Make sure that children or pets do not climb into
the drum.
• When the appliance is to be scrapped, cut off the
electrical supply cable and destroy the plug with
the remaining cable. Disable the door catch in
order to prevent children from becoming trapped
inside while playing.
The following warnings are provided in the interests of overall safety. You must read them carefully before
installing or using the appliance.
Page 4

4
Disposal
Tips for environmental protection
Packaging materials
The materials marked with the symbol are
recyclable.
>PE<=polyethylene
>PS<=polystyrene
>PP<=polypropylene
This means that they can be recycled by disposing
of them properly in appropriate collection
containers.
Machine
Use authorised disposal sites for your old appliance.
Help to keep your country tidy!
The symbol on the product or on its packaging
indicates that this product may not be treated as
household waste. Instead it shall be handed over to
the applicable collection point for the recycling of
electrical and electronic equipment. By ensuring this
product is disposed of correctly, you will help
prevent potential negative consequences for the
environment and human health, which could
otherwise be caused by inappropriate waste
handling of this product. For more detailed
information about recycling of this product, please
contact your local city office, your household waste
disposal service or the shop where you purchased
the product.
To save water, energy and to help protect the
environment, we recommend that you follow these
tips:
• Normally soiled laundry may be washed without
prewashing in order to save detergent, water and
time (the environment is protected too!).
• The machine works more economically if it is fully
loaded. Do not overload!
• With adequate pre-treatment, stains and limited
soiling can be removed; the laundry can then be
washed at a lower temperature.
• Measure out detergent according to the water
hardness, the degree of soiling and the quantity
of laundry being washed.
DIMENSIONS Height 85 cm
Width 60 cm
Depth 63 cm
MAXIMUM LOAD Cotton 7 kg
Synthetics 3 kg
Delicates 3 kg
Woollens 2 kg
SPIN SPEED 800 rpm max. (FE 827 G)
1000 rpm max. (FE 1027 G)
POWER SUPPLY VOLTAGE/FREQUENCY 220-230 V/50 Hz
TOTAL POWER ABSORBED 2200 W
MINIMUM FUSE PROTECTION 10 A
WATER PRESSURE Minimum 0,05 MPa
Maximum 0,8 MPa
This appliance complies with the following EEC Directives:
73/23/EEC of 19/02/73 relating to low voltage
89/336/EEC of 03/05/89 relating to electromagnetic compatibility.
Technical specifications
Page 5
5
ENGLISH
Installation
Unpacking
All transit bolts and packing must be
removed
before using the appliance.
You are advised to keep all transit devices so
that they can be refitted if the machine ever has
to be transported again.
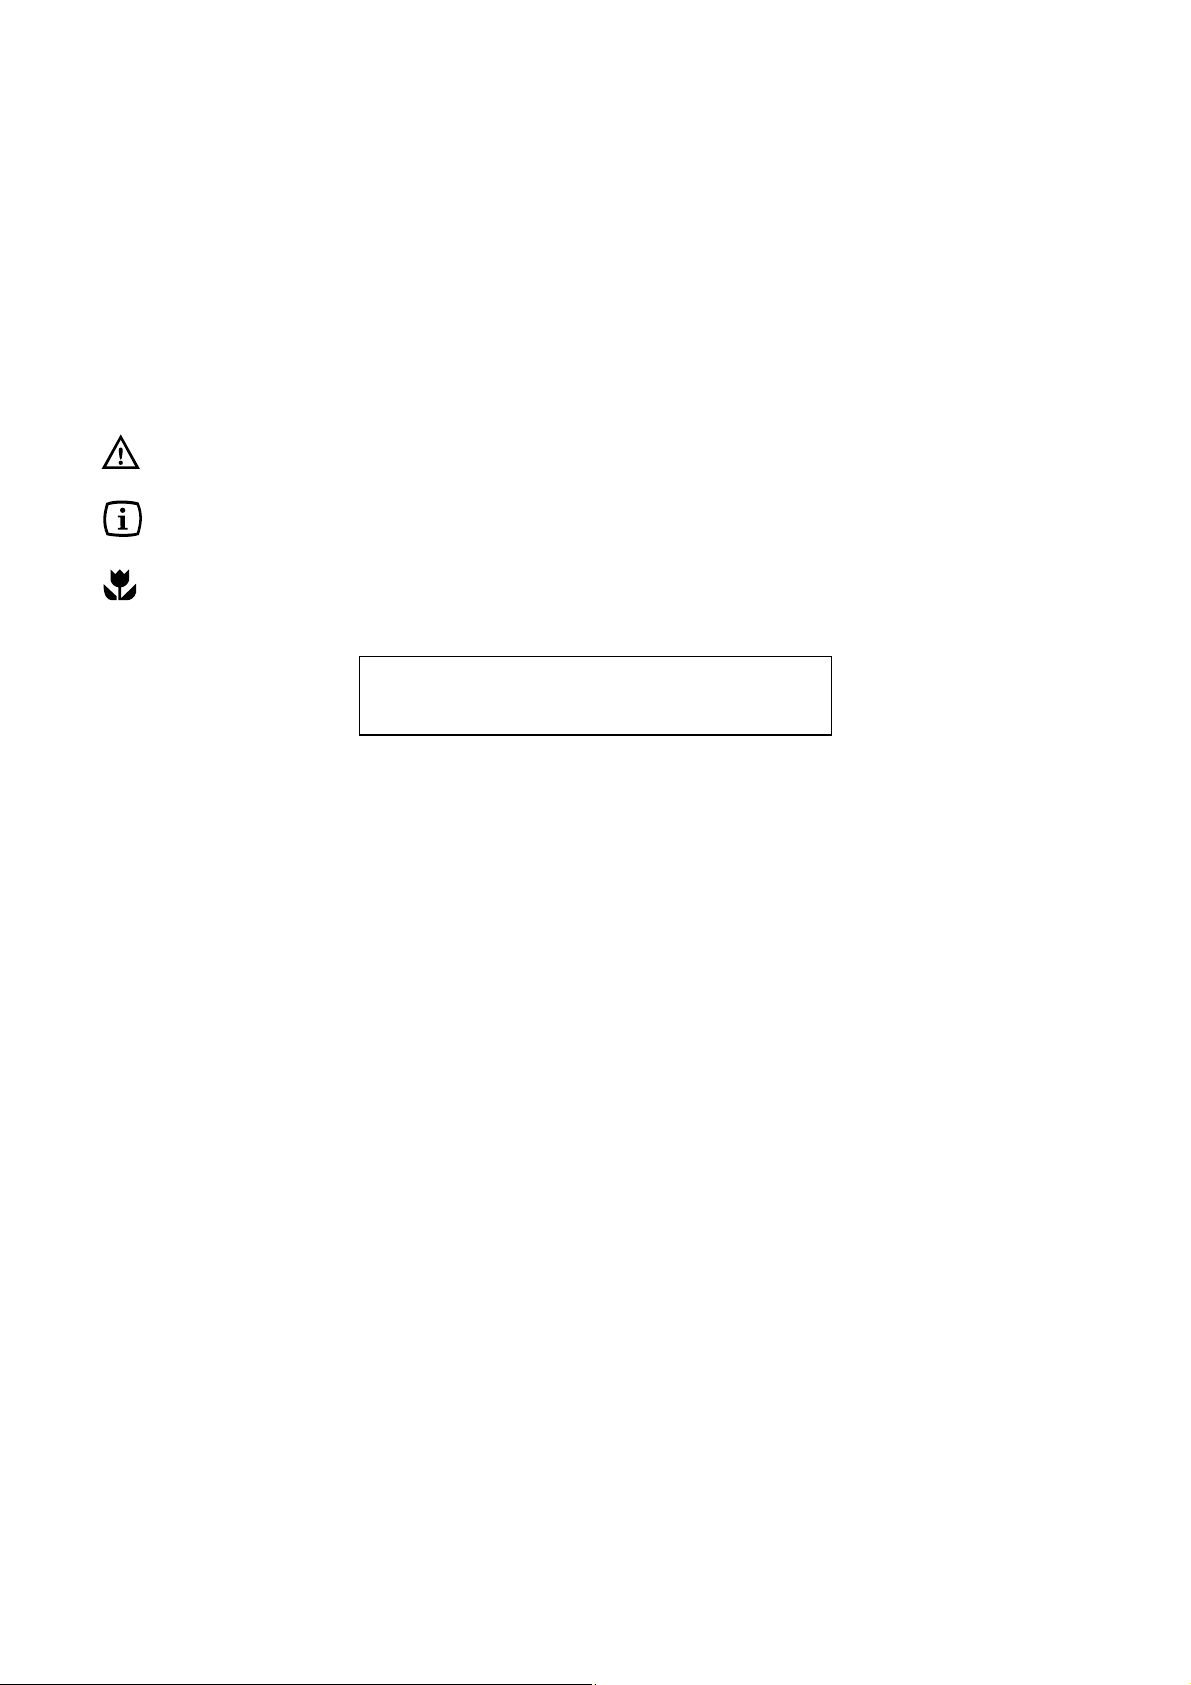
1. After removing all the packaging, carefully lay
machine on it’s back to remove the polystyrene
base from the bottom.
2. Remove the power supply cable and the draining
hose from the hose holders on the rear of the
appliance.
3. With a suitable spanner unscrew and remove the
central rear bolt A. Slide out the relevant plastic
spacer.
4. Unscrew and remove the two large rear bolts B
and the six smaller bolts C.
5. Remove the bracket D and tighten up the six
smaller bolts C.
C
C
HEC0014
HEC0011S
D
HEC0003S
C
C
B
B
HEC0002S
A
HEC0001
HEC0008
6. Open the porthole, take out the inlet hose from
the drum and remove the polystyrene block fitted
with the adhesive tape on the door seal.
7. Fill the smaller upper hole and the two large ones
with the corresponding plastic plug caps
supplied in the bag containing the instruction
booklet.
8. Connect the inlet hose as described under the
paragraph “Water Inlet”.
Positioning
Install the machine on a flat hard floor.
Make sure that air circulation around the machine is
not impeded by carpets, rugs etc. Check that the
machine does not touch the wall or other kitchen
units.
Carefully level by screwing the adjustable feet in or
out. Never place cardboard, wood or similar
materials under the machine to compensate for any
unevenness in the floor.
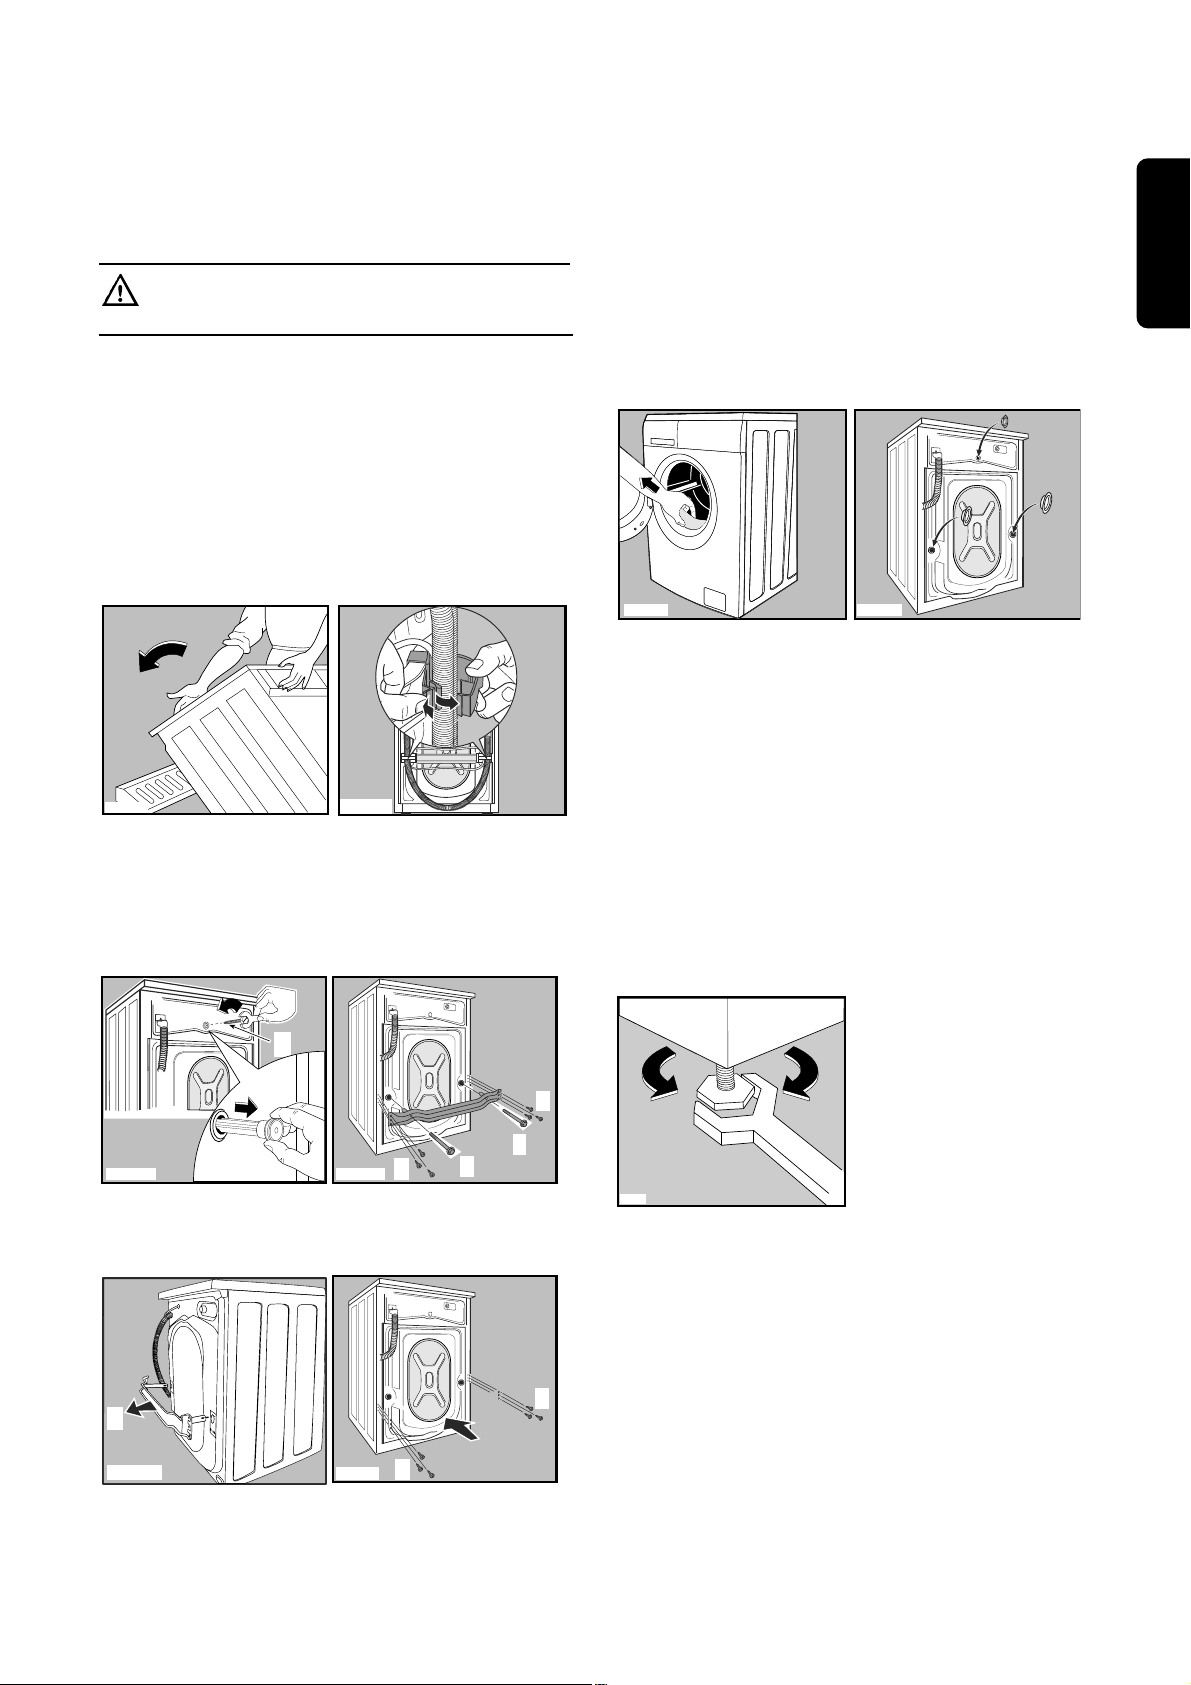
Water inlet
An inlet hose is supplied and can been found inside
the machine drum.
Do not use the hose from your previous machine
to connect to the water supply.
1. Open the porthole and extract the inlet hose .
2. Connect the hose with the angled connection to
the machine.
Important!
Do not place the inlet hose downwards. Angle
the hose to the left or right depending on the
position of your water tap.
HEC0005
HEC0010
P1051
Page 6
6
3. Set the hose correctly by loosening the ring nut.
After positioning the inlet hose, be sure to tighten
the ring nut again to prevent leaks.
4. Connect the hose to a tap with a 3/4” thread.
Always use the hose supplied with the appliance.
The inlet hose must not be lengthened. If it is too
short and you do not wish to move the tap, you will
have to purchase a new, longer hose specially
designed for this type of use.
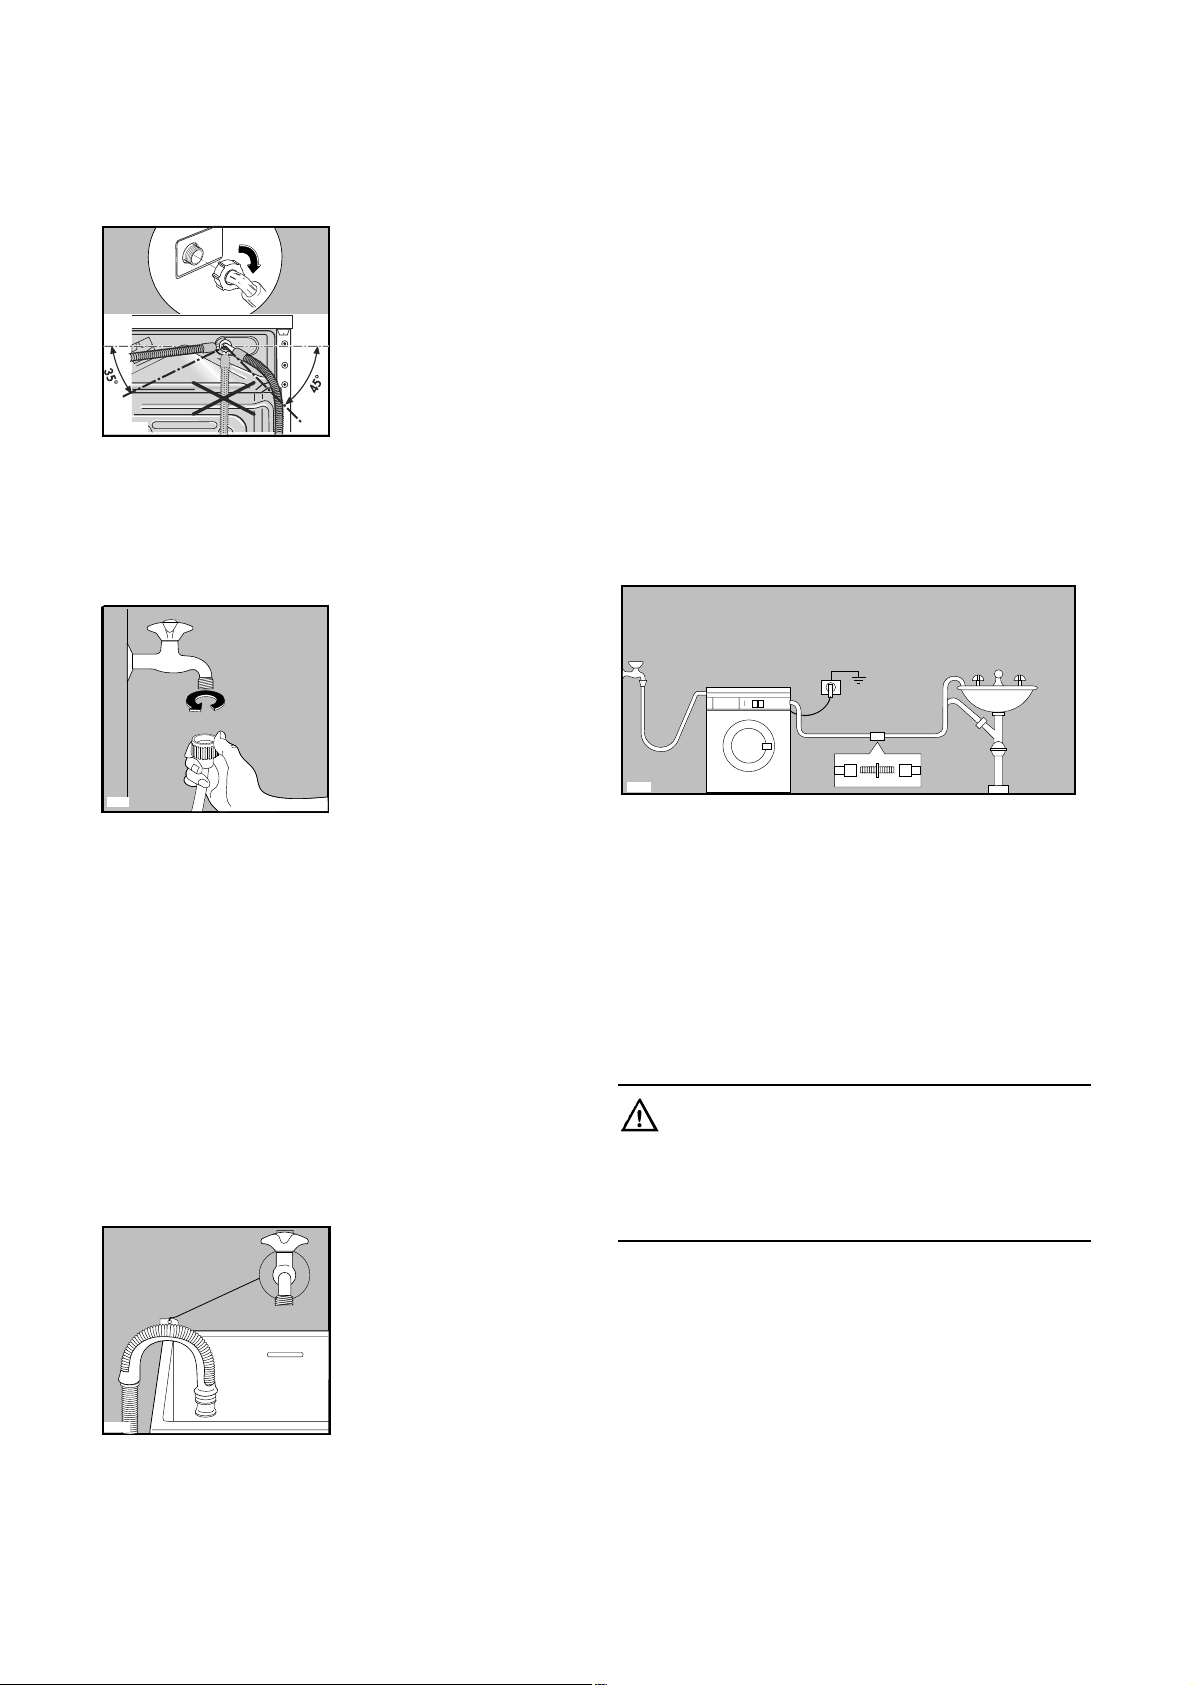
Water drainage
The end of the drain hose can be positioned in three
ways:
Hooked over the edge of a sink using the plastic
hose guide supplied with the machine. In this
case, make sure the end cannot come unhooked
when the machine is emptying.
This could be done by tying it to the tap with a piece
of string or attaching it to the wall.
Important!
Before connecting up the machine to new pipework
or to pipework that has not been used for some
time, run off a reasonable amount of water to flush
out any debris that may have collected in the pipes.
P0022
P1088
HEC0006
In a sink drain pipe branch. This branch must be
above the trap so that the bend is at least 60 cm
above the ground.
Directly into a drain pipe at a height of not less
than 60 cm and not more than 90 cm.
The end of the drain hose must always be
ventilated, i.e. the inside diameter of the drain pipe
must be larger than the outside diameter of the drain
hose.
Any extension applied to the drainage hose should
not be longer than 200 cm and its diameter must not
be smaller than that of the original hose. Use a
suitable fitting for the connection.
The drain hose must not be kinked.
Electrical connection
This machine is designed to operate on a 220-230 V,
single-phase, 50 Hz supply.
Check that your domestic electrical installation can
take the maximum load required (2.2 kW), also
taking into account any other appliances in use.
Connect the machine to an earthed socket.
The manufacturer declines any responsibility
for damage or injury through failure to comply
with the above safety precaution.
Should the appliance power supply cable
need to be replaced, this must be carried out
by our Service Centre.
Please ensure that when the appliance is
installed the power supply cable is easily
accessible.
P1118
Page 7
7
ENGLISH
This new machine meets all modern requirements for effective treatment of laundry with low water, energy and
detergent consumption.
• The programme selector dial combines the function of programme and temperature selection, making it
easier to set the programme.
• The programme progress display shows the programme steps selected and the programme phase which
is running.
• The special wool programme with its new delicate wash system treats your woollens with extreme care.
• The automatic cooling of the washing water from 90° to 60°C before draining will prevent old drain pipes
from being deformed and will reduce thermal shock to fabrics, helping to prevent creasing.
• The unbalance detection device prevents vibration during spinning.
• The ECO valve allows total use of detergent and reduces water consumption so saving energy.
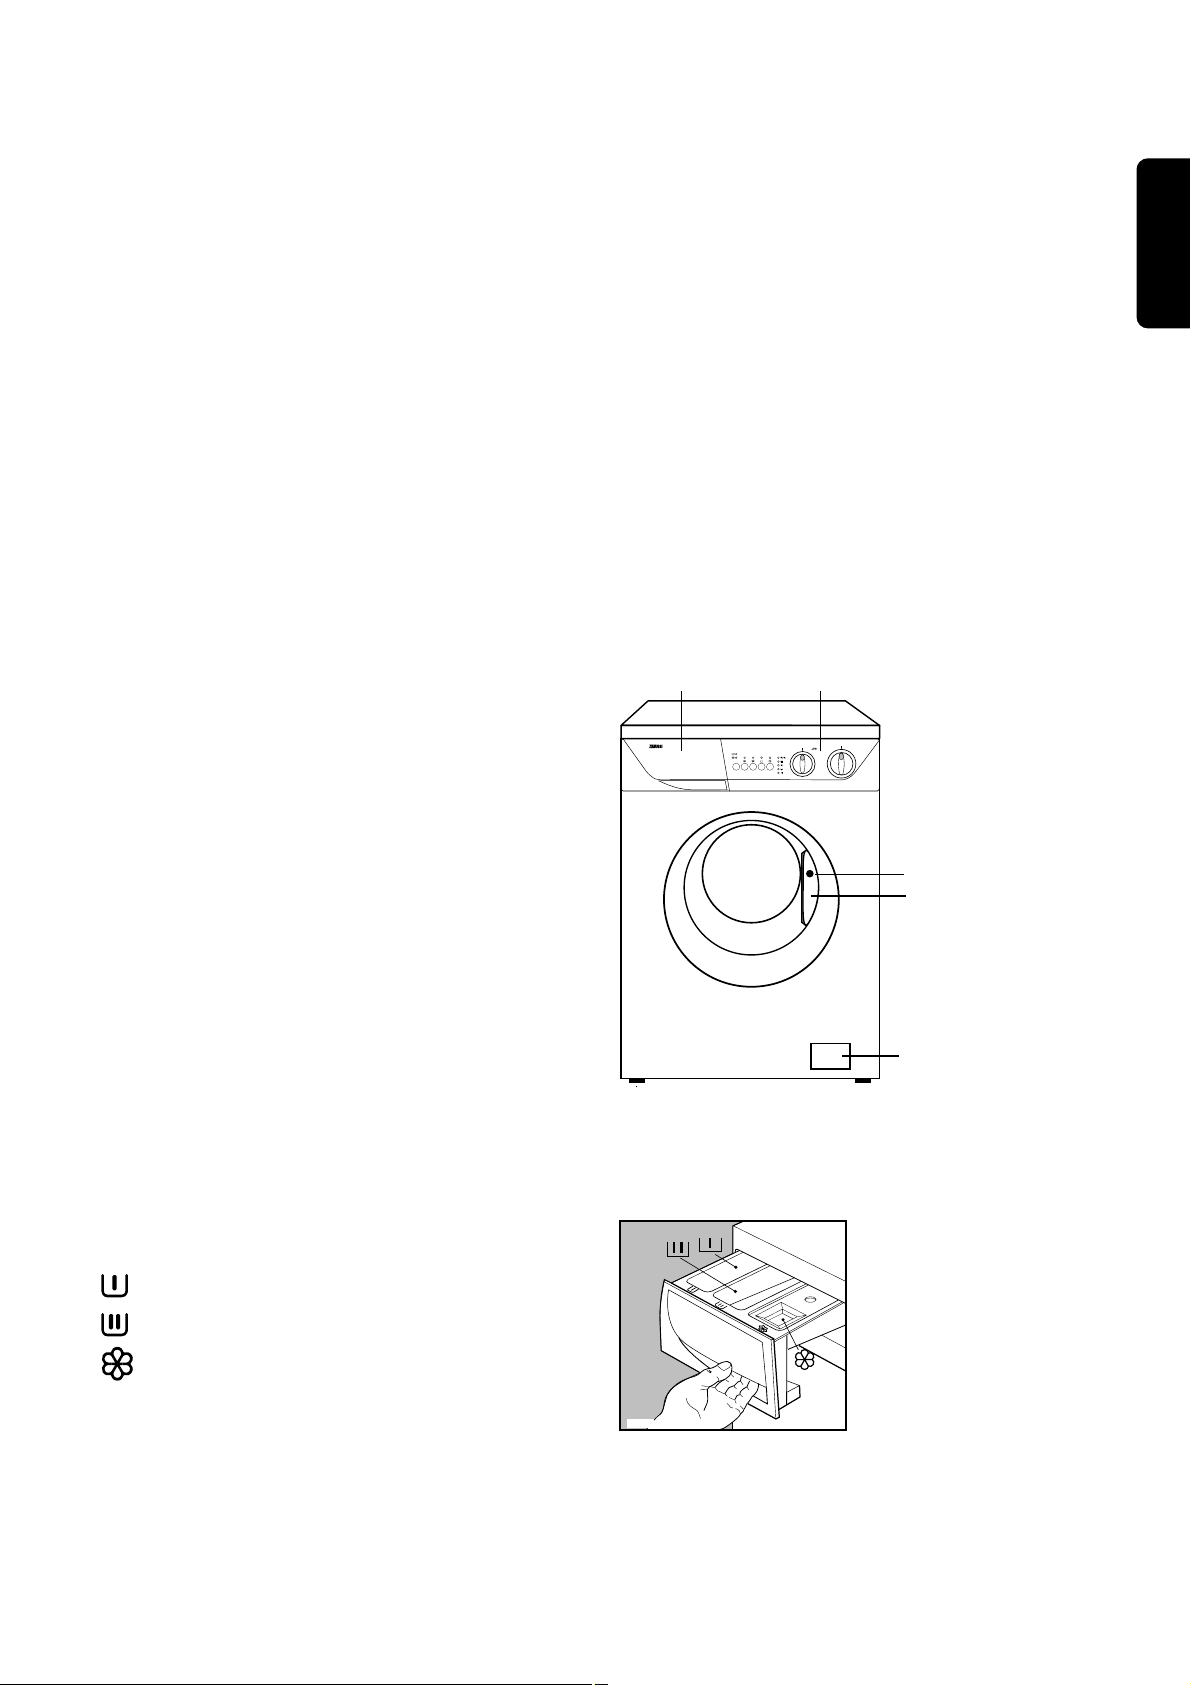
1 Detergent dispenser drawer
2 Control panel
3 Door locked light
4 Door handle
5 Drain pump
6 Adjustable feet
Door locked light (3)
It stays on during the whole programme indicating
that the door is locked.
When the light goes out, the door can be opened
(see page 14).
Your new washing machine
1
2
3
5
4
F 827 G
Detergent dispenser drawer
Prewash
Main wash
Fabric softener, starch
C0063
Page 8
8
Use
Programme Option buttons
Depending on the programme, different functions
can be combined. These must be selected after
choosing the desired programme and before
depressing the Start/Pause button .
When these buttons are pressed, the corresponding
pilot lights come on. When they are pressed again,
the pilot lights go out.
If an incorrect option is selected, the pilot lights flash
for about 2 seconds.
1 “Options” button
Press this button to select the following options:
● Prewash
Select this option if you wish your laundry to be
prewashed at 30°C before the main wash
(not available for wool).
The prewash ends with a short spin in
programmes for cotton and synthetic fabrics,
whereas in the programme for delicate fabrics the
water is only drained.
● Quick wash
This button allows you to select the QUICK
WASH function, for laundry that is only slightly
soiled (not for wool and together with
function).
The washing time will be reduced according to
the type of fabric and the selected temperature.
Max. load for cotton 3.5 kg.
2 “ECO” button
a) By depressing this button together with
programme "Cotton 90°C", the temperature
decreases until 67°C and the washing time
increases by 22 minutes.
By depressing this button together with
programme "Synthetics 60°C", the temperature
decreases until 40°C and the washing time
increases by 10 minutes.
This function can be used for normally soiled
laundry in order to save energy.
b) In order to obtain washing class "A" you have to
press this button together with programmes
"Cotton 60°C" and "Cotton 40°C". The washing
time increases by 10 minutes at 60°C and by 35
minutes at 40°C.
3 “Extra Rinse” button
The Extra Rinse option can be selected with all
programmes except the wool programme. The
machine will perform 2 additional rinses. This option
is recommended for people who are allergic to
detergents, and in areas where the water is very soft.
4 “Rinse Hold” button
When selecting this option the water of the last rinse
is not emptied out, to prevent the fabrics from
creasing.
At the end of the programme the pilot light “End”
illuminates and the door locked light is on. To
drain water, proceed as follows:
● turn the programme selector dial to position “O”;
● select programme (drain) or (short spin);
● press Start/Pause button.
You can reduce the spin speed by means of the
selector dial to adapt the spin speed to the
laundry.
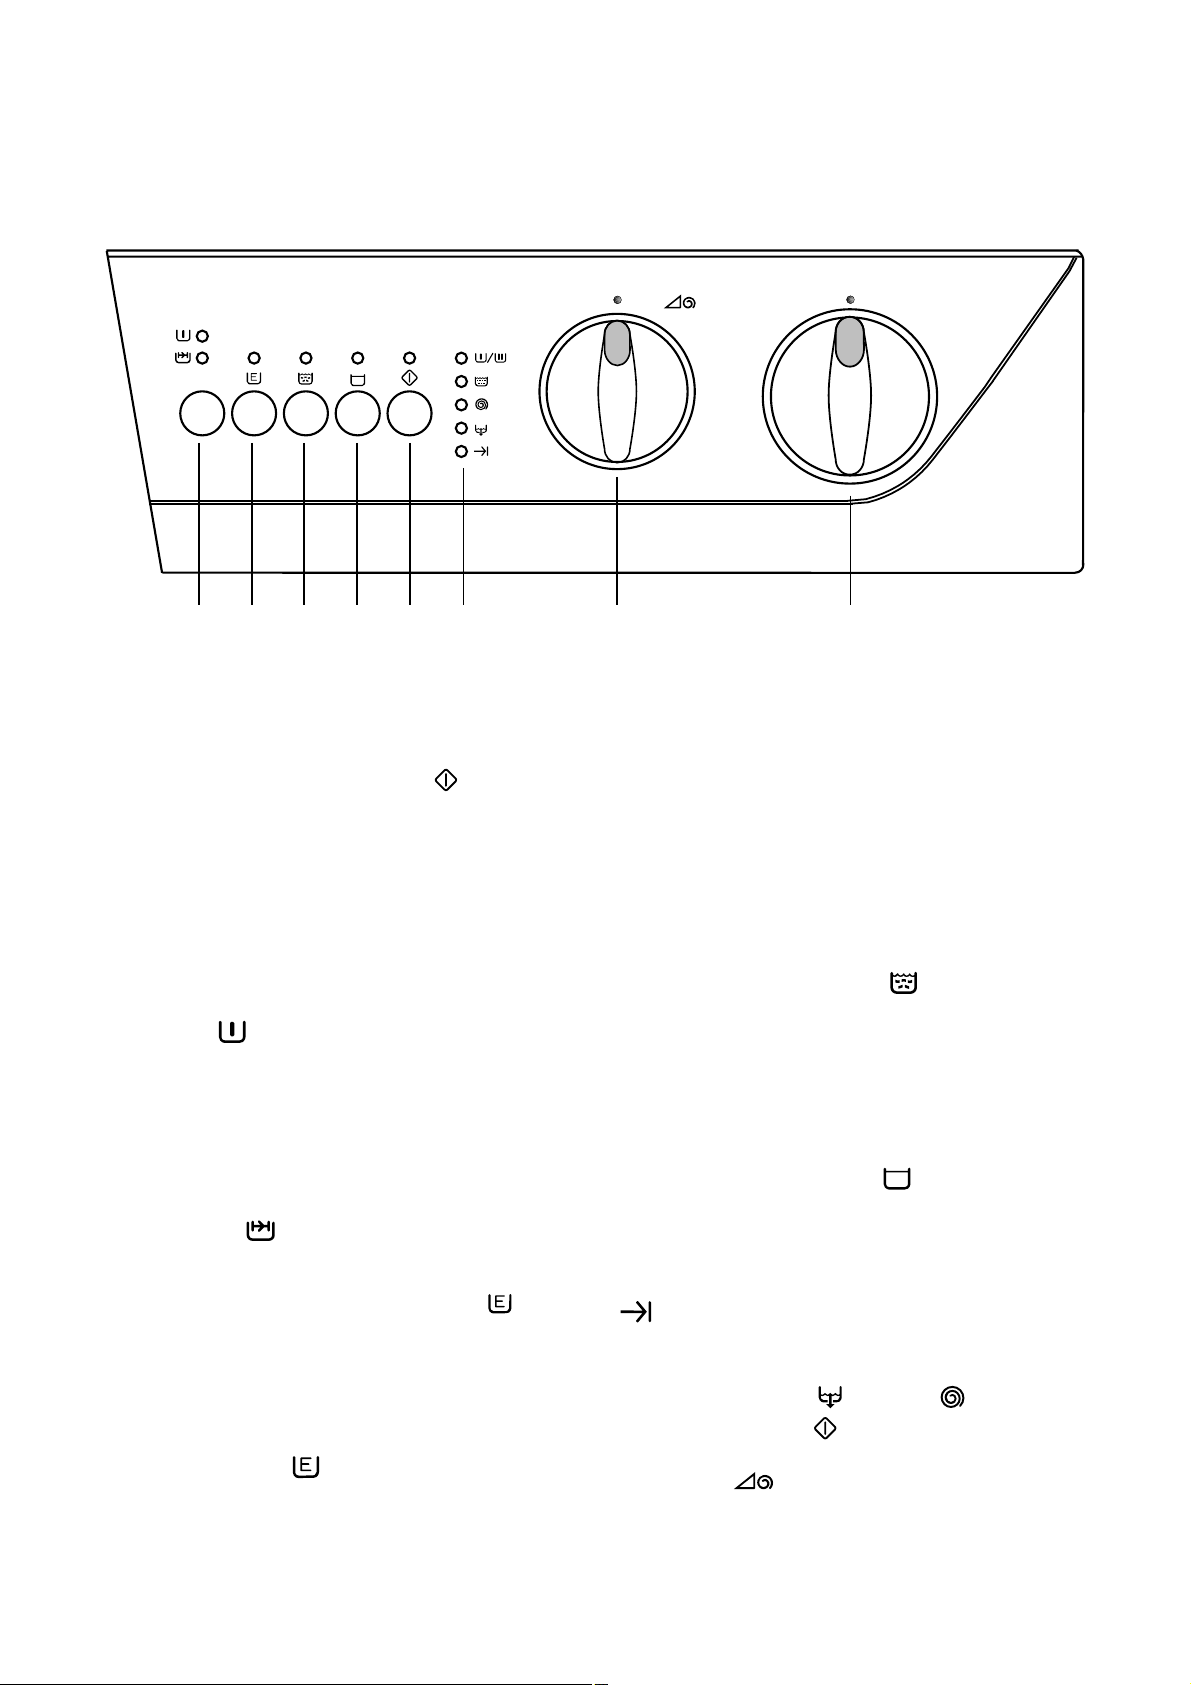
123456 7 8
FE 827 G
Control panel
Page 9
9
ENGLISH
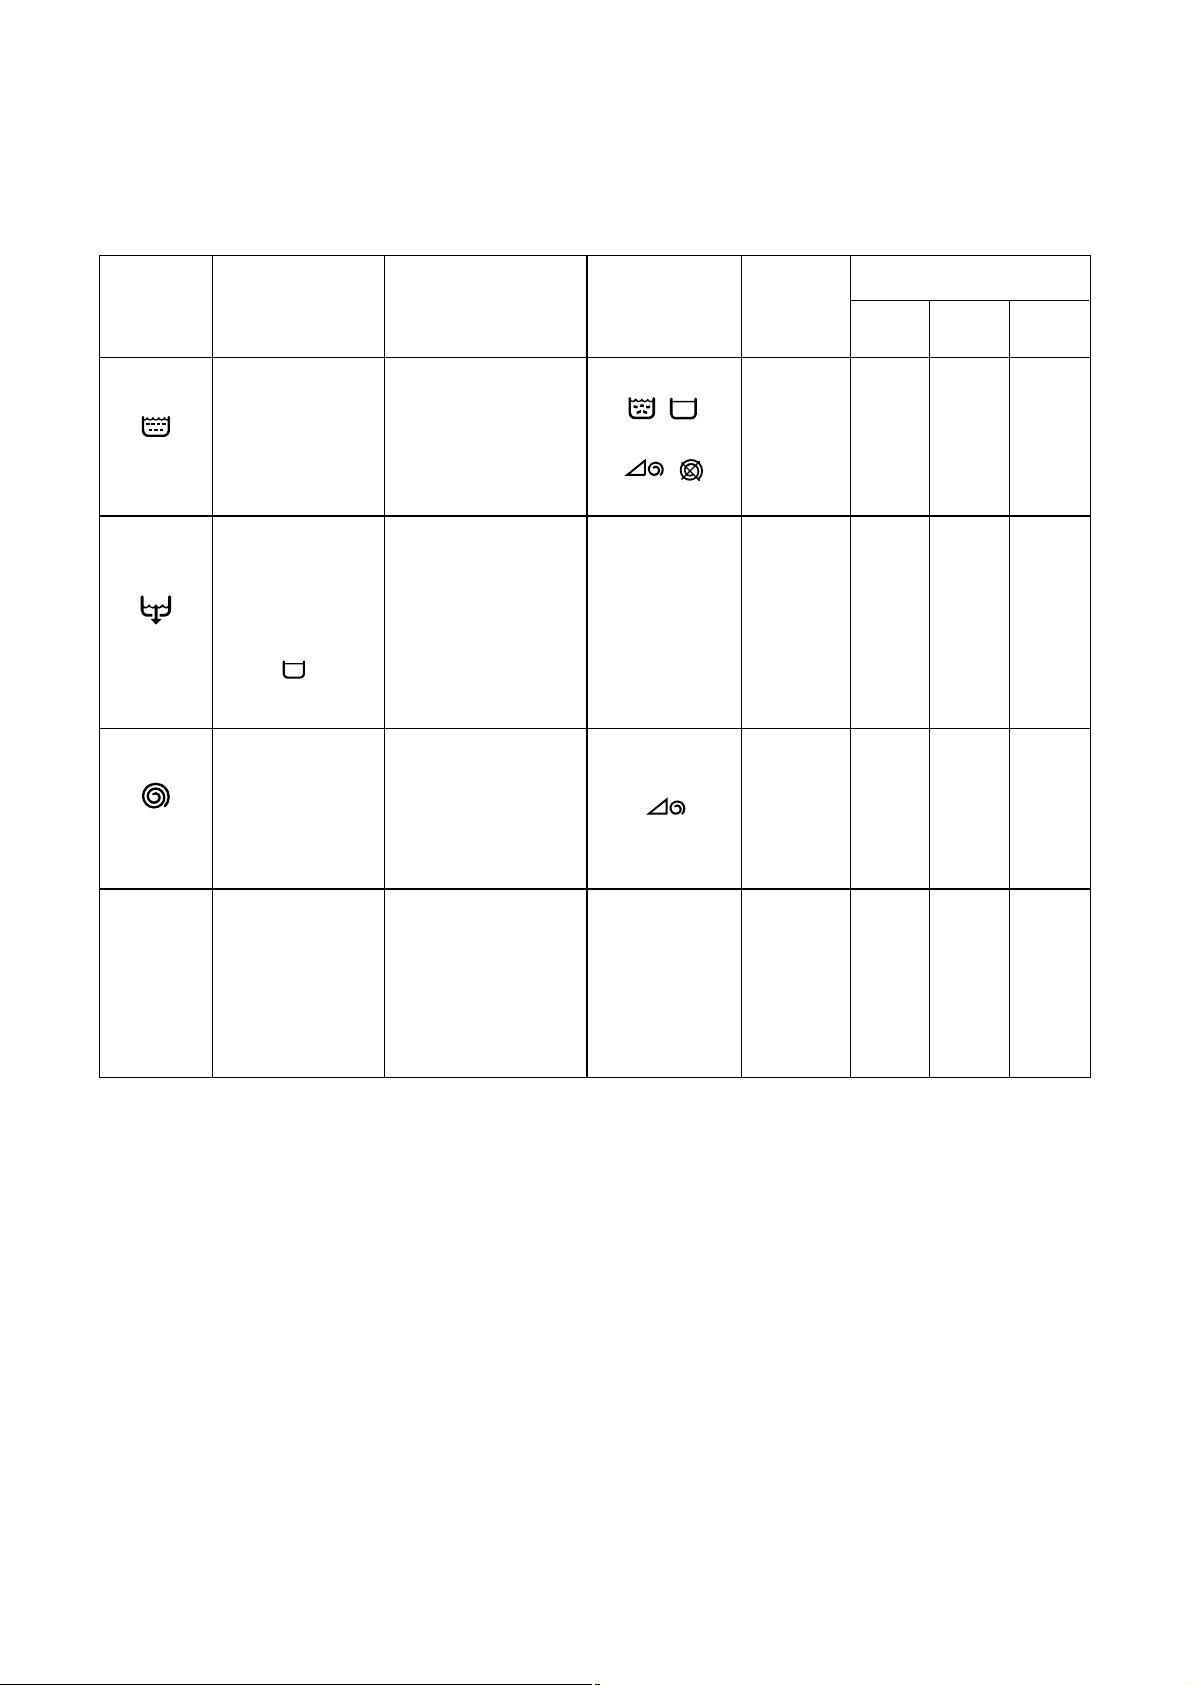
5 “Start/Pause” button
After having selected the programme and the
required options press this button to start the
machine. The corresponding pilot light stops flashing
and remains lit.
To interrupt a programme which is running, depress
the Start/Pause button: the corresponding pilot light
starts to flash.
To restart the programme from the point at which it
was interrupted, press the START/PAUSE button
again.
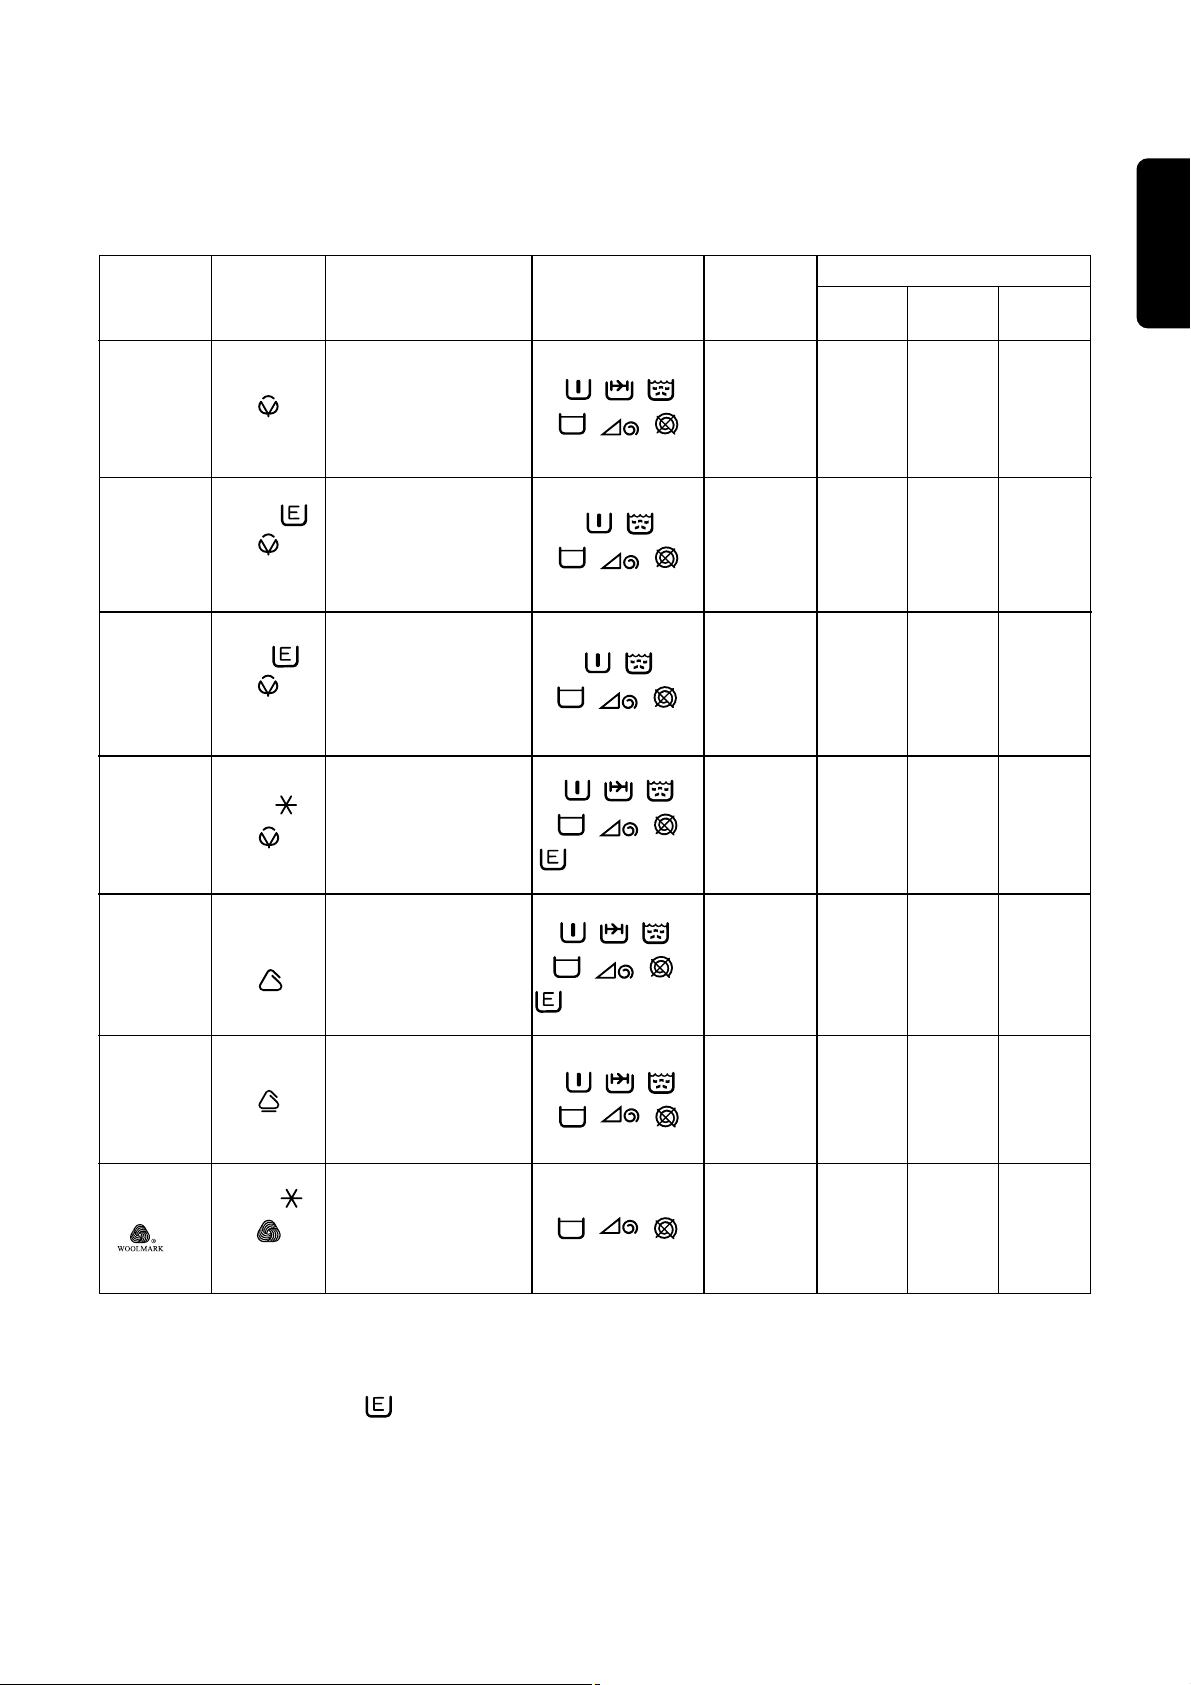
6 Programme progress display
By selecting the wash programme, the pilot lights
corresponding to the various phases making up the
programme come on.
After the machine has started, only the running
phase pilot light stays on.
●
/
: when this light comes on this means
that the machine is performing the washing
phase. If you have selected the “Prewash”
function, this light will be on during the prewash
phase too.
●
= rinses
●
= spin
●
= drain
●
= end of programme
At the end of the programme the pilot light
illuminates.
The pilot light also flashes in the event of
operating problems:
- 4 flashes = the door has not been closed
- 2 flashes = the machine does not empty
- 1 flash = the machine does not fill
To eliminate the problem, see paragraph “Something
not working”.
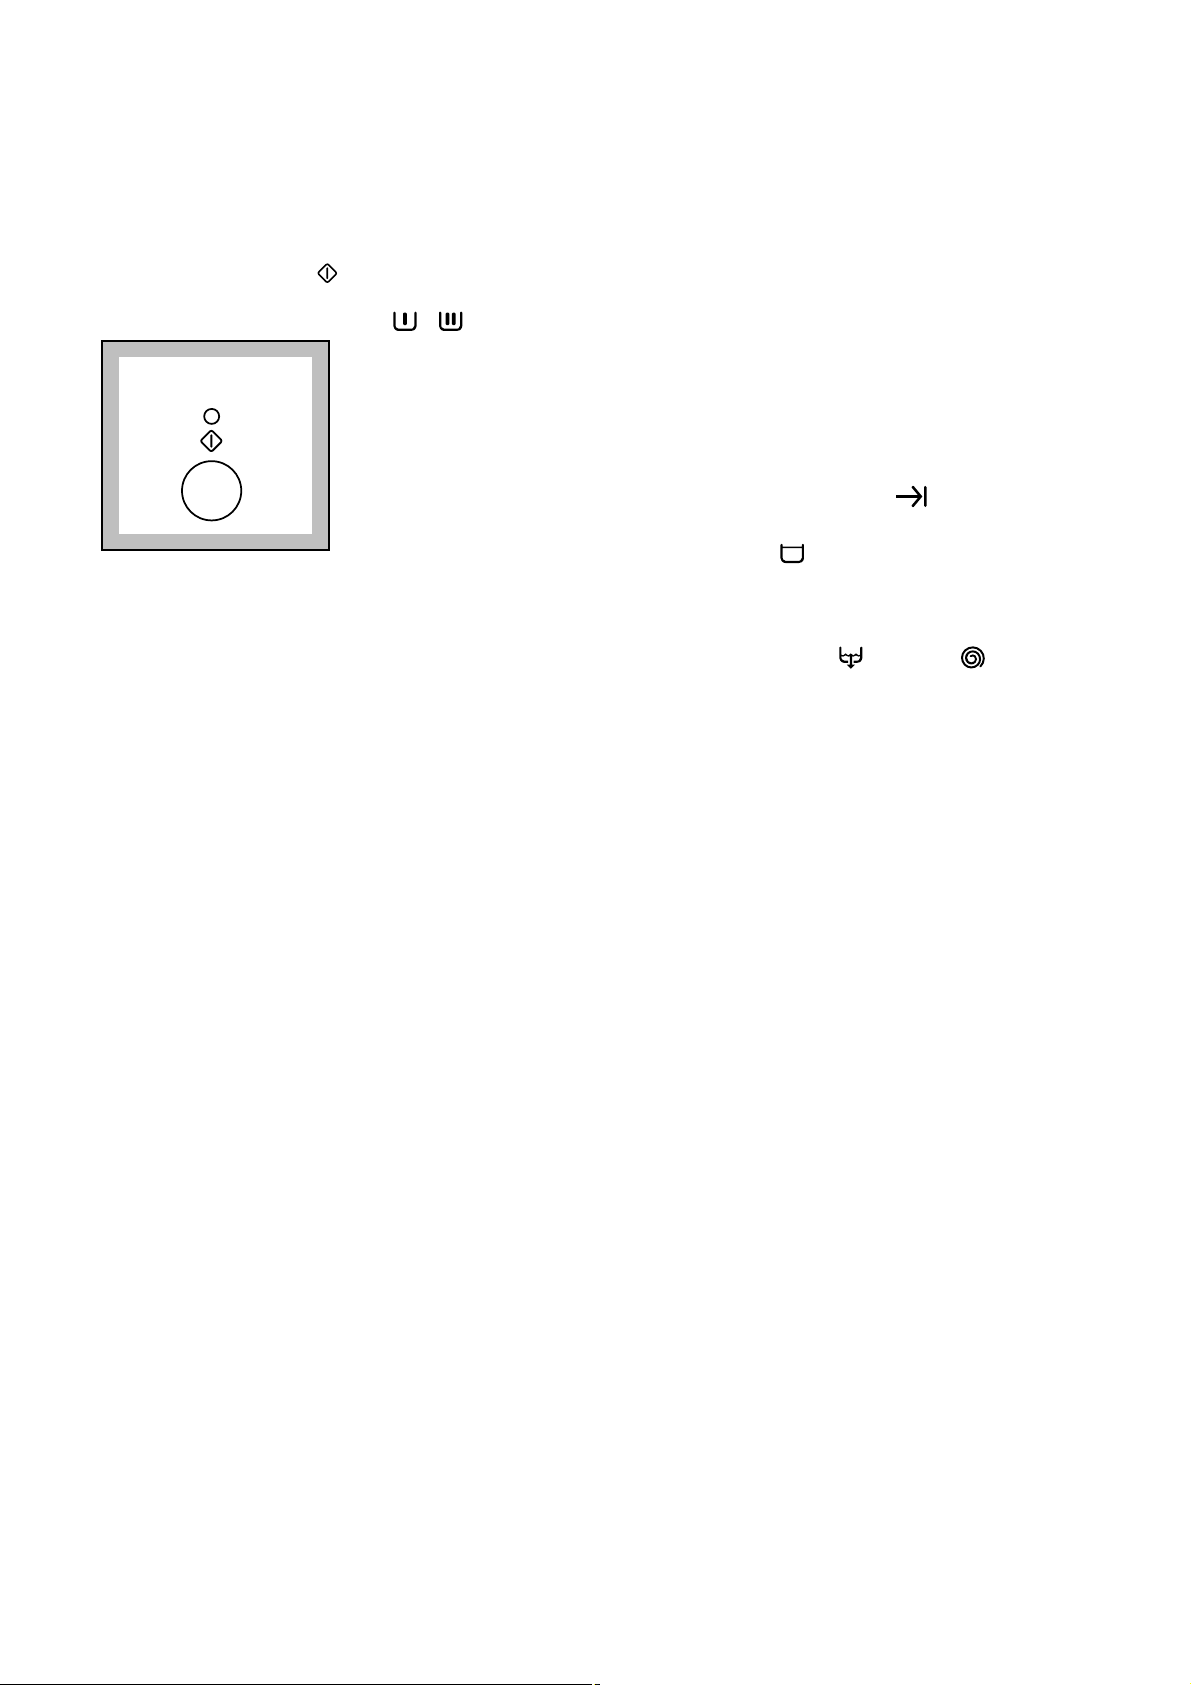
7 “Spin speed” selector dial
By means of this dial you can reduce the final spin
speed or select "NO SPIN" position .
The spin speeds on the dial refer to cotton
programmes.
Mod. FE 827 G
Position 800 corresponds to 700 rpm for delicates.
Position 400 corresponds to 400 rpm for every kind
of fabrics.
Mod. FE 1027 G
Position 1000 corresponds to 900 rpm for synthetics
and wool and to 700 rpm for delicates.
Position 500 corresponds to 500 rpm for synthetics
and wool and to 400 rpm for delicates.
NO SPIN position: by turning the dial to position
the machine will not spin. This function can be used
for extremely delicate items.
The machine will perform 3 extra rinses for cotton
and 1 extra rinse for synthetics.
Important:
If you have selected spin programme and the
selector dial is on position ,
the machine will perform anyway a short spin at 400
rpm.
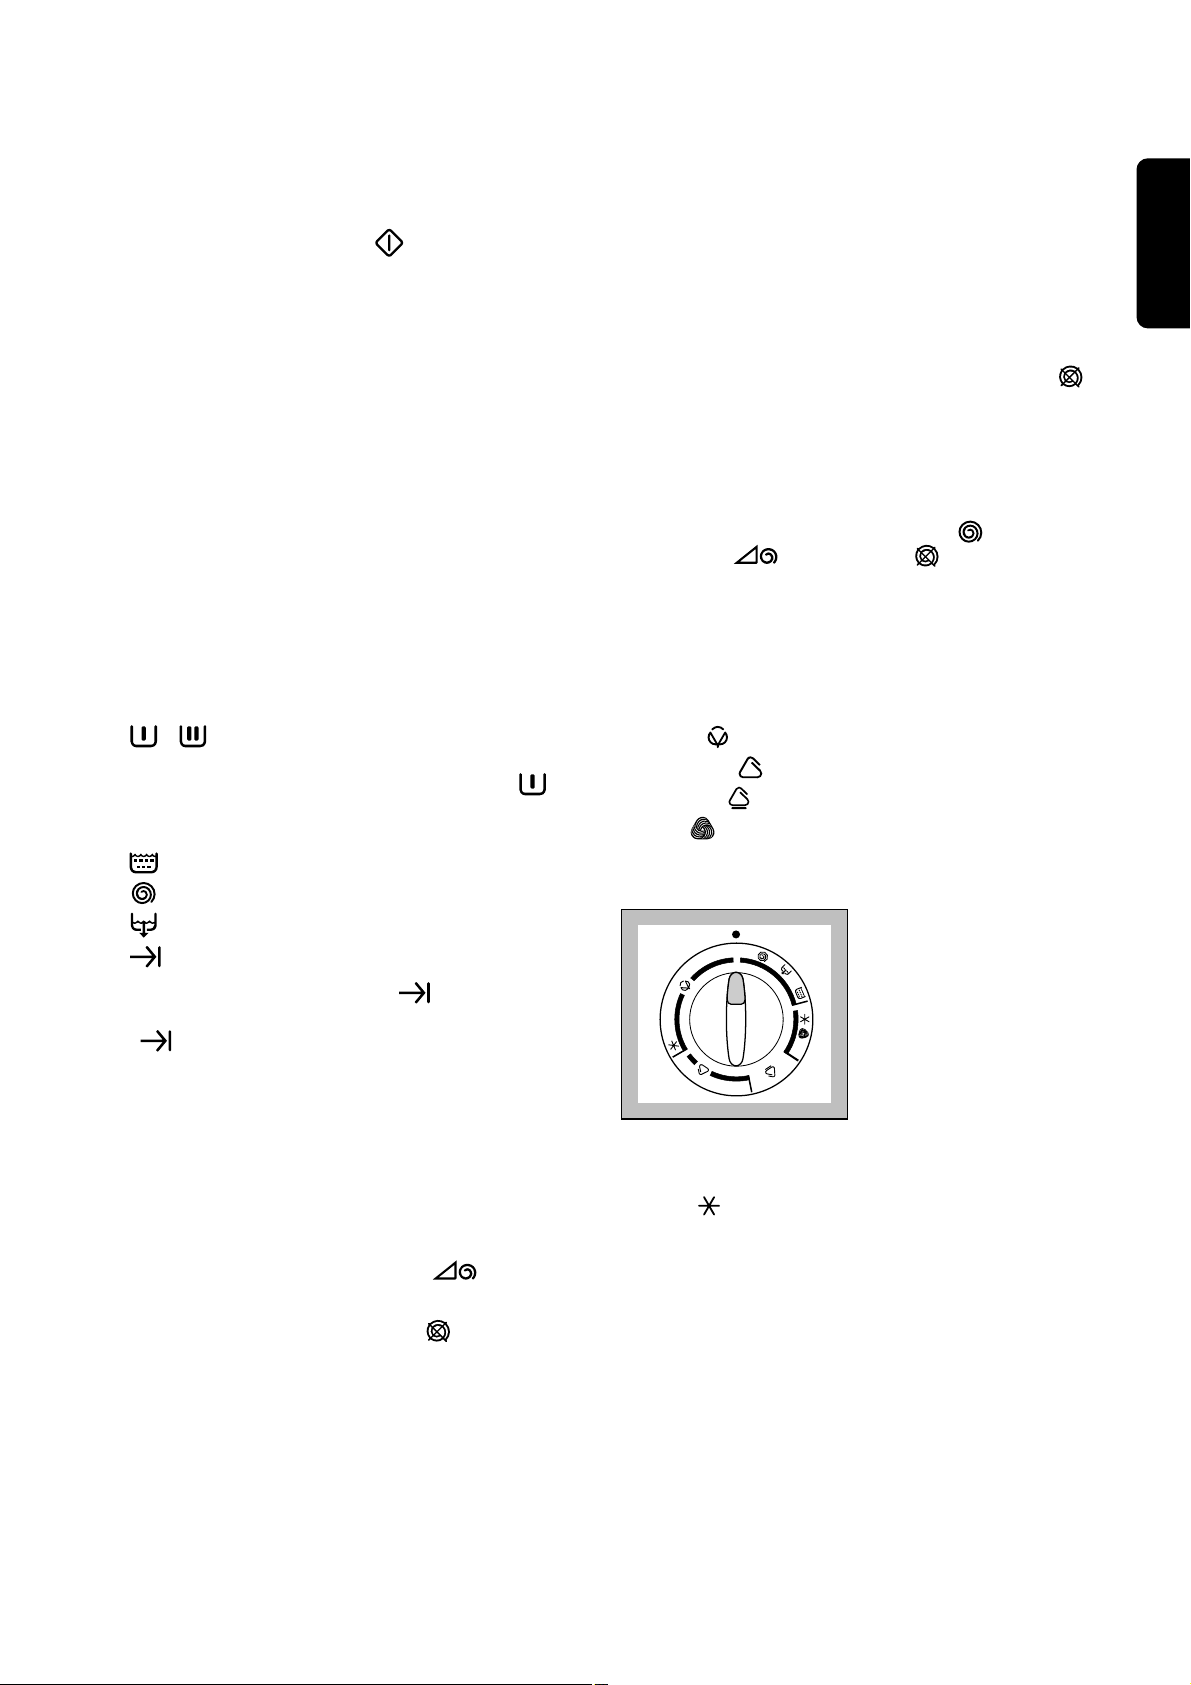
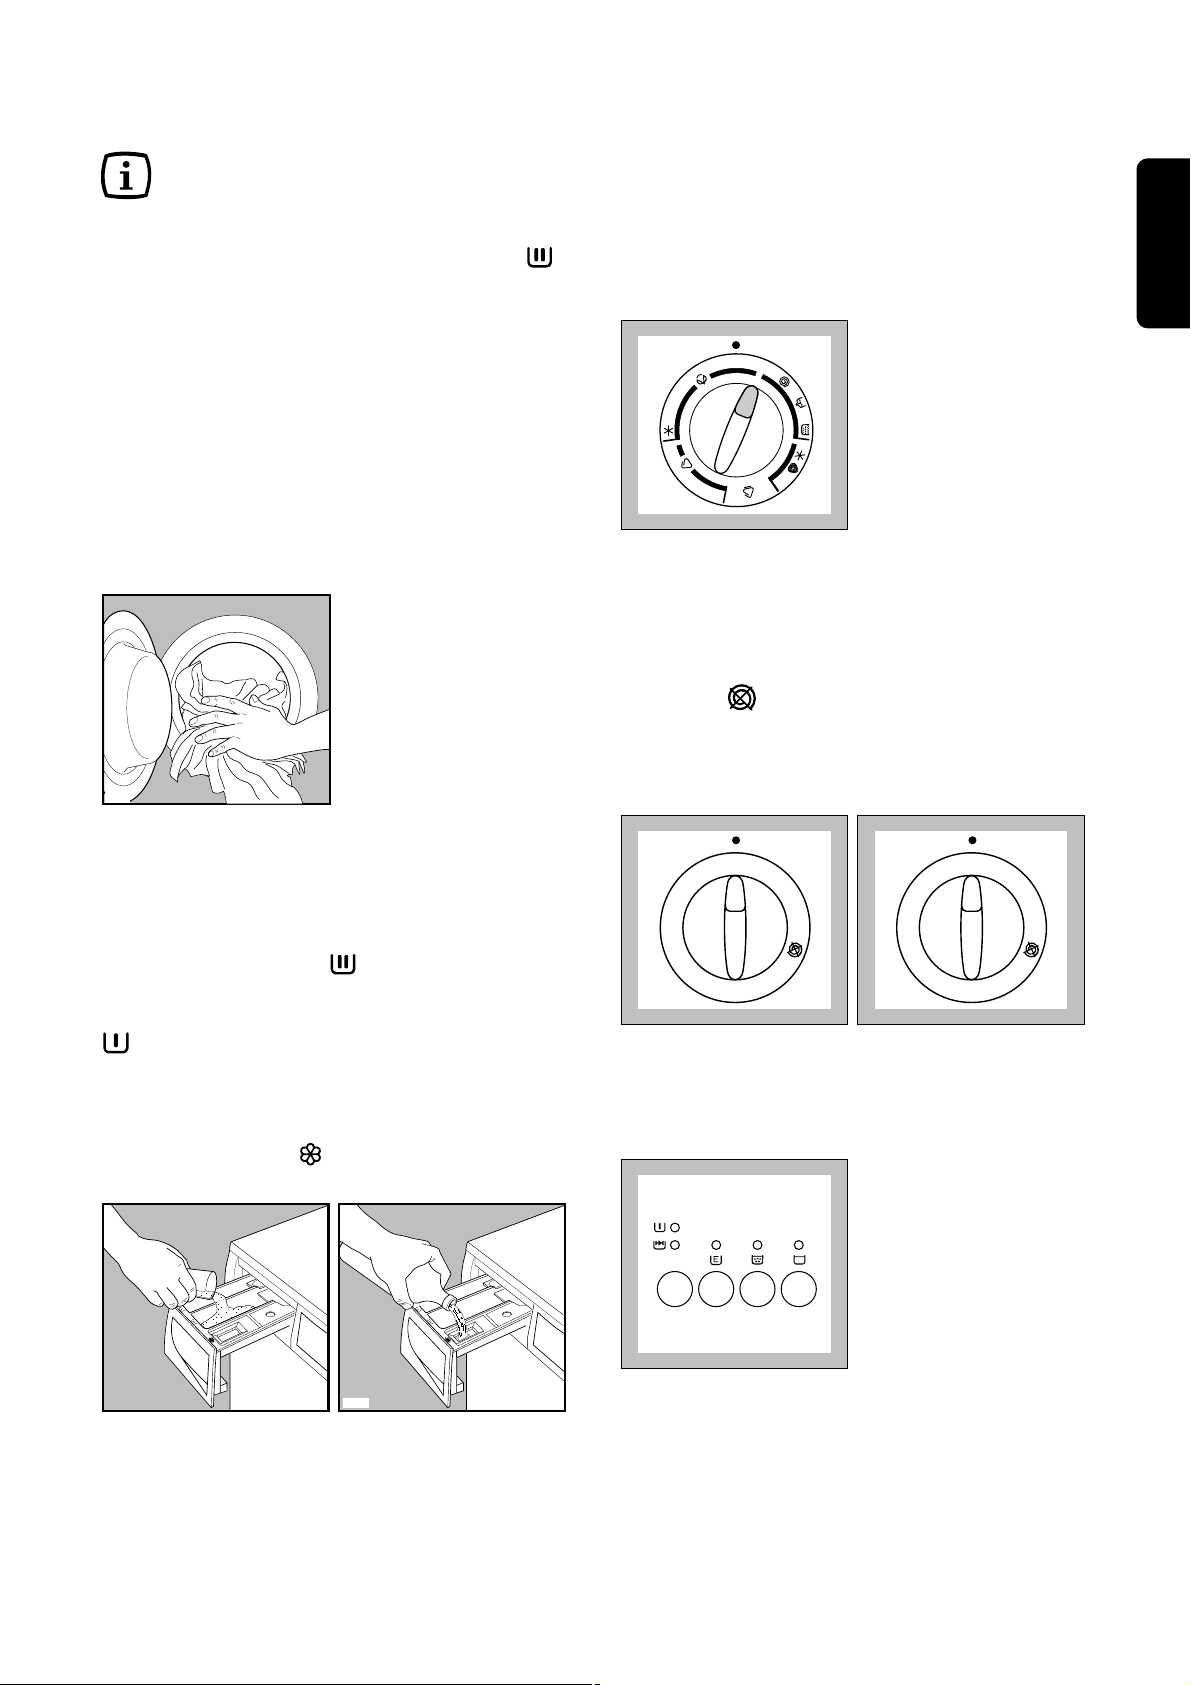
8 Programme selector dial
The selector is divided into 5 sections:
• Cotton
• Synthetics
• Delicates
• Wool
• Special programmes
O Reset programme/OFF
The selector dial can be turned either clockwise or
anticlockwise.
Position corresponds to “cold wash”.
At the end of the programme the selector dial
must be turned to position O.
Attention!
If during a washing programme the selector dial is
turned to another programme, the pilot lights of the
programme progress display start to flash. The
machine will not perform the new selected
programme.
O
9
0
6
0
4
0
3
0
6
0
4
0
3
0
4
0
3
0
3
0
Page 10

10
Washing hints
Sorting the laundry
Follow the wash code symbols on each garment
label and the manufacturer’s washing instructions.
Sort the laundry as follows:
whites, coloureds, synthetics, delicates, woollens.
Temperatures
90°
for normally soiled white cottons and linen
(e.g. tea cloths, towels, tablecloths,
sheets...)
60° for normally soiled, colour fast garments
(e.g. shirts, night dresses, pyjamas....) in
linen, cotton or synthetic fibres and for
lightly soiled white cotton (e.g. underwear).
(cold) for delicate items (e.g. net curtains), mixed
30°-40° laundry including synthetic fibres and
woollens bearing the label «pure new
wool, machine washable, non-shrink».
The wool wash cycle of this machine has
been approved by Woolmark for the
washing of machine washable Woolmark
products provided that the garments are
washed according to the instructions on
the garment label and those issued by the
manufacturer of this washing machine.
M9604.
Before loading the laundry
Never wash whites and coloureds together. Whites
may lose their “whiteness” in the wash.
New coloured items may run in the first wash; they
should therefore be washed separately the first time.
Make sure that no metal objects are left in the
laundry (e.g. hair clips, safety pins, pins).
Button up pillowcases, close zip fasteners, hooks
and poppers. Tie any belts or long tapes.
Remove persistent stains before washing. Rub
particularly soiled areas with a special detergent or
detergent paste.
Treat curtains with special care. Remove hooks or
tie them up in a bag or net.
Maximum loads
Recommended loads are indicated in the
programme charts.
General rules:
Cotton, linen: drum full but not too tightly packed;
Synthetics: drum no more than half full;
Delicate fabrics and woollens: drum no more than
one third full.
Washing a maximum load makes the most efficient
use of water and energy.
For heavily soiled laundry, reduce the load size.
Laundry weights
The following weights are indicative:
bathrobe 1200 g
napkin 100 g
quilt cover 700 g
sheet 500 g
pillow case 200 g
tablecloth 250 g
towelling towel 200 g
tea cloth 100 g
night dress 200 g
ladies’ briefs 100 g
man’s work shirt 600 g
man’s shirt 200 g
man’s pyjamas 500 g
blouse 100 g
men’s underpants 100 g
Removing stains
Stubborn stains may not be removed by just water
and detergent. It is therefore advisable to treat them
prior to washing.
Blood: treat fresh stains with cold water. For dried
stains, soak overnight in water with a special
detergent then rub in the soap and water.
Oil based paint: moisten with benzine stain
remover, lay the garment on a soft cloth and dab the
stain; treat several times.
Dried grease stains: moisten with turpentine, lay
the garment on a soft surface and dab the stain with
the fingertips and a cotton cloth.
Rust: oxalic acid dissolved in hot water or a rust
removing product used cold. Be careful with rust
stains which are not recent since the cellulose
structure will already have been damaged and the
fabric tends to hole.
Mould stains: treat with bleach, rinse well (whites
and fast coloureds only).
Grass: soap lightly and treat with bleach (whites and
fast coloureds only).
Ball point pen and glue: moisten with acetone (*),
lay the garment on a soft cloth and dab the stain.
Page 11

11
ENGLISH
Lipstick: moisten with acetone as above, then treat
stains with methylated spirits. Remove any residual
marks from white fabrics with bleach.
Red wine: soak in water and detergent, rinse and
treat with acetic or citric acid, then rinse. Treat any
residual marks with bleach.
Ink: depending on the type of ink, moisten the fabric
first with acetone (*), then with acetic acid; treat any
residual marks on white fabrics with bleach and then
rinse thoroughly.
Tar stains: first treat with stain remover, methylated
spirits or benzine, then rub with detergent paste.
(*) do not use acetone on artificial silk.
Detergents and additives
Good washing results also depend on the choice of
detergent and use of the correct quantities to avoid
waste and protect the environment. Although
biodegradable, detergents contain substances
which, in large quantities, can upset the delicate
balance of nature.
The choice of detergent will depend on the type of
fabric (delicates, woollens, cottons, etc.), the colour,
washing temperature and degree of soiling.
All commonly available washing machine detergents
may be used in this appliance:
– powder detergents for all types of fabric,
– powder detergents for delicate fabrics (60°C max)
and woollens,
– liquid detergents, preferably for low temperature
wash programmes (60°C max) for all types of
fabric, or special for woollens only.
The detergent and any additives must be placed in
the appropriate compartments of the dispenser
drawer before starting the wash programme.
If using concentrated powder or liquid detergents, a
programme without prewash must be selected.
Pour liquid detergent into the dispenser drawer
compartment marked just before starting the
programme.
Any fabric softener or starching additives must be
poured into the compartment marked before
starting the wash programme.
Follow the product manufacturer’s
recommendations on quantities to use and do not
exceed the «MAX» mark in the detergent
dispenser drawer.
Quantity of detergent to be used
The type and quantity of detergent will depend on
the type of fabric, load size, degree of soiling and
hardness of the water used.
Water hardness is classified in so-called “degrees”
of hardness. Information on hardness of the water in
your area can be obtained from the relevant water
supply company, or from your local authority.
Follow the product manufacturers’ instructions on
quantities to use.
Use less detergent if:
– you are washing a small load,
– the laundry is lightly soiled,
– large amounts of foam form during washing.
Degrees of water hardness
Level Characteristic
Degrees
German
°dH
French
°T.H.
soft
medium
hard
very hard
0- 7
8-14
15-21
more
than 21
0-15
16-25
26-37
more
than 37
1
2
3
4
Page 12
12
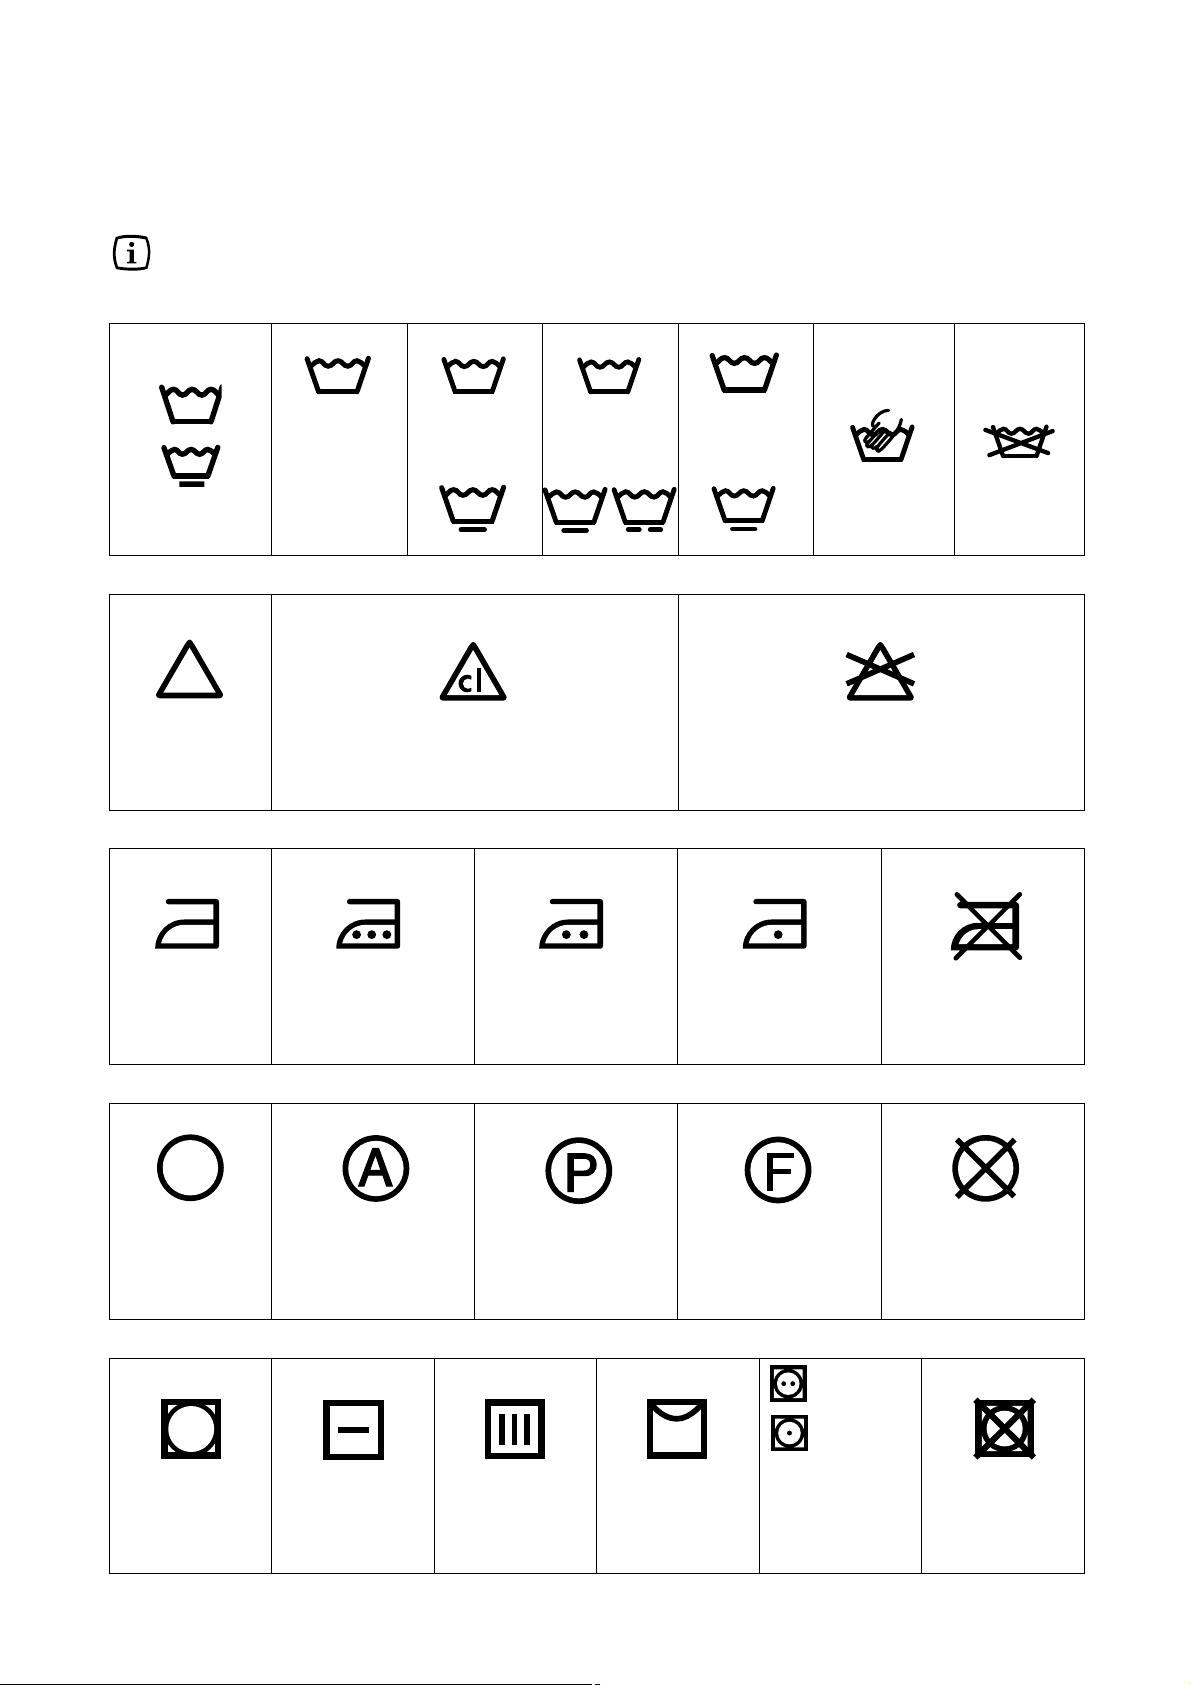
International wash code symbols
95
60
60
40
40
40
30
30
These symbols appear on fabric labels, in order to help you choose the best way to treat your laundry.
Energetic wash
Max. wash
temperature
95°C
Delicate wash
Bleaching Bleach in cold water Do not bleach
Ironing Hot iron
max 200°C
Max. wash
temperature
60°C
Max. wash
temperature
40°C
Warm iron
max 150°C
Max. wash
temperature
30°C
Hand wash Do not
Lukewarm iron
max 110°C
wash
at all
Do not iron
Dry cleaning Dry cleaning
in all solvents
Drying Flat On the line On clothes
Dry cleaning in
perchlorethylene,
petrol, pure alcohol,
R 111 & R 113
hanger
Dry cleaning
in petrol,
pure alcohol
and R 113
Tumble dry
Do not
dry clean
high
temperature
low
temperature
Do not
tumble dry
Page 13
13
ENGLISH
4. Select the desired programme
Turn the programme selector dial to the desired
position.
The lights corresponding to the different phases
making up the selected programme light on.
The light of the START/PAUSE button starts to flash.
5. Select the spin speed or “No Spin”
option
Turn the spin speed selector dial to the required
position.
FE 827 G FE 1027 G
6. Select the required options
The light corresponding to the depressed button
illuminates.
1
0
0
0
9
0
0
7
0
0
6
0
0
5
0
0
8
0
0
7
0
0
6
0
0
5
0
0
4
0
0
O
9
0
6
0
4
0
3
0
6
0
4
0
3
0
4
0
3
0
3
0
Operating sequence
Before the first wash we recommend that you pour 2
litres of water into the main wash compartment
of the detergent drawer in order to activate the ECO
valve. Then run a cotton cycle at 90°C, with the
machine empty, in order to remove any
manufacturing residue from the drum and tub.
Pour half a measure of detergent into the main wash
compartment and start up the machine.
1. Place the laundry in the drum
Open the door.
Place the laundry in the drum, one item at a time,
shaking them out as much as possible.
Close the door.
2. Measure out the detergent
Pull out the dispenser drawer until it stops. Measure
out the amount of detergent recommended by the
manufacturer in a graduated cup and pour it into the
main wash compartment .
If you have selected the Prewash option, pour
detergent into the appropriate compartment marked
.
3. Measure out the additive
If required, pour fabric softener into the
compartment marked , without exceeding the
«MAX» mark.
C0065
C0064
P0004
Page 14
14
7. Start the programme
Depress START/PAUSE button, the corresponding
pilot light stops flashing. The door locked light
illuminates and only the pilot light
/
remains lit.
8. Altering an option or a programme
It is possible to change any option before the
programme carries it out.
Before you make any change, you must pause the
washing machine by pressing the “Start/Pause”
button.
Changing a running programme is possible only by
resetting it.
Turn the programme selector dial to “O” and then to
the new programme position.
Start the new programme by depressing the
“Start/Pause” button. The washing water in the tub
will not emptied out .
9. Interrupting a programme
Depress the START/PAUSE button to interrupt a
programme which is running, the corresponding light
starts to flash. Depress the same button again to
restart the programme.
10. Opening the door after the
programme has started
First set the machine to PAUSE by pressing the
START/PAUSE button.
The door can be opened when the door locked light
has gone out.
If the door does not open (the door locked light
remains alight), this means that the water
temperature is above 55°C, that the water level is
above the bottom edge of the door or that the drum
is turning.
If you cannot open the door but you need to open it
you have to switch the machine off by turning the
programme selector dial to “O”. After about 3
minutes the door can be opened (pay attention to
the water level and temperature!).
Select the programme again and depress
START/PAUSE to restart it.
11. At the end of the programme
The machine stops automatically. The Start/Pause
pilot light goes offand the End pilot light comes
on.
If the Rinse Hold option has been selected, the
door locked light is on to indicate that the water
must be emptied out before opening the door.
To do this turn the programme selector dial to “O”
and then to programme (drain) or (spin).
The spin programme is performed at the maximum
speed. In order to avoid any creasing in synthetic,
delicate and wool items, the spin speed can be
reduced by means of the relevant selector dial.
The door can only be opened after the door
locked light has gone out.
Switch the machine off by turning the programme
selector dial to “O”.
Remove the laundry from the drum and carefully
check that the drum is empty so as to avoid any
forgotten items being damaged in a subsequent
wash (e.g. shrinking) or their colour running into a
load of whites.
If you do not intend to carry out another wash, close
the water tap.
Leave the door open to prevent the formation of
mildew and unpleasant smells.
Page 15
15
ENGLISH
Programme table
* The consumption data shown on this chart is to be considered purely indicative, as it may vary depending
on the quantity and type of laundry, on the inlet water temperature and on the ambient temperature. It
refers to the highest temperature for each wash programme.
** In compliance with EC directive 92/75, the consumption figures indicated on the energy label refer to the
wash programme 60°C
+
for cotton.
WASHING PROGRAMMES
Fabrics
Temperature/
Programme
Type of laundry
Additional
functions
Wash load
max.
Energy
kWh
WaterltDuration
min.
Consumptions*
Coloured
cotton
Coloured items, for
example underwear,
shirts, blouses
White
cotton
60° +
**
(COTTON)
Normally soiled
items, for example
hand towels, sheets,
underwear,
tablecloths, shirts,
blouses
Synthetics
30°-40°
(DELICATES)
30° -
(WOOL)
Shirts, blouses,
underwear, mixed
fabrics
Acrylic, viscose,
polyester items,
curtains
Special programme
for garments bearing
the “ Pure new wool,
non-shrink, machine
washable” label
Delicates
Wool
White
cotton
Sheets, household
linen, towels,
tablecloths
60° - 90°
(
COTTON)
White
cotton
economy
Slightly soiled sheets,
household linen,
underwear
90° +
(
COTTON)
30°- 40° -
60°
(
COTTON)
30°-40°-
60°
(SYNTHETIC)
7 kg
3 kg
0.95 55 90
3 kg
0.55 57 65
2 kg
0.35 55 50
7 kg
2.3 57 150
1.14 54 140
7 kg
1.3 54 120
7 kg
1.55 54 140
(only with 40°C)
(only with 60°C)
Page 16
16
Programme table
SPECIAL PROGRAMMES
* The consumption data shown on this chart is to be considered purely indicative, as it may vary depending on
the quantity and type of laundry, on the inlet water temperature and on the ambient temperature.
Programme
selector dial
position
Rinses
Programme
Programme
description
Additional
functions
Wash load
max.
Energy
kWh
WaterltDuration
min.
Consumptions*
For rinsing hand
washed items
3 rinses with liquid
additive, if required
Short spin at max.
speed
7 kg 0.06 59 30
/
--2
7 kg
--6
Drain
For emptying out
the water of the
last rinse of
programmes with
option
Separate spin for
cotton,
synthetics,
delicates and
wool
Water draining
Short spin at max. speed
Spin
/
---
For cancelling
the programme
which is running
or to switch the
machine off.
O
Reset/Off
Page 17
17
ENGLISH
1. Bodywork
Clean the outside of the machine with soap and
water only. Rinse with clean water and dry with a
soft cloth.
Important: do not use methylated spirits, solvents or
similar products to clean the bodywork.
2. Door seal
Check from time to time the door seal and eliminate
eventual possible objects that could be trapped in
the fold.
3. Detergent dispenser drawer
After a while, detergents and fabric softeners leave
deposits in the drawer.
Clean the drawer from time to time by rinsing it
under a running tap. To remove the drawer from the
machine, press the button in the rear left-hand
corner.
To facilitate cleaning, the top part of the additive
compartments can be removed.
C0067
C0066
P1050
Detergent can also accumulate inside the drawer
recess: clean it with an old toothbrush. Refit the
drawer after cleaning.
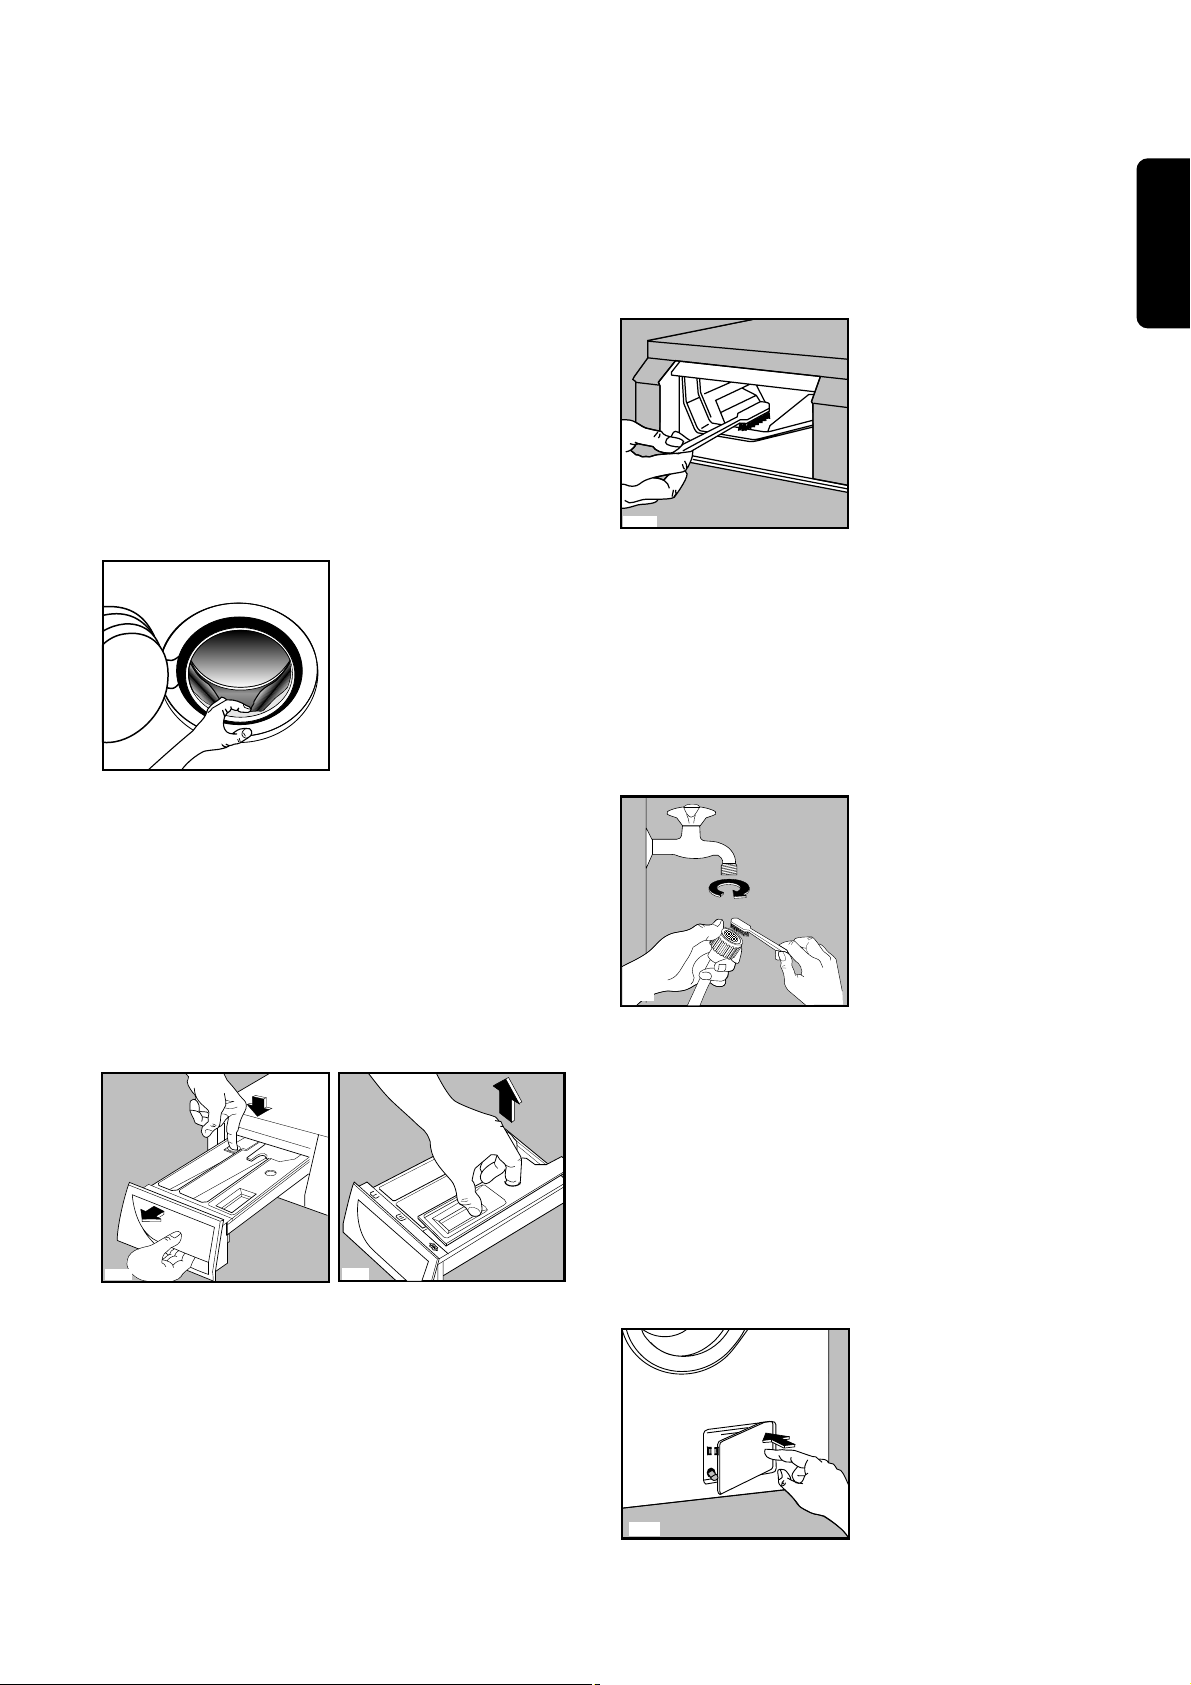
4. Water inlet filter
If you notice that the machine is taking longer to fill,
check that the filter in the water inlet hose is not
blocked.
Turn off the water tap.
Unscrew the hose from the tap.
Clean the filter with a stiff brush.
Screw the hose back onto the tap.
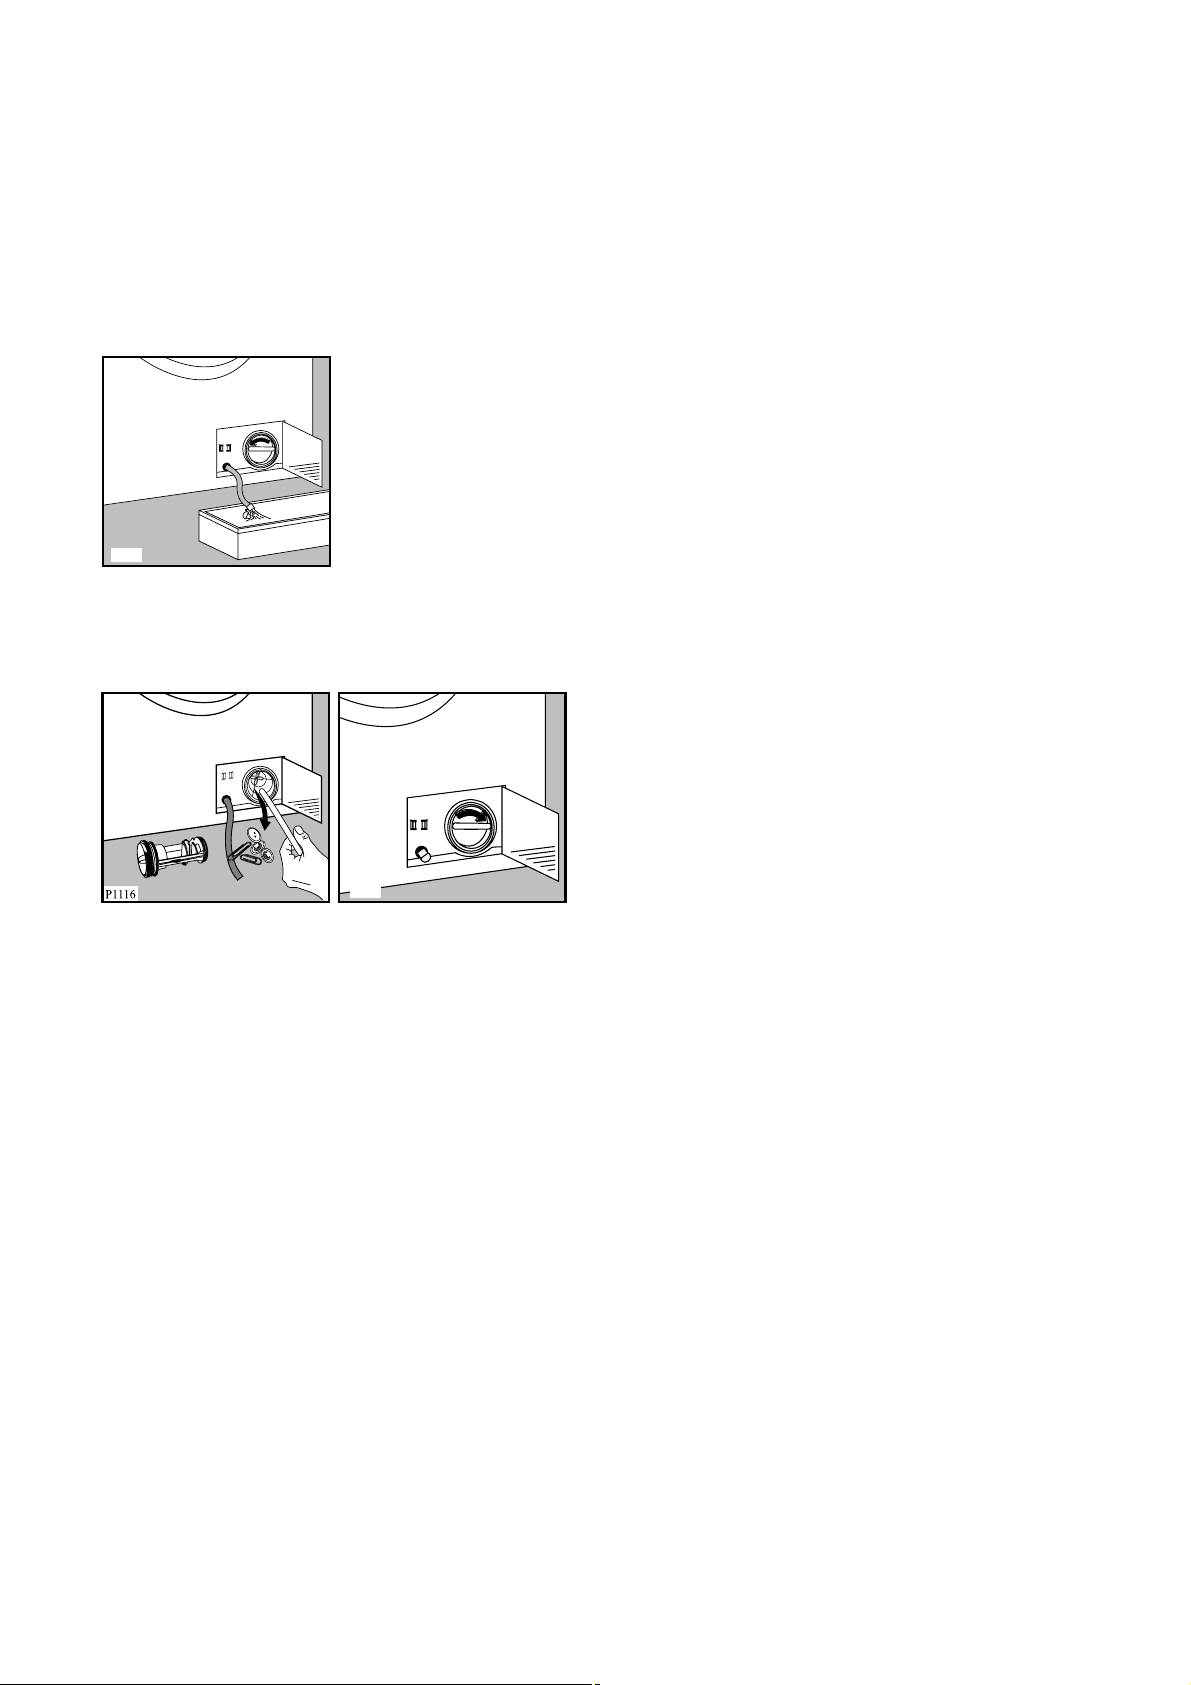
5. Drain pump
The pump should be inspected if
• the machine does not empty and/or spin
• the machine makes an unusual noise during
draining due to objects such as safety pins, coins
etc. blocking the pump.
Proceed as follows:
• Disconnect the appliance.
• If necessary wait until the water has cooled down.
• Open the pump door.
P1114
P1090
P0038
Maintenance
Page 18
18
• Place a bowl on the floor to collect any spillage.
• Pull out the emergency emptying hose, place it in
the bowl and remove its cap.
• When no more water comes out, unscrew the
pump cover and remove it.
• Remove any objects from the pump impeller by
rotating it.
• Put the cap back on the emergency emptying hose
and place the latter back in its seat.
• Screw the pump cover fully in.
• Close the pump door.
6. Emergency emptying out
If the water is not discharged, proceed as follows to
empty out the machine:
• pull out the plug from the power socket;
• close the water tap;
• if necessary, wait until the water has cooled down;
• open the pump door;
• place a bowl on the floor and place the end of the
emergency emptying hose into the bowl. Remove
its cap. The water should drain by gravity into the
bowl. Whe the bowl is full, put the cap back on the
hose. Empty the bowl. Repeat the procedure until
water stops flowing out;
• clean the pump if necessary as previously
described;
• replace the emergency emptying hose in its seat
after having plugged it;
• screw the pump cover again and close the door.
P1117
P1115
7. Frost precautions
If the machine is installed in a place where the
temperature could drop below 0°C, proceed as
follows:
• Remove the plug from the socket.
• Close the water tap and unscrew the water inlet
hose from the tap.
• Place the end of the emergency emptying hose
and that of the inlet hose in a bowl placed on the
floor and let water drain out.
• Screw the water inlet hose back on and reposition
the emergency emptying hose after having put the
cap on again.
By doing this, any water remaining in the machine is
removed, avoiding the formation of ice and,
consequently, breakage of the affected parts.
When you use the machine again, make sure that
the ambient temperature is above 0°C.
Important!
Every time you drain the water through the
emergency emptying hose you must pour 2 litres of
water into the main wash compartment of the
detergent drawer and then run the drain
programme. This will activate the ECO valve
avoiding that part of the detergent remains unused
at next washing.
Page 19
19
ENGLISH
Problems which you can resolve yourself, before calling the After Sales Service.
During machine operation it is possible that the END light starts to flash:
4 flashes= the door has not been closed
2 flashes= the machine does not empty
1 flash= the machine does not fill.
Once the problem has been eliminated, press the START/PAUSE button to restart the programme. If after all
checks, the problem persists, contact your local Service Centre.
Problem Possible cause
• The machine does not start up:
• The door is not firmly closed.
• The machine is not plugged in or there is no power
at the socket.
• The main fuse has blown.
• The programme selector dial is not positioned
correctly and the START/PAUSE button has not
been
depressed.
• The machine does not fill:
• The water tap is closed.
• The inlet hose is squashed or kinked.
• The filter in the inlet hose is blocked.
• The door is not properly closed.
• The machine fills then empties
immediately:
• The end of the drain hose is too low. Refer to
relevant paragraph in “water drainage” section.
• The machine does not empty and/or
does not spin:
• The drain hose is squashed or kinked.
• A programme which ends with water in tub
(option ) has been selected.
• The option has been selected.
• The drain pump is clogged.
• There is water on the floor:
• Too much detergent or unsuitable detergent
(creates too much foam) has been used.
• Check whether there are any leaks from one of the
inlet hose fittings. It is not always easy to see this
as the water runs down the hose; check to see if it
is damp.
• The drain hose is damaged.
• The cap on the emergency emptying hose has not
been replaced after cleaning the pump.
• Unsatisfactory washing results:
• Too little or too much detergent has been used.
• An unsuitable detergent has been used.
• Stubborn stains have not been treated prior to
washing.
• The correct temperature was not selected.
• Excessive laundry load.
• The machine vibrates or is noisy:
• The transit bolts and packing have not been removed.
• The support feet have not been adjusted.
• The laundry is not evenly distributed in the drum.
• Maybe there is very little laundry in the drum.
Something not working?
Page 20

20
If you are unable to identify or solve the problem,
contact our service centre. Before telephoning,
make a note of the model, serial number and
purchase date of your machine: the Service Centre
will require this information.
Mod. ..........
Prod. No. ...........
Ser. No. .........
M
o
d
. ..........
Prod
. N
o. ...........
S
er. N
o
. .........
P0042 BD
Problem Possible cause
• Water is not visible in the machine:
• The machine, which is the result of modern
technology, runs in a very economical way with
low water consumption. Performance is
nevertheless excellent.
• Spinning starts late or the machine
does not spin:
• The electronic unbalance detection device has cut
in because the laundry is not evenly distributed in
the drum. The laundry is redistributed by reverse
rotation of the drum. This may happen several
times before the unbalance disappears and normal
spinning can resume. If, after 10 minutes, the
laundry is still not evenly distributed in the drum,
the machine will not spin. In this case, redistribute
the load manually and select the spin programme.
• The machine makes an unusual noise
• The machine is fitted with a type of motor which
makes an unusual noise compared with other
traditional motors. This new motor ensures a softer
start and more even distribution of the laundry in
the drum when spinning, as well as increased
stability of the machine.
• Detergent residue is left after the wash
cycle
• This is most probably due to non soluble
components contained in modern detergents. It is
not a sign of inadequate rinsing. Brush or shake
the garments and, if necessary, wash them again.
• Foam remains after the last rinse
• Modern detergents can produce foam even after
rinsing, but this will not affect the quality of the
wash.
• The door will not open:
• The programme is still running, the drum is turning.
• The door lock has not been released.
• The water level is above the bottom edge of the
door.
• The machine is heating the water.
The door can only be opened when the relevant
light has gone out
Page 21

21
Estimado cliente,
Le rogamos leer atentamente estas instrucciones de uso y prestar particular atención a las normas de seguridad
escritas en las primeras páginas. Le aconsejamos conservar estas instrucciones para consultas futuras y darlas al
nuevo usuario en caso de venta del aparato.
Daños de transporte
Al momento del desembalaje, controle que el aparato no esté dañado. Si tiene dudas no lo ponga en
funcionamiento y consulte la asistencia técnica.
Algunos párrafos de este libro de instrucciones han sido identificados con símbolos que tienen el siguiente
significado:
El triángulo de advertencia y/o los términos de señal (¡Atención!, ¡Advertencia!), subrayan instrucciones
muy importantes para Su seguridad o para el buen funcionamiento del aparato. Le rogamos respetarlas.
Las informaciones precedidas por este símbolo completan las instrucciones de uso y de utilización práctica
del aparato.
Este símbolo indica consejos e instrucciones para un empleo económico del aparato que respete el
ambiente.
Nuestra contribución al ambiente:
utilizamos papel reciclado.
Índice
Advertencias y consejos 23
Eliminación 24
Consejos para la protección
del ambiente 25
Características técnicas 25
Instalación 26
Dispositivos de seguridad para el transporte 26
Colocación 26
Carga de agua 26
Descarga de agua 27
Conexión eléctrica 27
Su nueva lavadora 28
Descripción del aparato 28
Cubeta detergente 28
Uso 29
Panel de mandos 29
Mandos 29-30
Consejos para el lavado 31
Selección de las prendas 31
Temperaturas 31
Antes de cargar la ropa 31
Carga máxima de ropa 31
Pesos de la ropa 31
Eliminación de las manchas 31-32
Detergentes y aditivos 32
Símbolos internacionales
para el tratamiento de los tejidos 33
Secuencia de las operaciones 34-35
Programas de lavado 36-37
Mantenimiento 38
Exterior del aparato 38
Puerta 38
Cubeta detergente 38
Filtro del tubo de carga 38
Limpieza de la zona de descarga 38-39
Vaciado de emergencia 39
Precauciones contra el hielo 39
Anomalías de funcionamiento
40
Page 22

Instalación
• Antes del uso, hay que quitar todas las piezas de
embalaje y de transporte; de no hacerlo así, tanto
el aparato como los muebles podrían sufrir graves
daños. Consulte las instrucciones.
• Cualquier trabajo de tipo eléctrico necesario para
la instalación del aparato tendrá que ser realizado
por un electricista especializado o por una persona
competente.
• Cualquier trabajo de tipo hidráulico tendrá que ser
realizado por un fontanero especializado o por una
persona competente.
• Hay que tener cuidado de que el aparato no esté
apoyado sobre el cable de alimentación eléctrica.
• Si la máquina está colocada sobre piso de
alfombra asegúrese de que haya circulación de
aire entre las patas de apoyo y el piso.
Uso
• Este aparato ha sido proyectado para uso
doméstico. No lo use con finalidades diferentes a
aquellas para las cuales ha sido proyectado.
• Lave sólo aquellos tejidos que se pueden lavar en
la lavadora. En caso de dudas siga las
instrucciones que aparecen en la etiqueta del
artículo.
• No sobrecargue el aparato. Siga las instrucciones
contenidas en este manual.
• Las monedas, los imperdibles, los alfileres, los
tornillos, etc. que han quedado en la ropa pueden
provocar graves daños.
• No ponga en el aparato prendas manchadas con
gasolina, alcohol, aguarrás, etc. Si usa estos
productos, antes de introducir las prendas en el
aparato para lavarlas, espere que el producto se
haya evaporado.
• Agrupe las prendas pequeñas como calcetines,
cinturones, etc. en un bolso de tela o en una
funda. Evitará que esta ropa termine entre el cesto
y el tambor.
• Use solamente la cantidad de suavizante indicada
por el productor. Una cantidad excesiva de
producto podría arruinar la ropa.
Advertencias y consejos
22
• Deje la puerta entreabierta cuando no se usa el
aparato. Esto permite una mejor conservación de
la guarnición de la puerta y previene los olores de
moho.
• Antes de abrir la puerta, controle siempre que el
agua haya sido descargada. De lo contrario,
descárguela siguiendo las instrucciones dadas en
el manual de uso.
• Después del uso desenchufe siempre el aparato y
cierre el grifo del agua.
Seguridad en general
• Las reparaciones deben ser efectuadas sólo por
personal especializado. Las reparaciones
inadecuadas pueden causar peligros notables.
Para eventuales reparaciones diríjase a un centro
de asistencia técnica autorizado.
• Nunca desenchufe el aparato tirando del cable de
alimentación, tire directamente del enchufe.
• Durante el lavado a altas temperaturas el vidrio de
la puerta está caliente. ¡No lo toque!
Seguridad para los niños
• Los niños no se dan cuenta de los peligros de los
aparatos eléctricos. Cuando el aparato está
funcionando vigile atentamente a los niños y no los
deje jugar con el aparato.
• Las piezas de embalaje (por ej. películas,
poliestireno), pueden ser peligrosas para los niños.
¡Peligro de sofocación! Tenga las piezas fuera del
alcance de los niños.
• Conserve los detergentes en un lugar seguro fuera
del alcance de los niños.
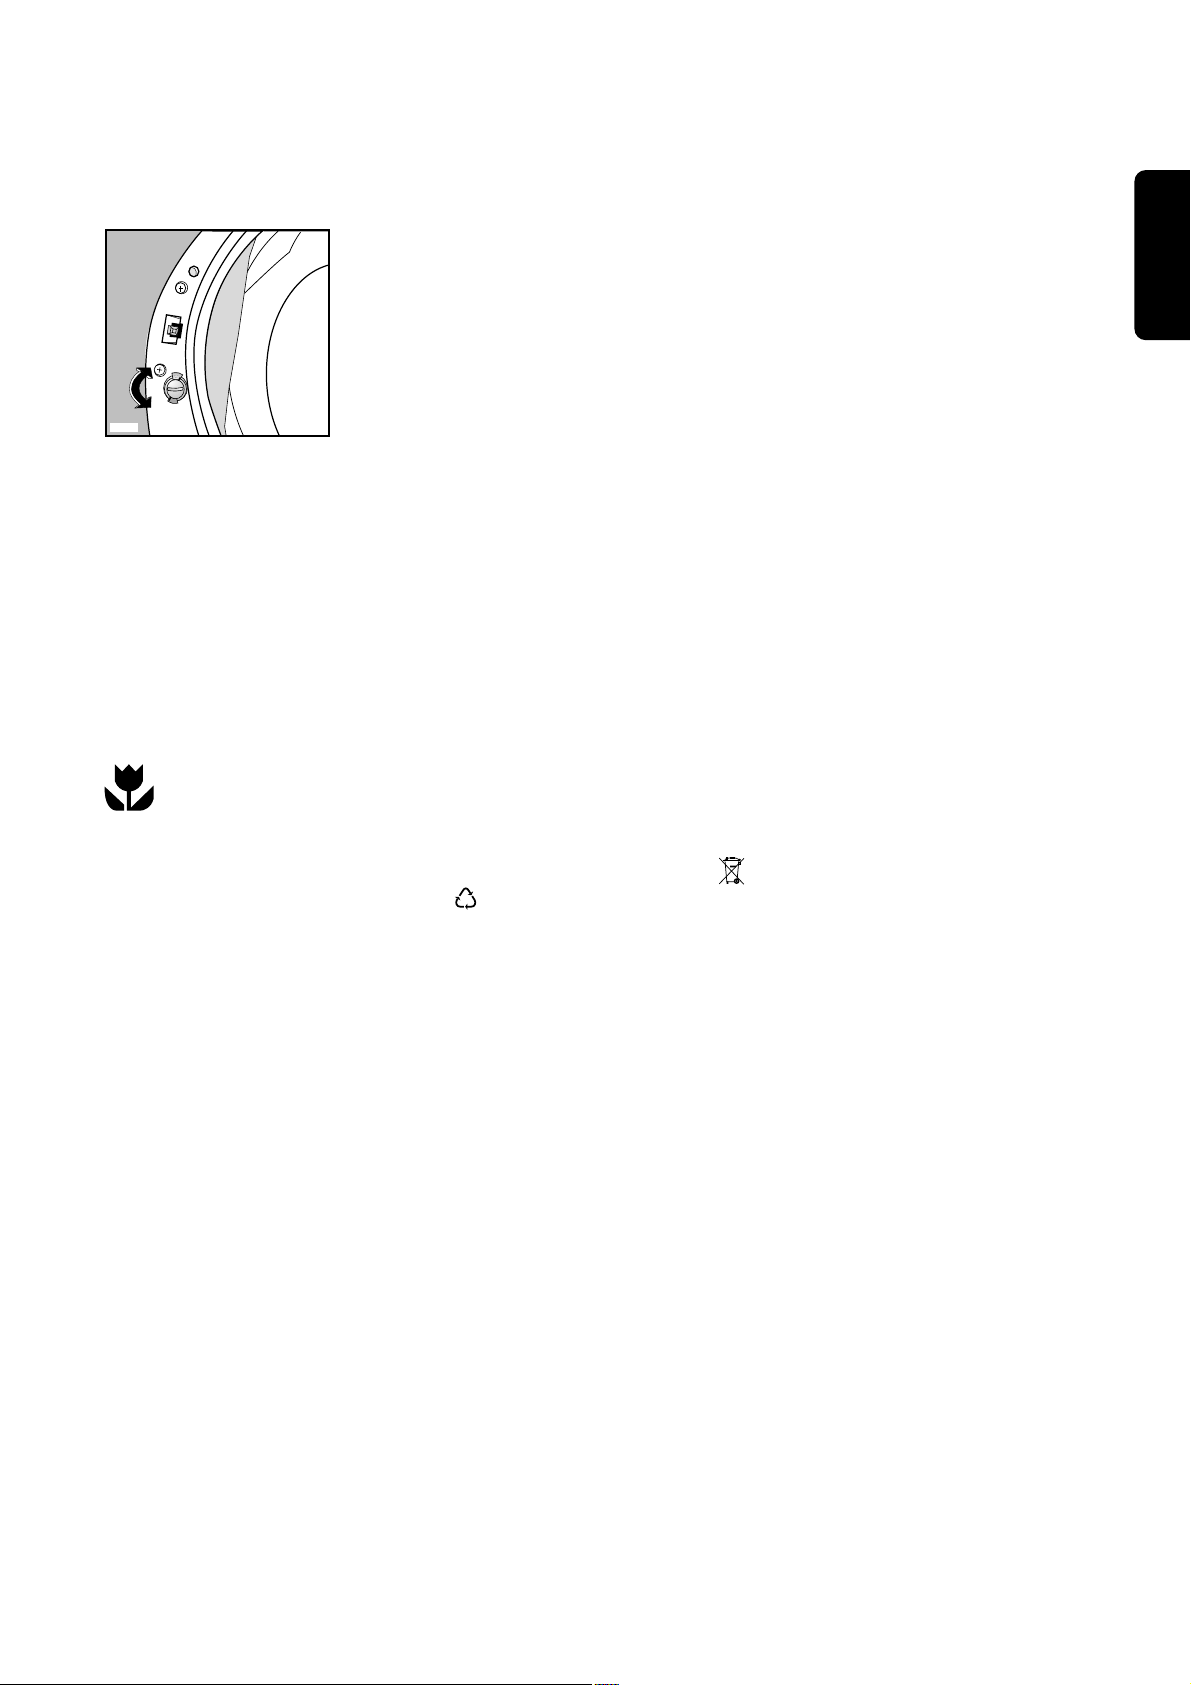
• Asegúrese de que los niños o los pequeños
animales domésticos no entren en el tambor de la
máquina.
Para evitar esto, es posible impedir el cierre de la
puerta actuando sobre el pequeño botón situado
en el lado interior de la puerta, girándolo hacia la
derecha de modo que la muesca se encuentre en
posición horizontal. Si es necesario, ayúdese con
una moneda.
Para desactivar el dispositivo y poder cerrar la
puerta, gire el pequeño botón hacia la izquierda de
modo que la muesca se encuentre en posición
vertical.
Estas advertencias han sido redactadas para su seguridad y la de todas las personas. Por lo tanto le rogamos
leerlas atentamente antes de instalar y utilizar el aparato.
Page 23
ESPAÑOL
23
Eliminación
Materiales de embalaje
Los materiales que incluyen el símbolo pueden
ser reciclados.
>PE<= polietileno
>PS<=poliestireno
>PP<=polipropileno
Para poder recuperarlos se deben depositar en los
espacios apropiados (o contenedores).
Aparato
Para una correcta eliminación de su viejo aparato,
Le aconsejamos utilizar las escombreras
autorizadas. ¡Ayúdenos a mantener limpia Su
ciudad!
El símbolo en el producto o en su empaque
indica que este producto no se puede tratar como
desperdicios normales del hogar.
Este producto se debe entregar al punto de
recolección de equipos eléctricos y electrónicos para
reciclaje. Al asegurarse de que este producto se
deseche correctamente, usted ayudará a evitar
posibles consecuencias negativas para el ambiente
y la salud pública, lo cual podría ocurrir si este
producto no se manipula de forma adecuada. Para
obtener información más detallada sobre el reciclaje
de este producto, póngase en contacto con la
administración de su ciudad, con su servicio de
desechos del hogar o con la tienda donde compró el
producto.
• Cuando quiera destruir el aparato, desenchúfelo,
corte el cable de alimentación y elimine el enchufe
con el cable restante. Inutilice el cierre de la
puerta: de esta manera los niños que están
jugando no se quedarán atrapados en el aparato.
P1131
Page 24

24
DIMENSIONES Altura 85 cm
Anchura 60 cm
Profundidad 63 cm
CAPACIDAD DE CARGA Algodón 7 kg
Sintéticos 3 kg
Delicados 3 kg
Lana y lavado a mano 2 kg
VELOCIDAD CENTRIFUGADO 800 rpm máx. (FE 827 G)
1000 rpm max. (FE 1027 G)
VOLTAJE/FRECUENCIA 220-230V/50 Hz
POTENCIA MAXIMA ABSORBIDA 2200 W
POTENCIA MINIMA DEL FUSIBLE 10 A
PRESION DEL AGUA mín. 0,05 MPa
máx. 0,8 MPa
Este aparato es conforme a las siguientes normas CEE:
73/23/CEE del 19/02/73 relativa al bajo voltaje
89/336/CEE del 03/05/89 relativa a la compatibilidad electromagnética.
Características técnicas
Consejos para la protección del ambiente
Para ahorrar agua y energía y contribuir a la
protección del ambiente, aconsejamos atenerse a lo
siguiente:
• Para ropa normalmente sucia es suficiente un
programa sin prelavado; de esta manera se ahorra
detergente, agua y tiempo (¡y se protege al
ambiente!).
• El aparato trabaja en economía si se cargan las
cantidades máximas de ropa indicadas.
• Con un tratamiento apropiado se pueden eliminar
las manchas y las zonas sucias limitadas; después
se puede efectuar un lavado a baja temperatura.
• Adapte la dosis de detergente a la dureza del
agua, a la cantidad de ropa y al grado de suciedad
de la misma.
Page 25

ESPAÑOL
25
25
Dispositivos de seguridad para el
transporte
Antes de poner en marcha el aparato,
controle que se hayan quitado todos los
dispositivos previstos para el transporte.
Conserve todos los elementos usados para el
transporte para poderlos volver a usar en caso
de mudanza.
Proceda de la siguiente manera:
1. Quitar el embalaje externo y depositar el equipo
sobre la parte posterior con precaución para
retirar la base de poliestireno que protege la
parte inferior.
2. Desenganchar el cable de alimentación y el tubo
de desagüe de los soportes que hay en la parte
posterior del equipo.
3. Aflojar y quitar (con una llave adecuada) el
tornillo superior central A de la parte posterior del
equipo. Extraer el perno de plástico.
4. Aflojar y quitar los dos tornillos grandes B y los
seis tornillos laterales más pequeños C que hay
en la parte posterior del equipo.
5. Extraer la barra de acero D con cuidado y atornillar
los seis tornillos laterales más pequeños C.
C
C
HEC0014
HEC0011S
D
HEC0003S
C
C
B
B
HEC0002S
A
HEC0001
HEC0008
6. Abrir la puerta, extraer el tubo de entrada del
agua y liberar el bloque de poliestireno que está
fijado a la junta de la puerta con cinta adhesiva.
7. Tapar el orificio superior pequeño y los dos
orificios inferiores laterales más grandes con los
tapones de plástico que hay dentro de la bolsa
del manual de instrucciones.
8. Conecte el tubo de carga
siguiendo las
instrucciones del
capítulo
“Carga de agua”.
Colocación
Coloque la lavadora sobre un piso plano y rígido.
Controle que la circulación del aire alrededor del
aparato no sea impedida por alfombras, moquetas,
etc. Controle también que el aparato no toque la
pared u otros muebles de la cocina.
Nivele el aparato cuidadosamente enroscando o
desenroscando las patas de apoyo. Nunca ponga
cartón, madera o materiales similares debajo del
aparato para compensar los eventuales desniveles
del piso.
Carga de agua
Se suministra un tubo de entrada de agua posterior,
que hallará en el interior del tambor de la máquina.
No utilice el tubo de la máquina antigua para
conectar el suministro de agua.
1. Abra el orificio y extraiga el tubo de entrada de
agua.
2.Conecte el tubo a la máquina mediante la
conexión en ángulo.
HEC0005
HEC0010
Instalación
P1051
Page 26

26
26
¡Importante!
No coloque el tubo hacia abajo. Sitúelo a
izquierda o derecha en función de la posición del
grifo.
3. Afloje la abrazadera para colocar el tubo
correctamente. Después de situar el tubo, vuelva a
apretar la abrazadera para evitar fugas.
4. Conecte el tubo de carga a un grifo roscado de
3/4". Debe utilizar siempre el tubo suministrado
con la máquina.
Si el tubo es demasiado corto y no se desea
desplazar el grifo, es necesario comprar un tubo
más largo, adecuado para este tipo de uso existente
en el servicio técnico autorizado.
Descarga de agua
Se puede instalar el recodo del tubo de desagüe en
tres modos diferentes:
En el borde de un lavabo usando el recodo de
plástico suministrado con el aparato. En este
caso es necesario verificar que el recodo no se
mueva del borde cuando el aparato descarga el
agua. Por ejemplo, se lo puede fijar al grifo o a la
pared con una cuerda.
P0022
P1088
HEC0006
En una derivación del desagüe del lavabo. Esta
derivación debe estar arriba del sifón, de modo tal
que el recodo del tubo esté como mínimo a 60 cm
del suelo.
En un conducto de desagüe situado a una altura
no inferior a 60 cm y no superior a 90 cm.
La extremidad del tubo de desagüe debe ser
siempre ventilada, o sea el diámetro interno del
conducto de desagüe debe ser más ancho que el
diámetro externo del tubo de desagüe.
El tubo de desagüe no debe estar retorcido.
Conexión eléctrica
El aparato funciona con una tensión de 220-230 V,
monofásica, 50 Hz.
Controle que la instalación doméstica pueda
soportar la carga máxima requerida (2,2 kW),
considerando también los otros aparatos en
funcionamiento.
Conecte el aparato a una toma de tierra y según
las normas en vigor.
El fabricante declina cualquier
responsabilidad por los daños o las lesiones
provocadas por el incumplimiento de las
normas de seguridad antedichas.
Si se debe sustituir el cable de alimentación,
diríjase a nuestro Centro de Asistencia
técnica.
Una vez que se haya instalado la máquina,
asegurarse de que se pueda acceder fácilmente
al cable de alimentación.
P1118
Page 27

ESPAÑOL
27
Este nuevo aparato afronta todas las exigencias de un moderno tratamiento de la ropa con ahorro de agua,
energía y detergente.
• El mando selección programas agrupa tanto la función de selección del programa como de la temperatura,
facilitando así la determinación del programa.
• El display fases programa da informaciones sobre el desarrollo del programa.
• El programa especial para lana trata la ropa con suma delicadeza, sin apelmazarla, gracias al sistema
delicado de lavado.
• El enfriamiento automático reduce la temperatura del agua de lavado de 90° a 60°C antes de efectuar la
descarga mediante un sistema programado afin de evitar que las tuberías de desagüe muy viejas se
deformen.
• El sistema de control de centrífuga asegura la posición del aparato y su funcionamiento silencioso.
• La válvula ECO consigue un aprovechamiento óptimo del detergente y reduce el consumo de agua,
ahorrando como consecuencia energía.
1 Cubeta del detergente y ficha programas
2 Panel de mandos
3 Manilla puerta
4 Zona de descarga
5 Patas regulables
Cubeta del detergente
Prelavado
Lavado
Suavizante, almidón
Su nueva lavadora
Descripción del aparato
1
2
3
5
4
F 827 G
C0063
Page 28

28
Uso
123456 7 8
FE 827 G
Teclas de Opción Programa
Según el programa, se pueden combinar diferentes
funciones. Estas se deben seleccionar tras haber
seleccionado el programa deseado y antes de
pulsar la tecla INICIO/PAUSA .
Al pulsar estas teclas, las luces piloto
correspondientes se encienden. Al pulsarlas otra
vez, las luces piloto se apagan.
Si se selecciona una opción incorrecta, las luces
piloto parpadean durante aproximadamente 2
segundos.
1 Tecla “Options”
● Prelavado
Seleccione esta opción si se desea prelavar la
ropa a 30°C antes del lavado principal (no
disponible para la lana).
El prelavado finaliza con un breve centrifugado
en los programas para algodón y tejidos
sintéticos, mientras que en el programa para
tejidos delicados el agua es descargada
solamente.
● Lavado rapido
Esta tecla permite seleccionar un lavado rapido
para la ropa ligeramente sucia (no para la lana y
la opción .
El tiempo de lavado será reducido según el tipo
de tejido y la temperatura seleccionada. La carga
máx. para el algodón es 3 kg.
2 “ECO” button
a) Cuando se selecciona esta opción con el
programa "Algodón 90°C", la temperatura de
lavado se reduce a 67°C y el tiempo de lavado
será prolongado de 22 minutos.
Cuando se selecciona esta opción con el
programa "Sinteticos 60°C", la temperatura de
lavado se reduce a 40°C y el tiempo de lavado
será prolongado de 10 minutos.
Se puede seleccionar esta opción para algodón y
tejidos sintéticos poco o normalmente sucios
permitiendo alcanzar un rendimiento energético.
b) Si se selecciona esta opcion con "Algodón 60°C"
o "Algodón 40°C", la máquina prolongará el
tiempo de 10 minutos a 60°C y de 35 minutos a
40°C en la fase de lavado, permitiendo alcanzar
un rendimiento energético y prestaciones de
lavado de clase AA.
3 Tecla “Aclarado extra”
Se puede seleccionar esta opción con todos los
programas hecha excepción del programa lana.
La máquina efectúa 5 aclarados en lugar de 3. Esta
opción se aconseja para las personas alérgicas a los
detergentes y en las zonas donde el agua es muy
blanda.
4 Tecla “Agua en Cuba”
Cuando se selecciona esta opción, no se descarga
el agua del último aclarado, para evitar que los
tejidos se arruguen. Al final del programa, la luz
piloto "Fin" se enciende, el piloto de la tecla
“Inicio/Pausa” se apaga y permanece encendida y la
puerta permanecerá bloqueada. Para descargar el
agua, actúe del modo siguiente:
- sitúe el selector de programas en posición "O" para
apagar el aparato;
- seleccione el programa (descarga) o
(centrifugado corto);
Gire el selector para seleccionar la velocidad
deseada.
- pulse la tecla “Inicio/Pausa” .
La luz "Descarga" o “Centrifugado” se
enciende durante la descarga o el programa de
centrifugado. Al final del programa, la luz piloto "Fin"
se enciende otra vez.
Page 29

ESPAÑOL
29
5 Tecla “Inicio / Pausa”
Tras haber seleccionado el programa y las opciones
requeridas, pulse esta tecla para poner en marcha la
máquina. La luz piloto correspondiente deja de
parpadear y permanece encendida.
Para interrumpir un programa durante su ejecución,
pulse la tecla Inicio/Pausa: la luz piloto
correspondiente empieza a parpadear.
Para reiniciar el programa desde el punto en que ha
sido interrumpido, vuelva a pulsar la tecla
Inicio/Pausa.
6 Display de programa
Cuando se selecciona un programa, las luces
correspondientes a las fases que forman el
programa se encienden.
Tras haber iniciado el programa, sólo la luz
correspondiente a la fase actualmente en curso
quedará encendida.
●
/
: cuando esta luz se enciende significa
que la máquina está ejecutando el programa de
lavado. Si se ha seleccionado la función
Prelavado, esta luz permanece encendida
también durante la fase de prelavado.
●
= aclarados
●
= centrifugado
●
= descarga
●
= fin
Al final del programa, la luz piloto "Fin" se
enciende. La luz "Fin" se enciende
en caso de problemas de funcionamiento:
- 4 parpadeos: puerta abierta
- 2 parpadeos: problema con la descarga del agua
- 1 parpadeo: problema con la alimentación del agua
Para más información, véase el párrafo "Anomalías
de funcionamiento"
7 Selector velocidad centrifugado
El selector permite reducir la velocidad de
centrifugado intermedia o final propuesta por la
máquina o seleccionar la opción EXCLUSION
CENTRIFUGADO .
Las velocidades de centrifugado indicadas en el
selector se refieren a los programas para algodón.
Modelo FE 827 G
La posición 800 corresponde a 700
revolutiones/minuto para los delicados.
La posición 400 corresponde a 400
revolutiones/minuto para todos los tejidos.
Modelo FE 1027 G
La posición 1000 corresponde a 900
revolutiones/minuto para los sintéticos y 700 para los
delicados.
La posición 500 corresponde a 500
revolutiones/minuto para para los sintéticos y lana
y revolutiones/minuto 400 para los tejidos.
EXCLUSION CENTRIFUGADO :
Cuando se selecciona esta opción todos los
centrifugados son suprimidos. Es aconsejable para
tejidos muy delicados. La máquina efectuará 3
aclarados adicionales en los programas para
algodón y 1 aclarado adicional en los programas
para sinteticos.
¡Importante!
Si el selector permanece situado en la posición
EXCLUSION CENTRIFUGADO el programa de
centrifugado se realiza a la velocidad de 400 r.p.m.
9 Selector de programas
El selector está subdividido en 5 secciones:
• Algodón
• Tejidos sintéticos
• Tejidos delicados
• Lana
• Programas especiales
• O Programa ANULACION/PARADA
Se puede mover el selector en sentido horario o
antihorario.
La posición corresponde a "lavado en frío".
Al final del programa se debe situar el selector
en posición O para apagar la máquina.
¡Atención!
Si durante un programa de lavado se sitúa el
selector en otro programa, las luces piloto del
display de programa empiezan a parpadear. La
máquina no ejecutará el nuevo programa
seleccionado.
O
9
0
6
0
4
0
3
0
6
0
4
0
3
0
4
0
3
0
3
0
Page 30

30
Consejos para el lavado
Selección de las prendas
Respete los símbolos para el tratamiento de los
tejidos en las etiquetas de cada una de las prendas
y las instrucciones para el lavado aconsejadas por el
fabricante.
Divida la ropa de esta manera:
ropa blanca, de color, sintéticos, delicados, lana.
Temperaturas
90°
para prendas blancas de lino o algodón
normalmente sucias (por ej. paños de
cocina, toallas, manteles, sábanas, etc.)
60° para prendas de color que no destiñen,
normalmente sucias (por ej. camisas,
camisones, pijamas, etc.) de lino, algodón
o fibras sintéticas y para prendas blancas
en algodón levemente sucias (por ej.
prendas íntimas).
(frío)
para ropa delicada (por ej. cortinas), ropa
30°-40° mixta con mezcla de fibras sintéticas y lana
con la indicación en la etiqueta: “pura lana
virgen, lavable, no encoge”.
EI ciclo lana de esta máquina ha sido
aprobado por la Woolmark para el lavado
de productos Woolmark lavables en
lavadora, siempre que las prendas sean
tratadas de acuerdo con las indicaciones
de cuidado de la respectiva etiqueta cosida
y con las instrucciones de uso del
fabricante de la máquina. M9604.
Antes de cargar la ropa
La ropa blanca y de color no se deben lavar juntas.
La ropa blanca puede alterar el color con el lavado.
La ropa de color nueva puede desteñir al primer
lavado; la primera vez se aconseja lavarla a parte.
Controle que en la ropa no hayan quedado
objetos metálicos (por ej. hebillas, imperdibles,
alfileres).
Abotone las fundas, cierre las cremalleras, los
ganchos y los ojales. Ate los cinturones y las cintas
largas.
Elimine las manchas persistentes antes del lavado.
Eventualmente friegue los puntos particularmente
sucios con un detergente especial o con un jabón
detergente.
Trate las cortinas con mucho cuidado. Quite los
ganchos de las cortinas o átelos en una red o en una
bolsa.
Carga máxima de ropa
Las informaciones sobre las cargas de ropa se
encuentran en las tablas de programas.
Reglas generales:
Algodón y lino: llene el tambor sin recargarlo.
Sintéticos: no más de la mitad del tambor.
Tejidos delicados y lana: no más de un tercio del
tambor.
Con una carga máxima se aprovecha óptimamente
el agua y la energía.
Tratándose de ropa muy sucia, reduzca la cantidad.
Pesos de la ropa
Los pesos que se indican a continuación tienen un
valor indicativo:
albornoz de baño 1200 g
servilletas 100 g
funda plumón 700 g
sábanas 500 g
fundas 200 g
manteles 250 g
toallas de felpa 200 g
paños de cocina 100 g
camisones 200 g
slip de señora 100 g
mamelucos de hombre 600 g
camisas 200 g
pijamas de hombre 500 g
blusas 100 g
calzoncillos 100 g
Eliminación de las manchas
Es posible que ciertas manchas particulares no se
eliminen solamente con agua y detergente. Por lo
tanto se aconseja tratarlas antes del lavado.
Sangre: las manchas todavía frescas se deben
tratar con agua fría. Tratándose de manchas ya
secas, deje la ropa en remojo por una noche con un
detergente especial y luego frótela en agua y jabón.
Pintura al aceite: humedezca con gasolina
detergente, haga presión sobre las manchas
después de haber colocado la prenda sobre un trapo
blando, trátelas varias veces con el detergente.
Manchas secas de grasa: humedezca con
trementina (aguarrás), haga presión sobre las
manchas con la punta de los dedos usando un trapo
de algodón, después de haber apoyado la prenda
sobre una superficie blanda.
Page 31

ESPAÑOL
31
Orín: sal oxálico disuelto en caliente o un producto
antiorín en frío. Preste atención a las manchas de
orín viejas porque la estructura de celulosa ha sido
ya dañada y el tejido tiende a agujerearse.
Manchas de moho: trátelas con blanqueador,
aclare bien (solamente las prendas blancas o de
color resistentes al cloro).
Hierba: enjabone levemente y trate con blanqueador
diluido (prendas blancas, resistentes al cloro).
Birome y cola: humedezca con acetona (*), haga
presión sobre las manchas después de haber
apoyado la prenda sobre un trapo blando.
Lápiz de labios: humedezca con acetona como
arriba indicado, luego trate las manchas con alcohol.
Elimine el color en los tejidos blancos con
blanqueador.
Vino tinto: deje en remojo con detergente, aclare y
trate con ácido acético o ácido cítrico, luego aclare.
Trate eventuales residuos con blanqueador.
Tinta: según la composición de la tinta, humedezca
el tejido primero con acetona (*), luego con ácido
acético; trate los eventuales residuos en las prendas
blancas con blanqueador y luego aclare bien.
Manchas de alquitrán: primero trate con
quitamanchas, alcohol o gasolina, luego frote con
pasta detergente.
(*) no use la acetona en la seda artificial.
Detergentes y aditivos
Un buen resultado de lavado depende de la
selección del detergente y del uso en dosis
correctas. Dosificar correctamente significa evitar
despilfarros y proteger el ambiente. No obstante se
trate de productos biodegradables, los detergentes
contienen elementos que dañan el delicado
equilibrio ecológico de la naturaleza.
La elección del detergente depende del tipo de tejido
(delicados, lana, algodón, etc.), del color, de la
temperatura de lavado y del grado de suciedad.
En esta lavadora se pueden usar todos los
detergentes para lavadoras normalmente fácil de
adquirir en comercio:
– detergentes en polvo para todo tipo de tejidos,
– detergentes en polvo para tejidos delicados
(máximo 60°C) y lana,
– detergentes líquidos, preferiblemente para
programas de lavado a baja temperatura (máximo
60°C) para todo tipo de tejidos o especiales
solamente para lana.
El detergente y el eventual aditivo deben ser
echados en los compartimientos apropiados antes
de iniciar el programa de lavado.
Si se usan detergentes concentrados en polvo o
líquidos, seleccione un programa sin prelavado.
Eche el detergente líquido inmediatamente antes
del inicio del programa en el compartimiento de
la cubeta detergente.
Los eventuales aditivos líquidos para suavizar o
almidonar la ropa deben ser echados en el
compartimiento con el símbolo antes de iniciar el
programa de lavado.
Para las dosis, siga las indicaciones de los
productores.
Cantidad de detergente por usar
El tipo y la cantidad de detergente dependen del tipo
de tejido, de la carga, del grado de suciedad y de la
dureza del agua usada.
La dureza del agua se clasifica en niveles de dureza.
Las informaciones sobre dichos niveles se pueden
obtener de la compañía distribuidora competente o
de la administración municipal.
Siga las instrucciones para la dosificación indicadas
por el productor.
Use una cantidad menor de detergente si:
– se lava poca ropa
– si la ropa no está muy sucia
– si se forma mucha espuma durante el lavado
Grados de dureza del agua
Nivel Característica
Grados
Alemanes
°dH
Franceses
°T.H.
dulce
media
dura
muy dura
0- 7
8-14
15-21
más de
21
0-15
16-25
26-37
más de
37
1
2
3
4
Page 32

32
Símbolos internacionales para el tratamiento de los tejidos
Las etiquetas con los símbolos que están pegadas en las prendas son muy útiles para el tratamiento de
las prendas.
i
Acción fuerte
Acción delicada
Lavado
a 95°C
Lavado
a 60°C
Lavado
a 40°C
Lavado
a 30°C
Lavado
delicado
a mano
No
lavar
Blanqueo Se puede blanquear en agua fría No blanquear
Planchado Plancha fuerte
máx 200°C
Plancha media
máx 150°C
Plancha floja
máx 110°C
No planchar
Limpieza
en seco
Limpieza en seco
con cualquier solvente
Limpieza en seco
con percloro, gasolina,
alcohol puro,
R111y R113
Limpieza en seco
con gasolina,
alcohol puro y R113
No limpiar
en seco
Secado Secar
extendido
Secar
colgado
Secar
en perchas
Puede secarse
en secadoras
Temperatura
normal
Temperatura
reducida
No secar
en secadoras
95
60
60
40
40
40
30
30
Símbolos internacionales para el tratamiento de los tejidos
Las etiquetas con los símbolos que están pegadas en las prendas son muy útiles para el tratamiento de las
prendas mismas.
Page 33

ESPAÑOL
33
4. Seleccione el programa deseado
Sitúe el selector de programas en la posición
deseada. La luz de la tecla “Inicio/Pausa” empieza a
parpadear.
Las luces correspondientes a las fases que forman
el programa se encienden.
5. Seleccione la(s) opción(es) deseada(s)
La luz correspondiente a la tecla pulsada se
enciende.
6. Seleccione la velocidad de
centrifugado o la opción EXCLUSION
CENTRIFUGADO
Sitúe el selector de centrifugado para seleccionar la
velocidad deseada o la posición EXCLUSION
CENTRIFUGADO
.
FE 827 G FE 1027 G
1
0
0
0
9
0
0
7
0
0
6
0
0
5
0
0
8
0
0
7
0
0
6
0
0
5
0
0
4
0
0
O
9
0
6
0
4
0
3
0
6
0
4
0
3
0
4
0
3
0
3
0
Secuencia de las
operaciones
Antes del primer lavado recomendamos poner 2
litros de agua en el compartimiento de lavado
de la cubeta para activar la válvula ECO. A
continuación realice el programa de algodón 90°C,
sin ropa, para eliminar los eventuales residuos de
elaboración del tambor y de la cuba. Eche media
medida de detergente en el compartimiento de
lavado y ponga en funcionamiento el aparato.
1. Introduzca la ropa
Abra la puerta.
Introduzca la ropa en el tambor, una por una,
desplegándola lo más posible. Cierre la puerta.
2. Dosifique el detergente
Extraiga la cubeta toda hacia afuera.
Use un dosificador para echar la cantidad
aconsejada de detergente en el compartimiento de
lavado .
Si desea efectuar un programa con “Prelavado”,
vierta el detergente o la sal quitamanchas en el
respectivo compartimiento .
3. Dosifique los aditivos
Si lo desea, vierta el suavizante en el
compartimiento sin superar el nivel “MAX” de
referencia.
C0065
C0064
P0004
Page 34

10. Cancele un programa
Para anular un programa en curso, sitúe el selector
en O. Ahora se puede seleccionar un nuevo
programa.
11. Abra la puerta después de haber
iniciado el programa
Antes de todo, sitúe la máquina en PAUSA,
pulsando la tecla "Inicio/Pausa".
Si la puerta no se abre tras 2 minutos, significa que
la máquina ya está en fase de calentamiento, que el
nivel del agua ha superado el borde inferior de la
puerta o que el tambor está girando.
Si no se puede abrir la puerta, aunque sea necesario
hacerlo, se debe apagar la máquina, situando el
selector en O. Tras unos 2 minutos se podrá abrir la
puerta (preste atención al nivel del agua y a la
temperatura).
12. Al final del programa
La máquina se para automáticamente. La luz de la
tecla "Inicio/Pausa" se apaga y la luz “Fin” se
enciende. Ahora se puede abrir la puerta.
Si se ha seleccionado la opción “Agua en Cuba”,
la luce de fase "Fin" está
encendida y la puerta está bloqueada para indicar
que se debe vaciar el agua antes de abrir la puerta.
Antes de efectuar esta operación, sitúe el selector
de programas en O y luego en el programa de
descarga o centrifugado . El programa de
centrifugado se realiza a la velocidad máxima. Para
evitar arrugas o daños a los artículos sintéticos,
delicados y de lana, se debe reducir la velocidad de
centrifugado mediante el selector de centrifugado.
Al final del programa, sitúe el selector de programas
en O para apagar la máquina.
Quite la ropa del tambor y controle con cuidado que
el tambor esté vacío.
Si no se desea efectuar otro lavado, cierre el grifo
del agua. Deje la puerta abierta para evitar la
formación de moho y malos olores.
34
7. Inicie el programa
Para iniciar el programa seleccionado, pulse la tecla
“Inicio/Pausa” ; la luz correspondiente deja de
parpadear. La luz de la puerta y la luz
/
se
encienden.
La máquina empieza a funcionar.
8. Modifique un programa
Se puede modificar el programa antes de que inicie.
Una vez que el programa haya iniciado, se puede
solamente anularlo, situando el selector de
programas en O; luego se puede seleccionar el
nuevo programa. El agua de lavado permanece en
la cuba. Inicie el nuevo programa, pulsando la tecla
“Inicio/Pausa”.
Si desea cambiar algunas opciones tras haber
iniciado el programa, primero ponga la máquina en
PAUSA pulsando la tecla "Inicio/Pausa". Ahora es
posible cambiar las opciones, la velocidad de
centrifugado y la temperatura de lavado, si no se
han ejecutado por el aparato.
9. Interrumpa un programa
Pulse la tecla "Inicio/Pausa" para interrumpir un
programa en curso; la luz correspondiente empieza
a parpadear. Pulse la tecla otra vez para reiniciar el
programa.
Page 35

ESPAÑOL
35
PROGRAMA AHORRO ENERGIA
Para la ropa de algodón poco o normalmente sucia, utilice el programa ECONOMIA: se obtendrá un ahorro de
energía con óptimos resultados de lavado.
* Conforme a la normativa CEE 92/75, los consumos indicados en la etiqueta energía se refieren al programa
para algodón 60°C
+
la opción .
** Estos datos tienen un valor solamente indicativo y pueden variar según el tipo y la cantidad de ropa, la
temperatura del agua y del ambiente. Los valores se refieren a la temperatura más alta prevista para cada
programa.
Ficha programas
PROGRAMAS DE LAVADO
Programa
Temperatura/
Tejidos
Tipo de tejido
Opciones
posibles
Carga
de ropa
Energía
kWh
Agua
litros
Duración
min.
Consumos **
AHORRO
ENERGIA
Colores resistentes
p. ej. sábanas,
toallas
Colores delicados
p. ej. camisas,
camisetas, ropa interior
CARGA
MIXTA DE
SINTETICOS
30° -
FRIO
LANA
Camisas, camisetas,
ropa interior, carga
mixta
Con este programa se
pueden lavar los tejidos
de lana con la etiqueta
“pura lana virgen,
lavable en lavadora, no
encoge”
LANA
BLANCOS
Sábanas, ropa para
la casa, toallas
60° - 90°
ALGODON
AHORRO
ENERGIA
Ropa para la casa,
sábanas, ropa
interior, ropa de
esponja, toallas
90° +
ALGODON
60° +
**
ALGODON
30°-40°-
60°
SINTETICOS
3 kg
0.95
55
90
2 kg
0.35
55
50
7 kg
2.3
57
150
7 kg
1.14 54
140
30°-40°
DELICADOS
Artículos de acrílico,
viscosilla y poliéster,
cortinas
DELICADOS
3 kg
0.55
57 65
7 kg
1.55
54
140
CUIDA LOS
COLORES
ALGODON EN
FRIO
Colores resistentes y
delicados
p. ej. sábanas, toallas
camisas, camisetas,
ropa interior
30°- 40° -
60°
ALGODON
7 kg
1.3
54
120
(sólo a 40°C)
(sólo a 60°C)
Page 36
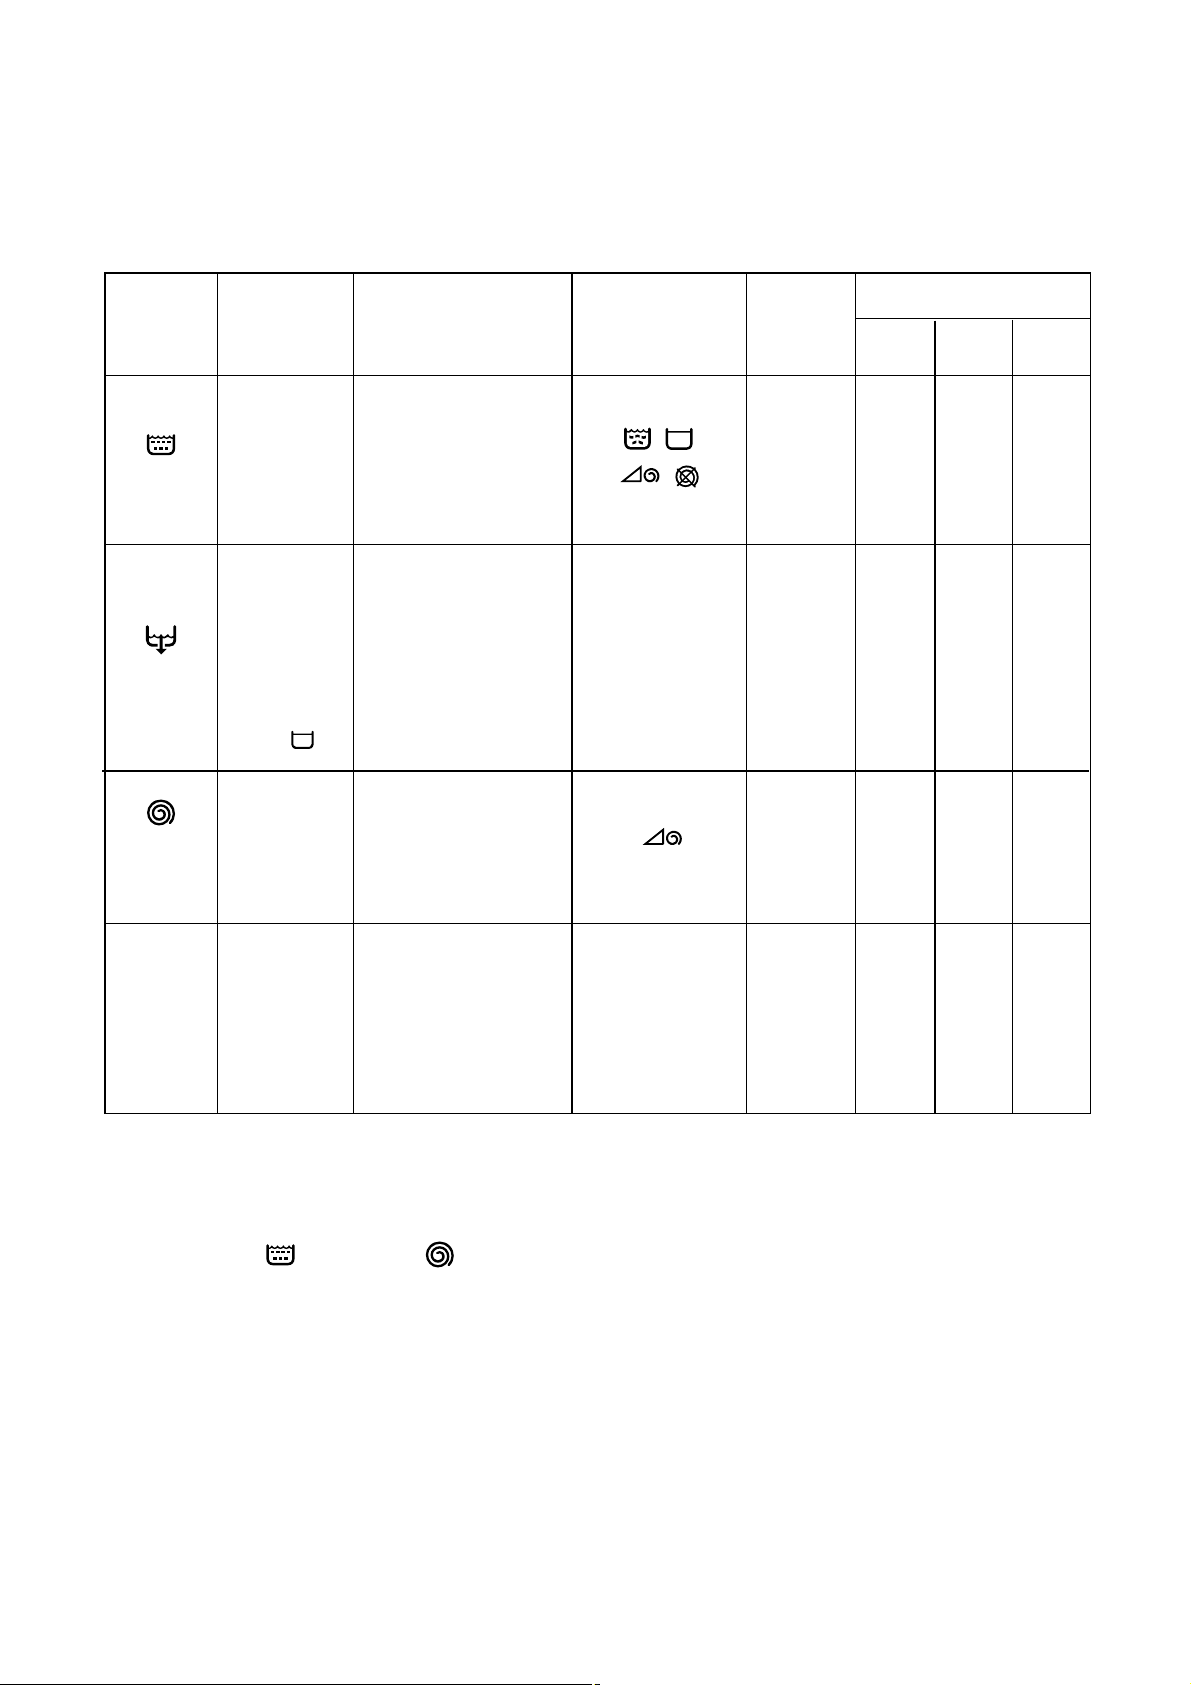
36
Ficha programas
PROGRAMAS ESPECIALES
* Estos datos tienen un valor solamente indicativo y pueden variar según el tipo y la cantidad de ropa, la
temperatura del agua y del ambiente.
¡Importante!
En los programas
(
Aclarados) y (Centrifugado), si se debe aclarar o centrifugar tejidos sinteticos,
delicados, lavados a mano y de lana, es aconsejable reducir la velocidad de centrifugado.
Posición
selector
programas
Aclarados
Programa
Descripción
programa
Opciones
posibles
Carga de
ropa
Energía
kWh
Agua
litros
Duración
min.
Consumos*
Con este
programa es
posible
aclarar las
prendas
lavadas a
mano.
3 aclarados con
aditivo líquido.
Centrifugado breve a
la velocidad máxima
7 kg 0.06 59 30
/
-
-
2
7 kg
--6
Descarga
Descarga del
agua del
último
aclarado en
los
programas
con opción
“Agua en
Cuba”
.
Centrifugado
separado
para todos
los tejidos
Descarga del agua
Centrifugado breve a
la velocidad máxima
Centrifugado
/
---
Anulación del
programa en
curso,
apagamiento
del aparato
O
Anulacion/
Parada
Page 37

ESPAÑOL
37
1. Exterior del aparato
Limpie la parte externa del aparato con agua tibia y
un producto neutro no abrasivo. Aclare con agua
limpia y seque con un trapo suave.
Importante: no use alcohol, disolventes o productos
similares para la limpieza.
2. Puerta
Controle periódicamente que no haya cuerpos
extraños como grapas, botones mondadientes en la
junta de la puerta.
3. Cubeta detergente
Los detergentes y el suavizante, con el tiempo,
forman incrustaciones.
De vez en cuando limpie la cubeta del detergente
pasándola debajo del grifo del agua. Para extraer
completamente la cubeta del aparato, apriete el
botón en fondo a la izquierda.
Para poder limpiar la cubeta más fácilmente, es
posible quitar la parte alta de la misma reservada a
los aditivos.
Con el pasar del tiempo, el detergente puede formar
incrustaciones en la parte interna de la cubeta:
límpiela con un cepillo de dientes. Vuelva a colocar
la cubeta en su lugar.
P0038
C0067
C0066
P1050
4. Filtro del tubo de carga del agua
Si se observa que el aparato necesita más tiempo
para llenarse, es necesario controlar que el filtro del
tubo de carga del agua no esté atascado.
Cierre el grifo del agua.
Desenrosque el tubo de carga del grifo.
Límpie el filtro con un cepillo.
Vuelva a enroscar el tubo teniendo sumo cuidado en
no pasar de rosca.
5. Limpieza de la zona de descarga
La limpieza de la zona de descarga de agua es
necesaria en caso de que la bomba haya quedado
bloqueada por cuerpos extraños ( por ejemplo
botones, grapas, clips, etc) o en caso de que la
máquina no descargue y/o no centrifugue.
●●
Desconecte el cable de alimentación.
●●
Si es necesario espere a que el agua de lavado se
enfríe.
●●
Abra la puerta de la zona de descarga.
●●
Coloque un recipiente para recoger el agua.
●●
Tire del pequeño tubo de descarga, colóquelo en
el recipiente y quite el tapón, cuando el recipiente
esté lleno, ponga el tapón al pequeño tubo de
descarga.
●●
Vacíe el recipiente y repita la secuencia de
operaciones anteriores hasta vaciar por completo
la lavadora. Tenga a mano un trapo para secar el
agua que se derrama cuando se quita el
filtro/diafragma.
P1114
P1090
Mantenimiento
Page 38
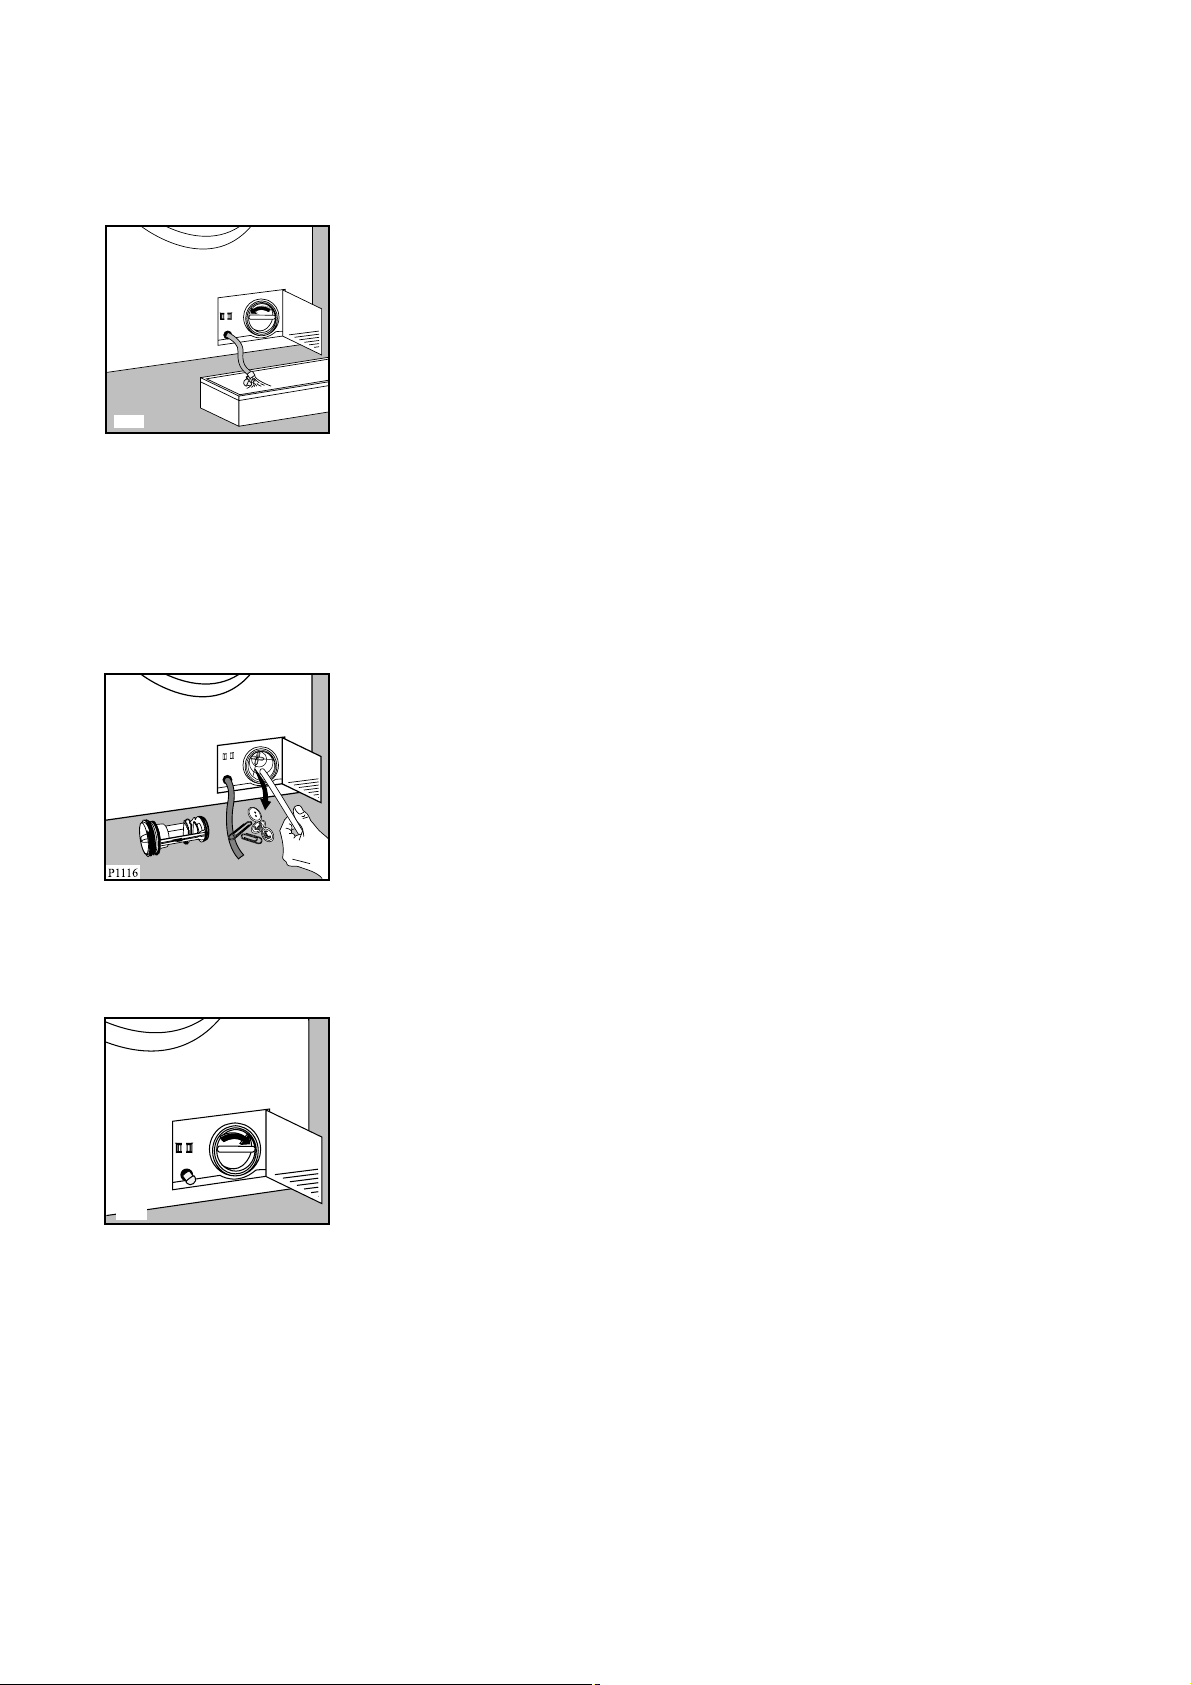
• tire del pequeño tubo de descarga, colóquelo en el
recipiente y quite el tapón;
• cuando el recipiente esté lleno, ponga el tapón al
pequeño tubo de descarga;
• vacíe el recipiente y repita la secuencia de
operaciones anteriores hasta vaciar por completo
la lavadora;
• limpie el filtro/diafragma si es necesario, como
descrito anteriormente;
• coloque el pequeño tubo de descarga en su
posición inicial y cierre la puerta de la zona de
descarga.
7. Precauciones contra el hielo
Si el aparato se instala en un cuarto donde la
temperatura podría descender por debajo de 0°C,
proceda como sigue:
• desenchufe el aparato;
• cierre el grifo del agua y desenrosque el tubo de
carga del grifo;
• abra la puerta de la zona de descarga;
• coloque un recipiente para recoger el agua que
saldrá de la lavadora;
• ponga la extremidad del tubo de carga en un
recipiente;
• tire del pequeño tubo de descarga, colóquelo en el
recipiente y quite el tapón;
• cuando termine de salir el agua, ponga el tapón al
pequeño tubo de descarga, colóquelo en su
posición inicial y cierre la puerta de la zona de
descarga;
• vuelva a enroscar el tubo de carga.
Efectuando estas operaciones el agua que ha
quedado en el aparato será evacuada, evitando la
formación de hielo y de consecuencia la rotura de
las partes afectadas.
Cuando haga funcionar nuevamente el aparato,
asegúrese de que la temperatura del ambiente sea
superior a los 0°C.
¡Importante¡
Cada vez que se descarga el agua a través del
pequeño tubo de descarga, se deben añadir 2 litros
de agua en el compartimento de lavado de la
cubeta, y a continuación realizar un programa de
descarga. Con esto se vuelve a activar la válvula
ECO, impidiendo que parte del detergente quede sin
usar en el siguiente lavado.
38
●●
A continuación desenrosque la tapa del
filtro/diafragma girándola en sentido anti-horario y
tire de ella.
●●
Retire los cuerpos extraños como botones,
monedas y las pelusas que se han acumulado en
la zona de las aspas de la bomba. Para facilitar la
limpieza gire las aspas de la bomba.
●●
Enrosque la tapa del filtro/diafragma en sentido
horario asegurándose que queda bien apretada.
●●
Coloque el pequeño tubo en su posición inicial y
cierre la puerta de la zona de descarga.
6. Vaciado de emergencia
Si el aparato no descarga (bomba desagüe
bloqueada o tubo desagüe obstruido), para vaciar el
agua proceda de la siguiente manera:
• desenchufe el aparato;
• cierre el grifo del agua;
• espere que el agua se enfríe (si es necesario);
• abra la puerta de la zona de descarga;
• coloque un recipiente para recoger el agua que
saldrá de la lavadora;
P1117
P1115
Page 39

ESPAÑOL
39
Anomalías de funcionamiento
Defectos que pueden resolver sin la ayuda de un técnico antes de dirigirse al Servicio de Asistencia Posventa.
Durante el funcionamiento de la máquina, la luz “Fin” puede empezar a parpadear:
- 4 parpadeos: no se ha cerrado la puerta
- 2 parpadeos: la máquina no descarga
- 1 parpadeo: la máquina no carga.
Una vez solucionado el problema, pulse la tecla “Inicio/Pausa” para reiniciar el programa. Si el problema
persiste después de los controles, diríjase al Centro de Asistencia local.
Anomalías Causas posibles
• El aparato no se pone en marcha:
• La puerta no está bien cerrada.
• El fusible de la instalación doméstica está dañado.
• El selector programas no está ubicado
correctamente y la tecla “Inicio/Pausa” no está
pulsada.
• El aparato no carga agua:
• El grifo del agua está cerrado.
• El tubo de carga está bloqueado o doblado.
• El filtro del tubo de carga está obstruido.
• La puerta no está cerrada.
• El aparato carga agua y la descarga
inmediatamente:
• La extremidad del tubo de desagüe se encuentra
demasiado bajo respecto al aparato. Véase el
párrafo correspondiente en el capítulo “descarga”.
• El aparato no descarga y/o no
centrifuga:
• El tubo de desagüe está bloqueado o doblado.
• La bomba de desagüe está obstruida. Límpiela.
• Se ha seleccionado la opción EXCLUSION
CENTRIFUGADO o AGUA EN LA GUBA
• La ropa no está bien distribuida en el tambor.
• Hay agua en el suelo:
• Hay demasiado detergente o se ha usado un
detergente inadecuado (hace demasiada espuma).
• Verifique si hay pérdidas de una de las roscas del
tubo de carga. Es difícil ver el agua pasar a lo
largo del tubo, controle si está húmedo.
• El tubo de desagüe está dañado.
• La bomba de desagüe no está bien enroscada
después de la limpieza.
• El pequeño tubo de descarga no está tapado.
• El resultado del lavado no es
satisfactorio:
• Se ha usado poco detergente o un detergente
inadecuado.
• Las manchas “difíciles” no se han sometido a un
tratamiento preliminar.
• No se ha elegido la temperatura justa, combinada
con el programa correcto.
• Se ha cargado demasiada ropa.
• El aparato vibra o hace ruido:
• No se han quitado todas las protecciones que
sirven para el transporte.
• No se han regulado las patas de sostén.
• La ropa no está bien distribuida en el tambor.
• Quizás hay poca ropa en el tambor.
Page 40

40
Anomalías Causas posibles
• El centrifugado inicia en retardo o no
se efectúa:
• Esta lavadora incorpora el sistema "control de
centrífuga" (o centrífuga controlada) que evita
vibraciones excesivas durante la centrifugación y
asegura su estabilidad.
Si al inicio de la fase de centrifugación, la ropa no
está distribuida uniformemente dentro del tambor,
la lavadora intentará distribuirla de manera
homogenea, mediante algunas vueltas del tambor
y solo cuando la colada se ha distribuido
correctamente se realizará la centrifugación.
Si después de 10 minutos, la ropa permanece
apelotonada, la lavadora saltará esta fase de
centrifugación y finalizará el ciclo.
Por ello, si observa que al finalizar el ciclo la ropa
está empapada, le aconsejamos redistribuirla
manualmente en el interior del tambor y poner el
programa de centrífuga.
Atención: Puede ocurrir que el tipo y la cantidad
de ropa (p.ej. 2 toallas unicamente) impidan su
distribución, por ello aconsejamos lavar, con las
toallas, otras prendas.
Si no se soluciona el problema o no se lo localiza,
diríjase al centro de asistencia después de haber
tomado nota del modelo, del número de serie y de la
fecha de compra del aparato; es necesario conocer
estos datos pues serán solicitados.
Para España: Puede comprar recambios y
accesorios on-line entre en
http://www.service.electrolux.com y seleccione
Tienda Virtual
Mod. ..........
Prod. No. ...........
Ser. No. .........
M
o
d
. ..........
Pr
od
. N
o
. ...........
S
er
. No
. .........
P0042 BD
P1035E
No se ve
agua en el aparato. Los aparatos,
fruto de la tecnología moderna, trabajan en
modo muy económico con consumo reducido
de agua. De todos modos las prestaciones
son excelentes
El aparato
hace un ruido insólito. El aparato está
dotado de un motor a colector que mejora la
prestación del aparato.
P1034E
• La puerta no se abre:
• El programa todavía está en curso.
• La puerta todavía no se ha desbloqueado.
• Hay agua en el tambor.
Se podrá abrir la puerta sólo cuando la luz de la
puerta se apagará.
Page 41

ЕЛЛЗНЙКБ
41
БгбрзфпЯ релЬфет,
ДйбвЬуфе бхфЭт фйт пдзгЯет лейфпхсгЯбт рспуекфйкЬ кбй дюуфе йдйбЯфесз рспупчЮ уфйт рбсбфзсЮуейт буцЬлейбт рпх
бнбцЭспнфбй уфйт рсюфет уелЯдет. УхуфЮнпхме нб дйбфзсеЯфе бхфь фп егчейсЯдйп пдзгйюн чсЮузт гйб меллпнфйкЮ
бнбцпсЬ кбй нб фп дЯнефе уе прпйпндЮрпфе меллпнфйкь йдйпкфЮфз.
ВлЬвет кбфЬ фз мефбцпсЬ
ВгЬжпнфбт фз ухукехЮ брь фз ухукехбуЯб фзт, вевбйщиеЯфе ьфй ден рбспхуйЬжей ципсЭт. ЕЬн Эчефе бмцйвплЯет, мзн
фз чсзуймпрпйЮуефе кбй елЬфе уе ербцЮ ме фп КЭнфсп УЭсвйт.
Фб уэмвплб рпх иб деЯфе уе псйумЭнет рбсбгсЬцпхт фпх егчейсйдЯпх Эчпхн фзн бкьлпхиз узмбуЯб:
Tп фсЯгщнп кбй/Ю пй лЭоейт (РспейдпрпЯзуз!, РспупчЮ!) фпнЯжпхн рлзспцпсЯет йдйбЯфесб узмбнфйкЭт гйб фзн
буцЬлейЬ убт Ю фп ущуфь фсьрп лейфпхсгЯбт фзт ухукехЮт.
Фп уэмвплп бхфь хрЬсчей дЯрлб уе рлзспцпсЯет рпх рбсЭчпхн ерйрлЭпн пдзгЯет кбй рсбкфйкЭт ухмвпхлЭт
учефйкЬ ме фз чсЮуз фзт ухукехЮт.
Фп уэмвплп бхфь хрЬсчей дЯрлб уе ухмвпхлЭт кбй рлзспцпсЯет учефйкЬ ме фзн пйкпнпмйкЮ кбй пйкплпгйкЮ
чсЮуз фзт ухукехЮт.
З ухнейуцпсЬ мбт уфзн рспуфбуЯб фпх
ресйвЬллпнфпт: Чсзуймпрпйпэме бнбкхклщмЭнп
чбсфЯ.
Ресйечьменб
РспцхлЬоейт 42
Брьссйшз 43
УхмвпхлЭт гйб фзн рспуфбуЯб фпх
ресйвЬллпнфпт 43
ФечнйкЬ чбсбкфзсйуфйкЬ 43
ЕгкбфЬуфбуз 44
БрпухукехбуЯб 44
ФпрпиЭфзуз кбй псйжпнфЯщуз 44
РбспчЮ неспэ 44-45
¸опдпт неспэ 45
ЗлекфсйкЭт ухндЭуейт 45
Фп нЭп убт рлхнфЮсйп спэчщн 46
● ЛхчнЯб буцЬлйузт фзт рьсфбт 46
● УхсфЬсй брпссхрбнфйкпэ 46
ЧсЮуз 47
РЯнбкбт чейсйуфзсЯщн 47-48
ЧейсйуфЮсйб 48-49
УхмвпхлЭт гйб фп рлэуймп 49
ЧщсЯжпнфбт фб спэчб 49
ИесмпксбуЯб 49
Рсйн вЬлефе фб спэчб уфп рлхнфЮсйп 49
МЭгйуфп цпсфЯп спэчщн 49
ВЬспт спэчщн ьфбн еЯнбй уфегнЬ 49
БцбЯсеуз фщн лекЭдщн 49-50
БрпссхрбнфйкЬ кбй рспуиефйкЬ 50
ДйеинЮ уэмвплб гйб фп рлэуймп фщн хцбумЬфщн 51
ДйбдпчЮ енесгейюн 52-53
РЯнбкбт рспгсбммЬфщн 54-55
УхнфЮсзуз 56
ЕощфесйкЮ ерйцЬнейб 56
ЛЬуфйчп фзт рьсфбт 56
УхсфЬсй брпссхрбнфйкпэ 56
ЦЯлфсп фпх ущлЮнб рбспчЮт 56
БнфлЯб бдейЬумбфпт 56-57
¢дейбумб неспэ уе ресЯрфщуз Экфбкфзт бнЬгкзт 57
РспуфбуЯб брь фпн рЬгп 57
ДхулейфпхсгЯет; 58-59
Page 42

42
ЕгкбфЬуфбуз
• ¼лб фб хлйкЬ ухукехбуЯбт рсЭрей нб бцбйсеипэн
брь фп еущфесйкь фзт ухукехЮт рсйн фз чсЮуз фзт.
ЕЬн ден бцбйсЭуефе ьлет фйт дйбфЬоейт буцблеЯбт
кбфЬ фз мефбцпсЬ Ю еЬн ден фйт бцбйсЭуефе
енфелют, мрпсеЯ нб рспклзипэн упвбсЭт влЬвет уфп
рлхнфЮсйп Ю уфб Эрйрлб ме фб прпЯб Эсчефбй уе
ербцЮ. ДйбвЬуфе фз учефйкЮ рбсЬгсбцп уфп
егчейсЯдйп пдзгйюн чсЮузт.
• Пй злекфсплпгйкЭт есгбуЯет рпх брбйфпэнфбй гйб фзн
егкбфЬуфбуз фзт рбспэубт ухукехЮт рсЭрей нб
екфелпэнфбй брь ербггелмбфЯб злекфспльгп.
• Пй хдсбхлйкЭт есгбуЯет рпх брбйфпэнфбй гйб фзн
егкбфЬуфбуз фзт рбспэубт ухукехЮт рсЭрей нб
екфелпэнфбй брь ербггелмбфЯб хдсбхлйкь.
• Бцпэ плпклзсюуефе фзн егкбфЬуфбуз фпх
рлхнфзсЯпх, вевбйщиеЯфе ьфй де уфзсЯжефбй рЬнщ уфп
кблюдйп фспцпдпуЯбт фпх.
• ЕЬн фп рЬфщмб рЬнщ уфп прпЯп фпрпиефЮизке фп
рлхнфЮсйп еЯнбй кблхммЭнп ме мпкЭфб, вевбйщиеЯфе ьфй
еЯнбй дхнбфЮ з кхклпцпсЯб фпх бЭсб бнЬмеуб уфб
рпдбсЬкйб уфЮсйозт кбй уфп рЬфщмб.
ЧсЮуз
• З рбспэуб ухукехЮ Эчей учедйбуфеЯ гйб пйкйбкЮ
чсЮуз. З чсЮуз фзт гйб Ьллпхт укпрпэт рЭсбн
бхфюн гйб фпхт прпЯпхт учедйЬуфзке ден
ерйфсЭрефбй.
• Рлэнефе мьнп фб хцЬумбфб рпх мрпспэн нб рлхипэн
уфп рлхнфЮсйп. БкплпхиЮуфе фйт пдзгЯет уфзн ефйкЭфб
кЬие спэчпх.
• Мзн хресцпсфюнефе фз ухукехЮ. БкплпхиЮуфе фйт
пдзгЯет уфп егчейсЯдйп пдзгйюн чсЮузт.
• ВевбйщиеЯфе ьфй ьлет пй фуЭрет фщн спэчщн еЯнбй
Ьдейет. БнфйкеЯменб ьрщт нпмЯумбфб, рбсбмЬнет,
кбсцЯфует кбй вЯдет мрпспэн нб рспоенЮупхн
екфефбмЭнет влЬвет.
• Мзн фпрпиефЮуефе уфп рлхнфЮсйп спэчб мпхукемЭнб
ме рефсЭлбйп, меихлйкЮ блкпьлз фсйчлпсбйихлЭнйп,
клр. ЕЬн чсзуймпрпйЮубфе фЭфпйб хгсЬ гйб нб
бцбйсЭуефе лекЭдет рсйн брь фзн рлэуз, ресймЭнефе
мЭчсй нб еобфмйуфпэн енфелют брь фп эцбумб рсйн
фпрпиефЮуефе фб спэчб уфп рлхнфЮсйп.
• ФпрпиефЮуфе фб мйксЬ бнфйкеЯменб ьрщт кЬлфует,
жюнет к.ф.л. уе Энбн хцбумЬфйнп уЬкп Ю мйб
мбойлбспиЮкз юуфе нб мзн рйбуфпэн кЬрпх уфпн
кЬдп.
РспцхлЬоейт
• ЧсзуймпрпйеЯфе брпклейуфйкЬ фйт ухнйуфюменет
рпуьфзфет мблбкфйкпэ. З хресвплйкЮ рпуьфзфб
мблбкфйкпэ ендЭчефбй нб кбфбуфсЭшей фб спэчб.
• БцЮнефе елбцсют бнпйчфЮ фзн рьсфб ьфбн з ухукехЮ
де чсзуймпрпйеЯфбй. ¸фуй дйбфзсеЯфбй уе кблЮ
кбфЬуфбуз фп лЬуфйчп фзт рьсфбт кбй де
дзмйпхсгпэнфбй дхуЬсеуфет пумЭт.
• ЕлЭгчефе рЬнфпфе еЬн фп несь Эчей бдейЬуей рсйн
бнпЯоефе фзн рьсфб. ЕЬн ьчй, бдейЬуфе фп несь
уэмцщнб ме фйт пдзгЯет уфп егчейсЯдйп пдзгйюн
чсЮузт.
• БрпухндЭефе рЬнфпфе фз ухукехЮ кбй клеЯнефе фз
всэуз неспэ мефЬ фз чсЮуз.
Генйкьфесз буцЬлейб
• Пй ерйдйпсиюуейт рсЭрей нб екфелпэнфбй мьнп брь
ейдйкехмЭнп рспущрйкь. Пй ерйдйпсиюуейт рпх
екфелпэнфбй брь Ьфпмб чщсЯт фзн кбфЬллзлз реЯсб
ендЭчефбй нб рспкблЭупхн упвбсь кЯндхнп.
ЕрйкпйнщнЮуфе ме фп КЭнфсп УЭсвйт фзт ресйпчЮт
убт.
• РпфЭ мзн фсбвЬфе фп кблюдйп фспцпдпуЯбт гйб нб
вгЬлефе фп цйт брь фзн рсЯжб, рЬнфпфе нб фсбвЬфе
фп Ядйп фп цйт.
• КбфЬ фз дйЬскейб фщн рспгсбммЬфщн рлэузт уе
хшзлЮ иесмпксбуЯб, фп гхблЯ фзт рьсфбт ендЭчефбй
нб иесмбниеЯ. Мзн фп бггЯжефе!
БуцЬлейб гйб фб рбйдйЬ
• Фб рбйдйЬ ухчнЬ ден бнфйлбмвЬнпнфбй рьупхт
кйндэнпхт егкхмпнпэн пй злекфсйкЭт ухукехЭт. ¼фбн
фп рлхнфЮсйп еЯнбй уе лейфпхсгЯб, фб рбйдйЬ рсЭрей нб
рбсбкплпхипэнфбй рспуекфйкЬ кбй нб мзн фпхт
ерйфсЭрефбй нб рбЯжпхн ме фз ухукехЮ.
• Фб хлйкЬ фзт ухукехбуЯбт (р.ч. рлбуфйкЮ мемвсЬнз,
рплхуфхсьлйп) ендЭчефбй нб еЯнбй ерйкЯндхнб гйб фб
рбйдйЬ - хрЬсчей кЯндхнпт буцхоЯбт! ЦхлЬууефЭ фб
мбксйЬ брь фб рбйдйЬ.
• ЦхлЬууефе ьлб фб брпссхрбнфйкЬ уе буцблЭт
мЭспт, мбксйЬ брь фб рбйдйЬ.
• ВевбйщиеЯфе ьфй фб рбйдйЬ Ю фб кбфпйкЯдйб ден
мрбЯнпхн мЭуб уфпн кЬдп.
• Рсйн фзн брьссйшз фзт ухукехЮт, кьшфе фп кблюдйп
фспцпдпуЯбт кбй кбфбуфсЭшфе фп цйт кбй фп хрьлпйрп
кблюдйп. Бчсзуфеэубфе фп мЬнфблп фзт рьсфбт юуфе
нб мзн рбгйдехфпэн мЭуб фб рбйдйЬ еню рбЯжпхн.
Пй бкьлпхиет рспцхлЬоейт рбсЭчпнфбй гйб фзн буцЬлейб ьлщн. РсЭрей нб фйт дйбвЬуефе рспуекфйкЬ рсйн фзн
егкбфЬуфбуз Ю чсЮуз фзт ухукехЮт.
Page 43

ЕЛЛЗНЙКБ
43
Брьссйшз
УхмвпхлЭт гйб фзн рспуфбуЯб фпх
ресйвЬллпнфпт
ХлйкЬ ухукехбуЯбт
Фб хлйкЬ рпх цЭспхн бхфь фп уэмвплп еЯнбй
бнбкхклюуймб.
>PE<=рплхбйихлЭнйп
>PS<=рплхуфхсьлйп
>PP<=рплхрспрхлЭнйп
Бхфь узмбЯней ьфй мрпспэн нб бнбкхклщипэн бцпэ з
брьссйшз гЯней ме фп ущуфь фсьрп, уе кбфЬллзлб
дпчеЯб ресйухллпгЮт.
РлхнфЮсйп
З брьссйшз фзт рблйЬт ухукехЮт убт рсЭрей нб гЯнефбй
уе егкексймЭнпхт чюспхт брьссйшзт. ВпзиЮуфе нб
дйбфзсЮуефе фз чюсб убт кбибсЮ!
Фп уэмвплп ерЯ фпх рспъьнфпт Ю фзт ухукехбуЯбт
фпх узмбЯней ьфй фп рспъьн бхфь де ухгкбфблЭгефбй уфб
ухнЮиз пйкйбкЬ брпссЯммбфб. БнфйиЭфщт, рсЭрей нб
мефбцесиеЯ уфп хрЬсчпн узмеЯп ресйухллпгЮт гйб
бнбкэклщуз фпх злекфсйкпэ кбй злекфспнйкпэ
еопрлйумпэ фпх. ДйбуцблЯжпнфбт фзн брьссйшз фпх
рспъьнфпт ме фп ущуфь фсьрп, ухмвЬллефе уфзн
брпфспрЮ ендечьменщн бснзфйкюн ерйрфюуещн гйб фп
ресйвЬллпн кбй фзн хгеЯб фзт кпйньфзфбт рпх иб
мрпспэубн ейдЬллщт нб рспклзипэн брь фпн
еуцблмЭнп фсьрп брьссйшзт фпх рспъьнфпт. Гйб
ресйууьфесет рлзспцпсЯет учефйкЬ ме фзн бнбкэклщуз
фпх рспъьнфпт, ерйкпйнщнЮуфе ме фйт дзмпфйкЭт
хрзсеуЯет уфзн ресйпчЮ убт, фзн бсмьдйб хрзсеуЯб
брпкпмйдЮт Ю фп кбфЬуфзмб брь ьрпх бгпсЬубфе фп
рспъьн.
Гйб нб еопйкпнпмЮуефе несь, енЭсгейб кбй гйб нб
ухмвЬлефе уфзн рспуфбуЯб фпх ресйвЬллпнфпт,
бкплпхиЮуфе фйт еоЮт ухмвпхлЭт:
• Фб цхуйплпгйкЬ лесщмЭнб спэчб мрпспэн нб рлхипэн
чщсЯт рсьрлхуз юуфе нб еопйкпнпмЮуефе
брпссхрбнфйкь, несь кбй чсьнп (ерЯузт, Эфуй
рспуфбфеэефе фп ресйвЬллпн!).
• Фп рлхнфЮсйп лейфпхсгеЯ рйп брпфелеумбфйкЬ ьфбн
Эчефе гемЯуей фпн кЬдп. Щуфьуп, мзн фп
хресцпсфюнефе!
• Ме фпн кбфЬллзлп кбибсйумь рсйн фп рлэуймп, пй
лекЭдет кбй з ресйпсйумЭнз всщмйЬ мрпспэн нб
бцбйсеипэн, фб спэчб рлЭнпнфбй уфз ухнЭчейб уе
чбмзльфесз иесмпксбуЯб, еопйкпнпмюнфбт Эфуй
енЭсгейб.
• МефсЮуфе фзн рпуьфзфб фпх брпссхрбнфйкпэ
уэмцщнб ме фз уклзсьфзфб фпх неспэ, фп рьуп
лесщмЭнб еЯнбй фб спэчб кбй фзн рпуьфзфЬ фпхт.
ДЙБУФБУЕЙУ ¾øïò 85 cm
РлЬфпт 60 cm
ВЬипт 63 cm
ПНПМБУФЙКП ЦПСФЙП ВбмвбкесЬ 7 kg
УхниефйкЬ: 3 kg
ЕхбЯуизфб 3 kg
МЬллйнб 2 kg
ФБЧХФЗФБ УФХШЙМБФПУ 800 óôñ/ëåð ìÝã. (FE 827 G)
1000 óôñ/ëåð ìÝã. (FE 1027 G)
ФБУЗ/УХЧНПФЗФБ 220-230 V/50 Hz
МЕГЙУФЗ КБФБНБЛЩУЗ ЙУЧХПУ 2200 W
ЕЛБЧЙУФЗ ФЙМЗ БУЦБЛЕЙБУ 10 A
РЙЕУЗ НЕСПХ ЕлЬчйуфз 0,05 MPa
МЭгйуфз 0,8 MPa
З ухукехЮ ухммпсцюнефбй ме фйт бкьлпхиет ПдзгЯет фзт ЕПК:
73/23/ЕПК фзт 19/02/73 ресЯ чбмзлЮт фЬузт
89/336/ЕПК фзт 03/05/89 ресЯ злекфспмбгнзфйкЮт ухмвбфьфзфбт.
ФечнйкЬ чбсбкфзсйуфйкЬ
Page 44

44
ЕгкбфЬуфбуз
БрпухукехбуЯб
РсЭрей нб бцбйсЭуфе ьлет фйт дйбфЬоейт
буцблеЯбт кбфЬ фз мефбцпсЬ.
рсйн фз чсЮуз фзт ухукехЮт.
Убт ухмвпхлеэпхме нб цхлЬоефе ьлет фйт
рспуфбфехфйкЭт дйбфЬоейт, рспкеймЭнпх нб фйт
чсзуймпрпйЮуефе уе ресЯрфщуз рпх иелЮуефе
меллпнфйкЬ нб мефбцЭсефе фп рлхнфЮсйп.
1. Бцпэ бцбйсЭуефе ьлз фз ухукехбуЯб, бкпхмрЮуфе
рспуекфйкЬ фп рлхнфЮсйп уфз сЬчз фпх гйб нб
бцбйсЭуефе фз вЬуз брь рплхуфхсьлйп.
2. БцбйсЭуфе фп кблюдйп фспцпдпуЯбт кбй фп ущлЮнб
бдейЬумбфпт брь фб Ьгкйуфсб фщн ущлЮнщн уфп
рЯущ мЭспт фпх рлхнфзсЯпх.
3. Ме Энб клейдЯ, оевйдюуфе кбй бцбйсЭуфе фзн
кенфсйкЮ рЯущ вЯдб A. ВгЬлфе фпн бнфЯуфпйчп
рлбуфйкь брпуфЬфз.
4. Оевйдюуфе кбй бцбйсЭуфе фйт дэп мегЬлет рЯущ
вЯдет B кбй фйт Эой мйксьфесет вЯдет C.
5. БцбйсЭуфе фп уфЮсйгмб D кбй уцЯофе фйт Эой
мйксьфесет вЯдет C.
C
C
HEC0014
HEC0011S
D
HEC0003S
C
C
B
B
HEC0002S
A
HEC0001
HEC0008
6. БнпЯофе фзн рьсфб, бцбйсЭуфе фп ущлЮнб рбспчЮт
брь фпн кЬдп кбй бцбйсЭуфе фп кЬлхммб
рплхуфхсплЯпх рпх еЯнбй фпрпиефзмЭнп ме кпллзфйкЮ
фбйнЯб уфп лЬуфйчп фзт рьсфбт.
7.
КлеЯуфе фзн мйксьфесз ерЬнщ прЮ кбй фйт дэп мегЬлет
ме фйт бнфЯуфпйчет рлбуфйкЭт фЬрет рпх рбсЭчпнфбй уфп
рлбуфйкь цЬкелп ме фп егчейсЯдйп пдзгйюн.
8. УхндЭуфе фп ущлЮнб рбспчЮт неспэ ьрщт
ресйгсЬцефбй уфзн рбсЬгсбцп “ЕЯупдпт неспэ”.
ФпрпиЭфзуз
ФпрпиефЮуфе фп рлхнфЮсйп уе ерЯредп кбй уфбиесь
дЬредп.
ВевбйщиеЯфе ьфй ден емрпдЯжефбй з кхклпцпсЯб бЭсб
гэсщ брь фп рлхнфЮсйп брь мпкЭфет, чблйЬ к.ф.л.
ЕлЭгофе ьфй фп рлхнфЮсйп ден Эсчефбй уе ербцЮ ме фпн
фпЯчп Ю фб Эрйрлб фзт кпхжЯнбт.
Псйжпнфйюуфе рспуекфйкЬ вйдюнпнфбт Ю оевйдюнпнфбт фб
схимйжьменб рпдбсЬкйб. РпфЭ мзн фпрпиефеЯфе кЬфщ брь
фп рлхнфЮсйп чбсфьнй, оэлп Ю рбсьмпйб хлйкЬ гйб нб
бнфйуфбимЯуефе фб бнйуьредб узмеЯб фпх рбфюмбфпт.
РбспчЮ неспэ
РбсЭчефбй Энбт ущлЮнбт рбспчЮт неспэ кбй мрпсеЯ нб
всеиеЯ мЭуб уфпн кЬдп фпх рлхнфзсЯпх.
Мз чсзуймпрпйЮуефе фп ущлЮнб брь фп рблйь убт
рлхнфЮсйп гйб фз уэндеуз фзт фспцпдпуЯбт неспэ.
1. БнпЯофе фзн рьсфб, бцбйсЭуфе фп ущлЮнб рбспчЮт .
2. УхндЭуфе фп ущлЮнб ме фп гщнйбкь ухндефЮсб уфп
рлхнфЮсйп.
Узмбнфйкь!
Мзн фпрпиефЮуефе фп ущлЮнб рбспчЮт рспт фб
кЬфщ. ГхсЯуфе фп ущлЮнб рспт фб бсйуфесЬ Ю фб
деойЬ бнЬлпгб ме фз иЭуз фзт всэузт.
HEC0005
HEC0010
P1051
Page 45

ЕЛЛЗНЙКБ
45
3.
СхимЯуфе фп ущлЮнб ущуфЬ чблбсюнпнфбт фп рбоймЬдй
фпх дбкфхлЯпх. Бцпэ фпрпиефЮуефе фп ущлЮнб
рбспчЮт, вевбйщиеЯфе ьфй уцЯобфе фп рбоймЬдй фпх
дбкфхлЯпх обнЬ гйб фзн брпцхгЮ дйбсспюн.
4. УхндЭуфе фп ущлЮнб уе всэуз ме хрпдпчЭт фщн 3/4”.
ЧсзуймпрпйеЯфе рЬнфпфе фп рбсечьменп ме фз
ухукехЮ ущлЮнб.
П ущлЮнбт рбспчЮт ден еЯнбй дхнбфьн нб ерймзкхниеЯ.
ЕЬн еЯнбй кпнфьт кбй ден ерйихмеЯфе нб мефбкйнЮуефе фз
всэуз, иб рсЭрей нб бгпсЬуефе Энбн енйбЯп, рйп ерймЮкз
ущлЮнб, ейдйкЬ кбфбукехбумЭнп гйб бхфЮ фз чсЮуз.
¸опдпт неспэ
З кбмрэлз фпх ущлЮнб еоьдпх мрпсеЯ нб фпрпиефзиеЯ
ме фсейт дйбцпсефйкпэт фсьрпхт:
Уфп чеЯлпт фпх нйрфЮсб, чсзуймпрпйюнфбт фпн
рлбуфйкь бгкюнб рпх рбсЭчефбй мбжЯ ме фп рлхнфЮсйп.
Уфзн ресЯрфщуз бхфЮ, вевбйщиеЯфе ьфй п ущлЮнбт ден
мрпсеЯ нб брбгкйуфсщиеЯ брь фп чеЯлпт фпх нйрфЮсб, ьфбн
фп рлхнфЮсйп бдейЬжей фп несь.
МрпсеЯфе нб фп уфесеюуефе дЭнпнфЬт фпн брь фз всэуз Ю
фпн фпЯчп.
Узмбнфйкь!
ЕЬн з уэндеуз рсбгмбфпрпйзиеЯ ме нЭет ущлзнюуейт Ю
ме ущлзнюуейт рпх ден Эчпхн чсзуймпрпйзиеЯ гйб
бскефь кбйсь, ухнйуфЬфбй нб фсЭоей кЬрпйб рпуьфзфб
неспэ гйб нб брпмбксхнипэн прпйбдЮрпфе хрплеЯммбфб
Эчпхн ухгкенфсщиеЯ уфпхт ущлЮнет.
P0022
P1088
HEC0006
Уе мйб дйбклЬдщуз фзт брпчЭфехузт фпх нйрфЮсб. З
дйбклЬдщуз рсЭрей нб всЯукефбй рЬнщ брь фп уйцьнй,
кбфЬ фЭфпйп фсьрп юуфе з кбмрэлз фпх ущлЮнб нб
всЯукефбй фпхлЬчйуфпн 60 cm рЬнщ брь фп рЬфщмб.
БрехиеЯбт уе Энбн бгщгь брпчЭфехузт уе эшпт ьчй
мйксьфесп брь 60 cm кбй ьчй мегблэфесп брь 90 cm.
Фп Ьксп фпх ущлЮнб еоьдпх рсЭрей рЬнфпфе íá
бесЯжефбй, дзл. з еущфесйкЮ дйЬмефспт фпх бгщгпэ иб
рсЭрей нб еЯнбй мегблэфесз брь фзн еощфесйкЮ дйЬмефсп
фпх ущлЮнб еоьдпх.
ПрпйбдЮрпфе ерЭкфбуз фпрпиефеЯфбй уфп ущлЮнб
еоьдпх ден рсЭрей нб хресвбЯней уе мЮкпт фб 200 cm
кбй з дйЬмефсьт фзт ден рсЭрей нб еЯнбй мйксьфесз брь
бхфЮ фпх бсчйкпэ ущлЮнб. ЧсзуймпрпйЮуфе кбфЬллзлп
уфегбнпрпйзфйкь еоЬсфзмб гйб фз уэндеуз.
П ущлЮнбт еоьдпх ден рсЭрей нб еЯнбй фубкйумЭнпт.
ЗлекфсйкЭт ухндЭуейт
Фп рлхнфЮсйп бхфь лейфпхсгеЯ ме мпнпцбуйкь сеэмб, ме
фЬуз 220-230 V кбй ухчньфзфб 50 Hz.
ЕлЭгофе еЬн з злекфсплпгйкЮ егкбфЬуфбуз уфп урЯфй
убт мрпсеЯ нб узкюуей фп мЭгйуфп брбйфпэменп цпсфЯп
(2,2 kW), лбмвЬнпнфбт хрьшз кбй фзн фбхфьчспнз
чсЮуз Ьллщн ухукехюн.
УхндЭуфе фп кблюдйп фспцпдпуЯбт фпх рлхнфзсЯпх
уе мйб рсЯжб ме геЯщуз.
П кбфбукехбуфЮт де цЭсей ехиэнз гйб влЬвет Ю
фсбхмбфйумпэт рпх пцеЯлпнфбй уфзн рбсЬвлешз
фщн рбсбрЬнщ рспцхлЬоещн учефйкЬ ме фзн
буцЬлейб.
Уе ресЯрфщуз рпх рсЭрей нб бнфйкбфбуфбиеЯ фп
кблюдйп фспцпдпуЯбт фзт ухукехЮт, з
бнфйкбфЬуфбуз рсЭрей нб гЯней брь фп КЭнфсп
УЭсвйт мбт.
ВевбйщиеЯфе ьфй мефЬ фзн егкбфЬуфбуз фпх
рлхнфзсЯпх ден емрпдЯжефбй з рсьувбуз уфп
кблюдйп фспцпдпуЯбт.
P1118
Page 46

46
Бхфь фп нЭп рлхнфЮсйп фзсеЯ ьлет фйт уэгчспнет рспдйбгсбцЭт гйб брпфелеумбфйкь рлэуймп ме лЯгп несь, енЭсгейб
кбй кбфбнЬлщуз брпссхрбнфйкпэ.
• П дйбкьрфзт ерйлпгЮт рспгсЬммбфпт ухндхЬжей фз лейфпхсгЯб ерйлпгЮт рспгсЬммбфпт кбй иесмпксбуЯбт,
дйехкплэнпнфбт бкьмз ресйууьфесп фз сэимйуз рспгсЬммбфпт.
• З пиьнз спЮт рспгсЬммбфпт деЯчней фб вЮмбфб рпх ерйлЭчизкбн, кбиют кбй фз цЬуз фпх рспгсЬммбфпт уфп
прпЯп всЯукефбй.
• Фп ейдйкь рсьгсбммб мЬллйнщн ме фп нЭп уэуфзмб брблпэ рлхуЯмбфпт чейсЯжефбй фб мЬллйнб спэчб убт ме
еобйсефйкЮ цспнфЯдб.
• З бхфьмбфз шэоз фпх неспэ рлхуЯмбфпт брь фпхт 90° уфпхт 60°C рсйн фп Ьдейбумб рсплбмвЬней фзн бллпЯщуз
фщн рблйюн ущлзнюуещн кбй мейюней фп иесмйкь упк уфб хцЬумбфб, брпупвюнфбт фп фублЬкщмб.
• Фп уэуфзмб елЭгчпх еойупссьрзузт: емрпдЯжей фпн ксбдбумь кбфЬ фп уфэшймп.
• З вблвЯдб ECO ерйфсЭрей фзн плпклзсщфйкЮ чсЮуз брпссхрбнфйкпэ кбй фз меЯщуз фзт кбфбнЬлщузт неспэ
еопйкпнпмюнфбт енЭсгейб.
1 УхсфЬсй брпссхрбнфйкпэ
2 РЯнбкбт чейсйуфзсЯщн
3 ЛхчнЯб буцЬлйузт фзт рьсфбт
4 ЧейсплбвЮ рьсфбт
5 БнфлЯб бдейЬумбфпт
6 Схимйжьменб рпдбсЬкйб
ЛхчнЯб буцЬлйузт фзт рьсфбт (3)
РбсбмЭней бнбммЭнз кби’ьлз фз дйЬскейб фпх
рспгсЬммбфпт, кЬфй рпх узмбЯней ьфй з рьсфб еЯнбй
клейдщмЭнз.
¼фбн з лхчнЯб увЮней, мрпсеЯфе нб бнпЯоефе фзн рьсфб
(вл. уелЯдб 53).
Фп нЭп убт рлхнфЮсйп спэчщн
1
2
3
5
4
F 827 G
УхсфЬсй брпссхрбнфйкпэ
Рсьрлхуз
Рлэуз
Мблбкфйкь, кьллб
C0063
Page 47

ЕЛЛЗНЙКБ
47
ЧсЮуз
РлЮкфсб Ерйлпгюн
БнЬлпгб ме фп рсьгсбммб рпх Эчефе ерйлЭоей, мрпсеЯфе
нб ерйлЭоефе кбй дйЬцпсет лейфпхсгЯет. МрпсеЯфе нб
ерйлЭоефе мефбоэ фщн лейфпхсгйюн, бцпэ рсюфб
ерйлЭоефе фп рсьгсбммб рпх иЭлефе кбй рсйн
рбфЮуефе фп рлЮкфсп ¸нбсозт/Рбэузт .
Рбфюнфбт бхфЬ фб рлЮкфсб, бнЬвпхн пй бнфЯуфпйчет
ендейкфйкЭт лхчнЯет. Рбфюнфбт фб Ьллз мйб цпсЬ, пй
бнфЯуфпйчет лхчнЯет увЮнпхн.
ЕЬн кЬнефе кЬрпйп лЬипт кбфЬ фзн ерйлпгЮ, пй
ендейкфйкЭт лхчнЯет бнбвпувЮнпхн гйб дэп
дехфесьлерфб ресЯрпх.
1 РлЮкфсп “Ерйлпгюн”
Рбфюнфбт фп рлЮкфсп бхфь мрпсеЯфе нб ерйлЭоефе дэп
дйбцпсефйкЭт дхнбфьфзфет:
● Рсьрлхуз
ЕрйлЭофе бхфЮ фзн ерйлпгЮ еЬн ерйихмеЯфе нб кЬнефе
мйб рсьрлхуз уфпхт 30°C рсйн брь фзн кэсйб рлэуз
(ден еЯнбй дйбиЭуймп гйб фб мЬллйнб).
З рсьрлхуз фелейюней ме Энб уэнфпмп уфэшймп гйб
фб вбмвбкесЬ кбй фб ухниефйкЬ, еню уфб
рспгсЬммбфб гйб лерфЬ хцЬумбфб фп несь брлют
брпуфсбггЯжефбй.
● Уэнфпмз рлэуз
Фп рлЮкфсп бхфь убт ерйфсЭрей нб ерйлЭоефе фз
лейфпхсгЯб УХНФПМЗ РЛХУЗ мьнп гйб елбцсют
лесщмЭнб спэчб (ьчй гйб мЬллйнб кбиют кбй мбжЯ
ме фз лейфпхсгЯб ).
П чсьнпт рлэузт иб мейщиеЯ бнЬлпгб ме фп еЯдпт
фщн спэчщн кбй фз иесмпксбуЯб рпх Эчей ерйлечиеЯ.
МЭг. цпсфЯп гйб вбмвбкесЬ 3,5 kg.
2 РлЮкфсп “ECO”
б) Рбфюнфбт фп рлЮкфсп бхфь мбжЯ ме фп рсьгсбммб
“ВбмвбкесЬ 90°C”, з иесмпксбуЯб мейюнефбй уфпхт
67°C кбй п чсьнпт рлэузт бхоЬней кбфЬ 22 лерфЬ.
Рбфюнфбт фп рлЮкфсп бхфь мбжЯ ме фп рсьгсбммб
“УхниефйкЬ 60°C”, з иесмпксбуЯб мейюнефбй уфпхт
40°C кбй п чсьнпт рлэузт бхоЬней кбфЬ 10 лерфЬ.
З ерйлпгЮ бхфЮ мрпсеЯ нб чсзуймпрпйзиеЯ мьнп гйб
спэчб цхуйплпгйкЬ лесщмЭнб рспкеймЭнпх нб
еопйкпнпмЮуефе енЭсгейб.
в) Гйб нб рефэчефе брьдпуз рлэузт “A” иб рсЭрей нб
рбфЮуефе фп рлЮкфсп бхфь фбхфьчспнб ме фб
рспгсЬммбфб “ВбмвбкесЬ 60°C” êáé “ВбмвбкесЬ
40°C”. П чсьнпт рлэузт бхоЬней кбфЬ 10 лерфЬ
уфпхт 60°C кбй кбфЬ 35 лерфЬ уфпхт 40°C.
3 РлЮкфсп “ЕрйрлЭпн ОевгЬлмбфпт”
З дхнбфьфзфб фпх ЕрйрлЭпн ОевгЬлмбфпт мрпсеЯ нб
ерйлегеЯ ме ьлб фб рспгсЬммбфб екфьт брь фб
рспгсЬммбфб гйб мЬллйнб. З мзчбнЮ иб екфелЭуей 2
рсьуиефб оевгЬлмбфб. БхфЮ з ерйлпгЮ ухнйуфЬфбй гйб
фпхт бллесгйкпэт уфб брпссхрбнфйкЬ кбй уфйт ресйпчЭт
ьрпх фп несь еЯнбй рплэ мблбкь.
4 РлЮкфсп “Бкэсщузт ОевгЬлмбфпт”
¼фбн ерйлЭоефе бхфЮ фз дхнбфьфзфб, фп несь брь фп
фелехфбЯп оЭвгблмб рбсбмЭней мЭуб Эфуй юуфе нб мзн
жбсюупхн фб хцЬумбфб.
Уфп фЭлпт фпх рспгсЬммбфпт з ендейкфйкЮ лхчнЯб
“ФЭлпхт” бнЬвей, еню кбй з лхчнЯб буцЬлйузт фзт
рьсфбт еЯнбй бнбммЭнз. Гйб нб бдейЬуефе фп несь,
бкплпхиЮуфе фзн еоЮт дйбдйкбуЯб:
● гхсЯуфе фп дйбкьрфз ерйлпгЮт рспгсЬммбфпт уфз
èÝóç “O”,
● ерйлЭофе фп рсьгсбммб (Ьдейбумб) Ю
(уэнфпмп уфэшймп),
● рбфЮуфе фп рлЮкфсп ¸нбсозт/Рбэузт .
МрпсеЯфе нб мейюуефе фзн фбчэфзфб ресйуфспцЮт
рспкеймЭнпх нб рспубсмьуефе фзн фбчэфзфб
ресйуфспцЮт бнЬлпгб ме фзн рлэуз.
123456 7 8
FE 827 G
РЯнбкбт чейсйуфзсЯщн
Page 48

48
5 РлЮкфсп “¸нбсозт/Рбэузт”
МефЬ фзн ерйлпгЮ фпх брбсбЯфзфпх рспгсЬммбфпт,
рбфЮуфе бхфь фп рлЮкфсп гйб нб оекйнЮуей фп рлхнфЮсйп.
З бнфЯуфпйчз ендейкфйкЮ лхчнЯб уфбмбфЬ нб бнбвпувЮней
кбй рбсбмЭней бнбммЭнз.
Гйб нб дйбкьшефе фп рсьгсбммб рпх екфелеЯфбй, рйЭуфе
фп рлЮкфсп ¸нбсозт/Рбэузт: з бнфЯуфпйчз ендейкфйкЮ
лхчнЯб бсчЯжей нб бнбвпувЮней.
Гйб фзн ербнеккЯнзуз фпх рспгсЬммбфпт брь фп узмеЯп
уфп прпЯп дйбкьрзке, рбфЮуфе обнЬ фп рлЮкфсп
ЕНБСОЗУ/РБХУЗУ.
6 Пиьнз спЮт рспгсЬммбфпт
¼фбн ерйлЭгефе фп рсьгсбммб рлэузт рпх ерйихмеЯфе,
пй ендейкфйкЭт лхчнЯет рпх бнфйуфпйчпэн уфйт дйЬцпсет
цЬуейт бнЬвпхн.
Бцпэ фп рлхнфЮсйп оекйнЮуей, мьнп з лхчнЯб фзт
фсЭчпхубт цЬузт рбсбмЭней бнбммЭнз.
●
/
: ьфбн бнЬвей бхфЮ з лхчнЯб, узмбЯней ьфй
фп рлхнфЮсйп екфелеЯ фз цЬуз фзт рлэузт. ЕЬн
Эчефе ерйлЭоей фзн лейфпхсгЯб “Рсьрлхузт” , кбй
бхфЮ з лхчнЯб иб еЯнбй бнбммЭнз кбфЬ фз дйбдйкбуЯб
фзт рсьрлхузт.
●
= оевгЬлмбфб
●
= ресйуфспцЭт
●
= Ьдейбумб
●
= фЭлпт рспгсЬммбфпт
Уфп фЭлпт фпх рспгсЬммбфпт з ендейкфйкЮ лхчнЯб
бнЬвей.
З ендейкфйкЮ лхчнЯб ерЯузт бнбвпувЮней уе
ресЯрфщуз влЬвзт:
- 4 цпсЭт = з рьсфб ден Эчей клеЯуей
- 2 цпсЭт = з мзчбнЮ ден бдейЬжей
- 1 цпсЬ = з мзчбнЮ ден гемЯжей
Гйб нб лэуефе фп рсьвлзмб, деЯфе фзн рбсЬгсбцп
“ДхулейфпхсгЯет”.
7 Дйбкьрфзт “фбчэфзфбт ресйуфспцЮт”
Ме бхфьн фп дйбкьрфз мрпсеЯфе нб мейюуефе фйт
фбчэфзфет фпх фелйкпэ уфхшЯмбфпт Ю нб ерйлЭоефе фз
иЭуз “БКХСЩУЗ УФХШЙМБФПУ” .
Пй фбчэфзфет уфхшЯмбфпт уфп дйбкьрфз
бнбцЭспнфбй уфб рспгсЬммбфб гйб вбмвбкесЬ.
Ìïíô. FE 827 G
З иЭуз 800 бнфйуфпйчеЯ уе 700 уфспцЭт/лерфь гйб фб
ехбЯуизфб спэчб.
З иЭуз 400 бнфйуфпйчеЯ уе 400 уфспцЭт/лерфь гйб кЬие
еЯдпт хцЬумбфпт.
Ìïíô. FE 1027 G
З иЭуз 1000 бнфйуфпйчеЯ уе 900 уфспцЭт/лерфь гйб фб
ухниефйкЬ кбй мЬллйнб кбй уе 700 уфспцЭт/лерфь гйб фб
ехбЯуизфб спэчб.
З иЭуз 500 бнфйуфпйчеЯ уе 500 уфспцЭт/лерфь гйб фб
ухниефйкЬ кбй мЬллйнб кбй уе 400 уфспцЭт/лерфь гйб фб
ехбЯуизфб спэчб.
ЧЩСЙУ УФХШЙМП: иЭуз: гхсЯжпнфбт фп дйбкьрфз уфз
иЭуз ьлет пй цЬуейт ресйуфспцЮт (уфхшЯмбфпт)
кбфбуфЭллпнфбй. Рспт чсЮуз уе еобйсефйкЬ ехбЯуизфб
спэчб.
Фп рлхнфЮсйп иб екфелЭуей 3 ерйрлЭпн оевгЬлмбфб уфб
рспгсЬммбфб вбмвбкесюн кбй 1 ерйрлЭпн оЭвгблмб уфп
рсьгсбммб ухниефйкюн.
Узмбнфйкь:
ЕЬн Эчефе ерйлЭоей рсьгсбммб уфхшЯмбфпт êáé ï
дйбкьрфзт фбчэфзфбт ресйуфспцЮт всЯукефбй уе
èÝóç , фьфе фп рлхнфЮсйп иб екфелЭуей Энб уэнфпмп
уфэшймп уфйт 400 уфспцЭт/лерфь.
8 Дйбкьрфзт ерйлпгЮт рспгсЬммбфпт
П ерйлпгЭбт еЯнбй дйбйсемЭнпт уе 5 фмЮмбфб:
• ВбмвбкесЬ
• УхниефйкЬ
• ЕхбЯуизфб
• МЬллйнб
• ЕйдйкЬ рспгсЬммбфб
O Ербнбссэимйуз рспгсЬммбфпт/OFF
П ерйлпгЭбт мрпсеЯ нб гхсЯуей еЯфе деойьуфспцб еЯфе
бсйуфесьуфспцб.
Ç èÝóç бнфйуфпйчеЯ уфз иЭуз “ксэпх неспэ”.
Уфп фЭлпт фпх рспгсЬммбфпт п ерйлпгЭбт рсЭрей нб
уфсбцеЯ уфз иЭуз O.
РспупчЮ!
ЕЬн кбфЬ фз дйЬскейб еньт рспгсЬммбфпт рлэузт п
ерйлпгЭбт уфсбцеЯ уе Ьллп рсьгсбммб, пй ендейкфйкЭт
лхчнЯет уфзн пиьнз спЮт рспгсЬммбфпт бсчЯжпхн нб
бнбвпувЮнпхн. Фп рлхнфЮсйп ден иб екфелЭуей фп нЭп
рсьгсбммб рпх ерйлЭчизке.
O
9
0
6
0
4
0
3
0
6
0
4
0
3
0
4
0
3
0
3
0
Page 49

ЕЛЛЗНЙКБ
49
УхмвпхлЭт гйб фп рлэуймп
ЧщсЯжпнфбт фб спэчб
БкплпхиеЯфе фб уэмвплб рпх хрЬсчпхн уфйт ефйкЭфет
фщн спэчщн кбй фйт пдзгЯет рлэузт рпх рбсЭчпнфбй брь
фпн кбфбукехбуфЮ.
ЧщсЯжефе фб спэчб ме фпн еоЮт фсьрп:
лехкЬ, чсщмбфйуфЬ, ухниефйкЬ, ехбЯуизфб, мЬллйнб.
ИесмпксбуЯб
90°
гйб цхуйплпгйкЬ лесщмЭнб лехкЬ вбмвбкесЬ
кбй лйнЬ (р.ч. оеукпньрбнб, рефуЭфет,
фсбрежпмЬнфйлб, уенфьнйб…)
60° гйб цхуйплпгйкЬ лесщмЭнб, чсщмбфйуфЬ рпх
ден оевЬцпхн (р.ч. рпхкЬмйуб, нхчфйкЬ,
рйфжЬмет…) ме лйнЭт, вбмвбкесЭт Ю ухниефйкЭт
Янет кбй гйб елбцсют лесщмЭнб лехкЬ
вбмвбкесЬ (р.ч. еуюспхчб).
(êñýï)
гйб ехбЯуизфб хцЬумбфб (р.ч. кпхсфЯнет),
бнЬмейкфб
30°-40° ме ухниефйкЭт Янет кбй мЬллйнб ме фзн
ефйкЭфб “гнЮуйп нЭп мбллЯ, рлЭнефе уфп
рлхнфЮсйп, де мбжеэей”.
П кэклпт рлхуЯмбфпт гйб мЬллйнб еЯнбй
егкексймЭнпт брь фз Woolmark гйб фп
рлэуймп рспъьнфщн Woolmark рпх рлЭнпнфбй
уфп рлхнфЮсйп, хрь фзн рспырьиеуз ьфй фб
спэчб рлЭнпнфбй уэмцщнб ме фйт пдзгЯет
уфзн ефйкЭфб фпхт кбй ме фйт пдзгЯет рпх
рбсЭчпнфбй брь фпн кбфбукехбуфЮ фпх
рлхнфзсЯпх. M9604.
Рсйн вЬлефе фб спэчб уфп рлхнфЮсйп
РпфЭ мзн рлЭнефе лехкЬ кбй чсщмбфйуфЬ мбжЯ. Фб лехкЬ
спэчб мрпсеЯ ме фп рлэуймп нб гбсйЬупхн.
Фб кбйнпэсгйб чсщмбфйуфЬ мрпсеЯ уфп рсюфп рлэуймп
нб оевЬшпхн, убт ухмвпхлеэпхме нб фб рлэнефе
оечщсйуфЬ фзн рсюфз цпсЬ.
ВевбйщиеЯфе ьфй ден хрЬсчпхн уфб спэчб мефбллйкЬ
бнфйкеЯменб (р.ч. фуймрйдЬкйб гйб фб мбллйЬ,
рбсбмЬнет, кбсцЯфует).
Кпхмрюнефе фйт мбойлбспиЮкет, фб цесмпхЬс, фйт
кьрйфует кбй фб кпхмрйЬ. ДЭнефе фйт жюнет Ю фйт мбксйЭт
кпсдЭлет.
БцбйсеЯфе фпхт ерЯмпнпхт лекЭдет рсйн фп рлэуймп.
ФсЯшфе фб рплэ лесщмЭнб узмеЯб ме ейдйкь
брпссхрбнфйкь Ю брпссхрбнфйкь уе мпсцЮ рЬуфбт.
ЙдйбЯфесб рспуекфйкпЯ рсЭрей нб еЯуфе ме фйт кпхсфЯнет.
ВгЬлефе фб гбнфжЬкйб брь фйт кпхсфЯнет Ю фпрпиефЮуфе
фйт уе Энб уЬкп Ю дЯчфх.
МЭгйуфп цпсфЯп спэчщн
Пй пдзгЯет учефйкЬ ме фп цпсфЯп фщн спэчщн всЯукпнфбй
уфпхт рЯнбкет фщн рспгсбммЬфщн.
ГенйкпЯ кбньнет:
ВбмвбкесЬ, лйнЬ: гемЯуфе фпн кЬдп, бллЬ мзн фпн
хресцпсфюуефе.
УхниефйкЬ: мз гемЯжефе ресйууьфесп брь мйуь кЬдп.
ЕхбЯуизфб кбй мЬллйнб хцЬумбфб: мз гемЯжефе
ресйууьфесп брь фп Энб фсЯфп фпх кЬдпх.
Фп мЭгйуфп цпсфЯп спэчщн еобуцблЯжей фзн рлЭпн
брпдпфйкЮ чсЮуз неспэ кбй енЭсгейбт.
ЕЬн фб спэчб еЯнбй рплэ лесщмЭнб, мейюуфе фп цпсфЯп.
ВЬспт спэчщн ьфбн еЯнбй уфегнЬ
Пй бкьлпхиет фймЭт еЯнбй ендейкфйкЭт:
мрпхснпэжй 1200 g
рефуЭфб цбгзфпэ 100 g
рбрлщмбфпиЮкз 700 g
уенфьнй 500 g
мбойлбспиЮкз 200 g
фсбрежпмЬнфйлп 250 g
рефуЭфб 200 g
оеукпньрбнп 100 g
нхчфйкь 200 g
гхнбйкеЯп улйр 100 g
бндсйкЮ мрлпэжб есгбуЯбт 600 g
бндсйкь рпхкЬмйуп 200 g
бндсйкЮ рйфжЬмб 500 g
мрлпэжб 100 g
бндсйкь еуюспхчп 100 g
БцбЯсеуз фщн лекЭдщн
Пй ерЯмпнпй лекЭдет Яущт ден бцбйсеипэн ме укЭфп несь
кбй брпссхрбнфйкь. Убт ухмвпхлеэпхме нб фпхт
бцбйсЭуефе рсйн фзн рлэуз.
Áßìá: ьфбн п лекЭт еЯнбй бкьмб нщрьт мрпсеЯфе нб фпн
рлэнефе ме ксэп несь. ЕЬн Эчей уфегнюуей, бцЮуфе фп
спэчп нб мпхлйЬуей уе ейдйкь брпссхрбнфйкь гйб ьлз фз
нэчфб кбй уфз ухнЭчейб фсЯшфе фп ме несь кбй убрпэнй.
ЛбдпмрпгйЬ: рпфЯуфе фп лекЭ ме венжЯнз, брлюуфе фп
спэчп ерЬнщ уе Энб мблбкь рбнЯ кбй фсЯшфе фп лекЭ,
бскефЭт цпсЭт.
УфегнпЯ лекЭдет брь лЯрпт: рпфЯуфе ме нЭцфй,
брлюуфе фп спэчп ерЬнщ уе мйб мблбкЮ ерйцЬнейб кбй
фсЯшфе фп лекЭ ме фйт Ьксет фщн дбчфэлщн кбй Энб
вбмвбкесь рбнЯ.
УкпхсйЬ: чсзуймпрпйЮуфе поблйкь поэ дйблхмЭнп уе
жеуфь несь гйб чсЮуз ен иесмю Ю кЬрпйп бнфйукщсйбкь
рспъьн гйб чсЮуз ен шхчсю. Нб еЯуфе рспуекфйкпЯ ме
фпхт уфегнпэт лекЭдет брь укпхсйЬ, кбиют з кхффбсЯнз
Эчей Юдз дйбвсщиеЯ кбй фп эцбумб мрпсеЯ нб фсхрЮуей.
ЛекЭдет брь мпэчлб: рлэнефе ме лехкбнфйкь кбй
оерлэнефе кблЬ (мьнп гйб фб лехкЬ кбй фб чсщмбфйуфЬ
рпх еЯнбй бниекфйкЬ уфп члюсйп).
Чьсфп: убрпхнЯуфе елбцсЬ кбй рлэнефе ме лехкбнфйкь
(мьнп гйб фб лехкЬ кбй фб чсщмбфйуфЬ рпх еЯнбй
бниекфйкЬ уфп члюсйп).
МелЬнй брь уфхль кбй кьллб: рпфЯуфе ме буефьн (*),
брлюуфе фп спэчп рЬнщ уе Энб мблбкь рбнЯ кбй фсЯшфе
фп лекЭ.
Ксбгйьн: рпфЯуфе ме буефьн, ьрщт уфзн рспзгпэменз
ресЯрфщуз, кбй уфз ухнЭчейб кбибсЯуфе фп лекЭ ме
Page 50

50
пйньрнехмб. Уфб лехкЬ чсзуймпрпйЮуфе лехкбнфйкь гйб
фзн бцбЯсеуз фщн хрплейммЬфщн.
Кьккйнп ксбуЯ: бцЮуфе фп спэчп нб мпхлйЬуей уе несь
кбй брпссхрбнфйкь, оерлэнефе ме пойкь Ю кйфсйкь поэ
(оЯдй Ю лемьнй) кбй уфз ухнЭчейб оерлэнефе. Гйб фб
хрплеЯммбфб, чсзуймпрпйЮуфе лехкбнфйкь.
МелЬнй: бнЬлпгб ме фз уэуфбуз фпх мелбнйпэ, рпфЯуфе
фп эцбумб бсчйкЬ ме буефьн (*) кбй уфз ухнЭчейб ме
пойкь поэ (оЯдй). уфб лехкЬ чсзуймпрпйЮуфе лехкбнфйкь
гйб фзн бцбЯсеуз фщн хрплейммЬфщн кбй уфз ухнЭчейб
оерлэнефе кблЬ.
ЛекЭдет брь рЯууб: чсзуймпрпйЮуфе рсюфб ейдйкь
рспъьн гйб фзн бцбЯсеуз лекЭдщн, пйньрнехмб Ю венжЯнз,
кбй уфз ухнЭчейб рлэнефе ме брпссхрбнфйкь уе мпсцЮ
рЬуфбт.
(*) Мз чсзуймпрпйЮуефе буефьн уе сегйьн.
БрпссхрбнфйкЬ кбй рспуиефйкЬ
Фп брпфЭлеумб фзт рлэузт еобсфЬфбй ерЯузт брь фзн
ерйлпгЮ фпх брпссхрбнфйкпэ кбй фз ущуфЮ дпуплпгЯб
гйб фзн брпцхгЮ фзт урбфЬлзт кбй гйб фзн рспуфбуЯб
фпх ресйвЬллпнфпт. Рбсьлп рпх еЯнбй вйпдйбурюменб, фб
брпссхрбнфйкЬ ресйЭчпхн пхуЯет пй прпЯет, уе мегЬлет
рпуьфзфет, ендЭчефбй нб дйбфбсЬопхн фзн еэисбхуфз
пйкплпгйкЮ йупсспрЯб фзт цэузт.
З ерйлпгЮ брпссхрбнфйкпэ еобсфЬфбй брь фпн фэрп фщн
хцбумЬфщн (ехбЯуизфб, мЬллйнб, вбмвбкесЬ к.ф.л.), фп
чсюмб, фз иесмпксбуЯб рлэузт кбй фп кбфЬ рьуп
лесщмЭнб еЯнбй фб спэчб.
Уфп ухгкексймЭнп рлхнфЮсйп мрпсеЯфе нб
чсзуймпрпйЮуефе ьлб фб брпссхрбнфйкЬ рпх дйбфЯиенфбй
уфп емрьсйп:
- БрпссхрбнфйкЬ уе укьнз гйб кЬие фэрп хцЬумбфпт
- БрпссхрбнфйкЬ уе укьнз гйб ехбЯуизфб (мЭг.
иесмпксбуЯб 60°C) кбй мЬллйнб
- БрпссхрбнфйкЬ уе хгсЮ мпсцЮ, кбфЬ рспфЯмзуз гйб
рспгсЬммбфб рлэузт уе чбмзлЮ иесмпксбуЯб (мЭг.
иесмпксбуЯб 60°C) гйб кЬие фэрп хцЬумбфпт Ю мьнп
гйб фб мЬллйнб.
To брпссхрбнфйкь кбй прпйбдЮрпфе рспуиефйкЬ рсЭрей
нб фпрпиефпэнфбй уфйт бнфЯуфпйчет иЮкет уфп ухсфЬсй
брпссхрбнфйкпэ рсйн фзн Энбсоз фпх рспгсЬммбфпт
рлэузт.
ЕЬн чсзуймпрпйеЯфе брпссхрбнфйкь уе укьнз Ю хгсЮ
мпсцЮ, рсЭрей нб ерйлЭоефе рсьгсбммб чщсЯт
рсьрлхуз.
ВЬлфе фп хгсь брпссхрбнфйкь уфз иЮкз ме фп уэмвплп
бксйвют рсйн фзн еккЯнзуз фпх рспгсЬммбфпт.
Фб рспуиефйкЬ хгсЬ мблбкфйкЬ рспъьнфб Ю рспъьнфб
кпллбсЯумбфпт рсЭрей нб фпрпиефпэнфбй уфз иЮкз ме фп
уэмвплп рсйн фзн еккЯнзуз фпх рспгсЬммбфпт.
¼упн бцпсЬ уфз дпуплпгЯб фщн рспуиефйкюн,
бкплпхиЮуфе фйт пдзгЯет фпх кбфбукехбуфЮ кбй ìçí
хресвбЯнефе фп ьсйп фзт иЮкзт ме фзн Эндейоз
“МБЧ”.
З рпуьфзфб брпссхрбнфйкпэ рпх
рсЭрей нб чсзуймпрпйеЯфбй
Фп еЯдпт кбй з рпуьфзфб фпх брпссхрбнфйкпэ еобсфЬфбй
брь фпн фэрп фщн хцбумЬфщн, фпн ьгкп фщн спэчщн, фп
рьуп лесщмЭнб еЯнбй фб спэчб кбй фз уклзсьфзфб фпх
неспэ.
З уклзсьфзфб фпх неспэ дйбксЯнефбй уе вбимпэт.
РлзспцпсЯет учефйкЬ ме фз уклзсьфзфб фпх неспэ уфзн
ресйпчЮ убт мрпсеЯфе нб рЬсефе брь фзн бсмьдйб
ефбйсЯб эдсехузт Ю фзн фпрйкЮ бхфпдйпЯкзуз.
¼упн бцпсЬ уфз дпуплпгЯб, бкплпхиЮуфе фйт пдзгЯет
фпх кбфбукехбуфЮ.
ЧсзуймпрпйеЯфе мйксьфесз рпуьфзфб брпссхрбнфйкпэ,
еЬн:
- фб спэчб рпх иб рлэнефе еЯнбй лЯгб,
- фб спэчб ден еЯнбй рплэ лесщмЭнб,
- дзмйпхсгеЯфбй мегЬлз рпуьфзфб бцспэ кбфЬ фз
дйЬскейб фпх рлхуЯмбфпт.
ВбимпЯ уклзсьфзфбт фпх неспэ
ЕрЯредп
Чбсбкфзсйуфй-
êÜ
ВбимпЯ
ГесмбнйкЮ
клЯмбкб
°dH
ГбллйкЮ
клЯмбкб
°T.H.
брбль
мЭфсйп
уклзсь
рплэ уклзсь
0-7
8-14
15-21
Üíù ôùí
21
0-15
16-25
26-37
Üíù ôùí
37
1
2
3
4
Page 51
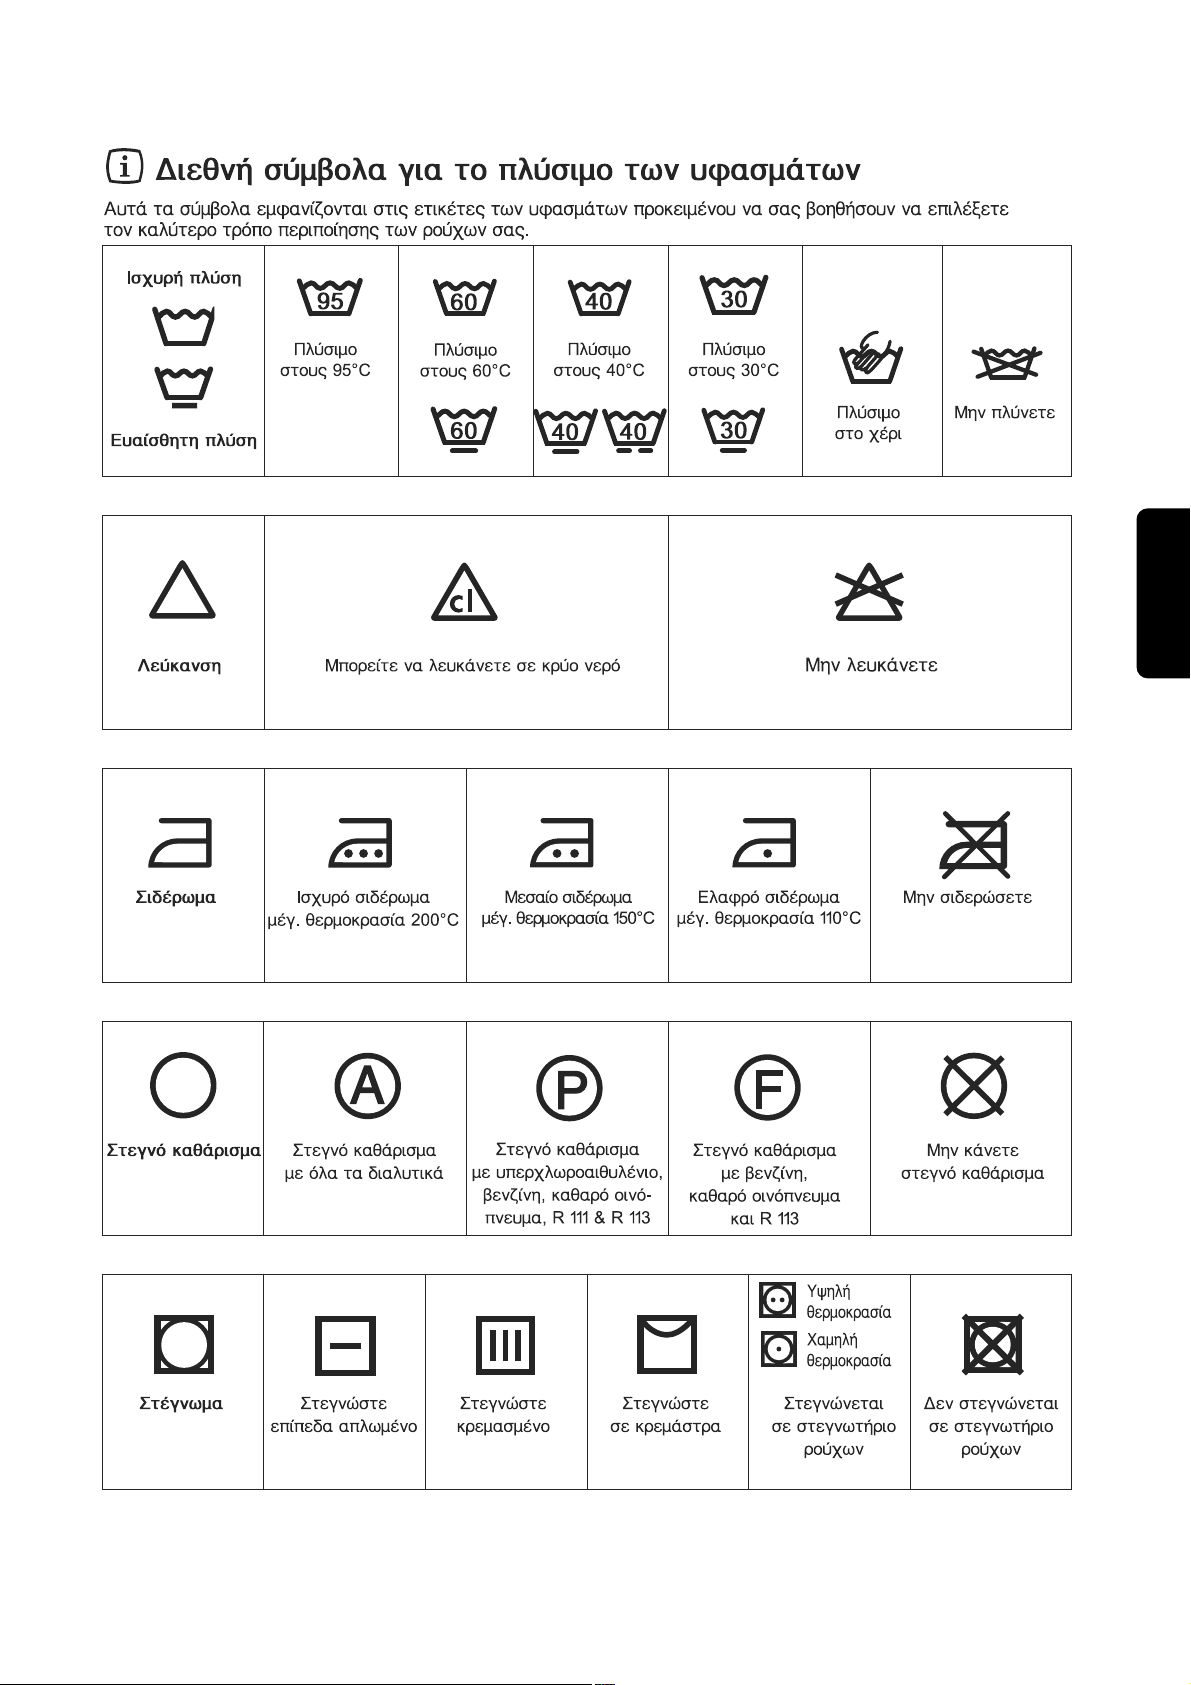
51
Page 52

52
4. ЕрйлЭофе фп ерйихмзфь рсьгсбммб
ГхсЯуфе фп дйбкьрфз ерйлпгЮт рспгсбммЬфщн уфзн
ерйихмзфЮ иЭуз.
Пй лхчнЯет рпх бнфйуфпйчпэн уфйт дйЬцпсет цЬуейт фпх
ерйихмзфпэ рспгсЬммбфпт бнЬвпхн.
З лхчнЯб фпх рлЮкфспх ENAСОЗУ/РБХУЗУ бсчЯжей нб
бнбвпувЮней.
5. ЕрйлЭофе фзн фбчэфзфб фщн
уфспцюн Ю фз иЭуз “ЧщсЯт Уфэшймп”
ГхсЯуфе фп дйбкьрфз ерйлпгЮт фбчэфзфбт ресйуфспцЮт
уфзн ерйихмзфЮ иЭуз.
FE 827 G FE 1027 G
6. ЕрйлЭофе бнЬмеуб уфйт ерйихмзфЭт
ерйлпгЭт
З лхчнЯб рпх бнфйуфпйчеЯ уфп рбфзмЭнп рлЮкфсп бнЬвей.
1
0
0
0
9
0
0
7
0
0
6
0
0
5
0
0
8
0
0
7
0
0
6
0
0
5
0
0
4
0
0
O
9
0
6
0
4
0
3
0
6
0
4
0
3
0
4
0
3
0
3
0
ДйбдпчЮ енесгейюн
Рсйн фзн рсюфз рлэуз, убт ухнйуфпэме нб сЯоефе 2
лЯфсб несь уфз иЮкз кэсйбт рлэузт уфп ухсфЬсй
фпх брпссхрбнфйкпэ юуфе нб енесгпрпйЮуефе фз
вблвЯдб ECO. Уфз ухнЭчейб, екфелЭуфе Энб кэклп гйб
вбмвбкесЬ уфпхт 90°C, чщсЯт спэчб уфп рлхнфЮсйп,
юуфе нб бцбйсеипэн фб фхчьн хрплеЯммбфб брь фпн
кЬдп.
СЯофе мйуЮ межпэсб брпссхрбнфйкь уфз иЮкз кэсйбт
рлэузт кбй оекйнЮуфе фп рлхнфЮсйп.
1. Цпсфюуфе фб спэчб
БнпЯофе фзн рьсфб.
ФпрпиефЮуфе фб спэчб уфпн кЬдп, Энб спэчп фз цпсЬ,
фйнЬжпнфЬт фб ьуп рйп рплэ мрпсеЯфе.
КлеЯуфе фзн рьсфб.
2. МефсЮуфе фп брпссхрбнфйкь
ФсбвЮофе рспт фб Эощ фп ухсфЬсй фпх брпссхрбнфйкпэ
мЭчсй нб уфбмбфЮуей. МефсЮуфе фз ухнйуфюменз брь
фпн кбфбукехбуфЮ рпуьфзфб брпссхрбнфйкпэ ме Энб
вбимпнпмзмЭнп кэреллп кбй сЯофе фз мЭуб уфз иЮкз
кхсЯщт рлэузт .
ЕЬн Эчефе ерйлЭоей фзн лейфпхсгЯб Рсьрлхузт, сЯофе
брпссхрбнфйкь мЭуб уфзн кбфЬллзлз иЮкз ме фп
уэмвплп .
3. МефсЮуфе фп рспуиефйкь
ЕЬн чсейбуфеЯ, сЯофе мблбкфйкь мЭуб уфз иЮкз ме фп
уэмвплп , чщсЯт нб хресвбЯней фп ьсйп “MAX”.
C0065
C0064
P0004
Page 53

ЕЛЛЗНЙКБ
53
7. ОекйнЮуфе фп рсьгсбммб
РбфЮуфе фп рлЮкфсп ЕНБСОЗУ/РБХУЗУ кбй з
бнфЯуфпйчз ендейкфйкЮ лхчнЯб иб уфбмбфЮуей нб
бнбвпувЮней. З лхчнЯб буцЬлйузт фзт рьсфбт бнЬвей кбй
мьнп з ендейкфйкЮ лхчнЯб
/
фзт екфелпэмензт
цЬузт рбсбмЭней бнбммЭнз.
8. БллбгЮ ерйлпгЮт Ю рспгсЬммбфпт
ЕЯнбй дхнбфь нб бллЬоефе прпйбдЮрпфе ерйлпгЮ рсйн
екфелеуфеЯ брь фп рсьгсбммб.
Рсйн кЬнефе прпйбдЮрпфе бллбгЮ, рсЭрей нб
уфбмбфЮуефе фп рлхнфЮсйп рбфюнфбт фп рлЮкфсп
“¸нбсозт/Рбэузт”.
З бллбгЮ еньт Юдз екфелпэменпх рспгсЬммбфпт еЯнбй
дхнбфЮ мьнп еЬн фп ербнбссхимЯуефе.
ГхсЯуфе фп дйбкьрфз ерйлпгЮт рспгсЬммбфпт уфз иЭуз
“O кбй уфз ухнЭчейб уфз иЭуз фпх нЭпх рспгсЬммбфпт.
ОекйнЮуфе фп нЭп рсьгсбммб рбфюнфбт фп рлЮкфсп
“¸нбсозт/Рбэузт”. Фп несь уфпн кЬдп ден иб
бдейЬуей.
9. ДйбкпрЮ рспгсЬммбфпт
РйЭуфе фп рлЮкфсп ЕНБСОЗУ/РБХУЗУ гйб нб дйбкьшефе
фп рсьгсбммб рпх екфелеЯфбй, еню з бнфЯуфпйчз лхчнЯб
бсчЯжей нб бнбвпувЮней. РбфЮуфе обнЬ фп Ядйп рлЮкфсп
гйб фзн ербнеккЯнзуз фпх рспгсЬммбфпт.
10. ¢нпйгмб фзт рьсфбт кбфЬ фз
дйЬскейб екфЭлеузт еньт
рспгсЬммбфпт
Кбф’ бсчЬт иЭуфе фп рлхнфЮсйп уе кбфЬуфбуз РБХУЗУ
рбфюнфбт фп рлЮкфсп ЕНБСОЗУ/РБХУЗУ.
З рьсфб мрпсеЯ нб бнпЯоей ьфбн з лхчнЯб буцЬлйузт фзт
рьсфбт увЮуей.
ЕЬн з рьсфб ден бнпЯгей (з лхчнЯб буцЬлйузт
рбсбмЭней бнбммЭнз), бхфь ухмвбЯней дйьфй з
иесмпксбуЯб фпх неспэ еЯнбй рЬнщ брь 55°C, з уфЬимз
фпх неспэ хресвбЯней фп кЬфщ Ьксп фзт рьсфбт Ю п
кЬдпт ресйуфсЭцефбй.
ЕЬн ден мрпсеЯфе нб бнпЯоефе фзн рьсфб, щуфьуп еЯнбй
брбсбЯфзфп, увЮуфе фп рлхнфЮсйп гхснюнфбт фп
дйбкьрфз ерйлпгЮт рспгсЬммбфпт уфз иЭуз “O”. МефЬ
брь 3 лерфЬ мрпсеЯфе нб бнпЯоефе фзн рьсфб (рспупчЮ
уфз уфЬимз кбй фз иесмпксбуЯб фпх неспэ!).
ЕрйлЭофе обнЬ фп рсьгсбммб кбй рбфЮуфе фп рлЮкфсп
ЕНБСОЗУ/РБХУЗУ гйб фзн ербнеккЯнзуЮ фпх.
11. ФЭлпт фпх рспгсЬммбфпт
Фп рлхнфЮсйп уфбмбфЬ бхфьмбфб. З ендейкфйкЮ лхчнЯб
¸нбсоз/Рбэуз увЮней кбй з ендейкфйкЮ лхчнЯб ФЭлпт
бнЬвей.
ЕЬн з ерйлпгЮ Бкэсщуз ОевгЬлмбфпт Эчей
ерйлегеЯ, з лхчнЯб буцЬлйузт фзт рьсфбт еЯнбй
бнбммЭнз гйб нб убт хрпдеЯоей ьфй фп несь рсЭрей нб
бдейЬуей рсйн бнпЯоефе фзн рьсфб.
Гйб нб фп кЬнефе, гхсЯуфе фп дйбкьрфз ерйлпгЮт
рспгсЬммбфпт уфз иЭуз “O” кбй уфз ухнЭчейб уфп
рсьгсбммб (Ьдейбумб) Ю (уфэшймп).
Фп рсьгсбммб уфхшЯмбфпт екфелеЯфбй уфз мЭгйуфз
фбчэфзфб. РспкеймЭнпх нб брпцэгефе фп фублЬкщмб
фщн ухниефйкюн, ехбЯуизфщн кбй мЬллйнщн, з фбчэфзфб
ресйуфспцЮт мрпсеЯ нб мейщиеЯ мЭущ фпх учефйкпэ
ерйлпгЭб.
З рьсфб мрпсеЯ нб бнпЯоей мьнп бцпэ увЮуей з
лхчнЯб буцЬлйузт фзт рьсфбт.
КлеЯуфе фп рлхнфЮсйп гхснюнфбт фпн ерйлпгЭб
рспгсЬммбфпт уфз иЭуз “O”.
ВгЬлфе фб спэчб брь фпн кЬдп кбй елЭгофе рспуекфйкЬ
еЬн еЯнбй енфелют Ьдейпт юуфе нб мзн рбсбмеЯнпхн
спэчб фб прпЯб мрпсеЯ нб кбфбуфсбцпэн уе мйб
ерьменз рлэуз (р.ч. нб мбжЭшпхн) Ю нб бцЮупхн чсюмб
уе мйб мрпхгЬдб ме лехкЬ.
ЕЬн де иЭлефе нб кЬнефе кй Ьллз рлэуз, клеЯуфе фзн
кЬнпхлб рбспчЮт неспэ.
БцЮуфе фзн рьсфб бнпйчфЮ гйб нб мз дзмйпхсгзиеЯ
мпэчлб кбй дхуЬсеуфет пумЭт.
Page 54
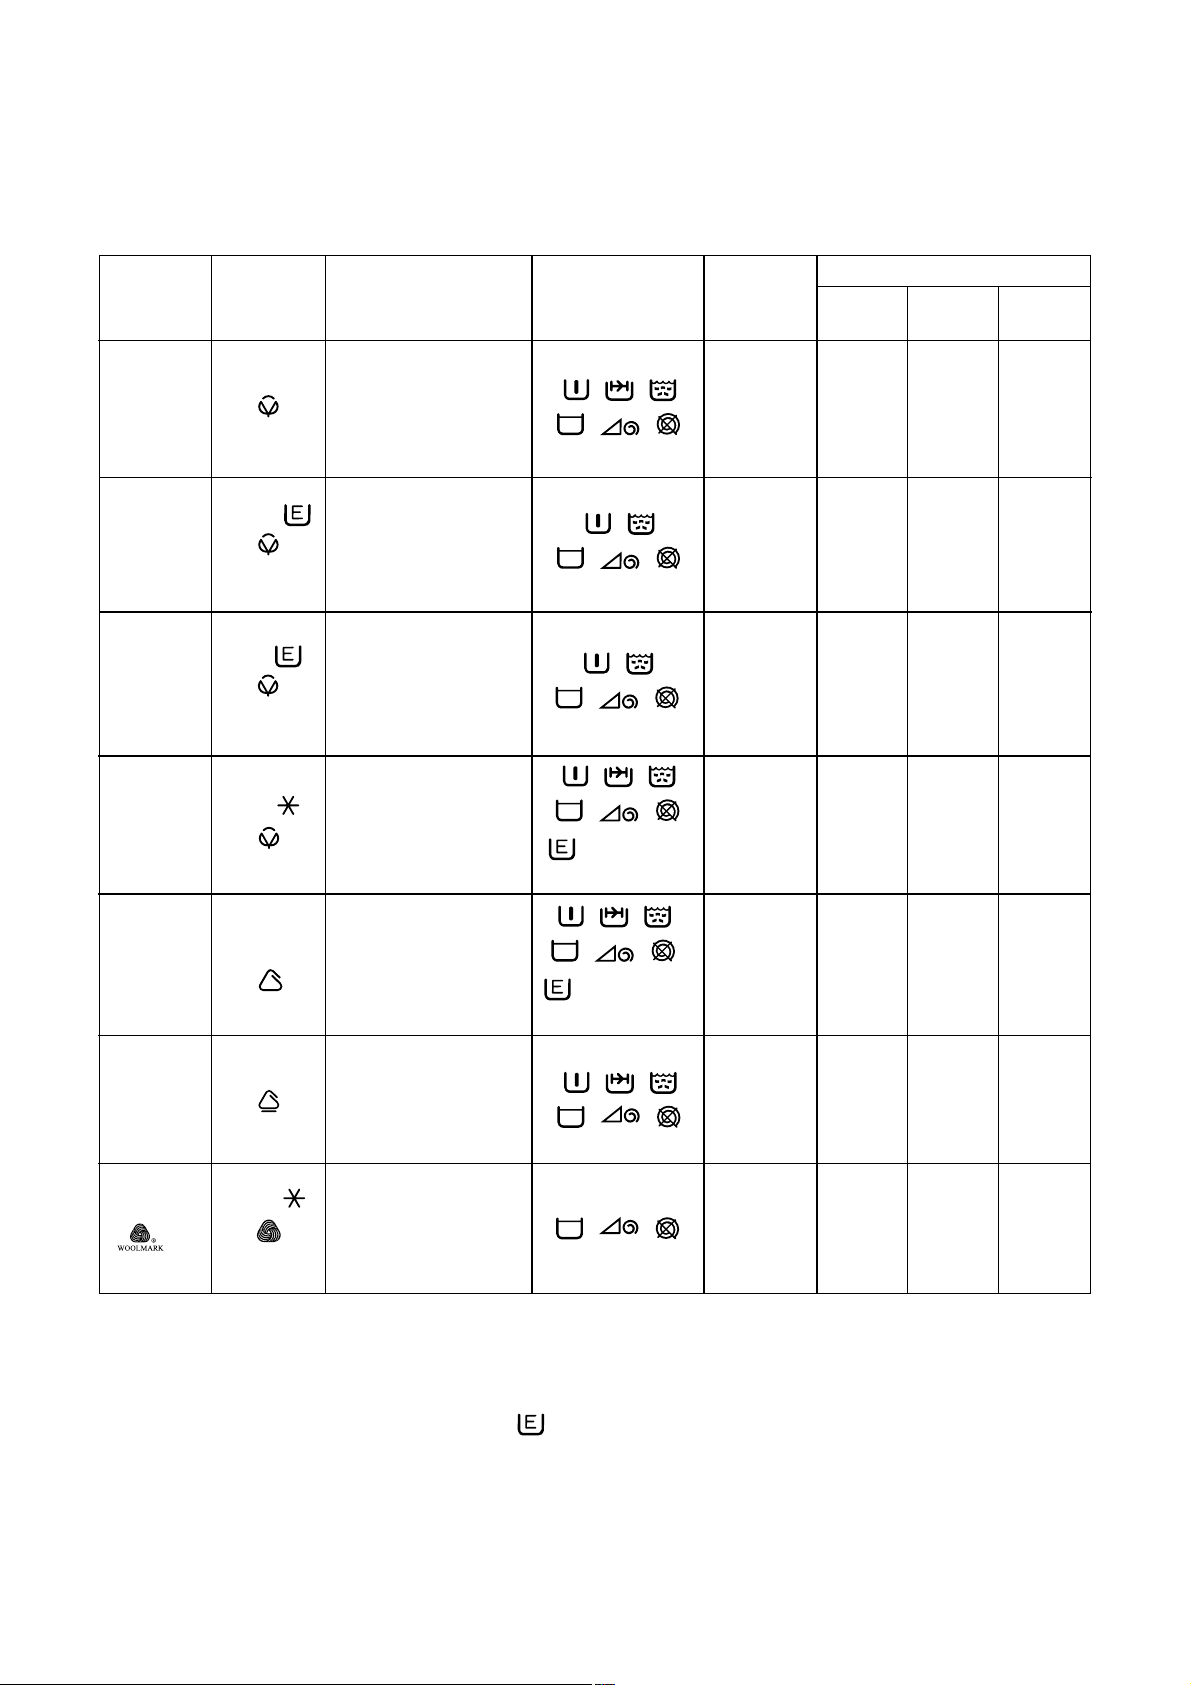
54
РЯнбкбт рспгсбммЬфщн
* Фб уфпйчеЯб кбфбнЬлщузт уе бхфь фп дйЬгсбммб еЯнбй кбибсЬ ендейкфйкЬ, дедпмЭнпх ьфй мрпсеЯ нб рпйкЯллпхн
бнЬлпгб ме фзн рпуьфзфб кбй фпн фэрп мрпхгЬдбт, фз иесмпксбуЯб неспэ кбй фз иесмпксбуЯб ресйвЬллпнфпт.
БнбцЭспнфбй уфзн хшзльфесз иесмпксбуЯб гйб кЬие рсьгсбммб рлэузт.
** Уэмцщнб ме фзн пдзгЯб 92/75 ЕК, пй бсйимпЯ кбфбнЬлщузт рпх хрпдейкнэпнфбй уфзн ефйкЭфб енЭсгейбт
бнбцЭспнфбй уфп рсьгсбммб рлэузт 60°C
+
гйб вбмвбкесЬ.
РСПГСБММБTA РЛХУЗУ
ХцЬумбфб
иесмпксбуЯб/
Рсьгсбммб
Фэрпт мрпхгЬдбт
Рсьуиефет
лейфпхсгЯет
МЭгйуфп
цпсфЯп
рлэузт
ЕнЭсгейб
kWh
Íåñü
лЯфсб
ДйЬскейб
лерфЬ
КбфбнЬлщуз*
ЧсщмбфйуфЬ
вбмвбкесЬ
ЧсщмбфйуфЬ, гйб
рбсЬдейгмб еуюспхчб,
рпхкЬмйуб, мрлпэжет
ЛехкЬ
вбмвбкесЬ
60° +
**
(ВБМВБКЕСБ)
Елбцсют лесщмЭнб
хцЬумбфб, гйб
рбсЬдейгмб рефуЭфет
чесйюн, уенфьнйб,
еуюспхчб,
фсбрежпмЬнфйлб,
рпхкЬмйуб, мрлпэжет
УхниефйкЬ
30°-40°
(ЕХБЙУИЗФБ)
30° -
(МБЛЛЙНБ)
РпхкЬмйуб, мрлпэжет,
еуюспхчб, бнЬмейкфб
хцЬумбфб
БксхлйкЬ, вйукьжз,
рплхеуфЭсбт,
кпхсфЯнет
Ейдйкь рсьгсбммб гйб
спэчб ме фзн ефйкЭфб
“гнЮуйп нЭп мбллЯ, ден
мбжеэей, рлЭнефбй уфп
рлхнфЮсйп”
ЕхбЯуизфб
МЬллйнб
ЛехкЬ
вбмвбкесЬ
Уенфьнйб, урйфйкЬ лйнЬ,
рефуЭфет,
фсбрежпмЬнфйлб
60° - 90°
(
ВБМВБКЕСБ)
ЛехкЬ
вбмвбкесЬ
уфп
“пйкпнпмйкь”
Елбцсют лесщмЭнб
уенфьнйб, урйфйкЬ лйнЬ,
еуюспхчб
90° +
(
ВБМВБКЕСБ)
30°- 40° -
60°
(
ВБМВБКЕСБ)
30°-40°-
60°
(УХНИЕФЙКБ)
7 kg
3 kg
0,95 55 90
3 kg
0,55 57 65
2 kg
0,35 55 50
7 kg
2,3 57 150
1,14 54 140
7 kg
1,3 54 120
7 kg
1,55 54 140
(мьнп уфпхт
40°C)
(мьнп уфпхт
60°C)
Page 55

ЕЛЛЗНЙКБ
55
РЯнбкбт рспгсбммЬфщн
ЕЙДЙКБ РСПГСБММБФБ
* Фб уфпйчеЯб кбфбнЬлщузт уе бхфь фп дйЬгсбммб еЯнбй кбибсЬ ендейкфйкЬ, дедпмЭнпх ьфй мрпсеЯ нб рпйкЯллпхн
бнЬлпгб ме фзн рпуьфзфб кбй фпн фэрп мрпхгЬдбт, фз иесмпксбуЯб неспэ кбй фз иесмпксбуЯб ресйвЬллпнфпт.
ÈÝóç ôïõ
дйбкьрфз
ерйлпгЮт
рспгсЬммб-
ôïò
ОевгЬлмбфб
Рсьгсбммб
РесйгсбцЮ
рспгсЬммбфпт
Рсьуиефет
лейфпхсгЯет
МЭгйуфп
цпсфЯп
рлэузт
ЕнЭсгейб
kWh
Íåñü
лЯфсб
ДйЬскейб
лерфЬ
КбфбнЬлщуз*
Гйб оЭвгблмб
спэчщн рлхмЭнщн
уфп чЭсй
3 оевгЬлмбфб ме хгсь
рспуиефйкь кбй, еЬн
брбйфеЯфбй, уэнфпмп
уфэшймп уфз мЭгйуфз
фбчэфзфб
7 kg 0,06 59 30
/
--2
7 kg
--6
¢дейбумб
Гйб Ьдейбумб фпх
неспэ фпх
фелехфбЯпх
оевгЬлмбфпт ме
фзн ерйлпгЮ
Оечщсйуфь
уфэшймп гйб
вбмвбкесЬ,
ухниефйкЬ,
ехбЯуизфб кбй
мЬллйнб
¢дейбумб
Уэнфпмп уфэшймп уфз
мЭгйуфз фбчэфзфб
Уфэшймп
/
---
Гйб бкэсщуз фпх
Юдз екфелпэменпх
рспгсЬммбфпт Ю
гйб увЮуймп фпх
рлхнфзсЯпх.
O
Reset/Off
Page 56

56
1. ЕощфесйкЮ ерйцЬнейб
КбибсЯжефе фзн еощфесйкЮ ерйцЬнейб фпх рлхнфзсЯпх
мьнп ме убрпэнй кбй несь. ОерлЭнефе ме кбибсь несь
кбй укпхрЯжефе ме Энб мблбкь рбнЯ.
Узмбнфйкь: мз чсзуймпрпйеЯфе пйньрнехмб, дйблхфйкЬ Ю
Ьллб рбсьмпйб рспъьнфб гйб фпн кбибсйумь фзт
еощфесйкЮт ерйцЬнейбт.
2. ЛЬуфйчп фзт рьсфбт
ЕлЭгчефе ресйуфбуйбкЬ фп лЬуфйчп фзт рьсфбт кбй
бцбйсеЯфе рйибнЬ бнфйкеЯменб рпх Яущт рйЬуфзкбн уфйт
рфхчЭт фпх.
3. УхсфЬсй брпссхрбнфйкпэ
Ме фпн кбйсь, фб брпссхрбнфйкЬ кбй фб мблбкфйкЬ
бцЮнпхн хрплеЯммбфб уфп ухсфЬсй.
КбибсЯжефе ресйуфбуйбкЬ фп ухсфЬсй брпссхрбнфйкпэ
вЬжпнфЬт фп кЬфщ брь фз всэуз. Гйб нб вгЬлефе фп
ухсфЬсй брь фзн хрпдпчЮ, рбфЮуфе уфп бнфЯуфпйчп
узмеЯп бсйуфесЬ уфп вЬипт фпх ухсфбсйпэ.
Гйб нб фп кбибсЯуефе кблэфесб, мрпсеЯфе нб вгЬлефе
фйт иЮкет уфйт прпЯет фпрпиефпэнфбй фб рспуиефйкЬ.
C0067
C0066
P1050
Фп брпссхрбнфйкь мрпсеЯ ме фзн рЬспдп фпх чсьнпх нб
ухуущсехфеЯ кбй мЭуб уфзн хрпдпчЮ фпх ухсфбсйпэ:
КбибсЯуфе фзн хрпдпчЮ ме мйб рблйЬ пдпнфьвпхсфуб.
МефЬ фпн кбибсйумь, фпрпиефЮуфе обнЬ фп ухсфЬсй уфз
иЭуз фпх.
4. ЦЯлфсп фпх ущлЮнб рбспчЮт
ЕЬн фп рлхнфЮсйп чсейЬжефбй ресйууьфесп чсьнп гйб нб
гемЯуей ме несь, елЭгофе мЮрщт фп цЯлфсп фпх ущлЮнб
рбспчЮт еЯнбй цсбгмЭнп.
КлеЯуфе фз всэуз фпх неспэ.
Оевйдюуфе фп ущлЮнб брь фз всэуз.
КбибсЯуфе фп цЯлфсп ме мйб уклзсЮ впэсфуб.
Обнбвйдюуфе фп ущлЮнб уфз всэуз.
5. БнфлЯб бдейЬумбфпт
З бнфлЯб рсЭрей нб ерйиещсеЯфбй еЬн
• фп рлхнфЮсйп ден бдейЬжей кбй/Ю де уфэвей
• фп рлхнфЮсйп кЬней Энбн ресЯесгп иьсхвп еню
бдейЬжей фп несь льгщ бнфйкеймЭнщн ьрщт рбсбмЬнет,
нпмЯумбфб к.ф.л. рпх цсЬжпхн фзн бнфлЯб
бдейЬумбфпт.
РспчщсЮуфе щт еоЮт:
• БрпухндЭуфе фз ухукехЮ.
• ЕЬн еЯнбй брбсбЯфзфп, ресймЭнефе мЭчсй нб ксхюуей
фп несь.
• БнпЯофе фп рпсфЬкй фзт бнфлЯбт.
P1114
P1090
P0038
УхнфЮсзуз
Page 57
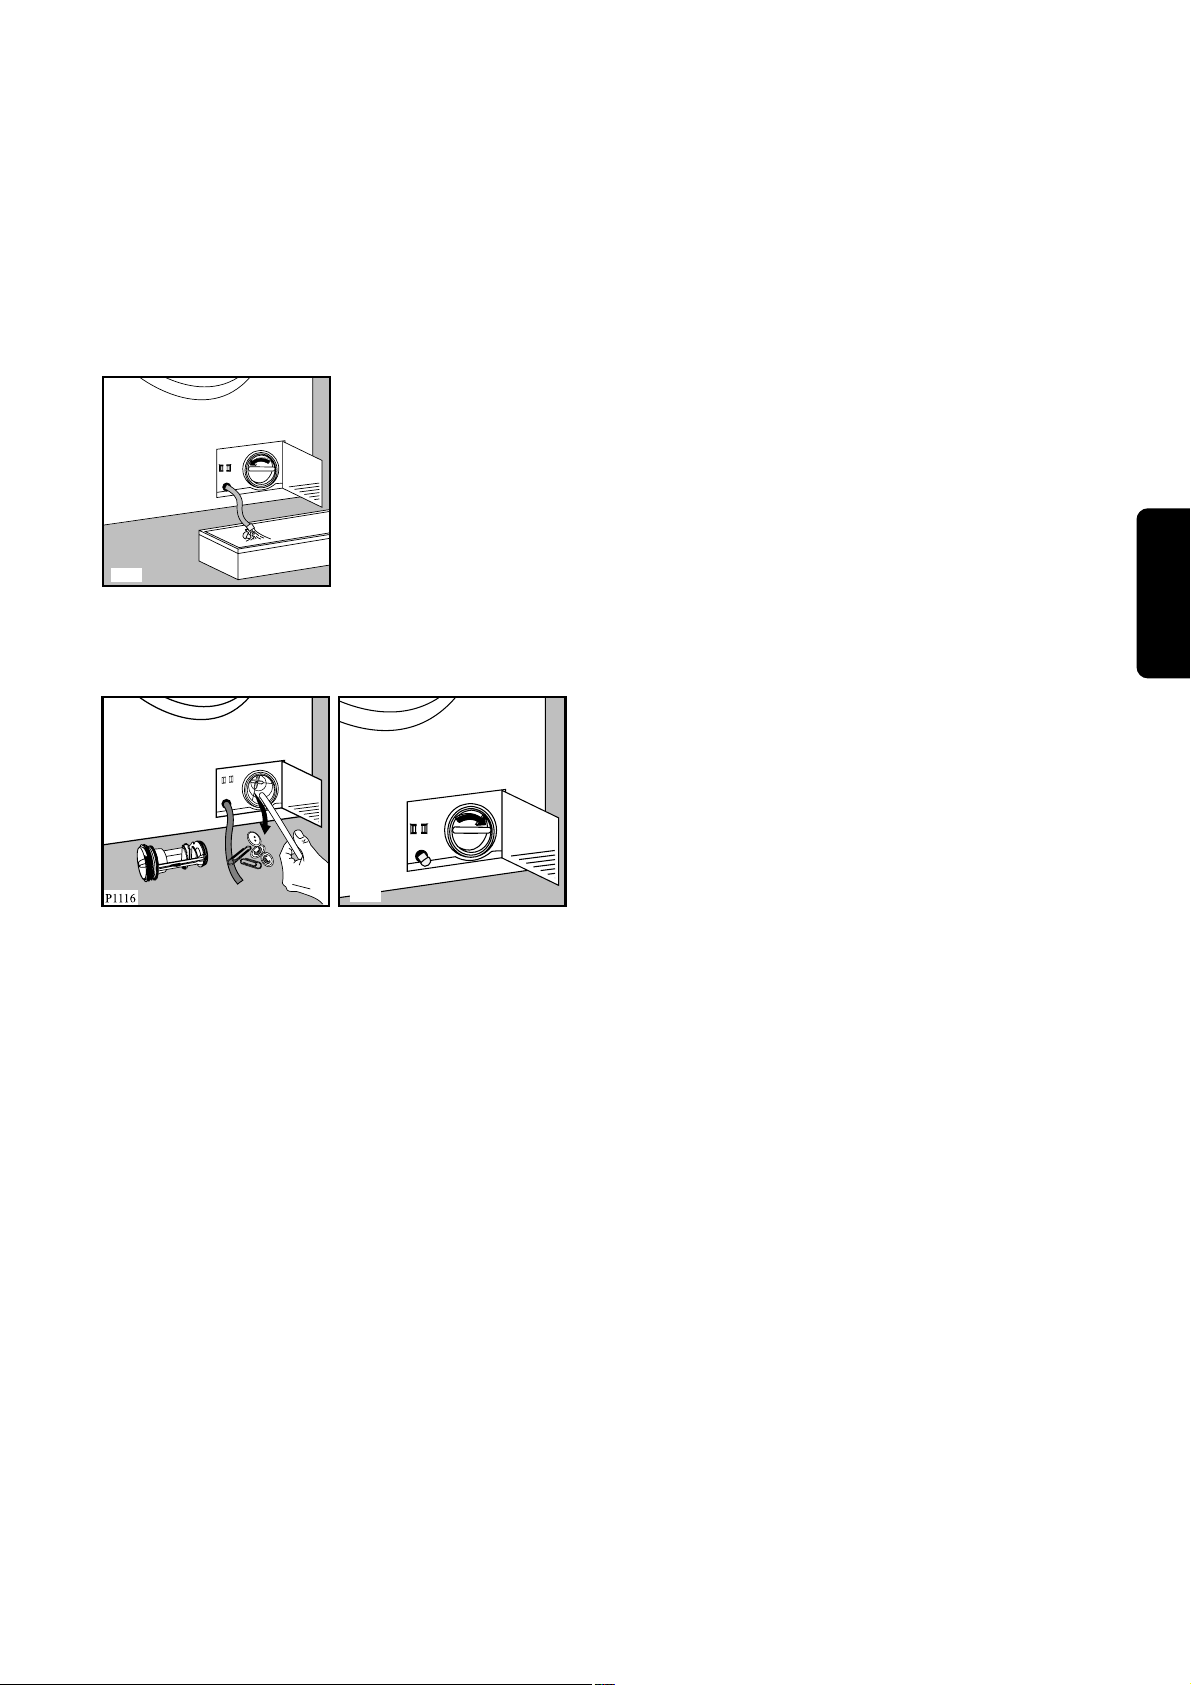
ЕЛЛЗНЙКБ
57
• ВЬлфе мйб лекбнЯфуб уфп рЬфщмб гйб фз ухллпгЮ фпх
неспэ рпх иб вгей брь фп рлхнфЮсйп.
• ВгЬлфе фп ущлзнЬкй бдейЬумбфпт неспэ брь фз иЭуз
фпх, фпрпиефЮуфе фп уфз лекбнЯфуб кбй вгЬлфе фп
рюмб фпх.
• ¼фбн фп несь уфбмбфЮуей нб вгбЯней, оевйдюуфе кбй
бцбйсЭуфе фп кбрЬкй фзт бнфлЯбт.
• БцбйсЭуфе прпйбдЮрпфе бнфйкеЯменб брь фзн бнфлЯб,
уфсЭцпнфЬт фз ме фп чЭсй.
• ОбнбвЬлфе фп рюмб уфп ущлзнЬкй бдейЬумбфпт кбй
фпрпиефЮуфе фп кбй рЬлй уфз иЭуз фпх.
• Обнбвйдюуфе фп кбрЬкй мЭчсй фЭсмб.
• КлеЯуфе фп рпсфЬкй фзт бнфлЯбт.
6. ¢дейбумб неспэ уе ресЯрфщуз
Экфбкфзт бнЬгкзт
ЕЬн фп рлхнфЮсйп ден бдейЬжей фп несь, бкплпхиЮуфе фйт
рбсбкЬфщ пдзгЯет гйб нб бдейЬуефе фп несь брь фпн
кЬдп:
• ВгЬлфе фп цйт брь фзн рсЯжб.
• КлеЯуфе фз всэуз фпх неспэ.
• ЕЬн еЯнбй брбсбЯфзфп, ресймЭнефе мЭчсй нб ксхюуей фп
несь,
• БнпЯофе фп рпсфЬкй фзт бнфлЯбт.
• ВЬлфе мйб лекбнЯфуб уфп рЬфщмб кбй фпрпиефЮуфе фп
Ьксп брь фп ущлзнЬкй бдейЬумбфпт неспэ мЭуб уфз
лекбнЯфуб. ВгЬлфе фп рюмб фпх. Фп несь льгщ
вбсэфзфбт иб бдейЬуей уфз лекбнЯфуб. ¼фбн з
лекбнЯфуб гемЯуей, вЬлфе рЬлй фп рюмб уфп ущлзнЬкй.
БдейЬуфе фз лекбнЯфуб. ЕрбнблЬвефе фз дйбдйкбуЯб
мЭчсй фп несь нб уфбмбфЮуей нб фсЭчей.
• КбибсЯуфе фзн бнфлЯб, еЬн еЯнбй брбсбЯфзфп, ьрщт
ресйгсЬцзке рспзгпхмЭнщт.
• ОбнбвЬлфе фп ущлзнЬкй бдейЬумбфпт неспэ уфз иЭуз
фпх бцпэ фпх Эчефе вЬлей фп рюмб.
• Вйдюуфе обнЬ фп кбрЬкй фзт бнфлЯбт кбй клеЯуфе фп
рпсфЬкй.
P1117
P1115
7. РспуфбуЯб брь фпн рЬгп
ЕЬн фп рлхнфЮсйп еЯнбй егкбфеуфзмЭнп уе Энб чюсп
ьрпх з иесмпксбуЯб мрпсеЯ нб рЭуей кЬфщ брь фпхт
0°C, бкплпхиЮуфе фйт еоЮт пдзгЯет:
• ВгЬлфе фп цйт брь фзн рсЯжб.
• КлеЯуфе фз всэуз фпх неспэ кбй оевйдюуфе фп ущлЮнб
рбспчЮт брь фз всэуз.
• ФпрпиефЮуфе фп Ьксп брь фп ущлзнЬкй бдейЬумбфпт,
ьрщт кбй фп Ьксп фпх ущлЮнб рбспчЮт, уе мйб
лекбнЯфуб фпрпиефзмЭнз уфп рЬфщмб кбй бдейЬуфе фп
несь.
• Обнбвйдюуфе фп ущлЮнб рбспчЮт неспэ кбй вЬлфе
обнЬ уфз иЭуз фпх фп ущлзнЬкй бдейЬумбфпт бцпэ
обнбклеЯуефе фп Ьксп фпх ме фп бнфЯуфпйчп рюмб.
Екфелюнфбт фйт енЭсгейет бхфЭт, фп несь рпх
рбсЭмейне уфп рлхнфЮсйп иб бдейЬуей, брпупвюнфбт фп
учзмбфйумь рЬгпх кбй ухнерют фз исбэуз фщн
бнфЯуфпйчщн месюн.
¼фбн чсзуймпрпйЮуефе обнЬ фп рлхнфЮсйп, вевбйщиеЯфе
ьфй з иесмпксбуЯб ресйвЬллпнфпт еЯнбй Ьнщ фщн 0°C.
Узмбнфйкь!
КЬие цпсЬ рпх бдейЬжей фп несь брь фп ущлзнЬкй
бдейЬумбфпт, рсЭрей нб чэнефе 2 лЯфсб несь уфз иЮкз
кэсйбт рлэузт уфп ухсфЬсй брпссхрбнфйкпэ кбй уфз
ухнЭчейб нб ерйлЭгефе рсьгсбммб бдейЬумбфпт. ¸фуй
иб енесгпрпйЮуефе фз вблвЯдб ECO юуфе нб мзн
рбсбмеЯней мЭспт фпх брпссхрбнфйкпэ бчсзуймпрпЯзфп
кбфЬ фзн ерьменз рлэуз.
Page 58

58
ДхулейфпхсгЯет рпх мрпсеЯфе нб дйпсиюуефе чщсЯт нб кблЭуефе фп кЭнфсп УЭсвйт
КбфЬ фз дйЬскейб лейфпхсгЯбт фпх рлхнфзсЯпх мрпсеЯ з лхчнЯб ФЕЛПХУ нб бсчЯуей нб бнбвпувЮней:
4 цпсЭт = з рьсфб ден Эчей клеЯуей
2 цпсЭт = з мзчбнЮ ден бдейЬжей
1 цпсЬ = з мзчбнЮ ден гемЯжей.
Бцпэ фп рсьвлзмб лхиеЯ, рбфЮуфе фп рлЮкфсп ЕНБСОЗУ/РБХУЗУ гйб ербнеккЯнзуз фпх рспгсЬммбфпт. ЕЬн, рбсЬ
фпн Элегчп рпх кЬнбфе, фп рсьвлзмб рбсбмЭней, ерйкпйнщнЮуфе ме фп КЭнфсп УЭсвйт фзт ресйпчЮт убт.
Рсьвлзмб РйибнЮ бйфЯб
• Фп рлхнфЮсйп ден фЯиефбй уе
лейфпхсгЯб:
• Ден Эчей клеЯуей кблЬ з рьсфб.
• Фп рлхнфЮсйп ден Эчей ухндеиеЯ уфзн рсЯжб Ю з рсЯжб
ден фп фспцпдпфеЯ ме сеэмб.
• ¸чей кбеЯ з кенфсйкЮ буцЬлейб фпх урйфйпэ.
• П дйбкьрфзт ерйлпгЮт рспгсЬммбфпт ден еЯнбй ущуфЬ
фпрпиефзмЭнпт кбй фп рлЮкфсп ЕНБСОЗУ/РБХУЗУ ден
Эчей
рйеуфеЯ
• Фп рлхнфЮсйп де гемЯжей:
• ЕЯнбй клейуфЮ з всэуз фпх неспэ.
• П ущлЮнбт рбспчЮт Эчей рбфзиеЯ Ю фубкЯуей.
• ЕЯнбй цсбгмЭнп фп цЯлфсп фпх ущлЮнб рбспчЮт.
• Ден Эчей клеЯуей кблЬ з рьсфб.
• Фп рлхнфЮсйп гемЯжей ме несь кбй фп
бдейЬжей бмЭущт мефЬ:
• Фп Ьксп фпх ущлЮнб бдейЬумбфпт всЯукефбй рплэ чбмзлЬ
уе учЭуз ме фп рлхнфЮсйп. БнбфсЭофе уфз учефйкЮ
рбсЬгсбцп фзт еньфзфбт гйб фп “Ьдейбумб неспэ”.
• Фп рлхнфЮсйп ден бдейЬжей фп несь
кбй/Ю де уфэвей:
• П ущлЮнбт бдейЬумбфпт Эчей рбфзиеЯ Ю фубкЯуей.
• ¸чефе ерйлЭоей рсьгсбммб ме фз дхнбфьфзфб неспэ
уфп кЬдп (ерйлпгЮ ).
• З ерйлпгЮ рпх Эчей ерйлегеЯ
• З бнфлЯб бдейЬумбфпт еЯнбй цсбгмЭнз.
• Фп несь фсЭчей уфп рЬфщмб:
• ¸чефе чсзуймпрпйЮуей хресвплйкЮ рпуьфзфб
брпссхрбнфйкпэ Ю бкбфЬллзлп брпссхрбнфйкь (кЬней рплэ
бцсь).
• ЕлЭгофе мЮрщт хрЬсчпхн дйбсспЭт брь кЬрпйп
уфегбнпрпйзфйкь дбкфэлйп фпх ущлЮнб рбспчЮт. ЕЬн еЯнбй
дэукплп нб дйбксЯнефе кбиют фп несь фсЭчей брь фп
ущлЮнб, елЭгофе еЬн еЯнбй хгсьт.
• ¸чей кбфбуфсбцеЯ п ущлЮнбт бдейЬумбфпт фпх неспэ.
• Де вЬлбфе фп рюмб уфп ущлзнЬкй бдейЬумбфпт фпх неспэ
мефЬ фпн кбибсйумь фзт бнфлЯбт.
• Фп брпфЭлеумб фзт рлэузт ден
еЯнбй йкбнпрпйзфйкь:
• ¸чефе чсзуймпрпйЮуей хресвплйкЬ мйксЮ Ю мегЬлз
рпуьфзфб брпссхрбнфйкпэ.
• ¸чефе чсзуймпрпйЮуей бкбфЬллзлп брпссхрбнфйкь.
• Ден кбибсЯубфе фпхт ерЯмпнпхт лекЭдет рсйн фзн
рлэуз.
• Ден ерйлЭобфе фз ущуфЮ иесмпксбуЯб.
• Хресцпсфюубфе фпн кЬдп.
• Фп рлхнфЮсйп дпнеЯфбй Ю кЬней
иьсхвп:
• Ден Эчпхн бцбйсеиеЯ пй дйбфЬоейт буцблеЯбт кбй фб хлйкЬ
ухукехбуЯбт.
• Фб рпдбсЬкйб уфЮсйозт ден Эчпхн кблЮ ербцЮ ме фп рЬфщмб.
• Фп цпсфЯп спэчщн ден еЯнбй пмпйьмпсцб кбфбнемзмЭнп уфпн
кЬдп.
• ºущт хрЬсчпхн рплэ лЯгб спэчб мЭуб уфпн кЬдп.
ДхулейфпхсгЯет;
Page 59

ЕЛЛЗНЙКБ
59
ЕЬн ден мрпсеЯфе нб енфпрЯуефе Ю нб лэуефе фп
рсьвлзмб, брехихниеЯфе уфп кЭнфсп уЭсвйт убт. Рсйн
фзлецщнЮуефе, узмейюуфе фп мпнфЭлп, фпн бсйимь
уейсЬт кбй фзн змеспмзнЯб бгпсЬт фпх рлхнфзсЯпх убт
кбиют фп КЭнфсп УЭсвйт иб убт жзфЮуей бхфЬ фб
уфпйчеЯб.
Mod. ..........
Prod. No. ...........
Ser. No. .........
M
o
d
. ..........
Prod
. N
o. ...........
S
er. N
o
. .........
P0042 BD
Рсьвлзмб РйибнЮ бйфЯб
• Фп несь ден цбЯнефбй мЭуб уфп
рлхнфЮсйп:
• Фп рлхнфЮсйп, фп прпЯп еЯнбй рспъьн уэгчспнзт
фечнплпгЯбт, лейфпхсгеЯ ме рплэ пйкпнпмйкь фсьрп кбй
кбфЬ ухнЭрейб, ме чбмзлЮ кбфбнЬлщуз неспэ.
Щуфьуп, з брьдпуЮ фпх еЯнбй еобйсефйкЮ.
• Фп уфэшймп оекйнЬ ме кбихуфЭсзуз
Ю ден оекйнЬ кбиьлпх:
• ¸чей енесгпрпйзиеЯ фп злекфспнйкь уэуфзмб елЭгчпх
еойупссьрзузт дйьфй фп цпсфЯп спэчщн ден еЯнбй
пмпйьмпсцб кбфбнемзмЭнп уфпн кЬдп. Фп цпсфЯп
спэчщн бнбкбфбнЭмефбй ме бнфЯуфспцз ресйуфспцЮ
фпх кЬдпх. Бхфь ендЭчефбй нб ухмвеЯ бскефЭт цпсЭт
рсйн бренесгпрпйзиеЯ фп уэуфзмб еойупссьрзузт кбй
оекйнЮуей фп кбнпнйкь уфэшймп. ЕЬн, мефЬ брь 10
лерфЬ, фп цпсфЯп спэчщн ден Эчей бкьмб кбфбнемзиеЯ
пмпйьмпсцб уфпн кЬдп, фп рлхнфЮсйп де иб оекйнЮуей
фз цЬуз уфхшЯмбфпт. Уе бхфЮ фзн ресЯрфщуз,
ербнбфпрпиефЮуфе фб спэчб уфпн кЬдп кбй ерйлЭофе
фп рсьгсбммб уфхшЯмбфпт.
• Фп рлхнфЮсйп кЬней Энбн бухнЮийуфп
иьсхвп
• Фп рлхнфЮсйп дйбиЭфей Энб фэрп мпфЭс рпх кЬней
бухнЮийуфп иьсхвп уе учЭуз ме фб рбсбдпуйбкЬ
мпфЭс фщн рлхнфзсЯщн. Фп нЭп мпфЭс дйбуцблЯжей рйп
Юрйб еккЯнзуз кбй пмпйьмпсцз кбфбнпмЮ фщн спэчщн
уфпн кЬдп кбфЬ фп уфэшймп, ьрщт ерЯузт кбй
бхозмЭнз уфбиесьфзфб фпх рлхнфзсЯпх.
• ¸чпхн меЯней Ячнз брпссхрбнфйкпэ
мефЬ фпн кэклп рлхуЯмбфпт
• Бхфь пцеЯлефбй рйибньфбфб уфб мз дйблхфЬ ухуфбфйкЬ
фщн уэгчспнщн брпссхрбнфйкюн. Ден еЯнбй Эндейоз
бнербскпэт оевгЬлмбфпт. ВпхсфуЯуфе Ю фйнЬофе фб
спэчб кбй, еЬн еЯнбй брбсбЯфзфп, рлэнефЭ фб обнЬ.
• ХрЬсчей бкьмб бцсьт мефЬ фп
фелехфбЯп оЭвгблмб
• Фб уэгчспнб брпссхрбнфйкЬ рбсЬгпхн бцсь бкьмб
кбй мефЬ фп оЭвгблмб, щуфьуп бхфь ден ерзсеЬжей
фзн рпйьфзфб фзт рлэузт.
• Ден бнпЯгей з рьсфб:
• Фп рсьгсбммб екфелеЯфбй бкьмб кбй п кЬдпт
ресйуфсЭцефбй.
• З рьсфб ден Эчей бкьмз брбуцблйуфеЯ.
• З уфЬимз фпх неспэ еЯнбй рЬнщ брь фп кЬфщ Ьксп
фзт рьсфбт.
• Фп рлхнфЮсйп иесмбЯней фп несь.
З рьсфб мрпсеЯ нб бнпЯоей мьнп ьфбн увЮуей з
учефйкЮ лхчнЯб
Page 60

КБФБУКЕХБУФЗКЕ УФЗН ЕПК
Áðü ôïí ¼ìéëï Electrolux. З кпсхцбЯб уфпн кьумп ерйлпгЮ.
П ¼мйлпт Electrolux еЯнбй п мегблэфеспт кбфбукехбуфЮт уфпн кьумп злекфсйкюн ухукехюн гйб фзн кпхжЯнб, фпн
кбибсйумь чюсщн, ьрщт кбй гйб еощфесйкЮ чсЮуз. РЬнщ брь 55 екбфпммэсйб рспъьнфб фпх ПмЯлпх Electrolux (ьрщт
шхгеЯб, кпхжЯнет, рлхнфЮсйб, злекфсйкЭт укпэрет, злекфсйкЬ рсйьнйб кбй чпсфпкпрфйкЭт мзчбнЭт) рщлпэнфбй кЬие
чсьнп ме боЯб рпх рлзуйЬжей фб 14 дйуекбфпммэсйб дплЬсйб ЗРБ уе рЬнщ брь 150 чюсет уе ьлп фпн кьумп.
 Loading...