

Page 1
EcoSense® pH10 pH/Temperature Pen
Operations Manual
YSI pH10 OVERVIEW
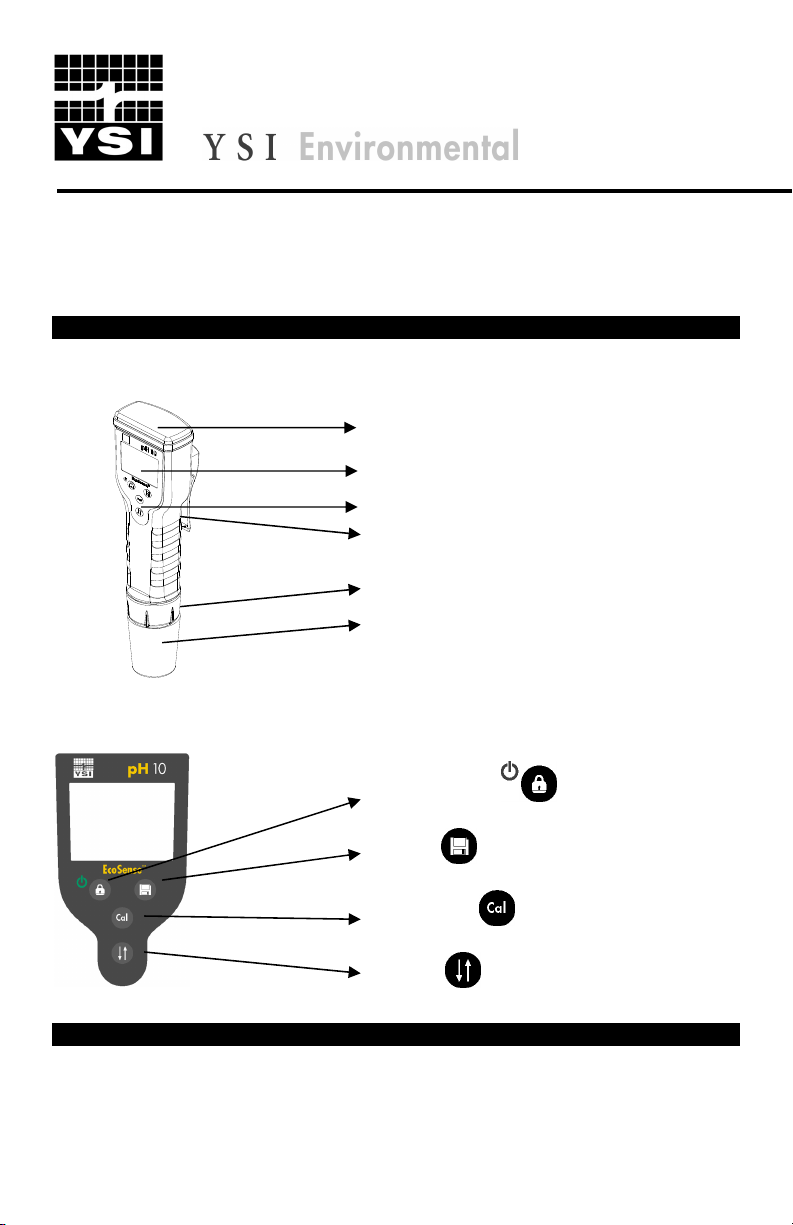
A. Description
1. Battery cap
2. Graphic LCD screen
3. Keypad
4. Belt clip (Do not remove screw.)
4. Electrode collar
5. Electrode & ATC assembly – outside o-ring on
electrode is yellow and inside o-ring is black.
(Electrode cap shown covering electrode.)
B. YSI pH10 Keypad Layout
Hold – On/Off key
Store key
Calibration key
Scroll key
INITIAL INSPECTION AND ASSEMBLY
Carefully unpack the instrument and accessories, and inspect for shipping damages. Notify your
local dealer or YSI immediately (800-897-4151 or environmental@ysi.com) of any damages or
missing parts. Save packing materials until satisfactory operation is confirmed.
Page 2
BEFORE USING
A. Insert the Batteries
1. Remove the battery cap at the top of the unit.
2. Insert the set of batteries (included) ensuring correct polarities.
3. Securely replace battery cap.
B. Soak the Electrode
1. Remove the electrode cap covering the pH10 meter electrode.
2. Soak electrode in pH 4 buffer for 10 minutes before first use or after storage.
OPERATION
A. Power ON/OFF
Press “HOLD – On/Off” key for 3 seconds. The unit will turn on and enter the “Measure
Mode”. Repeat process to turn off. 10 minute automatic shutoff.
B. Set Date and Time
1. Press and Hold “CAL” key until it enters “Date/Time Set Mode”.
2. Press “HOLD” key to select date or time parameters.
3. Press “STORE”
4. Press “CAL” key for 2 seconds to return to “Measure Mode”.
key to increase value or “SCROLL” key to decrease value.
C. Select Buffer Set
1. Press and hold “SCROLL” key until unit enters “Buffer Set Select Mode”.
2. Press “SCROLL” key again to select either 7.00 (7.00/4.01/10.01) or 6.86
(6.86/4.00/9.18) buffer sets.
3. Press “STORE” key for 2 seconds to return to “Measure Mode”.
Note: This is only needed once unless changing buffer sets.
D. Calibrate pH
1. Press “CAL” key for 2 seconds and release to enter “Calibration” mode.
2. Immerse meter into either pH 7.00 or 6.86 buffer solution depending on which Buffer
Set you are using. ‘WAIT” will flash.
3. The pH10 meter will determine when the calibration reading is stable. Meter is
calibrated when “WAIT” disappears. The unit will automatically enter the next
calibration point 5 seconds later. One/first point calibration is now completed. Press
“CAL” key to exit or continue to next step for two/second point calibration.
4. Repeat Steps 2 and 3 for two/second point calibration by immersing the meter in pH
4.01/4.00 or 10.01/9.18 buffers.
5. Move to #6 for three/third point calibration or press “CAL” to exit two point calibration.
6. Repeat Steps 2 and 3 for three/third point calibration.
7. When “WAIT” disappears unit will automatically return to “Measure Mode”.
Note: For accuracy, it is recommended pH calibration is performed routinely with good buffer
solutions and a clean electrode or anytime after replacing the electrode.
E. Measure
Dip the electrode into the test solution while in the “Measure Mode”.
F. Hold Data
1. When the pH is stable, press “HOLD” key once to lock the reading on the display.
Page 3

2. Press “HOLD” key again to unlock reading and the unit will return to “Measure Mode”.
Note: The unit cannot be powered off in “Hold Mode”.
The unit is now ready for another measurement.
G. Save Data
Either in the “Hold Mode” or the “Measure Mode”, press “STORE” key for 2 seconds. “DATA
SAVE” and “M-XX” will appear indicating the reading has been saved and stored in memory
location XX. The unit automatically returns to “Measure Mode”.
Note: The non-volatile memory stores up to 50 sets of data (pH, Temperature, Date, Time) even
if power is lost. If memory is full, the next set of data will overwrite the first data set stored, etc.
H. Recall Data
1. In “Measure Mode”, press “SCROLL” key 2 seconds, the most recent set of saved
data will appear.
2. Press the “SCROLL” key to view previous saved data.
3. Press “STORE” key for 2 seconds to return to “Measure Mode”.
ONGOING MAINTENANCE
A. Electrode Storage
1. Electrodes attached to the instrument should be kept in a moist environment. Keep
the sponge in the chamber moist, tap water is acceptable. The single-junction
electrode needs to be kept clean; check periodically for cleanliness.
2. For long-term storage, store in pH 4 buffer.
ERROR DISPLAYS AND TROUBLESHOOTING
pH LCD
Display
Any Value "OVER"
"OVER"
"OVER"
"OVER"
“UNDER”
ATC
Display
0.0-
99.9°C
0.0 -
60.0°C
0.0 -
60.0°C
DISPLAY
Mode
Measure
Measure
pH CAL
a.pH-
STAND
b.pHSLOPE
pH CAL
a.pHSTAND
b.pHSLOPE
Possible cause(s)
[Action(s)]
a. Temperature outside 0 to 99.9°C range.
[Bring solution to a lower/higher temp.]
b. Bad sensor. [Replace electrode.]
pH value outside 0.00 to14.00 pH range .
[Use new buffer, Recalibrate, or Replace electrode.]
a. Offset @ 7.00pH: mV > 90mV
Offset @ 6.86pH: mV > 98.3mV
b. New slope>ideal slope by 30%
[Use new buffer or Replace electrode.]
a. Offset @ 7.00pH: mV < -90mV
Offset @ 6.86pH: mV < -81.7 mV
b. New Slope < ideal slope by 30%
[Use new buffer or Replace electrode.]
SPECIFICATIONS
Range Resolution Accuracy
pH 0.00 to 14.00 pH pH 0.01 pH pH ±0.02 pH ± 1 LSD
Temp. 0.0 to 99.9 °C Temp. 0.1 °C Temp. ±0.3 °C
Temp. 32.0 to 211.8 °F Temp. 0.2 °F Temp. ±0.6 °F
pH
Page 4

Buffer recognition pH 7.00, 4.01, 10.01 or pH 6.86, 4.00, 9.18
Temperature compensation AUTO 0.0 to 99.9 °C (32.0 to 211.8 °F)
Buffer temperature range 0.0 to 60.0°C (32.0 to 140 °F)
Electrode offset ±90 mV at pH 7.00 +98.3 mV / -81.7 mV at pH 6.86
Electrode slope ±30% at pH 4.00, 4.01, 9.18 and 10.01
Input impedance >10
12
Ω
Temperature
Temperature sensor Thermistor, 10 k at 25°C
General
Battery life Meter: ~35 Hours
Ambient temperature range 0.0 to 50.0 °C
Display 98x64 graphic LCD
Case IP67 water-tight case
Weight 105 g (3.7 ounces)
REPLACEMENT PARTS
Item Number Description
605112 Instruction Manual
605113 pH10 Electrode Replacement Kit (Includes electrode, electrode collar, 2
605114 Sensor Cap
605115 Battery Compartment Kit (Includes battery cover and battery gasket)
605118 Battery Kit (Includes 4 batteries)
o-rings, and sensor cap)
WARRANTY
The YSI pH10 Instrument is warranted for one year from date of purchase by the end user against defects in
materials and workmanship. YSI pH10 electrodes are warranted for six months
end user against defects in material and workmanship. Within the warranty period, YSI will repair or replace,
at its sole discretion, free of charge, any product that YSI determines to be covered by this warranty.
To exercise this warranty, write or call your local YSI representative, or contact YSI Customer Service in
Yellow Springs, Ohio. Send the product and proof of purchase, transportation prepaid, to the Authorized
Service Center selected by YSI. Repair or replacement will be made and the product returned, transportation
prepaid. Repaired or replaced products are warranted for the balance of the original warranty period, or at
least 90 days from date of repair or replacement.
from date of purchase by the
Limitation of Warranty
This Warranty does not apply to any YSI product damage or failure caused by: (i) failure to install, operate or
use the product in accordance with YSI's written instructions; (ii) abuse or misuse of the product; (iii) failure to
maintain the product in accordance with YSI's written instructions or standard industry procedure; (iv) any
improper repairs to the product; (v) use by you of defective or improper components or parts in servicing or
repairing the product; or (vi) modification of the product in any way not expressly authorized by YSI.
THIS WARRANTY IS IN LIEU OF ALL OTHER WARRANTIES, EXPRESSED OR IMPLIED, INCLUDING ANY WARRANTY OF
MERCHANTABILITY OR FITNESS FOR A PARTICULAR PURPOSE. YSI's LIABILITY UNDER THIS WARRANTY IS LIMITED
TO REPAIR OR REPLACEMENT OF THE PRODUCT, AND THIS SHALL BE YOUR SOLE AND EXCLUSIVE REMEDY FOR
ANY DEFECTIVE PRODUCT COVERED BY THIS WARRANTY. IN NO EVENT SHALL YSI BE LIABLE FOR ANY SPECIAL,
INDIRECT, INCIDENTAL OR CONSEQUENTIAL DAMAGES RESULTING FROM ANY DEFECTIVE PRODUCT COVERED BY
THIS WARRANTY.
Item #605112 • Drawing #A605112 • Rev B
• August 2008
CONTACT INFORMATION
YSI Inc. • 1725 Brannum Lane • Yellow Springs OH, 45387
800-897-4151 • 937-767-7241 • Fax: 937-767-1058 • Email: ecosense@ysi.com
• For the latest version of this manual, visit www.ysi.com/environmental
• Website: www.ysi.com
 Loading...