

Page 1
PC6000 SOFTWARE
Operations
Manual
PC6000
+
+
-
-
Page 2

Page 3

CONTENTS
SECTION 1 INTRODUCTION 1
SECTION 2 GETTING STARTED 2
2.1
2.2
2.3
2.4
SECTION 3 CAPTURE, RETREIVE AND ANALYZE DATA 7
SECTION 4 PC6000 MENUS 12
4.1 File Menu 12
4.2 Setup Menu 21
4.3 Data Capture/ Real Time Setup 22
SECTION 5 ADVANCED SETUP 25
Installing PC6000 Software 2
Running Software 3
Software Setup 3
Communicating with a Sonde 5
4.1.1 Modify 13
4.1.2 View 18
4.1.3 System 19
SECTION 6 TROUBLESHOOTING 28
SECTION 7 CONTACT INFORMATION 29
SECTION 8 SENSOR DRIFT APPLICATION NOTE 30
SECTION 9 ACCESSORIES 33
i
Page 4

ii
Page 5

SECTION 1 INTRODUCTION
The PC6000 program is very useful in the operation of the YSI Sondes, and is prov ided as an option
with every sonde. This PC-based software can be used with any I B M-compatible computer.
PC6000 enables you to:
!
Configure and deploy the sonde
!
Capture data from the sonde
!
Create a variety of reports and plots
!
Print reports and plots
!
Save reports and plots to disk
!
Export data to other programs
The PC6000 program is completely menu-driven and easy to use. You can:
•
Use the arrow keys to move the cursor and hig hlig ht menu options.
•
Use the Enter key to select a highlighted m enu option.
•
Use the Esc key to return to a previous screen.
When each menu option is highlighted, a short, descriptive help line is displayed at the bottom of
the screen.
In Section 2 of this manual, you w ill learn how to:
•
Install the software to your PC
•
Run the software and set up the Com ports, and the display and plot colors
•
Establish communication between your sonde and com puter using PC6000
Section 3 of the manual provides the basics on how to:
•
Capture data from the sonde to your computer using PC6000
•
Upload data from your sonde to your computer
•
Report, plot, and analyze data files using PC 6000 software
Sections 4 through 9 provide complete details of the capability of PC 6000 as well as prov iding YSI
Customer Service contact information and a list of YSI sonde and software accessories.
Page 6

SECTION 2 GETTING STARTED
2.1 INSTALLING PC6000 SOFTWARE
PC6000 software can be used with an IBM-compatible PC with at least 256KB of RAM and
DOS 3.0 or later. If your system is not IBM-compatible, any terminal emulation program can be
used with your computer. PC6000 software is an optional accessory that can be requested at no
charge with each Sonde. The diskette is located in the back of this instruction manual.
You need a graphics adapter for operation of the plotting feature. You need one RS-232 port (also
called a Com port or serial port) to communicate with the sonde and to capture data files. This port
must be either Com1 or Com2.
For IBM-compatible computer systems with a hard disk drive:
your floppy disk drive. At the C:\ prompt, type the letter of the drive in which the disk was
inserted followed by a colon, then press
Example: “A:
To install PC6000 software execute the following command from the DOS prompt:
“INSTALL <destination>”
the PC6000 files to be installed.
Example: “INSTALL C:\PC6000”
If you have a non-standard video adapter
will also need to:
1. Put your video adapter into a compatible (standard) video mode. Typically the manufacturer of
the video adapter provides a program or utility to set the v ideo mode.
2. Type PC6000-V to run the program. This tells PC6000 to send video output through the
computer BIOS (built-in firmware), rather than directly to video memory. This procedure
slows down the video output somewhat, but g uarantees com p atibility .
Enter
”
where
Enter
.
<destination>
and monitor (rare except on CAD work stations) you
is the drive and directory in which you want
Insert the PC 6000 disk into
Page 7
Getting Started Section 2
2.2 RUNNING SOFTWARE
To start the software, make your current drive C:\PC6000 (or another directory where you have
installed PC6000). Then type “
PC6000”
and press
the menu bar will appear at the top of the computer screen.
Enter
. The PC6000 software will load and
Use the arrow keys to move the cursor and to highlight different menu options. Press
select a highlighted option. Press
PC6000 Main Menu Bar
Esc
to cancel an entry.
Enter
Sonde File Setup Real-Time Exit PC6000
2.3 SOFTWARE SETUP
To begin setting up your computer to communicate with a sonde, highlight
Enter.
Check the default setup values by referring to the following instructions and/or the
PC6000 Setup Screen below.
Setup
and then press
to
---DISPLAY -FORMATS---------COMPUTER-CONNECTIONS------------------Date format: MDY Comm port: 1
Date separator: / Baud rate 9600
Time separator: : Printer Port 1
Radix mark: . Printer type HP LaserJet laser
-------MORE-SETUP-------------COMPUTER-DISPLAY--------------------Data capture setup... Menu colors: User-defined menu colors
Advanced Setup... Plot colors: User-defined plot colors
Graphics mode: Automatic selection hi-res
Select the
connected. Press
Comm
option to enter the number of the Com port (1 or 2) to which your sonde is
Enter
to confirm a new entry. If the default setting is correct, it does not need
to be changed.
YSI Incorporated PC6000 Software Operations Manual 3
Page 8

Getting Started Section 2
Select the
highlight it and press
and press
Select the
printer is connected. If no printer is connected, select LPT1. Press
Baud
option to check the baud rate. The baud rate should be 9600. If it is not,
Enter
. A list of possible baud rates will appear. Select 9600 from the list
Enter
.
Printer
option to specify the parallel port (LPT1, LPT2 or LPT3) to which your
Enter
after making your
selection.
Printer type
Select
to select the type of printer connected to your computer system. From the
list, choose the selection that best describes your printer. If your printer is not on the list, refer to
your printer's instruction manual to determine what type of printer your printer emulates. Press
Enter
after making your selection.
Select the
the cursor between color schemes, the screen changes to display your selection. Press
Menu colors
option to choose a color scheme for the PC6000 menus. As you move
Enter
to
confirm a selection.
Select the
cursor between color schemes, the screen changes to display your selection. Press
Plot colors
option to choose a color scheme for the PC6000 plots. As you move the
Enter
to
confirm a selection.
Other setup functions are described in Section 4.2,
necessary for a quick start into the sondes operations. Press
Setup Menu
Esc
, but are usually are not
to exit the Setup Menu. The
cursor will return to the PC6000 Menu bar.
YSI Incorporated PC6000 Software Operations Manual 4
Page 9
Getting Started Section 2
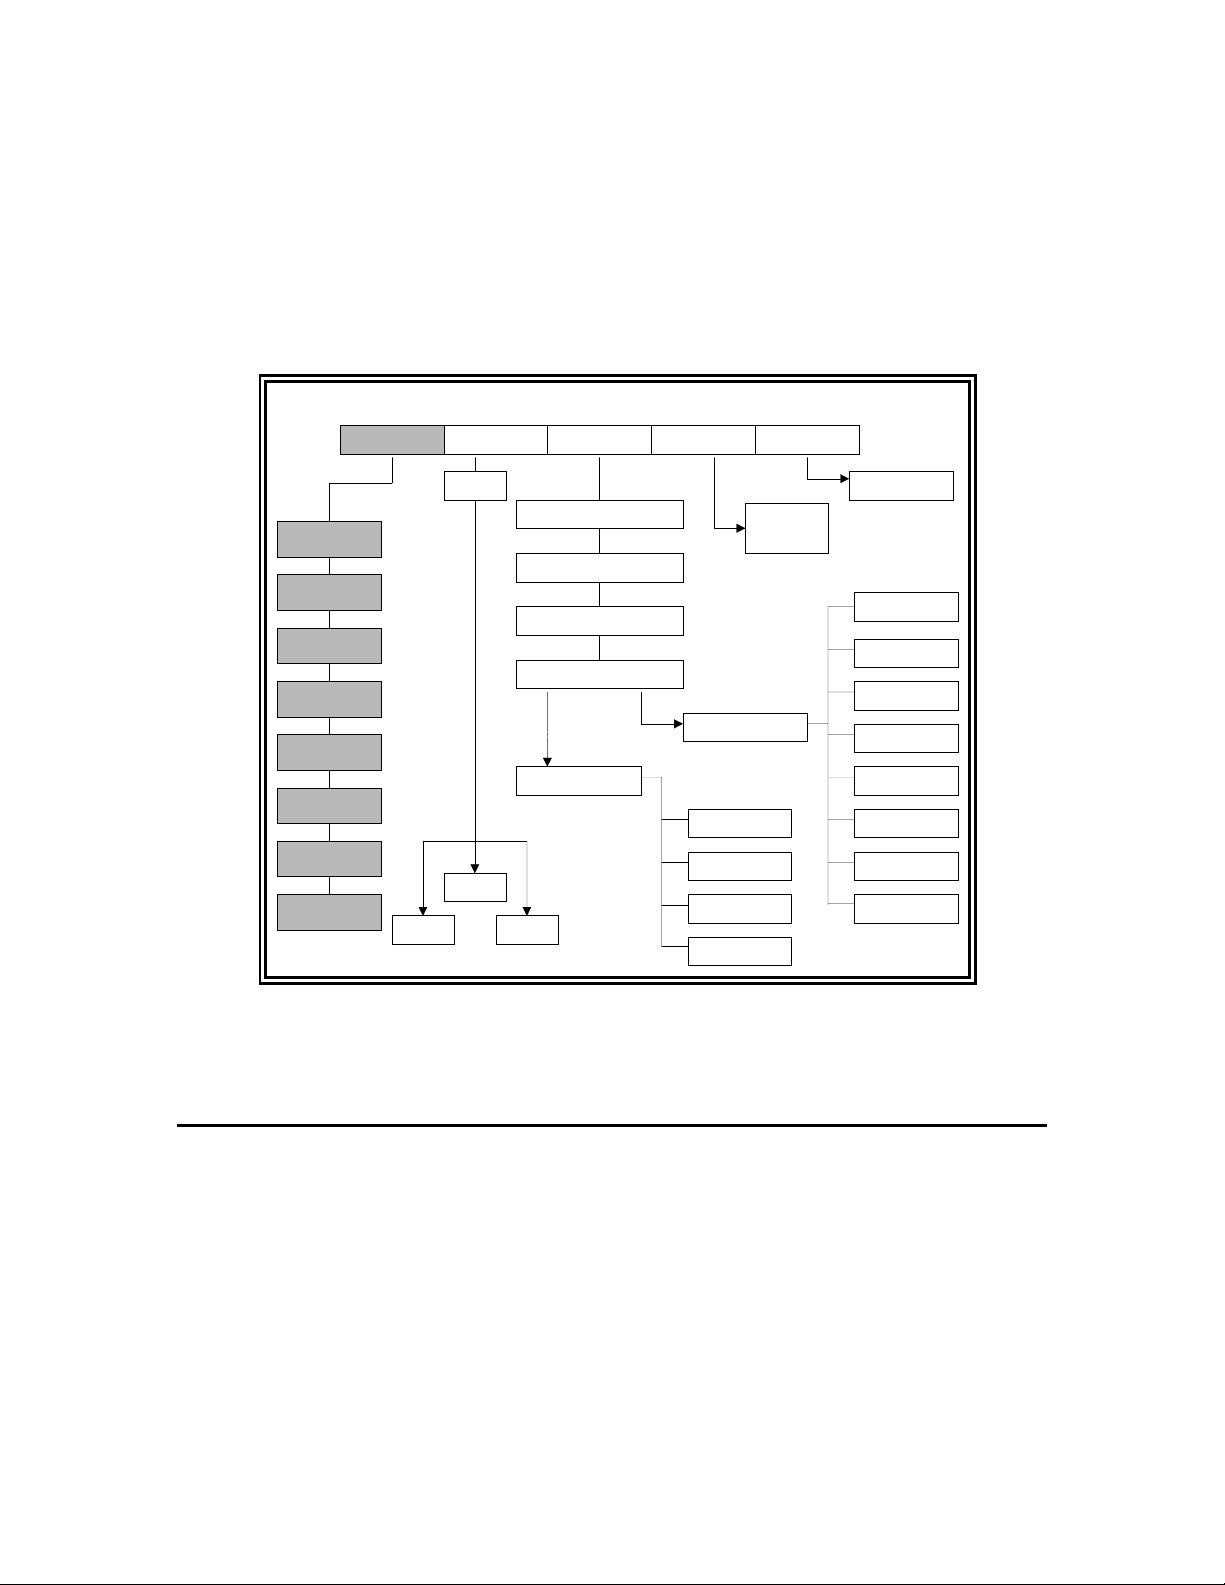
The PC6000 menu flow chart will help you visualize the relationship between the most often used
options in this PC-based software. To better understand the relationship between Sonde software
and PC6000 PC software, the sonde software menu items are listed in the shaded areas. Refer to
this chart as you learn more about the specific functions of these menu items in the following
descriptions.
PC6000 Menu Flow Chart for Sondes (Some choices in the sonde menu are not available with all sondes)
PC6000 MENU FLOW
Sonde File Setup Real-Time Exit
1. Run
2. Calibrate
3. File
4. Status
5. System
6. Report
7. Sensor
8. Advanced
Filename
View
Display Format
Computer Connection
Computer Display
More Setup
Advanced Setup
Advanced Setup
SystemModify
Readings
Displayed
Data Cap ture
Global Switch
Data Files
User-defined
Export
Return to DOS
Parser
Site Name
Instrument ID
Filename
Autoconfigure
X-axis Time
Parameter/Plo
Beep Notify
2.4 COMMUNICATING WITH YOUR SONDE
There are two sets of software at work within the YSI sonde. PC6000 is resident in your PC, while
the other software is resident in the sonde itself. When you select
menu the PC based software begins direct comm unication with the sonde-based software via
standard VT100 terminal emulation.
Using the arrow keys, highlig ht and select
instructed, type “
menu
” after the # sign and the Main sonde menu will appear.
Sonde
from the Main menu bar. Press
To use PC6000 to establish communication between your computer and sonde:
YSI Incorporated PC6000 Software Operations Manual 5
Sonde
from the PC6000 Main
Enter
as
Page 10
Getting Started Section 2
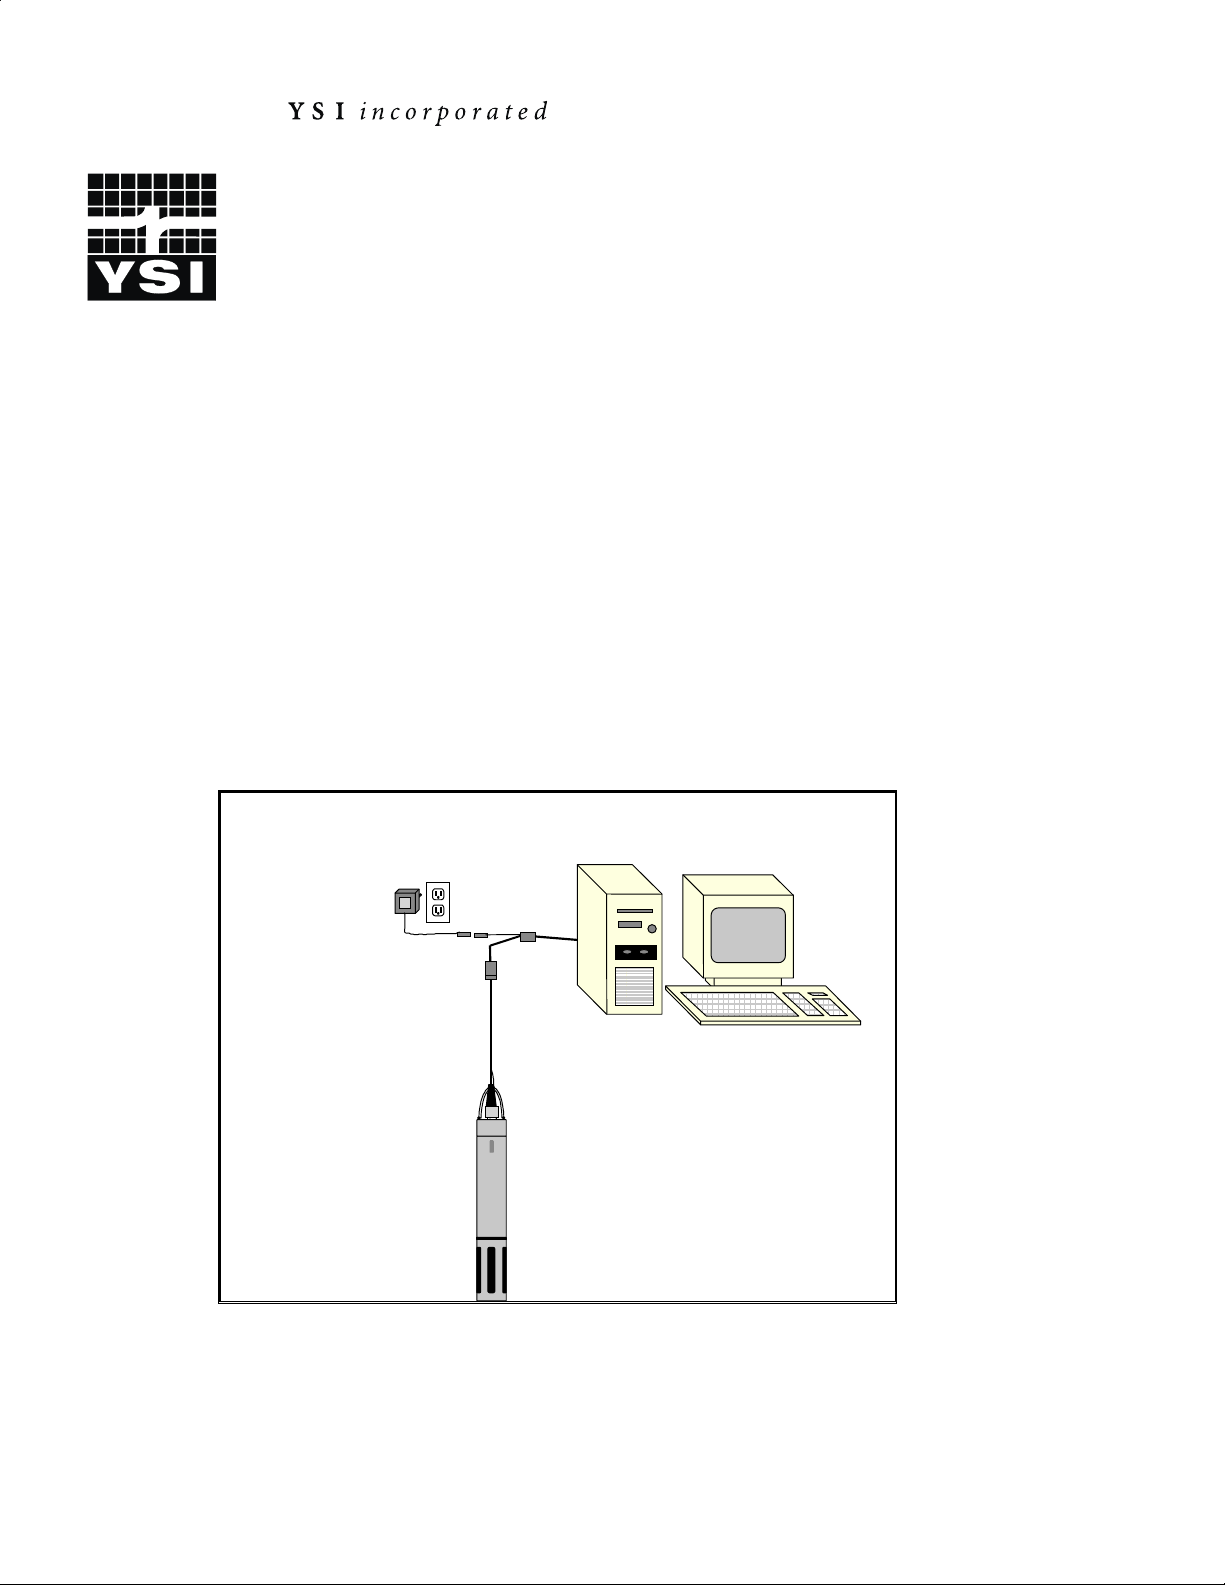
1. Connect one end of your YSI cable to the sonde and the other to the computer ‘s Com port
that was selected above.
2. Make certain that your sonde is powered either with batteries or a power supply.
3. Using the arrow keys, highlight the
Enter
.
Sonde
selection in the top menu bar of PC6000 and press
A display similar to that shown below will appear, followe d by a # si gn. As i n s t ructed, t ype
menu
“
” after the # sign and the Main sonde menu will appear.
PC6000 Main Menu Bar
Sonde
File Setup Real-Time PC6000
# menu
Sonde Main Menu
------------------Main----------------1-Run 5-System
2-Calibrate 6-Report
3-File 7-Sensor
4-Status 8-Advanced
Select option (0 for previous menu):
After establishing sonde communication proceed to Section 2 of the Sonde’s Operations manual
supplied with your sonde to learn about the basics of Sonde setup. Pay particular attention to
leaning low to set up Discrete Sampling and Unattended Sampling studies from the Run menu.
Then proceed to the next section of this manual to learn how to capture data from the sonde to
the computer in real time, to upload data from sondes containing memory, and to analyze the
captured or uploaded data.
YSI Incorporated PC6000 Software Operations Manual 6
Page 11

SECTION 3
USING PC6000 TO CAPTURE, RETRIEVE AND
ANALYZE DATA
CAPTURE – ALL SONDES
Once you have learned how to carry out Discrete Sampling studies using the sonde software
(Section 2 of your Sonde Operations Manual), you can capture that information into a data file
on your computer hard drive. This function is particularly useful when using sondes with no
internal memory (600R, 600XL, and 6820).
place only after the PC6000 software has been properly configured to match your parameter
selection as described in the following paragraphs.
PC6000 uses the date and time from your PC’s internal clock to stamp each incoming data point.
It is important, therefore, to make sure that the date and time are set up correctly inside your
computer. Consult your computer instruction manual if you are unsure how to set the internal
clock.
To set up for data capture return to the PC6000 menu bar by pressing F10.
Note, however, that this capture function can take
Sonde
# menu
Highlight
Select
menu will be displayed.
Parser: 6000
Site name: Clear Lake X-axis time per screen: 1
Instr ID: 96E12345 Parameters per plot: 2
Filename: CLRLAKE3 Auto-configure Beep notification: Both
ColumnParameter & Units Minimum Maximum
Use the arrow keys to highlight the
data on the computer hard drive or diskette. Remember that while you can type up to 15
characters in the name, MS-DOS will only recognize the first 8 for file designation.
File Setup Real-Time PC6000
Setup
from the top-line menu and press
Data Capture Setup
from the Setup menu and press
Filename:
Enter
.
Enter
. The Data Capture Setup
then type in a name that you will use to store the
Now highlight
PC6000 software has the same parameters as selected in the Report setup of the Sonde software.
Auto-configure
and press
Enter
. This makes sure that the Data Capture setup in
Page 12

Capture, Retrieve and Analyze Data Section 3
The parameters listed in the lower part of the display (not shown) are likely to change during the
Auto-configure execution.
IMPORTANT
may display error messages that refer to “differing parameters” that prohibit you from
proceeding.
Leave all of the other selections with their default settings intact and then press
return to the menu bar of PC6000.
To capture data, use the arrow keys to select
# sign type “
from the Main menu, and
Discrete Sample menu (600XLM, 6600 or 6920). Lines of data will be displayed to the screen
and updated at the interval specified.
Now press the
wish to create. Select
OK to create new data file?”
“
designated file will begin.
As noted above, a change in the format of the displayed data in that both date and time will now
be displayed. In this mode, data appearing on the screen will be saved to your computer memory
until you press either
returns the display to the original data scrolling. A second press of
and return the display to the Run menu.
: Without the execution of the Auto-Configure command, the PC6000 software
Esc
twice to
Sonde
from the main menu and press
menu
”. This command returns you to the Main Sonde menu. Next select
1-Start sampling
F3
key and a message appears on the screen asking for the type of data file you
PC6000
Esc
and press
Press
or F3. When you press either of these keys, data capture halts and
from the Setup Menu (600R, 600XL or 6820) or the
Enter
. A message now appears on the screen asking,
Enter
to indicate ‘yes’ and data capture to your
Esc
will stop the sampling
Enter
1-Run
. At the
You may view and/or analyze the data by pressing F10, and then following the instructions in the
Section 3, Analyzing Data
.
RETRIEVE – 600XLM, 6600 AND 6920 SONDES
PC6000 Software can also be used as the interface to transfer (upload) data logged to sonde
memory from the sonde to the computer hard drive. This function only applies to sondes with
internal memory (6920, 6600 and 600XLM).
To carry out this operation, consult Section 2 of your Sonde’s Operations Manual on the logging
of data to sonde memory using the Discrete Sample and Unattended Sample features of the sonde
software. Make certain that you have logged at least one file (or study) to the sonde memory.
After logging is complete and the studies terminated, attach the sonde to the computer via the
YSI cable as described above.
You may now retrieve data files using the following procedure. Remember these are not files in
the PC6000 directory, but are in the sonde file directory.
Run PC6000 software on your PC and select
keys. At the # sign, type “
menu
” to enter the Sonde Main menu. Next select
Sonde
from the PC6000 menu bar using the arrow
3-File
.
YSI Incorporated PC6000 Software Operations Manual 8
Page 13

Capture, Retrieve and Analyze Data Section 3
------------------File----------------1-Directory 4-View file
2-Upload 5-Quick view file
3-Quick Upload 6-Delete all files
Select option (0 for previous menu): 1
Select number
1-Directory
to view all files currently stored in the sondes flash disk memory, the
screen below shows 5 files. File 4-CLRLAKE2 is a 2-week study from August that can be
uploaded to PC6000 for viewing or plotting. The other 4 files are related to different studies.
You do not need to upload all files in the directory.
File Samples First sample Last sample Interval Site
1-BRIDGE1 20 07/10/96 09:42:52 07/10/96 09:44:12 Discrete Kenton Rd.
2-BRIDGE2 20 07/10/96 10:15:20 07/10/96 10:16:40 Discrete Lakeview Dr.
3-UPLAKE 672 07/10/96 12:00:00 07/14/96 12:00:00 00:15:00 Lake Site A
4-CLRLAKE2 1672 08/14/96 11:00:00 08/28/96 11:00:00 00:10:00 Clear Lake
5-DWNLAKE2 21 08/31/96 12:42:31 08/31/96 12:43:54 Discrete Lake Site B2
Select option (0 for previous menu):
Esc
Press
Select number
to return to the previous menu, File.
2-Upload
to view file lists in memory, and uploads the data to PC-based software.
With YSI PC6000 software you can produce reports, plots, data manipulation, statistics, and
more.
Prior to upload, a “
logged data to upload. You may select
Time window
” display appears that will allow you to select portions of the
1-Proceed
to upload all logged data from the dates and
times displayed.
--------------Time window-------------1-Proceed
2-Start date=08/14/96
3-Start time=18:00:00
4-Stop date=08/28/96
5-Stop time=11:00:00
Select option (0 for previous menu):
1-Proceed
Select
. Choose the appropriate file transfer protocol (in this example, PC6000) and a
status box will appear in the lower right quadrant of the screen. Verification of a successful
transfer is indicated when all of the requested data are transferred.
YSI Incorporated PC6000 Software Operations Manual 9
Page 14

Capture, Retrieve and Analyze Data Section 3
---------------File type--------------1-PC6000
2-Comma & ' ' Delimited
3-ASCII Text
Select option (0 for previous menu):
In the File menu, when you select
performed, except only the most recent flash disk file is uploaded in its entirety. You still must
choose the transfer format.
4-View File
Select
memory. You will first view the same screen as viewed in the Directory menu. From this menu
choose the file of interest, then, using the Time window menu, choose the dates and/or times of
interest. If you choose dates or times that are not within the designated start and stop times, no
data will be displayed.
You also may choose the entire file. You can use the
at any time. Use the
Select number
memory. This feature is particularly useful to quickly review any recently acquired data so that
system performance can be assessed.
Select number
memory. It is critical not to use this option until all relevant data from sonde memory is
transferred to your computer via one of the upload options. There is a verification screen that
appears, so that pressing the number 6-key does not immediately delete all files.
Now proceed to the next section to get the basics relevant to analyzing your captured or uploaded
data.
to examine the data in any file currently stored in the sondes flash disk
Esc
key to stop the view.
5-Quick view file
6-Delete
all files to
3-Quick Upload,
to view the last page of data from the last data file in flash disk
IRREVERSIBLY
the same operation as
Space Bar
removes all files from the sonde flash disk
to stop and restart the scrolling
2-Upload
is
ANALYZE
This section provides only basic information on obtaining reports, plots, and analysis of your
uploaded or captured data files. Detailed information on the many powerful functions
associated with these aspects of PC6000 software are found in
manual.
To begin your data analysis, select
A box will appear on the screen asking you to enter a filename. You may type a filename or press
Enter
for a directory listing all PC6000 format files on your hard drive. Use the arrow keys to
YSI Incorporated PC6000 Software Operations Manual 10
File
from the PC6000 menu bar.
Section 4, PC6000 Menus
of this
Page 15

Capture, Retrieve and Analyze Data Section 3
highlight the desired file and then press
Enter
to access the selected file. If only one file resides
in the directory, it will automatically load into PC6000.
Filename:
CLRLAKE2.DAT
MODIFY VIEW SYSTEM
Parameters...
Control Info...
Scaling Info...
Header
Report
Plot
Statistics
Print Report
Print Plot
Definitions
Export
Any changes you make from this menu will affect only the file listed, in this case
CLRLAKE2.DAT. To change default values for all files, see
Section 4.1, File Menu.
To view general information on the screen including filename, site description, a list of active
sensors, logging information, and more use the arrow keys to highlight
Esc
Press
Using the arrow keys highlight
to return to the File menu.
Report,
press
Enter
and the information will scroll by. You can
Header
view a time-stamped report of the entire set of data collected in the study. Press
stop the report and press
Enter
to resume. Press
Esc
to return to the File menu.
and press
Pause/Break
Enter
.
to
Plot
Select
to view a graphical expression of the data from the study. All Reports and Plots can
be customized to your preference.
Esc
Press
until the menu of the PC6000 program appears. You have now completed Basic
Operation of the sonde, which included basic calibration procedures, basic sampling and
deployment procedures, data capture, and data retrieval and viewing using PC6000 software.
YSI Incorporated PC6000 Software Operations Manual 11
Page 16

SECTION 4 PC6000 MENUS
4.1 FILE MENU
File
The
based on data that has been captured from the sonde. Select
press
Sonde File Setup Real-Time Exit PC6000
The following prompt appears on the monitor screen.
Filename: *.dat
menu option of PC6000 software allows you to specify and customize reports and plots
File
from the PC6000 menu bar, and
Enter
.
At this prompt, press
Highlight the file you wish to retriev e from the list. If only one data file exists, that file will be
loaded automatically.
SAMPLE.DAT 38046 2/06/92 11:11 am
CLRLAKE.DAT 21035 10/30/93 6:00 am
RIVER2.DAT 1926 7/23/96 10:22 pm
NOTE:
source drive and directory, then press
prompt, you will view a list of all files located in the directory named PC6000 and stored on a disk
in the A: drive.
When you choose a file, the following screen will appear. Highlig ht the option y ou prefer, then
press
first being “Parameters”. MODI FY, VIEW and SYSTEM are column headers only. The figure
below shows “Parameters” is highlighted as an example.
To retrieve files stored on another drive or directory, at the
Enter
. Use the Tab or Arrow keys to move through the options. There are 10 options, the
Enter
. A list of all data files in the current directory will be displayed.
filename:
Enter
. For example, when you type A:\PC6000\ at the
prompt, type the
Page 17

PC6000 Menus Section 4
Filename: SAMPLE.DAT
MODIFY VIEW SYSTEM
Parameters... Header Print Report
Control Info... Report Print Plot
Scaling Info... Plot Definitions...
Statistics
The following descriptions are the various options under the
then VIEW, and finally SYSTEM.
File
menu, beginning with MODIFY,
4.1.1 MODIFY
Any modifications performed w ith these functions w ill allow y ou to customize data and format
reports and plots for a selected file only. See
permanently. Select
X-axis parameter
----------------------- Date + Time
Y-axis parameter
----------------------- Temperature C
Specific Cond mS/cm
DO mg/L
pH
ORP mV
Parameters
from the Modify menu.
Setup
later in this section to change default values
Add parameter here
Delete this parameter
Move parameter up
Move parameter down
Detail this parameter
The Parameters menu helps you define the way you want your reports and plots to appear. When
you highlight any parameter on this display and press
submenu functions is described below. You may select one parameter for the X-axis, and up to
twelve parameters for the Y- axis.
Add parameter here
Select
that can be added will be displayed. Choose those parameters that you want to be included in
reports and plots.
Delete this parameter
Select
Select
down one position. By using these options all parameters within a report and plot can be displayed
in the order you prefer.
YSI Incorporated PC6000 Software Operations Manual 13
Move parameter up or Move parameter down
to add a parameter to a report or plot. A list of all available parameters
to delete the highlighted parameter from reports and plots.
Enter
, the submenu appears. Each of the
to shift the highlighted parameter up or
Page 18

PC6000 Menus Section 4
Detail this parameter
Select
to view the detailed information of a highlighted parameter. PC6000
has many built-in formulae. Each formula accepts certain inputs and produces a single output. An
example of this is the formula for specific conductance, which is calculated from temperature and
conductivity. Most formula inputs must be in the input data file from the sonde, but some can be
entered as constants. For example, the total dissolved solids (TDS) constant can be manually
entered.
Parameter: TDS (g/L)
Formula: Temp(C) Cond(mS/cm) TDScoef
Inputs: Temperature (C) from 6030 probe, channel 0
Conductivity (mS/cm) from 6030 probe, channel 3
TDS coeff source not selected
Compensate:
Parameter
Select
identifies the parameter you just chose.
Formula
to view and change the formula used by PC6000 to calculate the selected
parameter. This option will allow you to change formulae and input sources only in circumstances
where multiple formulae or input sources exist. If formula options for the highlighted parameter
exist, they will be displayed when pressing En ter while the formula is highlighted.
Inputs
The
Select
option is reserved for future software enhancements.
Compensate
to compensate a data file for long term sensor drift. This compensation
procedure is also commonly called Post- C alibration.
Compensation Example:
Dissolved oxygen data can be collected periodically
throughout a long-term deployment using a separate, freshly calibrated DO meter.
This independent data can then be used to compensate the sondes data for any
sensor drift that may occur over tim e.
NOTE:
The setup menu options for date format, date separator, time separator, and radix separator,
all apply here. The date, time and value are separated from each other by spaces. Lines that do not
match the above format are ig nored.
To create a compensation file, use a word processing program or follow the procedure below. The
file must be simple ASCII. In WordPerfect you use the DOS Text Out feature. In Word, save as
file type Text Only (*.TXT). From DOS, proceed as follows:
1. Issue the DOS command "COPY CON DO.CMP". The DO designation reminds you
that you are compensating DO % data in this exercise.
2. Type the compensation data into your file, placing each independently acquired reading
on a separate line. Make sure each line is correct before you press
YSI Incorporated PC6000 Software Operations Manual 14
Enter
for that line.
Page 19

PC6000 Menus Section 4
Example:
12/31/92 23:59:59 100
1/15/93 16:02:00 98
2/15/93 18:00:00 94
In this example, an independent DO reading taken at 4:02 PM on 1/15/93 showed a value
of 98 % air-saturation.
3. After the last line has been typed and entered, hold down Ctrl and press Z, then press
Enter
.
4. The message “1 File(s) copied” should appear.
If only one data point is entered into the compensation file, all data after that date and time will be
corrected. If more than one data point is included in the compensation file, data between points will
be corrected linearly.
To enter the compensation filename, press TAB while the highlight cursor is on Compensate. The
highlight cursor will mov e to the right. Enter the path and file name.
Example:
C:\DO.CMP Enter
.
When you enter a compensation filename, the program performs a test load of that compensation
file. A summary is displayed so you can verify the file structure. The summary includes how many
lines were accepted, rejected, or blank, the total number of lines, and the earliest and latest date.
If you compensate a constant used in calculating one param eter, you must also compensate the same
constant if you use it to calculate other parameters. A total of 1000 compensation points are
allowed for any single report or plot.
Control Info
Select
from the Modify menu. The Control I n fo m enu w ill be display ed.
Enter title line
SAMPLE.DAT
First sample was at: 02/05/92 13:58:00
Enter start time: begin
Enter stop time: end
Last sample was at: 02/06/92 11:42:00
Logging interval was: 60 seconds
Enter averaging interval: 0
X-axis time per screen: 1304
Cross-parameter style: AVG
Cross-parameter bins: 100 (maximum 2350)
Parameters per plot: 2
YSI Incorporated PC6000 Software Operations Manual 15
Page 20

PC6000 Menus Section 4
The Control Info menu allows you to report or plot an entire file, or any portion of a file. Other
options on the Control Info menu allow you to average several data points together and set up
reports and plots to display data in the format you choose.
Below the prompt,
Enter title line
, assign a title that will appear on all reports and plots.
SAMPLE.DAT is shown in the example screen above.
Select the four options below to view start and stop times of the file, and specify portions of the file
to report or plot.
First sample was at:
Enter start time:
Enter stop time:
Last sample was at:
The first and last line of this block of information indicates the actual start and stop times of the
current file. You can identify any segment of time from within a file to report and plot data. For
example, if the duration of the deployment was five days, but you wish to see a report and plot for
only the third day, simply enter the start and stop dates and times associated with day three. Even
though all five days of data are retained, reports and plots will show only day three.
The following two options show the sampling interval which was in effect throughout the
deployment and a method by which you can consolidate readings to improve report and plot
appearance.
Logging interval was:
Enter averaging interval:
You may choose to average several data points together for reporting and plotting. For example, if
the sondes readings were captured every 900 seconds (15 minutes) during the deployment, you
might want the reports and plots to average four of these readings together so that the information
can be reported or plotted on an hourly basis. To do this, define an averaging interval of 3600
seconds.
X-axis time per screen
Select
option to specify the time interval on the X-axis. This line is only
applicable when Date + Time have been defined for the X-axis. You can define the width of a given
plot screen in minutes by changing the num ber of minutes in this option.
Cross-parameter style
Select
to choose one of four plot styles. This option is only applicable if a
parameter other than Date + Time is selected for the X-axis (see Parameters above).
An averaged plot (
AVG
) assumes a correlation between the X-axis and the Y-axis parameters. The
averaged plot divides the X-axis into equal-sized memory bins. Each sample is tallied into the
appropriate memory bin based on its X-axis value. When finished, the average value for each
Y-axis parameter in each m emory bin is displayed.
A sequential plot (
SEQ
), plots each point successively as it comes from the data file. A sequential
plot provides more detail on the data than an averaged plot, but can appear rather messy.
YSI Incorporated PC6000 Software Operations Manual 16
Page 21

PC6000 Menus Section 4
The increase (
INC
) and decrease (
DEC
) plots are types of sequential plots. An increasing plot only
displays points when the X-axis values are increasing. A decreasing plot only displays points when
the X-axis values are decreasing. The increasing and decreasing sequential plots are especially
useful if you are profiling and display depth on the X-axis. Thus the plot shows only the time in
which the sonde is being lowered or raised.
Cross-parameter bins
Select
to set up the number of bins that will appear on the X-axis. This
feature only applies to reports and averaged plots (see descriptions above) with a parameter other
than Date + Time on the X-axis. Changing this value modifies the number of bins into which the
X-axis is divided. The smaller the number of bins, the wider and more general is the plotted
information. The maximum number of allowable bins varies with the capability of your computer
system, and is displayed in parentheses. For example, 100 is selected, and the maximum is 2350 as
shown in the screen above.
Parameters per plot
Select
option to setup the number of parameters that will be plotted together.
If you choose 1, there will be an individual X and Y-axis displayed for each selected parameter.
Select any number of parameters per plot, (from 1 to 4) which provides your data with the best plot
presentation.
Scaling Info
Select
from the Modify menu.
Scaling technique: automatic
Copy default to manual
Copy automatic to manual
Default
Scaling
Parameter Units Minimum Maximum Minimum Maximum Minimum Maximum
Manual
Scaling
Automatic
Scaling
------------ ------ ------ ------ ------ ------ ------ -----Temperature C -5 45 -5 45 4.6 2.1
Conductivity mS/cm 0 100 0 100 0 100
pH 2 14 2 14 2 14
ORP mV -1000 1000 -1000 1000 -1000 1000
DO mg/L 0 20 0 20 6.1 15
There are three scaling options.
Default Scaling
offers fixed limits. These limits correspond to the range of each parameter
as defined by the sensor specifications, so your plot will always fit within these limits.
Manual Scaling
allows you to enter custom limits for each parameter.
The computer scans the data file and determines the limits, then displays those limits on the
plot in
NOTE:
When entering a scaling technique, you need only type the first letter of the desired
technique and press
Copy default to manual or Copy automatic to manual
Select
Automatic scaling.
Enter
. PC6000 will fill in the rest.
to provide a quick way to copy
from either the default or automatic limits columns to the Manual scaling column.
YSI Incorporated PC6000 Software Operations Manual 17
Page 22

PC6000 Menus Section 4
Once you copy data into the manual scaling column, it can be modified. After copying is
complete, you will lose “manual limits” that were defined previously.
!
You can not change Default Scaling limits.
!
You can change Manual Scaling limits.
!
You can not change Automatic Scaling limits, but they are updated each time an automatically
scaled plot is generated.
4.1.2 VIEW
All of the
Filename: SAMPLE.DAT
Select
current file.
Select
portion of the menu) from the current file to the screen. As the report is scrolled onto the screen,
you can pause at any time by pressing any key. Once the entire report has been displayed, use the
Arrow ke ys, t he Pa ge Up a nd Pa ge Do wn keys , o r th e H ome a nd En d ke ys to move t o an y l o ca ti o n
within the report. If your computer system has limited RAM, early data points within a report may
become unavailable for viewing. To redisplay unavailable data points, simply redisplay the Report
from the beginning.
Select
Parameters and Control Info above. A plot can be abandoned at any time by pressing Esc, or
paused by striking any other key. If a plot is too large to fit on one screen, it will automatically
move to a new screen.
VIEW
Parameters... Header Print Report
Control Info... Report Print Plot
Scaling Info... Plot Definitions...
Header
Report
Plot
file options allow you to view file data on the screen.
MODIFY VIEW SYSTEM
Statistics Export
to display complete information about the sonde, probes, and configuration of the
to display a complete list of all readings (as defined by the settings in the Modify
to display a plot of the current data file to the screen. The plot can be customized, see
Statistics
Select
the displayed statistics are affected by the choices you make in the Parameters, and the Control info
menus described previously. To view statistics for a portion of a file enter the start and stop times
in Control Info. Statistics are only available after a report or plot is run.
YSI Incorporated PC6000 Software Operations Manual 18
to view statistics of a data file, or portion of a data file. As with reports and plots,
Page 23

PC6000 Menus Section 4
Sensor Type Minimum Maximum Mean Std.Dev.
Temperature (C) 4.69 21.00 5.88 2.877
Conductivity (mS/cm) 0.01 29.94 0.41 1.934
pH 6.32 9.44 7.64 0.200
ORP (mV) 75.7 313.5 156.7 36.45
DO (mg/L) 6.12 14.97 6.70 0.696
Number of samples = 1305
To print a copy of the Statistics screen, press the F2 key.
4.1.3 SYSTEM
SYSTEM
software program. The specific setup format of the report or plot can also be frozen for future use.
Filename: SAMPLE.DAT
Select the
prompt appears on the screen asking if your printer is ready. Press
operation. If more than 8 parameters are to be printed, PC6000 will assume you have a
wide-carriage printer. If your printer is not wide-carriage, set your printer to compress mode before
printing (see your printer manual for instructions). The printer port option, in the setup menu,
specifies the computer port to which the report will be sent.
Select the
appears on the screen asking if your printer is ready. Press
operation. The printer port option, in the setup menu, specifies the computer port to which the plot
will be sent.
menu options allow you to print the report and plot the data, or export the data to another
MODIFY VIEW SYSTEM
Parameters... Header Print Report
Control Info... Report Print Plot
Scaling Info... Plot Definitions...
Statistics Export
Print Report
Print Plot
option to send your report to the printer. After you select this option, a
Enter
to proceed with the print
option to send your plot to the printer. After you select this option, a prompt
Enter
to proceed with the print
Definitions
Select
Each file contains all options and setup information you defined in the Modify menus, see the
MODIFY options section, described earlier. After you have selected Definitions from the
SYSTEM menu.
YSI Incorporated PC6000 Software Operations Manual 19
to create and save different report or plot configurations from the same data file.
Page 24

PC6000 Menus Section 4
Active definition: default report/plot
Select an action: Select a definition
Create new definition
Rename active definition
Delete active definition
Clear active definition
Active definition
Highlight
Highlight
Select a definition
Create new definition
displays the name of the current active definition.
and press
Enter
and press
to retrieve an old definition.
Enter
to create a new report and plot format. You will
need to name the new definition, then specify the new definition by v ariation of the current format.
Example:
if you want to report and plot only dissolved oxygen readings in mg/L
for your study instead of all parameters, first create a new definition at the prompt
by typing “DO”. Then exit the definition menu by pressing
Parameters
menu and eliminate all parameters except DO, mg/L. This data
Esc
. Scroll to the
presentation can then be reported, plotted, or exported, but more importantly, if
you return to this data file at a later time, the “DO” definition can always be
selected to provide this same data format since it has been saved under its own
designation.
Remember: Always name the new definition in the “create new designation” option prior to making
changes that will define the new format.
Rename active definition
Select
Delete active definition
Select
option to change the name of the active definition.
option to remove the active definition from the file.
Select
Clear active definition
option to reset the active definition to default values. Thus all
customization features that you previously set up are reset to the default v a lues.
Export
Select
menu option to export a data file to another program. After selecting the Export
option you will be asked to name the file to be exported. The default name is the same as the
current data file with the extension .PRN, .CDF, or .SDF, depending on the export format selected,
ASCII, Comma & Quote Delimited or Space Delimited, respectively. Export formats are selected
in the Advanced Setup menu, see
Section 4.2, Setup Menu
). After the file has been exported to
disk, it can be retrieved using any program you choose. This feature is especially useful when
exporting to a database or a spreadsheet program. Follow the importing instructions outlined in the
destination program to retrieve the export file you hav e created.
YSI Incorporated PC6000 Software Operations Manual 20
Page 25

4.2 SETUP MENU
Highlight
specifications.
------DISPLAY-FORMATS---- ---------COMPUTER-CONNECTIONS-------Date format: mdy Comm port: 2
Date separator: / Baud rate: 9600
Time separator: : Printer port: 1
Radix mark: . Printer type: HP LaserJet laser
--------MORE-SETUP------- -----------COMPUTER-DISPLAY---------Data capture setup... Menu colors: Pacific Ocean (color)
Advanced setup... Plot colors: Danube River (color)
Other than the Comm port and Printer port options, the default values should be adequate to
perform virtually every function of the Sondes.
Under the COMPUTER-CONNECTIONS heading, sel ect
if the default value is not correct. This option must be properly set before you can communicate
with the software inside the Sonde. See
sonde and PC software. If you have difficulty communicating with the sonde, change the Com port
and try again. PC6000 allows only Com port 1 or 2.
Setup
from the PC6000 menu bar and press
Graphics mode: Automatic selection
Section 4.1.3, System
Enter
to configure the PC program to your
Comm port
to make necessary changes
, to verify agreement between the
Change the baud rate by highlighting
baud rates that are displayed. The baud rate you select here must match the baud rate set in the
sonde (which defaults to 9600).
Printer port
Select
printing, specify a different printer port (1, 2, or 3) and try again.
Printer type
Select
best describes your system's printer. If you have difficulty printing, try a different selection here.
You may need to consult the printer instruction manual to determine what type of printer your
printer emulates. The printer type option only affects plot
printing.
to specify where your computer’s printer is connected. If you have difficulty
to provide a list of printers that are supported by PC6000. Select a printer that
Baud rate
, then press
Enter
. Select from the list of possible
output, having no effect on report
Page 26

PC6000 Menus Section 4
Under DISPLAY-FORMATS change any default values that are not appropriate by typing in the
correct format.
Date format: mdy
Date separator: /
Time separator: :
Radix mark: .
Users may specify any order of day (d), month (m), and year (y) by selecting Date format. The
other options are used primarily outside of the US where other characters are sometimes used to
separate numbers in dates, times, or decimals.
Use the options below to specify what type of monitor your computer has, and change the colors of
both menus and plots as they are displayed on the screen.
Menu colors
Plot colors
Graphic Mode
The color selections have no effect on the printed output of reports and plots. Simply press
to activate either the Menu or Plot color selections, scroll through the choices with the Arrow keys,
and after selecting a color scheme, confirm it by pressing
are to your liking, you can setup a User Defined color schem e. See
From the list provided, choose a graphics mode which best matches your video adapter and
monitor. If you hav e difficulty , consult y our v ideo adapter's instruction manual.
Under
subsection. Section,
configure your sonde to provide “real-time” graphical display of in the discrete sample m ode.
MORE-SETUP
there are two important menu options. Each has been given a separate
Data Capture/ Real-Time Setup
Enter
again. If none of the color schemes
Section 5, Advanced Setup
, provides the instructions for you to
Enter
.
4.3 DATA CAPTURE / REAL-TIME SETUP
Real-time
When
is taken in the Discrete sample mode by the sonde. Each reading is display ed at the bottom of the
real-time screen, and plots are updated with the arrival of each data point. In addition, the data will
be automatically stored to the disk drive that y ou select.
mode has been properly set up, you will be able to v iew the data in real-time as it
YSI Incorporated PC6000 Software Operations Manual 22
Page 27

PC6000 Menus Section 4
Data capture setup
The
screen will appear similar to the one shown below.
Parser: 6000 X-axis time per screen: 1
Site name: YSPRINGS Parameters per plot: 2
Instr ID: 96K12345 Beep notification: off
Filename: CLRLAKE2 Auto-configure
Column Parameter & Units Minimum Maximum
------- ----------------- -------- -------1 Temperature (C) -5 45
2 Specific Cond (mS/cm) 0 235
3 DO (%) 0 200
4 DO (mg/L) 0 20
5 DO Charge 0 110
6 pH 2 14
The Data capture setup process is not difficult, but you must
carefully
follow the instructions below
to be sure of successful operation.
STEP 1.
Verify parameters in the Report setup (sonde software). Select
main menu bar and, if required, type “menu” at the # sign. Select
1-Start sampling
then
. Make certain that the parameters that you want to view in real-time are
1-Run
Sonde
, then
from the PC6000
1-Discrete
sample,
displayed correctly. Adjust these parameters, if necessary, via the Report Setup menu in the Sonde
software. Check these parameters again by viewing what is displayed on the screen. Exit the
Sonde menu by pressing
STEP 2.
menu bar select
Choose parameters in Data capture setup (PC6000 software). From the PC6000 main
Setup
F10
and return to the main menu bar of the PC6000 software.
Data capture setup
, then
. Verify that the Parser setting is “6000” for
600XLM, 6600 and 6920 sondes or “600” for 600R, 600XL and 6820 sondes. If not, type “6000”
in at the prompt and press
Enter
. Enter an appropriate site name, then press
Enter
.
The Site Name identifies the sampling location and is displayed on the File Header and Real-Time
screens and printouts. Enter an appropriate file name, then press
8 characters. Next highlight
Auto-configure
, then press
Enter
Enter
. The filename is limited to
. There will be a 5-10 second delay
while the PC6000 software examines the sonde software to determine the parameters that you have
decided to view in real-time. When the process is complete, these parameters appear in the list in
the lower portion of the Data capture setup screen.
STEP 3
Enter
per plot
. Set up display parameters which you wish to view (or hear) in real-time. Be sure to press
after each entry. First, set the
X-axis time per screen
that can be a value from 1 to 4. Finally, set the
in minutes. Next, set the
Beep notification
Parameters
to indicate the
acquisition of good data, bad data, or all data (both). Bad data contains errors in the communication
protocol when arriving from the sonde. This is rarely observed. If you prefer, you can eliminate the
beep function completely by selecting “off”. Simply type in one of the 4 notifications (good, bad,
both, off) indicated above, and press
Enter
.
STEP 4.
Set the scaling for each of the parameters in the lower right portion of the menu. There is
no automatic scaling in this mode, so you should select the manual scaling ranges that will result in
YSI Incorporated PC6000 Software Operations Manual 23
Page 28

PC6000 Menus Section 4
a meaningful display of your data. These selections will become easier with experience. Use the
Tab key to move from Minimum to Maximum, and the arrow keys to move vertically within the
scaling limits. Be sure to press
Enter
after each scaling entry.
STEP 5.
menu bar by pressing Esc twice. Then access
Type “
Start sampling
discrete sample mode is still operative, exit to the PC6000 main menu bar by pressing
Start sampling with the sonde. After entering scaling factors, exit to the PC6000 main
Menu
” at the # prompt and press
and begin sampling at the sample interval that is suitable for your study
Sonde
Enter
from the PC6000 main menu and press
. Select
1-Run
, then
1-Discrete
sample, then
Enter
. While the
Do not
F10.
1-
press Esc or the sampling will be terminated.
STEP 6
Enter
. View the data in real-time. From the PC6000 main menu bar, select Real-Time
. The Discrete Sample data from the sonde will be plotted on the display and will be logged
and press
to disk automatically under your desig n ated file nam e.
COMMON CAUSES OF ERRORS IN Real-Time MODE
The Parser is not set correctly.
sondes, and “600” for 60R, 600XL and 6820 sondes.
You have selected more parameters in the Sonde Report setup than can be viewed on the
computer screen.
Remove Time and Date and/or other less important parameters in the Report
setup menu so that all selected parameters are visible in Discrete Sam ple display .
The name that you entered for your file name already exists on your storage disk, but the file
format for the initial study is different from the current file format.
data file or delete the existing data file of this name from y our disk .
Set the Parser by typing in “6000” for 600XLM, 6600 and 6920
Change the name of the
.
You exited the Discrete sample mode of the sonde software using Esc rather than F10.
Return
to the Sonde menu and select 1-Run. Restart the Start sampling mode and exit with F10 to the
PC6000 menu bar. Choose Real-Time and press
YSI Incorporated PC6000 Software Operations Manual 24
Enter
.
Page 29

SECTION 5 ADVANCED SETUP
These options are provided for the advanced user who has special requirements of PC6000. It is
important to remember that the default values assigned to these options will be appropriate for most
operations.
Select
Advanced Setup menu appears.
Default scaling technique: automatic Export file format: prn
Default parameters per
plot:
Full screen sonde menu: no Export header
Multiple formula query: yes CDF delimiter: ,
Default data directory:
User-defined menu
colors...
User-defined plot
colors...
User-defined printer control codes...
Setup
from the PC6000 main menu bar, highlight
-------------GLOBAL-SWITCHES---------
---
2 Export date format: form
---------------DATA-FILES------------
---
--------------USER-DEFINED-----------
---
Advanced Setup
------------EXPORT---------
format:
and press
--
Enter
-
.
Full-screen sonde menu: yes
Select
PC screen, or should take place within the usual border drawn by the PC software.
Export date format: FORM
Select
data.
FORM (formatted):
MM/DD/YY and HH:MM:SS.
SEP (separated):
6 numeric values (m,d,y ,h,m ,s).
COMB (combination):
YYYYMMDD and a string of the form HH:MM:SS.
JUL (Julian):
to specify whether terminal emulation should use the entire
to choose from a variety of date formats for the exported
Page 30

Advanced Setup Section 5
A ten-digit integral number of seconds past midnight March 1, 1984.
NUM (numeric):
A fixed point number of the form DDDDDD.TTTTTT where DDDDDD is the number of days past
December 31 1899, and where TTTTTT is the fractional part of the day which has elapsed (.750000
is 6 PM).
REL (relative):
A fixed-point number of the form HHHH.HHHH giving the number of hours elapsed since the firs t
sample in the file.
NOTE:
The export date format only applies to CDF and SDF export files. The date and time
formats displayed on the PC6000 screen are determined in the SETUP m enu.
Export header format: --
Select
to specify what header lines (if any) should be included at the
top of CDF and SDF export files. The header can contain up to three lines.
(-): No header lines.
P: One header line, containing the name of each Parameter.
U: One header line, containing the name of each Unit.
T: One header line, containing the name of the report Title.
Multiple formula query: N
Select
to change the characteristics of a derived parameter. This
option should be set to N for no, except for advanced users.
User-Defined menu colors
Select
using this option permanently modifies the color scheme of
to customize the menu colors of PC6000. Changing the colors
User Defined Colors
in the Setup
menu. To use this feature, select a menu item to be changed from the lists provided. Find the box
that has the same title as the item you selected. Stop scrolling when the desired color is displayed
and press
Esc
.. Continue this process until all colors appear to your liking .
Select
User-Defined plot colors
to modify the plot colors of PC6000. As detailed in the
User-defined menu colors section above, select plot items to be changed from the list provided and
press
Enter
. Watch the sample plot as you repeatedly press
Enter
. Press
Esc
when the item color
you prefer is displayed. Repeat this process until all plot colors are to your liking .
Default Data Directory:
Select
to specify the drive and directory to which you want all PC6000
files to be stored. Type the drive and directory to which you wish all PC6000 data files to be stored
when captured from the sonde.
Example:
Typing C:\PC6000 would save all data files to the C:\ drive and to a
directory called PC6000.
User-defined printer control codes:
Select
to manually enter special printer commands. Consult
your printer's instruction manual for the specific com mands compatible with your printer.
YSI Incorporated PC6000 Software Operations Manual 26
Page 31

Advanced Setup Section 5
Select
program. See
Export file format: PRN
Section 4.1, File Menu
for more information. The software determines the correct
to setup a format if you wish to export data to another
format to specify to which you want to export data. Consult the manual of the destination software
to determine the compatible form at.
The three export format choices PC6000 allows are:
Printer format (PRN):
Select this option to export data in exactly the same format as it would be sent to a printer. All page
headings, column headings, and form feeds are present in the export file.
Comma & Quote (“ “) delimited format (CDF):
Select this option to export data in a format that encases all strings of data in double quotes, and
separates each option on each line with a comma (or other delimiter character). There will be no
spaces on any line unless they are inside a string.
Example:
"12/31/92","23:59:59",123.45,12.3,123
Space delimited format (SDF):
Select this option to export data in a format with fixed-column fields, which can be string or
numeric. Strings and dates are left justified in their field, numbers are right justified. Strings are
not encased in quotes. Lines are fixed width, and columns are apparent when viewing the file.
Field widths are as follows:
•
title is 80 characters
•
parameter names and units are 8 characters each
•
numbers are 8 digits including the radix separator and decim al dig its
•
formatted dates are two 8 character strings separated by 1 space
•
separated dates are six 3-digit values
•
combined dates are an 8-digit num ber and an 8 character string separated by 1 space
•
Julian dates are 10 digits
•
numeric dates are 13 digits
•
relative dates are 9 digits
Example:
Default scaling technique: or Automatic
Select
default values for reports and plots. These options are described in detail in
12/31/92 23:59:59 123.45 12.3 123
or
Default parameters per plot:
Section 4.1.1, Modify
2
to modify the
The Setup menu determines what the default scaling technique and parameters per plot should be
for each new data file. Change the values here to modify these options for future reports and plots.
To modify these options only for a current file, see
YSI Incorporated PC6000 Software Operations Manual 27
Section 4.1, The File Menu
.
.
Page 32

SECTION 6 TROUBLESHOOTING
This section contains a troubleshooting table that will be helpful to identify the causes of the
most common difficulties that may occur while operating the PC6000 software. The
column describes the type of difficulty that you might experience. The
describes the conditions that might cause the stated symptom. The
simple steps that can be followed to correct for the "possible cause" and cure the "symptom"
being experienced. The column entitled
subsection in the manual where you may find additional information.
If you need assistance that this Troubleshooting section can not provide, please contact YSI or
your authorized dealer. See Section 7 for specific contact information.
SYMPTOMS POSSIBLE CAUSE ACTIONS REF
PC6000 software
operates but no data
are captured to disk.
PC6000 displays data,
no files found.
Expected parameters
are not displayed on
reports or plots
Unable to print
reports or plots
Data capture not set up Move cursor to data capture
Will not auto configure. Enter parser, site name , ID 5
After auto configure, no data
arrives
Data directory path not
recognized
Data files not readable Export file as PRN, CDF, SDF 6
Parameters not added to Yaxis list
Sensor disabled Check sensor setup instructions
Printer port improperly
configured
Ref
is the number of the reference section and
setup and make proper
selections.
Return to sonde menu and start
sonde
Move cursor to PC6000
Advanced setup and establish a
directory
Add parameter 3
in the sonde manual
Try a screen print out to the
printer (print scrn)
Possible cause
Action
column provides
Symptom
column
3
2
Video screen of PC is
not readable
When selecting
“sonde” from PC6000
top line, sonde menu
not shown
Printer port improperly set Check setup 6
Printer type improperly
selected
Print cable improperly
connected
Incorrect menu color option
has been selected
Incorrect graphic mode Select compatible graphic mode 5
Prompt # appears in place of
menu
Communication problem Make certain com port
Check setup 6
Check connections at both ends
Select appropriate menu
parameter
Type “menu” and press (enter) 4
selection is correct.
Page 33

SECTION 7 CONTACT INFORMATION
For any questions regarding PC6000 software, or any YSI equipment, please contact YSI Technical
Support at (800) 897-4151 or e-mail at ysi@support.com. For ordering YSI equipment or
accessories, please see your YSI dealer, or the contact inform ation below.
1700/1725 Brannum Lane
Yellow Springs, Ohio 45387 USA
(800) 765-4974 (937) 767-7241
FAX: (937) 767-9320
Website: http://www.ysi.com
E-mail: info@ysi.com
Page 34

SECTION 8 SENSOR DRIFT APPLICATION NOTE
SENSOR DRIFT COMPENSATION
The following application note is designed to facilitate the use of the sensor drift software included
in the PC6000 package by providing the user with a specific exam ple.
After laboratory calibration, a user deployed their sonde in a readily accessible stream on 10/14/92
with the instrument set to capture data to memory at 15-minute intervals. The study was nam ed
SRUN7. The instrument was left in place for approximately 2 weeks and during this time period,
the user visited the site 3 times, took a water sam ple in a sealed bottle, and, on returning to the
laboratory, measured the dissolved oxyg en and pH w ith recently calibrated instruments. The user
also collected a water sample when the instrument was retrieved (10/26/92) and m easured dissolved
oxygen and pH in the laboratory. The following records were kept.
Laboratory Measurements
Date Time DO (mg/L) pH
10/17/92 8:00 5.40 7.62
10/29/92 8:00 7.50 7.63
10/23/92 10:00 7.30 7.58
10/26/92 8:15 6.32 7.60
The user now has everything required to compensate the DO and pH readings for field drift:
"
The data file captured by the computer or data collection platform.
"
The correct DO and pH readings at various times during the study based on grab samples of
water which were analyzed with recently calibrated laboratory instruments.
PC6000 software for retrieval and manipulation of the data from the sonde m emory.
"
COMPENSATION PROCEDURE
1- For this example, make certain that the data file is present in a subdirectory of the hard
drive (C:\PC6000).
2- "Exit" from PC6000 software using the top menu bar. The "C:\PC6000" prompt
should be displayed.
Page 35

Sensor Drift Compensation Section 8
3- The user must now write compensation files which contain the above data points and
which will be accessed automatically by the PC 6000 software. If the "C:\PC6000" prompt is
displayed, the files will be located in the same subdirectory as the SRU N7.D A T data file
compensation file for each parameter (DO and pH, in this example) must be written.
overall filename is SRUN7.D AT, the DO compensation file will be called SRUN7DO.CMP
and the pH compensation file will be called SRUN7PH.C MP. No te that for accurate record
keeping, the compensation file nam e should somehow be related to the name of the overall
study. For example, it will becom e extremely confusing if all dissolved oxyg en compensation
files are named "DO.CMP" as shown in the brief example in the manual.
. A
Since the
4- To compose the DO compensation file, ty pe the following at the "C:\PC6000" prompt
C:\PC6000
COPY CON SRUN7DO.CMP --
:
(Return)
10/17/92 8:00:00 5.40
10/20/92 8:00:00 7.50
10/23/92 10:00:00 7.30
10/26/92 8:15:00 6.32
Control Z
The screen will display "1 File Copied" if all is correct and the file SRUN7D O .CMP will now
be in the "PC6000" subdirectory of the C drive. Note that the data must be entered in exactly the
above format:
5- To compose the pH compensation file, ty pe the following at the "C:\ PC6000" prom pt:
C:\PC6000
(Return)
(1) The time must contain a designation for seconds ev en if the user does not
(2) There must be a space between the date, time, and param eter v alue entries.
COPY CON SRUN7PH.CMP
(Return)
(Return)
(Return)
(Return)
know this value exactly; an entry of XX:XX
--
:00
is suggested for all time inputs
(Return)
10/17/92 8:00:00 7.62
10/20/92 8:00:00 7.63
10/23/92 10:00:00 7.58
10/26/92 8:15:00 7.60
Control Z
(Return)
(Return)
(Return)
(Return)
(Return)
The screen will display "1 File Copied" if all is correct and the file SRUN7P H.C MP w ill now
be in the "PC6000" subdirectory of the C drive.
6- After writing the DO and pH comp ensation files to the C:\ PC 6000 directory , ty pe
"PC6000" at the "C:\PC6000" prompt to re-enter the PC6000 software package. Just as would
be done for no compensation, prepare the plot and report output format desired by m anipulation
of the "Parameters", the "Control Inform ation", and the "Scaling Information".
7- After the format is finalized, re-enter the "Parameters" section of the software. Place
YSI Incorporated PC6000 Software Operations Manual 31
Page 36

Sensor Drift Compensation Section 8
the cursor on the "DO (mg/L)" entry, press "Return", and then select the "Detail this parameter"
option within the window.
8- Move the cursor to the "Compensate" entry and press "Return". Move the cursor to
the "DO, mg/L" entry and press "Return" to activate the com pensation of this parameter.
9- Press the "Tab" key once to move the cursor to the rig ht portion of the screen and then enter the
location and designation of the DO compensation file in this bar. I n this case, the entry is:
C:\PC6000\SRUN7DO.CMP
procedure has been followed:
. Press "Return" and the screen should appear as follows if the
Parameter: DO (mg/L)
Formula: Temp (C) Cond (mS/cm) DO (%)
Inputs: Temperature (C) from 6030* probe, channel 0
Conductivity (mS/cm) from 6560 probe, channel 1
DO (%) from 6560 probe, channel 2
Compensate: DO (mg/L) c:\pc6000\srundo.cmp
10- Carry out the same procedure for pH:
(a) Activation of the compensation, and
(b) Entry of the location and designation of the pH compensation file.
YSI Incorporated PC6000 Software Operations Manual 32
Page 37

SECTION 9 ACCESSORIES
STANDARD EQUIPMENT WITH YSI SONDES
"
600R, 600XL, 600XLM, 6820, 6600 or 6920 Sonde with Calibration Cup
"
EcoWatch for Windows Software
"
Operations Manual
"
Guard for Probe Compartment
"
6570 Maintenance Kit
"
6560 Conductivity/Temperature Probe ( not supplied with the 600R)
PROBES FOR THE SONDES
"
6560 Conductivity/Temperature Probe
"
6561 pH Probe
"
6562 Rapid Pulse DO Probe
"
6565 Combination pH/ORP Probe
"
6026 Turbidity Probe, wiped
"
6036 Turbidity Probe, unwiped
"
6882 Chloride Probe
"
6883 Ammonium Probe
"
6884 Nitrate Probe
OPTIONAL ACCESSORIES FOR THE SONDES
"
PC6000 Software (Available at no cost)
"
6027 Turbidity Wiper Kit
"
6035 Probe Reconditioning Kit for 6562 Dissolved Oxyg en Probe
"
062655 Carrying case
"
6038 12 VDC power supply with 110 VAC input
"
6037 12 VDC Power Supply with 220 VAC input
"
6100 External Power Connector, attaches to 6095B Field Cable
"
6570 Maintenance Kit
"
5775 Membrane Kit
"
6108 Desiccant Cartridge Kit
"
6109 Desiccant Canister Kit
"
065802 Replacement Desiccant
CABLES FOR THE SONDES
"
6093 Field Cable, 100 ft (30 m)
"
6092 Field Cable, 50 ft (15 m)
"
6091 Field Cable, 25 ft (7.5 m)
"
6090 Field Cable, 8 ft (2.4 m)
"
6191 Field Cable, Vented, 25 ft (7.5 m)
"
6192 Field Cable, Vented, 50 ft (15 m)
"
6067B Low Cost Calibration Cable, Dry use only; 10 ft (3m)
Page 38

Accessories Section 9
"
6077B CE Calibration Cable, 10 ft. (3m)
"
SP6093-L Special field cables available in 25 ft (7.6 m) increm ents; Maximum 1000 ft (305 m)
"
6098B Field Cable to 610-D/610-DM adapter
"
6096 Field Cable to Flying Lead (wire) adapter, 15 ft (5m)
"
6095B Field Cable to Female DB-9 (PC Serial with Power Connector)
"
6099: 610 to Female DB-9 (PC Serial)
"
6100 External Power Connector, attaches to 6095B Field Cable (6ft)
"
6102: 610 to Portable Power Pack Adapter
"
6103 MS-8 Dust Cover (caps connector when not in use)
CONDUCTIVITY REAGENTS
"
3161 Calibrator Solution, 1,000 uS/cm (quart)
"
3163 Calibrator Solution, 10,000 uS/cm (quart)
"
3165 Calibrator Solution, 100,000 uS/cm (quart)
"
3167 Calibrator Solution, 1,000 uS/cm (box of 8 pints)
"
3168 Calibrator Solution, 10,000 uS/cm (box of 8 pints)
"
3169 Calibrator Solution, 100,000 uS/cm (box of 8 pints)
pH REAGENTS
"
3821 pH 4 Buffer (box of 6 pints)
"
3822 pH 7 Buffer (box of 6 pints)
"
3823 pH 10 Buffer (box of 6 pints)
ORP REAGENTS
"
3682 Zobell Solution (125 ml)
AMMONIUM REAGENTS
"
3841 1 mg/L ammonium-nitrogen standard solution
"
3842 10 mg/L ammonium-nitrogen standard solution
"
3843 100 mg/L ammonium-nitrogen standard solution
NITRATE REAGENTS
"
3885 1 mg/L nitrate-nitrogen standard solution
"
3886 10 mg/L nitrate-nitrogen standard solution
"
3887 100 mg/L nitrate-nitrogen standard solution
TURBIDITY REAGENTS
"
3845 0 NTU standard
"
6073 100 NTU standard suspension
"
3846 200 NTU standard suspension
"
3847 800 NTU standard suspension
YSI Incorporated PC6000 Software Operations Manual 34
Page 39

Accessories Section 9
DISPLAYS, LOGGERS, AND ACCESSORIES
"
610-D Handheld Field Display with Accessories
"
610-DM: 610-D with 128K of memory
"
610-DM: 610-D with 512K of memory
"
614 Ultraclamp, C-clamp Mount for 610
"
615 Leather Carrying Case for 610
"
616 Cigarette lighter adapter (powers and charges 610s)
"
617 Replacement Battery Pack for 610
"
6099: 610 to Female DB-9 (PC serial)
"
6097 Blank port plug for 610
"
6104 Replacement Charger Jack for 610
"
6042 Battery Charger for 610
"
6101 Portable Power Pack for 610 or sondes
LOGGER/TELEMETRY
"
1240: SDI-12 Logger for interfacing as many as 10 6-Series devices. Can also serve as RF
telemetry platform (RF radio, battery, interface cable, junction box not included)
"
1240B1: 7 amp hour, lead acid 12 VDC rechargeable battery
"
1240B2: 20 amp hour, alkaline 6 VDC battery (2 required)
"
1240AC: 110 VAC charger/transformer assembly, charges 1240B1
"
1240SO: 1240 Solar Panel Assembly, includes panel, mount, cable
"
1240SE: 1240 Serial data interface cable, connects 1240 to PC
"
1240JU: 1240/6 series Junction Box, provides input of multiple SDI-12 devices (standard
configuration is for 5 devices)
Note: For RF radio frequency telemetry system applications, contact YSI Customer Support @ 1800-363-3269 (USA) or 508-748-0366 or fax 508-748-2543.
SOFTWARE
"
PC6000: MS-DOS compatible communication, upload, plotting
"
610SOFT: Software upgrade for Model 610 D/DM
"
6920SOFT: Software upgrade for Model 6920
"
EW-DOS EcoWatch for MS-DOS Applications
"
EW-WIN EcoWatch for Windows (Use EW-WIN for 6-Series Applications)
YSI Incorporated PC6000 Software Operations Manual 35
Page 40

Accessories Section 9
YSI Incorporated PC6000 Software Operations Manual 36
Page 41

Page 42

1700/1725 Brannum Lane
Yellow Springs, Ohio 45387 USA
(800) 765-4974 (937) 767-7241
FAX: (937) 767-9320
Website: http://www.ysi.com
E-MAIL: INFO@YSI.COM
Item # 069305
Drawing # A69305
July 1998
 Loading...