

Page 1
Page 2

Page 3

Precaution
To avoid fire or electrical shock, do not expose this product to rain or moisture.
To avoid short circuit, please make sure the batteries contacts are securely packed and use the
batter y in accordance with the local provisions.
Please place the batteries and the parts which can be swallowed mistakenly away from children.
If swallowed, please get medical help immediately.
To avoid any possible injury to eyes, do not use the flash in a short distance from the eyes.
To avoid any possible safety accident, do not use the flash on the people focusing attention.
Please take out the batteries and stop using this product immediately in case of the following
situation:
This product is dropped or shocked seriously and the inner par t of this product is bared.
Wear gloves and take the batteries out if the corrosive liquid inside the batteries leaks.
This product gives off strange smell, heat or smokes.
Do not dissemble or maintain this product because the internal high voltage circuit may cause
the electric shock .
Please take out all the batteries if this product is not used for a long time.
-1-
Page 4

Equipped with 1800mAh lithium batter y, recycle time is only 1.5s, flash firing times of full output is
over 700.
Supports radio transmission master control, realizes 6-group flash control function easily.
As master unit,YN860Li is equipped with 6-group flash control function ,which supports remote
control of flash mode, flash output, focal length, stroboscopic times and stroboscopic frequency of
YN860Li/YN560III/YN560IV/YN660/YN968N
Supports Radio Transmission Slave Function
As slave unit,YN860Li can receive the control and trigger signal from YN860Li/YN560IV/YN660/
YN560-TX(II)/RF603 (II)/RF605/RF-602,and realizes M/Multi flash.
High Guide Number
Gn60@ ISO100,200mm,suppor ts manual and Multi flash.
Supports Lamp Head Electric Zoom Function.
Supports manual zoom, you can set flash coverage in the range of 24~200MM.
Supports USB Firmware Upgrade
Equipped USB interface, suppor ts firmware upgrade, please visit YONGNUO official website to
download firmware upgrade package to upgrade the flash.
Supports S1,S2 preflash avoidance trigger mode
Supports auto-save setting, custom functions setting(C.Fn)
Equipped with LCD screen, standard PC port, sound prompt system.
Adopts lithium batter y power supply design, ultra-fast charging recycle system
-2-
Features
Page 5

If you don't have much time to read the whole user manual, we advise you to read this
section.
1.Please avoid the excessive use of the output with maximum power. It can effectively extend
the service life of this product. (It is recommended that the speedlite should be idle for more
than 10 minutes when entering the overheat protection).
2.Short press [ ]to switch to various trigger modes, including on-camera/radio transmission
master control/radio transmission slave /optical transmission slave (S1 or S2)mode,in the mode of
radio transmission mode, long press this button for channel setting.
3.Press [MODE] to set flash mode:M/MULTI
4.In the master control mode of radio transmission, press [ ]to switch to various groups,the
setting of master unit setting is the same as that of group A .
5.Short press function button [ ] to enter focal length settings, flash frequency and flash times
settings in the stroboscopic mode. Long press this button to turn on/off sound prompt.
6.According to the wireless flash trigger model used,user can set the radio signal at RF603 or RF602
through the custom functions setting.
7.Press [MODE] and [ ] and hold together to restore the setting of flash shooting and wireless
shooting to default regular on-camera mode.
Quick Start
-3-
Page 6
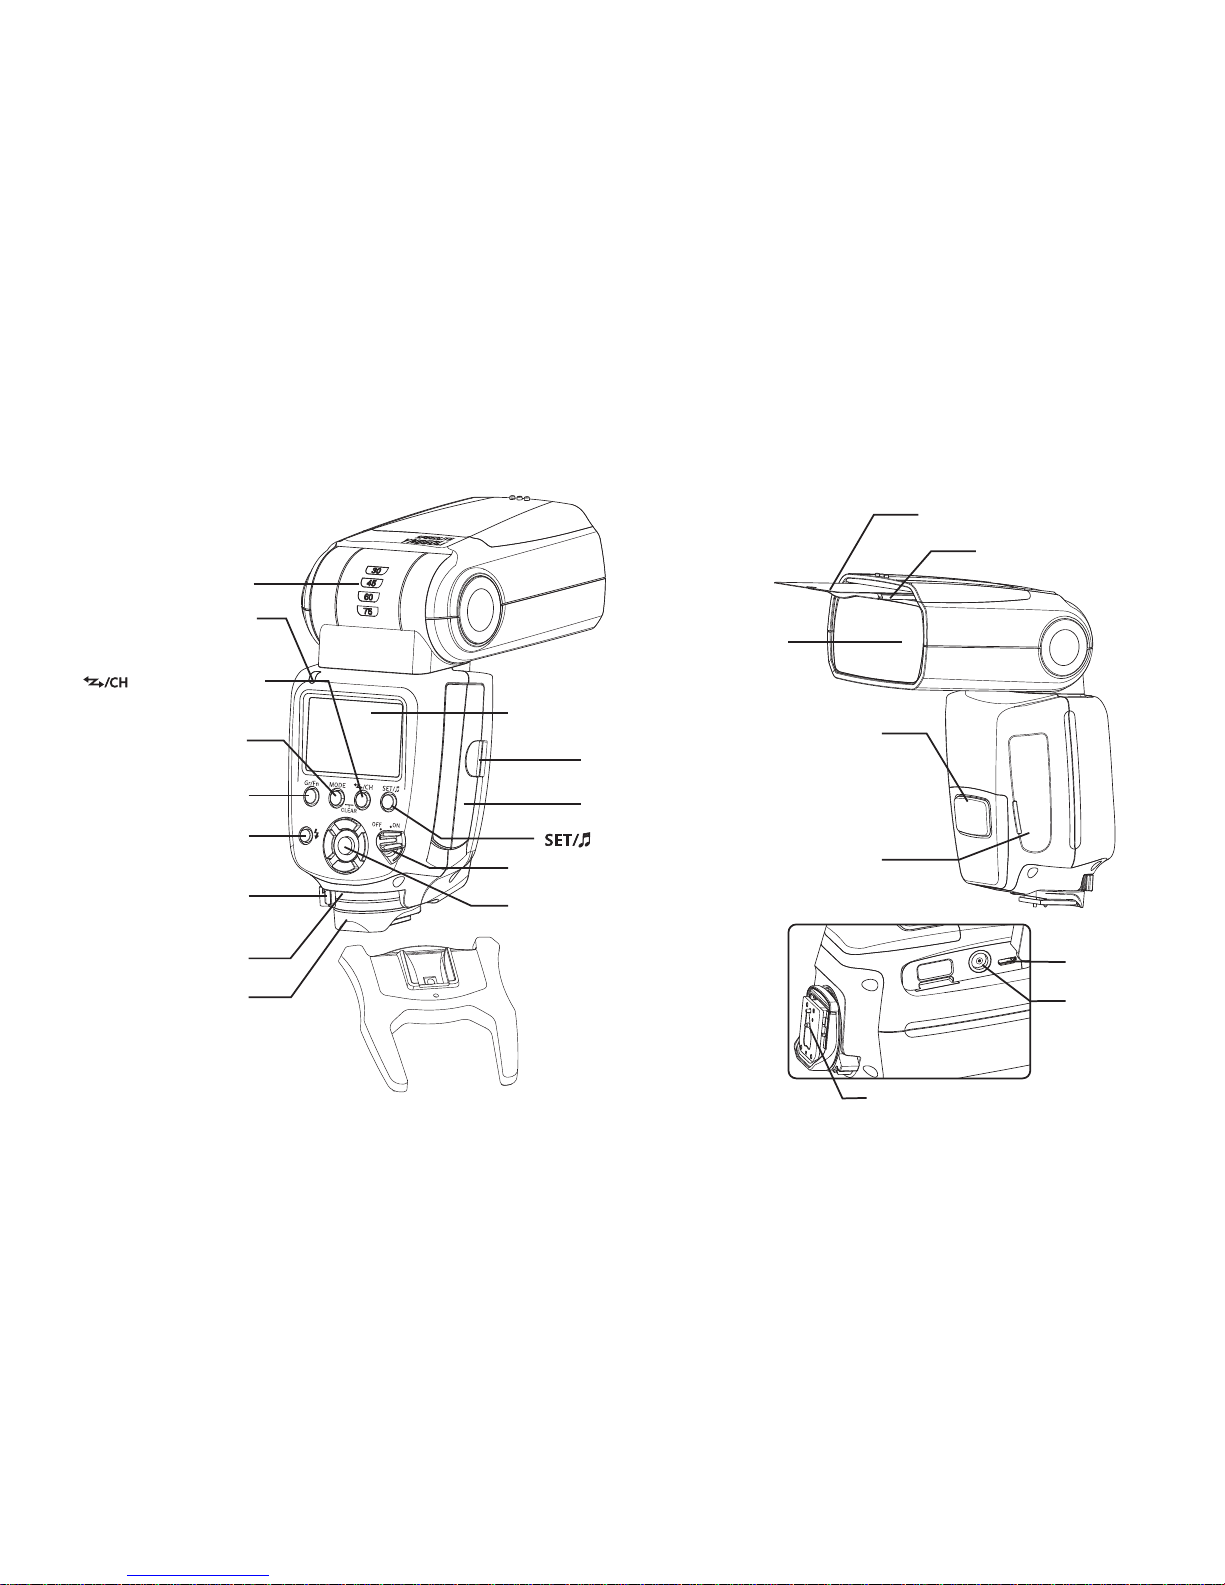
Wide panel
Flash head
wire less sensor
Optical transmissio n
Wide refection board
Terminal
cover
Mini stand
USB por t
PC port
Bounce angle index
Mounting foot
lock lever
Lock-release
button
Charging lamp/
Test flash button
Dust- and waterresi stant adapter
Flash mode button
[ ]
Channel button
Trigger mode/
Radio transmission
confirmation lamp
(LINK lamp)
LCD panel
Selection/Setting
button set
Power sw itch
Hotshoe contact
Components Description
[Gr/Fn]Group/Custom
Function button
[ ] Set/Sound Button
Li-ion Batter y (kit only)
Battery
Lock-release button
-4-
Page 7
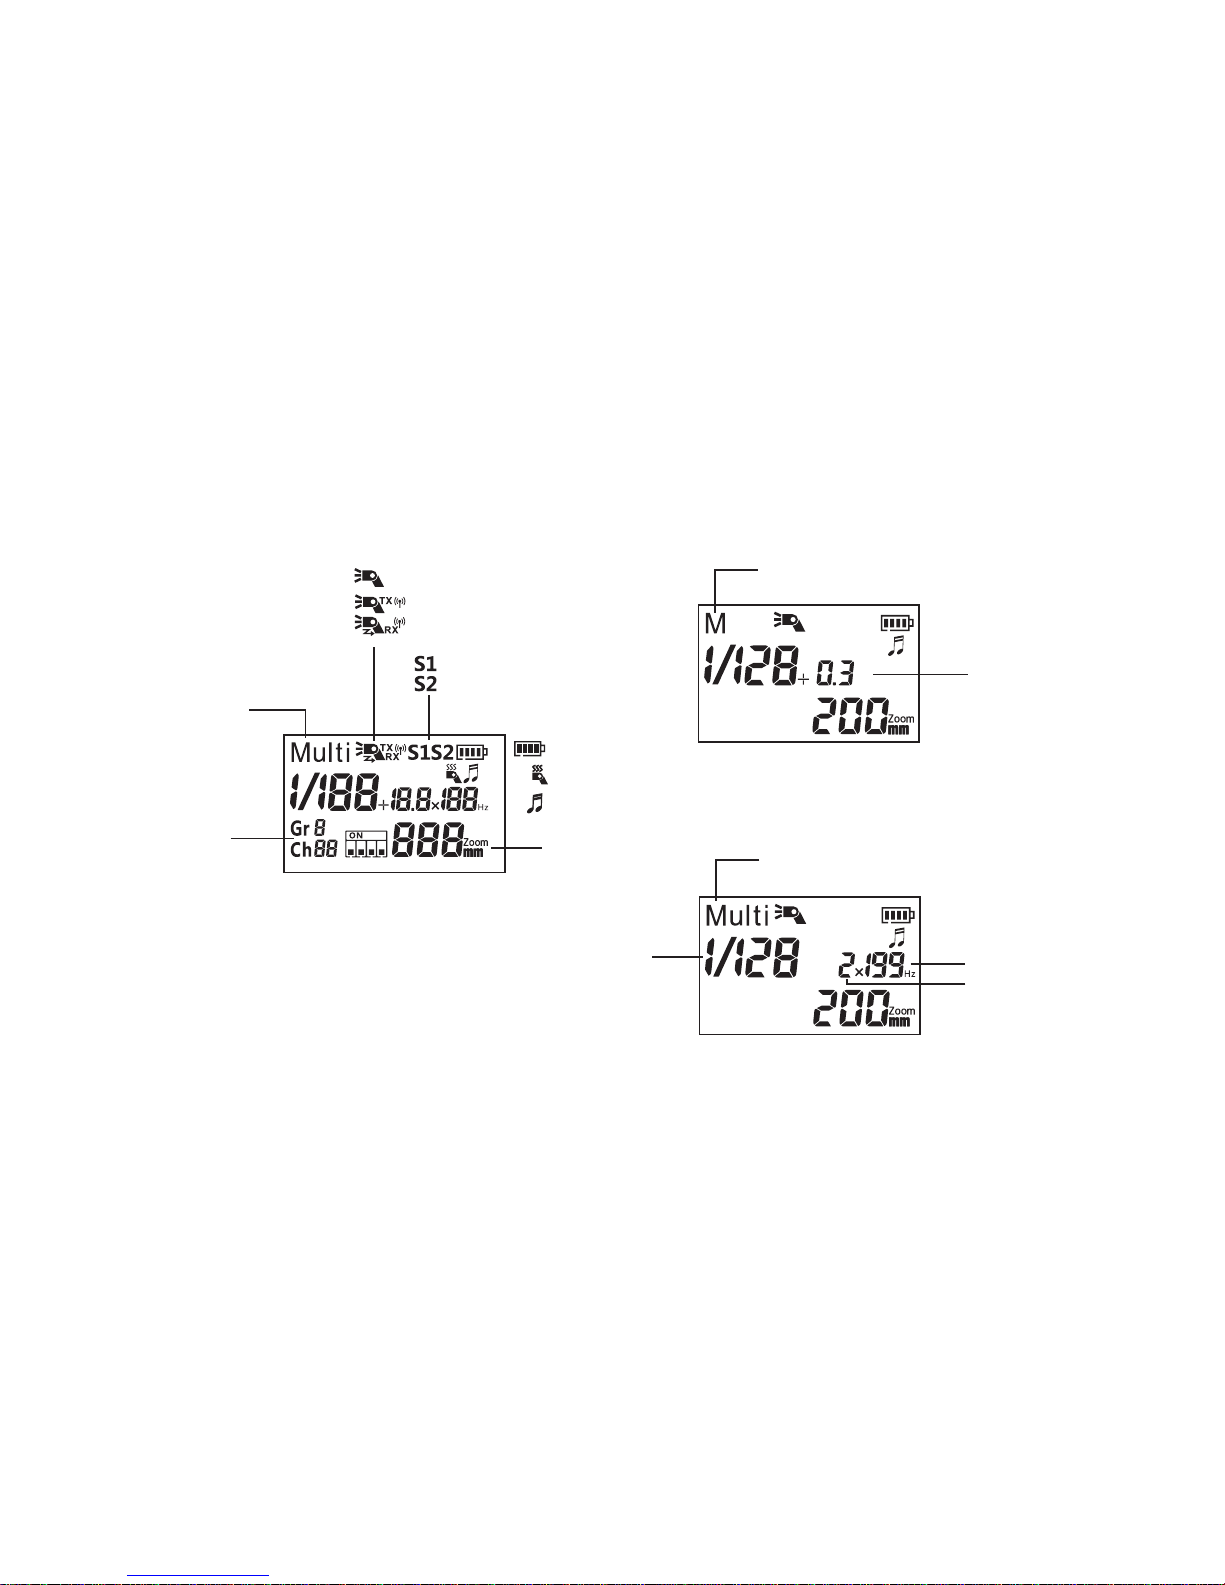
LCD Panel
M:Manual flash
MULTI:Multi flash
:Sound
M
M:Manual Flash Mode
Manual Flash Mode
Multi Flash Mode
MULTI:Multi Flash
Flash fre quency
Number of flas hes
Flash output
Flash output
Zoom
-5-
:Over heat
:Battery level
Gr:Grou p
Ch:Channel
:Optical wireless slave mode
:Optical wireless slave mode
:On-Camera Mode
:Radio wireless master mode
:Radio wireless slave mode
Page 8

:
master mode
Radio wireless
:Radio wireless
slave mode
Short press [ ]button to switch the mode to on-camera,radio transmission master control,or radio
transmission slave,long press this button to switch to S1/S2 of optical slave mode.In on-camera and
master control mode,the LCD backlight is on in green,in slave mode,LCD backlight is on in orange.
:On-Camera Mode
-6-
:
slave mode
Optical wireless
:
slave mode
Optical wireless
LCD Panel
Page 9

1.Install Battery And Take Out Batteries
According to the picture, inser t the lithium batter y fully into the batter y compartment ,the batter y will be
installed when a 'click' sound comes out from the batter y locking lever.
For taking out the lithium battery, turn the batter y locking lever according to the direction of arrow, the lithium
batter y will be popped out automatically.
Installation Instruction
2.Attaching to the Camera & Detaching
Slip the speedlite's mounting foot all the way into the camera's hot shoe.
Slide the mounting foot lock lever to the right side as the arrow shown, until heard the “clicks”sound.
To detach the speedlite, press the [lock-release button] and slide the [Mounting foot lock lever] to the left
side, then detach the speedlite.
-7-
Page 10

1.Button Operation
[ON/OFF] button
[MODE] button
[Gr/Fn]button
[ ]
/Sound buttons
Setting
[Selection/Setting
button set]
[TEST] button
Turn to "ON"、“OFF”to turn on or turn off the power source of the flash.
Short press this button to switch in sequence among flash trigger modes
including on-camera, radio transmission master control, radio transmission
slave, optical transmission slave (S1,S2),in radio transmission mode, long press
this button for channel setting.
[ ]trigger
mode/radio channel
button
Short press this button to cycle among M、MULTI、 --NO Flash (only in radio
transmission master control mode),
In radio transmission master control or slave mode, shor t press this button to
switch to different groups, long press this button for custom functions setting.
Short press this button to set focal length, stroboscopic times, stroboscopic
frequency, long press this button to turn on or turn off sound prompt.
Test flash or wake up the speedlite
Basic Functions
[Left][Right][Up][Down]and [OK]button in the middle. Press these buttons to
set flash output, output fine-tuning,times of stroboscopic flash and flash
frequency, custom functions, focal length,channel.
-8-
2.Meanings of Indicator Light
The green light lit
Meaning
The red light is lit
R ad i o t ra n s mi s s i on
communication status
S e n d o r r e c e i v e
trigger instructions.
Status of [Link] lamp
3.Display Backlight Color
Color
Green
On-camera or master control flash mode
Slave flash mode
Flash enters overheatprotection state
Orange
Meaning
Red
Page 11

4.The meaning of [Sound Prompt]
The sound form
Meaning
Meaning
Operation
Scope of Application
Tick-Tick tick tick tick
Continuous and
quick ticks
Overheat protection prompt
Wai ting for completion of
chargin g, idle 10 minutes
for overheat released.
Low ba tter y, the speedlite
is about to shut down
Replace the batteri es
Tick twice
The speedlite is fully charged,
and can be used
The charging has not been completed
Wai t for completion of charging
Normal
Tick tick tick
Tick-a long sound
Power on /the sound indicator is
enabled sound switch turns on/flash OK
Normal
-9-
Grouping
display status
GR A
TX master flash mode
Rx slave flash mode
GR B/C/
D/E/F
The unit used as a slave
flash unit in Group A
The unit used as a slave flash
unit in Group B/C/D/E/F
User can set the flash mode, output and focal length of
master unit and off-camera flash in group A.
5.Grouping display status and meanings of radio transmission TX master mode and RX slave mode
Flash OK only slave
mode indicates
Slave mode only
Slave mode only
All modes
All modes
Through master control unit, user can set flash mode,
flash output, focal length of speedlites in group B/C/D/E/F
respectively.
Basic Functions
Page 12

8.M Mode
In M mode, you can set the flash output as your requirement and
adjust the flash output though [left] [right] button. The adjustment
range of flash output is 1/128~1/1.The output can be divided into 8
grades, and each has 1/3 EV as adjustment increment by
. When shooting, you should just set the flash out, the
speedlite will flash with the sync signal from the camera.
[up] [down]
button
6.Power-on and Power-off
Set the power switch to [ON] position, the speedlite will turn on and start
charging.
Af ter turned on, the [Charging lamp] will bright with red light which indicates it
can flash. After use, set the switch to [OFF] position to turn off the power
source.
7.
When the charging lamp turns red, you can test the flash is normal or
through the [TEST] button.
Test Flash
-10-
Basic Functions
Page 13

-10-
10.Manually set the Zooming position
Short press function button [ ],then press [up] [down] [left]
[right] button to adjust coverage, user can adjust the flash coverage
(24,28,35,50,70,80,105,135,200mm)manually.
11.Overheat protection
When continuous flash, the temperature of the flash head may increase, a warning icon [ ] icon will be
displayed on LCD panel, and the recycling time will be longer.
When repeated firings of the flash, the overheat protection function will be triggered, the LCD is lighting in
red, the speedlite will be locked ,in such case, please wait for about 10 minutes before continuing use.
When the speedlite warns over tieating, please reduce the use intensity.
-11-
9.Multi Mode
Multi mode, the speedlite will flash according to the flash output, flash
frequency and number of flashes you set. Use [left][right]to adjust output
power. The adjustment scope of output level is 1/128-1/64-1/32-1/16-1/81/4. To adjust times of flash and flash frequency, please press [ ] first
to enter focal length setting menu, then press [ ] again to select the
item (blink) to be set, at this time, user can adjust times of flash and flash
frequency.
Basic Functions
Page 14

TX
RX
RX
RX
MAS TER
SLA VE
SLA VE
SLA VE
Tran sm is si on
distance Approx .
100m
Wireless flash shooting: Radio transmission
When YN860Li is used as master unit, it can remotely alter flash mode,
output, stroboscopic times, stroboscopic frequency and focal length of
YN860Li/YN660/YN560IV/YN560III/YN968N which are set to slave unit
mode, it can control slave unit parameters of 6 groups at most, it is also
compatible with RF605,RF603(II),RF-602 series wireless flash trigger.
When YN860Li is used as slave unit, it supports receiving signals from the
following master control unit: YN860Li/YN560IV/YN660 speedlite, and
YN560-TX(II)/RF605/RF603(II)/RF-602 series wireless flash trigger.
Master unit refers speedlite or wireless flash trigger installed on camera,
slave unit refers to speedlite or wireless flash trigger controlled through
radio transmission. For using accessary small bracket to fix slave unit, the
basic relative position and operating range are as shown in the figure.
-12-
Radio Transmission Master Control Unit Setting
Short press the [ ]on the speedlite until [ ]displays , the flash is
set to be master control unit.
Long press the [ ] button, the channel sign flickers, the speedlite
supports 16 channels, Press [up] [down] [left] [right] button for setting
and press [OK] to save.
Page 15

Radio Transmission Slave Unit Setting
Radio Transmission Flash Shooting
Short press master unit [ ] button to select grouping orderly, press [MODE] to set the flash mode
of the current group, the speedlite suppor ts M/MULTI flash mode and --(no flash).Press [ ] to set
the focal length of the speedlites in different groups, in Multi mode, short press [ ] to set
stroboscopic times and frequency. The flash mode, flash output, focal length of speedlites in groups
A-F can be set differently, among of the speedlites, the setting of the master control flash is set to be
the same as that of group A. When the camera's shutter button is pressed, the speedlites in all groups
fire according to the setting of the master control unit with the synchronizing signal of camera.
-13-
The radio transmission modes of master control unit and slave unit need to be set to be consistent
through customs function setting.
The flash parameters of YN860Li can be set remotely through YN560-TX(II) wireless flash trigger,
when RF-602/RF603/RF605 are used to send or receive signals,the flash mode or output needs to
be set on the speedlite of slave unit.
Short press the [ ] button of the speedlite until [ ] displays, the
flash is set to be slave unit.
Long press [ ]button to set slave unit and master unit to be in the
same channel.
Short press [ ]to set the grouping(A-F)of the slave unit.
Page 16

Wireless Flash Shooting: Optical slave mode(S1/S2)
Short press the [ ] button unit [S1] or [S2] icon is display.
modes are also suitable for off-camera slave unit, for create a variety of
lighting effects, which is suitable for manual flash and T TL flash
environment. The two modes are same as M mode when adjusting the flash
output. When using the S1\S2 mode, you can rotate the flash head to make
the sensors face to the master unit.
S1 mode: In this mode it will work with the first flash synchronously of the
master flash, with the result consistent with the use of radio slave. To use
this
mode properly, the master flash should be set at manual flash and the TTL
flash system with preflight function and the red-reduction function with
multiple flashes should not be used.
S2 mode: It is also called "pre-flash cancel mode". This mode is similar with
S1 mode, but it can neglect the pre-flash given by TTL flash. Therefore, it
can support the master flash working in TTL mode. In particular, if S1 mode
cannot flash properly and synchronically with your internal flash, you can
tr y to use S2 mode.
The two
outdoor
indo or
-14-
Page 17

2.Reflection Flash
Bounce flash means to take photos by making flash light head aimed at wall or
ceiling and using the light reflected back from the ceiling or wall to light the
desired object, so that the shade behind the object can be decreased to get more
natural shooting effect.
3.Use Reflection Board
For shooting with the reflection board in flash, pull out the reflection board and
the wide panel out from the light head at the same time and then push the wide
panel back . In such case, if this product is being used to take photos, it will
produce a highlighted point on the eyes of the subject and thus make the eyes
charming (catching light). This function can reach optimal effect when the flash
head is up 90°.
1.Use Wide Panel
Pull out the Wide panel, push back the Reflection board and arrange them as per
the figure. The flash range will be enlarged and the effect will be softer and more
natural.
If the wall or ceiling is too far, the bounce flash may be too weak to get
enough exposure. The wall or ceiling should be even and white in order to get
efficient reflection, if the reflection surface is not white, color cast may
appear in photo.
-15-
Advanced Applications
Page 18

4.Short Distance Flash Shooting
When you position the flash head down by 7° , you can shoot subjects at a
short distance in a range of approx. 0.5 to 2 m.
PC Sync port (input)
Through connecting to the PC sync por t, you can make the flash
synchronously.
High-speed Continuous Shooting
The flash can support the high-speed continuous shooting function. Please
set the camera in the continuous shooting form and then shoot.
Factor y reset
Long press the [MODE] button and [ ] button can set the flash
shooting function settings and wireless shooting setting recover to the
default set-top flash mode status.
Firmware Upgrade
1).Log in the YONGNUO official website (www.hkyongnuo.com) to
download the upgrade software and the latest firmware.
2).Power off, use USB-Micro USB cable connect to PC. (Do not include
cable)
3).Press the [MODE] button and set the power switch to [ON], the LCD will
display firmware upgrade interface.
4).Complete the firmware upgrade operation according to the prompt
5.
6.
7.
8.
Advanced Applications
-16-
Page 19

Long press the function button [ ] on the speedlite to enter customs function setting, press[up]or
[down] button to select the items need to be adjusted, press [left] or [right] to alter setting, press [OK]
to confirm and exit setting.
C.Fn-02:Power saving function( Auto Power Off ) in
slave mode
C.Fn-01: Power saving function( Auto Power Off ) in
on-camera mode and master control mode
Applicable Mode: On-camera mode and master
control mode
Represents number of minutes after entering
power save mode.
OFF: Power saving function is off.
05-120:
Applicable Mode: Slave mode
The speedlite powers off after keeping idle
for 5-120 minutes.
OFF: Power saving function is off.
05-120:
C.Fn-03: Radio transmission communication mode.
RF603:RF603 mode
RF602:RF602 mode
-17-
C.Fn:Setting Custom Functions
Page 20

C.FN-04:
A-C:
A-D:
A-E:
A-F:
Grouping in radio transmission
The speedlite can be set to A/B/C group
The speedlite can be set to A/B/C/D group
The speedlite can be set to A/B/C/D/E group
The speedlite can be set to A/B/C/D/E/F group
C.FN-05:Light duration of display backlight
05-12:Number of seconds of backlight lighting time.
C.FN-07: Optical transmission slave flash function
(S1,S2)
ON: Optical transmission slave flash function is enabled.
OFF: Optical transmission slave flash function is disabled.
C.FN-06: Indicator light function of slave unit
In radio transmission slave or optical transmission
mode, the function indicator light of slave unit blinks.
The function indicator light of slave unit is off.
ON:
OFF:
-18-
C.Fn:Setting Custom Functions
Page 21

Circuit design:
Guide No.:
Flash mode:
Trigger mode:
Zoom :
Ver tical rotation angle:
Horizontal rotation angle:
Power supply:
Full power flashes :
Recycle time:
Flash color temperature:
Flash time:
Flash control:
External interface:
Optical transmission
triggering distance:
Radio transmission
triggering distance:
Additional features:
Dimensions:
Net weight:
Contains items(kit):
Insulated Gate Bipolar Transistor (IGBT)
60 (ISO 100,200mm)
M, Multi
On-camera mode, radio wireless master mode, radio wireless slave mode, wireless
optical slave mode(S1,S2)
24,28,35,50,80,105,135,200mm
-7~90 degree
0~270 degree
11.1V 1800mAh Li-ion batter y
700 times
Approx. 1.5s
5600K
1/200s~1/20000s
8 levels of output control (1/128~1/1), 22 levels of fine tuning
Hotshoe, USB port, PC port
20~25m indoor, 10~15m out door
Up to 100m
Master flash, zooming, sound prompt, automatically saving setting, PC por t,
power saving mode, overheat protection, custom functions (C.Fn)
206 mm(extended state)
404g
Speedlite(1), Li-ion batter y(1), Batter y protective case(1), Charger(1), AC
Adadper(1),Protecting bag(1), Mini stand (1),Usermanual(1)
×75×56
Specifications
-19-
Page 22

1 .Power does not turn on or the flash dose not fire.
Make sure that the batteries are installed in the correct orientation.
Please check if the speedlite is in overheat protection status.
lf the electrical contacts of the speedlite and camera are dirty, clean the contacts.
2.The flash automatically shut off the power.
Please check if the flash enable the power saving mode or whether the battery power is enough.
3.Vignetting appears in photos or only part of the subject is illuminated.
Please check the current coverage of focal length and make sure if the lens focal length exceeds the
coverage range of the flash. The product's zooming range is 20~105 mm of the medium format
system. You can try to pull out the wide-angle diffuser to expand the flash range.
4.Radio Transmission Slave Unit
Please set the radio transmission master control unit and save unit to be in the same channel, please
set the communication modes of radio transmission master control unit and save unit to be
consistent(RF602 or RF603),in slave mode, the speedlite cannot flash when installed on the camera,
please set the flash mode to be on-camera mode.
5.Other problems.
Try to clear the settings of flash and camera, try to disable the flash power source and then
restar t the flash.
The functions of this user manual are based on test conditions of our company. Further
notice will not be given if the design and specifications change. The YONGNUO logo in this
manual includes the registered trademark or trademark of Shenzhen Yongnuo Photography
Equipment Co.,Ltd in China or/and other countries(regions). All other trademarks are the
property of their respective owners.
dose not fire.
Troubleshooting
- -20
 Loading...