


Copyright
Copyright © 2020 YEALINK(XIAMEN) NETWORK TECHNOLOGY
Copyright © 2020 Yealink (Xiamen) Network Technology CO., LTD. All rights reserved. No parts of this publication may
be reproduced or transmitted in any form or by any means, electronic or mechanical, photocopying, recording, or otherwise, for any purpose, without the express written permission of Yealink (Xiamen) Network Technology CO., LTD.
Under the law, reproducing includes translating into another language or format.
When this publication is made available on media, Yealink (Xiamen) Network Technology CO., LTD. gives its consent to
downloading and printing copies of the content provided in this file only for private use but not for redistribution. No
parts of this publication may be subject to alteration, modification or commercial use. Yealink (Xiamen) Network Technology CO., LTD. will not be liable for any damages arising from use of an illegally modified or altered publication.
Trademarks
Yealink®, the logo and the name and marks is trademark of Yealink (Xiamen) Network Technology CO., LTD, which are
registered legally in China, the United States, EU (European Union) and other countries.
All other trademarks belong to their respective owners. Without Yealink’s express written permission, recipient shall not
reproduce or transmit any portion hereof in any form or by any means, with any purpose other than personal use.
Warranty
(1) Warranty
THE SPECIFICATIONS AND INFORMATION REGARDING THE PRODUCTS IN THIS GUIDE ARE SUBJECT TO CHANGE
WITHOUT NOTICE. ALL STATEMENTS, INFORMATION, AND RECOMMENDATIONS IN THIS GUIDE ARE BELIEVED TO BE
ACCURATE AND PRESENTED WITHOUT WARRANTY OF ANY KIND, EXPRESS OR IMPLIED. USERS MUST TAKE FULL
RESPONSIBILITY FOR THEIR APPLICATION OF PRODUCTS.
(2) Disclaimer
YEALINK (XIAMEN) NETWORK TECHNOLOGY CO., LTD. MAKES NO WARRANTY OF ANY KIND WITH REGARD TO THIS
GUIDE, INCLUDING, BUT NOT LIMITED TO, THE IMPLIED WARRANTIES OF MERCHANTABILITY AND FITNESS FOR A
PARTICULAR PURPOSE. Yealink (Xiamen) Network Technology CO., LTD. shall not be liable for errors contained herein
nor for incidental or consequential damages in connection with the furnishing, performance, or use of this guide.
(3) Limitation of Liability
Yealink and/or its respective suppliers are not responsible for the suitability of the information contained in this document for any reason. The information is provided “as is”, and Yealink does not provide any warranty and is subject to
change without notice. All risks other than risks caused by use of the information are borne by the recipient. In no
event, even if Yealink has been suggested the occurrence of damages that are direct, consequential, incidental, special,
punitive or whatsoever (Including but not limited to loss of business profit, business interruption or loss of business
information), shall not be liable for these damages.
End User License Agreement
This End User License Agreement ("EULA") is a legal agreement between you and Yealink. By installing, copying or otherwise using the Products, you: (1) agree to be bounded by the terms of this EULA, (2) you are the owner or an authorized user of the device, and (3) you represent and warrant that you have the right, authority and capacity to enter into
this agreement and to abide by all its terms and conditions, just as if you had signed it. The EULA for this product is
available on the Yealink Support page for the product.

Patent Information
China, the United States, EU (European Union) and other countries are protecting one or more patents of accompanying products and/or patents being applied by Yealink.
Customer Feedback
We are striving to improve our documentation quality and we appreciate your feedback. Email your opinions and comments to DocsFeedback@yealink.com.
Technical Support
Visit Yealink WIKI (http://support.yealink.com/) for the latest firmware, guides, FAQ, Product documents, and more.
For better service, we sincerely recommend that you use Yealink Ticketing system (https://ticket.yealink.com) to submit
all your technical issues.

GNU GPL INFORMATION
Yealink device firmware contains third-party software under the GNU General Public License (GPL). Yealink uses software under the specific terms of the GPL. Please refer to the GPL for the exact terms and conditions of the license.
The original GPL license, source code of components licensed under GPL and used in Yealink products can be downloaded online: http://www.yealink.com/onepage_83.html.

Table of Contents
Table of Contents
Table of Contents
Getting Started
Hardware Overview
W80DM/W80B Hardware
W56H Hardware
W53H Hardware
CP930W Hardware
DD Phone Hardware
Power LED Indicator on the W56H/W53H/DD Phone
Menu on the W56H/W53H
Main Menu
Entering the Main Menu
Accessing the Main Menu Feature
Submenu
Accessing a Submenu Feature
Returning to Idle Screen
Screen and Icons
Idle Screen
W56H/W53H Line Status Screen
CP930W/DD Phone Calls Screen
Icons on the Idle Screen
W56H/W53H Icons on the Calls Screen
W56H/W53H Icons on the Line Status Screen
Rechargeable Battery
Viewing the Power Status
Entering Characters on the W56H/W53H
Setting the Input Modes
Entering Data on the W56H/W53H
Entering Data on the CP930W/DD Phone
5
10
10
10
11
12
14
16
17
17
17
18
19
19
19
20
20
20
21
22
22
23
23
23
24
24
24
24
25
Registering the Handset
Registering Handsets at the DECT Manager
Selecting a System to Connect
Call Features
Placing Calls
Placing External Calls
Placing an External Call
Placing Multiple External Calls
Placing a Call from the Call History
Placing a Call from the Directory
Placing a Call with a Speed Dial Key
Assigning a Speed Dial Number
26
26
26
27
27
27
27
28
28
28
28
28
5

Yealink W80 DECT IP Multi-Cell System User Guide
Changing a Speed Dial Number
Deleting a Speed Dial Number
Calling a Contact Using a Speed Dial Key
Redial
Redialing a Number
Redialing the Last Dialed Number
Adding a Dialed Number to Local Directory
Deleting a Redial Record
Deleting All Redial Records
Placing an Anonymous Call
Answering Calls
Answering a Call
Answering a Call When in a Call
Answering a Call Automatically
Disabling Call Waiting
Switching Among the Receiver, Handsfree and Headset Modes
Silencing or Rejecting Incoming Calls
Silencing a Call
Rejecting a Call Manually
Rejecting Anonymous Calls
Rejecting Calls with Do Not Disturb (DND)
Rejecting Calls with DND
Ending Calls
Muting/Unmuting Audio
Holding and Resuming Calls
Holding a Call
Resuming a Held Call
Call Forward
Forwarding Incoming Calls
Transferring Calls
Performing a Blind Transfer
Performing a Semi-Attended/Attended Transfer
Conference Calls
Local Conference
Setting Up a Local Conference Call
Merging Two Calls into a Conference
Muting or Unmuting a Conference Call
Ending a Conference Call
Network Conference
Setting Up a Network Conference
Inviting another Party into an Active Conference Call
Holding/Resuming a Conference Call
Ending a Conference Call
Recording Using an SD Card
Recording a Call
29
29
29
29
30
30
30
30
30
31
31
31
31
32
32
32
32
32
33
33
33
33
33
34
34
34
34
34
35
35
35
35
36
36
36
36
36
37
37
37
37
37
38
38
38
6

Table of Contents
Pausing/Resuming a Recording
Stopping a Recording
Managing the Recordings
Listening to a Recording
Pausing/Resuming a Playback
Fast Forwarding/Rewinding a Playback
Deleting a Recorded Call
Viewing the Available Recording Time
Advanced Call Features
Call Park and Call Retrieve
Parking or Retrieving a Call in the FAC Mode
Parking a Call in the FAC Mode
Retrieving a Parked Call in the FAC Mode
Parking or Retrieving a Call in the Transfer Mode
Parking a Call in the Transfer Mode
Retrieving a Parked Call in the Transfer Mode
Retrieving a Call with a Retrieve Key
Shared Line
State Indicator of Shared Line
Placing Calls on a Shared Line
Answering Calls on a Shared Line
Placing a Call on Public Hold
Placing a Call on Private Hold
Retrieving a Held Call on a Shared Line
Barging in an Active Call on a Shared Line
Pulling a Shared Call on a Shared Line
Voice Mail
Setting the Voice Mail Code
Leaving Voice Mails
Listening to Voice Mails
38
39
39
39
39
40
40
40
41
41
41
41
41
42
42
42
43
43
43
44
44
44
45
45
45
45
45
46
46
46
Directory
Local Directory
Adding Contacts
Viewing Contacts
Editing Contacts
Deleting Contacts
Deleting a Contact
Deleting All Contacts
Searching for Contacts
Shared Directory
Adding Shared Contacts
Editing Shared Contacts
Deleting a Shared Contact
Deleting All Shared Contacts
47
47
47
47
47
48
48
48
48
48
49
49
49
49
7

Yealink W80 DECT IP Multi-Cell System User Guide
Searching for Shared Directory Contacts
Saving a Shared Contact to the Local Directory
Blacklist
Adding a Blacklist Contact
Viewing Blacklist Contacts
Editing a Blacklist Contact
Deleting Blacklist Contacts
Deleting a Blacklist Contact
Deleting All Blacklist Contacts
Remote Phone Book
Searching for Remote Phone Book Contacts
Viewing Remote Phone Book Contacts
Saving a Remote Phone Book Contact to the Local Directory
Call History
Call History Icons
Viewing History Records
Saving a History Record to Local Directory
Saving a History Record to Blacklist
Deleting History Records
Deleting a Call Record
Deleting All Call Records
50
50
50
50
50
51
51
51
51
52
52
52
52
53
53
53
53
54
54
54
54
Customizing Your Phone
Turning Handset On
Turning Handset Off
Changing the Wallpaper
Setting the Screen Saver
Changing the Screen Brightness
Setting the Keypad Light
Changing the Language
Time & Date
Setting the Time and Date Manually
Changing the Time and Date Format
Shortcuts
Supported Shortcuts
Customizing the Shortcuts
W56H/W53H Handset Keypad Lock
Locking Handset Keypad
Unlocking Your Phone
DD Phone Lock
Setting the Phone Lock
Locking Your Phone Manually
Unlocking Your Phone
Changing Your Phone Unlock PIN
Silent Mode
55
55
55
55
56
56
56
56
57
57
57
57
58
58
59
59
59
59
59
60
60
60
61
8

Table of Contents
Switching on Silent Mode
Switching off Silent Mode
Audio Settings
Adjusting the Volume
Setting the Ring Tone
Setting the Ring Tone for the External Calls
Setting the Advisory Tone
Maintaining Your Phone
Investigating Warnings
Resetting the Handset
Appendix
Appendix A- Menu Structure
For W56H/W53H
For CP930W
For DD Phone
Appendix B - Input Modes and Characters on W56H/W53H
61
61
62
62
62
62
62
64
64
64
65
66
66
67
68
68
9

Getting Started
Getting Started
Before you use your phone, take some time to get familiar with its features and user interface.
Note: This guide mainly takes W56H as an example. Due to different LCD specifications and parameters, the graphics dis-
played on the other handsets may be different.
Topics
Hardware Overview
Menu on the W56H/W53H
Screen and Icons
Rechargeable Battery
Entering Characters on the W56H/W53H
Hardware Overview
Understanding the phone hardware helps you easily use the phone's features.
Topics
W80DM/W80B Hardware
W56H Hardware
W53H Hardware
CP930W Hardware
DD Phone Hardware
Power LED Indicator on the W56H/W53H/DD Phone
W80DM/W80B Hardware
No. Item Description
1 Device Key Long press for 20 seconds to reset the device to factory configurations.
10

Yealink W80 DECT IP Multi-Cell System User Guide
No. Item Description
2 LAN LED
3 ROLE LED Indicates the device role.
4 DECT LED For W80B, indicates the connection status to the DECT manager (DM).
• Indicates the power status.
• Indicates the LAN connection status.
W56H Hardware
Item Description
1 Receiver Receives audio in receiver mode.
2 Power LED indicator Indicates call status, message status, and charging status.
3 Phone Screen Shows information.
4 Soft Keys Access the function directly. It depends on the operating situation.
5 Message Key Accesses the voice mail or missed call.
• Switches among the receiver, headset, and handsfree modes.
6 Speakerphone Key
7 Navigation Keys Scroll through information or options on the screen.
11
• Answers an incoming call.
• Places a call in handsfree mode.
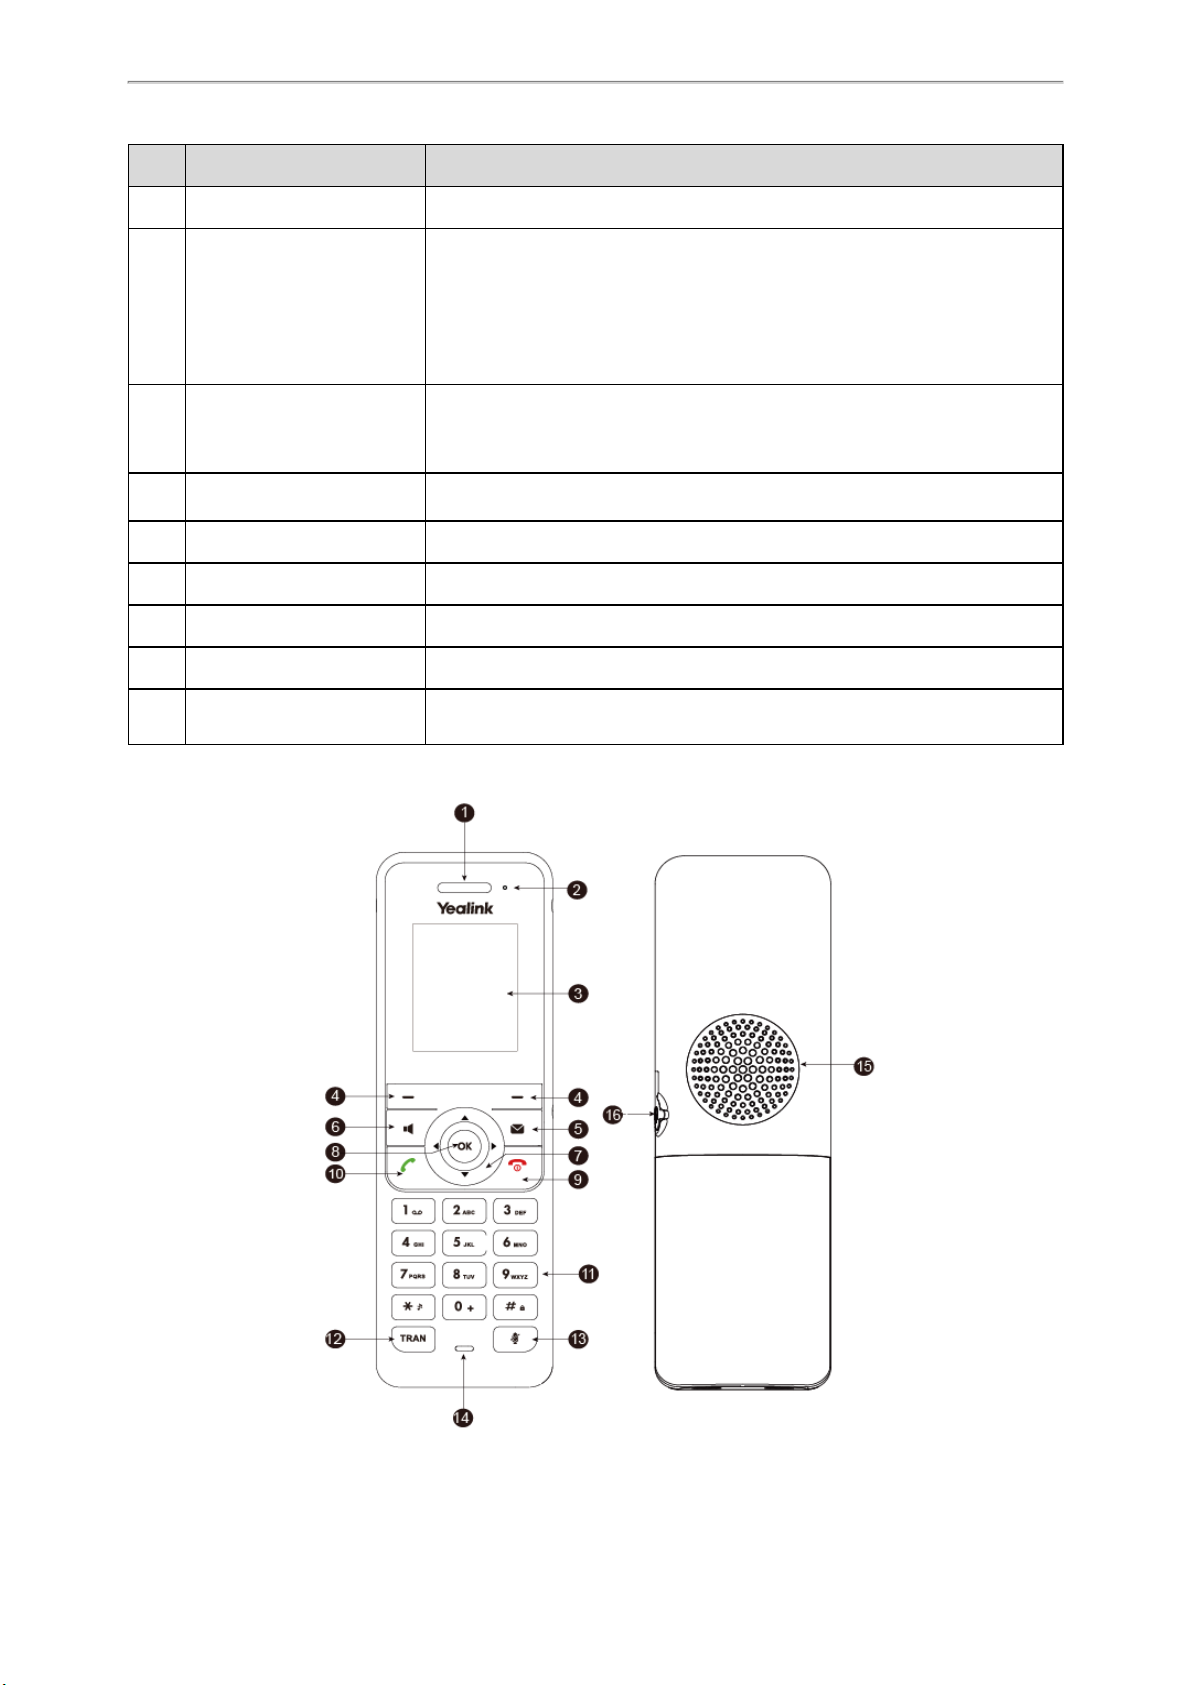
Item Description
8 OK Key Confirms actions or enters the main menu.
• Press briefly to return to the previous screen.
• Long press to return to the idle screen.
9 On-hook Key/Power Key
10 Off-hook Key
11 Keypad Provides digits, letters and special characters.
12 TRAN Key Transfers a call to another party.
13 Mute Key Toggles mute feature on or off.
14 Microphone Picks up audio.
• Press to turn the handset on.
• Long press on the idle screen to turn the handset off.
• Cancels actions or ends a call.
• Rejects an incoming call.
• Answers an incoming call.
• Enters the redial calls list.
• Places a call in receiver or headset mode.
Getting Started
15 Speaker Outputs audio in handsfree mode.
16 3.5mm Headset Jack Connects a standard 3.5mm headset.
W53H Hardware
12
Yealink W80 DECT IP Multi-Cell System User Guide
Item Description
1 Receiver Receives audio in receiver mode.
2 Power LED indicator Indicates call status, message status, and charging status.
3 Phone Screen Shows information.
4 Soft Keys Access the function directly. It depends on the operating situation.
5 Message Key Accesses the voice mail or missed call.
• Switches among the receiver, headset, and handsfree modes.
6 Speakerphone Key
7 Navigation Keys Scroll through information or options on the screen.
8 OK Key Confirms actions or enters the main menu.
9 On-hook Key/Power Key
10 Off-hook Key
• Answers an incoming call.
• Places a call in handsfree mode.
• Press briefly to return to the previous screen.
• Long press to return to the idle screen.
• Press to turn the handset on.
• Long press on the idle screen to turn the handset off.
• Cancels actions or ends a call.
• Rejects an incoming call.
• Answers an incoming call.
• Enters the redial calls list.
• Places a call in receiver or headset mode.
11 Keypad Provides digits, letters and special characters.
12 TRAN Key Transfers a call to another party.
13 Mute Key Toggles mute feature on or off.
14 Microphone Picks up audio.
15 Speaker Outputs audio in handsfree mode.
16 3.5mm Headset Jack Connects a standard 3.5mm headset.
13

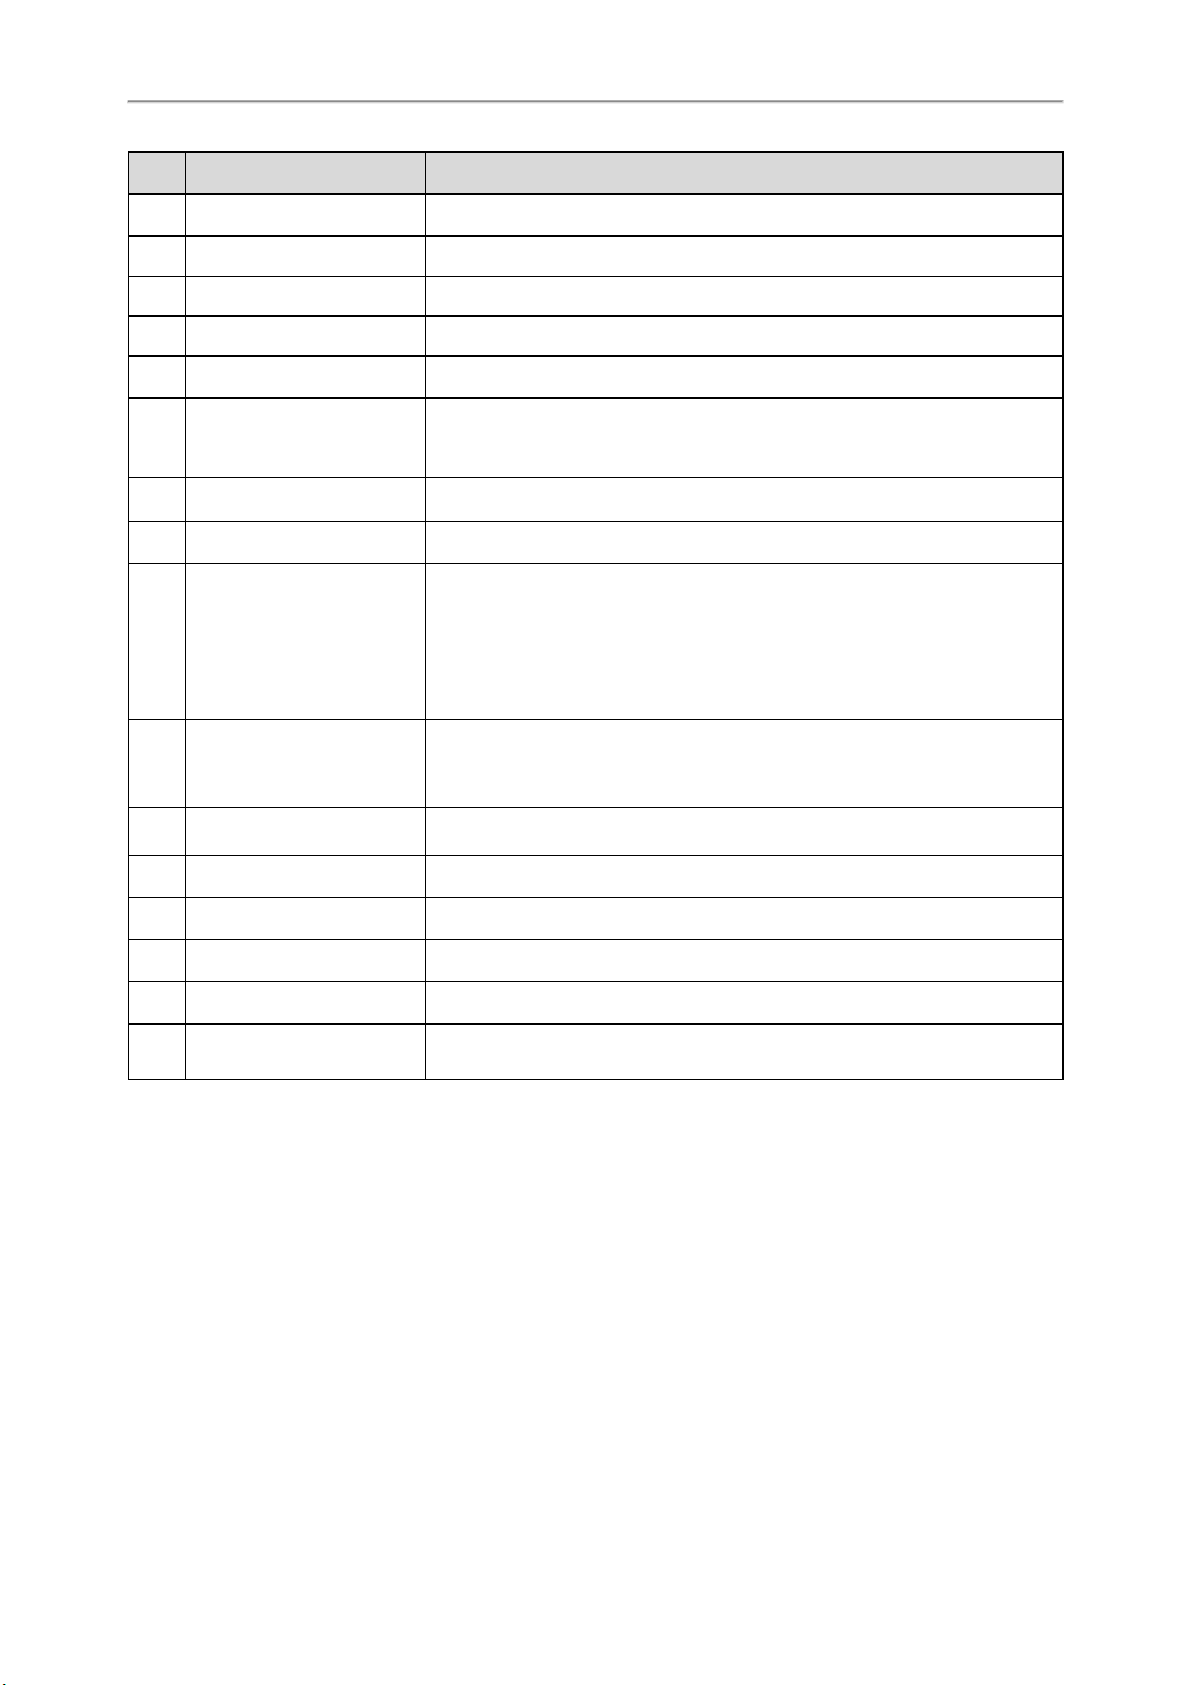
CP930W Hardware
Getting Started
NO. Item Description
Three Internal Micro-
1
phones
2 Mute Touch Key
3 Speaker Provides speakerphone audio output.
4 LCD Screen Shows information about calls, messages, soft keys, time, date and other relevant data.
Provide 20-feet (6 meters) and 360-degree sound pickup.
•Toggles mute feature.
•Indicates phone and call status.
14
Yealink W80 DECT IP Multi-Cell System User Guide
NO. Item Description
5 Soft Keys Labeled automatically to identify their context-sensitive features.
6 On-hook Key Ends a call, returns to the idle screen or turns off the phone.
Provides the digits, letters, and special characters in context-sensitive applications. It is
7 Touch Keypad
8 Volume Key(+) Increases the volume of the speaker, ringer or media.
9 Volume Key(-) Decreases the volume of the speaker, ringer or media.
10 Off-hook Key Enters the dialing screen, places a call or answers a call.
11 Bluetooth Key Enters the Bluetooth setting screen.
12 Confirms actions or answers incoming calls.
possible to open a menu option directly by tapping the number button that corresponds to the position of the option in the menu.
13
14
15 Security Slot
16 Micro USB Port
17 Micro SD Slot Allows you to connect an SD card to record calls and play recordings on the phone.
• Scrolls through the displayed information upwards.
• Accesses the Intercom list screen when the phone is idle.
• Scrolls through the displayed information downwards.
• Views the Directory list when the phone is idle.
Allows you to connect a universal security cable to your phone so you can lock down
your phone. The phone will not be removed after locked.
Allows you to connect a PC and turn your phone into an external speaker and microphone for your PC.
15

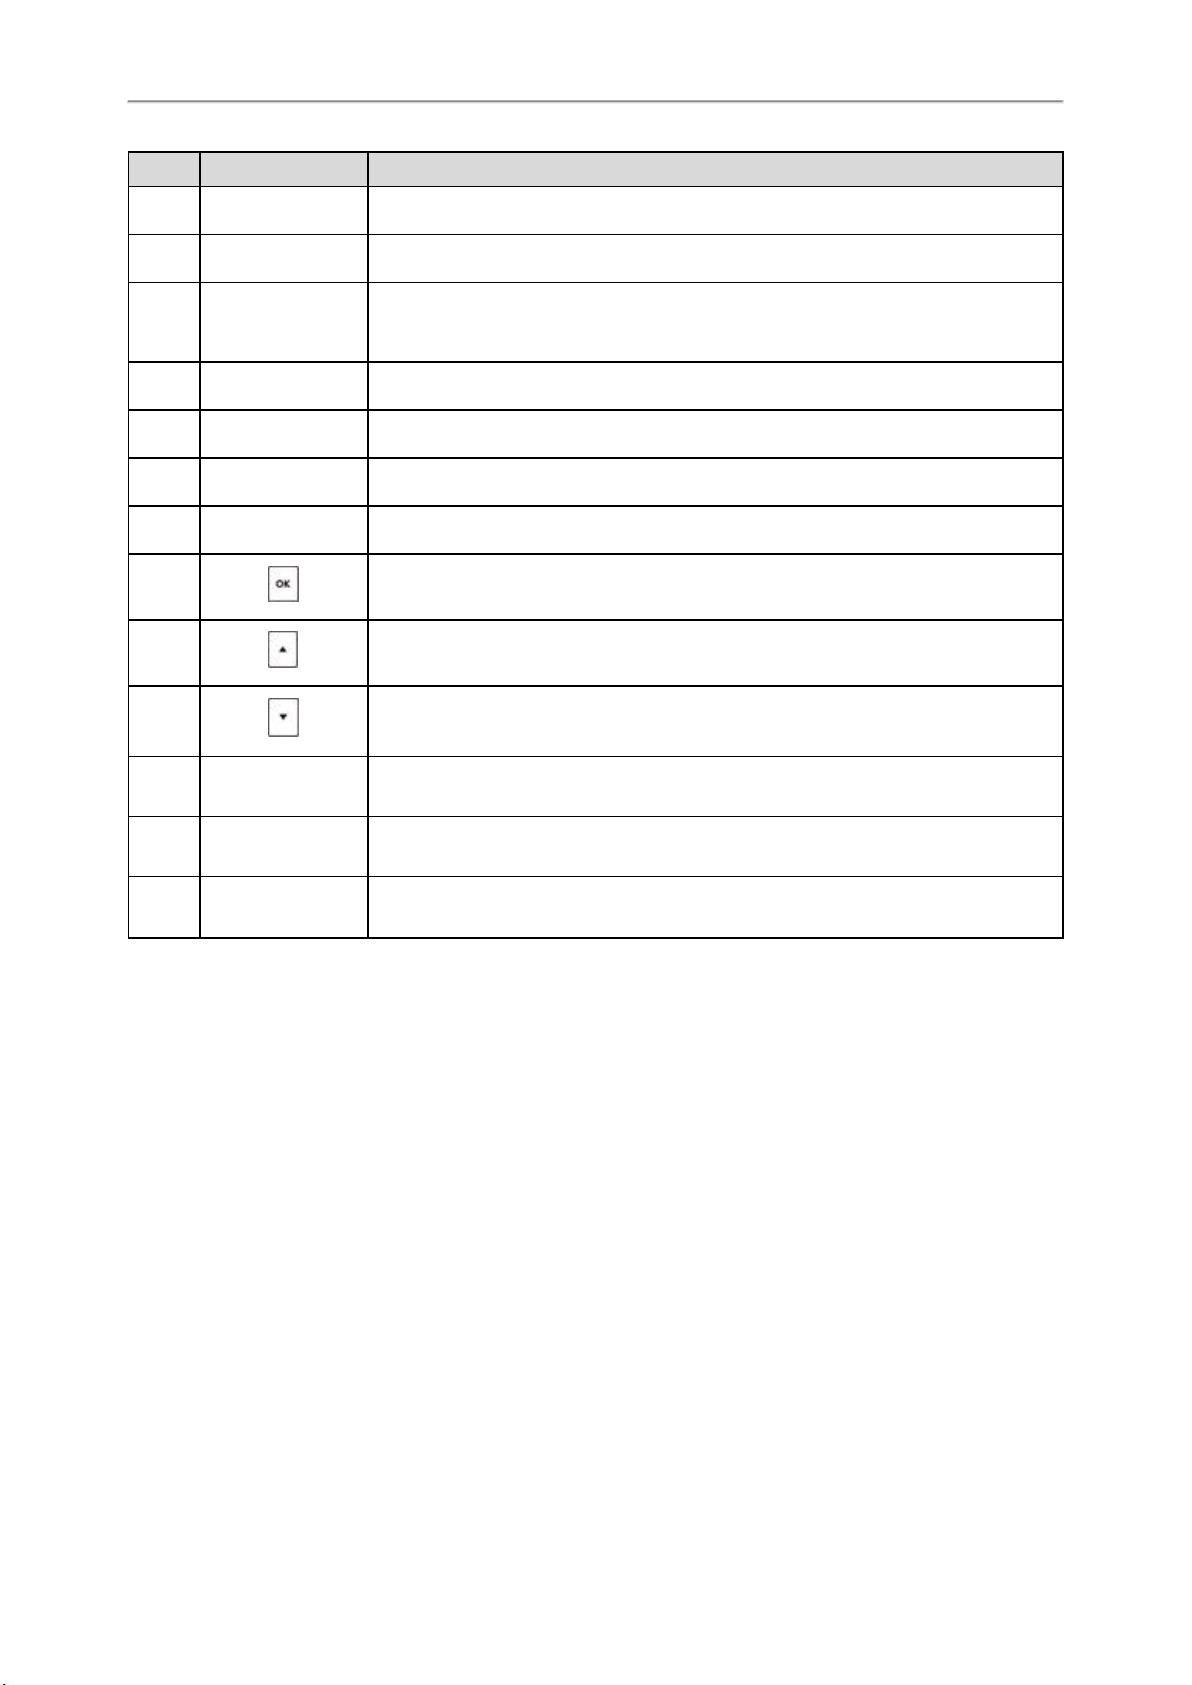
DD Phone Hardware
Getting Started
NO. Item Description
1 Phone Screen Shows a screen with backlight that enables you to view menus and data.
2 Power LED Indicator Indicates call status, message status and system status.
3 Line Keys Access your phone outgoing lines and features.
HEADSET Key
MUTE Key
4
MESSAGE Key Accesses your voice messages.
REDIAL Key Redials a previously dialed number.
5 Speakerphone Key
6 Volume Key Adjust the volume of the handset, headset, speaker.
Toggles the headset on or off.
The LED indicator glows green when the headset is activated.
Toggles the microphone on or off.
The LED indicator glows green when the mute feature is activated.
Toggles the speakerphone (hands-free) mode on or off.
The LED indicator glows green when the speakerphone is activated.
7 Keypad Keys
8 Navigation Keys
Allow you to enter numbers, letters, and special characters. If a menu item has an index
number, you can use the keypad keys to select the item.
• Scroll through information or options displayed on the screen.
• Access History and Directory respectively.
16

Yealink W80 DECT IP Multi-Cell System User Guide
NO. Item Description
OK Key Confirms actions or answers incoming calls.
Cancel Key Cancels actions or rejects incoming calls.
9 Soft Keys
10 Speaker Provides ringer and speakerphone audio output.
11 Reversible Tab
12 Hookswitch
Access the function displayed on the screen above the soft keys. The soft keys change
depending on what you are doing at the time.
Secures the handset in the handset cradle when the phone is mounted vertically. For
more information on how to adjust the reversible tab, refer to
Quick Installation Guide for Yealink IP Phones
Connects or disconnects the phone from the phone line. The hookswitch is automatically activated when a user lifts the handset from the cradle to get a dial tone.
.
Power LED Indicator on the W56H/W53H/DD Phone
LED Status Description
Solid red The handset is charging.
Fast flashing red (300ms) The handset is ringing.
Slowly flashing red (1s) The handset receives a voice mail or has a missed call.
The handset is powered off.
Off
The handset is idle.
The handset is fully charged. (W56H/W53H only)
Yealink Wall Mount
Menu on the W56H/W53H
The handset provides a variety of features that are grouped into the menu.
Topics
Main Menu
Submenu
Returning to Idle Screen
Main Menu
The main menu is the top menu, which consists of seven menu items: Status, Intercom, Voice Mail, Call Features, Directory, Settings, and History.
17

No. Description
Getting Started
1 Menu item you selected.
Menu icon:
: Status—To view the status information of DM, handset, and line.
: Intercom—Not available in the multi-cell system.
: Voice Mail—To set and view voice mail(s).
2
3 Soft key label.
Topics
Entering the Main Menu
Accessing the Main Menu Feature
: Call Features—To access the features of Call Forward, Do Not Disturb, Call Waiting, Anon.Call Rejection, and
Anonymous Call.
: Directory—To access the directory and manage the contacts.
: Settings—To personalize the setting of your handset.
: History—To access the call history list.
Entering the Main Menu
You can enter the main menu to view the features.
Procedure
1. Pressthe OK key when the handset is idle.
The main menus are displayed on the screen as icons.
18

Yealink W80 DECT IP Multi-Cell System User Guide
Accessing the Main Menu Feature
After entering the main menu, you can use the navigation keys to access the desired menu.
Procedure
1. Press the OK key when the handset is idle.
The main menus are displayed on the screen as icons.
2. Press the navigation keys to select a different menu icon.
The name of the associated menu appears on the top of the screen.
3. PressOK to open the selected menu.
Note: You can only access Status and Settings if the handset is not registered to a base station.
Related Topic
Appendix A- Menu Structure
Submenu
The functions in the submenus are displayed as lists. You can open the submenu to access a function.
For example, if you select the Settings menu, the submenu is displayed below:
Topic
Accessing a Submenu Feature
Accessing a Submenu Feature
After entering a certain menu, you can use the navigation keys to access the desired submenu.
Procedure
1. Press the up and down navigation keys to highlight the desired submenu.
2. Press OK to open the submenu.
3. Press the On-hook key or Back to return to the previous screen.
19

Getting Started
Returning to Idle Screen
Procedure
1. Long pressthe On-hookkeyto quickly exit the menu and return to the idle screen.
Screen and Icons
The user screens and icon indicators can help you navigate and understand the important information on the phone's
status.
Topics
Idle Screen
W56H/W53H Line Status Screen
Icons on the Idle Screen
CP930W/DD Phone Calls Screen
W56H/W53H Icons on the Calls Screen
W56H/W53H Icons on the Line Status Screen
Idle Screen
The idle screen is made up of the signal strength, battery status, status bar, handset name, and soft keys. The time &
date is displayed in the middle of the screen.
W56H/W53H
CP930W
20

Yealink W80 DECT IP Multi-Cell System User Guide
l Default Account: Indicates the local name or number.
l Signal Strength:
Weak to strong:
No reception:
l Battery Status:
DD Phone
Low to full:
Need Charging:
l Status Bar: Displays the feature status icons. The status icons are displayed when features are activated.
l Handset Name: Displays the registered handset name.
l Soft Keys: The soft key labels on the screen directly above the soft keys show the functions available at that par-
ticular moment.
Related Topic
Icons on the Idle Screen
W56H/W53H Line Status Screen
The line status screen is made up of the line and line status.
When the handset is idle, you can press Line to enter the line status screen. The line status screen is displayed below:
21
Getting Started
l Line: Display the corresponding line (display user name by default).
l Line Status: Display the icon of line status. The icon indicates the corresponding feature assigned to the line.
Related Topic
W56H/W53H Icons on the Line Status Screen
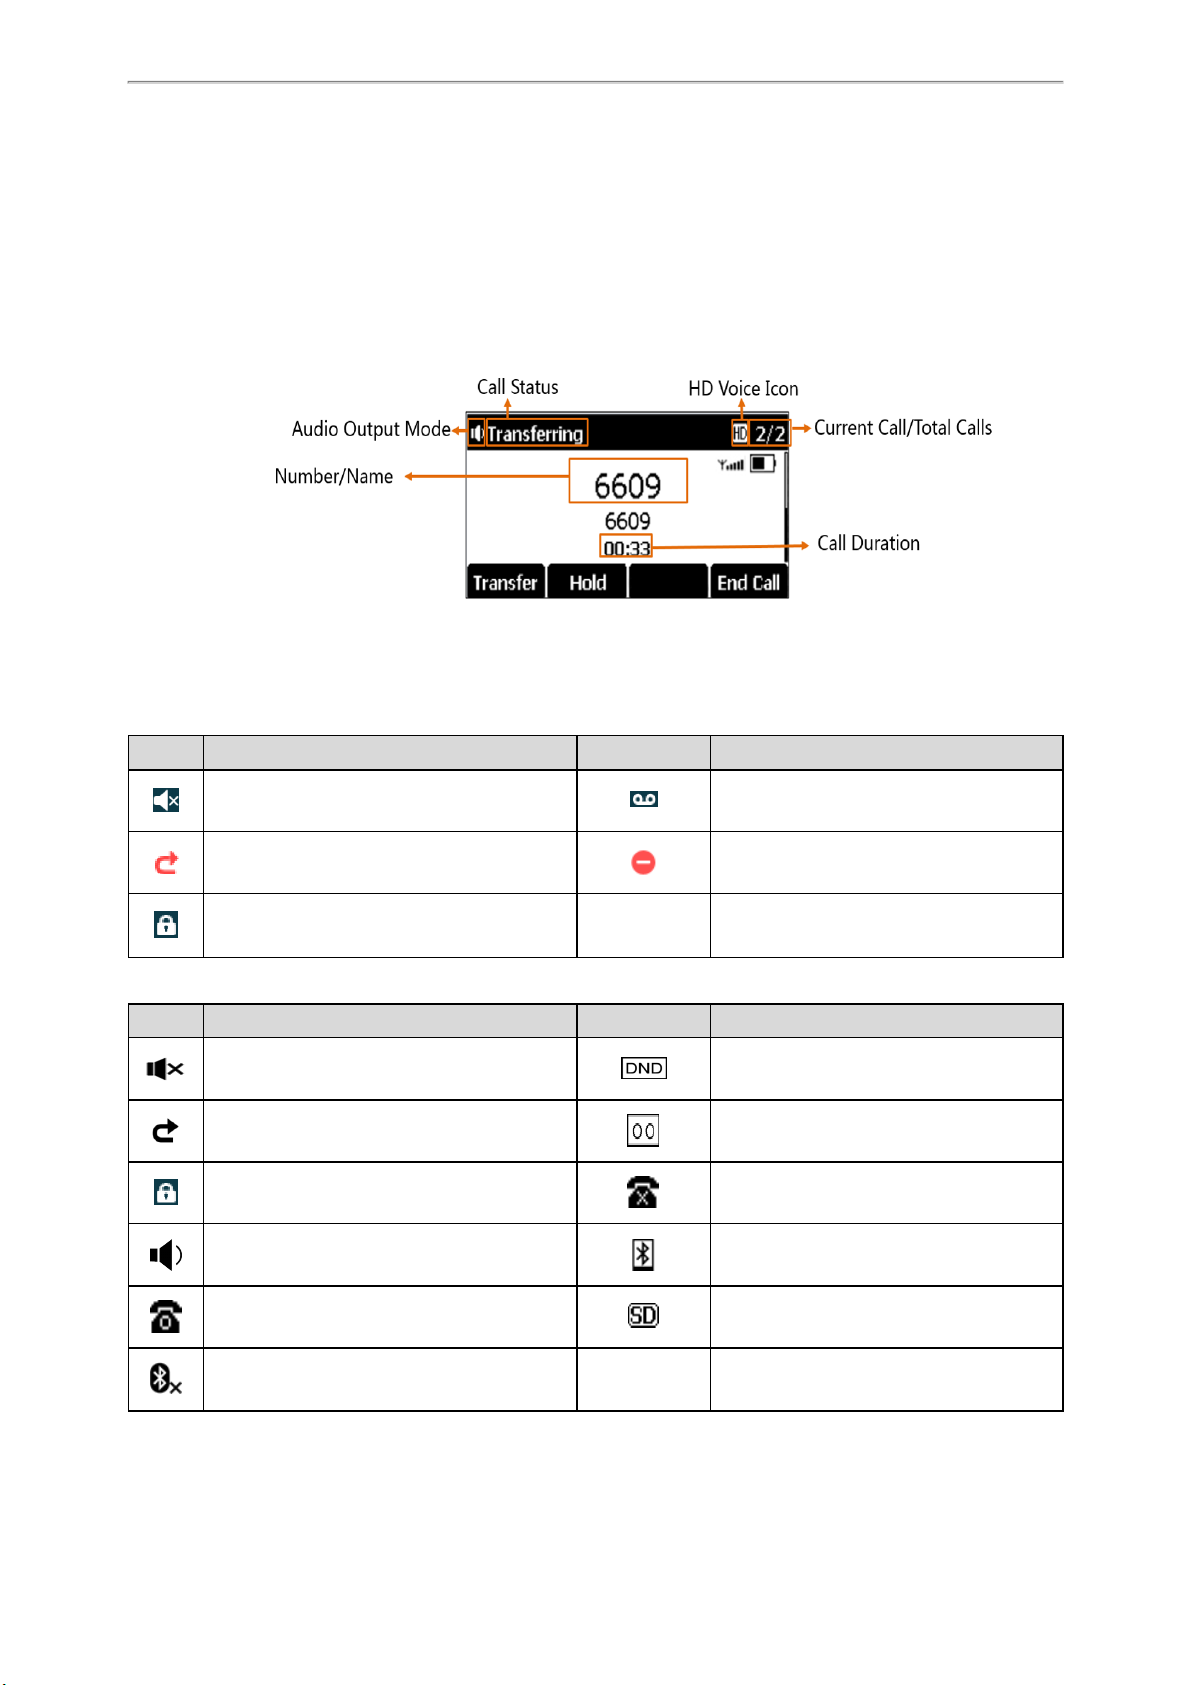
CP930W/DD Phone Calls Screen
All of your active and held calls are displayed on the calls screen.
Icons on the Idle Screen
By viewing the icons on the idle screen, you can easily get the current phone status, such as message status.
W56H/W53H:
Icons Description Icons Description
The ringer volume is 0 and the phone is in the
silent mode.
The phone has turned the Call Forward feature
on.
The keypad is locked.
CP930W:
Icons Description Icons Description
The ringer volume is 0 and the phone is in the
silent mode.
The phone has turned the Call Forward feature
on.
The keypad is locked.
The phone has new voice mails.
The phone has turned the Do Not Disturb
(DND) feature on.
The phone has turned the DND feature on.
The phone has new voice mails.
The phone failed to register to a base station.
The phone is in the Speakerphone (hands-free)
mode.
The phone has registered to a base station successfully.
The phone has enabled the Bluetooth feature. The battery is not inserted into the phone.
The Bluetooth-enabled mobile phone is
paired and connected to the phone.
The SD card is connected to the phone.
22

Yealink W80 DECT IP Multi-Cell System User Guide
Icons Description Icons Description
The phone is Recording a call or a conference. The phone has missed calls.
The recording is paused.
DD Phone:
Icons Description Icons Description
Speakerphone (hands-free)
mode
Call Forward Voice Mail
Handset mode Missed Calls
Headset mode Phone Lock
Ringer volume is 0
Do Not Disturb (DND)
W56H/W53H Icons on the Calls Screen
By viewing the icons in the calls screen, you can easily get the current call status, such as audio output mode status.
Icons Description Icons Description
Receiver Mode On Headset Mode On
Handsfree Mode On Contact
Call Hold Call Mute
Conference Call
W56H/W53H Icons on the Line Status Screen
Each icon in the line status screen indicates the corresponding feature assigned to the line.
Icons Description Icons Description
Call Forward Do Not Disturb (DND)
Anonymous call rejection is enabled Anonymous call is enabled
Rechargeable Battery
The phone comes with a charged battery, but it may need recharging to full capacity depending on how long it has
been in storage.
A fully-charged battery provides talk time of about 24 hours or 15 days of standby time.
Topics
Viewing the Power Status
23

Getting Started
Viewing the Power Status
When the phone is idle, you can check the battery's remaining capacity.
Procedure
1. Navigate to Menu > Status > Power Status.
The screen shows the remaining talk time and standby time.
Entering Characters on the W56H/W53H
You can enter and edit data in the corresponding field using the handset keypad. The input modes are selectable.
Topics
Setting the Input Modes
Entering Data on the W56H/W53H
Entering Data on the CP930W/DD Phone
Setting the Input Modes
The handset provides you with 12 input modes, and different input mode provides different characters.
The default input modes are Abc, 123, ABC and abc. You can enable the input modes used frequently and switch
among them if needed.
Procedure
1. Navigate to OK > Settings > Display > Input Method.
2. Select the desired input mode, and then press Change.
Entering Data on the W56H/W53H
In corresponding input mode, you can press the keypad repeatedly to view the character (or numbers) options and
press more times to highlight the desired character (or number), the available characters under each key are displayed
at the left bottom of the phone screen.
The following table describes how to enter different characters using the keypad keys:
If you want to Then you can
Press to switch among input modes.
Switch among input modes.
The current input mode is displayed at the right bottom of the phone screen.
Enter letters.
Enter special characters.
Delete the text.
Press a key one or more times (depending on what input mode you’re in) to enter the
possible characters that are displayed on the keypad key.
Press to enter the space character or the following special characters: _’ ” = / \ ^ ;
: , . - + * # § % & @ ? ! ¿ ¡ () {} [] < > ¥£$| ~ ¤
Press :
l If it is in the uppercase (ABC), uppercase and lowercase (Abc) or lowercase (abc)
input modes, it will provide space character and the following special characters: . , ?
! 0
l If it is in the numeric (123) input mode, it will only provide the digit 0.
l Long press the key to enter the character +.
Press or to position the cursor to the right of the text you want to delete, and then
press Del to delete one character at a time or long press to delete all characters.
24

Yealink W80 DECT IP Multi-Cell System User Guide
Related Topics
Setting the Input Modes
Appendix B - Input Modes and Characters on W56H/W53H
Entering Data on the CP930W/DD Phone
The following table describes how to enter different characters using the keypad keys.
Task Action
Switch input modes Press the ABC, abc, Abc, 2aB, or 123 soft key to switch the input modes.
Select ABC, abc, 2aB, or Abc mode.
On the DD phones, press the keys labeled with letters until your desired letter appears.
Enter alphas
Enter numbers Select 123 mode, press the corresponding keys.
Enter special characters
Insert space Select ABC, abc, 2aB, or Abc mode, press the 0 key.
Move cursor
Delete one or more
characters
On the CP930W, press a keypad key repeatedly to view the character options and stop when
the letter you want to enter is displayed in the field. Wait one second, and then enter the next
letter.
Select ABC, abc, 2aB, or Abc mode, press * key or # key one or more times to enter one of the
following special characters:
* key: *.,'?!\-()@/:_;+&%=<>£ $¥¤[]{}~^¡¿§#"|
# key: #
In 123 mode, you can press the * key to choose the following special characters: .*:/@[].
Press or to position the cursor.
On the DD phones, position the cursor to the right of the character, and select the Delete soft
key.
On the CP930W, press the Delete soft key.
25

Registering the Handset
Registering the Handset
You need to register your handset to the DECT manager (DM) if you want to use the basic functions of the DECT multicell system.
Topics
Registering Handsets at the DECT Manager
Selecting a System to Connect
Registering Handsets at the DECT Manager
After your system administrator has set the DM to the registration mode via the web user interface, you can register
handsets to the DM.
Procedure
1. Do one of the following:
l Press the Reg soft key on the handset to register quickly.
l Press OK > Register Handset and then select the desired base to register the handset.
l Press OK > Settings > Registration > Register Handset and then select the desired base to register the handset.
After registration, the handset prompts “Handset Subscribed”.
Note: The default base PIN is 0000.
Selecting a System to Connect
You can connect the handset to a desired system manually, or allow the handset to connect the registered system with
the greatest signal strength automatically.
Procedure
1. Navigate to OK > Settings > Registration > Select Base.
The phone screen displays all systems that the handset is registered to and the BestBase option.
2. Select the desired system or BestBase, and then press Select.
26

Call Features
Call Features
You can use the phone to place and answer calls, ignore incoming calls, transfer a call to someone else, conduct a conference call and perform other basic call features.
Topics
Placing Calls
Answering Calls
Switching Among the Receiver, Handsfree and Headset Modes
Disabling Call Waiting
Silencing or Rejecting Incoming Calls
Ending Calls
Muting/Unmuting Audio
Holding and Resuming Calls
Call Forward
Transferring Calls
Conference Calls
Recording Using an SD Card
Placing Calls
After the handset is registered successfully, you can use your handset to place an external call.
The handset can keep 2 calls at one time at almost, one (associated with the audio) active and the other one on hold.
Topics
Placing External Calls
Placing a Call from the Call History
Placing a Call from the Directory
Placing a Call from the Shared Directory
Placing a Call with a Speed Dial Key
Redial
Placing an Anonymous Call
Placing External Calls
You can place external calls on the handset. External calls based on the public telephone network require the SIP lines.
Topics
Placing an External Call
Placing Multiple External Calls
Placing an External Call
You can use the phone to place an external call.
Procedure
1. Do one of the following:
l Enter the desired number using the keypad.
l PresstheSpeakerphonekey to enter the pre-dialing screen.
Enter the desired number using the keypad.
27

Yealink W80 DECT IP Multi-Cell System User Guide
2. Press OK, Speakerphone key or Off-hook key to dial out.
Placing Multiple External Calls
When you are in a call, you can hold your current call and place a new call.
Procedure
1. Select New Call.
2. Enter the contact number.
3. Press the OK key.
Note: You can select Options > Directory, and then select a contact from the directory to dial out.
Placing a Call from the Call History
You can place calls to contacts from the History list, which contains the calls that were recently placed, answered, or
missed.
Procedure
1. Press History or navigate to OK > History.
The phone screen displays all call records.
2. Highlight a contact and select the Off-hook key.
Placing a Call from the Directory
You can place a call to a contact directly from your directory.
Procedure
1. Navigate to OK > Directory.
2. Select the desired directory.
3. Highlight the desired contact and select the Off-hook key.
If the selected contact has multiple numbers, highlight the desired number, and select OK.
Related Topic
Searching for Contacts
Placing a Call with a Speed Dial Key
You can quickly dial a number by using a speed dial key without entering the directory.
Topics
Assigning a Speed Dial Number
Changing a Speed Dial Number
Deleting a Speed Dial Number
Calling a Contact Using a Speed Dial Key
Assigning a Speed Dial Number
You can assign a contact number as a speed dial number to the digit key. A maximum of 8 speed dial numbers are
allowed.
Before You Begin
The assigned number should exist in the directory.
28

Procedure
1. Navigate to OK > Settings > Telephony > Speed Dial
The phone screen displays all available speed dial keys (2-9).
2. Select the desired digit key, and then press Assign.
3. Select the desired contact from the directory.
4. Press OK to assign the number to the selected Speed Dial key.
If the selected contact has multiple numbers, select the desired number, press OK.
Changing a Speed Dial Number
You can change the current speed dial number to a new desired one.
Before You Begin
The assigned number should exist in the directory.
Procedure
1. Navigate to OK > Settings > Telephony > Speed Dial.
2. Select an assigned Speed Dial key.
3. Press Options, and then select Change.
4. Select a contact number from the directory.
5. Press OK to change the assigned speed dial number.
Call Features
Deleting a Speed Dial Number
When you no longer use the speed dial number, you can delete it.
Procedure
1. Navigate to OK > Settings > Telephony > Speed Dial.
2. Select the desired Speed Dial key.
3. Press Options, and then select Clear Key.
Calling a Contact Using a Speed Dial Key
After you have assigned the speed dial number, you can place a call to a contact directly by pressing it.
Procedure
1. Long press the Speed Dial key (digit key 2-9) when the handset is idle.
The number assigned to this Speed Dial key is dialed out.
Redial
The redial list stores the last twenty dialed phone numbers. When the memory of the redial list is full, the handset will
automatically erase the oldest one when a new number is dialed. You can redial a call from the redial list.
Topics
Redialing a Number
Redialing the Last Dialed Number
Adding a Dialed Number to Local Directory
Deleting a Redial Record
Deleting All Redial Records
29

Yealink W80 DECT IP Multi-Cell System User Guide
Redialing a Number
The handset keeps a record of all the placed calls. You can call the recently dialed phone number.
Procedure
1. Press the Off-hook key when the handset is idle to access the redial list.
2. Select a record.
3. Press the Off-hook key or Speakerphone key to dial out.
Tip:Before placing an external call, you can press Options > Edit Before Call to edit the phone number.
Redialing the Last Dialed Number
You can quickly redial the last dialed number by the Off-hook key.
Procedure
1. Press the Off-hook key twice when the handset is idle.
A call to your last dialed number is attempted.
Adding a Dialed Number to Local Directory
You can add a dialed external call number to the Local Directory or update the number for an existing contact.
Procedure
1. PresstheOff-hookkey when the handset is idle to access the redial list.
2. Select the desired record.
3. Press Options, and then select Add To Local > New Entry.
4. Select the type you want to add the number to.
5. Edit the corresponding fields.
6. Press Save.
Tip:You can select Add To Local > Update Existing to add the number to an existing contact or update the existing con-
tact information.
Deleting a Redial Record
You can delete any record from the redial list.
Procedure
1. Pressthe Off-hookkey when the handset is idle to access the redial list.
2. Select a record.
3. Press Options, and then select Delete.
Deleting All Redial Records
You can delete all redial records at once.
Procedure
1. PresstheOff-hookkey when the handset is idle to access the redial list.
2. Press Options > Delete All.
The phone prompts whether to delete all records.
3. Press Yes.
30

Call Features
Placing an Anonymous Call
You can hide your name and number when you place a call. As a result, the callee receives an anonymous call without
caller identity.
Before You Begin
Contact your system administrator to find out if this feature is available on your phone.
Procedure
1. Navigate to OK > Call Features > Anonymous Call.
2. Turn on Local Anonymous.
3. Place a call.
The callee is prompted with an incoming call from anonymity.
If the callee enables anonymous rejection feature, you may be prompted that the callee does not accept calls from
an anonymous number.
Related Topic
Rejecting Anonymous Calls
Answering Calls
When you receive a call, you can choose to answer it manually or automatically.
Topics
Answering a Call
Answering a Call When in a Call
Answering a Call Automatically
Answering a Call
When you receive an incoming call, the phone rings and the screen displays the information of the incoming call. You
can choose to answer the incoming call.
Procedure
1. Do one of the following:
l Press the Off-hook key or Accept or Answer.
l Press the Speakerphone key .
l If a headset is connected, press Accept.
Related Topic
Switching Among the Receiver, Handsfree and Headset Modes
Answering a Call When in a Call
You can answer a call when there is already an active call on your phone.
When you are in an active call and an incoming call arrives on the phone, a call waiting tone beeps, and the incoming
call information is displayed.
Procedure
31

Yealink W80 DECT IP Multi-Cell System User Guide
1. On the W56H/W53H, press the down navigation key to select the incoming call.
2. Select Answer.
The active call is placed on hold, and the incoming call becomes active.
Note: You can disable the call waiting feature to reject the incoming call automatically during a call.
Related Topic
Disabling Call Waiting
Answering a Call Automatically
When the handset is placed in the charger, you can simply answer the incoming calls by picking up the handset from
the charger without pressing the Off-hook key.
It is only applicable to W56H/W53H.
Procedure
1. Navigate to OK > Settings > Telephony > Auto Answer.
2. Press Change to select the Auto Answer check box (the default status is checked).
Disabling Call Waiting
If the call waiting feature is disabled, when there is already a call, the new incoming call will be rejected automatically.
Procedure
1. Navigate to OK > Call Features > Call Waiting.
2. Select Disabled from the Status field.
Switching Among the Receiver, Handsfree and Headset Modes
You can place a call using the following call modes:
l Receiver mode—pressing the Off-hook key to dial out.
l Handsfree mode—pressing the Speakerphone key to dial out.
l Headset mode—connecting a standard 3.5mm headset.
Silencing or Rejecting Incoming Calls
When you receive an incoming call, you can choose to silence or reject the call instead of answering.
Topics
Silencing a Call
Rejecting a Call Manually
Rejecting Anonymous Calls
Rejecting Calls with Do Not Disturb (DND)
Silencing a Call
You can silence a call to stop your phone from ringing. Even if you silence the call, the incoming call notification continues to be displayed on your phone.
Procedure
32

Call Features
1. Select Silence.
Rejecting a Call Manually
You can reject a call manually, and the call may be sent to voice mail. The rejected calls are displayed in the Received
Calls list in your History list.
Procedure
1. Select the On-hook key.
Rejecting Anonymous Calls
You can reject incoming calls from the callers who have hidden their identities. As a result, your phone will not ring
and you will not be notified of an attempted call.
Procedure
1. Navigate to OK > Call Features > Anon.Call Rejection.
2. Turn on Anonymous Rejection.
3. Select Save.
Related Topic
Placing an Anonymous Call
Rejecting Calls with Do Not Disturb (DND)
You can enable DND to reject all incoming calls automatically when you do not want to be interrupted.
Note: Check with your system administrator to find out if the DND feature is available on your phone.
Topics
Rejecting Calls with DND
Rejecting Calls with DND
You can activate DND for specific lines. The phone will reject all incoming calls automatically.
Procedure
1. Navigate to OK > Call Features > Do Not Disturb.
2. Select Enabled from the Status field.
3. Select Save.
The status bar displays the DND icon.
You can press the Line soft key when the handset is idle to check the line status.
Ending Calls
You can end the current call at any time.
Procedure
1.
Press .
33

Yealink W80 DECT IP Multi-Cell System User Guide
Muting/Unmuting Audio
You can mute the microphone during an active call so that the other party cannot hear your discussion with your colleagues.
Procedure
1. Press the mutekeyduring a call to turn off the microphone.
The call is muted, and the mute icon is displayed on the phone screen.
2. Press themutekey again to unmute.
The mute icon disappears from the phone screen.
Holding and Resuming Calls
You can place an active call on hold and resume the call when you are ready. When you place a call on hold, the held
party may hear the music played by its sever.
Topics
Holding a Call
Resuming a Held Call
Holding a Call
You can place an active call on hold on your phone.
Procedure
1. Press Options during a call, and then select Hold.
Note: When you have multiple calls on the phone and the current call is held, you can press the up or down navigation key
to swap to the active call.
Resuming a Held Call
You can view and resume a held call on the phone.
Procedure
1. Press Resume, the Speakerphone key or Off-hook key.
If multiple calls are placed on hold, select the desired call first.
Note: When you have multiple calls on the phone and the current call is active, you can press the up or down navigation key
to swap to the held call.
Call Forward
You can enable call forward feature on a per-line basis. The handset will forward incoming calls of the line to another
party.
There are three forwarding types:
l Always Forward: Incoming calls are immediately forwarded. There is no prompt on the phone screen when the line
receives an incoming call. The incoming call is logged in the Received list.
l Busy Forward: Incoming calls are forwarded when the line is busy.
l No Answer Forward: Incoming calls are forwarded if not answered after a period of time.
Topic
34

Call Features
Forwarding Incoming Calls
Forwarding Incoming Calls
When you are not available to handle calls, you can forward incoming calls to a specific contact.
Procedure
1. Navigate to OK > Call Features > Call Forward.
2. Select the desired forwarding type.
3. Select Enabled from the Status field.
4. Enter the destination number in the Target field.
5. If you select the No Answer Forward, select the desired ring time to wait before forwarding from the After Ring
Time field.
6. Select Save.
The status bar displays the forward icon, and the incoming calls will be forwarded to the destination number
according to your setting.
Note: Local call forward settings may be overridden by the server settings. For more information, contact your system
administrator.
Transferring Calls
During a call, you can transfer the call to another contact.
You can use one of three ways:
l Blind Transfer: Transfer a call directly to the third party without consulting.
l Semi-Attended Transfer: Transfer a call when receiving ringback.
l Attended Transfer (Consultative Transfer): Transfer a call with prior consulting.
Topics
Performing a Blind Transfer
Performing a Semi-Attended/Attended Transfer
Performing a Blind Transfer
You can transfer a call to another contact immediately without consulting with her/him first.
Procedure
1. Select Options > Transfer, or the TRAN key.
2. Enter the number you want to transfer to.
3. Press TRAN or Transfer to complete the transfer.
Performing a Semi-Attended/Attended Transfer
You can transfer a call to another contact immediately when receiving ringback or after consulting with her/him first.
Procedure
1. Select Options > Transfer, or the TRAN key during a call.
2. Enter the number you want to transfer to.
3. Press the OK key, Off-hook key or Speakerphone key.
35

Yealink W80 DECT IP Multi-Cell System User Guide
4. Do one of the following:
l When you hear the ringback tone, press the TRAN key or Transfer to finish a semi-attended transfer.
l After the contact answers the call, press the TRAN key or Transfer to finish an attended transfer (consultative
transfer).
Conference Calls
The phone supports creating a conference with other two external parties and multi-way network conference.
During the conference, follow these tips:
l Mute your microphone when you are not speaking, especially in noisy environments.
l Avoid tapping or rustling papers near the microphone.
l Speak in your normal voice without shouting.
Topics
Local Conference
Network Conference
Local Conference
You can initiate a three-way (including yourself) conference calls with your contacts on the phone.
Topics
Setting Up a Local Conference Call
Muting or Unmuting a Conference Call
Ending a Conference Call
Setting Up a Local Conference Call
You can set up a local conference call with up to two contacts.
Procedure
1. Place a call to the first party.
2. When the first party answers the call, select Options > Conference to place a new call.
The active call is placed on hold.
3. Dial the second party’s number.
4. When the second party answers the call, selectConf. to invite two parties to join the conference.
Merging Two Calls into a Conference
You can invite a held call into a conference call with the active call.
Procedure
1. Place two calls on the phone.
2. Select the desired call for a conference and ensure that the call is active.
3. Select Options > Conference.
Muting or Unmuting a Conference Call
When you mute the local microphone during a conference call, other participants can hear each other except you.
Procedure
1. Press the MUTE key to mute the conference.
36

Call Features
2. Press the MUTE key again to unmute the conference.
Ending a Conference Call
You can end the current conference call at any time.
Procedure
1. Press the On-hook key or End.
If any party in the conference ends the call, the other parties remain connected.
Network Conference
If your system administrator has set a network conference feature on your phone, you can initiate a conference with
two or more contacts.
Topics
Setting Up a Network Conference
Inviting another Party into an Active Conference Call
Holding/Resuming a Conference Call
Ending a Conference Call
Setting Up a Network Conference
You can set up a network conference with two or more contacts.
Procedure
1. Place a call to the first party.
2. Select Options > Conference.
The active call is placed on hold.
3. Dial the second party’s number.
4. When the second party answers the call, select Conf. to add the second party to the conference.
5. Select Conf. to place a new call.
The conference call is placed on hold.
6. Enter the number of the new party, and then press the OK key.
7. When the new party answers the call, select Conf. to add the new party to the conference.
8. Repeat steps 5 to 7 until you add all parties.
Note: The procedures for setting up a network conference call on specific servers may be different. Contact your system
administrator for more information.
Inviting another Party into an Active Conference Call
Any party in the conference call can invite other party into an active conference call.
Procedure
1. Select New Call.
2. Enter the desired number and dial out.
3. When the new party answers the call, press Options, and then select Conference.
The new party is joined the conference call.
Holding/Resuming a Conference Call
Any party in the conference call can place himself/herself on hold, but other parties can continue the conference call
normally.
37

Yealink W80 DECT IP Multi-Cell System User Guide
Note: The conference call will only be held when all parties in the conference call place themselves on hold.
Procedure
1. Press Options > Hold.
2. Select Resume to resume the held conference call.
Ending a Conference Call
You can end the current conference call at any time.
Procedure
1. Press the On-hook key or End.
If any party in the conference ends the call, the other parties remain connected.
Recording Using an SD Card
By default, you can record your calls into an SD card so that you can listen to them later.
For more information on how to attach an SD card, please refer to the Quick Start Guide for your phone on Yealink Sup-
port.
Topics
Recording a Call
Pausing/Resuming a Recording
Stopping a Recording
Managing the Recordings
Viewing the Available Recording Time
Recording a Call
You can record the important parts during an active call.
Important: Before call recording, especially those involving PSTN, it is necessary to know about the rules and restrictions of
call recording in the country where you are.
It is also very important to inform all the call parties that you are recording and ask for their consent before recording the
conversation.
Before You Begin
Procedure
1. During a call, select More > StartREC.
The phone screen displays a recording icon and recording duration.
Pausing/Resuming a Recording
When you do not want the current sensitive information to be recorded, you can pause the recording.
After pausing, you can resume it at any time and the recording continues and will be saved in the same file.
Procedure
1. Select PauseREC to pause a recording.
The pause recording icon appears on the phone screen and the duration stops counting.
2. Select Re REC to resume a recording.
38

Call Features
Note: If you hold the call during the recording, none of the parties will be recorded until you resume the call.
Stopping a Recording
You can stop recording a call before the call ends. The recording also stops when the active call ends. The recording
will be saved as a "*.aac" file in the SD card automatically.
Procedure
1. Do one of the following:
l Select StopREC.
The recording icon and recording duration disappears. The screen prompts a message that the call is recorded
successfully.
l Select End Call.
The recording icon and recording duration disappears, and the phone returns to the idle screen. The screen
prompts a message that the call is recorded successfully.
Managing the Recordings
After stopping recording, you can manage the recordings on your phone. Make sure the is still inserted in the phone.
Topics
Listening to a Recording
Pausing/Resuming a Playback
Fast Forwarding/Rewinding a Playback
Deleting a Recorded Call
Listening to a Recording
You can browse and play back the recordings on your phone.
Tip:You can also play back the recordings on a PC using an application capable of playing the "*.aac" file.
Procedure
1. Navigate to Menu > Record > Browse Audio.
The phone screen shows all recorded files (filename and file size) in the Browse Audio list. The filename consists of
the recording time & date, the other party’s number/IP address/name (or the first person’s number/IP address/name you called).
2. Highlight the desired file, and select Play.
The length of the recording and a progress bar are displayed as the recording plays.
Related Topic
Adjusting the Volume
Pausing/Resuming a Playback
When you are playing a recording, you can pause it manually to take note.
Procedure
1. Select Pause to pause the playback. The Play soft key appears on the phone screen.
2. Select Play to restart the playback.
39

Yealink W80 DECT IP Multi-Cell System User Guide
Fast Forwarding/Rewinding a Playback
While a recording plays, you can fast forward or rewind the playback at any time.
Procedure
l Select to skip forward the playback. Tap once to skip forward 1 minute.
l Select to rewind the playback. Tap once to rewind 1 minute.
Deleting a Recorded Call
You can delete the recordings when you need additional space on your SD card or the recordings are useless.
Procedure
1. Navigate to Menu > Record > Browse Audio.
2. Highlight the desired recording, and select Delete.
(missing or bad snippet)delete the audio.
3. Select Yes.
Viewing the Available Recording Time
To avoid the recording failed due to timeout, you can view the storage space of the SD card, and check the available
recording time before recording.
Procedure
1. Navigate to Menu > Record > Storage Space.
40

Advanced Call Features
Advanced Call Features
By using the advanced features, your handset would perform more functions that make your work more efficient.
Topics
Call Park and Call Retrieve
Shared Line
Voice Mail
If you require additional information or assistance with your new phone, contact your system administrator.
Call Park and Call Retrieve
You can park a call, and then retrieve the call either from your phone or another phone. After parked, the call is placed
on hold, you can continue the conversation after retrieving it.
Note: Call park is not available on all servers. Check with your system administrator to find out if it is available on your
phone.
Topics
Parking or Retrieving a Call in the FAC Mode
Parking or Retrieving a Call in the Transfer Mode
Retrieving a Call with a Retrieve Key
Parking or Retrieving a Call in the FAC Mode
You can park the call to the local extension or the desired extension through dialing the park code.
Topics
Parking a Call in the FAC Mode
Retrieving a Parked Call in the FAC Mode
Parking a Call in the FAC Mode
You can park a call in the FAC mode directly. When you park a call to the local extension or the desired extension, the
call is held in the same network on your phone.
Before You Begin
Your system administrator has set call park in the FAC mode.
Procedure
1. During a call, select Options > Call Park.
The phone will dial the call park code which is pre-configured.
2. Do one of the following:
l If you want to park the call against the local extension, press the # key.
l If you want to park the call against the desired extension, enter the extension (for example, 4606) where you
want to park the call and press the # key.
If the call is parked successfully, you will hear a voice prompt that the call is parked.
Retrieving a Parked Call in the FAC Mode
You can retrieve a parked call in the FAC mode from any phone within your network.
41

Yealink W80 DECT IP Multi-Cell System User Guide
Before You Begin
Your system administrator has set call park in the FAC mode. There is a call parked on the extension. Get the park
retrieve code from your system administrator.
Procedure
1. Dial the park retrieve code.
2. Follow the voice prompt to retrieve:
l Press the # key on the phone where the call is parked.
l Enter the desired extension followed by # (for example, 4606#) on any phone.
Related Topic
Retrieving a Call with a Retrieve Key
Parking or Retrieving a Call in the Transfer Mode
You can park the call to the shared parking lot through a blind transfer.
For some servers, the system will return a specific retrieve park number (park retrieve code) after parking successfully.
Topics
Parking a Call in the Transfer Mode
Retrieving a Parked Call in the Transfer Mode
Parking a Call in the Transfer Mode
You can park a call in the transfer mode directly. When you park a call to the shared parking lot, the call is held on your
phone.
Before You Begin
Your system administrator has set call park in the Transfer mode.
Procedure
1. During a call, select Options > Call Park.
The call will be directly transferred to the shared parking lot.
Retrieving a Parked Call in the Transfer Mode
You can retrieve a parked call in the transfer mode from any phone in the same network.
Before You Begin
Your system administrator has set call park in the Transfer mode. There is a call parked on the shared parking lot.
Procedure
1. Dial the park retrieve code.
The phone will retrieve the parked call from the shared parking lot.
Tip:When the phone is idle, you can use a Retrieve key to retrieve a parked call directly.
Related Topic
Retrieving a Call with a Retrieve Key
42

Advanced Call Features
Retrieving a Call with a Retrieve Key
You can easily use a retrieve key to retrieve a parked call quickly.
Before You Begin
Check with your system administrator if the FAC or Transfer mode is set on your phone, and if the call park feature has
set for your phone.
Procedure
1. Navigate to OK > Settings > Shortcut.
2. Select the desired shortcut key, and then press Change.
3. Select Retrieve, and then press OK.
When there is a call parked on the extension or the shared parking lot, you can press the Retrieve key on the idle
screen, and the handset will dial the configured park retrieve code.
Shared Line
Yealink phone supports using Shared Call Appearance (SCA) to share a line. So that this line can be registered on more
than one phone at the same time.
Your system administrator can set your phone to use the shared line.
Topics
State Indicator of Shared Line
Placing Calls on a Shared Line
Answering Calls on a Shared Line
Placing a Call on Public Hold
Placing a Call on Private Hold
Retrieving a Held Call on a Shared Line
Barging in an Active Call on a Shared Line
Pulling a Shared Call on a Shared Line
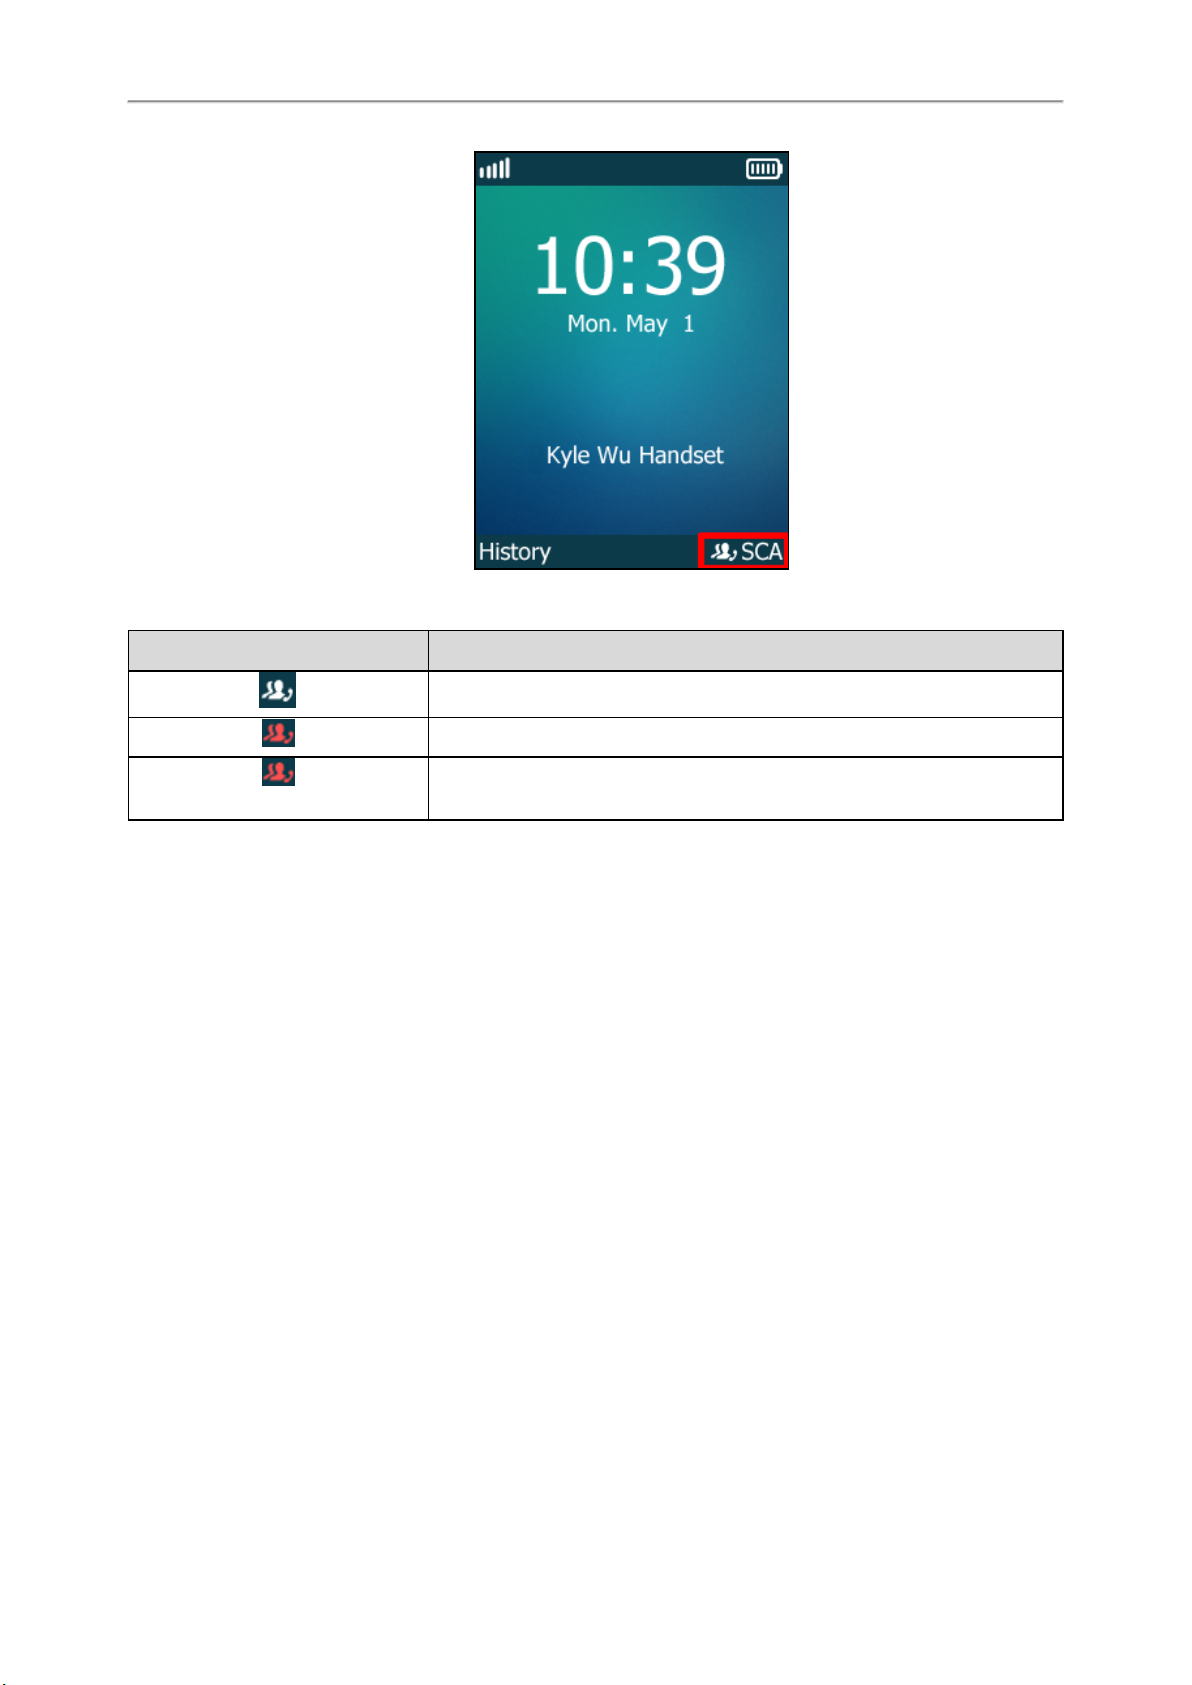
State Indicator of Shared Line
If your system administrator assigns the shared line to your handset, the SCA with an icon is displayed on the right soft
key.
43
Yealink W80 DECT IP Multi-Cell System User Guide
The following table shows the icon associated with the shared line:
Icons Description
The shared line is idle.
The shared line is dialing, in conversation or placed on private hold.
(Flashing)
The shared line receives an incoming call or is placed on public hold.
Placing Calls on a Shared Line
You can place one or multiple calls on a shared line.
The phone places a call on the first shared line automatically. You can press SCA to select the desired shared line.
Related Topic
Placing Calls
Answering Calls on a Shared Line
You can answer one or two calls on the shared line.
When an incoming call arrives on the shared line, all the registered phones will ring simultaneously, and the call can be
answered on any one of the phones.
Related Topic
Answering Calls
Placing a Call on Public Hold
You can place a call on public hold that any shared line phone can retrieve the held call.
Procedure
1. During a call, select Options > Hold.
44

Advanced Call Features
Placing a Call on Private Hold
You can place a call on private hold that only you on shared line can retrieve the held call.
Procedure
1. Press Options > Private Hold.
Then the call is held on your phone, and the other phones registered with shared line show the call is in the busy
state. Other users on the shared line cannot resume your held call.
Retrieving a Held Call on a Shared Line
If you place a call on hold on a shared line, you can resume this call at any time. When the shared line key shows a call
that is in a held state, you can resume the held call remotely from other user's phone.
Before You Begin
There is at least one call placed on public hold on the shared line.
Procedure
1. Press SCA, and then select the held call.
2. Press Resume.
Barging in an Active Call on a Shared Line
In the SCA scenario, you can barge into an active call on the shared line. After you barge into a call, the call turns into a
three-party conference.
Note: Only one user can barge into an active call on the shared line at a time.
Before You Begin
There is at least one active call on the shared line.
Procedure
1. Press SCA, and then select an active call.
2. Select BargeIn (Barge In) to interrupt the active call.
Pulling a Shared Call on a Shared Line
In the SCA scenario, both you and other users can pull an existing call from another shared phone that is active or held.
Before You Begin
There is an active or held call on the shared line. Contact your system administrator for the call pull feature access
code.
Procedure
1. Enter the call pull feature access code (for example, *11).
2. Press OK, Speakerphone key or Off-hook key.
Voice Mail
Voice Mail feature allows you to leave voice mails for someone or listen to your voice mail messages on your IP
phones.
45

Yealink W80 DECT IP Multi-Cell System User Guide
This feature is set up on the server-side and not all servers support this feature.
Topics
Setting the Voice Mail Code
Leaving Voice Mails
Listening to Voice Mails
Setting the Voice Mail Code
If you want to connect to the message center, you need to set the voice mail code on your phone.
Procedure
1. Navigate to OK > Voice Mail > Set Voice Mail.
On the CP930W, navigate to Menu > Message > Set Voice Mail Code.
On the DD phone, navigate to Menu > Message > Voice Mail > Set Voice Mail Code.
2. Select Enabled from the Status field.
3. Enter voice mail code in the Number field.
4. Select OK.
Leaving Voice Mails
You can leave a voice mail to someone who is busy or inconvenient to answer the call.
Procedure
1. Follow the voice prompts to leave a voice mail.
2. Hang up to complete the voice mail.
Listening to Voice Mails
You can listen to your voice mails on the handset directly.
Before You Begin
You need to set the voice mail code in advance.
Procedure
1. Navigate to OK > Voice Mail > Play Message or press Message key.
On the CP930W, navigate to Menu > Message > Play Message.
On the DD phone, navigate to Menu > Message > Voice Mail > View Voice Mail.
The handset dials out the voice mail code using the selected line automatically.
2. Follow the voice prompt from the system server to listen to your voice mails.
Related Topic
Setting the Voice Mail Code
46

Directory
The phone provides several types of phone directories, which can be customized by your system administrator.
Topics
Local Directory
Shared Directory
Blacklist
Remote Phone Book
Local Directory
You can store up to 100 contacts in the handset's Local Directory, as well as add, edit and delete a contact.
Topics
Adding Contacts
Viewing Contacts
Editing Contacts
Deleting Contacts
Searching for Contacts
Directory
Adding Contacts
When you add a contact to your Local Directory, you can choose how much information you want to enter for your
contact. You are required to enter a contact name at least for each new contact.
Procedure
1. Navigate to OK > Directory.
On the CP930W, select Directory or navigate to Menu > Directory > Local Directory.
2. Select Options > New Contact.
3. Enter your contact's information.
4. Select Save.
Viewing Contacts
You can view the local contacts from the Local Directory on your phone.
Procedure
1. Navigate to OK > Directory.
2. Use the navigation keys to look through the contacts.
On the CP930W, select Directory navigate to Menu > Directory > Local Directory.
The contact names are displayed in alphabetical order.
Editing Contacts
You can update your contacts' information.
Procedure
1. Navigate to OK > Directory.
On the CP930W, select Directory navigate to Menu > Directory > Local Directory.
47

Yealink W80 DECT IP Multi-Cell System User Guide
2. Highlight the desired contact, and select Options > Edit.
3. Edit the contact information.
4. Select Save.
Deleting Contacts
You can delete one or all contacts from the Local Directory.
Topics
Deleting a Contact
Deleting All Contacts
Deleting a Contact
You can delete any contact from the Directory.
Procedure
1. Navigate to OK > Directory.
On the CP930W, navigate to Menu > Directory.
2. Select the desired contact.
3. Select Options > Delete.
(missing or bad snippet) delete this contact.
4. Select Yes.
Deleting All Contacts
You can delete all contacts from the Directory.
Procedure
1. Navigate to OK > Directory.
On the CP930W, navigate to Menu > Directory.
2. Select Options > Delete All.
(missing or bad snippet) delete all contacts.
3. Select Yes.
Searching for Contacts
In the Local Directory, you can enter search criteria to find your desired contact quickly.
Procedure
1. Navigate to OK > Directory.
On the CP930W, enter your search criteria directly by tapping the keypad..
2. Enter your search criteria in the search field.
Shared Directory
All handsets that are registered on the same DM can share the contacts with each other. You can store up to 100 contacts in your phone’s shared directory.
Check with your system administrator to find out if this feature is available on your phone.
It is not applicable to DD phones.
48

Directory
Topics
Adding Shared Contacts
Viewing Shared Contacts
Editing Shared Contacts
Deleting a Shared Contact
Deleting All Shared Contacts
Searching for Shared Directory Contacts
Saving a Shared Contact to the Local Directory
Placing a Call from the Shared Directory
Adding Shared Contacts
When you add a contact to your Shared Directory, you can choose how much information you want to enter for your
contact. You are required to enter a contact name at least for each new contact.
Procedure
1. Navigate to OK > Directory > Shared Directory.
On the CP930W, navigate to Menu > Directory > Shared Directory or tap Directory > Shared Directory.
2. Select Options > New Contact.
3. Enter the shared contact's information.
4. Select Save.
Editing Shared Contacts
You can modify or add more information to your contacts.
Procedure
1.1. Navigate to OK > Directory > Shared Directory.
On the CP930W, navigate to Menu > Directory > Shared Directory or tap Directory > Shared Directory.
2. Highlight a contact and then select Options > Edit.
3. Edit the shared contact information.
4. Select Save.
Deleting a Shared Contact
You can delete any contact from the Shared Directory.
Procedure
1.1. Navigate to OK > Directory > Shared Directory.
On the CP930W, navigate to Menu > Directory > Shared Directory or tap Directory > Shared Directory.
2. Highlight a contact and then select Options > Delete.
The phone prompts whether to delete the contact.
3. Select Yes to delete.
Deleting All Shared Contacts
You can delete all contacts from the Shared Directory.
Procedure
1.1. Navigate to OK > Directory > Shared Directory.
On the CP930W, navigate to Menu > Directory > Shared Directory or tap Directory > Shared Directory.
49

Yealink W80 DECT IP Multi-Cell System User Guide
2. Highlight a contact and then select Options > Delete All.
The phone prompts whether to delete all contacts.
3. Select Yes to delete.
Searching for Shared Directory Contacts
In the Shared Directory, you can enter search criteria to find your desired contact quickly.
Procedure
1.1. Navigate to OK > Directory > Shared Directory.
On the CP930W, navigate to Menu > Directory > Shared Directory or tap Directory > Shared Directory.
2. Enter the name or number you are looking for in the search field.
The contacts will be displayed in the result list.
Saving a Shared Contact to the Local Directory
You can move a shared contact to the Local Directory. The shared contacts added to the Local Directory will not disappear, even after your system administrator disabled the Shared Directory feature.
Procedure
1. Navigate to OK > Directory > Shared Directory.
On the CP930W, navigate to Menu > Directory > Shared Directory or tap Directory > Shared Directory.
2. Highlight a contact, and select Options > Add To Local > New Entry.
3. (Optional.) Edit the contact's information.
4. Select Save.
Blacklist
Incoming calls from the Blacklist are rejected automatically. You can store up to 30 contacts in the blacklist to block
unwanted callers.
Topics
Adding a Blacklist Contact
Viewing Blacklist Contacts
Editing a Blacklist Contact
Deleting Blacklist Contacts
Adding a Blacklist Contact
You can add a blacklist contact on the phone to prevent someone from calling you.
Procedure
1. Navigate to OK > Settings > Telephony > Blacklist.
On the DD phone, navigate to Menu > Directory > Blacklist.
On the CP930W, navigate to Menu > Settings > Basic Settings > Blacklist.
2. Select New Entry or Options > New Entry.
3. Enter the blacklist contact’s information.
4. Select Save.
Viewing Blacklist Contacts
You can view the blacklist contacts from the Blacklist on your phone.
50

Procedure
1. Navigate to OK > Settings > Telephony > Blacklist.
2. Use the navigation keys to look through the blacklists.
On the DD phone, navigate to Menu > Directory > Blacklist.
On the CP930W, navigate to Menu > Settings > Basic Settings > Blacklist.
Editing a Blacklist Contact
You can update your blacklist contacts' information.
Procedure
1. Navigate to OK > Settings > Telephony > Blacklist.
On the DD phone, navigate to Menu > Directory > Blacklist.
On the CP930W, navigate to Menu > Settings > Basic Settings > Blacklist.
2. Highlight the desired blacklist contact, and select Options > Edit.
3. Edit the blacklist contact information.
4. Select Save.
Directory
Deleting Blacklist Contacts
You can delete one or all blacklist contacts. If a contact is removed from the blacklist, you can answer the call from the
contact normally.
Topics
Deleting a Blacklist Contact
Deleting All Blacklist Contacts
Deleting a Blacklist Contact
If you want to answer a call from a specific contact, you need to remove it from the Blacklist.
Procedure
1. Navigate to OK > Settings > Telephony > Blacklist.
On the DD phone, navigate to Menu > Directory > Blacklist.
On the CP930W, navigate to Menu > Settings > Basic Settings > Blacklist.
2. Select the desired blacklist contact.
3. Select Options > Delete.
Deleting All Blacklist Contacts
You can delete all contacts from the Blacklist when you are ready to answer calls from them again.
Procedure
1. Navigate to OK > Settings > Telephony > Blacklist.
On the DD phone, navigate to Menu > Directory > Blacklist.
On the CP930W, navigate to Menu > Settings > Basic Settings > Blacklist.
2. Select Options > Delete All.
(missing or bad snippet)delete all contacts.
3. Select Yes.
51

Yealink W80 DECT IP Multi-Cell System User Guide
Remote Phone Book
If the Remote Phone Book feature has been enabled by your system administrator, you can access your corporate directory directly from your phone.
Topics
Searching for Remote Phone Book Contacts
Viewing Remote Phone Book Contacts
Saving a Remote Phone Book Contact to the Local Directory
Searching for Remote Phone Book Contacts
In the Remote Phone Book, you can enter search criteria to find your desired contact quickly.
Procedure
1. Navigate to OK > Directory.
On the CP930W/DD phone, navigate to Menu > Directory > Remote Phone Book.
2. Select the desired remote phone book.
3. Enter your search criteria in the search field.
Viewing Remote Phone Book Contacts
You can view the contact list of the remote phone book on your phone.
Procedure
1. Navigate to OK > Directory.
2. Select the desired remote phone book.
3. Use the navigation keys to look through the remote phone book contacts.
On the CP930W/DD phone, navigate to Menu > Directory > Remote Phone Book.
Saving a Remote Phone Book Contact to the Local Directory
You can save any remote phone book contact to the Local Directory, to conveniently call this contact when you cannot access the remote phone book.
Procedure
1. Navigate to OK > Directory.
On the CP930W/DD phone, navigate to Menu > Directory > Remote Phone Book.
2. Select the desired remote phone book.
3. Highlight the desired contact, and then select Options > Add To Local > New Entry.
4. Edit the corresponding fields.
5. Select Save.
Tip:You can select Add To Local > Update Existing to update the existing contact information.
52

Call History
The call history list includes Missed Calls, Placed Calls and Received Calls, and each list holds 100 entries.
Topics
Call History Icons
Viewing History Records
Saving a History Record to Local Directory
Saving a History Record to Blacklist
Deleting History Records
Call History Icons
The call history icon in the Call History indicates the corresponding call history types.
W56H/W53H:
Icon Description
Call History
Received Calls
Missed Calls
Placed Calls
CP930W/DD phone:
Icon Description
Received Calls
Missed Calls
Placed Calls
Viewing History Records
The history record saves the call information such as the caller's name and number, local line and call duration.
Procedure
1. Press History or navigate to OK > History.
2. Select the desired list.
3. Select the desired entry.
4. Select Options > Detail.
Saving a History Record to Local Directory
To identify someone's call the next time, you can save a history record to the Local Directory.
Procedure
1. Select History or navigate to OK > History.
2. Select the desired list.
53

Yealink W80 DECT IP Multi-Cell System User Guide
3. Highlight the desired entry, and select Options > Add To Local > New Entry.
4. Edit the contact information.
5. Select Save.
Tip:You can select Add To Local > Update Existing to update the existing contact information.
Saving a History Record to Blacklist
You can prevent someone from calling you again by saving a history record to the blacklist.
Procedure
1. Select History or navigate to OK > History.
The phone displays all call records.
2. Select the desired list.
3. Highlight the desired entry, and then select Options > Add To Blacklist.
(missing or bad snippet) add it or not.
4. Select Yes.
Deleting History Records
You can delete one or all call records from the call history list.
Topics
Deleting a Call Record
Deleting All Call Records
Deleting a Call Record
You can delete any call record from the call history list.
Procedure
1. Press History or navigate to OK > History.
2. Select the desired list.
3. Highlight the desired entry, and select Options > Delete.
Deleting All Call Records
You can delete all call records from the call history list.
Procedure
1. Press History or navigate to OK > History.
2. Select the desired list.
3. Select Options > Delete All.
(missing or bad snippet)delete all the records.
4. Select Yes.
54

Customizing Your Phone
You can make your phone more personalized by customizing various settings.
Topics
Turning Handset On
Turning Handset Off
Changing the Wallpaper
Setting the Screen Saver
Changing the Screen Brightness
Setting the Keypad Light
Changing the Language
Time & Date
Shortcuts
W56H/W53H Handset Keypad Lock
Silent Mode
Customizing Your Phone
Turning Handset On
The handset will be turned on automatically when the battery is inserted into the handset. You can also turn the handset on manually.
It is only applicable to W56H/W53H/CP930W.
Procedure
1. Do one of the following:
l Press the On-hook key. The handset screen lights up.
On the CP930W, long tap the On-hook key. The mute touch key glows red and then the handset screen lights
up.
l Place the handset to the charging cradle.
Turning Handset Off
The handset will be turned off automatically when the battery runs out. You can also turn the handset off manually.
It is only applicable to W56H/W53H/CP930W.
Procedure
1. Long presstheOn-hookkeywhen the handset is idle.
On the CP930W, a message prompts whether to power off the device.
2. On the CP930W, select Yes.
Note: You can not turn the CP930W off when the phone is charging.
Changing the Wallpaper
You can change the wallpaper that is displayed on the idle screen.
It is only applicable to W56H/W53H.
55

Yealink W80 DECT IP Multi-Cell System User Guide
Procedure
1. Navigate to OK > Settings > Display > Wallpaper.
2. Press the navigation keys to select the desired image.
3. Press Save.
Setting the Screen Saver
The screen saver is designed to protect your phone screen by filling it with an analog clock.
When the screen saver is enabled, an analog clock will be activated and appear on the phone screen if the handset is
idle for approximately 10 seconds.
It is only applicable to W56H/W53H.
Procedure
1. Navigate to OK > Settings > Display > Screen Saver.
2. Press Change.
Changing the Screen Brightness
For W56H/W53H, the handset backlight in charger or out of charger can be configured independently.
When in charger/out of charger is enabled, the backlight will be turned off after the handset is idle for about 30
minutes when the handset is or not in the charging cradle. When an incoming call arrives, a key is pressed or the handset status changes, the backlight is automatically turned on.
For CP930W, the backlight automatically turns off, when the phone is charging and inactive for a specified time.
Note
When the CP930W is not in charging, its backlight will be turned off after the phone is inactive for about 30 seconds.
Procedure
1. Navigate to OK > Settings > Display > Display Backlight.
On the CP930W, navigate to Menu > Settings > Basic Settings > Display > Display Backlight.
2. On the W56H/W53H, select the desired value from the In Charger or Out Of Charger field.
3. Select Save.
Setting the Keypad Light
You can enable the keypad light to illuminate the keypad keys when any key is pressed.
It is only applicable to W56H/W53H.
Procedure
1. Navigate to OK > Settings > Display > Keypad LED.
2. Press Change.
Changing the Language
Your phone supports several languages that you can choose to use on the phone.
Contact your system administrator to find out exactly which languages are supported on your phone.
56

Procedure
1. Navigate to OK > Settings > Language.
On the CP930W/DD phone, navigate to Menu > Settings > Basic Settings > Language.
2. Select the desired language.
(missing or bad snippet) change the language.
3. Select Yes.
The phone language is changed to the selected one.
Time & Date
You can set the time and date manually. The time and date formats are also variable.
Topics
Setting the Time and Date Manually
Changing the Time and Date Format
Setting the Time and Date Manually
If your phone cannot obtain the time and date automatically, you can set it manually.
Customizing Your Phone
Before You Begin
Check with your system administrator to find out if the manual mode has been enabled.
Procedure
1. Navigate to OK > Settings > Date & Time.
On the CP930W, navigate to Menu > Settings > Basic Settings > Time & Date.
On the DD phone, navigate to Menu > Settings > Basic Settings > Time & Date > Manual Settings.
2. Edit the date and time.
3. Select Save.
The time and date set on the handset will be changed accordingly.
Changing the Time and Date Format
You can set the phone to display the time in 12-hour format or 24-hour format. You can also change the date format,
including the options to display the day (D), month (M), and year (Y).
Note: Your system administrator can customize the date format.
Procedure
1. Navigate to OK > Settings > Display > Time Format or Date Format.
On the DD phone, navigate to Menu > Settings > Basic Settings > Time & Date.
On the CP930W, navigate to Menu > Settings > Basic Settings > Display > Time Format or Date Format.
2. Select the desired time format or date format.
3. Select Change/Save.
Shortcuts
Shortcuts allow you to quickly and directly access the feature without scrolling through the menu when the phone is
idle. For example, press the down navigation key to access Directory. You can configure six shortcuts on the phone in
57
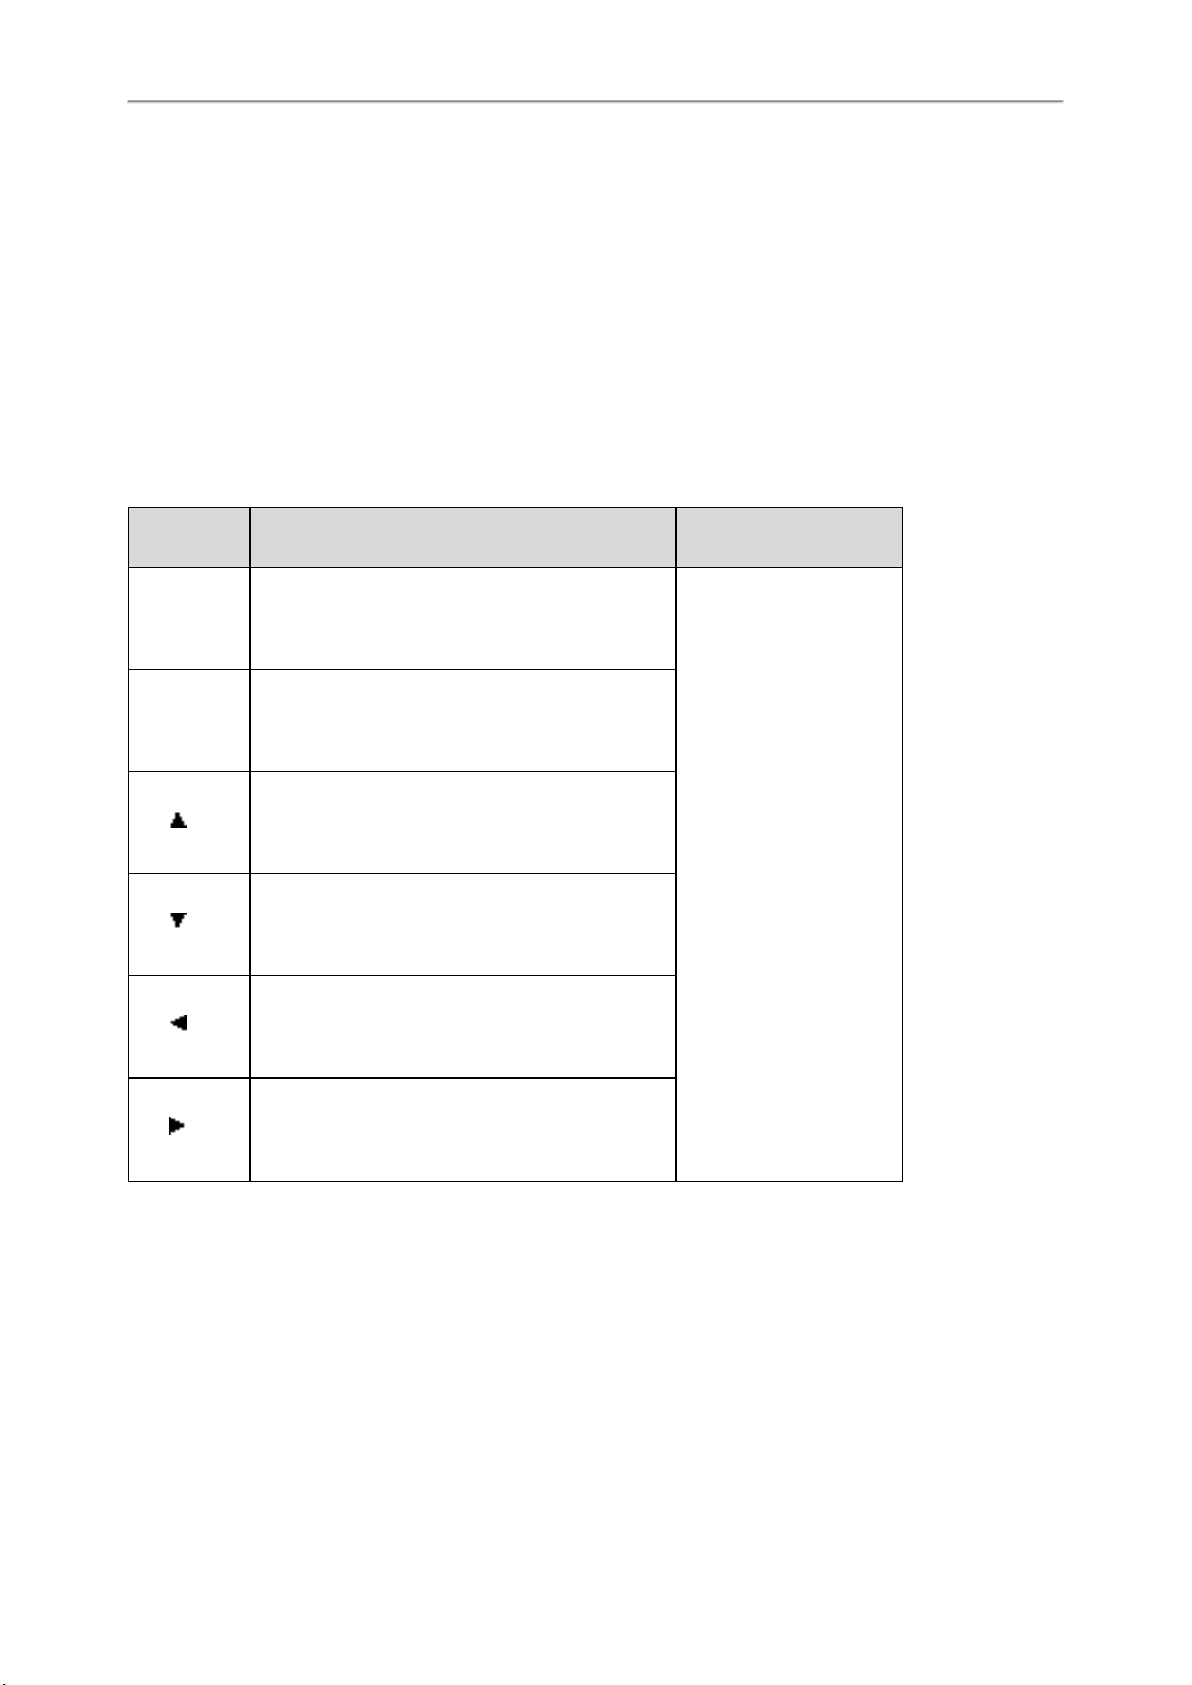
Yealink W80 DECT IP Multi-Cell System User Guide
total.
It is only applicable to W56H/W53H.
Topics
Supported Shortcuts
Customizing the Shortcuts
Supported Shortcuts
By default, the handset provides a certain access feature for a certain shortcut, you can change it to make your phone
more personalized.
The following table lists the default access feature of the desired shortcut, and the available access features for all shortcuts:
Shortcut Default Access Feature Available Access Features
History
Left Softkey History
Right Softkey Line Status
Intercom (not available in the multi-cell system)
Directory
Volume-
Volume+
Missed
Received
Redial
Speed Dial
Menu
Line Status
Default Line
Call Forward
Do Not Disturb
Directory
Local Directory
Remote Directory
Volume-
Volume+
Status
Customizing the Shortcuts
You can customize the function of the shortcuts to make your handset more personalize.
Procedure
1. Navigate to OK > Settings > Shortcut.
2. Select the desired shortcut, and then press Change.
The feature currently assigned to the selected key is highlighted and followed by a left arrow.
3. Select the desired feature, and then press OK.
58

Customizing Your Phone
Related Topic
Supported Shortcuts
W56H/W53H Handset Keypad Lock
To prevent accidental use of the handset, the keypad can be locked manually by long pressing the # key. When the
keypad is locked, incoming calls will still ring on your phone, but only the emergency numbers can be dialed out.
Topics
Locking Handset Keypad
Unlocking Your Phone
Locking Handset Keypad
When you temporarily do not use your handset, you can lock it manually.
Procedure
1. Long pressthe # key when the handset is idle until the phone prompts you the handset is locked.
The lock icon appears in the status bar.
Unlocking Your Phone
When you need to use the locked handset, you can unlock it manually.
Procedure
1. Long pressthe # keywhen the locked handset is idle until the phone prompts you the handset is unlocked.
The lock icondisappears from the status bar.
DD Phone Lock
Phone lock helps you protect your phone from unauthorized use.
Topics
Setting the Phone Lock
Locking Your Phone Manually
Unlocking Your Phone
Changing Your Phone Unlock PIN
Setting the Phone Lock
You can manually lock the phone or wait a specified time to automatically lock the phone.
What unauthorized users can do depends on the settings of the phone lock type.
The phone supports the following phone lock types:
l Menu key: it prevents unauthorized users from accessing the menu, changing the personal settings for your phone.
l Function key: it only allows users to use the keypad for placing a call, answering or rejecting an incoming call and
ending a call, and it prevents unauthorized users from other operations.
l All keys: it only allows users to use the keypad for dialing an emergency number or authorized numbers that set up
by your system administrator, answering or rejecting an incoming call and ending a call, and it prevents unauthorized users from other operations. The phones only support All Keys type of phone lock.
Note: The Volume key always available when you lock the phone.
59

Yealink W80 DECT IP Multi-Cell System User Guide
Procedure
1. Navigate to Menu > Settings > Basic Settings > Phone Lock.
2. Enter the desired PIN (default PIN: 123) in the Unlock PIN field.
3. Select OK.
4. Select Enabled from the Lock Enable field.
5. Select the desired type from the Lock Type field.
6. Enter the desired interval (0 - 3600seconds) in the Auto Lock field.
If the value is set to 0, the phone will not be automatically locked.
7. Select Save.
Locking Your Phone Manually
You can lock the phone manually before the phone is automatically locked.
Before You Begin
Make sure that the phone lock is set.
Procedure
1. Long press # key when the phone is idle.
The lock icon appears on the phone screen.
Related Topic
Setting the Phone Lock
Unlocking Your Phone
You can use an unlock PIN to unlock the phone.
If you forget the unlock PIN, you can enter the administrator password to unlock your phone, and then automatically
access the PIN change screen.
Procedure
1. Press any locked key, the phone prompts you to enter an unlock PIN.
2. Enter the desired PIN (default: 123) in the Unlock PIN field.
3. Select OK.
The lock icon disappears from the phone screen.
Changing Your Phone Unlock PIN
The default unlock PIN is “123”. For security reasons, you should change the default unlock PIN as soon as possible.
Procedure
1. Navigate to Menu > Settings > Basic Settings > Change PIN.
2. Enter your old and new unlock PIN respectively.
The unlock PIN length must be within 15 digits.
3. Select Save.
60

Customizing Your Phone
Silent Mode
You can enable the silent mode if you do not want to be disturbed. The handset will not ring when receiving an incoming call, but the phone will still display the incoming call information.
It is only applicable to W56H/W53H.
Topics
Switching on Silent Mode
Switching off Silent Mode
Switching on Silent Mode
You can silence an incoming call by switching on silence mode to stop your phone from ringing.
Procedure
1. Long press the* key until the phone prompts “All Ring Tones Off”.
The silent icon appears in the status bar.
Note: When the silent mode is activated, the phone will not play any advisory tones.
Related Topic
Setting the Advisory Tone
Switching off Silent Mode
If you want to resume the incoming ring, you can switch off silent mode.
Procedure
1. Long press the* key until the phone prompts “All Ring Tones On”.
61

Audio Settings
You can change the basic audio settings on your phone.
Topics
Adjusting the Volume
Setting the Ring Tone
Setting the Advisory Tone
Adjusting the Volume
You can adjust the volume of the ringer, media, and audio during a call.
Procedure
1. Press the left or right navigation key.
On the CP930W, press the Volume touch key.
On the DD phone, press the Volume key .
Audio Settings
Setting the Ring Tone
Ring tones are used to indicate the incoming calls.
Topics
Setting the Ring Tone for the External Calls
Setting the Ring Tone for the External Calls
You can select a unique ring tone for the external calls so that you can identify callers when the phone rings.
Procedure
1. Navigate to OK > Settings > Audio > Ring Tones > Melodies.
On the CP930W/DD phone, navigate to Menu > Settings > Basic Settings > Sound > Ring Tones.
2. Select the desired ring tone.
The ring tone is played automatically.
3. Select Save.
Setting the Advisory Tone
Advisory tones are the acoustic signals of your handset, which inform you of different actions and states.
You can configure the following advisory tones independently:
l Keypad Tone: plays when you press any key on the keypad.
l Touch Tone: plays when you tap the keys (except the touch keypad).
l Confirmation: plays when a setting is changed or the handset is placed in the charger cradle.
l Low Battery: plays when the battery's remaining capacity is low and the handset needs charging.
Note: If the silent mode is activated, the advisory tones will not play, but you can still see the alert of low battery on the
phone screen.
Procedure
62

Yealink W80 DECT IP Multi-Cell System User Guide
1. Navigate to OK > Settings > Audio > Advisory Tones.
On the CP930W/DD phone, navigate to Menu > Settings > Basic Settings > Sound > Advisory Tones.
2. Select the desired value from the Keypad Tone field.
3. On the CP930W, select the desired value from the Touch Tone field.
4. Select the desired value from the Confirmation field.
5. Select the desired value from the Low Battery field.
6. Select Save.
63

Maintaining Your Phone
Maintaining Your Phone
When your phone cannot operate properly, you need to investigate or troubleshoot issues along with other tasks that
your administrator may ask you to perform.
Topics
Investigating Warnings
Resetting the Handset
Investigating Warnings
When the default password is used on the phone, you can view the warning details about the issue from Status screen.
Procedure
1. Navigate to OK > Status > DM.
On the CP930W/DD phone, navigate to Menu > Status > DM (DM Status).
The warning detail is displayed in the Warning field.
Resetting the Handset
You can reset individual settings that you have configured on the handset.
Except the settings of directory, call history, voice mail, and the handset registration, the handset will reset all customized settings to factory after the resetting.
Procedure
1. Navigate to OK > Settings > System Settings > Handset Reset.
On the CP930W/DD phone, navigate to Menu > Settings > Advanced Settings (default PIN: 0000) > Handset
Reset.
The phone prompts whether to reset the handset.
2. Select Yes.
64

Appendix
Topics
Appendix A- Menu Structure
Appendix B - Input Modes and Characters on W56H/W53H
Appendix
65

Yealink W80 DECT IP Multi-Cell System User Guide
Appendix A- Menu Structure
For W56H/W53H
Note: The menus in the gray box are not available when the handset is not registered to a base station.
66

For CP930W
Appendix
Note: The menus in the gray box are not available when the handset is not registered to a base station.
67

Yealink W80 DECT IP Multi-Cell System User Guide
For DD Phone
Note: The menus in the gray box are not available when the handset is not registered to a base station.
Appendix B - Input Modes and Characters on W56H/W53H
Abc
(initials in
capitals)
ABCabc2 2 ABC2 abc2 ΑΒΓ2
DEFdef3 3 DEF3 def3 ΔΕΖ3 DEÈÉÊËẼ F3 deèéêëẽf3 DĎEÉĘĚF3 dďeéęěf3
68
123 ABC abc ΑΒΓ AÄÅ aäå SŚŠ sśš аб в АБВ גב א
1 1 1 1 1 1 1 1 1 1 1 1
AАБВГДЕЖBC-З2aабвгдежbc-
ç2
AÁÄĄBCĆČ2 aáäąbcćč2 АБ В Г2 аб вг2 ו הד
Д Е Ж З-
дежз 3 ג ב א

Abc
(initials in
capitals)
Appendix
123 ABC abc ΑΒΓ AÄÅ aäå SŚŠ sśš аб в АБВ גב א
3
GHIghi4 4 GHI4 ghi4 Η ΘΙ4 GĞHIÌÍÎÏĨİĬ4 gğhiìíîïĩıĭ4 GHIÍ4 ghií4
JKLjkl5 5 JKL5 Jkl5 ΚΛΜ5 JKL5 jkl5 JKLŁĹĽ5 jklłĺľ5
MNOmno-
6
PQRSpqrs-
7
TUVtuv8 8 TUV8 tuv8 ΤΥΦ 8 TUÙÚÛÜŨV8 tuùúûüũv8 TŤUÚÜŰŮV8 tťuúüűův8
WXYZwxy-
z9
space . , ?
! 0
space = /
\ ^ ; : . , + * # § %
@ ? ! ¿ ¡ ()
{} [] < >
¥$£| ~
¤
MNO-6mno-
6
PQRS-
7
9
0
space _’ ”
= / \
^ ; :
. , + *
# §
% @
? ! ¿ ¡
() {}
[] <
> ¥
$£
| ~ ¤
pqrs7 Π Ρ Σ7 PQRSŞß7 pqrsşß7 PQRŔŘSŚŠ7 pqrŕřsśš7
7
WXYZ-9Wxyz-9ΧΨΩ-
0 . , ?
0 . , ? !
space
spac-
spac-
space
e _’ ”
_’ ” =
= / \
/ \ ^ ;
^ ; : .
: . , -
+ * #
* # §
§ % @
% @
? ! ¿ ¡ (
? ! ¿ ¡
) {} []
() {}
< > ¥
$£|
> ¥$
~ ¤
6
!
e
, - +
[] <
£|
~ ¤
MNСOТУФХЦ-Ш6mnсoтуфхц-ш6MNŃŇOУЦ-Ő6mnńňoуц-
ΝΞΟ6
WXYỲÝZŹŻ-Ž9wxyỳýzźżž-9ЬЭЮЯ-
space _’ ” = /
\ ^ ; : . , - + *
# § % @ ? ! ¿
¡ () {} [] < >
¥$£| ~ ¤
Ɣ9
space
0
space
_’ ” = /
\ ^ ; : .
, - + *
# § %
@ ? ! ¿
¡ () {}
[] < >
¥$£|
~ ¤
WŴXYŶZ9 wŵxyŷz9
space 0 space 0 space 0 space 0 0 Ґ ЄІЇЎ 0ґєіїў
space _’ ” = / \
^ ; : . , - + * # §
% @ ? ! ¿ ¡ () {}
[] < > ¥$£| ~
¤
space _’ ” = /
\ ^ ; : . , - + *
# § % @ ? ! ¿
¡ () {} [] < >
¥$£| ~ ¤
ő6
space _’ ”
= / \ ^ ; : .
, - + * # §
% @ ? ! ¿ ¡
() {} [] <
> ¥$£|
~ ¤
ИЙ К Л-
МНОП-
РСТУ6 рсту 6 טחז
Ф Х Ц Ч-7фхцч-
ШЩЪ-Ы8шщъ-
space _’
” = / \ ^
; : . , - +
* # § %
@ ? ! ¿ ¡
() {} []
< > ¥$
£| ~ ¤
4
5
9
ийк л4 ן נםמ
мноп5 לךכי
תשר
7
קץ צ
ы8
space
, - + *
# § %
@ ? ! ¿
$£|
~ ¤
פע ס-
ף
spac-
e 0
space _’ ”
= / \
^ ; : .
, - +
* # §
% @
? ! ¿ ¡
() {}
[] <
> ¥$
£|
~ ¤
ьэюя9
_’ ” = /
\ ^ ; : .
¡ () {} [
] < > ¥
69
 Loading...